
Wondering how to enlarge a picture without losing quality? Then, stay right here!
Thanks to advancements in AI and upscaling technologies, we now have tools and software that can increase image size while preserving the original quality.
So, this article explores the best image enlarger tools that can help you achieve stunning results. With the experiments of their features, you can pick and use the perfect method for your needs.
Now, let’s dive right into it!
Why Does Image Quality Reduce When Enlarged?
Before moving into the steps, learn the reason behind the degradation in quality after image enlargement.
When an image is enlarged, its quality reduces due to the following reasons:
- Pixelation: After image enlargement, the original number of pixels has to cover a larger area, making every pixel more visible. This leads to a pixelated appearance as individual squares of image color become distinct.
- Interpolation Artifacts: When you enlarge an image, software may add new pixels to fill the gaps, referring to interpolation. As they aren’t perfect, this leads to blurry images.
- Resolution Limitations: Digital images have a fixed resolution, measured in PPI (Pixels Per Inch). After enlargement beyond its original resolution, the capacity to display the details reduces, making the image less sharp.
- Software Limitations: Some software does not handle enlargements better than others. So, they may affect the quality, as no software perfectly upscales an image without some loss in quality.
Hence, understanding these factors helps in managing expectations and choosing the right tools and techniques to minimize quality loss when enlarging images.
Now, let’s dive into the best ways for image enlargement, shall we?
How to Enlarge a Picture Without Losing Quality? (7 Best Ways)
If you want to know how to enlarge a picture without losing quality, then this guide points out the seven different ways to do so. They are categorized into two different methods.
So, let’s look at the features, pricing, and working mechanisms one by one.
Before diving in, here’s the original image used and we’ve enlarged it ‘2x‘ on all methods:

Method 1: Using Online Image Enlarging Tools
First, let’s get into the simplest method for image enlargement. That’s by using the various online tools. Get set, go!
1. Photopea
Photopea is an online and advanced image editor with picture enlargement capabilities. It supports PSD, AI, PDF, and CDR formats of applications like Adobe Photoshop, Adobe Illustrator, PDF, SVG, and CorelDRAW, respectively.

Moreover, it lets you create a new image or open existing files on your computer. In addition, you can save the image as PSD or in image formats like JPG, PNG, and SVG.
Features
- Integrates with Dropbox, Google Drive, PeaDrive, PeaGames, etc.
- You can also install this application on your device.
- Offers templates that let you start your image creation and enlargement process.
- Provides a simple and user-friendly interface.
- Supports multiple languages, such as Spanish, Italian, etc.
- If you find any issues, then you can report a bug.
Pricing
Photopea is a free online image editor. So, you can start using it for enlarging your images without losing quality right from its website.
Moreover, you can also purchase its premium version through an account. It costs around $5 per month or $12 for 3 months.
Usability
In this section, we’ll go in-depth on how to enlarge a picture without losing quality by using the free Photopea tool. Buckle up, and start right away!
First, ensure you have an image that you want to enlarge. Now, visit the Photopea website and open ‘File > New’. Now, add the height and width of the image up to which you want to enlarge. Then, hit the ‘Create’ button.
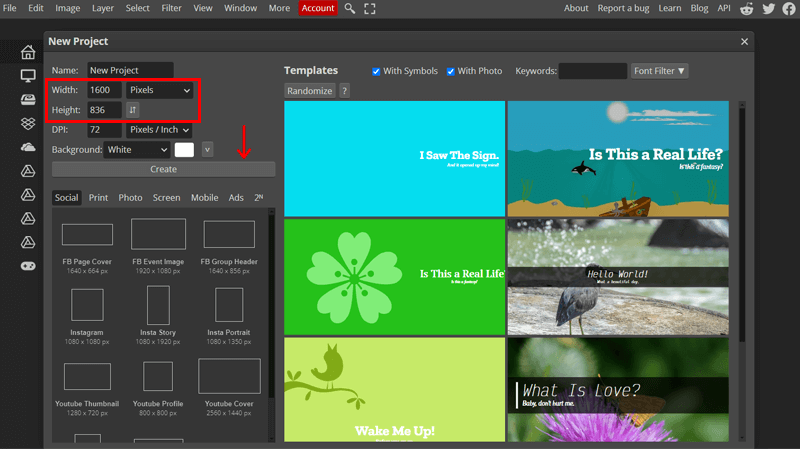
After that, navigate to ‘File > Open’ and open the image to enlarge. Following that, copy this image and paste it to the blank canvas where you want to enlarge it. There, ensure the image is above the white canvas.
Now, right-click on the image layer and click on ‘Convert to Smart Object’. You’ll notice a new icon on the image layer.

Next, enlarge the image using the bottom-right transform control option of the image. You can enlarge it as much as you want.
Once you do that, you’ll find a ‘tick’ symbol to confirm the transformation. So, click on it, and you’re done.
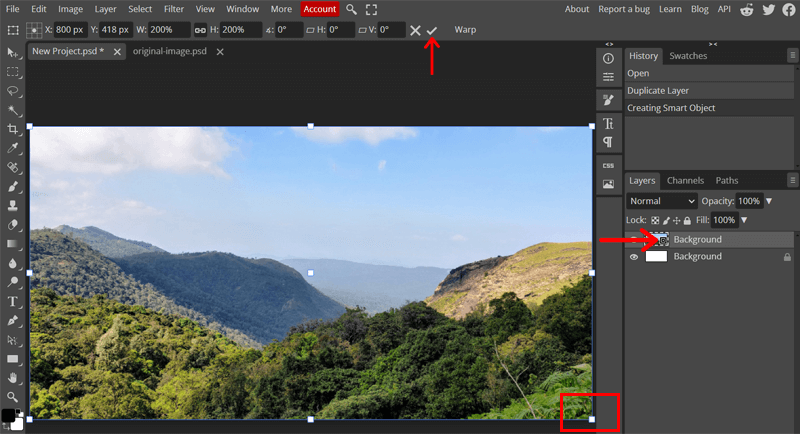
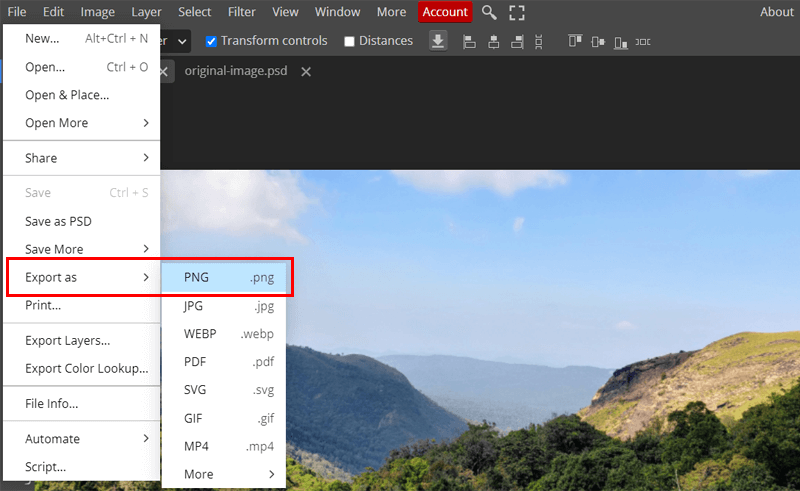
Now, all you need to do is navigate to ‘File > Export As’ and choose the image format. Then, save the image. It’ll be downloaded to your computer system.
Rating its Quality (Average/Good/Excellent): Good

2. Upscale.media
If you want an AI-based picture enlargement tool, then use Upscale.media. This is an online tool that effortlessly transforms your images with speed and precision.

Moreover, it supports various image formats like PNG, JPEG, JPG, WebP, etc. Plus, the image can have a resolution of up to 1500 px x 1500 px.
Features
- Includes a bulk transformation option, from which you can enlarge multiple images at once.
- By integrating APIs into your organization, you can speed up your workflows and productivity.
- You can increase the image resolution up to 4x without losing quality.
- It shows the original and upscaled images side by side for easy comparison.
- It reverses compression, which means that editing and saving a JPEG image multiple times will still give smooth edges.
- Integrates with Google Play and Apple apps.
Pricing
Upscale.media is a freemium image upscaling tool. The free tool offers 3 credits and 3 free downloads. So, it’s ideal for personal use.
For professionals and businesses, you can purchase one of these paid pricing plans:
- Subscription Plan: $0.1 per credit per month, $0.07 per credit per year.
- Pay as you go: $0.33 per credit per month.
- Enterprise Plan: You need to book a demo with its experts.
Usability
Using this tool is a piece of cake. Just visit the website and log in with your account.
Now, click on ‘Upload Image’ and open your image in the tool. By default, this tool upscales the image 2x. But you can choose it to be 4x too.

Plus, it lets you choose between normal upscaling and AI-based upscaling. Let’s go with AI-based upscaling here!
Further, you can enable the ‘Enhance Quality’ option for better results. Lastly, hit the ‘Download Image’ button.

Rating its Quality (Average/Good/Excellent): Good

3. Let’s Enhance
Another online image enhancer and enlarger tool on this list is Let’s Enhance. With one click, you can make your pictures sharp and clear. In addition, it lets you increase its resolution and enhance its quality.

Guess what? You can upscale pictures without losing quality up to 16x. Yes, you heard it right.
Features
- You can use the AI-generated images to create visually stunning images.
- Offers presets that let you quickly optimize your enlarged photos for printing.
- Contains advanced settings that let you remove the background and enhance color or tone.
- Further, the images can be old photos, portraits, digital art, logos, etc.
- Supports image formats like JPEG, PNG, and WebP and uploads from Google Drive.
Pricing
Let’s Enhance is also a freemium image enhancer tool. The free tool offers 10 free credits with unlimited storage for 6 months.
Moreover, there are the following subscription plans for its premium version.
- $12 per month, 100 credits, chat support, no watermark, etc.
- $29 per month, 300 credits, all previous features, and more.
- $39 per month, 500 credits, and all premium features.
Usability
To use this tool, click the ‘Start Free’ option on its website and log into your account. On the new interface, upload your desired image and insert the ‘Custom’ size for the enlarged image. Now, press ‘Start Processing’.
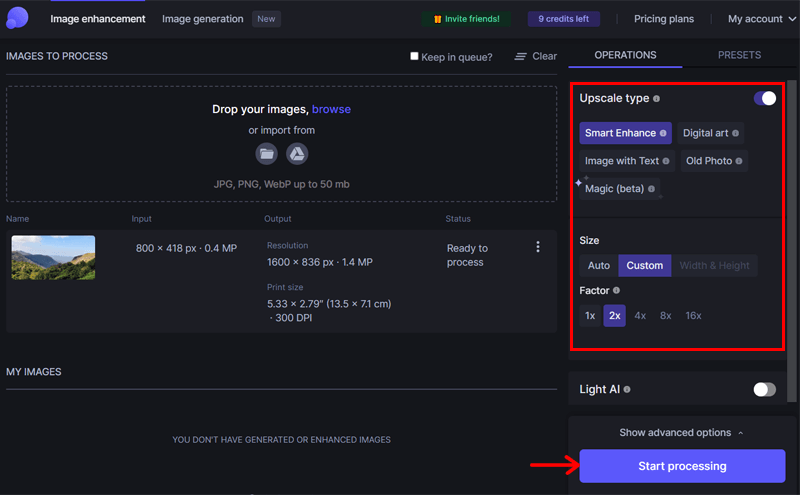
After a few minutes, you’ll find the enlarged image in the ‘My Images’ section. Download it on your computer, as simple as that!

Rating its Quality (Average/Good/Excellent): Good

4. Clipdrop
Upscaling is easy with the online tool, Clipdrop. Along with upscaling, it also lets you denoise and enhance your images.
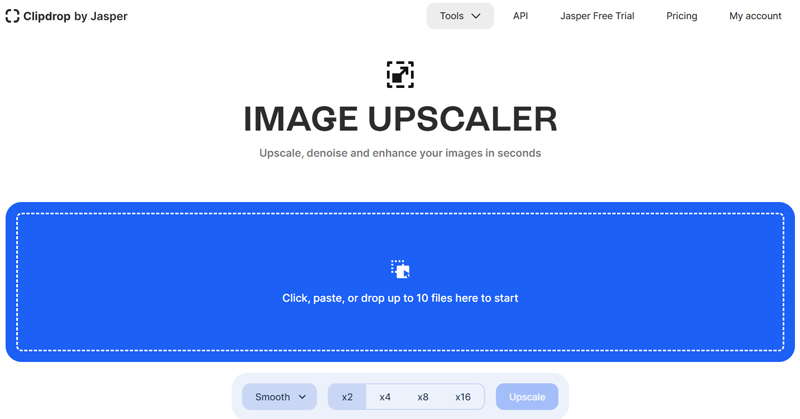
Moreover, it has two modes, namely Smooth and Detailed. These are actually the quality results of the process based on time to enlarge the picture. Basically, the Detailed one processes slower than the Smooth one.
Features
- Enlarge up to 10 images in bulk.
- Based on your needs, the images can be scaled 2x, 4x, 8x, and 16x.
- Integration with other Jasper and Clipdrop tools, including background replacements, instant text to image, etc.
- Offers an API that lets you integrate this tool with other products.
- Further, it offers tools like Uncrop, Replace the Sky, Swap People, etc.
Pricing
Clipdrop has a free plan that lets you enlarge the images up to 2x. It also offers other tools like Swap, Sky Replacer, etc.
For more enlargement options, the following premium plans are available:
- Pro: $11 per month, free features, Uncrop, and other high-resolution options.
- API: Usage-based prices, so you have to pay as you use the tool.
Usability
To use this platform, simply open the Image Upscaler tool and log in with your account. Now, upload the desired image, select a mode (Smooth or Detailed), and click ‘Upscale’.

After a while, the image gets enlarged, and you can click ‘Download’ to save it.
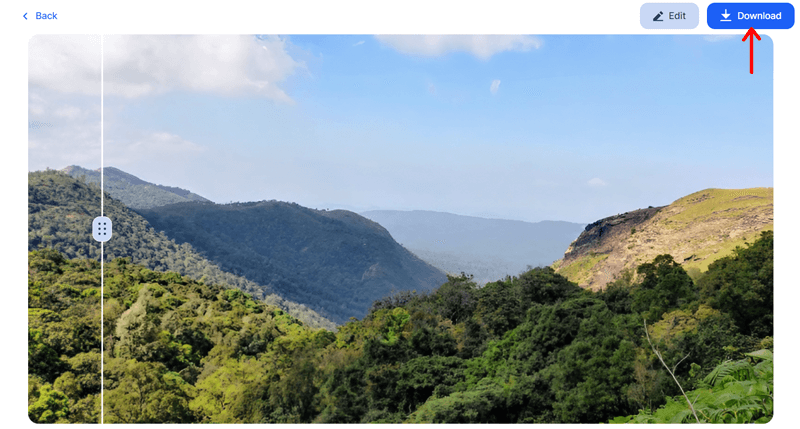
Rating its Quality (Average/Good/Excellent): Average

Method 2: Using Image Editing Software
In this method, we’ll go through the different software that lets you enlarge a picture without losing quality. So, if your job is all about images, then these are helpful! Here we go!
5. Adobe Photoshop
Adobe Photoshop is one of the most popular editing tools, with various capabilities. One of those capabilities is resizing images, including enlarging or reducing the size as per your requirements.

In addition, its latest versions also come with generative AI features. Hence, you can make complex edits by providing simple text prompts to add or remove image content.
Features
- Provides adjustment layers using which you can make edits without permanently changing the original image.
- You can use the Sharpen tool to highlight details and define edges, which refines blurry objects and edges.
- Using the Spot Healing Brush tool lets you remove the flaws in the image.
- Select a part of an image using the Crop tool and remove everything beyond the selected area.
- Easily replace the sky in the photo with preset options or an image with the Sky Replacement tool.
Pricing
Photoshop is a paid image editor available with the following Individual plans:
- Photoshop: $22.99/mo, 100 GB storage, 500 generative credits, etc.
- Photography: $19.99/mo, 1 TB of storage, 500 generative credits, and more.
- Creative Cloud All Apps: $59.99/mo, 100 GB storage, 1000 generative credits, and others.
Usability
Now, let’s get into the steps of using Photoshop. Just open this software and then the image too. After that, open a new canvas by clicking on ‘File > New’ on the menu. Please keep the canvas size as the required size for your enlarged image.

Now, copy the image and paste it on this new blank canvas. Next, press ‘Ctrl+T’ from your keyboard or use the transform tool. Then, utilize the bottom-right transform control to enlarge the image.
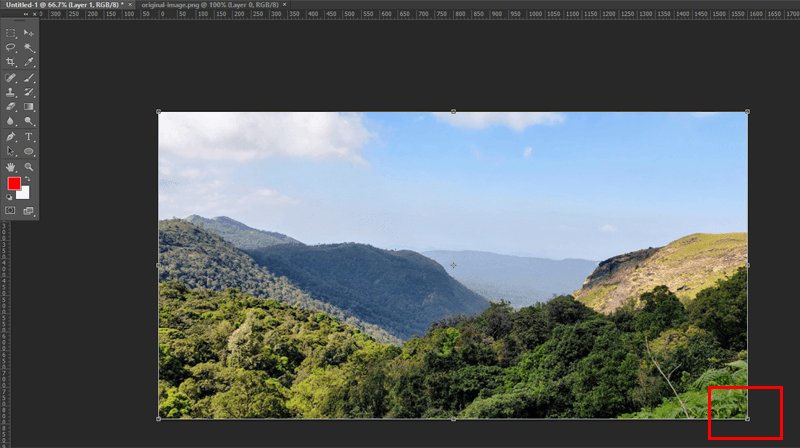
By just doing that, you’ll get an enlarged image in Photoshop without losing quality. So, just save the image.
Rating its Quality (Average/Good/Excellent): Excellent

6. GIMP
If you want free software to enlarge your pictures, then use GIMP (short for GNU Image Manipulation Program). As a graphic designer, photographer, or illustrator, you can use GIMP to enhance your images to the fullest.

In addition, it’s open-source software, so developers can change the source code and distribute the changes. So, it’s preferred by many businesses too.
Features
- Provides multiple tools to create high-quality images. That includes retouching and restoring image elements.
- Lets you manually insert the image size required for enlargement.
- Image transformations with various options are available for flexibility.
- It can be used to generate graphical design elements, mockups, etc.
- Offers various color management features ideal for print and digital media.
Pricing
GIMP is completely free software. You can download it from its official website and install it on your system.
Usability
First, you must download and install this free software on your computer. Next, open the software and open the image you want to enlarge. There, navigate to ‘Image > Scale Image’.
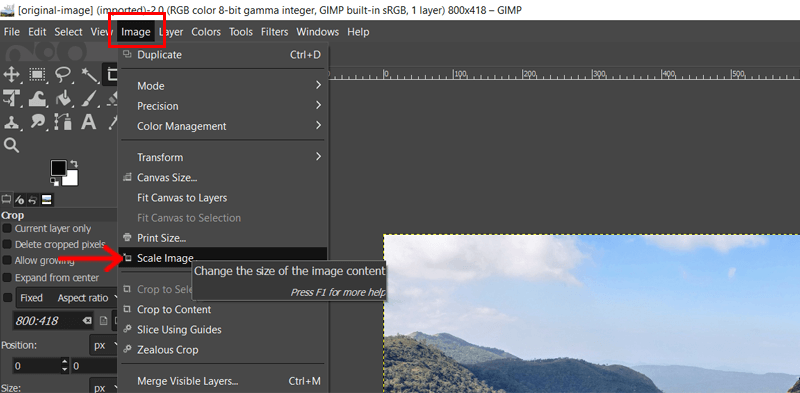
Now, a popup appears where you must enter the width and height of your image’s dimensions. Ensure you picked ‘Cubic’ as the interpolation method in the ‘Quality’ section. Lastly, hit ‘Scale’.
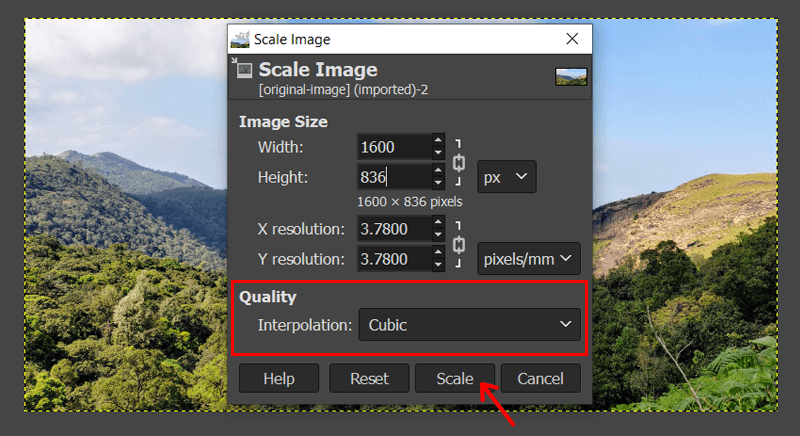
Afterward, you can export the enlarged picture in various image formats.
Rating its Quality (Average/Good/Excellent): Good

7. IrfanView
Last but not least, IrfanView is a free photo editing software. You can use it to resize and enlarge images if you’re using the Windows-based operating system.

Moreover, you can manually insert the image size to enlarge it. The size can be added in pixels, centimeters, and inches.
Features
- It’s fast and compact, at just 6 MB.
- This software supports multiple languages that help you perform actions easily.
- Supports GIF, TIF, AVIF, PNG, and many more image formats.
- Includes a thumbnail or preview option to view the enhanced images.
- Offers a file search option so that you can easily find image files.
- Provides effects like image sharpener, blur, filters unlimited, and more.
Pricing
IrfanView is completely free software for image editing. So, you can just download it from the website and install it on your system.
Usability
After the installation, open your image in Irfanview. There, navigate to ‘Image > Resize/Resample’.
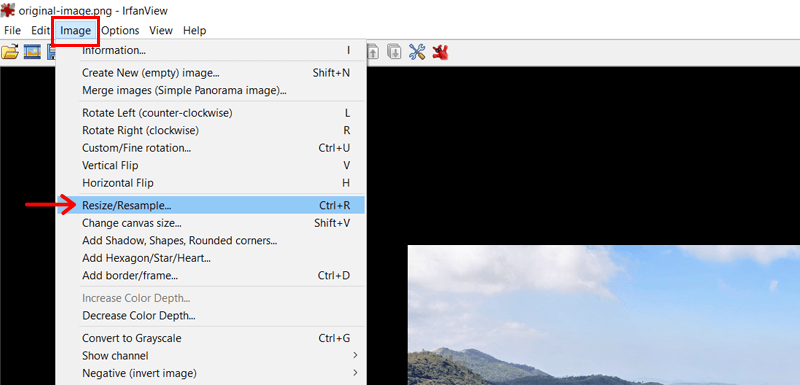
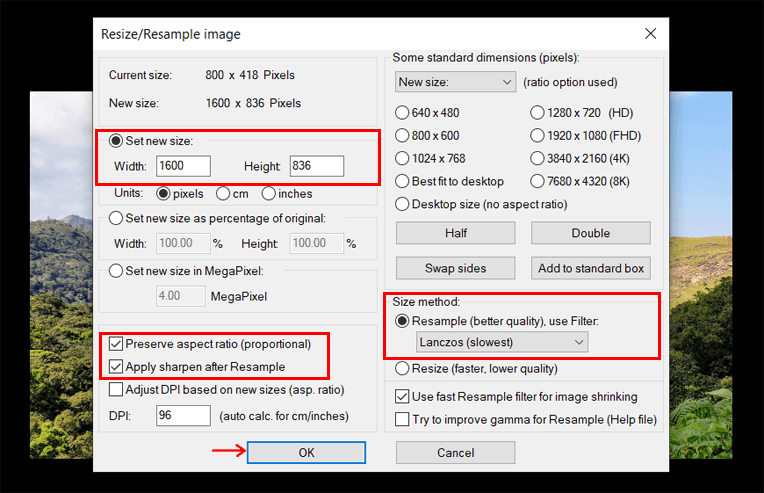
Now, enter your desired image size in the ‘Set new size’ option of the popup window. That’s by determining the height and width. Ensure you pick ‘Size method’ in the resample section.
Following that, check the box for ‘Apply Sharpen after Resample’ and hit ‘OK’. That’s all! Just save the enlarged image to your computer.
Rating its Quality (Average/Good/Excellent): Good

Learn how to create a website from scratch if you want to get online visibility.
Frequently Asked Questions (FAQs)
1. Why does image quality degrade after enlarging it?
Images are made of pixels, so enlarging them stretches these pixels. Ultimately, the pixels become more visible, causing blurriness or pixelation.
2. Why should we enlarge pictures without losing quality?
Printing and presentations are some areas where larger images are used. So, maintaining quality ensures that these enlarged images are clear and avoid a pixelated look.
3. What are the best software and tools for enlarging pictures?
The best software for enlarging pictures are Photoshop, GIMP, Irfanview, etc. Similarly, the best tools for enlarging images are Photopea, Upscale.media, etc.
4. How can I improve the quality of enlarged images?
To improve the quality of enlarged images, you must first start with high-resolution images. Now, you must use the right software or tool that has good interpolation. Lastly, ensure you avoid extreme enlargements.
5. How do AI-based tools help in enlarging images?
AI-based tools analyze the image content and try to intelligently recreate details that are lost during enlargement. Ultimately, you’ll get sharper and more natural-looking results than with traditional methods.
Conclusion
That’s a wrap! Hopefully, you’re able to pick the right tool or software for your needs. Also, we hope that you can now enlarge a picture without losing quality.
Among the above-mentioned tools and software, we recommend using Photopea because it has the capabilities of advanced photo editing tools and is also available online, without needing to download the software.
Otherwise, any of these tools and software provide a smooth image even after enlargement. So, make sure to comment on the tool or software you’ll be using.
If you have more concerns, then share your questions. We’ll gladly help!
In addition, ensure reading more articles, including the best image optimizer plugins and how to find copyright-free and royalty-free images for blogs.
Lastly, follow us on Facebook and Twitter to get the latest updates on our blog.


