
Are you wondering how to create a table in WordPress without a plugin? Or do you want to know how to insert a table in WordPress using HTML code? Worry not! This guide will help you!
Tables are a great way to display and organize your huge data in a very comprehensive manner. It makes it quite readable and understandable for your audience. Hence, adding a few tables to your WordPress posts/pages can be a good thing for a website owner.
But if you’re a beginner, then you may not have an idea of how to create a table in WordPress without a plugin. So, in this guide, we’ll explain the step-by-step process of creating a table in WordPress.
Let’s get started!
How to Create a Table in WordPress without a Plugin?
There are several ways in which you can create a table in WordPress. Here, we’re going to see four different ways in which you can create a table in WordPress without a plugin.
Let’s begin with the first method – creating a table in the WordPress block editor.
Method 1: Table Block in WordPress Block Editor
WordPress block editor comes with a built-in table that makes it super easy to add tables to your WordPress website. It gives you full freedom to style your table the way you want.
Now, let’s have a look at how it works:
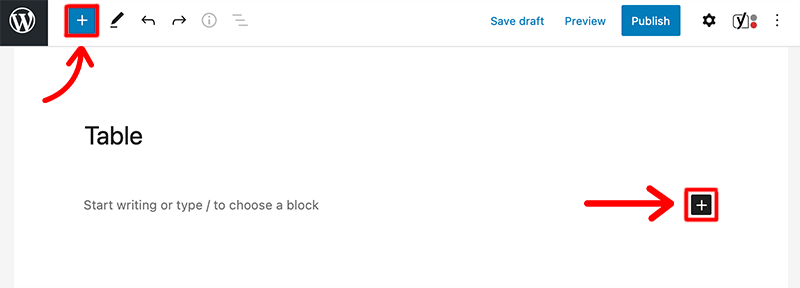
Firstly go inside the content editor, then click on the “+” symbol which is on the top bar or wherever you can type. This is how you add content blocks to your WordPress.
And after that type Table on the Search for a block bar to find the table icon. Then select the Table block.
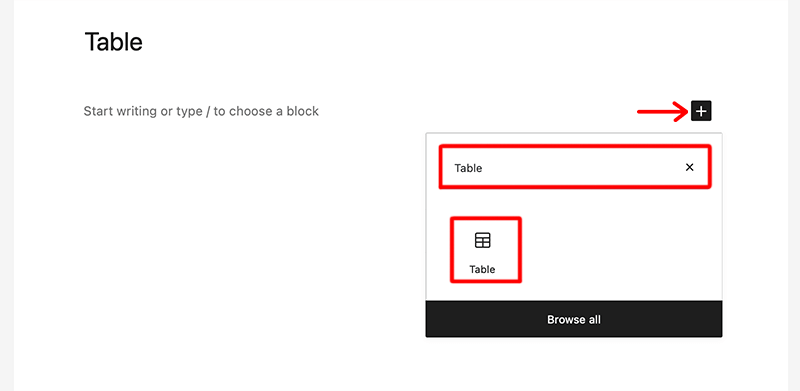
Similarly, you can also insert a Table block by typing the slash “/” followed by the word “table” to search for the table block.
Next, it’ll ask you to set some basic settings such as the number of columns and rows. As for default, it has set both figures to 2.

But for our tutorial, we’ve created a table with 3 columns and 4 rows. Now click on the Create Table button.

After the table has been created, you’ll be able to set the table styles, add/remove columns and rows, etc. by using the Table block’s toolbar.
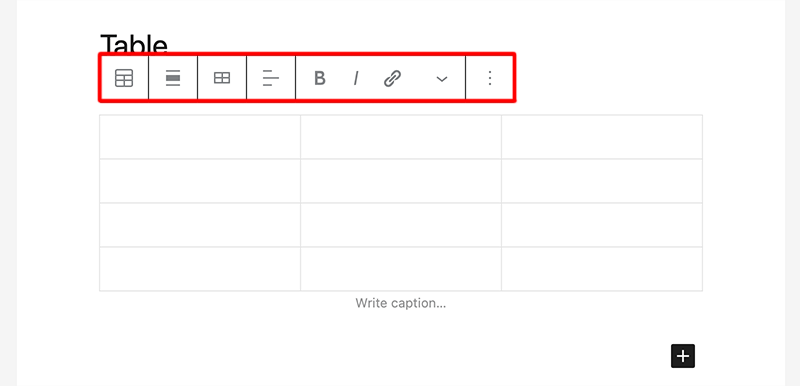
How to Use Table Block Settings in the Toolbar?
Here we just looked at how we can easily create tables in WordPress without using plugins. Now let’s look at how we can change the style and format of the table using the table block setting.
For instance, you can add a new row or column, just by clicking on a cell in the table where you want to add it. Then, click on the Edit Table button.

Similarly, you can delete rows and columns by clicking on a cell in the row or column that you want to delete. Next, select Delete Row or Delete Column from the Edit Table menu.
If you look carefully then you’ll find that the text in your table’s columns is already aligned to the left. However, you can change this setting by clicking in a column and then clicking the Change Text Alignment button.
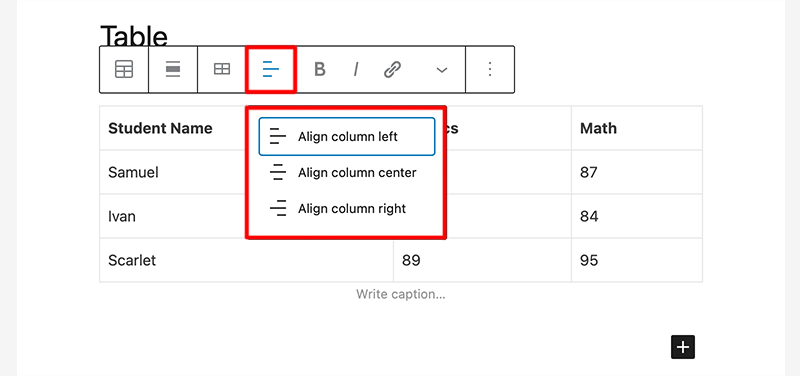
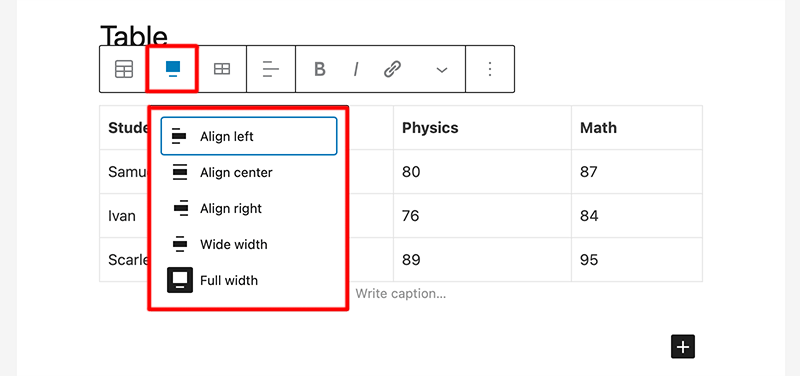
It’s likely at some point you might want to change the alignment of your whole table within the post/page. In that case, you can do so by clicking on the Change Alignment button and selecting an option from the list.
For more settings, if you look at the right side of the editor, you’ll see some handpick settings for the table block.

From there you can add a table header or footer section. If you want your cells to have a fixed width then you can even set that too. Also, you can set the background color of your table under the Color Settings option.
As you can see, it’s quite simple to create a table in the WordPress block editor. And gives you a lot of flexibility when it comes to how you want to display your tables.
Method 2: HTML Code
The first method that we just saw is extremely easy and even beginners can use it in no time. As you can see, there aren’t any technical skills required to insert tables in WordPress.
However, if you’re a developer or have got some basic understanding of coding, then this second method might suit you the best. In this method, you basically would be working with HTML and CSS.
Therefore, we hope that you have got some skills working with HTML and CSS before going with this method.
First, you need to create a new page/post on WordPress, then click on the “+” symbol which is on the top bar.
Following that look for the dedicated Custom HTML block and click on it.

After that, you can write down your HTML code inside the dedicated HTML block.
To create the HTML table you need to use the <table> tag. Inside which the <tr> tag is used to create table rows and the <td> tag is used to create data cells.
However, the elements under the <td> tag are always regular and left-aligned by default.
For example,
<table style="font-family:arial,sans-serif; border-collapse: collapse; width: 100%">
<style>
     td{
        border: 2px solid #000000;
        text-align: center;
        padding: 8px;
     }
</style>
<tbody>
     <tr>
         <td>Row 1, Column 1</td>
         <td>Row 1, Column 2</td>
         <td>Row 1, Column 3</td>
     </tr>
     <tr>
         <td>Row 2, Column 1</td>
         <td>Row 2, Column 2</td>
         <td>Row 2, Column 3</td>
     </tr>
     <tr>
         <td>Row 3, Column 1</td>
         <td>Row 3, Column 2</td>
         <td>Row 3, Column 3</td>
     </tr>
</tbody>
</table>
You can copy this HTML code to create tables for your WordPress website. After you’ve pasted this HTML code, make sure to click on the Preview option to view the result.
Finally, the above-given code will result in the table below:

That’s it, this is how you create a table in WordPress using HTML code. In comparison to the first method, this is quite technical and may not be a cup of tea for everyone.
Method 3: Using Google Docs
Another great method for creating a table in WordPress is using Google Docs. Google Docs is an online word processor that lets you create and edit documents online and comes with real-time collaboration.
Fortunately, Google Docs comes with a built-in table feature. It’s quite simple and easy to use to create a table in Google Docs. All you’ve to do is create a table and then copy-paste the table from Google Docs to WordPress’s editor.
Now, let’s look at this method in detail.
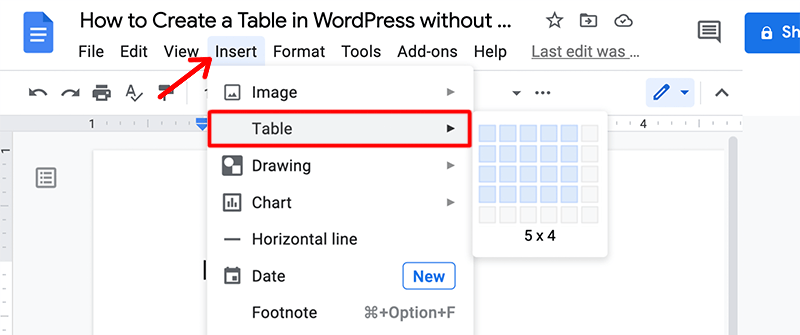
Firstly, go to your Google Docs page and click on the Insert button on the menu bar. After that click on the Table option and select the size of your table. You can create a table of up to 20×20 cells at a time.
Following that, you’ll see that the blank table has appeared on your Google Docs page. Now you just need to fill that empty table with all the data that you want to display.

The best practice would be if you fill all those cells right now instead of doing it later once you’ve moved it to WordPress. Because it’s extremely easy to edit and update the rows and columns on Google Docs.
Once you’ve filled the table, you can also add and edit rows/columns on Google Docs. For that, you need to right-click a cell in a table and you’ll see some options to edit your table.

Finally, after everything has been completed, you can copy the entire table and paste it into your WordPress visual editor.
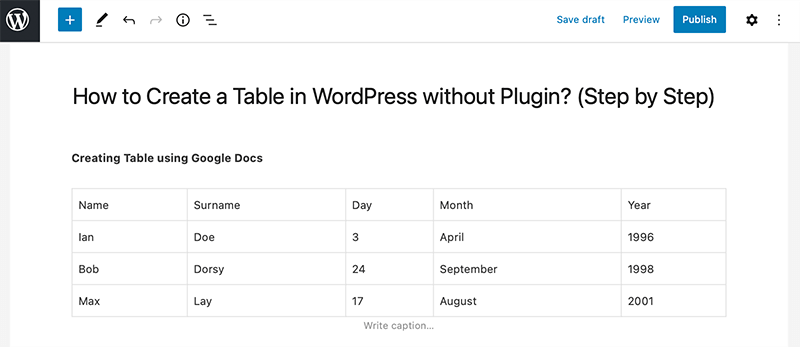
Pretty cool right! This is how you generate a table in Google Docs and paste it into your WordPress. Hands down this one is the simplest and easiest way to create a table in WordPress without a plugin.
Method 4: With Online Table Generator
At last, we have an online table generator method for creating tables without using any plugins. If you search online then, you’ll find many decent table generators that help to generate simple to large and complex tables.
The best thing is that you just have to provide the dimensions, then your information and a table are generated. After that, you only have to simply copy and paste it into your WordPress editor.
Hence, for this tutorial, we’re going to use RapidTables – HTML Table Generator. It lets you create tables in HTML without needing much coding expertise.
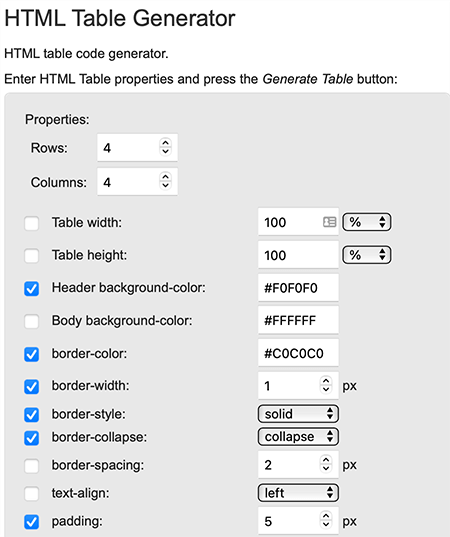
As you see that, all you’ve to provide is the HTML table properties, and then press the Generate Table button. Some of the HTML table properties are numbers of rows and columns, text alignment, padding, border color, border style, background color, and more.
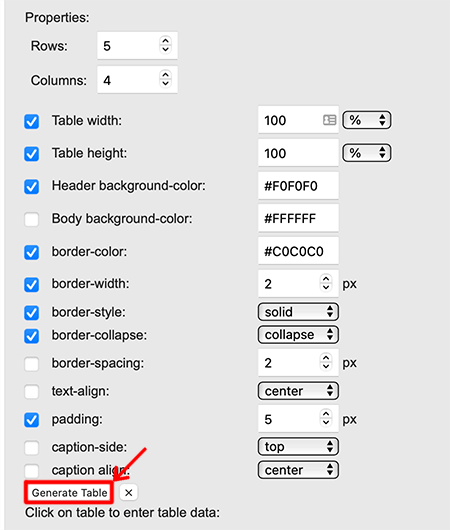
After you’ve entered all the table properties that you want, now you need to click on the Generate Table button. This will generate a blank table for you along with the HTML code for that generated table.
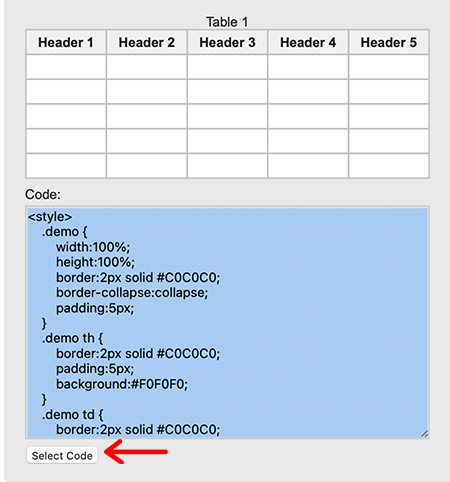
So now it’s time to copy that HTML code and paste it into your WordPress. You can use a dedicated Custom HTML block to paste down your code. After you’ve pasted your HTML code, make sure to click on the Preview option to view the result.

Pretty simple right? Well, this is how you generate a table with an online table generator.
Pros and Cons of Adding Tables Without a Plugin
We hope that you’ve enjoyed reading our tutorial on how to create a table in WordPress without a plugin. To sum up, let’s quickly look at some of its pros and cons.
First, let’s start with the pros:
Pros of Adding Tables Without a Plugin:
- Quick and easy
- No need to download an external plugin
- No need to check the compatibility with the WordPress
- The lesser the plugin in your WordPress, the better it’ll perform
Cons of Adding Tables Without a Plugin:
- If you want more, you’ll have to write a code by yourself
- Less flexibility and power to handle large amounts of data
- Lack options when it comes to styling your table
Which Method is Best to Create a Table in WordPress without a Plugin?
By now, you’ve already found the best method to create a table in WordPress for yourself. If yes, then it’s good for you. But if you’re still wondering which is the best method, then let us help you with that.
All the methods mentioned above are effective and easy and suitable for most users. However, using table blocks is the easiest method to add a table in WordPress. As with other methods you don’t have to depend upon other tools nor require coding skills. At the same time, they’re auto responsive and look good even on your mobile devices.
Conclusion
We hope this article has helped you with how to create a table in WordPress without a plugin. We believe that now you can also easily create WordPress tables using Google Docs.
If you’ve any further queries about how to create a table in WordPress, then please leave a comment below. We’ll try to get back to you as soon as possible.
Also, check out our complete beginner guide on how to optimize your WordPress speed. And also check out the 25 best free minimalist WordPress themes. Be sure to go through it once.
If you like this article, please share it with your friends and colleagues. Also, don’t forget to follow us on Twitter and Facebook.


