Are you wondering if Dokan is the best WordPress multivendor plugin? Do you want an honest review on Dokan? Then, you’ve got to come to the right place.
Dokan is a popular multivendor WordPress plugin. It provides you with everything that you need to set up your multivendor online marketplace using WordPress and WooCommerce. Hence, it’s a great platform to build and run a multivendor eCommerce store.
Nevertheless, let’s review Dokan and see whether it’s worth using or not. Here, we’ve prepared this article to help you understand what Dokan is, how it works and how you can run a multivendor online marketplace on Dokan.
So, let’s dive in.
A. What is Multivendor Marketplace?
First of all, let’s try to understand what multivendor is. A multivendor marketplace is an online store or platform where multiple sellers (vendors) sell their products to various customers in one place.
Here the marketplace owner acts as the administrator of the store, but the vendors can also manage their respective products. As the marketplace owner lets vendors set up and sell their products they have to pay a certain commission to the marketplace owner for use.
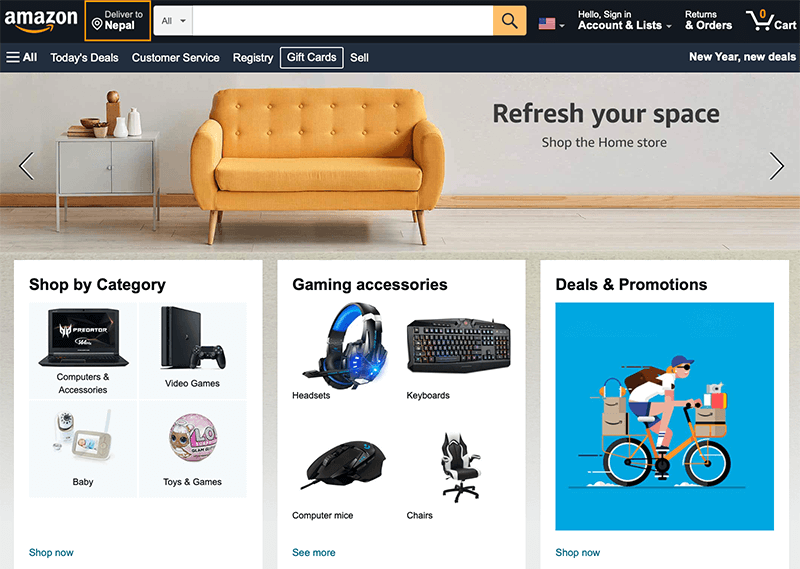
For example, Amazon is one of the most popular multi-vendor marketplaces which was started as an online bookstore. And later on expanded into selling products such as media, electronics, clothing, home appliances, food, toys, and jewelry.
Similar to that, eBay, AliExpress, Esty, and Flipkart are some other well-known examples of multivendor eCommerce marketplaces.
Want to create a multi-vendor marketplace like these? You can do so easily with the Dokan WordPress plugin.
So without any further delay, let’s check out how it works and how to build a multivendor site using it.
B. What is Dokan? – Overview
If you’re planning to build your marketplace just like Amazon, or eBay without any hassle, then it’s possible with the WordPress multi-vendor marketplace plugin called Dokan.
Dokan is an awesome WordPress plugin that lets you build WooCommerce based multi-vendor online stores in the smartest and fastest way possible. It is a popular product developed by WeDevs that helps you build your dream multi-vendor marketplace.

With 70,000+ active installations, it’s one of the best multi-vendor WordPress plugins available in the market. It allows you to easily create, customize, and run multiple stores within a single WordPress installation.
Not just that, it lets you create a marketplace where you can sell for different product types like physical products, downloadable products, bookable products, etc.
And with each store set up within your marketplace, you can earn commissions via vendor commissions, product-based commissions, and more.
The best thing about Dokan is that anyone can be a vendor in your marketplace. Vendors can easily register and start selling. And anyone can register as a customer.
Overall, Dokan comes with way more functionality than any other multivendor plugin.
So let’s jump into another section to know more about the Dokan multivendor plugin.
C. Major Features of Dokan Multivendor Plugin
In this section of the Dokan review, we’ll be looking into some of the key features of the Dokan Multivendor Plugin.
Dokan comes with a complete set of features that can help you to set up and run your multi-vendor website effortlessly. Now, let’s see the major features of Dokan which make it one of the best multi-vendor plugins.
1. Independent Stores
Dokan makes sure that each vendor gets their own independent and customizable storefront. This means that vendors would have full control over their store customization.
2. Frontend Dashboard
Dokan provides you with a rich and customizable frontend dashboard for both vendors and customers to manage their information. Vendors can use it to manage their product inventory, sales, withdrawals, order management, coupons, and more.
3. Coupon Management System
With a coupon management system, vendors can now create and manage their coupons right from their dashboard. Here, you can even set the expiry and restriction for the coupons.
4. Super Easy Withdraw Option
Dokan offers an easy withdrawal system for the vendors. All they need to do is request the payment right from the frontend dashboard. With this system, you can set the withdrawal limit, payment channel, minimum withdrawal limit, and more.
5. Shipping Management for Each Store
Dokan has an inclusive shipping management system that allows each vendor to manage and set their shipping options. It even offers zone-wise shipping so that the vendors can select different shipping zones.
6. Vendor Store Setting
Dokan lets each vendor configure their store settings right from the frontend dashboard. The vendors can customize their store the way they want to reflect their brand and products.
7. In-built Reporting System
Another important feature of Dokan is its in-built detailed reporting system. It’s a comprehensive reporting system that allows vendors to see their store sales report in detail. Also, it gives a complete overview of their store’s performance.
These are some of the features that are added after installing Dokan to your website. Now, let’s go ahead into the next section of this Dokan review and see how to install and set up Dokan.
D. How to Install and Configure Dokan Multivendor Plugin?
In this section of the review, we’re going to show you how we can download and install the Dokan multivendor plugin.
Like any other WordPress plugin, Dokan is extremely easy to install and use. Even beginners can easily install and set up the plugin without any hassle.
Now let’s look at how you can install and use the Dokan within a few clicks.
Dokan Free Version Install and Configure
You can easily test and use the free version of the Dokan plugin on your site. For that, all you need is to install and activate it on your WordPress.
Followed by installing and activating Dokan is similar to any other WordPress plugin.
Anyway, let’s look at the steps involved in installing it in detail.
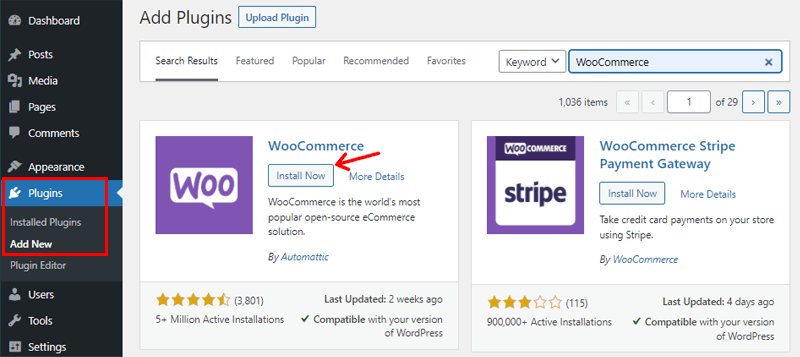
Step 1: Install WooCommerce Plugin
As we know, Dokan is a WooCommerce based multivendor plugin. So, you’ll be going to need WooCommerce to run Dokan.
However, while installing Dokan, the WooCommerce plugin will automatically install if you haven’t already done so.
To install WooCommerce, you’ll have to navigate to Plugins> Add New> WooCommerce> Install> Activate.
Step 2: Install and Activate the Dokan Plugin
To install and activate the free version of the Dokan, you have to first log in to your WordPress dashboard. After that, go to the Plugins section and then click on the Add New button.
On this page, you’ll see the search field located at the very top right-hand side. Then, type in Dokan and click on the Enter to search for the plugin.
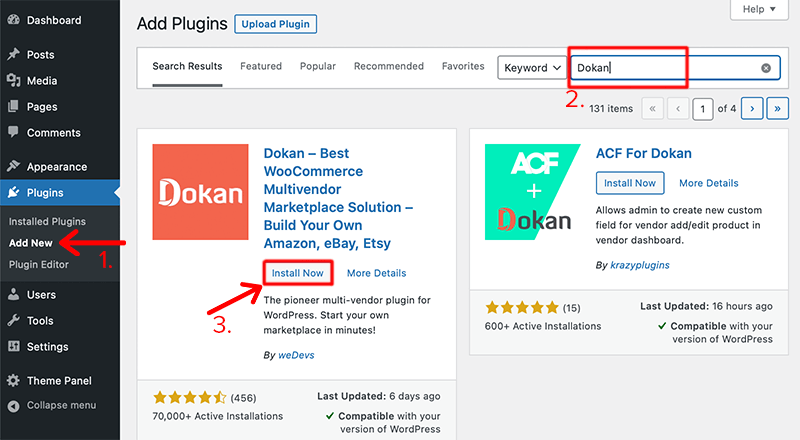
Once you found your plugin, click on the Install Now button for installing it on your dashboard.
After the installation has been completed, click on the Activate button. This is how you fully install the Dokan multivendor plugin on your website.
This is how you fully install and activate the free version of the Dokan multivendor plugin on your WordPress website.
Step 3: Configure the Plugin
As soon as you activate the plugin, you’ll be redirected to the configuration page of the Dokan that welcomes you into the world of Dokan. It’s a quick setup wizard that will help you configure the basic settings before you start using this plugin.
This setup wizard is divided into five different sections, namely Store, Selling, Withdraw, Recommended and Ready.
However, this step is completely optional and you can skip it now and configure it later.
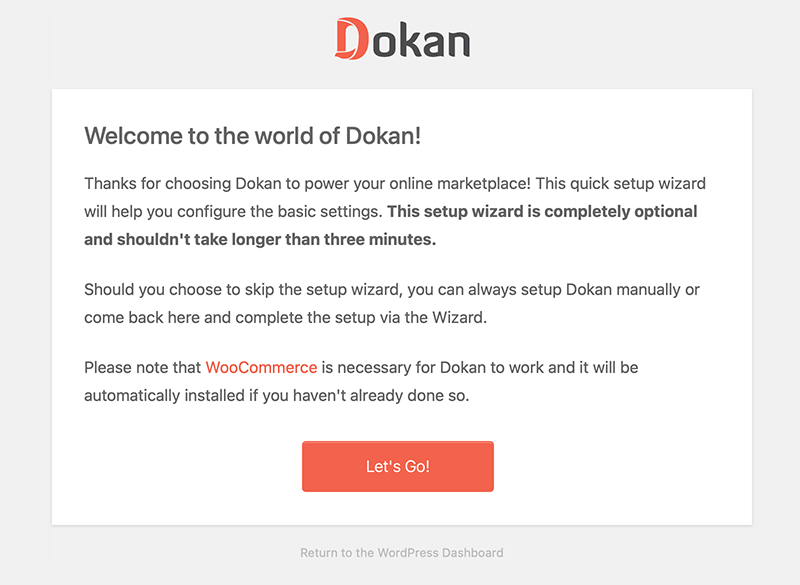
To get started with that, click on the Let Go! button.
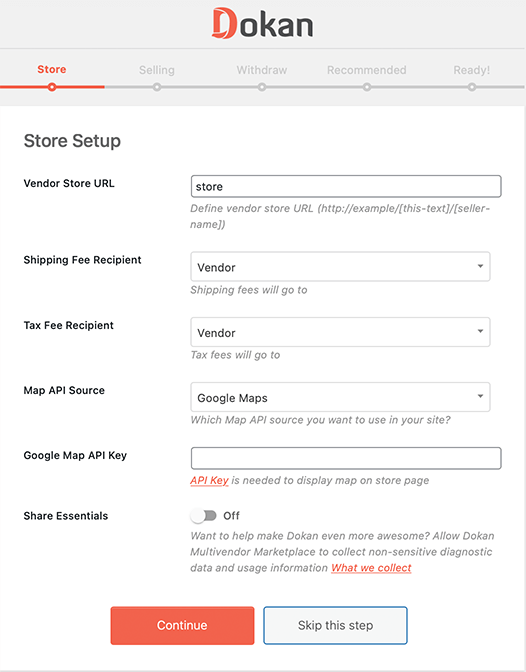
i. Store
Following that, it’ll take you to the first section of the setup wizard i.e. Store. In this section, you’ll have to set up your store by providing the information for the shipping fee, tax, Google Map API, and vendor store URL.
ii. Selling
Here, you’ll enable the selling status for newly registered vendors and set up the admin commission. In this way, it allows new vendors to start selling their products immediately on your marketplace.
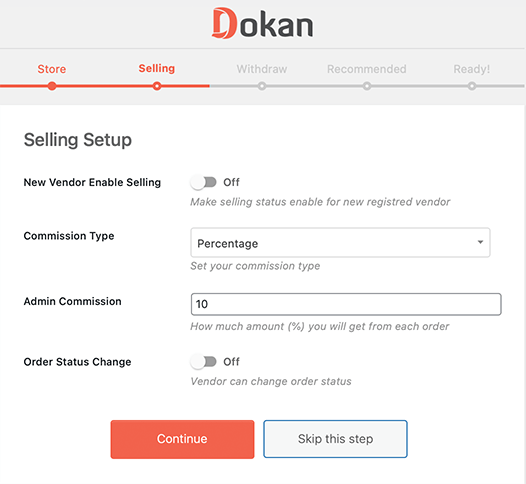
iii. Withdraw
The Withdraw option allows you to configure the withdrawal methods for your vendors. In this setup, set up the minimum withdrawal limit and the order status for withdrawing.
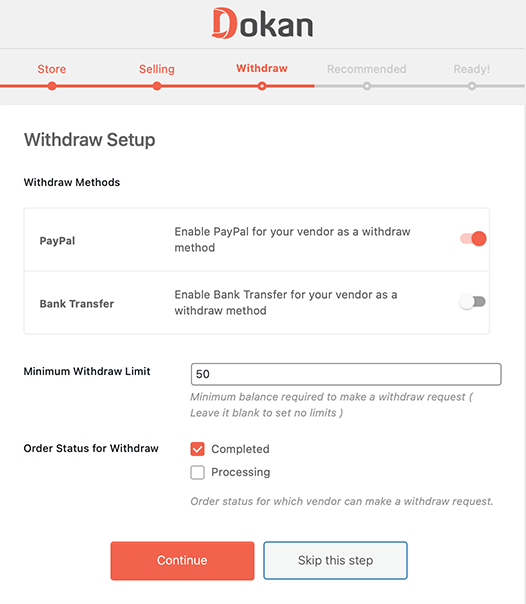
iv. Recommended
This section of the setup wizard is optional. You could see a list of all the recommended plugins that integrate well with your Dokan multivendor plugin. You can choose the plugins that you want to install to effectively improve your performance.
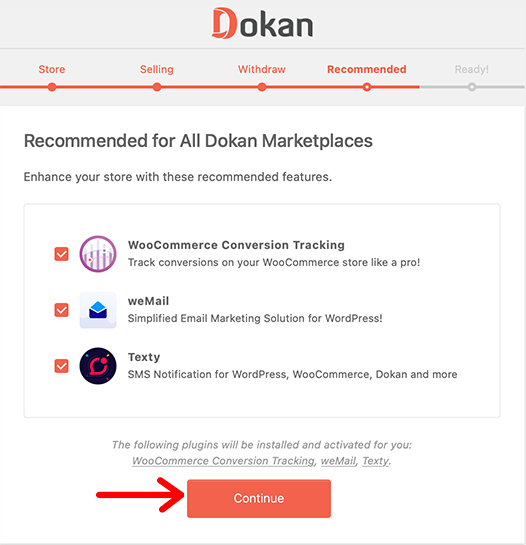
v. Ready
Lastly, once you’ve completed configuring the setup wizard, you’re now ready to start your marketplace.
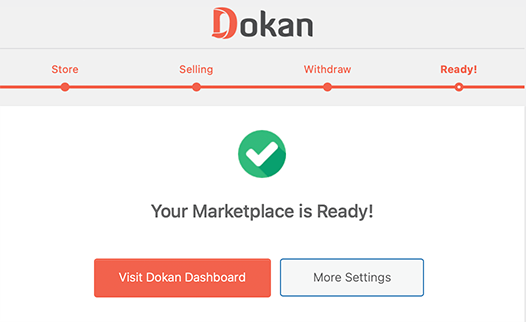
For more settings options, you can click on the More Settings option, or else you can directly visit your Dokan dashboard. After you’re done, you’re good to start your marketplace.
Congratulations, if you’ve been able to install and activate the free version of the Dokan plugin into your WordPress site.
Dokan Premium Version Purchase and Install
We just looked at how we can install the free version of the Dokan. But for a more extensive set of features, you’ll have to purchase one of its premium versions.
Hence, we present to you the steps to do it in this Dokan review.
Step 1: Purchase and Download the Plugin
First, you need to purchase the premium version of Dokan from its official website and then download it to your local device. You’ll notice that the downloaded file will be downloaded in the form of a zip file.
Step 2: Upload the File Into Your WordPress
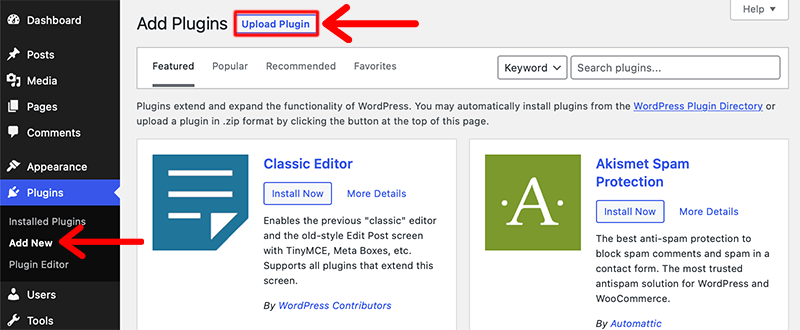
Now, upload that downloaded zip file into your WordPress site. For that, go to Plugins > Add New, and then click on the Upload Plugin button.
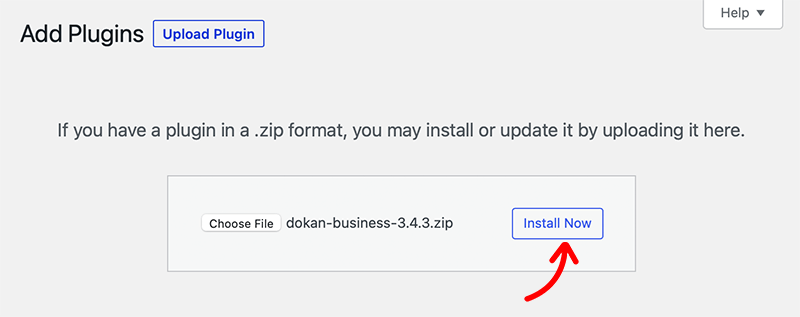
After that, select the downloaded file from your local drive and click on the Install Now button.
Step 3: Activate the Plugin
Once the plugin has been uploaded into your WordPress, click on the Activate Plugin button. Then, your site is ready to create your very first marketplace.

Now we’re almost ready to use Dokan Pro, but before that, we’ll have to install the core plugin to make it functional. Hence, for that click on the Install Now button.
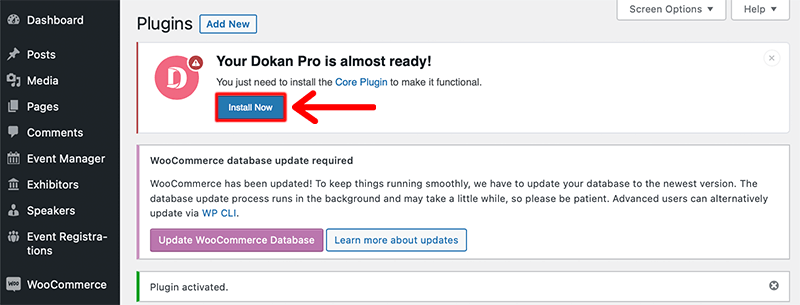
Once the installation is completed, don’t forget to configure the setup wizard as in the free version for your premium version as well.
Woo-hoo!! Congratulations, if you’ve been able to install and activate the Dokan multivendor plugin into your WordPress site.
E. How Does Dokan Multivendor Work?
When we talk about creating a multi-vendor store there are always three main users or actors who are going to interact with the system. They are Admin, Vendors, and Customers.
- Admin is the main administrative head or owner of the multi-vendor marketplace. They’re the ones who control what vendors can sell or what customers can see on the website.
- Similarly, vendors are the ones who own space inside the store to sell their products.
- And customers are the ones who ultimately purchase goods.
Hence, Dokan makes sure that all these three users’ needs and requirements are fulfilled for a successful marketplace. In that case, it provides an individual and fully-customizable dashboard for both admin and vendors.
At the same time, both types of dashboards come with their benefits. Now, let’s look at each of the dashboards and see what we can find.
What is the Dokan Admin Dashboard?
After you’ve successfully installed Dokan on your WordPress site, you’ll be able to easily navigate to your Dokan Dashboard.
To access your dashboard, you have to log in to your WordPress dashboard and then go to Dokan > Dashboard.
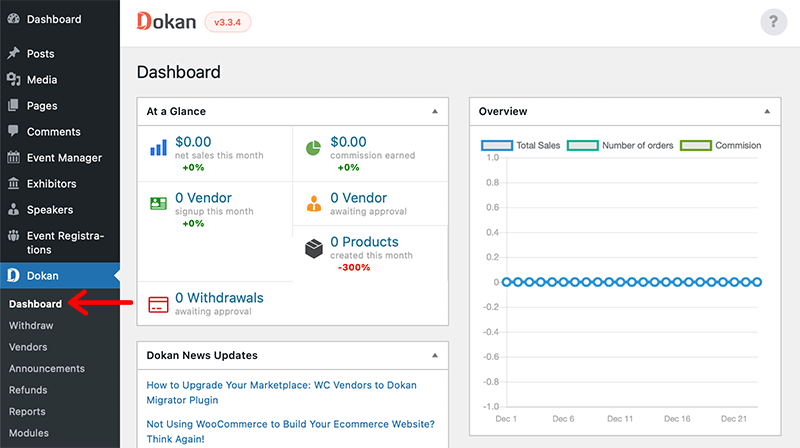
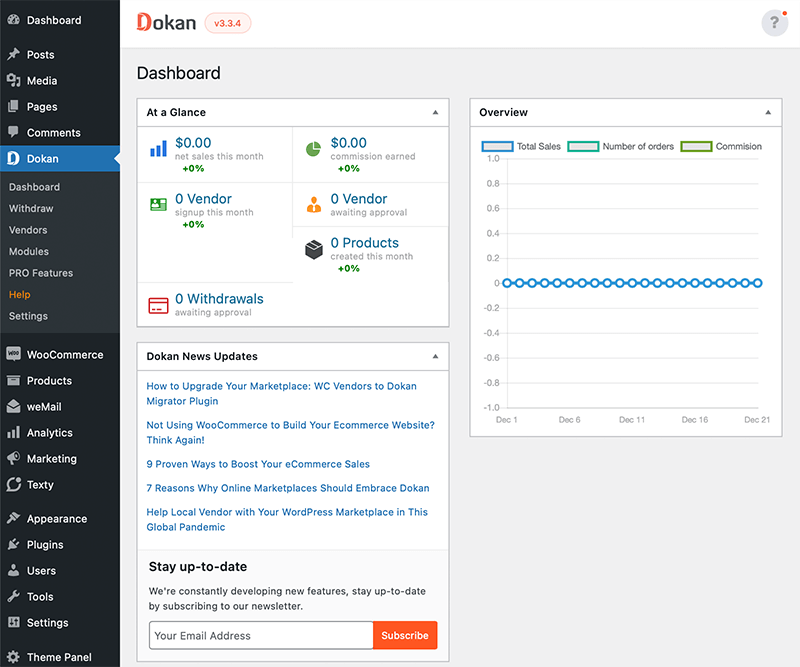
The Dokan dashboard looks quite intuitive and well organized. You could see that in the main section of the dashboard you’ll get all the information about your store at a glance.
Some of the information that you can find on your dashboard is the number of vendors, amount of commissions, sales per month, number of withdrawals, and more.
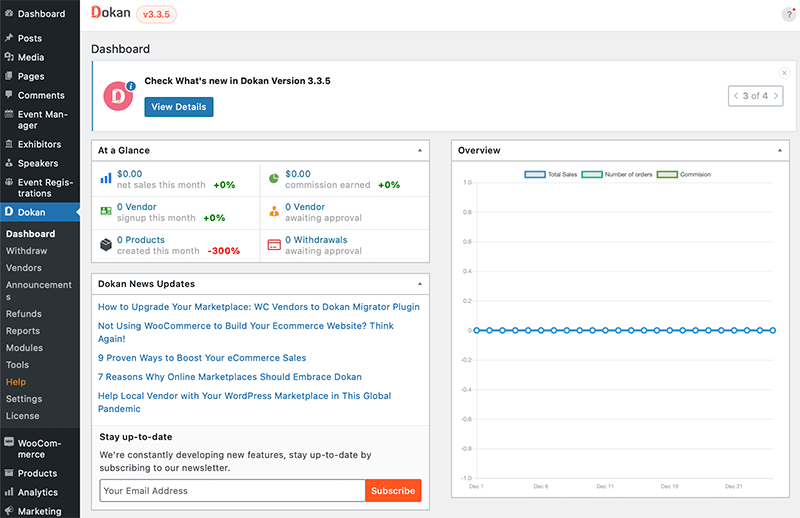
The best part about the Dokan admin dashboard is that you get a quick overview of your store’s insights. This means that you don’t have to check each vendor’s profiles to investigate their sales, reviews, updates, and more.
For your ease, the Dokan admin dashboard is further divided into four sections – At a Glance, Overview, Dokan News Update, and Stay up-to-date.
- At a Glance – This section displays the overview of net sales this month, total vendors signed up this month, a commission earned, total products created this month, the number of vendors waiting this month, and withdrawals awaiting approval.
- Overview – This gives you the graphical representation of your total sales, totaled orders placed, and commission earned.
- Dokan News Update – In this section, you get updates about the latest news related to Dokan.
- Stay up-to-date – If you want to be first to get all the news about the new features of Dokan then subscribe here to their newsletter using an email address.
How to Use the Dokan Admin Dashboard?
In this section, let’s see what the Dokan admin dashboard has to offer. With that, we’ll also see how much freedom and ease it provides to their admin to start their multi-vendor marketplace.
So, let’s start by looking at how you can create new vendors from the admin dashboard.
1.How to Create New Vendors from the Admin Dashboard?
Here let’s see how we can create, and add a new vendor using the Dokan admin backend.
Let’s see the basic steps to do that.
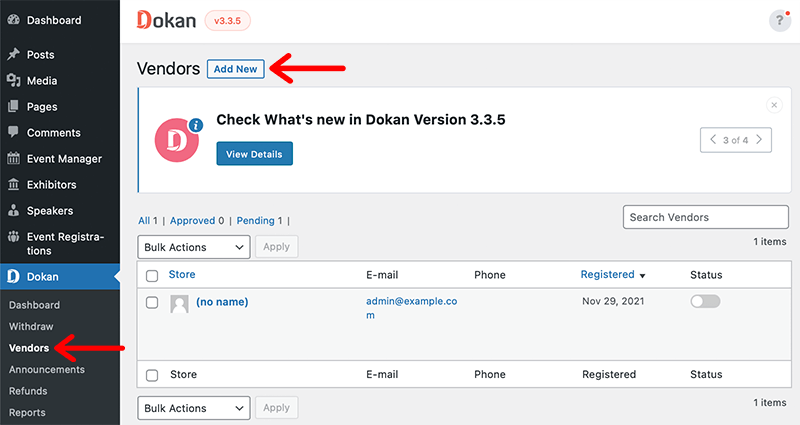
Start by going to the Dokan Menu from your dashboard and selecting the Vendors option. This will take you to the Vendor page from where you can create a new vendor profile or see your previously added vendors.
If you’re adding a new vendor for the first time, then you can create one by clicking on the Add New button.
After that, it’ll open a form containing all the necessary fields to add new vendors. You’ll have to fill out these fields in three steps where each step will ask you to enter different details.
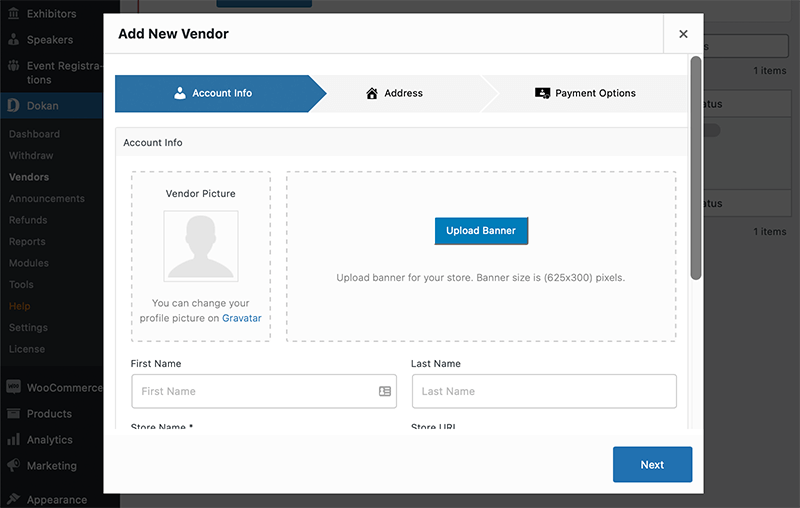
In the first step, it’ll ask you to fill out the personal information of the vendors. Here, you’ll have to provide information such as vendor’s name, photos, upload banner image, store name, store URL, username, and password.
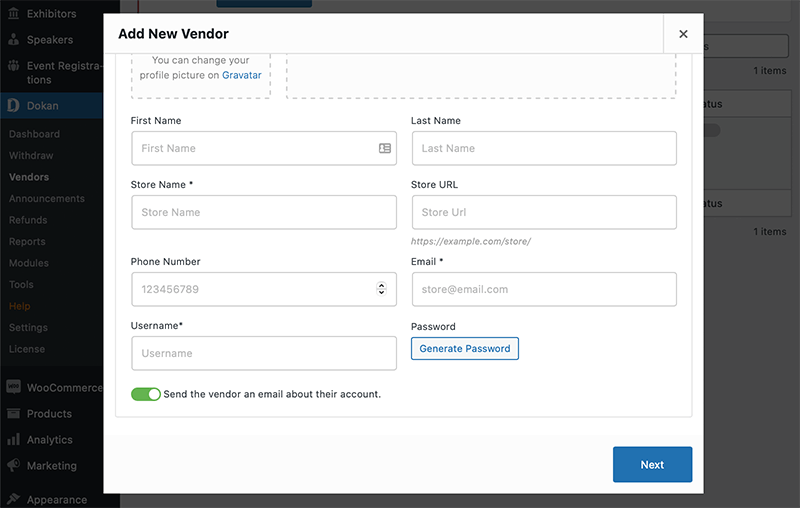
Once you’ve filled out all the necessary fields, click on the Next button and it’ll take you to the second step.
The second step is all about providing the correct address of the vendor and clicking on the Next button to proceed.
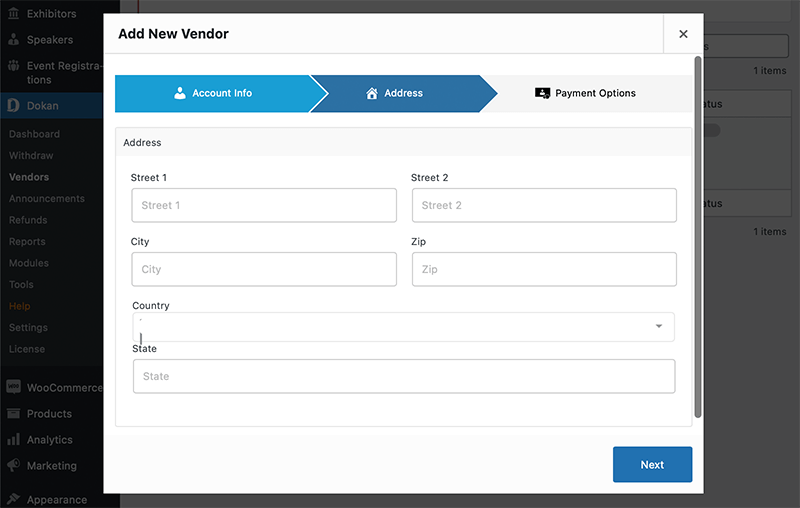
In this last step, you’ll provide the bank account details of the vendor along with their PayPal email id.
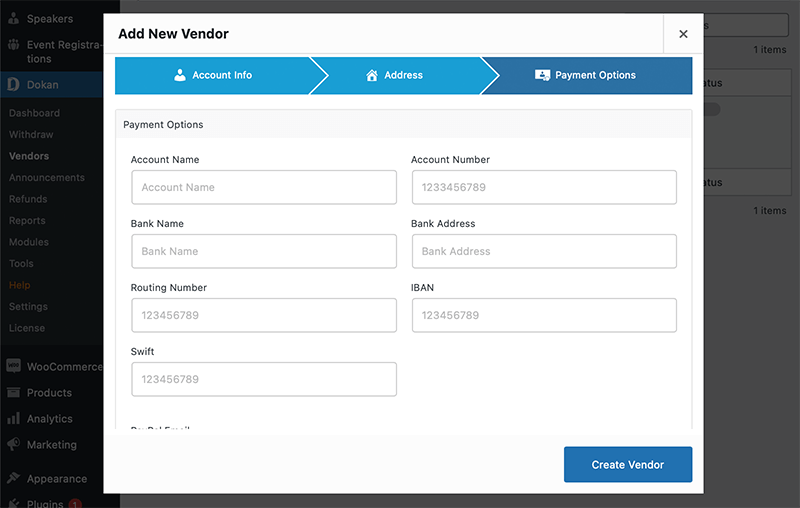
Besides, you can enable the toggles allowing vendors to sell their products, publish products directly and make a vendor featured.
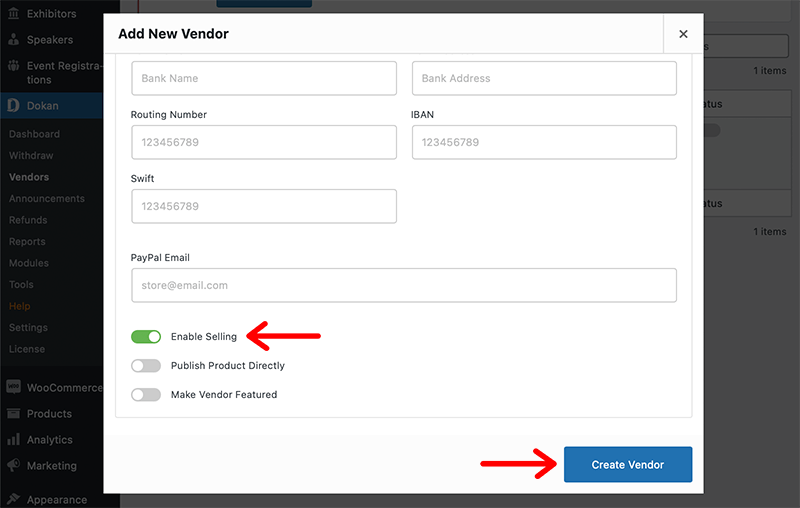
Following that, if you’ve filled out all the necessary fields, then you can click on the Create Vendor button to create the vendor profile. After you’ve done that, the vendor that you’ve created will be visible in the vendors’ list.
That’s it! This is how you add a new vendor from the admin backend dashboard in Dokan.
2.How to Setup a Dokan Vendor Commission?
Dokan comes with a comprehensive commission system that lets you set up commission rates on all products sold. With Dokan, you can even set up the percentage, fixed-rate, or both commission types on all sales made on the site.
However, Dokan comes with four different types of vendor commissions. They are:
- Global Commission – This commission is applied to every vendor and is set up from Dokan Settings.
- Vendor Wise Commission – This commission is applied to individual vendors which can be set up from the Vendor Profile Edit Page.
- Category Wise Commission – This commission is applied to an individual product category and is set up from the Product Category Page.
- Product Wise Commission – This commission is applied to individual products which can be set up from the Product Edit Page.
Now let’s look at how we can configure the commission for each type of vendor commission.
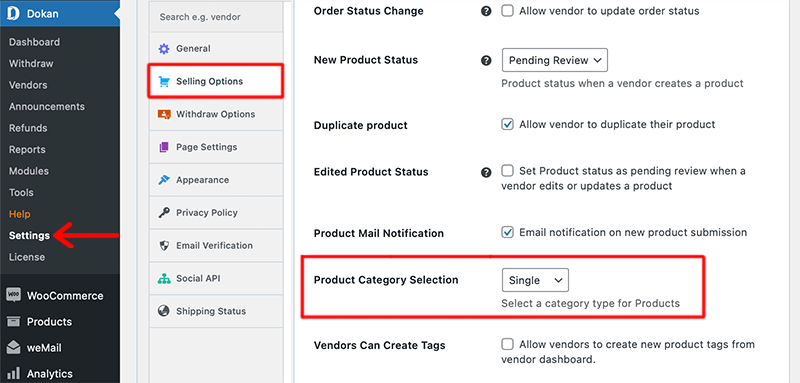
But before that, you need to make sure you’ve selected the “Single” category type for products. Or else, the Category Wise Commission will not work.
To ensure that, navigate to WP Admin > Dokan > Settings > Selling Options > Vendor Capability > Product Category Selection.
How to Setup a Global Commission?
To set up a global commission you’ll have to log in to your dashboard. And then go to Dokan > Settings > Selling Options.
After that, in the Commission section, the very first thing would be to select a Commission Type for vendors. There are three options – Percentage, Flat, and Combine Commission.
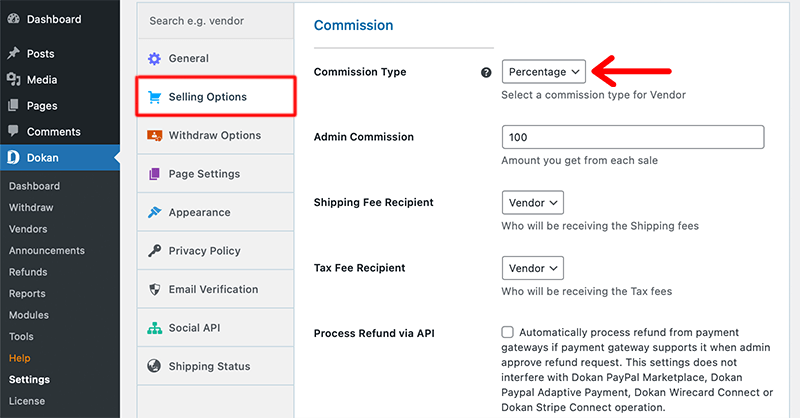
Following that, in the Admin Commission field, you can put your global commission. For example, if you select Commission Type “Percentage” and Admin Commission “90%” then the vendor will get a 10% commission. And, then click on the Save Changes button to save it.
How to Setup a Vendor Wise Commission?
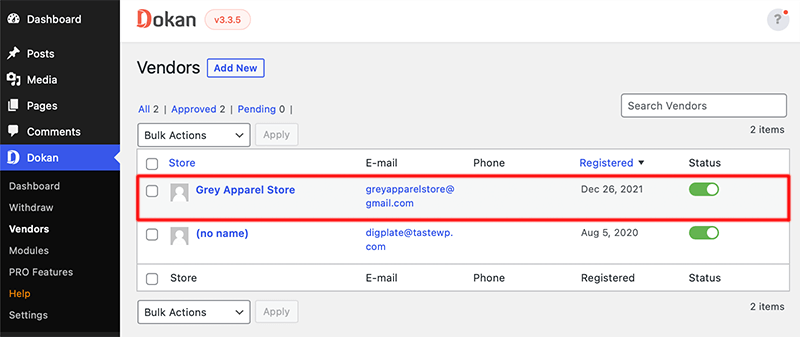
For that, go to your WordPress Dashboard > Dokan > Vendors. Hereafter, you need to select the vendor for whom you want to set the commission. Once you’ve selected the vendor, now click on the Edit option of that vendor.
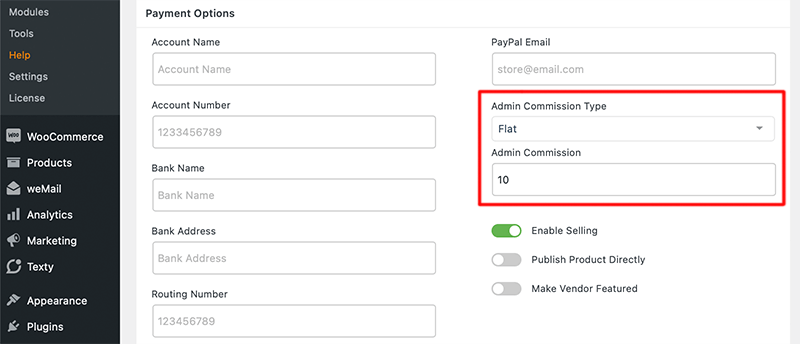
Next, it’ll take you to the vendor edit page and scroll down to look for the Admin Commission Type and Admin Commission options. There you’ll add the amount of commission that you want to set up for that vendor. And, then click on the Save Changes button to save it.
How to Setup a Product Wise Commission?
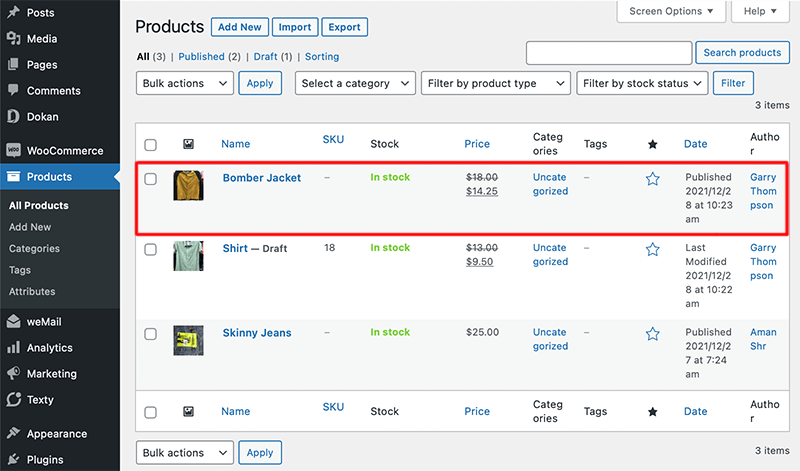
Navigate to your WordPress Dashboard > Dokan > Products. Then, select and click on the product that you want to set the commission for.
After that, scroll down the Edit Product page and inside the Product Data section, under the Advanced options, you will find the Commission field.
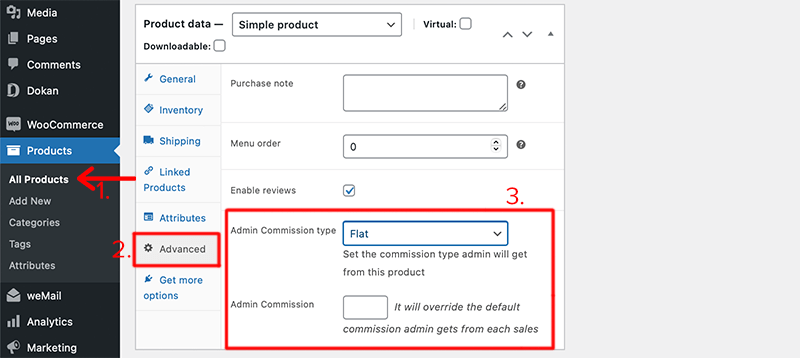
Next, you’ll enter the commission rate for that specific product and then update the product using the Update button.
Finally, this is how you can set up different types of vendor commission in Dokan.
3.How to Manage Withdrawal Requests?
Right now, Dokan has got two types of payment gateways. They’re as follows:
- Adaptive Payment Gateway and
- Non-adaptive Payment Gateway
Adaptive payment gateways are gateways that will resolve the payment and transfer the share of the admin and the vendor to their respective account for an order as soon as the order is placed by the customer.
For example, Dokan Stripe Connect and Dokan PayPal Marketplace can be used as an adaptive payment gateway.
Meanwhile, non-adaptive payment gateways transfer the paid amount to the admin’s account and the vendor’s earnings will be added to the withdrawable balance of the vendor.
From the vendor dashboard, the vendors will be able to transfer a withdrawal request to the admin. After that, the admin will need to transfer the money to the vendor’s account manually.
Note that the payment won’t be transferred to the vendor’s account automatically after approving the withdrawal request from the admin’s side.
However, if you wish to set the desired payment gateway for your store then, navigate to WP Admin Dashboard > Dokan > Settings > Withdraw Options > Withdraw Methods.
After that, you can select the desired payment method for vendors to withdraw the money in your multivendor store.
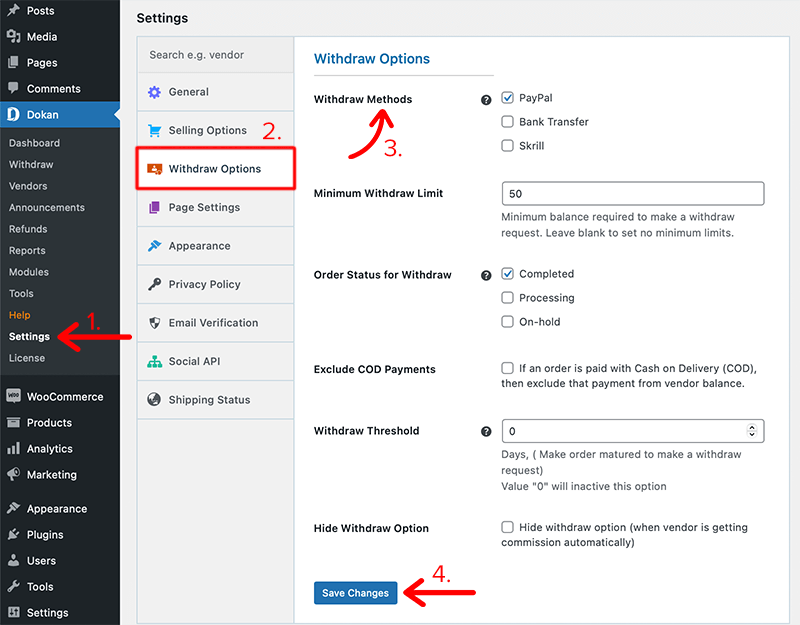
Similarly, just below that option, you can set the Minimum Withdraw Limit. This lets you enter the minimum balance required to make a withdrawal request. Or else, you can even leave the field blank to set no minimum limits.
At last, once everything has been set according to your needs, you can click on the Save Change button.
4.How to Activate and Deactivate Dokan Modules?
To your surprise, Dokan comes with 27 modules that work as an extension to provide more functionalities to your multivendor marketplace. You can easily activate and deactivate all the modules directly from within the plugin.
Therefore, you won’t need to manually download and install it anymore. These are the premium Dokan modules that are in-built and can be found in your premium package.
We shall talk about each of them later in this article, meanwhile let’s look at how we can activate and deactivate those modules.
Firstly, to activate these modules, go to your WP Admin Dashboard > Dokan > Modules.
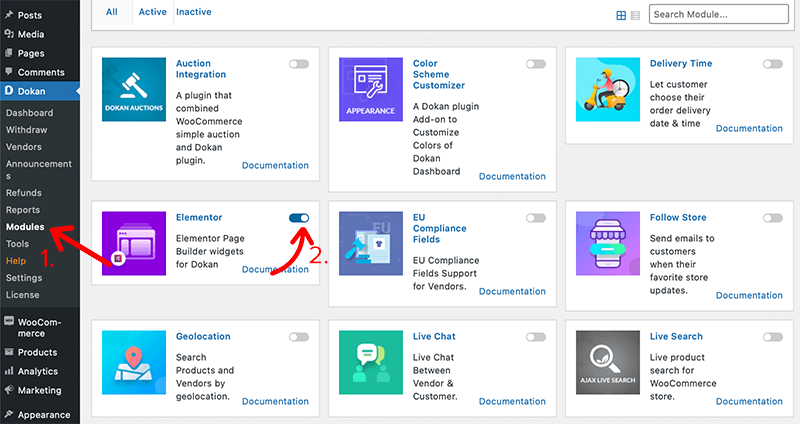
After that, you’ll see a list of premium modules in front of you. Now all you need to do is enable the toggle button to activate the module that you want.
Similarly, to deactivate the previously active module, you just need to simply disable the toggle button.
That’s it, this is how you activate and deactivate a Dokan module. Isn’t it easy?
Nevertheless, if you want to use free modules then you have to install and activate the module as you install any WordPress plugin.
5.How to Enable Single Seller Mode?
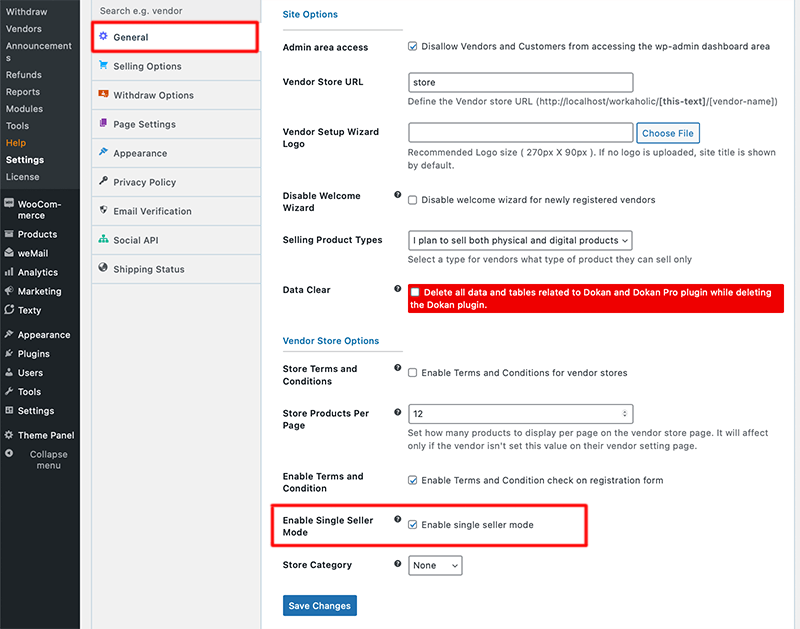
Dokan Pro allows you to enable a mode in which the customer will only be allowed to buy from one vendor at a time. This single seller mode will restrict your customers from buying from multiple vendors in a single order.
To enable this mode, first, navigate to your WP Admin Dashboard > Dokan > Settings > General. After that, under the Vendor Store Options, enable the checkbox called Enable Single Seller Mode. Then, click on the Save Changes button to save the changes.
6.How to Generate a Vendor Registration Form?
It’s not always possible to register the vendors from the admin dashboard. Or the admin wants to make the vendor registration public. In that case, the admin needs to show the vendor registration in the frontend.
Most of them may not know that when you install WordPress the registration form is not enabled by default. Hence, you need to enable the registration feature from the settings to view the vendor and customer registration form.
Anyway, let’s look at the steps for generating the vendor registration option.
Step 1: Enable Registration Option from WordPress Settings
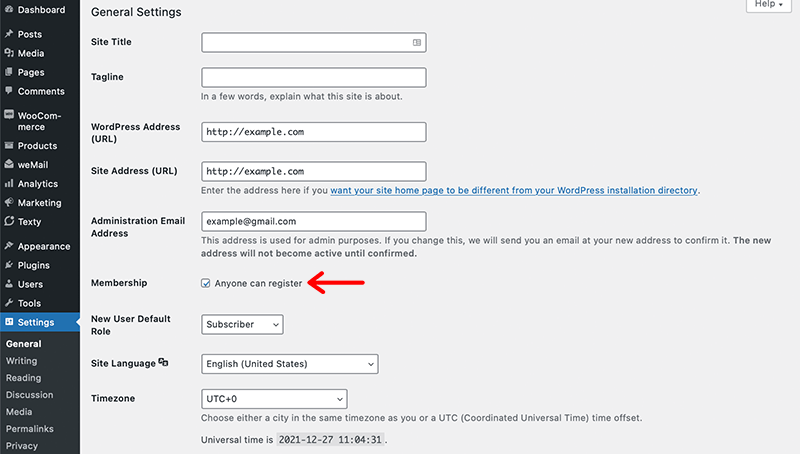
For that, you have to go to WordPress Dashboard > Settings > General Settings. After that, you’ll have to check the box that says Membership – Anyone can register. Then, click on the Save Changes button to save your settings.
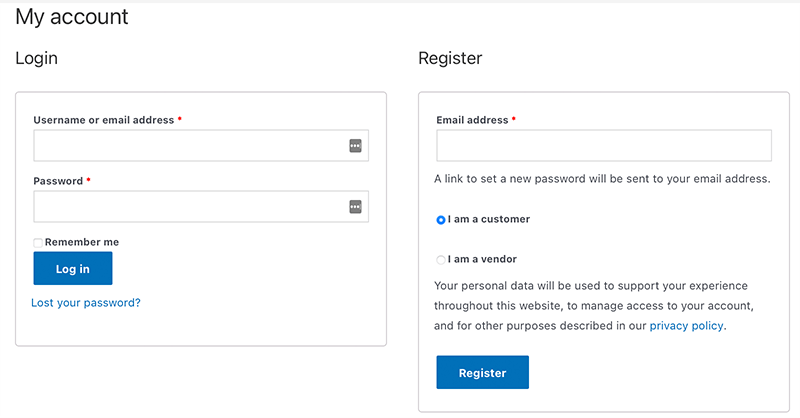
Once you check that box, you’ll notice that the vendor and customer registration form will be visible on the /my-account/ page.
Step 2: Permalink Settings
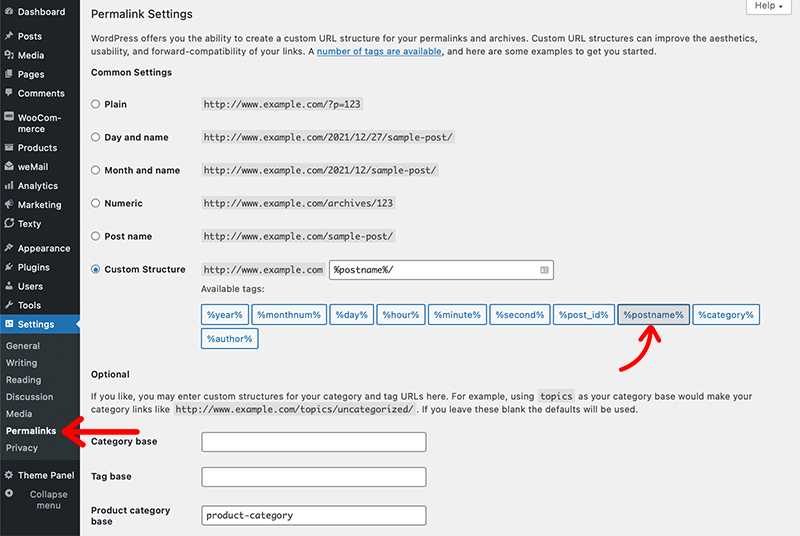
After that, it’s time to configure the system URL in a specific format. For that, navigate to WordPress Dashboard > Settings > Permalinks > Permalink Settings > Custom Structure. Next, select the Post name (%postname%) option.
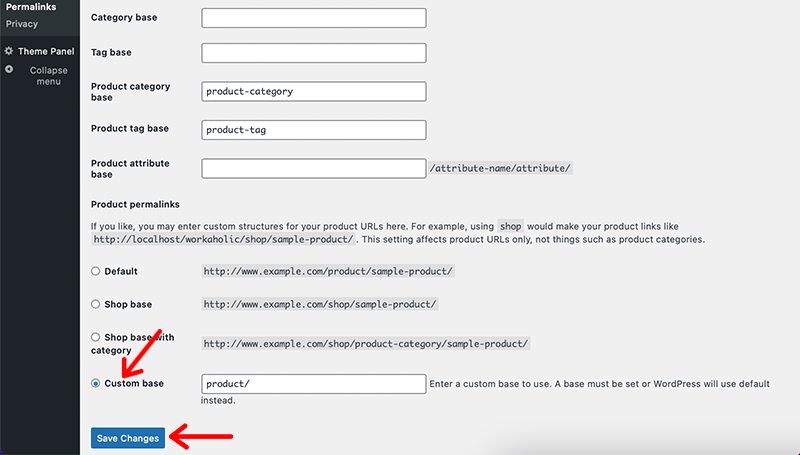
Following that, select the Custom Base option for product permalinks and enter a custom base “/product” to use. And then click on the Save Changes to save your changes.
Congratulations, if you’ve been able to generate a vendor registration form with ease following each of the steps discussed above.
Ok, these are the few of the functionalities that you get with the admin dashboard. Now, let’s check what the Dokan vendor dashboard looks like and what it has to offer.
What is the Dokan Vendor Dashboard?
Similar to that of the admin dashboard, the Dokan Vendor Dashboard is the administration area of the vendor which displays the overview of their store. From there, vendors will be able to easily manage their store and also get quick insights.
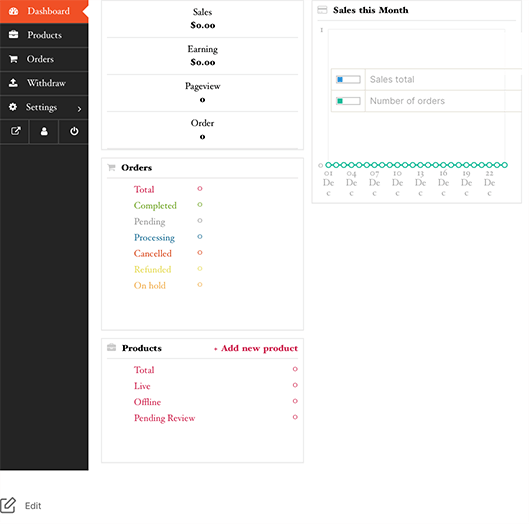
With that all, the dashboard would also provide suggestions on how to make your store more appealing and engaging to your customers. Inside the main section of the vendor dashboard, you’ll get an overview of your store, sales, pageview, orders, earnings, reviews, and products.
How to Use the Dokan Vendor Dashboard?
Similar to the Dokan admin dashboard, here we’ll be looking at what the vendor dashboard has to offer. With that, we shall also see how much freedom and ease it provides to their vendors to start their store within the multi-vendor marketplace.
So, let’s start by looking at how you can add a product from the vendor dashboard.
1.How to Add a Product from the Vendor Dashboard?
The vendor can easily create products using the Dokan vendor dashboard. Once the vendor has been registered to your marketplace, they can easily create products and customize them from the dashboard.
Now, let’s look at how vendors can add a product from their dashboard.
Beginning by navigating to the vendor dashboard and then clicking on the Products menu from the sidebar. After that click on the Add New Products button from the top right corner.
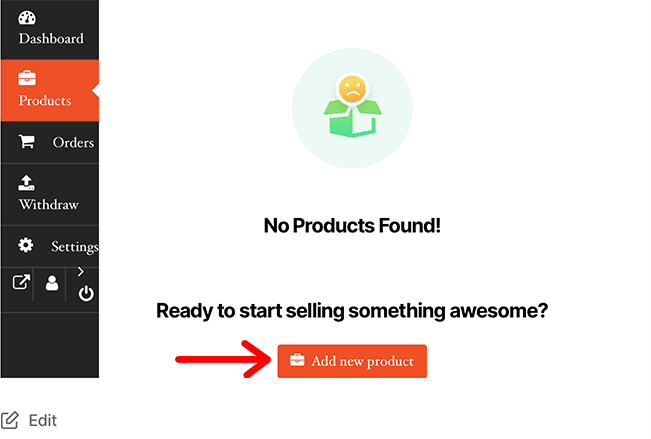
Following that, it’ll open a new window that allows you to fill a form to create a new product.
Here, it’ll ask you to provide some basic information about the product. Such as the product name, image, price, and description. Alongside the price, you can also include the discounted price (optional).
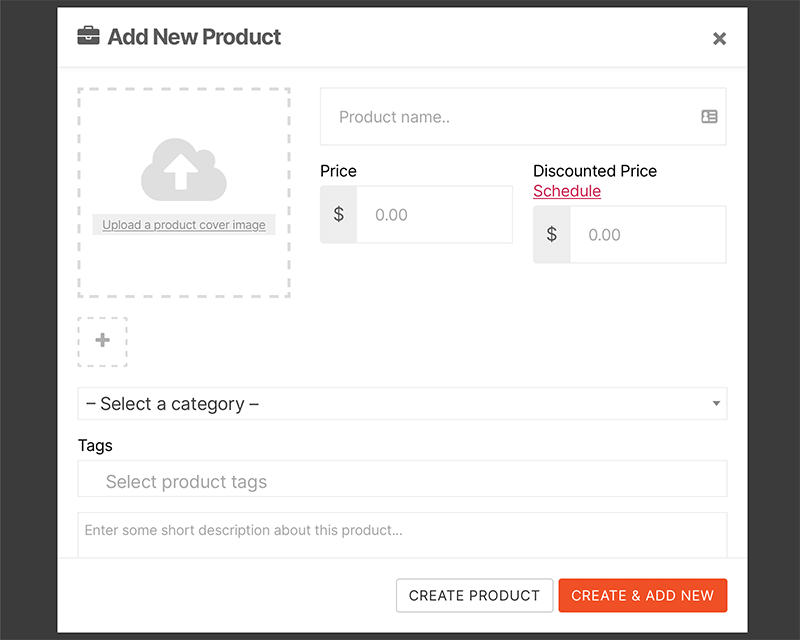
Not just that you can even schedule the discounts for a certain amount of time. Once you’ve filled in all the required details, you can now click on the Create Product button. This will then create a product and will redirect you to the product edit page. And from there you can add and edit more details to your product.
However, if you want to create another product immediately after this, then click on the Create & Add New button.
In this way, vendors can easily add new products using their vendor dashboard.
2.How to Add and Create Digital Products?
As we already know, Dokan lets you not only sell physical products but also lets you sell digital or downloadable products as well. Now let’s see how vendors can create and sell a digital product with Dokan.
Start by logging in to your vendor dashboard and then navigate to the Products > Add New Product button.
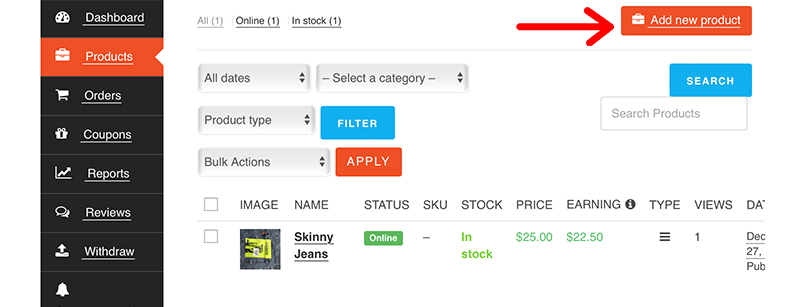
This will then open an Add New Product window and just like creating any other product, you’ll create this product as well.
Once you’ve done that, click on the Edit option of that product and then click on the Downloadable checkbox. In this way, the downloadable product will give access to a file upon purchase.
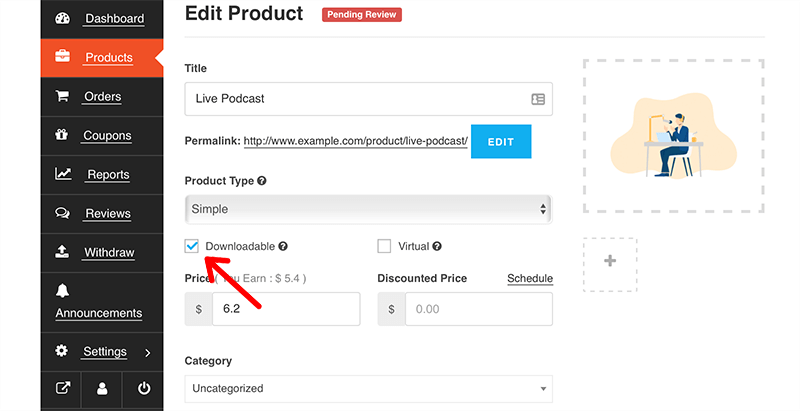
After that, if you scroll down the page then you’ll find a new section called Downloadable Options. Here, you’ll be able to configure your downloadable product settings.
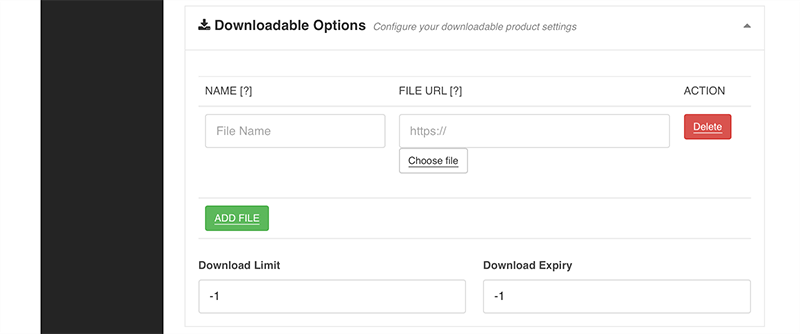
For example, you can upload the downloadable product, enter the product name, and file URL. Also, you can set the download limit and download expiry for your product.
In this way, like any other physical product, vendors can add and sell their digital products with Dokan.
3.How to Create a Grouped Product with a Vendor Dashboard?
How about you want to sell your newly launched music album. Along with that, you want to sell your extended play record as a whole. Then, in that case, you need to create a Grouped product and sell it out.
Now, let’s see how vendors can create a group product by following these simple steps:
Step 1: Create a Parent Group Product
If you’re a vendor then, you need to login into your dashboard and navigate to Products > Add New Product.
Then, you’ll create a product like any other product and then you’ll open the edit page of that newly created product. After that, you’ll have to select the Product Group from the Product Type drop-down menu.
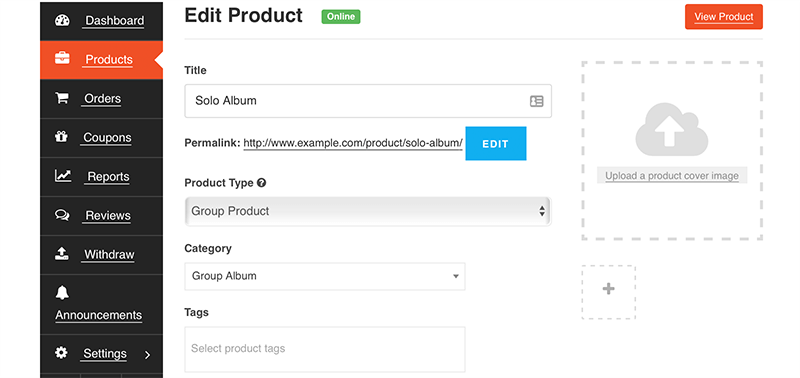
Since we’re creating a parent group product, there is no price field. And you also need to make sure that you select a Category for this product.
Step 2: Create a Child Product
In this step, we’ll create another product called Child Product. Once you create a child product, make sure that you give it the same category as the parent product.
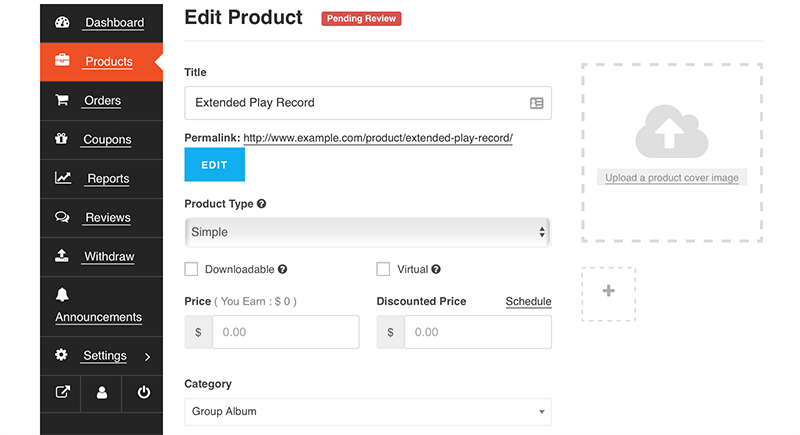
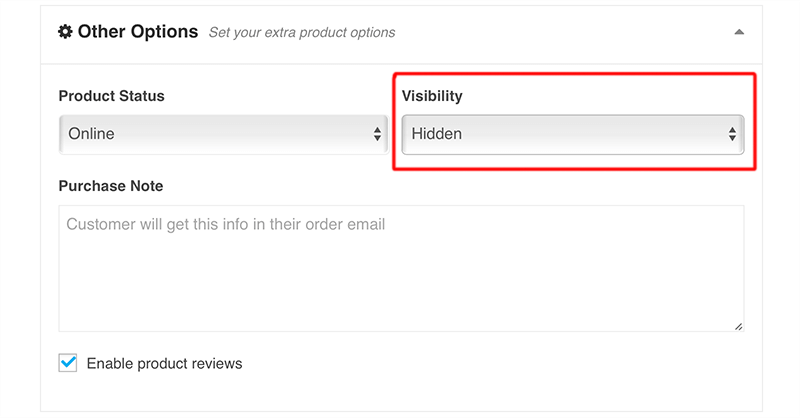
Now you need to hide this product from the catalog. So for that, scroll down and under the Other Options sections, there is a Visibility field. There you need to set the visibility to Hidden and then save it.
Step 3: Link Child Product to the Parent Product
Now, go back to the Parent Product and under the Linked Products, you’ll have to select the Child Product in the Group Products field. This will then link both of them together.
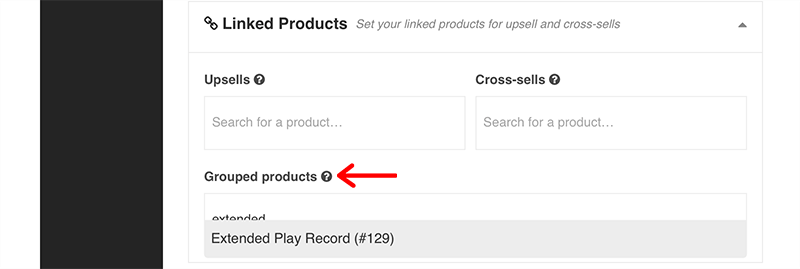
Here, if you follow these steps – Step 2 and Step 3 then you’ll be able to link more products to the Parent Product.
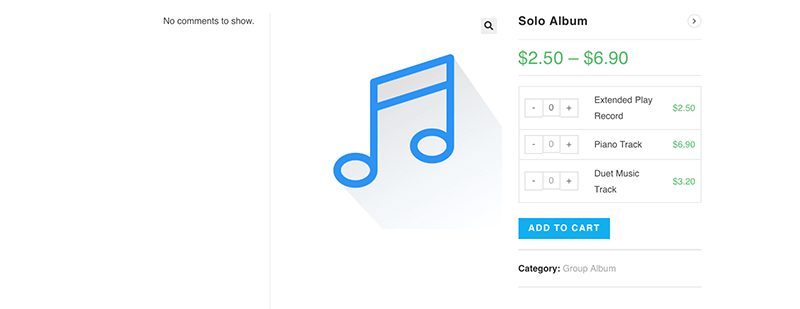
Finally, after linking all your child products to the parent product you will get a group product that looks like this:
4.How to Configure Opening and Closing Hours for Your Store?
So, Dokan allows the vendor to set opening and closing times for their online stores.
To do this, vendors need to log in to their Vendor Dashboard and go to Settings > Store.
After that, you need to scroll down and look for Store Opening & Closing Time. Then, you’ll need to enable the checkbox for this feature.
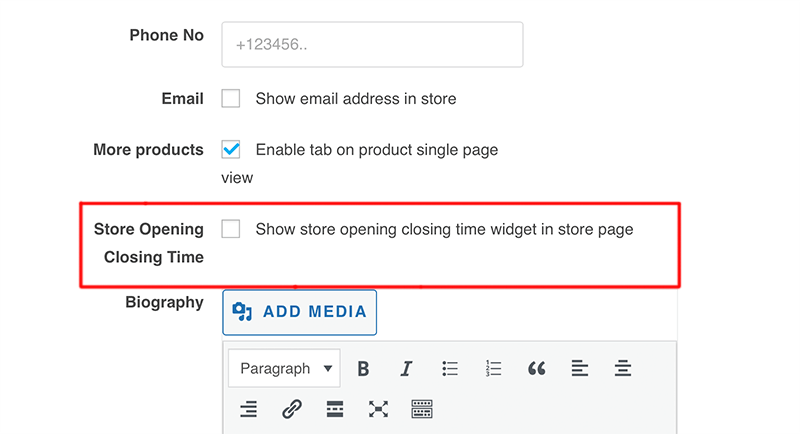
Once that is done, it’ll drop down a list of each day of a week along with the field to set the opening time for the store. When you select Open for the store, it’ll display a slot to set hours of working.
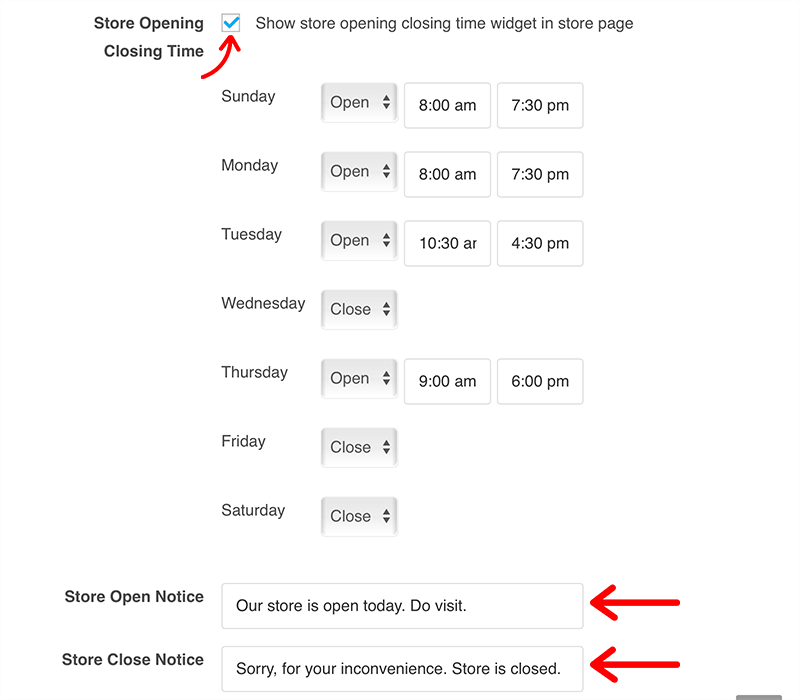
Besides that, you can even customize the notice field for Open and Closed hours too. Then, when you finish configuring, click on the Update Settings button to save it.
Next, when visitors visit your store, they’ll be able to view these notices on the store banner.
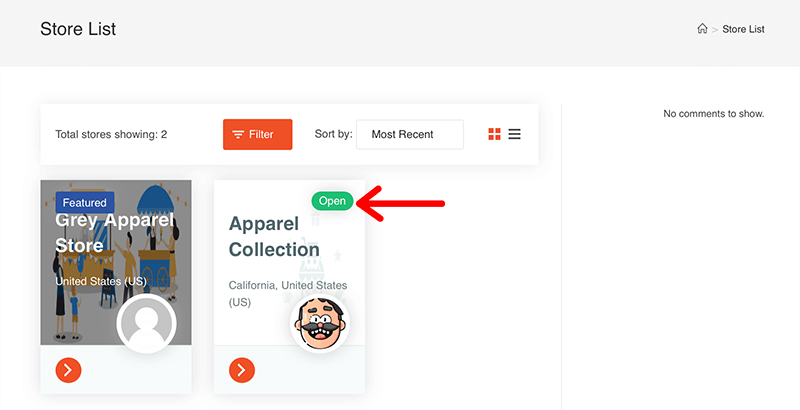
This ends the configuration for setting up the opening and closing hours for your store.
Ok, these are the few of the functionalities that you get with the vendor dashboard.
F. Dokan Compatible Themes
Here let’s check out some of the best multi-vendor WordPress themes that are compatible with the Dokan multivendor plugin.
1. REHub
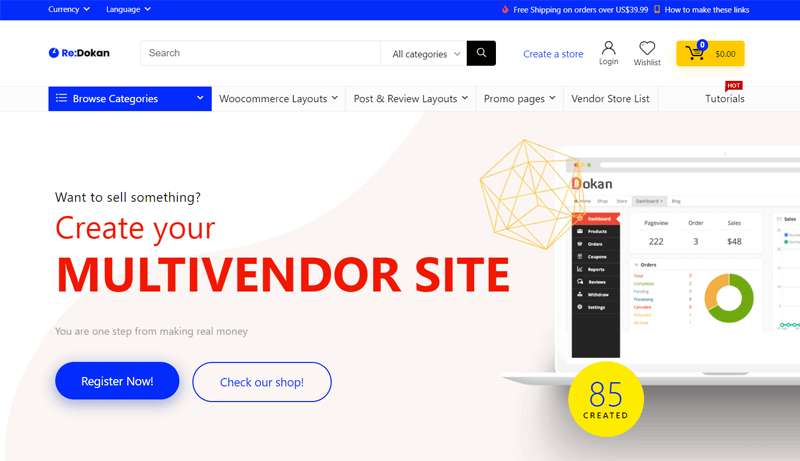
REHub is a popular multivendor marketplace WordPress theme that is super compatible with Dokan. It’s a feature-rich WordPress template that comes with an all-in-one combination of online money-making strategies.
With this theme, you get responsive and customizable layouts including compact special navigation for the vendor dashboards. It comes with a dynamic chart builder that helps you create vendor price comparison in one product and help users to choose the best product.
Likewise, it includes special schema markups to make special product snippets and even some secret schema for advanced snippets. Also, comes with an advanced affiliate function that supports many popular affiliate plugins and import tools too.
2. Marketo
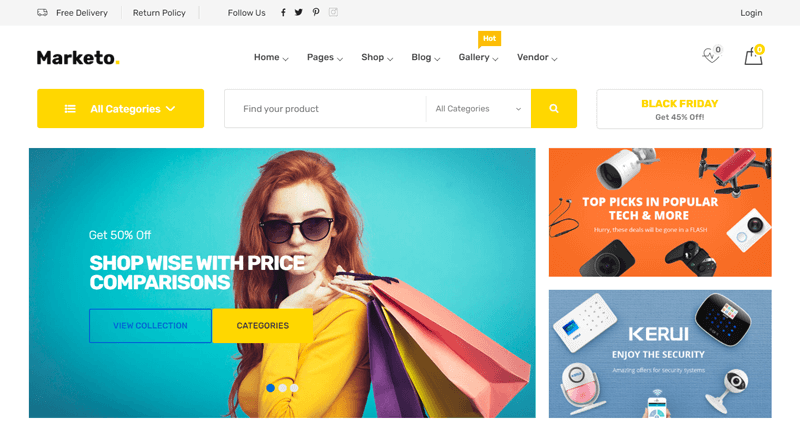
Marketo is compatible with the Dokan multivendor solution. With this combination, you can build your own Amazon, Aliexpress like marketplace in just 30 minutes.
It’s a clean eCommerce multi-vendor theme that contains 11+ homepage designs with fully customizable, and well-organized editable.
This theme has a unique and great function that includes lots of unique Elementor modules and a library of ready templates. Also, you can find 15+ unique headers styles, product details page with the product shop pages, blog page, and so on.
3. Cartzilla
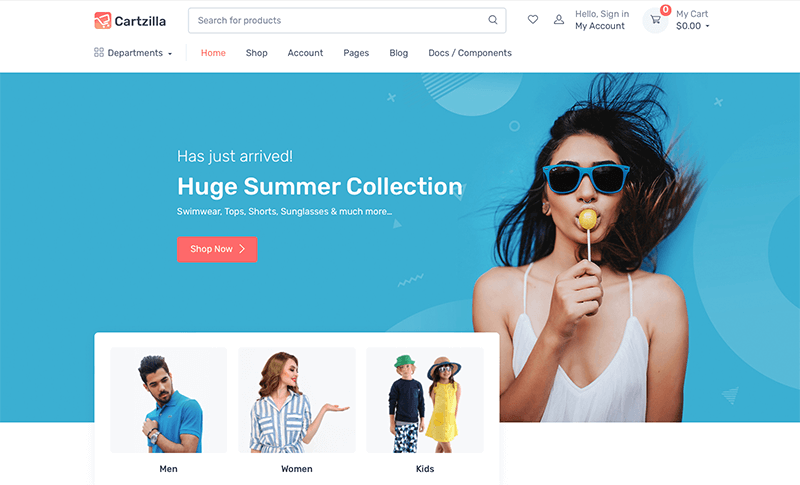
Cartzilla is yet another Dokan-friendly WordPress theme that provides multi-vendor features. It comes with multiple layouts for the home page and product page to give you the best selections in customization.
Similarly, it includes 30+ Gutenberg Blocks to customize our home pages. For a better user experience and load time, Cartzilla offers AJAX products blocks.
Some of its other features include a responsive layout, mega menu, page builder, product quick view, and so much more.
G. Premium Dokan Modules
Dokan modules are used to add more functionality to your multi-vendor marketplace. It provides you with 20+ premium modules that help you enhance the functionality of the plugin.
Therefore, let’s look at some of its premium Dokan modules:
| Modules | Description |
| Table Rate Shipping | Allows vendor create conditional shipping rates |
| EU Compliant Fields | Provides the fields required by EU for both customers and vendors |
| Dokan PayPal Marketplace | Lets you enable all PayPal Commerce Platform (PCP) features |
| Vendor Analytics | Allows vendors to set the analytics for their store right from the frontend |
| Single Product Multivendor | This module allows vendors to sell each other’s products |
| Geolocation | Offers location specific search feature available for your customer |
| Rank Math SEO | Helps you manage your product SEO with an easy-to-navigate front-end dashboard |
| ShipStation | Lets your users take control of their shipping |
| Wirecard | Integrated with popular payment gateway systems i.e. Moip |
| Vendor Staff Manager | Allows your vendor to manage their workforce on the go |
H. Dokan Mobile App
In today’s time, mobiles have become omnipresent, as they’re not only used for daily life communication but also business purposes. Therefore, having a mobile application for your businesses is a must.
When it comes to mobile apps, Dokan has its mobile app called Dokan Mobile App. It lets you turn your marketplace website into a mobile app and let your customers shop smarter.
Dokan Mobile App is a white-label mobile app that lets your customers shop from their iPhone or Android. In this way, your customers can shop online as they are on the go

Some of the features of the Dokan Mobile App are as follows:
- Comes with an interactive slider that lets you manage your banner images of the app whenever you need.
- Customers can create and edit their personalized profiles from the app as they like.
- Allows customers to easily apply for vouchers and view their cart amount before checkout.
- Includes Facebook login feature for effortless register or login process.
- Allows customers to view their order list and check order status anytime with a single tap.
- Offers a wishlist page to allow customers to easily find their favorite items later.
- Comes with an easy checkout system to ensure the correct and proper delivery of the product.
- Allows your customers to shop from different sellers at a time.
- Customers can easily rate and review the vendors directly from the app.
- Lets customers find their desired products by using the search box located on the top of their app interface.
Nevertheless, Dokan Mobile App is a perfect way for any business that is seeking richer engagement and sales.
I. Support Options in Dokan
By far we’ve already known that Dokan is a huge multivendor plugin. It provides you with everything that you need to create your dream marketplace. However, it sometimes becomes quite overwhelming when it comes to using Dokan on your own.
Hence, at such times you need strong support and documentation so that your problems are taken care of.
If you’re using the Dokan Lite, then you must check out the support forum of the plugin in WordPress.org. Here, you can look into different topics that other users have raised while using it. Similarly, you can also create a topic or reply on other topics.
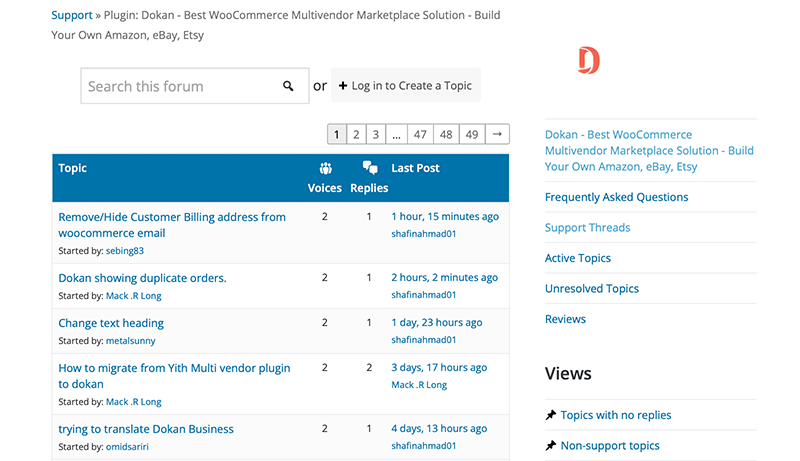
Moreover, for more support options you can go to their official website and click on the Get Help option at the top of the page. There you’ll get a list of support options for you.

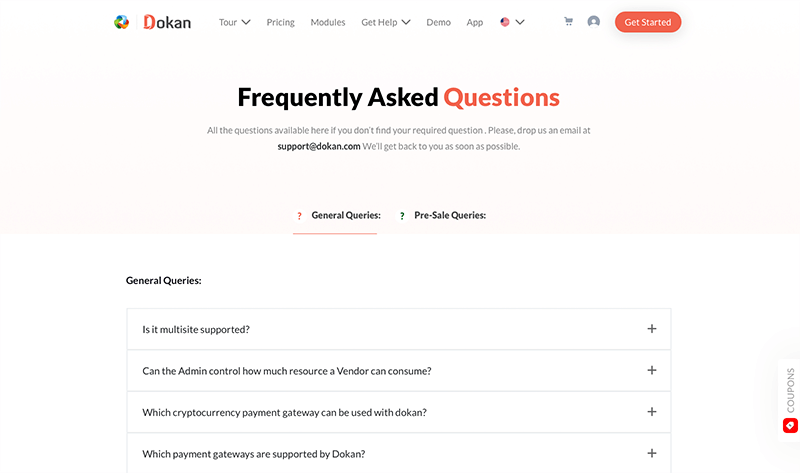
For example, let’s look at the FAQ. Here you’ll find all the answers to all the frequently asked questions. Also, you can drop down your queries through email at support@dokan.com.
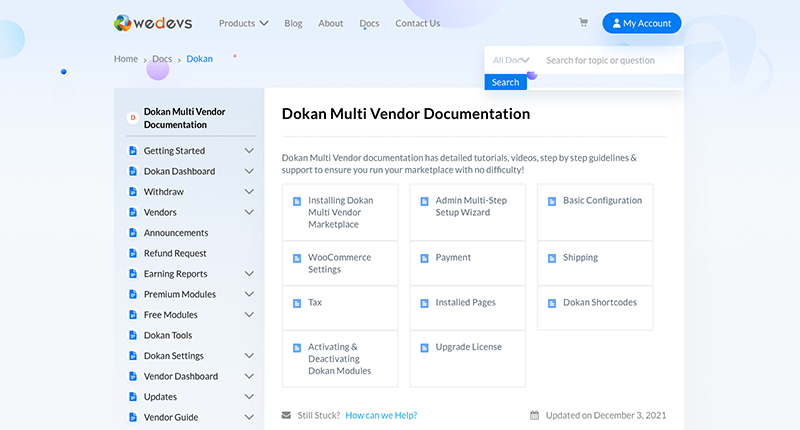
Similarly, you can check out their Docs and look for detailed tutorials, videos, step-by-step guidelines, and more. It contains different tutorials and documentation starting from Getting Started to Dokan Mobile App.
However, if you’re still unable to resolve your issue, then you can submit a Support Ticket. After that, they’ll provide your dedicated support team to take care of your issue. But to do so, you need to log in to the Dokan account.
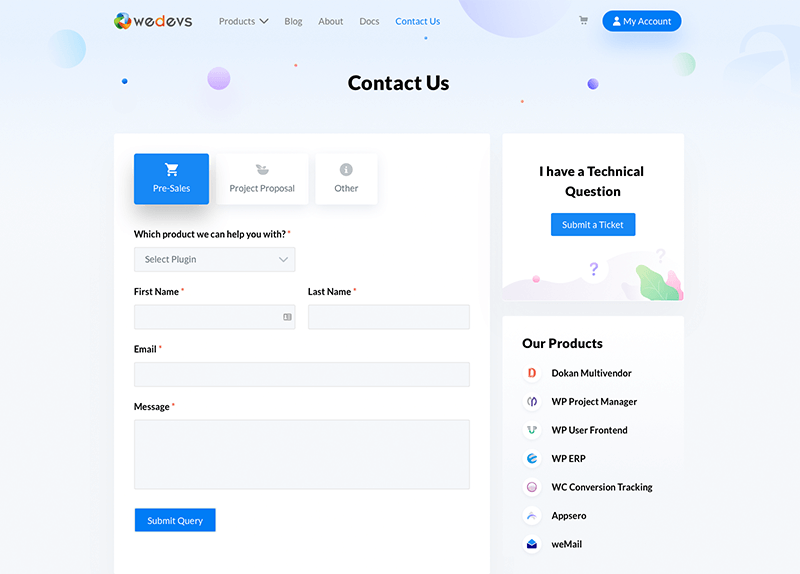
Besides, there’s also a Contact Us option that includes a contact form from where you can send an email to the company. Also, you can connect with them using the social media links on this page.
Lastly, you can use their live chat option for immediate support. Hence, we can say that Dokan support is always there with you throughout your business journey.
J. Dokan Pricing Plans
Just like any other multi-vendor plugin, Dokan also comes with various pricing with several types by businesses in mind. In this way, it makes it quite easier for the users to select their desired pricing plan along with their needs.
By far we’ve already known that Dokan is a freemium plugin. You can download the Dokan Lite from the WordPress.org repository which is always free.
Similarly, for additional features, you’ve to purchase one of its premium versions. As we go through the pricing plans, Dokan seems to offer you four different premium plans.
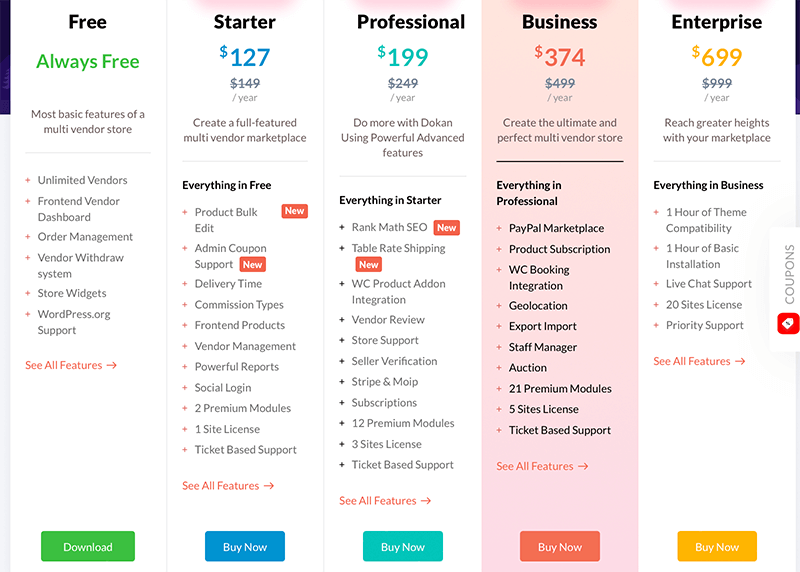
- Starter ($127/year) Best for creating a full-featured multi-vendor marketplace.
- Professional ($199/year) Do more with Dokan using powerful advanced features.
- Business ($374/year) Best for creating the ultimate and perfect multivendor store.
- Enterprise ($699/year) Perfect for those who are looking to reach greater heights with their marketplace.
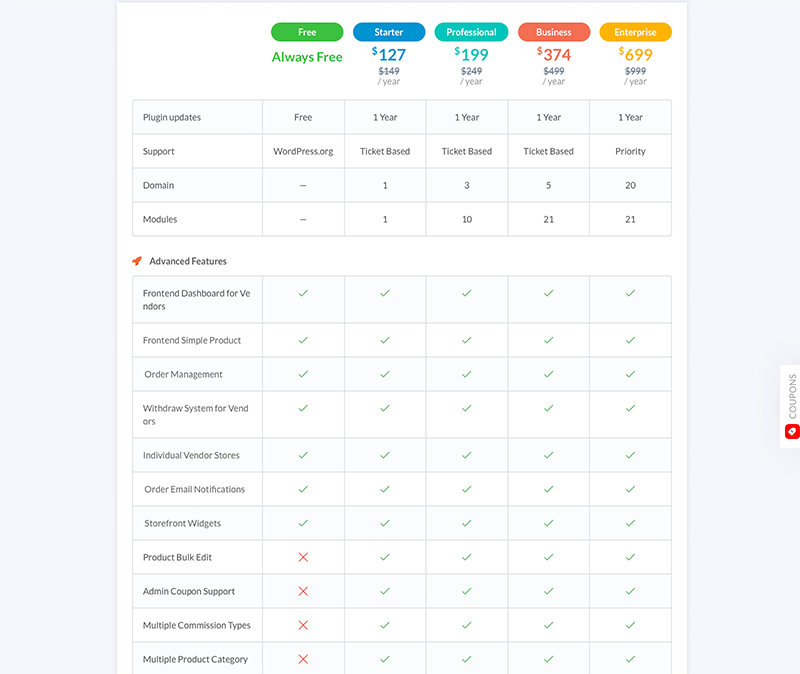
Along with these plans, you get an advanced frontend dashboard for vendors, admin reports, coupon creation, shipping management, storefront widgets, product bulk edit, and more.
However, after purchasing Dokan if you feel that this isn’t the one for you then they offer a 100% refund of your money within the 14-days of your purchase.
Lastly, we’d like to recommend you to start your multivendor marketplace with Starter Plan. Since it’s quite budget-friendly and perfect for those who are starting up with their new online venture.
K. Pros and Cons of Dokan Multivendor Plugin
To sum up, this Dokan review, let’s look at some of its pros and cons in this section.
First, let’s start with the pros:
Pros of Dokan Multivendor
The pros of the Dokan Multivendor plugin are:
- User-friendly front-end dashboard
- Gives vast control over to the vendor on what they want to do with their store
- Comprehensive order management system
- Regularly updated
- Compatible with most of the WooCommerce themes and plugins
- 100% refund of your money within the 14-days of your purchase
- Fully RTL compatible
- Well documentation
Cons of Dokan Multivendor
The cons of the Dokan Multivendor plugin are:
- Quite an expensive pricing plans
- Dokan modules are not available for Dokan Lite
- Needs to improve the support for multi-currency and multilingual shops
- Some beginners may find it hard with the whole setup process
- Not compatible with WordPress multisite system
L. How to Convert Your Store to a Multivendor Platform?
Did you know that you can turn your single store into a multivendor marketplace? It’s a perfect way to give your customers access to multiple vendors under one roof.
The best thing is that you do all these without having to change your current platform. In this way, you can provide a seamless experience to your customer and can convert more visitors into customers.
If you’ve got a store that is running on a WordPress site then you might have also installed WooCommerce too. Because WooCommerce is a familiar name in WordPress as well as helps you easily create a store on your site.
Now the only thing you need for creating a multivendor platform would be installing the Dokan multivendor plugin. Therefore, we suggest you follow the earlier topics that we’ve talked about in this review for more knowledge.
Lastly, we can say that turning a single seller store into a full-fledged marketplace gives a greater opportunity with minimum chance of any loss.
M. Alternatives of Dokan Multivendor
Dokan multivendor allows you to set up a complete online marketplace on your own. Similar to it, there are other alternatives to this WooCommerce multivendor plugin available in the market.
So, let’s check some of the alternatives of Dokan multivendor in this section.
1. WC Vendors Marketplace
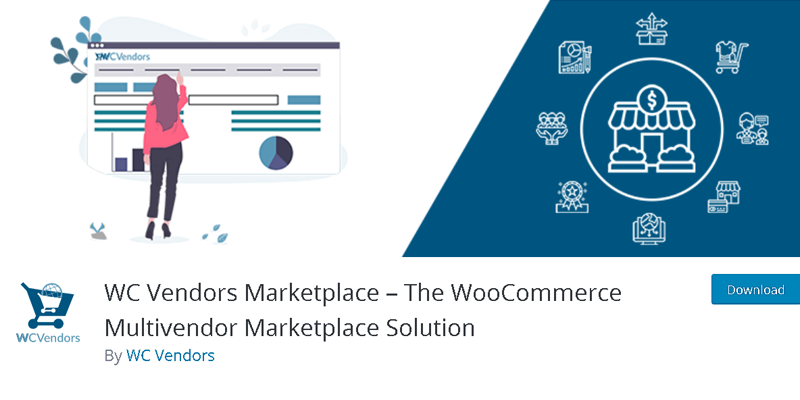
Developed by WC Vendors, WC Vendors Marketplace is a popular multivendor plugin for WordPress. With it, you build your marketplaces with no limitation on the number of vendors.
It comes with a user-friendly dashboard from where vendors can manage their entire store. Moreover, it offers multiple ways to earn money with your marketplace through its advanced commission system.
Plus, it has a comprehensive shipping system that allows the vendors to manage their shipping and set up shipping rates. Also, you can set limits on products, orders, categories, files, and storage for your vendors.
2. WC Marketplace
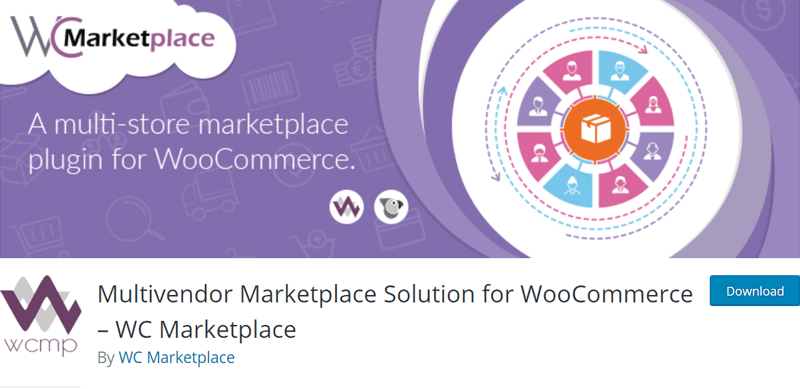
WC Marketplace provides you with the best marketplace software to kickstart your eCommerce marketplace. With this plugin, you get a range of tools that help you operate any kind of marketplace.
It comes with a simplistic vendor registration process and a user-friendly personalized frontend dashboard. Besides, for more revenue generation, it provides a global commission system that you can adjust for specific vendors.
It even comes with “Single Product Multiple Vendor” functionality which means that multiple vendors can sell the same product. Also, provides a wide range of payment options like PayPal, MassPay, Direct Bank Transfer, and Stripe.
3. WCFM Marketplace
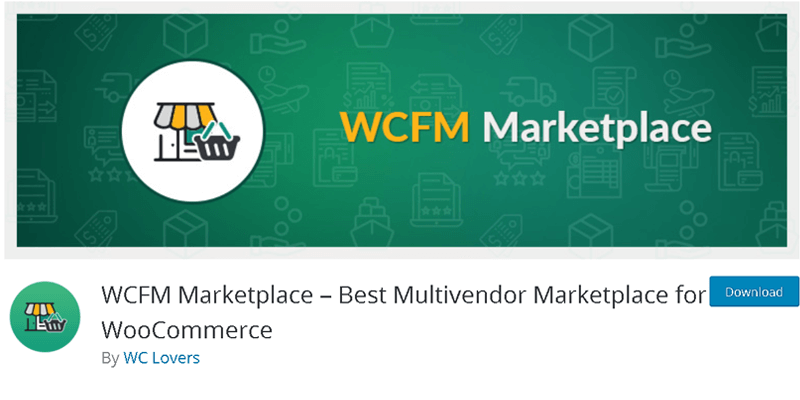
WCFM Marketplace is one of the top-class multistore marketplace plugins for WooCommerce. Developed by WC Lovers it comes with plenty of features that give you overwhelming control over your online marketplace.
You get a magnificent WooCommerce frontend manager with powerful and customized features like refund requests, flexible commission, ledger book, and Stripe Split Pay. Plus, it integrates well with popular WordPress page builders like Elementor to design a beautiful store easily.
Furthermore, it comes with a flexible shipping management tracking system (shipping rates by zone, country, distance, weight). Also, you get live shipment status updates for shipping products.
For more, check out this article on the best WordPress multivendor plugins.
N. Dokan Plugin FAQ
Yes, Dokan is a fully responsive multi-vendor WordPress plugin. It follows a mobile-first approach and displays its content well on mobile and tablet devices too.
To your surprise, Dokan is 100% customizable.
Dokan works pretty well with any WooCommerce payment gateway to withdraw your money. Dokan supports more than 100+ payment gateways for immediate transactions.
With Dokan, the admin can disable product upload options for the vendors. In this way, vendors have to ask permission from the admin to upload the products on the website.
Vendors cannot deactivate their stores. It’s only the admin who can deactivate vendor stores.
Dokan is not compatible with WordPress multisite system. However, if you want to use it on a single subdomain of your multisite installation then it’s possible.
No, Dokan doesn’t allow a single vendor to open multiple stores.
These are just a few FAQs that we’ve covered in this Dokan review. For more detailed queries, you can visit their FAQ page to find the solution to all of your questions.
O. Final Thoughts – Is it the Best WordPress Multivendor Plugin?
With this, we come to an end of the Dokan review and we hope that you’ve already got enough idea about it. And have already decided on whether you should or shouldn’t use this Multivendor WooCommerce plugin.
To sum up, we’d like to say that Dokan is a perfect WordPress plugin to build your multipurpose marketplace. It’s a simple yet powerful plugin that has all the necessary tools for building and sustaining successful online marketplace websites.
So, whether you’re selling your physical goods or digital ones, you can easily do so with Dokan. And managing your stores also becomes easy with this plugin.
However, we recommend you first install and use its free version on your dashboard yourself. In this way, it’ll get to know its functions for a better understanding.
Conclusion
That’s about it. This is a brief review of the Dokan multivendor plugin. We hope that you’ll agree with our review.
If you’ve any further queries about Dokan, then please leave a comment below. We’ll try to get back to you as soon as possible. Also, if you’ve tried using it, then you can also share your experience with us.
Also, check out our article on the best WooCommerce hosting services. And also check out our detailed guide on social media marketing and affiliate marketing. Be sure to go through it once.
If you like this article, then please share it with your friends and colleagues. Also, don’t forget to follow us on Twitter and Facebook.

