Website security is important to protect your site from potential threats. So, you must be careful when you install and setup Wordfence Security in WordPress.
In fact, Wordfence Security is one of the most popular WordPress security plugins with 5 million+ active installations. It offers a range of features, including a firewall, malware scan, and login protection, to keep your site safe and secure.
Installing and configuring Wordfence becomes way simpler if you’ve got the right guidance. We’ve tested it and are here to help you with this step-by-step guide.
So, buckle up your seat belts and get started with Wordfence now!
What is Wordfence Security? Why Use Wordfence for WordPress?
First, let’s get to know the Wordfence Security plugin better.
Wordfence Security is a comprehensive WordPress security plugin. It secures your website from possible hacking attempts, malware, DDoS (Distributed Denial of Service) attacks, and brute force attacks.
Till now, it has 384 million downloads and is still trusted by 5 million websites. Plus, it scores a perfect 4.7 out of 5 stars average rating by over 4K users.
Wordfence is available in both free and premium versions. The free plugin has the necessary features to protect your site. You can upgrade to a premium plan to access advanced capabilities.
So, both beginner and expert WordPress site owners can use Wordfence for their sites. Here are the free and pro Wordfence features showing how it’s one of the must-have plugins for WordPress:

Web Application Firewall (WAF)
- WAF monitors and filters your website traffic to help you block suspicious or malicious IPs and requests.
- Offers 599 firewall rules and 5,623 malware signatures in the paid plans.
- Lets you block the most malicious IPs at the moment to reduce load.
- Includes brute force protection by limiting continuous login attempts.
Malware Scanner
- Checks if your WordPress files, themes, and plugins have harmful code or made any unauthorized changes.
- Goes through bad URLs, SEO spams, and malicious redirects.
- Scans your site for known vulnerabilities and alerts you for potential issues.
- Checks your files, posts, and comments to maintain content safety.
Login Security
- You can set up 2FA (Two-Factor Authentication) for secure logins.
- Lets you add CAPTCHA to the login page to prevent bots from logging in.
- Password security by ensuring admins don’t use compromised passwords.
Audit Log
- The premium plans let you monitor changes and actions made on your site.
- Lets you configure all or certain events to only log.
Wordfence Central
- Easily manage multiple websites from a single location to maintain security.
- Use templates to quickly configure Wordfence on websites.
- Get alerts on crucial security events right on the dashboard.
Security Tools
- Country blocking premium feature lets you block requests from a country.
- Block IPs or set advanced rules to stop requests from certain IP details.
- Monitor hack attempts and visits on the Live Traffic tool in real-time.
Now you know the basics, so let’s dive into the installation process.
How to Install Wordfence Security in WordPress?
Installing Wordfence Security has the similar process like any other WordPress plugin. Here, we’ll show the steps required for its free version.
If you purchased a premium plan, then check out the guide on how to install a WordPress plugin on our blog. Now, let’s jump right into it!
Step 1: Install and Activate the Plugin
First, log into your WordPress dashboard. There, navigate to the ‘Plugins > Add Plugin’ menu. Now, search for the ‘Wordfence Security’ keyword. Once you find the plugin, click the ‘Install Now’ button.

Afterward, press the ‘Activate Plugin’ button.

This installs and activates Wordfence on your WordPress website.
Step 2: Install the Free License
Now, a pop-up appears where you must click the ‘Get Your Wordfence License’ button.

This opens a different page for license registration on the Wordfence website. There, you’ll find various free and premium options. Among them, let’s get Wordfence FREE and click the ‘Get a Free License’ button.

Next, a confirmation message shows the limitations of using the free plugin. If you want basic and essential security features, then go with the free plan. Just click the ‘I’m OK waiting 30 days for protection from new threats’ option.

After that, enter your email address so that you’ll get the license key. Further, pick between ‘Yes’ and ‘No’ regarding to receive security alerts on your email.
Once you agree to the terms and conditions, hit the ‘Register’ button.

With that, open the email you got for the registration license key. There, just hit the ‘Install My License Automatically’ button.

Moving forward, your WordPress site opens up with the ‘Install Wordfence’ section. Here, there is automatic addition of your email and license key. So, all you need to do is press the ‘Install License’ button.

Once Wordfence is active on your site, click the ‘Go to Dashboard’ button.

That’s how to install Wordfence Security in WordPress. Now, move ahead to its configuration.
How to Setup Wordfence Security in WordPress?
After the license activation, you’ll land up in the ‘Wordfence > Dashboard’ menu. There are quick options for firewall, malware scan, and other tools.

But let’s go step-by-step and learn how to setup Wordfence Security in WordPress.
Note that this guide recommends possible settings for personal or small business websites. Such sites have user interactions from contact forms and blog comments. The traffic flow on such sites are low to average (around 1K visitors per month).
Hence, such websites can face brute force attacks, spam comments, outdated software risks, and malware. Keeping that in mind, the suggested configuration settings are provided.
According to your website niche and brand, you may require a different setup of Wordfence settings. Only with that, you may be able to secure your WordPress site.
Without further delay, let’s start!
Step 1: Manage Wordfence Firewall
The first step involves managing the firewall. So, go to ‘Wordfence > Firewall.’ Now, press the ‘All Firewall Options’ section to access every setting in one place.

I. Basic and Advanced Firewall Options
At the top, you’ll find the ‘Basic Firewall Options.’ By default, your WAF status is set to ‘Learning Mode.’ After a week, it’ll automatically enable the firewall. So, make sure the status is ‘Enabled and Protecting’ later.
Next, click the ‘Optimize the Wordfence Firewall’ button.

On the pop-up, Wordfence lets you download your current .htaccess file as a backup. So, press the ‘Download .htaccess’ button. Once the download process finishes, hit the ‘Continue’ button.

With that, Wordfence will update your .htaccess file which makes it run before WordPress. When you’re back to the firewall options page, the basic protection level will be converted to extended protection.
Following that, open the ‘Advanced Firewall Options’ tab. There, you can:
- Let only process firewall rules work at first and not the IP blocking.
- List the allowlisted IP address that can bypass every rule.
- Add the URLs to block IPs trying to access it. For instance, the login URL.
- Mention the IPs that Wordfence WAF can ignore when sending alerts.
- Enable or disable the different rules set by WAF.

II. Brute Force Protection
Next, open the ‘Brute Force Protection’ tab. This feature limits login attempts to protect your website by not compromising login credentials.
This security issue can occur on any website even if there’s differences in the type of content or its traffic flow. So, begin by enabling this feature and then set up these possible options (ideal for personal or small business sites):
- Lock out after 3 login failures.
- Lock out after 3 forgot password attempts.
- Count failures over 5 minutes of time period.
- A user is locked out for 10 days.
Other than this, it’s best to tick mark all the other options in this section. This involves locking out invalid usernames and checking password strength on profile updates. Hit the ‘Save’ button so that the settings get saved.

Here’s the complete guide on how to protect WordPress from brute force attacks.
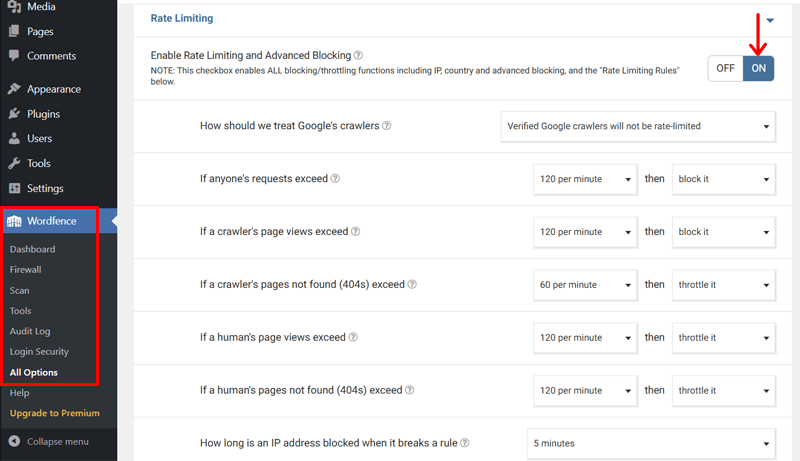
III. Rate Limiting
Next, let’s set up the ‘Rate Limiting’ tab. This function lets you control how often a user or crawler can make requests to your website or server in a defined period.
So, you must enable this feature and configure the given options as you want:
- If anyone’s requests exceed 120 per minute, then block it.
- If a crawler’s page views exceed 120 per minute, then block it.
- If a crawler’s pages not found (404s) exceed 60 per minute, then throttle it.
- If a human’s page views exceed 120 per minute, then throttle it.
- If a human’s pages not found (404s) exceed 120 per minute, then throttle it.
- Block an IP address for 5 minutes when it breaks a rule. And more.
As mentioned before, configuration of the settings can vary based on your website.
IV. Allowlisted URLs
Following that, let’s move to the ‘Allowlisted URLs’ tab. Here, the list is made when in the Learning Mode or automated false positive identified. But that’s not it.
Suppose there are URLs or parameters with their action or request identified not secure by Wordfence Firewall. But you recognize that they are false positives.
In that case, you can add them to this allowlisted list, so that they are not tested by firewall. Just you need to insert the URL, pick the Param Type, and add the Param Name. Then, click the ‘Add’ button, followed by the ‘Save Changes’ button.

This completes the setup process for WAF. Now, let’s jump into the next setting.
Step 2: Configure Scan Options and Scan the Website
Moving forward, let’s navigate to ‘Wordfence > Scan.’ There, press the ‘Scan Options and Scheduling’ button.

Now, you’ll get the following scan options to configure.
I. Scan Scheduling
Here, you can enable the scan scheduling feature. Then, pick to let Wordfence scan your website whenever required. For a manual schedule, you need a premium plan.
Further, there are 4 basic scan options. They are limited, standard, high sensitivity, and custom scan. It’s recommended to use the standard scan, but you can also go for a custom scan so that the scan occurs after a change in configuration.

II. General Options
In this section, you can enable and disable various scan options. For example:
- Scan core files against repository versions for changes.
- Scan file contents for malicious URLs.
- Scan for signatures of known malicious files.

III. Performance Options
Here, you can optimize scans for your server’s resources. So, you can:
- Enable low-resource scanning to reduce server load.
- Adjust email alert limits for scan results.
- Set time or memory limits.
- Configure execution time per scan.

IV. Advanced Scan Options
Lastly, opening this section lets you fine-tune advanced abilities of scanning, like:
- Exclude files using wildcard patterns (text strings to match filenames)
- Add custom scan signatures
- Force IPv4 for scan starts.
- Configure scan resume attempts.
Don’t forget to hit the ‘Save Changes’ button. Then, press the ‘Back to Scan’ option.

V. Scan the Website
Now, press the ‘Start New Scan’ button. You can find the progress of the scan, including checks completed for spam, blocklist, file changes, malware, etc.

After this process completes, Wordfence provides the results. If there’s anything that’s identified as not secure, then you can:
- First, check its details.
- Ignore not essential issues identified.
- Click the ‘Repair All Repairable Files’ button to take action.
- Press the ‘Delete All Deletable Files’ button to delete all the files.

Step 3: Block Suspicious IPs and Other Additional Tools
Next, let’s check out how to set up Wordfence tools. Navigate to ‘Wordfence > Tools’ and you’ll find these settings.
I. Live Traffic
Before checking the live traffic, pick which traffic to log and ignore. You can:
- Choose to enable traffic logging mode for all traffic or security purposes.
- List usernames to ignore (use comma to separate them).
- Maximum number of live traffic data to store.
- Maximum days to save the live traffic data. And more.
Save the changes once you’ve finished editing the settings.
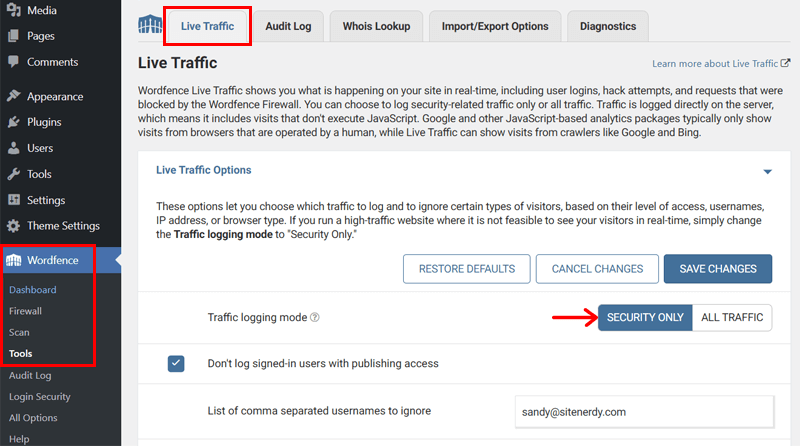
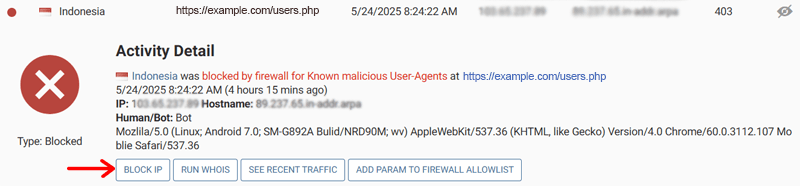
Below that, you can check out the IPs that are categorized to be human, bot, warning, or blocked. As we chose the ‘Security Only’ mode, the list contains login and firewall activities.
Other than the human categorized IPs, the remaining ones can possibly be bots and suspicious people attacking your site. So, you can take action by clicking the ‘View’ icon on the request.
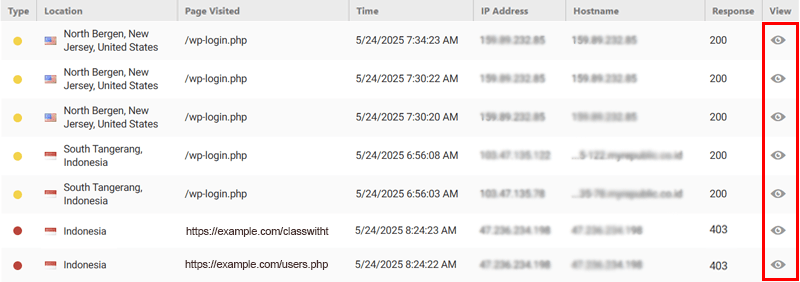
There, you can perform multiple actions. But if you’re sure enough to block those suspicious IPs, then click the ‘Block IP’ button. With that, there won’t be any further request or activity from that blocked IP.
II. Whois Lookup
Add the IP or domain of a suspicious agent on your site to the text box and click ‘Look Up IP Or Domain.’ This tool shows additional information related to your input. For example, entering the IP provides hostname, contact information, etc.

III. Import/Export Options
This tab lets you export your website’s Wordfence options by clicking the ‘Export Wordfence Options’ button. Now, you can import them to another website.
Similarly, you can also import Wordfence options from another website. Just add the token and click the ‘Import Wordfence Options’ button.

IV. Diagnostics
Here, you can check out several details about your website. This even involves identifying the Wordfence version installed to your WordPress site.
In fact, you can set up some of the settings, for example, the debugging options. Once you’re done, save the changes.

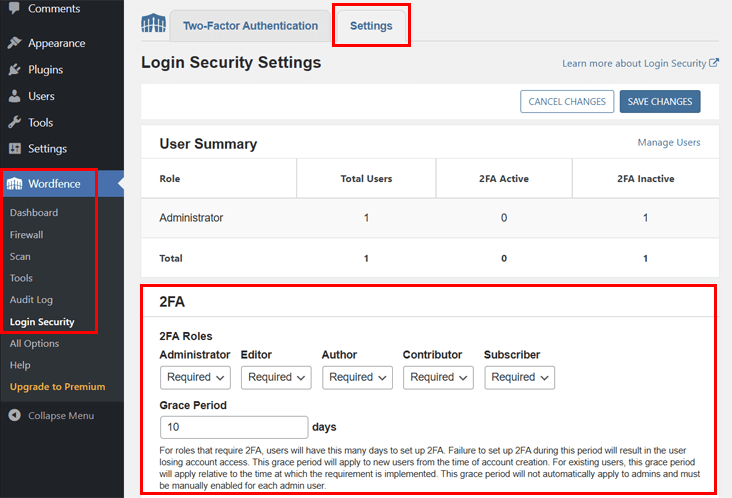
Step 4: Setup Login Security
Move on to ‘Wordfence > Login Security > Settings.’ Here, you can set up many aspects of security for your login page and functionality. Let’s configure them.
I. 2FA
Before enabling 2FA, you must perform these actions:
- Set the 2FA roles. You can pick Disabled, Optional, or Required to establish 2FA on every user role. We recommend choosing ‘Required.’
- Enter the grace period. By default, your users must configure 2FA on their accounts within 10 days.
- Enable or disable remembering the device for 30 days after 2FA setup.
- Require or skip 2FA for XML-RPC calls that require authentication.
- Disable XML-RPC authentication to not let login attempt.
If you need a detailed guide, then check out how to enable 2FA on WordPress.
II. WooCommerce and Custom Integrations
Next, move to the configuration options for WooCommerce. Here, you can:
- Add reCAPTCHA and 2FA to WooCommerce login or registration forms.
- Put a 2FA menu on the account page of the WooCommerce site.
- Enable the use of shortcode to embed 2FA settings on custom pages.
- Show 2FA settings in a vertical list instead of side-by-side columns.

III. reCAPTCHA
After that, you can turn on invisible reCAPTCHA v3 to try stopping the bots without the use of annoying puzzles. Just get and add the free Site Key and Secret from Google. Then, put a score threshold for differentiating humans and bots.
With that, a simple but effective reCAPTCHA can fail the bots silently as real users can verify themselves through the email received. You can also use it in the test mode.

Here’s a tutorial on how to add CAPTCHA in WordPress forms for free.
IV. General
In this section, you can add multiple allowlisted IPs to skip 2FA or reCAPTCHA. Plus, you can enable NTP Time Sync to keep 2FA codes accurate.
In addition, it lets you show last login time or user CAPTCHA scores. And even wipe all 2FA data after plugin removal. Lastly, press the ‘Save Changes’ button.

Step 5: Configure Global Options
Apart from them, you’ll find some global options in the dashboard. Go to the ‘Wordfence > Dashboard’ menu and click the ‘Global Options’ setting.

These are the various global options to work with:
- View Customization: Show Blocking and/or Live Traffic menus.
- General Wordfence Options: Choose to update automatically, add the email for getting alerts, pick the way Wordfence receives IPs, and more.
- Dashboard Notification Options: Specify whether you want to get notifications on your dashboard about updates and scan status.
- Email Alert Preferences: Configure when you want to get alerts, for example, plugin deactivation, scan results, lost password, etc.
- Activity Report: Get a report for the summary once a week or when and show it as a widget in the dashboard or not.
After you set up these options, click the ‘Save Changes’ button.

That’s how you install and setup Wordfence Security in WordPress. Congratulations on getting a more secure website.
Check out the complete guide on how to secure a website.
Frequently Asked Questions (FAQs)
Check out these FAQs if you have questions on your mind.
1. Is Wordfence Security compatible with other WordPress themes and plugins?
Yes, Wordfence Security is compatible with most WordPress themes and plugins. However, there are some rare cases in which a conflict arises because the plugin or theme is poorly coded. So, make sure to test the settings to check compatibility.
2. How often should I run malware scans with Wordfence?
You should run malware scans on your website with Wordfence on a regular basis (daily or weekly) for optimal security. If your site is updated or has high traffic, then run scans more frequently. Just adjust the scan frequency on its settings.
3. How do I restore my website if Wordfence detects malware?
First, Wordfence notifies you of detected malware. With the free plugin, you’ve to manually clean up the malware or restore your website from a backup. If you’ve the premium plugin, then you’ll get the real-time malware removal support.
4. Can I use Wordfence on multiple WordPress websites?
Of course, you can use Wordfence on multiple WordPress websites. Its premium version offers a multi-site license that lets you manage security across your sites from a single dashboard.
5. Can Wordfence detect vulnerabilities in my WordPress themes and plugins?
Indeed, Wordfence scans for vulnerabilities in themes, plugins, and core files of your WordPress website. So, you’ll get alerts if any vulnerability is detected to take immediate action.
Final Thoughts
That’s how you install and setup Wordfence Security in WordPress!
The free plugin is easy to install and configure on your site. If you want advanced capabilities with multisite support, then buy and configure its premium version.
Got stuck? Then, comment down your confusion. Let’s secure your site together.
In addition, check out our security guides on how to prevent DDoS attacks on WordPress, eCommerce security, and update WordPress to the latest version.
Lastly, follow us on Facebook and X to get updates on our latest content.
YOU MIGHT ALSO LIKE...
We've picked you some best articles that you might be looking for. Check them now!