Are you wondering how to install a WordPress plugin? If so, then you may be also worried about what to do after installing a plugin. Worry not! This guide will help you!
In simple words, WordPress plugins are tools that add extra functionality to our existing system. This allows you to add many more features to your WordPress like contact form, page builders, shopping cart, and more.
But if you’re a beginner, then you may not have an idea of how to install WordPress plugins. So, in this guide, we’ll explain the step-by-step process of installing a WordPress plugin.
A) Things to Remember Before Installing a Plugin

Before you start searching for a plugin, you want to be clear about what features you want for your website. So, the best thing would be to make a checklist of features that you’re trying to find within the plugin.
For example, if you’re running an eCommerce store then search for plugins that might help you grow your email list or increase your sale. Similarly, search for plugins that might create an excellent user experience, and also test and analyze your performance.
Once you have made a list, you can go to the WordPress Plugin Directory or the other plugin stores to find the plugin you would like. Now while choosing the right plugin always make sure to look out for the following key points:
- Always search for the plugin that has good user ratings.
- Make sure to go through the user reviews section and see what other users have to say about that plugin.
- Try to look out for its total number of active installations, as the higher the numbers, the more it’s trusted by the community.
- Look for when was the last time it had been updated.
- Lastly, do they provide you strong user support or not with an active support forum.
For more, check our article on How to Choose the Best WordPress Plugins for your Website?
Now let’s start with how to install a WordPress plugin on your website.
B) How to Install a WordPress Plugin?
We described here 3 different methods to install a WordPress plugin. Go with the easy method and that one is from the admin dashboard.
1. Installing Free Plugins from Dashboard
This is the easiest way to install any free WordPress plugin for your website. That’s because you can access the WordPress plugin directory right from your WordPress dashboard.
Now let’s go ahead and see how it’s done.
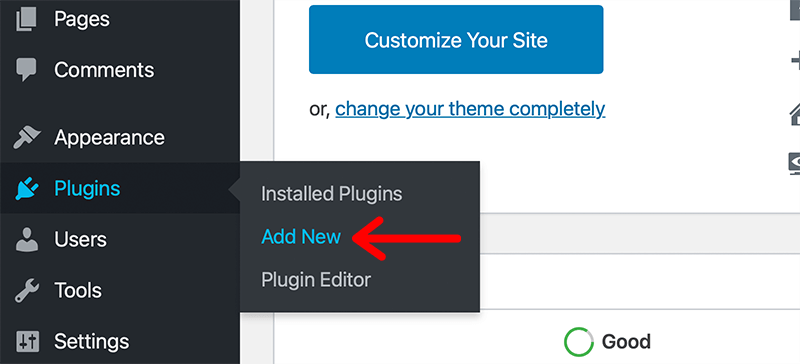
Step 1: Firstly, login into your WordPress dashboard and then go to Plugins > Add New.
Step 2: At the very top, on the right-hand side, you would see the search field. And there you can search for the name of the plugin that you want to install. For example, we have searched for the WPForms plugin. You can also search the plugin with author names and tags.
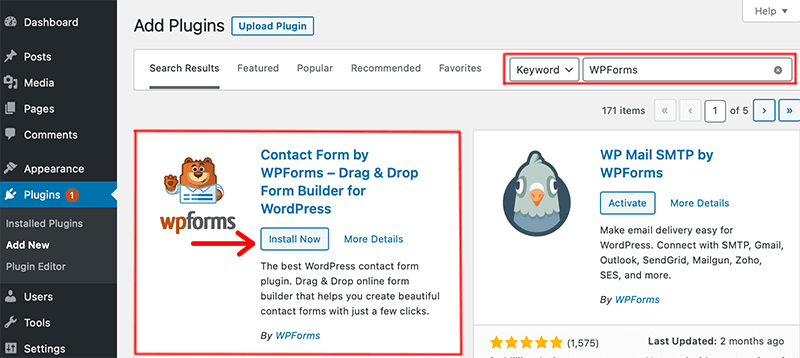
Step 3: Click Install Now button.
Step 4: After installing it, click on the Activate button.
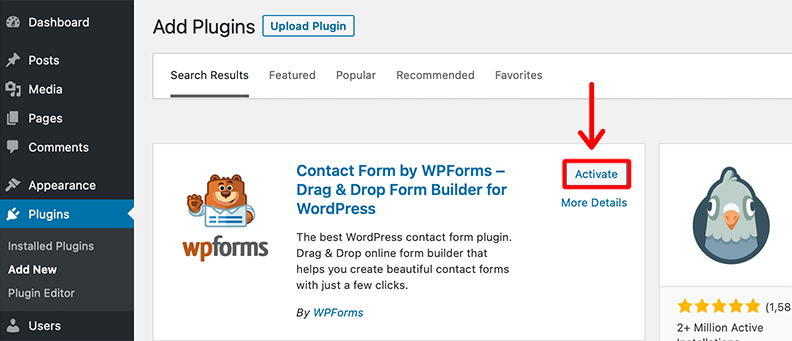
That’s it! Now the free WordPress plugin WPForms is fully installed on your website.
As you can see, it takes just a few steps!
2. Installing Premium Plugin from Upload Method
The first method is not applicable for installing premium/paid plugins. Because these plugins are not available in the WordPress plugin directory. Hence, it’s not accessible from the WordPress dashboard.
Therefore, there is another method called Upload Method in WordPress for installing those premium plugins. Here’s how you install it:
- Firstly you need to purchase the plugin that you want for your website. For example, if you want to use the premium version of WPForms, go to its official site wpforms.com and purchase it.
After checkout is complete, download the plugin file to your computer. Make sure that it’s in .zip format for easy upload.
- Login to your WordPress dashboard and then go to Plugins > Add New.

- At the top of the page, you would see the “Upload Plugin” button and then click on it.
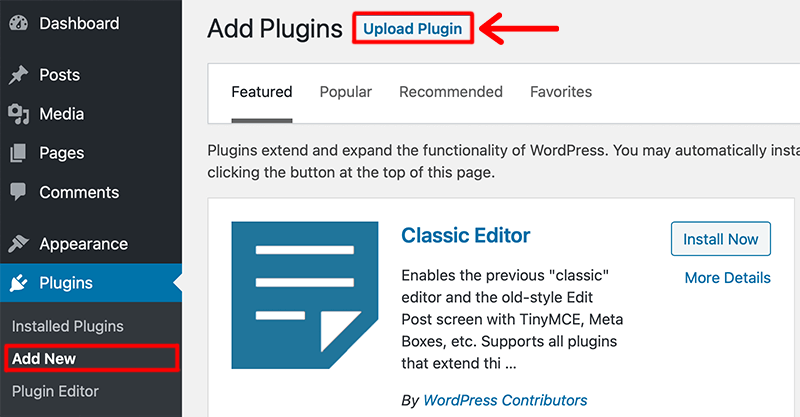
- After that, click Choose File and select the plugin file that you have downloaded earlier from your computer. Here we have uploaded the WPForms Pro zip file.
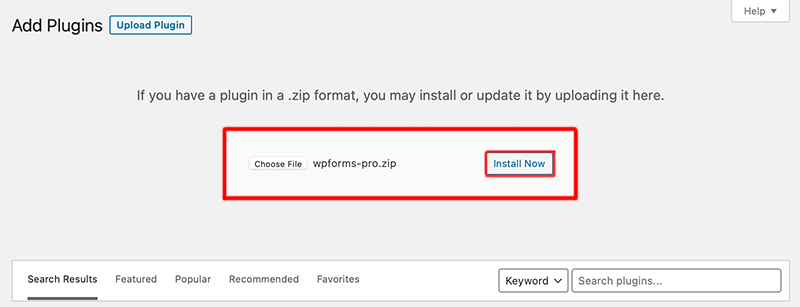
- Click on the Install Now button.
Wait until the installation is complete and then click on the Activate Plugin button
Pretty simple right? Well, this is how you install a premium plugin into your WordPress site.
3. Installing a Plugin Manually via FTP
Sometimes you may not be able to directly install plugins from your WordPress dashboard. So in that case you might need to install a plugin via the FTP method.
FTP (File Transfer Protocol) is a set of rules used for transferring files from one system to another over the internet. This method seems to be slightly less user-friendly for beginners. As you need to know how to configure an FTP client.
Here’s how you install plugins manually via FTP:
Step 1: You need to download the plugin file in zip format. You download most of the free plugins from the WordPress.org plugin directory. In the case of paid plugins, you should buy them and only then download them.
Step 2: You need to establish an FTP connection. Before that, you must know your FTP login credentials. If you don’t know your FTP credentials then contact your web hosting provider.
Step 3: Now connect the FTP client to your website using login credentials. We recommend using FileZilla software for transferring files over the internet. After that, go to the /wp-content/plugins/ folder on your website.
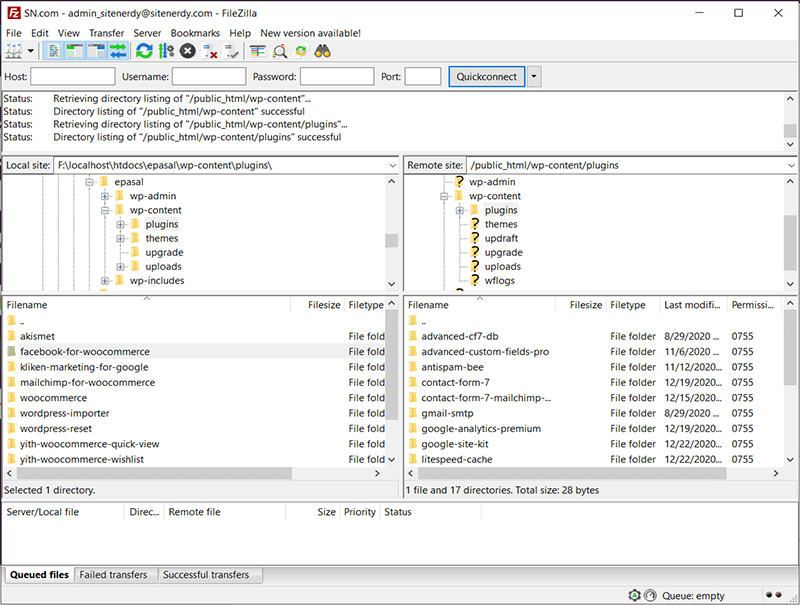
Step 4: Drag and drop the unzipped plugin folder to the /wp-content/plugins/ folder on your website.
Step 5: After uploading the files, go to the Plugin page from your admin area. Then, Activate the plugin that you have just uploaded and you’re done!
Therefore, these are the three different methods for installing a plugin into WordPress.
C) What to Do After Installing a Plugin?
Now after installing a plugin, many people have a query about what they should do after installing the plugin. Hence, let’s talk about what to do after installing a plugin.
In this guide, we’ll explain how to install UpdraftPlus and how to use it at the same time. Step by step guide to using UpdraftPlus.
i) How to Install the UpdraftPlus Plugin?
It’s quite simple to install UpdraftPlus as it just takes a minute or two to install it. Here are the steps to follow:
- In your WordPress dashboard, go to Plugins > Add New.

- Type UpdraftPlus in the search field.

- Look for the UpdraftPlus WordPress Backup Plugin and click on the Install Now button.
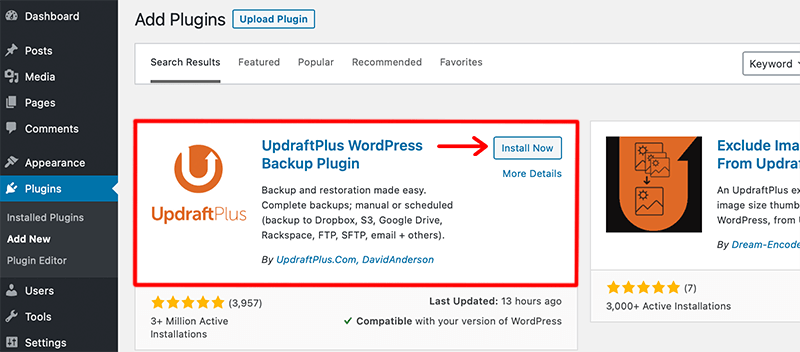
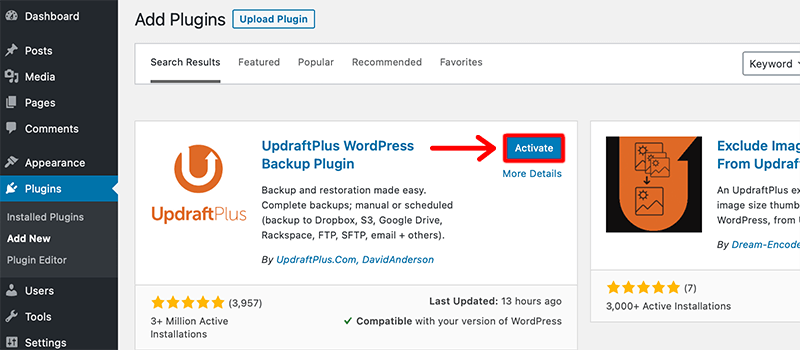
- After that, click on the Activate button. That’s how you install the UpdraftPlus plugin.
ii) How to Use UpdraftPlus Plugin?
Always remember that all plugins will not work straight out of the box. Therefore, you might need to configure some settings for that plugin. Once, you have installed a plugin, you can find access to its settings within your WordPress menu.
If any problem occurs while setting up a plugin then most plugins have provided support materials to help you with the setup process. Make sure to go through it.
Hence, in this article, we have tried to show you how you can find the setting of the plugin and then set it up for your site. We have tried to explain it using UpdraftPlus as an example.
Now once you have installed the plugin, all you need is to set up your WordPress for a backup. For that all you need to do is follow these simple steps:
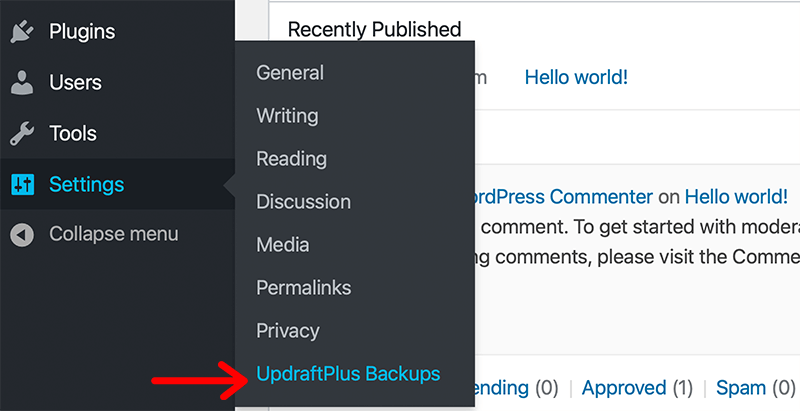
- Inside your WordPress dashboard, go to Setting > UpdraftPlus Backups. And it’ll open your UpdraftPlus setting page.
- Click on the Setting tab at the top.
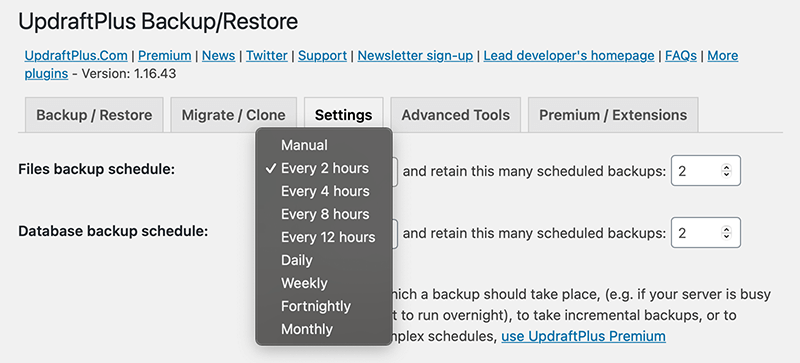
Here you can schedule how often you want to UpdraftPlus to create a new backup. For example, if you regularly update your website, then frequently backing up your data/files is a must. Hence, you can pick whatever Backup schedule you want for your website.
You can also select how many of those backups you want to store at a time. Always remember that any new backups will override the older ones.
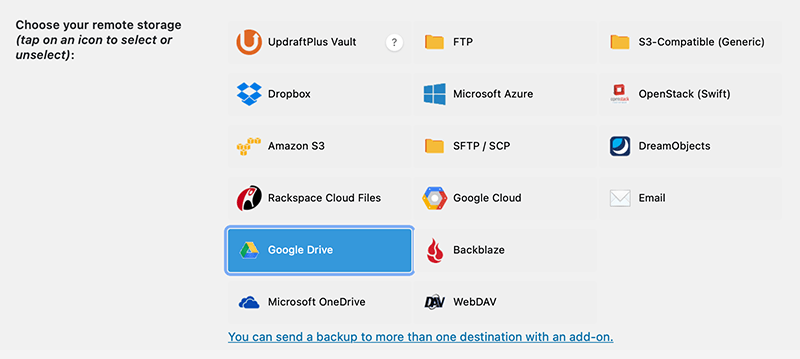
- Scroll down the page and select where would you like your backups to be stored. Here we have selected Google Drive as our remote storage location for backing up our files.
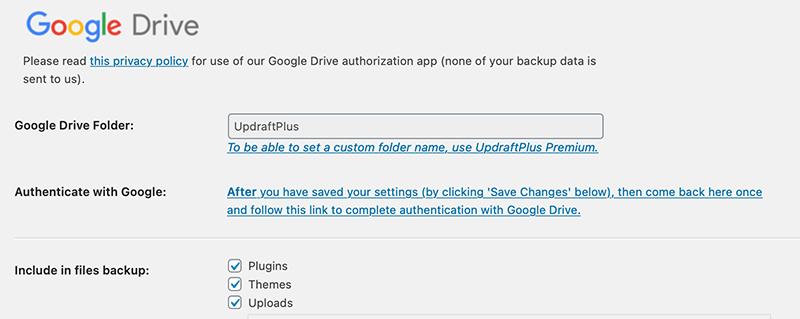
- After that, just below that, you would see the sets of instructions for that individual storage option. All you need to do now is follow the instructions as per your need.
- At last, click on the Save Changes button at the bottom of the page.
Now you’ve set up your location storage and other settings, UpdraftPlus will automatically carry out its first site backup without your help.
D) How to Update WordPress Plugins?
It’s very important to keep your plugin up to date because those plugins are created by third-party developers. So, they keep on trying to improve their plugins by adding new features and improving their code quality. Hence, if you want to ensure that those changes are applied to your site then you must update your plugins regularly. This also improves the performance and security of your website.
For your luck, WordPress comes with a built-in update system. So it automatically checks for updates and if there are any then it’ll show the notification on your dashboard.
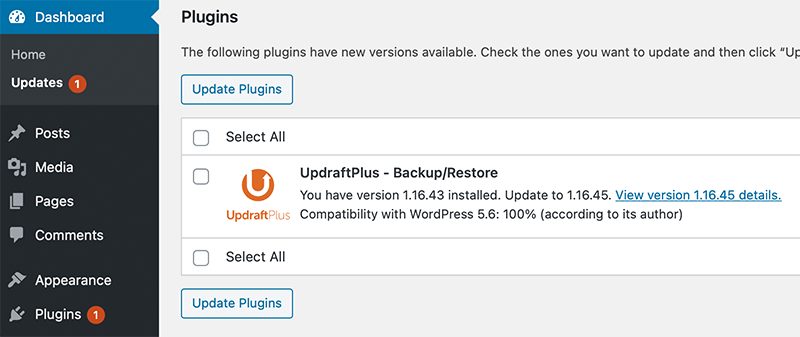
Hence, you can manually check for updates by going to the Dashboard > Updates page and scroll down to the Plugins section. After that, select the plugin you wish to update and click on the Update Plugins button.
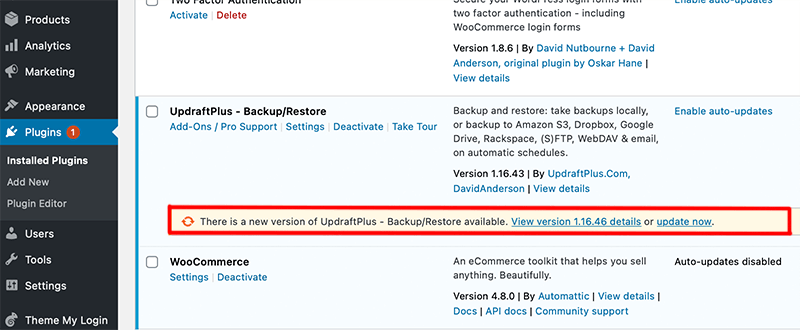
You can also update plugins by visiting the Plugins page too. If there are any new updates then you’ll see a notification below each outdated plugin. Now you can simply click on the Update Now link to install updates.
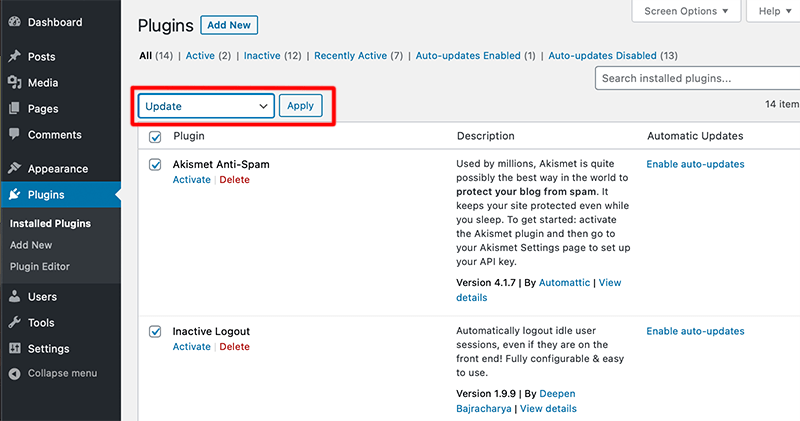
Lastly, you can also update several plugins at the same time on your site. To do so you need to select all the plugins and use the Bulk Action dropdown list. There you’ll select an option called Update and then click on Apply.
E) How to Uninstall a WordPress Plugin?
Uninstalling a WordPress plugin is super easy from the admin area. As you just have to log in to your WordPress dashboard and go to the Plugins page. There you can find a list of plugins that are currently installed on your site. After that follow the following steps to uninstall a plugin from WordPress:
- Find the plugin that you want to uninstall.
- Click on the Deactivate link just below the plugin title. This will deactivate/inactive the active plugin without permanently deleting it from the site.
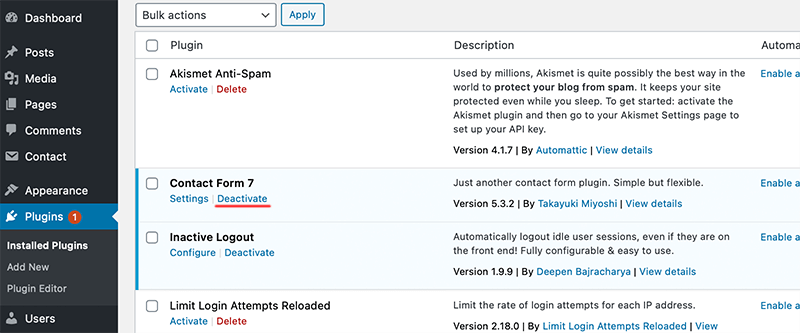
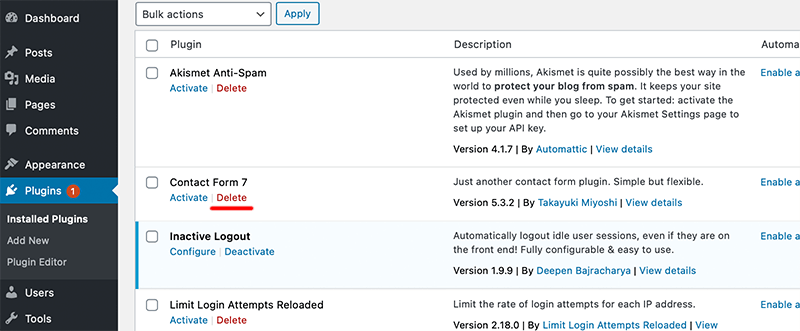
- After that, the Delete link will now appear just below the plugin title. Then click on that link to completely uninstall the plugin.
- At last, WordPress will ask for confirmation whether you want to delete the plugin. You just need to click on OK and then it’ll safely remove the plugin from your site.
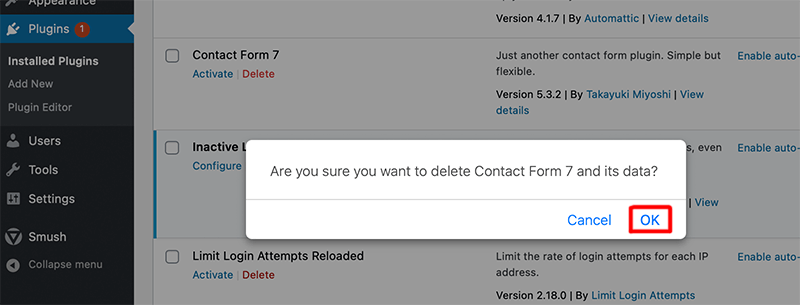
Bang! That’s how you successfully uninstall a plugin from your WordPress site.
FAQ
Here are some frequently asked questions about installing WordPress plugins.
Why can’t I install plugins in WordPress.com?
You cannot install plugins on WordPress.com because it’s a self-hosted WordPress software. So, you cannot install any external plugins from third-party developers unless you upgrade to their business plan.
See our complete guide on the difference between WordPress.com vs WordPress.org for more detail.
How can I find plugin support?
Most of the plugin comes with their setup documentation for a smooth setup process. If you’re using a free plugin from WordPress.org then you can find a whole bunch of support documentation directly from the website or community forums. Or else you can directly contact the developers on the plugin page via a support forum.
In the case of premium plugins, they will provide you with ticketed email support with some documentation for any issues that may occur.
Here is an example of the UpdraftPlus Support Forum.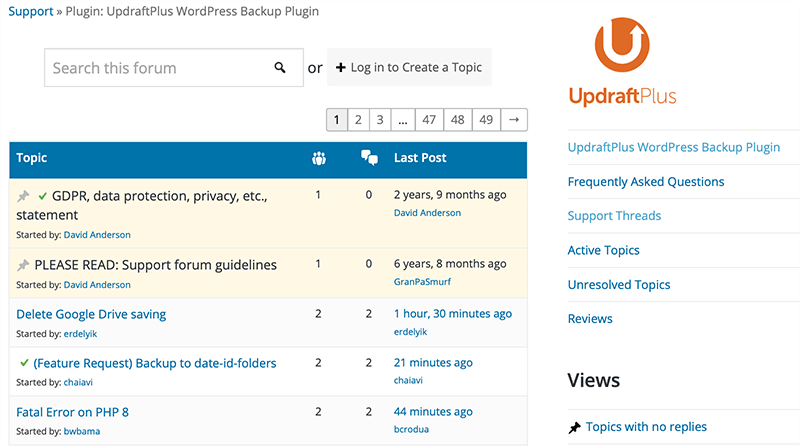
Why should I install one plugin at a time?
You should always install one plugin at a time because it makes it easy to identify which plugin may have caused a problem if they occur. At the same time, installing many plugins can sometimes overload your WordPress website which can slow down your website too.
Conclusion
We hope this article has helped you with how to install a WordPress plugin. We believe that you can now install both free and premium plugins onto your website without any hassle.
If you’ve any further queries about how to install a WordPress plugin, then please leave a comment below. We’ll try to get back to you as soon as possible.
Also, check out our article on 12 reasons why you need a website. Be sure to go through it once.
If you like this article, then please share it with your friends and colleagues. Also, don’t forget to follow us on Twitter and Facebook.

