
Do you need help to learn how to add footnotes in WordPress? No worries! We’ve got your back!
Footnotes are extra information or sources that can boost your content and make it more trustworthy. And guess what? You don’t need to be tech-savvy to make them work for you.
So, why should you care about footnotes anyway? Well, they can make your readers go “Wow!” and trust you even more. But hey, no need to stress about the how-to. We’ll walk you through it, step by step.
Ready to make your WordPress site a little extra exciting? Let’s get started on how to add footnotes in WordPress!
Why Add Footnotes in WordPress?
First things first, let’s talk about why footnotes are cool for your website.
Footnotes serve as valuable additions to WordPress content, enriching it with supplementary information, citations, or explanations. Understanding the significance of adding footnotes can boost the quality and credibility of your WordPress posts or pages.
Let’s look into why you need to add footnotes in WordPress.
- Enhance Credibility: Provide a way to cite sources, references, or additional reading material, adding credibility to your content.
- Provide Contextual Information: They allow readers to dive deeper into specific topics or terms, providing valuable context that enriches their understanding.
- Improve User Experience: Incorporating footnotes in WordPress enhances the overall user experience by offering additional insights or clarifications without cluttering the main content.
- Facilitate Navigation: It serves as a navigational aid, guiding readers to relevant sources or related content mentioned in the text.
- Demonstrate Attention to Detail: It shows that you value accuracy and transparency in your writing, creating trust and credibility with your readers.
With that, let’s dive into our main focus!
How to Add Footnotes in WordPress? (3 Easy Steps)
Now that we understand the importance of adding footnotes, let’s explore the methods to achieve this task seamlessly.
Method 1: Using the Gutenberg Editor for Footnote
This is a straightforward method to add footnotes in WordPress without the hassle of installing plugins. To use the WordPress Footnotes block, first, access the Gutenberg block editor.
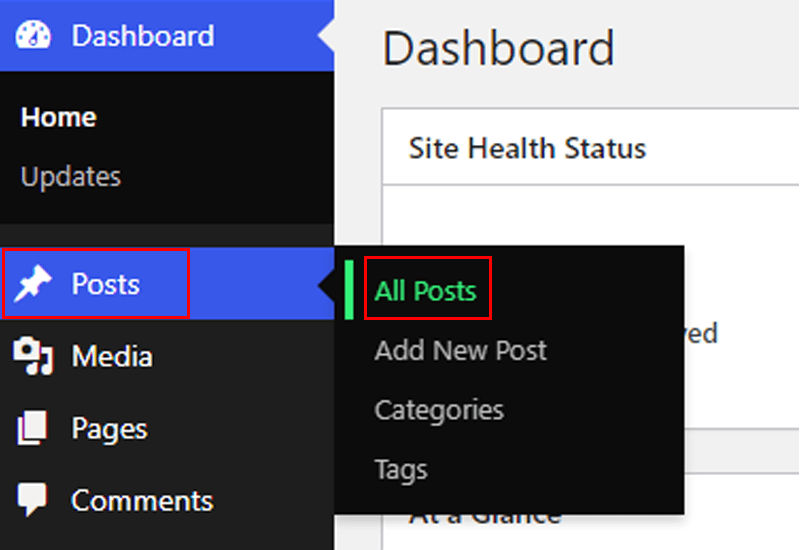
To do so, you need to create a post or edit an existing post. Here, we’ll be editing our existing posts, so, go to your WordPress dashboard, “Posts>All Posts.”
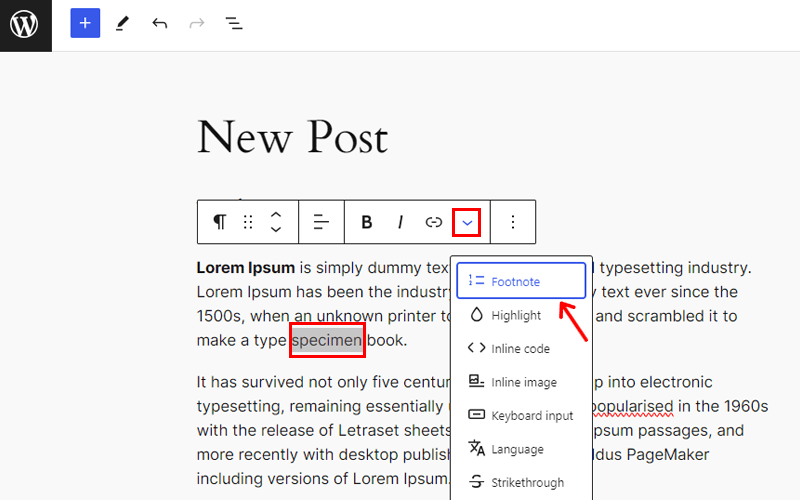
Once you’re in the editor, simply highlight the word or phrase in your content where you wish to insert the footnote. Then, navigate to the block toolbar, spot the dropdown arrow, and click on the ‘Footnote’ option.
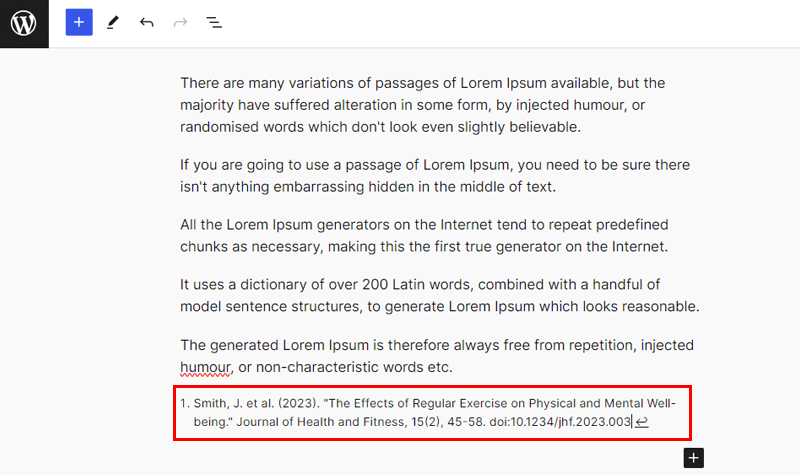
Following that, you’ll be redirected to the end of your post, where you’ll see the Footnote block that’s added. Now, here you can add more information, like we’ve added in the example image below.
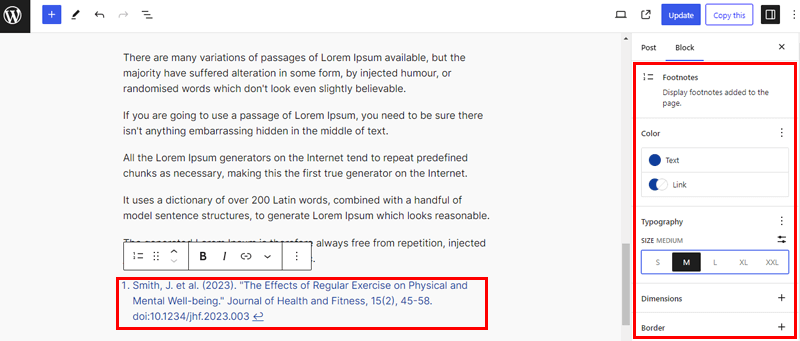
Moreover, you can customize the color, typography, dimensions, and border of the footnote block using the settings on the right-hand side.
When you visit your site, there should be a footnote link to the sentence you’ve highlighted while creating a footnote.

Besides, you can add as many footnotes as you like in a single post or page.
Method 2: Using a Footnote Plugin
Now the next method of adding a footnote on your post or page is by using a plugin. For this tutorial, we’ll be using the Modern Footnotes WordPress plugin.

So, start by installing and activating the plugin. Go to your WordPress dashboard>Plugin>Add New Plugins. There, search for the “Modern Footnotes” and then click the “Install” option once the plugin appears.

Following that, click on the “Activate” button right after installing.
For more information about plugin installation, check out our guide on how to install a WordPress plugin.
After installing, you need to configure the plugin. So, go to the “Settings>Modern Footnotes” option.

Now, let’s check each of the settings!
The first one is the “Desktop footnote behavior,” which lets you choose how your footnote will behave when visitors visit your website.
On the dropdown, you can choose from 3 options (Tooltip footnotes that open on click, Tooltip footnotes that open on hover, and expandable footnotes.) For this guide, we’ll choose the first one.

Moving down, you can check the box and make your footnote content appear in the web browser’s native tooltip when hovering over the footnote number.
This means the footnote will appear in the browser’s tooltip rather than in the plugins when visitors hover over the text.
However, we suggest disabling this setting if you opt for the tooltip display on desktops. Enabling both options may result in duplicate tooltips appearing for the same footnote, which could potentially irritate readers.

Moreover, you can choose to display the footnote list at the bottom of posts, so your readers can see all the information in a single place.
Additionally, you can add a “Heading for footnote list,” and this text will be displayed above footnote lists. This helps to separate footnotes from the other content, you can add texts like References, Footnotes, Citations, etc.
Here, we’ll add “Footnotes” text for this tutorial.
Below, you can choose the “Heading tag name for footnote list,” we’ll keep it as Heading 2. If you want to add some custom CSS to modify the footnote text, then feel free to insert it in the “Modern Footnote Custom CSS” box.
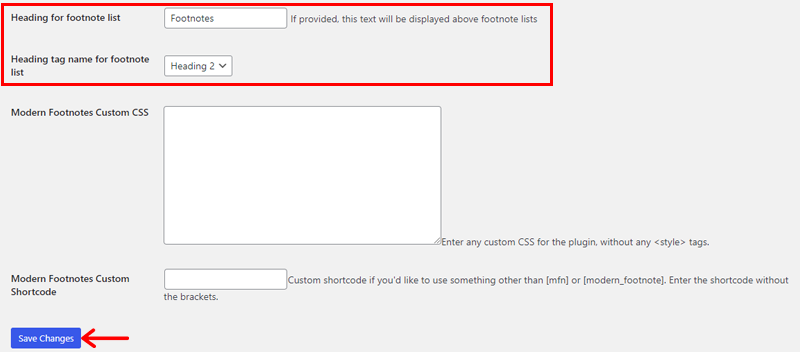
If you prefer a more customized approach to adding footnotes in WordPress, then you have the option to tailor the Modern Footnotes shortcode to suit your specific needs. Once done, hit the “Save Changes” button to make changes.
Let’s add footnotes!
Now that you’ve set up the Modern Footnotes configuration, it’s time to dive into inserting some footnotes into your content.
There are a couple of ways to add a footnote, but we recommend using a shortcode for simplicity and ease.
To start, locate the sentence in your content where you want to insert a footnote. Then, right next to that sentence, simply type in the following shortcode:
[mfn]Insert your footnote here[/mfn]
Ensure to replace the placeholder text between the brackets with your actual footnote information.
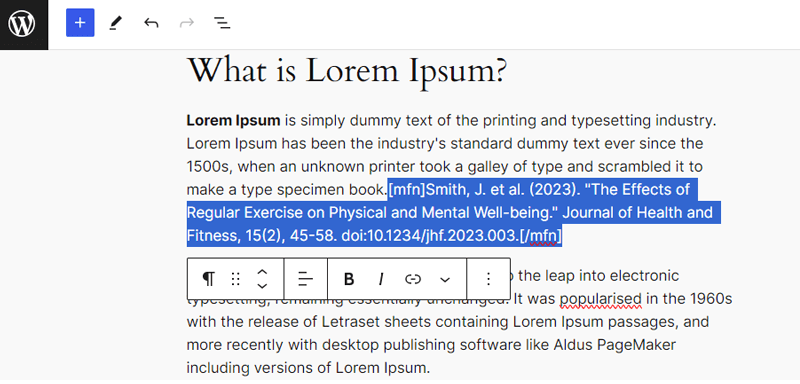
Also, make sure to add the shortcode in the same block, right next to the content, and without any spaces.
Below is an example of how your footnote will look in a live site.
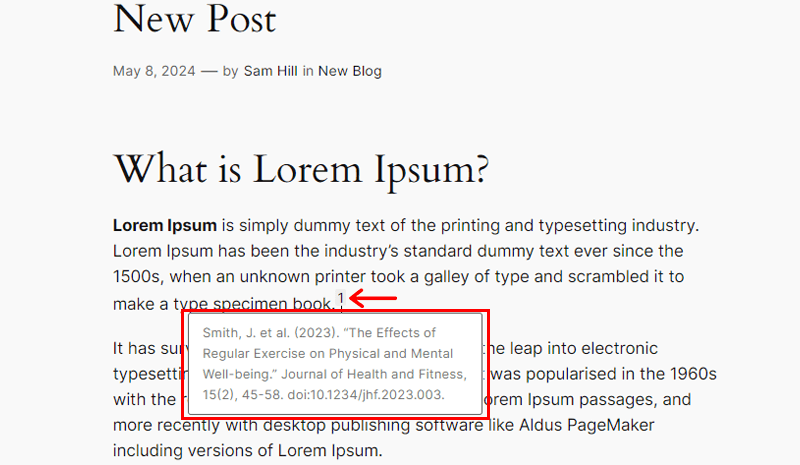
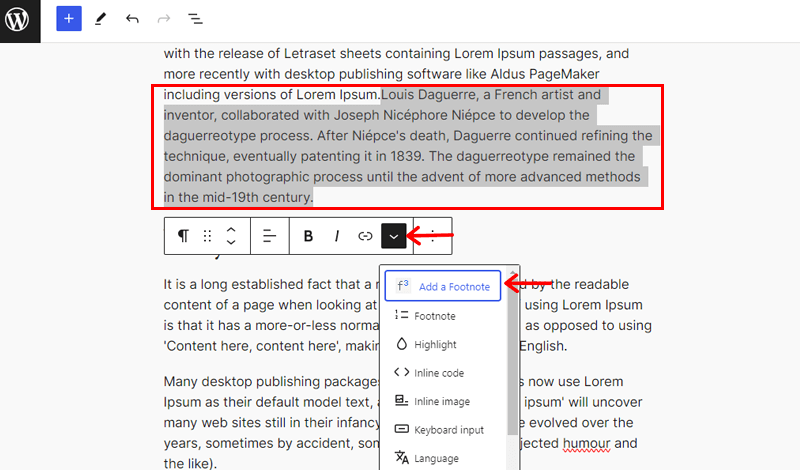
There is another easy way to add footnotes to your WordPress content. It involves typing your footnote text right next to the sentence where you want to add the footnote.
Remember, there shouldn’t be any space between the footnote text and the sentence.
Now comes the fun part.
Once you’ve written your footnote, highlight the text and click on the down-arrow button in the toolbar. There, select “Add a Footnote” from the options that appear. It’s as simple as that!
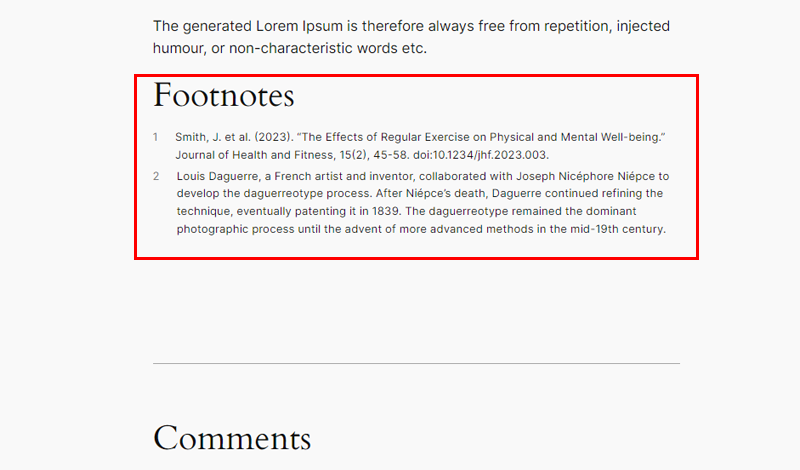
Finally, if you choose to display all of the footnote content at the bottom of the post, then you can scroll down to find everything there. It’ll appear above the comment section as shown in the image below.
And that’s it!
Method 3: Manually Inserting Footnotes Using HTML Code
Next up, you can add footnotes in WordPress using HTML. you can use this method for a single post or page on your WordPress site. However, this method is slightly complicated, so you need to be more careful.
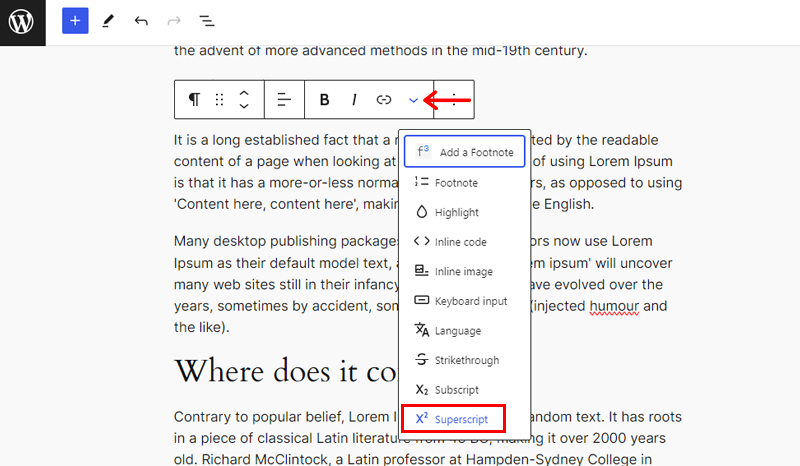
First, go to your post or page editing screen and place the cursor where you wish to add a footnote. Next, in the toolbar that appears above your text, choose the “Superscript” option that appears by clicking the down arrow icon, as shown below.
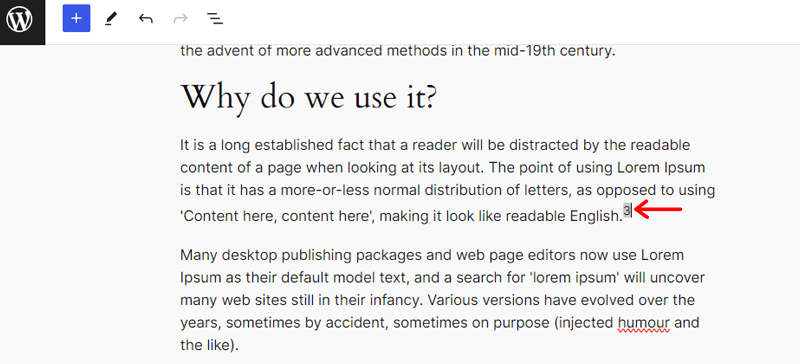
Once done, write the number, which will appear as a small superscript text. So here we’ll write the number 3 for this guide.
Now, add a Heading block at the bottom of your page or post, and type a title for your footnotes section. You can name it “Footnotes,” “References,” “Bibliography,” or anything you like. Here we’ll name it citations and will add a list block to it.
Once you’ve created your footnotes section, go to the “Advanced” section from the Block settings. In the HTML ANCHOR section, enter a unique label like citations. Also, we’ve added a list in the Citations section.

Moving on, add a link to the number that you’ve added to your text. To do so, highlight the number, and click the Link option in the toolbar. Now, enter “#” followed by the anchor label, here it’s “citations,” and then press Enter.
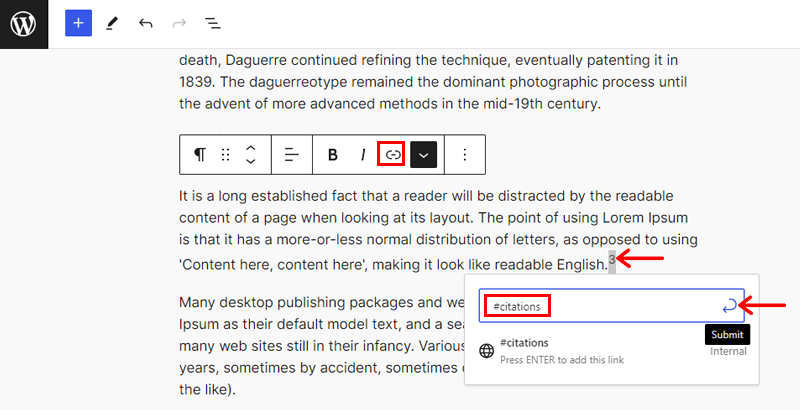
And that’s it! You can now check your page or post and test the link to ensure it works correctly.
Best Practices for Using Footnotes in WordPress
Effective use of footnotes in WordPress can greatly enhance the readability and credibility of your content. To ensure that your footnotes contribute positively to the user experience, it’s essential to follow best practices.
Here are some key guidelines to help you make the most out of footnotes in your WordPress posts or pages.
- Ensure that footnotes provide relevant and sufficient information without unnecessary elaboration.
- Establish a uniform style for formatting footnotes throughout your WordPress site. Consistency in numbering, placement, and styling helps maintain professionalism.
- Indicate the source or reason for each footnote to help readers understand its relevance whether it’s a citation, explanation, or additional information.
- Write informative and descriptive footnote content that adds value to the main text.
- Avoid overwhelming your content with an excessive number of footnotes.
- Regularly review and update your footnotes to ensure accuracy and relevance.
Now it’s time to answer some of your common questions!
Frequently Asked Questions
1. How to write a footnote?
To write a footnote, insert a superscript number in the main text where the reference should appear. Then, at the bottom of the page or end of the document, write the corresponding footnote content, starting with the same superscript number.
2. Is it necessary to add a footnote?
Whether to add a footnote depends on the context and purpose of the writing. In academic writing, footnotes are often necessary for citations, references, or additional context. In other cases, footnotes may not be needed if the main text is clear without additional explanation.
3. How many styles are there to write a footnote?
There are several styles for writing footnotes, including Chicago Manual Style, MLA (Modern Language Association), APA (American Psychological Association), and Turabian styles. Each style has specific guidelines for formatting footnotes. But they generally follow a similar structure with variations in citation format and punctuation.
Conclusion
That’s all! We’re ending this article on how to add footnotes in WordPress.
Hope, this guide has helped you to add a footnote to your content. Adding footnotes has never been easier whether you opt for built-in features or rely on plugins.
If you have more doubts, then leave your queries in the comment section below. We’ll try hard to answer your questions.
Meanwhile, you can read our other articles on how to add a page menu in WordPress and how to find a page ID.
Lastly, follow us on Facebook and Twitter to get notified about our latest blogs.


