Are you curious about how to build a Wix website? If yes, then stay right here.
Wix is a popular website builder that empowers users to effortlessly create stunning websites without extensive technical knowledge. So it’ll be easy for you to build your website.
Also, with its intuitive drag-and-drop interface, you can choose from a plethora of templates, and customize designs. And take your website design to new heights.
By the end of this article, you’ll have all the knowledge you need to build a Wix website that’ll leave your visitors in awe.
We’ll walk you through the step-by-step process, and you’ll have your impressive website up and running quickly!
Now, let’s dig in!
Table of Contents
Understanding Wix
Before you start to build your website with Wix, it’s essential to understand what this powerful platform has to offer. So, let’s proceed with a brief introduction.
Wix is a popular website tool that over 11 Million are using to make their websites. It’s easy to use with a drag-and-drop system, making it user-friendly for both individuals and businesses.
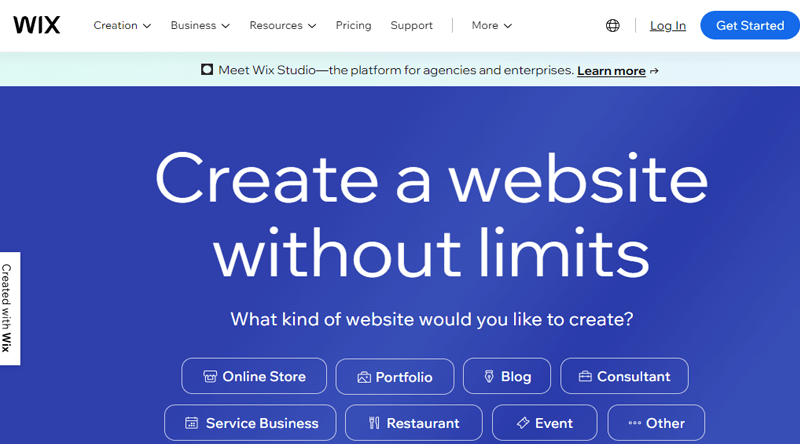
For someone who enjoys blogging, Wix offers a different style. Because Wix keeps things simple and visually appealing. It depends on what someone prefers for their website.
Besides this, it offers Velo, an advanced web development tool. It’s a full-stack development platform that empowers you to rapidly build, manage, and deploy professional web apps.
For more detail, let’s take a detailed look at its key features!
Key Features of Wix
1 Entrance Animations
With this feature, you can use animations to bring your site to life with effects like “Float-in” and “Expand-in.” This will create imaginative, striking pages and draw visitors’ attention to your content.
It’s pretty easy to add this animation to the elements.
Simply click on the elements you like in the Editor. Then, click on the Animation icon.
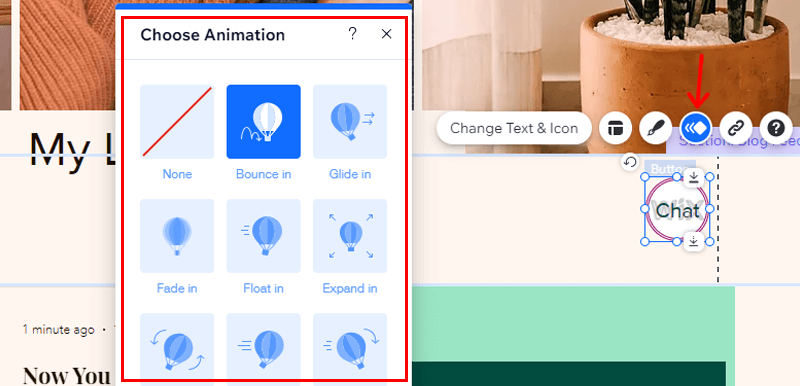
Following that select an animation from the available options.
And there you have it!
After adding animation to an element, you can customize it to make it behave the way you want and suit your site’s feel. We’ll talk about this in detail in another section.
Note: Animations added to elements in the header are only displayed when the element is first loaded.
2. Domain Registration
With Wix, you also get to register a domain for our website. So you can search, buy, and register a domain name for your website, all in one place. Also, it comes loaded with tons of benefits.
Some of them are:
- Own your domain name and take it with you even if you want to move platforms.
- Choose the perfect extension for your site from a wide range of options.
- Keep your information secure and avoid spam with private domain registration.
Moreover, it has a domain name generator, that instantly gets domain name ideas for your website. Simply enter a keyword or phrase and find domains that fit your brand.
However, it’s a premium plan, that comes with multiple pricing plans that start at $4.50 per month. It offers 1GB bandwidth, 500MB storage space, etc.
3. Generate with AI
With this feature, simply, enter a few keywords and let AI help you generate unique text for your site’s pages. Also, you can create product descriptions, Answer a few questions about the product, and instantly get options to choose from.
Moreover, you can instantly generate optimized meta titles and descriptions for each of your pages with AI product descriptions. Fine-tune with prompts and customize straight from your SEO Panel.
Besides, with an AI email generator, choose the type of email campaign you want to send out and let AI do the rest. All the way from the layout to content creation.
4. Multiple Site Collaborators
Now using this feature, you can invite people to collaborate on your site and assign roles based on their expertise. Also, each role comes with a set of permissions, so you can control who can make changes to your site and dashboard.
As their access needs change, you can update their role. Or create a new role with tailored access.
Besides, you can access Roles and Permissions from settings on your site’s dashboard. Go to “Dashboard>Settings>Role & Permissions.”
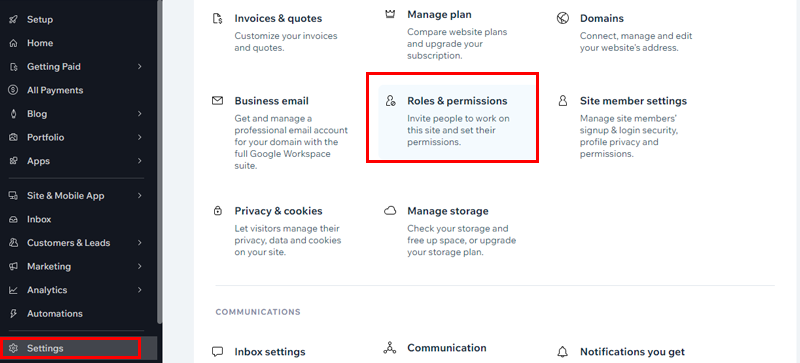
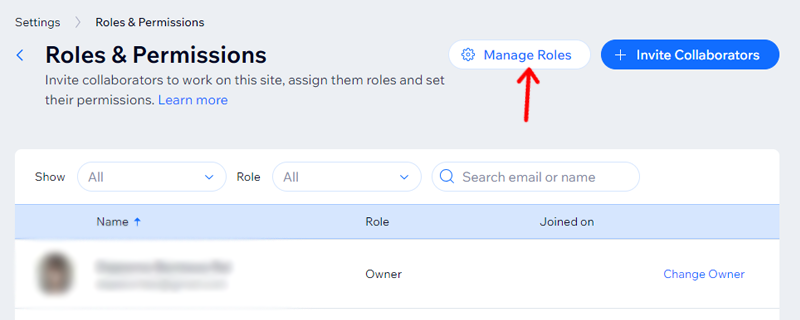
Click on the the Manage Roles page, it shows the roles available for your site. Beneath each role title is a permission summary, to confirm the access the role grants.
Each site has an Owner role and General Roles for managerial support. The additional roles available in your dashboard are based on the Wix apps you use on your site.
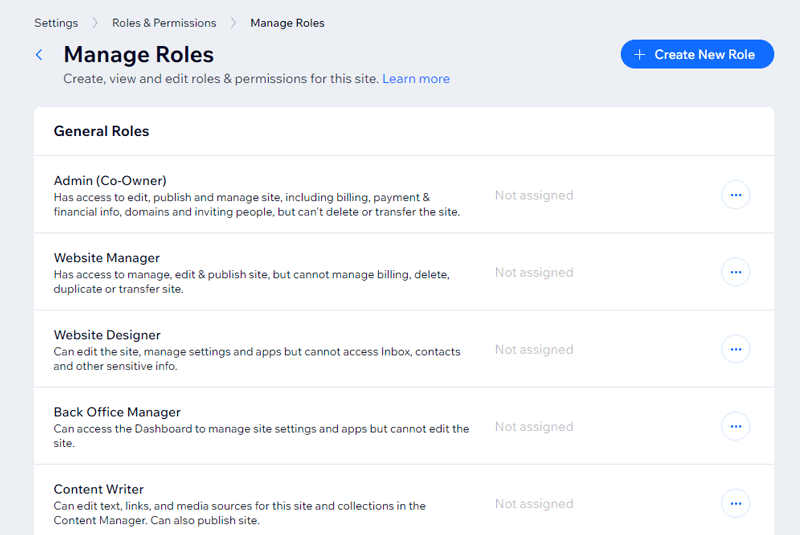
Let’s take a look at how it works:
| Roles | Permissions |
|---|---|
| Site Owner Role | The Owner role is assigned to the person who created the site or received site ownership. And can manage and make changes to everything on the site and in the dashboard. |
| Admin | Full access to manage, edit, and publish the site, including billing, inviting people, and managing groups, but cannot delete or transfer a site, or connect a domain. |
| Website Manager | Access to manage, edit & publish the site, but cannot manage to bill, delete, duplicate, or transfer site |
| Website Designer | Can edit the site, and manage settings and apps but cannot access Inbox, contacts, and other sensitive info. |
| Back Office Manager | Can access the Dashboard to manage site settings and apps but cannot edit the site. |
Moreover, when you integrate a Wix app into your site, your dashboard updates to include relevant roles. Like CMS roles, billing roles, store roles, blog roles, etc.
Additionally, you can create custom roles from scratch, and duplicate and edit existing roles to match your permission needs.
Besides, you can always manage your collaborator access from your “Site’s dashboard>Settings>Roles & Permissions.”
- Update your collaborator’s roles and permissions as their contribution to your site changes over time.
- Assign different collaborator roles, edit custom roles, and remove collaborator access as needed.
5. Content Management System (Formerly Content Manager)
This feature lets you manage content in one central place, and then display it on many pages. You can display your content in elements like repeaters, with the same design and a variety of content. This approach is ideal for listings, portfolios, recipes, services, and more.
Moreover, you can minimize the amount of effort to build and manage your site. At the same time, you maintain your Search Engine Optimization (SEO) standards.
As a result, you keep visibility in search engines such as Google, no matter how much content you have.
Let’s learn how to create a dynamic, content-filled site by adding CMS.
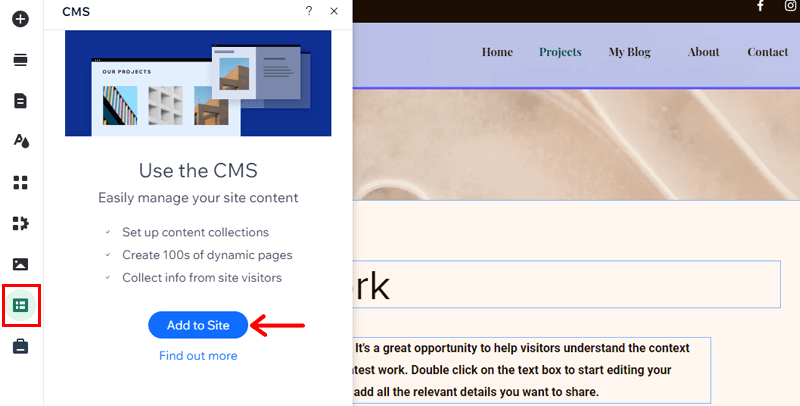
To get started, go to your Wix editor. Then click on the CMS icon on the left side of the Editor. There click the “Add to Site” option.
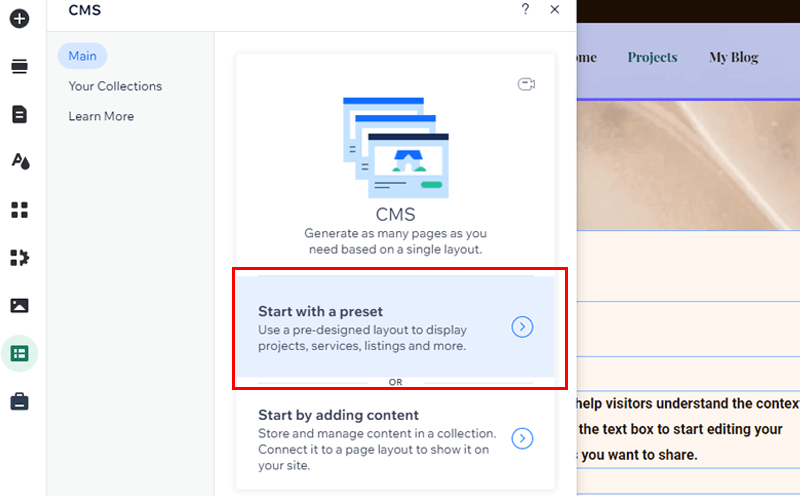
Following that you need to select an option, “Start with a preset” or “Start by adding content.” Here we’ll choose collection preset.
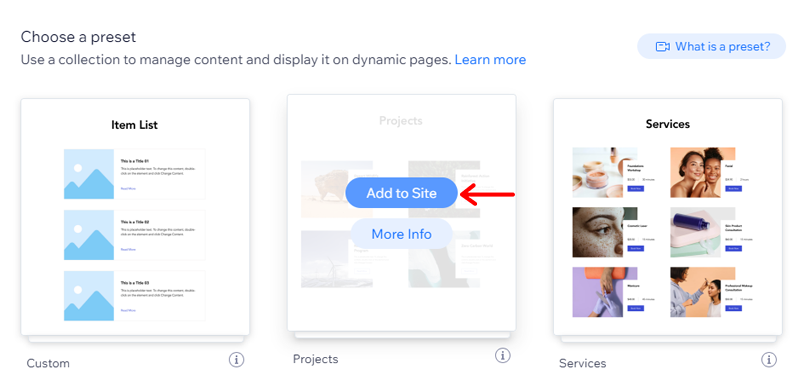
Now select a preset that suits your content and click the “Add to Site” option.
Once you’ve added preset, you’ll have some extra items for your site, like:
- Dynamic pages that’ll display all items from your collection in a repeater.
- Blog Page that will generate blog posts.
- Portfolio Pages with a set of collection pages, project pages, and more.
Note: You can only use a specific preset once per site. If you want to use the same preset again, you must first delete the collections connected to the first preset.
6. Marketing
Here you can create and customize strong email marketing campaigns to engage your audience, send promotions, and increase traffic. As well as get reports with actionable insights and data about your site and marketing activities.
Moreover, you can connect tools like Google Analytics, Facebook Pixel, and CAPI. And get insights on site traffic, visitor behavior, etc.

Not just that, it lets you design, schedule, and easily share your content across multiple platforms to boost engagement. Plus, feature your Instagram feed on your site to show off your visual content and attract new followers.
On top of that, you can create and customize strong email marketing campaigns to engage your audience. Plus send promotions and increase traffic on your website.
7. Search Engine Optimization(SEO)
Run and scale your business with a proper SEO optimization strategy. And here with Wix, you can optimize robots.txt files to tell search engines which pages to crawl.
As well as markup allows site content to be eligible for rich results. It’s preset for some pages, like products and blog posts. Plus, Wix automatically sets default canonical tags. So, you can edit them to tell search engines which pages are the primary versions for indexing.

SEO Settings is a great tool to save time by applying the same SEO logic to many pages at the same time. Instead of editing each page’s settings, you can customize the settings that apply to entire sections of your site.
Besides, Wix automatically creates default SEO Settings for all the pages of your site according to their type like, products, main pages, etc.
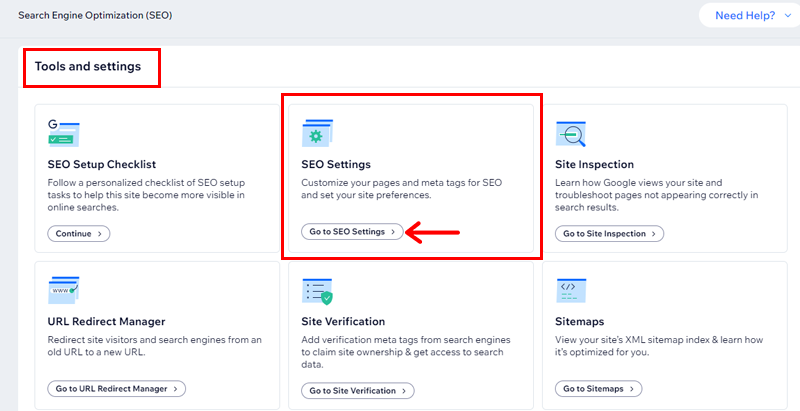
To access your site editor, then click on the “Marketing & SEO>SEO” option. There select the “Go to SEO Settings” option.
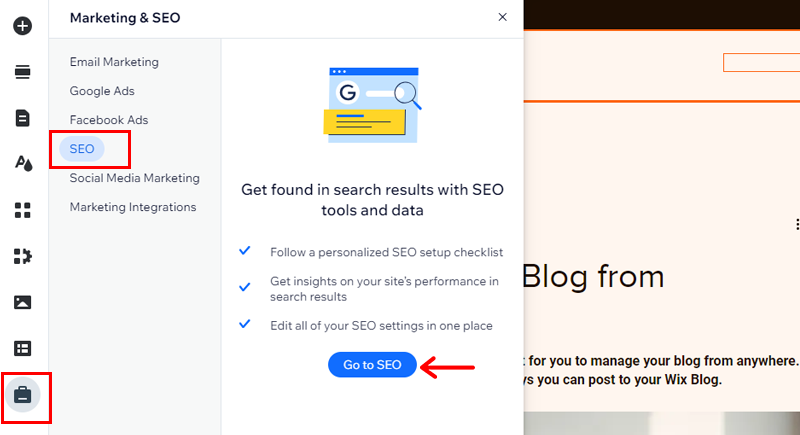
Now scroll and go to the “Tools & Settings” and click on the “Go to SEO Settings” option.
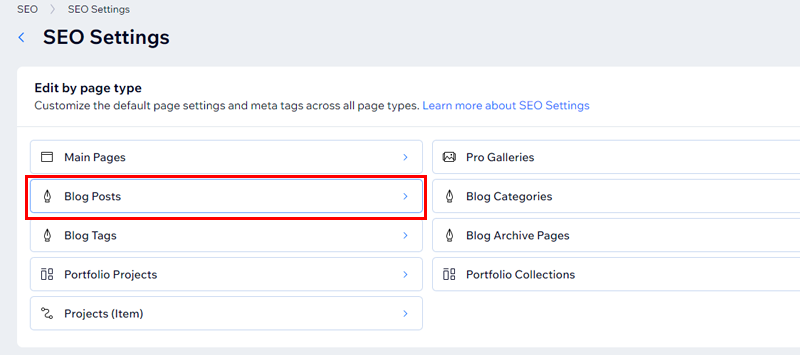
Following that, select the page you want to edit, here we’ll select the “Blog Post.”
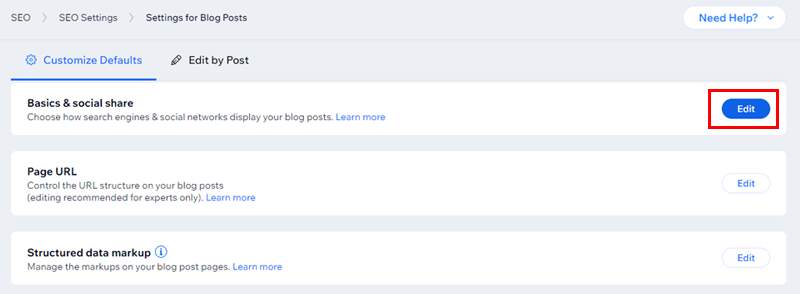
Then, click the “Edit” beside SEO Basics & social media share to customize your pages for search engines.
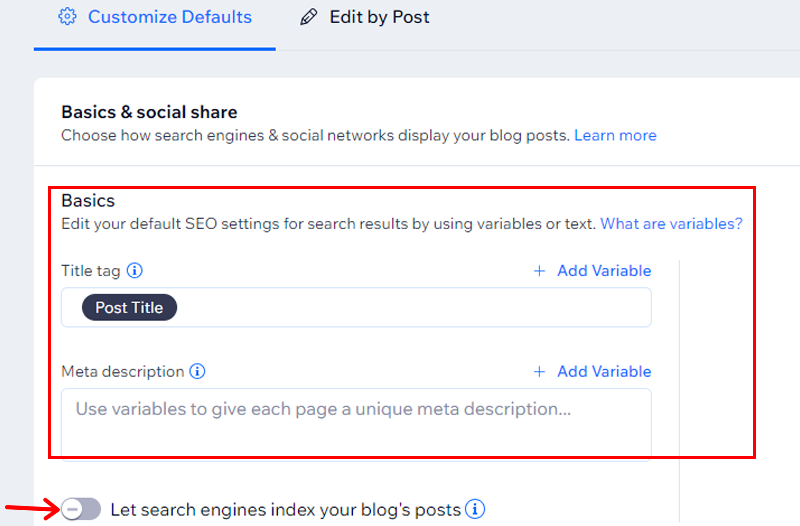
Here you’ll be able to customize the title tag and meta description in the basic SEO section. And enable the “Let search engine index your products” option.
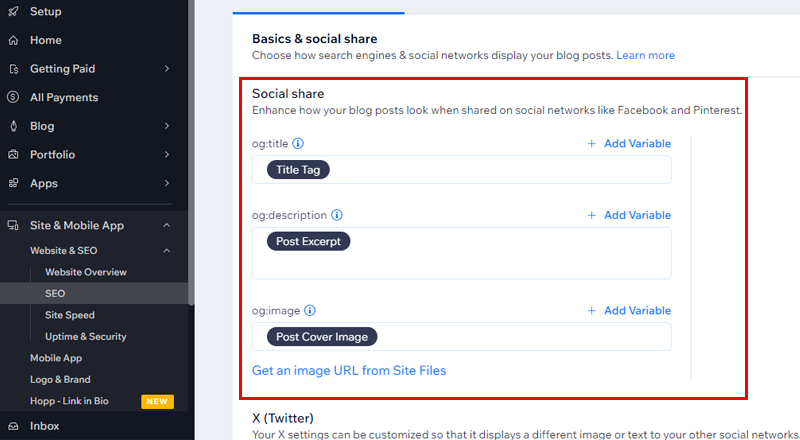
Further, you can customize your social sharing settings. There you can update how your page looks when shared on social media like Facebook and Twitter. Update your title tag, meta description, and general social image of your page.
And, you’re done!
8. Other Features
But Wix doesn’t stop with just the above-mentioned features. There are more:
- Site verification: Verify your site, confirm ownership, and track site performance in search results on Google, Bing, Yandex, Naver, and Pinterest.
- Wix Analytics: Get actionable insights to help you better understand and improve your site’s SEO.
- eCommerce: It offers website templates, custom checkout, displaying products & categories, a Wix owner app, and more.
- Service Business: Under this feature, you’ll get a scheduling system, calendar management, Google & iCal sync, loyalty program, and more.
- Web Hosting: Get reliable, scalable, and free web hosting to build your online presence.
- SSL Certificate Verification: All Wix sites include HTTPS and SSL protocols to ensure secure communication between your site and visitors.
You can always visit their official site for more details on Wix features.
Websites You Can Create with Wix
1. eCommerce
If you’re starting an eCommerce site, then Wix provides a variety of free designed templates. Or you can build your custom online store using professional eCommerce elements.
What you’ll get is,
- Showcase your products using fully customizable category pages, product pages, and galleries.
- Unified multichannel selling online, in person, and on leading sales channels.
- Add your brand logo and custom checkout fields to create a customized experience for your customers.
- Generate additional revenue by putting your products on the top of Google search result pages.
- Add the currency converter to your store to make it easy for customers to view product prices in their preferred currency.
- Also, use Wix POS to accept in-person payments for your business anywhere you want to sell.
- You can accept in-person payments from anywhere with just your phone or portable card reader.
Wanting to build an online store with WordPress, then read our article on how to build an eCommerce website.
2. Service Business
So, planning to go forth with a service business, then Wix got you covered. It helps to manage your bookings, payments, staff, appointment reminders, and more–from one place. You can schedule and manage appointments, classes, and courses through your calendar.
Not just that, you can,
- Sync your personal and Wix Bookings calendars to view all events in one place, plus block time slots to prevent double bookings.
- Create recurring classes for clients to book and set all of the details, including when they take place, how long they last, and more.
- Create custom booking pages to personalize or streamline the experience for your clients.
- Build and sell courses to create a steady revenue stream for your business.
- Save your clients’ credit cards (with permission) and authorize credit card charges anytime, even for future orders.
- Also, you can send automatic payment requests to clients when a session starts or ends.
3. Blog
But, if you’re a blogger, then there are lots of possibilities you add to your website. To get started, choose from professionally designed templates to customize and make your own.
Also, make use of use SEO tools to optimize your posts for search engines, increase traffic, and get found. Plus monetize your blog with ads, subscriptions, and more.
Moreover, you can,
- Get reports with insights to see how visitors interact with your blog.
- Use social media to promote your blog and share new content with your readers.
- Allow readers to add comments to posts and increase engagement.
- Create exclusive content subscription plans to offer to your readers.
- Schedule posts and target the best time to reach your readers.
- Also, add writers to your blog or allow a one-time contributor for a specific post.
Do read our article on how to start a WordPress blog.
4. Portfolio
Looking forward to creating a great portfolio for yourself, then Wix is an ideal platform for you. You not only get a unique portfolio layout and customize it to perfection. But you’ll be able to design every aspect of your portfolio, from your project pages to collections.
Wait, there’s more to it! You can,
- Make your portfolio stand out with the most advanced design capabilities and layout controls.
- Sync your portfolio with Instagram, Google Photos, Dribble, and other apps to showcase all your work in one place.
- Manage your portfolio on the go, directly from the Wix Owner app on your phone.
- Promote yourself online with a suite of marketing tools.
- And you can accept payments, manage your bookings, and more – all from your dashboard.
5. Events
Want to build an event website? Well, Wix got you covered here too! It’ll provide you with a variety of customizable templates. As well as you can manage free RSVP or ticketed events. track the guestlist, set ticket prices, scan tickets upon arrival, etc.
Besides, this, you can:
- Promote and manage physical events, or host online events directly from your Wix website.
- Create one or more ticket types for your event and set prices for each one.
- Build and publish a seating map so guests can pick seats for your event.
- Create and send custom event invitations to your guests.
- Showcase your events with a variety of layouts including a calendar, a grid, and others.
- As well as add or remove guests, edit guest information, and manage your waitlist.
6. Restaurants
Would you like to create a website for your restaurant business? Then not to worry, Wix comes with a variety of pre-designed restaurant templates, and customize one to make it your own. You can also Take orders directly from your site without paying any commission.
Moreover, you can,
- Let customers book tables online through your restaurant website.
- Showcase your restaurant’s items with an online menu that you can update and edit whenever you like.
- Connect a Point of Sale (POS) to your restaurant site so you can manage all your payments from one place.
- Get insights about your restaurant like your most popular dishes, busiest times, info about your customers, and more.
- Give customers the option of scheduling orders in the future.
- Get listed on the app which makes it easy for customers to find your restaurant, place orders, and make reservations. That too commission commission-free!
Pricing Plan for Wix:
When it comes to pricing, Wix offers different plans to cater to various needs. Each plan provides access to different features and benefits, allowing you to choose the best fit for your project.
Here’s a brief overview of the website pricing schemes of Wix, which is best for showcasing a professional site.
- Connect Domain Plan: Costs $4.50 per month and comes with a free SSL certificate, 1GB bandwidth, 500MB storage space, 4 lead capture forms, and 10 fields per form.
- Combo Plan: Costs $8.50 per month and comes with a free domain for 1 year, no Wix ads, 2GB bandwidth, 3GB storage space, 30 minutes of video hours, and more.
- Unlimited Plan: Costs $6.25 per month and comes with unlimited bandwidth, 10GB storage space, 1 hour video hours, 10 lead capture forms, 20 fields per form, etc.
- VIP Plan: Costs $12.25 per month and comes with 35GB storage space, 5 hours of video hours, 75 lead capture forms, 75 fields per form, site booster app, logo, etc.
Now that we’ve explored the foundations of Wix, its features, and pricing.
Get Inspired by Wix Sites
1. Daniel Artistizabal
The Daniel Artistizabal is a portfolio website where you can see his works displayed professionally on the website. The author is an art director and digital artist working across the fields of art, fashion, and entertainment.

As you go through the website, it’s pretty simple with no overwhelming menus. While scrolling down, you’ll get to see projects the author worked for. Besides, you can also follow the author on his Instagram social handle.
2. Gen She
Gen She is a business website, where you’ll find many talented females who excel as creators, leaders, YouTube strategists, designers, etc. And they will provide you with consultations for your career.

Talking about the website is stunning and professional. The site has a Job Board page where you’ll find numerous job vacancies that can suit your caliber. Also, you can listen to the podcast which talks about career, side hustle, relationships, and their experience.
3. Chief JFB
If you’re planning for a restaurant website, then Chief JFB can be the ideal inspiration for you. It’s a black design website with a simple header menu option where you’ll find everything you need.

Besides, on the home page, if you scroll down, you’ll know about the author Jean-Francois Bury. Further down, you’ll see some of his featured recipes, As well as his contact information for visitors to get in touch with the author.
Now you might want to create a website with Wix. So, let’s learn how to build a Wix website.
How to Build a Wix Website Free? (Step by Step Guide)
Get set to design and explore the fun of creating websites with Wix!
Step 1: Plan Your Website
Before jumping into building your website with Wix, it’s crucial to pause and plan your path. Think about what you want your website to do, what your visitors expect, and how you want them to feel when they visit.
Go through some of the tips mentioned here:
- Clearly outline the main goal of your website. Whether it’s sharing your poetry, showcasing artwork, or discussing various topics, having a clear purpose will guide your content.
- Understand who your intended audience is. Tailor your content and design to cater to their interests and preferences, ensuring a more engaging and relevant experience for visitors.
- Establish specific and achievable goals for your website. Whether it’s increasing readership, gaining followers, or promoting your art.
- Plan how you’ll structure your content. Create categories or sections that make navigation easy for visitors, enhancing the overall user experience.
- Think about the visual style you want for your website. Choose colors, fonts, and layouts that reflect your brand and resonate with your audience.
- With many users accessing websites from mobile devices, ensure your design is responsive and looks good on various screen sizes.
- Plan your content creation schedule. Whether it’s regular blog posts, artwork updates, or sharing your thoughts, consistency is key to keeping your audience engaged.
Take the time to plan these aspects and it’ll set a solid foundation for your website.
Now let’s dive into designing and developing your website.
Step 2: Getting Started With Wix
Here we’ll cover the initial setup and the Wix interface, a powerful web design and development platform.
I) Create a free account
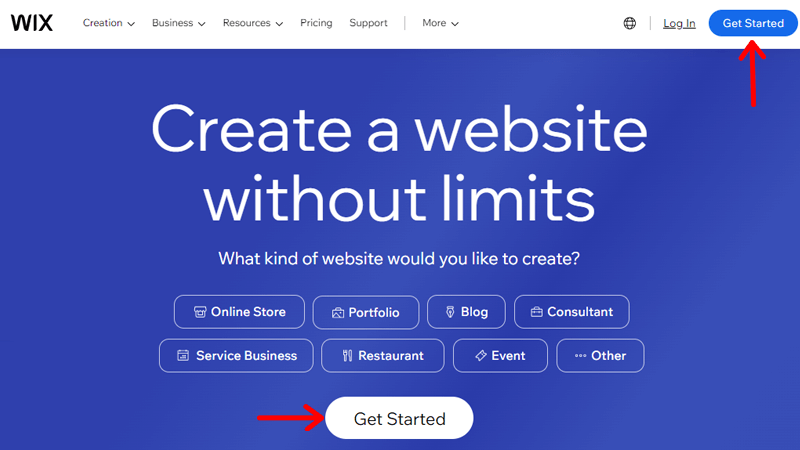
Begin your Wix journey by signing up for a Wix account. Simply visit the Wix website and click on the ‘Get Started’ option.
You’ll be prompted with a signup page, where you can use a Google account or Facebook account.
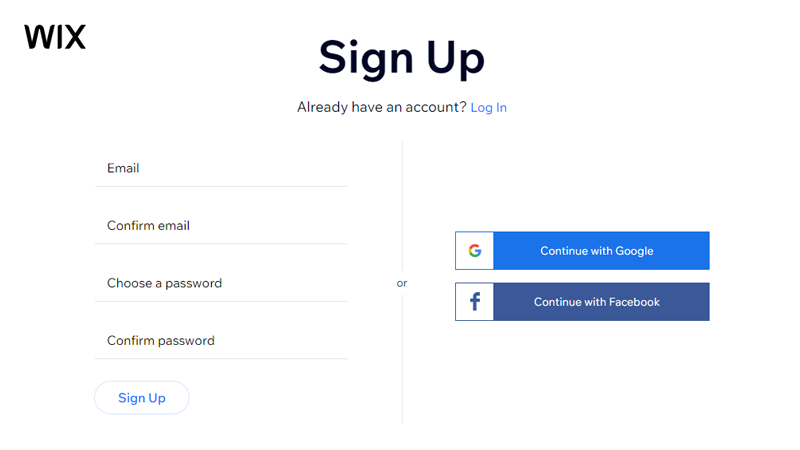
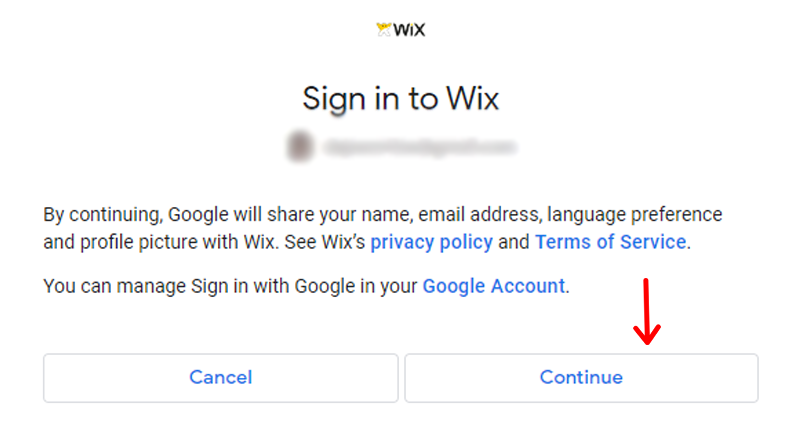
So, if you go with the Google account, you get to choose which one to use. So choose your preferred account and move ahead.
On the next page, click the “Continue” button.
And you’ve successfully created an account on Wix!
Now let’s get started with the setup process.
II) Setup Your Website
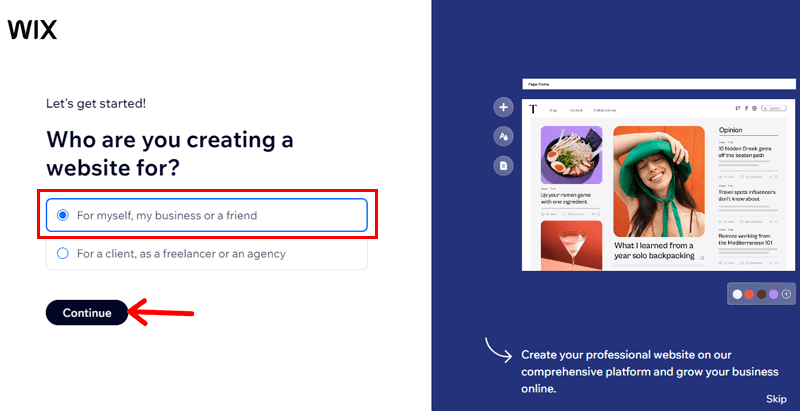
After signing in, you’ll be asked who are you creating a website for. You’ll have options like “For myself” or “For client.” Here we’ll go with the “For myself” option. Once chosen click the “Continue” button.
Next, you’ll see a page where you can chat with an AI. there you can tell about your website ideas and the AI will provide you with personalized tools, images, and text. Here we’ll choose to Set up without AI.

However, if you’re going with AI, then do remember that AI can make mistakes. So double-check that the results are accurate before using them.
Now, you’ll be asked what types of websites you want to create. You can choose from an online store a personal blog and everything in between. Here we’ll go with a Blog. Once put your website types in a search bar, you’ll get multiple options to choose from.
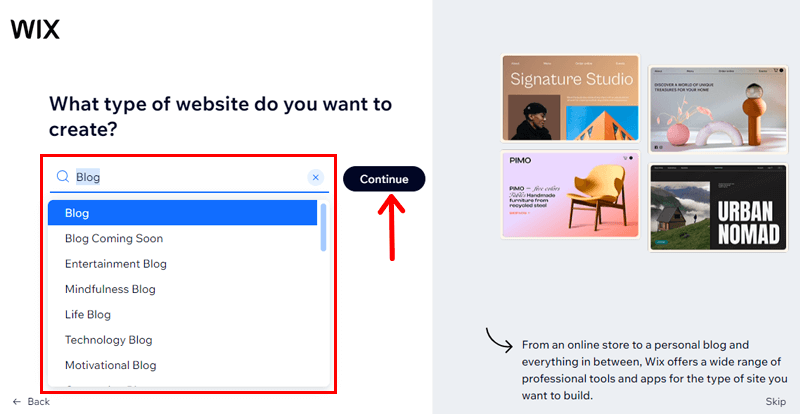
Like we’ve chosen a blog and it displays other options like, “Blog Comming Soon,” “Life Blog,” etc. As shown in the image above. Then Click on the “Continue” button.
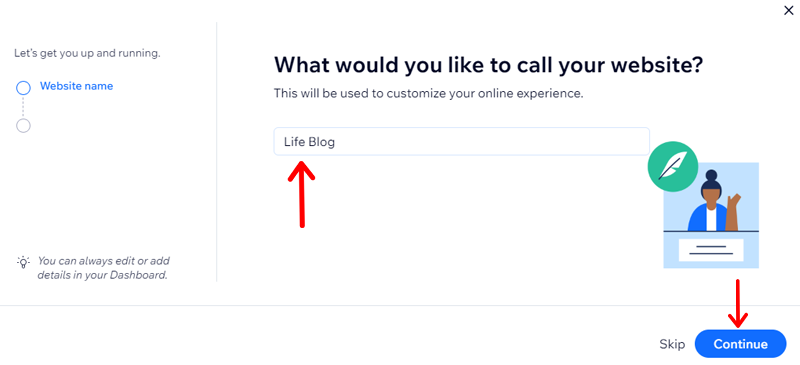
Now it might take a few moments to prepare your dashboard. Then you need to name your site. For example, in this tutorial, we’ll give the name “Life Blog.” Then hit the “Continue” button to move forward.
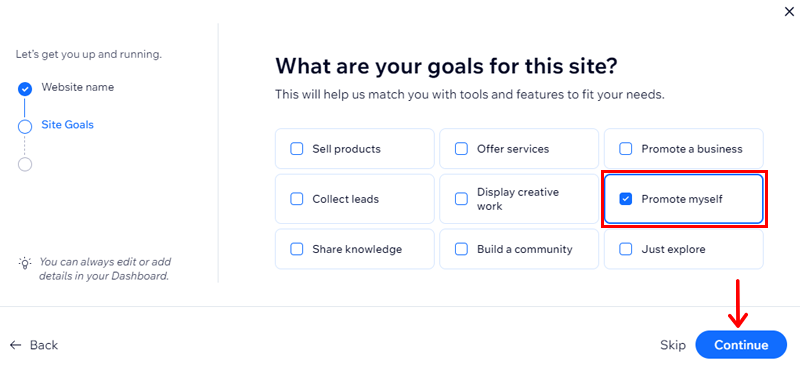
Moving on, you need to set goals for your site. This will help Wix to match you with tools and features that fit your needs. Here we’ll go with the “Promote myself” option. Do hit that “Continue” button after making your choice.
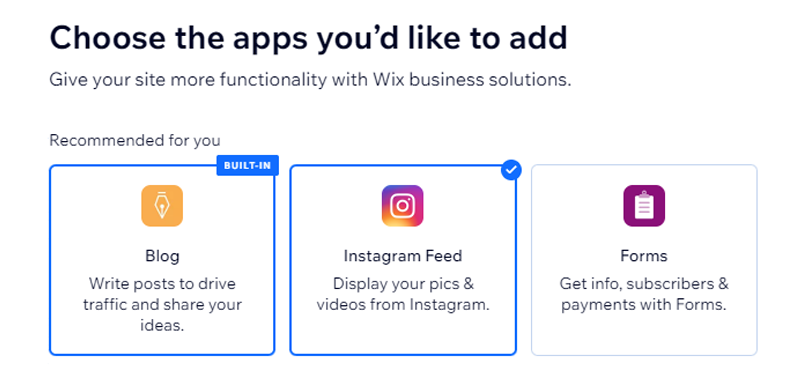
Following that, you need to choose the apps you’d like to add to your website. This helps to get your site more functional with Wix business solutions.
Besides, based on the information provided, Wix will recommend some apps. For this tutorial sire, we’ve got a Blog, Instagram Feed, and Forms.
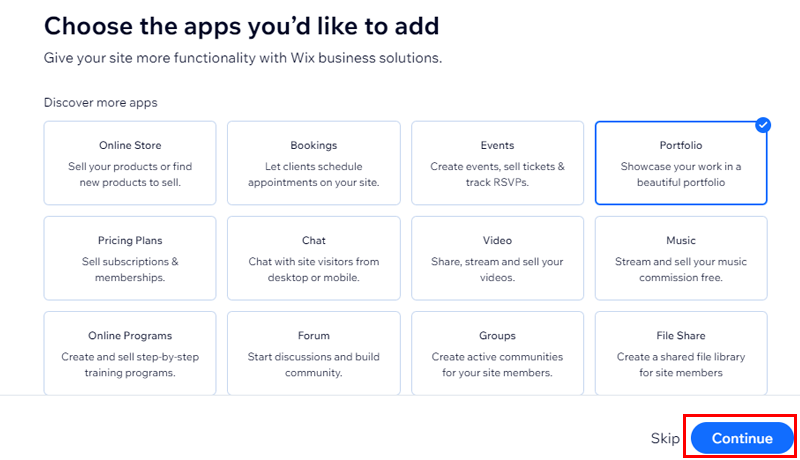
But if you scroll down, you’ll see more apps like online store, bookings, events, and much more. Choose the one you want to add to your website and then click the “Continue” button.
And that’s it!
Now you’re all set, so click on the “Head to Dashboard” button to move ahead.
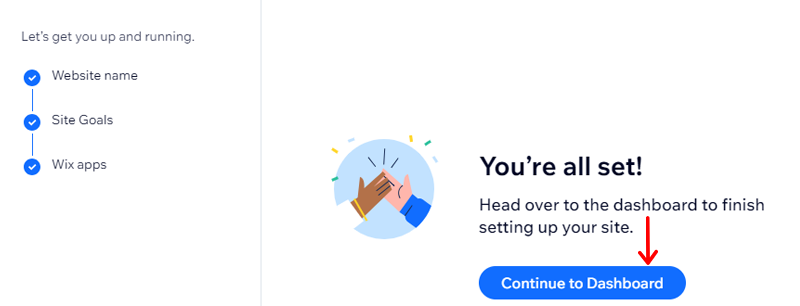
Note: You can always edit or add details in your Wix dashboard.
Step 3: Design Your Website
After creating your Wix account and finishing the setup process, it’s time to become familiar with the Wix interface.
Once you log in, you’ll be directed to the Wix dashboard, which serves as the central hub for managing your website projects. It functions as your control center, providing easy access to your projects, site settings, hosting configurations, and more.
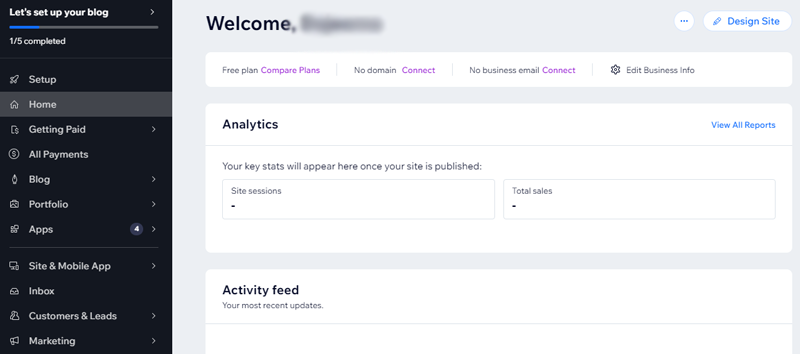
Now, take a moment to explore the various sections and familiarize yourself with the available navigation options.
After spending some time exploring the dashboard, you’ll be ready to maximize your Wix experience.
Upon accessing the dashboard, you’ll be asked to set up your blog site. You can go through this right away or complete it later.
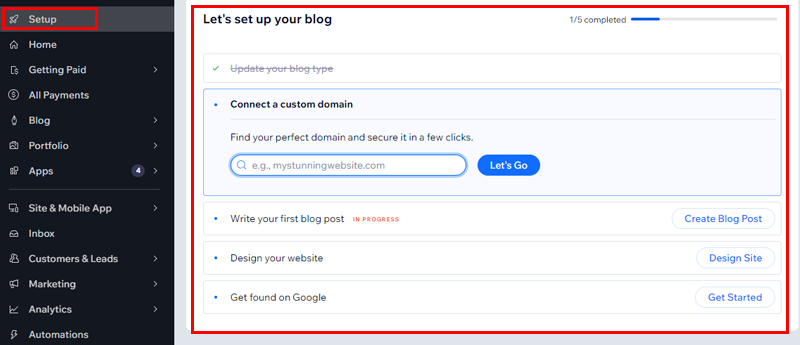
Now, let’s begin with designing your site!
I) Choose a Template
Now start by clicking on the “Design Site” option.
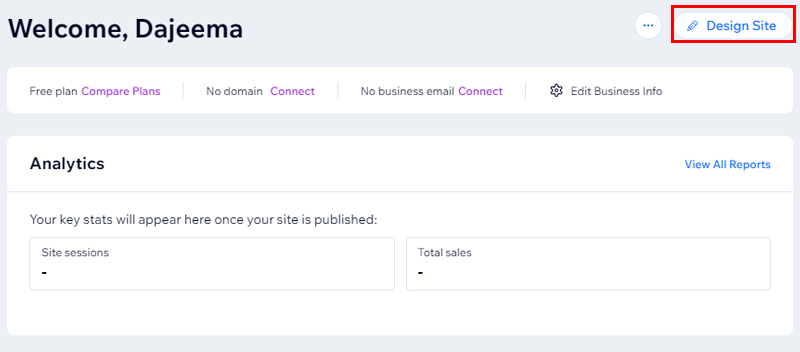
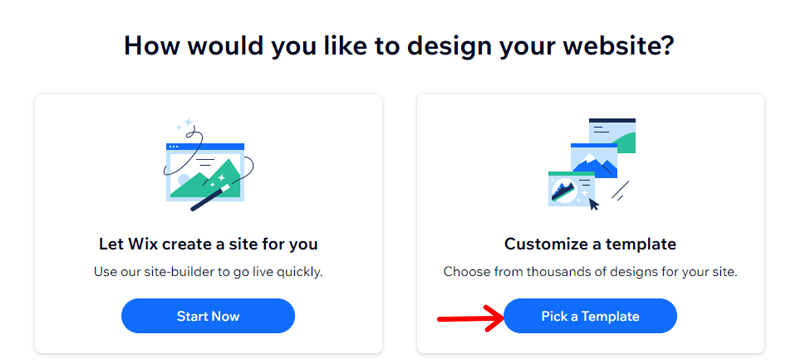
Where you’ll meet two options, “using Wix site builder” or “customizing a template.” Here, we’ll choose to customize a template.
Now you’ll see tons of free templates that will match your website. The best part is that Wix shows which template will best match your site. So we’ll go with the Wix recommendation
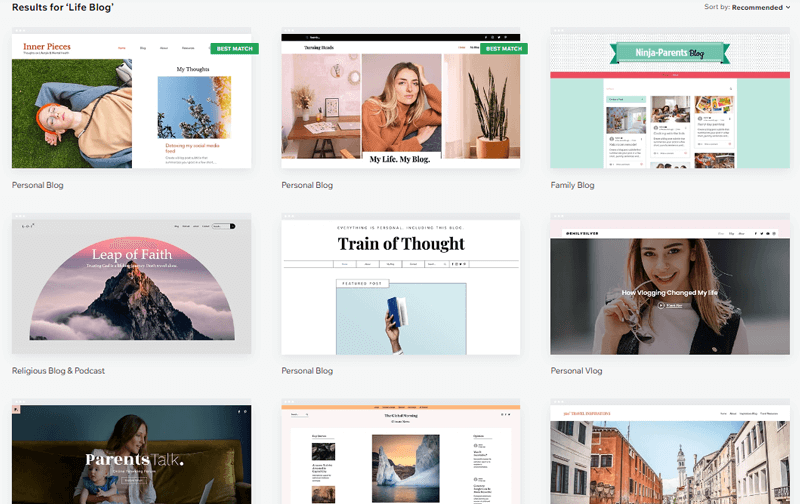
So to pick the one, if you hover over the template, you can choose to edit the template or view it. Now let’s “Edit” the template.
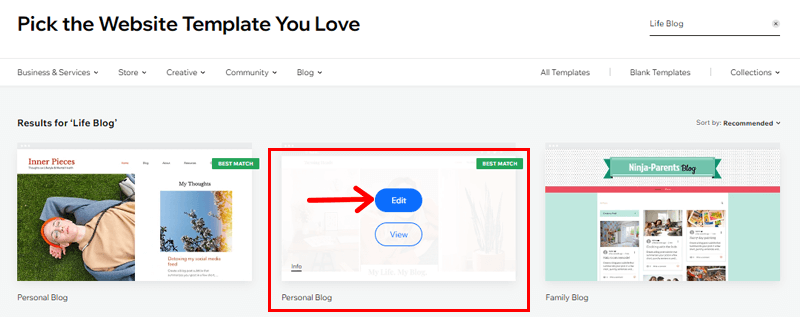
And you’ve successfully added a template for your site.
Following that, on the next page, a pop-up will appear saying to write content using AI. Where you can add some details about your site and generate. However, we’ll skip this and start designing our website manually.
II) Customize Design Elements
Now that you’re on the Wix editors page, the first thing you can do is add and design elements. So click on the “Add Elements” option.
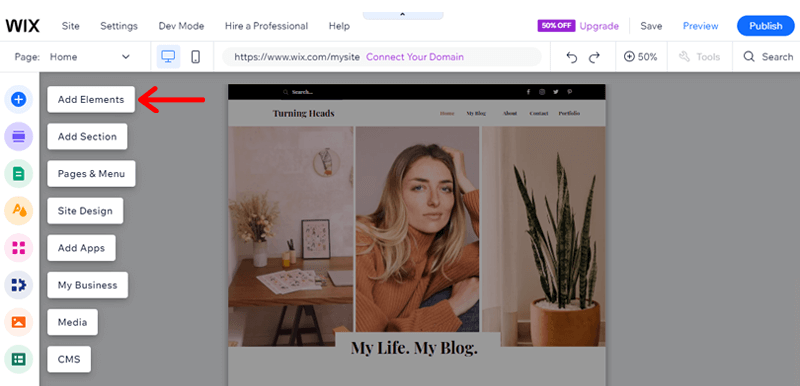
Following that, you’ll see tons of free Wix elements you can add to your site. And if you hover over any of the elements you’ll see the options to pick and how it looks.
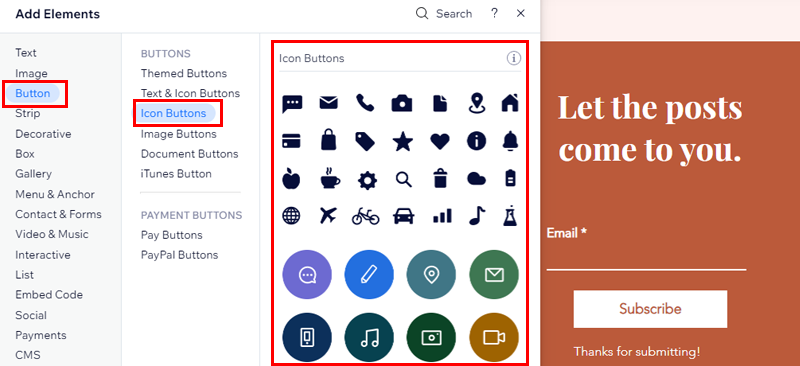
For example, we’ve selected the Button element, and the Icon Button from the available options. Right beside, you’ll see all the available icon buttons. As shown in the image above.
Note: Some element tabs have themed elements. These elements have been handpicked for you, as they match your site’s color and text theme.
Now to add the elements, simply choose the one and drag it on your site. And it’s done. To customize your element, all you need to do is click on the element and there you’ll see 6 options to play with.
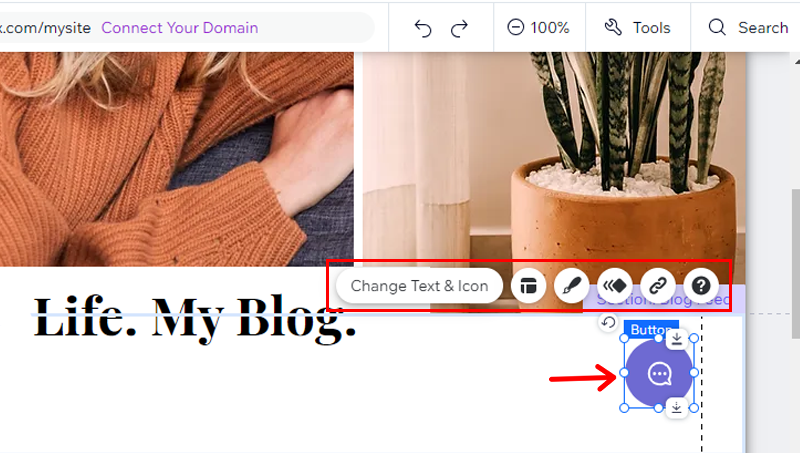
So, let’s go through each one of the themes!
First, we can change the text and icon of the element. Click the “Change Text & Icon” button.
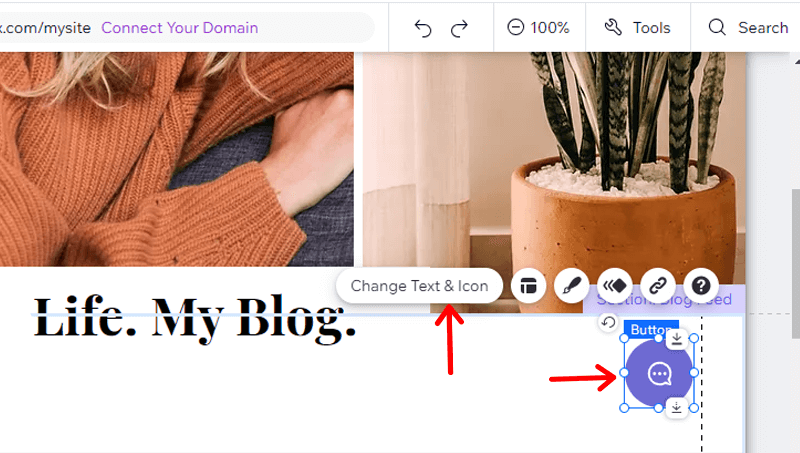
A popup will appear where you can choose what display. There you’ll have 4 options, text and icon, Icon Only, Text Only, or Nothing. Here we’ll go with Text Only.
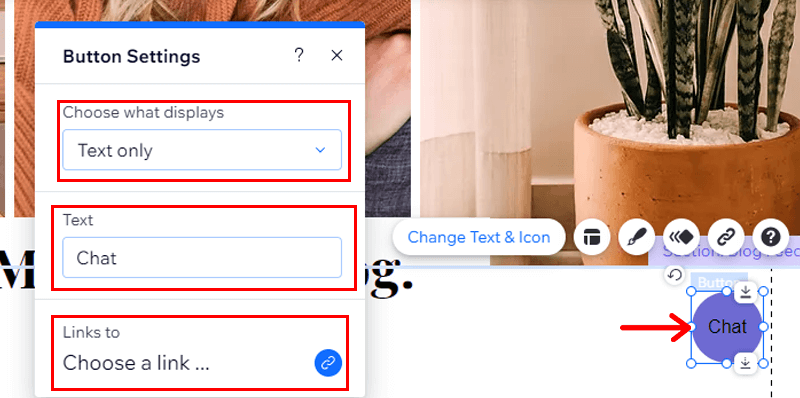
Also you can add a what text to display. We’ll keep it “Chat” for now. And you can link your button to a site address, a page, etc.
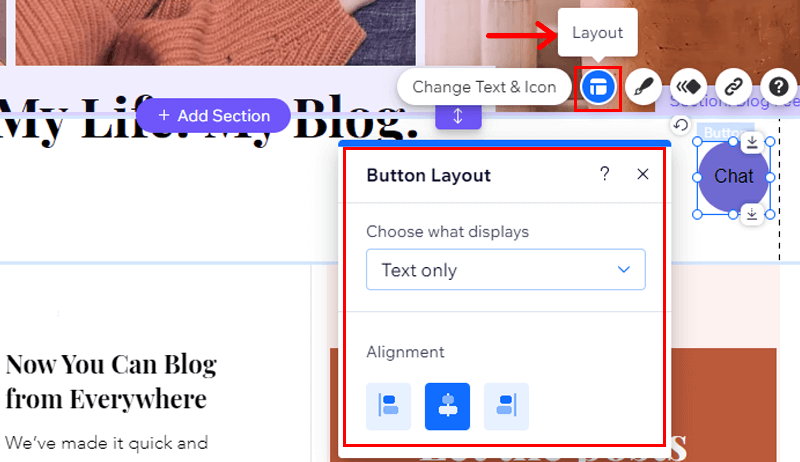
Moving on to the Layout option, here you can again choose what to display on the button. As well as alignment. So here we’ve left it as Text only like before. And kept the middle alignment for the text.
Now we’ll go to the Design option, and you’ll see the Themed Button option, that is recommended by Wix to match your website. Below you’ll see Text & Icon Buttons, where you can choose from multiple options.
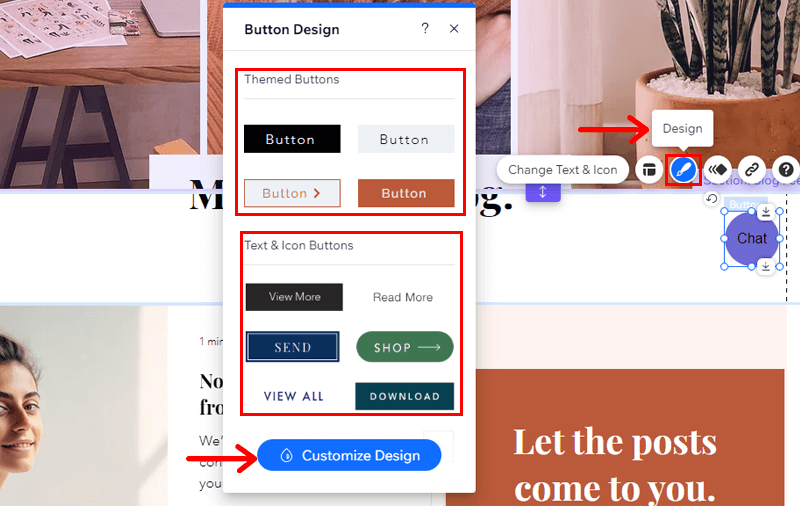
At last, you’ll see the “Customize Design” button, so click on that. Following that you’ll see 2 options, “Regular” and “Hover.” first let’s go with the Regular option, as you can see many options like Background Fills, Text, Borders, Corners, Shadows, Layout, and Icon.
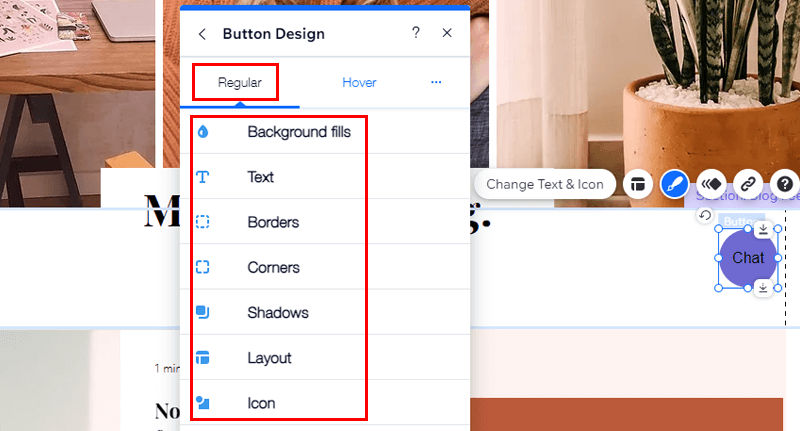
Let’s go through them!
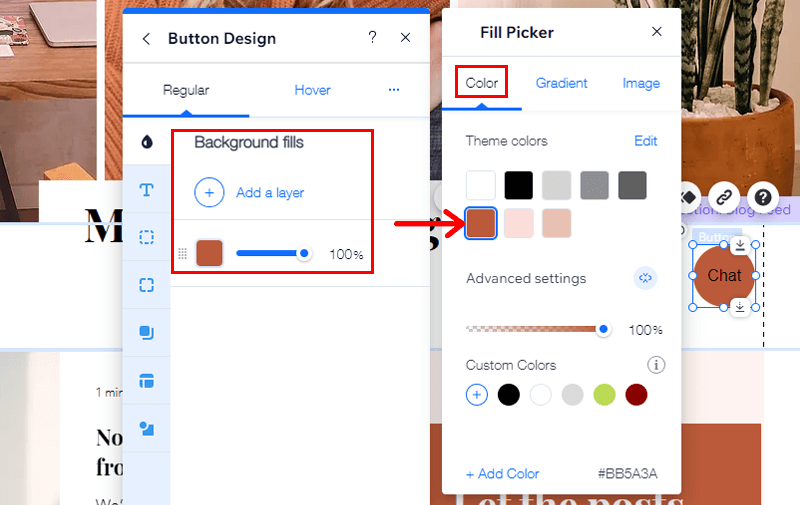
Starting with Background Fills, you can add a layer to your icon or change the background color of the icon. We’ve picked the theme color, but you can also choose a custom color for your button.
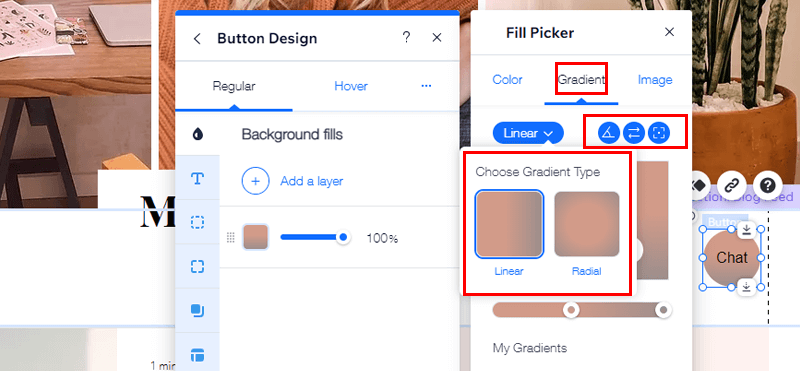
There, you can also choose gradient type, we’ll go with the Radical type and position your gradient of the button.
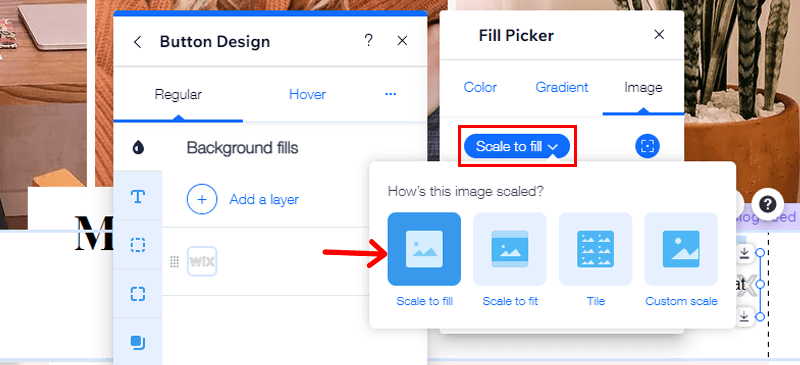
Next we can add an image to the button. Go to the “Image” option and choose your desired image.
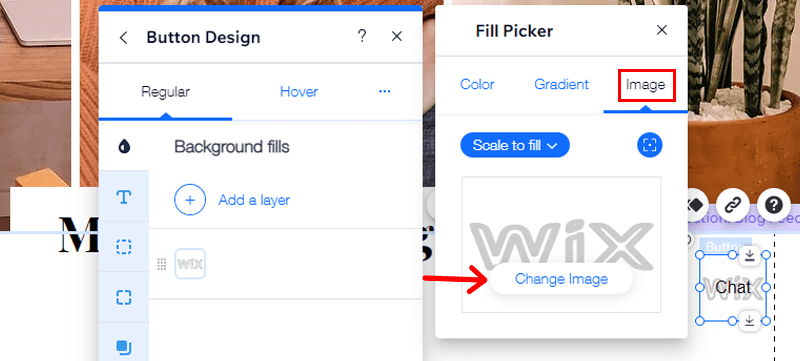
Now if you look at the “Scale to fill” option, you can choose how the image is scaled. It can be scaled to fit, fill, tile, or custom scale. Here we’ll go with the “Scale to fill” option.
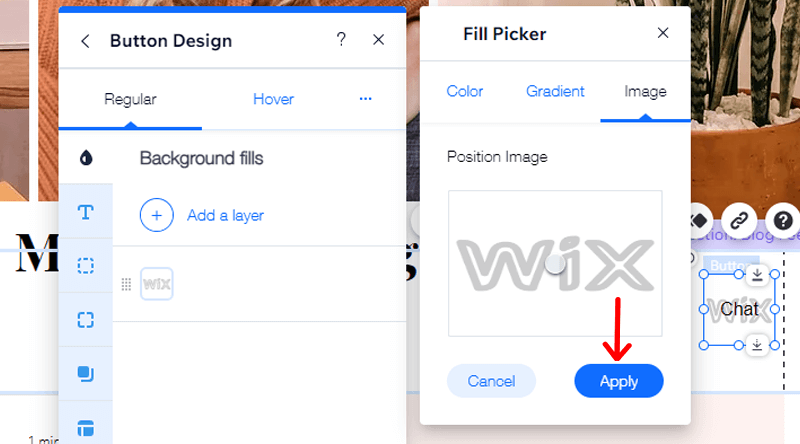
When you’re done, click the “Apply” button.
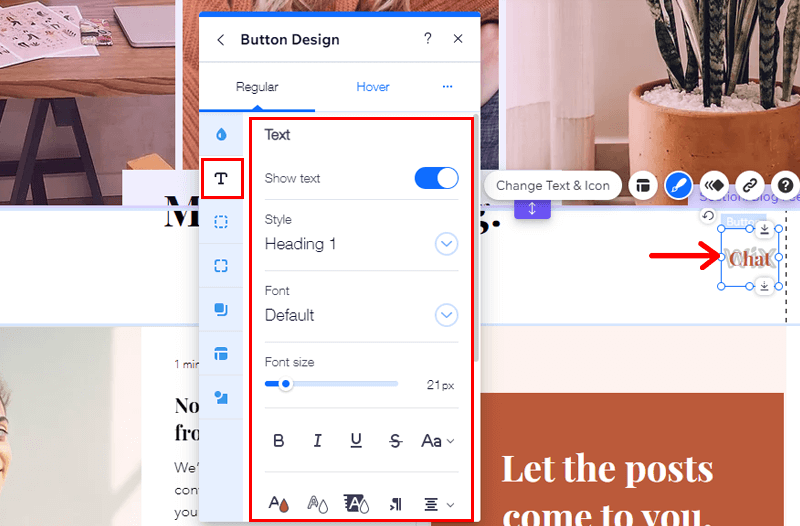
Next, on the “Text” option, you can choose to show or hide text, text style, font, font size, line spacing, and text color of your button text.
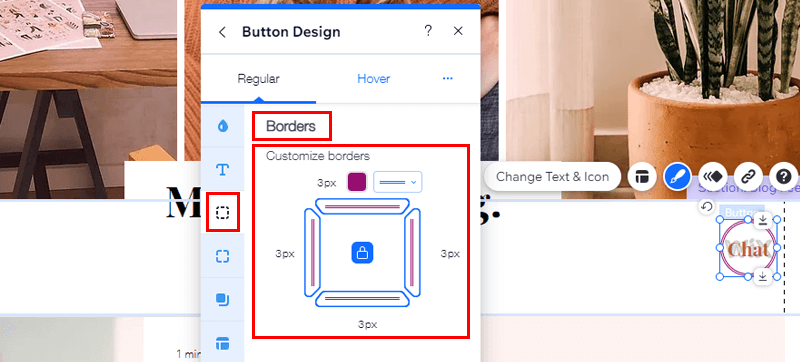
Moving on we’ll go with the “Borders” option. Here, you can customize the color, size, and style of your border.
Similarly, go through the other options and customize the way you like.
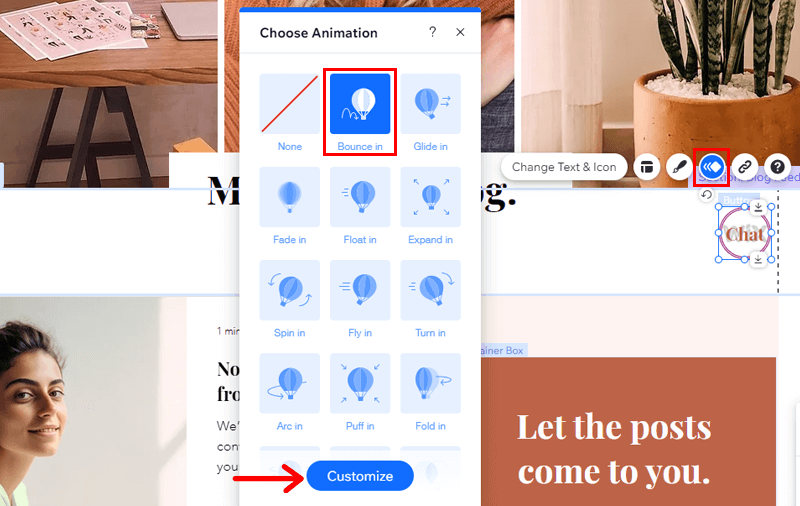
Now, let’s customize the Animation of a button. There you can choose the animation you like and customize it. Here we’ve chosen the “Bounce In” option. Following that click on the “Customize” option to make changes.
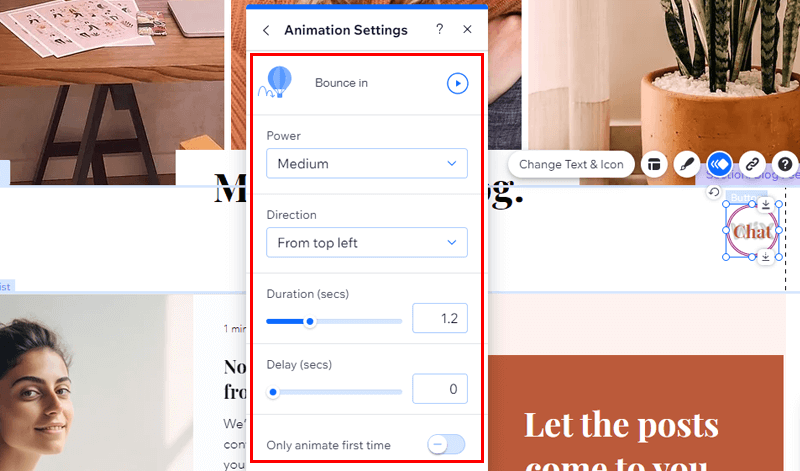
On the customize tab, you’ll have the option to choose how hard or soft your animation will appear. Also choose the direction of animation, duration, and delay, or choose to animate for the first time only.
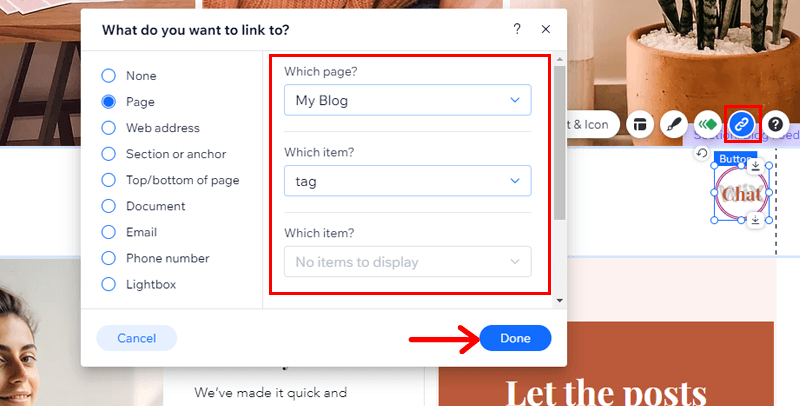
Further if you click the “Link Icon,” you’ll see what you want to link to your button. Here we’ve chosen a page. Once you’re done click the “Done” button.
And there you have it, your fully customized button.
III) Manage and Add Pages
Moving on, we’ll add a page and learn how to manage it. So start by clicking the “Page & Menu” option on the left menu.
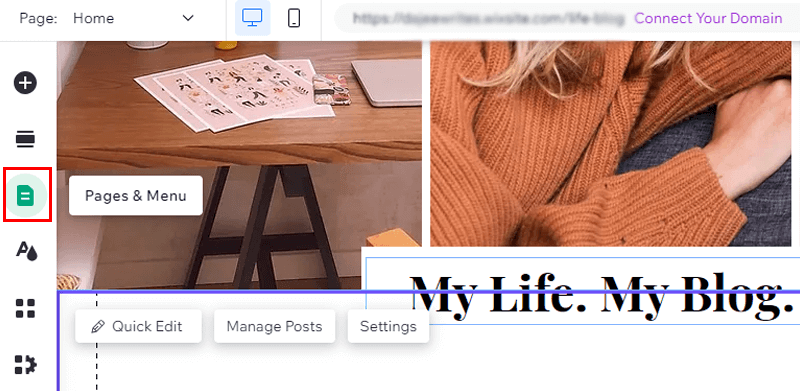
Next, click on the “Add Page” button.
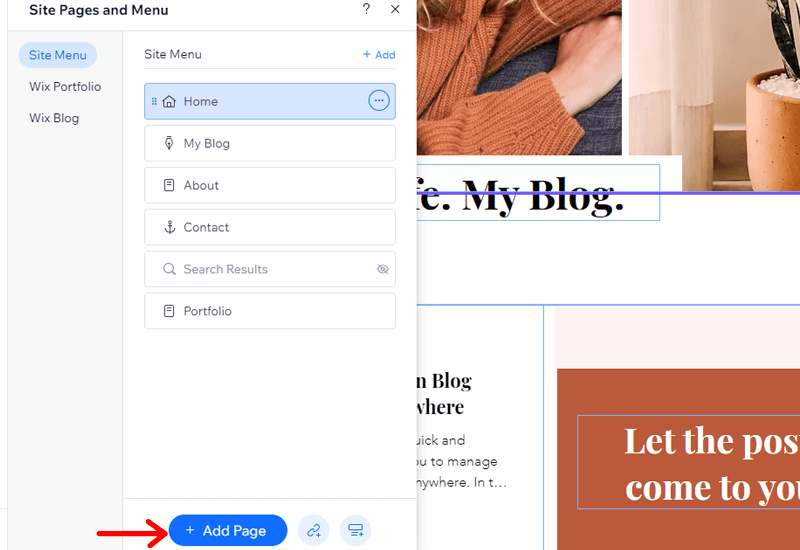
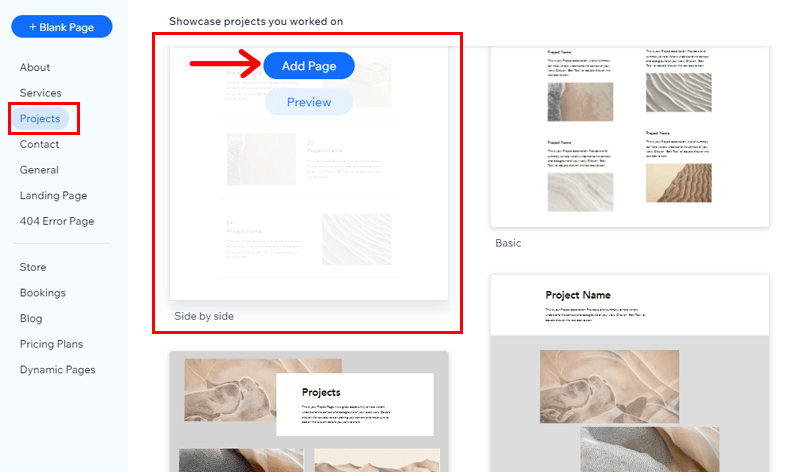
Now you can choose what page to add, here we’ll go with the “Projects” page. After selecting the page you’ll can choose templates for your page. Let’s pick the “Side by side” template option.
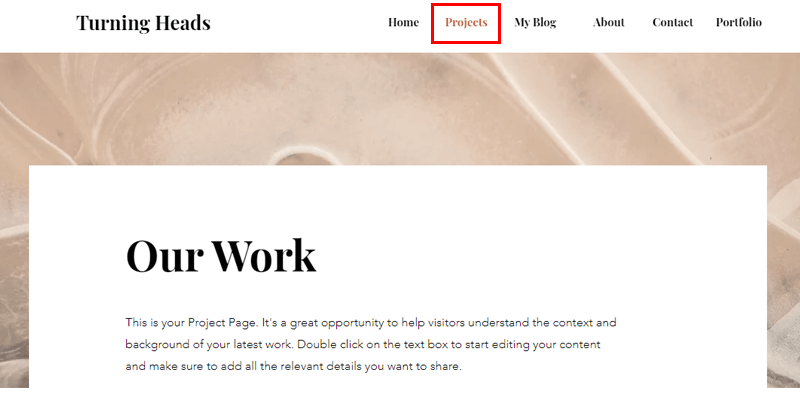
And that’s it! Here you can see our project page is added to our site.
Now, let’s manage the page!
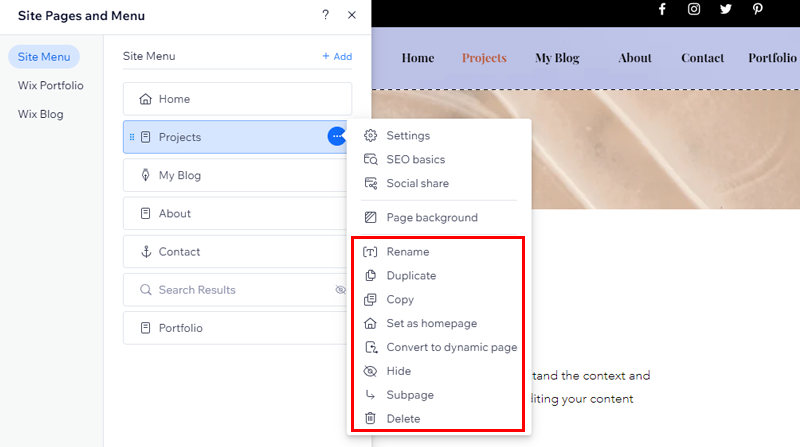
So again, start by clicking the “Page & Menu” option. There you can see all the pages of your website. Now let’s manage our Project page, so click on the three-dot button, then go to the “Settings” option.
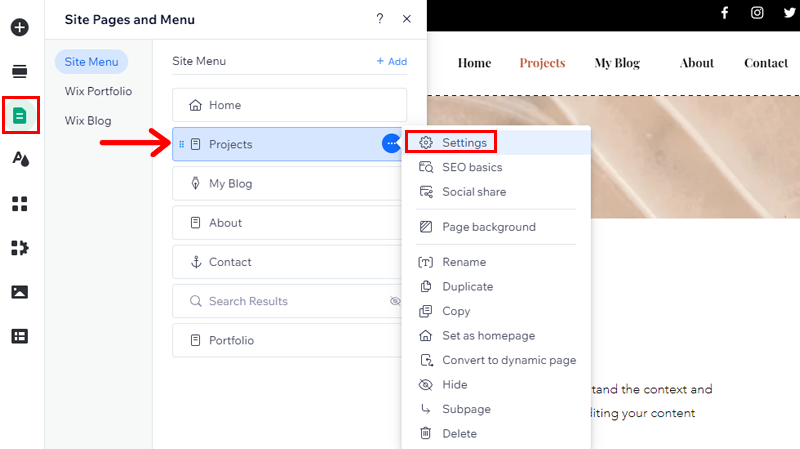
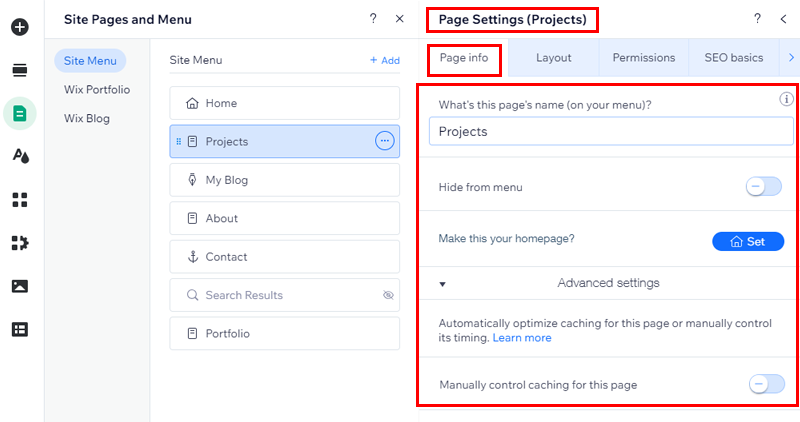
Here, under the “Page Info,” you can name your page, also choose to hide it from the menu and enable/disable manual control caching for this page.
Now, under the “Layout” tab, you’ll have 2 options:
- Standard: This option will add a header at the top of the page and a footer at the bottom.
- No header & footer: Choosing this option does not show the header, footer, and elements on both desktop and mobile.
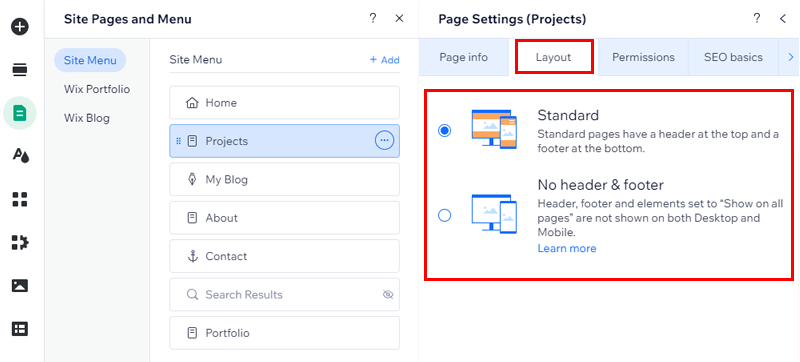
Here we’ll go with the Standard option, as shown in the image above.
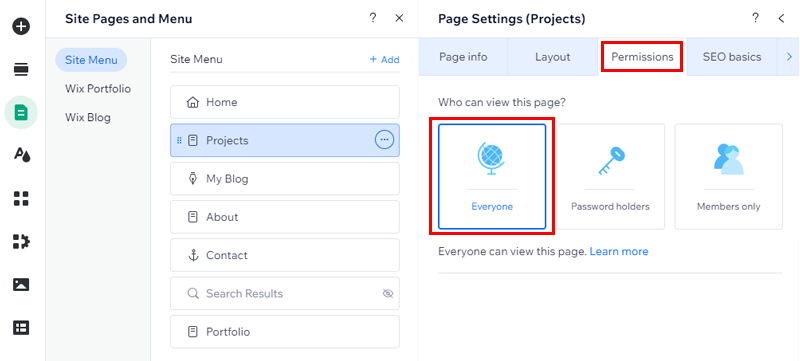
Moving on to the “Permissions” tab, you can set who will view this page. There are 3 options, Everyone, password holders, or members only.
As this is a project page, we’ll set it for everyone to view.
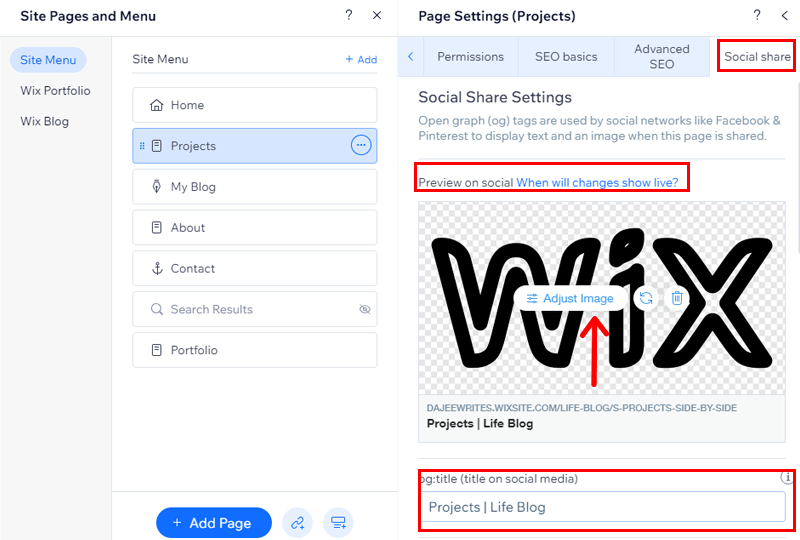
And there comes the “Social Share” tab. Here you’ll get to choose an image for your social site. Also, you can add a title for displaying on social media and a description.
Moreover, if you again click on the three-dot button, then you’ll see the option to change the background of your page.
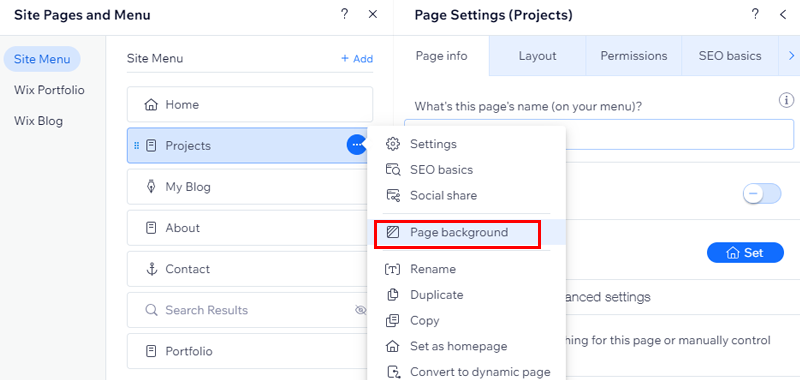
There you’ll have 3 options, color, image, and video. First, let’s start with the color option, there you can change the overall color of your page background.
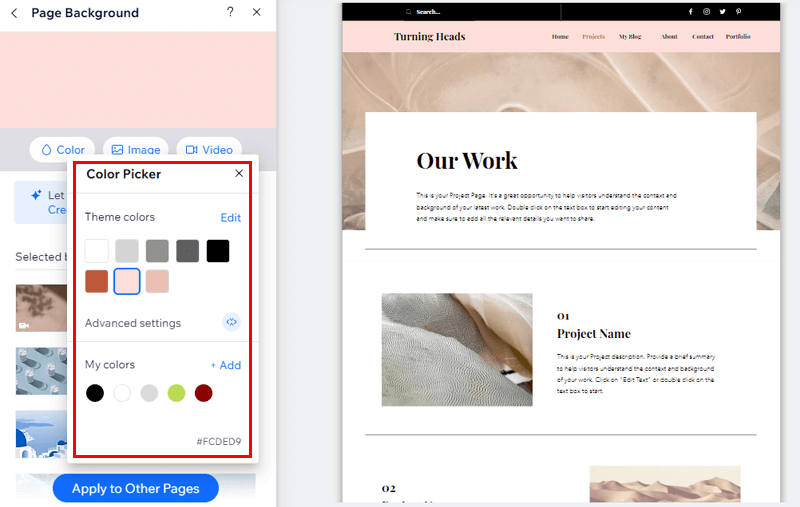
The Wix shoes the theme colors or sets your custom color for the page. There is another option, that’s if you want to change the background for the other pages or not.
Adding to that, you choose to add images and video for the page background. On top of that, it allows you to add a background for your page.
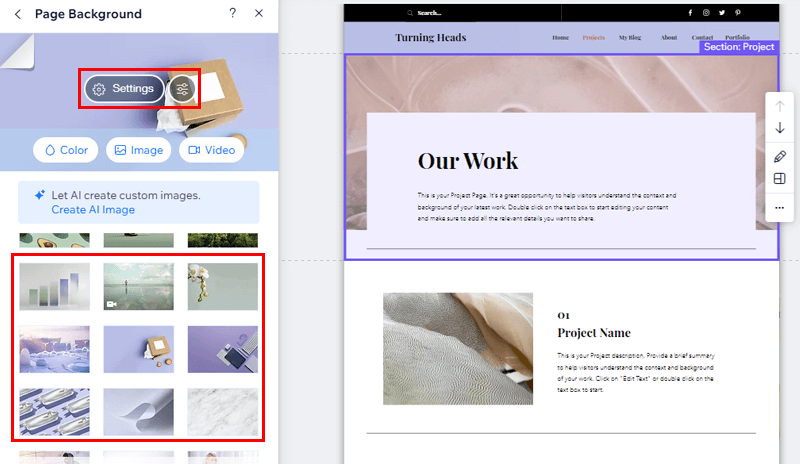
Moreover, here too you can customize the settings for your selected background. Simply click on the “Settings” option.
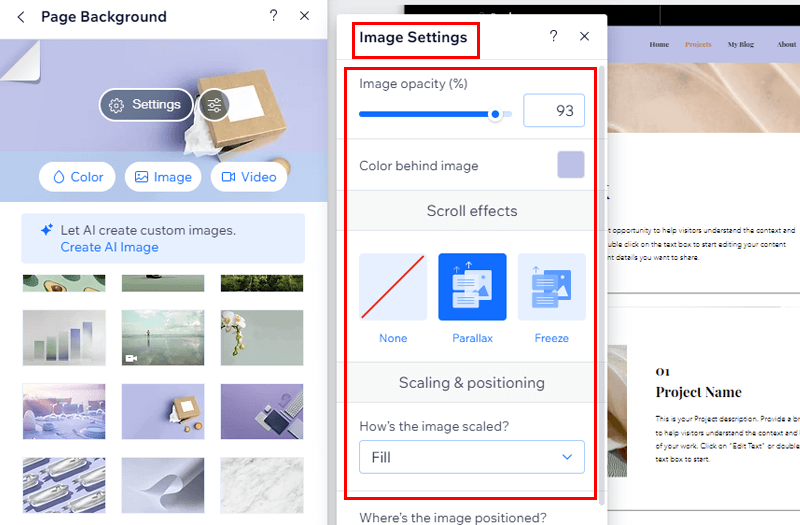
Here you can change the image opacity, color behind the image, scroll effects, scaling & positioning, how the image scales, and how it’s positioned.
Besides these settings, you can always change the name of your page, duplicate this page, copy, or set this as a homepage. Also, you can convert it to a dynamic page, hide this page, add a subpage, or delete it completely.
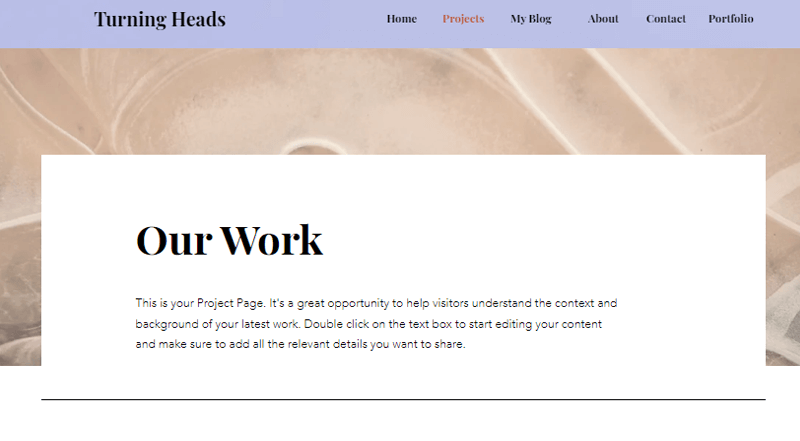
And there you have it, your page is ready. Below is an example of how it looks!
IV) Customizing Site Design Options
Now let’s complete the site design option. To get started, click on the “Site Design” option on the left-hand side.
There you can change the theme, but we’ll stick with this one.
Customizing Color Theme
Further, you’ll have a bunch of options to customize the design. Starting with the Color Theme.
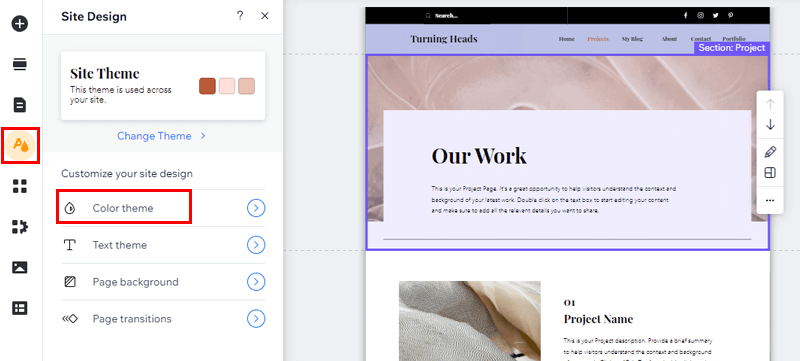
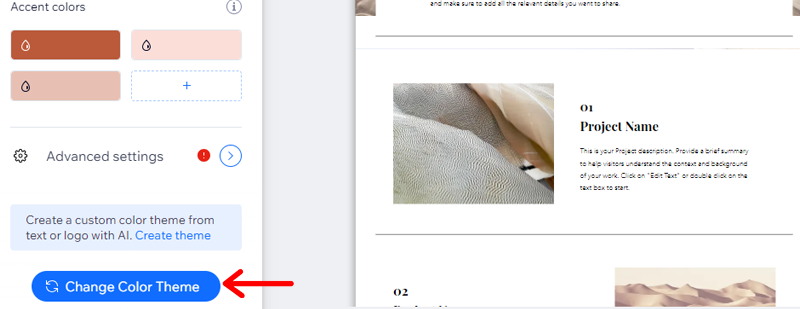
Now you can change the color of your theme, at it’ll be used across your site.
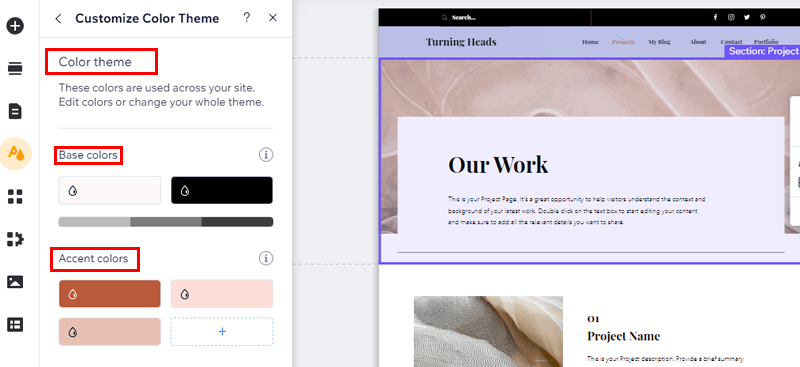
Further down, you’ll see an option “Change Color Theme,” so click on it.
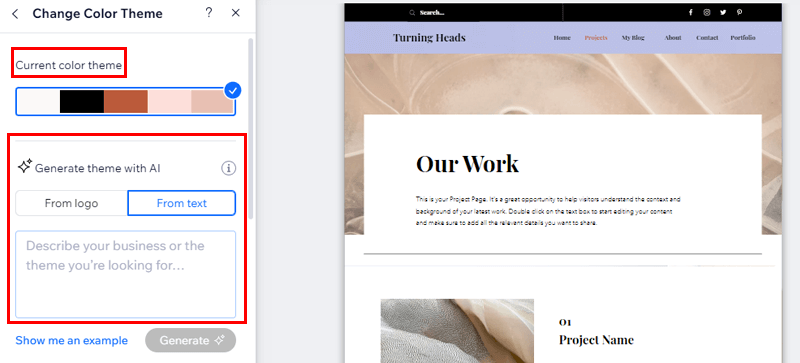
Now you’ll see the current color theme, also you’ll have the option to generate a theme with AI from text or the logo.
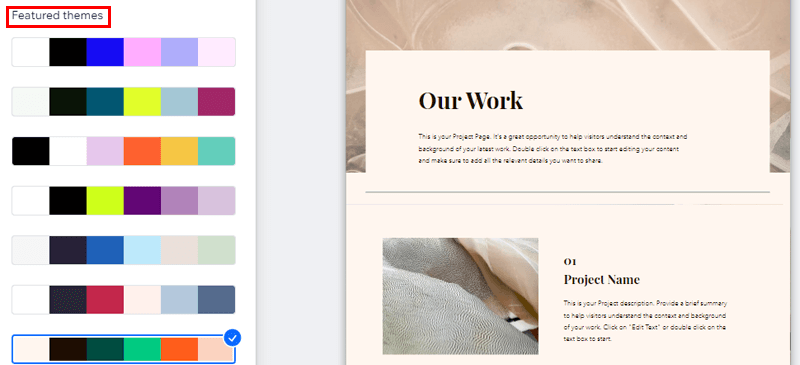
Further down, you’ll see featured themes and color palettes you can choose.
Customizing Text Theme
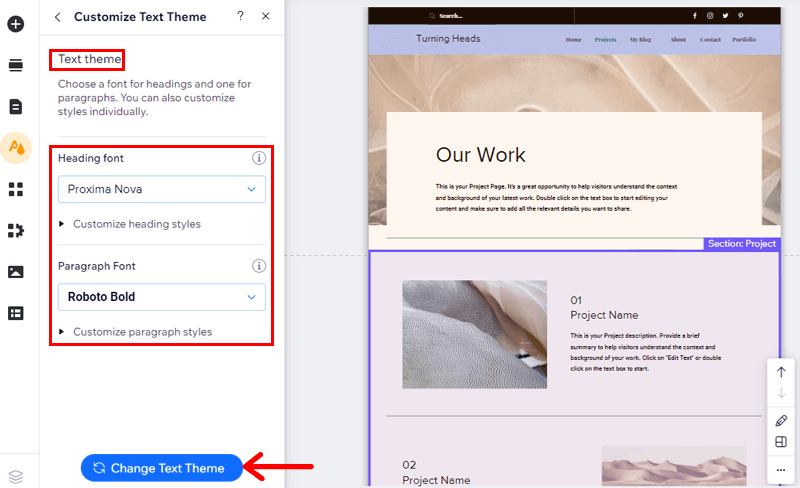
To customize the text theme, under the Site Design option, click the “Text Theme” tab.
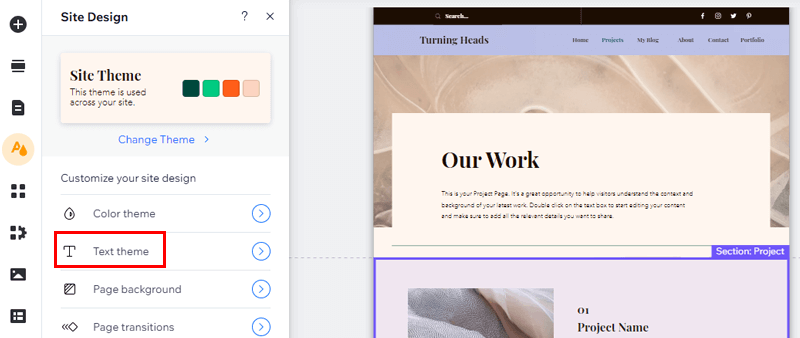
Here you can choose heading font, heading styles, and customize paragraph style. Below, you’ll see the “Change Text Theme” button, so click on it.
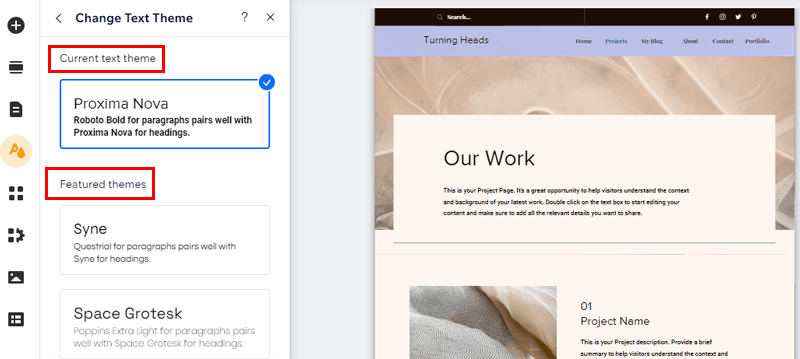
There you can change the current text theme, with the featured themes recommended by Wix.
Page Transitions
Now, again go to the “Site Setting>Page Transitions” option.
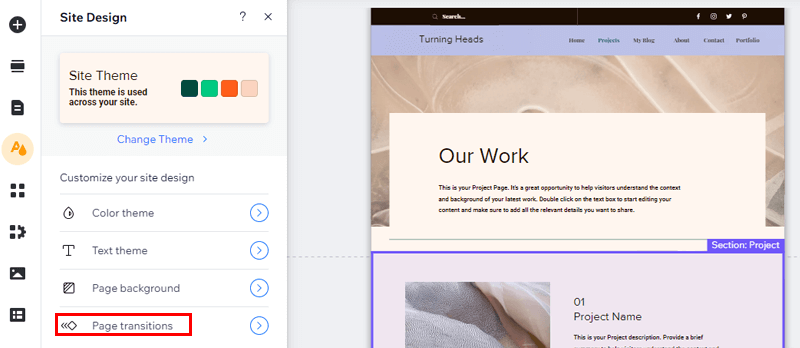
Here, you have to change the page transition to horizontal, vertical, crossfade, and out-in.

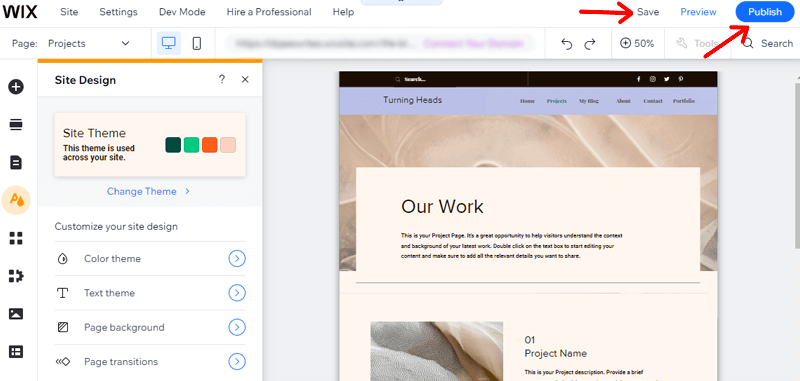
Once done with editing, hit the “Save” and “Publish” buttons.
Step 4: Add Free Wix Apps
Wix offers tons of apps to maximize your website functionality.
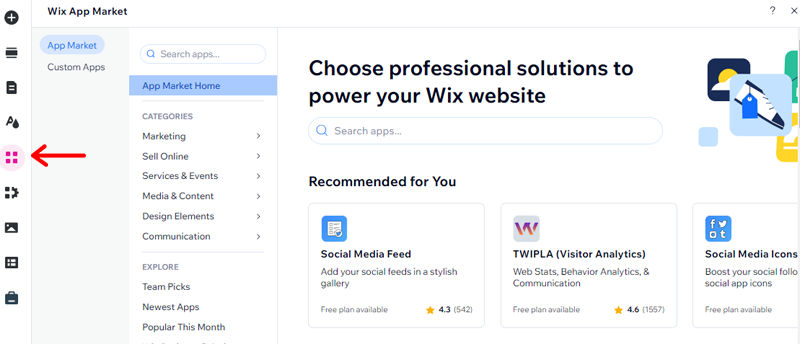
So, click on the “Add Apps” option on your Wix editor dashboard. It’ll take you to the Wix App Market where you’ll find tons of apps as per the categories.
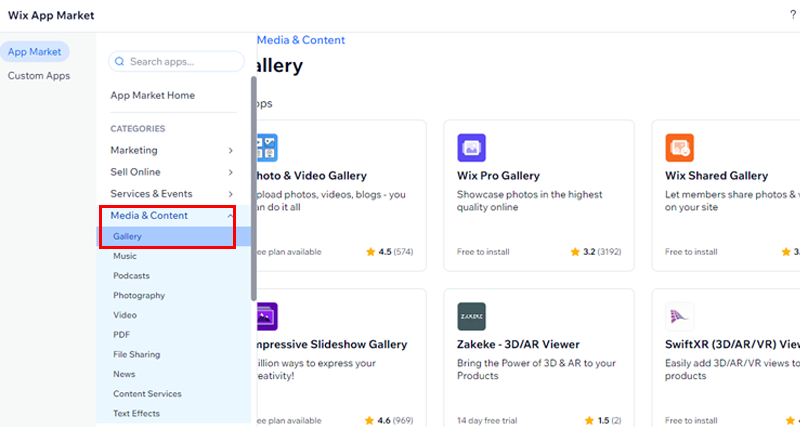
Here we’ll choose Gallery under the Media and Content option. Then you’ll see available apps for your site, so pick one of your choices.
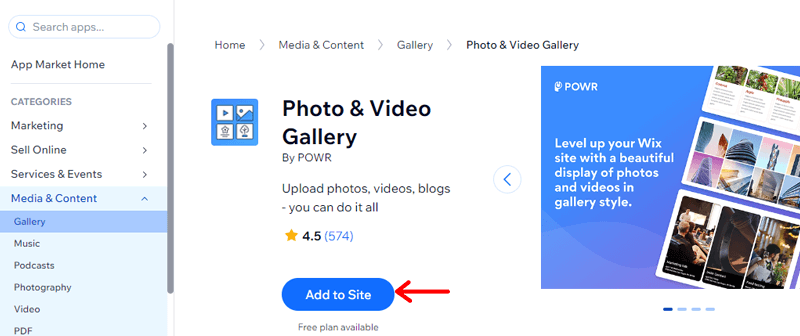
So, we’ve chosen the Photo & Video Gallery, now click the “Add to Site” button.
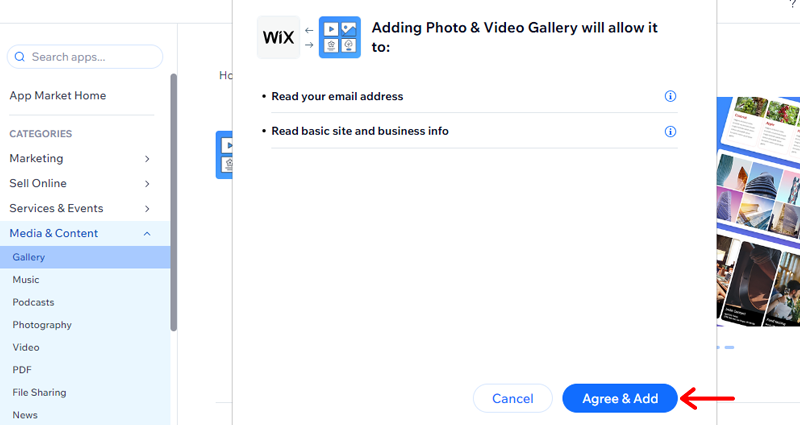
On the next popup page, you’ll need to reconfirm your email address and site basic detail, then click the “Agree & Add” button.
And you’ll see the photo and video gallery added to your site. Now click on the “Settings” option.
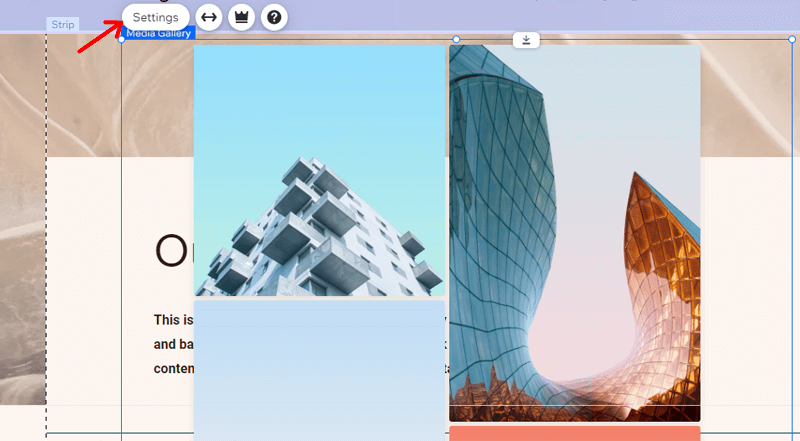
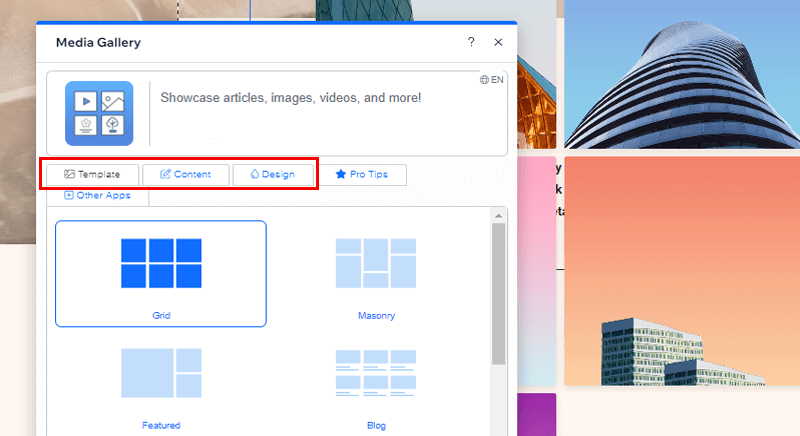
Under the settings, you can customize various options like:
- Templates: It offers multiple options like a grid, masonry, blog, lightbox, social, and more.
- Content: Here you can add or remove images and videos for your site.
- Design: This lets you customize image layout, hover effects, title, border, and more.
Not just that, you can also gag the galley and adjust it anywhere you like on your pages. As well as manage the size of the media gallery.
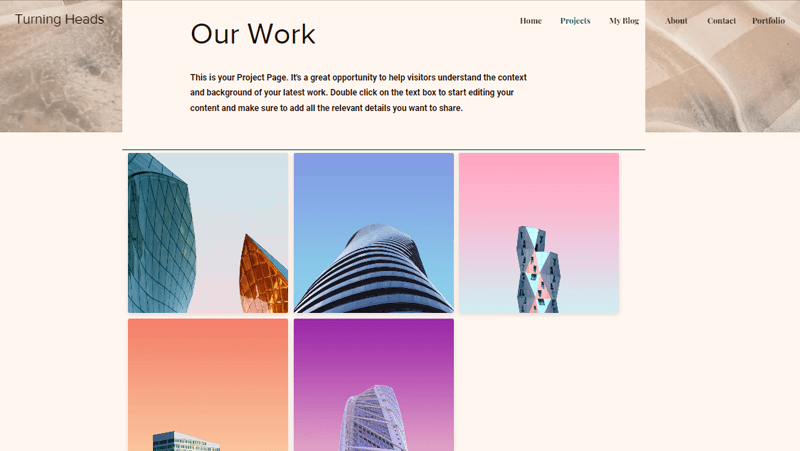
Above is the image of how it looks on your website.
And that’s it, you’ve successfully added the app to your site.
Step 5: Optimize Website for Search Engines
Now that you’ve created a stunning website, it’s time to ensure that it’s easily discoverable by search engines like Google. Search Engine Optimization (SEO) is crucial for increasing your website’s visibility and attracting organic traffic.
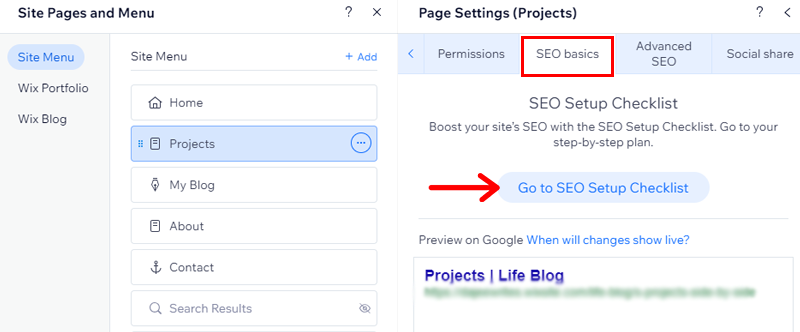
And yes, Wix provides built-in SEO settings that you can use to optimize your website. To access the SEO settings, go to the “Page & Menu> Settings>SEO Basic.”
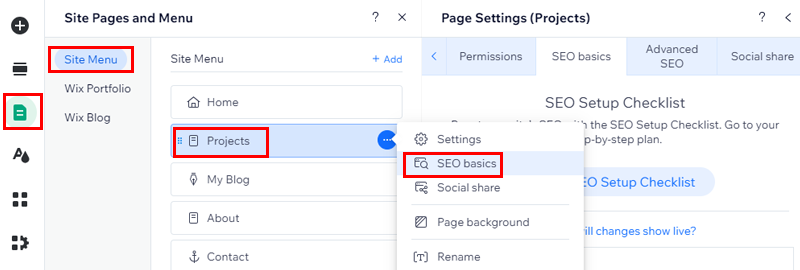
Now click on the “Go to SEO Setup Checklist” button.
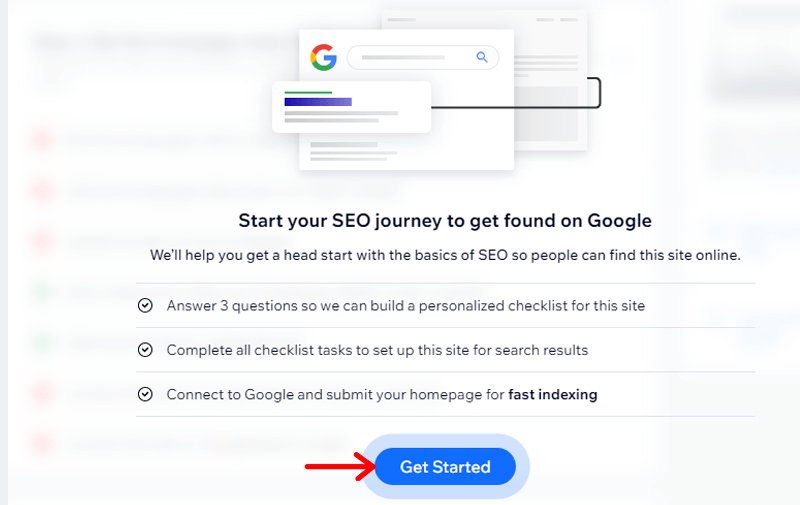
This will prompt you to the next page, here complete all checklist tasks to help this site get found in search results. So, click on the “Get Started” option.
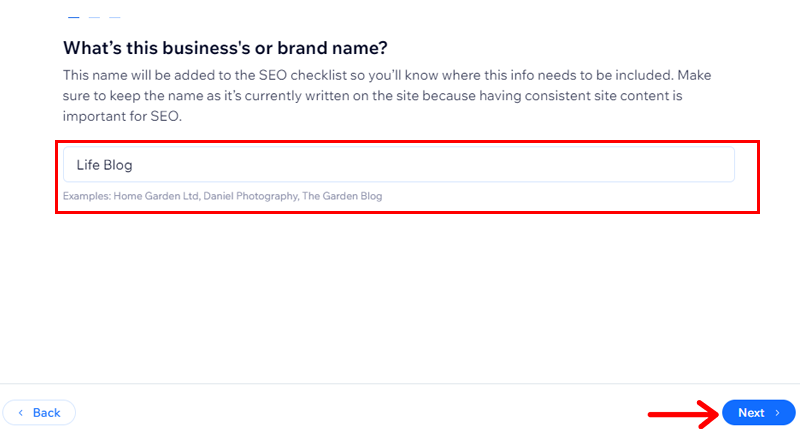
First appears the business or brand name. So, add your website name and click “Next.”
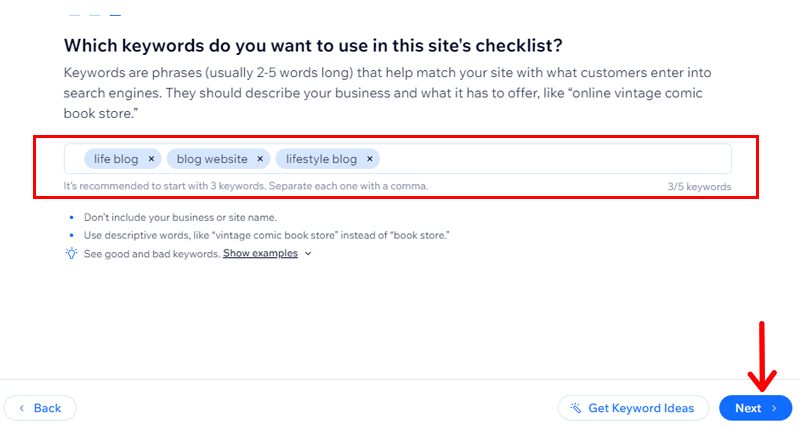
Now enter the keywords that match your site and help customers find you easily on the search engines. Then click on the “Next” option.
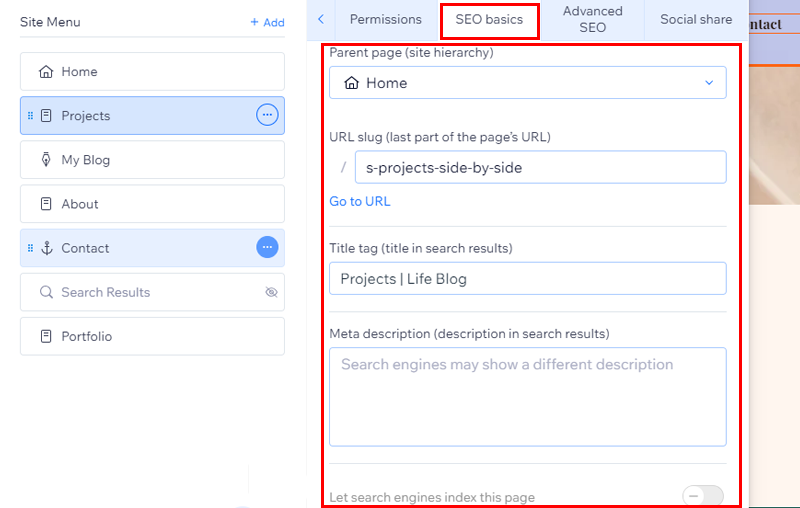
Further under the SEO Basics tab, you’ll see areas to add a parent page, URL slug, title tag, meta description, and the option to enable “let search engine index this page.”
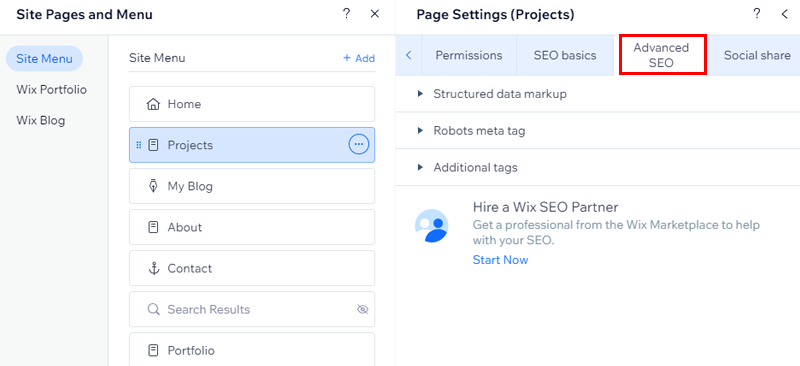
Moving on, you can also edit your Advanced settings. They come with options like structured data markup, robots meta tags, and additional tags. Or get a professional from the Wix marketplace for your website SEO.
Following these steps, you can optimize your Wix website for SEO and increase your chance of getting found by potential visitors.
Step 6: Test and Launch Your Site
Once you are happy with the design and content of your website, it’s important to test it thoroughly to make sure it’s working properly.
Here are five brief tips to test a site before going live:
- Browser Compatibility: Test your site on various browsers to ensure consistent performance and appearance.
- Mobile Responsiveness: Verify that your website functions well on different devices, especially mobile phones and tablets.
- Link Check: Scan and validate all links to avoid broken links, using tools like W3C Link Checker.
- Load Time Optimization: Optimize images and minimize unnecessary elements to enhance the site’s loading speed.
- Security: Do use security measures and obtain an SSL certificate for your website.
But you need to be mindful, that testing your website is not a one-time process. It’s vital to continually test and optimize your website based on user data and feedback.
Launch Your Site
Once tested, and you’re happy with it, now it’s time to launch it.
Since Wix is a fully hosted website builder, you don’t have to worry about managing your hosting and domain. The free plans of Wix provide you with hosting locked to a Wix subdomain, 500MB storage space, and access to some webpages.
All you’ve got to do is hit that “Publish” button in the Wix editor.
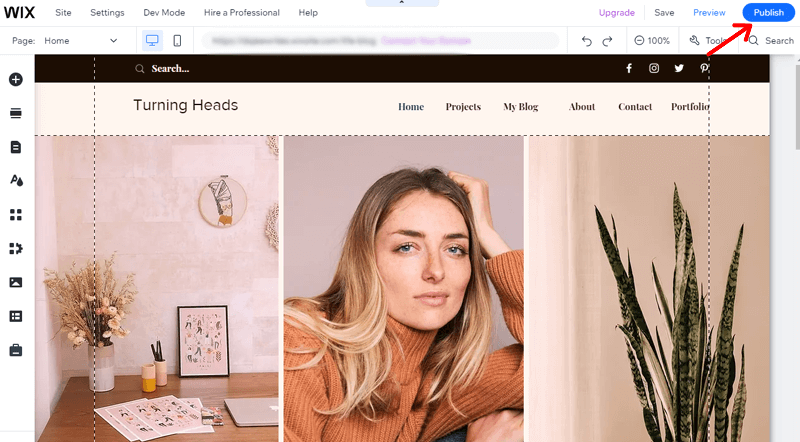
And you’ve successfully created and published your Wix website free.
Step 7: Promote and Market Your Site
But hold on! Even if your website is alive your job is not done yet. You need to do a few more things to keep your website running smoothly and successfully. That is to promote and market your site.
Here are simple tips to promote and market a recently published website:
- Social Media Sharing: Share your website on platforms like Facebook, Twitter, and Instagram to reach a wider audience.
- Email Marketing: Build an email list and send out newsletters to keep your audience updated about your website.
- Collaborate and Network: Partner with influencers or other websites to expand your reach.
- Paid Advertising: Consider using online advertising, like Google Ads or social media ads, for targeted promotion.
- Monitor Analytics: Keep an eye on website analytics to understand user behavior and refine your marketing strategies.
By following these tips, you can ensure that your website is successful and continues to grow and improve over time.
Having said that, let’s explore some of the alternatives of Wix!
Wix Alternatives
Each website builder mentioned below is top-notch. So, select the ideal platform that meets your needs the most.
1. WordPress.org
WordPress.org is a free and open-source content management system (CMS) that empowers users to create and manage websites easily. Launched in 2003, it has grown to become one of the most popular platforms for building websites and blogs.
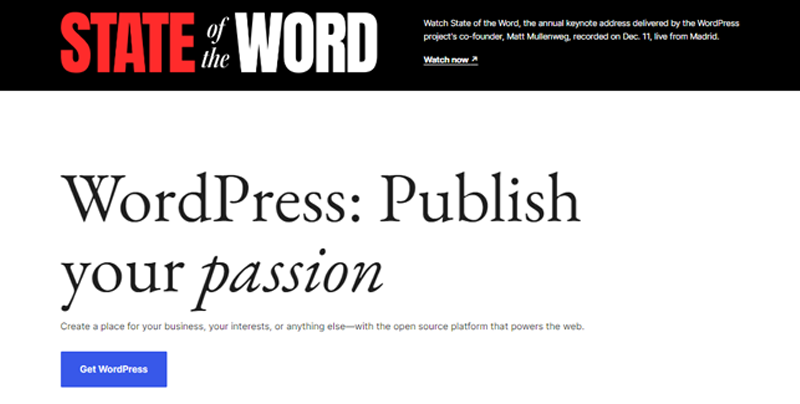
With a user-friendly interface and a vast library of 11,000 + themes and 59,000+ plugins, WordPress.org allows you to customize your site easily.
Moreover, the community plays a vital role in its success. It’s a hub for developers, designers, and users who share knowledge and collaborate on projects. As well as contribute to the improvement of the platform.
2. Webflow
Webflow is a user-friendly website-building platform that lets you create websites without needing to code. It’s like a virtual toolbox for building websites, offering a drag-and-drop interface. This means you can design your site visually.
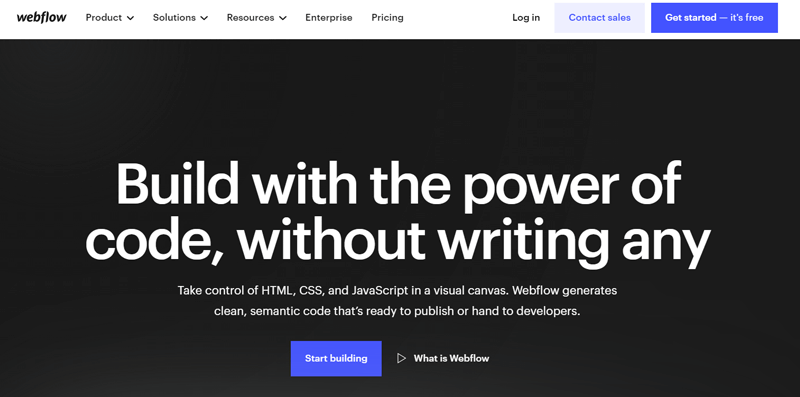
Moreover, the best feature of Webflow is its responsiveness. This means your website will look good and function well on various devices, like phones, tablets, and desktops.
Also, it provides hosting services, making it even more convenient. Once your website is ready, you can publish it directly on Webflow’s servers. This all-in-one approach simplifies the process of creating, designing, and launching your website.
In essence, Webflow empowers users to build beautiful and functional websites with ease.
If you want to create a webflow site, check out our article.
3. Shopify
Shopify is an e-commerce platform that allows you to create online stores. Its design is simple and you can customize the look and feel of the online store without extensive coding knowledge.

With Shopify, you can easily add products, manage inventory and process orders. The platform also offers a variety of templates and themes, enabling users to create a professional and visually appealing storefront.
Additionally, Shopify provides integrated payment options, making transactions smooth and secure for both the business owner and customers. Overall, Shopify has become a popular choice for those looking to enter the world of e-commerce due to its user-friendly approach.
For more details, do check our Shopify review article.
Now it’s time to answer some of your burning questions. So, let’s go!
Frequently Asked Questions FAQs
1. What are the limitations of a free Wix site?
You won’t be able to connect custom domains, can’t remove Wix ads, and storage is only 500MB. As well as Google Analytics and online payments are not included in the free Wix site.
2. How long does Wix take to create a site?
The time to create a site on Wix varies based on complexity. With its user-friendly interface, a simple site can be set up in a few hours, while more intricate designs may take a few days.
3. Do I own my site on Wix?
Yes, you own the content on your Wix site. Wix is a platform that hosts your site, but the content and domain are yours. It’s important to review Wix’s terms of service for details.
4. Do you need a business license to sell on Wix?
Whether you need a business license to sell on Wix depends on your location and local regulations. It’s advisable to check with local authorities to ensure compliance with licensing requirements for your online business.
If you’re wondering if there are any detailed tutorials to build a website with WordPress, then check out our comprehensive article on how to create a website.
Conclusion
And that’s all, folks! We’ve come to the end of our article on how to build a Wix website for free.
We believe you can smoothly build a website with Wix following the above-mentioned steps and guidelines. All you’ve to do is start right now!
Still any queries? Don’t hesitate to ping us in the comment section below. We’re more than happy to help you to build your website with Wix.
You might love exploring our other comprehensive tutorial guides. Such as how to build a website with Webflow and how to build an affiliate marketing website.
Also, don’t forget to share this article with your friends and family planning to build a website with Wix.
Lastly, please follow us on our social media handles Facebook and Twitter to stay updated with our articles.
