
Are you looking for the best WordPress caching plugins to improve your website performance? If yes, then your search ends here.
In today’s fast-paced digital world, website speed is one of the most critical factors for better user experience as well as Search Engine Optimization (SEO).
Good news for WordPress users, caching plugins make it super easy to improve the site load times.
But with so many caching plugins available, it’s challenging to determine which one is right for your specific needs. But don’t worry anymore!
In this article, we present you with the top 10 WordPress caching plugins available in 2024. We’ve selected these plugins based on their ability to deliver superior results while remaining easy to use and configure.
Now, let’s dig in!
Table of Contents
Video Tutorial: Best WordPress Caching Plugins
Would you prefer to watch a tutorial video on YouTube instead? It’s right here!
Meanwhile, if you still prefer reading comprehensive post, then read all the way to the bottom.
Understanding Caching and Its Importance in WordPress Sites
Are you new to word caching? Well, caching is a fundamental concept in web performance optimization that plays a crucial role in enhancing the user experience of WordPress sites.
To delve into this topic more deeply, let’s explore what caching is. And why it’s essential to have an effective cache strategy within your WordPress environment.
What is Caching?
Simply put, caching means storing pre-rendered or processed versions of website content locally on users’ devices (browsers) or servers. Further, the stored (cached data) is quickly fetched instead of reprocessing it for every visitor’s page request.
In other words, caching is like saving a snapshot of website stuff on your device or server. So it can be accessed super fast instead of redoing it every time someone asks for a webpage.

As a result, this reduces the number of server requests needed to generate dynamic pages. So, caching significantly improves load times.
Why Is It Required in a WordPress Site?
WordPress works by creating web pages using info from a database and a special code called PHP. This means every time someone wants to see a page on a WordPress site, it requires processing power.
So, if it’s not set up well, then this can make the pages load slowly.
Hence, implementing caching helps to remove these issues. By providing faster access to static assets like images, CSS files, JavaScript libraries, and even entire rendered pages.
The benefits of using caching plugins include:
- Improved Load Times: With less work required to render pages, visitors will notice quicker response times when navigating through your site.
- Reduced Server Resources: Fewer server requests mean fewer CPU cycles consumed. Thus, this allows you to handle higher traffic volumes with ease.
- Enhanced User Experience: A speedy site leads to increased engagement, lower bounce rates, and better search engine rankings.
- Scalability: Caching enables you to scale your site without worrying about its performance degradation as traffic increases.
By leveraging caching techniques, you can create a seamless browsing experience while minimizing resource consumption.
10 Best WordPress Caching Plugins 2024
Now, we’ll dive deeper into some of the best WordPress caching plugins available today. Further, helping you make informed decisions regarding which solution suits your specific needs.
1. WP Rocket
WP Rocket is a premium caching plugin that has gained immense popularity among WordPress users. Particularly, due to its user-friendly interface and exceptional performance.
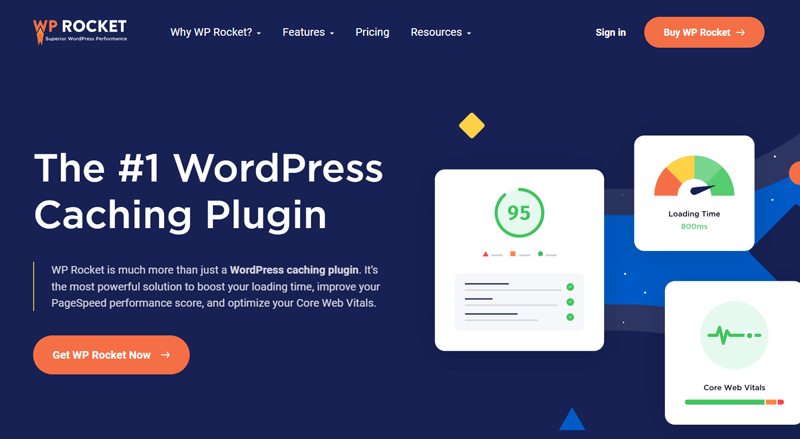
This powerful caching plugin optimizes your WordPress site’s performance by caching pages, posts, and other static content. It also minifies HTML, CSS, and JavaScript files, reducing their size and improving load times.
Moreover, it’s super easy to install and use, making it an ideal choice for beginners and advanced users alike.
How to Use It?
Using WP Rocket is a breeze. Indeed, it offers a user-friendly interface that allows you to customize settings according to your specific needs.
If you’re new to installing the plugin, then check out our article on how to install the WordPress plugin for detailed guidance.
After installing and activating the plugin, you can access its settings from the WordPress dashboard via ‘Settings > WP Rocket’.
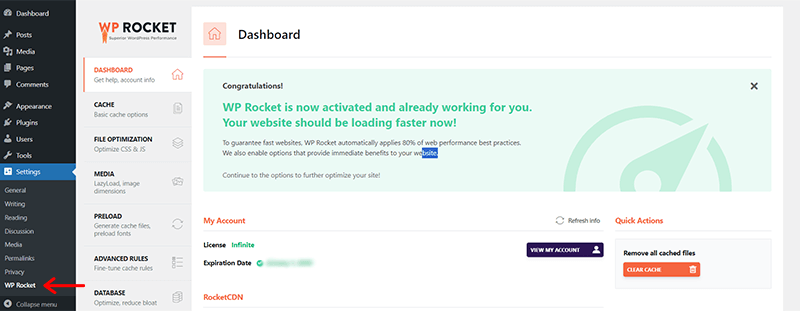
The best part is right after its activation, this plugin automatically implements 80% of web performance best practices.
Further, you can navigate to the ‘Cache’ tab. There, you’ll find several settings for ‘Mobile Cache’, ‘User Cache’, and ‘Cache Lifespan’,
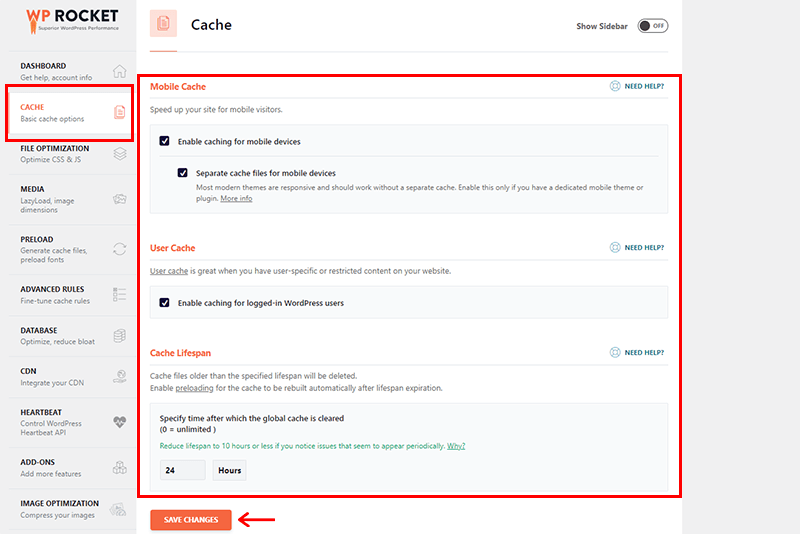
Once you configure it, you can click on the ‘Save Changes’ option.
Further, you can explore other tabs such as ‘File Optimization’, ‘Media’, ‘Preload’, ‘Advanced Rules’, and so much more. You can easily configure these optimization features with just a few clicks.
For more guidance, you can check its detailed getting started documentation article.
Key Features:
- Caches pages, posts, and other static content, reducing server load and improving load times.
- Minifies HTML, CSS, and JavaScript files, reducing their size and improving load times.
- Offers lazy loading for images, videos, and iframes, improving page speed and reducing bandwidth usage.
- Optimizes your WordPress database by removing unnecessary data, and improving site performance.
- Integrates with popular Content Delivery Networks (CDNs) like Cloudflare, improving site speed and performance.
Pricing:
As mentioned earlier, WP Rocket is a premium plugin. This means it’s available to you in 3 pricing plans:
- Single: Costs $59/year for 1 website.
- Plus: Costs $119/year for 3 websites.
- Infinite: Costs $299/year for unlimited websites.
All plans come with one year of support and updates. It also offers a 14-day money-back guarantee, so you can try the plugin risk-free.
At SiteNerdy, we chose WP Rocket because of its ability to provide a noticeable increase in site speed and performance.
Our team found the plugin’s setup process straightforward and easy. Requiring only a few minutes to activate and begin experiencing the benefits.
2. LiteSpeed Cache
LiteSpeed Cache is a free caching plugin that offers exceptional performance and optimization capabilities for WordPress sites. It’s mainly developed for LiteSpeed servers.
Precisely, it utilizes server-level caching (LSCache) to deliver lightning-fast load times for WordPress sites. This provides superior performance compared to traditional PHP-level caching plugins.
It offers a range of optimization features such as page caching, minification, and image optimization to improve site performance. Moreover, it’s compatible with most hosting providers and is easily integrated with popular CDNs.
How to Use It?
Using LiteSpeed Cache is a straightforward process. After installing and activating the plugin, you can access its settings from the WordPress dashboard.
For that, navigate to ‘LiteSpeed Cache > Cache’. Next, under the ‘Cache-Control Settings’ you can locate the ‘Enable Cache’ option. Toggle the switch ON to activate caching.
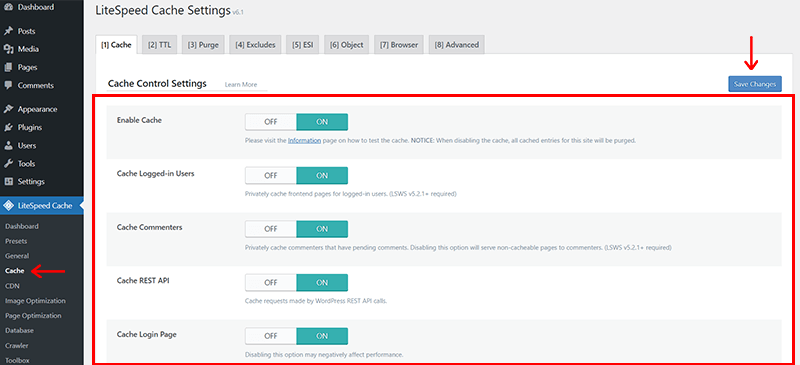
Similarly, you can enable other options like Cache logged-in users, cache commenters, cache Rest API, cache login page, and so forth. Once done, click on the ‘Save Changes’ option.
Further, you can find other tabs like TTL, Purge, Excludes, ESI, etc that offer a range of customization options. With that, you can fine-tune your caching settings according to your specific needs.
You can check LiteSpeed Cached’s detailed documentation to learn more about it.
Key Features:
- Easy minification of HTML, CSS, and JavaScript files, combining multiple files into one, and image optimization.
- Configure your web server to set browser caching headers. This can tell browsers to store frequently accessed files locally on the user’s device.
- Includes features like lazy loading specifically designed to improve the performance of your website on mobile devices.
- Automatically optimize images for the web, which can significantly reduce their file size without sacrificing quality.
- Preload certain resources, such as fonts and critical CSS, which can help improve your website’s perceived performance.
Pricing:
LiteSpeed Cache is a free WordPress plugin that you can easily install right from your WordPress dashboard or the repository.
However, LiteSpeed Cache can integrate with LiteSpeed Web Server, a high-performance web server that delivers exceptional speed and scalability. By utilizing LiteSpeed Web Server and LiteSpeed Cache together, you can achieve unparalleled performance for your WordPress site.
For that, you’ll need to purchase a license for LiteSpeed Web Server that starts at $10 per month.
3. WP Super Cache
WP Super Cache is a powerful WordPress plugin designed to enhance the performance of your website. Particularly by generating static HTML files from your dynamic WordPress website.
So, when a static HTML file is created, your web server serves it instead of processing the heavier and more resource-intensive WordPress PHP scripts. This results in faster page loading times and improved overall site speed.
Further, it serves cached files to the vast majority of your users. Including those who are not logged in, haven’t left comments, or haven’t viewed password-protected content.
How to Use It?
Using WP Super Cache is a relatively straightforward process. Once installed and activated, you can configure the plugin via the ‘Settings > WP Super Cache’ menu in your WordPress dashboard.
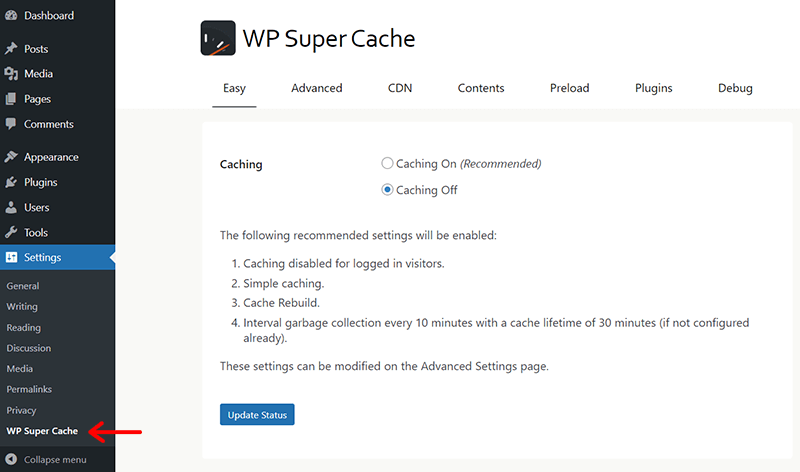
Also, you can choose between various caching modes, including ‘Simple’ and ‘Expert’ via the ‘Advanced’ tab. It also offers a range of customization options that allow you to fine-tune your caching settings according to your specific needs.
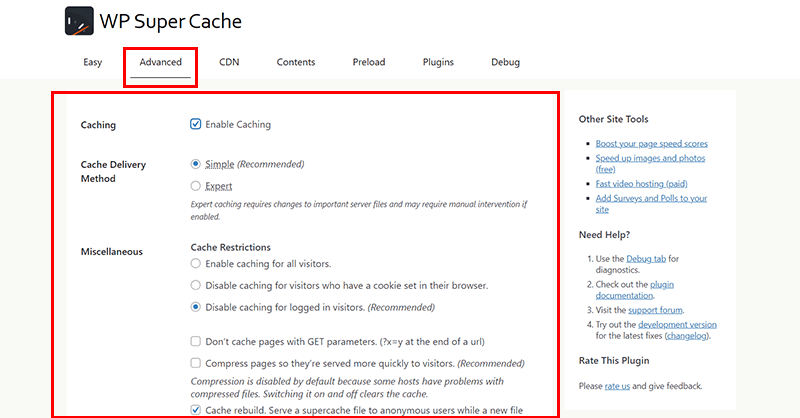
For instance, you might want to exclude certain pages or user roles from caching or specify the maximum age of cached files before they expire. It also includes tools for clearing cached files manually or automatically after updating content.
Once done, click on the ‘Update Status’ option to save your settings.
For more guidance, check its detailed documentation on the initial setup and configuration.
Key Features:
- Offers 3 caching methods such as expert mode, simple mode, and advanced mode.
- Automatically removes outdated cached files to maintain efficient storage utilization.
- Implements specific caching strategies for mobile devices, optimizing the user experience on smartphones and tablets.
- Provides granular control over what gets cached and for how long, allowing you to exclude specific pages or URLs.
- Displays the status of your cache and allows manual preloading of cached pages for improved performance.
Pricing:
WP Super Cache is a completely free plugin that you can easily download and use from the WordPress plugin repository.
4. W3 Total Cache
W3 Total Cache is another popular WordPress caching plugin known for its comprehensive approach to website performance optimization.
Essentially, this plugin helps to optimize your WordPress database by cleaning up unnecessary data and optimizing table structures. Further, this significantly improves website performance for users worldwide.
In addition, it integrates with various CDNs to deliver static content (images, CSS, JS) from geographically distributed servers. And, compresses website content before sending it to the browser, reducing file size and improving transfer speeds.
How to Use It?
Right after its installation and activation, you’ll see a new ‘Performance’ tab on the left-hand side navigation of your dashboard.
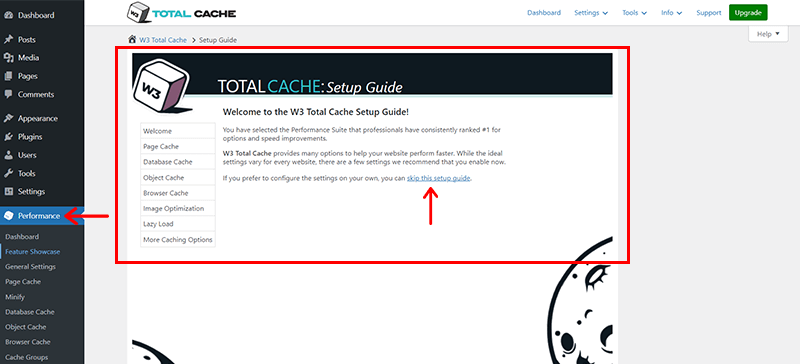
Also, you’ll see a quick setup guide to have a quick overview of the features and configuration. Meanwhile, you can skip the setting if you want to configure the caching settings on its own.
In that case, you can choose the type of caching you would like to enable – page cache, object cache, database cache, etc.
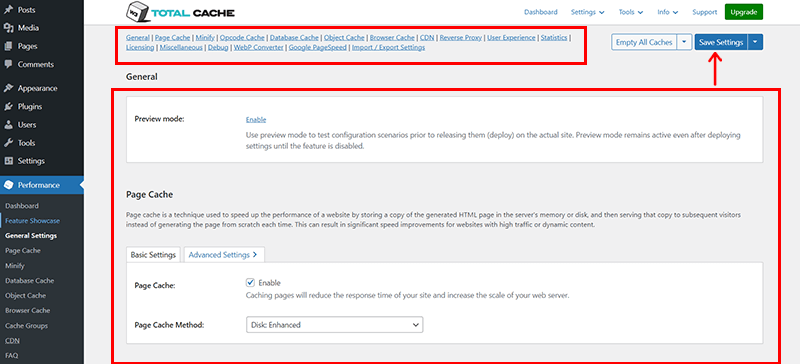
Then, customize the settings for each type of caching with ‘Basic’ and ‘Advanced’ options to suit your preferences. Once done, hit the ‘Save Settings’ option to save the changes.
Key Features:
- Caches complete pages, reducing server load and improving page load times for returning visitors.
- Offers a basic ‘Easy’ mode for simpler setup and a more detailed ‘Advanced’ mode with deeper configuration options.
- Caches database queries and other dynamic objects, minimizing database calls and boosting performance.
- Sets browser caching headers to encourage browsers to store frequently accessed files locally, further reducing server load.
- Offers security enhancements like comment caching and minification to help protect your website.
Pricing:
W3 Total Cache is a WordPress caching plugin developed by BoldGrid, hence, it’s 100% free to use. Easily install it right from your dashboard and get your hands on the caching game right away.
However, you can upgrade it to the premium version for more advanced features at the cost of $99/year for 1 site license. With that, you get features like advanced statistics, full site delivery, Rest API caching, fragment caching, etc.
5. WP Fastest Cache
WP Fastest Cache stands out as another popular caching plugin available in the market. It’s known for its simplicity and effectiveness in enhancing the speed and performance of WordPress websites.

This plugin utilizes the server’s mod_rewrite module for efficient caching, considered one of the fastest methods. What’s more is, it automatically deletes cached files when new posts or pages are published. Further, ensuring visitors see the latest content.
In addition, it also provides a user-friendly interface with clear options and settings. Further, making it easy for users of all levels to manage caching and performance optimization.
How to Use It?
Using WP Fastest Cache is a straightforward process that requires minimal configuration. You get an easy interface for customizing cache settings based on your specific requirements.
After installing and activating the plugin, you can see a new ‘WP Fastest Cache’ menu on your dashboard.
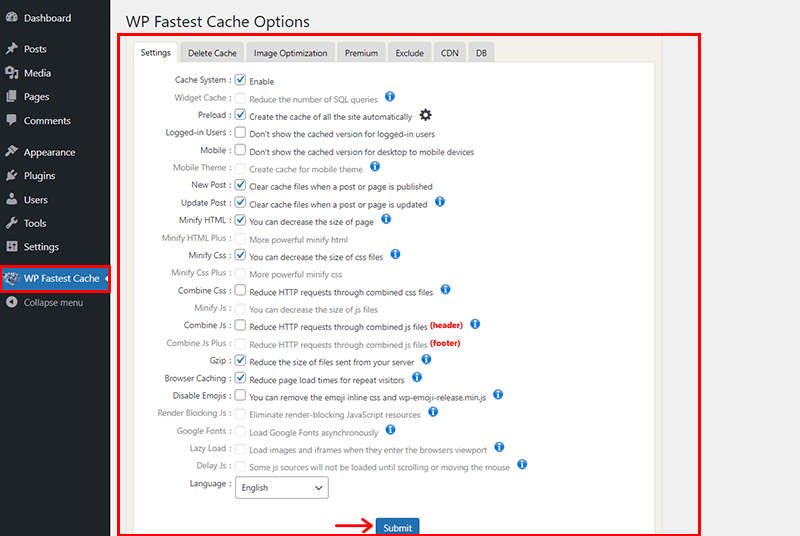
From there, you can enable caching with a single click and choose from various optimization options such as minification, browser caching, GZIP compression, and more.
Once done, click on the ‘Submit’ option.
To further enhance performance, you can explore other tabs like image optimization, database cleanup, and CDN integration. These additional premium functionalities allow you to fine-tune your site’s speed and efficiency without extensive technical knowledge.
Key Features:
- Allows manual deletion of all cached files and minified CSS/JS files from the plugin’s settings page.
- Enables blocking specific pages or posts from being cached using shortcodes, providing flexibility for dynamic content.
- Sets expiration times for cached files, allowing you to control how long cached versions are stored before being refreshed.
- Compresses website content before sending it to the browser, further reducing file size and speeding up delivery.
- Allows enabling or disabling caching for logged-in users, providing flexibility for content requiring frequent updates.
Pricing:
WP Fastest Cache is a freemium WordPress caching plugin. You can download the free version right from the plugin repository.
Meanwhile, for advanced features, you can upgrade to the premium version at the following price costs:
- Bronze: Costs $49/lifetime for 1 license.
- Silver: Costs $125/lifetime for 3 licenses.
- Gold: Costs $175/lifetime for 5 licenses.
- Platinum: Costs $300/lifetime for 10 licenses.
All the above-mentioned plans come with 1000 image credits per license, with 1 limited support and updates, and a 1-year license transfer fee right.
6. WP-Optimize
WP-Optimize emerges as another versatile caching WordPress plugin dedicated to optimizing site performance and streamlining database management. It’s created by the team UpdraftPlus, one of the popular backup plugins.
Basically, it scans and cleans your WordPress database by removing unnecessary data. Such as revisions, drafts, and spam comments, leading to improved database performance and reduced server load.
It provides a comprehensive suite of features for image optimization and minification. Ultimately, offering a user-friendly solution for both beginners and experienced users.
How to Use It?
Utilizing WP-Optimize is a straightforward process that can significantly impact your site’s performance. Upon installation and activation, navigate to the ‘WP-Optimize > Cache’ settings in your WordPress dashboard.
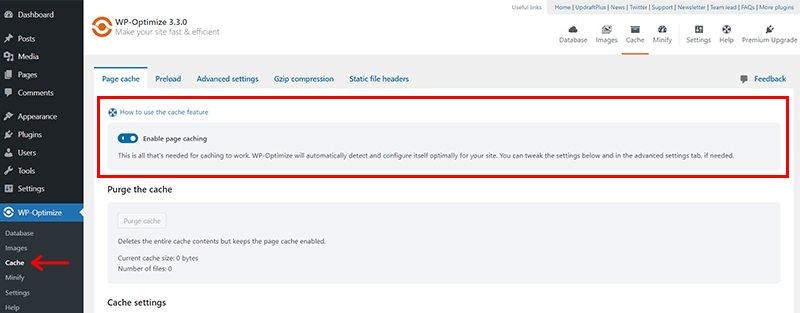
Then, all you have to do is click on the ‘Enable Page Caching’ button. With that, WP-Optimize will recognize and adjust itself to your site’s best advantage automatically.
If necessary, you can adjust the settings in the advanced options tab as well as just below it.
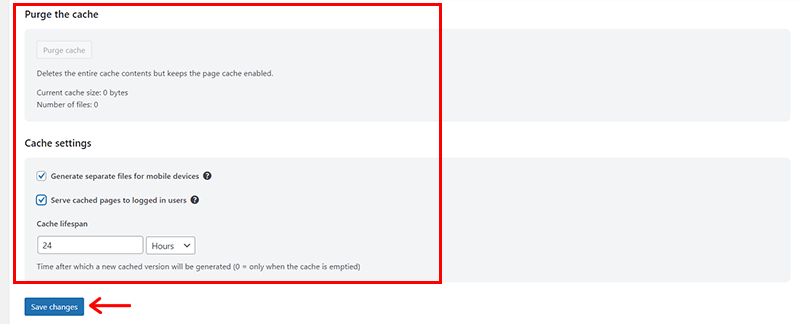
Once done, click on the ‘Save Changes’ option. You can also explore other tabs such as ‘Preload’, ‘Advanced Settings’, ‘Gzip Compression’, and more.
Key Features:
- Allows preloading of cached versions of frequently accessed pages, ensuring immediate delivery for returning visitors.
- Reduces the size of your website’s code files by removing unnecessary characters and whitespace.
- Offers bulk optimization of existing images in your media library, allowing you to quickly optimize many images at once.
- Enables backup and restore functionality for your database and optimized images, providing an additional layer of security and flexibility.
- Compatible with WordPress multisite installations. So, you can manage caching and optimization for multiple websites from one central location.
Pricing:
WP-Optimize is a freemium WordPress plugin. Easily install the free version right from your WordPress dashboard.
Meanwhile, a few of its features are available in the premium version, which is available to you at the following prices:
- Starter: Costs $49/year for 1-2 websites.
- Business: Costs $99/year for 3-5 websites.
- Unlimited: Costs $199/year for unlimited websites.
All the above-plan comes with features like lazy load, preload key requests, advanced cache purge, premium support, and more.
7. Speed Optimizer
Are you using SiteGround hosting to host your WordPress website? If yes, then Speed Optimizer is exactly what you need.
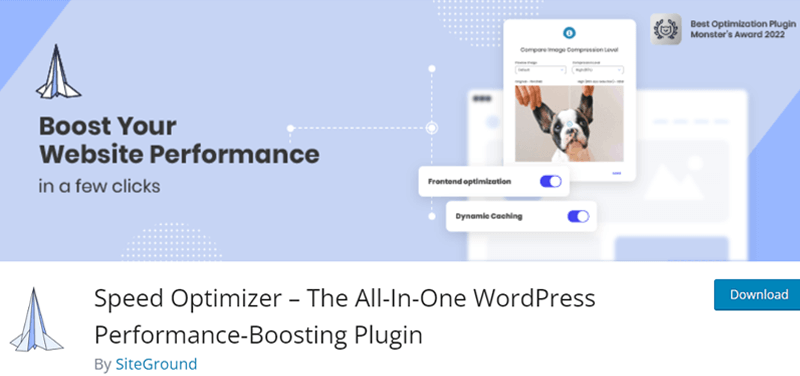
Created by SiteGround itself, it’s a powerful yet user-friendly WordPress plugin designed to accelerate your site’s performance and enhance user experience. It offers a core set of features focused on caching, front-end optimizations, media optimization, and basic environment optimizations.
The plugin defers JavaScript execution until after the initial page load. Moreover, it combines multiple CSS and JavaScript files into single files, reducing the number of HTTP requests. Ultimately, this decreases blocking behavior and improves perceived performance.
How to Use It?
Once you’ve installed and activated the Speed Optimizer plugin, then navigate to the ‘Speed Optimizer > Caching’ option on your dashboard.
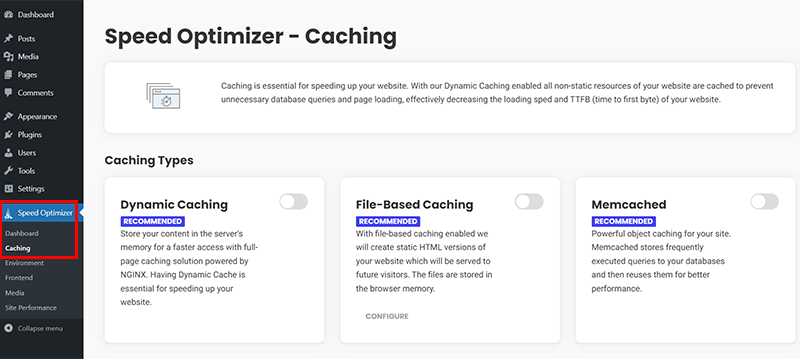
With that, you can see several caching types and settings. Such as ‘Dynamic Caching’, ‘File-based Caching’, ‘Mem-cached’.
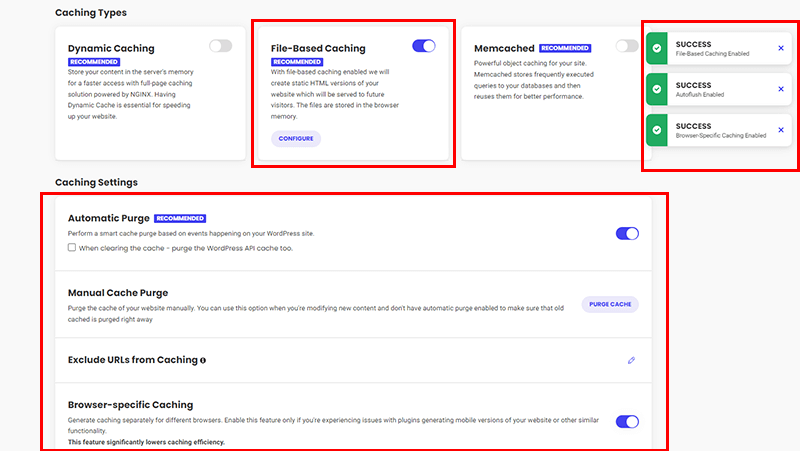
You can quickly enable it and once you do so, you’ll see the ‘Success’ notification. Likewise, you can enable Automatic Purge, Browser-Specific Caching, and other settings.
However, do note that to enable dynamic caching and mem-cached, you need the SiteGround hosting environment.
Key Features:
- Implements server-level caching to deliver lightning-fast load times for your WordPress site.
- Offers automatic caching, browser caching, cache exclusion, and cache preloading features.
- Identifies and disables unnecessary WordPress core scripts, reducing the number of resources loaded and improving performance.
- Provides a built-in speed test tool to assess your website’s loading speed and identify areas for improvement.
- Compatible with WordPress multisite installations for caching on multiple sites from a single place.
Pricing:
You’ll be glad to know that Speed Optimizer is a plugin created by SiteGround hosting service. And it’s completely free to use, install it right from your dashboard and you’re all done to go with your caching game.
8. Breeze
Have you been using Cloudways hosting to host your WordPress website? If yes, then Breeze is exactly what you need.
Created by Cloudways itself, Breeze is another lightweight and user-friendly caching plugin designed to streamline performance optimization. It leverages browser caching, minification, and other speed-enhancing strategies. This reduces load times, enhances user experience, and boosts overall site efficiency.
The best part is that it comes with a heartbeat API (Application Programming Interface) management feature. As a result, this fine-tunes notifications, sales data, autosaves, and more. Just by adjusting Heartbeat API call frequencies, potentially improving performance.
How to Use It?
Breeze offers a simple interface that allows you to customize settings according to your specific requirements. After installing and activating the plugin, access the Breeze settings via ‘Settings > Breeze’ in your WordPress dashboard.
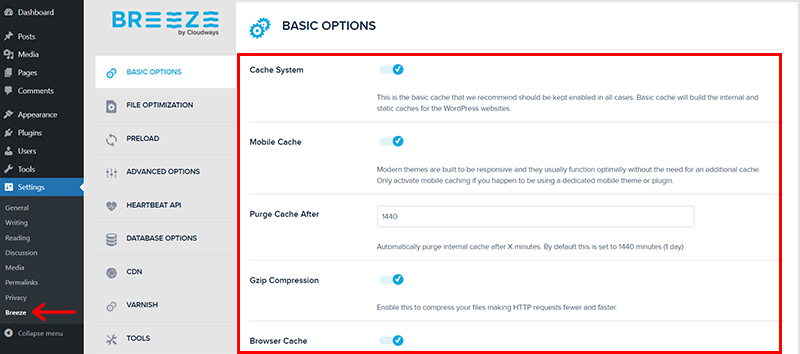
From there, you can enable ‘Cache System’, ‘Mobile Cache’, ‘Gzip Compression’, ‘Browser Cache, and other optimization features with ease.
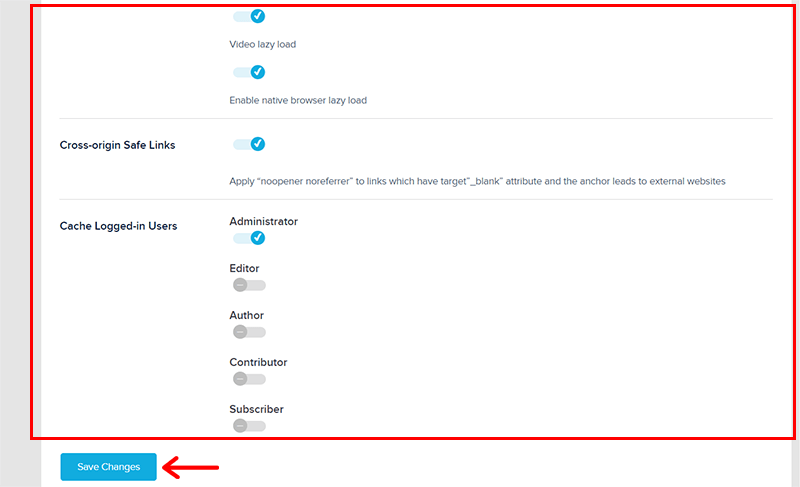
Once done, click on the ‘Save Changes’ option and you’re all good in your caching game.
Besides, you can explore other settings tabs such as ‘File Optimization’, ‘Preload’, ‘Advanced Options’, ‘Heartbeat API’, and more.
For more information, check this documentation article on installing and configuring the Breeze plugin.
Key Features:
- Creates static copies of your website’s pages and resources, reducing server load and improving page load times for returning visitors.
- Integrates with the Varnish server-level caching software for even faster caching and performance improvements.
- Compresses website content before sending it to the browser, decreasing file size and improving delivery speeds.
- Allows integration with CDNs to serve static content from geographically distributed servers, further reducing load times for users worldwide.
- Enables easy backup and restoration of your plugin configuration through exporting and importing settings as a JSON file.
Pricing:
Breeze is a free caching plugin available for download from the WordPress plugin repository. It offers essential caching and optimization features at no cost.
9. Hummingbird
Hummingbird is a robust caching plugin tailored to enhance the performance of WordPress websites. It comes equipped with a range of features designed to accelerate site speed and streamline optimization efforts.
For instance, you can set browser caching headers to efficiently store essential resources locally on visitors’ devices. Further, reducing server load on subsequent visits.
In addition, it proactively loads essential fonts used on your website. Ultimately, ensuring they are readily available for rendering text, leading to a smoother user experience.
How to Use It?
Similar to other plugins, Hummingbird is quite easy to use. Right after you install and activate it, you’ll see the ‘Setup Wizard’ as shown below.
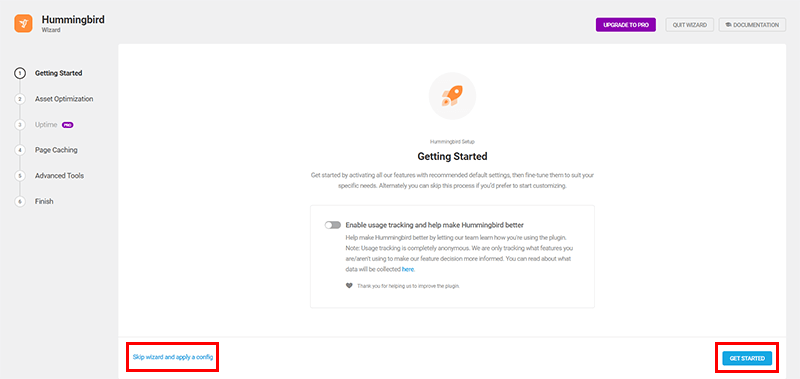
You can try the setup settings one by one as guided via the ‘Get Started’ option or simply click on the ‘Skip wizard and apply a config’ option.
Once you do so, you’re back to your WordPress dashboard and go to the ‘Hummingbird > Caching’ option.
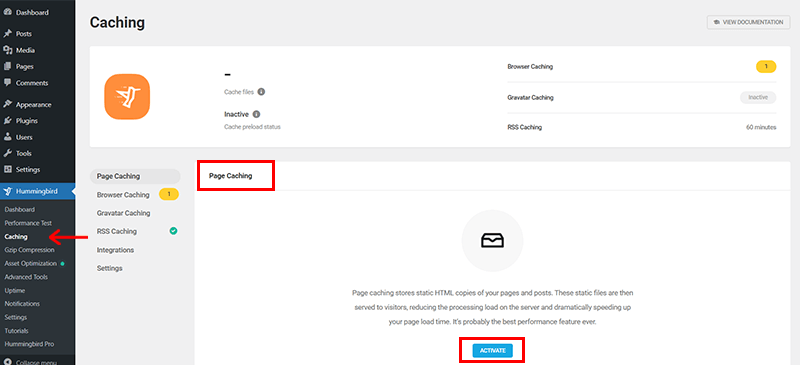
And click on the ‘Activate’ button to enable the page caching. Following that, you can enable several caching options like ‘Preload Caching’, ‘Cache interval’, ‘Integrations’, and more.
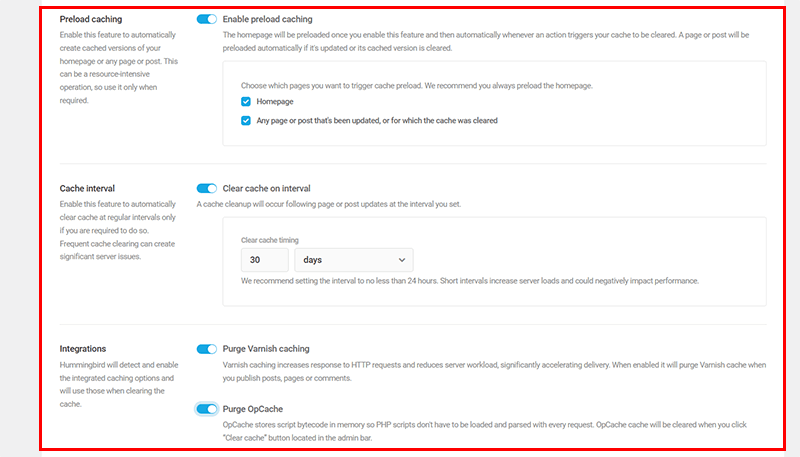
Once done, click on the ‘Save Settings’ button to save the changes.
For detailed guidance, check the documentation on the caching configuration of the Hummingbird plugin.
Key Features:
- Cache-specific website elements like database queries and dynamic objects. Ultimately, minimizing server processing and improving performance.
- Warms up the cache by pre-generating cached versions of frequently accessed pages, ensuring immediate delivery for visitors.
- Continuously monitors your website’s uptime and alerts you if it goes down or experiences slow response times.
- Provides detailed reports generated by Google Lighthouse. Further, offering insights into website performance and identifying areas for improvement.
- Integrates with Cloudflare’s Automatic Platform Optimization (APO) to further optimize website performance on Cloudflare-powered servers.
Pricing:
Hummingbird is a freemium WordPress caching plugin available in both free and paid versions. You can easily install the free version right from your WordPress dashboard.
Meanwhile, you can upgrade to the premium version at the following price costs:
- Basic: Costs $6/month for 1 site license with 5 GB CDN and 5 GB backup storage.
- Standard: Costs $10/month for 3 site licenses with 10 GB CDN and 10 GB backup storage.
- Freelancer: Costs $20/month for 10 site licenses with 20 GB CDN and 20 GB backup storage.
- Unlimited Sites: Costs $40/month for unlimited site licenses with 50 GB CDN and 50 GB backup storage.
What’s more, all the above-mentioned plans include all WPMU Dev Pro plugins at no additional cost.
10. Cache Enabler
Last but not least, we’ve got Cache Enabler developed by KeyCDN on our list of the best WordPress caching plugins available in the market. It’s a lightweight plugin that focuses on speeding your website through basic yet effective caching functionalities.
Basically, it focuses on creating static HTML files of your dynamic WordPress site to reduce server load and improve page loading times. By serving these static files to visitors, Cache Enabler enhances site performance. Further, this accelerates load times and ensures a seamless browsing experience.
How to Use It?
Cache Enabler offers a user-friendly interface that allows you to customize caching settings based on your specific requirements.
Once you’ve installed and activated the plugin, you can access the Cache Enabler settings via ‘Settings > Cache Enabler’ in your WordPress dashboard.
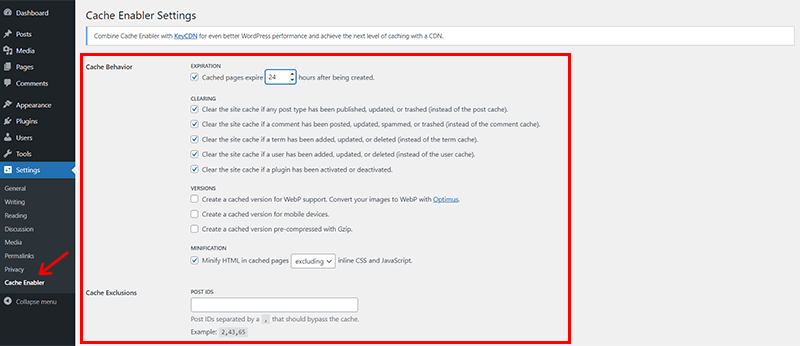
From there, you can enable caching with just a few clicks and configure additional settings such as ‘Cache Expiration Times’ and ‘Exclusion Rules’.
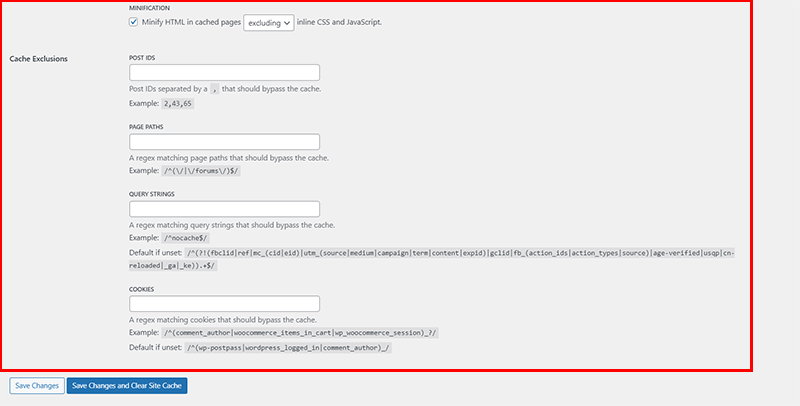
Once done, click on the ‘Save Changes’ or ‘Save Changes and Clear Site Cache’ as you wish.
For more information, you can check its documentation on configuration settings.
Key Features:
- Automatically clears the cache when new content is published or updated, ensuring visitors see the latest information.
- Also, you can manually clear the cache through the plugin’s settings page whenever needed.
- Minifies HTML code excluding or including inline CSS and JavaScript, potentially reducing file size and improving loading times.
- Displays the size of your website’s cache in real-time within the WordPress dashboard, providing insights into cache usage.
- Improves caching efficiency by utilizing the 304 Not Modified HTTP status code. Further, indicating to the browser that the cached version is still valid.
- Enables caching for specific custom post types on your website.
Pricing:
Cache Enabler is a totally free plugin. You can quickly download the free version from the plugin repository or install it right from the WordPress dashboard.
Our Recommendation: WP Rocket
As highlighted earlier, WP Rocket stands out as a premier caching plugin. That offers a wide array of features designed to enhance WordPress site performance.
Based on our analysis, we strongly recommend WP Rocket. Particularly, for its robust feature set, user-friendly interface, and proven ability to deliver positive results. As mentioned earlier, at SiteNerdy, we wholeheartedly use WP Rocket. And thereby, we encourage you to give it a try and see the difference.
Conclusion
And that’s all, folks! We’ve come to the end of our article on the best WordPress caching plugins for 2024.
Here, we’ve explored several caching plugins that offer unique advantages and features tailored to meet diverse optimization needs.
So why wait? Start exploring these remarkable cache plugins today and watch your WordPress site reach new heights!
If you’ve any questions or confusion, then do let us know in the comment section below. We’re happy to help you out.
Do share this article with your friends and family looking for the right caching plugin for their WordPress site.
Also, browse our other reads such as how to make your website accessible and how to set up Google Analytics on WordPress.
Remember to like and follow us on our social media handles Facebook and Twitter to stay tuned with our content.


