Do you want to know how to build an eCommerce website from scratch? Or are you willing to learn how to launch a successful eCommerce website? Then, you’ve come to the right place.
The Internet has been successfully able to impact different types of businesses, especially shops and retailers. Nowadays, most people like to shop online from the comfort of their homes.
Therefore, this has made it almost a necessity for every retail store to have an online presence with the online store. Now suppose you’re thinking and not sure how to get started with developing an eCommerce website! If that’s the case, then you don’t need to panic!
Here, we’ll show you exactly how to build an eCommerce website from scratch without any coding skills. Let’s get started!
Table of Contents
A. Why Do You Need to Build an eCommerce Site?
In short, an eCommerce website is a type of website that allows you to sell and purchase goods/services over the internet. Any shopping that is done virtually over the Internet is called online shopping.
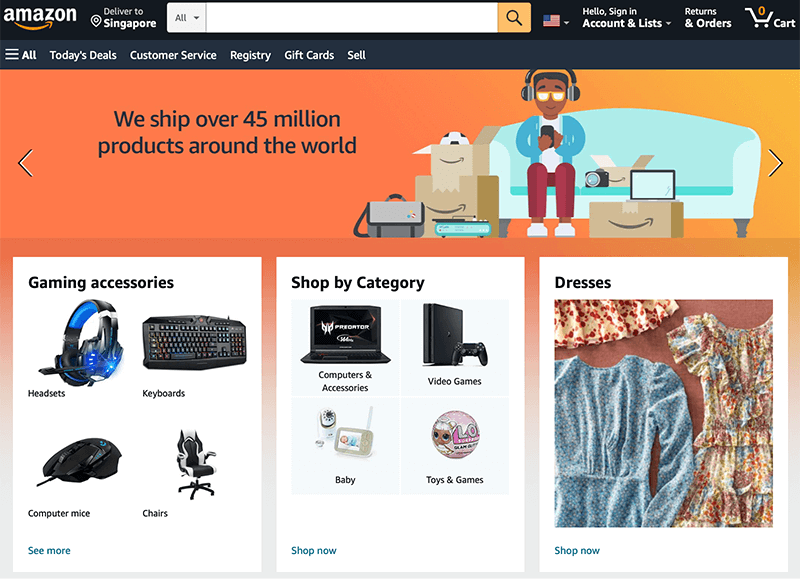
These are some of the most popular examples of eCommerce websites that you can find across the world.
On your eCommerce website, you can sell multiple kinds of goods and services. They can be physical products, subscriptions, digital products, dropshipping, etc.
So, who and why should you launch an eCommerce site? Multiple businesses can start an online store, but this guide is especially for startups and small businesses who want to sell to consumers.
There is nothing better than having an eCommerce website for your business today. Therefore, to help you out even more we’ve listed a few reasons you need an eCommerce website today.
1. Build a Customer Email List and Sell Directly to Them
Having your eCommerce website makes it easier to market and promote your products directly to your website visitors and customers. Plus, it not only helps you directly sell to the consumers but also you can collect their contact information.

In those contact information, you can use their email addresses to send them email marketing promotions, offer discounts, and announce new products. Hence, it provides an easier and cheaper way to retain a customer, provide good customer service, and promote your other products.
2. Great Way to Know Your Consumers More
When you develop your eCommerce website, it provides you with a better understanding of your customers. As it provides you with demographic stats on what your consumers are looking at and how they’re buying from you.
This analytic behavior on your website will help you gain information about your existing customers, and how you can strengthen your bond with them. Plus, you can find out more about those audiences who didn’t end up purchasing from your website.
3. Sell Your Products Internationally
Who doesn’t want to take their business international and sell their products across the world? You always wish to expand the market for your business and beat your competitors.
Now with eCommerce websites, you’ll not only be able to sell your products locally but you can sell to customers across the world with ease. This will not just only help you make international customers but also help you build your market value over your competitors.
4. Run Your Business From Anywhere
Now how can we forget the most unique feature of having your eCommerce website? And that is, it allows you to run your business from anywhere. You can sit back on your couch inside the comfort of your home and run your business online.
As long as you’ve got proper internet access and your mobile or laptop, you can manage your business from wherever you want.
5. Establishes Your Brand
Owning an eCommerce website means that every product that you sell through it is owned by you. Selling your products on a marketplace will make your consumers remember the marketplace for purchasing the product instead of you.

However, if it’s the case with your eCommerce website then your consumers will associate your product with your brand. As they’ll think of your product as a part of your brand. In this way, it gives you full control over remodeling your brand identity and strengthens it even better.
B. What are the Things to Consider When Building an eCommerce Website?
Before you start to build an eCommerce website from scratch there are a few things you need to consider. Unlike creating a standard website or starting a blog, an eCommerce website comes with its challenges.
Hence, we’re going to look at those challenges that come at the very beginning before you decide to build your eCommerce website from scratch.
- Market: Must have a clear understanding of your target market with proper research and analysis. Also, ensure you learn about your competitors, customers, demographics, trends, etc. As a result, you can define your features, strategies, and promotional activities.
- Budget: As a small business, you must fix your budget and use it accordingly. Know that you may need to pay for your domain, hosting, website builder, etc., as per your payment duration.
- Product: If you’re a starter, then pick your product types to sell. It must fit the target audience, for example, for kids as the target audience, you can sell their clothing or toys.
- Payments: Beforehand, you can define which payment methods to utilize in your eCommerce site for the customers to perform transactions. It can be Google Pay, Amazon Pay, Stripe, etc.
- Shipping: Similarly, you must be clear with your shipping locations, options, and shipping amount. Based on your audience and needs, you must strategize.
C. How to Build an eCommerce Website from Scratch? (Step-by-Step Guide)
Just like any other website, you can easily build an eCommerce website from scratch. May be simpler than you imagine. However, you still have to do a bit more upfront work to get your website ready with eCommerce.
Nowadays, you can find many eCommerce solutions that do most of the work for you. Having said that, you’re still required to understand how things are done and what your site needs. Besides, with enough research, you can surely make great decisions that help you grow your website in the years to come.
To build your eCommerce website from scratch, you need to start by discovering your market and finding out what you’re going to sell in your store.
1st Step: Market Research and Pick a Niche for Your Business
Won’t you be disappointed if you find out that no one wants to buy what you’re selling? To be honest, it’s the worst nightmare for any business owner if this thing happens.
It’s very important that even before you build your eCommerce website from scratch, you need to be aware of the market and your target audience. So that, in the latter half you’ll be able to attract relevant traffic and sales to your website.
Let’s discuss a few points down below and look at how you should do market research and then pick a niche for your business.
- Research current Trends – A great way to find out what product to sell would be to look for the currently trending products.
- Understand Customer Behaviors – When doing online market research, try to understand how your target customers shop online.
- Check out the Competition – The best way to learn about a market is to have a close look at your potential competitors at that moment in time.
- Conduct Keyword Research – When you perform keyword research, it helps you figure out whether there’s a demand for the product that you want to sell online.
- Love and Passion – You should go with an eCommerce niche that you care about and are passionate about.
- Target High-Dollar Products – It’s true that investing your time and money in high-dollar products guarantees to deliver high-end profit.
2nd Step: Choose Your eCommerce Site Builder
By far, we’ve already picked our niche, so in this step, we’ll choose our eCommerce site builder. An eCommerce builder is a platform that helps you quickly and easily build an eCommerce website from scratch and sell products instantly online.

Besides, you can find plenty of options when it comes to platforms for your eCommerce website. Also, before you decide on your builder, several different site builders let you try their demos.
In this way, you can determine the best eCommerce website builder that fits your needs and goals.
Similarly, some CMS platforms also offer eCommerce tools and extensions. However, considering your budget you’ve to set and choose the best site builder that you find easy to navigate.
Hence, before we head to the list, let’s look at a bunch of factors you should take into account. To make sure you go with the right solution that best fits your needs.
How to Choose the Best eCommerce Website Builder?
Here are some major factors to consider that to keep in mind when considering a platform and narrowing down your top picks.
- Budget and Pricing: Choose a platform that fits your budget and investment. Free ones can be good for beginners at first but know that you may need to pay an amount once you add more products or gain more customers. Ensure you have a plan once your site grows.
- Technical Skills: eCommerce builders provide drag-and-drop technology but you must have basic skills to add products and product pages to your store.
- Templates and Designs: Ensure the builder offers templates that meet your niche and brand values. So, it must be good in quality and quantity for you to easily kickstart your shop.
- Customization Options: After using a template, check if you have enough customization options to personalize the store to match your brand.
- Payment Integration: Check if the website builder has a secure payment integration to all the gateways and methods you’re planning to utilize for your store. For example, Stripe, PayPal, etc.
- Apps and Extensions: For advanced features, eCommerce builders provide apps or extensions. Based on your requirements, check if your platform has various free and premium add-ons.
- SEO Options: SEO is crucial for visibility, traffic, and sales in your store. So, the platform must let you optimize the website content, links, titles, meta descriptions, etc.
- Customer Support: Your platform must provide quality support when help is required. It can be through knowledge bases, tutorials, live chat, email, etc. But your issues must be solved.
Now keeping these things in mind, let’s look at some of the best eCommerce website builders to start with.
3 Best eCommerce Website Builders Worth Considering
Here, we’ve compiled the 3 best eCommerce website builders that are worth considering to help you make an online shop. Make sure to go through it and find the one that meets your needs. So, let’s dive in!
1. WooCommerce (with WordPress)
WooCommerce is one of the best eCommerce platforms that has covered over 43.35% of all online stores on the web. It’s a WordPress-based open-source platform that helps you turn your site into a fully functional online store.

WooCommerce comes with countless themes and templates that you can find in its WooCommerce Theme Store. They’re 100% customizable and let you easily customize the design and layout with a visual builder or through the code.
With the power of WordPress, WooCommerce gives you the sake of adding more functionalities to your eCommerce websites. As it seamlessly integrates with thousands of WordPress plugins to enhance the functionality of your store.
Pricing: Completely free to start using WooCommerce. You can also use free or premium add-ons.
Read what WooCommerce is in-depth. Otherwise, find out the best WooCommerce alternatives here.
2. Shopify
Shopify is a popular eCommerce platform with over 2.1 million users and 1 million running businesses. It provides everything that you need to create an online store.

With Shopify, you’ll get over 70+ professional and customizable themes to choose from for your store. It comes with several store management features including customer profiles, customer accounts, customer groups, etc.
Furthermore, it allows you to sell your products on different social media channels like Facebook, Instagram, etc. Also, it integrates with third-party payment options such as PayPal, Amazon Pay, Stripe, etc.
Pricing: Premium platform starting at the cost of $25 per month.
Learn about Shopify from this guide. If you want a better platform, then read Shopify alternatives and competitors here!
3. Wix
Wix is a popular website builder that is not limited to only creating blog sites but can also build an eCommerce site. It comes with a simple yet powerful drag-and-drop design tool that lets you build an eCommerce website from scratch.

Similar to Shopify, Wix is also a fully hosted platform which means you won’t have to worry about hosting. Besides, it comes with a huge number of templates to choose from for displaying your goods and services.
Eventually, Wix doesn’t ask for any transaction fees. However, you still have to pay the regular fees as set by the various payment gateways.
Pricing: The eCommerce plan starts at $17 per month.
Find the differences between Wix and WooCommerce plus Wix and Shopify. For better options, here’s the best Wix alternatives list.
Our Recommendation – WooCommerce
Among those mentioned above eCommerce website builders, we’d like to recommend that you should go with WooCommerce. Since it’s a free open-source platform that is built specifically for WordPress.

Although, unlike others, WooCommerce is not an independent website builder, it works alongside WordPress as a plugin. As we all know, WordPress itself is an extremely flexible and versatile platform.
Hence, the perfect combination of both WordPress and WooCommerce will surely help you to set up a secure online store in no time. Besides, being open-source, you’ll get a large community of users and developers.
And they’re pretty much ready to help if you need to make advanced changes to your WooCommerce store.
For you to have more confidence in using WooCommerce, check out our article on the benefits of using WooCommerce for building online stores.
3rd Step: Select a Good Domain Name
Now that you’ve finalized your eCommerce niche, it’s time to select a good domain name for your eCommerce website.
Just like picking up a niche, in the same way choosing the best domain name can also be quite stressful. Every time your domain name will be called it’ll always be associated with your brand. Hence, you don’t want to make any mistakes in selecting it.
Before we further move, a domain name is simply the name of your website. This name is what your audiences typically type in the address bar of their browser to access your website.
Usually, a domain name has two parts, the name, and a suffix, that goes after it. For example, in “SiteNerdy.com,” where “SiteNerdy” is the name and “.com” is the suffix.
How to Choose the Perfect Domain Name for Your Business?
Now that you know why it’s important to choose the right domain name, let’s go over some key tips to help you do just that. You can follow these few tips below to help you pick the perfect domain name.
| Tips | Description |
| Reflect Your Brand | Your domain name should help you reflect your brand. In most cases, your brand may take time to come into popularity. Perhaps, including your brand name in your domain can help you stand out and build memories of your brand in their heads. |
| Less is More | Having a shorter domain means less chance of mistyping and misspelling it. At the same time, longer domain names have been linked to harder-to-remember for most users. Hence, we’d recommend keeping your domain name under 15 characters. |
| Easy to Pronounce and Spell | In search of creating a unique and brandable domain name, don’t fool yourself with complex names. No one will be able to neither pronounce or spell it easily. Hence, you should go with something that can easily roll off the tip of your tongue. |
| Simple, but Not Perfect | You should come up with such a unique domain name that people can easily remember and type it accurately. However, choosing a perfect domain name shouldn’t hold you back from spending your time building a great brand. |
| Use Keywords | If you can add your brand to your domain then it’s great. Or if not then adding relevant keywords will help users to find you in a search and recognize what your website is about. |
Besides, after all, if you’re still struggling to find a good domain name then you should consider using domain name generators. These are the free tools that automatically search and generate clever domain name ideas for your defined keywords.
Some of the popular domain name generators include Instant Domain Search, GoDaddy Domain Generator, DomainWheel, Nameboy, etc.
Few Things to Avoid While Choosing the Best Domain Name
Here are a few important things you should avoid while picking your domain name that reflects your brand. Such as:
- You should avoid creating a domain name with hyphen signs (-).
- Do not use the brand names or trademarks that are used by other companies.
- Never use double letters in your domain name to avoid any misspellings.
- If possible don’t use any numbers in your domain name.
- Avoid using generic keywords and phrases exclusively.
How Do You Get a Domain Name for Your Business?
The best way to get yourself a domain name would be from a domain name registrar. A domain name registrar is a company that allows you to purchase and register a domain name under your identity or your business.
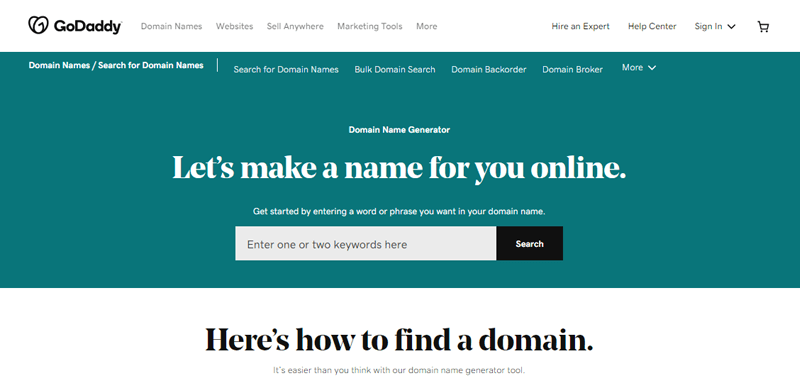
Most people register their domain name under the .com extension. Since it’s a widely popular and easy-to-remember domain extension. However, there are other popular extensions too such as .net, .org, .biz, and .tv, etc. But this one you should only go with this if it matches your business module.
Some of the popular domain name registrars to purchase a domain name includes:
Besides popular domain registrars, some web hosting companies also seem to offer you free domain registration with new hosting accounts. Some such providers are Hostinger, Bluehost, etc. Among them, we recommend using Hostinger due to its affordable prices.
4th Step: Purchase and Configure an eCommerce Hosting Provider
The next step in how to build an eCommerce website from scratch would be to get an eCommerce hosting provider.
The hosting services not only provide a place for your website on the internet but also give you the storage space and bandwidth to run your site the way it should. Learn the differences between web hosting vs domain names from here.
It’s quite important to choose the right eCommerce hosting provider because you don’t want your customers to be unable to access your website. The frequent occurrence of downtime can imprint a bad reputation and could even sink your business.
Not just that, even a slow website can ultimately let your customer leave you because of poor customer experience. Since about 47% of consumers expect any webpage to load in less than 2 seconds.
Hence, any best eCommerce hosting company won’t risk such factors to happen with their customers.
Considerations When Choosing an eCommerce Host for Your Store
Although finding the right hosting is lucrative, it’s a hectic task on its own. Hence, it’s extremely important to do some research before committing to any one of them.
Yes, you can change your hosting service at any time, but migrating your site can be a hassle.
That’s why it’s a better idea if you choose the best web hosting upfront so that you get familiarized and scale up as you grow.
- Encryption – With any hosting service, security should be one of your top concerns. Look for any hosting plans that offer advanced security features such as DDoS protection, SSL certificates, etc.
- Greater Uptime – Downtime of the website means no sales. Make sure to inquire about the amount of uptime you can expect especially during peak times.
- PCI Compliance – For secure payment transactions and to protect an enormous amount of personal data, every hosting company should be PCI compliant.
- Automatic Backups – In case your eCommerce site goes down, you should have a backup that includes product names, descriptions, images, etc.
- Great Storage – An eCommerce store is a heavily-stuffed website with high-quality images and other content. So, choose a hosting provider that offers enough bandwidth.
- Support Option – The best hosting platform should provide a technical skilled team with 24/7 customer service via email, chat, phone, and priority support.
- Pricing – Don’t think that choosing the cheapest hosting plan is fit for running an online store. Always, look into your requirements and budget based on that only choose your suitable plan.
Now let’s check out some of the best eCommerce hosting providers you can check out!
Are you still wondering how to choose the best hosting provider for your eCommerce store? Don’t worry, have a complete look at our article on how to choose the best web hosting company.
Best eCommerce Hosting Providers Worth Considering
Below we’ve listed a few best eCommerce hosting providers worth considering. We hope you understand the key differences between them and choose the one essential to your online business strategy.
1. Hostinger
Hostinger is an affordable WordPress hosting platform ideal for eCommerce websites, even built using WooCommerce. It offers a free domain registration service along with its hosting features. In addition, it gives unlimited bandwidth to host around 100 websites even in its starter plan.
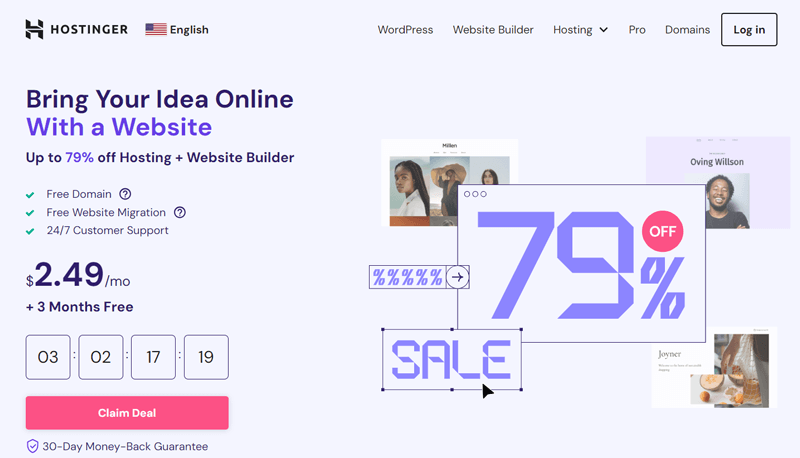
Furthermore, it offers DDoS protection, a malware scanner, a secure access manager, free domain WHOIS privacy protection, etc., for maintaining your website security. So, it’s the most suitable hosting platform if you want to focus on your eCommerce website due to its managed hosting capabilities.
Pricing: The starting price of a Hostinger plan is $2.49 per month.
Learn the best Hostinger alternatives if you want a better hosting provider.
2. Cloudways
Cloudways is an excellent cloud web hosting service that provides hassle-free services for you to focus on your eCommerce business. It comes with an eCommerce Starter Bundle that includes all the pre-installed plugins to design, launch, and manage your eCommerce store.
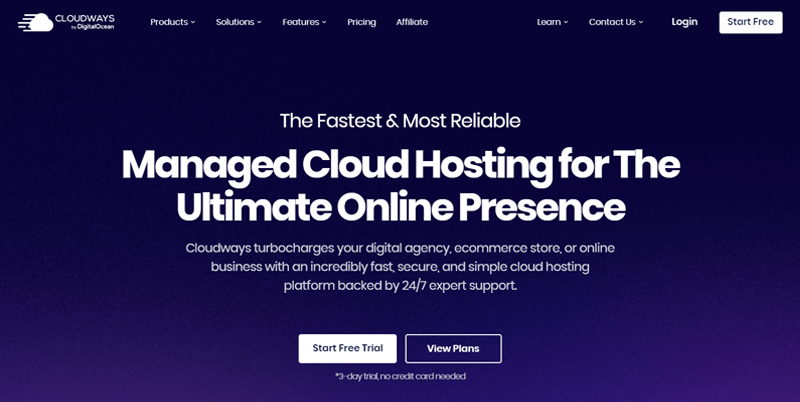
Cloudways offers the best WooCommerce hosting with top IaaS cloud providers. With that, you can take your eCommerce store to the next level and deliver a smooth experience to your customers.
Likewise, it offers block storage, 1-click free SSL installation, Cloudflare Enterprise CDN, dedicated firewalls, around-the-clock server monitoring, and more.
Pricing: The cost of the premium starter plan for DigitalOcean cloud hosting is $14 per month.
Learn the best Cloudways alternatives from here!
3. Kinsta
Kinsta is a popular WordPress hosting platform for growing eCommerce websites. Its managed hosting service lets you pick a data center near your audience among the 35 options. Also, every data center has several PoP locations (260+ total) for the fast loading of eCommerce websites.

On top of that, it contains many security features, like DDoS protection, backups, uptime checks, malware security pledges, etc. In addition, you can manage all the features from a simple MyKinsta dashboard.
Pricing: The starter plan costs $35 per month with many features for your eCommerce website.
Learn everything about Kinsta in this Kinsta hosting review.
4. Nexcess
Nexcess is a fully managed WooCommerce hosting that provides you with a managed solution to build and host high-performance WooCommerce sites. It offers a fast and flexible online store builder called StoreBuilder to build a beautiful online store.
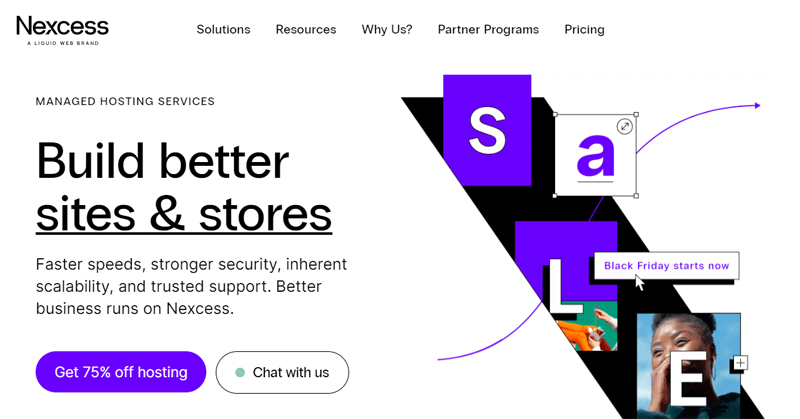
Similarly, it comes with free Smart Monitoring that alerts you to sales trends, slow site speed, and checkout problems. You can compare the performance of your site before and after plugin/theme changes have been made with Nexcess Plugin Performance Monitor.
Lastly, your site is fully protected by the iThemes Security Pro plugin that scans for any suspicious activities on your site.
Pricing: The starting price of Nexcess’s managed WordPress hosting is $21/mo.
Purchasing Hosting and Domain with Hostigner
As said before, you can find both domain name and web hosting in a single package saving some money and time. One such platform is Hostinger which we’ll use for this eCommerce site tutorial. So, follow a simple set of steps.
Step 1:
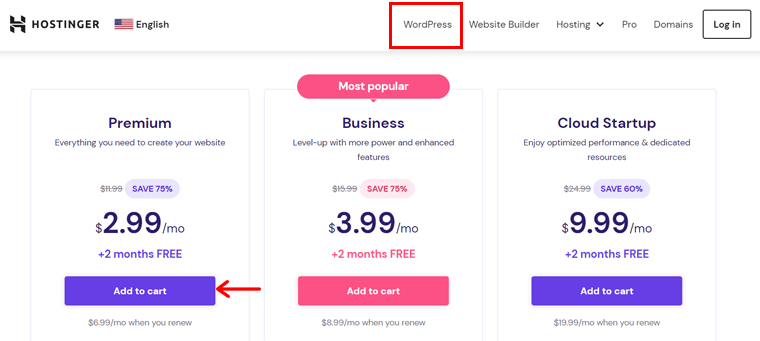
Initiate by visiting the Hostinger website and opening the ‘WordPress‘ menu. There, you’ll find 3 different pricing schemes, i.e., Premium, Business, and Cloud Startup. Now, click ‘Add to Cart‘.
Step 2:
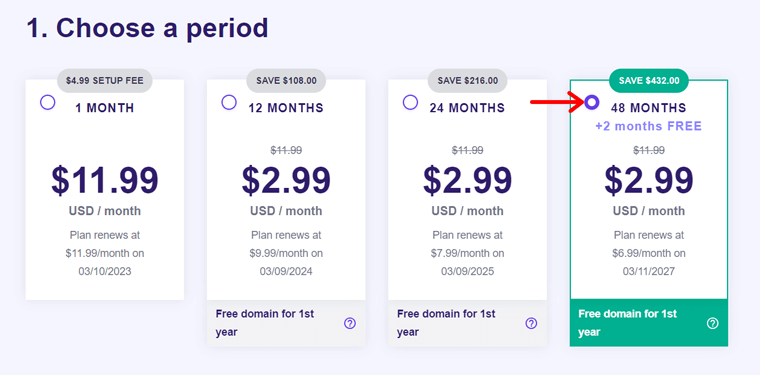
Next, pick a payment period for your plan like we did the ‘Premium‘ plan. This includes 4 periods stating the contrasting duration of payment.
Step 3:
Next, set up your Hostinger account using your email address or via Facebook or Google profile. In case you have an account, then press ‘Log in‘ and open it.
Step 4:
Following that, select a payment method among the given options to choose from. Then, finish the purchase by clicking ‘Submit Secure Payment‘.

Step 5:
Next, log into your account and click ‘Start Now‘. On your panel, press ‘Claim domain‘ and add a domain of a suitable extension for 1 year free.

Step 6:
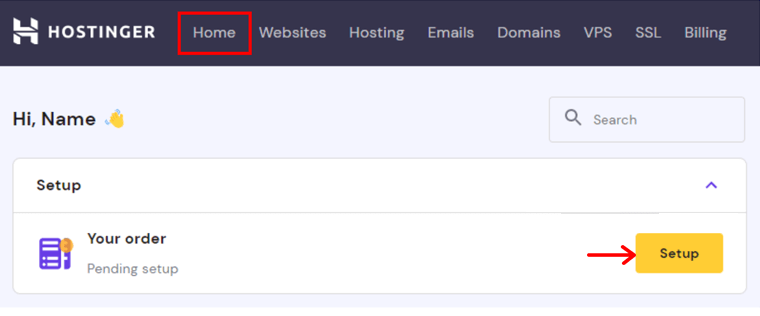
Moving forward, you can begin setting up the host and install WordPress for your eCommerce site. The WordPress hosting plan provides a one-click WordPress installation option for WordPress. So, follow the steps below. In the Home menu, click the ‘Setup‘ button for your order.
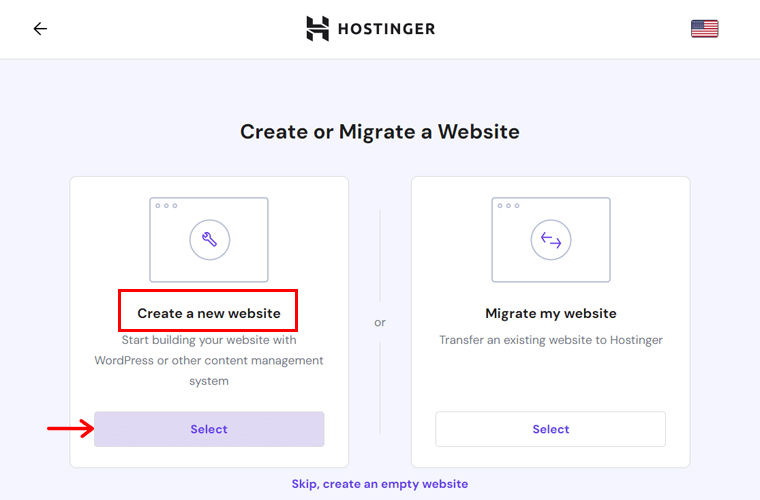
Then, you must click ‘Create a new website‘.
Moving forward, select ‘WordPress‘ and open your WordPress account. After going through some custom choices, click ‘Continue‘.
Step 7:
Next, pick your domain again and point it to the servers. Later, select the data center location and click ‘Finish Setup‘.
Step 8:
Right after that, open the dashboard by clicking on the ‘Admin Panel‘ button in the ‘Websites‘ menu.
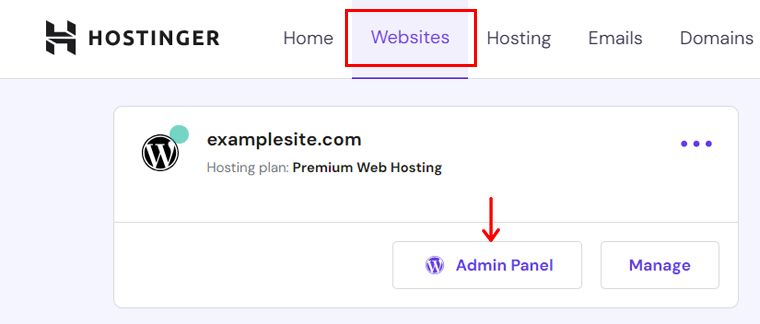
This opens the login page of WordPress, where you can log into the WordPress dashboard. There, enter your credentials and click ‘Log In’.
5th Step: Pick up a Theme for Your eCommerce Website
Now that you’ve got the best web hosting and chosen your eCommerce platform, it’s time to select a theme and customize it according to your business needs.
Any eCommerce website must have an attractive and appealing design to lure more visitors to the website. Along with great products, a professional-looking website is a must.
This tutorial recommends WooCommerce to you all. So from here onward, we’ll look into all the steps that go behind what happens if you choose WooCommerce as your go-to eCommerce platform.
How to Choose the Best WooCommerce Theme for Your Website?
Before moving ahead, you should keep certain things in mind before choosing the right theme.
So, below is a list of points that you must consider while choosing the best WooCommerce themes for your eCommerce store.
- Responsive Design – Your choice of theme must be responsive enough to provide a good customer experience on a variety of devices.
- Work Seamlessly with Extensions – There are 100s of free and premium extensions available for WooCommerce. Any good eCommerce theme must work seamlessly with all the extensions/addons.
- Customization Option – Look for a theme that provides demo sites to help you start a website easily and quickly with tons of customization options.
- Compatible with WordPress Plugins – WooCommerce is a WordPress-specific platform. Hence, choose a theme that’s compatible with WordPress plugins to add more features to your online store.
- Page Builder Integration – Developing an eCommerce website on your own is a task. So, the theme you choose integrates with drag-and-drop page builders.
- Speed – Another thing to consider is whether the theme affects the speed of the website or not. Your choice of theme should have less page load time and fast performance.
- Multilingual Support – To sell your products internationally, the theme should support multilingual WordPress plugins like WPML.
- SEO-friendliness – Good traffic means more sales. Keeping this in mind, your theme must have built-in SEO optimization to help you get more traffic.
- Social Media Integration – In the current scenario, selling your products on different social media is a need. Try to search for a theme that lets you promote your products in multiple channels.
With that, let’s take a look at where you can get the best WooCommerce theme.
Where Can You Get the Best WooCommerce Themes?
We just found out the different ways in which we can choose the best WooCommerce store for our online shop. But do we know how and where we can get and purchase those WooCommerce themes?
WooCommerce itself has its theme store called WooCommerce Theme Store. There you can find many themes categorized based on different industries, from arts and crafts to pet care.

Most importantly, these themes can be further categorized into three more categories too – Free (3), Storefront Themes (14), and Responsive (37).
In addition, Storefront is the official theme for WooCommerce. This is the most recommended WooCommerce for beginners and everyone else. Besides, it’s a free theme that seamlessly integrates with WooCommerce extensions and updates. Learn the Storefront review!
Alongside the official theme store from WooCommerce itself, there are a few other marketplaces as well where you can purchase WooCommerce themes. They’re as follows:
Other than Storefront, we highly recommend using Astra, the most popular freemium theme. It’s a multipurpose theme that integrates with WooCommerce to help you create an immersive online store with multiple products, full-width ad banners, and stylish pages in a full-screen layout.
It offers you a dropdown cart to let your users see the products that they’ve added to the cart. Indeed, you can display trendy and attractive sales bubbles on your products to boost sales.
To check out more WooCommerce themes, head on over to our article best WooCommerce themes.
If none of these themes satisfies you, then check out our tips on how to choose the best WordPress theme. There we’ve tried to cover everything you need to know on how to select a great theme!
How to Install a WooCommerce Theme on Your Website?
Once you’ve decided which theme you want to use for your online store, the next step is to install your theme. Here, we’ll show the process for both free and premium versions of Astra.
If you’re going with a free theme then you can easily download it from your WordPress dashboard.
All you need to do is log in to your WordPress dashboard and then navigate to Appearance > Themes > Add New.
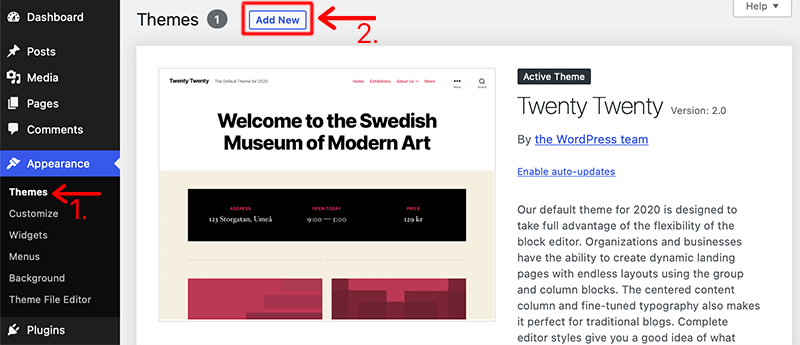
Afterward, search for the theme you’ve chosen in the search bar at the top right side of the page and click on the Install button. After the installation is completed, click on the Activate button and you’re done.
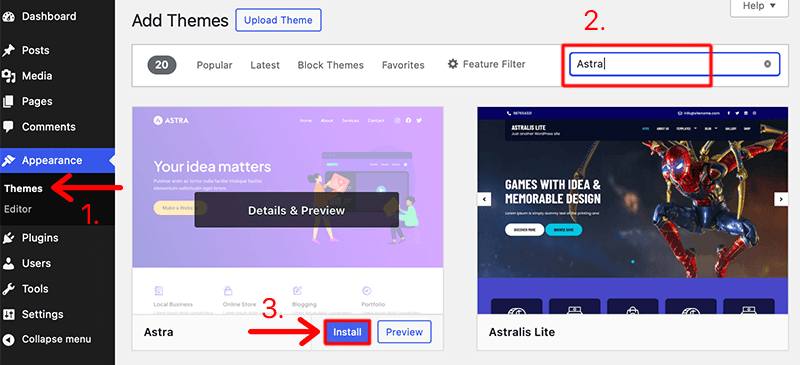
For instance, in the above images, you can see how we’ve installed and activated Astra on our site.
Pretty simple right? Now, if you want to use a premium theme then you should do it via the Upload Method. Astra Pro is a premium extension for additional customization.
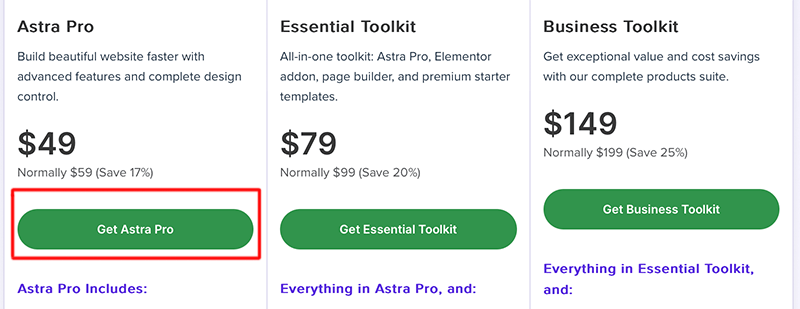
To buy it, open the pricing page, pick the plan, choose the number of websites, and click ‘Get Astra Pro‘.
Then, fill up your payment and account information. After completing the process, view the Brainstorm Force account and navigate to the ‘Accounts > Downloads‘ menu to find your download options.
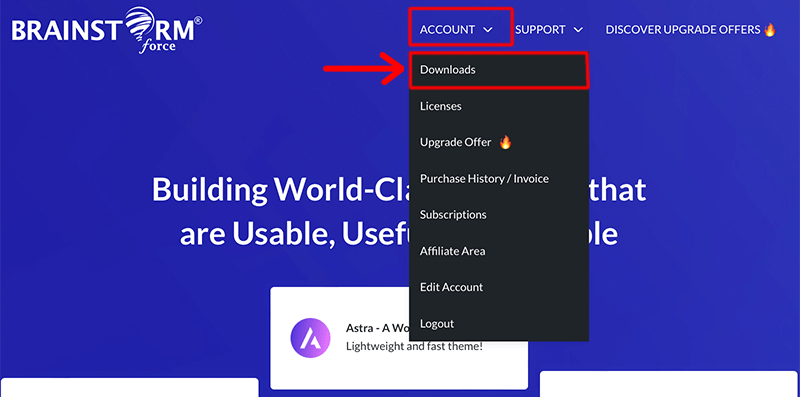
There, download the Astra Pro Addon plugin. The process is in the figure below:
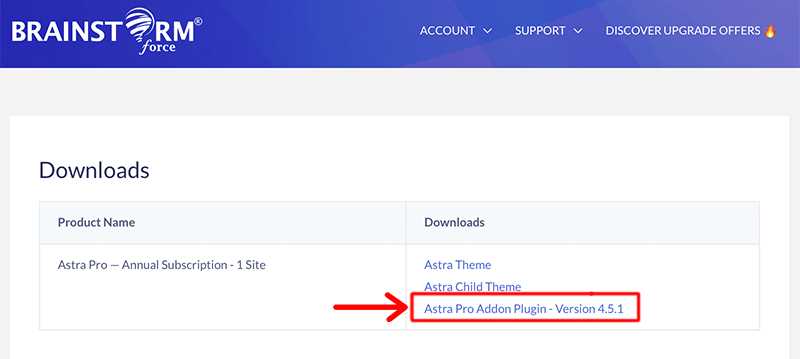
Following that, you must insert it into your dashboard. Just open your dashboard and go to ‘Plugins > Add New > Upload Plugin‘.
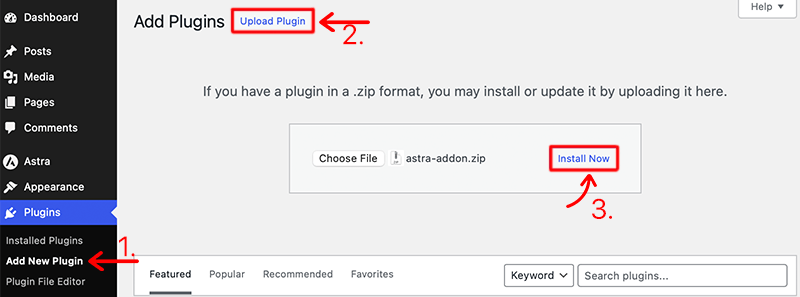
Moving forward, upload the file and click the ‘Install Now‘ button. Later, press the Activate button.
To activate the license later, open your Brainstorm Force Account page and click on ‘Licenses‘. There, copy the license key and keep it safe.
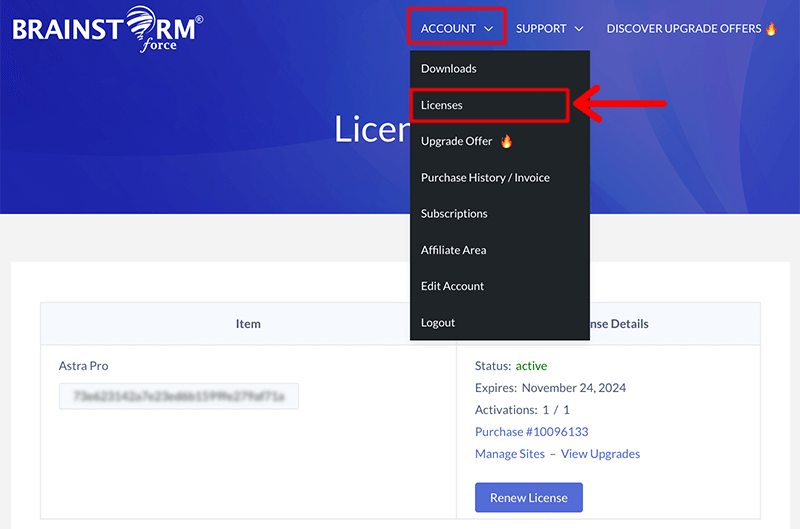
Afterward, visit your WordPress dashboard and navigate ‘Astra > Dashboard > Settings.’ There, add the license on the placeholder ‘Astra Pro License’ and then activate it.
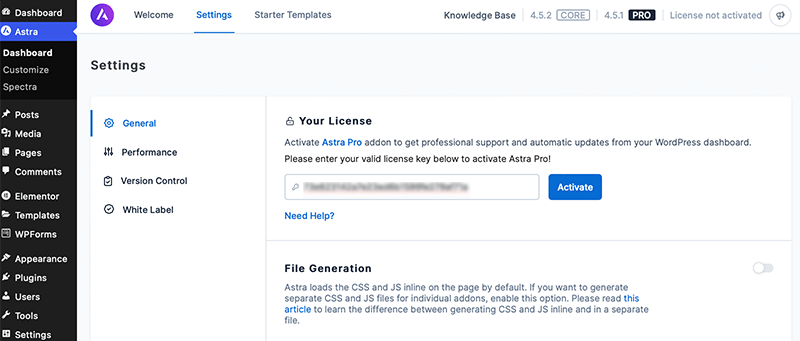
This concludes the Astra Pro activation process.
To learn more, check our complete guide on how to install a WordPress theme.
How to Import a Starter Template from Astra?
Astra offers Starter Templates providing hundreds of templates with free and premium options. For your online store, go to the ‘Plugins > Add New‘ menu, and search for ‘Starter Templates’. There, press the ‘Install‘ button of the plugin.
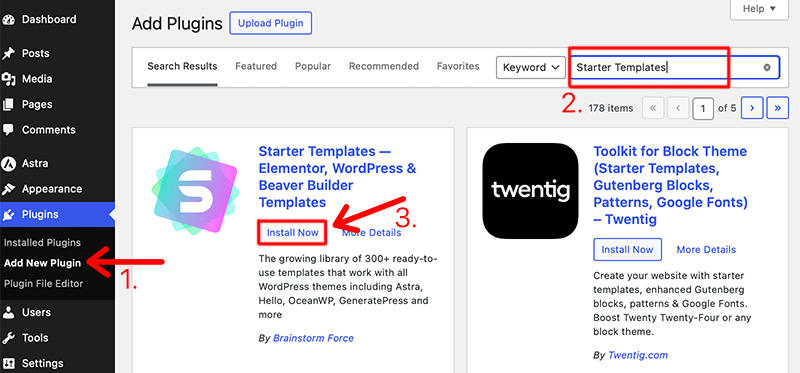
Afterward, click on the ‘Activate‘ button. Following that, you can start using Starter Templates by going through these steps:
First, navigate to ‘Appearance > Starter Templates‘ and select a page builder. It can be classic starter templates or the AI website builder. Here, we’ll go for ‘Build with Templates‘.
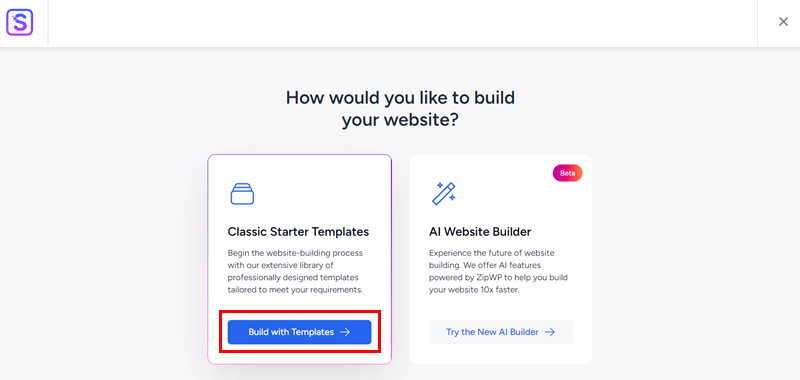
Then, pick either Block Editor, Elementor, or Beaver Builder. We’ll select Block Editor here.
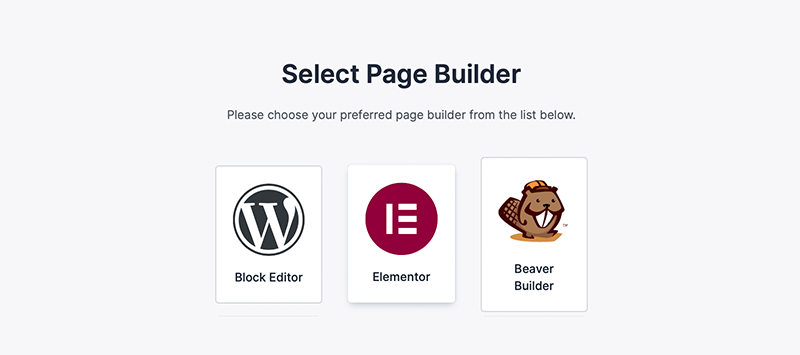
Right after that, you can search and choose the eCommerce template. Here, we’ll help you create an eCommerce website ‘Fether‘.

So, let’s pick a similar template and you’ll be redirected to another page.
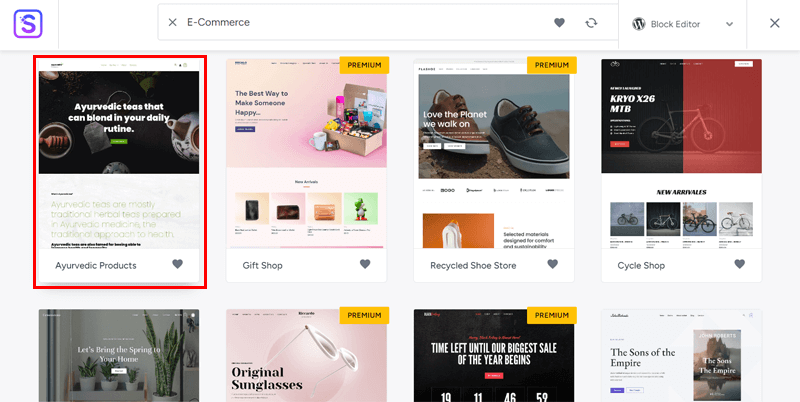
Here, it involves styling settings including the logo, colors, and typography. So, finish the process based on your needs.
First, click the ‘Click to Upload‘ button and perform these steps. Upload the logo, adjust its size, and click ‘Continue‘.
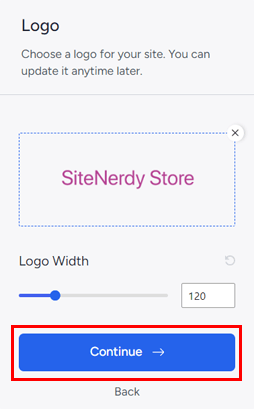
Next, pick the ideal global palettes and typography presets. When choosing, preview the changes, and confirm your choices. Lastly, click ‘Continue‘.

For the import, tell about yourself and pick the advanced options. Next, click on ‘Submit & Build My Website‘. Now, view your site, or close the notification to go back to the dashboard.
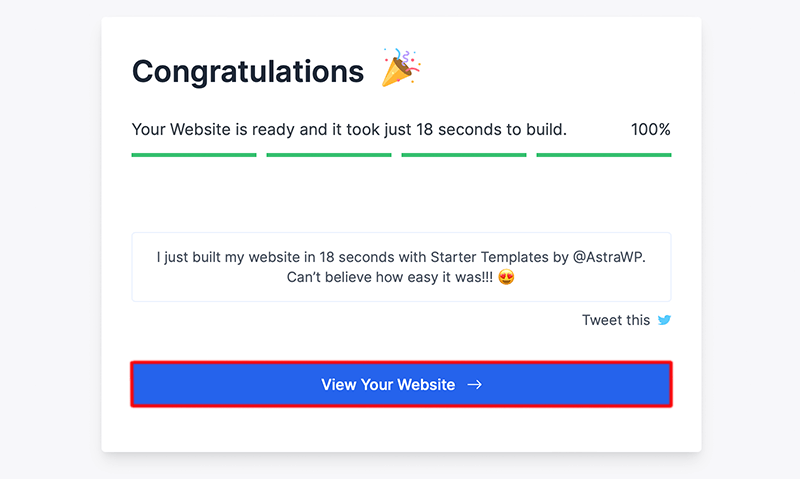
Along with the template, Astra may install other plugins essential, for example, Spectra. If it doesn’t, then you can install it from the Astra dashboard t get access of blocks.
6th Step: Set up Your eCommerce Store
Now, it’s time to move forward to the next step of how to build an eCommerce website from scratch. That is to set up and configure our store even more.
1. Install and Configure WooCommerce
When using Hostinger, you must install WooCommerce to your website first. However, using an eCommerce template can even automatically install the required plugins like WooCommerce.
If not, then open the ‘Plugins > Add New Plugin’ menu and search for ‘WooCommerce‘.
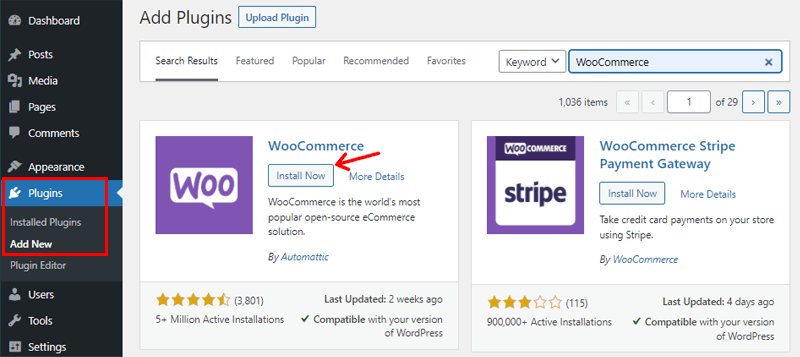
Once you find it, press the ‘Install Now’ button, followed by the ‘Activate’ button.
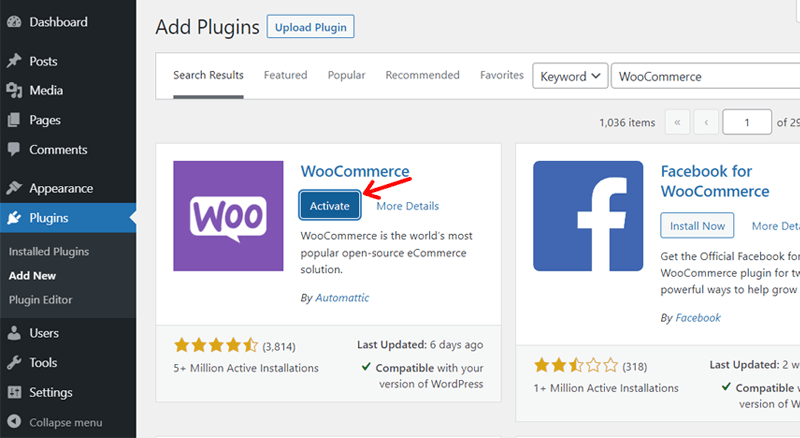
Now, you must set up WooCommerce based on your needs. To do so, navigate to the ‘WooCommerce’ menu or open ‘WooCommerce > Home’.
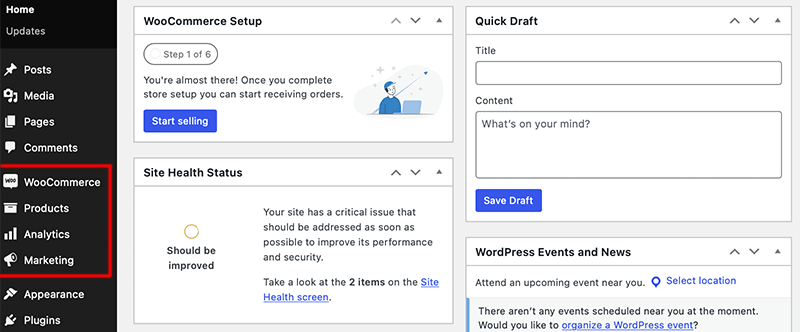
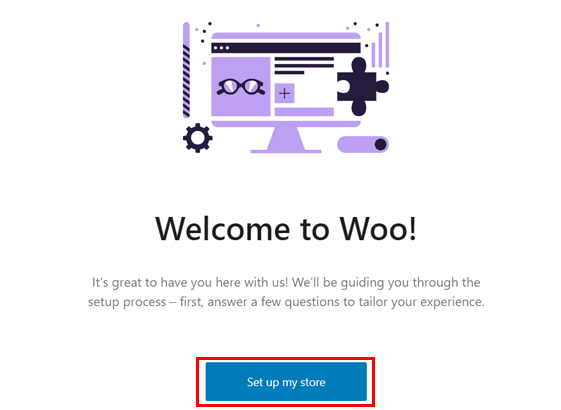
This opens the setup wizard where you must click the ‘Setup my store’ button.
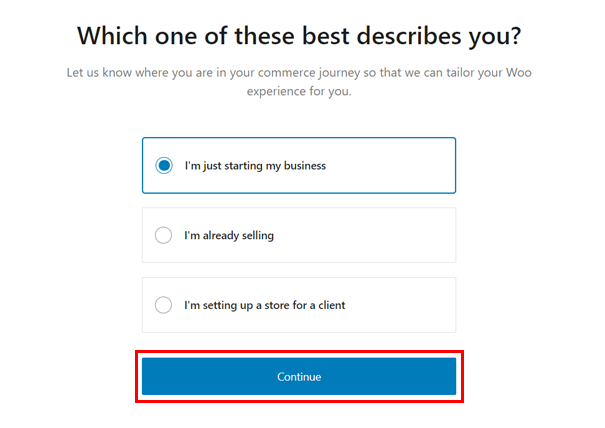
Next, you have to explain your business type and later click the ‘Continue’ button.
Following that, state your WooCommerce store’s name, industry type, and location followed by pressing the ‘Continue‘ button. Plus, WooCommerce recommends using some extensions like Jetpack AI Assistant, Pinterest product showcase, MailPoet, Google listings, etc.
Once you decide on the choices, pick them and click the ‘Continue’ button.
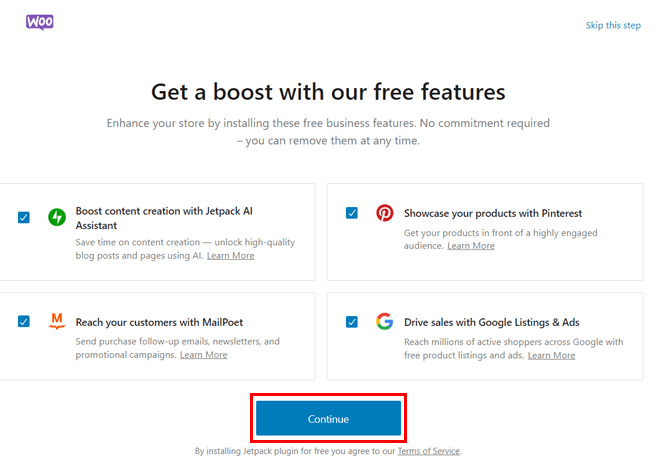
Finally, you can connect your shop with your WordPress.com account for Jetpack features or just press the ‘No, Thanks’ option.
Similarly, you can configure WooCommerce further from its ‘WooCommerce > Settings‘ menu. It has the following major options:
- General: Here, you can specify the store location, shipping locations, tax rates, coupons, etc.
- Products: In this tab, you can configure products like shop pages, reviews, ratings, and others.
- Emails: This part lets you manage how the emails will be sent to customers via MailPoet.
- Tax: In this section, you can adjust the various tax options and rates.
- Advanced: Here, it allows configuring the pages and features for the cart, account, checkout, etc.
After completing the process, click the ‘Save Changes’ button. But that’s not all! Keep reading!
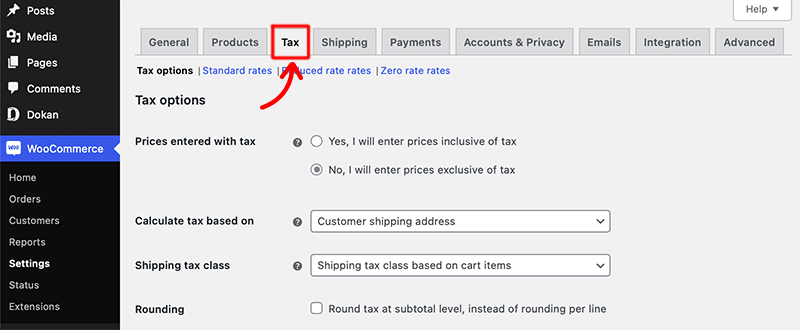
2. Add Payment Options
Now before we move ahead and launch our product on our website, we need to determine how we’ll process payments on our eCommerce website.
When you build your eCommerce website from scratch you’ll need to implement a payment gateway option. So, you can easily obtain payments directly from your customers after each sale.
Make sure to take your time and do research first. It mostly depends on different factors including, sales volume, processing fees, and more.

Your choice of payment solution should integrate with your business’s bank account and an online payment provider like PayPal. Besides, you get to accept a wide variety of payment methods, including direct bank transfers, credit card transactions, and more.
Each website builder will provide you with some payment gateway options to choose from: PayPal, Stripe, Visa, American Express, etc. Whereas some platforms also offer in-built payment services as well.
For example, let’s look at how we can integrate and configure the payment gateway in WooCommerce.
How to Set up a Payment Gateway in WooCommerce?
As we’ve already installed WooCommerce on our site, so login into the WordPress dashboard and navigate to and click on the Payments tab within the WooCommerce > Settings menu.
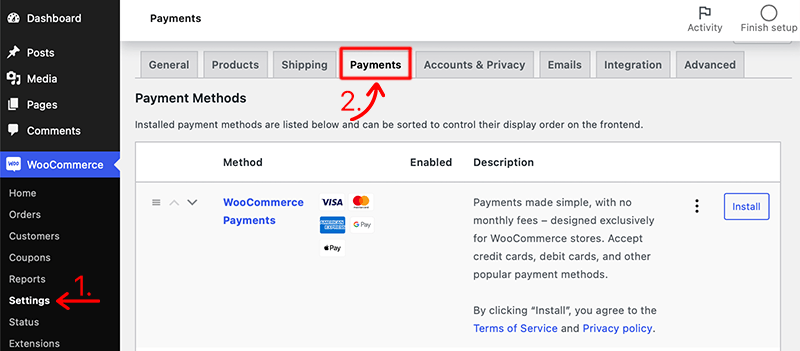
After that, you’ll find many payment options listed out there in front of you. Now all you need to choose is the payment method that you want to enable for your customers. To your advantage, you can enable more than one payment method for your eCommerce store.
For instance, if you’ve chosen WooCommerce Payments, which is the official payment gateway from WooCommerce, you just need to install the plugin. After that, you just need to create an account, provide your business details and you’re ready to go.
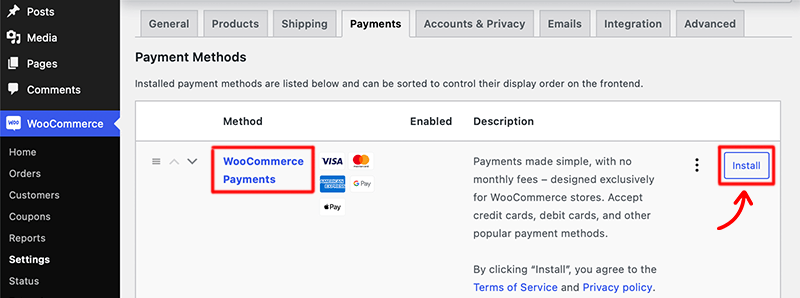
However, besides this, if you choose another payment method then first you need to enable the toggle for that payment method. And then click on the Setup button corresponding to that payment method.
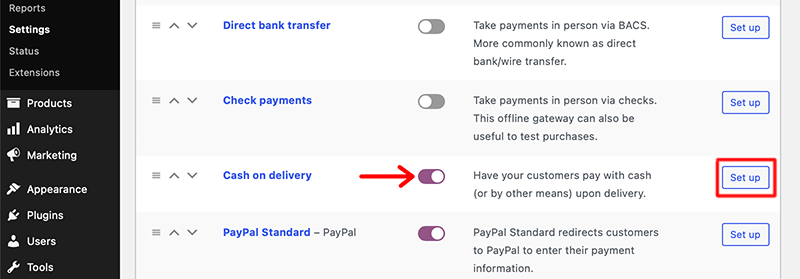
After that, fill out all the necessary credentials that allow WooCommerce to process the payment through your choice of payment method. And then click on the ‘Save Changes‘ button to save the integration.
In this way, you can easily and quickly set up and configure the payment option for your WooCommerce store. Similarly, other website builders will also have a similar way of setting up the payment option for the website.
Just make sure that you follow their documentation and knowledge base to properly set up the payment gateway into your eCommerce website.
3. Set Up Shipping Options
Similar to payments, shipping is also the major component of any eCommerce store. When you’re running an online business, you’ll have customers from all around the world. And you must be able to deliver their goods on time.
So, you must determine how you will ship your goods, and how much this will cost. Besides, most of the customers are also keen to know whether or not you’ll charge your customers for shipping.

Not all businesses will be able to provide free shipping. So, you can offer free shipping and then add the cost of shipping to the price of the product.
Furthermore, many eCommerce websites also seem to offer their customers premium shipping options like 2-day or overnight shipping. It’s all up to you whether you can offer these options or if you’ll only go with standard shipping.
For now, let’s look at how easily you can set up shipping in WooCommerce within minutes.
How to Set Up Your Shipping in WooCommerce?
After you’ve installed WooCommerce, the first step to setting up shipping is to identify your Shipping Zones. This process will inform your customers regarding where you ship, as well as configure different shipping methods and rates per zone.
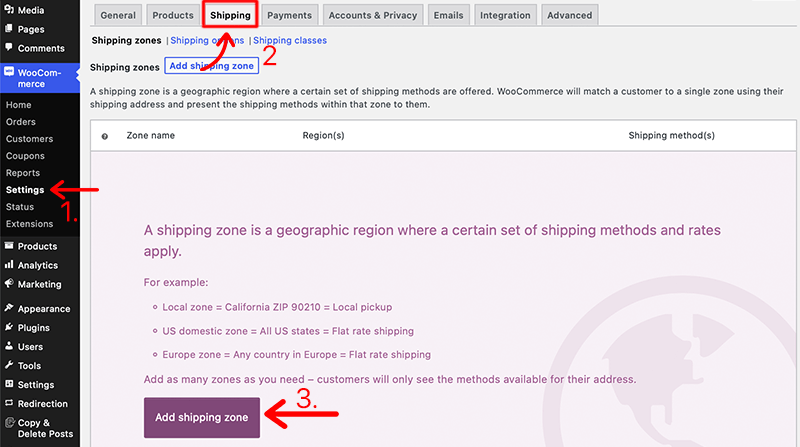
To set up the shipping zones, navigate to WooCommerce > Settings > Shipping from your WordPress dashboard.
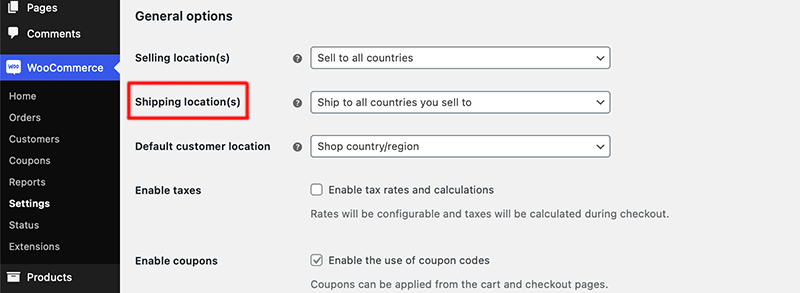
However, if you don’t see the Shipping option, then go back to WooCommerce Settings > General. Next, scroll down to Shipping Location(s) and use the dropdown to review and choose an option – ‘Ship to all countries you sell to’ option.
After that, again navigate to WooCommerce > Settings > Shipping and click on the Add shipping zone button.
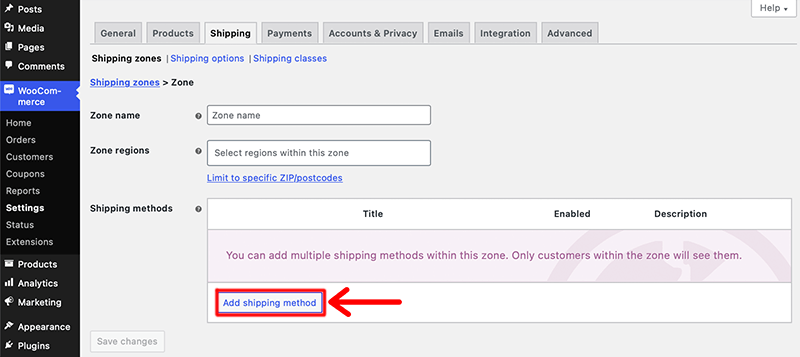
This will redirect to the next screen and enter the Zone Name and Zone Region. The regions can consist of countries, states, or continents. Next, click on the Add shipping method button, then choose the shipping method from the dropdown list. The options are:
- Flat rate – This allows you to set a flat rate for all orders purchased for that shipping zone.
- Free shipping – It makes the shipping fee free for that shipping zone.
- Local pickup – Instead of shipping, customers can pick up their orders directly from the store.
Not to forget you can create as many shipping zones as you like for all of the customers you service. Lastly, to save your new shipping zone, click on the Save Changes button.
Congratulations! If you’ve followed these steps, then you know how to set up shipping for your eCommerce store.
7th Step: Add Products to Your Store
Now, it’s time to add a product to your store. The product page is the most crucial page on your eCommerce store. As it’s that page that displays your customers what you’re selling. Hence, you need to take some time and then add products to your website properly.
Make sure that every visitor who visits your website leaves your website being your potential customer. To ensure that you must include optimized product descriptions, eye-catching images, and product categories.
i. Product Description
A product description is an essential part of any product. Since it provides all the important information about the product. So, keep it simple and short without any cliches and complex phrasing. Besides, a good product description must provide the answer to the following questions:
- What does your product do?
- Who should use the product?
- When should someone use the product?
- What does your product contain?
- How should one use the product?
ii. Product Images
Every product must come with high-quality images. In an online shop, your customers won’t be able to touch, feel, or try out your products before buying. Hence, having alluring multiple images from various angles, and dimensions can motivate your customers to make a purchase.
iii. Product Categories
Categorizing your products makes it easier for your customers to sort through specific brands, product types, and price ranges. Adding ‘Featured Items’ to your category is a great way to lead customers down your preferred shopping path.
How to Add Products in WooCommerce?
To add products to your WooCommerce store, you have to go to WooCommerce > Products from your WordPress dashboard. Then, click on the Create Product button to create and add your first product to your store.
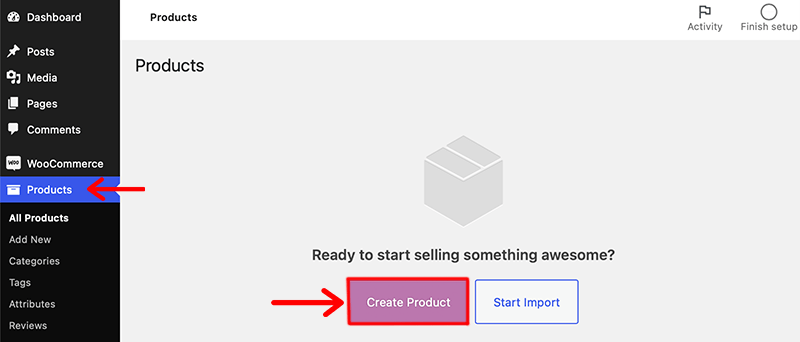
This will then redirect you to the WordPress editor that you’re already familiar with and has some new additions to it too.
1. Add Product Title and Description
The first thing you need to do is enter the name of the product in the title section. After that, add the description for your product.
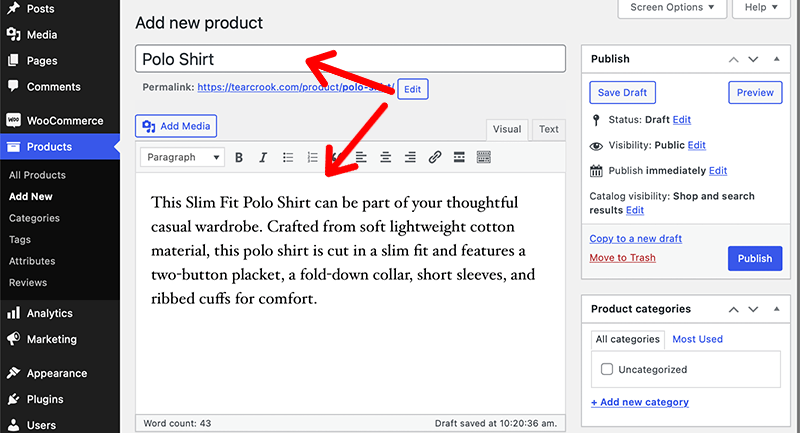
2. Choose the Product Type
Now, depending on what you’re selling, WooCommerce lets you use different product types.
- Simple product – A default product type for your WooCommerce store.
- Grouped product – A product that is sold in a combination of simple products.
- External/Affiliate product – Any affiliated store or dropshipping business can select this product type.
- Variable product – Select this product type if you sell multiple variations of a product like colors, sizes, etc.
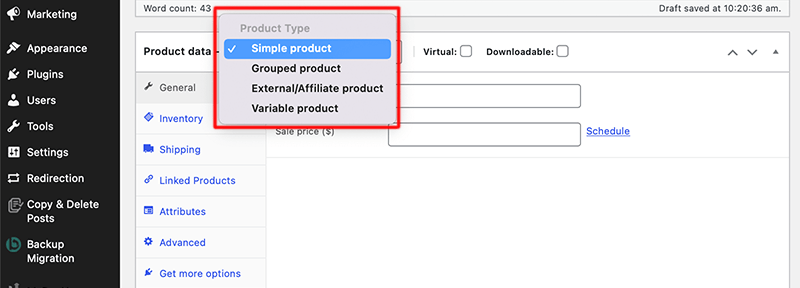
Alongside that, it comes with two additional options to modify those four core product types:
- Virtual – Option for selling online digital products that don’t require a shipment.
- Downloadable – Any product that can be purchased in the form of a downloadable file like an eBook or audio file.
3. Fill Out the Product Data Meta Box
After you’ve selected your product type, you need to configure the details in the Product Data box. You get 7 different tabs to configure and can use the tabs on the left to navigate between different sections.
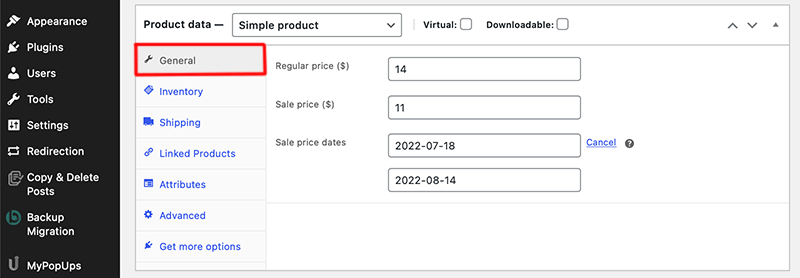
Under the General Tab, you can add the price of the product for regular and sale prices. Besides, you can also schedule and run a discount campaign for sale prices.
Similarly, in the Shipping tab, you can control all the important details about a product for shipping. For instance, there you can enter the weight of the product and its dimensions.
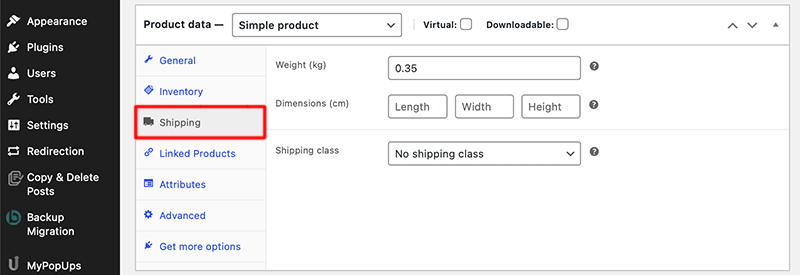
Plus, in its Shipping class option, you can group similar types of products and define the shipping rate for that.
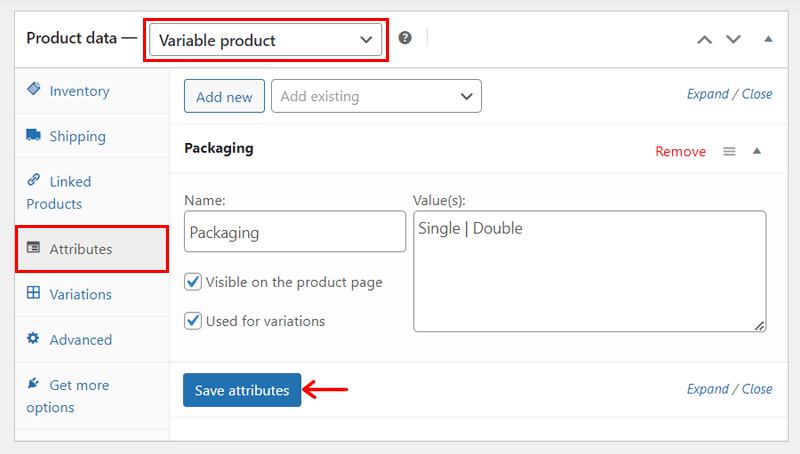
These steps are the same for both simple and variable products. However, if you want ‘Variable Product‘ as the product data, then you must set up ‘Attributes‘.
For instance, the website we’re referring to has attributes for its single and twin packaging. So, we can add the name ‘Packaging’ and its values, separated by ‘|’. Next, click ‘Save attributes’ and tick ‘Used for variations’.
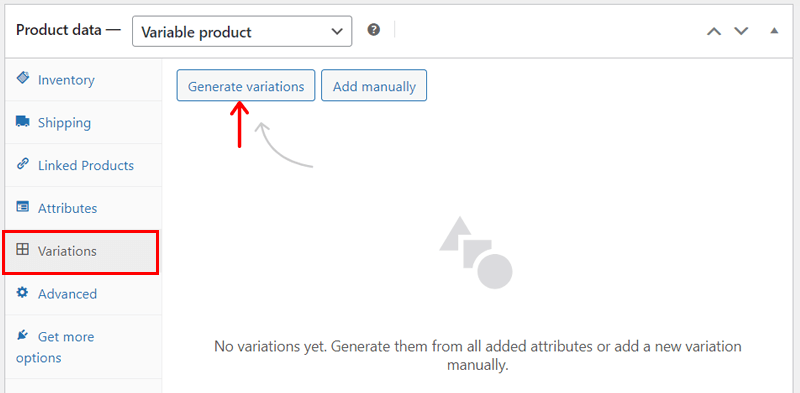
After that, navigate to the newly added ‘Variations’ tab. There, click ‘Generate variations’ and then the ‘Ok’ button.
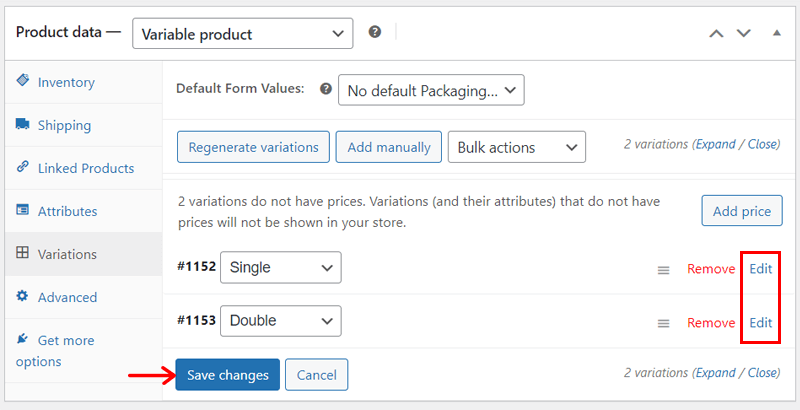
Further, you can click ‘Edit’ to include the prices and details of each variation followed by clicking ‘Save Changes’. By default, a drop-down menu will showcase these product variations.
If you want to show them differently, then you can utilize plugins like Variation Swatches for WooCommerce. Just install this plugin, configure the settings, and save the changes. Now, your variations will be shown on the buttons.

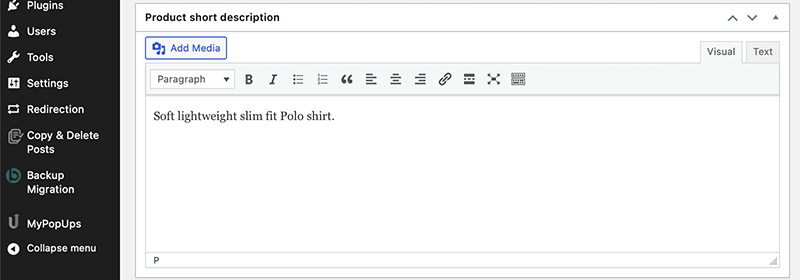
4. Add a Short Description
Once you’ve filled out all the Product data boxes, scroll down a little to the Product short description section. A short description is a quick summary of your product that appears on the product page under the product name.
5. Add Product Categories, Tags, and Images
On the right-side sidebar, you’ll get three different sections to add product categories, tags, and products.
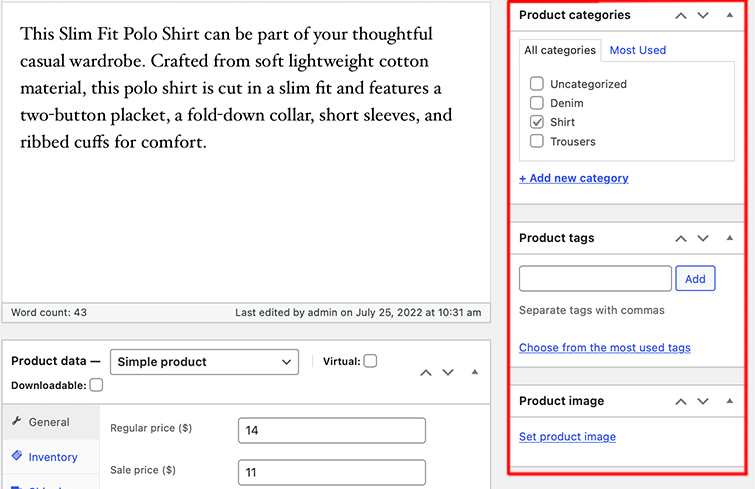
Make sure to properly categorize your product to make it logical and useful for your target customers. Also, along with a single product mage, you can add extra images in the Gallery section.
6. Hit the Publish Button
Lastly, before you hit the publish button, double-check all the product details. And then, you can hit Publish to make your product live for your customers.
Congratulations! You’ve successfully added your first product to your eCommerce site by following the above steps. Similarly, following those steps, you can add more products to your product page.
8th Step: Set Up Other Essential Pages
Undoubtedly, the store in itself is the star of your show, yet, you’ve to set up other essential pages. This helps your visitors to acquire some basic information about you and your business.
Hence, let’s take a look at some must-have pages for your eCommerce website:
- An interactive homepage that acts as your first page to your website when customers visit it. In it, you can display your most featured deals or any ongoing sale.
- An ‘About Us‘ page that talks about who you are and what the vision and mission of your business are.
- A ‘Contact Us’ page allows your customers to quickly and easily get connected with you.
- A ‘Blog’ page includes all the resources for your customers in the form of a blog, podcast, FAQ, or knowledge base.
- ‘Testimonials’ tells your potential customers about how much your previous customers are happy and satisfied with your services.
- ‘Privacy Policy is a must-have page that provides a privacy notice of your website to your customers in the EU (under the GDPR compliant).
- The ‘Feedback’ section encourages your customers to share their feedback about your website or products.
While creating a page, make sure you’ve well-written content that reflects your brand voice. This helps you to connect with your target audience and boost your conversions. Also, with every page, you make sure it includes a meta description and URL to it.
With most website builders, you can easily add pages, with a simple click on Add Page in your dashboard. From there, you’ll get an intuitive content editor that’ll walk you through adding text and media to your page.
If you aren’t sure where to begin, then start with About Us, Terms & Conditions, or other similar, less daunting page types.
How to Create a Homepage for Your Online Store?
The homepage is the most significant page on an eCommerce website. So, we’ll show you the process of making one taking the reference of the real website mentioned before. Let’s begin!
Add the Necessary Pages and Posts
As per our reference, we need to make a header and footer navigation. For that, please add the necessary pages to include as menu items. That includes Shop, Blog, Contact, About, etc.
To add a new page, you must go to ‘Pages > Add New Page‘, name the page, and click ‘Publish‘. Here, we also must insert a new homepage, so let’s name it ‘Home‘.
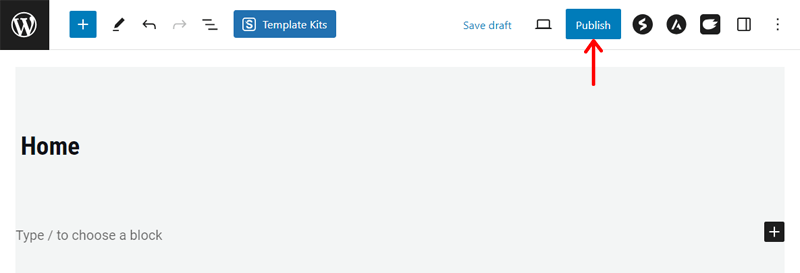
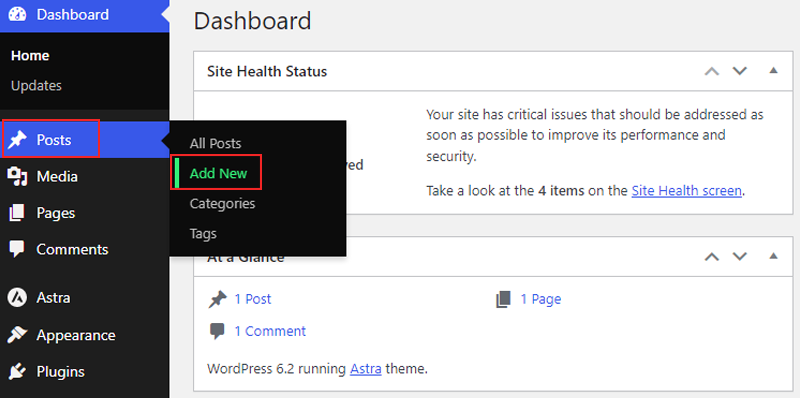
Similarly, to insert a new blog post for the blog page, navigate to ‘Posts > Add New Post‘.
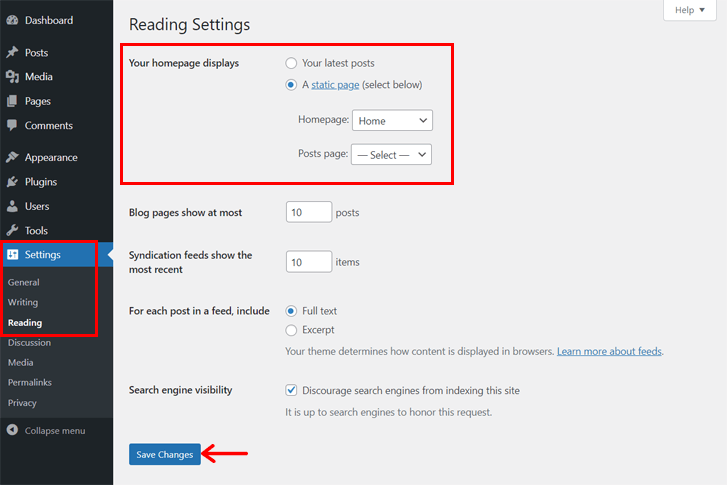
Because your template also provides a home page but you want to design it from scratch, so you must specify that the one you’re making is the homepage. For that, navigate to ‘Settings > Reading‘ and select ‘Home‘ as the default homepage.
Inserting Navigation Menus
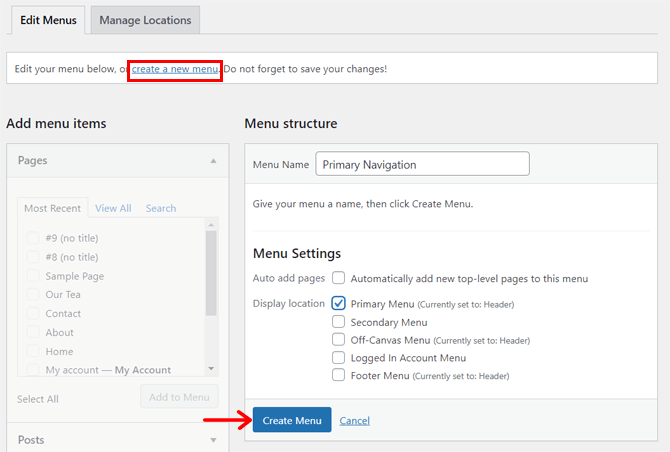
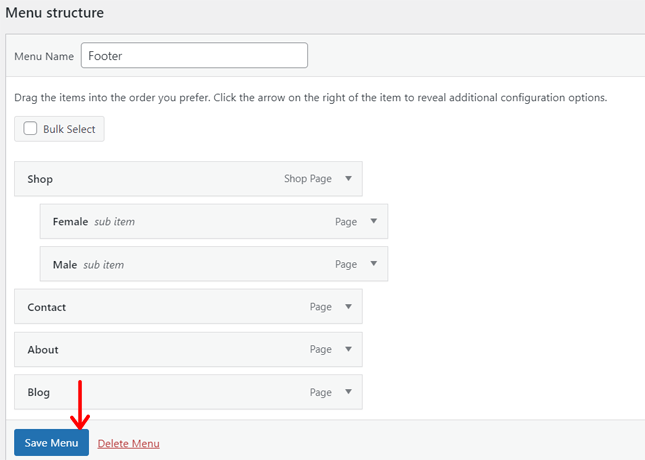
Now, open the ‘Appearance > Menus’ option and click on ‘create a new menu‘. There, add the name ‘Primary Navigation‘, Primary Menu as display location, and click ‘Create Menu‘.
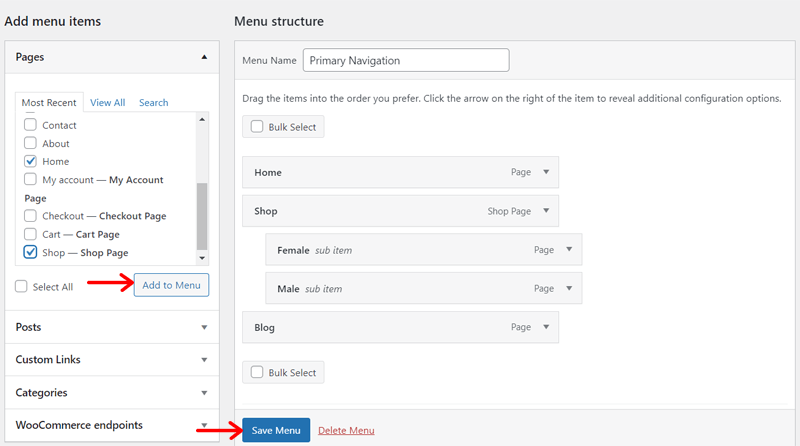
After that, select the pages to include in this menu and click ‘Add to Menu‘. Following that, sort the menu items, and if you want a dropdown menu item, simply drag it within the main menu item. Lastly, click ‘Save Menu‘.
Similarly, create another menu for the footer and select the display location as ‘Footer Menu‘.
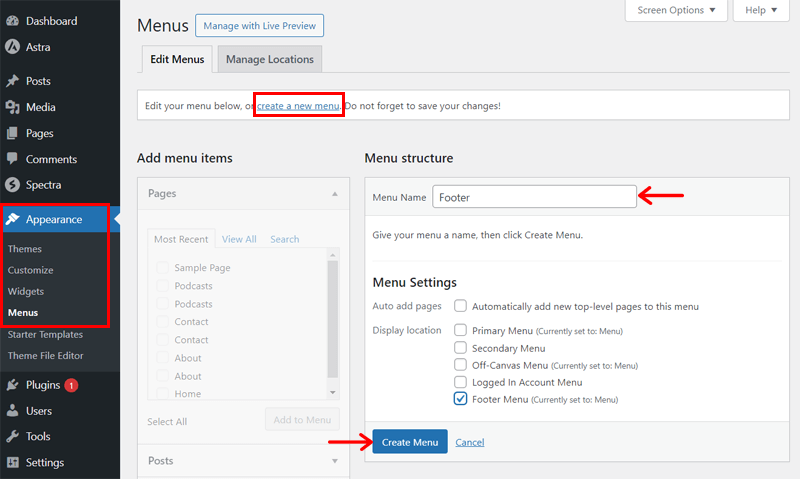
Then, add the menu items, sort them, and click ‘Save Menu‘ as before.
Create Required Widgets
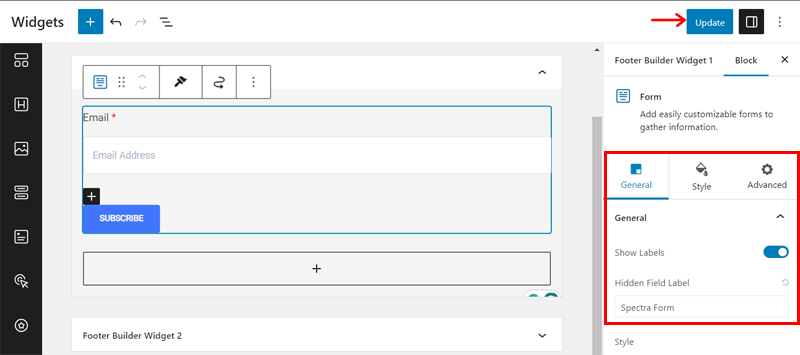
To add various sections to the homepage, we can create widgets so that it can be used many times. As per our requirement, we need a widget for the email registration. So, let’s go through its process.
First, navigate to ‘Appearance > Widgets‘ and insert a form from Spectra, the blocks plugin by Astra. Also, you can customize it as you want from the block settings on the right. Lastly, click ‘Update‘.
Configure Header and Footer
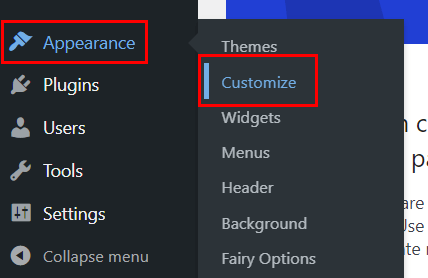
Moving forward, now, you can begin creating the header and footer of the online store using the menus and widgets created. For that, open ‘Appearance > Customize‘.
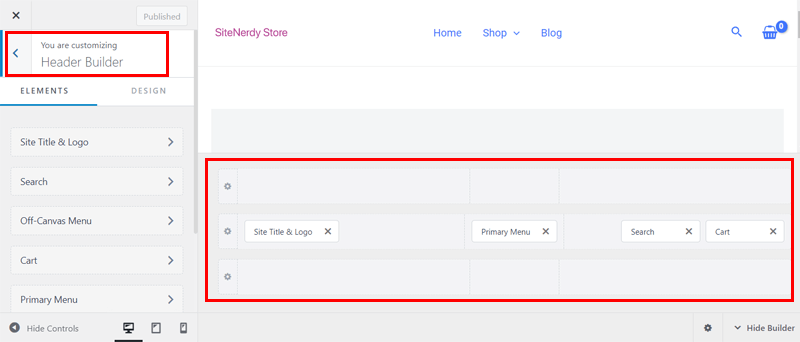
On the WordPress customizer, open ‘Header Builder‘. On the visual editor, you can find multiple header rows to edit. So, let’s adjust the menus as we need. In addition, you can customize the color for the header.
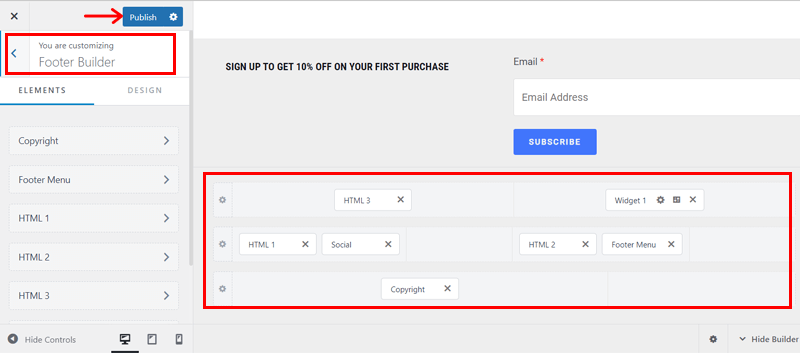
Similarly, open ‘Footer Builder‘ on the customizer. There, we can add the footer menu and the widgets in various rows. Similarly, customize them according to our requirements. Lastly, click ‘Publish‘.
Customizing the Body Section
Finally, you can open your home page and begin the editing of the body section. So, let’s design the homepage as per the real website reference.
First, let’s add a page header image. For that, click the ‘Template Kits‘ button by Spectra and open the ‘Page Header‘ tab. There, click the ‘Insert’ button of a pattern you want. But you may need to link it to the new AI assistant by Astra.
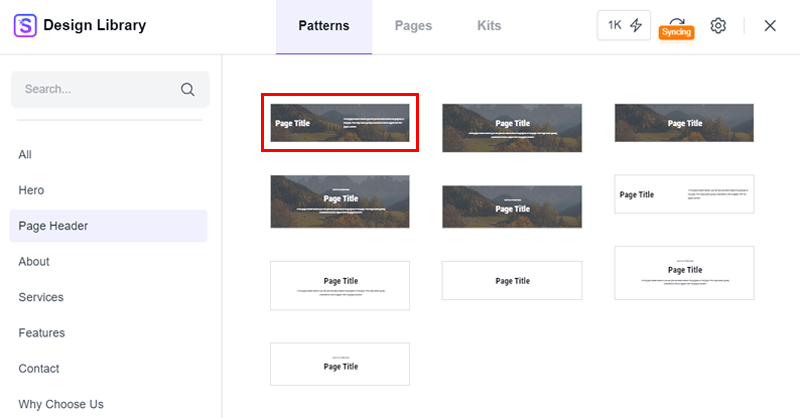
Now, change the image and remove the unnecessary text.
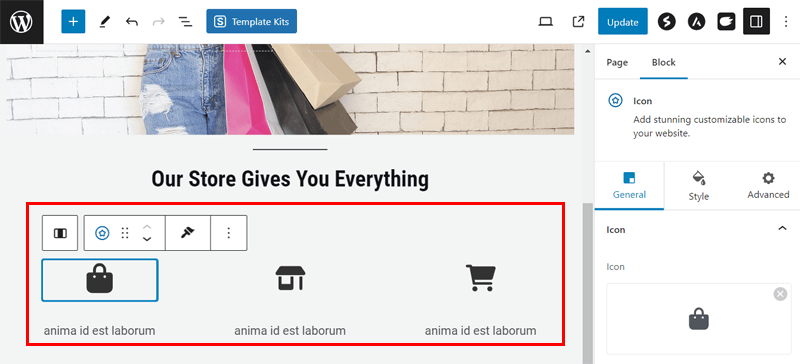
Below that, let’s add another column with 3 sections. On each section insert an icon and text. Here’s see how it looks like:
After that, you must insert a ‘Products (Beta)’ block. So, simply search for it and click once you find it. This adds all the products of your store.
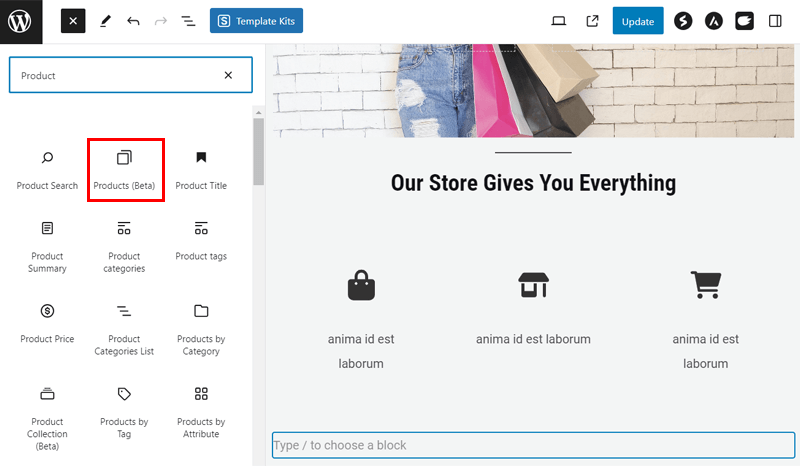
However, you can utilize its settings to adjust the product information and customize the display.
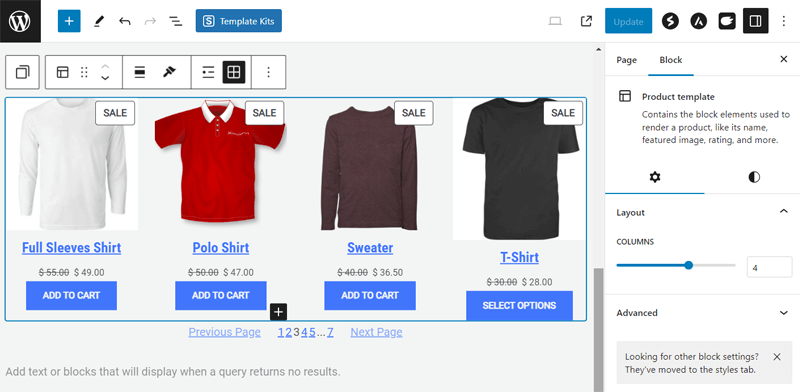
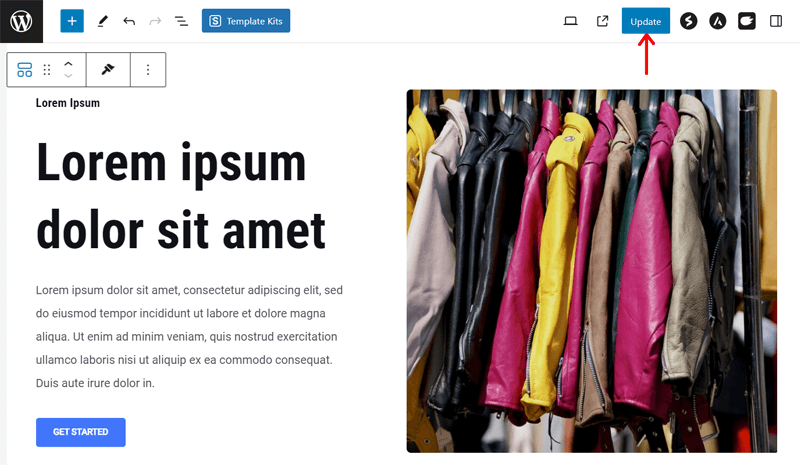
Lastly, let’s add a section to display content or a blog from the store. For that, we can utilize a pattern. So, again click on Template Kits and search for a suitable template. Among the given options, select one.

Moving forward, you can edit the content and image of the block. Once you complete the process, click the ‘Update‘ button.
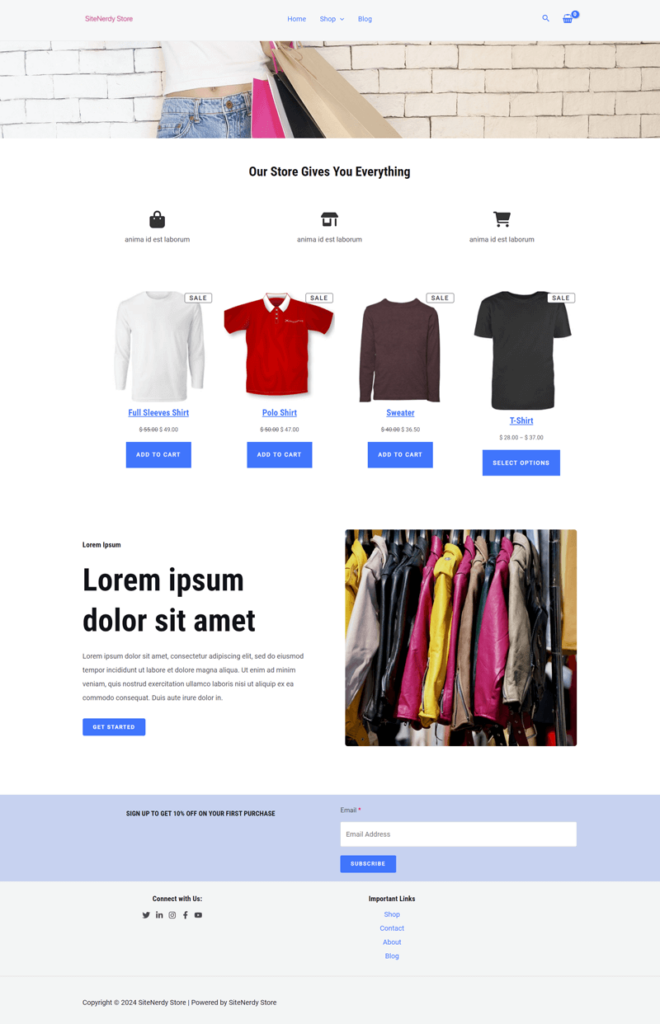
This concludes the entire steps of creating the homepage. Here’s a preview of how amazing your website looks like:
9th Step: Preview and Launch Your Online Store
We’re almost to the end of launching our eCommerce website. By following the above steps, we’ve completed all the hurdles that came along the way. And we’re just a click away from launching our online store.
But before we go live with our website wouldn’t it be better if we preview and test all features from our website? Because you don’t want your potential customers leaving your website empty-handed just because your website isn’t mobile-friendly. What a BUMMER it will be!!
Therefore, you need to make sure that you test everything before you hit the publish button of your website.
Here are a few things you need to test before you launch your eCommerce business:
| Checklist | Description |
| Check the Basics | Starting with checking some most basic things like ensuring trustworthiness and brand authority, double-checking spelling and grammar, and brand logo. |
| Mobile-friendly | Before hitting publish, test how your website looks on mobile devices. With that, also check how easy it is to click on the buttons and whether the images are clear or not on a smaller screen. |
| Products Showcase | Your website should display your products with high-quality images, well-written descriptions, optimized image tags, appropriate use of currency, etc. |
| Browser Compatibility | There are many web browsers available such as Chrome, Safari, Firefox, Edge, etc. Just make sure that your website works perfectly on all browsers without any difficulties and configuration required. |
| Payment Integration | Before you launch your store, conduct a test purchase to ensure your payment system is working properly, and send confirmation emails to respective customers. |
10th Step: Promoting and Marketing Your eCommerce Website
Now that you’ve successfully launched your store and have started selling products in good numbers. However, it’s just not enough to make your online business flourish.
In today’s time, the internet is a big infinite vessel that has a lot of competition. And if you don’t fight to be in front of people, then they’ll be unlikely to find you at all. Unfortunately, they’ll buy much less from you or in the worst scenario leave your website for other better ones.
That’s why you must put together effective marketing tactics to drive traffic to your online store and convert that traffic into paying customers. There are different marketing practices and strategies to build a robust eCommerce website.
Let’s explore a few of the most common eCommerce marketing tactics in this section on how to build an eCommerce website from scratch.
8 Best Ways to Promote Your eCommerce Site to Increase Online Sales
Try out these 8 marketing tactics to retain your existing customers and attract new customers. So, it helps you promote your online store and drive more traffic to increase online sales.
1. Optimize SEO
For your website to rank in search engine results or for customers to be able to find your site, invest in eCommerce SEO. It’s the perfect way to increase the visibility of your website and maximize your profits.
You need to optimize your online store to get your product pages among the top 10 results on search engines. For that, start by performing keyword research and including keywords in your page URLs, product descriptions, and blog posts.
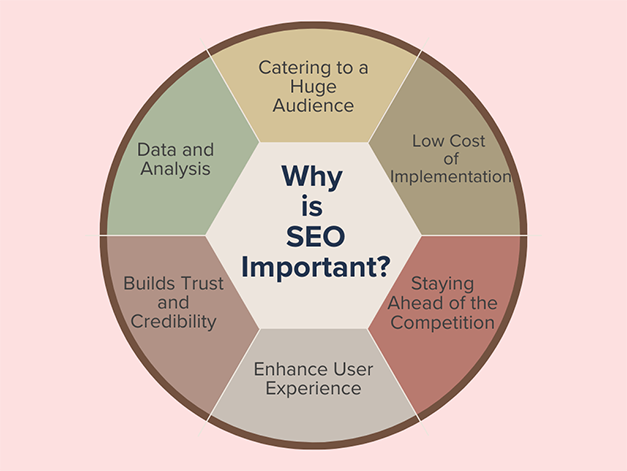
To learn more strategies on SEO, check out our complete beginner’s guide on what is SEO. Also, find the best WooCommerce SEO services.
2. Invest in PPC Campaigns
Pay-per-click (PPC) is a cost-effective way of advertising your business online. With PPC, you can target online ad space in search engines, social media platforms, or websites to promote your brand and products.

Besides, you can make your eCommerce website appear first in search engine results pages with your chosen keywords via Google Ads. Hence, PPC campaigns are extremely helpful to generate traffic to your eCommerce website while you’re establishing organic rankings.
3. Strengthen Your Social Media Game
According to the survey, around 61.4% of the world’s population uses social media. Therefore, social media provides a great opportunity to promote and reach your target market audiences.

Having a pretty solid presence on social media will not only boost your digital engagement but also let you put your words on your eCommerce products, events, and promotions. Besides, it’s a perfect way to get connected with your fan base and encourages you to get honest customer feedback too.
Learn everything about social media marketing here. Also, find the best WordPress social media plugins.
4. Collaborate with Brands
Collaborating with other businesses that have a similar target audience is a chic way of cross-promotion. This helps you to reach out to a whole new yet relevant audience.

You can partner with a similar brand and sell a complementary product. For instance, if you sell home decor items then you should partner with a brand that sells home appliances. In another way, you can generate a promotion code to discount one product when buying another product.
5. Partnered with Influencers
Influencers are internet celebrities who have many followers and can influence a large audience’s purchasing behavior. They can act as an ambassador for your brand and help you bring your product to many potential customers.

When you work with the right influencers, they can help you increase your brand awareness and advertise your business. You can let your influencer write a blog post about your product, post social media content reviewing, or demonstrate the use of your product.
6. Create a Blog
What if you can provide your customer with all the valuable content and build their trust in your brand? For that, you can launch your very own blog. This technique has been applied by many companies across all industries to bring traffic to their site and provide their customers with valuable information.

However, you just need to remember that your content should be interesting, scannable, and readable too. In your very first blog, you can answer your audience’s recurring queries so that they continually return to you whenever they face problems.
Check out our comprehensive guide on how to start a blog.
7. Reward Your Loyal Customer
Advertising your brand, building an email list, and brand partnerships are forms of promoting your website to your customers. Having said that, showing gratitude toward your loyal customers is another way of building stronger relations with them.

You can reward your loyal customers through a customer loyalty program. Within that program, you can simply invite them to special events, provide discount coupons, or feature them on your website. Just make them feel welcomed into your community and treat them with royalty.
8. Leverage Your Offline Store
If you already have a great name and a loyal following within your offline store, then you sure can take advantage of it. With very little effort, you can convert your offline customers into online shoppers and drive traffic to your new online store.
However, you shouldn’t force them to engage with your brand online the way they do offline. Instead, you can enroll them in a customer loyalty program and draw their attention to promotion codes. Like, you can provide a referral code that they can share with their friends and family for some discounts.
Therefore, promoting your online presence and increasing traffic is a tough challenge. It requires a lot of time and effort with constant patience within yourself. Yet, it’s possible to achieve your goals if you take one step at a time and use the strategies suggested in the article.
D. 12 Best eCommerce Practices for Better eCommerce Website
Ok, no doubt that now you’ve successfully built an eCommerce website from scratch after following all those mentioned steps. But does just developing an eCommerce website make it a successful venture? The answer would be a BIG NO!
Let’s just imagine that you visited your local mall on the busiest day of the weekend and you saw a mall with overcrowded and disorganized people. Followed by a rude and obnoxious sales assistant who is shouting at the top of their voice.
What would you do in such a scenario? Of course, you’ll try to leave.
Similarly, in the case of your online store also, if your customers form a bad first impression then they’ll bounce back. That’s why along with a well-designed storefront, it should also be easy to navigate and display what the customer is looking for.
Therefore, below we’ve listed a few tips you can practice after creating your eCommerce website from scratch. Following these practices will help you attract new customers and keep them loyal to your brand. Plus, it’ll help you promote your website effectively and enhance its efficiency.
i. Clutter-free Design
No doubt that any website that has simple designs has higher conversion rates. As it helps your visitors to get less distraction from finding a required product and making a purchase.
Having a whole lot of information as soon as they log in to your store will make your visitors confused. This will make them less want to stay on your website.
Therefore, the best eCommerce homepage best practice would be to get rid of clutter from your website. You should avoid cluttering your designs with fancy graphics, big menus, or others that distract users from performing target actions.

Besides, make good use of whitespace in your online store. Lastly, keep your homepage design minimal so that customers can easily find their way to the product they desire.
ii. Add a Noticeable Search Bar
Many of your visitors who visit your website might have to browse the website to find items they like. Or some might know exactly what they’re looking for. Adding a prominent search bar will help your visitors to get directly to the page they need.
Plus, including a product filter, it makes it easier to find the item based on their preferences instead of scrolling through random suggestions.
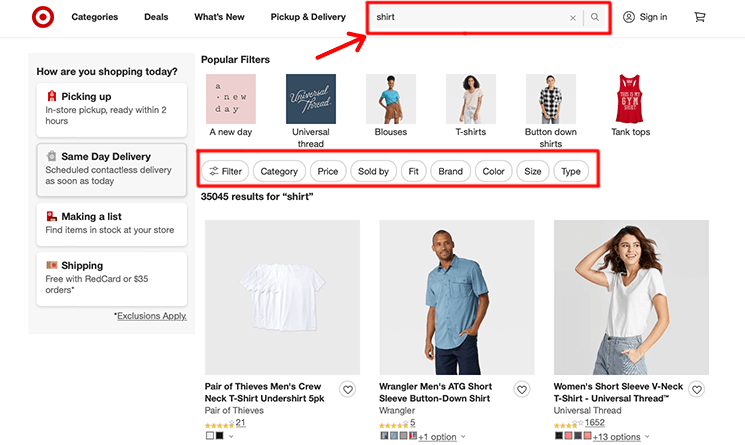
See how Target, an American big-box department store chain, lets its users easily find a product by setting specific search parameters at once.
Therefore, including a filter with a search bar provides the best shopping experience and helps visitors find products in a matter of seconds.
iii. Use Better Product Images and Demos
No doubt that a picture is worth a thousand words. On that note, according to Jeff Bullas, 67% of online shoppers believe that having quality images of any product contributes to selecting and purchasing a product.

Hence, adding alluring imagery to your product description will draw more attention and entice them into making a purchase. With the latest trend, using 360-degree images can be quite effective if you’re selling clothes, real estate, or cars.
Besides image products, using video demos is also an important part of marketing strategy and can contribute to increasing sales too. All you need to do is shoot the video, provide complete information about the product and put it online.
iv. Add Detailed Product Description
Having a popular brand name or an eye-catching image of a product doesn’t guarantee a sale. With all those things, each product on your website must have a detailed product description.
When writing a product description, make sure to keep those descriptions short and to the point. Also, try to display the key information first and foremost so that the customers get to know it right off the bat.
Alongside that, to make the description more scannable and readable for customers you can use bullet points as well.
v. Include Wishlist Functionality
Many of your visitors might prefer to research before they buy a product or avoid buying impulsively for budgetary reasons. For such reasons, including a wishlist functionality in your online stores helps them to save the items they like for possible future purchases.
When you allow your customers to save items for later, it eventually reduces cart abandonment too. And whenever they visit your store, it makes it easy for them to pick up where they left off.
Here’s a well-known fashion brand H&M has nailed its eCommerce wishlist.
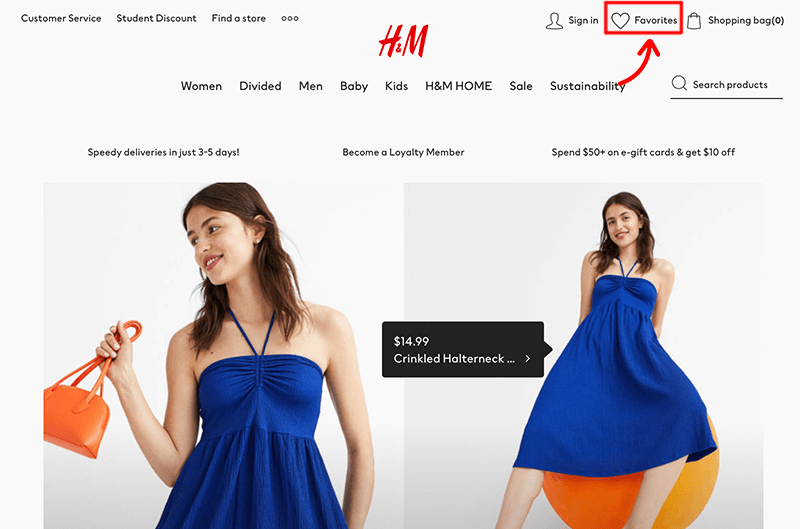
This company has placed it at the top-right corner front and center here via its “Favorites” feature.
Adding a wishlist on your WooCommerce store is easy with plugins like YITH WooCommerce Wishlist.
vi. Efficient Product Menu
Owning an eCommerce website means that you’ll have dozens of different types of products to be sold. This can lead your customers to be overwhelmed with finding their choice of products on your website.
Therefore, having a simple yet efficient menu lets you stay organized and display your products in a clear and user-friendly manner. You shouldn’t overcomplicate things and confuse your customers.
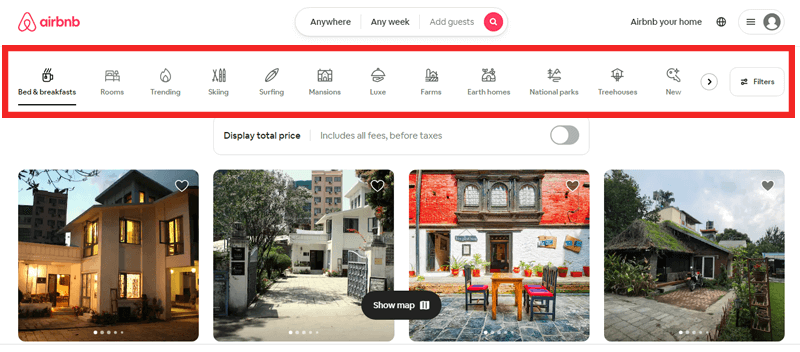
The simple navigation menu structure helps your customers to navigate through your website easily. In it, you should create categories and subcategories for your products.
Plus, you need to add your navigation menu at the top of the page so that visitors can discover it quickly.
vii. Don’t Force to Create an Account
On average 70.19% of customers abandon their shopping cart during checkout. And, that also, over 24% of them do so because the website wanted them to create an account in the first place.
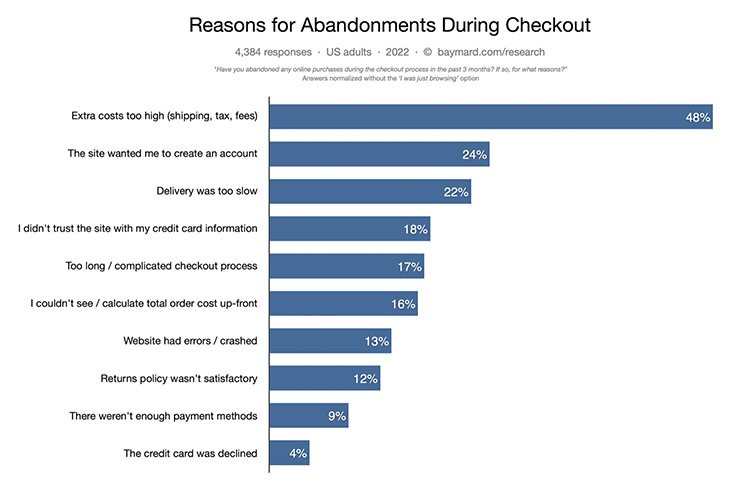
You should not force your buyers to create an account to just buy a single product and waste their time. Instead, a great eCommerce practice would be to provide your buyers with the option of a guest checkout.
However, you can encourage your users to create an account if they want to access extra features, such as writing reviews and receiving offers. However, it must not be a requirement to complete an order.
viii. Build an eCommerce Email List
Building an eCommerce email list is one of the best eCommerce practices that can help you drive traffic to your website. According to OptinMonster, 61% of consumers prefer to be contacted by brands through email. Isn’t it good news for your business?

Once you’ve got your visitor’s email address, you can have the perfect opportunity to send them personalized emails. In that email, you can offer them some special discounts or inform them about your newly launched products.
If not then you can offer incentives (such as free PDF and eBook) for your visitors in exchange for their email addresses.
Learn what email marketing is and the best email marketing services.
ix. Send Shopping Cart Abandonment Emails
There’ve been many cases when customers have set up their user profile and have added something to their shopping cart to purchase. But at the last moment because of some reason they have to abandon their shopping.
In such cases, it’d be better if you could ask for their feedback about what led them to abandon their cart. Or, they might have left it there to purchase it some other day.
Hence, sending an email and reminding the customers about the item can be quite helpful enough to finalize the sale.
Here let’s look at an example from the Adidas store.
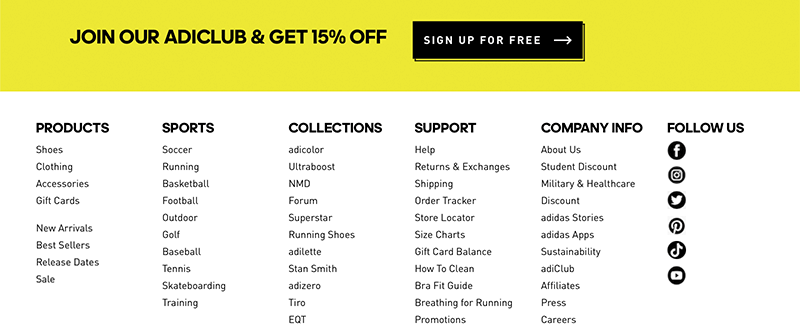
On their website, they’ve added a signup button for their email lists at the bottom of their page. Here, you’ll also notice that Adidas has offered an incentive of 15% off to sign up.
x. Offer Free Shipping
Don’t you want your customer to have a happy ending? Yes, you do it by simply not charging your customers for shipping.
One of the main reasons why customers abandon their shopping carts is because of the high-end shipping costs. The best thing you can do is to include the shipping cost in your product price instead of including separate delivery charges.
Hence, this will make your customers feel a bit better, increase the number of orders and make your store more profitable.
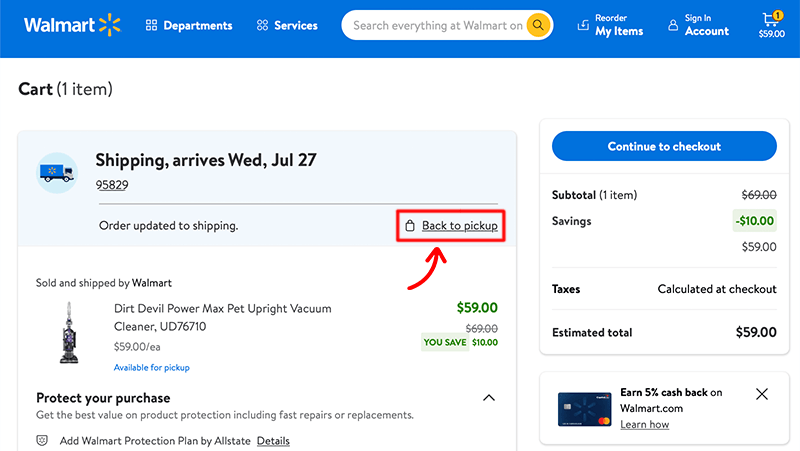
Besides, you can even offer other shipping options, such as in-store pickup. For instance, in the above image, you can see Walmart letting you choose between a pickup or delivery from the store delivery options.
xi. Enable Customer Reviews
According to a survey conducted by PowerReviews, more than 99.9% of consumers go through reviews whenever shopping online. This proves that customer reviews do enhance the shopping experience of a customer.
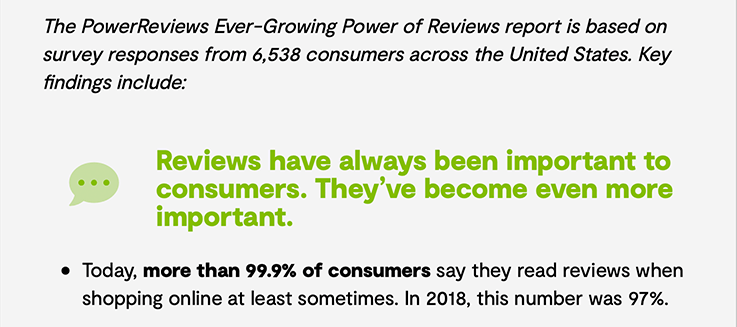
Hence, you should offer an option to leave a customer review and rate a product on your eCommerce website. This will help your customers find a way to hear honest feedback directly from each other.
Plus, you can build a strong reputation for having transparency between you and your customers. Besides, displaying both positive and negative reviews shows your honesty toward your buyers.
xii. Improve Your Website’s Responsiveness
With all the above-mentioned tips, your website should be responsive at the same time. So, your website can easily load up on different devices with varying screen sizes.
Besides, Google prefers those websites whose website responsiveness is top-notch and rewards them with more visibility in search results. There are different ways in which you can optimize your website’s responsiveness and maximize performance.

You can reduce the size of your images and get rid of unnecessary page elements from your website. Also, make sure to use responsive web design and templates to ensure website responsiveness throughout all the device screens.
Hence, these are a few eCommerce best practices for a better eCommerce website. This again proves that running a successful eCommerce website is not an easy task.
Fortunately, there are a lot more things to improve your chances of driving sales and keeping your customers coming back for more. Make sure to do good research at the beginning only for better results.
E. 7 Best eCommerce Tools and Plugins to Build Your Store
Here, we’ve shortlisted some of the best eCommerce tools and plugins that help you easily create an eCommerce site. Let’s have a look at this section on how to build an eCommerce website from scratch.
1. Semrush (Research Tool)
Semrush is a keyword research tool that helps discover keyword ideas that your targeted audiences are searching for on search engines. You can find organic keywords and get all of the information and data for a successful eCommerce website.

It’s an all-in-one marketing toolkit that allows you to do keyword research up to 100 keywords at a time. Besides, you can compare your website with other websites to understand your competitors better.
You can generate a report on the strengths and weaknesses of a complete website, identify keywords, and analyze ad campaign performance.
Get started with all the SEO certification courses to boost your career.
2. Veeqo (Business Tool)
Veeqo is an inventory management tool that easily manages inventory, orders, shipping, and more, across multiple sales channels. Any small to medium-sized eCommerce business can manage its inventory, warehousing, and shipping all from one platform.
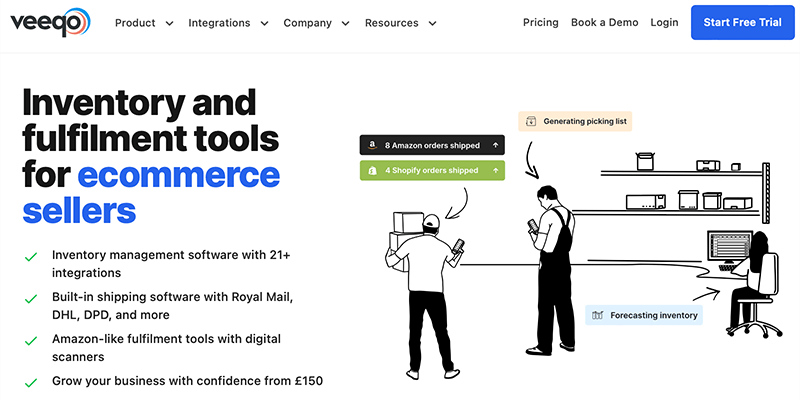
Similarly, it’s a go-to solution for any omnichannel retailer who’s looking to better manage their inventory. It integrates with all of the major eCommerce platforms such as Magento, Shopify, WooCommerce, BigCommerce, and more.
3. Dokan ( Multi-vendor Marketplace)
Dokan is the best WordPress multivendor plugin that lets you build a multi-vendor marketplace like Amazon without any hassle. It provides you with everything that vendors need to sell their products to various customers in one place.

Likewise, it allows each vendor to get their own independent and customizable storefront. And with each store set up within your marketplace, you can earn some vendor commissions or product-based commissions from each product sold.
Check out our complete review on Dokan! Pick one of the best WordPress multivendor themes!
4. Rank Math (SEO Plugin)
Rank Math is a WordPress SEO plugin that helps to enhance your SEO and attract more traffic to your website. With this, you can easily optimize your content with its built-in suggestions based on widely accepted practice.
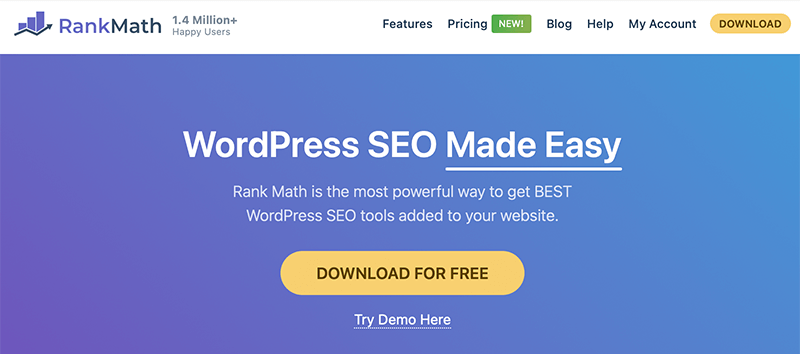
Moreover, it offers a WooCommerce SEO function that includes an automatic schema for WooCommerce products. It allows you to automatically set SEO titles and meta descriptions for individual pieces of information.
Here’s our honest review of Rank Math. Find other popular SEO plugins like Yoast SEO and AIO SEO.
5. ActiveCampaign (Marketing Tool)
ActiveCampaign is a powerful all-in-one email marketing solution that lets you send emails, create pages, and automate your marketing. It provides you with marketing automation and CRM tools to create incredible customer experiences.
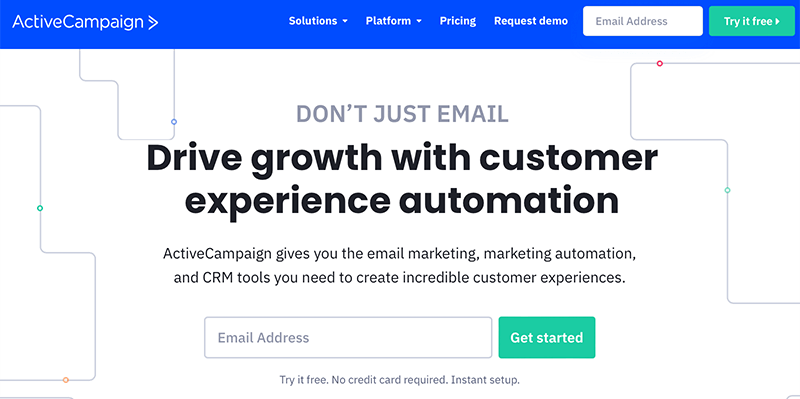
Likewise, you can schedule and send personalized newsletters and messages exactly targeting each contact’s interest. Indeed, it lets you generate detailed reports on what’s working and what’s not by getting the most out of your data.
If you want a different platform, then you can find the best ActiveCampaign alternatives here!
6. Buffer (Social Media Tool)
Buffer is a social media automation tool that helps you build an audience organically. It allows online stores to schedule and automate their social media posts — via Facebook, Twitter, Instagram, etc in advance.

This makes it easier for the marketing team to easily create, organize, and promote your posts on social media from one place. With just a single click, you can create hundreds of social media posts and customize the schedule of different groups of content and posts.
7. Google Analytics (Analytics Tool)
Google Analytics is the best eCommerce analytics tool that helps you analyze data for your business from one place. It’s the right tool to help you easily make rightful decisions that can potentially increase your sales and reduce costs.

Google Analytics is a free-to-use tool that helps you understand your website and users and makes the most use of that data. It comes with fantastic visualization features to easily track your landing pages, your website visitors, and their behavior.
Learn how to set up Google Analytics on your eCommerce website built with WordPress here!
F. Why is Using an eCommerce Builder than a Custom Build Site?
When we say we want to build an eCommerce website from scratch we think that we’ll use custom code from top to bottom. However, in today’s context, as an alternative to it, we’ve got a website builder.
Back in the day, when you wanted to build an eCommerce website from scratch you should know how to program using HTML/CSS and other additional programming languages.
This was the reason why many small-sized businesses were unable to afford their eCommerce site. Hiring a developer to develop eCommerce was expensive and time-consuming back then.
But now with the introduction of website builders, it has made it easier for people to create beautiful websites without any programming knowledge.
Benefits of Using Website Builder:
Nowadays, many modern store builders come with a ton of great features that allow you to make some truly great websites. So, here are some of the biggest benefits of using a website builder include:
- Less Expensive – Surprisingly, some of the website builders are already free to use. And even if you have to buy the tool they can be quite affordable and budget-friendly.
- Beginner-friendly – Store builders are easier to use than coding the website. This is a great option for beginners who don’t have any coding experience.
- Fast – Even professionals can’t code and develop a site from scratch in an hour. But with a site builder, anyone can build a great website in hours or minutes based on the features.
- Fully Integrated with Advanced Features – With a custom-built site, every new feature must be developed. Whereas, store builders give the features pre-built or from their add-ons.
- Excellent Support – No doubt, store builders come with excellent customer support. They’re there for you if you need help with a problem or have questions using it.
Lastly, if you’re looking for the easiest and quickest way to develop your eCommerce website from scratch, then a website builder is the way to go. Undoubtedly, they come with many great tools and services that let you build an eCommerce website from scratch without any coding experience.
G. FAQs to Building an eCommerce Website
1. Why do you need to have an eCommerce website?
Undoubtedly, an eCommerce website can offer a plethora of benefits to consumers. Hence, having a standalone eCommerce website is a must if you want your business to be around for the long run.
a. You Can Go International
b. Increases Customer Reach
c. Helps to Strengthen Your Brand
d. Make Money Online
e. Allows You to Run Your Business from Anywhere
2. What do you need to build an eCommerce website from scratch?
Here’s a quick rundown on what you need to build an eCommerce website from scratch – a domain name, website hosting provider, store builder, payment gateway option, and more.
3. What are some of the best eCommerce site builders to build an eCommerce website from scratch?
Some of the best eCommerce site builders to build an eCommerce website from scratch are Shopify, WooCommerce, BigCommerce, Ecwid, and Squarespace.
4. What are the steps required to develop an eCommerce website from scratch?
The beginner’s steps required to develop an eCommerce website from scratch are:
Step 1: Market Research and Pick a Niche for Your Business
Step 2: Choose Your eCommerce Site Builder
Step 3: Select a Good Domain Name
Step 4: Get a Best eCommerce Hosting Provider
Step 5: Pick up a Theme for Your eCommerce Website
Step 6: Set up Your eCommerce Store
Step 7: Add Products to Your Store
Step 8: Set Up Other Essential Pages
Step 9: Launch Your Store and Sell Your Products
Step 10: Promoting and Marketing Your eCommerce Website
5. How long does it take to build an eCommerce website from scratch?
The time required for building an eCommerce website depends mostly on the website builder, design complexity, functionality, and third-party integration. Usually, it’ll generally take 1-2 months to build an eCommerce website from scratch.
Conclusion
That’s the end of our easy beginner’s guide on how to build an eCommerce website from scratch. We hope that it’ll help you create your online shop and start selling products.
You can pat yourself on your back if you’re able to successfully build an eCommerce website from scratch after following the above steps.
At last, what we can just say is, to build an eCommerce website from scratch is not a piece of cake. As it takes your time, work, and a little bit of startup capital.
If you have any further queries on how to build an eCommerce website from scratch, then please leave a comment below. We’ll try to get back to you as soon as possible.
You may also want to explore our comprehensive guides on the best ways to secure eCommerce and eCommerce CRO.
Lastly, don’t forget to follow us on Facebook and Twitter for more updates. And, if you like this article, then please take a second to share this guide on your social media accounts and spread the message!

