Do you want to know how to install a WordPress theme? Then, you’ve come to the right place.
WordPress themes are the elements that provide design features and make your site look unique. At the start, you get a pretty simple default theme, which you might not want, or doesn’t suit your website. That’s when you need to install a new WordPress theme.
If you’re new to WordPress, then installing WordPress themes is one of the first things you should learn. So, we’re here with the complete tutorial of installing WordPress themes, with different approaches. You’ll also get to learn to update, customize, and uninstall a WordPress theme here.
Let’s begin!
A) What is a WordPress Theme and Why Do You need it?
A WordPress theme is a component that determines the looks and feels of your WordPress site. It includes files, templates, stylesheets, graphics, etc. working together to provide a visual appeal to your site.
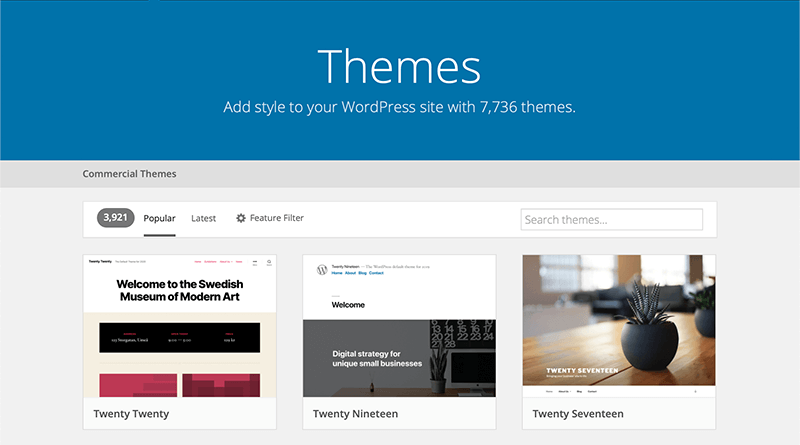
Now, you should know that you must have at least one theme installed on your site. For that reason, you’ll have a default WordPress theme installed automatically at the start.
However, like most of the users, you might want to switch to a better theme. As a result, you can make your site and site’s information look better to the users. Moreover, you get lots of features like responsiveness, site speed, widgets, security, updates, etc.
Here’re some points on things to look at while choosing the best WordPress theme for your site.
- Consider your budget.
- Choose the theme perfect for your niche.
- Make sure the theme is compatible with all devices and web browsers.
- It should have features like SEO-friendliness, plugin support, etc.
- Check the theme’s ratings and reviews, and so on.
If you want to learn more, then read our article on how to choose a WordPress theme.
Now, let’s move on to how you can install a WordPress theme.
B) How to Install a WordPress Theme?
The procedure of installing a WordPress theme might differ depending on the type of theme. For now, we’ll see 3 different ways that could work for installing all WordPress themes.
- Installing a Free Theme from the Dashboard
- Uploading a Theme to the WordPress Dashboard
- Installing a WordPress Theme via FTP
Now, let’s discuss them in details.
1. Installing a Free Theme from the Dashboard
It’s the most common and simplest way of installing a WordPress theme. With this method, you can install all the themes available in the official WordPress.org free theme repository.
With the theme search functionality on the WordPress dashboard, you can find all the themes on the repository.
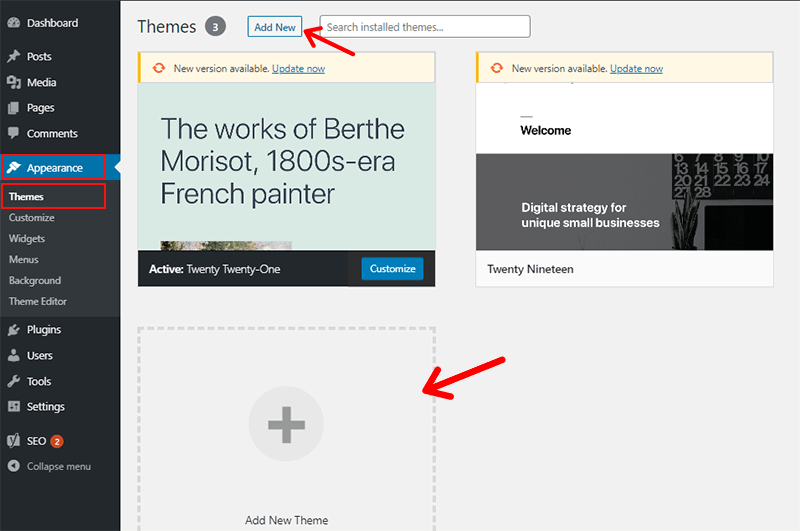
Now, to install a theme from the WordPress dashboard, go to your web browser first. After that, enter your WordPress login URL and login to your WordPress site. Then, on your Dashboard > Appearance > Themes. Next, click on Add New.
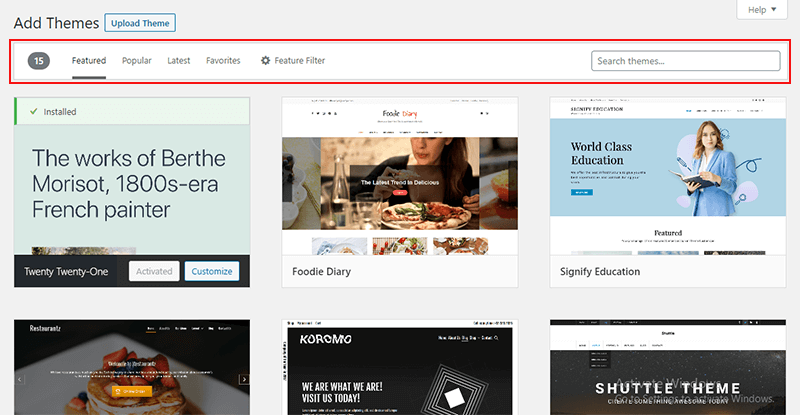
After that, it’ll open the ‘Add Themes’ page. There you can pick a theme from the Featured, Popular, Latest, and Favorites tabs.
If you want certain features with the theme, then you can use the Feature Filter tab and tick the features you want. Or, if you’ve already selected a theme, then you can search by its name.
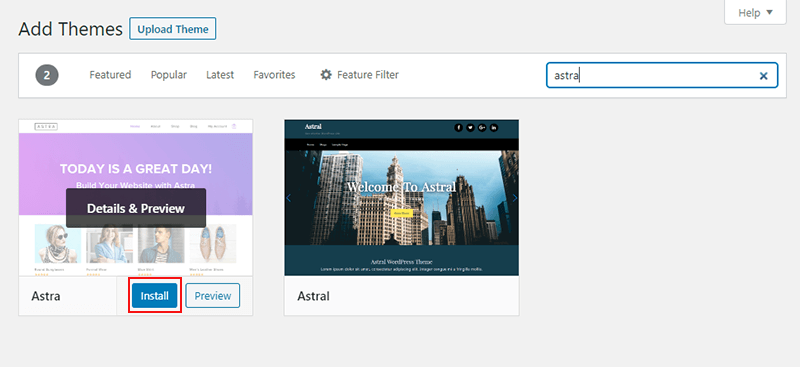
After you choose your appropriate theme, click on Install to run the installation. For example, we’re going to install the Astra theme here.
After that, click on the Activate button, which comes up after the installation is complete.
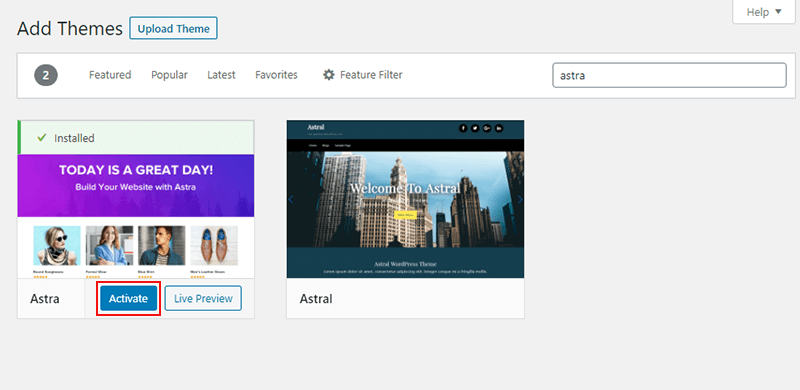
Clicking on the Activate button will activate it on your site, and deactivates your previously active theme.
Then, you can move on to customizing your theme by clicking on the Customize button.
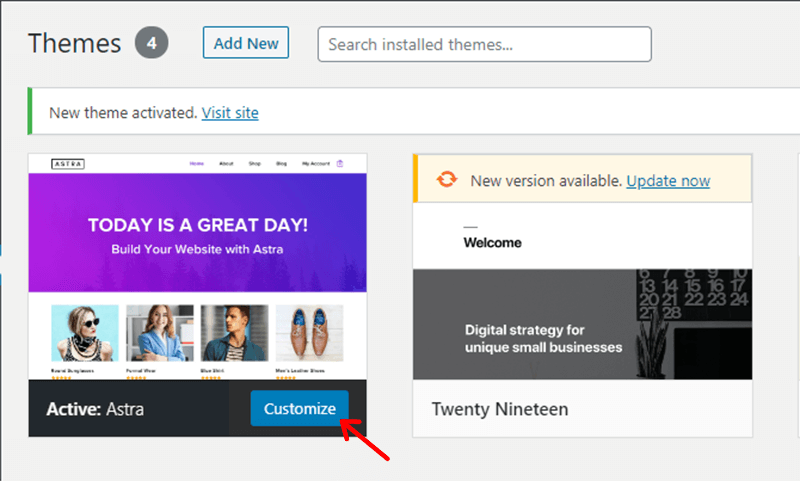
We’ll explain more about customizing your theme in another section below. Keep reading.
Also, this method is useful to install a theme on your local WordPress i.e. If you have hosted WordPress locally, then you can create a testing environment for the themes and various other WordPress features.
2. Installing a Theme by Upload Method
Installing a theme by upload method is applicable if you want to install an already downloaded theme. It can be a premium theme you purchased, a custom-made theme, or even a free theme you’ve downloaded on your device.
In this method, you basically upload a theme from your local computer to the WordPress theme area.
For this method, we’re going to install Divi WordPress theme.
Then, to start installing, go to your WordPress dashboard. Next, similar to previous steps, go to Appearance > Themes and click on Add New.

On the next page, click on Upload Theme.
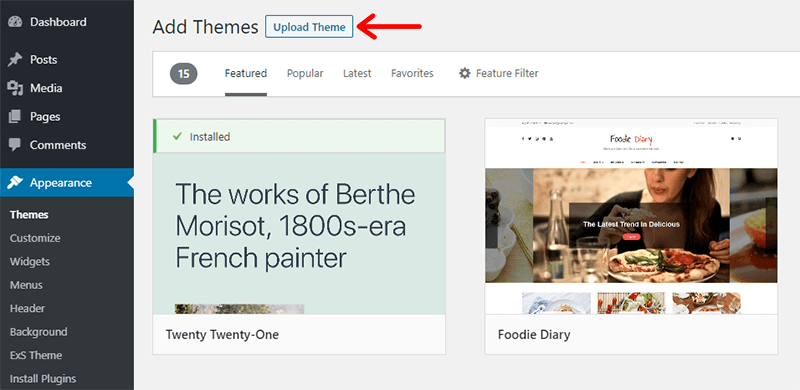
Then, click on Choose File.

Then, choose the theme from your local computer. But first, make sure the theme folder is zipped.
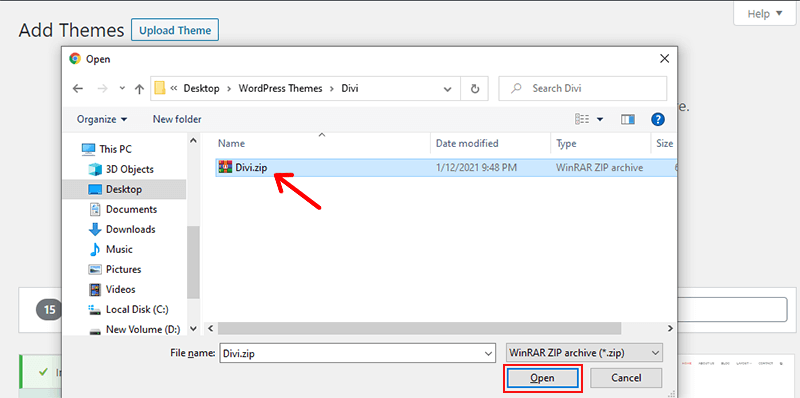
After that, click on Install to start installing.
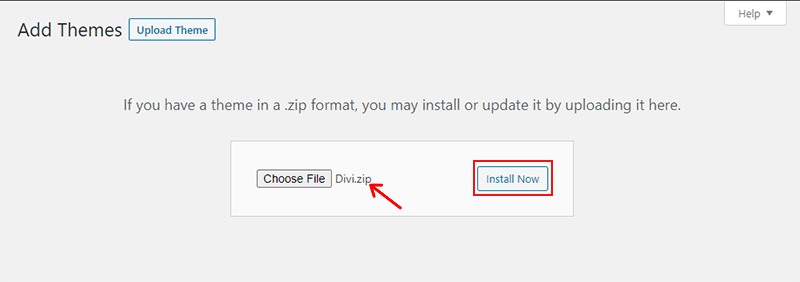
After completing, you’ll see a message saying that the theme is installed successfully. Also, you’ll see a link to activate the theme, so click on it.
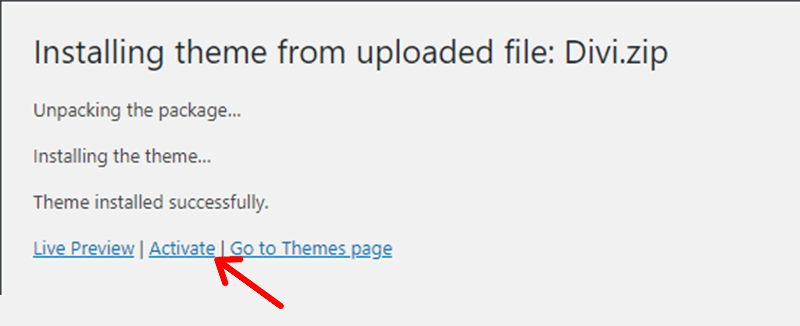
After that, the theme will be activated.
3.Installing a WordPress Theme via FTP
Sometimes, due to some reasons, the themes won’t install with the two methods explained above. In that case, you need to install the WordPress theme via FTP (File Transfer Protocol).
Remember that this method is a little more advanced than the previous ways we explained above. So, we recommend you to use this method only other methods don’t work.
Now, let’s clearly understand how to install a WordPress Theme via FTP.
i. Installing FTP Client (FileZilla) on your PC
The first thing you need is FTP client software on your computer. It connects your local computer and WordPress hosting account, so you can directly upload or remove files.
Some of the popular FTP clients are FileZilla, CyberDuck, Transmit, Free FTP, etc. So, install any one of them on your computer. For now, we’re going to use FileZilla.
ii. Connecting Local PC with WordPress Server Site using FileZilla
After installing, open FileZilla to connect with your WordPress site. On the top, you’ll have to enter your login credentials i.e. Host, Username, Password, and Port.
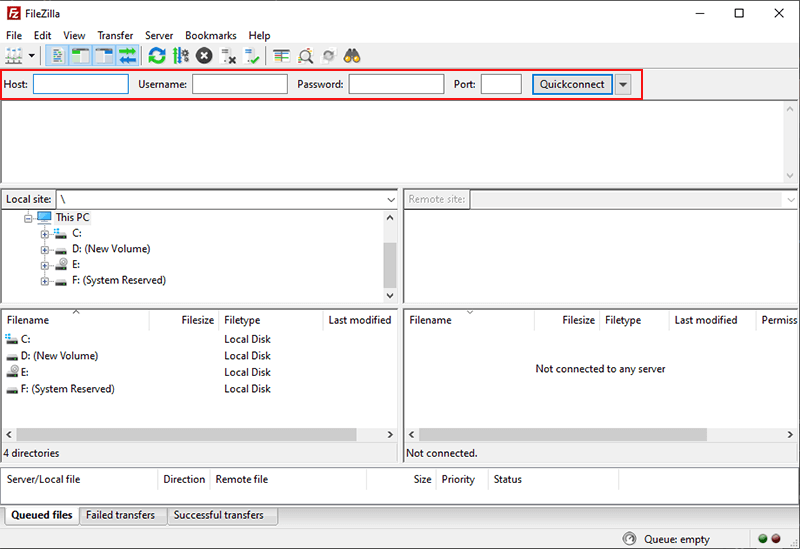
So, what credentials should you enter? Let’s see.
In host, you just have to enter the URL of your site.
For username and password, you should check the web hosting cPanel. You can look for FTP accounts there. From there, you can create your username and password. If you can’t find the FTP section, then you can contact your web host to get your FTP credentials.
For port, you can try leaving it blank. If it doesn’t work, then try entering the number ‘21’.
After entering all the credentials, click on QuickConnect.
It’ll connect your WordPress site with your local computer. After the connection is done, it’ll display your local files on the left whereas your WordPress site files will be displayed on the right site.
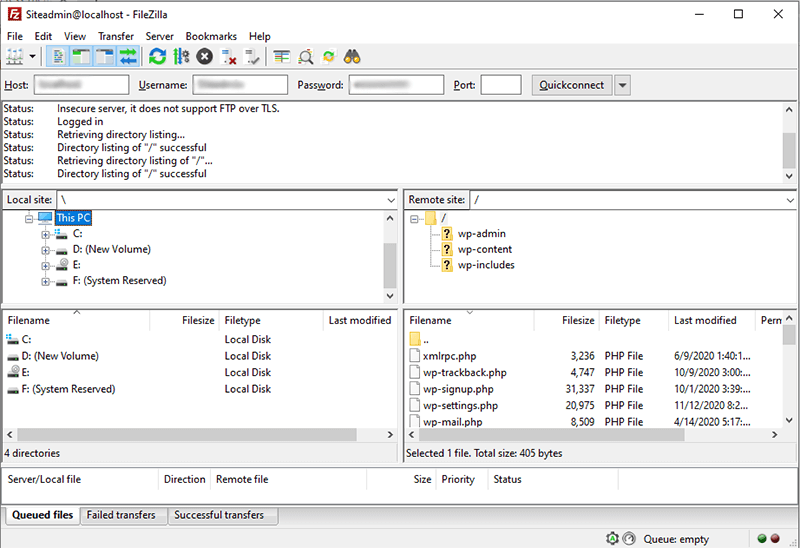
iii. Uploading the Theme From Local PC to WordPress Server
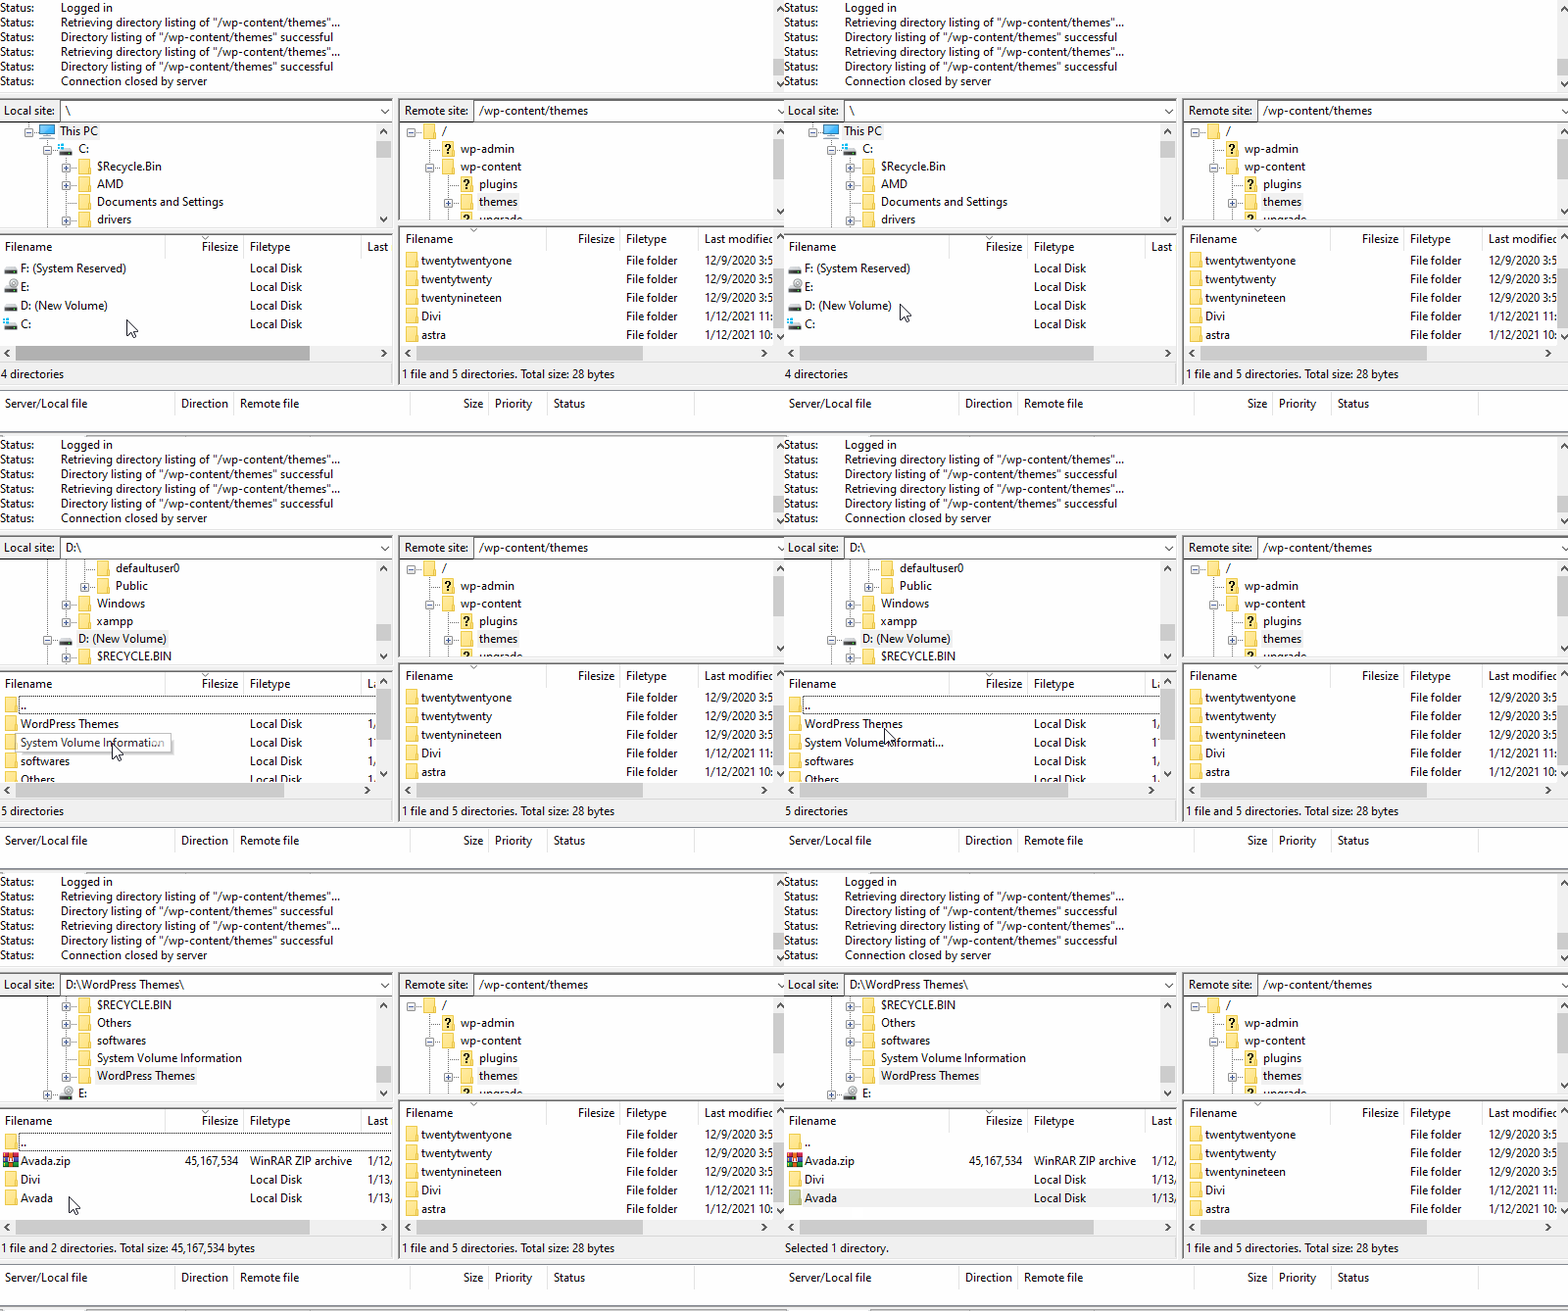
Now, on your WordPress files on FileZilla, open wp-content > themes. It’s where all your installed WordPress theme lies.
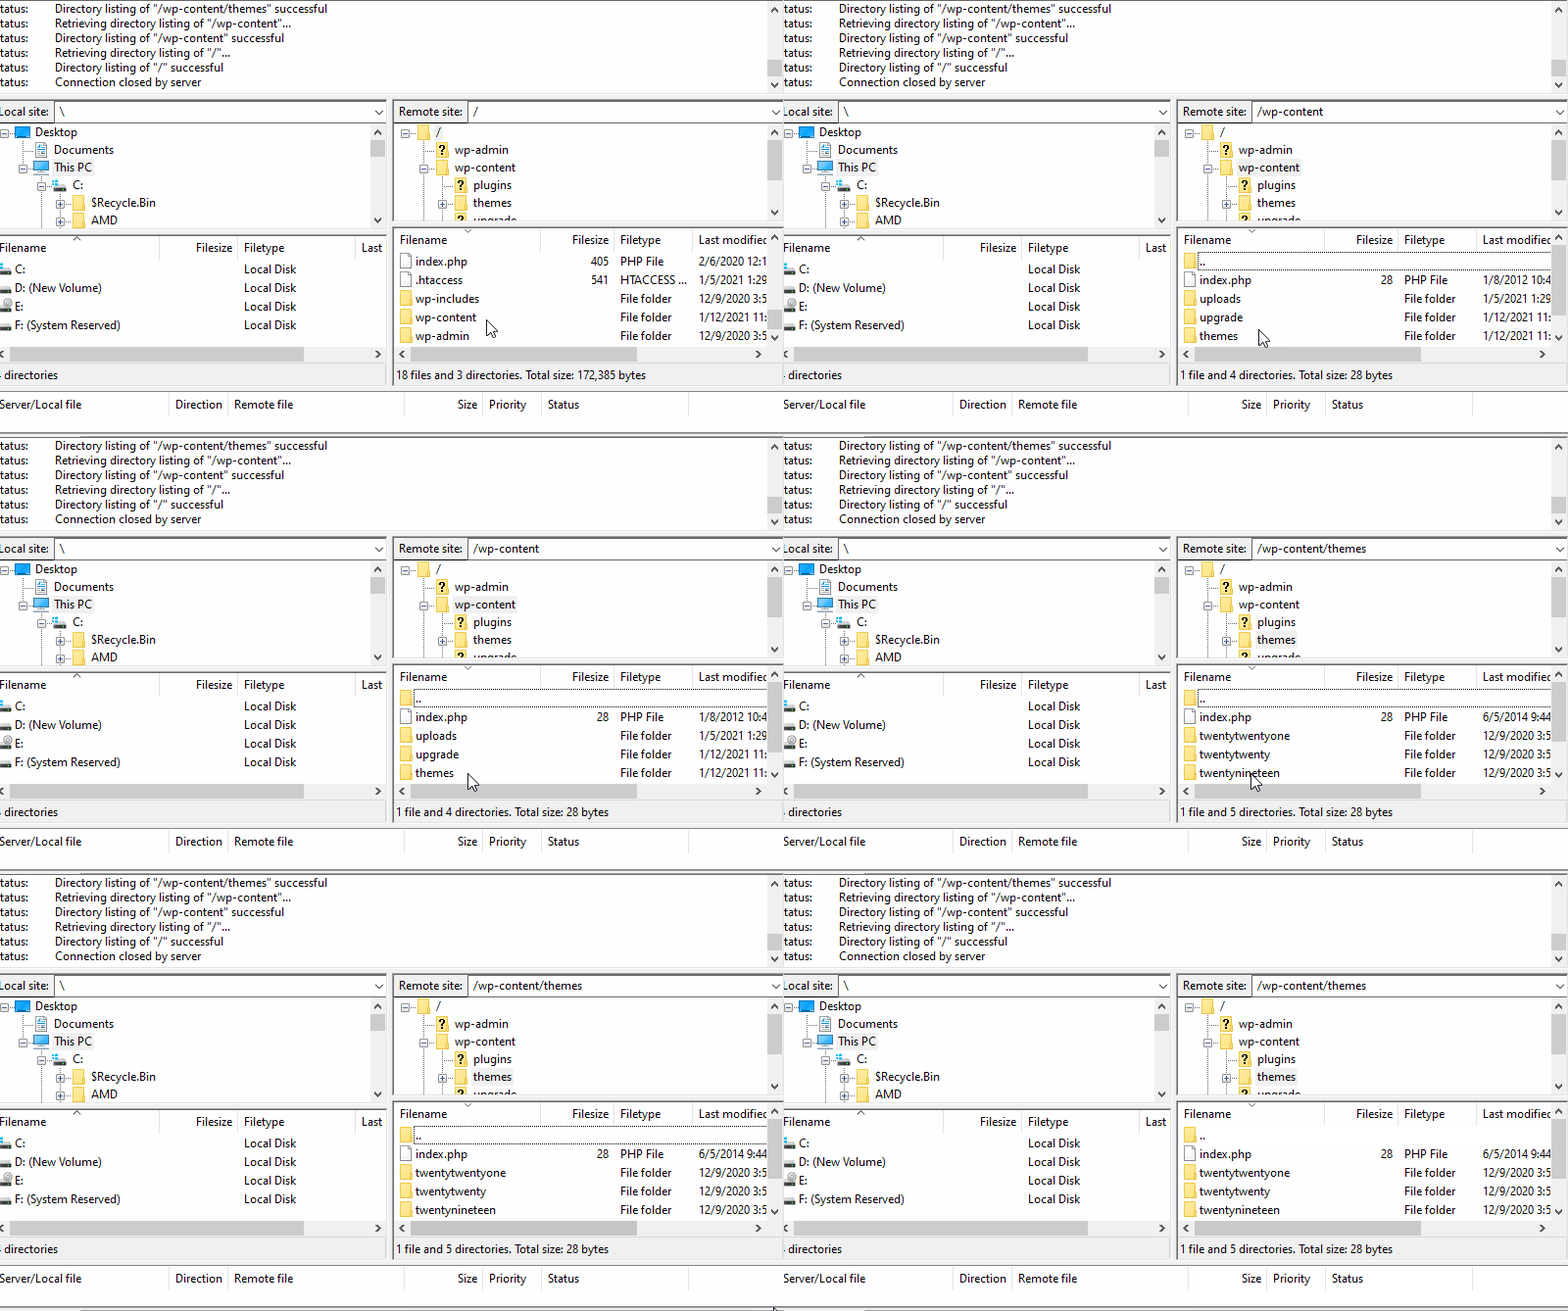
Then, from your left section, go to the local folder containing the theme you want to install. Make sure that the theme is unzipped.
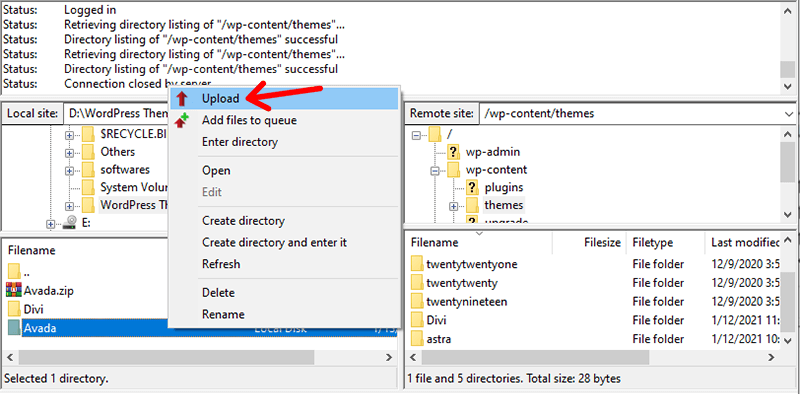
Now, right click on the folder, and click on Upload.
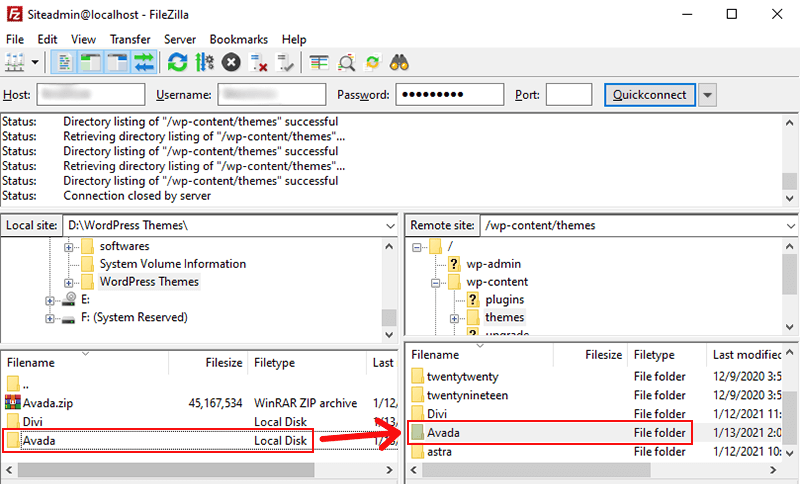
Then, the theme folder will start uploading from local to the WordPress folder. It may take some time, and it’ll display a success message after completion.
iv. Activating the Theme
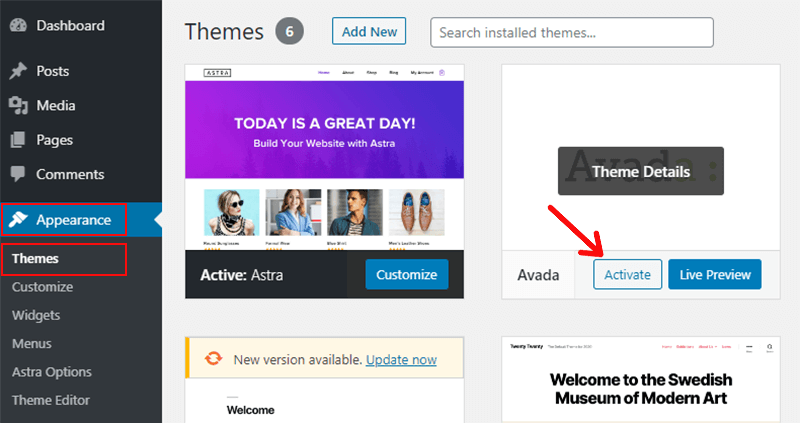
After done, go to Appearance > Themes from your WordPress dashboard. You’ll see the uploaded theme listed on the installed theme section. After that, you can simply activate it by clicking the Activate button.
C) Customizing Your WordPress Theme
After installing your theme, when you open your site, it’s nothing like what it looks like in the demos. Rather, it’s just plain and might not even look good just after installing the theme.
And, you can expect it to look good because it’s not customized yet. And, it’s your task now to customize the theme and make it look beautiful.
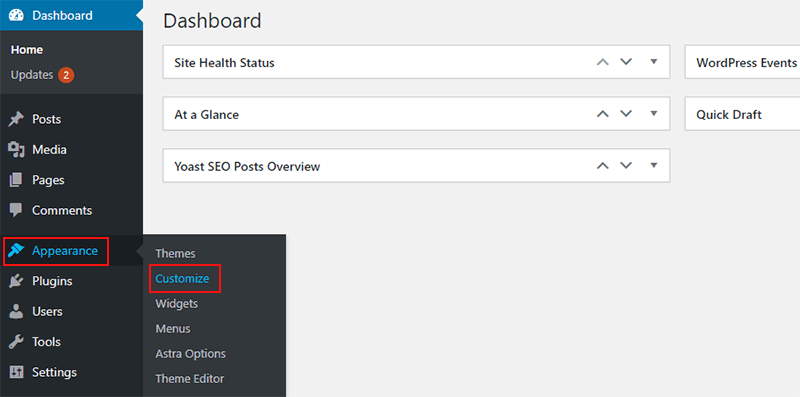
To start with customizing your theme, you can simply go to Appearance > Customize.
Or, you can also start customizing by clicking on the Customize button on your active theme from the Appearance > Themes.
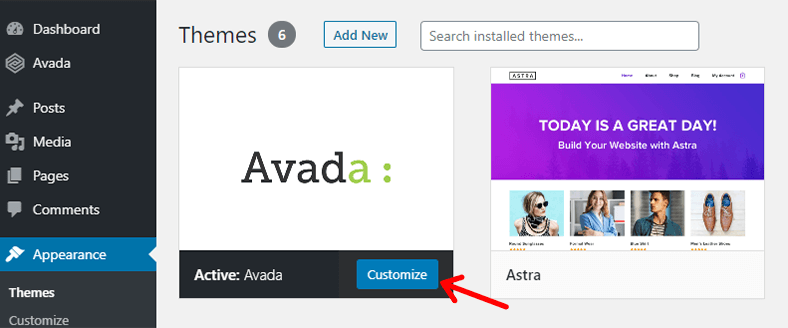
Doing either of the 2 ways, you’ll reach the WordPress customizer, which contains tons of customization options.
There, you’ll see editable options of different site elements like header, blog, sidebar, footer, menus, etc. You can edit their layout, design, color, typography, sizes, etc.
WordPress offers customization in real-time. So, you’ll see changes happening on your site during the time of editing. With this feature, you can keep an eye on your site so that it doesn’t look bad, while you’re editing in real-time.
D) Updating Your WordPress Theme
Updating your WordPress theme is as important as installing one. With updates, your theme receives security features, plus some newer features that you can use. Also, the theme developers make updates available by fixing previous issues and bugs. So, whenever you know your theme has a new update available, be sure that don’t miss it out.
But, you should make sure that you don’t lose any of your data or settings after updating. Sometimes, updating the theme might remove some data or create errors on your live site.
Normally, you won’t lose any theme tweaks done with the WordPress customizer. Only the changes made by editing the source code will disappear.
Anyway, it’s a good idea to always do a backup of your site before updating your theme.
Now, let’s see how you can update your WordPress theme. For that, we’ll be seeing 2 different methods.
1. Updating Automatically From the Dashboard
When the update of the theme is available, it’ll show a notification on Appearance > Themes page.
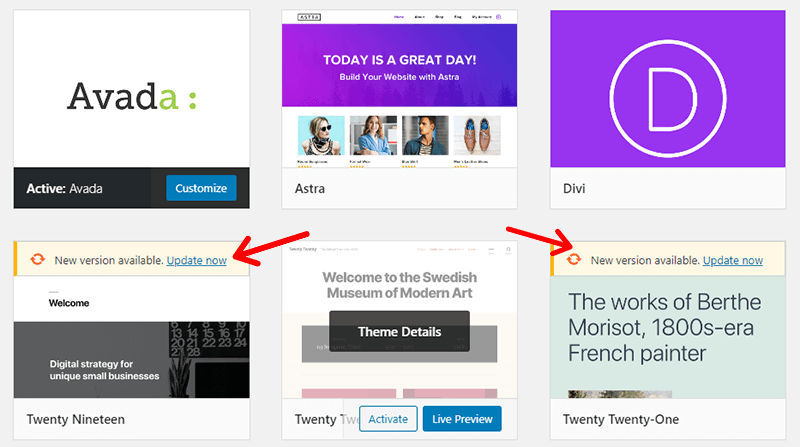
Then, you can just click on Update Now to continue. Then, the theme will be updated after some time.
This also works on local installation of WordPress.
2. Updating Manually by Uploading Updated Version of the Theme
If you use premium themes, you’re required to update by replacing your old theme with the updated version of it. First, you download the updated theme on your local PC, and then manually upload it.
Here’s an important thing. Uploading the updated theme is not allowed from WordPress dashboard directly. It’s because obviously you’re not allowed to have two folders of the same name.
That’s why, you’ll have to take help from an FTP client like FileZilla. Like we explained before, you can connect your WordPress site to your local PC. Then, you can manually upload the updated theme from the local directory. It’s a similar process like installing a theme using FTP that we explained before.
If FileZilla notifies that it already has the folder with the same name, then simply choose to override the existing folder.
E) Uninstalling your WordPress Theme
Sometimes, you might need to uninstall the WordPress themes on your site.
You already know that you can only have one active theme on your site. So, keeping the unused ones has no use. Thus, you should uninstall those themes.
Also, uninstalling the theme is a good idea as it decreases your website’s size and helps to improve your website speed.
There could be several reasons why you would want to uninstall a WordPress theme. Like,
- You might want to get rid of default WordPress themes that were installed automatically.
- Or, you’ve decided to use a different theme, and you no longer need the current one.
- Your current theme might have some bugs, so you don’t want to use it.
One thing you should know that you can’t remove the theme that’s currently active. So, better make sure the theme you want to uninstall is not activated. If it’s active, then better activate another one.
With that said, let’s see how you can uninstall a WordPress theme.
1. Uninstalling From the WordPress Dashboard
It’s the easiest and the most common way of uninstalling a WordPress theme.
To uninstall a theme from the dashboard, first go to Appearance>Themes. From there, you’ll see a list of all the installed themes.
Then, hover over and click on the theme that you want to uninstall. You’ll see the details and description of the theme.
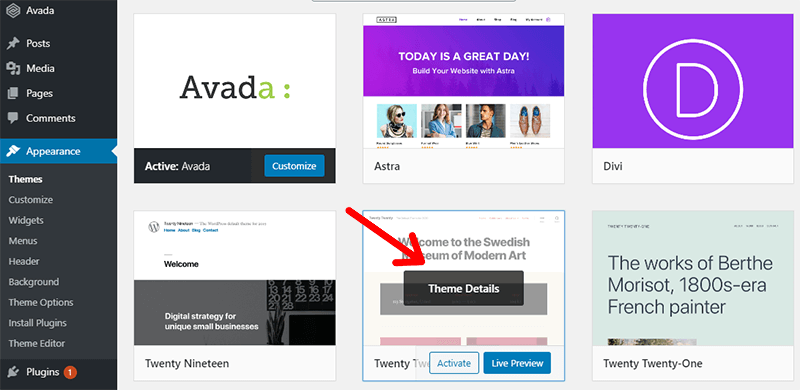
At the bottom right corner, you’ll see a Delete link. Simply click on it.
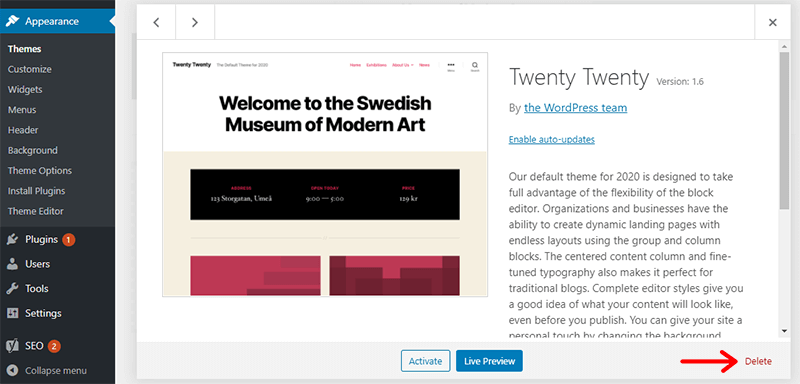
Lastly, it’ll ask you to confirm deleting. Just click on Ok. Then, the theme will be completely removed from your site.
2. Uninstalling Via FTP
For installing your WordPress theme via FTP, you might need some technical understanding. So, we recommend you use this method only if you somehow can’t get access to your WordPress dashboard.
To start with it, first make sure that you get access to your WordPress web hosting server via the FTP client. From the FTP client, go to the folder that contains the theme you want to remove. i.e. wp-content > themes.
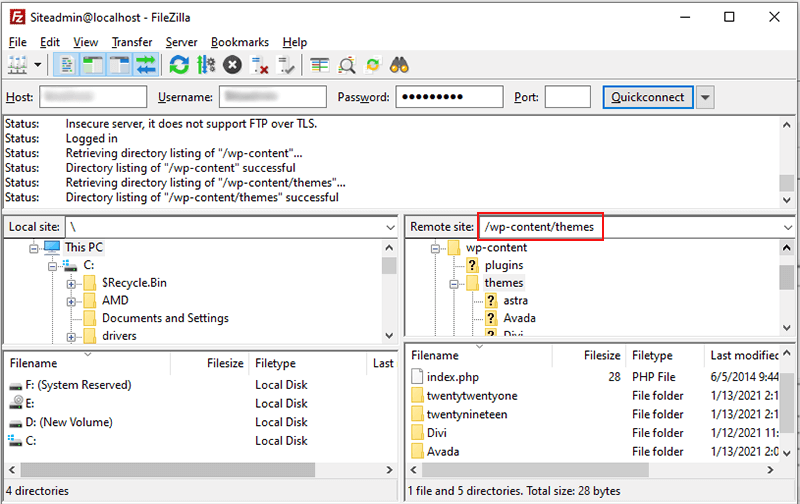
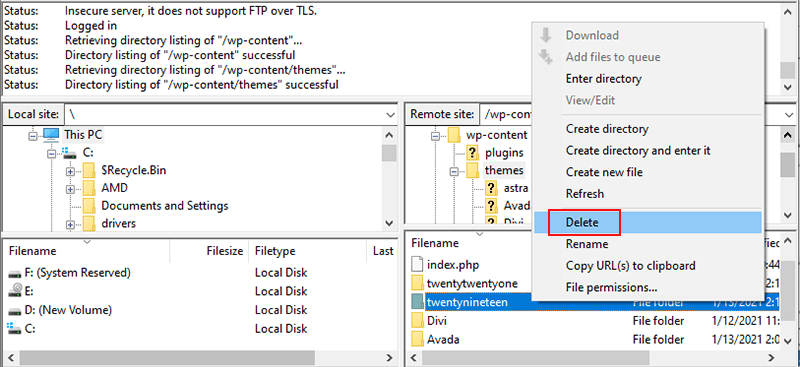
Next, select the theme you want to uninstall. Right-click on it and then click on the Delete Button.
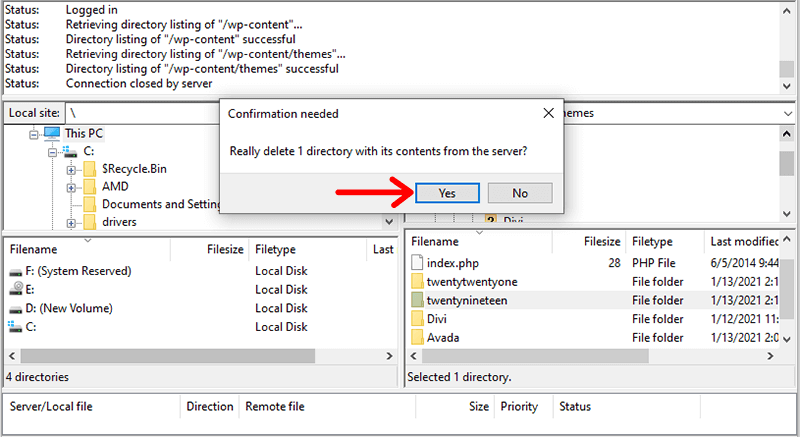
After that, you can confirm it by clicking on Yes.
Conclusion
That’s all you should know about installing a WordPress theme. We hope that you understand how to install a WordPress theme and other related topics like customizing and uninstalling the theme. We also hope that you can install a theme by different methods all by yourself as well.
If you have any other questions regarding installing a WordPress theme, then you can comment below. We’ll try to reach you ASAP!
Do you find it hard to choose the best WordPress theme for your site? Then, read our article on how to choose a WordPress theme best for your site. Also, you can choose from our picks for the best free WordPress themes.
If you want to get in touch with us, you can also reach us on Facebook and Twitter.
