Do you know what WordPress staging is? Are you looking to set up a staging site for WordPress but are not sure where to start? Don’t worry; stay with us.
We always want good things for our website and hope it’ll insanely drive traffic. To do so, we’ll always have to make a few changes and updates to our WordPress site.
We’re always in a dilemma or in fear that the changes may break our website and make it unusable. That’s why we never dare to implement new changes. This will ultimately push our visitors away from the website.
Don’t do that! There are lots of ways to deal with such a situation. The best would be to set up a staging environment. It creates a duplicate site where you can safely make plugin updates and other changes before going live.
In this step-by-step tutorial, we’ll define what WordPress staging is. Also, we’ll look into how we can easily create a staging environment for your WordPress site. So, we’ve covered a few different methods to easily set up a staging site.
Let’s begin!
A. What is WordPress Staging? – Overview
A staging WordPress site is a copy of your live website. It allows you to safely test and make changes before your site goes live on the internet.
This gives developers, designers, or content creators a controlled, protected space. Additionally, users can test out their website without impacting how it works or how users interact with it.
Before releasing new plugins and themes, you can test them in a staging environment to make sure they function properly. Furthermore, it helps in finding and fixing any faults or problems that might occur during upgrades or development.
Before publishing their work on the live site, content creators can utilize it to preview and improve their work.
However, you can work together with teammates or clients, get feedback, and make sure your website is reliable and functional. Once you’ve completely tested and validated it in the staging environment, you can safely apply it to the live site. Therefore, it lowers the chances of errors or disruptions.
B. Why is It Important to Set Up a WordPress Staging Site?
We’re aware that creating a WordPress staging site helps reduce risks and ensure the quality and stability of your website. Additionally, it gives your users a better experience.
In fact, before implementing changes to the live environment, you can test, improve, and optimize your website. Having said that, the following list of elements shows the significance of setting up a WordPress staging site:
- Testing and Quality Assurance – You can test any changes or modifications that you want to make to your WordPress website with this tool. It helps you find any problems or bugs without affecting the experience of your visitors.
- Theme and Plugin Updates – It’s very helpful when updating your WordPress theme or plugins. To make sure they work with your current setup, you can test these upgrades first on a staging site.
- Design and Customization – If you wish to make significant design or customization changes, then a staging site offers a secure area for experiments. It allows you to test out several themes, evaluate the results, and make any changes that are needed.
- Performance Optimization – Optimizing your WordPress website’s performance can be done using staging sites. Without disrupting the user experience on your live site, you can test various caching plugins or other optimization techniques.
- Content and SEO Updates – This makes it easier for you to create and edit new pages, blog posts, or goods. That too without being concerned that mistakes will be seen by your visitors. Before making them live, you may examine how they affect the search engine rankings of your website.
- Collaboration and Approval – A staging environment offers a centralized workspace for teamwork. Before changes are implemented, it enables team members to examine and approve them. This guarantees better coordination and minimizes the risk of errors or conflicts.
In conclusion, creating a WordPress staging site is essential for testing and making changes to your website without compromising the live version.
C. How to Set Up a WordPress Staging Site With Your Web Host?
In this section, we’ll examine a few different approaches to setting up a WordPress staging site.
WordPress staging sites can be created in plenty of ways. The best would be to use the built-in staging site feature offered by your hosting provider.
One-click staging websites are already available from some of the best WordPress hosting providers. If your website is hosted by one of them, then you may effortlessly and hassle-free construct a staging site.
Creating a Staging Site on Cloudways
Cloudways is one of the best WordPress hosting companies that offer a quick 1-click staging site solution.
In this tutorial, we’ll show you how you can easily create a staging environment using Cloudways web hosting. Don’t worry, setting up a staging environment is straightforward and will take only a few minutes.
Here’s a step-by-step procedure for setting up a staging environment using Cloudways.
Step 1: Navigate to Your Application
First, you need to log in to your Cloudways Platform using your login credentials. After that, it’ll take you to your Cloudways Dashboard.
From the top menu bar of the dashboard, click on the Servers menu. Then, you’ll need to choose the server where your desired application is deployed.

Next, once you’ve chosen your server, just beside that, click on the ‘www’ icon. From there, choose the application installed on the server that you want to clone.
As you can see, in the image below, you’ll find that our Server is a Production Server and the App is called SiteNerdy Blog.

Step 2: Create a Staging Environment
Now that you’ve successfully navigated through your dashboard, let’s look at how we can create a staging environment.
You need to hover over the grid menu located at the very bottom right-hand corner of the dashboard. After that, it’ll pop-up three more options on the screen.
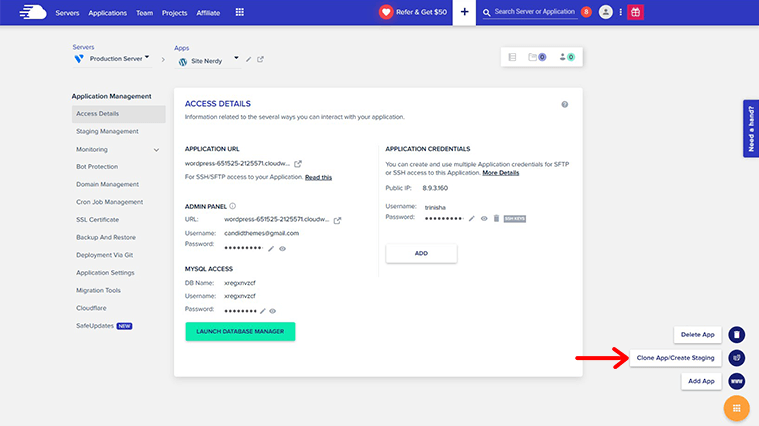
From there, click on the ‘Clone App/Create Staging’ option.
After that, it’ll pop up a dialog box in front of your screen that’ll ask you for some information. It’ll ask you to choose the server where you’d like to build the staging environment. You can choose the same server or a different server.
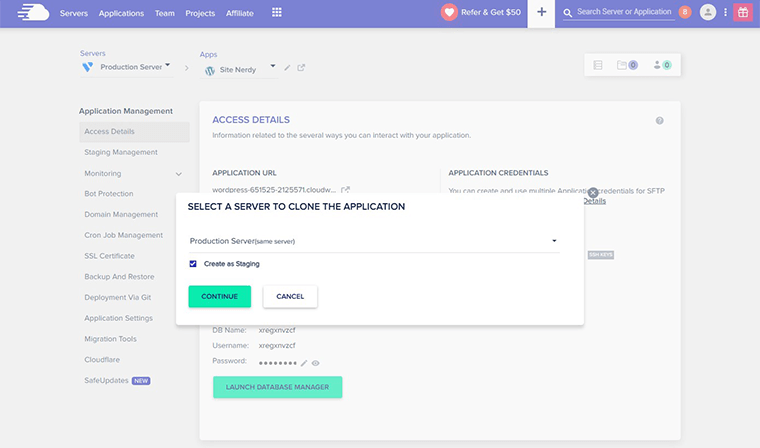
However, while selecting a server, don’t forget to tick the ‘Create as Staging’ checkbox. Then, click on the Continue button.
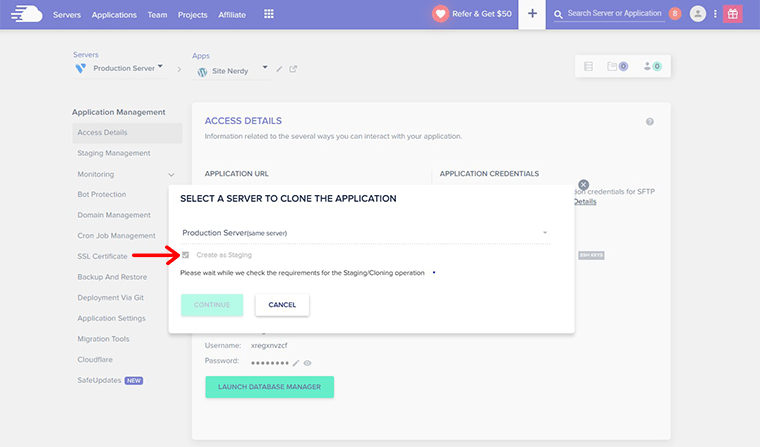
Once you’ve done that, it’ll begin staging site deployment shortly after. The staging application will be a complete clone of your live application.

After creating a staging application is completed, it’ll also be available in the applications list with the staging tag. You can see in the image below that we’ve got a staging environment called Staging-Site Nerdy.

In this way, you can set up a WordPress staging site in Cloudways. Isn’t it quick and easy?
Congratulations, if you’ve successfully followed these steps and have now set up a WordPress staging site. In a similar manner, you can also set up a staging site using other web hosting.
D. How to Set Up a WordPress Staging Site Using a Plugin?
In the above method, we just looked at how we can set up a WordPress staging site using our web hosting. This method is quite good and comes with lots of perks and support.
However, if you’re looking for another good alternative, then using a staging plugin will also work. All you need to do is download and install the plugin and work according to the instructions to set up a WordPress staging site.
Before we look thoroughly into how we can set up a WordPress staging site, let’s look at some of the best WordPress staging sites.
3 Best WordPress Staging Plugins to Build a Test Environment
1. WP Staging
WP Staging is a popular all-in-one duplicator, staging, and backup WordPress plugin. It allows you to create an exact copy and backup of your website in seconds.
You can create a clone of your website into a subfolder or subdomain of your main WordPress installation. Besides, the cloned site also includes an entire copy of your database.
Pricing:
This plugin comes in both a free as well as a premium version. You can download the free version from the WordPress.org plugin repository. Or else, you can directly install the plugin into the WordPress dashboard.
The premium version offers four different plans.
- Personal: $96/year
- Business: $150/year
- Developer: $258/year
- Agency: $322/year
2. BlogVault
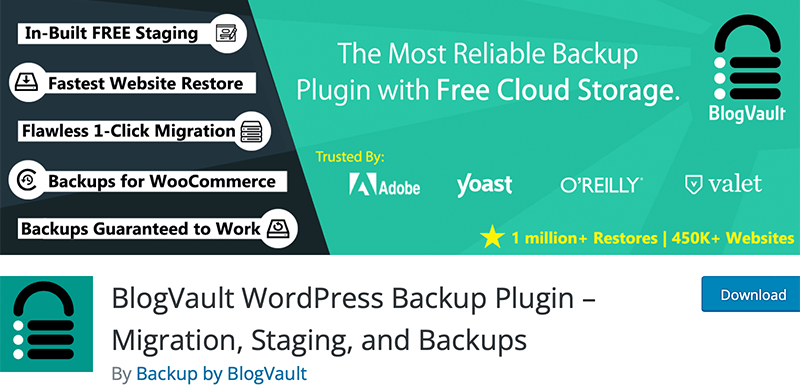
BlogVault is one of the best backup and staging plugins that offer free cloud storage. It allows you to deploy a staging site with one click of a button.
The best thing is that each staging site is SSL protected, this ensures maximum likeness with your live site. Also, it automatically blocks Googlebot and other search engines from crawling the staging site.
Pricing:
BlogVault staging plugin is available in free as well as premium versions. The premium versions offer three different plans.
- Basic: $89/yr for 1 site, $199/yr for 3 sites, and $399/yr for 10 sites.
- Plus: $149/yr for 1 site, $349/yr for 3 sites, and $799/yr for 10 sites.
- Advanced: $299/yr for 1 site, $899/yr for 3 sites, and $1999/yr for 10 sites.
3. WP Stagecoach
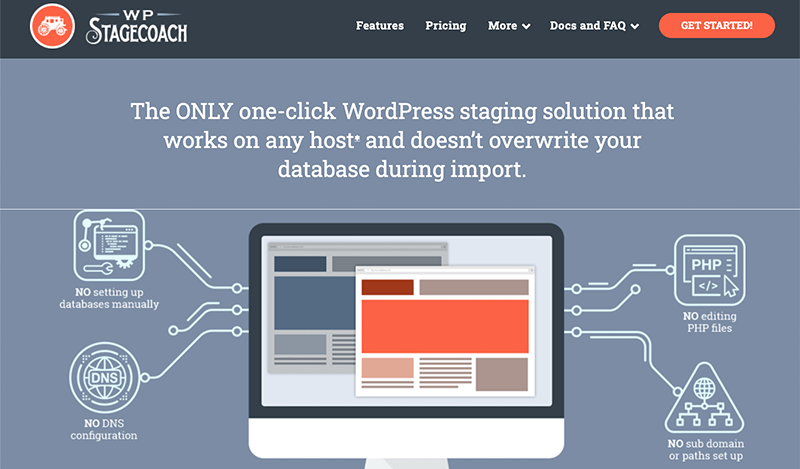
WP Stagecoach offers a one-click WordPress staging solution. It can work on any host and doesn’t overwrite your database during import too.
Similarly, it lets you merge databases without losing your content by copying your staging site to your live domain. Indeed, it shows your customers their site-in-progress with a web-based URL they can access from their own computers.
Pricing:
WP Stagecoach has a free version called Enterprise (Free) version. To download and use the free version, you’ll have to contact their support team.
Meanwhile, the premium version has three plans. They are as follows.
- Small: $99/year
- Medium: $199/year
- Large: $349/year
Hence, these are some of the most reliable and popular WordPress plugins that allow you to easily set up a staging site. Now, using one of these plugins, we’ll look at how we can easily set up a staging site in WordPress.
For this tutorial, we’re going to look at how to create a staging site for your live website using the WP Staging plugin.
Setting Up a Staging Site with the WP Staging WordPress Plugin
To start off, first log in to your WordPress dashboard. Next, navigate to Plugins > Add New. In the search bar, search for the “WP Staging” plugin. Once you’ve found it, continue it by clicking on the Install Now and Activate button.
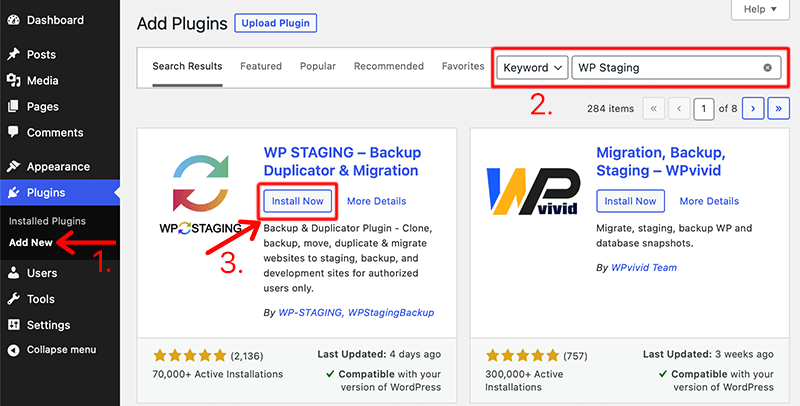
With this, you’ve successfully installed and activated the WP Staging plugin on your WordPress dashboard.
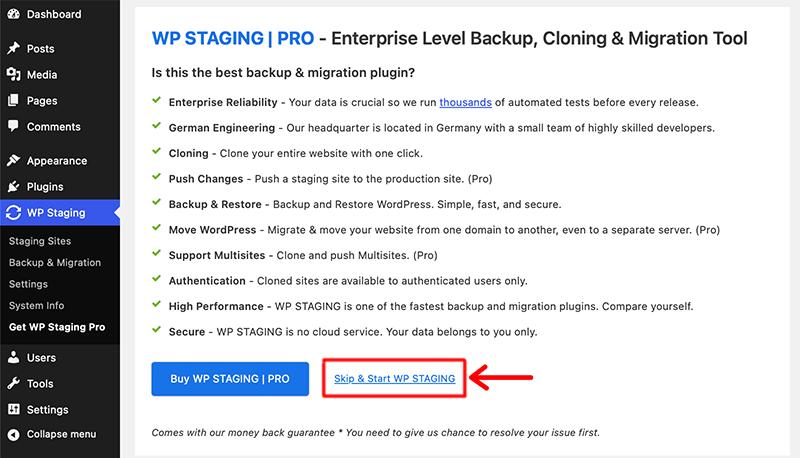
After that, the plugin will ask you to either get the WP Staging Pro version or Skip & Start WP Staging hyperlink. However, before you proceed any further, back up your WordPress sites to avoid any misfortunes.
Following that, click on the Create New Staging Site and it’ll redirect you to the configuration screen. The first thing you need to do is enter the staging site name and then configure other options according to your need.
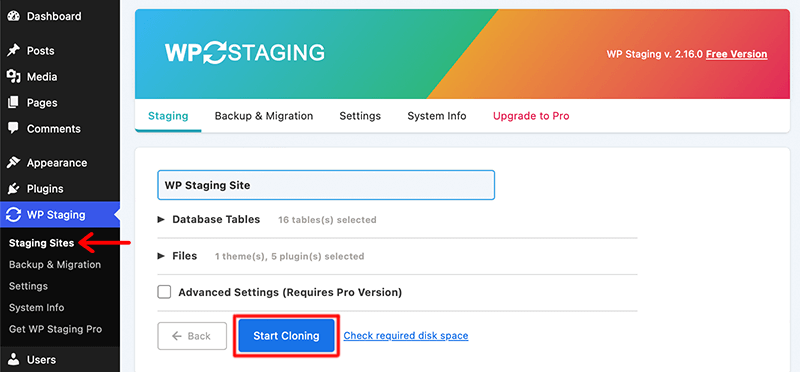
Also, don’t forget to Check the free disk space link, especially if you’ve got a larger live website. Then, once everything is configured, click on the Start Cloning button.
With that, it’ll begin processing to clone your live website which will take a few minutes. After that, the staging site will be created which you can access via the WordPress dashboard.
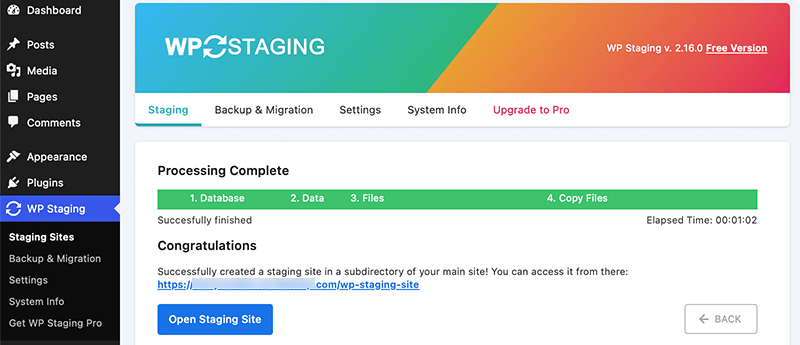
In this way, you can successfully set up a staging site in WordPress using a WordPress plugin. Now you can test any changes and updates without affecting the live website.
However, the ability to push changes back to the live site is only available in the premium version.
E. Best Practices for Creating a Staging Site
Without a doubt, setting up a WordPress staging site is a great approach. As a result, you can test changes, upgrades, and new features before deploying them to your live website.
After that, let’s explore a few best practices for setting up a WordPress staging site. –
- Must use a separate environment – Setting up a totally different environment from your live website for your staging site is recommended. As a result, any changes or problems on the staging site won’t impact your live site.
- You need to choose a staging environment that closely matches your live website environment. This includes using the same version of WordPress, themes, plugins, and server configurations.
- Protect your staging site – To prevent unwanted access, secure your staging site with a password. By doing this, the staging site can only be seen and tested by authorized people.
- Disable search engine indexing – Use a “noindex” tag to stop search engines from indexing your staging site. It’ll keep your staging site secret by preventing search engines from crawling and indexing it.
- You need to clone your live site in the staging environment. This will ensure that all the content, settings, and functionality are replicated accurately.
- Don’t forget to update all your plugins and themes on your staging site to match your live site’s configuration. It helps to identify any compatibility issues before deploying changes to the live site.
- You need to test any changes thoroughly. Such as updates, theme modifications, or new features, thoroughly on the staging site.
- Debug and troubleshoot – Use the staging area as a platform for testing and troubleshooting. You can look into and make any necessary corrections to any problems or errors without affecting the live site.
- Always remember to regularly back up your staging site. This will help you revert back to a previous state if anything goes wrong during testing.
Hence, by following these best practices, you can effectively use a staging site to test changes before implementing them on your live WordPress website.
F. FAQs – What is a WordPress Staging?
1. What do you mean by WordPress staging environment?
Before implementing changes and upgrades on the live site, you can test them on a different version of the website called the WordPress staging environment. It enables testing and bug repair without having an impact on the live website.
2. What is a WordPress staging site?
A WordPress staging site is a copy or clone of a live website that is used for testing. Before making changes to the live site, developers can test new features, or debug issues in a secure and isolated environment.
3. Why do you need to set up a staging site for your WordPress site?
You can test changes, upgrades, or new features without affecting the live version by setting up a staging site. Additionally, it offers a secure environment where issues can be found and fixed before changes are implemented on the main site.
4. What WordPress hosting providers offer a staging environment?
A number of WordPress hosting providers, like Cloudways, Kinsta, Hostinger, Elementor, SiteGround, and DigitalOcean offers a staging environment.
5. What are some of the best WordPress staging plugins for your site?
Some of the best WordPress staging plugins are BlogVault, WP Staging, Duplicator, BoldGrid, WP Stagecoach, and All-in-One WP Migration.
Conclusion
In this article, we looked at what WordPress staging is. We hope this article helped you quickly set up a WordPress staging site.
Please feel free to comment below if you have any further queries about the WordPress staging. We’ll do our best to respond as soon as we can.
Also, let us know which method you’re going to use from the list. You can share your top pick in the comments section below.
Besides that, we’d also love to hear your thoughts on this article. So, please feel free to comment on any queries or suggestions below.
You may also want to check out our guide on how to update WordPress to the latest version and how to build a WordPress website without a domain and hosting.
Follow us on Facebook and Twitter for more articles like these. Also, if you liked this article, then share it with your friends and colleagues.
