Are you wondering how to build a job board website with WordPress? So, you can connect employers with qualified candidates? If yes, then stay right here.
It goes without saying that WordPress is a popular Content Management System (CMS) that’s easy to use and customize. On top of that, several plugins help you build a professional-looking and functional job board website.
Here, we’ll walk you through the easy steps on how to build a job board website with WordPress. Precisely, we’ll cover choosing the right plugin, installing it, configuring it, and everything else you need to create a job board website.
So, let’s dig in!
A) Understanding the Significance of Job Board Website
Before we move ahead, let’s understand the job board website from a close angle.
Simply put, a job board website is a platform where employers post job openings and job seekers find and apply for jobs. Thus, job board websites can be a valuable resource for both employers and job seekers.

Employers can use job board websites to reach a large number of potential candidates cost-effectively. Also, they can target their job postings to specific demographics or locations. And even track the number of applicants they receive for each job opening. This can be quite helpful in making hiring decisions.
Meanwhile, job seekers can use job board websites to find job openings that match their skills and interests. Also, stay up-to-date on the latest job trends. Additionally, it can provide job seekers with access to resources such as resume writing tips and interview preparation guides.
Why You Need to Create a Job Board Website
Here’s a quick sneak peek at why job board websites are so important. And why you should consider building one with WordPress.
- Bridging the Gap: Job board websites serve as a bridge between job seekers and employers, creating a centralized hub where both parties can interact.
- Simplifying the Search: Helps job seekers search for positions based on criteria like location, industry, or salary range. This simplifies job hunting, saving time and effort.
- Expanding Reach: Posting job listings online means opportunities are accessible to a global audience. This increased visibility can lead to a more extensive and diverse selection of applicants.
- Cost-Effective: Compared to traditional recruitment methods, advertising job openings on a job board website is often more cost-effective. It eliminates the need for expensive newspaper ads or recruitment agencies.
- Real-Time Updates: Provide real-time updates on job listings and applicant submissions. This data-driven approach helps you to track the performance of the job postings.
- Brand Building: By creating your job board website with WordPress, you have the opportunity to showcase your brand’s personality and values.
In short, job board websites have become indispensable tools in today’s job market. They offer convenience, efficiency, and cost-effectiveness for both job seekers and employers.
Now that we’ve explored their significance, let’s explore some of the versatile WordPress plugins that help build your own job board website.
B) Top 3 Best Job Board Website Plugins
As mentioned earlier, several job board website plugins can help you create a job board website. Some of the best options include:
1. JobWP Plugin
JobWP is a versatile WordPress plugin designed to revolutionize your website’s job board capabilities. Indeed, it empowers HR professionals, recruiters, business owners, and community members to create job boards with ease.

Moreover, it comes with an easy-to-use dashboard. As a result, you can add, edit, or remove job postings as your hiring needs evolve with ease. Overall, JobWP simplifies the process of posting job listings.
Additionally, it offers a seamless application process, complete with file uploads, resume submissions, and application tracking. Consequently, job seekers can easily apply for positions through your website.
Key Features:
- Provides you with customizable fields. So, you can tailor your job listings to specific industries or roles and gather relevant information from applicants.
- Includes a robust search feature that enables users to find the right job listings based on keywords, location, categories, or custom filters.
- In today’s mobile-centric world, JobWP ensures your job board looks and functions flawlessly on all devices. From desktops to smartphones.
- Keep both job seekers and employers informed with automated email notifications for new job listings, applications, and updates.
- What’s more, you can generate reports on job postings, applicants, and other aspects of your job board website.
Pricing:
You’ll be glad to know that JobWP is a freemium WordPress plugin. You can quickly get the free version from the WordPress.org repository. Or, install it right from your dashboard.
For the premium version, it offers a flexible pricing structure to cater to various needs:
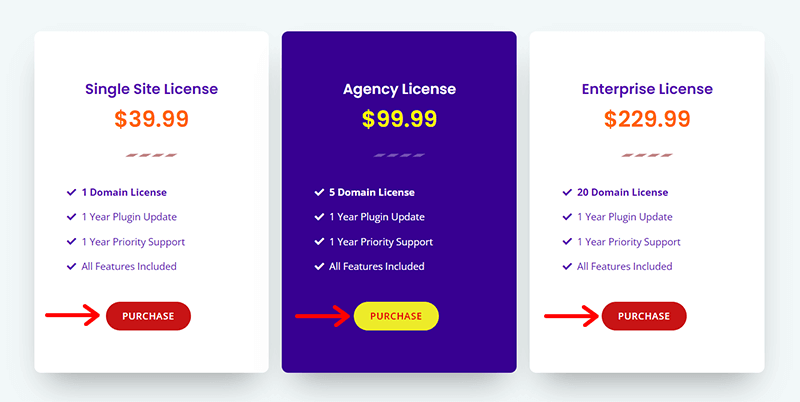
- Single Site License: Costs $39.99 per year. Includes 1 domain license, 1 year plugin update, 1 year priority support, and more.
- Agency License: Costs $99.99 per year. Covers 5 domain licenses, 1 year plugin update, 1 year priority support, etc.
- Lifetime Plan: Costs $229.99. Cover 20 domain licenses, 1 year plugin update, 1 year priority support, etc.
2. WP Job Manager
Next, we’ve got WP Job Manager as the top best job board website plugins. Indeed, it’s a robust and highly popular solution for managing job listings. And creating a feature-rich job board on your WordPress website.
Moreover, it provides a comprehensive suite of tools designed to simplify the process of job listing management. Consequently, making it an excellent choice for businesses, recruitment agencies, and organizations looking to streamline their hiring efforts.
Key Features:
- It’s a shortcode-based plugin. So, you can easily add the shortcode while building your job board website. Hence, setting up this plugin is simple.
- Makes it simple to add, update, and organize job listings. Plus, potential candidates can use the Ajax-powered capability to search and filter jobs.
- Includes frontend forms so that registered users and guests can post and maintain their job ads.
- Also, logged-in employers can browse, amend, or delete their live job postings.
- Seamlessly integrates with other popular WordPress plugins and themes. Further, it expands its functionality and adaptability to your specific needs.
Pricing:
WP Job Manager is a totally free WordPress plugin. Meaning, you can directly install it right from your WordPress dashboard. No charge at all!
3. Simple Job Board
Last but not least, we’ve got the Simple Job Board plugin as our top pick for the best job board website plugins. It’s a straightforward yet effective tool for adding job listings and managing a job board on your WordPress website.
With its simplicity and ease of use, this plugin is an excellent choice for small businesses, startups, or organizations. As it provides a hassle-free way to display job opportunities to potential candidates.
And the best part is that this plugin is available in multiple languages. To name them, French, Arabic, Brazilian, Portuguese, Italian, Dutch, and more. So, if you want to create a multilingual job board website, Simple Job Board is the right deal.
Key Features:
- Add personalized job postings to any page. All you’ve to do is insert the [jobpost] shortcode.
- Through global settings, you can customize a position’s job description, job features, application form, filters, and email notifications.
- Contains the Anti-hotlinking option. This helps you increase the security of your documents.
- Email alerts for new job postings, applications, and updates. This helps you keep both employers and job seekers updated.
- Provides an iOS and Android mobile app to manage your job board from anywhere. However, you require the Mobile App Connector add-on for that.
Pricing:
The Simple Job Board plugin is available for free from the official WordPress plugin repository. It provides core job listing functionality without the need for additional purchases.
While the free version covers the basics, there are premium add-ons available for those seeking advanced features and functionality. You can purchase it separately to enhance your job board’s capabilities.
For instance, the Related Jobs addon costs you $10, the Custom Apply Link addon costs $15, the Mobile App Connector addon costs $49, and so forth.
Our Recommendation: JobWP Plugin

After thoroughly exploring the available job board plugins for WordPress, our top recommendation is the JobWP Plugin. It stands out for its versatile features, user-friendly interface, and flexible pricing options.
With JobWP, you can effortlessly transform your WordPress website into a dynamic job board. That attracts top talent and simplifies the hiring process.
Having said that, let’s proceed to build a job board website with WordPress using the JobWP plugin.
C) How to Build a Job Board Website with JobWP Plugin?
Let’s explore the steps involved in creating a WordPress job portal using JobWP. Firstly, you’ll need to install the plugin, configure it, add job postings, and then publish it on your site.
Follow the steps below carefully to learn how to create an amazing job board.
Note: You can use any popular WordPress theme that’s compatible with JobWP. In this tutorial, we are using Astra. This theme works well with most plugins and has a simple interface.
Read our article on how to choose a theme and install it on your WordPress dashboard to learn more about it.
I. How to Purchase and Install JobWP?
Initially, you must choose between a free and a premium plan of the JobWP plugin. Based on that, you can follow the below steps. Let’s go!
i) Installing the Free JobWP Plugin
You can install and activate the free JobWP plugin similarly to any other WordPress plugin. The easiest way is to install it directly on your website.
Step 1: Install the JobWP Plugin
Proceed by logging into your WordPress dashboard. Then, go to the ‘Plugins’ > ‘Add New’ menu on the left-side navigation.
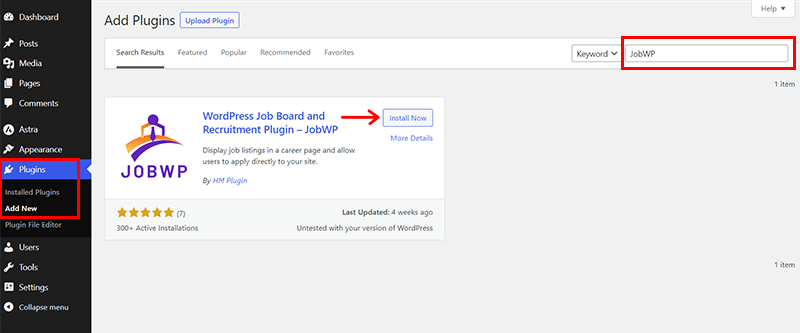
Now, on the search bar, type in your keyword ‘JobWP’. Shortly, once you locate the plugin, click on the ‘Install Now’ button.
Step 2: Activate the JobWP Plugin
Once the installation is completed, you’ll see the ‘Activate’ button. Click on it.
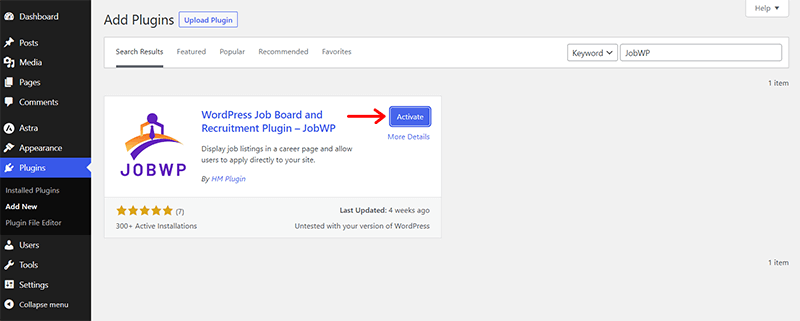
Done? Well, now you’ve successfully installed and activated the JobWP free version on your website.
Shortly, you’ll also see that a new ‘JobWP’ menu is added to your dashboard.
You can find a notice regarding its updates right here.
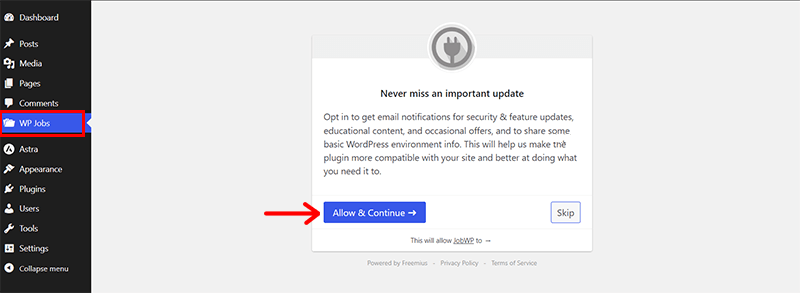
If you want to get email alerts for security and feature updates, guides, and rare offers, then click the ‘Allow & Continue’ option. Otherwise, click the ‘Skip’ option to continue.
ii) Purchasing and Installing the Premium JobWP Plugin
Now, let’s look at the installation process of the premium JobWP plugin. First, you must purchase the premium version from its website. Just follow us as we guide you through!
Step 1: Purchase the JobWP Plugin
First thing first, go to the JobWP website and click the ‘Pricing’ menu in the header.
On the Pricing page, you’ll find three several pricing options. Choose a plan based on the number of websites you want to use the plugin for. Then, click the ‘Purchase’ button for that plan.
With that, you can see a checkout page from the Freemius service. Then, choose either the annual or lifetime option for the plan. If you have a promotional code, then you can enter it now. Also, provide your personal details, such as your email address and name.
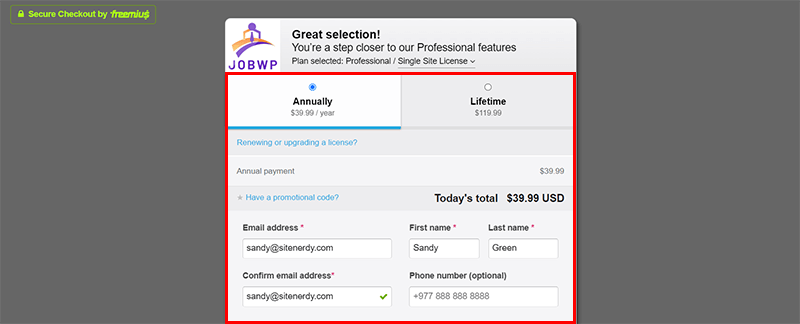
Following that, pick your payment method and fill out the payment details. Finally, click the ‘Review Order’ option.
Once you have completed the purchase, you’ll receive an email with your account and payment details.
This email will also contain the download link for the premium plugin and the next steps to take. Now, you need to download the plugin and save its license activation key.
Step 2: Upload and Activate the JobWP Plugin
Again, your next step requires you to come back to your WordPress dashboard.
Then, go to the ‘Plugins’ > ‘Add New’. There, click on the ‘Upload’ button.
Hit the ‘Choose File’ button and upload the previously downloaded ZIP file of the JobWP plugin. Then, click on the ‘Install Now’ button as shown in the below image.

Shortly, you’ll see the ‘Activate Plugin’ option. Click on it.

After that, on your dashboard, you’ll see the new ‘WP Jobs’ menu. There, you must enter the previously copied license key to activate the premium plugin.
Choose whether or not you want to be notified of new features and updates before adding the license key from the received email. Finally, press the ‘Activate License’ button.
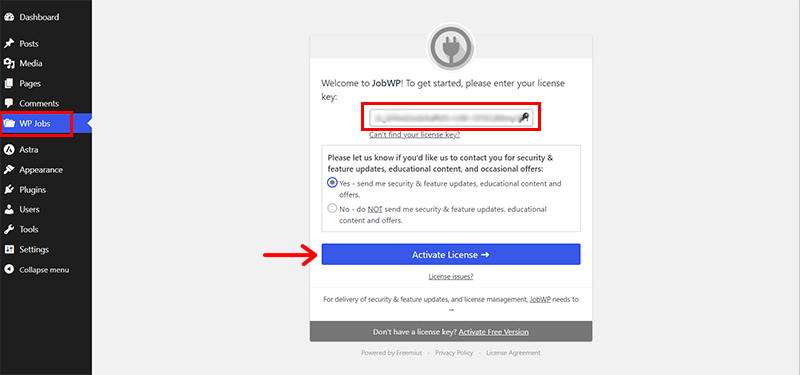
Done? If yes, then congratulations! You’re all set to use the premium version of JobWP to build your job board website with WordPress.
Do you want a more detailed guide to the installation? Then, check out an article on how to install a WordPress plugin for in-depth insights.
II. How to Configure the JobWP Plugin?
Before you dive into using the plugin, let’s give it a little makeover, shall we?
Just click on ‘WP Jobs’ and then ‘General Settings’. You’ll find some setting options there.
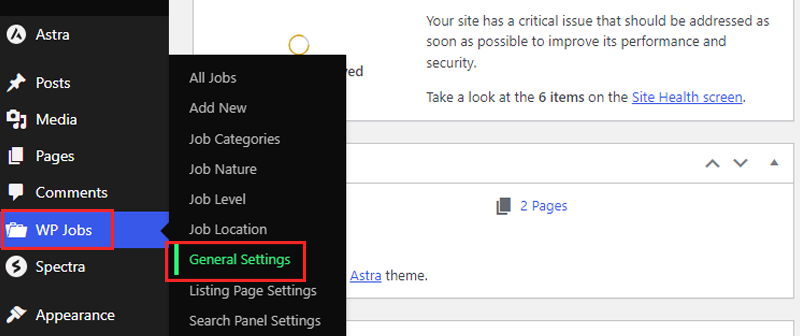
Now, when it comes to the look of your job page, you can choose between a neat ‘List’ or a stylish ‘Grid’ layout. If you’ve got an external application form you want to use, just check the box that says so.
And if you’ve got a shortcode for that external form, pop it in the ‘External Application Form Shortcode’ area.
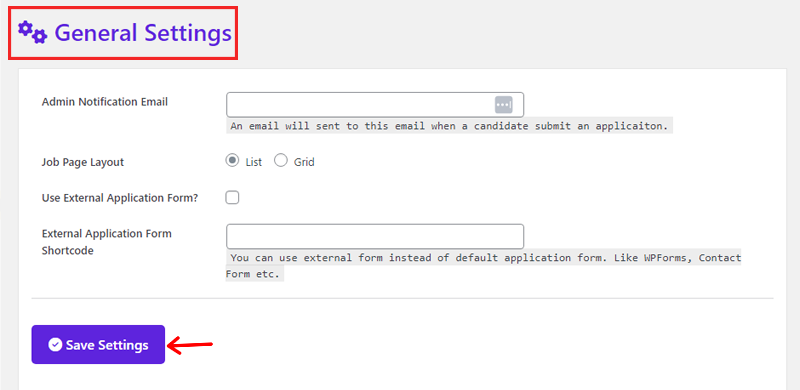
Once you’re done with configuring them, click the ‘Save Settings’ button.
JobWP doesn’t just stop at job listings, it’s got a whole bag of tricks!
Not only can you change your listing page, but you can also modify the search panel. Also, make your job details page pop, and even finesse your application form.
So, let’s take a sneak peek at these awesome features!
i) Customizing Job Listings
Now to get started, go to the ‘WP Jobs > Listing Page Settings’ menu. There, you’ll find some interesting options to customize.
First, the ‘Content’ tab allows you to reveal or conceal stuff on your listing page. You can even change the labels to whatever you desire. Plus, it’s got a built-in word counter to tell you how many words are in the overview.

Once you’re done, click on the ‘Save Settings’ option.
Likewise, the ‘Styles’ tab helps to change text with the right colors and sizes. And don’t forget the background, you can make it as colorful as you want.
Plus, you can even give your text container a border to make it stand out in the crowd.

After that, hit the ‘Save Settings’ button.
ii) Designing Search Panel
Similarly, head over to the ‘WP Jobs > Search Panel Settings’ menu.
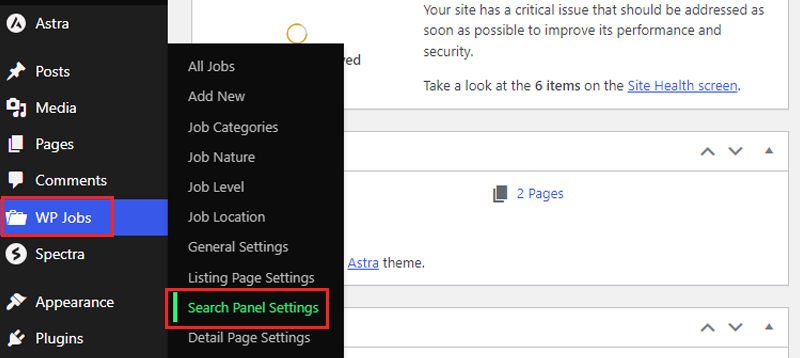
Now, on the ‘Content’ tab, you can do a couple of cool things. You can either make the search panel or its search options disappear. Or, you can change the text that shows up in those search options and the button.
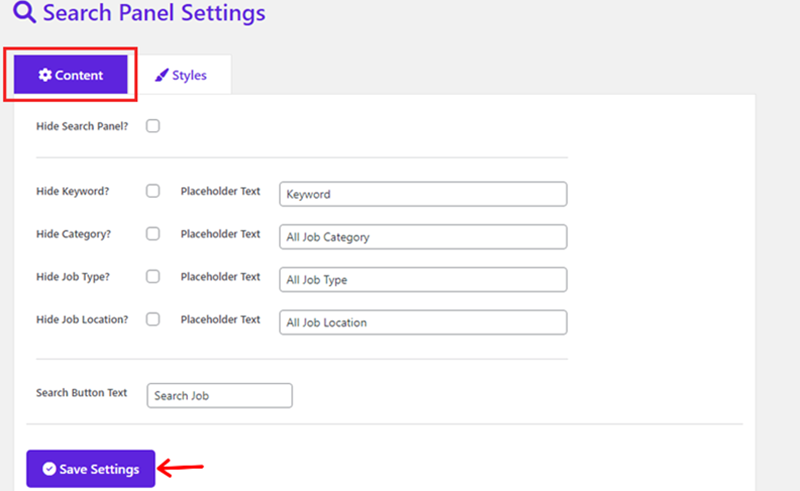
After you configure it, click on the ‘Save Settings’ button.
iii) Customizing Detail Pages Settings
Alright, your next destination is the ‘WP Jobs > Detail Page Settings’ menu. There, on the ‘Content’ tab, you can give them fancy name tags to job details.

Furthermore, when you hop on over to the ‘Styles’ tab, you can tweak how the box looks, what the job details say, and even fancy up the button.
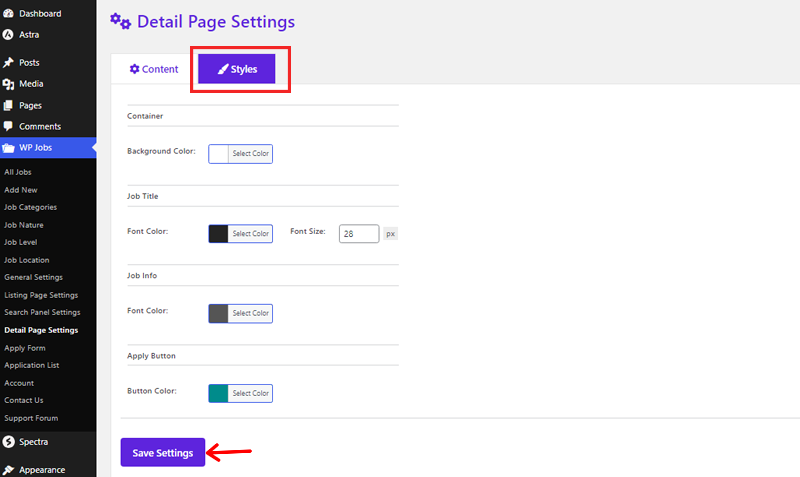
Then hit the ‘Save Settings’ option to make the changes.
iv)Setting Up Job Application Forms
Alrighty, let’s dive into the ‘WP Jobs’ menu, then go to the ‘Apply Form’ section. We’re going to tweak a few things, like the settings for the job application form.
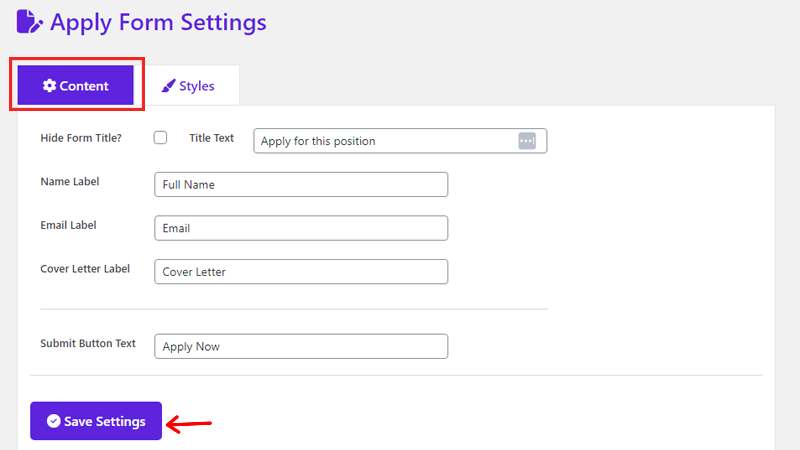
So, go to the ‘Content’ tab, where you can make your job title go incognito. Not just that, you can also give the submit button a fancy style. So, after you’ve tweaked things, just give that ‘Save Settings’ button a simple click.
Furthermore, in the ‘Styles’ section, you get to make the form look all fancy. Easily change the box where you type text, the words next to it, and even the button you click.
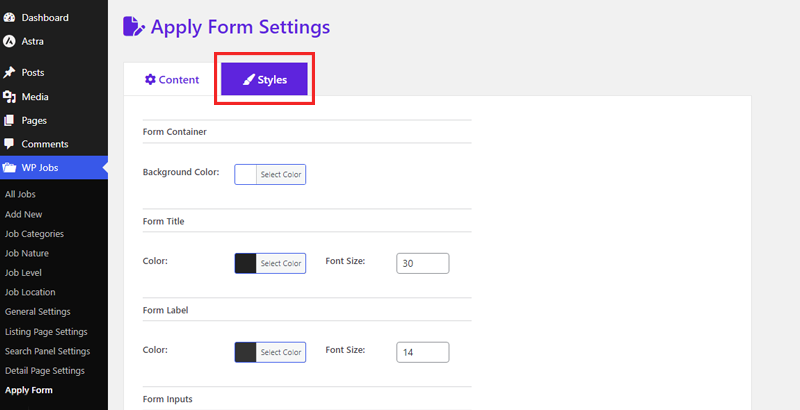
After you’ve finished, give that ‘Save Settings’ button a little tap.
III. How to Add a New Job Using JobWP?
Alrighty, it’s time to add some job listings! Just follow these steps, and we’ll be on our way to making your website a job-hunting platform.
Step I. Prepare Job Categories, Types, Levels, and Locations
Alright, folks, step one, let’s toss in all those job types, flavors, difficulty levels, and where they’re going to happen.
Just head over to the ‘WP Jobs > Categories’ menu. Once you’re there, give your new category a name, a cool nickname (slug), and a little description.

Further, to seal the deal, click the ‘Add New Job Category’ button. And you’re done!
Step II. Create a New Job Listing
Afterward, you can add the first job opening to your portal. For that, all you’ve to do is open the ‘WP Jobs > Add New’ menu. There, you can fill out all the information regarding the job.
So, first things first, let’s modify this job posting. We’re talking about giving it a catchy title, a description, a level, and a location for the job.
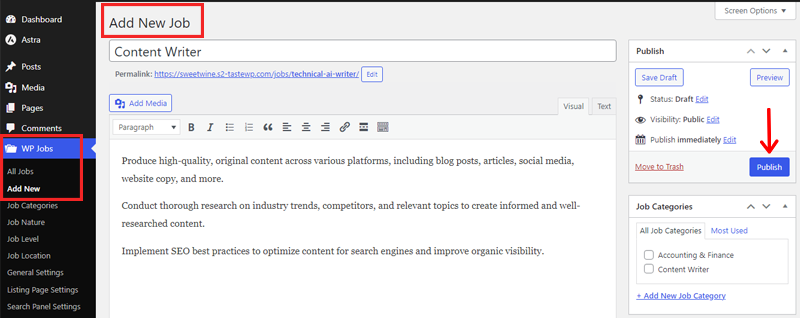
And once done, hit that ‘Publish’ button.
IV. How to Create a Career Page on Your Website?
To bring the job vacancy to the front and center, we’re going to use a super simple shortcode.
Alright, now go to the ‘Pages’ section and hit the ‘Add New’ button.
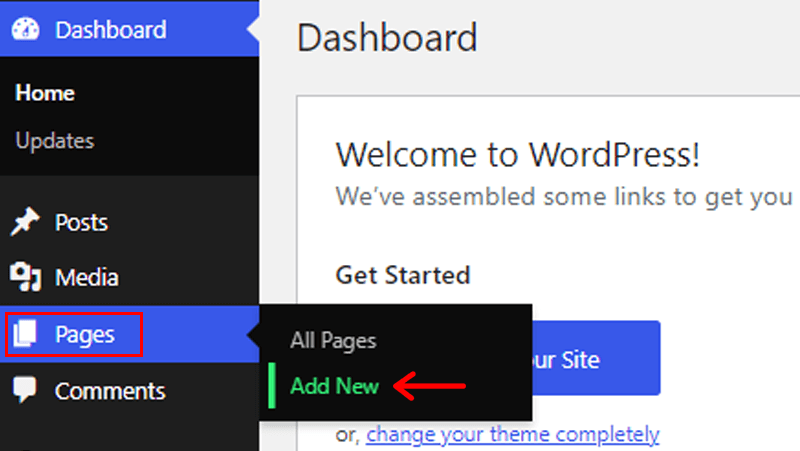
On the page editor, give it the title ‘Work With Us.’ Then, drop in the shortcode, ‘[jobwp_listing].’ Now, press the ‘Publish’ button.

So, you’ve just crafted your job listings page for your website, and guess what? WordPress will add that new career page right into your website’s menu.
Congratulations! That’s a wrap on how to build a job board website with WordPress. But hey, there’s more fun ahead!
V. Check Everything & Launch Your Job Board Website
Before you make your job board website go live, it’s crucial to run through some essential checks.
Here’s a detailed list of what to consider:
- Check every part of the website, like buttons, links, and navigation menus, to ensure they work properly.
- Fill out forms and go through the form submission process.
- Sort jobs neatly into categories for website visitors.
- Clearly label each job vacancy so your visitors know what they’re looking at.
- Ensure visitors can easily see their application history and manage their accounts.
- Add SSL (Secure Sockets Layer) certificates and encryption to protect user’s data.
- Make sure the website follows important privacy laws like GDPR (General Data Protection Regulation) or CCPA (Central Consumer Protection Authority)
- Make sure the website shows up well in search engines by optimizing meta tags, descriptions, and other SEO (Search Engine Optimization)elements.
- Review all the text and images on the website to catch any errors and ensure a professional look.
- Create a step-by-step plan for how to take the website from where it is now to being live for visitors.
By following these steps, you can make sure your website is in great shape and ready for your viewers to use.
D) How Do Job Seekers Apply for a Job? – Sneak Peek
Now, let’s take a look at how your website works with JobWP for people looking for jobs.
When folks visit your site, they’ll notice a ‘Work With Us’ option in the menu at the top. Clicking on this will take them to a page where they can see a list of available jobs. It’s that easy!
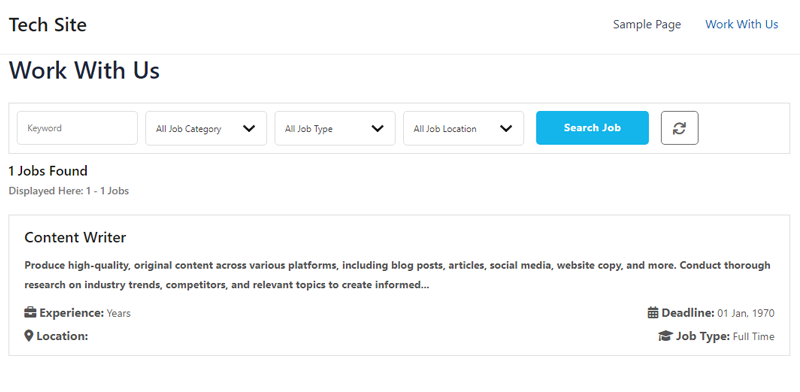
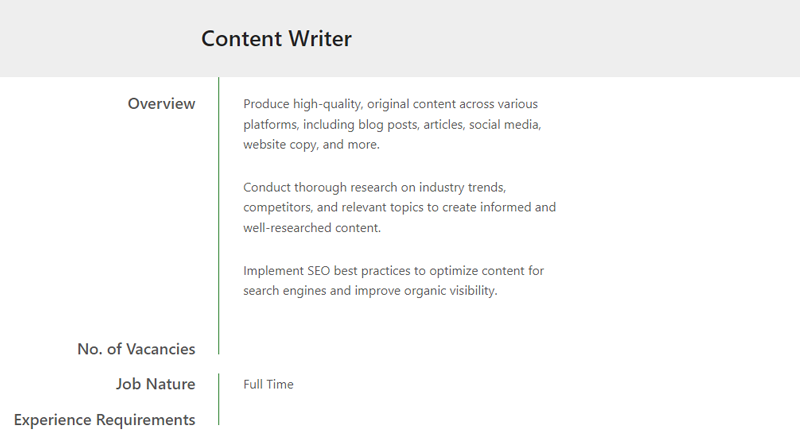
After users discover a job they’re interested in on the search panel, they can simply click on it. This action will take them to a detailed page where they can find all the information related to that job.
This smooth transition allows users to seamlessly access the specifics they need about the job they’ve chosen.
Towards the end, you’ll find a section titled ‘How to Apply.’ Right there, candidates can simply click on the ‘Apply Online’ button. It’s as straightforward as that!

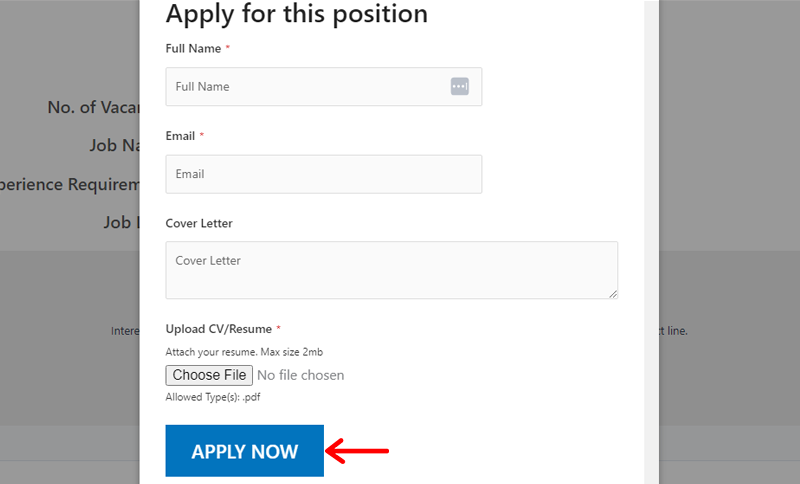
After clicking a button, a little window pops up with a form inside. In this form, folks who want to apply can type in their name, email address, and a message about themselves.
They can also put their CV or resume here. Finally, they need to hit the ‘Apply Now’ button when they’re done.
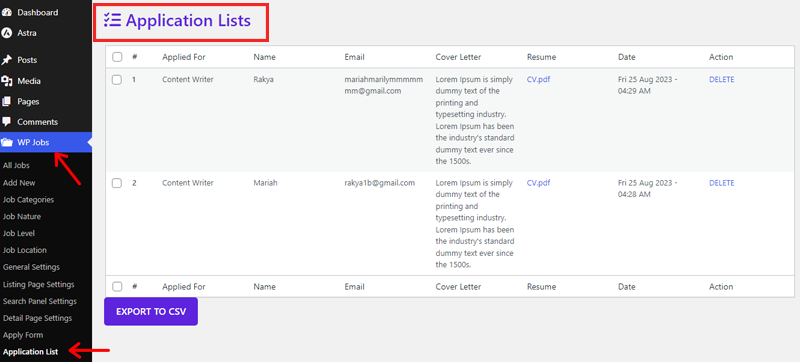
As an employer, you can easily manage all your job applicants from your dashboard.
Just go to the ‘WP Jobs > Application List’ section. There, you can view their resumes and decide whether to keep or reject them.
So, this marks the end of our guide on how to build a job board website with WordPress using JobWP.
Conclusion
That wraps up our article on how to build a job board website with WordPress. We’ve covered all the essential details on how to build a job board website with WordPress. We hope you now have a clear understanding of how to create one.
If it aligns with your requirements, we encourage you to give it a try and create your job posting website.
If you have further queries, then you can post them in the comment section. We’ll guide you as much as possible. Also, you can share your experience of creating a job board website.
You can also check our article on the best job board WordPress themes and best WordPress job application plugins.
Finally, follow us on Facebook and Twitter to view similar articles like this.


