
Looking for a way to set up Google Analytics on your WordPress website? Or measure your site performance with data-driven insights? If yes, then here we go!
Google Analytics is the most popular and powerful tool for tracking and analyzing your website traffic. It can help you understand your audience, optimize your content, improve your conversions, and grow your business.
But how do you set up Google Analytics on WordPress?
In this article, we’ll show you how to set up Google Analytics on WordPress quickly. You’ll learn everything from the signup process to using different methods to set up Google Analytics on WordPress and view your reports.
Now, let’s dig in to track and analyze your website traffic like a pro!
Table of Contents
Introducing Google Analytics
Before we move ahead, let’s quickly explore Google Analytics from a close angle.
Essentially, Google Analytics is a website analytics tool developed by Google. It enables you to track the traffic and user behavior on your website.
What’s more, it offers hundreds of reports in the form of tables and visual charts based on both historical and real-time data.

With Google Analytics, you can answer questions such as:
- How many people visit your website and where do they come from?
- What pages or content are the most popular and engaging on your website?
- How do visitors interact with your website and what actions do they take?
- How well do your marketing campaigns and goals perform on your website?
- How can you improve your website performance and user experience?
No doubt, Google Analytics is a powerful and essential tool for any website owner who wants to understand their audience. So, you can optimize your content, improve the conversions, and grow your business.
Why Do You Need to Add Google Analytics to Your WordPress Site?
If you have a WordPress site, then you might be wondering why you need to add Google Analytics to it. After all, WordPress already has some built-in stats that show you how many visitors and views you get.
However, Google Analytics is much more than just a traffic counter. It can provide valuable insights into your audience, your content, your marketing, and your website performance.
Here are some of the benefits of adding Google Analytics to your WordPress site:
- Understand your audience: Google Analytics reveals visitor details, so you can tailor content and design for a better user experience.
- Measure content impact: Identify popular pages, analyze user behavior, and optimize your content strategy across various channels.
- Track marketing goals: Set, monitor, and optimize marketing goals and conversions to evaluate ROI (Return on Investment) and enhance efforts.
- Improve website performance: Identify and fix issues, optimizing mobile-friendliness and SEO (Search Engine Optimization) for increased organic traffic.
As you can see, Google Analytics can help you make data-driven decisions and improve your WordPress site in many ways. That’s why adding Google Analytics to your WordPress site is a smart move to grow your online presence.
Signing Up for a Google Analytics Account
Before you can set up Google Analytics on WordPress, you need to sign up for a Google Analytics account.
The best thing is signing up for a Google Analytics account is easy and free. You just need to have a Google account or create one if you don’t have one already.
Here are the basic steps to sign up for a Google Analytics account.
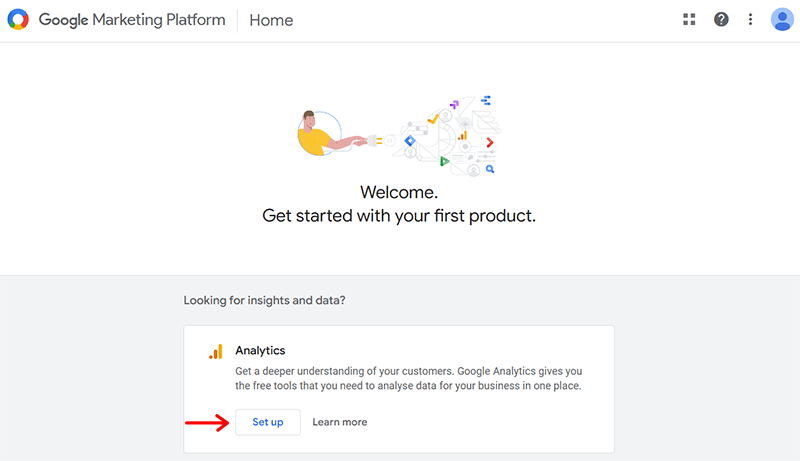
First thing first, go to the Google Analytics website and click on the ‘Set Up’ option.
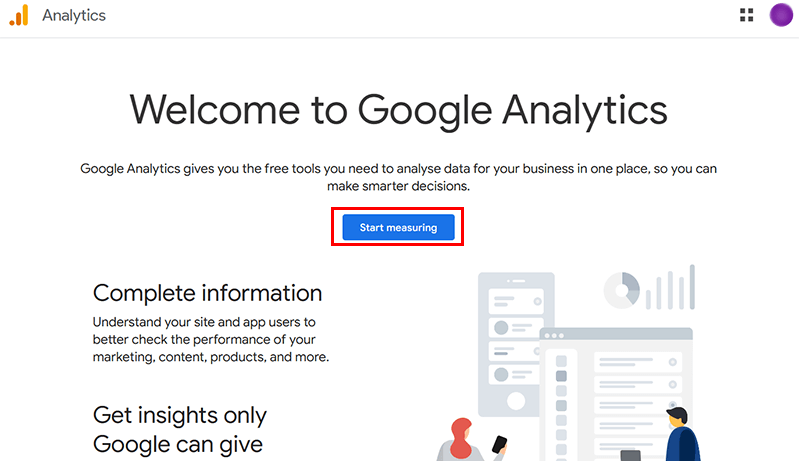
Following that, you’ll see the page below, click on ‘Start Measuring’. (Note, if you’re not signed in to your Google Account, you’ll be prompted to do so or create a new one.)
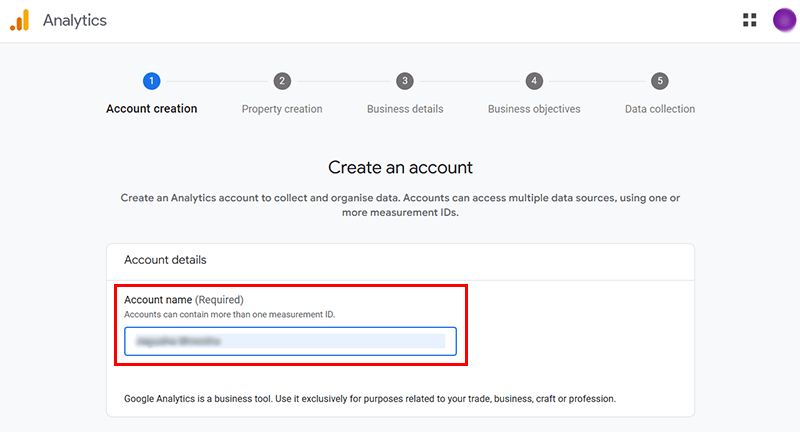
Once you’re signed in, Google will present a screen to begin setting up your new Analytics account. Here, all you’ve to do is ‘enter a name for your account’.
Then, configure the data-sharing settings to control which data you share with Google and other Google services.
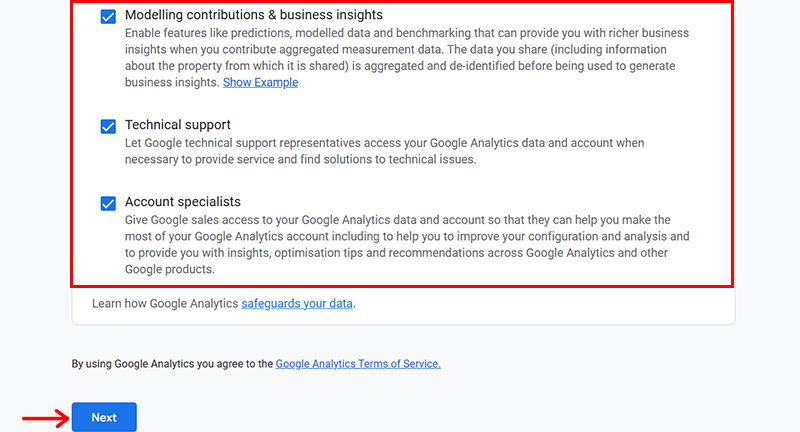
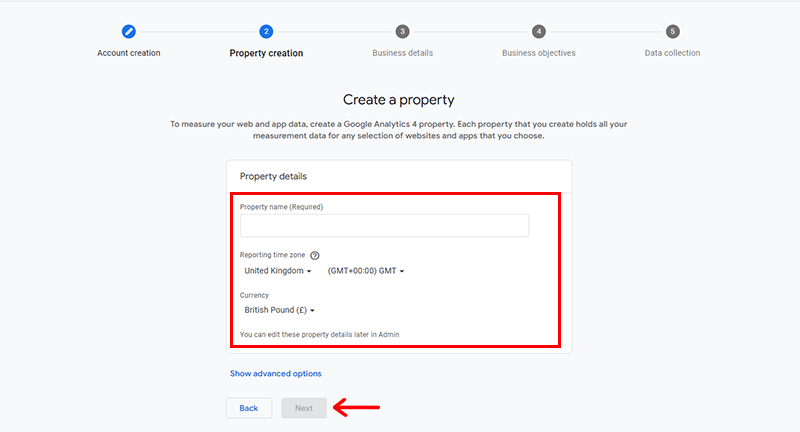
Click on the ‘Next’ option and ‘enter a name for your property’, which is a specific website name that you want to track and analyze. You can also set the Reporting Time Zone and Currency as per your preference.
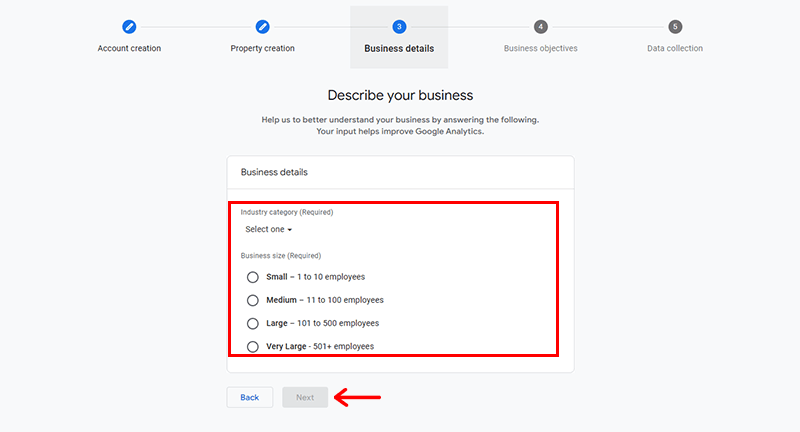
Once done, also specify the Industry category and Business size. These settings will affect how your data is processed and displayed in Google Analytics.
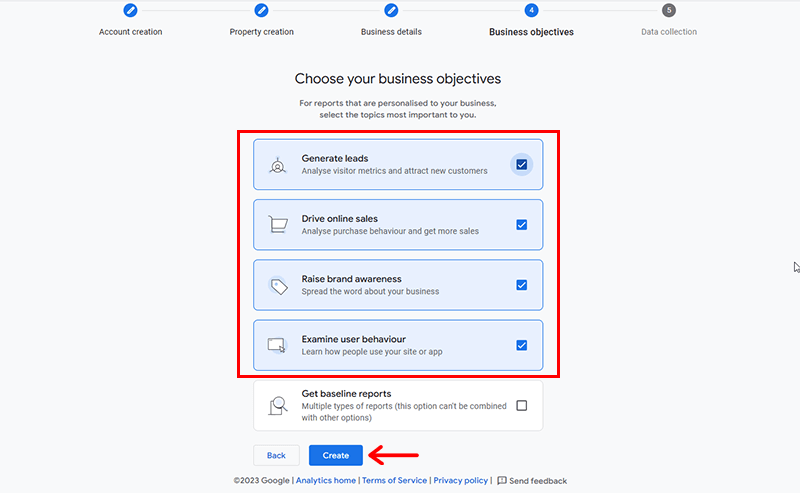
Click on ‘Next’ and select how you intend to use Google Analytics. This will help Google Analytics tailor the default reports based on your goals and needs.
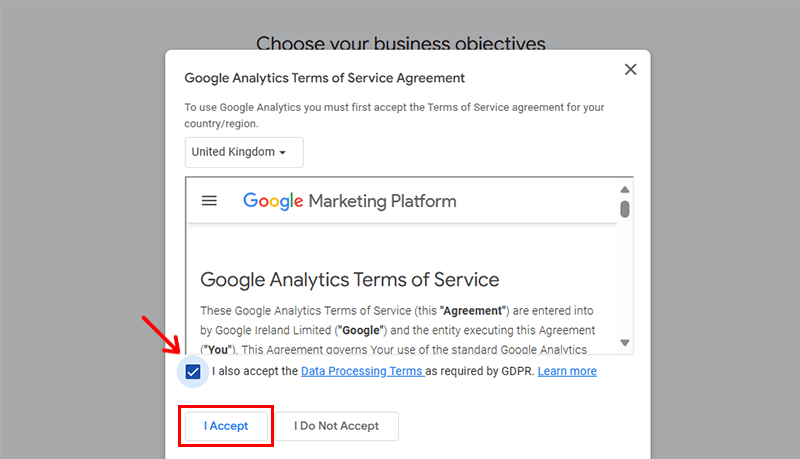
With that, you can click on the ‘Create’ option. And ‘I Accept’ option to accept the Google Analytics Terms of Service and Data Processing Amendment.
Afterward, you’ll see the Data collection page where you need to choose where the data is to be collected. Whether from the Web, Android app, or iOS app.
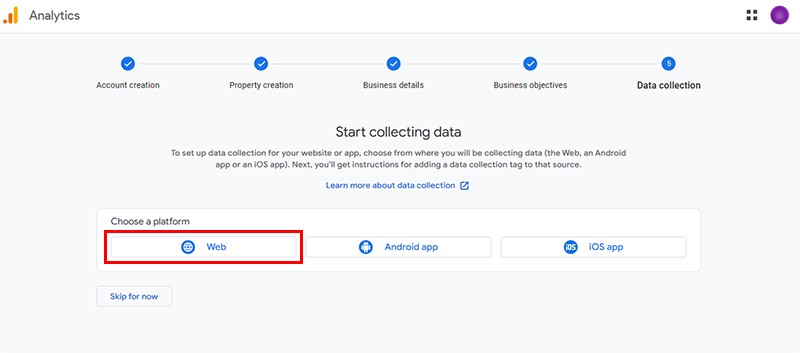
Here, we’ve chosen the ‘Web’ option. Next, you’ll see the page as below, where you need to enter your website URL. Also, add the Stream name, for example, ‘My Website’.
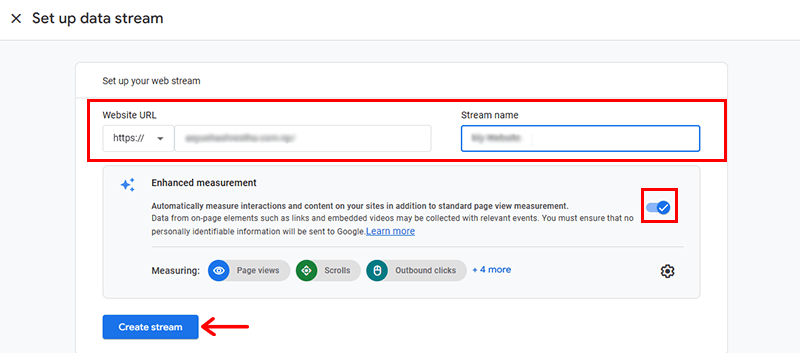
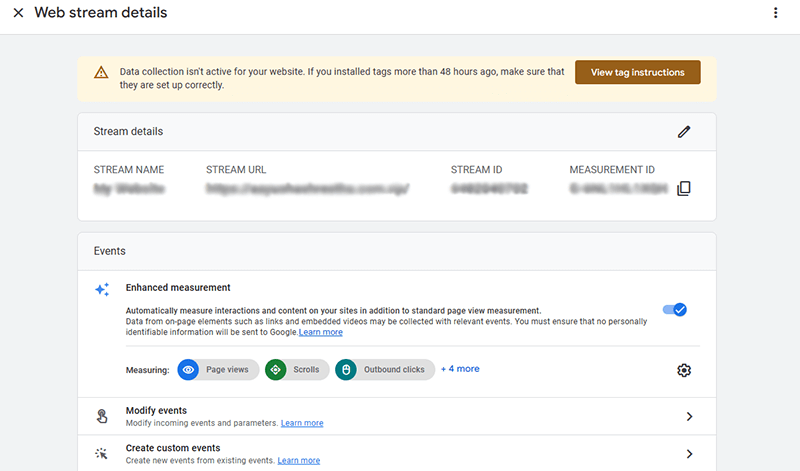
Then, enable the ‘Enhancement measurement’ option and click on the ‘Create Stream’ option. With that, you’ll see the Web stream details page below. Hold on to it.
How to Set Up Google Analytics on WordPress? (Step-by-Step)
Now, as you’ve successfully signed up for a Google Analytics account, it’s time to set it up on your WordPress website. There are several methods to do so.
Let’s check each method rigorously and choose the one that best matches your needs and comfort.
Method 1: Adding Google Analytics Using a WordPress Plugin
One of the easiest and most popular ways to add Google Analytics to WordPress is by using a plugin called MonsterInsights.
MonsterInsights is the best Google Analytics plugin for WordPress, with over 3 million active users.
It allows you to connect your website to Google Analytics without any coding. Also, add crucial tracking features and an analytics dashboard right inside your WordPress admin.
Here are the steps to add Google Analytics to WordPress using Monster Insights.
Step 1: Install and Activate the MonsterInsights Plugin
The first step is to install and activate the MonsterInsights plugin on your WordPress site. So, make sure you log in to your WordPress dashboard if you haven’t.
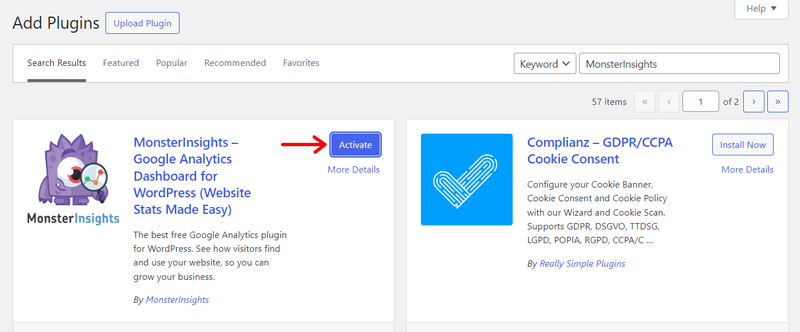
Then, simply go to the ‘Plugins > Add New’ and search for ‘MonsterInsights’ in the search bar.
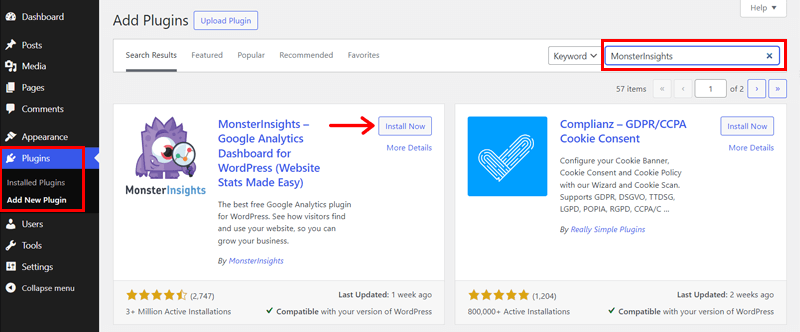
Once you locate the plugin, click on the ‘Install Now’ button, followed by the ‘Activate’ button.
Step 2: Connect Your Website to Google Analytics
The next step is to connect your website to Google Analytics using Monster Insights.
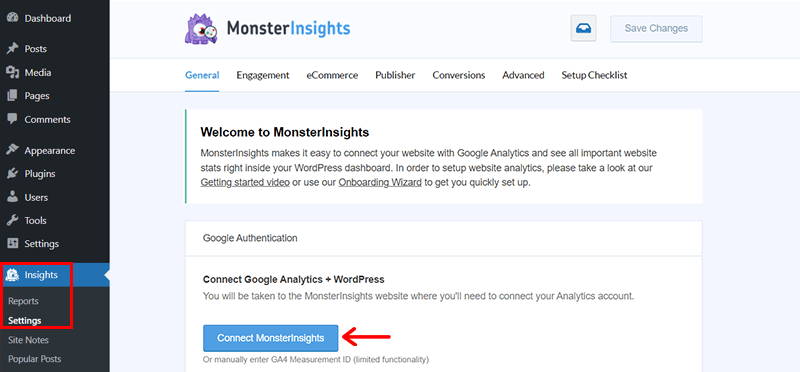
To do this, go to ‘Insights > Settings’ in your WordPress dashboard and click on the ‘Connect MonsterInsights’ button.
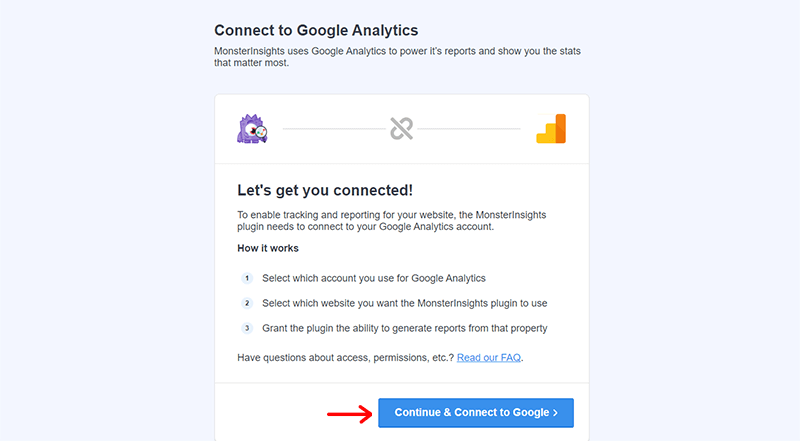
With that, you’ll see the page below. Here, click on the ‘Continue & Connect to Google’ button.
Then, you’re taken to a screen where you can sign in to your Google account that you used to create your Google Analytics property.
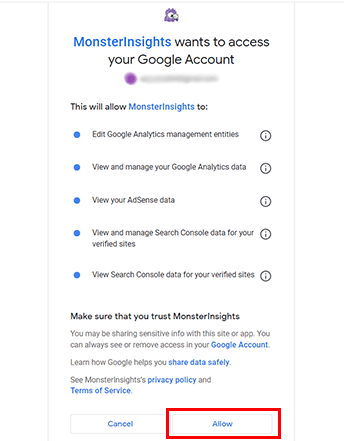
Afterward, click on the ‘Allow’ button to allow MonsterInsights to access your Google Analytics data.
Following that, you can choose the property that you want to connect to Monster Insights from the dropdown menu.
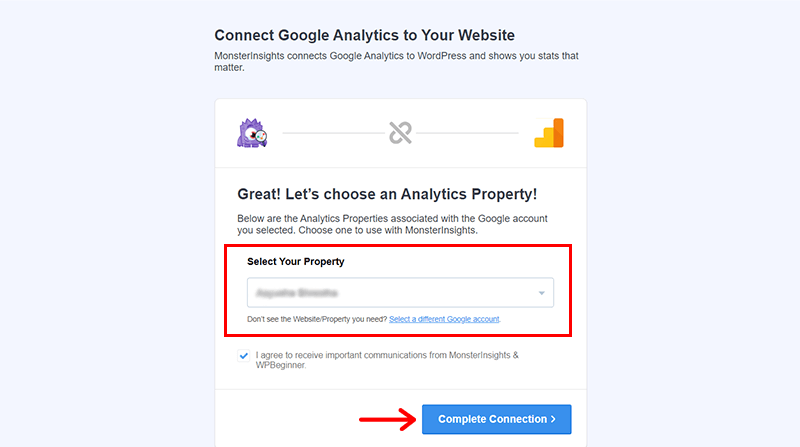
Click on the ‘Complete Connection’ button.
That’s it! You have successfully connected your website to Google Analytics using Monster Insights. You don’t need to insert any code or edit any files.
Step 3: View Your Google Analytics Report
The final step is to view your Google Analytics report on your WordPress dashboard.
Monster Insights provides you with a user-friendly Google Analytics dashboard with all metrics and insights about your website performance.
To access your Google Analytics Report, go to the ‘Insights > Reports’ in your WordPress dashboard. Alternatively, you can also click on the ‘View Reports’ option that comes right after connecting your website.
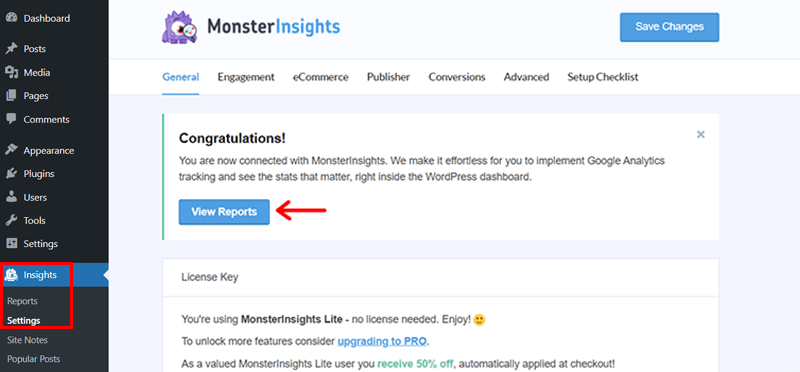
Here’s a quick breakdown of the different reports available in MonsterInsights:
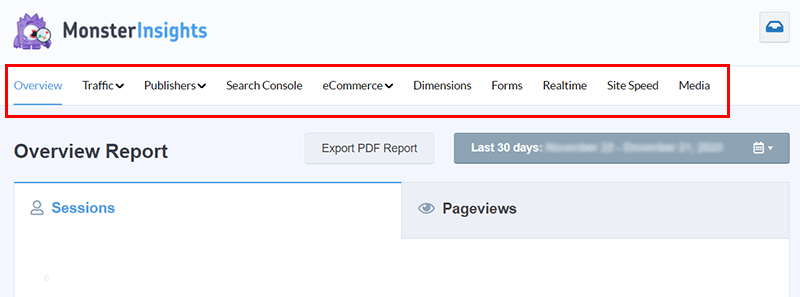
- Traffic Report: Understand visitor sources and identify high-engagement areas.
- Engagement Report: Boost conversion rates by analyzing Top Landing Pages, Affiliate Links, Exit Pages, and more.
- Search Console Report: Track how visitors discover your site through Google.
- eCommerce Report: Gain insights into Average Order Value, Total Revenue, and Top Conversion Sources.
- Site Speed: Get key insights on Server Response Times, Mobile and Desktop Scores, and other performance metrics.
With that, let’s jump into the next method.
Wondering if there are any alternative plugins to MonsterInsights? Well, you can use Google’s plugin called ‘SiteKit’ to set up Google Analytics on WordPress. Check this documentation to get more insight on it.
Method 2: Installing Google Analytics with Code Snippets
Another way to install Google Analytics on WordPress is by using a code snippets plugin called WPCode.
WPCode is a plugin that allows you to easily insert custom code snippets into your WordPress site without editing theme files. You can use it to add Google Analytics tracking code to your site’s header section.
Here are the steps to install Google Analytics on WordPress using WPCode:
Step 1: Install and Activate the WPCode Plugin
As done earlier, the process for installing the plugin is the same and easy.
Simply go to the ‘Plugins > Add New’, and search for ‘WPCode’ in the search bar.
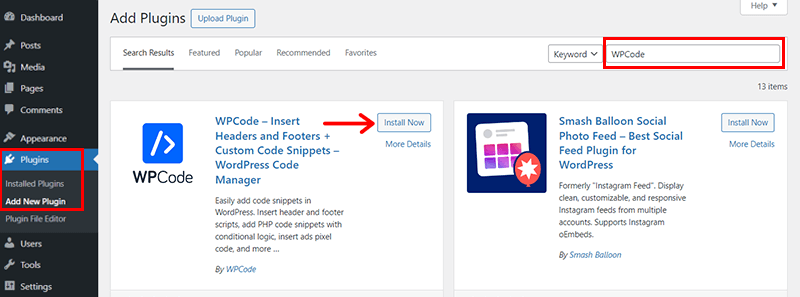
Once you locate it, click on the ‘Install Now’ button and click on the ‘Activate’ button.

After activation, you’ll see the ‘Code Snippets’ menu has been added in the left navigation of your dashboard.
Step 2: Get a Tracking Code
Now, the next step is to get a tracking code for your Google Analytics property.
To do this, you need to come back to your Google Analytics account where you left earlier after the signup process. For a quick recap, you can see the image as shown below.
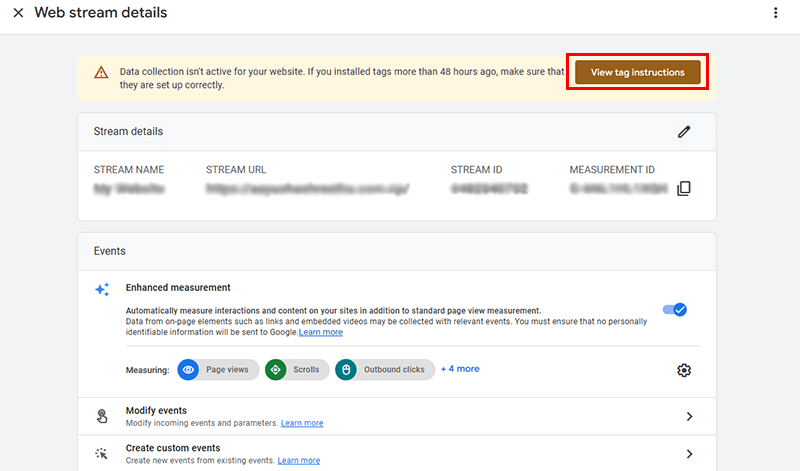
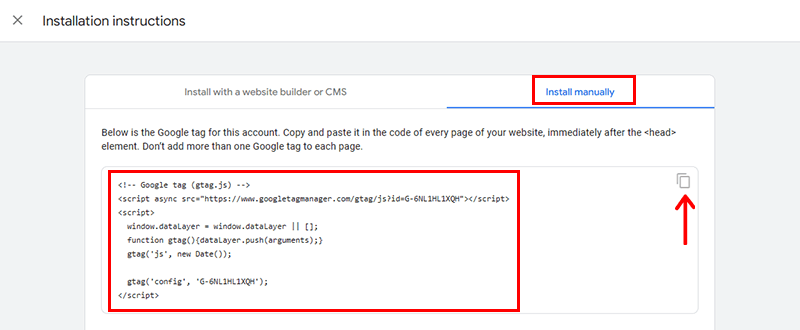
Here, click on the ‘View tag instructions’ button at the top. With that, you’ll see the page as shown below. Click on the ‘Install Manually’ tab.
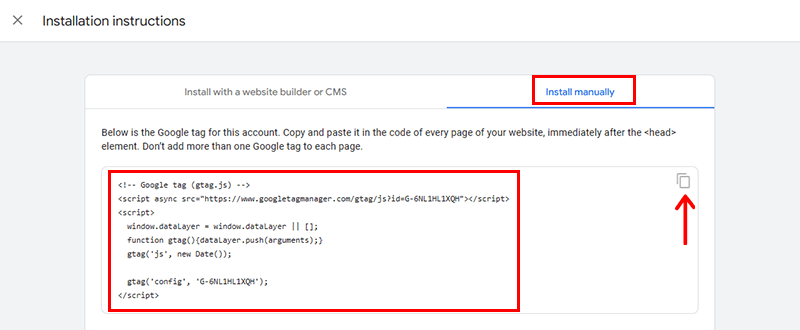
On doing so, you’ll see your ‘Google Analytics Tracking Code’ which is a piece of code that you need to insert into your website to enable the tracking. Click on the ‘Copy Icon’ and keep it handy for the next step.
Step 3: Open the WPCode Settings and Paste the Code into the Header Section
Now, the final step is to open the WPCode settings and paste the code into your header section.
To do this, on your WordPress dashboard, go to the ‘CodeSnippets > Header & Footer’ tab.
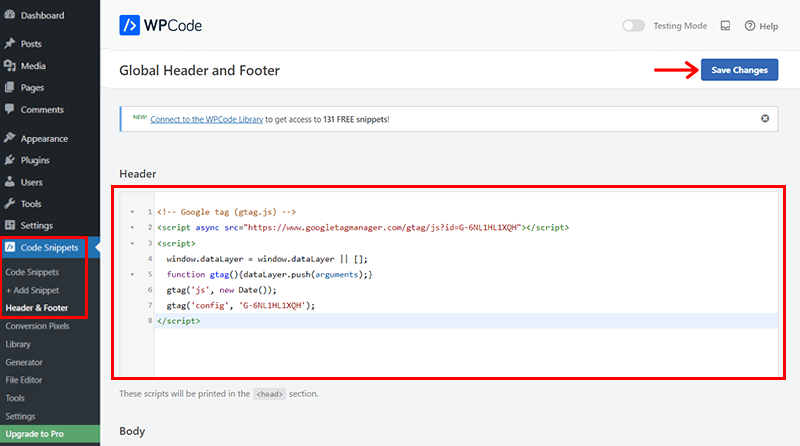
Then, paste your Google Analytics tracking code into the Header area and click the ‘Save Changes’ button.
That’s it! You have successfully set up Google Analytics on WordPress using WPCode. The best part is you don’t need to insert any code or edit any files.
Method 3: Setting Up Google Analytics Editing Theme Code
Last but not least, the third way to set up Google Analytics on WordPress is by editing your theme code and adding the tracking code manually.
To let you know, this method is for advanced users who are comfortable with the code and have access to their theme files.
Nevertheless, if you’re a newbie, then also you can try. However, make sure to have a backup of your site before making any changes to your code.
Here are the steps to set up Google Analytics on WordPress by editing theme code:
Step 1: Go to Appearance > Editor > Functions.php
The first step is to go to the ‘Appearance > Theme File Editor’ in your WordPress dashboard.
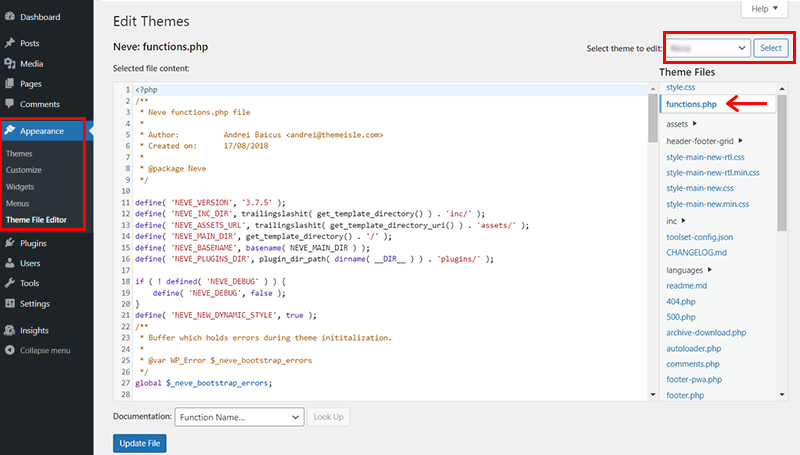
Also, select your active theme from the drop-down menu. Next, click on the ‘functions.php’ file on the right panel to open the code editor.
To let you know, the functions.php file is a file that contains the functions and features of your theme. It is also where you can add custom code snippets to your themes.
Step 2: Add the Tracking Code to the Functions.php File
Following that, you need to add the tracking code to the functions.php file. To do this, you need to sign in to your Google Analytics account and get the tracking code for your website, as explained in Method 2.
Then, you need to add a function similar to this one to the functions.php file:
<?php
add_action ('wp_head', 'add_google_analytics');
function add_google_analytics () {
?>
// Paste your Google Analytics code here
<?php
}
?>
This function will add the Google Analytics code to the head section of every page of your website. Make sure to paste your Google Analytics code between the PHP tags, as shown below.
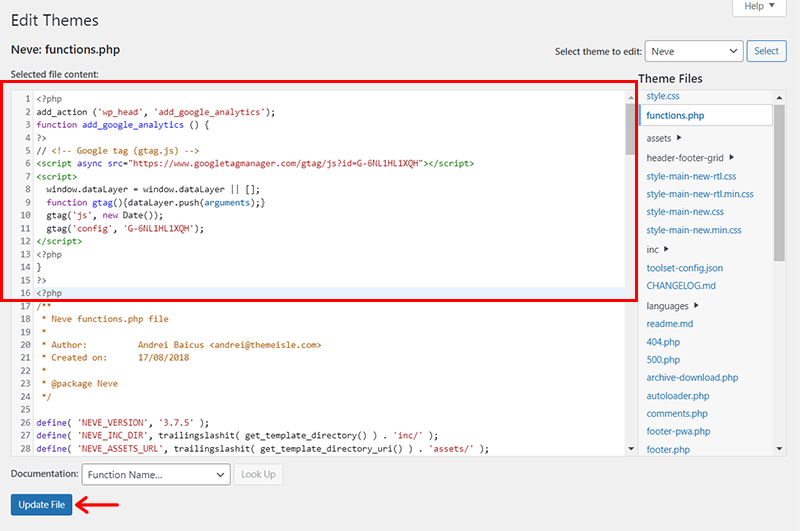
Once done, click on the ‘Update File’ option at the bottom of the code editor.
With that, you’ll see the ‘File edited successfully’ notification.
Step 3: Go to the Google Analytics Website & Look for Real-Time Data
The final step is to go to the Google Analytics website and look for real-time data. This will help you verify that your tracking code is working and that Google Analytics is receiving data from your website.
For that, sign in to your Google Analytics account and go to the ‘Reports’ section.
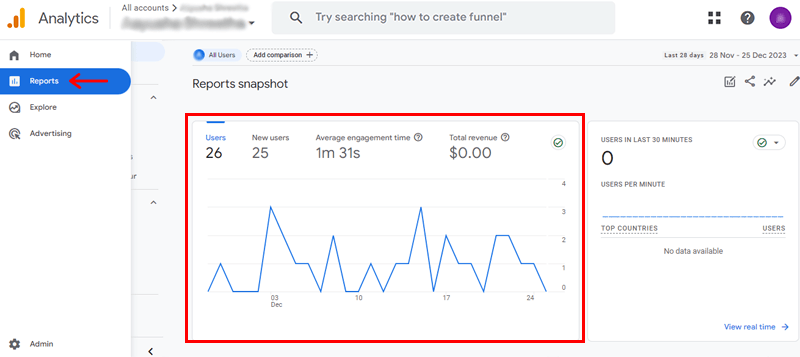
With that, you’ll see a report that shows you the number of active users on your website. Along with their locations, traffic sources, pages, events, and conversions.
What’s more, you can apply filters and segments to see more specific data about your real-time users.
Here’s a quick breakdown of the different reports you’ll find in Google Analytics:
- Realtime Report: Instantly reveals current site visitors for a live snapshot of user activity.
- Acquisition Report: Exposes how users discover your site, whether through searches, referrals, emails, or affiliates.
- Engagement Report: Highlights conversions and events occurring on your site.
- Monetization Report: Organizes eCommerce data, encompassing in-app purchases and publisher ads.
- Retention Report: Provides insights into user retention by distinguishing between new and returning visitors.
- Demographics Report: Details audience location, including countries and cities. With gender breakdowns and interest reports.
- Tech Report: Reveals specifics about devices, browsers, operating systems, app versions, and screen sizes used to explore your website.
And that’s it! You can monitor your analytics views and reports whenever you’d like by following this easy path.
Note: To let you know, whether you follow Method 2 or Method 3, the process to check the real-time data from Google Analytics is the same.
Frequently Asked Questions (FAQs) on Setting Up Google Analytics on WordPress
Here are some FAQs along with their answers regarding setting up Google Analytics on WordPress to clear your pathway.
Q.1: How do I set up Google Analytics on my WordPress site?
Q.2: Is there a manual method for adding Google Analytics to WordPress?
Q.3: How can I confirm if Google Analytics is working on my WordPress site?
Q4: Does Google Analytics affect website speed on WordPress?
Q5: Can I track specific events, like form submissions, using Google Analytics on WordPress?
Q6: How often does Google Analytics update data for WordPress sites?
Did you check your Google Analytics stats and want to unlock the full potential of your website? Then, check our article on the eCommerce CRO to improve your conversions.
Conclusion
And that’s all, folks! We’ve come to the end of our tutorial article on how to set up Google Analytics on WordPress.
We hope this article has helped you set up Google Analytics on WordPress easily and effectively.
You have just learned how to set up Google Analytics on WordPress using 3 different methods. That is using a plugin, code snippets plugin, or editing your theme code.
Each method has its pros and cons, so you can choose the one that suits your needs and preferences best. If you have any questions or feedback, please let us know in the comments below.
You might like our other informative reads such as how to add a banner in WordPress and how to make a mobile-friendly website for conversions.
Follow us on our social media handles Facebook and Twitter to stay in touch with our content.


