Wondering how to unpublish a WordPress site? Or want to know how to password protect your WordPress posts and pages? Worry not! This guide will help you!
There are times when you might need to unpublish your WordPress site. This can be because of either privacy, maintenance work, editing, or any other. Whatever the case, it’s extremely important to know how to unpublish a WordPress site properly.
So, in this guide, we’ll explain the step-by-step process of unpublishing a WordPress site (the whole site, pages & posts).
Let’s get started!
Why Do You Need to Unpublish a WordPress Site?
The very first thing you need to know before we start our tutorial is that unpublishing your site doesn’t mean you’re deleting your whole site.
Rather it means that you’ve taken down your site from the web to make changes or updates. As you don’t want others to know what you’re doing and want to make sure that everything is working properly. In other words, it’s taking your website offline for some time.
There can be many instances where you might have to disable your site. Here’s a list of the most common reasons why you need to unpublish a WordPress site.
- The information that you’ve shared may no longer be valid and needs an update.
- Sometimes your site may get hacked and the very first thing you need to do is temporarily disable your WordPress site.
- At the same time, once your site gets hacked, your customers should see a maintenance mode screen rather than face a security problem.
- You might need to run regular maintenance on your site.
- At last, the best thing about unpublishing a site would be that you can keep all its content to yourself for later purposes.
Now let’s start with how to unpublish a WordPress site properly.
A. How to Unpublish a Whole WordPress Site? (Step-by-Step)
Unpublishing a WordPress site is a very easy and straightforward process. It can take just 2 steps to do so. They’re
- Set Your Website to Maintenance Mode
- Disable Search Engine Visibility
We’ll talk about them separately in detail one at a time. Now let’s start with setting your website to maintenance mode.
Step 1. Set Your Website to Maintenance Mode
This is the easiest way to unpublish any WordPress site. That’s because this takes your site offline and makes it unavailable to the public.
But still, it’ll be available for you to work on by giving access to your dashboard until it’s ready to publish again.
Now let’s go ahead and see how it’s done.
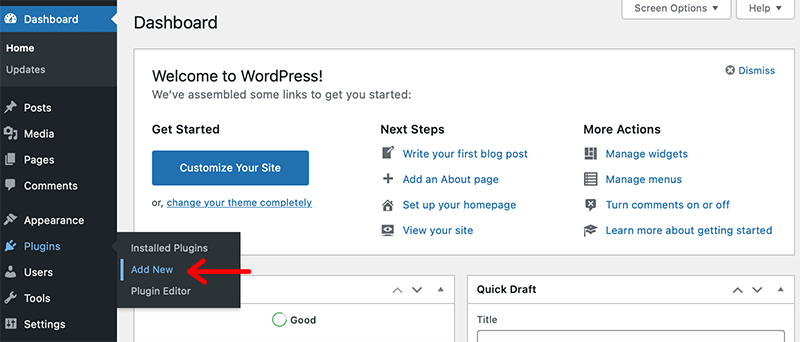
Firstly, login into your WordPress dashboard and then go to Plugins > Add New.
At the very top, on the right-hand side, you would see the search field. And there you can type “coming soon” or “ maintenance” to see a list of plugins.
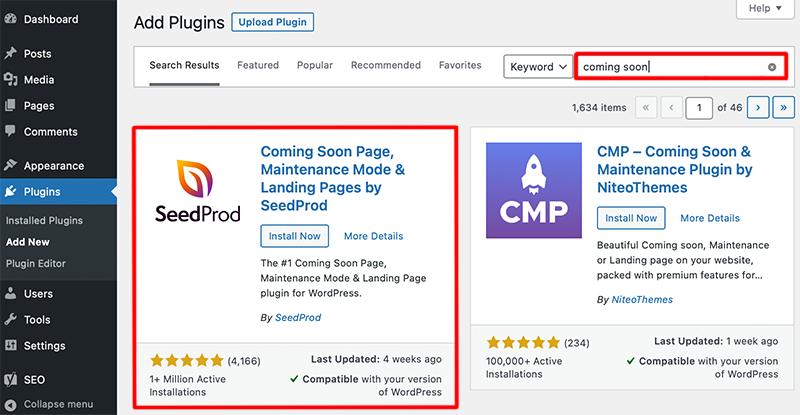
After that, choose the plugin that you want to install. For example, we’re going to install the Coming Soon Page & Maintenance Mode by the SeedProd plugin. You can also search the plugin with author names and tags.
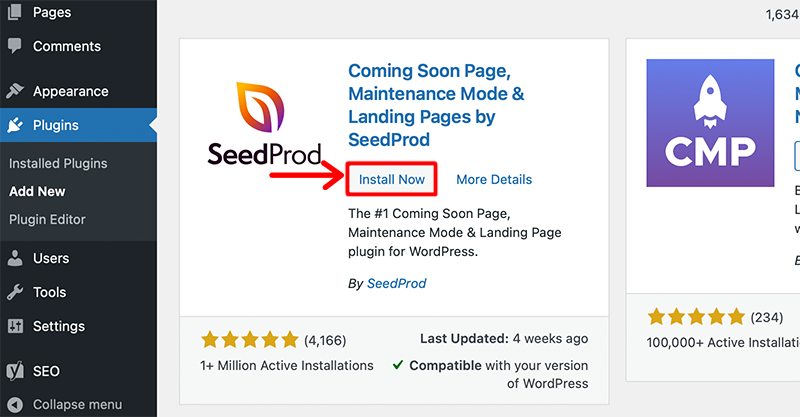
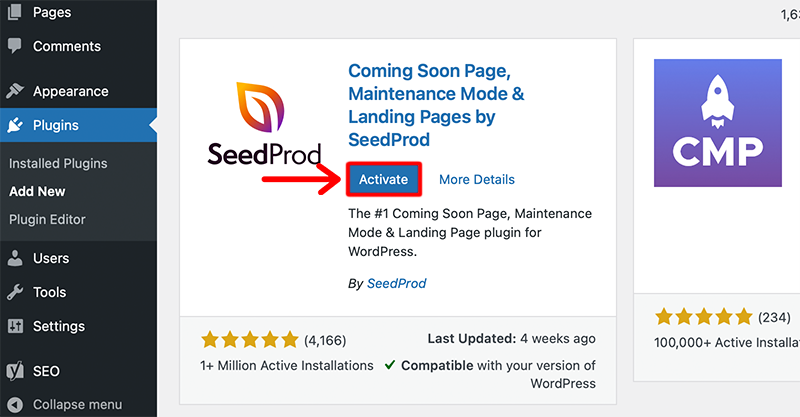
Once you’ve found the plugin, click the ‘Install Now’ button. After installing it, click on the ‘Activate’ button.
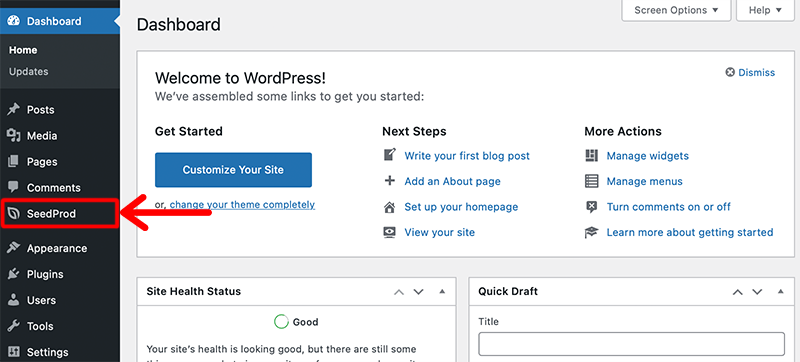
Soon after the plugin has been activated, you’ll see the ‘SeedProd‘ menu appear in your side navigation menu. Then, click on that menu and it’ll take you to its Pages Settings.
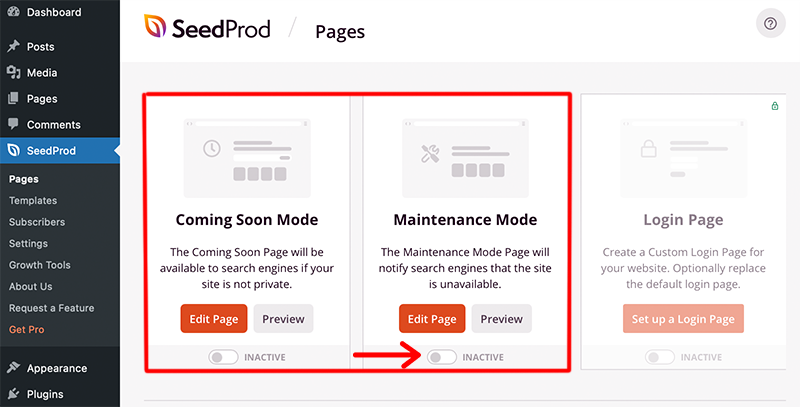
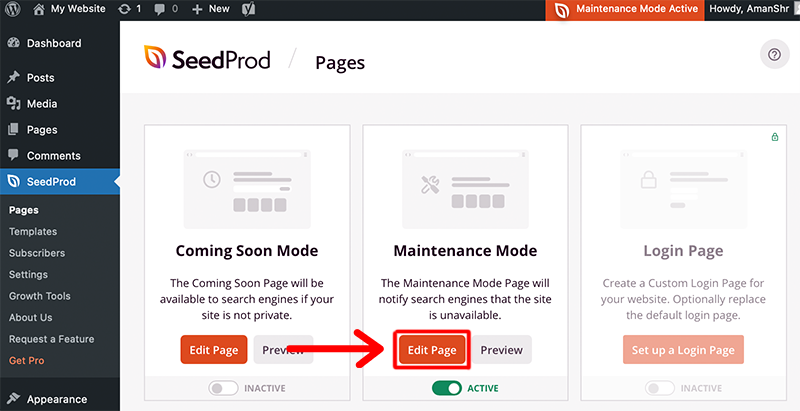
On the setting page, you’ll see the toggle switch to enable either Coming Soon Mode or Maintenance Mode. Select Maintenance Mode to enable the maintenance mode page.
Finally, you’ll see the notification at the top of the page indicating “Maintenance Mode Active”.
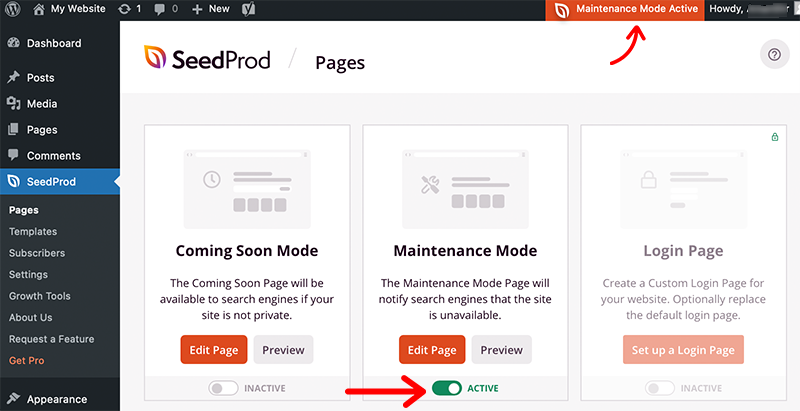
That’s it – this is how you unpublished your site.
Customize Your Maintenance Mode Page for Better Results
We just now looked at how easily you can unpublish your site using the SeedProd plugin. This only shows how you can add a simple maintenance mode page to your site.
However, you can edit that page by adding different blocks and at the same time, you can change the template of that page. Hence, let’s look at how you can edit and change the template of the maintenance mode page.
In the Pages Settings page of the plugin, just below the Maintenance Mode, you’ll see the button for the Edit Page. Click on that button.
Once you’ve clicked on that button, it’ll take you to the design editor. There you can drag and drop different blocks from the sidebar to the live editor on the right side.
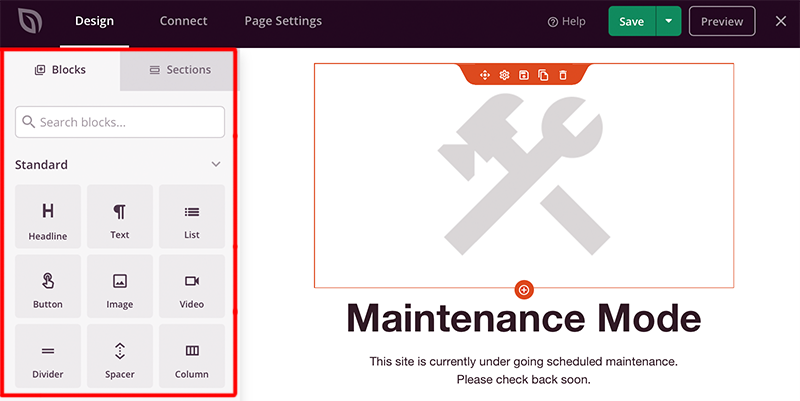
After you’ve completed editing the page, you can save it by clicking on the Save button.
For changing the template, go back to the SeedProd > Templates. This will take you to the library of pre-made templates. And from there you can select the templates that you want to use.
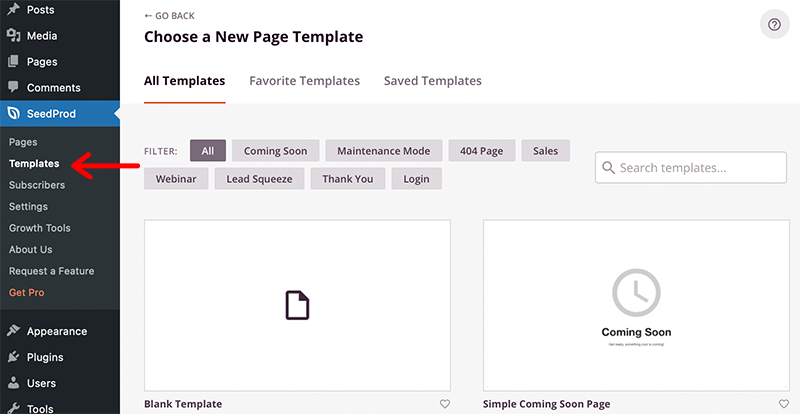
Hence, this is how you successfully edit and change the template of the maintenance mode page.
Step 2. Disable Search Engine Visibility
We just now looked at how we can set maintenance mode on any WordPress site. This step itself can be enough to make sure that your WordPress site is unpublished and invisible to your audience.
However, even after you make sure that your site is in maintenance mode, still your site can be visible in search results if your SEO is good. To make sure that your site isn’t showing up in the search by search engines, you must disable search engine visibility. This means that you encourage search engines not to index your website.
Hence, in this next step, you don’t have to install any plugins for unpublishing your WordPress site. As you can use the inbuilt feature that is available already inside WordPress.
However, there are some maintenance and coming soon plugins that include this option. Therefore, we suggest that you should look into the plugin’s setting before you begin this step.
Therefore, we’ve discussed below the necessary steps for disabling search engines from indexing your site.
Go to your WordPress admin area. Select Settings > Reading.
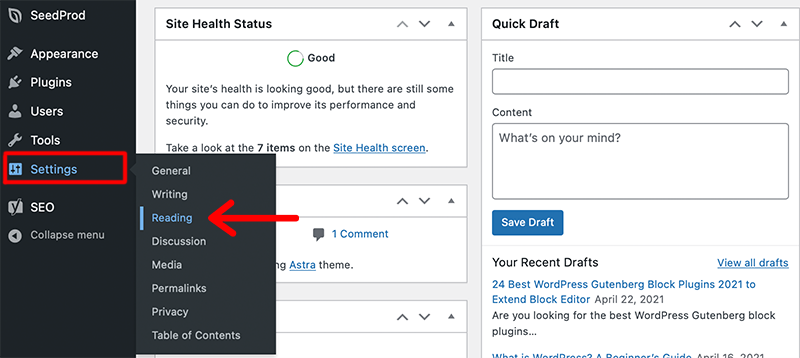
After that, it’ll take you to the Reading page, and then at thievery last you’ll the Search Engine Visibility option. Just beside that option, you’ll see a checkbox that you’ve to check.
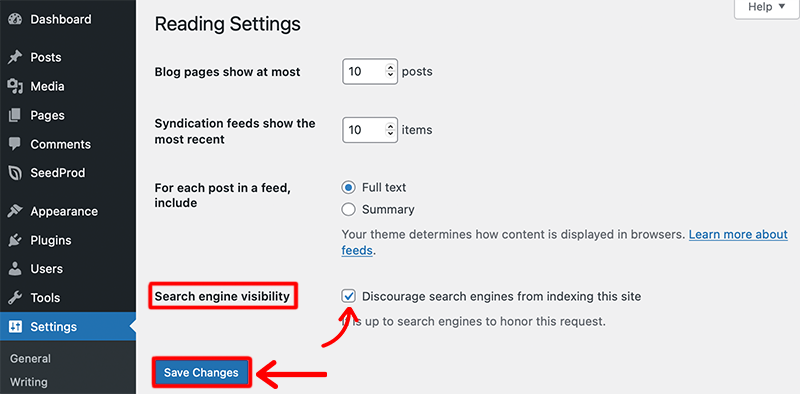
At last, click on the Save Changes button at the bottom of the page.
That’s it! This is how you disable search engine visibility on your WordPress website.
Therefore, these are the two steps that you’ve to follow for unpublishing a WordPress site properly. And both steps are quite easy and anyone can use them with less difficulty.
B. How to Unpublish Your WordPress Posts & Pages?
If you want to keep some of your page/posts hidden or keep them private from your visitors, then this method can come in handy.
This method is useful if you want to keep some of your content unpublished while keeping the website online. And, only the logged-in users can see the unpublished posts and pages.
You can unpublish your WordPress pages and posts in many different ways as shown below.
- Set Your WordPress Pages/Posts Private
- Password Protect Your WordPress Posts & Pages
- How to Draft the Published WordPress Page/Post?
Method 1: Set Your WordPress Pages/Posts Private
One of the easiest ways to set your WordPress posts and pages offline is to put them private.
Luckily, WordPress by default includes this feature. In the post/page editor, you can find the ‘Visibility’ option which allows you to set your content private.
Now, let’s go ahead and see how we can set up our WordPress page and post it privately step-by-step.
Step 1: Firstly, go to your WordPress dashboard. And, then click on Posts and then select the post that you want to select.
Step 2: After that, just below that post you’ve selected, you’ll get an option of Edit. Click on that option.
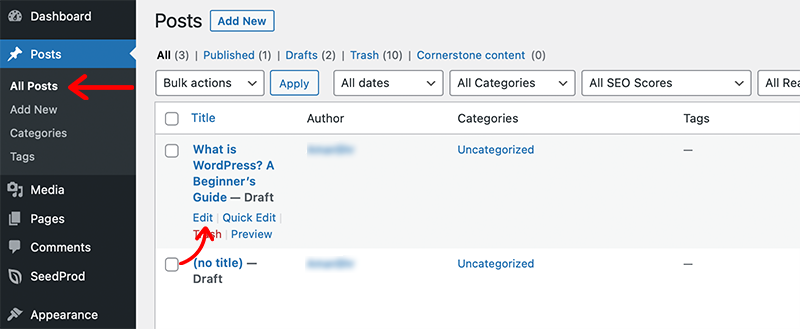
Step 3: Once you’ve clicked on that option, it’ll take you to its editor page. There on the right sidebar, you’ll see the Post block. And there at the top, you’ll find the Status & visibility section.
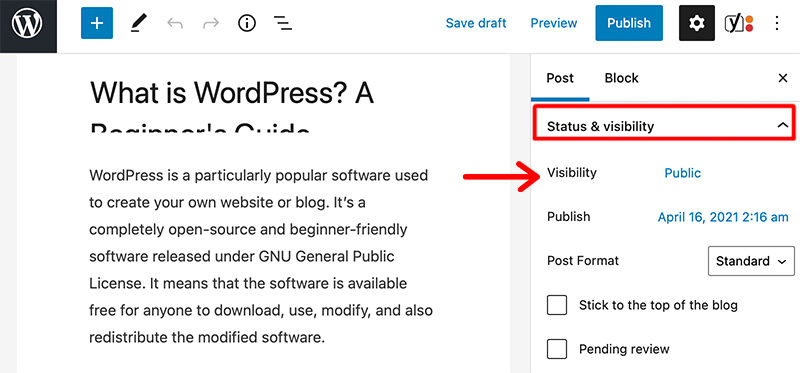
Step 4: In there look for the Visibility option and click on the Private option.
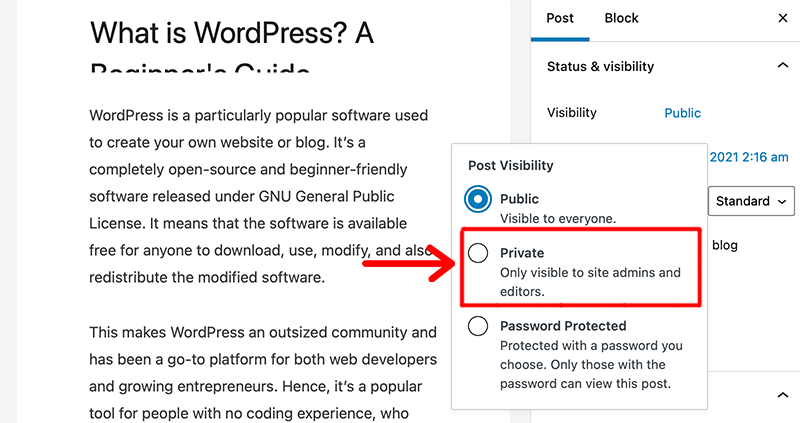
Step 5: After that, it’ll ask for confirmation. There you just have to click on the OK button. This will confirm that you want to publish the post privately.
That’s it! This is how you set your WordPress post/page private. And that post will only be visible to the logged-in members.
Method 2: Password Protect Your WordPress Posts & Pages
If you want to password protect your WordPress post or page, then WordPress provides you the in-built feature to do that. You can set up this feature also via the Visibility setting.
You can find the Visibility setting inside the WordPress content editor which can be used for every type of content. Hence, let’s look at how we can get started:
Go to your Pages/Posts section. Then open the WordPress editor for the piece of content that you want to add password protection.

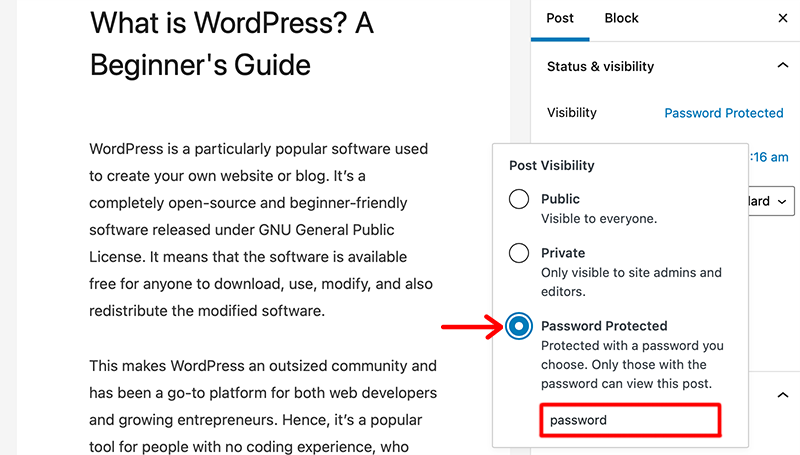
After that find the Visibility option on the right-hand side of the editor. Click on the Visibility option.

Select Password Protected from the drop-down. Followed by entering the password that you want to use to view that post. And then save the changes that you’ve made.
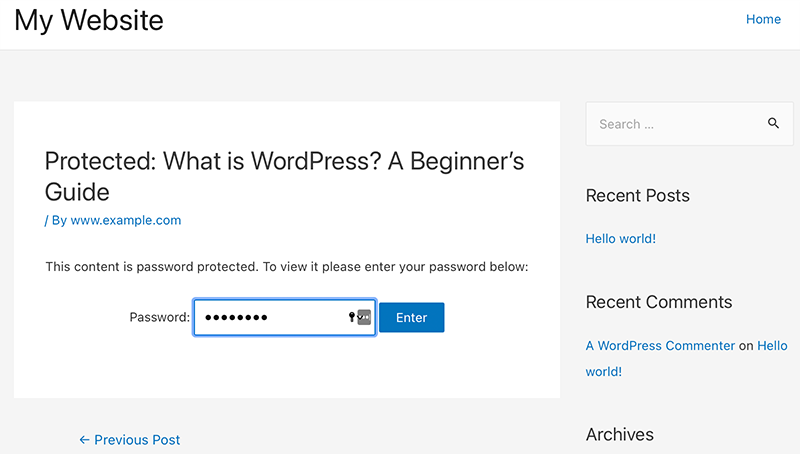
After you’ve updated your post, any visitors who try to view that post will be asked to enter the password first. Once a visitor enters the correct password, they’ll be able to post.
Method 3: How to Draft the Published WordPress Page/Post?
This is a very easy and straightforward process for drafting the published WordPress page/post. This will make sure that your page/post won’t be visible to the visitors on your site. However, the admin or anyone who has access to the WordPress panel will be able to see the draft page/post.
Below are the simple steps to draft the published WordPress page/post:
Firstly, go to your WordPress dashboard. And there click on the Posts and select the post that you want to draft.
Click on the Edit option present just below the post that you’ve selected.

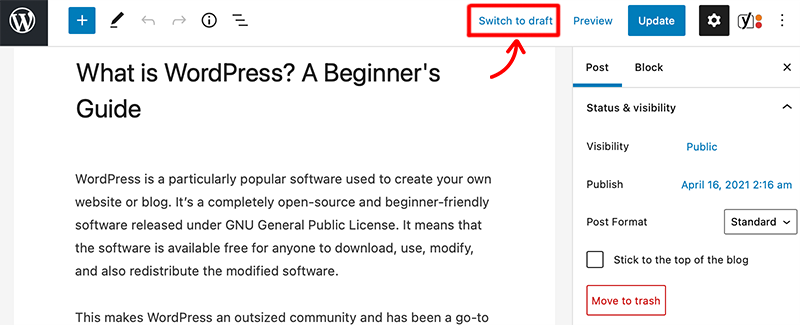
Now, it’ll take you to its post editor page. There on the top section, you’ll need the Switch to draft option. Click on that option.
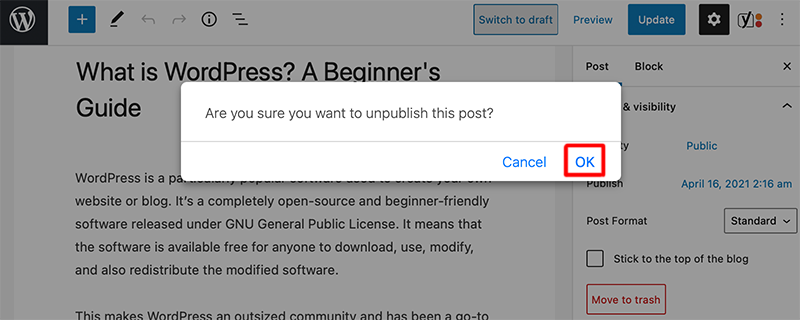
At last, WordPress will ask for confirmation whether you want to unpublish this post or not. You just need to click on OK and then it’ll successfully unpublish the post from your site.
C. How to Unpublish WordPress Pages/Posts in Bulk?
Let’s look at how you can unpublish your pages/posts in bulk. For that all you need to do is follow these simple steps:
Step 1: Firstly, login into your WordPress dashboard. Then go to Posts > All Posts.
Step 2: Select all the posts that you want to unpublish.
Step 3: After you’ve selected the posts, click on the drop-down menu. And select the Edit option.

Step 4: Now click on the Apply button. This will open the bulk edit setting option.
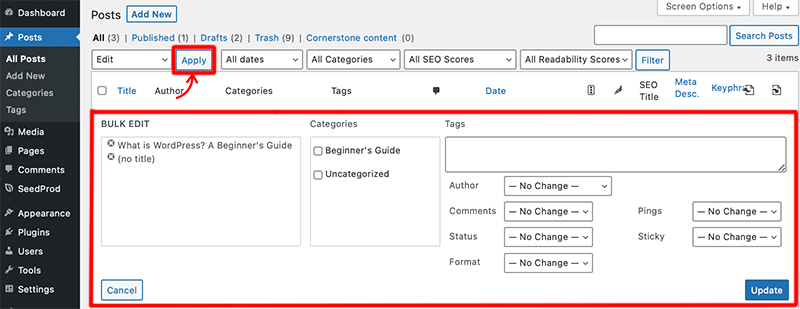
Step 5: In there look for the Status option. Then click on it and select the Draft option.
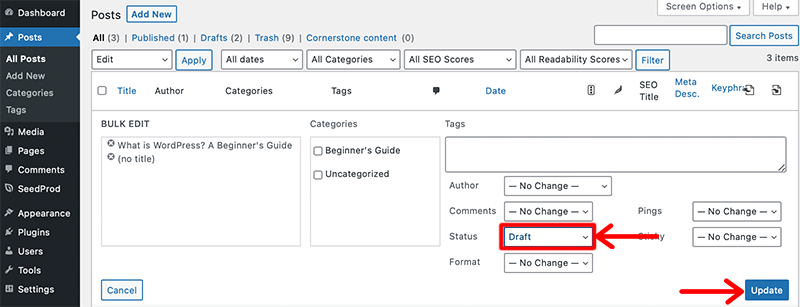
Step 6: Once you have done that, click on the Update button to save the changes.
Bang! Now you’ve successfully unpublished the posts in bulk.
D. How to Hide WordPress Page/Post by User Roles?
Lastly, let’s look at how we can hide pages and posts by user roles. Here we’ll look at how we can set different passwords for different user roles, i.e. one for editors, and one for authors.
To hide your page/post by user roles, you’ll need to install a plugin called WordPress Password Protect Page (PPWP) on your website. This is a free WordPress plugin that offers you a powerful and all-in-one solution to protect your website with passwords.
It’ll ensure you can add a password to protect WooCommerce products, fewer posts, or your entire website. However, remember that this plugin won’t protect images or uploaded files attached to the protected pages or posts. This means they can be accessible to anyone with the link.
Now, let’s follow the steps below to hide the page/post by user roles using the PPWP plugin:
Step 1: In your WordPress admin dashboard, go to Plugins and click on Add New.
Step 2: After that type “Password Protect WordPress” in the search box and then search for the PPWP plugin. And, then Install and Activate the plugin.
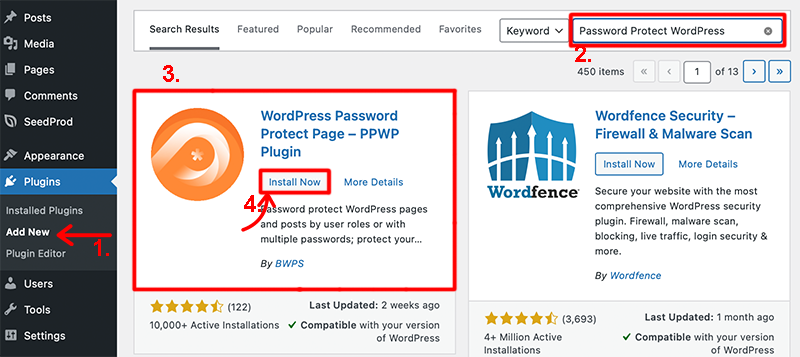
Step 3: Now go to the Pages or Posts section and select the content that you want to hide. Click on the Edit option.

Step 4: After that look for the Password Protect WordPress option on the bottom of the right panel. And click on the Edit option present at the bottom of that section.
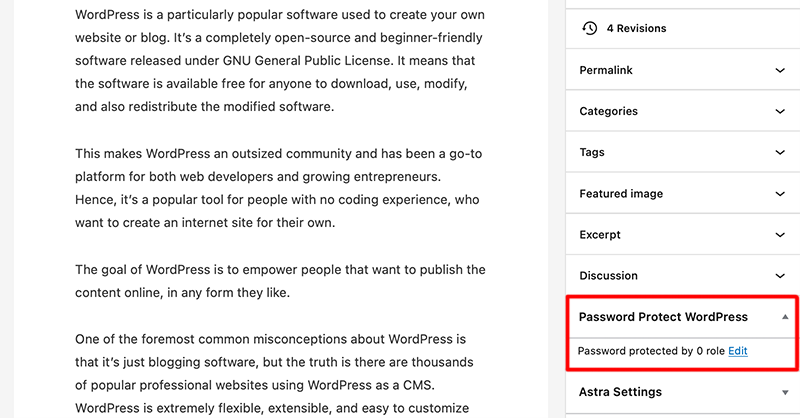
Step 5: Select a user role from the Role dropdown list to add the password.
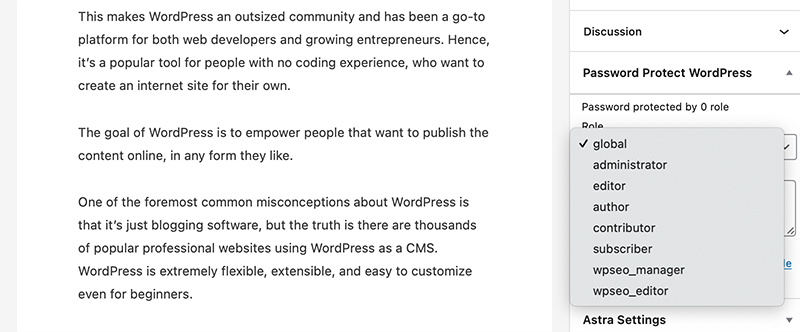
Step 6: Now you’ve to enter the password for the role that you’ve selected in the Password section. Followed by clicking on the Submit button below.
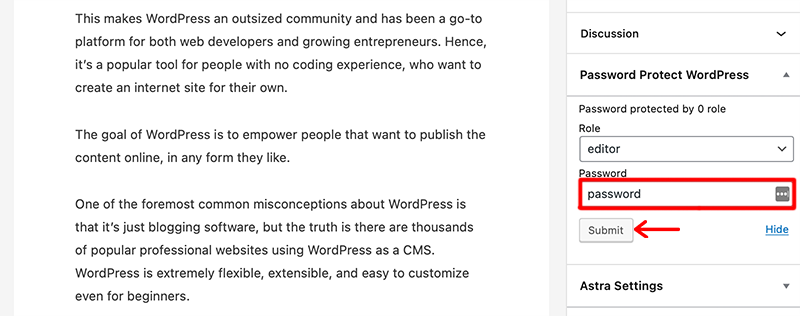
This is how you hide the page/post by user roles using the PPWP plugin.
Conclusion
We hope this article has helped you with how to unpublish a WordPress site. We believe that now you can also unpublish pages/posts in bulk and set a WordPress page/post private without any hassle.
If you’ve any further queries about how to unpublish a WordPress site, then please leave a comment below. We’ll try to get back to you as soon as possible.
Also, check out our complete strategic guide on what is social media marketing? And also check out the 14 best eCommerce platforms to make an online shop. Be sure to go through it once.
If you like this article, please share it with your friends and colleagues. Also, don’t forget to follow us on Twitter and Facebook.


