Do you want to know how to create a donation form in WordPress? Or, do you want to add a donation form to your website’s page? If it’s so, then this guide will help you out.
A donation form is a necessary tool for non-profit organizations to collect donations virtually. Even a simple donate button may work fine. However, accepting donations via a donation form is more helpful. Also, you can receive donations from across the country and around the globe.
As a result, with the donation form, you’re allowing more individuals to contribute. Once you complete customizing your donation form, you can add to your page, or even share on social media, or include it in an email.
So, in this article, we’ve prepared a step-by-step guide on how to create a donation form on your WordPress website. Also, you’ll get to learn to customize the form, settings, and add a form to your pages. The best part is you don’t need any coding skills.
A. Why Create a Donation Form?
We all know how important having a donation form on your site is. It offers numerous benefits for both site admin and customers. Let’s check some of them below.
- Easy to donate: With an online form, your supporters are more likely to donate because it’ll be easy for them. Using an online form, they can donate whenever they want without having to search for your contact information. Which is easier and user-friendly for your regular contributors.
- Save time on data entry: When you collect donations in person, you’ll have to sit and enter an endless amount of information. For instance, the amount of the donation, donor’s name, and contact details. And, also the range of information, like cheque and credit card numbers to total gifts from individual donors. However, integrated donation forms allow you to add information instantly to your system without manual data entry.
- Easy integration with payment gateway: You can easily integrate your donation forms with various payment gateways like PayPal or Stripe. Which makes it easier to collect donations online across the globe.
- Easy access: You can easily insert these forms anywhere on your WordPress website’s page or posts. These forms are flexible and can be accessed through any device like laptops, pc, smartphones, tablets, and many more. So, it’ll allow you to reach your potential contributors.
B. Choosing the Best Donation Form Plugin
As you know the benefits of having a donation form on your website. Now you might be thinking, creating a donation form can be tricky. However, there are WordPress plugins for nonprofits that’ll make it easy for you to create donation forms on your website.
Creating a donation form by yourself for a website can be a difficult task if you need to code. However, using a donation form WordPress plugins can be easier to create a donation form in WordPress.
This plugin will let you design your donation form with texts, buttons, checkboxes, dropdowns, etc. Then you can add the form to the desired places on your website.
However, there are tons of good plugins in WordPress to build a donation form. And, choosing the best one is a must for your website. So, here’re some of the things you consider while choosing a donation form plugin.
- Features: Firstly, your plugin should offer you tons of features to make your donation form better. It should come with features like unique fields, responsiveness, confirmations, notifications, integrations, and more.
- Addons: Secondly, get a plugin that supports add-ons to have some extra features you need. Features can be Google Analytics, payment integration, file uploader, pop-ups, and more can be attained with addons.
- Easy-to-use: When choosing a plugin, always look for beginner-friendly that can be used without coding skills. Your plugin should be easy to use when creating and adding a donation form anywhere on your website.
- Pricing: Finally the plugin you choose shouldn’t cost a lot and should be available under your budget.
Now, let’s check on some of the popular WordPress form generating plugins.
1.WPForms
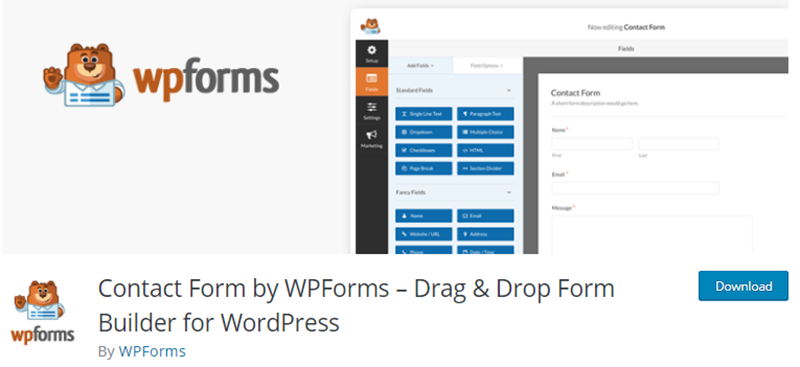
WPForms is a popular, easy-to-use, and powerful drag-and-drop WordPress form builder. Apart from the donation form, you can also create contact forms, online surveys, and other WordPress forms without using code.
Also, it comes with pre-built WordPress form templates that are easy to customize. Using this template you can easily create a donation form without having to start from scratch.
In addition, you can fully customize your donation forms with section dividers, HTML, blocks, and custom CSS. Also, it comes with tons of hooks and filters for developers to create custom functionality.
Pricing:
WPForms is a free WordPress form-generating plugin. However, if you want to use pro features, you can upgrade to the premium version. The premium version is available for the following prices:
- Basic: $39.50 yearly
- Plus: $99.50 yearly
- Pro: $199.50 yearly
- Elite: $299.50 yearly
2. GiveWP
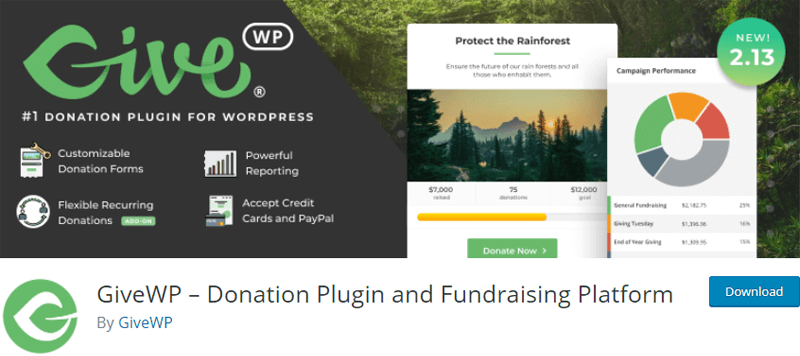
GiveWP is the best donation plugin for WordPress. This plugin allows you to receive donations online through your WordPress website. Using this plugin you can create custom donation forms, manage your donors, and gain insight from fundraising reports.
It comes with limitless form customization options. You can set donation amounts, use regular donations to schedule daily, weekly, monthly, quarterly, or annual subscriptions. You can use your forms as separate pages or add them to any pages on your website.
Moreover, it integrates with GiveWP Google Analytics to learn about your donor’s profile and how they choose to donate. You can also keep track of the information you need to improve your fundraising.
Pricing:
GiveWP comes in both free and premium versions. You can get the free version from WordPress.org official plugin directory. And, the premium version is available on its official website in 3 purchase plans;
- Pro: $499 annually
- Plus: $360 annually
- Basic: $249 annually
The best thing is, you’ll get a 30-day money-back guarantee.
3. Gravity Forms
Gravity Forms is the most powerful premium plugin for building custom forms. With this plugin, you can create custom web forms to capture leads, collect payments, and build a business online.
This plugin comes with built-in features like conditional logic, integration forms. Also, it saves data in the cache so that users can continue where they left off. With this plugin, you can easily add a conditional form or a long entry form to your website. Moreover, you don’t need to worry about data loss on the user’s end.
In addition, you can also limit the number of submissions from a single form. And, schedule your forms for the website.
Pricing:
Gravity form is available in the following purchase plans:
- Basic: $59 yearly for single-site access
- Pro: $159 yearly for3 site access
- Elite: $259 yearly for unlimited sites
C. How to Create a Donation Form in WordPress?
We’re now going to take you through the steps to create a donation form on your WordPress website.
Here, we are using the WPForms plugin to create the form because it allows creating a form more easily and quickly. So, all the beginners can easily follow the same steps we present here to have a nice-looking donation form.
Also, WPForms has both free and pro versions, you can choose any of them. Even the free version has a large number of form designing and configuring options.
Below, we’ll walk you through the steps of using and customizing the WPForms plugin. Following these steps, you can easily create a donation form on your WordPress website.
So, go through the steps listed below.
Step 1. Installing the WPForms Plugin.
Firstly, you need to log in to your WordPress website and go to your website’s dashboard. Then you’ll need to search and download the WPForm plugin. For more detail, you can also follow our step-by-step guide on how to install a WordPress plugin.
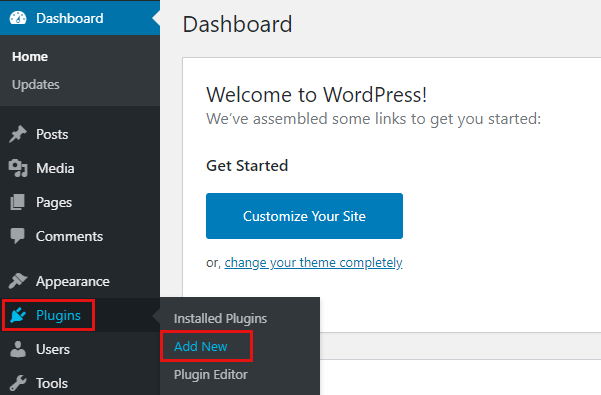
Now, to install the WPForms plugin, go to the Plugins menu and click on the Add New option.
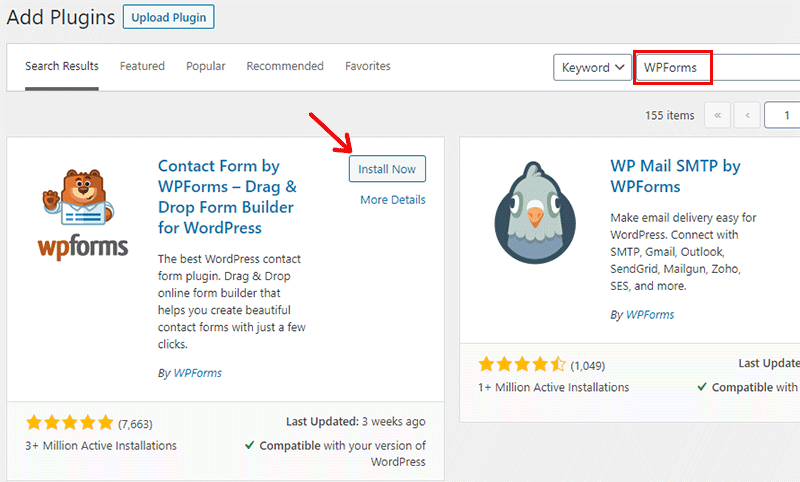
After this, search for the keyword WPForms on the top-right side of your dashboard. Then click on the Install Now button once you’ve found the plugin.
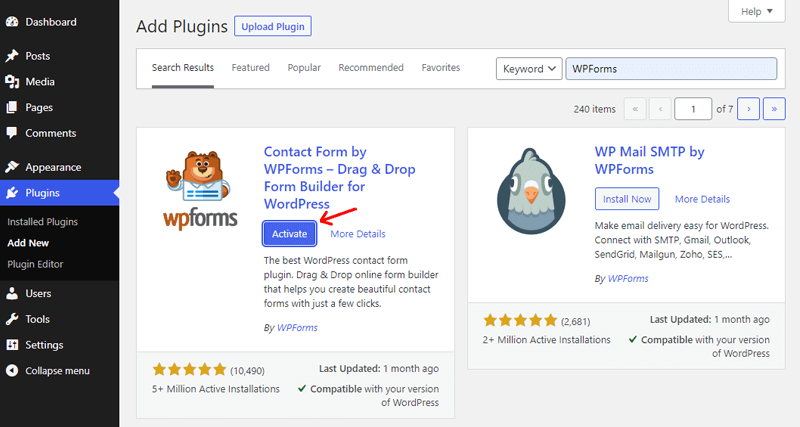
Once the plugin is installed, make sure you activate it. To do so, click on the Activate button.
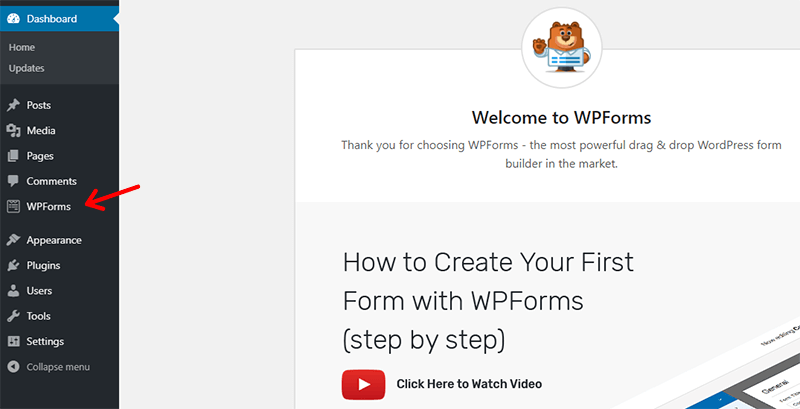
After activating the plugin, you’ll find a new menu item ‘WPForms’ added to your WordPress dashboard as a new menu item.
Step 2. Creating a Donation Form
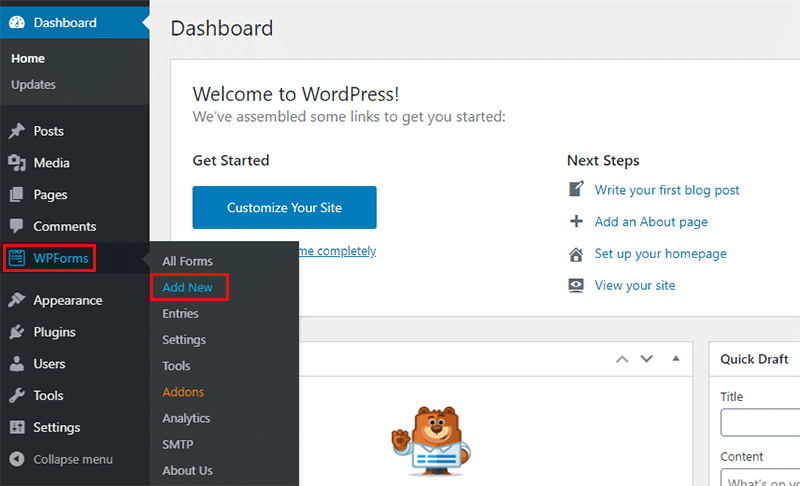
Now, you’re all set to create your donation form. Simply go to your WordPress dashboard and WPForms and click on the Add New button.
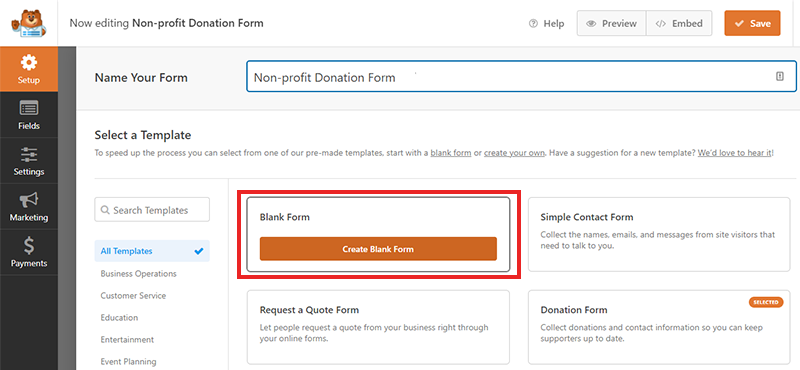
Here you’ll see the form set up page. You can simply begin by writing the name of the form at the top of the page.
With that, you’ll have 2 methods for creating a donation form. The first method is to start from scratch by using the blank template. And, the next one is to use the donation form template and start editing it.
Let’s take a deeper look at these methods.
Method 1: Create a Donation Form From Scratch
To begin from scratch, go to the ‘Blank Form’ area. Then click on the Create Blank Form button while hovering over it.
After this, you can start editing Blank Forms using the Add Fields menu. Also, you can check standard fields options in the Fields section.
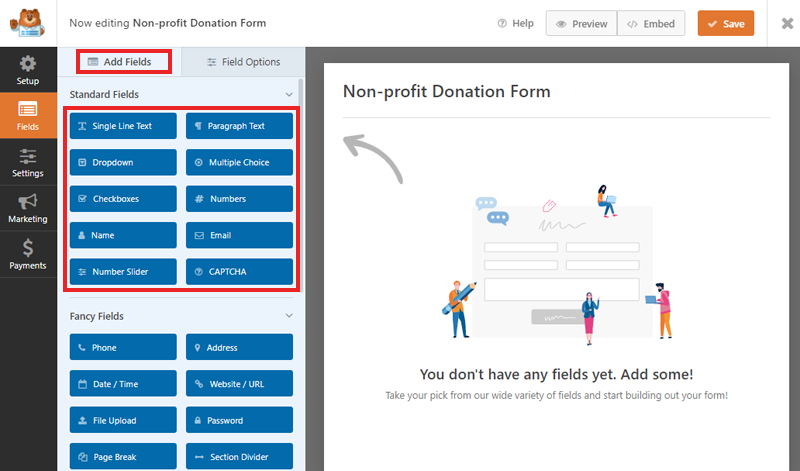
Simply drag and drop the required fields into your form after that. You have the freedom to input whatever field you like.
Also, you can customize the name content on your form. You can simply drag the name field in the donation form.
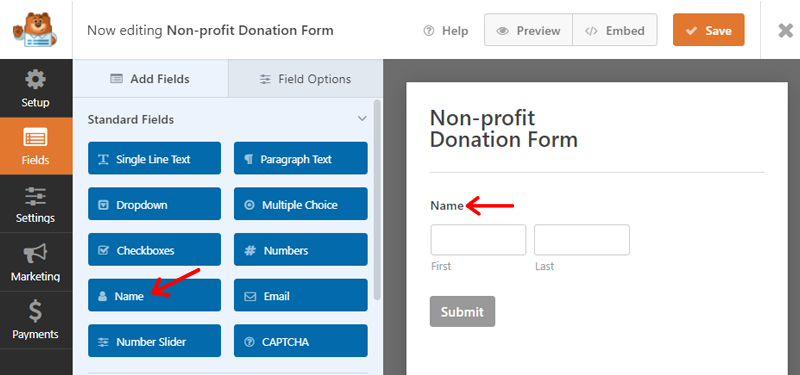
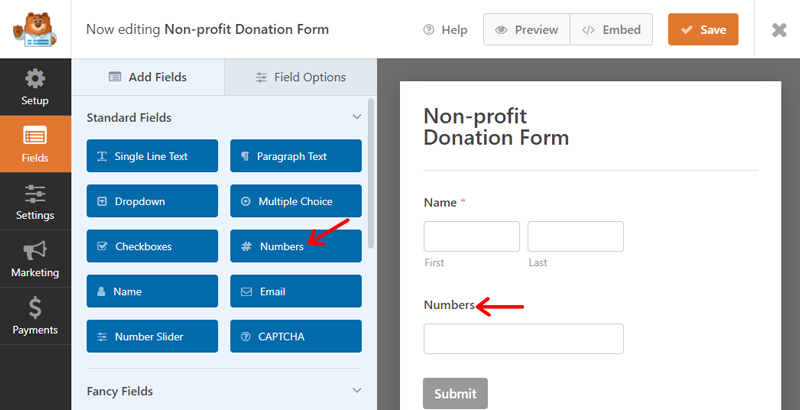
Similarly, you can easily move the Numbers field to create a Contact Number option.
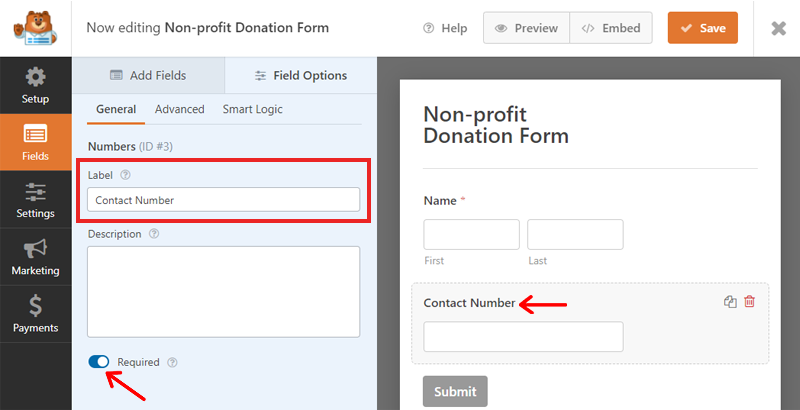
You can also edit the label by clicking the number field on the form and changing it to the Contact Number. Also, by clicking the required button, you can make it mandatory to fill it out.
Likewise, you can add an Email field to the donation form using the dragging method.
Same way, you can easily add and edit other fields on your donation forms like Donation Amount, CAPTCHA, and more. Just drag desired fields to your donation form on the right. Then you can edit by clicking on it.
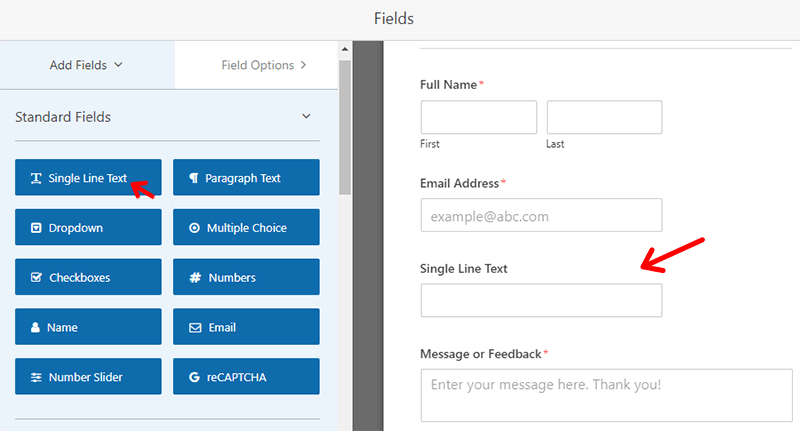
You can also move Single Line Text and change the label to the required contents.
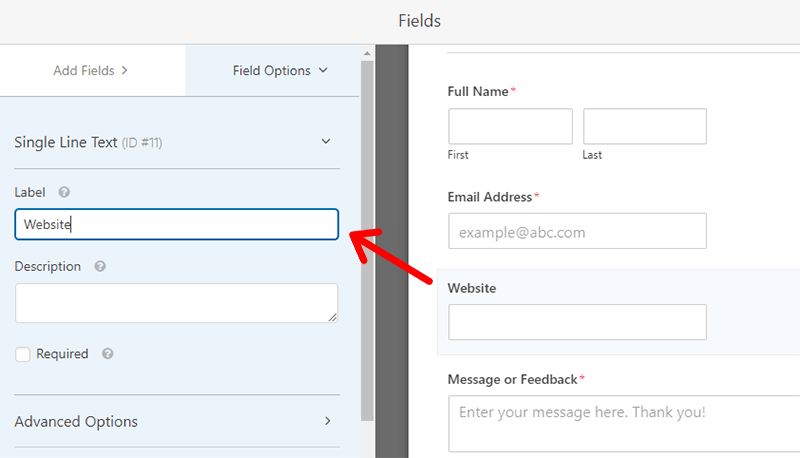
Here, for instance, we’ve edited it as a Website. You can add many of them as per the requirement of the form.
After editing, click on the Save button at the top right corner and you’re done.
However, if you want an easier method to create a donation form, you can use the donation form template of WPForms in its pro version.
Method 2: Create Donation From From Template
Once you upgrade to the pro version, you can easily use the donation form template.
To upgrade to the premium WPForms plugin, go to their official website. After that choose the best deals available and fill in the required information. Then, make the payment to receive a license key.
After that, add your license key to your WPForms settings.
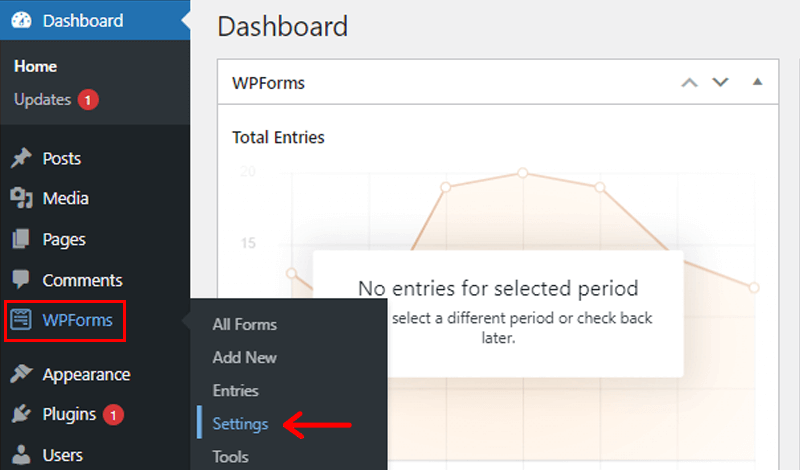
To do so, first, log in to your WordPress dashboard and navigate to WPForms and the Settings section.
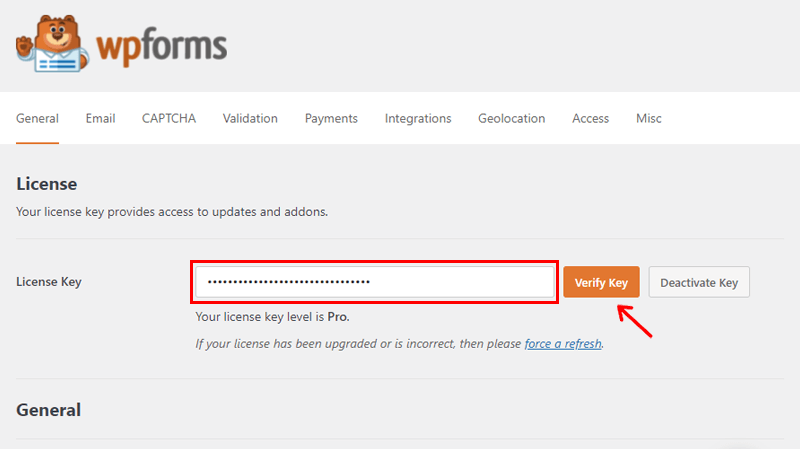
Then, you’ll come across a page where you’ll need to enter the License key. After entering the license key, click on the Verify Key button. Once it’s verified, click the Connect button, then follow up with installing the premium WPForms plugin.
After completing the installation process, you’ll need to deactivate the free WPForms Lite plugin. The best part is, you’ll not lose any data because the premium plugin will manage all forms and settings.
Just go to Plugins and then to Installed Plugins. After that, hover over WPForms Lite and click the Deactivate button.
Now you can easily import the pre-built Donation Form template.
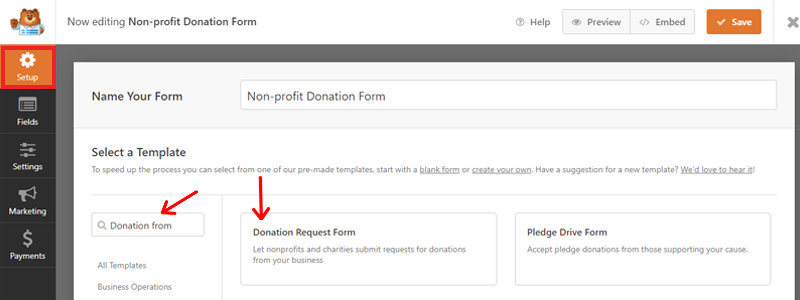
To import, go to the setup page and search the template “Donation Form” on the search box. Here, you’ll find the Donation Request Form template.
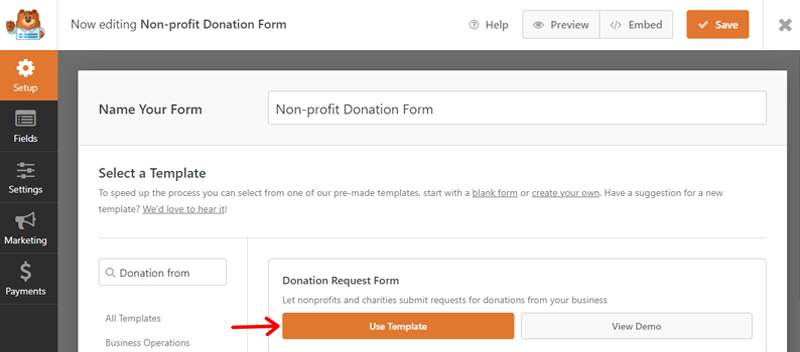
Then, click on the template, there you’ll have 2 options: “Use Template” and the “View Demo”. Just click on the Use Template option and there you’re with a pre-made donation form.
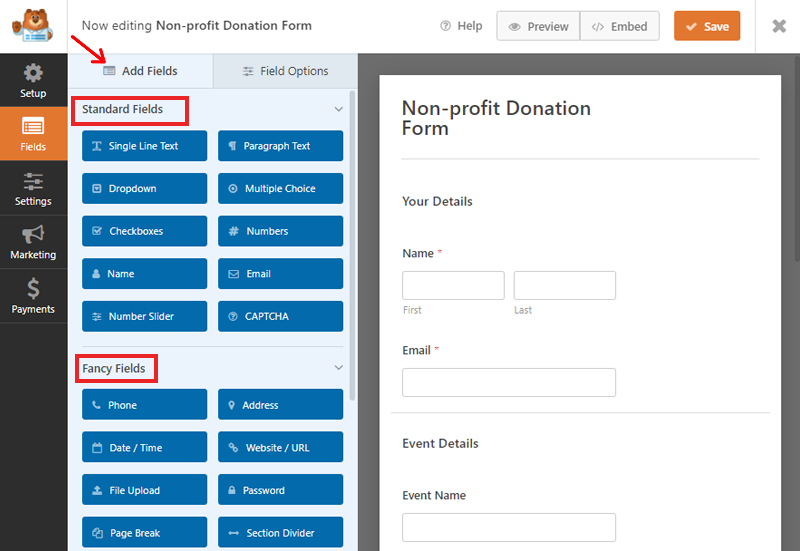
Now, you can add fields using the “Add fields” menu in the field section on the left side. There you’ll find Standard Fields and Fancy Fields. You can drag these fields into the template as required.
Also, you can easily change the field content of the form. Simply go to the “Field Options” menu on the right side of the field section. You’ll have 3 options here, General, Advanced, and Smart Logic.
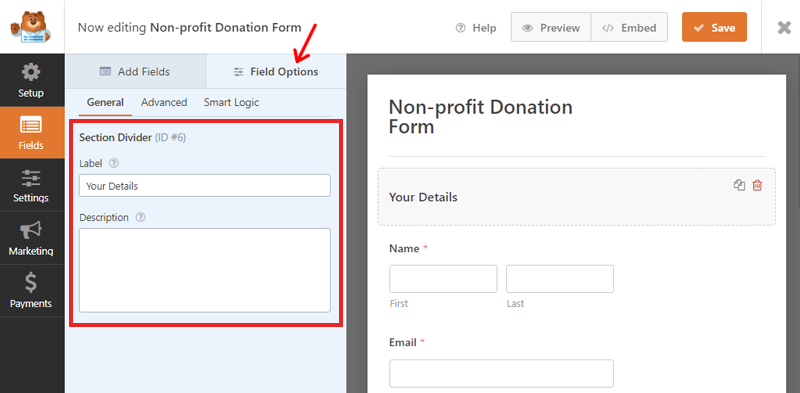
In this field, you can easily change the general things such as label, format, and description. Besides, you’ll also have the option to make other changes like making certain fields mandatory to fill, changing field size, and more.
Moreover, you can easily delete some of the content fields on the form. Simply click the field you feel unwanted, you’ll see the delete icon, click on the icon and OK option. And you’re done, the field is removed from your form.
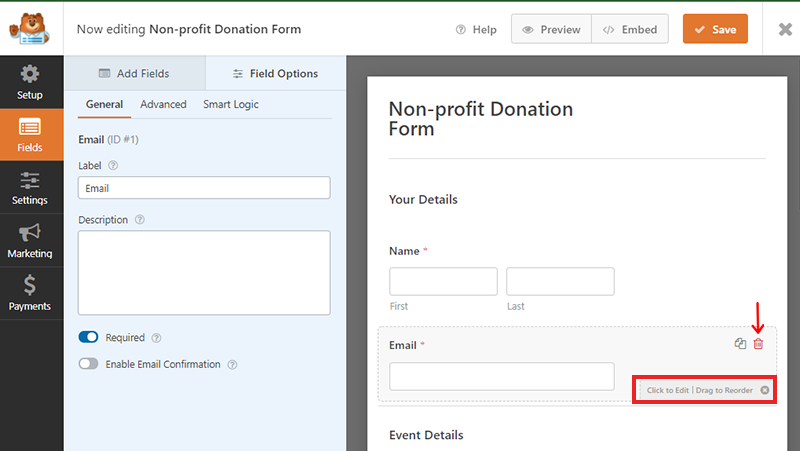
Likewise, if you want to reorder any of the fields, simply click on the field and you’ll see the “Drag to reorder” button. Use this button to rearrange the field on the form. All you need to do is drag and drop the field to your desired placement.
Once you’re done modifying your form, don’t forget to save it. Just click on the Save option at the top right corner.
Step 3. Set Up Payment Integration.
Now that you’ve created a donation form, the next is to set up a payment processor for donations. Here, we’ll use Paypal as a payment gateway, let’s check how to set up an integration with Paypal.
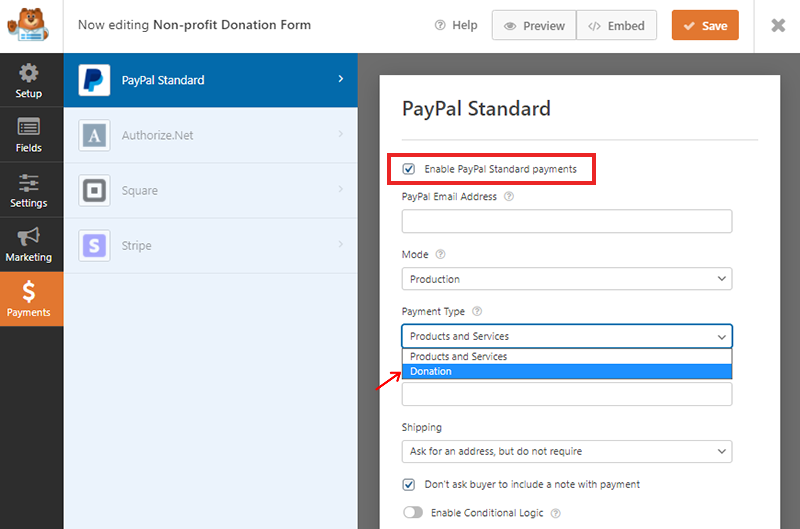
To add a payment method, click on the Payment tab on the bottom left, then choose Paypal Standard option.
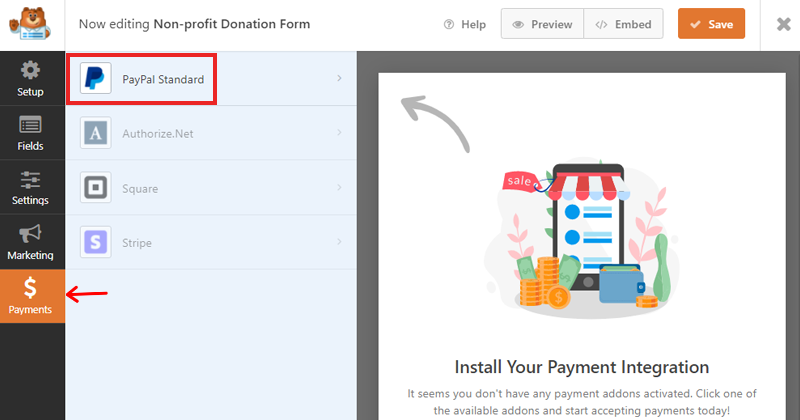
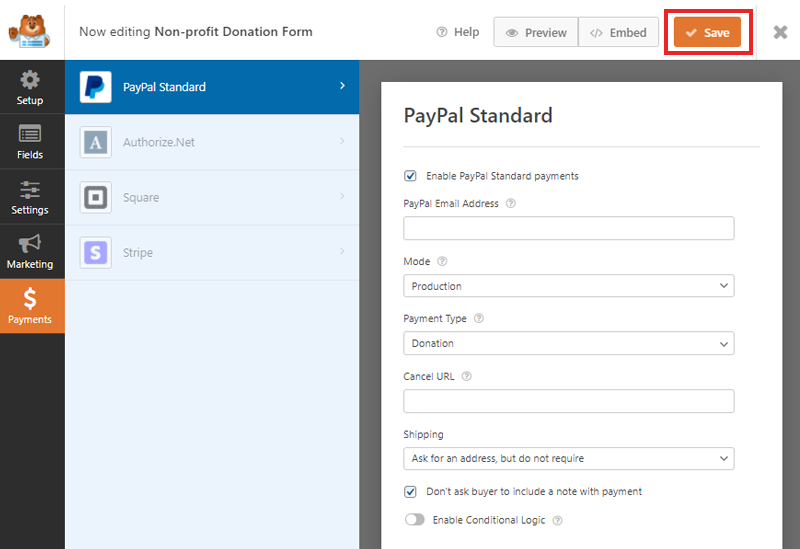
Now, on the right side, you can input your settings. To begin, select the box ‘Enable Paypal Standard Payment’ and enter your Paypal email address. Then, select the donation option in the Payment Type dropdown menu. You can also modify the shipping address option under the Shipping menu.
Finally, you are all set to use the donation form, be sure to click on the Save button on the top right corner.
Step 4. Adding the Form in Page.
Now that you’ve completed creating your donation form, you can add it to your website. So, let’s see how it’s done.
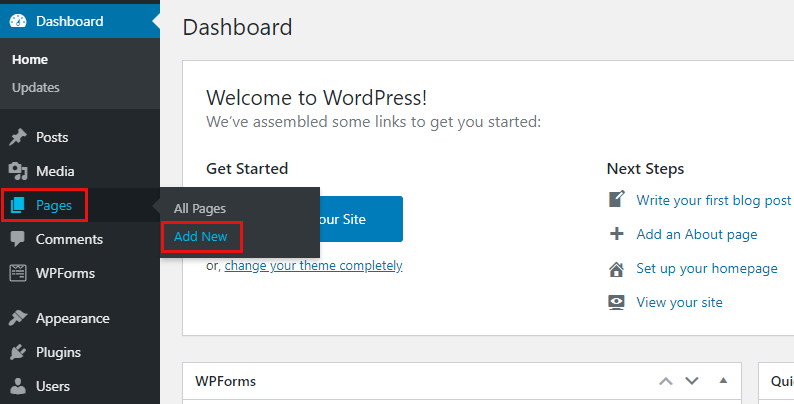
You can add a donation form on a new page or an existing page. If you want to add a new page, you’ll need to create a new page first. To do so, go to your WordPress Dashboard and then go to the Page option, and then click on Add New.
After this, you’ll see a block editor to create a page. Here, you can add a title like “Non-Profit”., you can also write a description about your page and more.
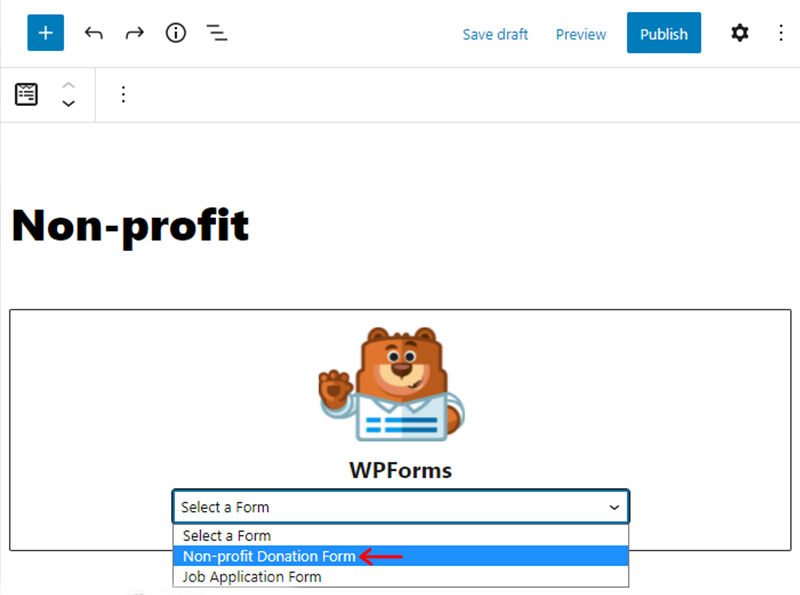
From here you can add the form, first add the WPForms block on the page. To do so, click on the block button (+) sign on the top left of the page or right corner of the page. Then search for WPForms.
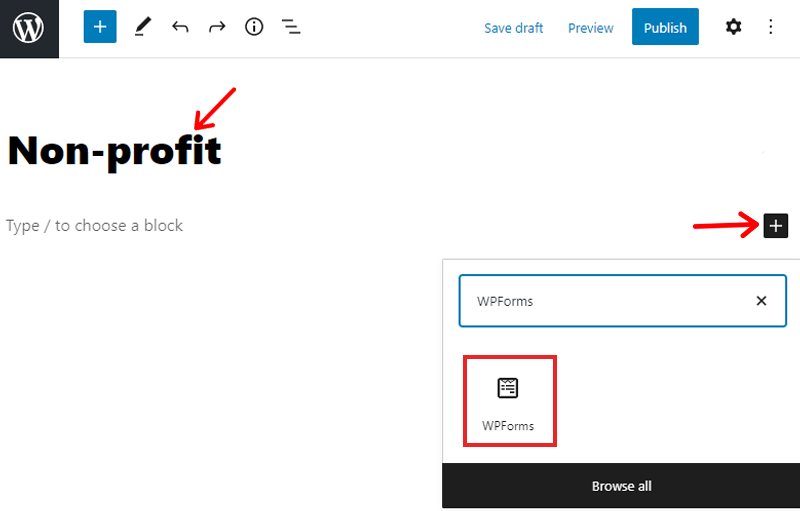
After that click on Select a Form, there you’ll get the list of forms you’ve created. Select the form from the dropdown menu of the WPForms block. Here, we’ll choose “Non-profit Donation Form”.
Now you can publish your post or page to see the donation form on a live site. Just click on the Publish button in the top right corner of your page.
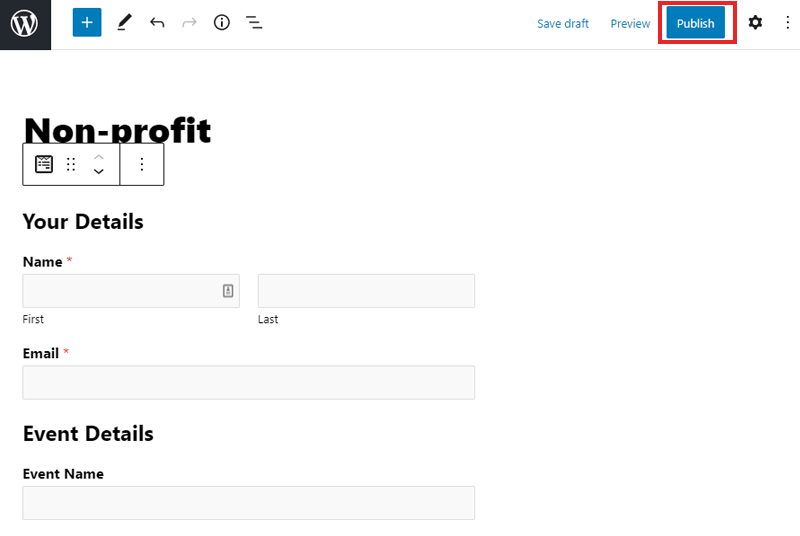
And there you’ve your website live, along with a donation form.
Conclusion
So, that’s it, we hope this article will help you learn how to add a donation form in WordPress. If you’ve not created a donation form yet, then you can try it along step by step.
Also, you can check our article on How to Create a Contact Form in WordPress (Step by Step Guide) and Best Form Builder Plugins.
If you have any queries, and suggestions regarding this article, then please feel free to comment below. We’ll get back to you as soon as possible.
Also, if you like this article, please share it with your friends and colleagues.
Also, you can follow us on Facebook and Twitter for more useful information.


