Are you wondering what WordPress Playground is and how to use it? If yes, then don’t go anywhere else.
WordPress Playground is a browser-based tool that lets you run a full WordPress website without installing anything. It’s popular among developers and site owners.
Why? Because this tool makes it quick and easy to test a plugin, experiment with themes, or learn the WordPress working mechanism. So what are you waiting for?
This article covers WordPress Playground, its major features, some limitations, and how to start using it with a few clicks.
Let’s jump right into it!
What is WordPress Playground? – An Overview
WordPress Playground is a free and temporary version of WordPress to run a full WordPress website directly in your web browser. It’s great for developers, site owners, learners, and anyone curious about WordPress.

Simply put, it lets you explore, test, and learn more about how the platform works in a safe, temporary space. There, you can add new pages, install plugins, try different themes, and explore WordPress features.
Moreover, you can build themes and a demo website or template. That too, without needing to install anything or set up a server. Just access it anytime and anywhere.
Keep in mind, the changes you make won’t be saved permanently. If you refresh the page, then everything resets. But you can download your setup and upload it again later to continue where you left off.
How Does WordPress Playground Work?
WordPress Playground uses intelligent technologies so your WordPress site will run right inside your browser. That’s why no server or setup is needed.
But how does it work? Here are the answers to your queries:
| Technology | Justification |
| WebAssembly (Wasm) | Lets your browser run PHP code to power WordPress. Now, WordPress can work on modern browsers, such as Chrome, Firefox, Safari, or Edge. |
| SQLite Database | MySQL requires a server. Keeping that in mind, WP Playground uses SQLite instead. It’s a lightweight browser-based database that uses a ‘wp-sqlite-db’ plugin. |
| Service Workers & Worker Threads | These tools handle background tasks in the browser. Moreover, this helps WordPress respond to user actions smoothly, just like a regular website. |
| Developer Tools Integration | Developers can connect it with tools like Node.js, Visual Studio Code, command-line apps, and even AI tools like OpenAI. |
| Used in wp-now Tool | It has a wp-now tool, which lets developers launch WordPress locally and test sites using Visual Studio Code. |
Now, let’s check out the features in-depth!
Features of WordPress Playground
To sum up, the WordPress playground contains different features for beginners, developers, and website owners. They are categorized under these sections:

1. Build
- Create your WordPress site in seconds. No need for installation or hosting.
- Database configuration isn’t required, as everything runs in the browser.
- Build a website from the browser of any device, even if you’re offline.
- Craft a block theme on your browser and save it to GitHub.
- Use or create blueprints to quickly run pre-configured sites with themes, plugins, and settings.
- Integration with developer tools, like Node.js, Visual Studio Code, and even OpenAI, for a smoother workflow.
2. Test
- Install and try plugins and any theme securely in this test environment.
- Quickly preview changes in the browser to review, debug, and assure quality.
- Test different versions of WordPress and PHP to check compatibility and the website features.
- Try templates, blocks, or product features before adding them to the live site.
- Upload and test your custom themes, plugins, or complete projects.
3. Launch
- Share your configured website with others through downloadable files.
- Build new sites from Blueprints and share them with a few clicks.
- Embed interactive demos on your site to showcase products or tutorials.
- Launch Playground on your browser, in Visual Studio Code, or with other command-line tools.
- Lets you keep a native app running WordPress in the App Store.
Limitations of WordPress Playground
Along with the above-mentioned beneficial features, WordPress Playground also has some cons. Here are some limitations that we analyzed:
- Still in Development: It’s an experimental project, so everything doesn’t work fine and requires improvement.
- No Access to Plugin and Theme Directories: You can’t install plugins or themes right on the WordPress directly as it works offline.
- Suitable for Temporary Changes: All the changes you’ve made on the site will be lost if you refresh the page. So, export your setup to save your work.
- iFrame Display Concerns: WordPress runs inside an iFrame, causing issues with links and pop-ups when using target= “_top” and JavaScript modals. Similarly, embedding your Playground in another site can lead to unexpected refreshes or parts not loading properly.
- Unsupported PHP Features: PHP features like pthreads, pcntl_ functions, and XDebug don’t work because they use PHP compiled to WebAssembly.
- Prone to Small Errors: Some plugins or features may not work accurately. Glitches and bugs can occur, so users can send improvement feedback.
Now, let’s move ahead to the most exciting part!
How to Use WordPress Playground?
Here, we’ll showcase the different steps in configuring, using, and managing your WordPress Playground. Go through them to understand the use cases of this incredible platform.
1. Configure Your WordPress Playground
First, open the WordPress Playground website on WordPress.org. There, click the ‘Explore Playground’ button.
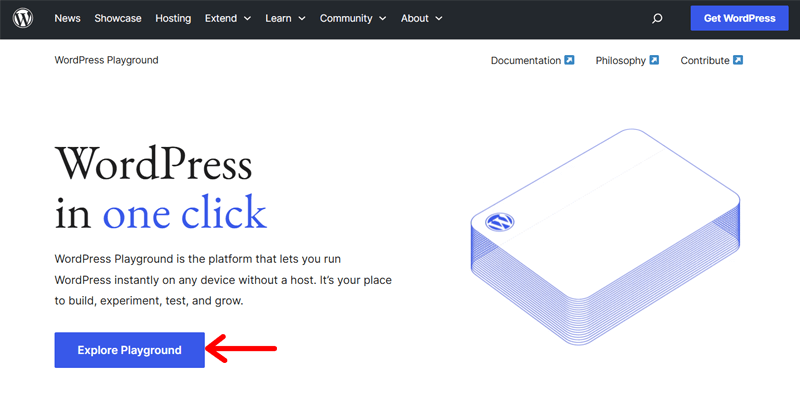
This redirects you to the tool’s user interface. Here, you must configure the settings first. For that, click the top-right settings icon, as shown in the image below. There, you’ll get the following options:
- Select the particular WordPress version for your Playground website.
- Pick the right PHP version on which you’ll be working.
- Choose a language for your overall admin dashboard and site content.
- Determine if you’ll be allowing network access.
- Enable it if you want to create a multisite network.
Once you’ve made your choices, click the ‘Apply Settings & Reset Playground’ button.

Suppose you want to use a pre-configured WordPress environment with some plugins and/or a theme already installed. Then, you can use a blueprint present in the gallery.
Just go to the four-dotted option on the left and open the ‘Blueprints Gallery’ menu. Next, preview the given configured blueprint and use it to move ahead.

Here, we’ll not be using it and going through the general process. So, let’s figure out the steps to install a theme and some plugins.
2. Install a WordPress Theme
To install a theme, let’s open the WordPress dashboard by hovering the website name and clicking ‘Dashboard.’

Notably, WordPress Playground works offline, so you won’t get to access the repositories on your dashboard. If you want, then enable ‘Network Access’ inside the Playground Settings. But it’s an experimental feature.
Hence, you must either download a theme from WordPress.org or use a query API. The same goes for plugins. Now, let’s get down to business!
i. Familiar Installation Process
Installing a WordPress theme in Playground is similar to installing it on a regular WordPress website. For example, let’s go to the WordPress.org theme repository and open the Kadence theme, followed by ‘Download.’

Moving forward, navigate to ‘Appearance > Themes’ and click ‘Add New Theme. ’

Next, press the ‘Upload Theme’ button and upload the downloaded theme file. Afterward, click ‘Install Now.’

Later, press ‘Activate.’

Here’s our complete guide on how to install a WordPress theme.
ii. Using Query API
To make things easy, WordPress Playground provides the query API technique for quick installation. It works by translating the configuration options, like query parameters, to the URL.
Hence, this API lets you pre-configure the test website with one click. Check how easy it is by following this pattern on the URL:
https://playground.wordpress.net/?configurationoptions=valueFor example, installing the Kadence theme requires the use of this URL:
https://playground.wordpress.net/?theme=kadence
Here, the configuration option is the theme, while Kadence is the value. Note that the value for the plugin or theme must be the exact name written in the WordPress.org directory URL.
3. Install WordPress Plugins
Following that, let’s explore the ways to install WordPress plugins. The criteria and restrictions for plugins are the same as those for themes. So, if you forget, then go through the guidelines again.
Now, let’s check out the process of installing the plugins on the usual upload steps and also using the query API. Here we go!
i. Familiar Installation Process
Installing a WordPress plugin in Playground is similar to installing it on a regular website. For instance, just go to the WordPress.org plugin repository and open the Kadence Blocks plugin, followed by ‘Download.’

Moving forward, navigate to ‘Plugins > Add New Plugins.’

Next, press the ‘Upload Plugin’ button and upload the downloaded plugin file. Afterward, click ‘Install Now.’

Later, press ‘Activate Plugin.’

If you want a detailed guide, then here’s it for WordPress plugin installation.
ii. Using Query API
As mentioned before, the query API technique also works for the plugin installation. So, if you missed reading about it, then go through them quickly.
Here’s how to use it. For example, installing the Kadence Blocks plugin requires the use of this URL:
https://playground.wordpress.net/?plugin=kadence-blocks
Here, the configuration option is plugin, while Kadence Blocks is the value. The value is the same name that this plugin uses on its URL in the WordPress.org repository.
4. Install a Theme and Plugin At Once with Query API
Best of all, you can combine several query parameters to install many plugins and a theme on the website together. This is the right way because using a query for just a plugin will remove the previous configuration for the theme.
So, all you must do is separate every parameter with the ‘&’ ampersand sign.
Let’s say you want to install the ‘Kadence Blocks’ and ‘Rank Math’ plugins along with the ‘Kadence’ theme. Then, the URL to enter should be:
https://playground.wordpress.net/?theme=kadence&plugin=kadence-blocks&plugin=seo-by-rank-math
Now, your test website will have these plugins and the theme instantly running. As simple as that, isn’t it?
5. Save the Instance in the Browser or Local Directory
Suppose you’ve built a landing page or a website in WordPress Playground. But you can refresh or close the tab to lose everything.
What you can do is save your instance. This can be in your browser or local directory. To do that on the browser, click the square icon on the top left corner.

i. On the Browser
On the ‘Temporary Playground’ tab, click the ‘Save’ button and pick the ‘Save in this browser’ option.

In a moment, WordPress will store this playground instance on your browser. Once it’s done, you can find a new section referred to as ‘Saved Playgrounds’ on the left. There, the name of your playground will automatically show up as it’s saved.
Guess what? You can still configure the PHP version and network access settings to further test your website. But other options won’t be accessible.
If you’ve made any changes, then press the ‘Save & Reload’ button to reopen the instance. Guess what? Your instance will not be saved even if you close the tab.

ii. On the Local Directory
In addition, WordPress Playground also offers a ‘Save in a local directory’ option. Just click the ‘Save’ button and then this option.
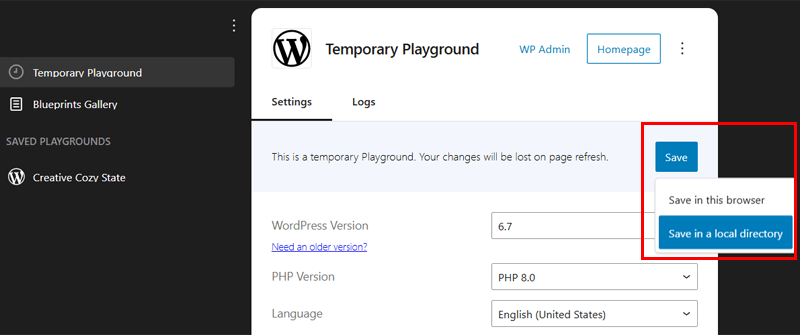
When doing that, WordPress downloads all the Playground files unzipped, similar to a normal WP installation. So, you’ll get folders like wp-content, wp-admin, etc.
Suppose you want to upload these files to a staging environment or even an empty website hosted on a server. Then, downloading the files to the local directory and uploading them to these locations is possible.
6. Download and Restore the WordPress Playground Site
Next up, we’ll discuss the process of downloading and restoring your Playground website. Other than saving the website on the browser or getting unzipped files in your local directory, there’s a process to download it more effectively.
If you download the WordPress Playground as a ZIP file, then it becomes a portable backup that you can store, share, and even restore. Yes, you read it right.
To begin with, click on the square icon on the top left like before. On the same ‘Temporary Playground’ tab, click the three-dot menu in the top right corner. Now, press the ‘Download as .zip’ option.

By doing that, your browser downloads the file to your system.
For example, you want to restore your downloaded Playground. To do that, click the three-dot menu right above ‘Temporary Playground.’ There, hit the ‘Import from .zip’ option.
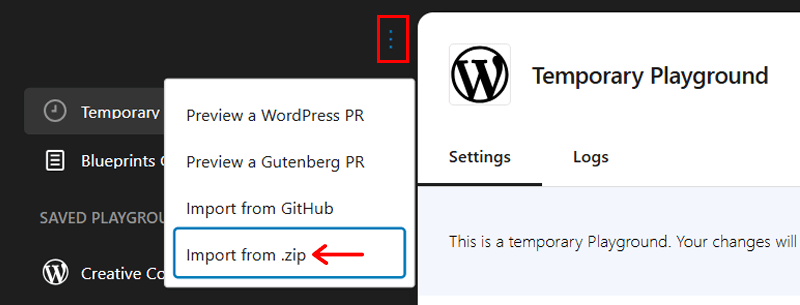
This opens a pop-up where you can choose the file to import into the website. Once done, press the ‘Import’ button.

When you’re importing a valid file, you’ll receive a success message, where you must click ‘OK.’ With an automatic refresh on the browser tab, your restored setup will show up on the Playground.
Good news! You can export the WordPress Playground’s ZIP file and use it on Studio by WordPress.com, too. It’s a local development tool by WordPress.com.
In fact, you can even import and export your website files from and to GitHub.
7. Embed WordPress Playground to Your Site
Another great capability of WordPress Playground is that you can embed it in your page or post on a hosted website. Didn’t get it? We’ll explain it further.
Suppose you’re writing a WordPress tutorial. Then, you may likely add screenshots from the WordPress dashboard to guide readers through the instructions.
However, the screenshots don’t comprehensively elaborate the required actions. Do they? In that case, this feature comes in handy.
Just embed this test website on your post or page so that users can understand the guidelines interactively. In fact, readers can follow the instructions using the embedded Playground instance.
But how to do it? Open the Gutenberg block editor for a page or post. Now, press the ‘+’ button to search and add the ‘Custom HTML’ block.

There, copy the code given below and paste it inside the HTML block.
<iframe src=“https://playground.wordpress.net/”></iframe>Furthermore, it’s even possible to include some query parameters in this URL. This will add a certain theme or functionality to the site that’s essential for the instructions.
Next, you can click the ‘Save’ or ‘Publish’ button to make the changes live.

However, your theme may not completely support and display the embedded Playground on the website accurately. For example, the alignment may not be right with other blocks, or the elements may be displayed smaller for interaction.
In such cases, using the following code comes to the rescue.
<div class="iframe-container"><iframe src="https://playground.wordpress.net/" style="width: 100%; height: 500px"></iframe></div>Simply put, the iFrame tag is wrapped around the div tags. This ensures the Playground is embedded with padding and margin of the container. Plus, the style attribute sets the width to 100% of its container for a responsive nature.
This solves the issues and makes the WordPress Playground display correctly.
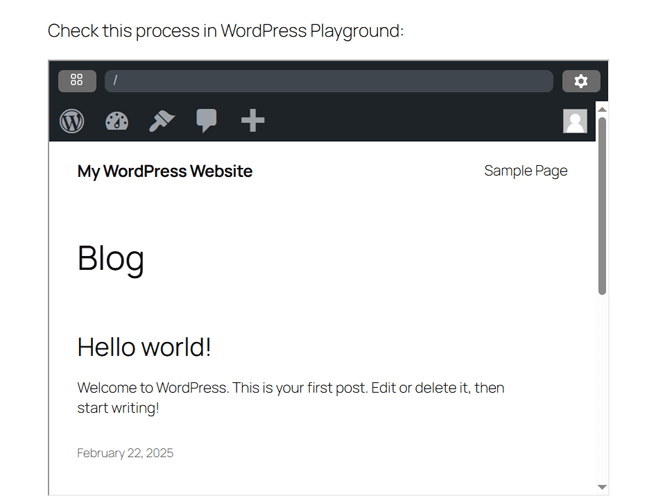
Comparison Table of WP Playground with its Alternatives
WordPress Playground isn’t the only tool of its kind. It has some good alternatives that you can also use whenever needed.
Here, we’ll compare WordPress Playground with its top alternatives, which are:
| Feature | WordPress Playground | InstaWP | TasteWP | Local by Flywheel |
| Setup Easiness | Instant access on your browser. | Instant setup without delays. | Quick instance creation within a few clicks. | Download and installation are necessary even though the setup is quick. |
| UI | Basic yet functional. | User-friendly. | Basic but intuitive. | Modern and intuitive. |
| Environment | Browser-based and temporary. | Complete site management. | Temporary instances. | Complete local development environment. |
| Integration with Plugins and Themes | Requires manual uploads for installation. | Direct integration. | Pre-installed via links. | Complete support. |
| Usage | Ideal for educational and testing purposes. | Ideal for complex projects. | Perfect for quick demos and tests. | Best-suited for complete local development. |
| Testing Tools | Basic. | Advanced. | Basic. | Advanced. |
| Multi-site Support | Limited support. | Supported. | Supported. | Complete support. |
Find the best WordPress local development environment platforms here!
Frequently Asked Questions (FAQs)
Check out some FAQs to clear out all your confusion and misunderstandings:
1. Is WordPress Playground free and suitable for beginners?
2. Can I upload a WordPress Playground site to my hosting account?
3. How do I report an error in WordPress Playground?
4. Can I import/export the WordPress Playground to GitHub?
5. Can I use custom themes and plugins in WordPress Playground?
Find the complete guide on creating a WordPress website here.
Conclusion
That wraps up our guide on WordPress Playground. Thanks for reading!
In conclusion, WordPress Playground is a simple yet powerful tool that lets you explore and test WordPress directly in your browser.
Overall, it’s fast, free, and an easy-to-use handy tool for building and experimenting anytime, anywhere. Haven’t you tried it yet? What are you waiting for?
If you come across any confusion, then point them to the comment section.
In addition, check out our other articles on what website staging is and how to update WordPress to the latest version.

