Are you planning to backup WordPress to Google Drive? Is it bothering you how to back up your WordPress site to Google Drive? If so then, you’ve come to the right place.
We all know that it’s quite important to keep an updated backup of your website. You never know when your site will be hit hard by any disaster. At that time having that backup can make the difference in getting your site back to running as usual.
Having said that, although you can store your backups on your server, it’s not quite recommended. Because you never know when your server will crash or get hacked. That’s why it’s always better if you look for a remote storage location to store your backups.
In that case, Google Drive is one of the best options when it comes to remote locations to store your backups. Besides, with Google Drive, you can make and store backups easily, and for free.
Therefore, in this article, we’ll show you the step-by-step process for WordPress backup to Google Drive. Now, without any delay, let’s begin!
IN THIS GUIDE
hide
What is a WordPress Backup?
A WordPress backup is the process of making a copy of your website in case the originals are lost or damaged. It’ll include all the files and other data regarding your website.
Moreover, it’s a duplicate of your website so you can restore it if something happens to the original files on the server.

Within your WordPress backup, you can include all your pages, posts, comments, and more. Even more, it can have everything stored from your database, as well as the plugins, themes, and uploads.
Therefore, you should always keep a backup for the website. Especially if you own a WooCommerce store that contains a large amount of data in a central database.
If you don’t want any misfortune with your database, then you must regularly keep a backup of your website. So that, you can restore your data and everything to get your site back online right away.
Why Do You Need to Backup Your WordPress Site?
We all have done quite a hard work on our website so that it can rank better in search engines. Not just that, we always want our content to in some way or another influence our visitors and audiences.
Having worked so hard for years, it gets flooded in front of our sight in a couple of seconds. We’re pretty sure that this is something that nobody wants to see. It’s HEARTBREAKING and SAD!
And today, our website has become quite vulnerable to everything from server crashes to security flaws. When such things happen we tend to lose our dear time, money, and reputation.

In some cases, we’d ultimately have to lose our site almost always. Hence, if you don’t want such a worse scenario, then it’s always best to keep a backup of your website.
Doing so, it’ll also help you protect your website data in case of any suspicious cyber attack.
All you need to do is create your own manual backup or enable automatic backup using the backup plugin. As UpdraftPlus and BlogVault plugins make it easier to keep your website backup infinitely quicker, simpler, and safer.
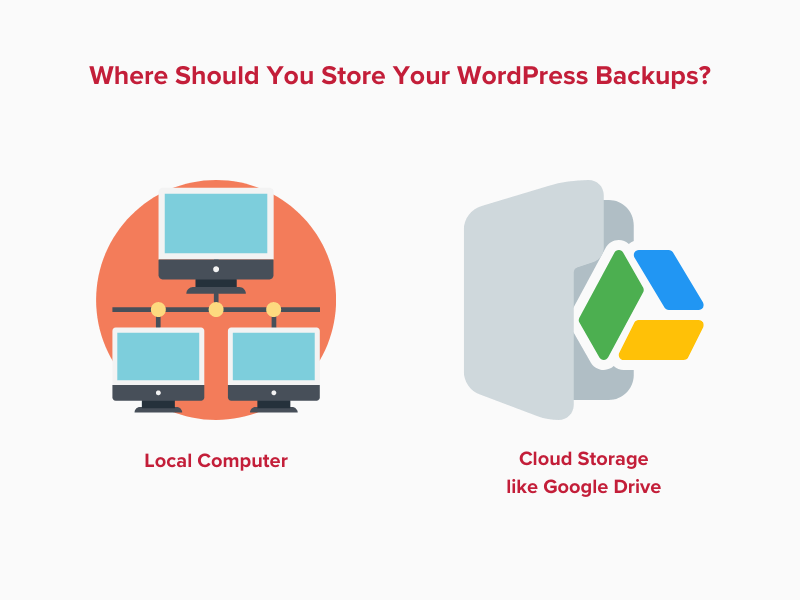
Where Should You Store Your WordPress Backups?
Now that we know why it is so important to keep a backup of our site. It’s time to know exactly where we should store the backups of our sites.
To be honest, there isn’t any hard and fast rule on where one should store their backups at. However, it should always be somewhere it’s safe and can be easily accessed by authorized users.
Likewise, when it comes to plugins, many plugins have listed different storage options to choose from – local computer to the cloud. Now it’s all upon you where you want to store your backup.
However, in our recommendation, it would be better if you’d back up every option that is available to you.
Among all, the most viable option would be to go with the remote backup option. Such as Dropbox, Google Drive, or Amazon S3. The reason behind it is that cloud servers are much more reliable and safe than your local computer.
Although backing up your computer can be one good option, totally relying on it would be a challenge on its own. Nobody knows when your computer will malfunction or break down in two pieces (accidentally). At this time, it can lead to a total wipeout of your entire backup.
At the same time, the main reason behind backing up your site is to avoid hardware failure. And your best bet is nothing like remote storage options of your files in as many places as possible.
9 Best WordPress Backup Plugins
As we all know, selecting the best backup plugin to use for your WordPress site can be a little overwhelming. Therefore, we’ve listed our few picks for the one that fits your needs.
Here’s a quick list for you –
1. UpdraftPlus
UpdraftPlus is the most popular scheduled backup plugin that simplifies backup and restoration processes. It allows you to back up your files and database in the cloud and restore them with a single click.
Similarly, you can back up into the cloud directly to Dropbox, Google Drive, Amazon S3, and email. In fact, it comes with 1GB of free storage with the option of purchasing more as and when required.
Key Features:
- It’ll automatically back up when plugins or dashboard themes update and before WordPress core updates run.
- It supports both manual and automated (scheduled) backups – every 4, 8, and 12 hours; daily, weekly, fortnightly, or monthly options.
- You can encrypt your database backups for more advanced security.
- It displays the status of backups in progress in the WordPress admin panel, along with any errors or warnings.
- Your databases can be decrypted within the WordPress control panel via drag-and-drop.
Pricing:
UpdraftPlus is a freemium WordPress plugin having both free and paid versions. The free plugin can be downloaded from the WordPress.org plugin repository. Or you can also install the plugin from your WordPress dashboard.
If you want advanced features, then go with a premium plan. The price options are –
- Personal – $70/year for upto 2 sites.
- Business – $95/year for upto 10 sites.
- Agency – $145/year for upto 35 sites.
- Enterprise – $195/year for unlimited sites.
- Gold – $399/year for unlimited sites.
With all these premium plans, you’ll get all UpdraftPlus add-ons, free updates, support, and storage.
2. Everest Backup
If you want a popular WordPress backup plugin, then here’s Everest Backup. Undoubtedly, it’ll take care of your website’s backups, restoration, migration, and cloning.
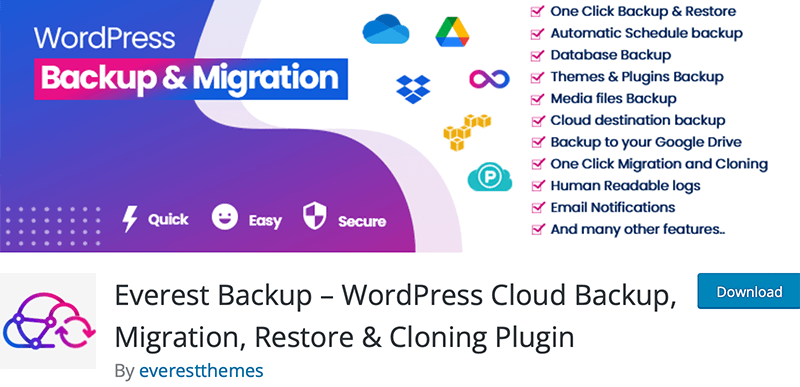
Indeed, it offers both manual and automatic backup options. For automatic backups, all you need to do is choose a date and time. Or else you can manually generate a backup at any time with a simple click.
Key Features:
- Offers Google Drive and other cloud services to securely store backups.
- It notifies its users whenever a backup process is completed or if it requires any attention.
- Provides humanly readable logs that allow you to get the information happening on your backup files without any technical assistance.
- Auto trigger backup – Automatically run a backup before any WordPress Core updates, Plugins updates, or theme updates.
- Also, allows you to add an individual site as a subsite of a multisite and you can backup and restore the entire WordPress multisite.
Pricing:
There are both free and premium pricing plans in Everest Backup. The free plugin is present in the WordPress.org plugin directory and its official website.
Similarly, you can purchase a premium plan from its site among the following options:
- Personal – Starts at $39/year, 2 websites license, advanced reporting, update yearly, and more.
- Business – Starts at $79/year, 21 websites license, improved notification system, Personal Plan features, etc.
- Agency – Starts at $129/year, 99 websites license, improved notification system, auto backup on WooCommerce, Business Plan features, etc.
3. Jetpack VaultPress Backup
Jetpack VaultPress Backup is a popular WordPress backup plugin launched by the team of Automattic. It provides cloud-based backups and one-click restores without installing the full Jetpack plugin.
Additionally, you can back up all files including WordPress database backups, theme file backups, and plugin backups. Indeed, it lets you back up all WooCommerce customer and order data.
Key Features:
- Allows you to create and store redundant copies of backup files on multiple servers.
- Works perfectly with your WooCommerce store to keep your order and customer data safe.
- You can restore your site to any past state while keeping all orders and products current.
- Allows full, incremental, and differential backups in real-time.
- Also, you can have off-site/cloud backups so there’s no load on your server.
Pricing:
Jetpack VaultPress Backup is a free-to-use WordPress backup plugin. You can download the free plugin directly from the WordPress.org plugin directory. But you must have a paid Jetpack subscription.
However, it comes with a paid version too that will cost you $4.95 for the first month. After that, you’ll have to pay $9.95 per month on your yearly bill.
4. BlogVault
Another WordPress backup plugin that provides the fastest website backup and restores is BlogVault. It makes WordPress database and files backup much safer and simpler than creating a backup manually.
Besides, it includes an advanced monitoring system that constantly monitors your sites, so you can act quickly if something goes wrong. Indeed, you can create staging sites with the click of a button and make changes in a safe environment.
Key Features:
- Helps you store encrypted copies of the entire backups across multiple data centers.
- Comes with the most reliable and easiest-to-use migration service to migrate an entire website in minutes.
- Provides automatic malware scans, one-click malware removal, and a real-time firewall for complete security of your website.
- Additionally, it includes real-time backups for WooCommerce sites without slowing down your website.
- Allows backup, restore, and migrate multisite installs of any type, just as easily as a regular site.
Pricing:
BlogVault is another freemium plugin. You can download the free plugin from the WordPress.org plugin directory.
If the free features aren’t enough for your site, then purchase one of its premium plans. In this case, you’ll get 3 purchase plans to choose from –
- Personal – $49.5/yr for 1 site and $145.9/yr for 5 sites. Includes daily automatic backups, 30 days of backups, 1 day of validity of staging, etc.
- Business – $149.5/yr for 1 site and $449.5/yr for 5 sites. Includes 2 daily automatic backups, 90 days of backups, and the Personal plan features.
- WooCommerce – $249.5/yr for 1 site and $749.5/yr for 5 sites. Includes 365 days of backups, 6 monts of validity of staging, priority support, etc.
5. BackWPup
BackWPup is one of the best backup WordPress plugins with a backup function. You can save your complete website and push it to an external backup service, like Dropbox or Google Drive.
Some of the notable features include database backups, creating a backup in multiple file formats, backups by email, etc. Also, it seamlessly supports WordPress multisite.
Key Features:
- Allows you to import the backup zip file from your storage location to your site.
- Offers schedule automatic backups so that you don’t have to remember to back up every time.
- Indeed, it helps you restore your backups with a few clicks from your WordPress backend.
- You can save the backup on your local computer or send it to your email.
Pricing:
There are both free and premium pricing plans in BackWPup. The free plugin is present in the WordPress.org plugin directory.
Similarly, you can purchase a premium plan from its site among the following options:
- Starter – $49, 2 WordPress installation, premium support, data encryption, etc.
- Advanced – $99, 5 WordPress installations, and Starter plan features.
- Pro – $199, 20 WordPress installations, and Advanced plan features.
6. Duplicator
Duplicator is an all-in-one WordPress plugin that lets you easily migrate and back up your WordPress site. It gives users the ability to migrate, copy, move, or clone a site from one location to another.
You can move, migrate or clone a WordPress site between domains or hosts with zero downtime. Indeed, it supports WordPress.com, WPEngine, GoDaddy Managed, Liquid Web Managed, and more!
Key Features:
- Allows you to manually back up a WordPress site or parts of a site.
- You can duplicate a live site to a staging area or vice versa.
- It lets you transfer a WordPress site from one host to another.
- Provides a special 2-step streamlined installer mode for mega-fast installs.
- Also, provides protection against bad updates by letting you quickly roll back your system to a known, good state.
Pricing:
Duplicator is also a freemium plugin. The free plugin is downloadable from the WordPress.org plugin directory.
If you want the premium version, then get one of the following plans available:
- Basic – 69.30/year, up to 2 sites, unlimited backups and migrations, and more.
- Plus – $99.50/year, up to 5 sites, hourly scheduling, installer branding, and more.
- Pro – $199.50/year, up to 20 sites, multisite support, server-to-server import, regenerate SALTS, and more.
- Elite – $299.50, up to 100 sites, secure file encryption, migrate Duplicator settings, and more.
7. WPvivid
If you want an all-rounder WordPress backup and migration plugin, then get WPvivid. It provides robust and stable backup and migration solutions, designed for freelancers, agencies, and site owners.
Moreover, it lets you easily create a backup of your WordPress site. Indeed, it lets you choose to back up the entire site, all files, or the database only. Also, you can clone and migrate your WordPress site to a new domain with a single click.
Key Features:
- Allows you to migrate a site to a subdirectory, from a.com to b.com, from a.com to a.com/directory, and more.
- Lets you set the backups to run every 12 hours, daily, weekly, and monthly, and choose backup items and destination.
- It supports the leading cloud storage providers – Dropbox, Google Drive, Amazon S3, Microsoft OneDrive, etc.
- Besides, it can scan your WP media library to find unused images, then you can choose to clean specific or all unused images.
- Also, you can set up one or multiple email addresses to receive a backup report.
Pricing:
As a freemium WordPress plugin, WPvivid comes in both free and premium plans. The free plan is present to download in the WordPress plugin repository.
If the free features aren’t enough, then go with one of its premium price options. They are –
- Blogger – $49/year and $99 for a lifetime; 2 domains, unlimited image optimization, and 3 days domain change.
- Freelancer – $69/year and $139 for a lifetime; 10 domains, unlimited image optimization, and unlimited domain change.
- Small Business – $99/year and $199 for a lifetime; 50 domains, unlimited image optimization, and unlimited domain change.
- Ultimate – $149/year and $299 for a lifetime; unlimited domains, unlimited image optimization, and unlimited domain change.
8. JetBackup
JetBackup is a complete WordPress backup and migration plugin. It lets you easily backup, restore, and migrate your WordPress website. Moreover, it can be your files, database, or both.
In addition, there’s no limit on the number of backups and restores you perform. In fact, you can easily download your backup files for migration, upload your backup files to restore, and even cancel the backup process whenever you want.
Key Features
- You can manage your backups, including their deletion and checking the backup or restore logs.
- Lets you pick the folders for the backup process.
- Check the live progress of the current backup and restore procedure.
- Schedule your backups by configuring the frequency and time for the backup automation.
- It supports FTP/SFTP, Dropbox, Google Drive, Amazon S3, etc.
- Its premium plans let you receive notifications after the process completion.
Pricing
JetBackup is a freemium WordPress backup plugin. You can use the free plugin right on your website after installing it on your dashboard.
Moreover, it has three variations of plans based on payment, number of sites, and multisite purpose. Each of these has a 10-day free trial. The paid plans based on payment duration for each server are:
- Monthly: $8.95 per month, unlimited accounts, advanced restore options, and more.
- Annually: $89.95 per year, and all the Monthly plan features.
9. WP Time Capsule
WP Time Capsule is another useful WordPress plugin that uses cloud apps’ native file versioning system to find and back up altered files and databases. In addition, enabling the automated backup option can back up your site after every update.
Moreover, you can back up your website in real time. Wondering how? It lets you revert your website to how it was just an hour ago. Moreover, you can alter the backup interval to every 6 hours, 12 hours, or daily.
Key Features
- Backs up and restores those files and databases with recent changes and not the entire site.
- You can store your backups in your cloud storage platforms, like Google Drive, Dropbox, Wasabi, or Amazon S3.
- Offers a calendar view option to restore content from a specific date.
- Create a staging website with a click to test any change you are planning to make on your site.
- It does not zip your files but directly drops them into your cloud account.
Pricing
WP Time Capsule is a freemium plugin. It’s available for free on the WordPress.org plugin directory.
The following are the premium pricing schemes for advanced backup capabilities:
- Business: $49/year, $149 for a one-time payment, 2 websites, 30-day restore window, etc.
- Freelancer: $99/year, $299 for a one-time payment, 10 websites, 120-day restore window, and the Business plan features.
- Agency: $199/year, $699 for a one-time payment, unlimited websites, 365-day restore window, and the Freelancer plan features.
Check out all the top WordPress backup plugins on our complete list here!
How to Backup WordPress to Google Drive? (Using UpdraftPlus)
Now that we’ve just looked into some of the best WordPress plugins available in the market. Let’s look at how we can back up our site using one of these plugins.
For this tutorial, we’re going to use the UpdraftPlus plugin to see how we can store our WordPress to Google Drive. This plugin is one of the most popular ones with over 3 million active installations. In fact, it’s simple to install and easy to use.
Before that, let’s look at how we can install and activate this plugin on our WordPress site. For that let’s install the free version of the UpdraftPlus plugin from the plugin directory of our WordPress dashboard.
i. How to Install and Activate the UpdraftPlus WordPress Plugin?
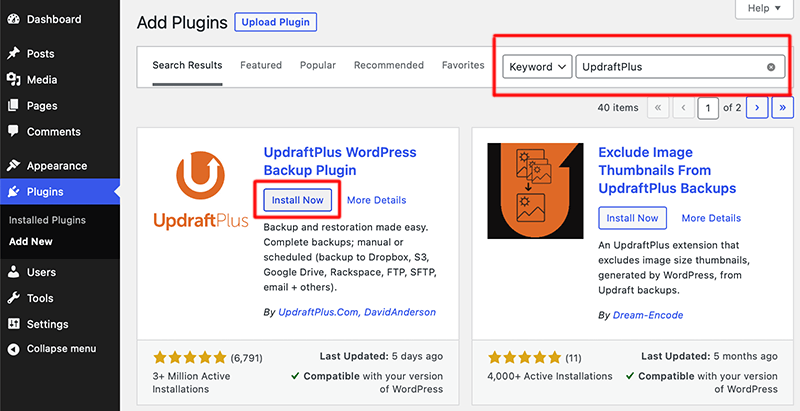
Firstly, login into your WordPress dashboard and navigate to Plugins > Add New Plugin option.
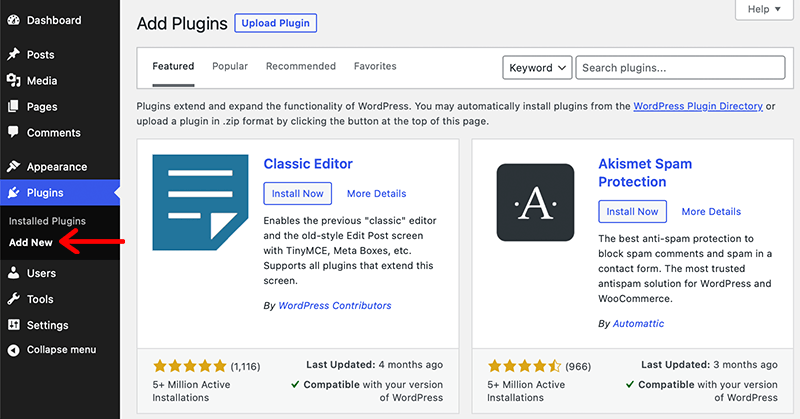
After that, to the almost top right corner of the search bar, type in the “UpdraftPlus”. This will display all the possible plugins that you’re looking for.
Among them, select the plugin with the name “UpdraftPlus WordPress Backup Plugin”. Now click on the Install Now button followed by the Active button.
In this way, you can quickly and easily install and activate the UpdraftPlus plugin on your WordPress dashboard. However, this is how you install the free version of this plugin.
If you want more advanced backup features, then make sure that you purchase its premium plan and install it on your dashboard. To know more, on how to install the WordPress plugin correctly, click here.
Moving ahead into our article let’s look at how we can actually back up your WordPress site into Google Drive.
ii. Connect Your UpdraftPlus to Google Drive
For that, head over to the Settings > UpdraftPlus Backups options from your WordPress dashboard. This will take you to the official setting page for this plugin. Following that, click on the Settings tab.
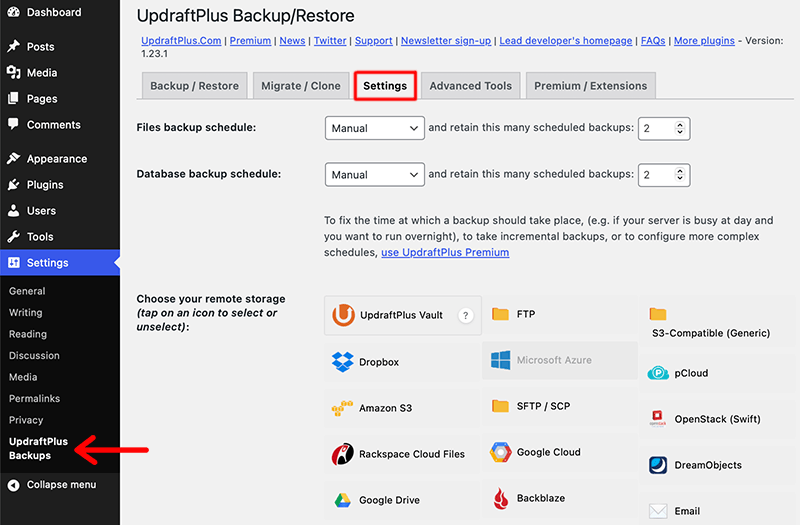
As we’ve already mentioned earlier, UpdraftPlus allows you to save your backups to different online storage services. Such as Dropbox, Google Drive, Amazon S3, FTP, and many others.
With that, under the “Choose your remote storage” section, you’ll find a list of different online storage options to choose from. For now, you’ll go ahead and click on the ‘Google Drive’ option.
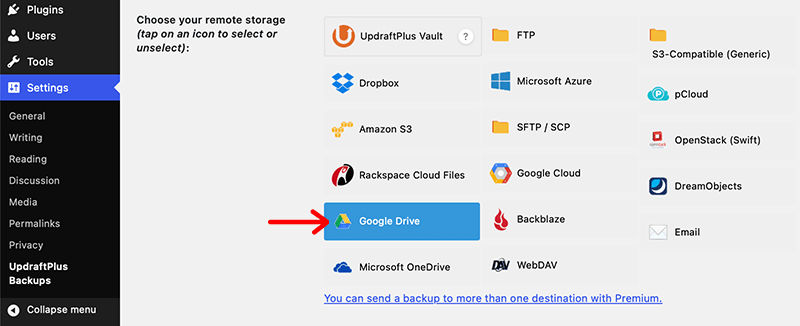
As soon as you select Google Drive as your storage location, it’ll list out a set of setup options just below that section. At the very first, it’ll ask you to sign in to your Google Account where you want to store your backup.
To get started, you need to click on the ‘Sign in with Google’ button.
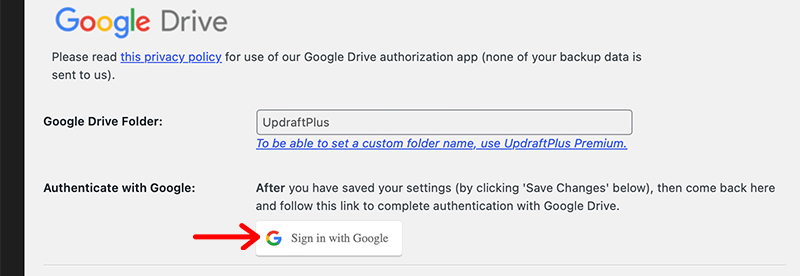
Following that, you’ll have to follow a bunch of instructions to give UpdraftPlus access to your Google account. Once you’ve done that, you’ve successfully connected your UpdraftPlus to Google Drive.
iii. How to Create an Automatic WordPress Backup Schedule
Once you’ve selected where you would like to store your backups, it’s now time to actually look at how we can create an automatic backup schedule.
For that, head over to Settings > UpdraftPlus Backups, and under the Settings tab, you’ll find the option to schedule automatic backups. Also, you’ll see that UpdraftPlus has divided WordPress backups into two parts – files and database.
This means that UpdraftPlus will allow you to save both files and databases separately. In both scenarios, you’ll have to choose how frequently UpdraftPlus should back up your site and how many different backups should be kept.
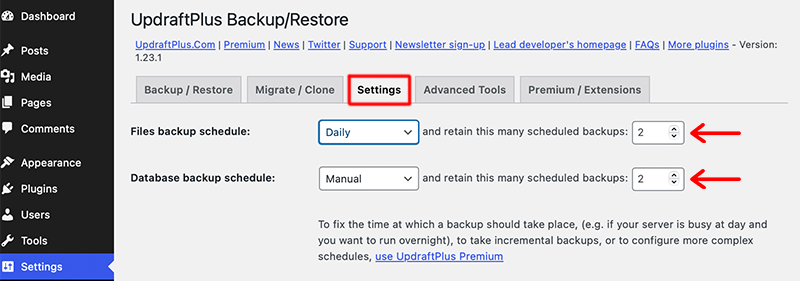
Under how frequently UpdraftPlus should back up your site, you can choose from once every month to once every 2 hours. Meanwhile, you can enter any number of times you’d want UpdraftPlus to keep the backup.
Lastly, if you don’t know then as a file backup it’ll store all your site’s code files, plugin and theme files, and images. Whereas all of its posts and pages, comments, links, and website settings are stored under the database. Therefore, it’s important to create backups of your database regularly too.
iv. How to Choose What is in UpdraftPlus Backups on Google Drive
Did you know that UpdraftPlus allowed you to choose what to be included in your backup? By default, UpdraftPlus would include all your WordPress plugins, themes, and uploads in your Google Drive backups.
However, you can decide on your own what you want to keep as your backup for later use. Although, we do recommend you all must keep all the backups of your WordPress site.
Under the Settings tab, if you scroll down a bit, you’ll come across the section called “Include in files backup”. In this section, you’ll find the list of checkboxes that are selected by default – Plugins, Themes, and Uploads.
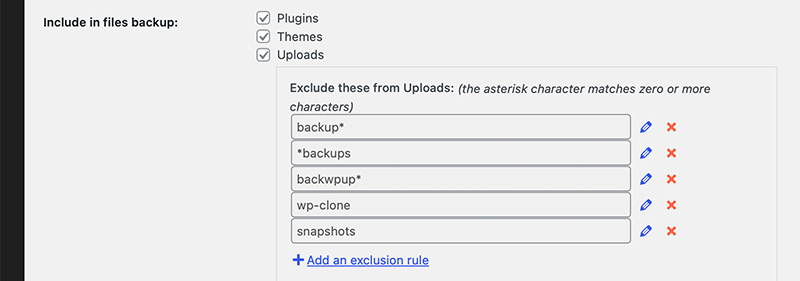
In case you don’t want to include anyone of those in your backup, simply uncheck the box next to that setting. Ultimately, it also helps you to reduce the size of your backups and takes less space on your Google Drive.
Meanwhile, if you keep the Uploads box checked, then it’ll allow you to create some rules. In this, you can choose the kind of uploads that UpdraftPlus would exclude from its backups.
Similarly, you can create more rules about the kind of content that it’ll exclude. For that, simply click on the ‘Add an exclusion rule’ link.
Once everything is OK, make sure to click on the Save Change button to implement your changes.
v. How to Backup Your WordPress Site to Google Drive Manually
Far we just looked at how we can schedule our backup and it’ll automatically save our files in Google Drive. Although, automatic backups are great and save you time from constantly remembering when to create a backup of your site.
Having said that, you’ll still want to create a manual backup. It’s always great to create a manual backup before updating your WordPress version. In fact, you should also create a manual backup after publishing tons of content.
In order to create a backup of your site manually on Google Drive, go to Settings > UpdraftPlus Backups. After that, click on the Backup/Restore tab.
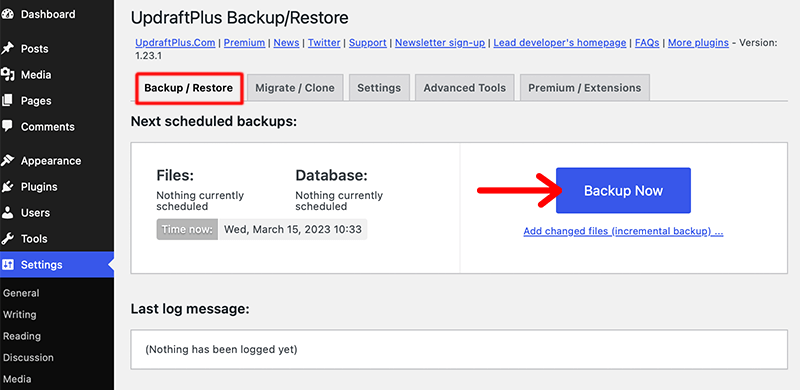
Now to create a manual backup, simply click on the Backup Now button. After that, it’ll pop up some basic settings that you can use to configure the manual Google Drive backup.
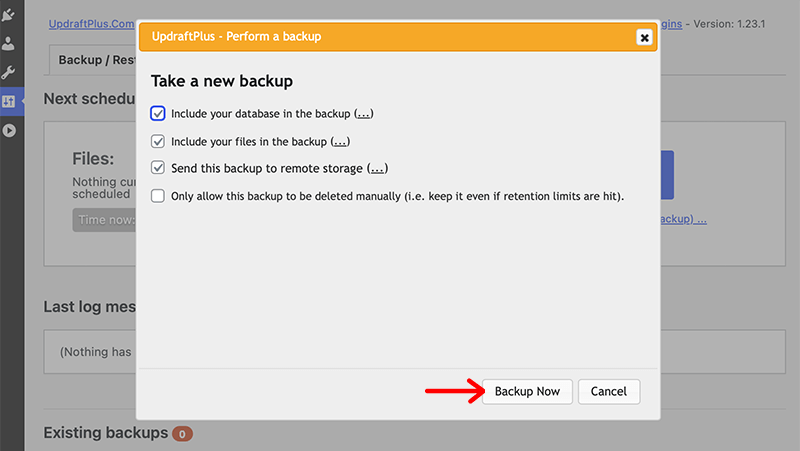
As default, it’ll keep the backup of all your files and the WordPress database in Google Drive. As earlier, we’ve already shown how to select the remote storage location. So, it’ll use the same remote storage location that you use for automated backup i.e. Google Drive.
Once all the settings are done, you’re ready to click on the Backup Now button. In this way, you’ll be able to easily back up your WordPress site to Google Drive manually.
How to Restore Your WordPress from Google Drive? (Using UpdraftPlus)
We hope that you found it quite easy to create a backup in Google Drive using UpdraftPlus. However, alongside backing up your site, you should also know how to restore them from Google Drive with ease.
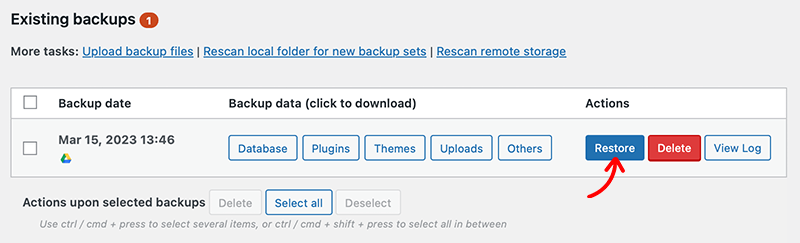
For that, you’ll have to navigate to Settings > UpdraftPlus Backups page. After that, scroll down the page until you reach the Existing Backups section.
Under that section, you’ll find the list of existing backups that you’ve stored in your remote storage location. All you need to do is find the backup you want to restore and press the blue Restore button.
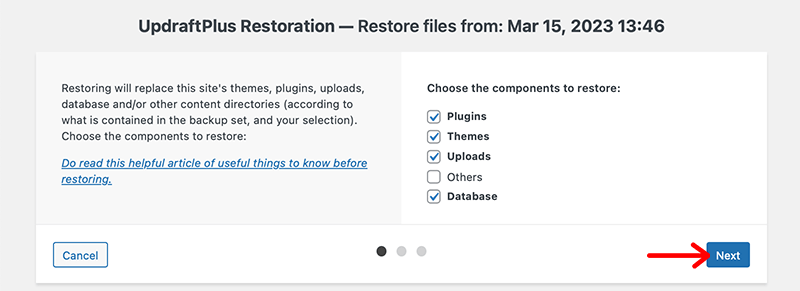
Following that, it’ll redirect to the page where it’ll ask you to choose the components that you want to restore. After clicking all the required boxes of components, go ahead and click on the Next button.
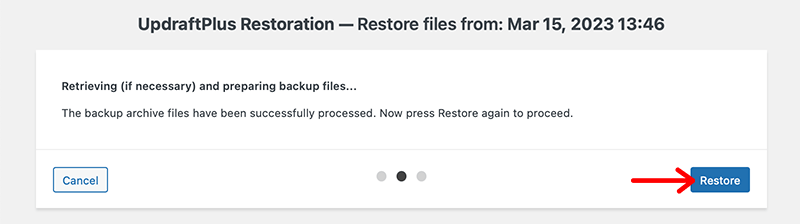
With that, UpdraftPlus will make all the files ready for restoration from your Google Drive. It might take a while depending on the number of plugins, themes, and other files present on your site.
Once all the backup archive files have been successfully ready for restoration, you just need to click the Restore button. Hence, UpdraftPlus will begin restoring your backup from Google Drive.
Once the restoration is finished, you’ll get a ‘Restore Successful’ message at the end of an Activity log. With that, you can click the Return to UpdraftPlus configuration button to return to your main WordPress dashboard.
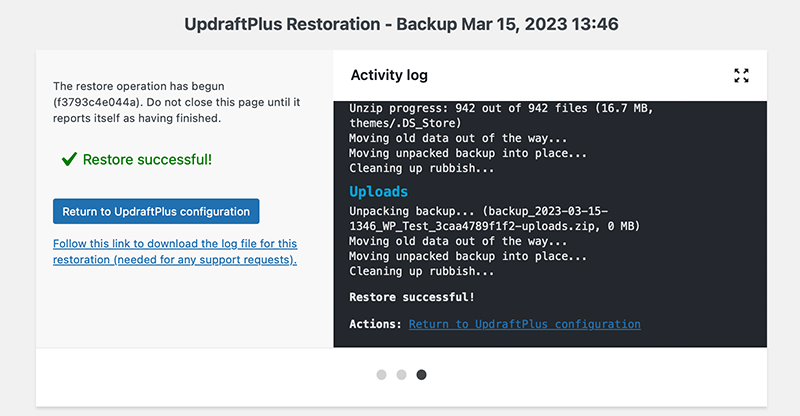
That’s it! This is how you successfully restore your WordPress site from Google Drive.
How to Backup WordPress to Google Drive? (Using Everest Backup)
Moving forward, here’s a quick guide to back up WordPress to Google Drive using another plugin, i.e. Everest Backup. Despite being a simple plugin, it’s one of the easiest ways to solve your concerns.
The following steps let you install, configure, and use this plugin for taking backups. Let’s start!
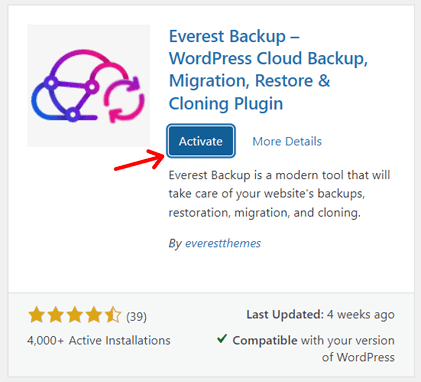
i. Install and Activate Everest Backup
First, log into your WordPress dashboard and navigate to ‘Plugins > Add New Plugin‘. There, search for the plugin ‘Everest Backup‘. Once you find it, click on its ‘Install Now’ button.

Following that, press the ‘Activate‘ button.
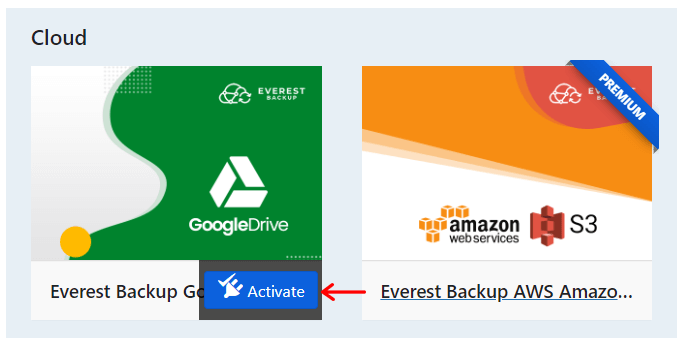
ii. Install and Activate Google Drive Addon
By default, you can back up your website on your local computer. If you want to do this on a cloud storage, for example, Google Drive, then you must use the respective add-on.
Therefore, you must first install and activate the Google Drive Addon by Everest Backup. For that, go to the newly added menu ‘Everest Backup > Addons‘. There, find the ‘Cloud‘ section and hover over to the ‘Everest Backup Google Drive’ option. Next, press ‘Install & Activate‘.

Right after that, click the ‘Activate‘ button. This makes this add-on active on your website.
iii. Login with Google Drive
Next, you’ve to link your Google Drive account to the Everest Backup plugin. Only after that, you can store your website’s back up there. So, go to the ‘Everest Backup > Settings’ menu.
Then, open the ‘Cloud’ option. There, you’ll see the ‘Login With Google’ option where you must link your Google account.
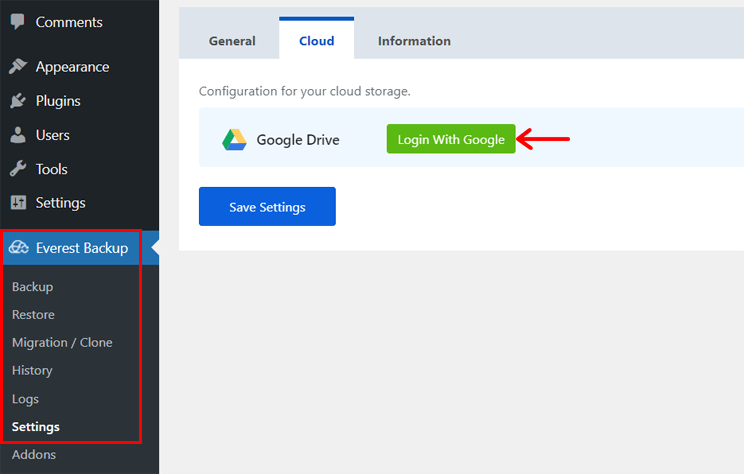
Once you do that, you can adjust the transfer rate and hit ‘Save Settings‘.
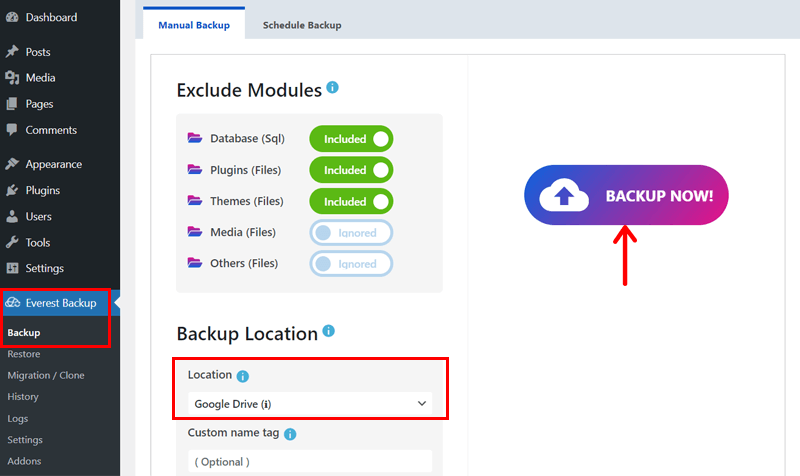
iv. Create a Manual Backup to Google Drive
Now, navigate to ‘Everest Backup > Backup‘. The first method is ‘Manual Backup’. To use this, exclude the modules you don’t want on your backup.
Scroll down and choose the ‘Backup Location’ as ‘Google Drive’. Then, hit ‘Backup Now‘.
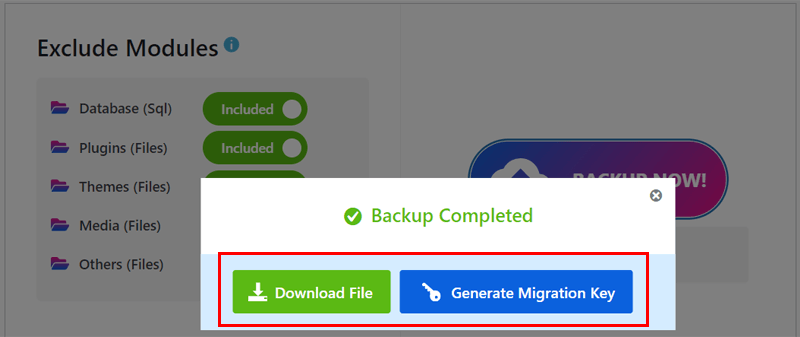
After the backup is completed, a popup appears with two options. Choose ‘Download File’ to download the backup files to your local computer. Otherwise, click ‘Generate Migrate Key’ to migrate the files to another location by copy-pasting the key on your chosen location.
v. Schedule an Automated Backup to Google Drive
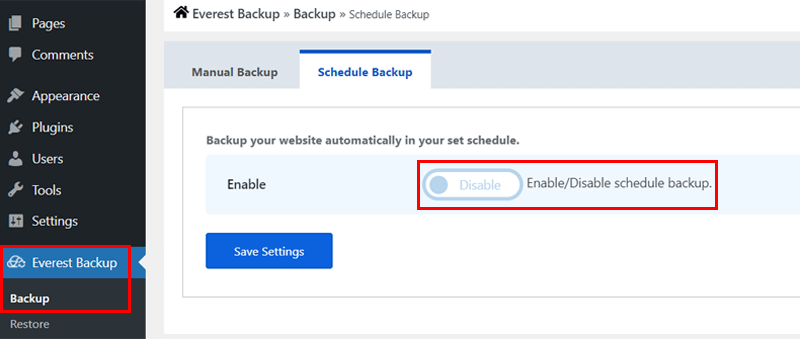
If you want to schedule automated backups, then you must configure the plugin accordingly. Navigate to ‘Everest Backup > Backup‘ and open ‘Schedule Backup‘. There, enable the schedule backups option.
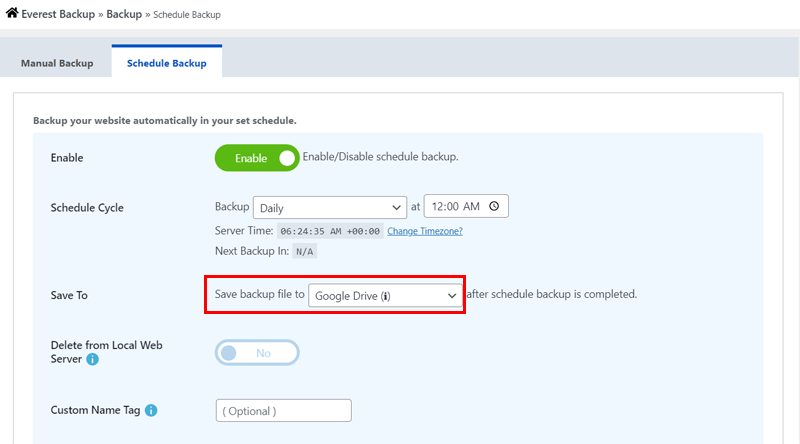
This loads the configuration settings for the scheduling. There, you can perform these actions:
- Choose the ‘Schedule Cycle‘ as daily, weekly, or monthly. Also, pick the exact time, timezone, etc.
- Select the backup location as ‘Google Drive‘.
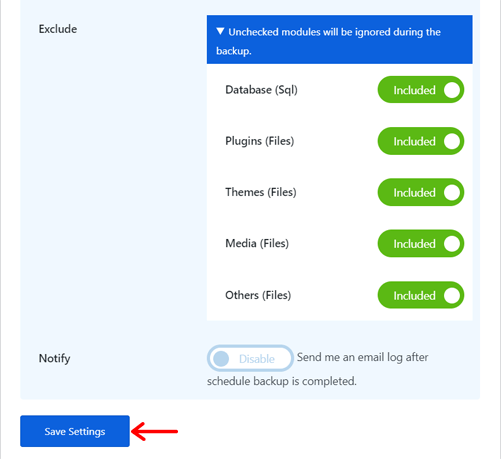
- Pick the modules to exclude from the backup.
- Get notified by the email log once the scheduled backup is completed.
After these options are used, press ‘Save Settings‘.
In this way, you can easily ‘backup your WordPress website’ in Google Drive.
How to Restore Your WordPress from Google Drive? (Using Everest Backup)
You may need to restore your backup due to security issues or any other unwanted changes on your website. Hence, you must know the process to restore your backups to recover your website.
With Everest Backup, doing this is easy. Go through these steps briefly:
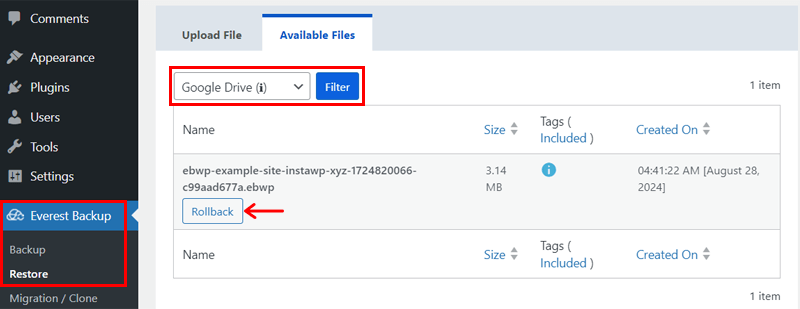
First, navigate to ‘Everest Backup > Restore‘. There, you’ll find two options. They are to upload the backup file and use the available files. This guide lets you store your backups in Google Drive, you must go with the second option.
So, open ‘Available Files‘ and choose ‘Google Drive‘. Now, hover over to the backup you want to restore. Then, click the ‘Rollback‘ button.
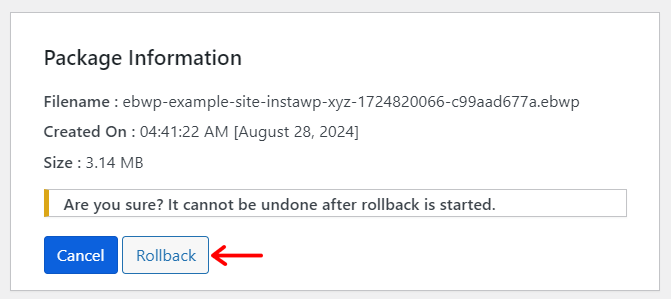
Again, you’ll be questioned about the rollback confirmation. So, hit ‘Rollback‘ again.
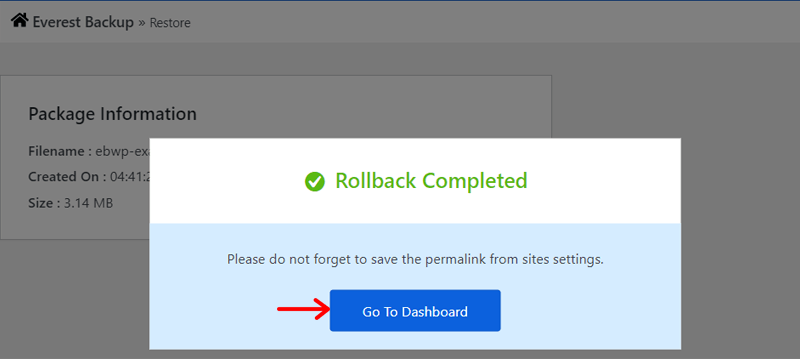
After the restoration, you’ll see the ‘Rollback Completed‘ popup box. With that, the WordPress site will be rolled back to the previous state. Now, move back to your dashboard with the ‘Go to Dashboard’ option.
FAQs on WordPress Backup
1. What are some of the best WordPress backup plugins?
You can find both free and premium WordPress backup plugins in the market. Among them, some of the popular ones are UpdraftPlus, Duplicator, Everest Backup, BlogVault, WPvivid, and more.
2. Where can you store your WordPress backups?
For your ease, you can store your WordPress backup on your local computer. However, the best location to store your backups would be in cloud storage. Such as DropBox, Google Drive, Microsoft Azure, Amazon S3, OneDrive, and more.
3. Why should I back up my WordPress site to Google Drive?
Backing up your WordPress site to Google Drive ensures your data is safely stored in the cloud, protected from server failures, and easily accessible from anywhere. Moreover, it’s the simplest platform available for all Google users.
4. Do I need technical skills to set up these backups?
No, most backup plugins are user-friendly and designed for non-technical users. Hence, this makes it easy to set up backups with just a few clicks.
5. Can I restore my site from these backups easily?
Yes, these plugins typically offer simple restoration options. So, you can restore your site from Google Drive backups with minimal effort.
Conclusion
That’s the end of our easy beginner’s guide on how to keep WordPress backup to Google Drive. We hope that it’ll help you create a backup and restore your Google Drive.
With this, you can pat yourself on your back for successfully backing up a WordPress site after following the above steps.
If you have any further queries on how to back up WordPress sites to Google Drive, then please leave a comment below. We’ll try to get back to you as soon as possible.
Further, we want you to check our articles that may be helpful. For instance, explore our comprehensive guides on what is SSD storage in web hosting and how long it costs to hire a WordPress developer.
Lastly, don’t forget to follow us on Facebook and Twitter (X) for more updates. And, if you like this article, then please take a second to share this guide on your social media accounts and spread the message!
YOU MIGHT ALSO LIKE...
We've picked you some best articles that you might be looking for. Check them now!


