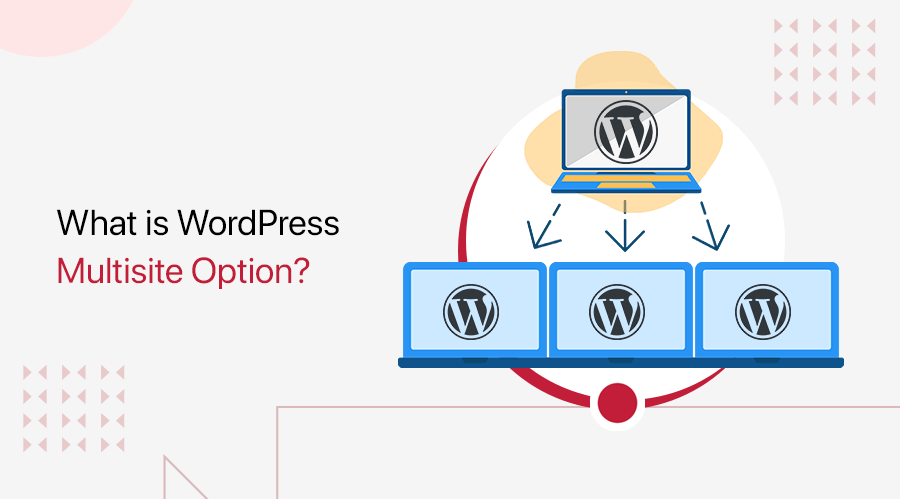
Did you know that you can create and manage multiple WordPress sites simultaneously? Yes, it’s possible with WordPress Multisite.
WordPress multisite lets you create a network on your WordPress installation. It means you can then run as many sites as you want in that network. This feature is mostly used by schools and businesses who want to run separate sites under one dashboard.
We’ve prepared this article to help you understand what WordPress multisite is, how it works and how you can set up multiple WordPress with ease.
Also, we’ll look into the pros and cons of WordPress multisite, who uses it, and so much more. So, let’s dive in.
A. What is WordPress Multisite? (Introduction)
A WordPress multisite network is a way of creating and managing multiple sites under a single WordPress installation.
In other words, a WordPress multisite is a network of sites that all share the same WordPress installation core files. This feature was first introduced back in WordPress 3.0. And since then it has become a popular and preferred method of managing and maintaining multiple related sites.
You can easily activate the feature by adding a few lines of code to your WordPress installation (which we’ll show you shortly). Once you’ve activated, you can now easily create new sites, as well as allow other users to do so.
Whenever you add a new site to your multisite network, you can either use a subdomain or subdirectory.
For instance, a main website with the domain example.com can have a subdomain such as site1.example.com.
Or else, you can create sites using a sub-directory such as example.com/site1.
The most popular multisite network is WordPress.com. This allows you to host a wide range of sites from personal blogs to business enterprises.

Some other examples of WordPress multisite networks in schools and universities using it to create multiple sites for different departments corporations. Plus, business enterprises create sites for separate branches or offices.
B. Who Should and Shouldn’t Use WordPress Multisite?
WordPress multisite is an excellent solution for those who are running multiple similar kinds of WordPress sites. This makes it easier to manage them from one place, also you can ensure that all sites on a network are up-to-date.

However, it doesn’t mean that you should use a multisite network just because you’re running and managing multiple WordPress sites.
You need to remember one thing in a multisite network is that all sites in the network share the same database. As a result, you won’t be able to back up only a single site.
For example, if you’re a web developer who is thinking of using multisite to manage several unrelated projects in one place then it’s not for you. It’s because if you have to move any one of the sites elsewhere from that multisite network then it’d be a hassle.
Since that site shares its database with other sites on the network, it becomes a problem to back up a single site on the network. In such a scenario, using a single WordPress installation would be better.
Now let’s look at some of the scenarios where you can benefit from a WordPress multisite network:
- Educational institutions – Schools and universities use this feature to allow teachers to create blogs and let students create their portfolios on school servers.
- Business sites – Many big companies use it to build separate sites for each project and branch under one roof. It makes it easier to manage multiple client sites.
- Commercial sites – Some commercial web networks like WordPress.com allow users to pay a subscription fee to host their site within the network.
- Personal sites – This feature has been utilized by bloggers who run their own network of blogs on multiple subdomains.
- Internal networks – Some schools and other companies use multisite networks to run internal sites for networking purposes.
C. Admin and Super Admin – Roles and Capabilities
Before we start looking at how we can set up and use WordPress multisite, let’s try to understand what are the different roles of super admin and site admin.
A super admin is a type of user role that has complete control over the whole network of sites. This kind of user role exists only in a multisite installation. They’re the one who actually activates the multisite option for WordPress in the first place.
Similarly, a website admin is a typical administrator who has access to all the administrative features within a single site of a multisite network. As a website admin, they can add users only to websites where they’re assigned as admin.
However, they cannot install plugins or themes and can only choose which ones to active or deactivate. Since this entire responsibility is under the control of the super admin.
| Super Admin’s Capabilities | Website Admin’s Capabilities |
| 1. Manage all the users across the entire network; 2. Can add, delete and edit sites; 3. Upgrade WordPress core for the entire network; 4. Manage all themes and plugins; Gives user permission to create new accounts or site; 5. Possess all the capabilities of website admin too; | 1. Full control over the content including posts, media, pages, images; 2. Add, edit, delete, and moderate blog comments; 3. Complete control over site’s settings; |
However, later on in this guide, we’ll show you how you can add a new super admin to a WordPress multisite network.
But for now, let’s look into some real examples of sites that are using the concept of WordPress multisite.
D. WordPress Multisite Real Examples
If you really want to be familiar with the concept of WordPress multisite, you must check out other sites that are using the multisite networks for your business. It not only makes you familiar with its capabilities but also gives you ideas on how you can use it for your business.
Hence, here are some of the sites that use WordPress multisite effectively for their businesses.
| Company Name | Description |
| WordPress.com | Popular CMS platform that allows people to create their own WordPress site with no hassle. |
| BBC America | American cable network that airs sci-fi and action series along with BBC original programs. |
| Harvard Blogs | A free service for the Harvard community that allows them to start their own .edu blog on the site. |
| OpenView Venture Partners | A venture capital firm that specializes in funding software companies to turn their vision into reality. |
| Cheapflights | A travel website that helps you with flight tickets, hotel bookings, and vacation packages. |
| Edublogs | Popular educational blogging network that provides a trusted web publishing platform for teachers and students. |
E. Pros and Cons of WordPress Multisite
By far you’ve already known that WordPress multisite offers you a simple and straightforward solution to create a connected network of websites. Also, we just now looked at some of the real-time use of WordPress multisite.
Hence, it’s time to look at some of the pros and cons of WordPress multisite.
Pros of Using WordPress Multisite Network
Here are some of the pros of using a WordPress multisite network.
- Allows you efficiently and effortlessly manage multiple sites from a single WordPress dashboard.
- Let you assign a different admin for each site on the network.
- You can install and activate themes and plugins for multiple sites with one download.
- With one master installation, you can easily update your WordPress, theme, and plugin.
Cons of Using WordPress Multisite Network
However, creating a WordPress multisite network does come with its own disadvantages. Hence, let’s look at some of those so that you can keep them in mind before setting it up.
- Since all the sites share the same server resources, if one site is down then all others would also get down.
- Can be quite a challenge to manage server resources and handle unexpected traffic for most of the users.
- Not all hosting services support multisite options.
- Higher security risk because if one site gets attacked or hacked, others may also be compromised.
- Some of the WordPress plugins aren’t compatible with multisite networks.
F. Prerequisites For Setting Up WordPress Multisite
After knowing the pros and cons, you must have already decided that WordPress multisite is right for you. At the same time, you might have been wondering how to install and set up WordPress Multisite.
But before that, let’s take some of the prerequisites first for setting up the WordPress multisite network. These are a few handfuls of requirements that you must meet before installing a WordPress Multisite network.
However, this process depends upon whether you’re installing a WordPress Multisite network in a fresh WordPress installation or an existing site.
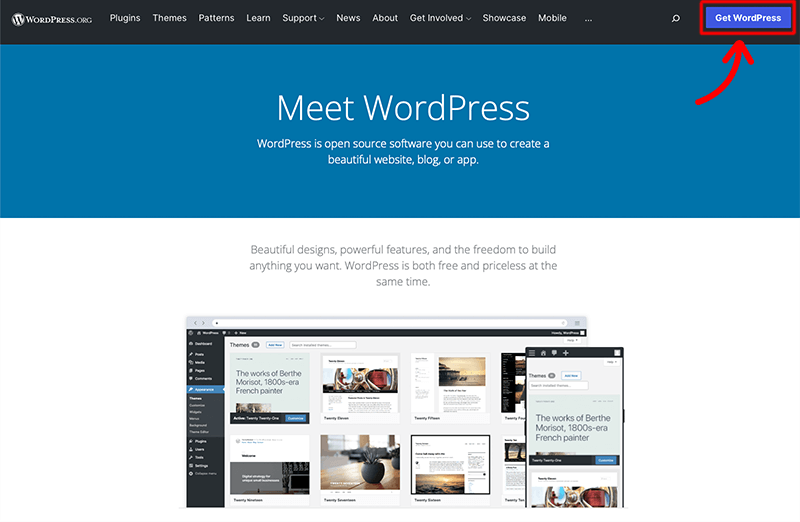
If it’s your first time, then you can download WordPress for free from WordPress.org. After that, you need to have some basic knowledge of how to install WordPress.
Another most important thing would be to have a good WordPress hosting provider that can handle multiple domains in a single web hosting plan.
For a couple of websites with low traffic, you should go with the shared hosting plans. However, looking at the nature of a multisite network, you should choose VPS hosting or a dedicated server.
Next, if you’re creating a multisite network on an existing WordPress site, then it’s better to create a backup of your database and files. Since, once you set up a multisite network, it’ll automatically update WordPress to the latest version. In this way, creating a backup of your site won’t create a risk of losing any critical data.
Lastly, you’ll need to deactivate all of your currently running WordPress plugins. It’s another important thing that you need to do before you turn one multisite option for WordPress.
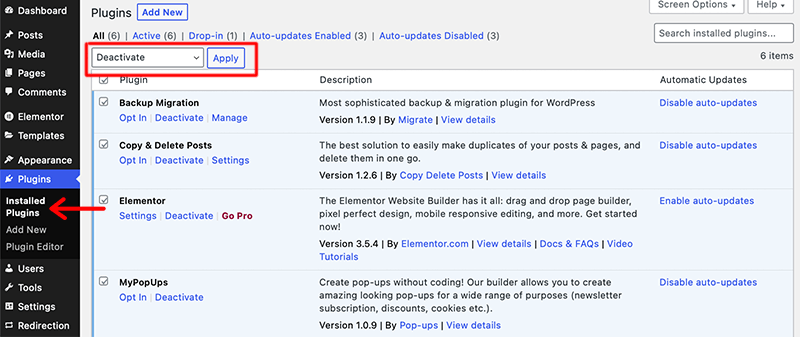
For that, navigate to Plugins > Installed Plugins from your WordPress dashboard. Then, check the boxes for all the plugins and click on the Deactivate from the Bulk Action drop-down menu. Followed by clicking on the Apply button.
G. How to Setup Multisite Option for WordPress?
Once you’ve taken care of all those requirements, it’s time to get to work. Let’s look at the steps involved in installing and setting up a WordPress multisite network.
Step 1: Update the wp-config.php File
The first step would be to update your WordPress wp-config.php file to activate the multisite feature. This file is usually located in the root directory of your website.
If you’ve installed your WordPress locally using XAMPP then you can easily access it through the XAMPP app.
All you need to do is open the XAMPP app and click on the Open Application Folder button.
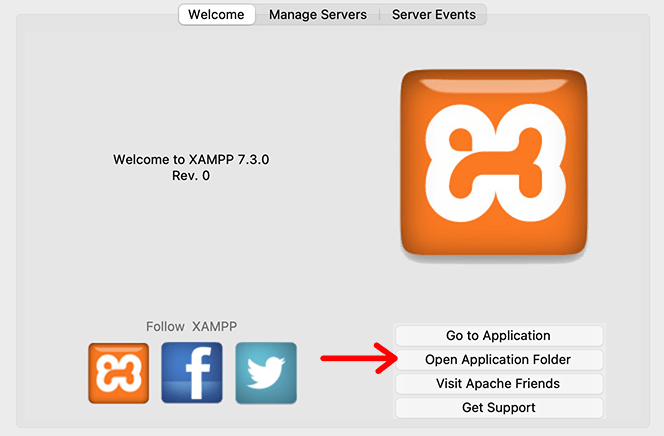
After you click on that, you’ll see a folder that gets opened that contains all your XAMPP files, as shown below.
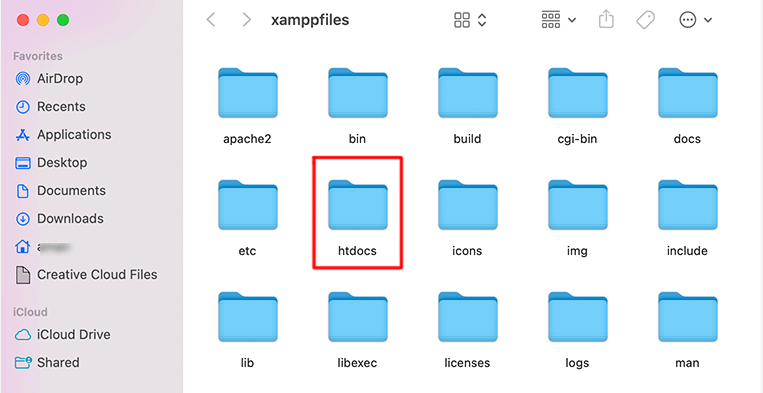
Now, you need to look for the folder that says htdocs. Inside that, you’ll need to find another folder that is named after your WordPress site. After that, open that folder and look for the wp-config.php file.
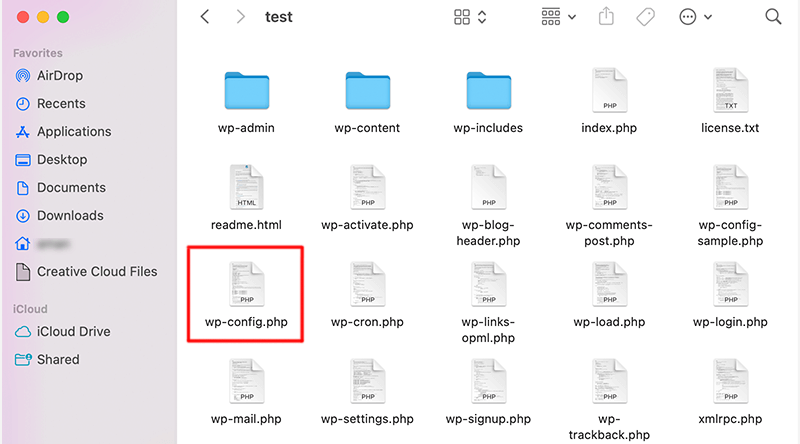
Following that, open the wp-config.php file and add the following code just before the /* That’s all, stop editing! Happy blogging. */ line.
/* Multisite */
define( ‘WP_ALLOW_MULTISITE’, true );
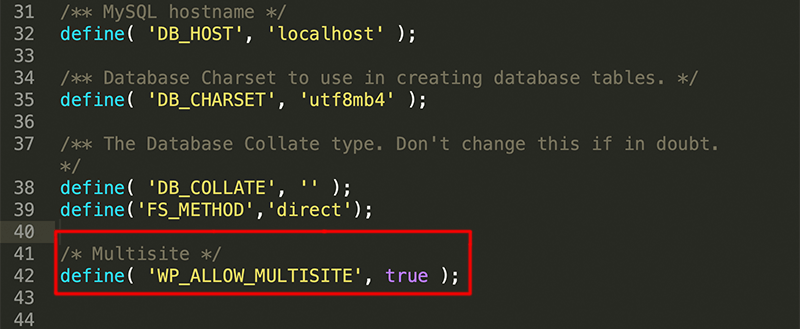
Once you are done, save the changes and upload the wp-config.php file back to the server.
Hence, this is how you update your wp-config.php file. Adding this code will simply enable the multisite feature on your WordPress site.
Step 2: Create a Network
In the very first step, we’ve successfully enabled the multisite network feature on our WordPress site. Now, it’s time to set up our WordPress multisite network.
First of all, you need to login into your WordPress dashboard. Next, you have to head over to the Tools > Network Setup page to configure your multisite network.
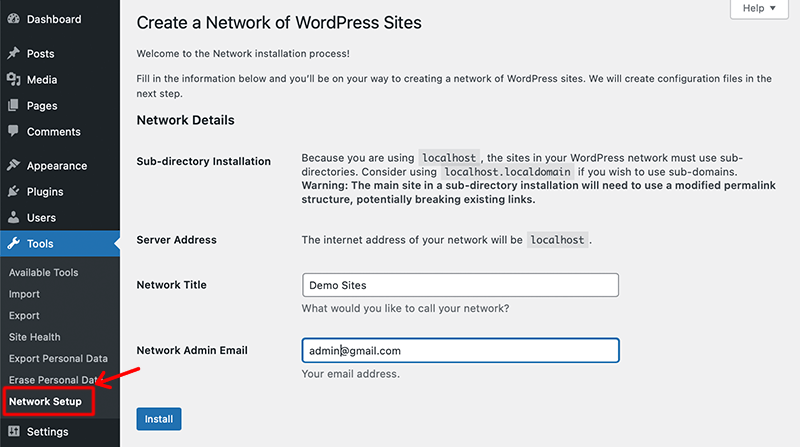
Following that, it’ll ask you to fill out the information to create a network of WordPress sites. Here you need to provide a title for your network and the email address of the network admin.
Once you’re ready, click on the Install button.
Step 3: Enable a Network
After you’ve created the network, it’s time to enable the multisite network.
As soon as you click on the Install button, it’ll take you to the next screen that will help you create configuration files. There you might see two snippets of code that you need to add to your wp-config.php and .htaccess file respectively.
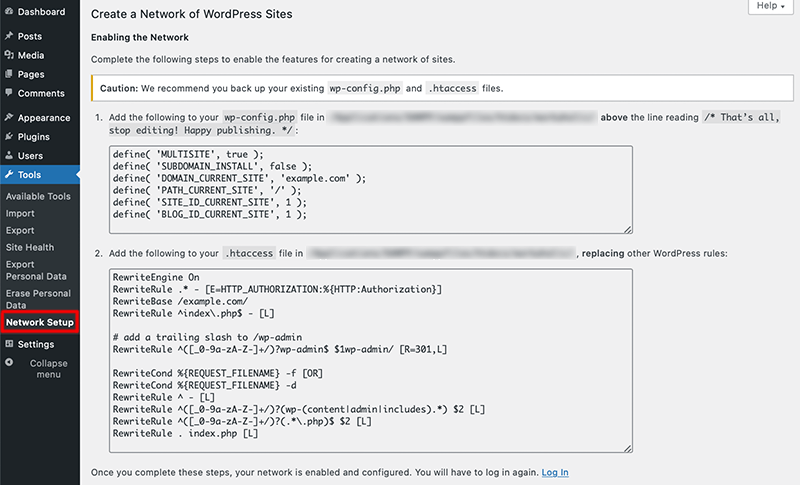
To do so, all you need to do is copy the corresponding snippet and paste it into the respective files. Then, you need to re-login to your WordPress site to access the multisite network.
That’s it! This is how you successfully install and activate WordPress multisite.
H. How to Use the Multisite Option for WordPress?
By now you might have already noticed that WordPress looks a little different when it’s configured for multisite. Also, you’ll see the My Sites item added to your top menu bar:
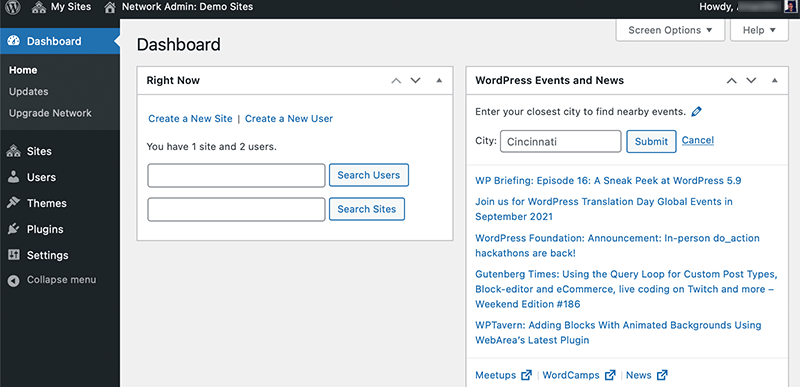
Hence, let’s look at what you can do with these new options:
1. Configure Network Settings
The first thing after enabling the network, it’s time to configure network settings.
For that, you have to switch to the Network Admin Dashboard. To access the Network Dashboard, you have to hover your mouse over to the My Sites menu in the admin toolbar. This will then pop up a dropdown menu and click on the Network Admin > Dashboard.
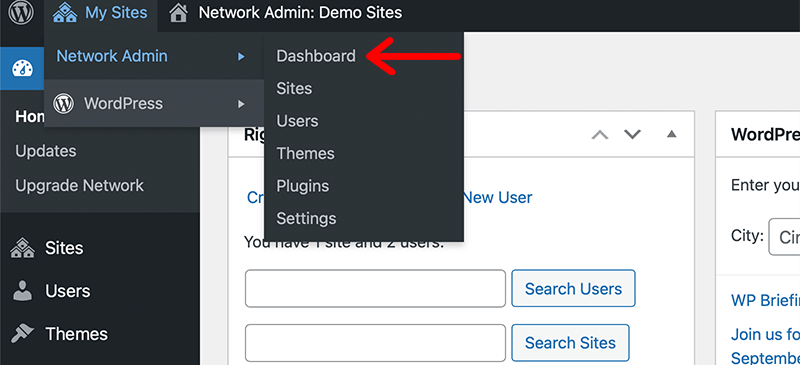
From here, it’ll take you to the multisite network dashboard where you’ll add new sites and users to your network. The Right Now dashboard widget will allow you to create a new site and add new users.

However, for configuring network settings, you’ll need to click on the Settings link from the admin sidebar.
This will then open a Network Settings page, and in its first option, it’ll ask you for your site title and admin email address. By default, these fields are filled automatically since we’ve already provided them during the setup.
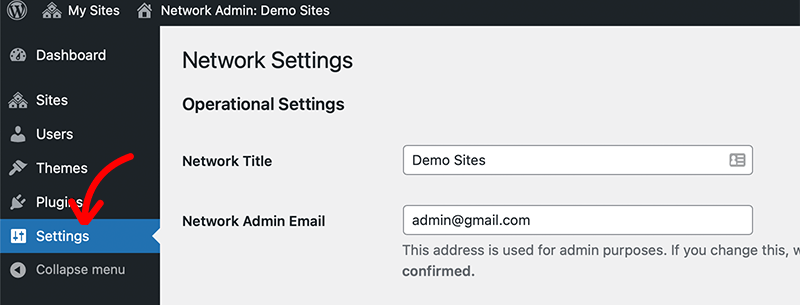
Configure Registration for Multisite Network
If you scroll down the Network Settings page a bit then you’ll see the Registration Settings section.
This is another important setting in your network setup which is disabled for both user and site registrations by default.
You can enable it by choosing to open your site for user registration, allow existing users to create new sites, or allow both user and site registration.
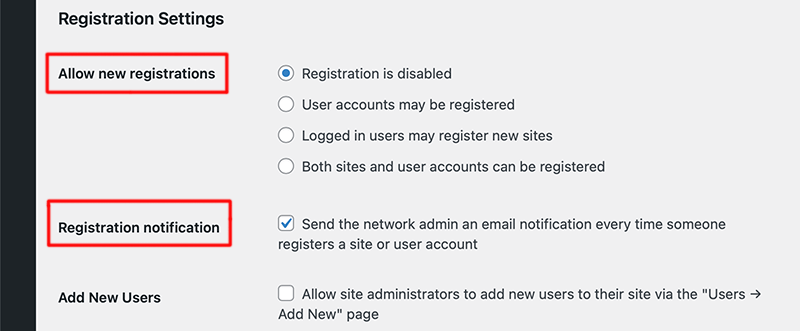
Similarly, as you’re allowing new registrations, check the box next to the Registration Notification option. This will then send the email notifications to the network admin every time a new user or site is registered.
Besides, you can also allow site administrators to add new users to their sites. All you need to do is check the box next to the Add New Users option.
Configure New Site Settings
Now just below the Registration Settings section, there is a New Site Settings section. This allows you to configure default options for new sites created on your multisite network.
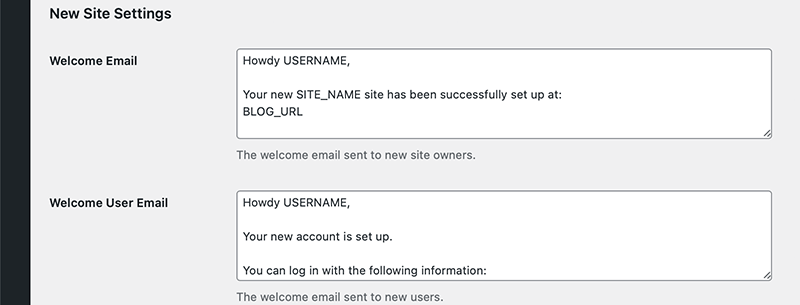
Here, you can modify the welcome emails that are sent to the new site owners and users. Plus, you can also modify the contents of the first default post, page, and comment in these settings.
Configure Upload Settings for Multisite Network
Next, we’ve got the Upload Settings section that manages the usage of your user resources. In this, we can limit the total amount of space a site can use for uploads.

Depending on how much disk space you have, you can increase or decrease the site upload space. You can even set the upload file types for images, audio, video, and pdf files.
Likewise, you can set a limit on upload file size, so that users can’t upload large files to the server.
Configure Plugin Menu Settings
Lastly, we’re going to look at how we can enable the administrative menu on your network sites. Under the Menu Settings section, check the box next to the Enable administration menus option.

This will then show the plugins menu to respective site admins and can activate or deactivate a plugin on their individual sites. However, they won’t be able to install new plugins.
Once you’ve configured all the settings, make sure to click on the Save Changes button.
2. Add New Site
After you’ve successfully configured the network setting, it’s time to add a new site to your WordPress multisite network.
Start off by simply navigating to My Sites > Network Admin > Sites menu in the admin toolbar.
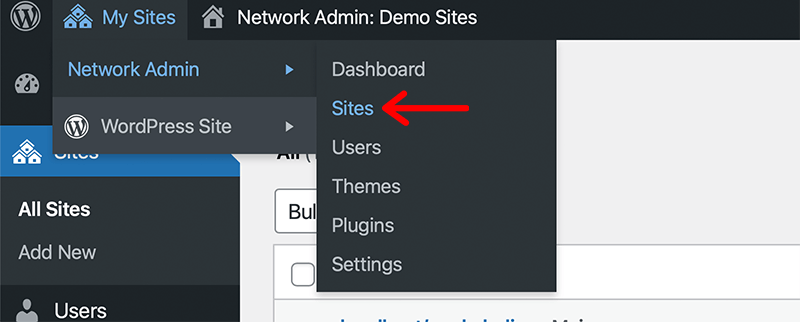
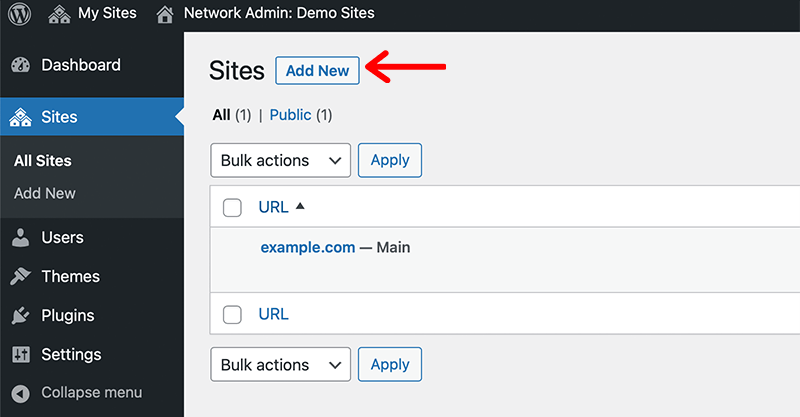
This will then show you a list of sites that are currently available on your multisite network. By default, you’ll find that there is only one site listed in your WordPress multisite network.
And to create a new site, click on the Add New button at the top.
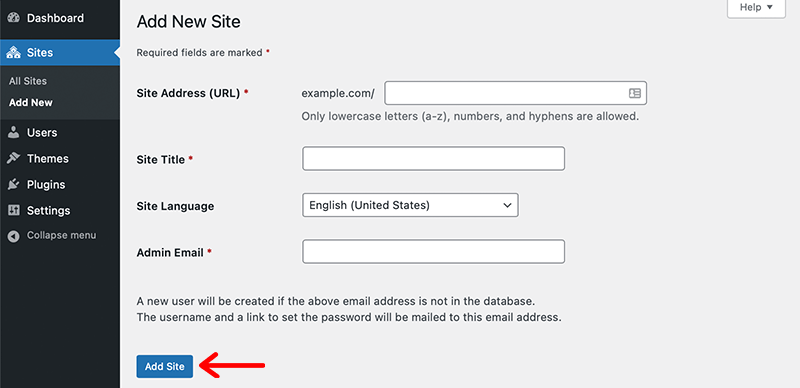
Following that, you’ll reach the Add New Site page, where you have to provide the site’s address, title, and admin’s email address. Then, click on the Add Site button to finally create a new site.
Hence, this is how you can easily create a new site on your WordPress multisite network. You can repeat this process for creating as many sites as you want.
And once new sites are created, they can be found in the Sites > All Sites in the network admin’s WordPress dashboard.
3. Install Plugins and Themes
Let’s see how to install WordPress themes and plugins in the WordPress multisite network.
The best thing about multisite is that any themes and plugins that you install for one site apply to the whole network. Hence, they take less storage space, less time to update, and can be used as many times as you want across multiple sites.
Likewise, the installation process for both of them is more or less the same as on a standard WordPress site.
Before we start you must know that only the network admin can install new plugins and themes. This means individual sites admin cannot install themes and plugins on their own in a multisite network.
Installing WordPress Themes
You can install a WordPress theme to your multisite network by going to My Sites > Network Admin > Themes:
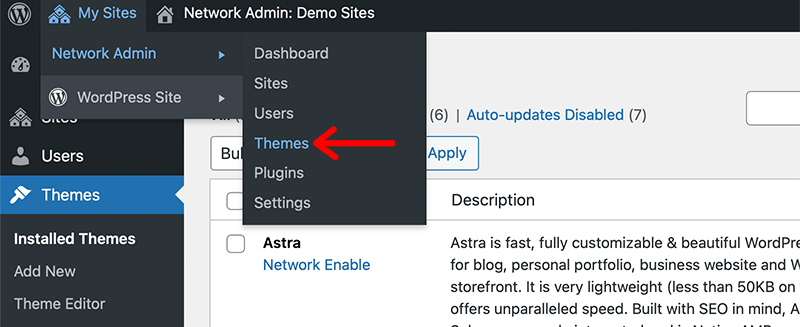
After that, you’ll see a list of currently installed themes on your WordPress multisite. Now, to make them available to other sites on the network, click on the Network Enable link under the theme.
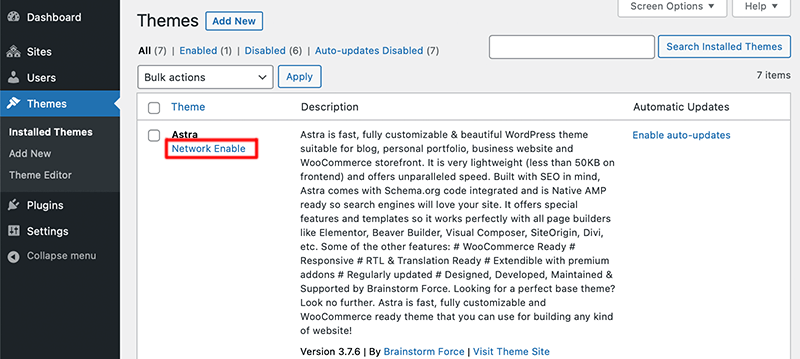
Besides you can also disable a theme for certain sites by clicking on the Network Disable link under the theme.
Similarly, to install a new theme, click on the Add New button at the top of your screen and then install a WordPress theme that you want.
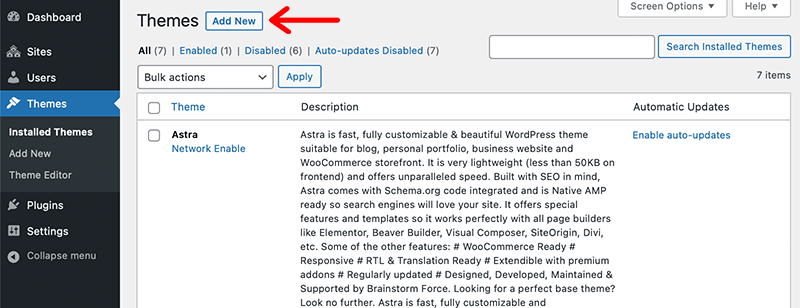
Once the theme is installed, to make it available to other sites on your network, click on the Network Enable option.
Installing WordPress Plugins
Similar to installing themes, you can install WordPress plugins by navigating to the My Sites > Network Admin > Plugins page.
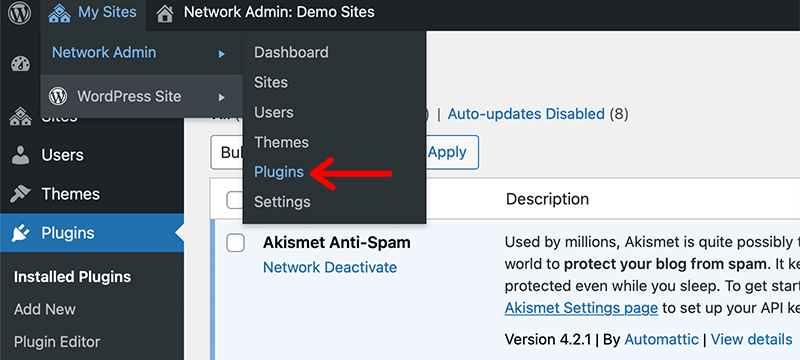
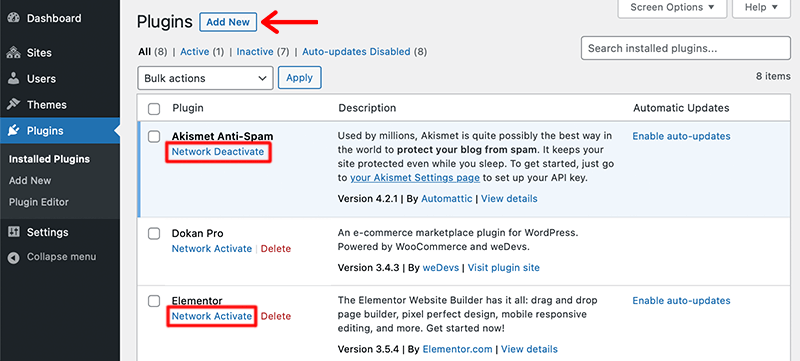
To install new plugins, click on the Add New button at the top of your screen. After that, install the plugin that you want then click on the Network Activate link below each plugin to activate them on your multisite network.
4. How to Add New Users in Multisite Network
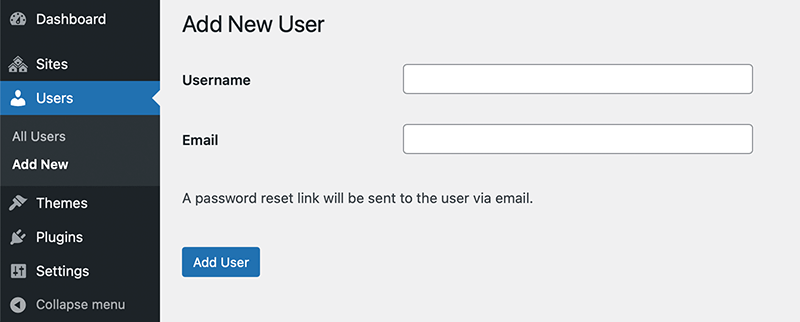
To add new users, navigate to Users > Add New from your network admin dashboard. Next, you just have to provide the username and email address. Once you’ve provided those credentials, you can click on the Add User button. Then, an email will be sent to the users to set a password and log in.
Once you’ve added new users, you can view and manage all your users from one place. For that, navigate to Users > All Users in the network admin’s WordPress dashboard.
Next, we’re going to see how we can grant this new user the role of super admin for the network.
5. Add Super Admin
Earlier in this article, we talked about who are super admins and what are their roles in WordPress multisite. Now, we’re going to see how we can add a new super admin to our network.
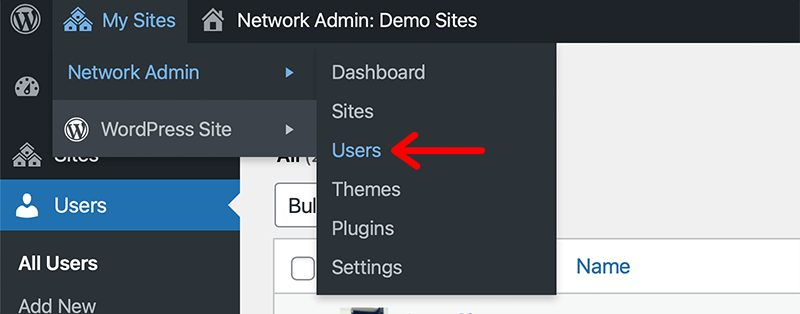
Start off by navigating to My Sites > Network Admin > Users menu in the admin toolbar.
Following that, it’ll show you a list of users that you’ve created on your network. By default, you’ll find that there is already one user who is assigned as super admin. Actually, that super admin is the one who created the multisite network in the first place.
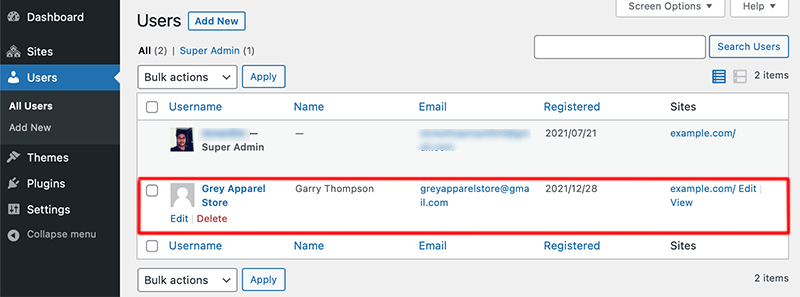
Now to add a new super admin, click on any other user from the list and it’ll open the edit page of that user. Then, scroll down the page to the Super Admin option, and select the Grant this user super admin privileges for the Network checkbox.
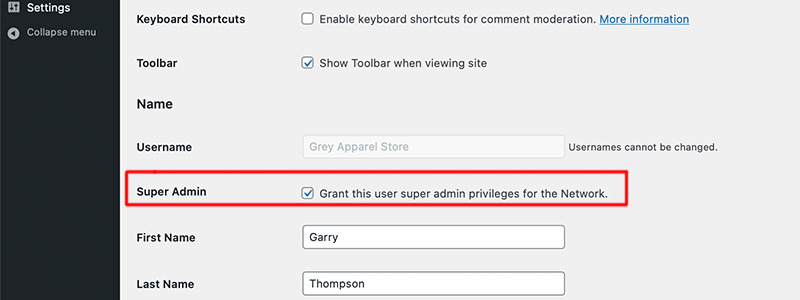
Finally, click on the Update User button at the bottom of the page.
Woo-hoo! This newly added super-admin user can start managing all the sites under the network.
Tips for Adding New Super Admin to the Network
- You should never use admin as the username for a super admin account
- Make sure that you only create a few super admins as possible
- Use strong and secure passwords for all users that have the super admin role
I. Security With WordPress Multisite
When it comes to security, WordPress always takes it very seriously. However, just like with any other system, potential security issues may arise from anywhere. Hence, having some basic security precautions to secure your WordPress site is a must.
For more secure encrypted communication between a web browser and a website, you can enable an SSL certificate. This will make sure that your sensitive data remains undecipherable to malicious users, bots, and hackers.
Some of the hosting services do provide free SSL certification which is only applied to the main domain. Since we’re talking about WordPress multisite networks, you’ll have to purchase a separate SSL certificate for each subdomain.
Similarly, if one site on your multisite network lacks SSL, then the security of all the other sites will be compromised too.
Hence, make sure that all sites on your WordPress multisite network have proper SSL certificates.
J. Must-Have Plugins for WordPress Multisite
1. Multisite Enhancements
Multisite Enhancements is another must-have plugin that helps you with customizing your entire multisite network’s WordPress admin area. This adds some usability features to the network area for super admins.
You can use it to display information about the sites on your network such as active plugins, themes, child themes, and more. It lets you optimize the admin dashboards to enhance the experience for admins of the subsites.
Plus, you can display only the useful information for each admin and hide the unnecessary details from the backend.
2. WP Multisite User Sync/Unsync
If you’re looking to manage multiple users across multiple websites, then you should use WP Multisite User Sync/Unsync plugin. It helps you quickly sync or unsync a user or multiple users from one site to another in your multisite network.
Likewise, you can add a role manager who can sync/unsync users across the network and assign user roles. Plus, its pro version would automatically sync users in a multisite network whenever they’re added, updated, or registered.
3. UpdraftPlus
The thing with WordPress multisite networks is that they have dozens of subsites that you must back up to keep every site on the network safe. Hence, UpdraftPlus is the most trusted WordPress backup and restore plugin.
It lets you easily back up your files and database into the cloud and restore them with a couple of clicks. You can even create automated backups for every site on your network.
Also, you can restore individual sites within a multisite network without having to restore all sites.
4. MonsterInsights
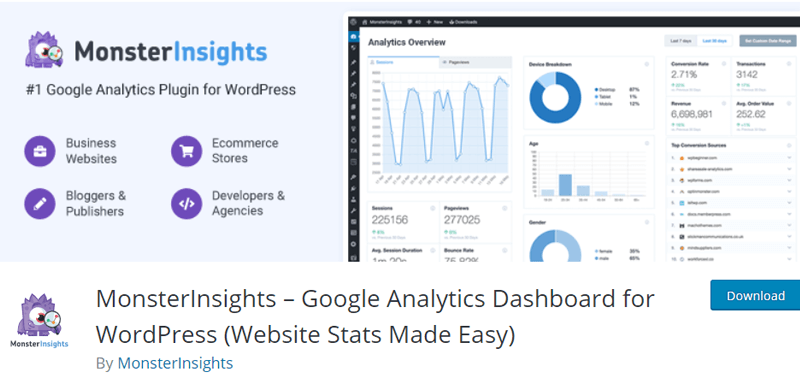
MonsterInsights is the most popular Google Analytics plugin for WordPress. For WordPress multisite networks, you can easily monitor traffic resources for your network and its subsites directly from your admin dashboard.
It also lets you analyze which sites are performing well at a glance. Moreover, you even decide for which sites you want to enable or disable the analytics feature too.
Likewise, you can even set up tracking features such as event tracking, eCommerce tracking, outbound link tracking, and more.
5. User Switching
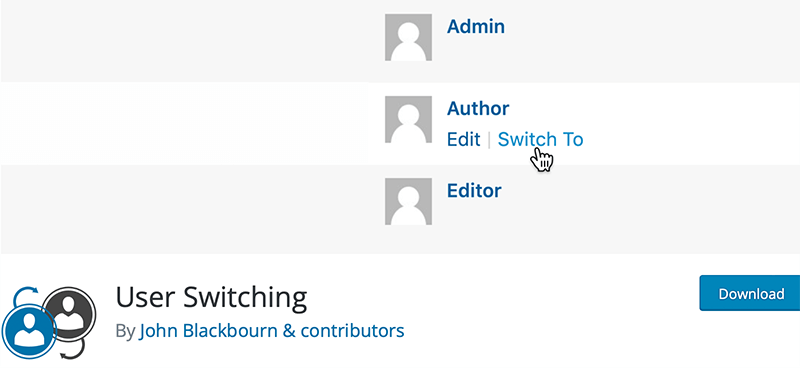
If you want to quickly switch between user accounts in your multisite network, then User Switching is the one for you. It lets you quickly swap between user accounts in WordPress with a couple of clicks.
Since it’s simple and effective, this plugin is quite handy for test environments for testing new installations across a network. To maintain security measures, it’ll never reveal any account passwords and uses a cookie authentication system to remember the accounts.
6. NS Cloner
NS Cloner is a popular cloning plugin that easily clones your existing site to a new site on your WordPress multisite network. It can completely clone identical to the original site.
When it comes to cloning it can clone the design, plugins, content, and even the individual WordPress settings. Besides, it quickly sets up staging sites for collaboration or effortlessly duplicates content for regional versions of sites.
7. Multisite Language Switcher
Multisite Language Switcher is a simple yet powerful plugin that lets you add multi-language capabilities to your WordPress multisite network.
It allows you to manage the translations for posts, pages, custom post types, categories, tags, and custom taxonomies. Further, you can translate entire websites or individual pieces of content across your entire network.
K. FAQs on WordPress Multisite
1. Why do I need to use a WordPress multisite?
You’ll use WordPress multisite when you’re creating a network of sites that share similar functionality.
2. Does WordPress multisite allow you to install any plugins to your site?
No, you cannot install any WordPress plugin to your WordPress multisite. Because not all plugins are compatible with WordPress multisite.
By default, a user who is registered on one site cannot register themselves to another site on the same network. Since they are registered in the shared WordPress database.
4. Does WordPress multisite allow its users to add an online store to the network?
Yes, it allows the users to add an online store in WordPress multisite network. Plus, WooCommerce is compatible with WordPress multisite. So, you can build your WooCommerce multisite where each site in the network can be an online store.
5. How many sites can I add to my network?
The best part about WordPress multisite is that it allows you to add as many sites as you want to your network.
Conclusion
Hence, we’re at the end of the article for the WordPress multisite network.
We hope that now you have some basic knowledge of multisite options for WordPress. In this, we’ve covered everything from the definition, pros and cons, security, and steps to set up a WordPress multisite network.
If you have any queries and suggestions regarding this article, then please feel free to comment down below. We’ll get back to you as soon as possible.
Also, check out our article on the best WordPress hosting services. And also check out our detailed guide on affiliate marketing. Be sure to go through it once.
If you like this article, then please share it with your friends and colleagues. Also, don’t forget to follow us on Twitter and Facebook.

