Want to know how to integrate Payoneer in WordPress? If yes, then you’re at the right place to get the complete guide to do that.
If you want to expand your eCommerce or freelancing business, then you need to set your target clients worldwide. For that, you must integrate a solution that enables you to receive and send payments across the globe.
Payoneer is one of such payment solutions that allow any business to reach the new global economy. Using this, you can make international payments, receive funds, manage your digital business, get affiliate commissions, and much more.
Luckily, there’re WordPress plugins available from which you can easily integrate Payoneer into your WooCommerce site. But you may find it difficult to do that all by yourself. So, we provide you an easy guide on how to integrate Payoneer in WordPress.
Without further delay, let’s get into the guide.
A) What is Payoneer (Overview)?
Payoneer is a cross-border payment solution that offers you a universe of opportunities. It enables you to transact across countries and currencies. So, it aims to help Payoneers (Payoneer users) to imagine, engineer, and inspire a universal future for commerce. This leads you to work as per your potential.

This brand was founded in 2005 in New York City. And since then, it has been powering the growth of customers for entrepreneurs to the world’s leading digital brands. Currently, there’re over 5 million Payoneers with 24 global offices serving more than 200 countries.
The major industries that use Payoneer include freelancers, service providers, online sellers, digital marketers, and IT outsourcing services. While getting in detail about the opportunities that this payment solution provides, here are some of them pointed out.
- Local Receiving Accounts: You can open your local currency account in another country and get paid just like having a local bank account.
- Bill Your Clients: Plus, you’re able to request payments from your clients worldwide. And, they can easily and safely pay online with just a few steps.
- Manage Your Store: In a single platform, you can combine all your global eCommerce stores and view their payment activity.
- Make Payments from your Payoneer Balance: Also, you’re able to pay your suppliers, contractors, employees, vendors, and service providers from your Payoneer balance.
After getting to know about Payoneer, let’s jump into the next section.
B) Why Do You Need a WooCommerce Payoneer WordPress Plugin?
Now, you may have known that Payoneer provides numerous solutions for your business to grow. And, you can do so for your eCommerce business as well.
However, you aren’t able to use Payoneer as a payment gateway on the WooCommerce store. It’s because Payoneer doesn’t have a payment gateway platform. It’s a digital payment solution.
So, you can’t add a Payoneer payment button on your store for the customers to pay. But you can use a plugin that integrates Payoneer on your WooCommerce WordPress website.
By using a plugin, it’ll allow Payoneer to accept payments that you receive from your store. And, certain WordPress plugins allow you to easily do so.
Let’s have a look at some of them in the next section.
C) 3 Best WooCommerce Payoneer WordPress Plugins
Here, we provide you a shortlist of the best Payoneer WordPress WooCommerce plugins. You can use any one of them to integrate Payoneer into your WooCommerce WordPress site.
So, let’s go through them.
1. Payment Gateway Payoneer For WooCommerce

Payment Gateway Payoneer For WooCommerce is one of the most widely used WordPress plugins for integrating Payoneer to WooCommerce. It’s used when you need to accept payment from other Payoneer users. The major aim of this plugin is to transfer money to another Payoneer recipient account via email.
First, customers need to transfer money to mentioned email. Then, they can enter the Payoneer email address and the Transaction ID for verification. Initially, the order will be ‘on hold’ by default but after the verification, you can set it to ‘completed’.
Pricing:
It’s a completely free plugin that you can easily get from WordPress.org.
2. 2Checkout for WooCommerce
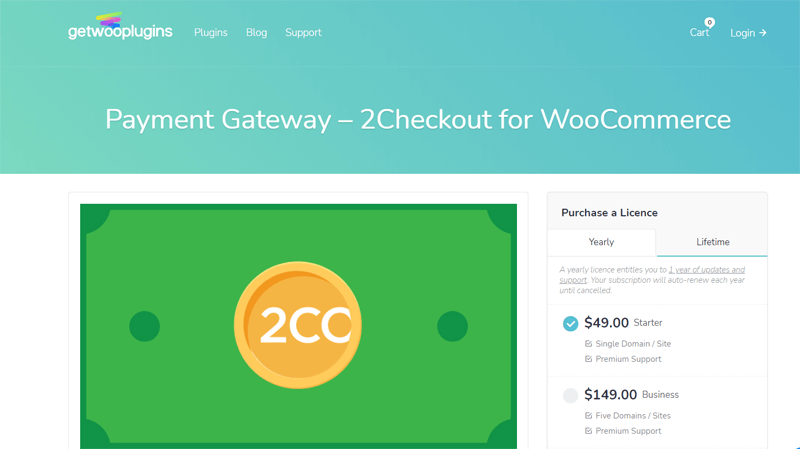
2Checkout for WooCommerce is a payment gateway plugin that accepts payment from Paypal, Credit Card, Master Card, and more. It’s a reliable and secured payment gateway that accepts online payment plus other localized payment options. Also, it allows you to integrate your store with the branded Payoneer MasterCard.
Therefore, you can transfer money in 87 currencies, 15 languages, and 8 payment methods in total using this plugin.
Pricing:
This is a freemium plugin that’s available in both free and premium versions. For the premium version, there’re a variety of pricing plans, that are:
- Starter: For a single site, get yourself the Starter plan that costs $49/year or $149 for a one-time payment.
- Business: To get up to 5 domains, choose this plan that costs $149/year or $449 for lifetime use.
- Developer: For unlimited websites, select this plan with the price of $299/year.
3. Payoneer Manual Payment Gateway
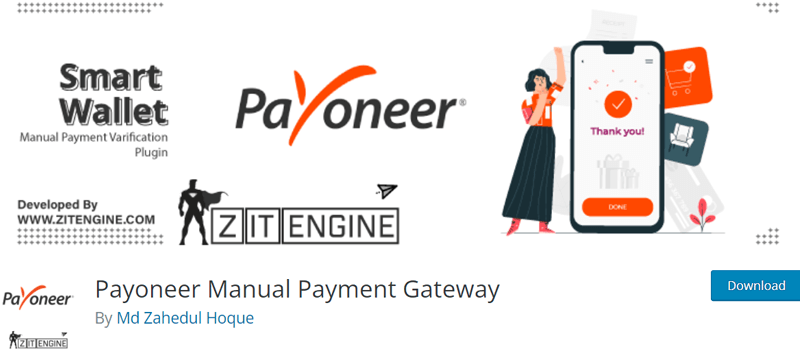
Payoneer Manual Payment Gateway allows you to easily integrate the Payoneer solution in any kind of WooCommerce website. Also, it’s a lightweight and easy-to-use plugin. Plus, both the backend and frontend of the plugin are completely secure.
You need to have a Payoneer account and WooCommerce activated, then you can easily integrate Payoneer using the plugin. All you need to do is enter your email address used in the Payoneer account and other basic information.
Pricing:
This plugin is also completely free. So, you can install and activate it on your WordPress dashboard to start using it.
Recommended – Payment Gateway Payoneer For WooCommerce
Among these above-mentioned plugins, we recommend you to use Payment Gateway Payoneer For WooCommerce. It’s because it’s the most widely used plugin for Payoneer integration. Plus, it’s very easy to use and provides an intuitive interface.
That’s why we’ve chosen this plugin to show you the integration steps on this guide. So, let’s move to the following section to know how to integrate Payoneer in WordPress WooCommerce.
D) How to Integrate Payment Gateway Payoneer For WooCommerce in WordPress?
Now, it’s time to focus on the steps to integrate Payoneer into WordPress. As mentioned before, we will be using the Payment Gateway Payoneer For WooCommerce plugin in this guide.
Before using the plugin, there’re also a few steps or things you need to do. Such steps are also discussed hereby.
Note that you can use any one of the WordPress themes that’s compatible with WooCommerce. Here, we’re using the Astra theme. So, you can also choose one for your eCommerce site.
After that, follow these steps carefully.
Step 1: Create Payoneer Account
Having a Payoneer account is a must for using the Payoneer solution on a WordPress website. It’s great if you already have one. You just need to use the email address that you entered while creating the Payoneer account.
If you don’t have one, then follow these basic steps to easily create your Payoneer account.

First, open payoneer.com on your browser. And then, click on the Register button given on the right side of the website’s navigation. As soon as you click there, a new webpage opens.
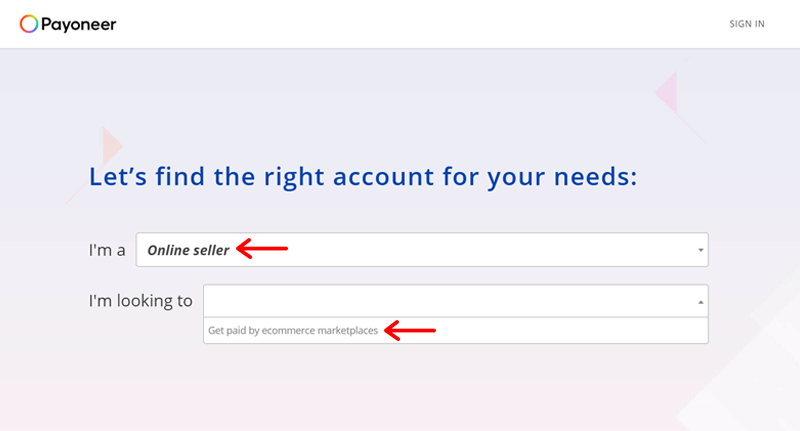
There, you need to choose the type of account you’re seeking for. The dropdown options include if you’re a freelancer, online seller, affiliate marketer, vacation rental host, or individual. So, choose one that suits you. Here, we’ve chosen ‘Online seller’.
Then, another dropdown option displays where you need to select ‘Get paid by eCommerce marketplaces’.

After that, click on the Register button on the new webpage that will redirect you to the Signup page. Here, there’re 4 important steps that you need to fill. They are:
1. Getting Started
First of all, select a radio button that mentions the type of your business. Either select Individual or Company.
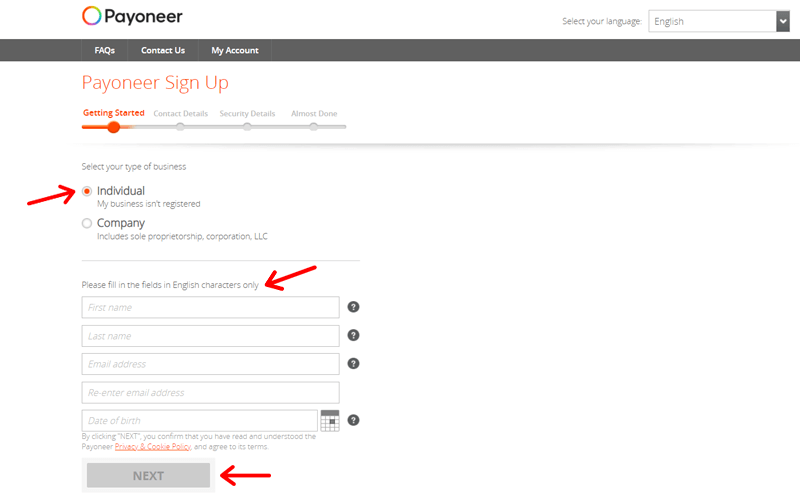
Then, you need to fill in the basic information about yourself. It includes First Name, Last Name, Email address, Re-enter email address, and Date of birth.
After you fill each of them, click on the Next button.
2. Contact Details
In this step, you must fill your contact information. So, fill in the Country, Street and number, City/Town, Postal/ZIP code, and Mobile number first.
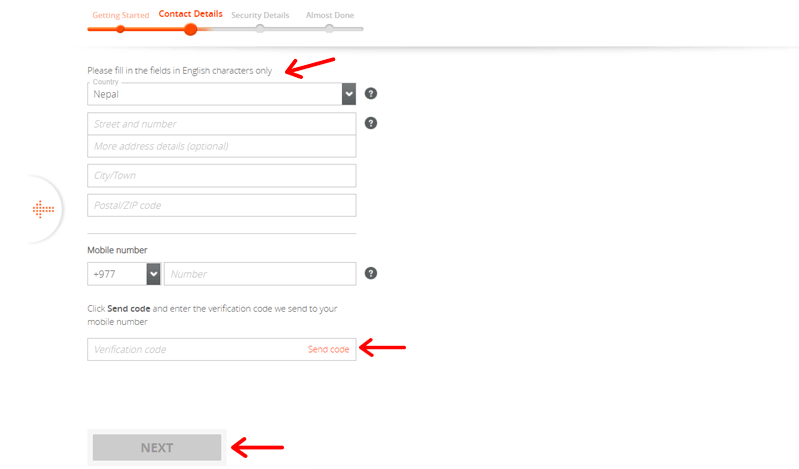
After that, click on the ‘Send code’ option. You’ll receive a verification code on your mobile number that you need to fill on the ‘Verification code’ text box.
Then, click on the Next button to proceed to the next step.
3. Security Details
Here, you need to fill in security details for your account. It includes your username and password. Plus, you must select a ‘Security question’ on the given dropdown option and write its answer in ‘Security answer’.
After that, you’ve to fill in the ID details. You need to select the country whose ID you’re going to enter. Then, choose the ID type to be either National ID, Driving License, or Passport. And accordingly, on the ‘ID number’, you should fill that number.
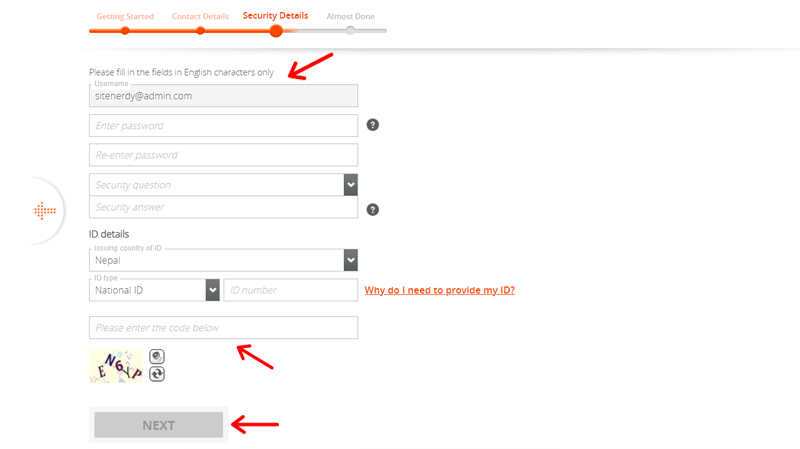
Don’t forget to enter the code that’s provided at the bottom for security reasons.
Lastly, click on the Next button to reach the last step.
4. Almost Done
Now, it’s time to fill in the bank account information in Payoneer. Select your account to be personal or business at first. And then, choose the country and currency of your account. After that, you must fill in other information like Bank Name, Account Number, etc.
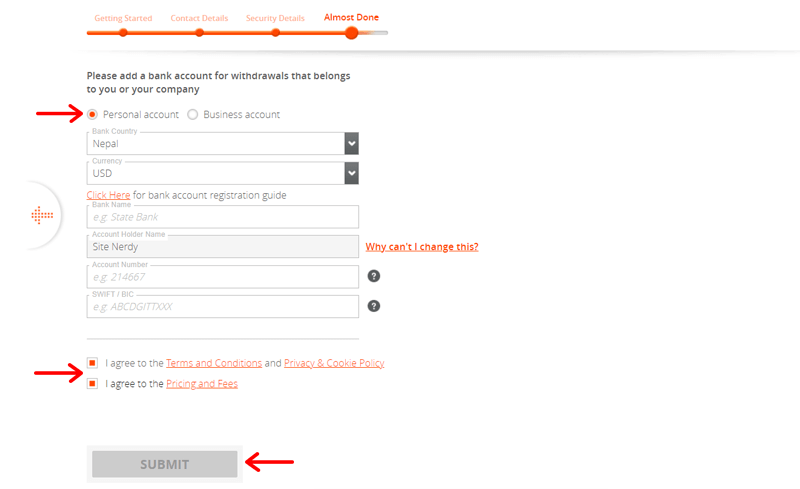
Lastly, you need to click on the Submit button but don’t forget to check if the terms and conditions are ticked beforehand.
Your account is now created so you can log in to check your account.
Step 2: Install and Activate WooCommerce Plugin
You need to have the WooCommerce plugin installed on WordPress to integrate it with Payoneer. So, the next step is to install and activate the WooCommerce plugin. For that, you need to first go to your WordPress dashboard.
So, log in to your WordPress dashboard and click on the Plugins section of the menu. Then, click on the Add New option on that section.
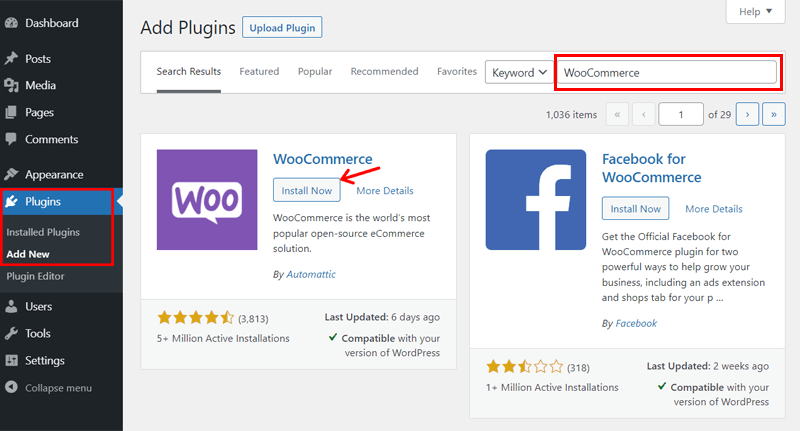
You can see that there’s a search box where you need to enter the keyword ‘WooCommerce’. After that, press enter on the keyboard to search the plugin.
In the search result, you can find the ‘WooCommerce’ plugin. So, you must click on the Install Now button to start the installation.
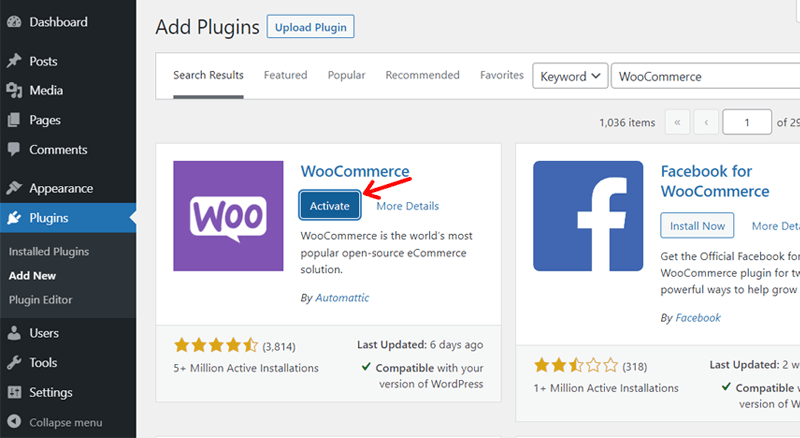
Once the installation completes, you need to click on the Activate button. This activates the installed plugin making it ready to use.
Step 3: Install and Activate Payoneer Plugin
Next, you’ve to install and activate the Payoneer Plugin. Here, we’re using the Payment Gateway Payoneer For WooCommerce plugin. And the process to do so is similar to installing any other WordPress plugin.
So, again go to the Add New option on the Plugins section of the dashboard menu.
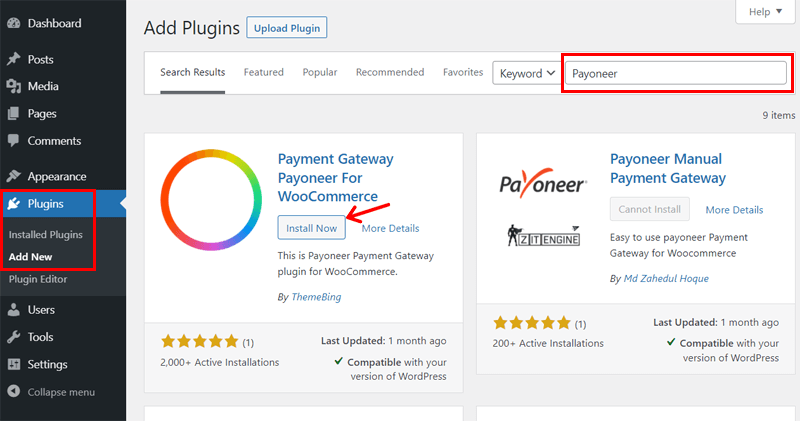
This time, search for ‘Payoneer’ on the search box. Then, click on the Install Now button on the ‘Payment Gateway Payoneer For WooCommerce‘ plugin of the search result.
After a while, Activate button shows up instead. So, click on it to continue the activation of the plugin.
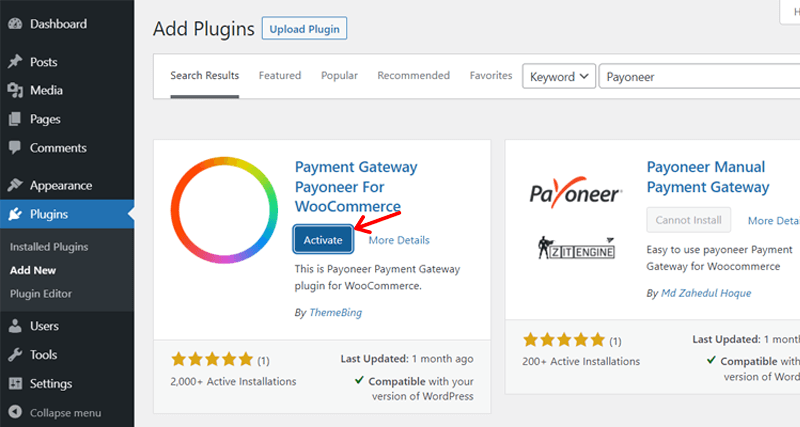
Following these steps, the Payoneer plugin gets installed and activated on your WordPress.
Now, you can see that the ‘WooCommerce’ menu is added to your dashboard. There, you can configure it as per your store details.
Step 4: Add Products to Your eCommerce Site
To understand whether Payoneer is integrated into your WooCommerce site or not, it’s better to add some products to it.
For doing that, go to the newly added ‘Products’ menu. This menu is also added when WooCommerce and Payoneer get installed on your WordPress. There, click on Add New option.
We’re simply going to show you how to add a product to WooCommerce. With the help of that, you can add multiple products to your store.
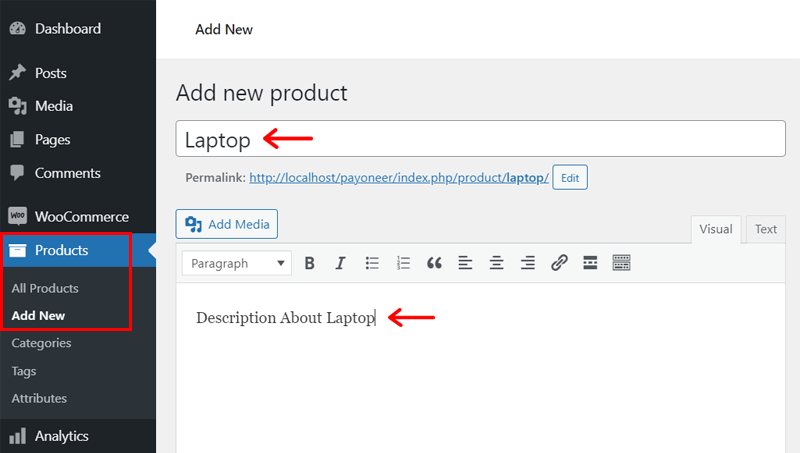
First, write down the product name on the text box. Also, you can write the description of the product in the text area. Then, choose the product type on the ‘Product data’ dropdown option. Here, we’ve chosen ‘Simple product’.
Now fill in all the necessary information about that product on the product settings. Note that, the values you need to enter may be different for a different kind of product type you choose. Some of the necessary details to fill for now are:

- General: You must enter the regular price and selling price value of the product here.
- Inventory: Mark a tick on the radio button to enable stock management at the product level. Then, enter the quantity of that stock.

On the right side, there’re other options to display information about the product. So, you can choose the category of product, insert an image, etc.
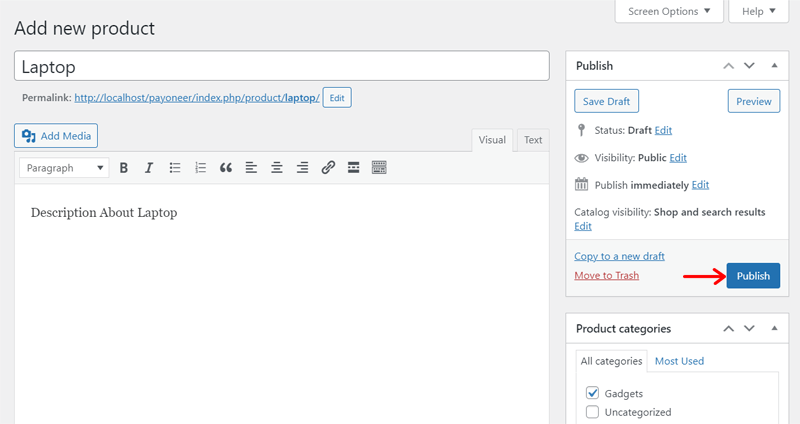
After doing that, click on the Publish button available on the Publish section on the right side of this menu.
Step 5: Set Up Payoneer Gateway in WooCommerce
Now, we’ve reached the major part of this guide. To integrate Payoneer on WooCommerce, you need to go to the ‘Settings’ section of the ‘WooCommerce’ menu on your dashboard.
Then, click on the ‘Payments’ tab. You can find ‘Payment Gateway – Payoneer’ on the payment method list. So, you need to enable this setting and after that click on the Setup button right next to it.

By doing that, you can see the settings for the Payoneer gateway. Here, you can change the description that will be shown on the payment page.
Also, the order status by default is ‘Onhold’. You can change it to ‘Processing’ or any other whenever someone orders.
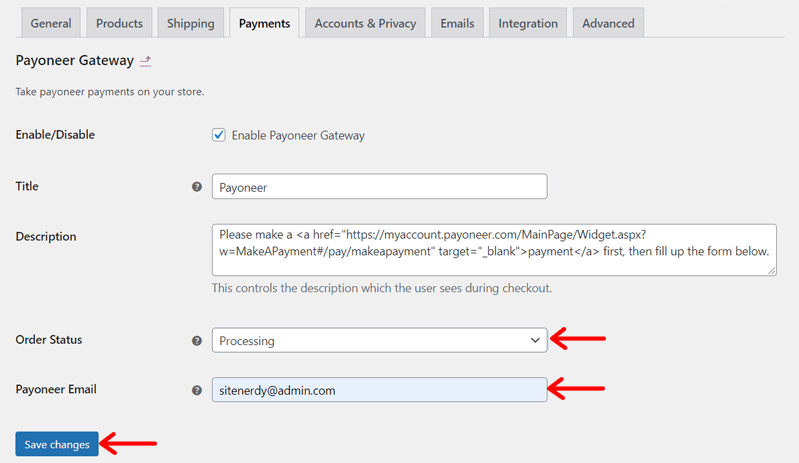
The main thing to manage in this setting is the Payoneer Email. You need to enter the email address of your Payoneer account on which you’ll receive the payment from your customers.
Lastly, you need to click on the Save Changes button to save the changes on the setting.
Step 6: Preview the Checkout Page and Place Order using Payoneer
After you enable Payoneer, you must check whether the gateway is working on your WooCommerce store or not. Although these steps are to be performed by your customers but to check the working let’s have a look at the website.
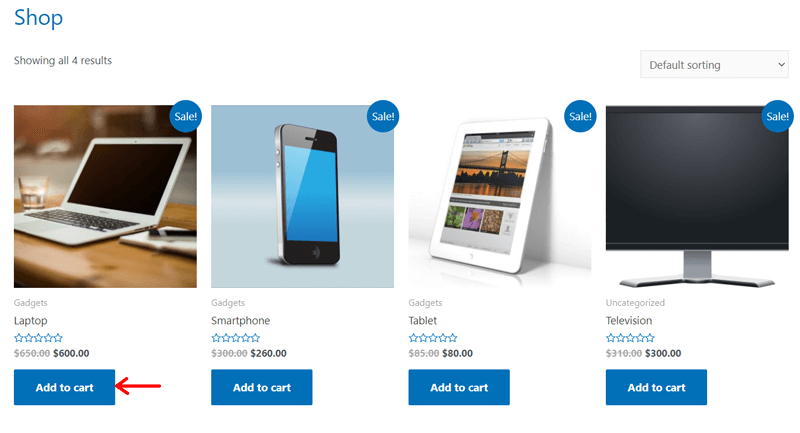
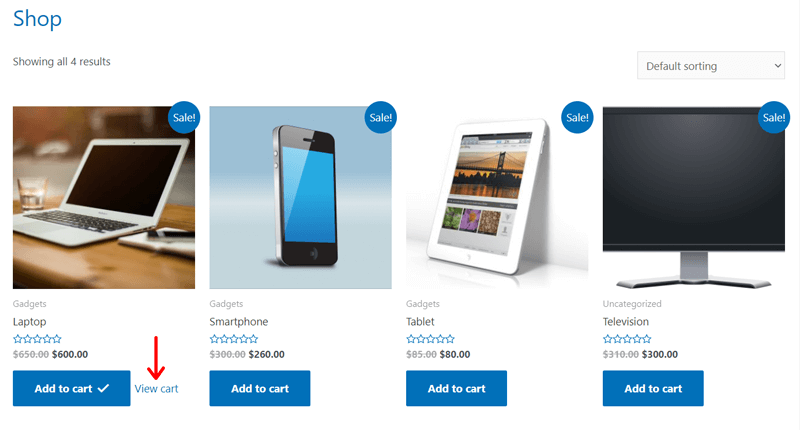
For that, preview your website by going to the Shop page. Now, click the Add to Cart button on one of the products on the page. Then, click on the View cart option. That’ll redirect you to the Cart page.
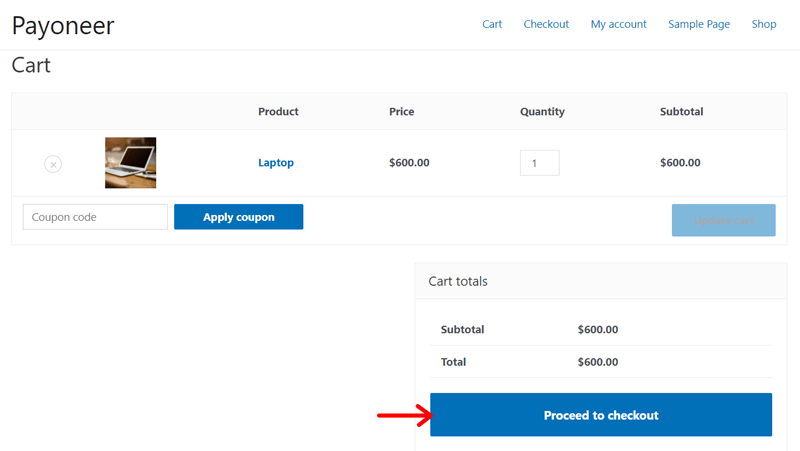
On the ‘Cart totals’ section, there’s a button Proceed to Checkout that you must click. As the Checkout page opens, you can see the billing details on the left side and the Payoneer payment option on the right side.
Fill in the important information of the billing details including name, address, mobile number, email address, etc. After that, make the payment for your ordered product using the email address provided.
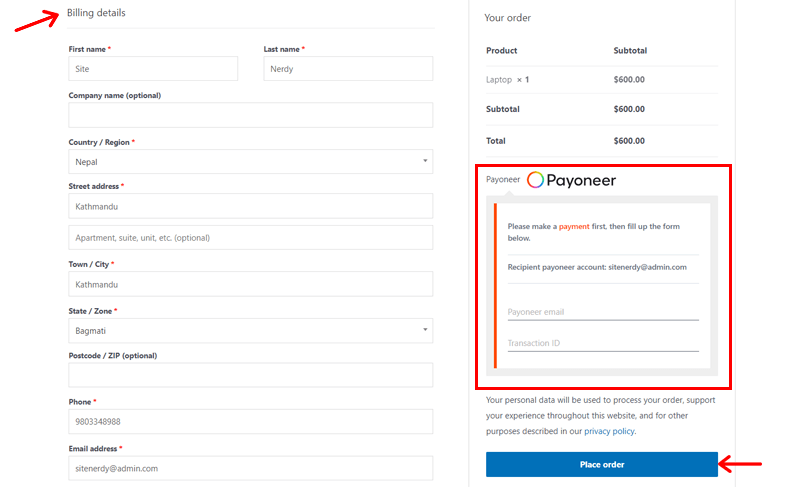
When you transfer money to that email, you’ll receive the transaction ID. Now, you must fill in your Payoneer email and that transaction ID on the gateway form. Lastly, click on the Place Order button to order the item.

By doing that, you’ll get redirected to another webpage mentioning that your order has been received. This shows that Payoneer is successfully integrated into WordPress WooCommerce.
Step 7: Check the Order List
Lastly, you can also check the order list on your dashboard. This’ll justify that the order placement is successful or not.
To do that, go to your dashboard again. There, click on the Orders option in the WooCommerce menu. Here, you can see the list of orders made.
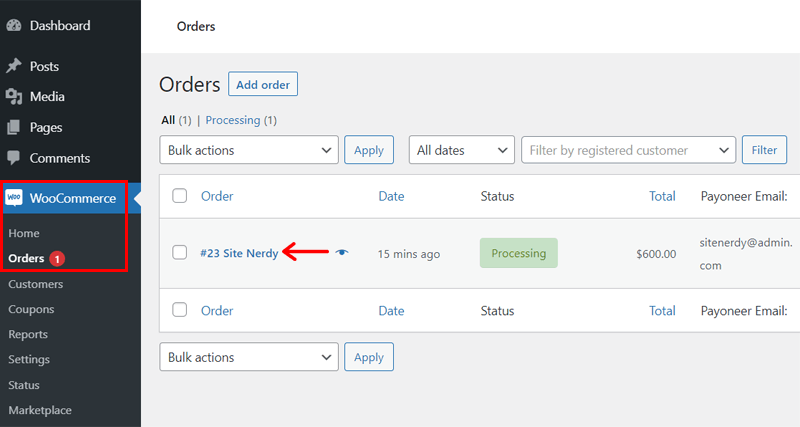
Now, as an owner of the eCommerce site, you can change the status and other information of each order. Like you can set the order status as ‘Completed’.
After completing these 7 steps, now you’re able to know how to integrate Payoneer in WordPress. It’s necessary to have a Payoneer account to do so.
However, Payoneer is not only the payment solution. There are others also present that you can include on your WordPress. You can have a quick peek at them in the following section.
E) Alternatives to Payoneer
Now, let’s look at some of the good alternatives of the Payoneer solution. They are discussed hereby.
1. PayPal

PayPal is an easy-to-use and safe solution to pay and get paid online. Users can pay in any way that they like using this payment solution. Such as by credit cards, bank accounts, etc. without sharing any financial information.
It was founded in California in 1998 and now has become a global leader in payment solutions. Using PayPal, payment is possible across 202 countries and 25 currencies around the world.
2. Skrill

Skrill offers a wide range of online payment and money transfer services. You can upload money to Skrill wallet by a variety of payment solutions. Such as card, bank transfer, etc. Plus, the funds can be used to pay other Skrill users, merchants, and more.
This digital wallet provider was established in 2001. And now it has been operating in 120+ countries in 40 different currencies.
3. Google Pay

Google Pay is a safe, simple, and helpful digital wallet platform and online payment solution by Google. It provides an app, online, and in-person contactless purchase option on mobile devices for easy payment on Andriod phones.
Using Google Pay, you can easily stay connected with your favorite businesses. Also, you’ll get insights about what you have, your recent activity, and what you’ve spent.
Conclusion
That’s all folks! We’ve come to the end of this guide.
We truly hope that you’re able to understand how to integrate Payoneer in WordPress WooCommerce. This guide provides step-wise details on the entire process. So, we also hope you were also able to follow them and integrate Payoneer into your store.
If there’s any confusion or difficulty you’re facing during this process, then post a comment below. We’re eagerly waiting to provide you with solutions to solve your problems.
Similarly, you may also like some of our similar articles on how to start a WordPress blog and how to create a website.
Lastly, show us your support by following our social media handles on Facebook and Twitter.
