Are you curious to build a website with Webflow but don’t know how? If yes, then stay right here.
Embarking on website design can be simple and stress-free. With Webflow, building a stunning website is a breeze, even if you’re not a coding pro.
With its intuitive interface and powerful design tools, Webflow is the perfect platform for unleashing your creativity. And taking your website to new heights.
By the end of this article, you’ll have all the knowledge you need to build a website with Webflow that’ll leave your visitors in awe.
We’ll walk you through the step-by-step process, and you’ll have your impressive website up and running in no time!
Now, let’s dig in!
Understanding Webflow
Before you start to build your website with Webflow, it’s essential to understand what this powerful platform has to offer. So, let’s proceed with a brief introduction.
Webflow serves as one of the best website builders for crafting stunning and interactive websites. Hence, it simplifies website creation without having to be a coding expert to use it.
It’s a space where your creativity can flourish, allowing you to construct any website that truly represents your brand.
In fact, it goes beyond just a website builder; it offers a comprehensive set of features. That empowers you to build a website tailored to your specific needs.
Once you log in, you’ll find an intuitive dashboard that places all the essential tools right at your fingertips.
On top of that, with its drag-and-drop functionality, you can easily create and customize elements on your website. From headers and footers to interactive forms and animations.
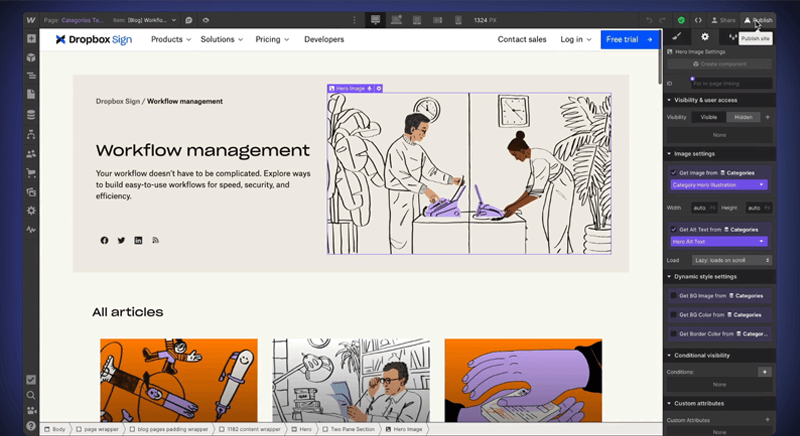
Not to mention, the platform also provides a robust selection of templates and themes to jumpstart your design process. As a result, this ensures your website looks polished and professional from the start.
Therefore, with Webflow, building your website becomes a delightful and effortless experience.
Scope of Webflow
One of the key strengths of Webflow lies in its flexibility. With Webflow, you have the freedom to design and customize every aspect of your website.
Whether you want a simple one-page layout or a complex multi-page website, it provides the tools and flexibility to make it happen.
From choosing the perfect font and colors to implementing advanced animations and interactions. The possibilities are virtually limitless with Webflow.

Precisely, you can use Webflow to build the following websites:
- Blogging Websites: Platforms for individuals or groups to publish articles, stories, and insights on various topics.
- Business Websites: Online hubs for companies to showcase products, services, and contact information.
- Portfolio Websites: Showcases of an individual’s or professional’s work, such as art, design, or photography.
- eCommerce Websites: Online stores where products or services are bought and sold.
- Event Websites: Platforms for promoting and managing events, conferences, or gatherings.
- Educational Websites: Online resources for learning, including courses, tutorials, and educational content.
- Non-profit Websites: Websites for charitable organizations and NGOs to share their mission, goals, and donation information.
Having considered Webflow’s wide scope, you might wonder if this website builder is too costly. So, let’s explore the pricing in the next section.
Pricing
When it comes to pricing, Webflow offers different plans to cater to various needs. Each plan provides access to different features and benefits, allowing you to choose the best fit for your project.
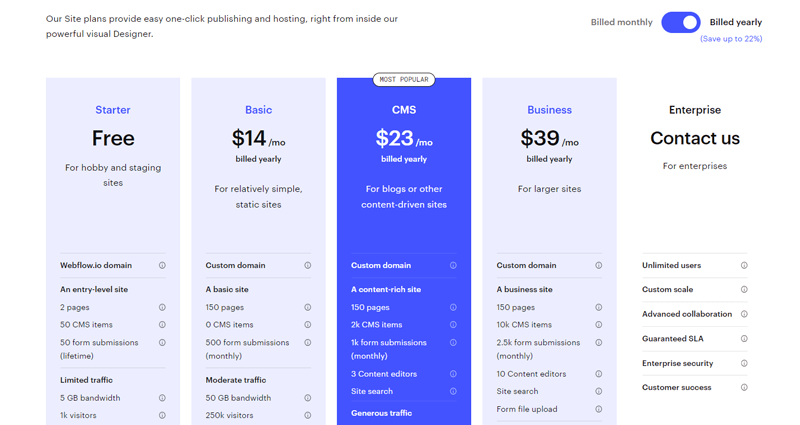
Here’s a brief overview of the pricing schemes of Webflow:
- Starter Plan: Free. Comes with a custom domain, 50 CMS items, 50 form submissions, and 1 GB of bandwidth. Ideal for learning how to use Webflow.
- Basic Plan: $14/month billed yearly. Everything in the Starter Plan. Along with 500 monthly form submissions and 50 GB bandwidth. Best for launching a simple site.
- CMS Plan: $23/month billed yearly. Everything in the Basic Plan. Plus 2000 CMS items, 1000 monthly form submissions, 200 GB bandwidth, etc. Ideal for a blog and content-driven sites.
- Business Plan: $39/month billed yearly. Everything in the CMS Plan. Plus unlimited team members, unlimited projects, and priority support. Best for a high-traffic marketing site.
- Enterprise Plan: Custom-priced. All features of the Business Plan. Plus additional features such as custom monthly forms, custom bandwidth, etc. Ideal for firms with complex needs.
Now that we’ve explored the foundations of Webflow, its features, scope, and pricing.
We’re ready to build a website with Webflow in the next part of this article.
How to Build a Website with Webflow? (Step-by-Step)
So, put on your designer hat and get ready to dive into the exciting world of web development with Webflow!
Step 1: Planning Your Website Journey
Before you start to build your website with Webflow, it’s important to take some time to plan your journey. This means considering what you want your website to achieve, what your visitors want, and how you want them to feel.
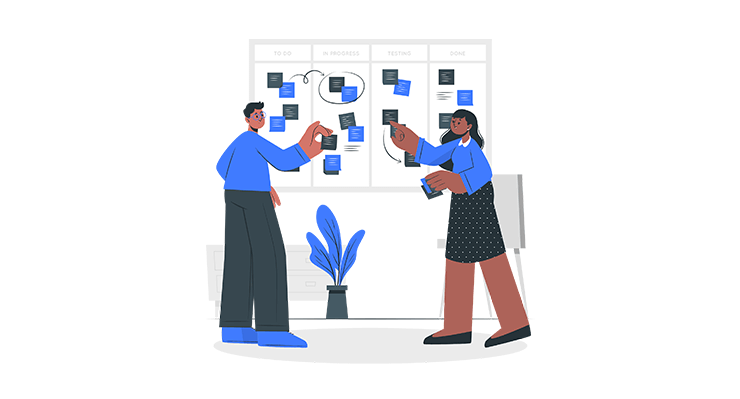
Here are some tips and techniques to follow as you plan your website journey:
- Define Your Goals: Clarify your website’s purpose – showcase a portfolio, promote a business, or sell products. Goal clarity shapes design and content.
- Identify Your Target Audience: Know your audience’s demographics, interests, and needs to tailor your website’s design and content effectively.
- Sketch Your Layout: Create a basic wireframe for your website’s sections and pages, aiding content structuring and logical flow.
- Plan Your Content: Strategically plan written, visual, and interactive content aligning with goals and audience needs.
- Research and Gather Inspiration: Explore niche-related websites for design, functionality, and user experience ideas, enhancing your uniqueness.
- Create a Sitemap: Construct a visual roadmap with main and subpages to ensure user-friendly navigation.
All done? Congratulations! You’ve completed the first step of your Webflow website journey.
Now armed with a solid plan, you’re ready to dive into the design and development phases.
Step 2: Getting Started with Webflow
In this step, we’ll cover the initial setup and the Webflow interface, a powerful web design and development platform.
I) Creating a Webflow Account
Begin your Webflow journey by signing up for a Webflow account. Simply visit the Webflow website and click on the ‘Get Started’ option.
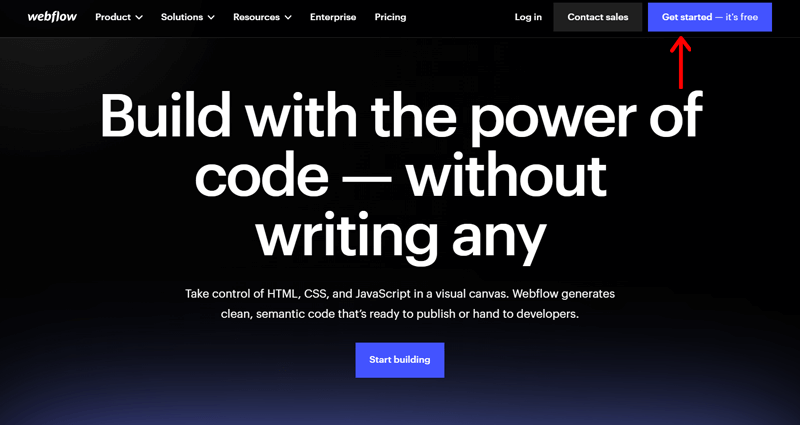
You can choose between a free account with basic features or explore various paid plans that offer additional features and hosting options. For this guide, we’ll be using the free version.
Follow the prompts to sign up with your email address and provide the necessary information.
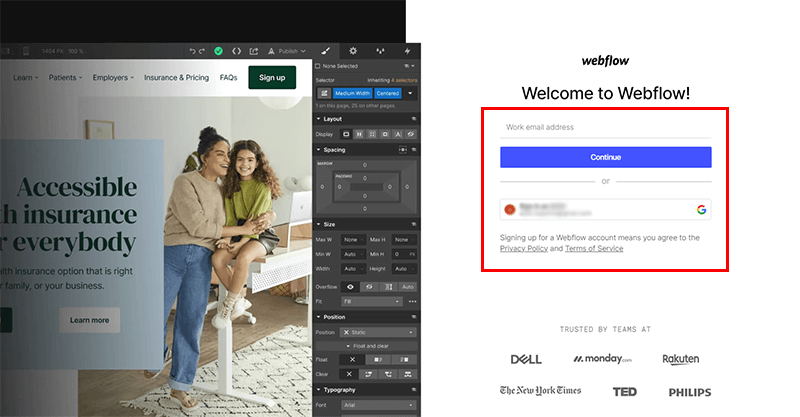
Next, select your role. In this case, we’ll choose ‘Marketer’ to align with our goal of creating a website.
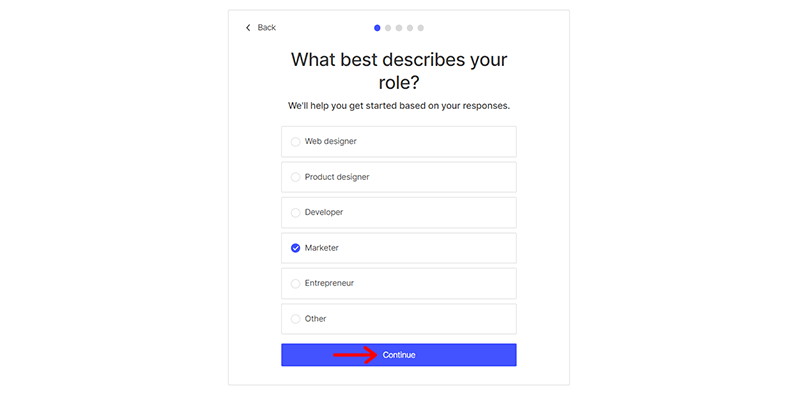
After selecting your role, click ‘Continue’ to proceed.
Webflow will then ask, ‘Who will you be building websites for?’ In this case, choose ‘My Business’ to indicate that you’re creating a website for your business.
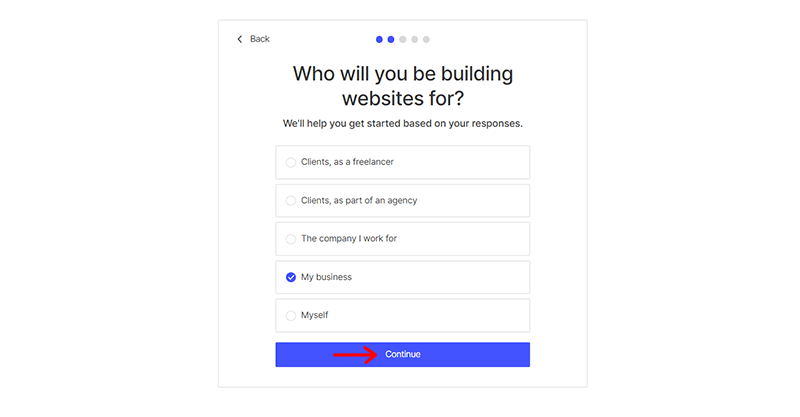
Click ‘Continue’ to move forward with the setup process.
You’ll be asked about your familiarity with HTML and CSS. Choose the option that best represents your comfort level. Here, we’re selecting ‘I’m unfamiliar with HTML/CSS’.
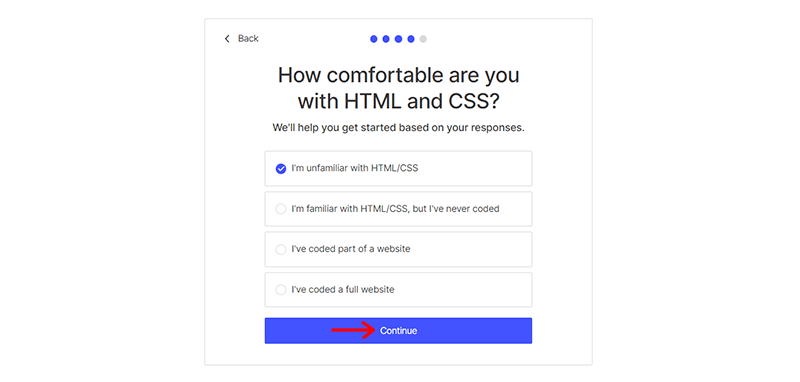
Then, click ‘Continue’ to proceed to the next step.
Now, specify what you want to create with Webflow at this point. Let’s choose the ‘Business Site’ option from the list since our objective is to create a general website.
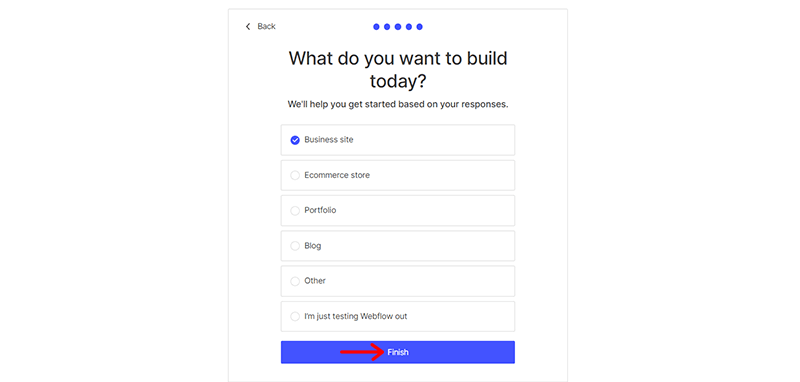
Click ‘Finish’ to complete the account setup process.
II) The Webflow Interface
After creating your Webflow account and finishing the setup process, it’s time to become familiar with the Webflow interface.
Once you log in, you’ll be directed to the Webflow dashboard, which serves as the central hub for managing your website projects. It functions as your control center, providing easy access to your projects, site settings, hosting configurations, and more.
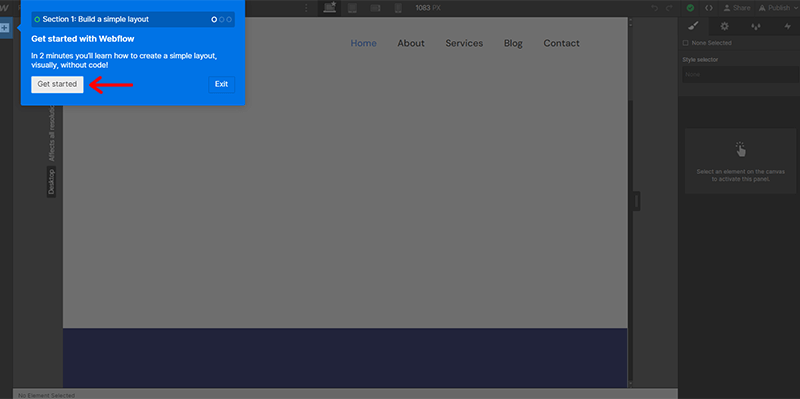
Now, take a moment to explore the various sections and familiarize yourself with the available navigation options. It’s worth noting that Webflow provides brief tutorial guides directly within the dashboard menu.
After spending some time exploring the dashboard, you’ll be ready to maximize your Webflow experience.
Step 3: Creating a New Website Project & Designing it
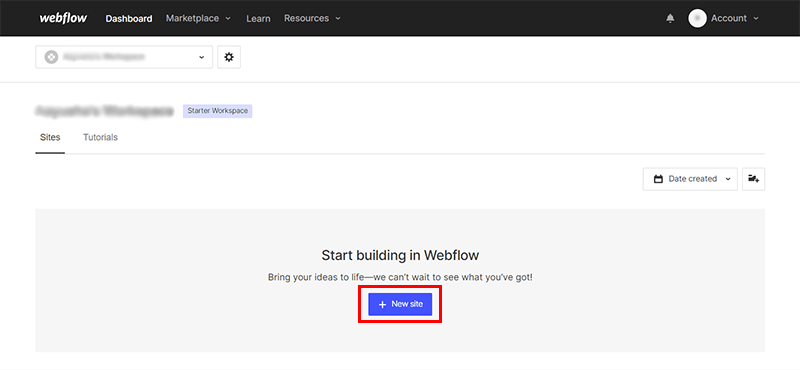
Once you complete the tutorial in Step 2, you’re directed to the page as shown below.
Afterward, all you’ve to do is click on the ‘+ New Site’ option in the blue box.
I) Pick a Suitable Webflow Template
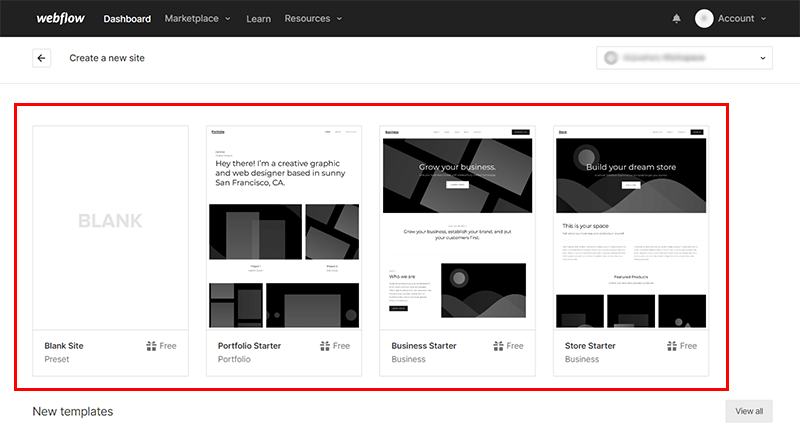
Next, choose a blank template or a pre-made template to kickstart your design process. Webflow offers a variety of templates for different niches, ensuring there’s something for everyone.
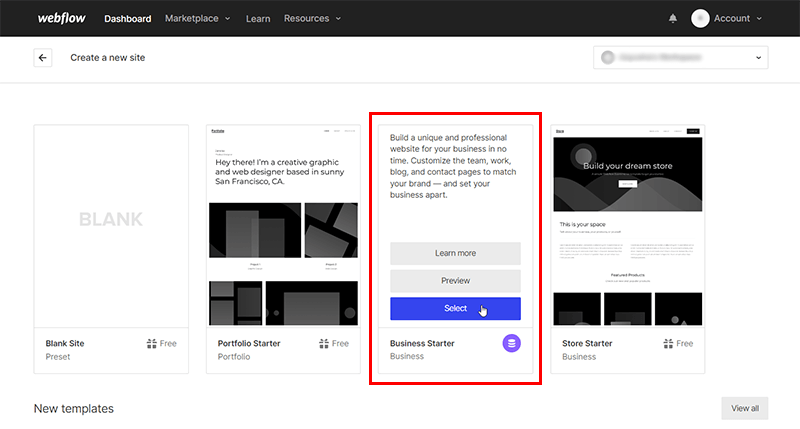
Here, we’re selecting the ‘Business Starter’ template.
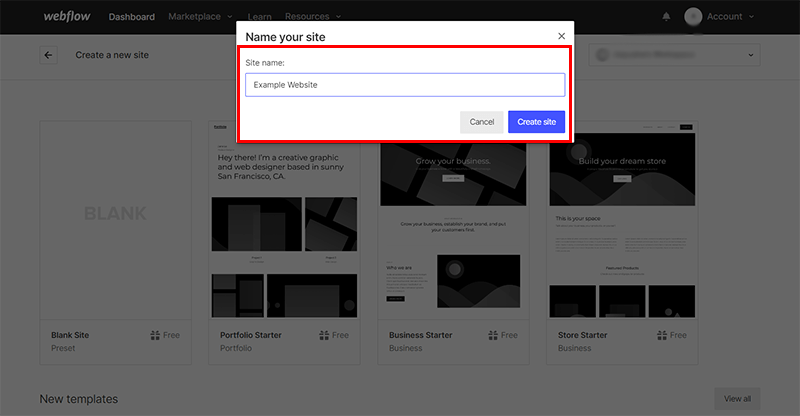
Specify the name of your website. For this demo, we’ve named it ‘Example Website’. Then, click the ‘Create Site’ option to proceed.
II) Do Necessary Customizations
Once your project is set up, you can access the Webflow Designer, a powerful visual editor. That gives you the ability to customize any element of your website’s design, as introduced in Step 2 (II).
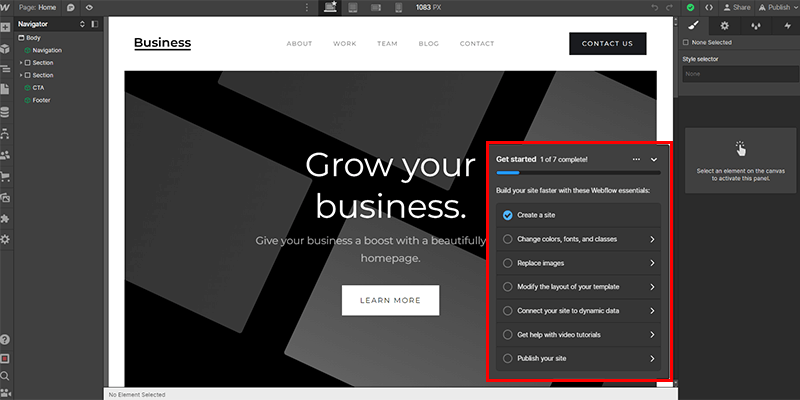
What’s more, you have the option to use Webflow’s helpful Get Started guide for designing your website, as shown below.
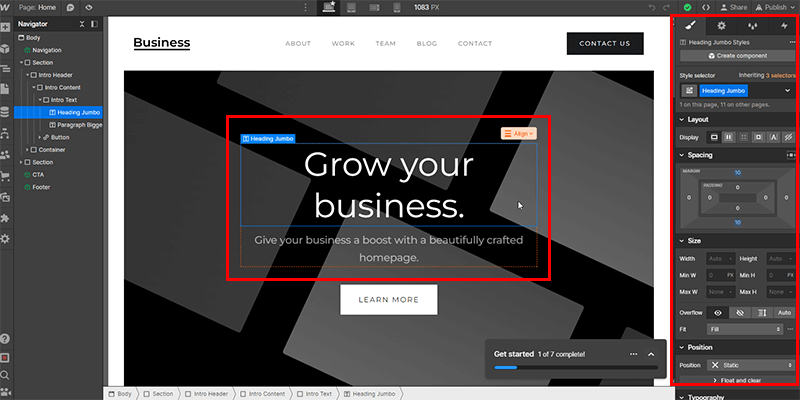
Furthermore, you can choose to select specific components from your imported template. And take advantage of Webflow’s grid system, responsive design options, and a vast library of pre-designed components.
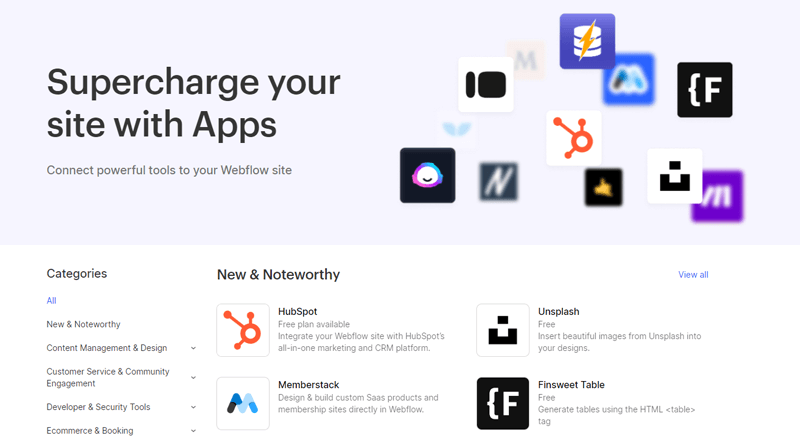
You can find more information about these extensions on the Webflow Apps page.
This approach empowers you to design layouts, add elements, and select fonts and colors while giving free rein to your creativity. Ultimately, you’ll create a website that authentically represents your vision.
You are now well on your way to building your website with Webflow. Keep in mind the fundamental steps. And explore the various customization features and settings available to make your website truly exceptional.
Step 4: Customizing Website Pages
Since we’ve imported Webflow’s business template earlier, there’s no need to create website pages from scratch. Instead, you can choose the pages and customize them to your liking.
To access the ‘Pages’, click on the fourth icon on the left navigation, as shown below.
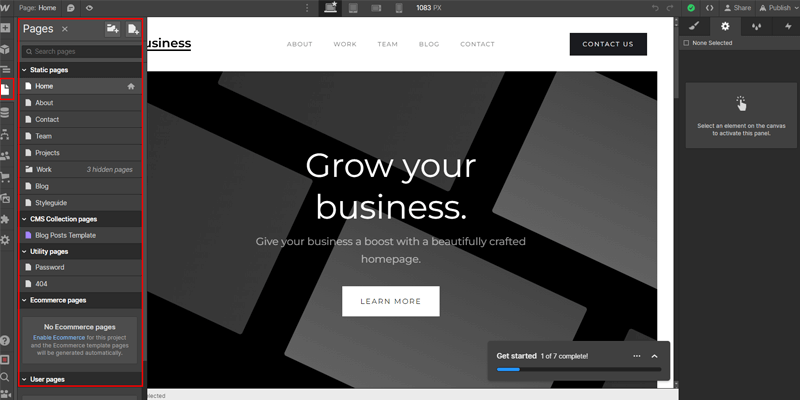
From here, you can access all available web pages and customize them one by one.
For now, let’s customize some of the essential pages.
I) About Page
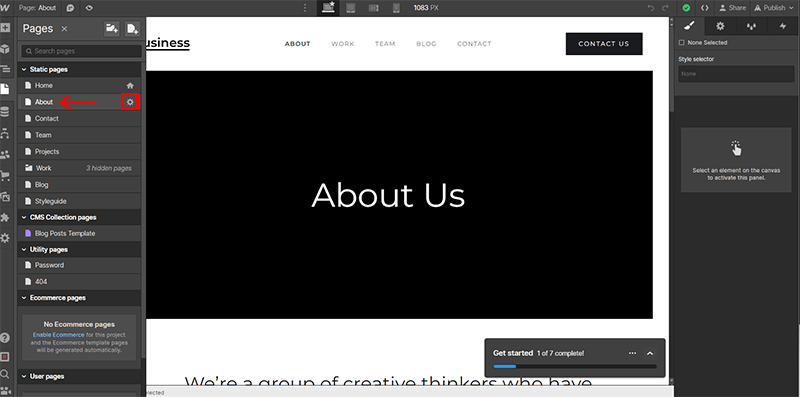
Start by clicking on the ‘About’ page to access it. Beside it, you’ll find a small settings icon. Click on it.
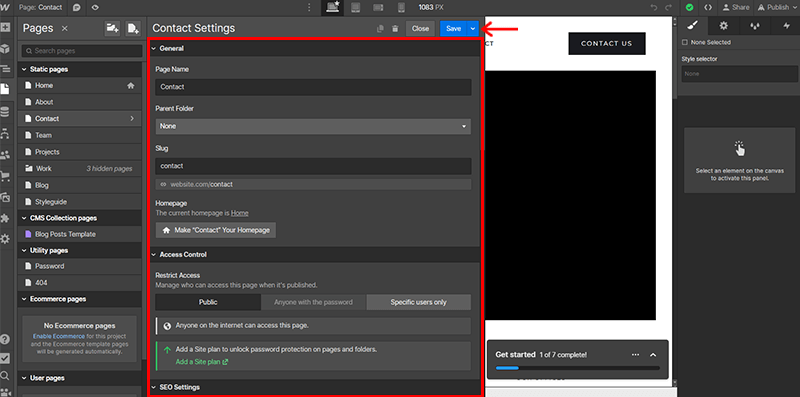
Here, you can configure 3 main settings. They are ‘General’, ‘Access Control’, and ‘SEO Settings’ for the page.
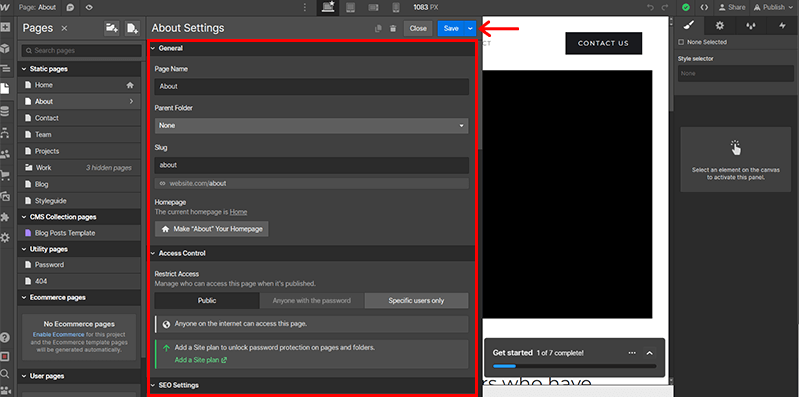
Once you’ve made the necessary adjustments, click the ‘Save’ button to save your changes.
Next, click on each element of the ‘About’ page to customize it with your desired information.
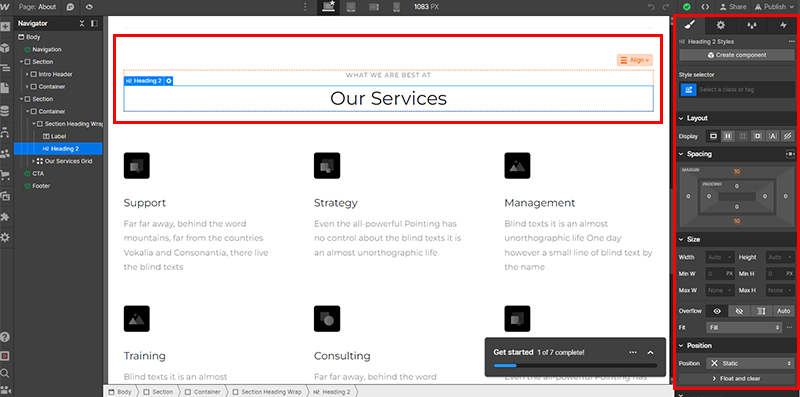
To do this, click on the element on the left and configure it using the settings options on the right.
II) Contact Page
Now, similar to the About page, click on the ‘Contact’ page to further customize it.
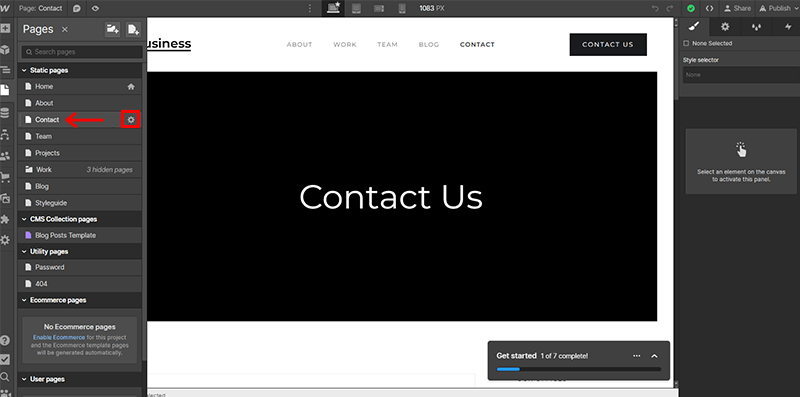
Click the settings icon, and you’ll find settings as seen previously. Make the required customizations and click ‘Save’.
Then, individually edit the relevant sections of the Contact Us page to tailor it precisely to your preferences.
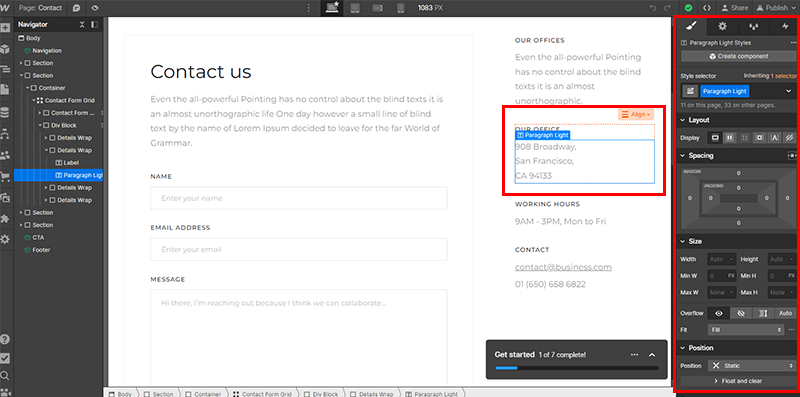
You can follow the same process to configure other pages of your website. Such as the ‘Team’ page, ‘Work’ page, ‘Blog’ page, and more.
III) New Page
Meanwhile, if you want to add a new page, then you can simply click on the second icon just beside the Pages option. You can refer to the image below for reference.
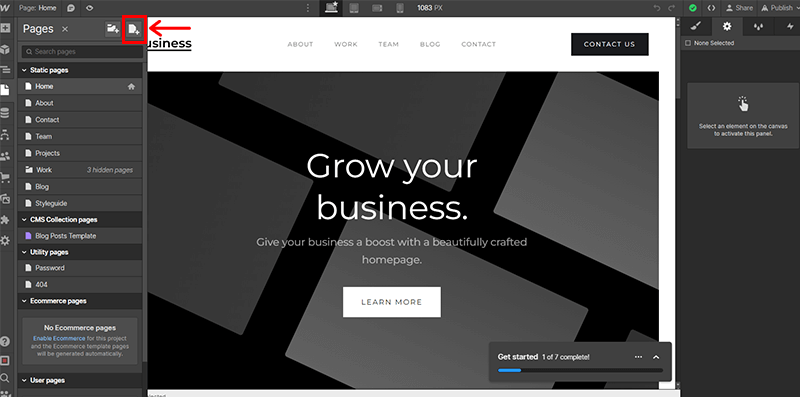
However, do note that you’ll have to upgrade to the premium version of Webflow to add more pages than already specified pages.
With these customizations complete, let’s move on to the next step.
Step 5: Enhancing Interactivity and Functionality
In this step, we’ll take your website to the next level by adding interactivity and essential functionalities. That engages your visitors and provides a seamless user experience.
Let’s go!
I) Adding Basic Animations and Interactions
Animations and interactions can help to make your website more visually appealing and engaging. So, here’s how you can do that with Webflow.
Simply, click on the element you want to animate or add an interaction to. Then, open the Interactions panel.
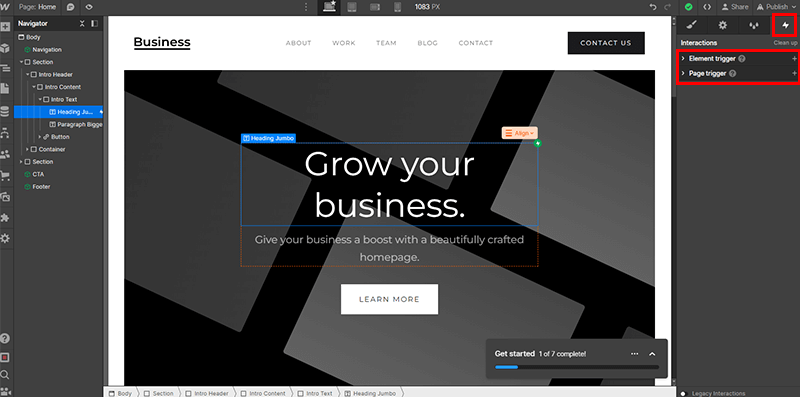
Here, you’ll find 2 major interaction elements. They are ‘Element Trigger’ and ‘Page Trigger’.
Now, choose the type of interaction you want to create. For now, let’s go with the ‘Element Trigger’. Simply click on the ‘+’ icon just right to it.
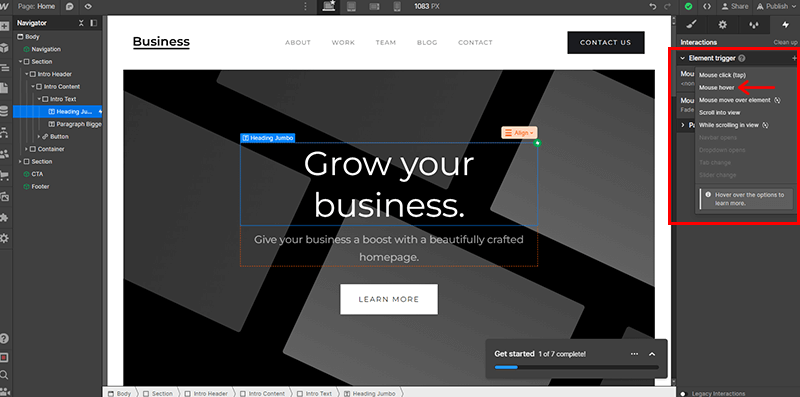
With that, you’ll see several choices of how you want the animation to begin. Like ‘Mouse click’, ‘Mouse hover’, ‘Mouse move over element’, ‘Scroll into view’, etc.
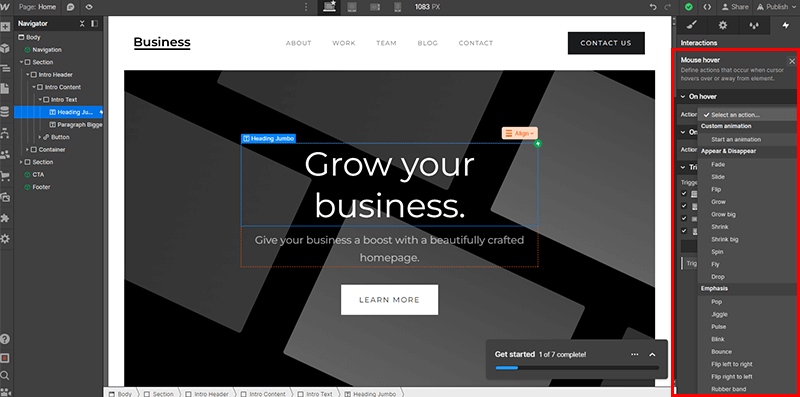
Now, let’s go with ‘Mouse hover’ for now. On clicking it, you’ll find several animation choices. Such as ‘Fade’, ‘Slide’, ‘Flip’, ‘Pop’, etc. Select the one you want.
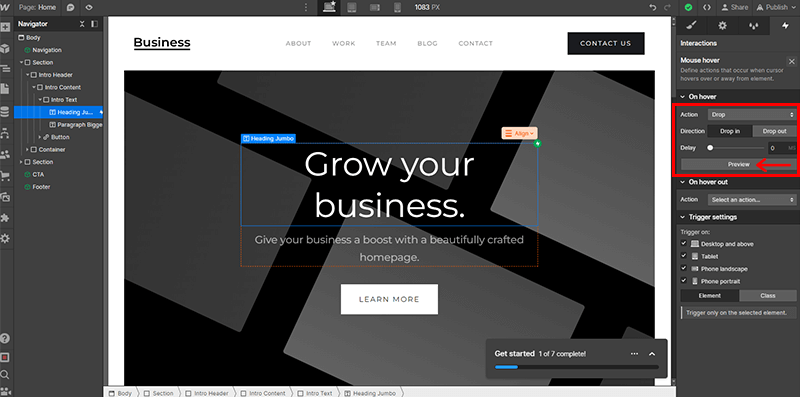
For now, we’ll go with the ‘Drop’ animation. You can click on the ‘Preview’ option to see the animation right there.
II) Integrating Forms for Contact or Feedback
Since our imported template already comes with a default contact form. You don’t need to do much to integrate forms for contact or feedback. However, you can certainly customize it the way you want.
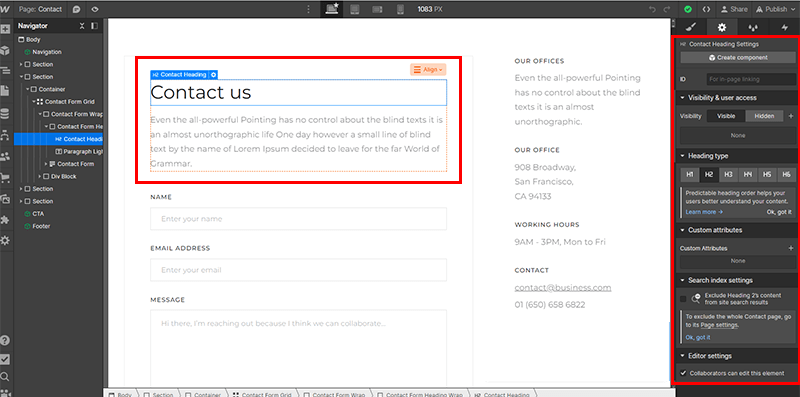
For that, again navigate to the ‘Contact’ page. On scrolling a bit down, you’ll find a form field for contact and feedback purposes.
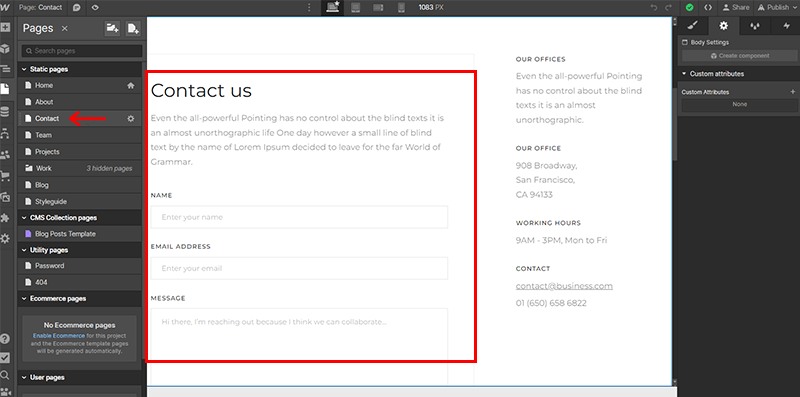
Now, you can select a particular element of the form and customize it. For example, you can precise the heading type, custom attributes, and so forth.
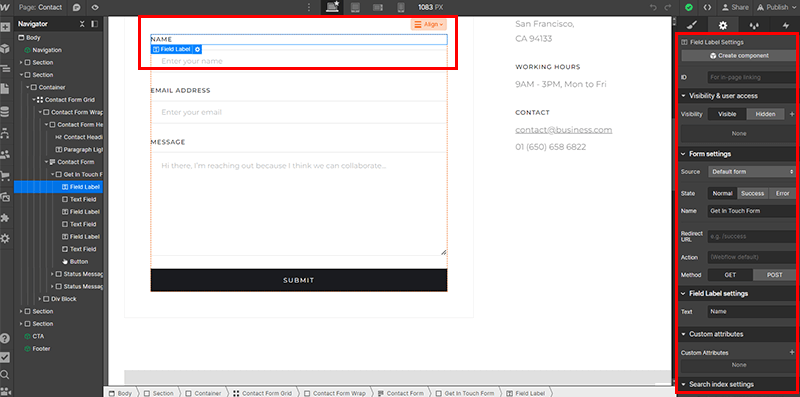
Similarly, you can select the whole form field. And customize the ‘Form settings’, ‘Field label settings’, ‘Search Index Settings’, and more.
III) Responsiveness & Mobile-Optimization
Next up, you need to ensure your website looks and works flawlessly on all devices.
For that, you can use Webflow’s responsive design tools to adjust your layout for various screen sizes.
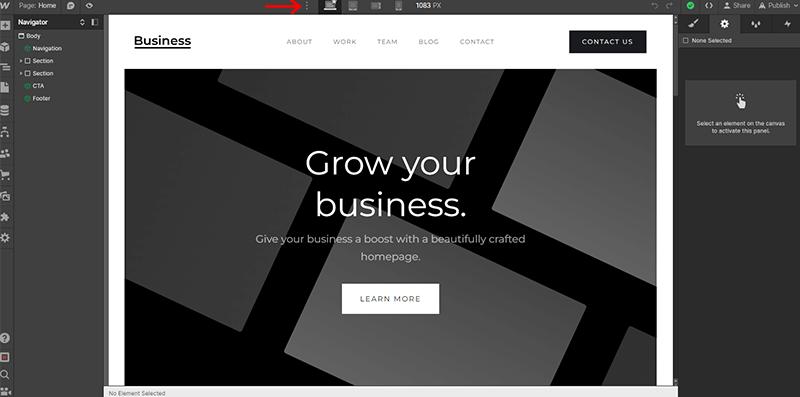
On the top bar, you can see several icons. On clicking each icon, you can Preview to see how your site appears on desktop, tablet, and mobile devices. And test your site’s responsiveness.
For instance, on clicking the Tablet icon, you’ll see how your site appears on tablets.
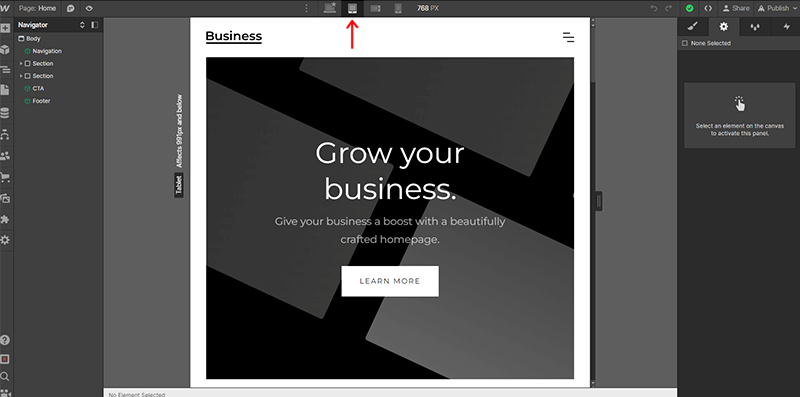
Similarly, check how your site looks on mobile devices via a quick click on a mobile icon.
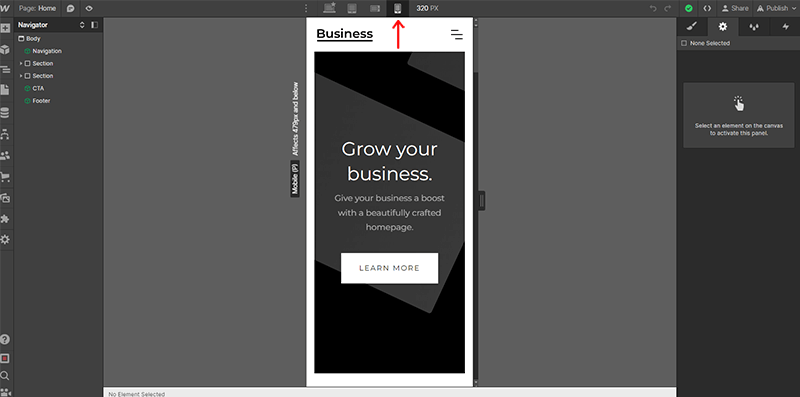
With that, you can make adjustments as needed to maintain a consistent and user-friendly experience across all screen sizes.
Also, pay special attention to mobile optimization. As more users access websites on smartphones. So, you must ensure that buttons and text are appropriately sized and spaced for touchscreens.
By prioritizing interactivity, functionality, and responsiveness, you’ll craft a visually appealing website that offers an engaging, user-friendly experience.
Step 6: Optimizing the Website for Search Engines
Now that you’ve created a stunning website, it’s time to ensure that it’s easily discoverable by search engines like Google. Search Engine Optimization (SEO) is crucial for increasing your website’s visibility and attracting organic traffic.
And yes, Webflow provides built-in SEO settings that you can use to optimize your website. To access the SEO settings, go to the Page Settings tab and scroll down to the ‘SEO Settings’.
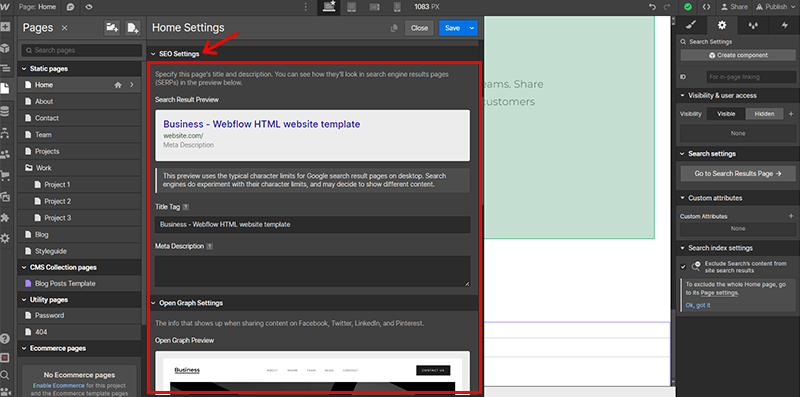
The SEO settings in Webflow include:
- Title tag: The title tag is the text at the top of the browser tab. It’s one of the crucial elements for SEO, so make sure to include your target keywords.
- Meta description: It’s the text under the title tag in the search engine results pages (SERPs). It should be a brief and concise overview of your site with your target keywords.
- Robots.txt: It guides search engine crawlers on which pages to index or ignore. You can use the robots.txt file to prevent search engines from indexing under-construction pages.
- Sitemap: A sitemap is a file that lists all of the pages on your website. It helps search engines crawl your website more efficiently. You can easily create a sitemap using the Webflow SEO tools.
- Canonical URL: The canonical URL specifies the preferred URL for a page to avoid duplicate content issues. You can set the canonical URL for a page in the SEO settings.
Extra SEO Tips:
In addition to these built-in SEO settings, there are several other things you can do to optimize your Webflow website for SEO. These include:

- Keyword research: Select relevant keywords for your content.
- High-quality content: Create clear, concise, and informative content that resonates with your audience.
- Backlinks: Build trustworthy backlinks from other websites.
- SEO plugins: Consider using SEO plugins for additional optimization.
- Consistent design: Maintain a consistent layout for better search engine understanding.
- Image optimization: Use descriptive alt text and optimize image file sizes.
- Fresh content: Update your website regularly for search engine favor.
- Monitor and analyze: Use SEO tools to track and improve your website’s performance.
Following these tips will help you optimize your Webflow website for SEO and increase your chance of getting found by potential visitors.
Step 7: Testing Your Website
Once you are happy with the design and content of your website, it’s important to test it thoroughly to make sure it is working properly.
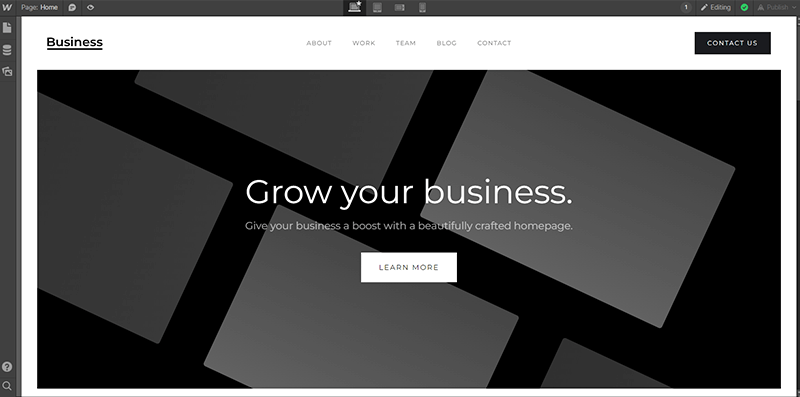
Here are some things to test:
- Functionality: Verify all features and functionality, such as links, forms, and payments.
- Responsiveness: Check your website’s appearance and performance on various devices.
- Cross-browser compatibility: Ensure your website works well in different browsers.
- Broken links: Use tools like W3C Link Checker to identify and fix broken links.
- Security: Implement security measures and obtain an SSL certificate for your website.
Remember, testing your website is not a one-time process. It’s essential to continually test and optimize your website based on user data and feedback. To ensure it remains effective and user-friendly.
Step 8: Launching Your Website
Once you have tested your website and are happy with it, you are ready to launch it.
Since Webflow is a fully hosted website builder, you don’t have to worry about managing your hosting and domain. The premium plans of Webflow automatically provide you with that facility.
All you’ve got to do is point your chosen domain name in the publish settings in Webflow.
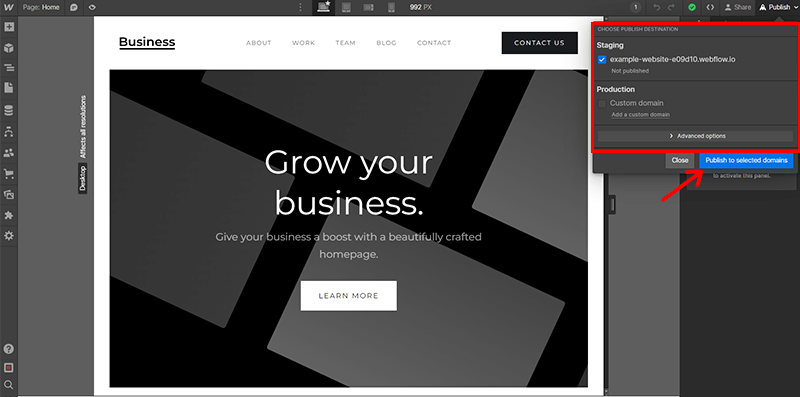
Since we’re using the free version of Webflow to build the website here, we’re going with the webflow.io domain.
Then, click on the ‘Publish to selected domains’ and here you go!
Nevertheless, you can certainly use your own domain and hosting and utilize the Webflow platform to launch your website too.
For that, here’s how you can do it:
- Purchase a domain name: A domain name is the address of your website on the internet. You can purchase a domain name from a domain registrar, such as GoDaddy or Namecheap.
- Sign up for web hosting: Web hosting is the service that stores your website files and makes them accessible to visitors. You can sign up for web hosting from a web hosting provider, such as Bluehost or Cloudways.
- Point your domain: Next, you need to point your domain name to your web hosting account. This tells the internet where to find your website.
Finally, when you have pointed your domain name to your web hosting account, you can publish your website.
To do this, you will need to follow the same process as earlier. That is, go to the publishing settings in Webflow and select your domain name. And hit the ‘Publish’ button.
Step 9: Post-Launch Tasks
Hold on! Even if your website is alive your job is not done yet. You need to do a few more things to keep your website running smoothly and successfully.
Here are some important post-launch tasks to do after you’ve built your website with Webflow:
- Promotion: Once your website is live, you need to promote it. You can do this via social media marketing, email marketing, and other channels.
- Content updates: Keep your website up-to-date with fresh content. This will help keep visitors coming back to your website.
- Traffic monitoring: It’s important to monitor your website traffic so that you can see how people are finding it. And what pages they are visiting.
- Analytics analysis: Your website analytics tells a lot about how people are interacting with your site. This helps you improve your website’s design, content, and functionality.
- Feedback response: People will leave feedback on your website, both positive and negative. So, respond to the feedback positively to increase the user-friendliness.
- Error resolution: There will inevitably be some errors or problems with your website. So, fix any errors as soon as you find them so that they do not affect your site’s performance.
- Regular backups: Last but not least, back up your website regularly so that you can restore it if something goes wrong.
By following these post-launch tasks, you can ensure that your website is successful and continues to grow and improve over time.
Extra Tips:
Here are some additional tips for post-launch tasks:
- Track your set goals: As we already did in step 1, you can track your progress and make sure that you are on track.
- Be patient: It takes time to build a successful website. Don’t expect overnight success. Just keep working hard and you will eventually see results.
- Have fun!: Building a website should be enjoyable. If you’re not having fun, then it’ll be difficult to keep up with the work involved.
Having said that, let’s explore some of the frequently asked questions on how to build a website with Webflow.
Frequently Asked Questions (FAQs)
Q.1 Do I need coding skills to use Webflow?
A: No coding skills are necessary! Webflow offers a user-friendly visual interface for website design and development. However, if you’ve got the skills, then it’s definitely a plus point.
Q.2 Can I use my own domain with a website built in Webflow?
A: Yes, you can connect your custom domain to your Webflow site for a personalized web address.
Q.3 What is the cost of using Webflow, and are there any free options available?
A: Webflow provides both free and paid plans, with pricing options to suit various website needs and budgets.
Q.4 How can I optimize my Webflow website for SEO?
A: To optimize SEO, you can use descriptive titles, meta descriptions, and keywords, and maintain a well-organized site structure.
Q.5 What kind of support and documentation does Webflow offer for users?
A: Webflow offers extensive support and resources, including tutorials, a community, a help center, a Webflow forum, and more.
Are you wondering if there are any detailed tutorials to build a website with WordPress? If so, then do check our comprehensive article on how to create a website.
Conclusion
And that’s all, folks! We’ve come to the end of our article on how to build a website with Webflow.
We believe you can smoothly build a website with Webflow following the above-mentioned steps and guidelines. All you’ve to do is start right now!
Still any queries? Don’t hesitate to ping us in the comment section below. We’re more than happy to help you to build your website with Webflow.
You might love exploring our other comprehensive tutorial guides. Such as how to build a job board website with WordPress and how to build an affiliate marketing website.
Also, don’t forget to share this article with your friends and family planning to build a website with Webflow.
Lastly, please follow us on our social media handles Facebook and Twitter to stay updated with our articles.


