Do you want to learn how to add a banner in WordPress? And want to add banners in the finest ways for conversions? If yes, then here we go!
Banners help you inform your site visitors about special offers, deals, or business updates. It’s a smart way to convert your website visitors, into potential customers.
Nevertheless, the core concern is determining the most effective way to add a banner to your WordPress website. But now, don’t be concerned anymore! We’ve you covered.
In this tutorial, we’ll guide you through several methods to add a banner to your WordPress site. That further leads you to the best conversions.
So, let’s dig in!
Why Do You Need to Add a Banner to Your WordPress Site?
Before we move ahead, let’s explore the top reasons to add a banner to your WordPress site. They are:
- Create a focal point which is the first thing noticed on your website by site visitors.
- Showcase particular products or display exclusive offers. So that more users access such offerings.
- Make use of banners to redirect visitors to landing pages, social media campaigns, or email marketing.
- Displaying brand-new products, or top-selling items on your banner will draw users’ attention.
- Banners with high-resolution featured images help to project an appealing appearance to site visitors.
Hence, it’s crucial to get a website banner correctly. Since it only has a few seconds to grab a visitor’s attention. And persuade them to continue browsing the site.
With that, let’s explore various types of banners that you can add to your website.
Types of Banners You Can Add to Your Website
Adding relevant, distinctive, and interesting banners on your website is the key to ensuring the best conversions. In fact, there are several types of banners that you can add as per your website’s requirements.
So, let’s get to know them briefly.
i) Affiliate Banner
Affiliate banners are graphics with different sizes that are made to increase your sales. Also, you can earn commissions by advertising the goods and services of businesses. In other words, this process is also known as affiliate marketing.
For example, you can check out the website Wirecutter. On the right-hand side, you can see the Daily deals section. Here, you can find various affiliate banners added to this website.

For most affiliate banners, you can easily copy the HTML code that most merchants supply to you. Then, add eye-catching visuals to your website and increase affiliate revenue.
ii) Advertisement Banner
Advertisement Banner is another form of the banner that’s used in the context of digital advertising. Whereby, brands can advertise their products and entice visitors to visit their websites by using banner ads.
It’s placed strategically on a website either in a static or dynamic format. Further, helping a brand achieve its commercial objectives. Whether those objectives are to increase brand recognition, encourage more clicks, or increase traffic.

For instance, you can check out the website Gear Patrol. On the top section, you can find the advertisement banner for the Blundstone boots.
iii) Notification Banner
Notification Banner is another popular type of banner that precisely sits at the top of your website.
For example, you can check out the popular WordPress theme Zakra’s official website. On top of the site, you can find the red colored notification banner.

It’s used to promote discounts, new features, product upgrades, and other important updates. Not to mention, notification banners are less annoying than in-app, or pop-up notifications.
iv) Scrolling Banner
Scrolling Banner is another clever way to draw people’s attention. And further, divert them at the predetermined period.
With this banner, you can have a specific message scroll over the screen to draw attention. Whether be it for a crucial date reminder or to remind viewers of an essential product or message.
For example, you can explore one of the popular marketplace websites i.e. Amazon.

Once you’re on this website, you’ll see a scrolling banner on the top section. That mentions its best products with the finest discount deals. This is one among the many examples of a scrolling banner.
v) Sales Banner
Sales Banner is another popular type of banner used as one of the effective means for promoting sales. It’s widely used during sales seasons like Black Friday and Cyber Monday. Or say festive seasons like Christmas and New Year.
Nevertheless, most eCommerce store owners also use sales banners for their special hyped-up products and services.
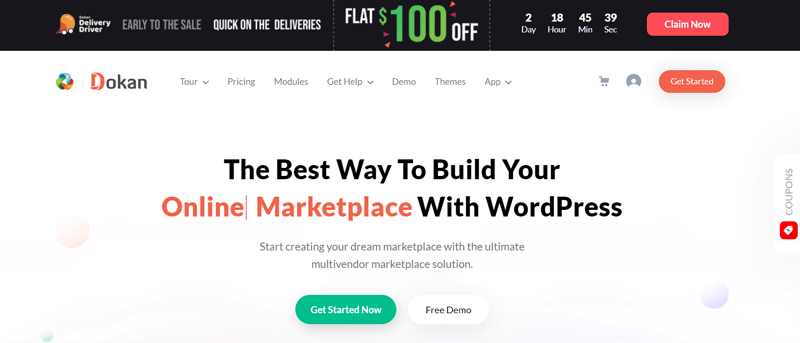
For reference, you can check the Dokan WordPress plugin website. On the top, you can find the sale banner used for early sale purposes.
vi) Popup Banner
Last but not least, we’ve one of the most well-liked banners used i.e. popup banner. As its name implies, these banners “pop up” on the website and present the user with a promotional message.
More precisely, you can understand a popup banner as a banner that spontaneously appears in the visual interface’s forefront. Typically in a window with a distinct boundary.
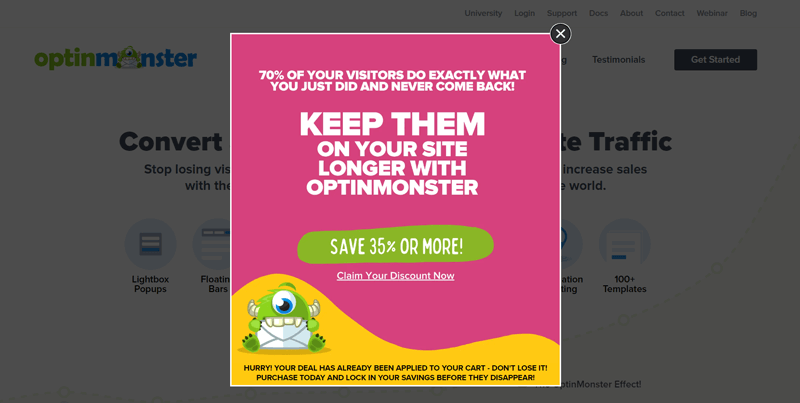
For your reference, you can check out the OptinMonster WordPress plugin’s official website. Once you’ve been on this website for a while, a pop-up banner advertising a discount will appear.
Consequently, you can understand that the popup banner aids in promoting sales and generating leads. That ultimately leads to high conversion rates.
Now that you know the various types of banners you can add to your WordPress site, let’s proceed forward!
How to Add Banner in WordPress? (5 Ways for Best Conversions)
There are various methods that you can use to add banners to your WordPress site.
Here, we’ll explore some of the quickest and simplest methods for adding banners for the best conversion rates.
So follow along with us as we walk you through each method. And choose the one that works best for you and your WordPress website.
Method 1: Use a Theme with Banner Space
The first approach on the list is using a theme that has banner space. It’s among the simplest ways to add banners without using any plugins.
You can simply follow the given steps below:
Step 1: Search For Themes With Banner Space
First, you need to explore themes that provide you with the exact kind of banner space you’re looking for.
If you want us to recommend one, then we’d go for the ColorMag WordPress theme.
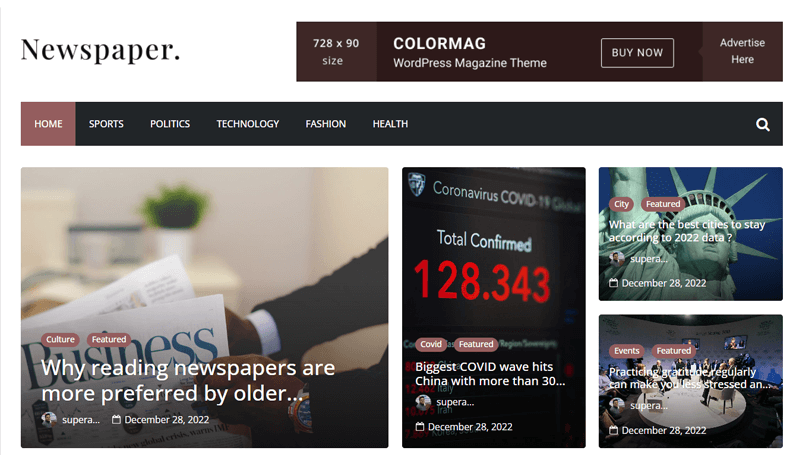
It’s one of the adaptable freemium WordPress themes built with various-sized banner advertising widgets.
As a result, you can easily use its widgets to add adverts to your website. And further, receive payment from the advertisers. Alternatively, you can also use these spaces to put up affiliate banners or sale banners.
Step 2: Install and Activate the Theme
Now that, we’ve decided on a theme, it’s time to install and activate the theme.
For that, all you need to do is log in to your WordPress dashboard.
Then, on the left-hand side of your dashboard, you’ll see the ‘Appearance’ menu. On hovering over it, you’ll find the ‘Themes’ option. Following that, you need to click on the ‘Add New’ option on the top section of your dashboard.
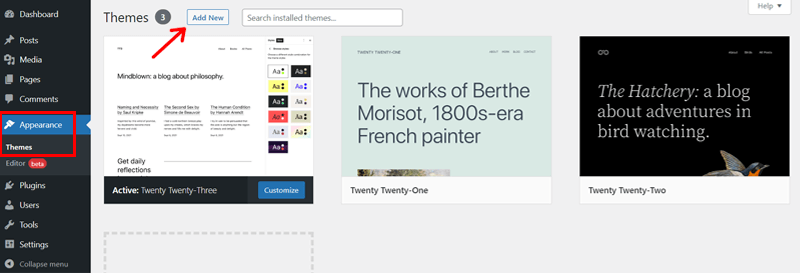
Following that, you’ll see a search bar in the top right corner. There, you need to type in the theme name. As for our theme choice, let’s type in ‘ColorMag’.
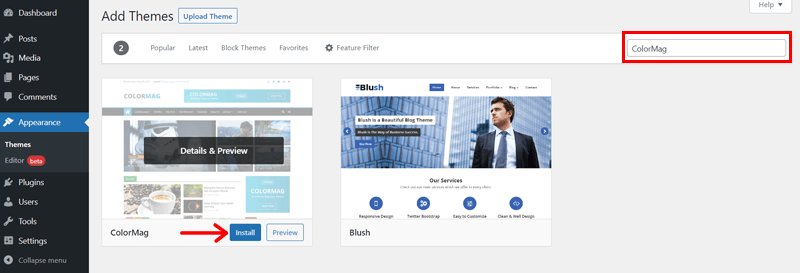
Once you locate the theme, hover over it. With that, you’ll see the ‘Install’ option. Click on it.
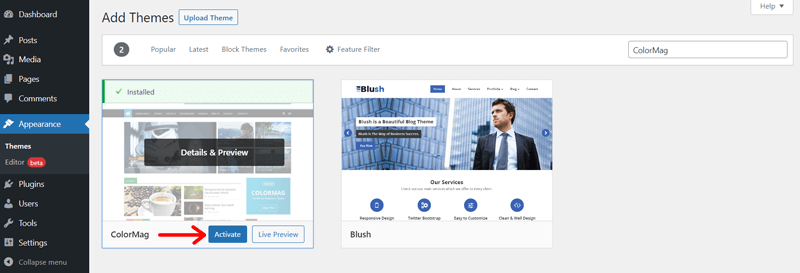
Shortly after the installation process is completed, you’ll see the ‘Activate’ option. Click on it.
With that, you’ve now successfully installed and activated the ColorMag theme.
Step 3: Import a Demo with the Banner Space
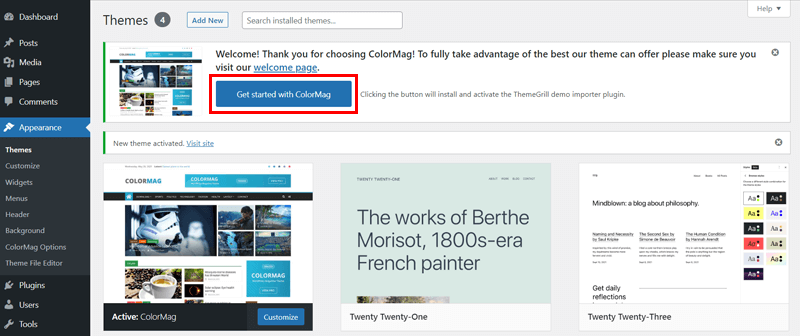
Next up, you’ll see the notification popup with the ‘Get Started with ColorMag’ option. Click on it to import the various prebuilt demo templates offered by ColorMag.
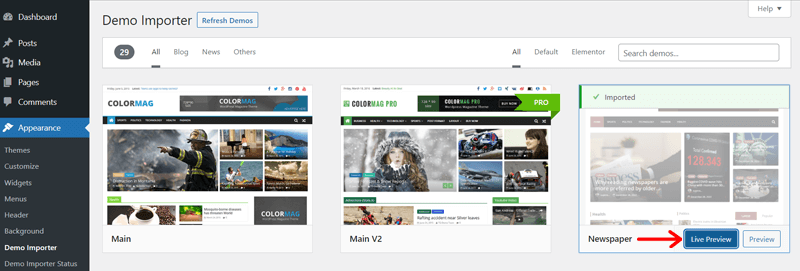
Once you find the demo with the banner space, simply hover over it and click on the ‘Import’ option. For instance, here we import the ‘Newspaper’ demo template.

Once your demo is successfully imported, you can simply click on the ‘Live Preview’ option. Consequently, you can see the changes on your website.
Step 4: Configure the Banner Space & Save the Updates
On live previewing your imported demo, you can see the ‘Edit Page’ option on the top. Simply click on it.
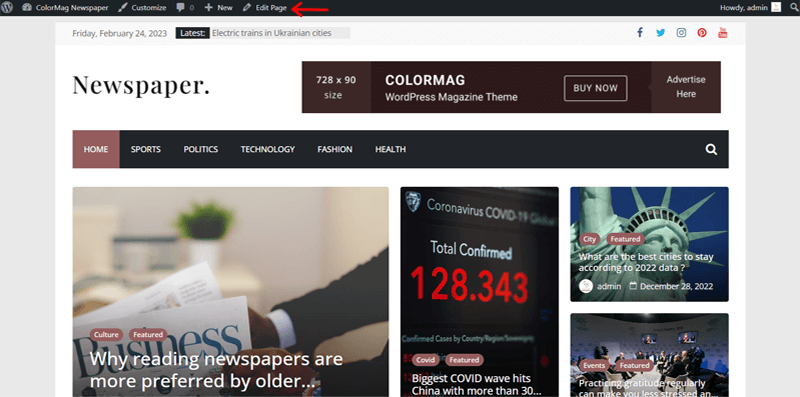
With that, you’ll land on the configuration page where you can customize your banner.
Now, you need to simply click on the available advertisement banner space. With that, you’ll access its further settings.
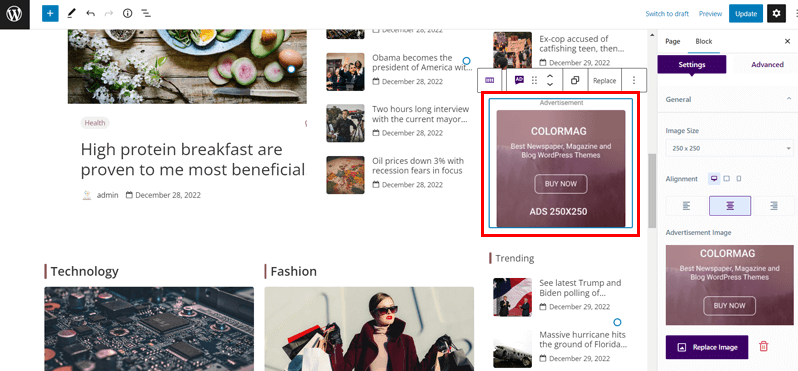
Here you can change the banner image, insert the advertisement URL link, and make other necessary changes.
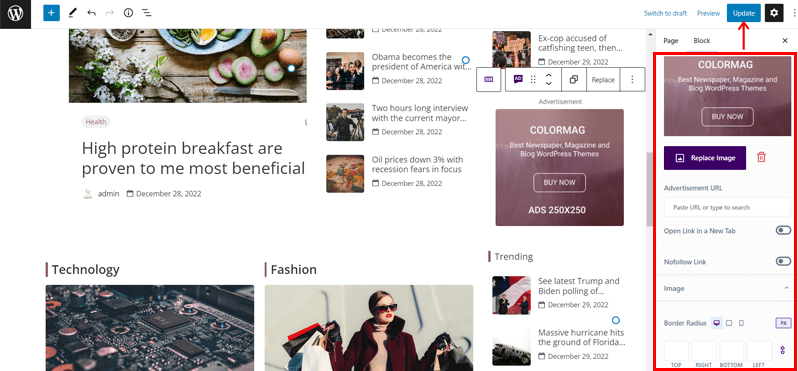
Once done, simply click on the ‘Update’ option in the top right corner. And you’re all done adding the banner image to your WordPress website.
With that, let’s proceed forward to the next method to add a banner to your WordPress site.
Method 2: Use Widgets to Add Banners
Some theme provides you with pre-built banner space just like how we used the ColorMag theme in Method 1.
Meanwhile, there are also several other themes with no specific banner space. However, they do provide different widgets to create and place your banners.
This method is useful if you have a functioning WordPress site using some other themes. And don’t have specific banner space.
So, let’s look into our next method which is to add banners un using widgets.
Step 1: Navigate to Appearance > Widgets
Just to let you know, widget areas are layout elements that are global and can receive blocks. They can vary depending on the theme but are usually sections like your Sidebar or Footer.
Now, all you’ve to do is navigate to the ‘Appearance’ option in the left sidebar of your dashboard. Then, click on the ‘Widgets’ option.
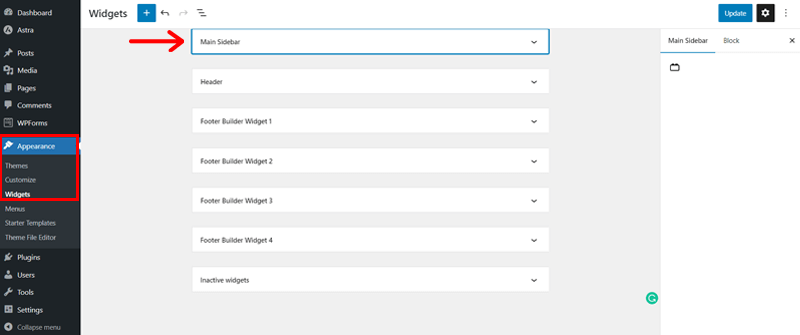
With that, you’ll find several options where you want to create widgets for your banners.
So, now you need to choose from the available widget areas where you want to add your banners. For now, let’s create one on the ‘Main Sidebar’ option.
Step 2: Configure Your Banner Widget
Following that, you can see the plus ‘+’ icon. On clicking it, you’ll have access to various blocks that you can use to create a widget for your banners.
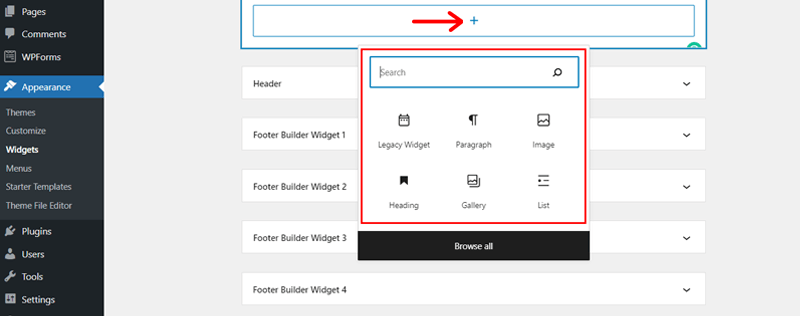
Now, we’ve created a simple image banner using the Column, Image, Buttons, and Text blocks. Just as shown in the below snapshot.
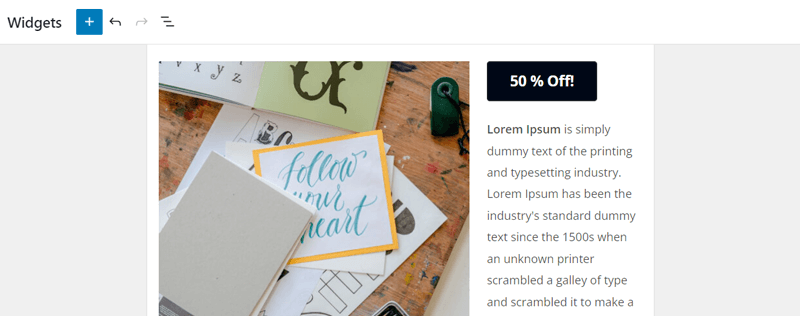
You can also create one for your WordPress website as per your site’s need.
Step 3: Save the Widget & Add the Banner
Once done, simply click on the ‘Update’ option in the top right corner. That’ll save your created banner widgets.
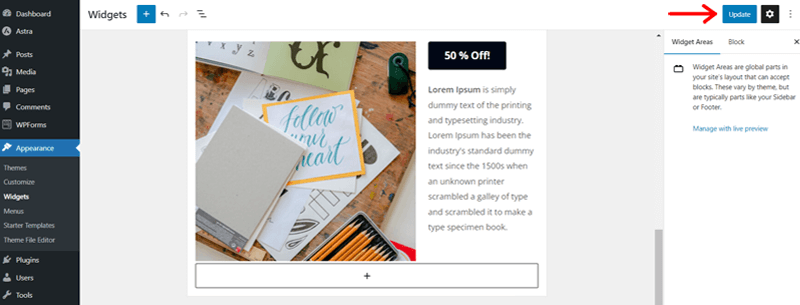
Following that, you can quickly add these banner widgets where you precisely want a banner on your website.
With that, let’s proceed forward to the following method to add the banner to your WordPress site.
Method 3: Adding a Popup Banner via Popup Maker
Next up, you can use various WordPress plugins to add a banner to your WordPress website.
So, here we’ll be using one of the popular WordPress plugins Popup Maker. It’s one of the well-liked popup builder plugins to create conversion-focused pop-up banners.
Now, follow the below steps as we guide you through.
Step 1: Install and Activate the Popup Maker Plugin
First thing first, navigate into the ‘Plugins’ section on the left navigation of the WordPress dashboard. And click on the ‘Add New’ option.
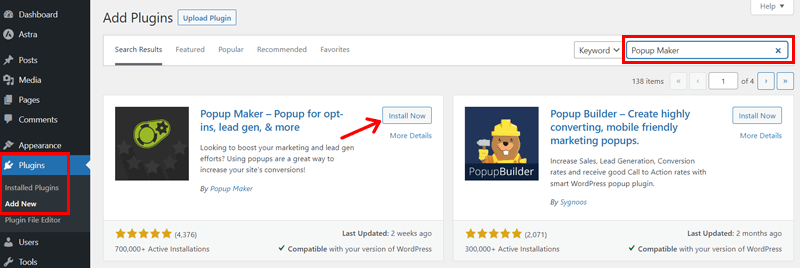
Then, on the search field, type the ‘Popup Maker’. Once you’ve located the plugin, you need to click on the ‘Install’ button.
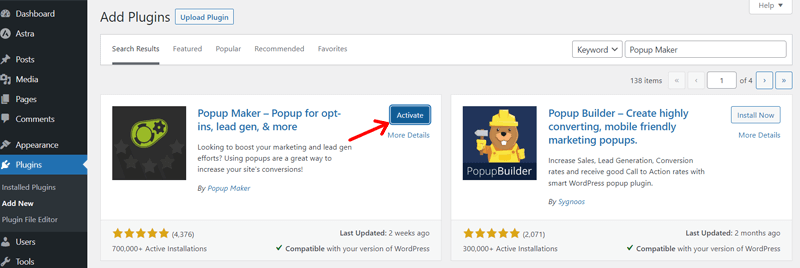
Following that, you’ll see the ‘Activate’ option. Simply, click the button to activate it.
Step 2: Create a New Popup for Your Banner
Once you’ve successfully installed the Popup Maker plugin, you’ll see the first welcome message. Also, you can find a new ‘Popup Maker’ option on the left navigation sidebar.
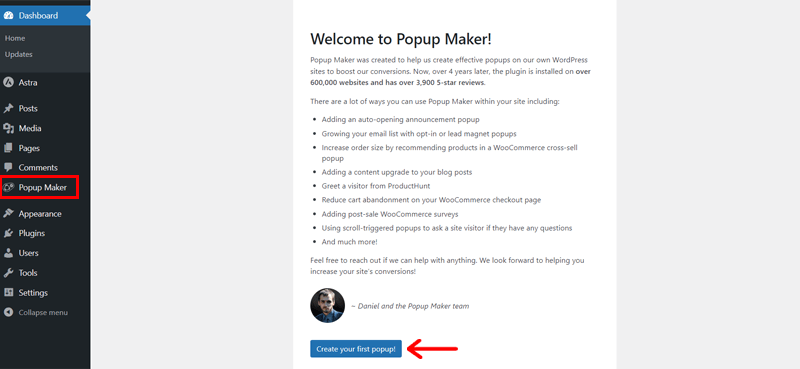
Now, you can simply click on the ‘Create your first popup!’ option to kickstart your popup banner.
Alternatively, you can also go to Popup Maker > Create Popup Option to create your popup banners.
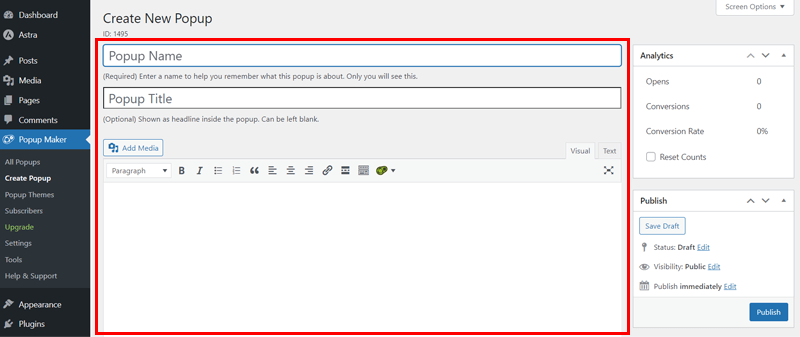
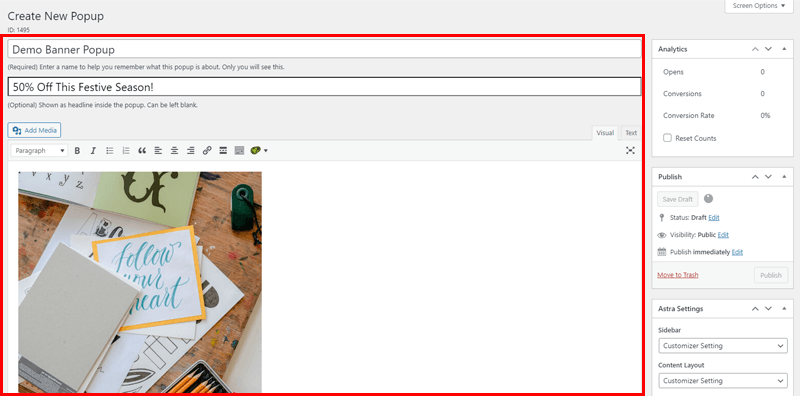
With that, you’ll see a page as shown in the above snapshot. Here, you need to add your banner popup name, title, and your respective image.
Once you fill in the respective details of your banner, it’ll look just as shown in the image below.
Step 3: Configure Popup Settings & Publish it
Now, if you scroll a bit down on the very same page, then you can find further popup settings.

Precisely, here you can configure:
- Triggers: From this option, you can precisely choose the trigger condition that causes your banner popup to open.
- Targeting: Choose a condition to tailor your popup to particular content or different audience segments from this field.
- Display: This option helps you select how you want a banner popup to be displayed. For example, Central, Right Bottom Slide-in, Top Bar, etc.
- Close: You can tailor the close text and close button delay from this field.
- Advanced: Lastly, the Advanced field provides you the option to disable automatic re-triggering and accessibility features.
Besides, it also provides various custom fields option to further tailor your popup exactly how you want it.
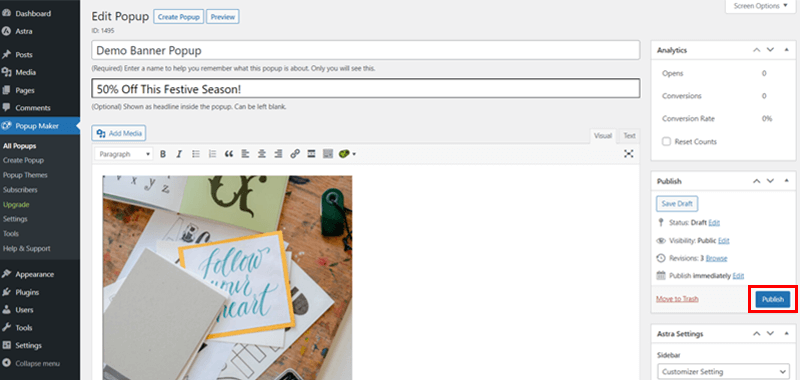
Once done, simply click on the ‘Publish’ button at the top right side to live your popup banner.
Step 4: Navigate to All Popups to Enable/Disable it
Last but not least, you can also disable your popup banner if you don’t want it after some time. And enable it again when you want it back.
For that, all you’ve to do is navigate to the Popup Maker > All Popups.

Just beside each popup banner, you can find the enable/disable button. Simply click on it as per your website requirement.
And there you go adding a popup banner to your WordPress site successfully.
Now, let’s proceed to the next method.
Method 4: Adding a Scrolling Banner via Horizontal Scrolling Announcements
Similarly, are you planning to add a scrolling banner to your WordPress site? Then, be at ease!
You can easily do so using the Horizontal Scrolling Announcements WordPress plugin. This plugin offers you a simple way to create scrolling content from one end to the other like a reel.
So, follow the given steps as we walk you through them.
Step 1: Install and Activate the Horizontal Scrolling Announcements Plugin
Horizontal Scrolling Announcements is a free WordPress plugin. Therefore, you can quickly install it right from your WordPress dashboard.
All you need to do is head into the ‘Plugins’ section on the left navigation of the dashboard. And click on the ‘Add New’ option.

Now, on the search field, type the ‘Horizontal Scrolling Announcements’. Once you’ve located the plugin, you need to click on the ‘Install’ button.

Shortly, you’ll see the ‘Activate’ option. Simply, click the button to activate it.
Step 2: Add New Scrolling Announcement and Configure it
With that, you’ll see the new menu ‘Horizontal scroll’ on your WordPress dashboard.

Simply, click on the ‘Add New’ option on the top to create a new scrolling announcement.

Then, you can add the announcement text, respective link if you’ve got any, display order, style, and other details.
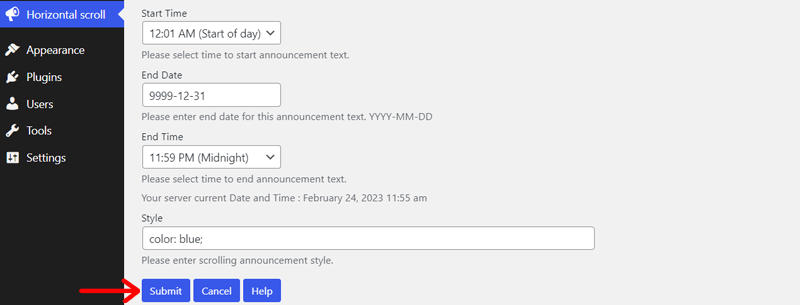
Once done, all you’ve to do is click on the ‘Submit’ button.
Step 3: Configure the Widget
Following that, you’ve to configure the widget. For that, navigate to Appearance > Widgets.
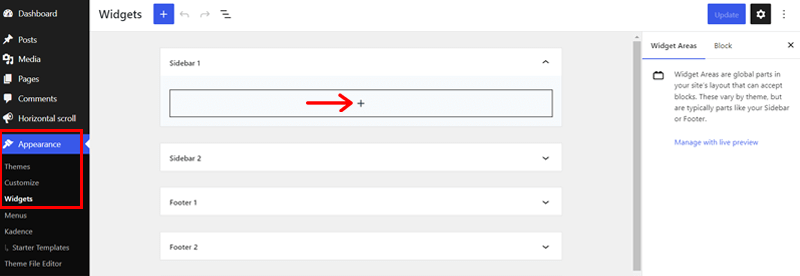
Then, you’ll see the available widget areas. On clicking your preferred widget area, you’ll also find the plus ‘+’ icon. Simply click on it.
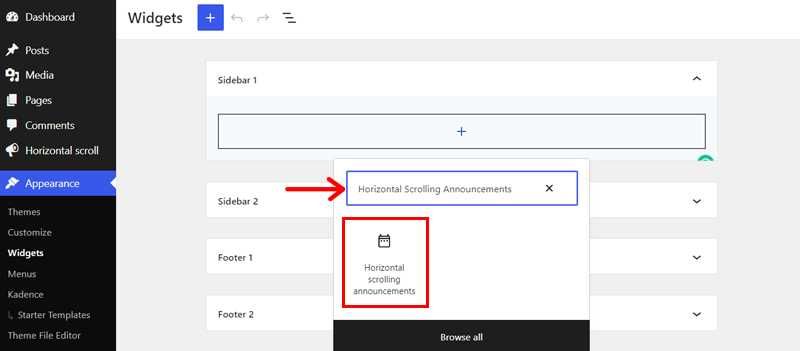
Now, on the search bar, type ‘Horizontal Scrolling Announcements’. Once you locate it, simply click on it.
Afterward, you can give the suitable widget title name, announcement group, speed, duration, and other necessary settings.
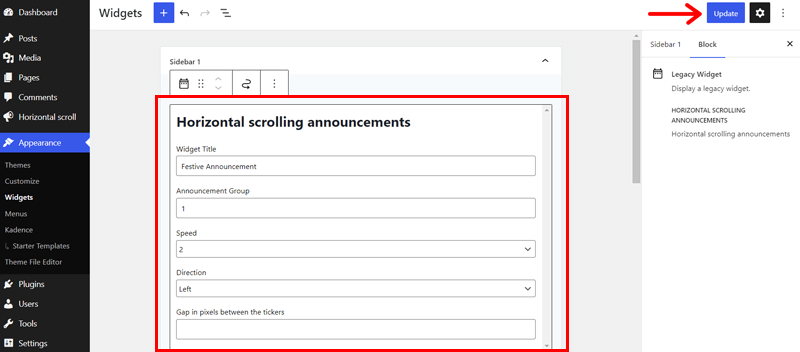
Once you’re done, click on the ‘Update’ option in the top right corner.
Step 4: Insert the ShortCode on the Home Page Editor & Update it
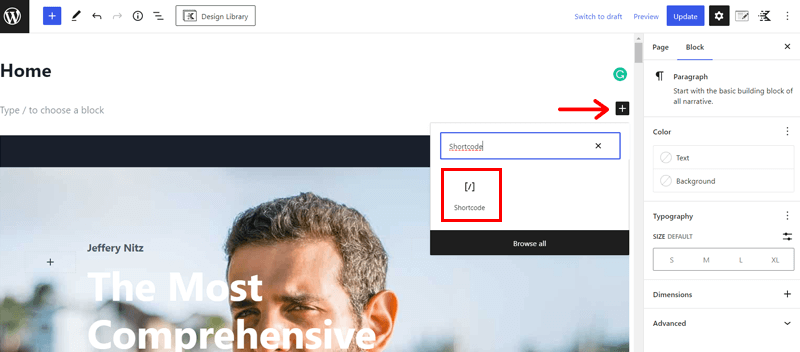
Next up, you need to come back to your website Home Page Editor. Just below the Home title, you’ll be using a shortcode to add the scrolling banner.
For that, click on the plus ‘+’ icon and type ‘Shortcode’ in the search bar. Just as shown in the above screenshot. Once you locate it, click on it.
To let you know, the Horizontal Scrolling Announcements plugin provides you with 2 main shortcodes. They are:
- [hsas-shortcode group=”” speed=”2″ direction=”down” gap=”50″]
- [hsas-shortcode group=”” speed=”10″ direction=”left” gap=”50″]
You can make necessary changes to the shortcode as your choice for speed, direction, and gap.
Following that, you’ll need to ‘insert the shortcode’ in the box just as shown in the image below.

Then, finally, click on the ‘Update’ option and check on the preview of your live website.
With that said, let’s move proceed forward to the last but not least method to add a banner to your WordPress site.
Method 5: Adding a Notification Banner via Simple Banner
Likewise, you can add a notification banner to your WordPress site using the Simple Banner plugin. It’s a free WordPress banner plugin that makes it quite simple to add a notification banner at top of your page.
So, stick with us as we walk you through the steps below.
Step 1: Install and Activate the Simple Banner Plugin
Like before, navigate into the ‘Plugins’ section on the left navigation of the dashboard. And click on the ‘Add New’ option.
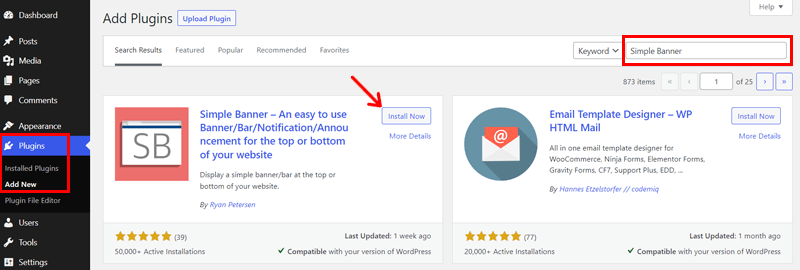
Then, on the search field, type the ‘Simple Banner’. Once you’ve located the plugin, simply click on the ‘Install’ button.
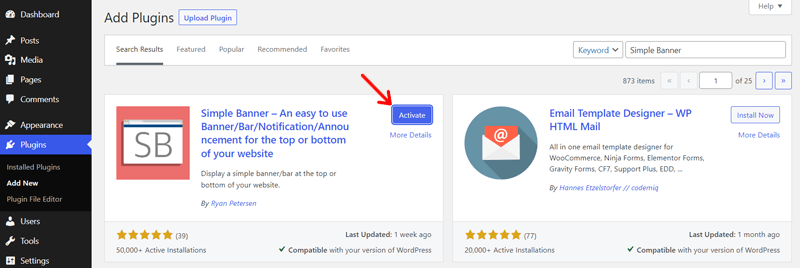
Eventually, you’ll see the ‘Activate’ option. Simply, click the button to activate it.
Step 2: Configure the Banner Settings
Following that, you’ll see the ‘Simple Banner’ option on the left-hand side navigation of your dashboard.
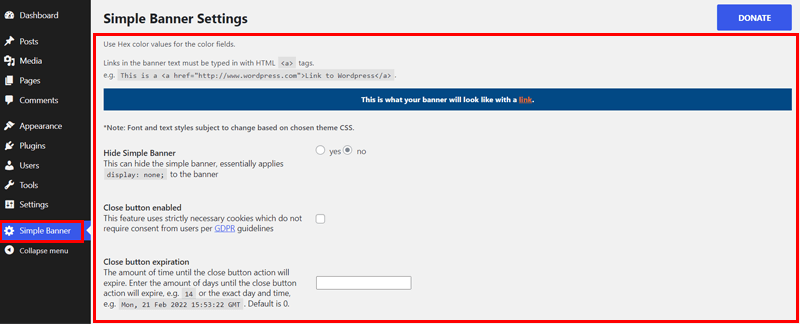
Also, on the right-hand side of your dashboard, you can find various banner configuration settings.
To be precise, you can configure the font size, background color, text color, link color, and button color of your choice. Just as shown in the image below.
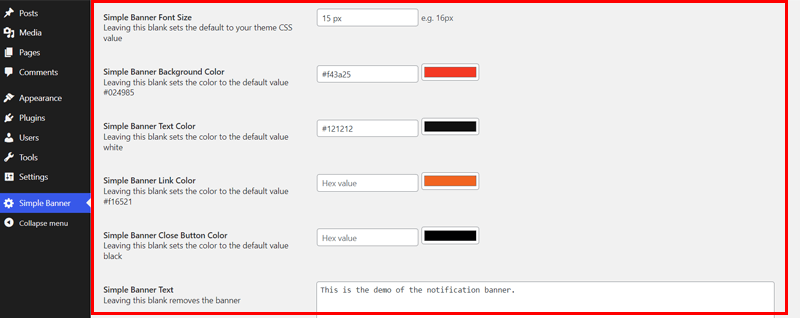
Also, you have the option of placing the text that you want on your notification banner.
Step 3: Save and Preview the Banner
Lastly, you’ll see the ‘Save Changes’ option on the bottom section of the configuration page. Click on it.
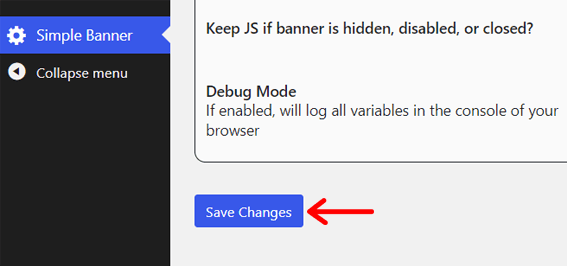
Once done, go to our live website to preview the notification banner on the top section of your website.

Conclusion
That’s all, folks! We’ve come to the end of our tutorial on how to add a banner to your WordPress site.
We sincerely hope that this article helps you in adding the banners that provide the best conversions. Do let us know which of the aforementioned methods you plan to use as well.
And feel free to ask any questions you may have throughout the tutorial process. We’re pleased to help you and clear any concerns.
Browse through our other similar articles. Such as how to choose the best domain name for affiliate marketing. And how to update WordPress to the latest version.
If you find this tutorial article fruitful, then don’t forget to spread the word with your friends and family.
Lastly, remember to like and follow us on our social media handles Facebook and Twitter to keep a close eye on our articles.


