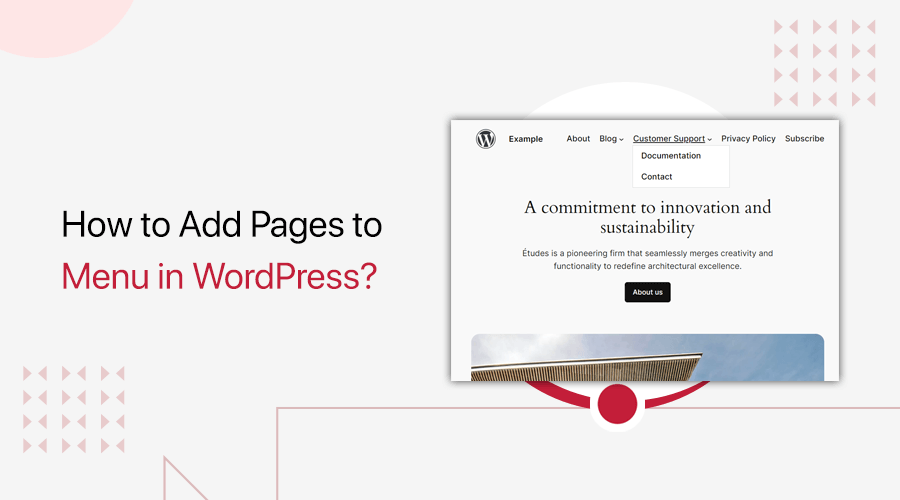
How to add pages to menu in WordPress? Is this question troubling your website creation process? If yes, then stay right here.
Menu structure is a significant aspect of website navigation. A well-organized menu enhances the user experience and ensures that visitors effortlessly find their way around your website.
In this article, we’re diving into the art of adding pages to your menu in WordPress. It covers the process in both classic and block themes.
So, whether you’re using the traditional classic editor or the modern block editor, master menu creation. It guides your audience and helps you shape your site.
Let’s start!
Adding Pages to Menu in WordPress – Video Tutorial
Would you prefer to watch a video tutorial instead? We have a complete video tutorial attached below on adding pages to the menu in WordPress. Watch it now!
Nevertheless, keep reading for a detailed guide to the process!
Significance of Adding Pages to WordPress Menu
Adding pages to the WordPress menu is significant for several reasons. So, before diving into the process, let’s get insights about its importance.
- Navigation: A website menu helps visitors navigate through the website. Simply put, it lets them find and access crucial content on your website.
- Organization: An organized menu logically structures your website. So, related pages must be grouped and arranged hierarchically.
- Conversion Optimization: Placing pages in menus helps users perform their desired actions on conversion-focused websites like eCommerce.
- SEO (Search Engine Optimization): A well-structured menu boosts your site’s SEO as search engine crawlers can easily navigate and index your site.
- Accessibility: Clear labels and logical page groupings are the icing on the cake for users with disabilities who are using assistive technologies.
Therefore, adding pages to the WordPress menu is not just aesthetic, but crucial. With that, let’s begin the steps for the block themes, shall we?
How to Add Pages to Menu in WordPress Block Themes? (Twenty Twenty-Four)
For beginners, block themes are those WordPress themes introduced in WordPress 5.9 that provide the full site editing experience. Simply put, they let you edit and stylize the entire website from a single place.
Notably, adding pages to the WordPress menu in block themes is the easiest. That’s because the latest site editor offers this functionality by default. Thus, you can add pages to the menu right from the editor when using such a theme.
Among several WordPress block themes, here we’ll be using Twenty Twenty-Four. It’s the latest block theme with full-site editing capabilities by WordPress.
So, let’s begin!
Step 1: Go to the Site Editor
First, log into your WordPress dashboard and ensure that Twenty Twenty-Four or any other block theme is installed.
Here’s our complete guide to WordPress theme installation.
Further, check if you’ve added all the pages on your website to show in the menu.
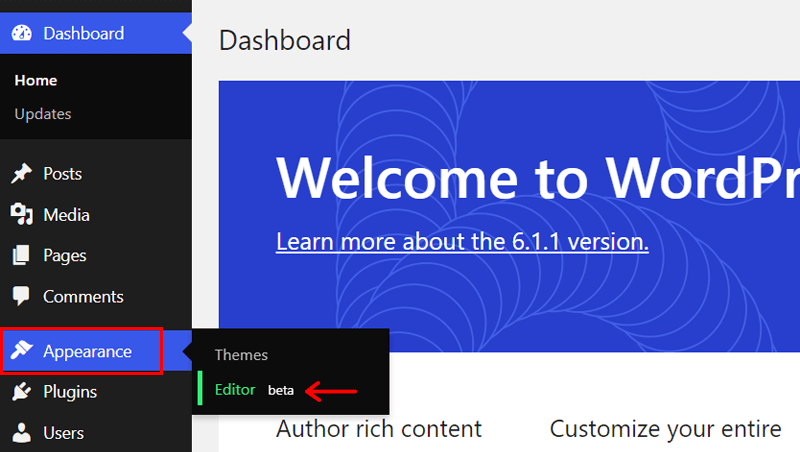
Once your theme and pages are ready, go to the ‘Appearance > Editor’ menu on your dashboard. This opens the new Site Editor with left-hand side design options.
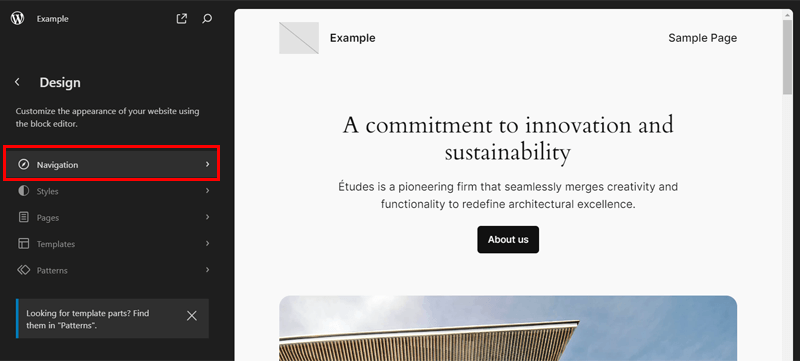
Now, click on the first ‘Navigation’ option designed for creating menus.
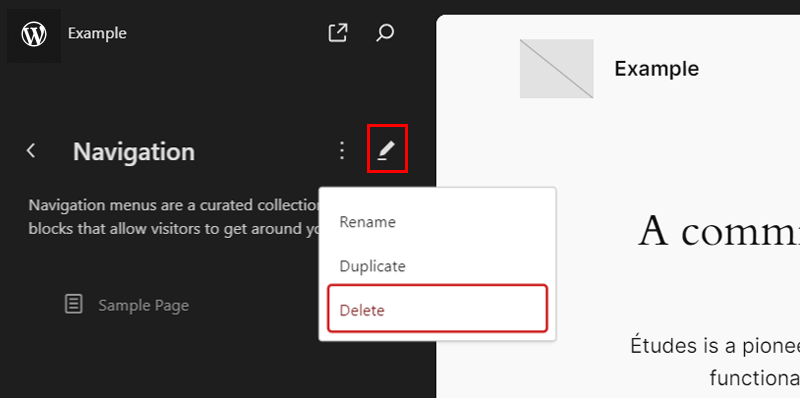
By default, the block editor already creates a navigation menu. You can either edit the existing menu or start from scratch. Here, let’s learn the process from scratch.
So, click on the ‘Actions’ option, followed by the ‘Delete’ option. In the displayed popup notification, click the ‘Delete’ button.
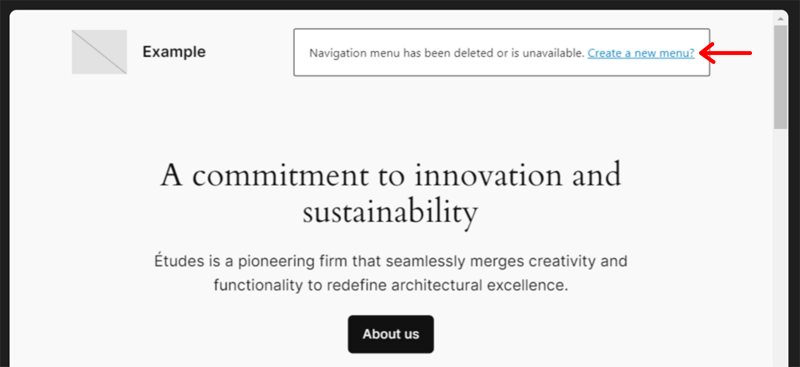
Now, press the ‘Create a new menu’ option in the right-side website preview.
Step 3: Add Pages to the Menu
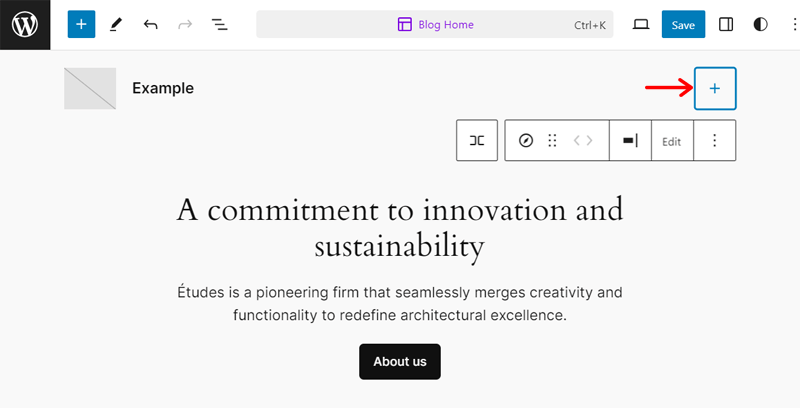
Once the editor opens, click on the same option again. After that, click on the ‘+’ icon of the already present ‘Navigation’ block.
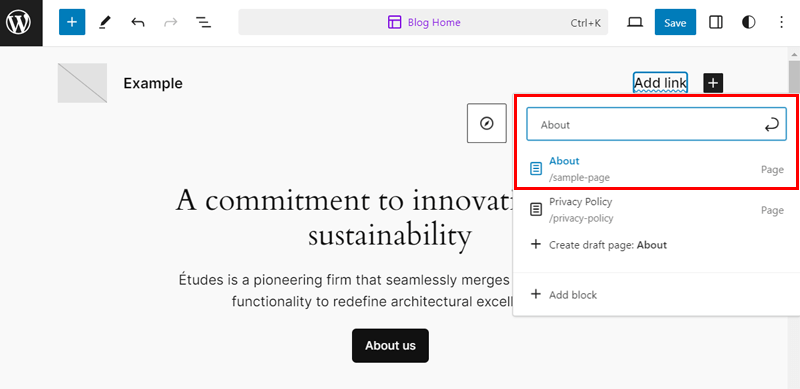
Next, search for the page you want to add to the navigation and click it once you find it. Similarly, do the same for other pages that you want to insert into the menu.
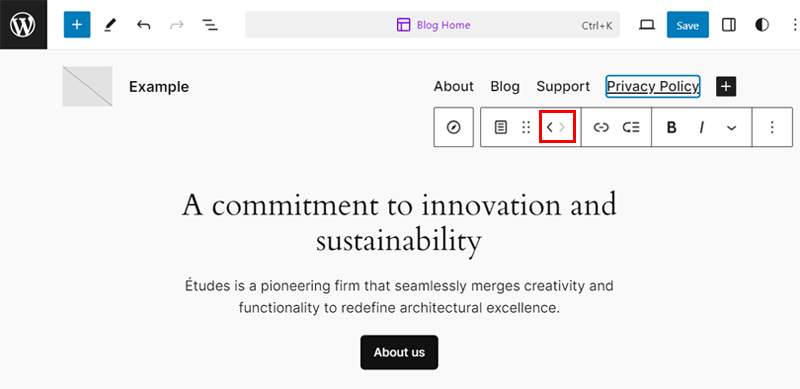
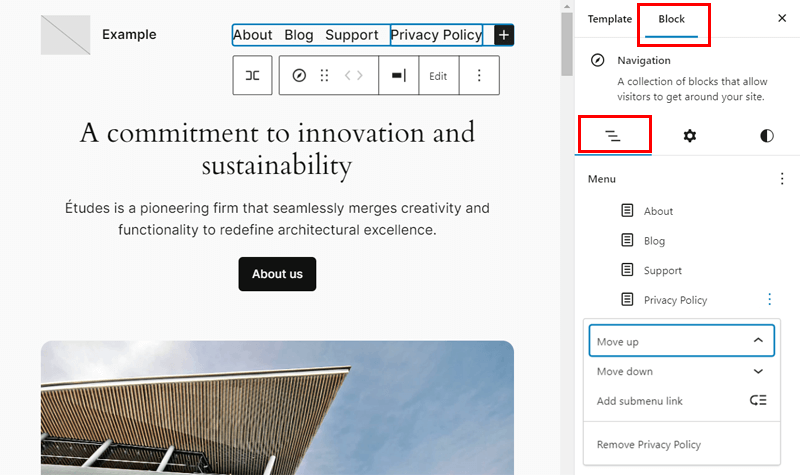
In addition, you can sort the menu items from the ‘Move left’ and ‘Move right’ options present in the toolbar.
Further, you can also add the pages to the menu in the right-side ‘Block’ settings. Just select the entire navigation block and add them to the ‘List View’. Plus, you can sort them from the ‘Options for Page Link’ option there.
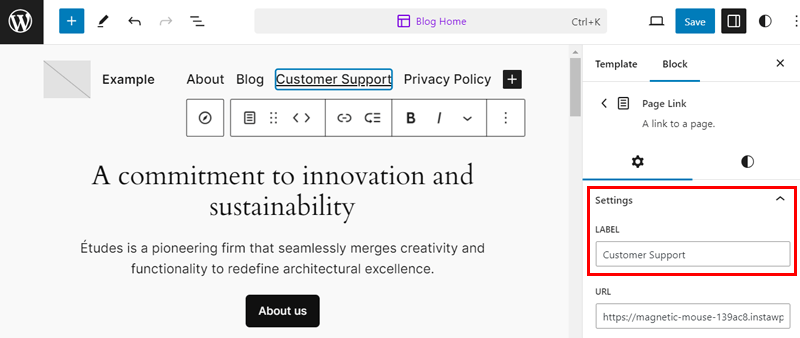
Suppose you want to rename the page when adding it to the menu. For that, use the editor, like changing the text or from the ‘Label’ option on ‘Block > Settings’.
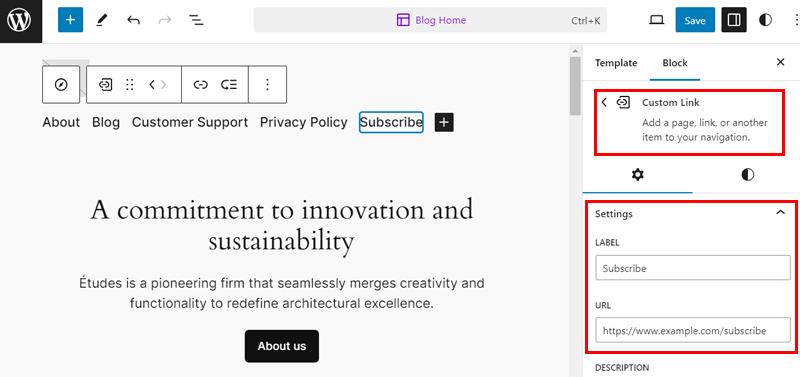
Similarly, you can also add custom links to your menu. For example, click ‘+’ and in the Block Settings and pick the ‘Custom Link’ block. Then, insert the label and URL for the menu item for the custom link.
This is how you add the pages to the WordPress menu. The steps to add blog posts to the menu are also the same.
Notably, you can place the menu items differently based on your needs. These are the ways to organize them:
i. Drop-down Menu
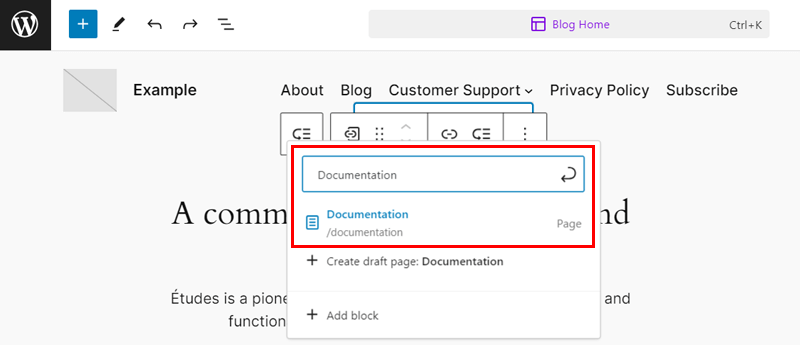
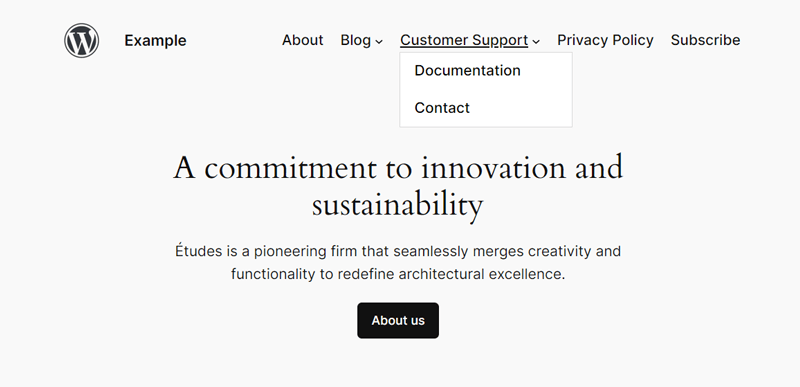
Do you want to add a drop-down menu item with multiple pages within it? To do so, click ‘Add submenu’ on the toolbar of the ‘Customer Support’ page.

There, click the ‘Add link’ option and pick the page to add within it. To add another, click the ‘+’ icon. That’s all for creating a simple drop-down menu.
ii. Category
Similarly, if you want to add the various blog post categories to your menu, then the process is similar. But ensure you already have the blog categories on your site.
So, ensure you’ve added a page like ‘Blog’, containing all the posts in a grid or list view. Next, add a drop-down menu where we’ll add blog categories instead of pages.
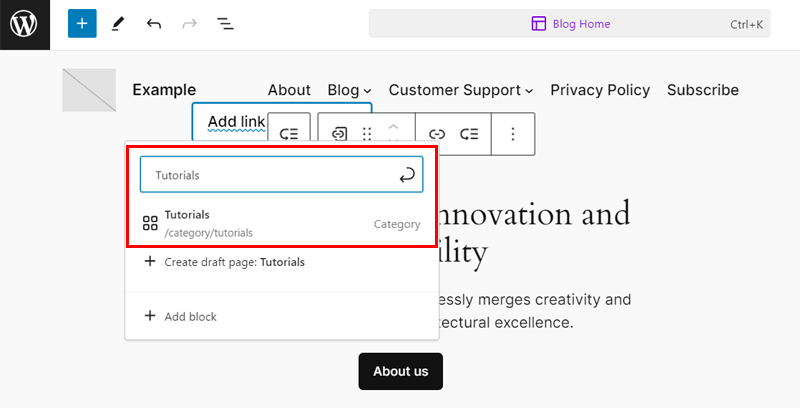
For instance, let’s search for the category ‘Tutorials’. Similarly, you can add other categories to the WordPress menu.
WordPress block themes also let you customize your navigation and menu items from the editor. To stylize the entire menu, select the Navigation block and find the ‘Settings’ and ‘Styles’ tabs in the Block settings.
The ‘Settings’ tab lets you perform the following actions:
- Alter the justification and orientation of the navigation.
- Configure the overlay menu option and submenus.
On the other hand, the ‘Styles’ tab lets you perform the following activities:
- Change the color of the text, background, and submenu.
- Choose the typography for the text.
- Adjust the dimensions, including block spacing and width.
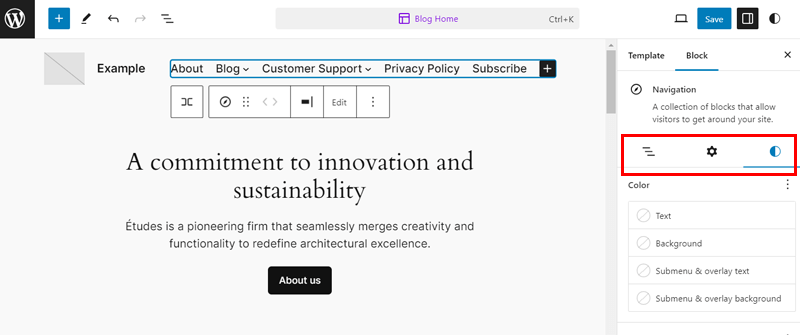
Similarly, you can select a specific menu item and also customize its appearance.
Once you’ve finished adding the pages to the menu, click the ‘Save’ buttons twice.

After that, navigate to the ‘View > View Site’ option at the top. Your navigation menu is all ready with the added pages. Congratulations!
How to Add Pages to Menu in WordPress Classic Themes? (Astra)
Moving forward, this section deals with adding pages to the WordPress menu in classic themes. The WordPress theme repository has thousands of such themes. They come with WordPress customizer options and menu settings.
Among a long list of WordPress themes, here we’ll use Astra to showcase the process of creating a navigation menu. So, without any delay, let’s start!
First, your website should have a running, classic theme. As we’re using Astra, ensure that it’s installed. Here’s our guide to the theme installation process.
Notably, check if you’ve added all the pages on your website to show in the menu.
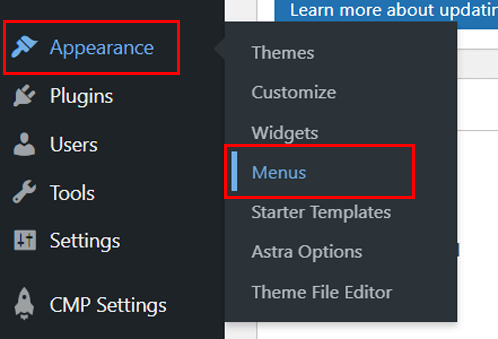
Once your theme and pages are ready, open the ‘Appearance > Menus’ menu on your dashboard. This takes you to the WordPress menu builder.
Step 2: Create a Menu or Choose an Existing Menu
Now, you can start creating your first menu. Just add the menu name, for example, ‘Header’. Then, select the ‘Display location’, in this case, it’s ‘Primary Menu’. Next, click the ‘Create Menu’ button.
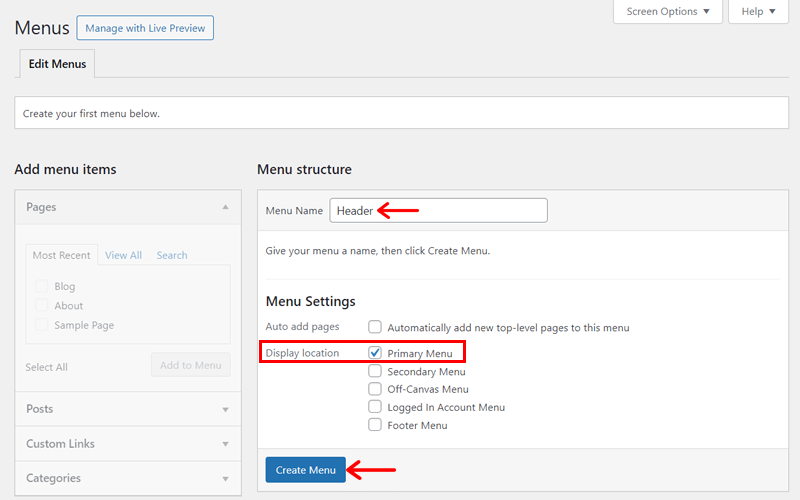
Suppose you already have a menu and want to add the pages to it. Then, select the menu and follow the next steps.
Step 3: Add Pages to the WordPress Menu
Once you’ve created the menu, pay attention to the ‘Add menu items’ section.
On the ‘View All’ tab of the ‘Pages’ accordion, tick the pages you want to add to the menu. Then, click the ‘Add to Menu’ button.
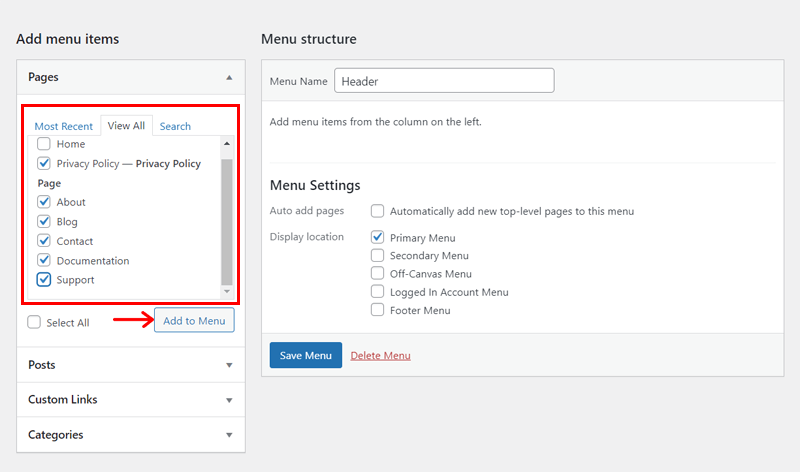
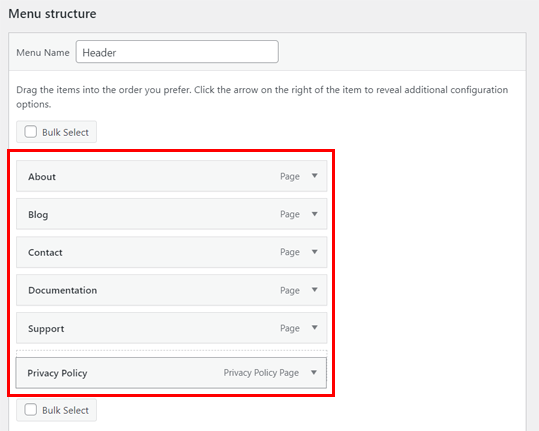
Following that, you can sort the menu items for the navigation. Just drag and drop the menu items into the desired locations.
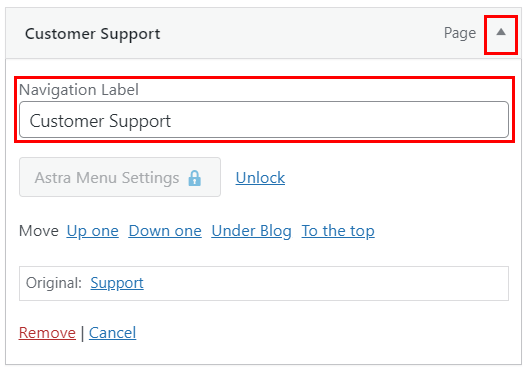
Suppose you want to rename a menu item for navigation. In that case, click on the small arrow icon next to it and change the ‘Navigation Label’ text.
Similarly, if you want to add a custom link to the menu, then it’s also easy. Open the ‘Custom Links’ tab. There, insert the URL and name for the menu item. After that, click the ‘Add to Menu’ button.
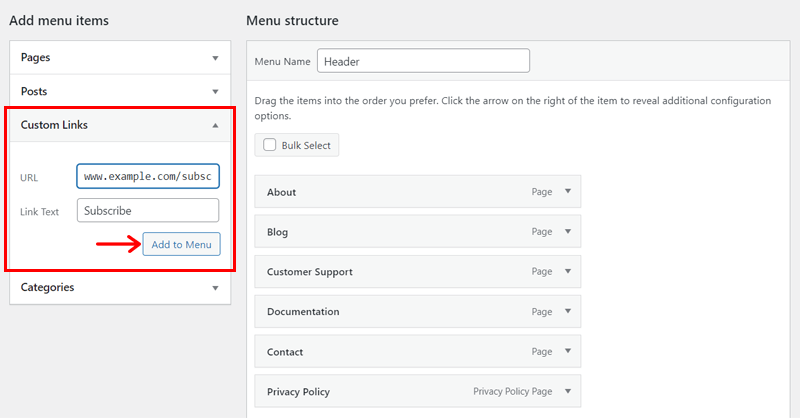
These are the minimum steps for adding pages to the WordPress menu. Further, the steps are the same for adding blog posts from the ‘Posts’ tab.
Moreover, you can place these menu items in a more organized way. The ways are:
i. Drop-down Menu
If you want to create a drop-down menu, then the process for classic themes is also a simple drag-and-drop. Just drag the to-be sub-menu item and drop it under the menu item, like in the screenshot below.
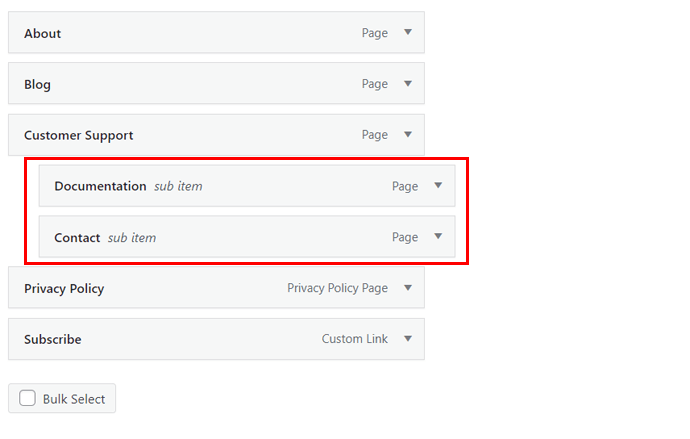
That’s how simply you can simply organize the pages under a drop-down menu.
ii. Category
On the other hand, organizing blog posts in the menu is also possible through the addition of categories. So, create the necessary blog categories on the dashboard.
Initially, add a menu item that’ll include these categories in the navigation. After that, open the ‘Categories’ tab and navigate to ‘View All’. There, select the categories and click ‘Add to Menu’.
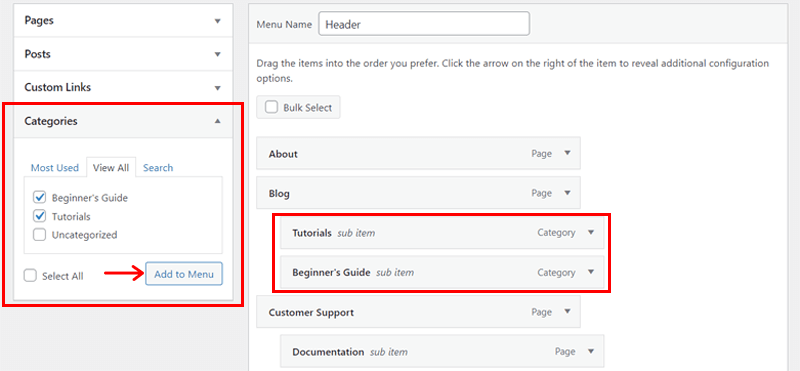
Following that, add those categories under the menu item, just like creating a drop-down menu. As simple as that!
Step 4: Save and Preview the WordPress Menu
In the end, save the changes by clicking on the ‘Save Menu’ button.
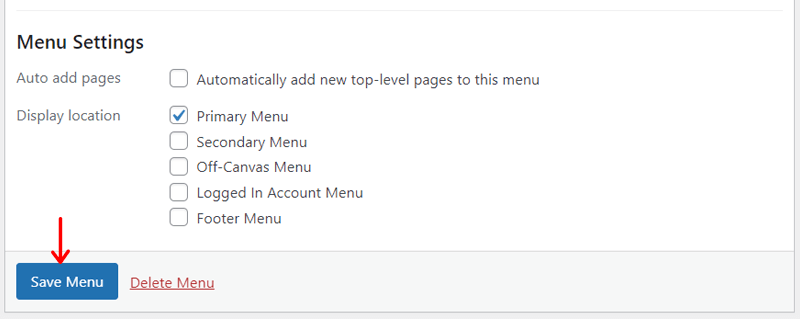
You can also preview your website to see how the navigation looks.
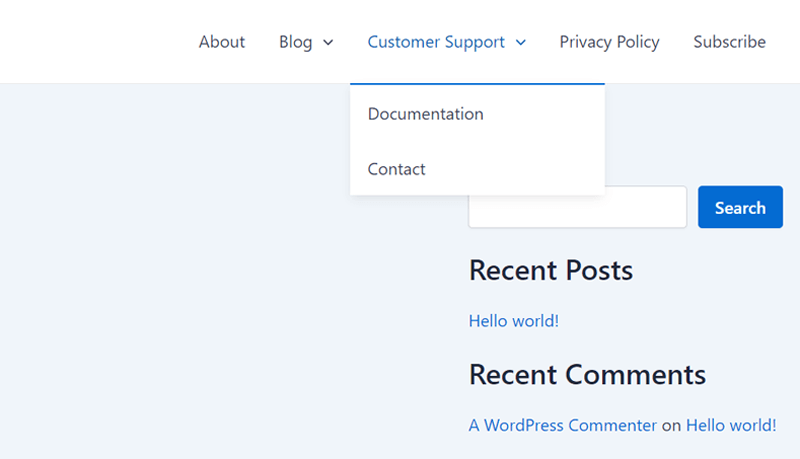
If you want to customize the navigation menu and its items, then you can do that from the WordPress customizer. In fact, adding pages is also possible here!
Just click the ‘Manage with Live Preview’ button in ‘Appearance > Menus’. This takes you to the menu customizer.
To access the customization options, click on the edit icon in the navigation on the front-end preview. This opens the primary menu options on the left, which contain:
- General: Here, it has the configuration options for the menu and sub-menu.
- Design: This tab has options for font, spacing, sub-menu container, etc.
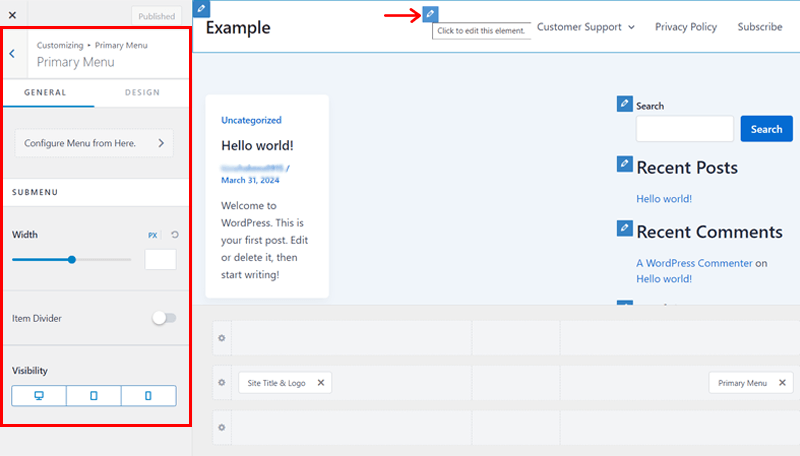
After making the changes, make sure to click the ‘Publish’ button. Your menu is now all ready to grab the user’s attention.
Do you want to add your crucial pages to the WordPress menu in the footer? If yes, then keep reading. Here, we’ll guide you on creating the WordPress footer.
1. Using Block Themes (Twenty Twenty-Four)
Generally, block-based themes provide many pre-designed ways to create a footer, such as block patterns. Plus, the steps for adding pages to the footer are similar to those in the header.
So, let’s learn the steps when using the template part of the Twenty Twenty-Four theme. First, go to ‘Appearance > Editor’ and click on the ‘Patterns’ menu.
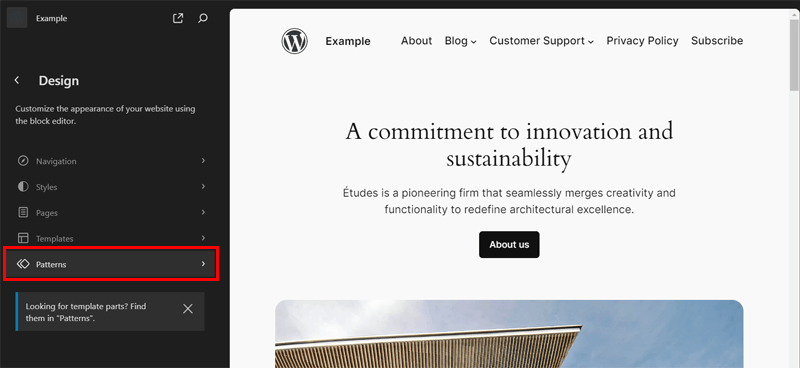
There, open the ‘Manage all template parts’ option, followed by ‘Footer’.
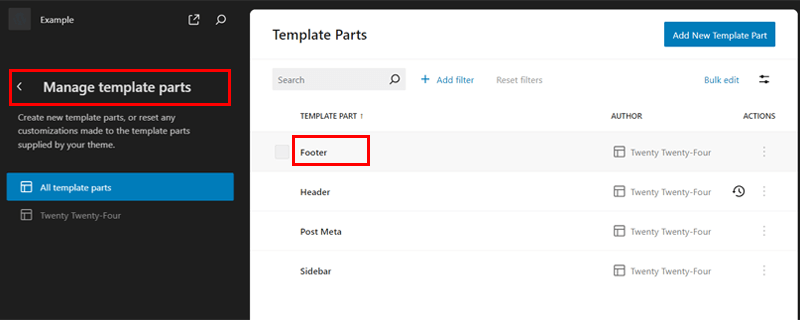
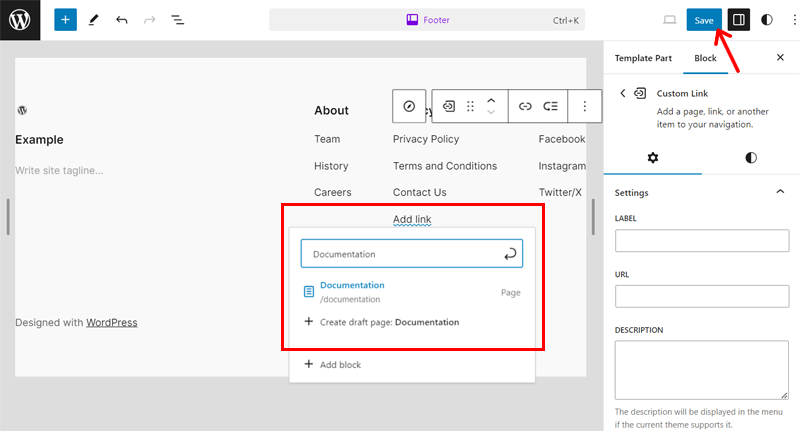
Following that, open the site editor and begin adding the pages to the footer. You can remove the default pages added by the theme first.
To add a page, simply click the ‘+’ option and search for the page. Once you find it, click and add it to the menu. Lastly, click the ‘Save’ button twice.
2. Using Classic Themes (Astra)
In classic themes, the process of adding pages to the footer is also similar to that of doing that to the header. Once you create your footer menu, you must add a widget to the footer and save changes to the website.
Going stepwise, go to ‘Appearance > Menus’. There, follow the steps for adding the pages to the menu. But just select the ‘Display location’ as ‘Footer Menu’.
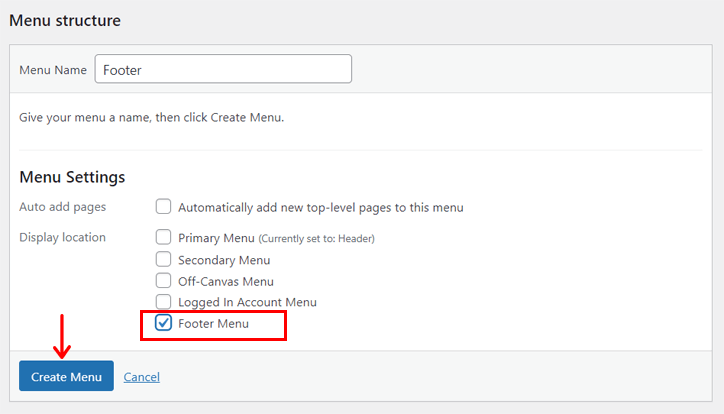
Moving forward, open ‘Appearance > Widgets’.
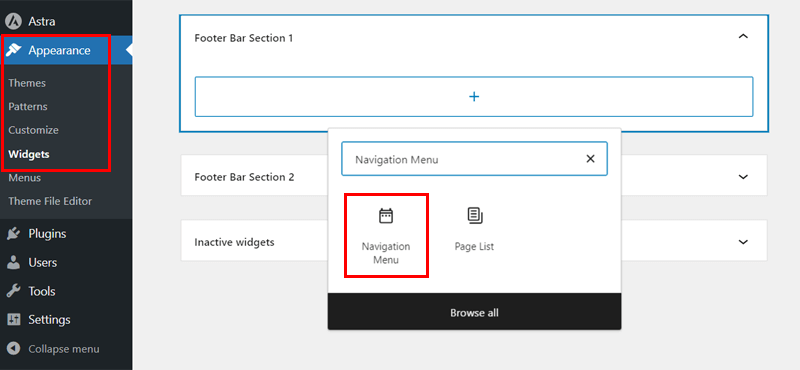
There, find the widget addition section for the footer. Here, we’ve ‘Footer Bar Section 1’. So, let’s click the ‘+’ button and insert the ‘Navigation Menu’ block.
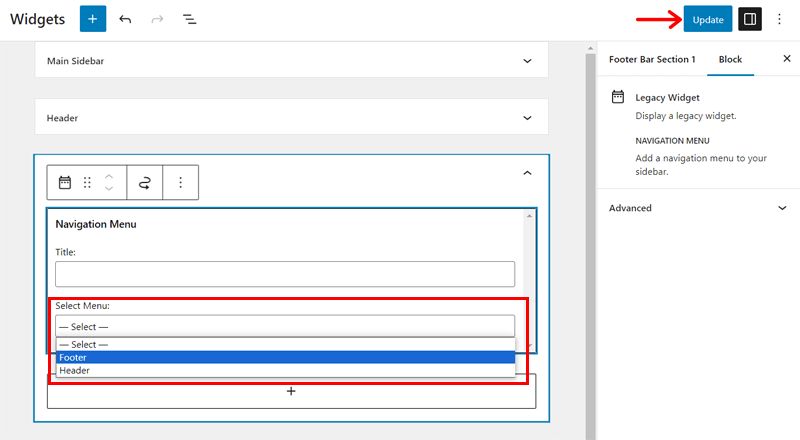
Following that, select ‘Footer’ as the ‘Select Menu’ option. Then, click ‘Update’.
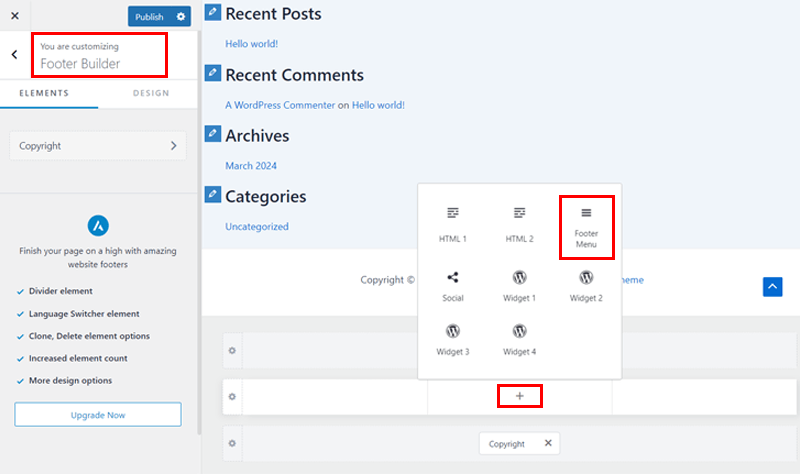
Now, move to the ‘Appearance > Customize’ menu and open ‘Footer Builder’. This showcases the footer builder in the front-end preview of the website.
Hence, click the ‘+’ option in the center location of the ‘Primary Footer’ and add the ‘Footer Menu’ widget.
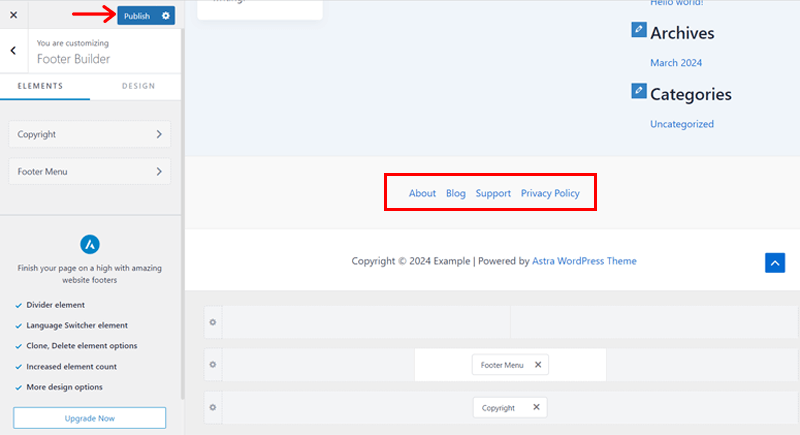
On the live preview itself, you can see the pages added to the menu in the footer. Lastly, click the ‘Publish’ button to save the newly added footer menu.
Learn how to change footer text and background color in WordPress here!
This concludes the steps for adding pages to the WordPress footer menu. Congrats!
Frequently Asked Questions (FAQs)
Any more doubts? If yes, then don’t worry! Here are some common FAQs that may solve your confusion. So, check them out!
1. What is the maximum number of pages I can add to a WordPress menu?
There isn’t a fixed maximum number of pages you can add to a WordPress menu. However, this may depend on your theme’s design, server resources, etc. Further, adding an adequate number of pages is preferable so that there won’t be site issues.
2. What is the difference between classic and block themes?
Classic themes are WordPress themes using the classic editor for content creation. They mostly don’t support the new block editor. Block themes fully leverage the block editor, making your website completely customizable.
3. Can I add multiple navigation menus to WordPress?
Yes, you can add multiple navigation menus to WordPress. Each of these can be assigned to a separate menu location, like the primary menu, footer menu, off-canvas menu, etc. Thus, menus can be shown in headers, footers, sidebars, etc.
4. How do I effectively organize pages in WordPress menus?
You can effectively organize pages in WordPress menus by following certain guidelines. That includes prioritizing crucial pages, categorizing related pages, keeping them concise, using clear labels, and testing their usability on devices.
5. Are there any WordPress plugins to add pages to the WordPress menu?
Yes, there are multiple WordPress plugins available in the plugin directory for adding pages to the WordPress menu. Some of them include the Max Mega Menu, the WP Mobile Menu, etc. All of these are for adding complex navigation menus.
Just starting your website? Here’s an in-depth guide to creating a website.
Conclusion
That’s all! We’re ending this article on how to add pages to menu in WordPress.
The steps for adding pages to the menus differ in WordPress classic and block themes because of different editors. Therefore, this guide gives you the simplest way to do so for your contrasting needs.
If you have more doubts, then leave your queries in the comment section below. We’ll try hard to answer your questions.
Meanwhile, you can read our other articles on the best practices for website navigation and how to find the page ID in WordPress.
Lastly, follow us on Facebook and Twitter to get notified about our latest blogs.


