Are you wondering how to change the footer text and color in WordPress? If that’s the case, then you’ve landed on the right page.
Although footers are usually overlooked areas of a website, it’s extremely important for site navigation. However, it can be made stunning in several ways. All you need to do is edit it and make some tweaks to make changes to its text, color, and background.
Having said that, you might still be curious about how to change the footer text and color in WordPress. Don’t be concerned! A thorough handbook has been prepared specifically for you.
Therefore, we’ll go through different ways to change the footer color and text in WordPress within this article. Let’s get rolling!
The footer is usually the bottom part of the WordPress website that comes after the main content. It serves as the conclusion of the overall website as it completes the entire design, something like the final slide.

As we know, footers aren’t as exclusive as headers of the website, regardless, it’s immensely important to create a distinct footer. So, WordPress mostly offers the unique footer functionality that comes with your theme.
Moreover, with stunning footers,
- You can make it simple for your visitors to navigate your website easily.
- Also, it’ll be useful for visitors who are interested in digging deep into your content.
Further, the WordPress footer comes with the default design. You can edit it to include different colors, fonts, and backgrounds. Also, you can insert essential links, information, blog posts, security badges, forms, and more.
Did you accidentally land up here? And are you planning to build a website of your own? Then, check our comprehensive and beginner-friendly article on how to create a website.
Before moving to the different ways to change the color and text in WordPress, let’s discuss the reasons for it.
- Improves SEO: With the help of important links on your footer, the SEO of your website will be enhanced. Because the number of external and internal links determines SEO rankings.
- Builds Trust: You can include prominent awards, reliable certificates, security tags, etc. in your footer area. This makes customers feel your site is trustworthy.
- Branding: The footer is an ideal place on the website to display your company name, logo, and tagline. This reinforces the brand identity of your company to the customers.
- Establish Communication: The footer provides a line of communication with your visitors because you can include interactive elements like contact form, location info, contact details, etc.
With that, now let’s dive into the different ways!
We’ve enlisted some of the easiest ways to change the footer text and color on the WordPress website. So, let’s start!
One of the easiest methods is using its theme settings. So, we would like to recommend you edit the footer text using Block themes. You can use any of the Full Site Editing (FSE) themes.
However, for this tutorial, we’ve already installed and activated the Twenty Twenty-Four theme, which is also the default theme for WordPress.
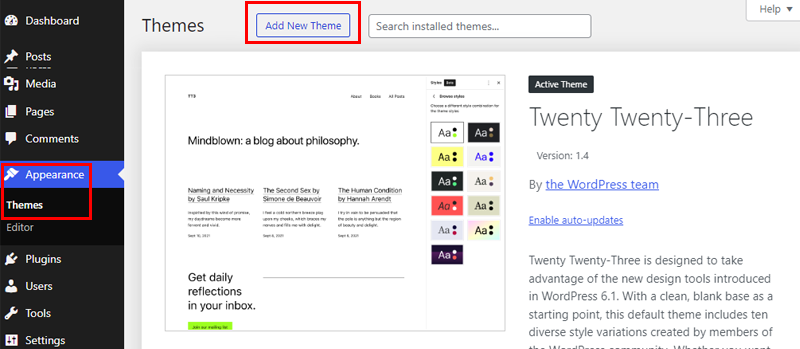
So, start by installing and activating the theme. To do so, go to your WordPress dashboard, then click on “Appearance > Themes > Add New Theme.”
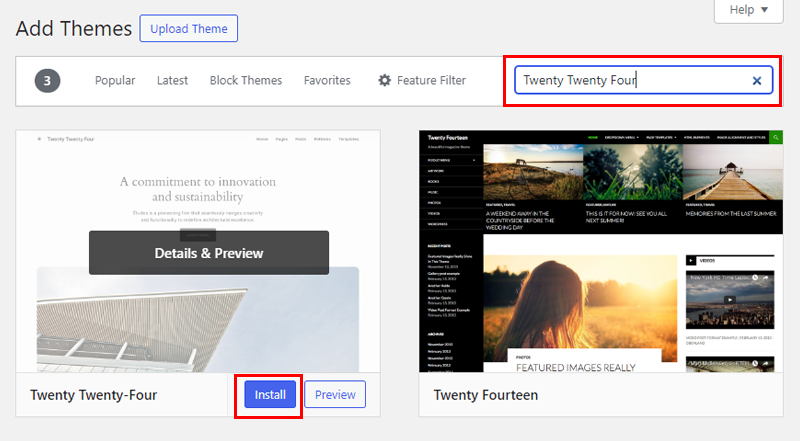
After that, search for the Twenty Twenty-Four theme and hit the “Install” button once the theme appears.
After that, activate the theme.
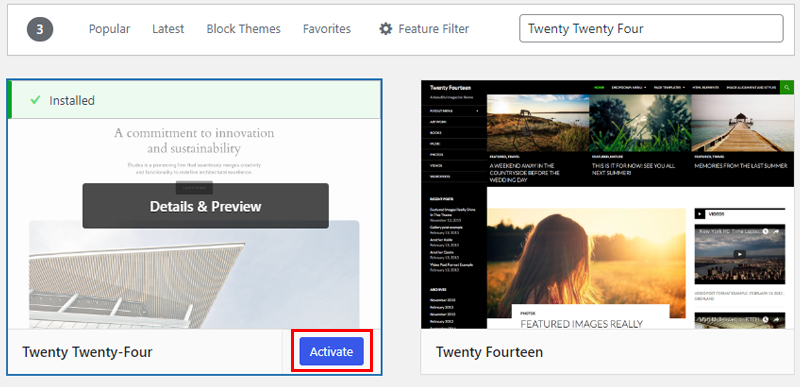
Note: If you’ve already installed the theme then you can skip the installation and activation part.
Now, let’s change the footer text!
Changing Footer Text
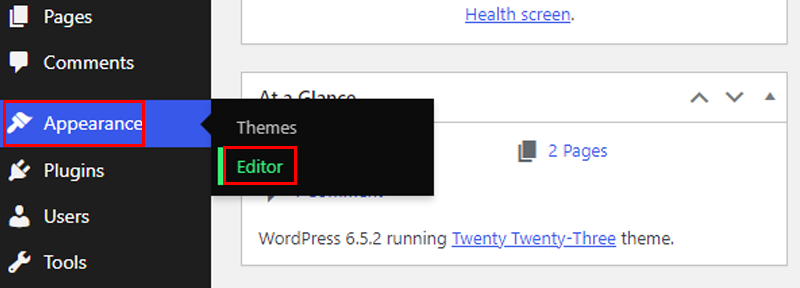
Begin by going to the Appearance option of your WordPress dashboard. Then click on the Editor option.
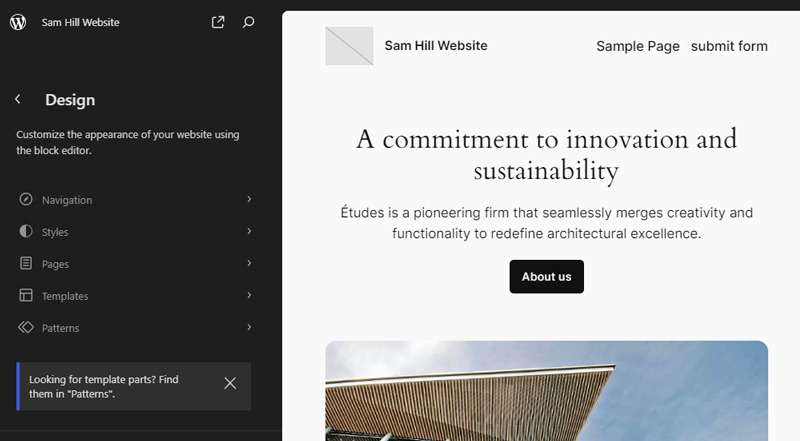
Now, you’ll be redirected to the editor interface where you can edit any of the elements of this theme.
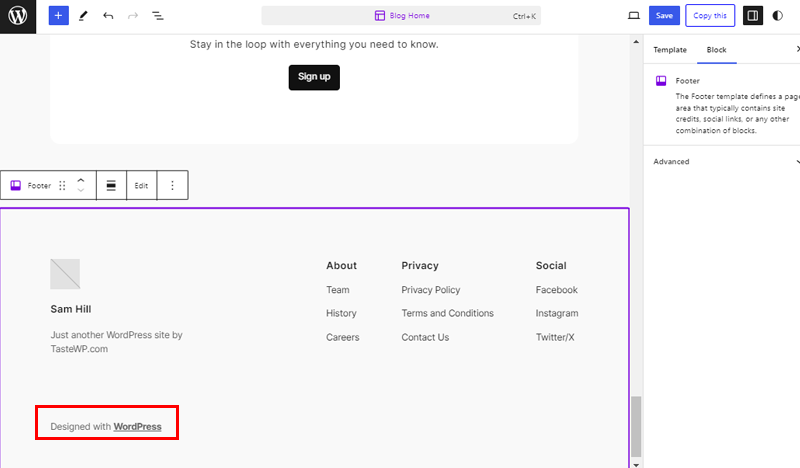
So, to edit the footer text, scroll down below and click on the text you want to edit. For this guide, we’ll edit the “Designed with WordPress” text. So, click on that text, and write the text of your choice.
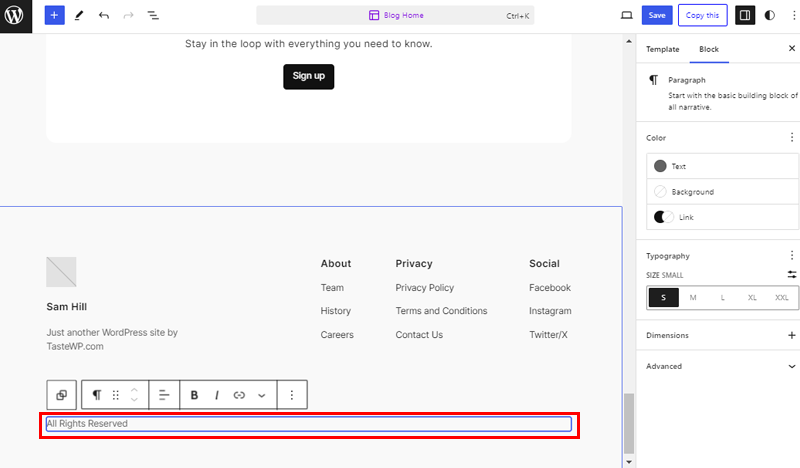
We’ve changed the “Designed with WordPress” text to “All Rights Reserved” which is shown in the below snapshot.
You can also remove the entire “Designed with WordPress” text. If you want to do so, then click on that text and click on the 3 dot options on the text taskbar.
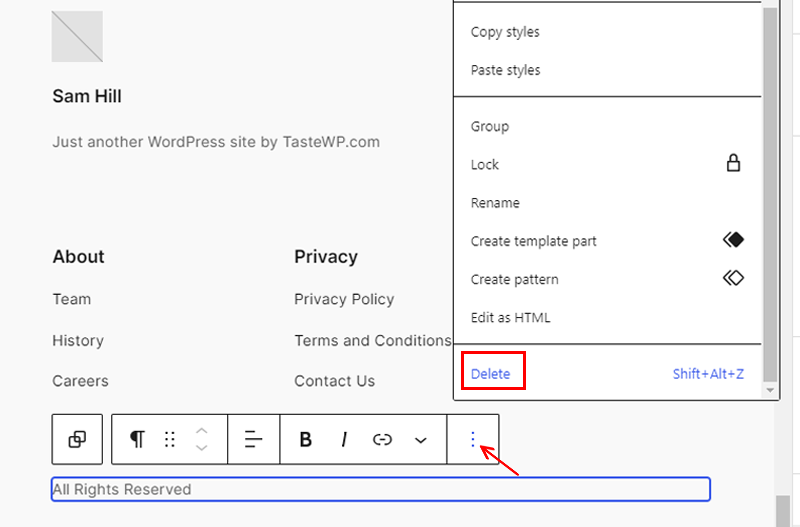
There you can find a “Delete” option. Just click on that option and that text will disappear.
Changing Footer Text Color
Now that, we’ve changed the footer text, let’s change the text color.
So, let’s select the same footer text we’ve just changed. Then go to the settings option. Under the “Color” tab go to the “Text” menu.
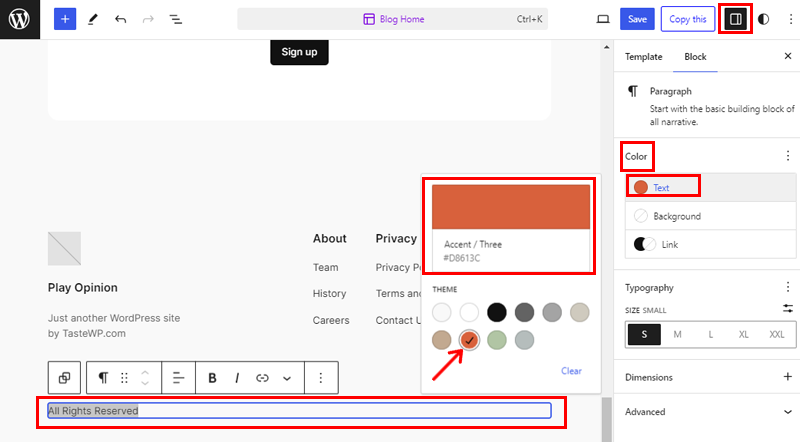
Now you’ll see many color options, so click the one you like. And That’s it!
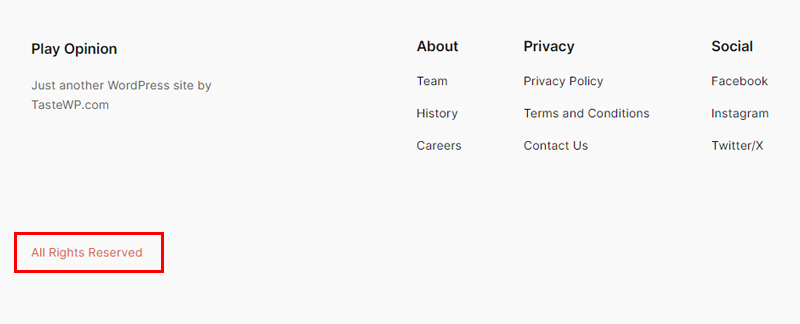
And, below is an example of how your footer text will look like.
Changing Footer Background Color
Here, we’ll be editing the background color of the footer. So, let’s move!
Again, click on the footer block, go to the top right of your editing interface, and click on the settings icon.
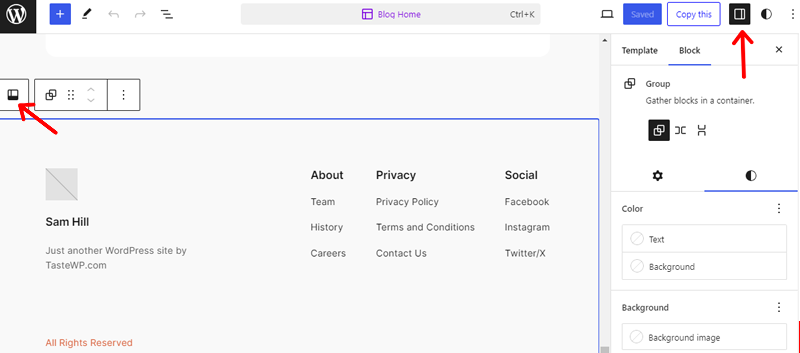
There, you can see various options of settings. Among them, click on the Background option under the Styles tab.
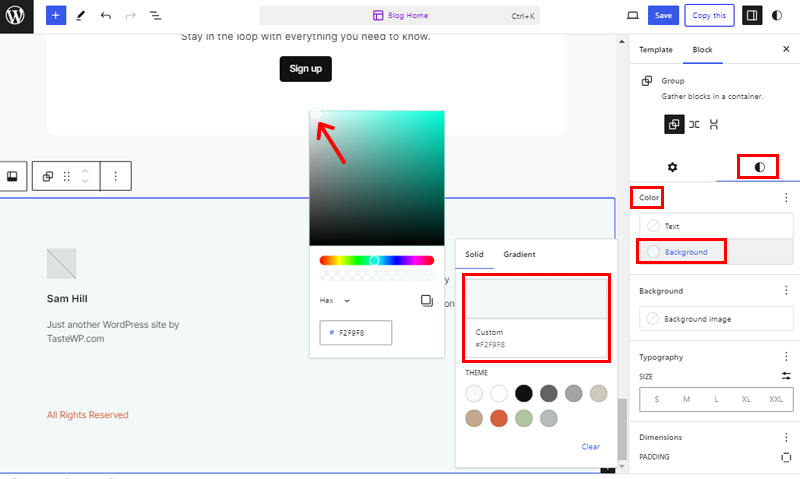
After that, it comes with different color options. Click on your preferred color and you can see the changes in the background color of your footer instantly. Or drag the slide to make your color more precise.
And, that’s it!
Method 2: When Using WordPress Theme Settings
In this method, we’ll be using the Astra theme to take as an example.
If you are using a different theme than Astra, you can follow a similar way. Or follow the theme documentation of that particular theme.
Now, let’s install and activate the Astra theme. Similar to FSE, go to the “Appearance > Add New Theme.”

Then search for the Astra theme. Following that hit the “Install Now” button after the theme appears.
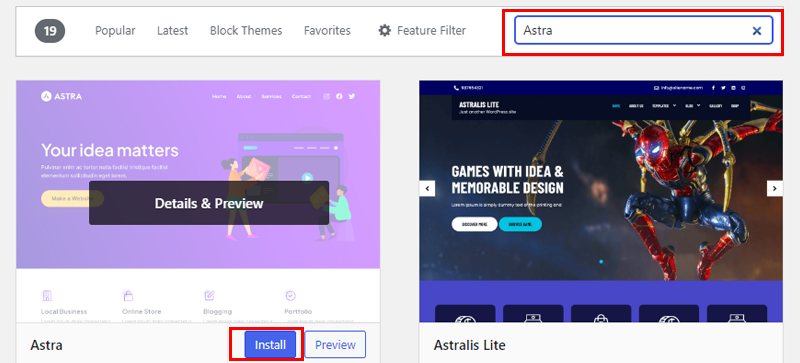
Once done with the installation, hit that “Activate” button and your theme is ready to use.

You can also check our article on how to install a WordPress theme, for a full guide.
Changing Footer Text
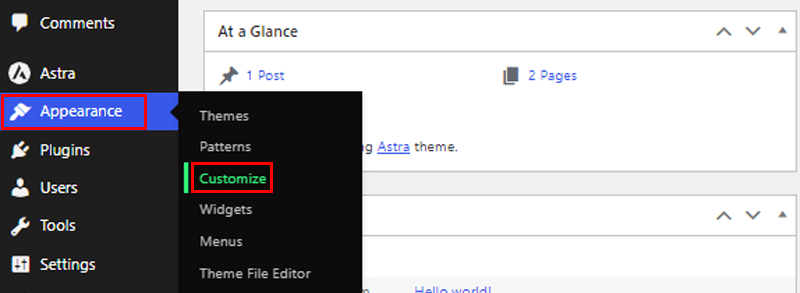
Now to make the changes, go to your WordPress dashboard and click on Appearance>Customize.
Then, you’ll be redirected to the editing panel. On the customization options, look for the footer option. On the Astra theme, you can find the Footer Builder option. Simply, click on that!
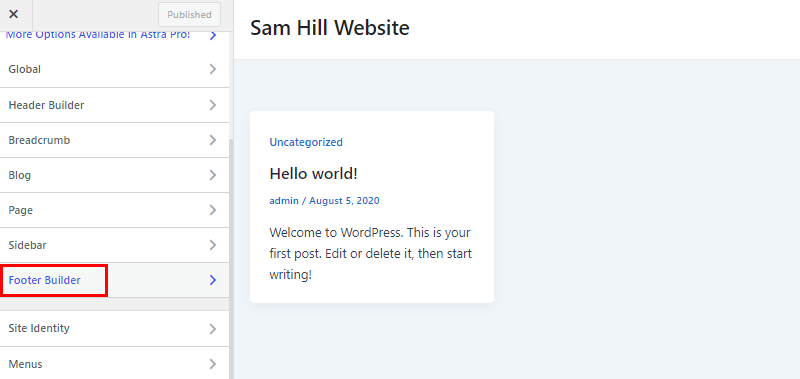
After that, you can see the Copyright option under the Elements tab.
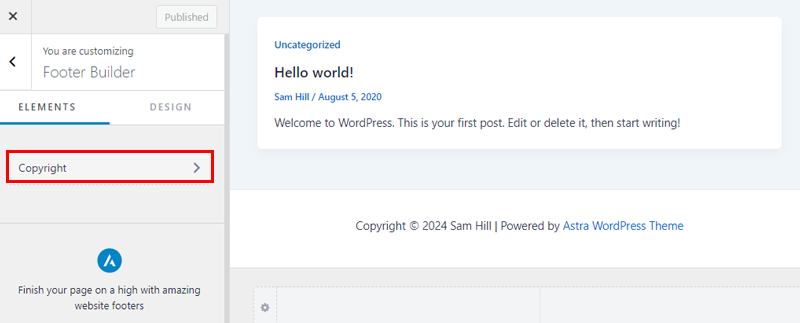
Once you click on the Copyright option, you can find copyright text. The text is written as “Copyright © 2024 Sam Hill Website | Powered by Astra WordPress Theme”.
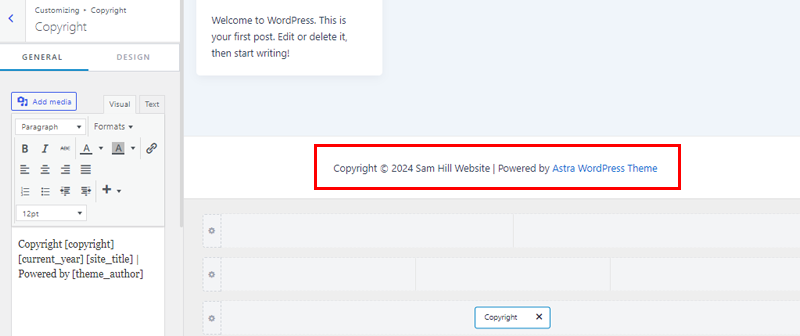
You can simply edit the text or completely remove it as per your choice from the left-hand side text box as shown in the image below.
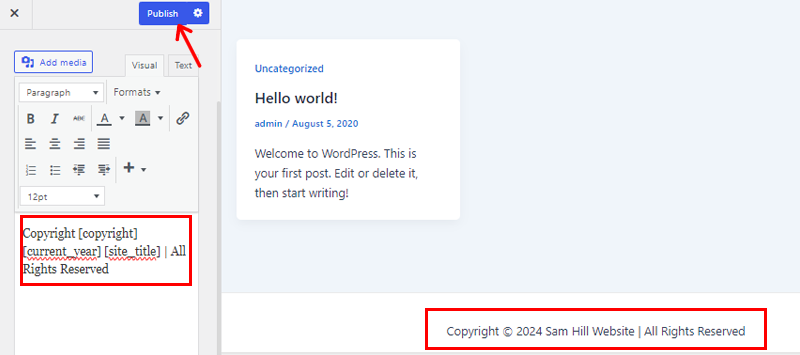
For now, we’ve changed the text to “Copyright © 2024 Sam Hill Website | All Rights Reserved”. After changing the text, you can instantly see the changes on your footer on the customizer as well.
Also, don’t forget to click on the Update or Publish button at the top after making changes to save them.
That’s it! Editing your footer text is way easier than you think with this method, right?
Changing Footer Text Color
Now to change the footer text color, you need to go to customization again, similar to changing the footer text.
As we’re here on the same customization page, let’s change the color of the footer text.
So, under the design option, Click on the “Text Color” option.
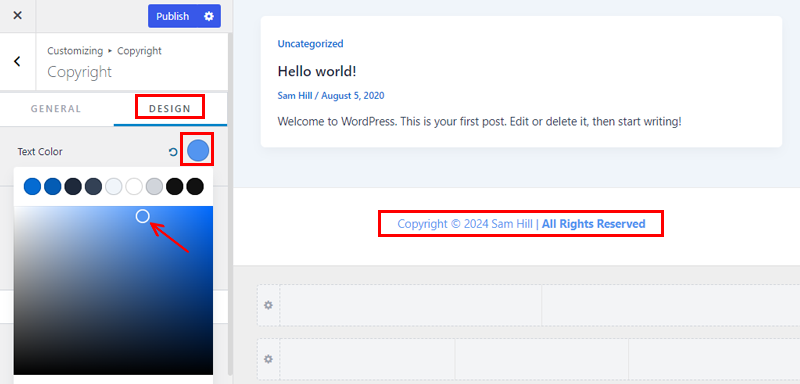
There you’ll find a range of color options, so choose the one you like. Or drag the slide to change the color of the text.
Moreover, you can also change the color code. Simply type or paste your color code in the box. And it’s done.
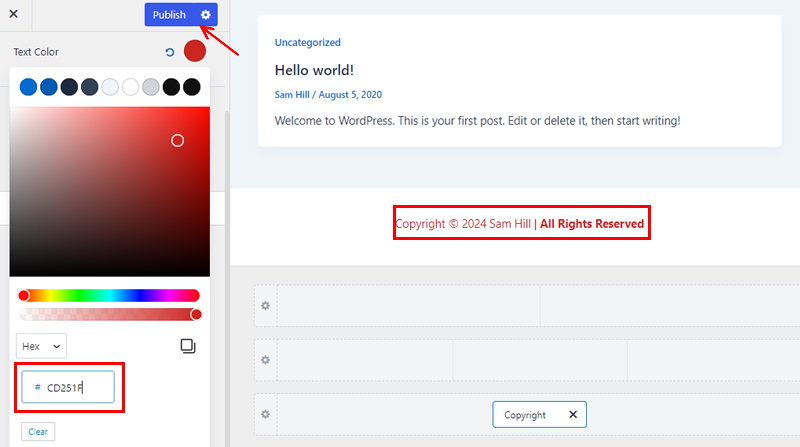
Once done, hit the “Publish” button to save the changes.
Changing Footer Background Color
Next up, let’s customize the footer background color. So, on the same customization interface of Footer Builder, click on the Edit icon on the footer.
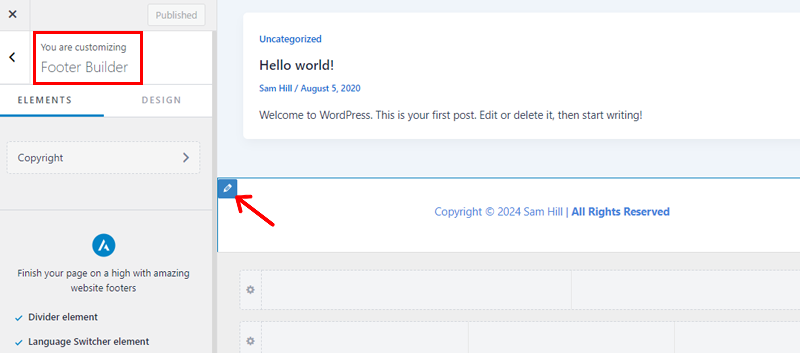
Then, you can see various options under the General tab. But you need to click on the Design tab where you can find the Background option.
Now, click on the background option and you can find a range of color options. To change the color of your choice, you can simply click on any color or drag the slides to make it a precise color.
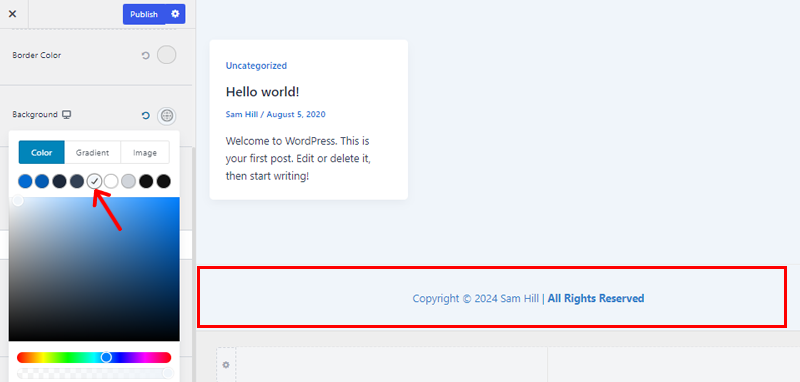
Alternatively, you can also edit the color code. For that click on the color picker on the right side, and you can write your color code.
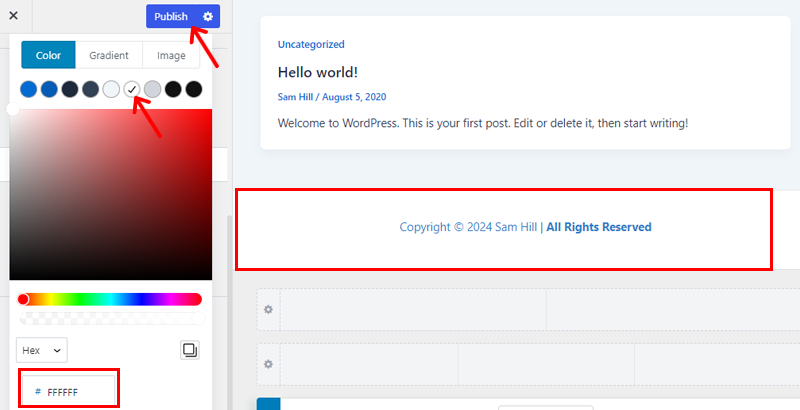
Now that you’ve changed the color, don’t forget to click on the Publish or Update button at the top.
Method 3: When Using Elementor Page Builder
In this section, we will give you a tour of how to edit the footer text using the page builder. For this method, we’ll be using the Elementor plugin.
However, note that you’ll need the Pro version of the Elementor plugin to use this feature. So, make sure that you have the premium Elementor.
But first, let’s install the free version!
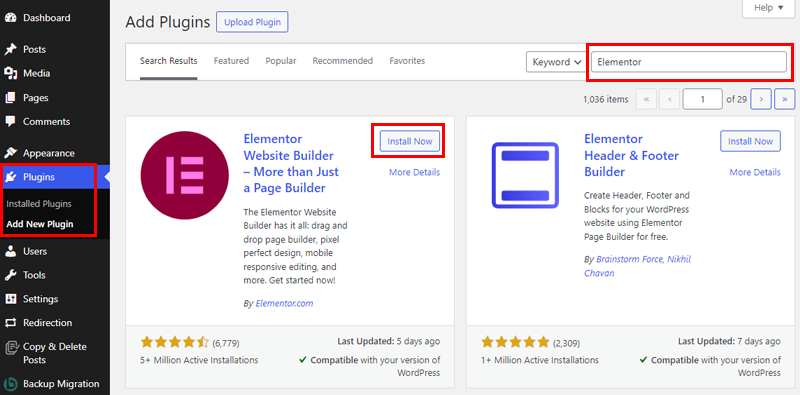
For that, you need to log in to your WordPress dashboard and go to Plugins>Add New. After that, go to the search bar and enter “Elementor”. Once you’ve found the plugin, click on the Install button.
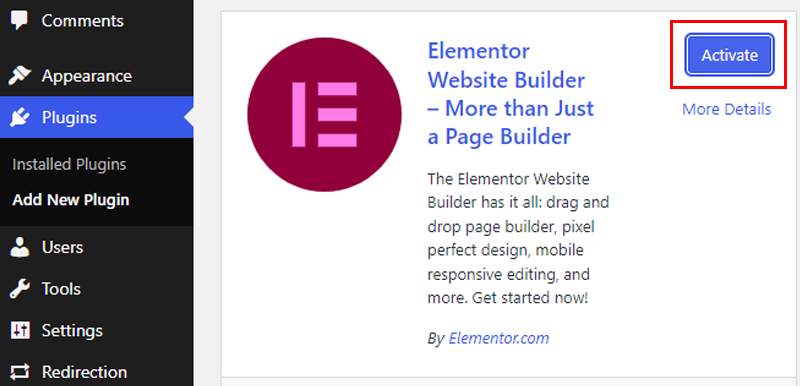
After the installation is completed click on the Activate button.
Now, for the pro version, go to the official website of Elementor, select any of the premium pricing plans of Elementor, and upgrade it to the pro version.

For reference, check how to purchase and install the premium version of a plugin from our guide.
Now, go to your WordPress dashboard, then go to “Plugins > Add New Plugins> Upload Plugin > Choose File.” After uploading hit the “Install Now” button.
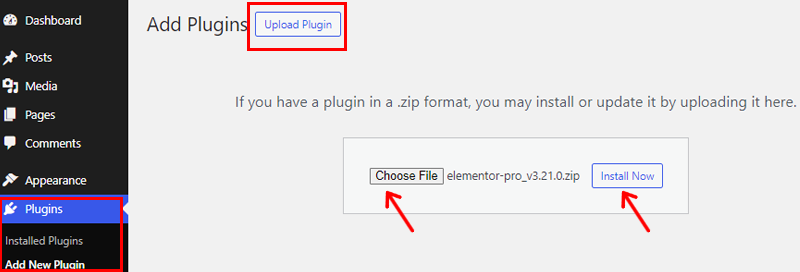
Following that, click on the “Activate Plugin” button.

And, your page builder is ready to use!
Changing Footer Text
After upgrading to the premium version, go to the Templates menu of your dashboard and click on the Theme Builder option.
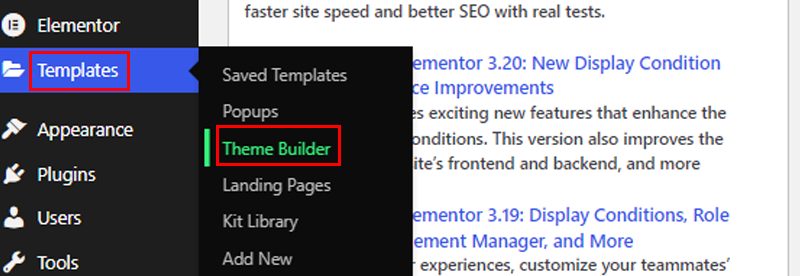
Following that, you can see all the parts required for your website.
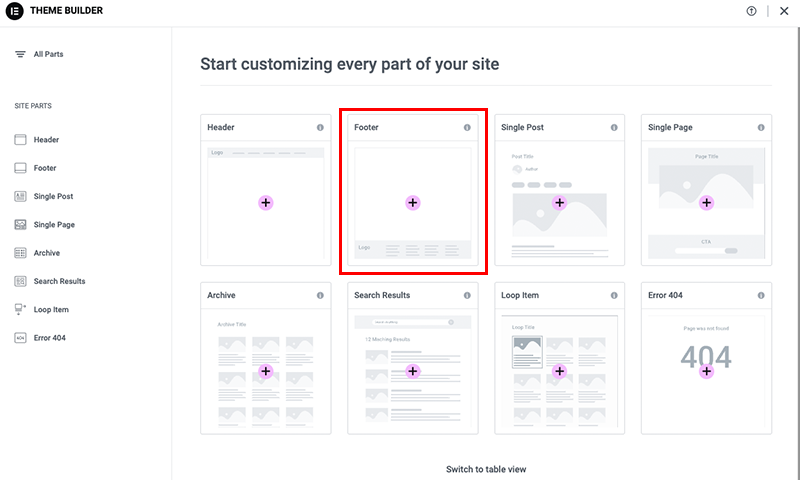
From there, you need to go to the Footer part. And, you can see various footer templates that you can install. You can explore those templates and click on the Insert button of your preferred ones.
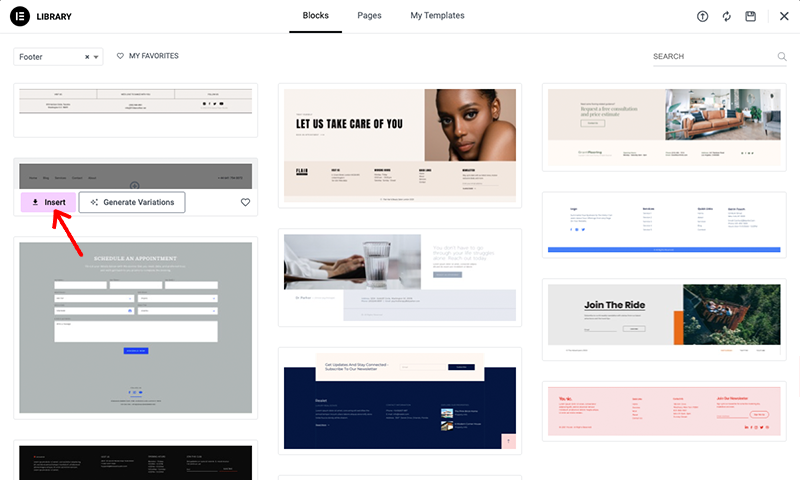
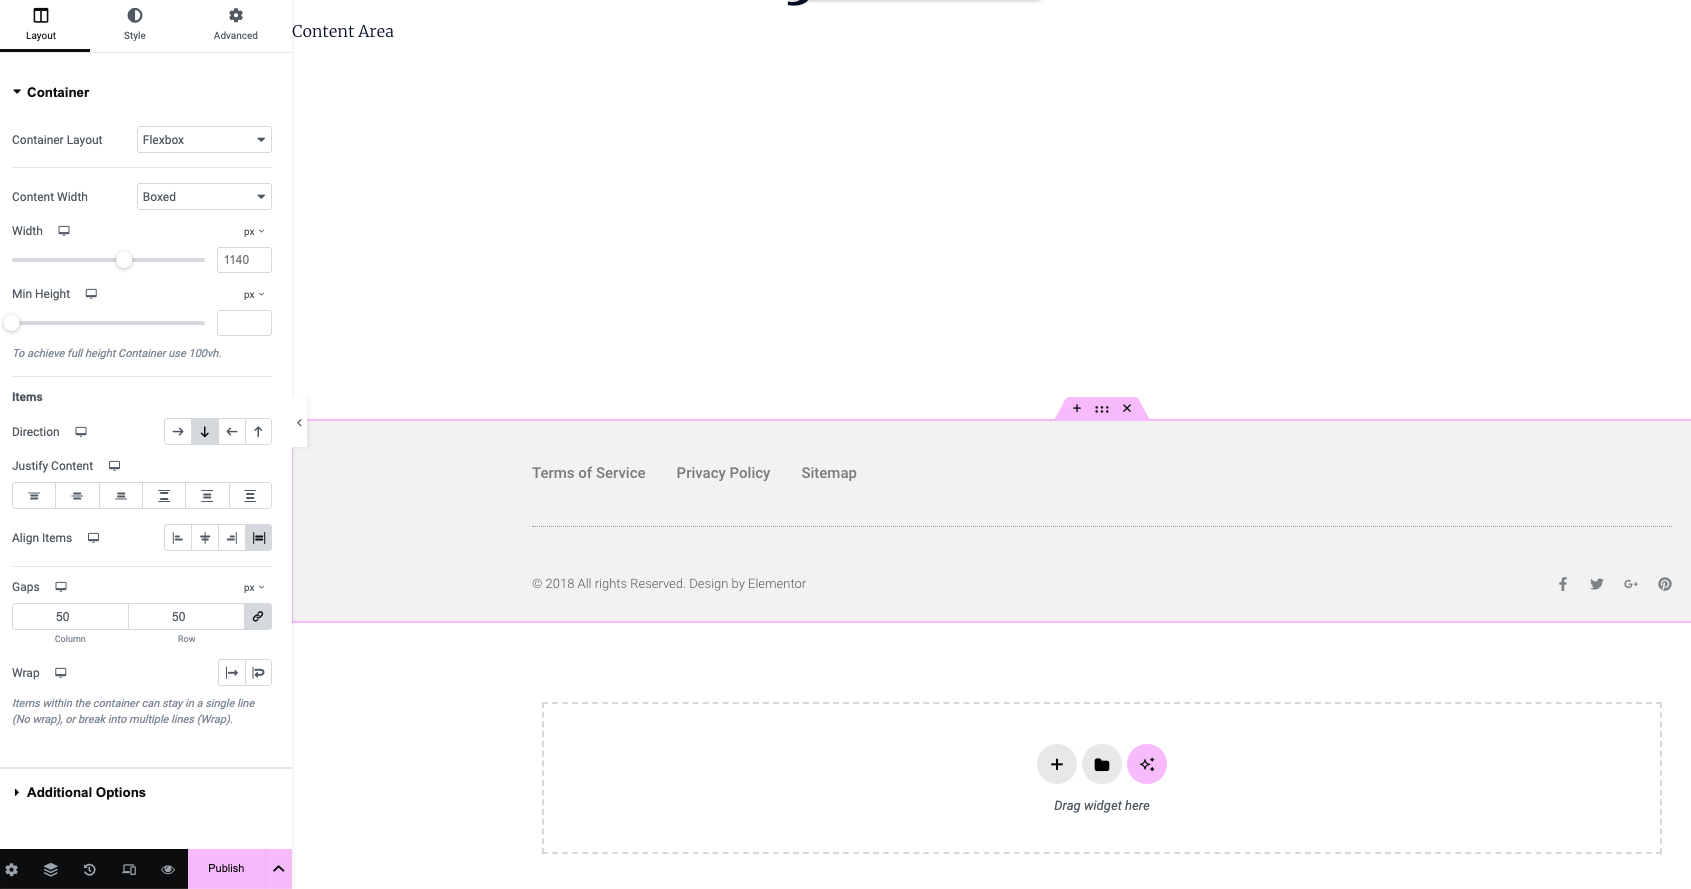
After inserting the template, you’ll be redirected to the editor panel of the Elementor.
Now, click on the text you want to edit and you can find an edit icon. Click on that icon and on the left side, you can see that text is under the Title box, written as “All Rights Reserved”.
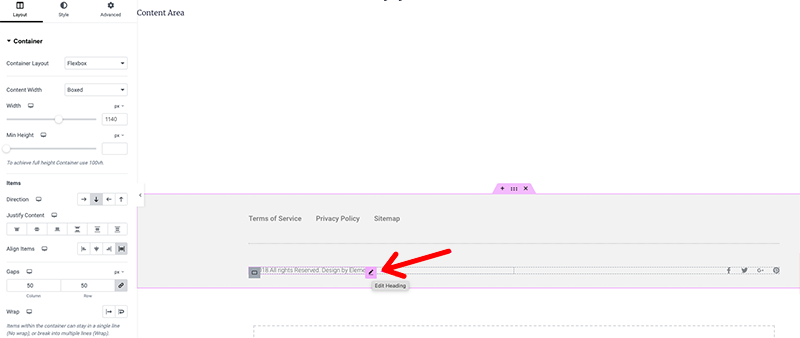
From there, click on the text, and edit those text with the preferred ones. For example, we’ve changed it to “Powered by WordPress”.
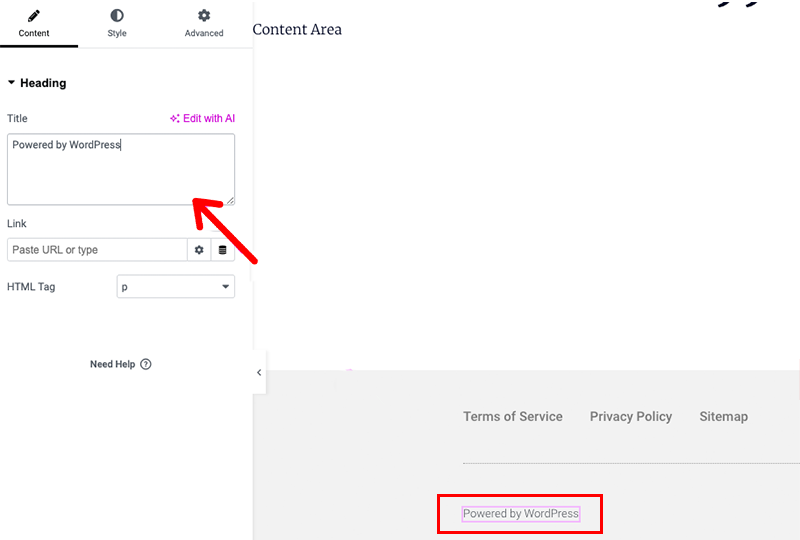
So, this is how you can edit your footer text effortlessly.
Changing Footer Background Color
Now to change the footer background color, simply, go to the Templates>Theme Builder from your WordPress dashboard.

Following that, insert the footer like we did while changing the footer text section.

Once the footer is inserted, click on the whole footer layout, and you’ll see the blue-colored border. There, you need to click on the middle icon which is between the + and x icons. That middle icon is the edit container icon.

Then, you’ll find different options under the Style tab, so, go to the Background option.
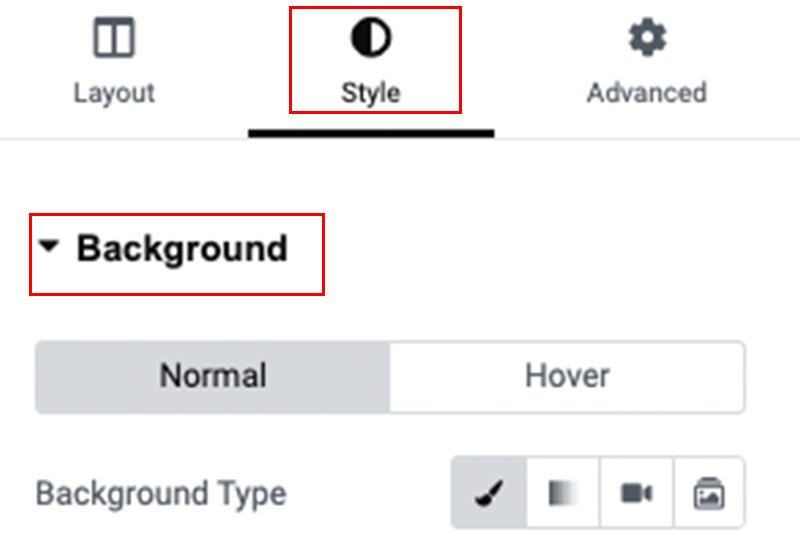
There, you can find the Background Type element from which you need to select the Classic icon.
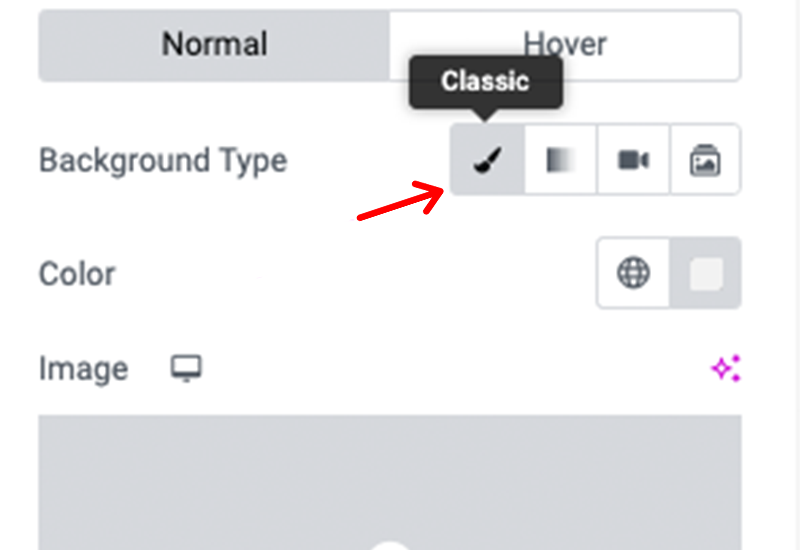
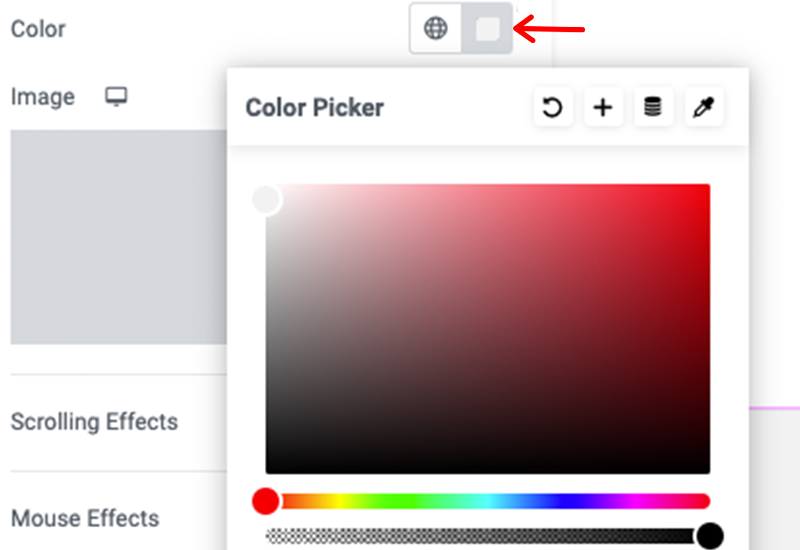
After clicking on the Classic icon, you can finally see the Color element. Then, click on the icon which is on the right side of the Color element. From there, you can select the global colors.
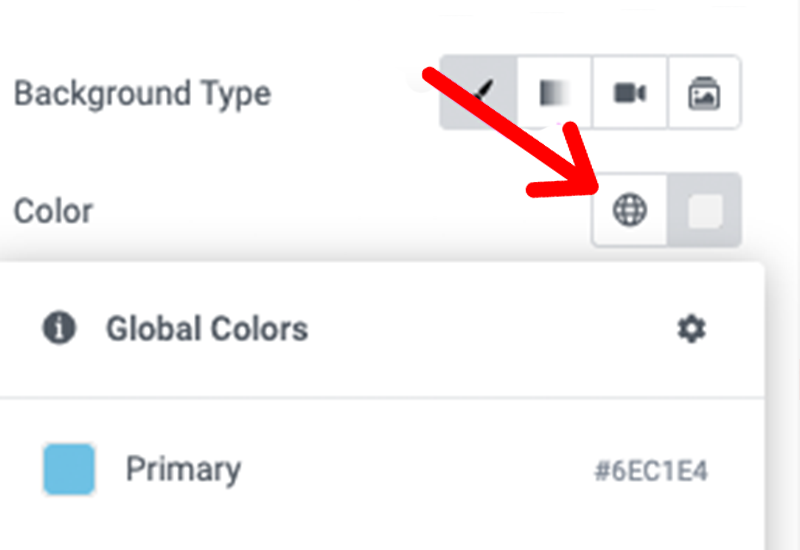
Once you’ve selected the color, you can also make your color more precise by clicking on the color picker. There, you can directly click on the color of your choice, or write the color code.
And that’s it!
You can instantly see the background color of the footer which is changed after your color selection.
Conclusion
And, that’s all folks! We’ve arrived at the end of this article.
We’ve discussed different methods for how to change the footer color in WordPress. Now, you can easily change the footer color and text in your WordPress site using any of these easy methods.
We recommend you go to the “Using Theme Settings” method for changing both the footer text and background color in WordPress. This method is easier and more convenient to use. Most of all, anyone, even beginners, can quickly change them.
Also, if you’ve tried any of these ways mentioned above, then do leave us a comment below and your experience regarding the method.
In case you’ve any more queries about changing footer color and text in WordPress, then feel free to ask us. We’ll get back to you as soon as possible. Also, share this article with your friends and colleagues.
Also, do check out our article on how to add images side by side in WordPress Gutenberg & how to add a logo slider in WordPress.
Don’t forget to follow us on Facebook and Twitter for more helpful articles.


To the sitenerdy.com webmaster, Thanks for the well-structured and well-presented post!