
Are you looking for an easy guide on how to create a survey form in WordPress easily? Or, interested to learn how to make an online survey? If that’s the case, this article will be of use to you.
Generally, surveys are one of the appropriate methods for gathering data and information from a specific group of people. This helps you to make insightful decisions based on real data.
These days, online surveys are more preferred than offline surveys for numerous reasons. A survey form is a perfect method to collect feedback from your site visitors. This further assists to make evaluations for growing your organization or business.
So, we’ve brought a simple step-by-step tutorial on how to create an online survey form in WordPress.You’ll also learn how to change the form’s appearance, alter its settings, and link it to the relevant page. Let’s get going!
A) Significance of an Online Survey Form
Before we go any further, let’s discuss why you need an online survey form on your WordPress website.
- Honest Feedback: Online survey form helps site visitors anonymously express their views and concerns. Further, this aids you to get honest and useful feedback from folks directly impacting your business.
- Quick Analysation: The online survey results are available for review at any time of your convenience. You can view real-time surveys to react immediately, make graphs, export data for more research, and so on.
- Time-Saving: It takes two-thirds less time to complete an online survey form than offline. As information is collected automatically and response time is short. This helps you to make critical decisions on time.
- Objective focused: You can prioritize issues in an online survey form by making a few fields mandatory. This helps to fulfill the key objective of your survey.
- Affordable: Online survey forms allow you to save a lot of money on questionnaire charges. Furthermore, data is automatically saved in databases, making it less expensive than offline survey forms.
B) Choosing the Best Survey Form Plugin
By now, we understand how important it is to have a survey form on your WordPress website. So, we must identify the most straightforward method to effectively create a survey form on your website.
There are various approaches or methods to create a survey form. One of them is using coding knowledge. It’s done by developers who have coding expertise. However, it can be a difficult task if you don’t know how to code.
Thankfully, there are a variety of WordPress plugins that help you create survey forms. That also, without having to code. These plugins let you build and design your survey form with all the required details.
Also, you should always select the plugins that best meet your requirements. To make it easier, we’ve listed a few best WordPress plugins to create an online survey form on your site.
Let’s check on them.
1.WPForms
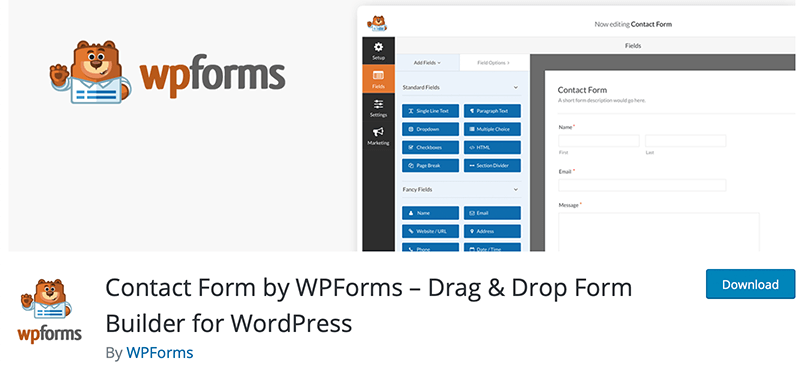
WPForms is a popular drag-and-drop WordPress form builder that is simple to use and powerful. Basically, you can create any kind of form such as a survey form, contact form, job application form, etc. Also, you do not require any prior coding knowledge.
In fact, this plugin offers a function that walks you through the process of creating your first form. Moreover, it has an editable survey form template for creating a survey form. Its tons of setting capabilities help you to design a survey form to your liking.
Pricing:
WPForms is a free WordPress plugin. You can, however, upgrade to premium versions for more features at the following prices:
- Basic: $39.50/year
- Plus: $99.50/year
- Pro: $199.50/year
- Elite: $299.50/year
2. Formidable Forms
Formidable Forms is another popular WordPress survey plugin with more than 300k active installs. It has lovely form designs for creating survey forms. This further aids to catch the attention of the site visitors. This plugin is the most effective way to link your survey forms to email-based marketing providers.
Moreover, it has advanced data reporting capabilities As the filled survey form is immediately saved in the WordPress database. This ensures that your data is stored properly. In addition, it’s speed-tuned making it one of the fastest form builders plugins in the market.
Pricing:
You can download the free version directly from the WordPress.org directory. Pro version will cost you:
- Basic: $39.50/year
- Plus: $99.50/year
- Pro: $199.50/year
- Elite: $299.50/year
3. Crowdsignal Forms
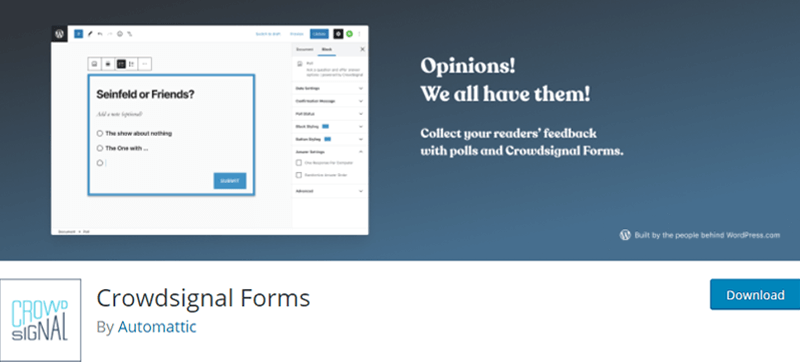
Crowdsignal Forms is another most popular plugin for creating surveys and polls. It was created by Automattic, the same company that created WordPress.com. This plugin uses a drag-and-drop method to let you easily create surveys.
Basically, it comes with 20 lovely styles for the questionnaires to choose from. It’s a straightforward yet effective tool that helps you build and manage polls. You have the option to make the polls result public or private to your wish.
Pricing:
It’s a free WordPress plugin. You can upgrade to the premium version at following packages:
- Premium: $15 per month, billed annually.
- Business: $45 per month, billed annually.
- Team: $29 per month, billed annually.
Here we would like to recommend the WPForms plugin for creating online survey forms in WordPress.
Now the recommended plugin WPForms is used for this tutorial out of the aforementioned plugins. As it’s one of the popular WordPress form plugins that’s simple to use. Its user-friendly interface makes it a good choice to create an online survey form.
Also, WPForms offers both free and paid versions. The free version includes a plethora of form design and configuration choices. However, for additional functionalities, you can upgrade to the premium version.
So, let’s go to the following section, i.e. easy guide on how to create an online survey form in WordPress.
C) Steps to Create a Survey Form in WordPress
Here, we’ll show you how to create a survey form on your WordPress site using the WPForms plugin. You can also design your website using any appropriate WordPress theme.
Let’s go over the steps:
Step 1: Install and Activate the Plugin “WPForms”.
First of all, log in to your WordPress website and go to the dashboard.
Then, you need to look for and install the WPForms plugin. For that, go to the Plugins menu and click on the Add New button.
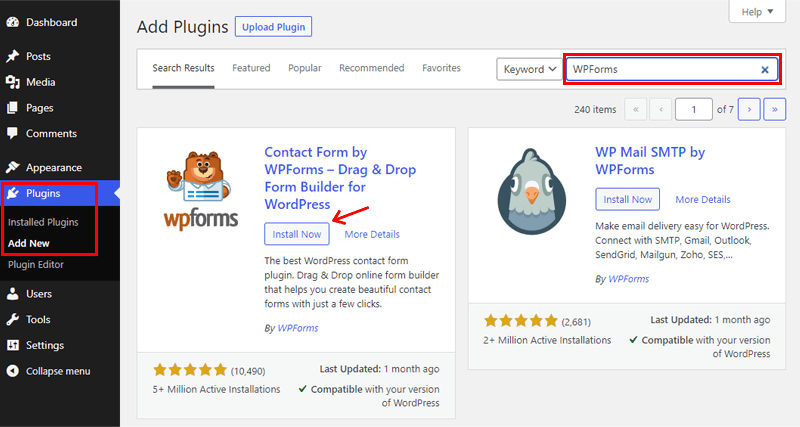
Then you’ll see a search bar on the top-right side of your dashboard. Type “WPForms” into the search field to locate the plugin for installation.
After you’ve discovered the plugin, click the Install Now option.
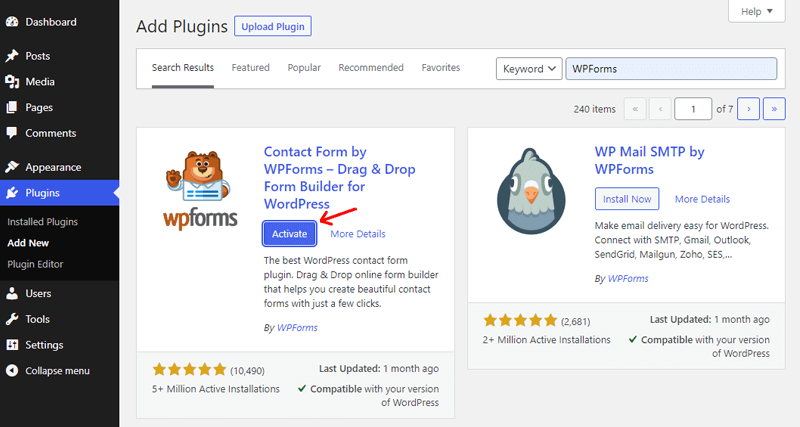
After you’ve finished the installation, you’ll find the Activate button and click on it.
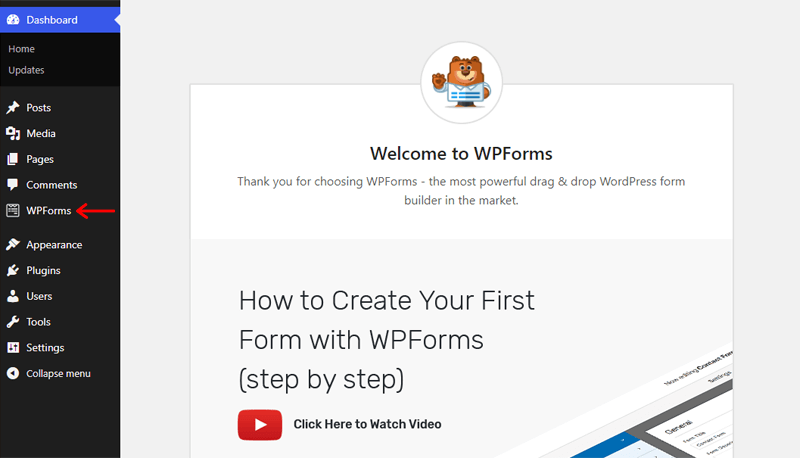
You’ll note that WPForms has been added to the WordPress dashboard as a new menu item after activation.
You can also refer to our step-by-step guide on how to install a WordPress plugin for further detailed information.
Step 2: Create a Survey Form
Now, you’re all set to create a survey form easily on your website.
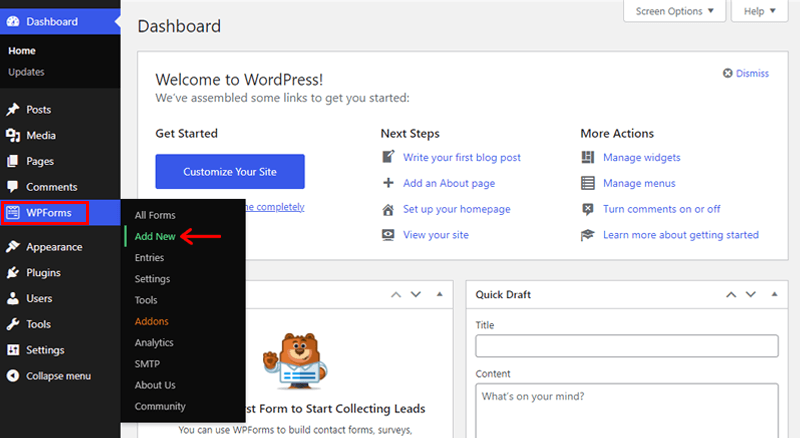
Simply, go to WPForms on your WordPress dashboard and click on the Add New option.
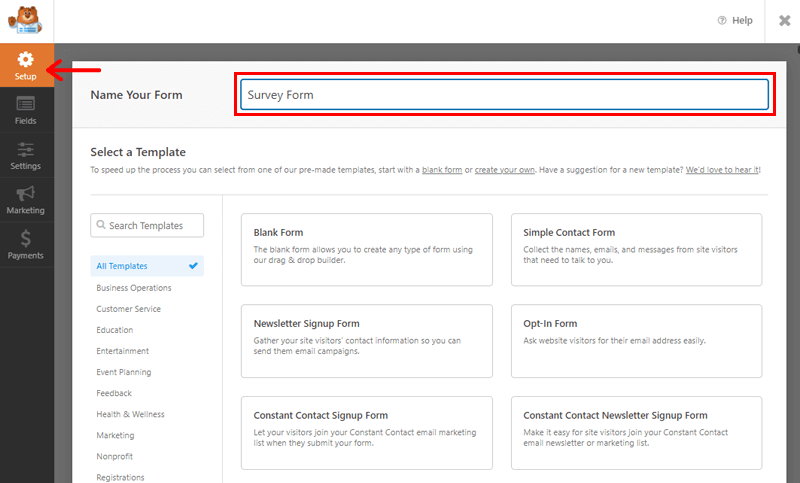
Now, you’ll find the form setup page. You can start by writing the name of the form at the top of the page. For e.g. Survey Form.
Then, you can design a survey form using one of these two methods. The first one is to start over from scratch by choosing a blank template. Another way is to start tweaking the survey form template.
Let’s take a deeper look at each of these methods.
Method 1: Create a Survey Form From Scratch (With Free WPForms)
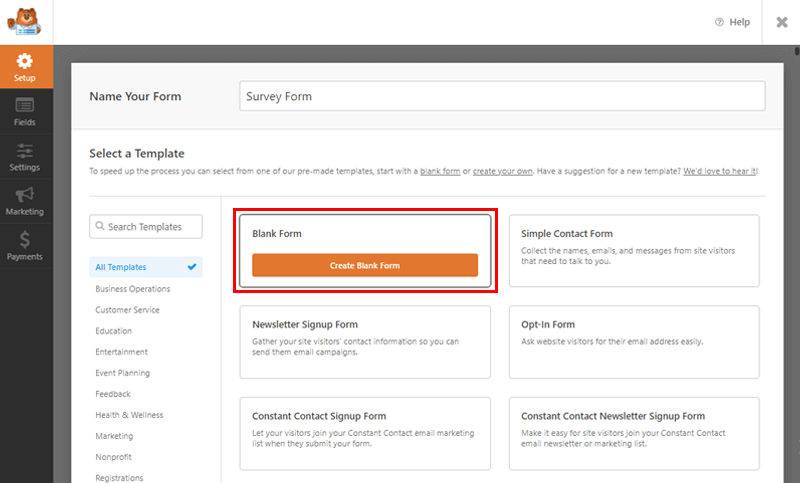
Firstly, go to the “Blank Form” section to create a survey form from scratch. Then, while hovering over it, click on the Create Blank Form button.
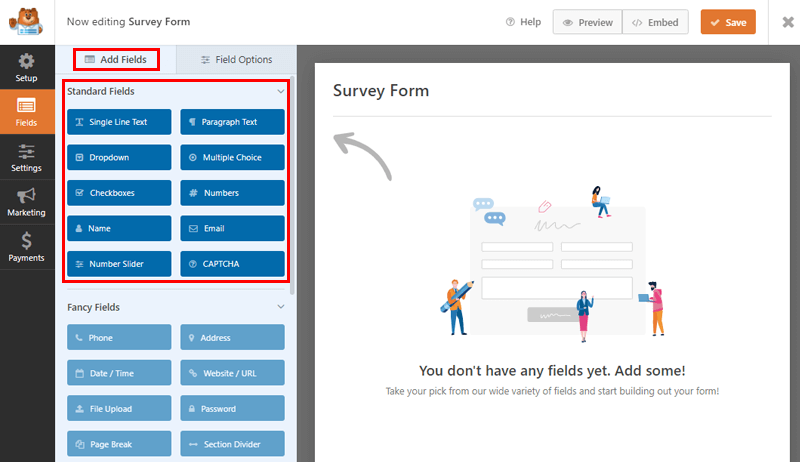
You’ll now be directed to the editing area of the “Blank Form.” In the Fields section, you can browse Standard Field options using the “Add Fields” menu.
Afterward, simply drag and drop the required fields into your form. You have the choice to input whatever field you choose.
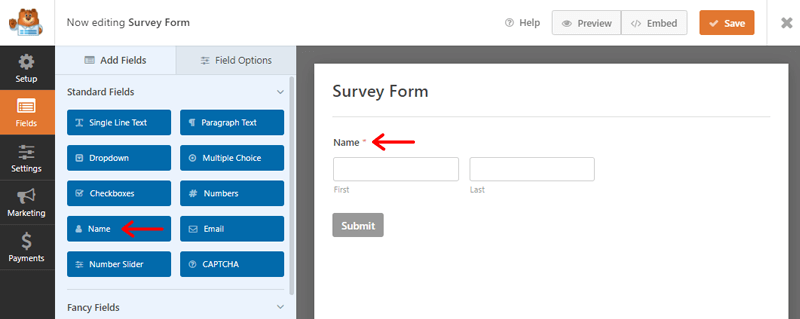
As shown above, you can put the Name content on your form. All you’ve to do is simply drag the Name field in the survey form to the right.
Also, you might want more site visitors to fill your survey forms. And some may not want to disclose their names. So, you might want to make the Name field not mandatory to fill.
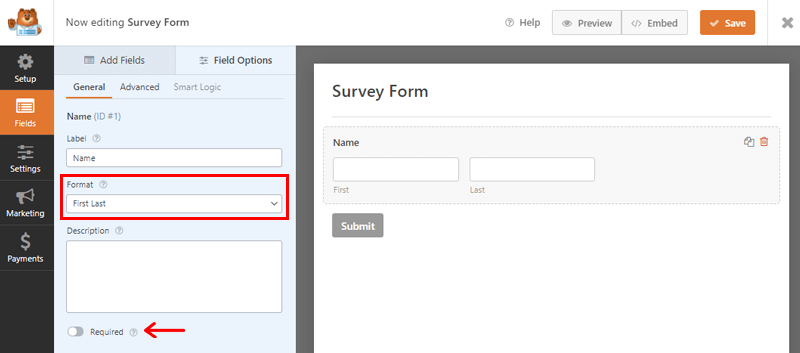
To do so, once you click on the Name field you’ll be directed to the editing section as shown above. There you’ll see the Required button is clicked by default. Just unclick the Required button. This way, you can get more users as well as honest answers to your survey. You can also change the Name Format to your liking.
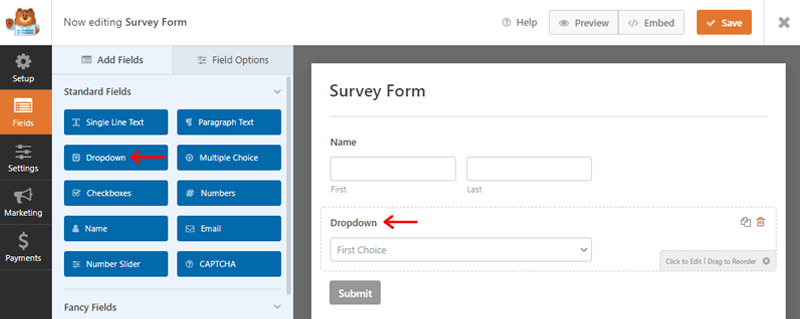
Similarly, you can move the Dropdown field to present your questions in dropdown format.
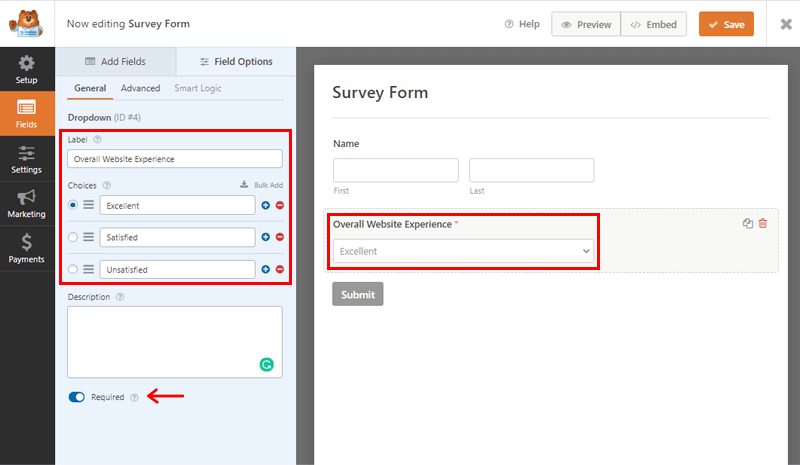
On clicking the Dropdown field on the form, you can edit it.
For e.g. we’ve changed the label to Overall Website Experience. Similarly, we’ve kept on choices Excellent, Satisfied, and Unsatisfied respectively. You can also click on the Required button to make it mandatory.
Likewise, you can use Multiple Choice fields to put more Objective Queries.
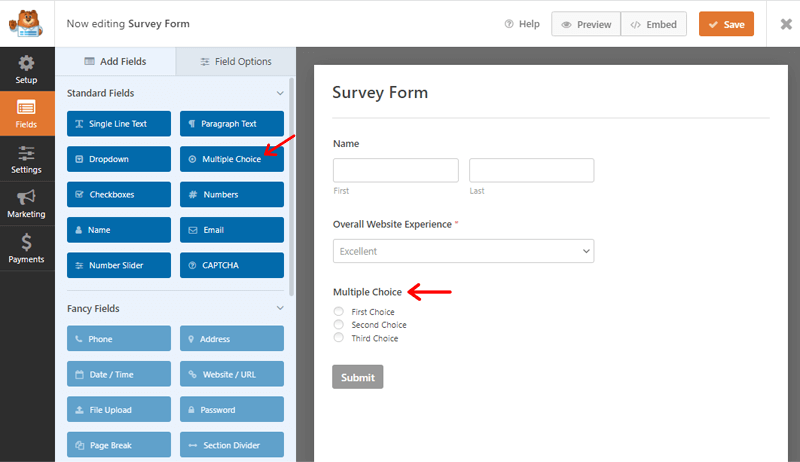
Like before, you can click or drag the multiple choice field to the survey form on the right. You’ll be able to edit the content once you click on it.
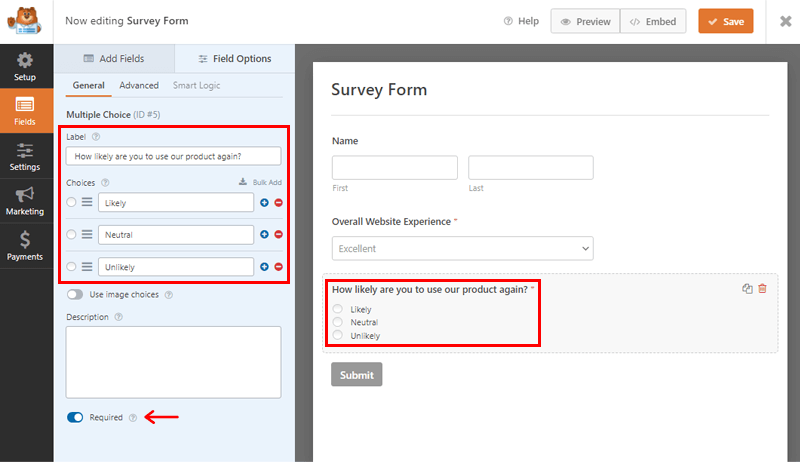
As shown, here we’ve changed the label to our objective question. That is “How likely are you to use our product again?” On choices, we’ve put Likely, Neutral, and Unlikely respectively. To make this field mandatory, click on the Required button.
Also, you can add more as per the necessity of your survey form.
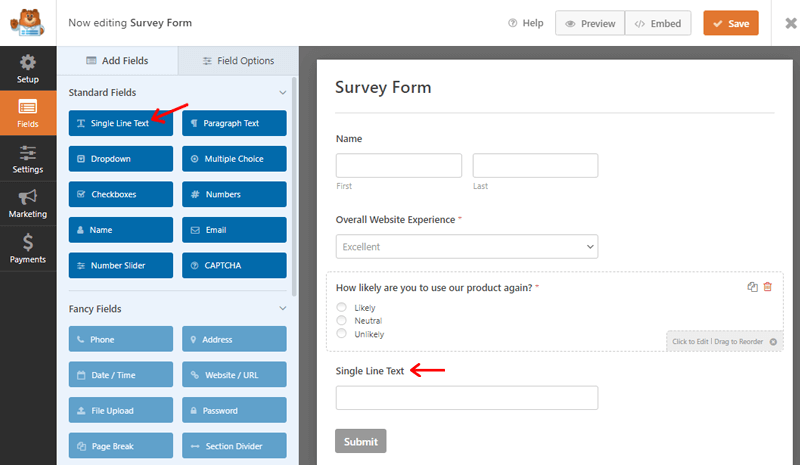
Likewise, you can drag Single Line Text to get some thoughts of your site visitors.
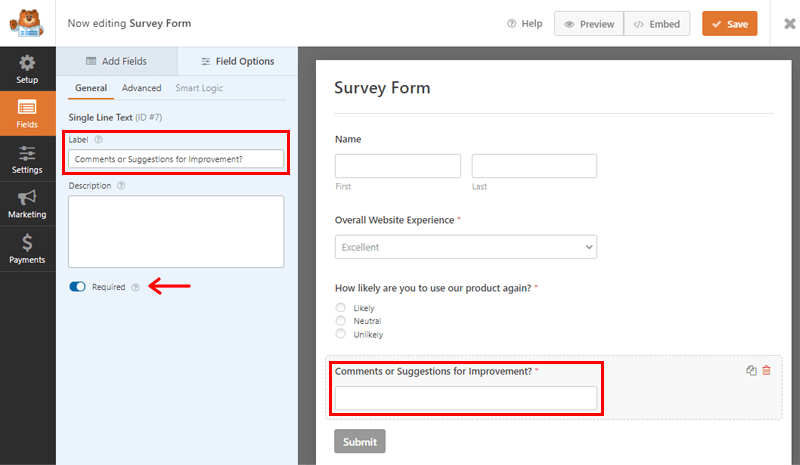
Here, for instance, we’ve changed the label to “Comments or Suggestions for Improvement?” As before, you can make this field mandatory by clicking on the Required option.
Besides, you can add Numbers, Email, CAPTCHA, and many other fields as per the need of your survey form. The processes are the same as done above. All you need to do is drag and edit the content.
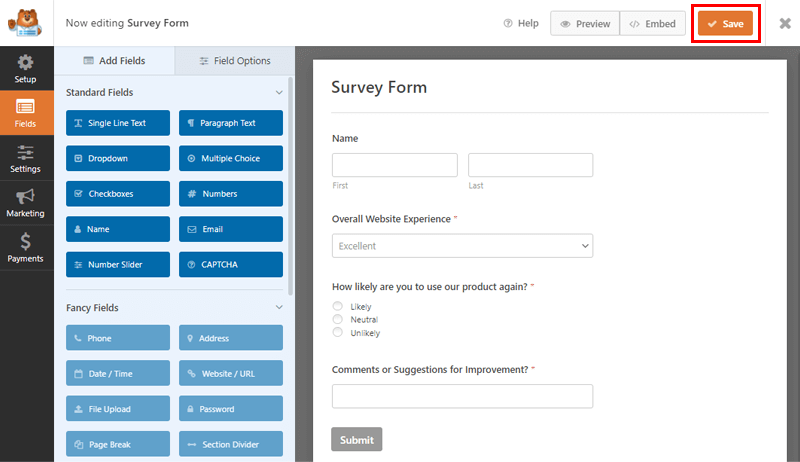
Once you’re done with editing, click on the Save button at the top right corner. Pretty simple right?
Still, wondering if you can create a survey form in WordPress more simply and quickly? WPForms’ Pro version includes a pre-built survey form template, so you can get started right away.
Method 2: Create a Survey Form From Template(Using WPForms Pro)
As said before, you can use the survey form template once you’ve upgraded to the premium version.
You can upgrade to the premium WPForms plugin by directly heading to their official website. All you’ve to do now is pick the ideal pricing package and fill out the necessary information. After that, you must pay to obtain the license key.
Further, you must enter the license key into WPForms settings.
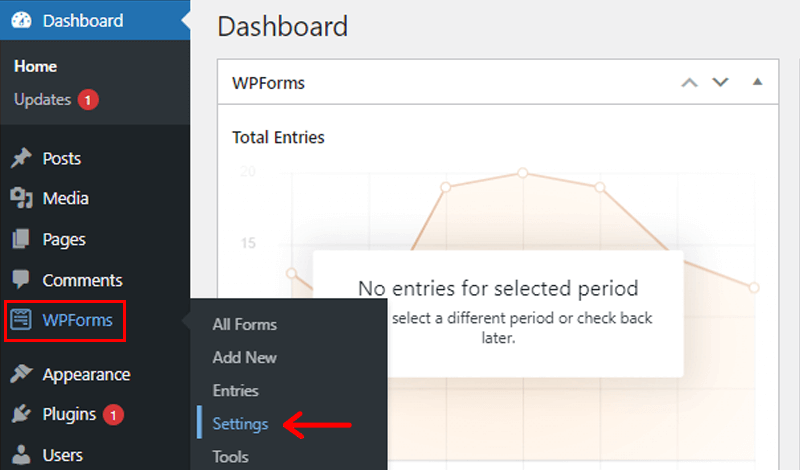
For that, go to the WPForms and Settings area of your WordPress dashboard.
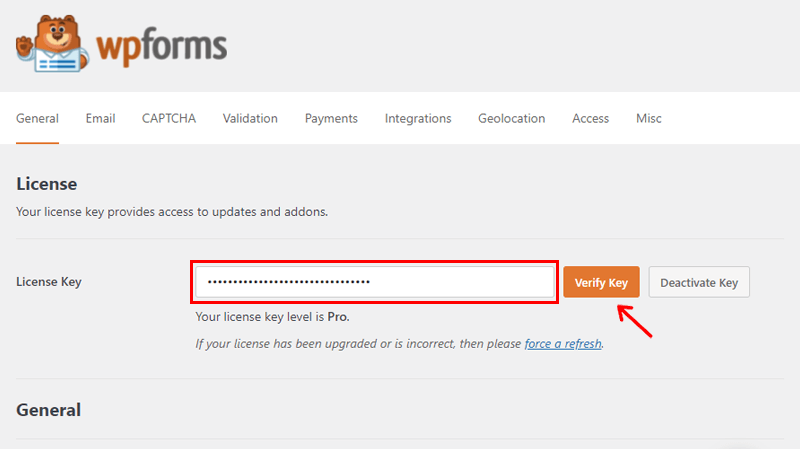
Following that, you’ll be taken to a page where you must enter the License Key. After that, press the Verify Key button. Once it’s verified, you should click the Connect button. That completes the installation of the premium WPForms plugin.
After you’ve finished installing the premium WPForms plugin, you’ll need to deactivate the free WPForms Lite plugin. Also, since the premium plugin now manages all forms and settings, you won’t lose any data.
All you need to do is go to Plugins, then to the Installed Plugins. And browse over WPForms lite and click on the Deactivate button.
You can now effortlessly import the ready-made Survey Form template.
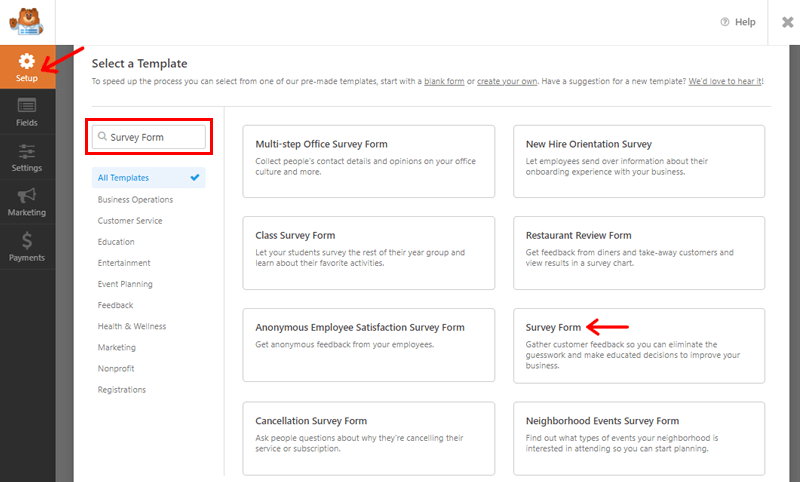
To import, go back to the setup page and type “Survey Form” into the search box. After that, you’ll see the various survey forms available for different purposes. So, here we’ve chosen a general Survey Form template.
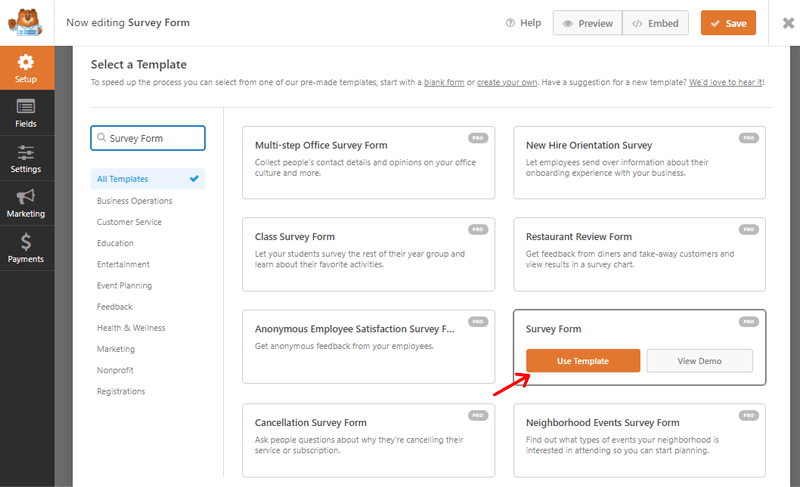
Once you click on the template, you’ll see two options: Use Template and View Demo. After that, click on the Use Template option. There you have it: a ready-to-use survey form.
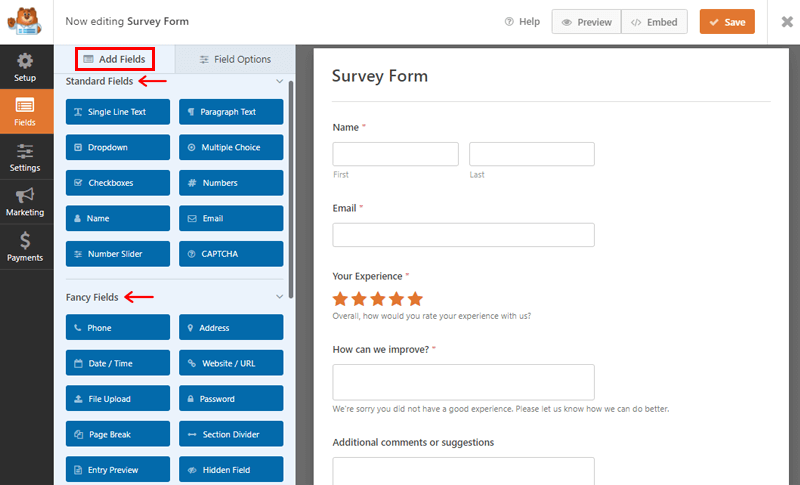
As shown above, the directed page is the editing page of the survey form template.
You can see the “Add Fields” menu in the field area on the left side. It’s used for adding extra fields to the template. Namely, there are 2 types of fields i.e. Standard Fields and Fancy Fields. You can drag and drop these fields into the template as needed.
Similarly, you can change the form’s field content as well. For that, navigate to the “Field Options” menu on the right side of the field area. Here, you’ll find 3 sub-options i.e. General, Advanced and Smart Logic.
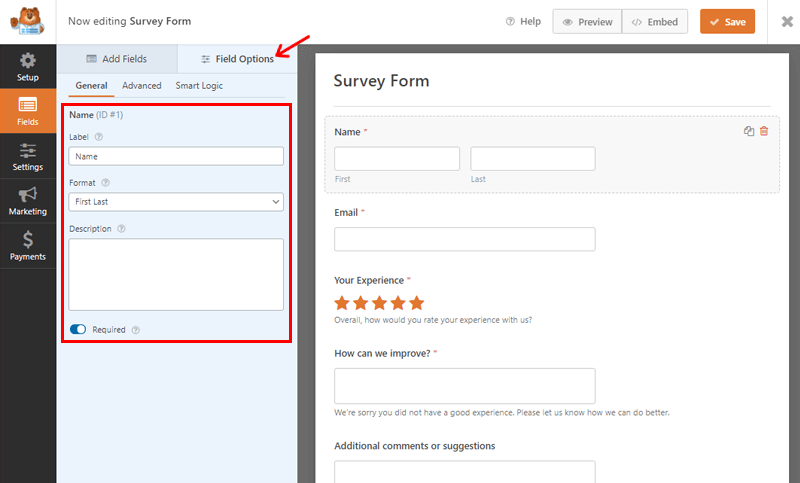
You can quickly tweak the label, format, and description of a specific field of the form here. In addition, you’ve got the option of making further changes to your form. For e.g. you can make specific forms required to fill out, adjust field sizes, enable conditional logic, and so on.
Delete and Reorder
Have you ever been compelled to remove some of the form’s content fields? There’s nothing to be concerned about.
Simply select the fields that you consider aren’t required. Then you’ll see the delete icon, which you can click, and then the OK option. You’ll find that the field has been removed from your form.
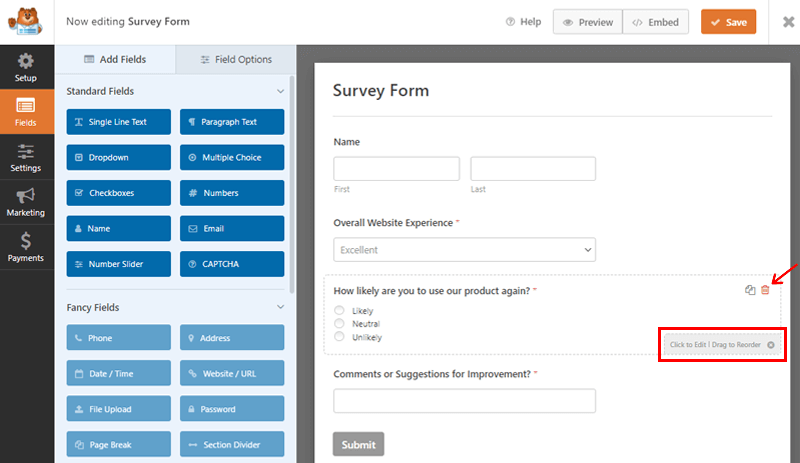
When it comes to re-ordering, you’ll notice the “Drag to reorder” button once you click on a specific field. You can reorganize the fields by using this method. Now you simply need to drag and drop the fields into the correct order.
Once you’re done personalizing your survey form, you can click on the Save button at the top right corner.
Step 3: Configure the Survey Form Settings
After you’ve created the survey form using one of the ways listed above, the next step is to configure the form’s options.
For that, go to the Settings section on the left side of your WPForms screen. Also, both free and premium versions include 3 primary settings. Namely General, Notification, and Confirmations. Let’s dig deeper at each of them.
General
Here, we’ve General as the first setting option. In this section, you’ll have complete control over the contents. You can change the form’s name, description, processing text for the submit button, and more. Also, you’ll see the “Enable anti-spam protection” button. Simply click on it to avoid spambots and texts.
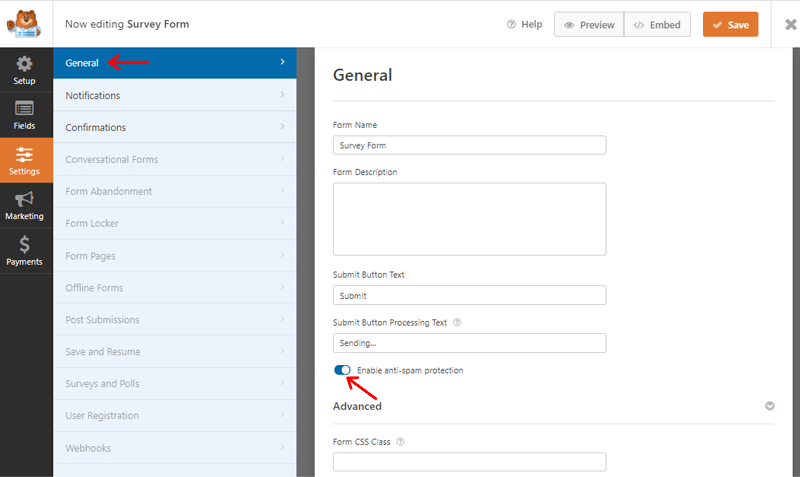
Below that, you can set complex components like adding a CSS class to forms and buttons, and so on. You can also leave the default settings alone, but make sure to save any changes you make.
Notifications
The Notification feature notifies you when site users fill out a survey form on your website. In this section, you can specify how you want to obtain emails or messages.
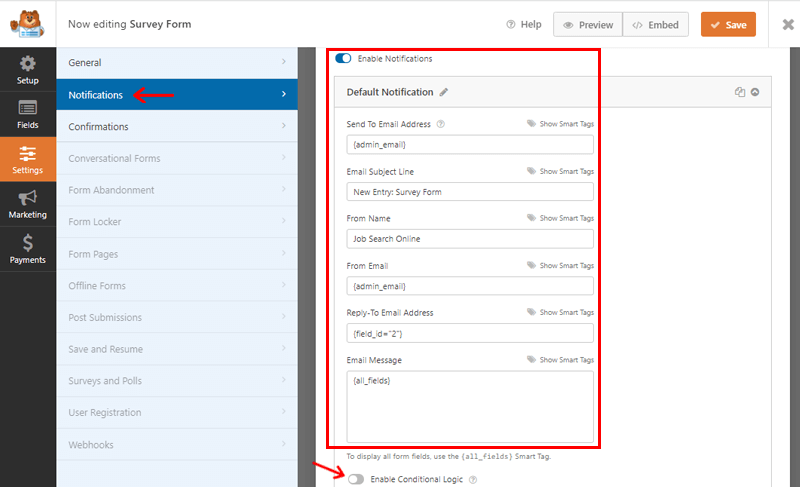
As shown in the screenshot above, the “Enable Notifications” button is enabled by default. If you don’t want to be bothered with it, you can turn it off. You can configure the following features:
- Send to Email Address: You can use this field to specify a custom email address to receive all completed survey forms. If you want to add several recipients, then split the addresses with commas.
- Email Subject Line: Change the subject lines for the emails you get from your survey form effortlessly.
- From Name: You can customize the text of the From Name field with this option.
- From Email: This field is set to the admin email address by default. You can, however, change it to any other email address if necessary.
- Reply To Email Address: You can make your designated email address the recipient of any survey responses.
- Email Message: By default, it contains all fields. On the other hand, you can modify the email’s text.
- Enable Conditional Logic: You can specify the conditions for receiving the notification here. This allows you to swiftly pick out potential clients for your specific offerings.
In addition to the above features, you’ll notice “Show Smart Tag” next to each element. You can use it to send notifications to let users know that the survey is received.
Confirmations
The last component of the configurations is confirmations. Here, you can customize confirmation messages for site users who’ve filled survey forms.
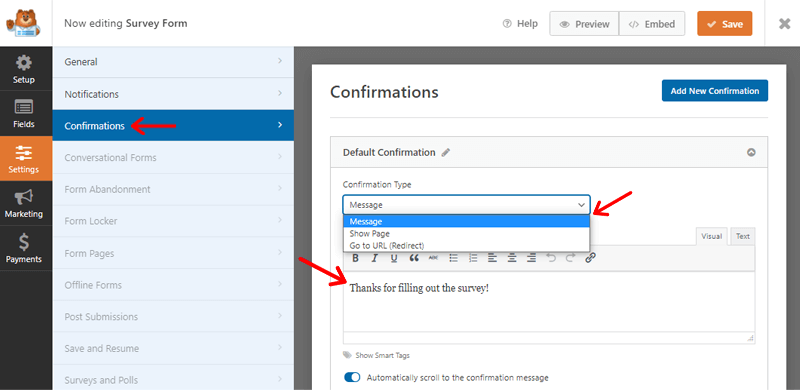
As you can see, the Confirmation Type element has 3 sub-options.
- Message: Once the site user successfully fills out the survey form, it’s used to display a success message. You can display whatever success message you prefer. For instance, we’ve used “Thanks for filling out the survey!”
- Show Page: Similarly, if you choose “page,” then the users will be sent to one of your website’s web pages.
- Go to URL(Redirect): Likewise, you can direct users to any other pages with a URL by clicking “URL (Redirect).” It allows you to define the page’s URL for users to be sent to.
You can also enable or disable features like scrolling to the confirmation message automatically.
Finally, to preview how your form will seem to your candidates, click the Preview button in the top right corner. Once you’ve done the final recheck of your survey form, click on the Save button.
Step 4: Add the Survey Form on the Page
After you’ve completed creating the survey form, you’ll need to upload it to the relevant page on your website. Let’s dive deeper into it.
First of all, you’ve to create a new page on your website to which you’ll add your survey form.

Simply go to your dashboard. Then, click on the Pages option and Add New.
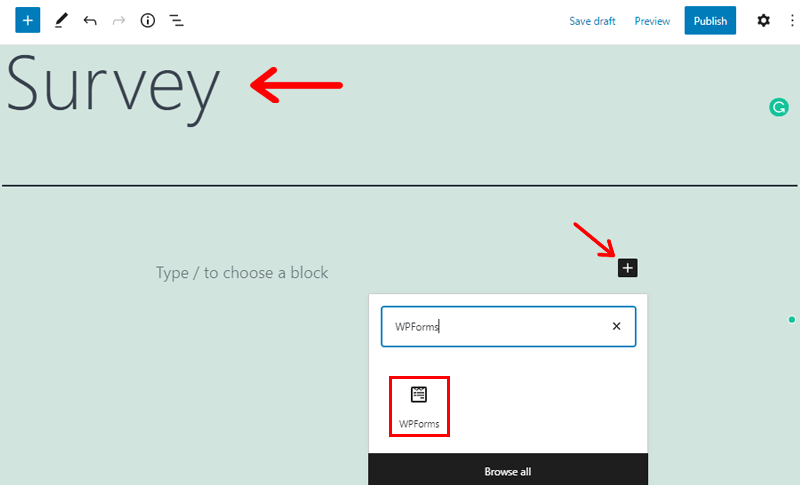
After you’ve created a new page, give it a good title. For instance, let’s put “Survey” for now.
In the “Type/or select a block” section, click the (+) button. Then, type “WPForms” in the search bar.
Once you’ve found WPForms, click on it to open the WPForms wizard in your text editor.
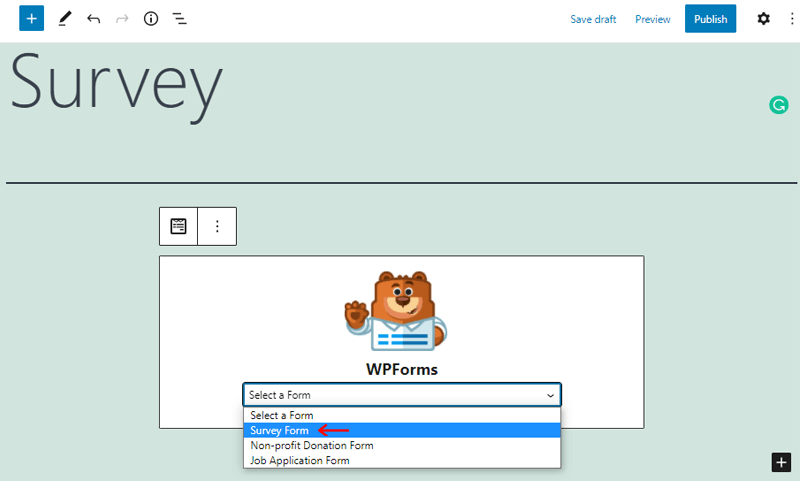
Now, click on the “Select a Form” option. You’ll see the list of the forms you’ve created. As you select one of the forms to embed on your page, it will appear in your text editor. We select “Survey Form” here.

Finally, when you’ve finished adding the form to your page, click the Publish button in the top-right corner. And there you’ve it: your website is up and running, complete with a survey form!
Conclusion
That’s it, folks! Our article has come to the end. We genuinely hope this article on how to create a survey form in WordPress was helpful.
Now, you’ll be able to quickly create a survey form in WordPress by following this easy guide. As a result, you can improve the performance and grow your website.
If you’ve any queries or suggestions regarding this article, then please don’t hesitate to contact us. We’ll get back to you as quickly as we can.
Also, please forward this article to your colleagues and friends if you found this article fruitful.
You might also be interested in our articles on how to create a job application form in WordPress. Also, do check out our easy guide to integrate Payoneer in WooCommerce.
Kindly, like us on Facebook and follow us on Twitter for more related articles.


