Are you wondering how to create a job application form in WordPress easily? Or, do you want to learn how to make an application form? If it’s so, then this guide article will help you out.
These days, a lot of firms have started to post different job vacancies on their website rather than advertising in papers. At the same time, firms lack a proper method for receiving employment applications. This results in an overwhelming quantity of resumes in your mailbox.
So, you can sort this out by creating a proper job application form on the website. As potential candidates can directly reach out to you via the form. Also, you can easily acquire the needed information of your candidates.
So, we’ve put together an easy step-wise guide on how to create a job application form in WordPress.You’ll also discover how to modify the form, manage settings, and link it to your career section page.
Let’s get started!
A) Importance of a Job Application Form on your website.
Before we move ahead, let’s talk about why you need a job application form on your website.
- Acquire candidate’s details: Job application form helps you quickly obtain the necessary details of your candidates. You can make certain fields such as name, qualification, contact info, etc mandatory to fill out.
- Organized Details: You’ll receive all the required details of your candidate in an organized manner via forms. Infact, you can link the form data to excel sheets to get more organized and comprehensive information.
- Reachability: These days, long resumes, CVs, and other documents are rarely sent or checked. So, filling out job application forms makes it simple for candidates to apply for your positions. No doubt, sorting job applications is a breeze.
- Credibility: Proper job application form shows that available job vacancies are genuine ones. This helps to attract potential candidates to be the human resources of your firm.
- Convenience: Without a doubt, job application forms make it way more convenient to both the job provider and seeker. Job seekers can easily apply by filling required details on the form. And job providers can select the right applicants quickly.
B) Choosing the Best Job Application Form Plugin.
We all know how critical having a job application form on your WordPress site is. As a result, we must choose the simplest and best technique for creating a job application form on the site. So, let’s look at some different ways to create job application forms.
In most cases, developers can code a form on their own. It is one of the options. However, not everyone who wants a website knows how to code.
Thankfully, there’s no need to code in WordPress! There are a plethora of plugins available to quickly create a job application form. The best part is that most of them are free.
You can easily choose the plugin that best meets your needs. So, here are a few of the most effective WordPress plugins to create job application forms on your website.
Let’s take a look at them.
1. WPForms
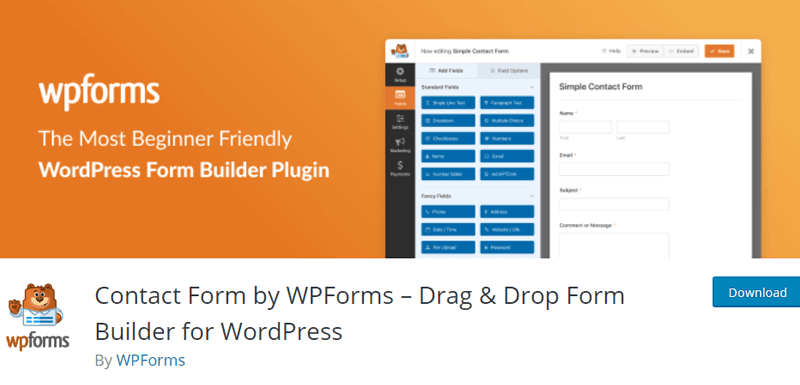
WPForms is a well-known WordPress plugin for creating any type of form. This plugin comes with a template for a job application form. You can use it to create a job application form in a matter of seconds. This plugin also allows you to personalize forms with various fields like name, email, and more.
Furthermore, it facilitates the customization of the form’s general settings. Such as spam protection, customizable messages, design, and more. In fact, setting up form confirmation to display a message after the user submits the form is simple.
Pricing:
WPForms is a free plugin. However, you can upgrade to premium versions for additional functionalities at the following prices:
- Basic: $39.50/year
- Plus: $99.50/year
- Pro: $199.50/year
- Elite: $299.50/year
2. Gravity Forms
Gravity Forms is a premium WordPress plugin for creating job application forms. It’s a drag and drop form builder plugin to select and manage various modules. This helps you to quickly and easily create any type of form. You can also personalize your form with this plugin by selecting from 30+ form fields.
Furthermore, it offers a file upload field on your job application forms. This helps to upload resumes, CVs, and other necessary documents with ease. In addition, you’ll receive an email notification for each job application.
Pricing:
Gravity Forms will cost you the following prices:
- Basic: $59/year for 1 site.
- Pro: $159/year for 3 sites.
- Elite: $259/year for unlimited sites.
3. Apply Online
Apply Online is a WordPress plugin that allows you to create a user-friendly job application form. It’s a drag and drop form builder plugin with a number of premium add-ons. You can add a title, thumbnail image, Apply Now button, and other features to a listing.
From the dashboard, you can effortlessly add, organize, and manage job application forms. Employers can leave comments after receiving an application to help evaluate the candidate. Also, you can add a variety of advert categories, such as job openings, workshops, and promotions.
Pricing:
You can directly download Apply Online from the WordPress.org directory.
Here we would like to recommend WPForms. WPForms is the most popular WordPress form plugin.
From the aforementioned plugins, we prefer the WPForms plugin for this tutorial.
This plugin is quite easy to use and has a user-friendly interface. Essentially, it supports Mailchimp forms, GetResponse forms, and many more. It’s simple to include forms in blog posts, webpages, sidebars, widgets, footers, and other areas.
So, let’s move on to the next section to a stepwise tutorial on creating a job application form in WordPress easily.
C) Steps to Create a Job Application Form in WordPress easily?
We’ll walk you through the steps of utilizing the WPForms plugin to create a job application form on your WordPress site. Also, you can use any suitable WordPress themes to build your website.
Let’s take a look at the steps listed below:
Step 1: Install and Activate the Plugin “WPForms”
To begin, go to your WordPress website’s dashboard and sign in.
After that, you should find and install the WPForms plugin. To do so, go to the Plugins menu and click on the Add New option.
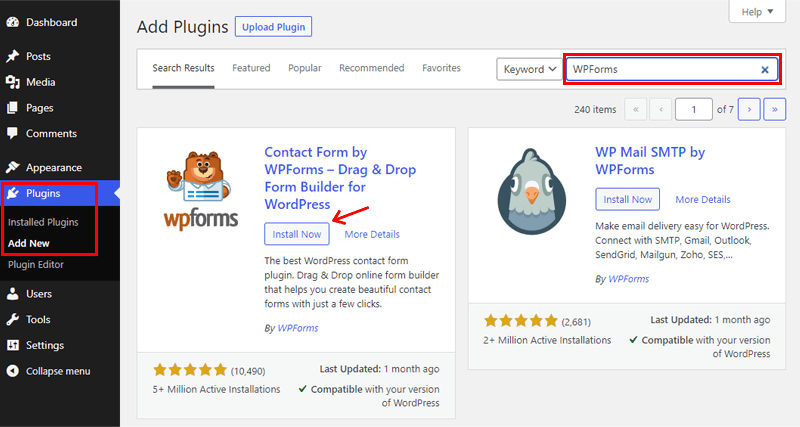
Then, on the top-right side of your dashboard, you’ll notice a search bar. To find the plugin for installation, type “WPForms” into the search bar.
Click the Install Now button after you’ve found the plugin.
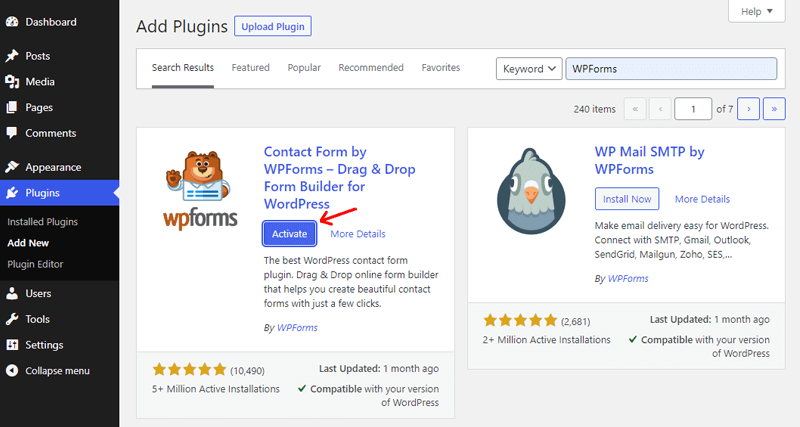
Once you’ve completed the installation process, you can see the Activate button and click on it.
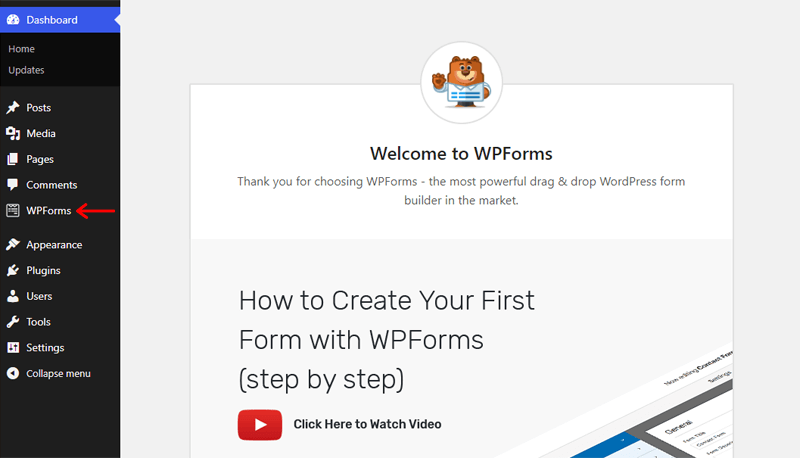
After activating, you’ll notice that WPForms has been added to the WordPress dashboard as a new menu item.
Step 2: Create a Job Application Form
Now, you can begin to create a job application form easily.
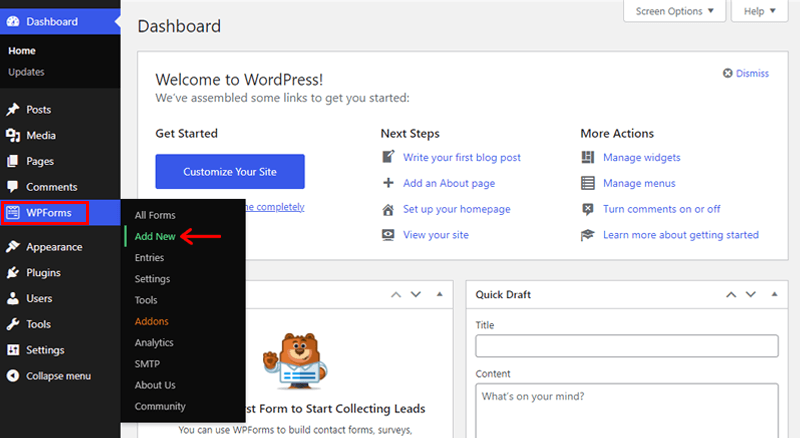
First of all, from the WordPress admin area go to WPForms and click on the Add New button.
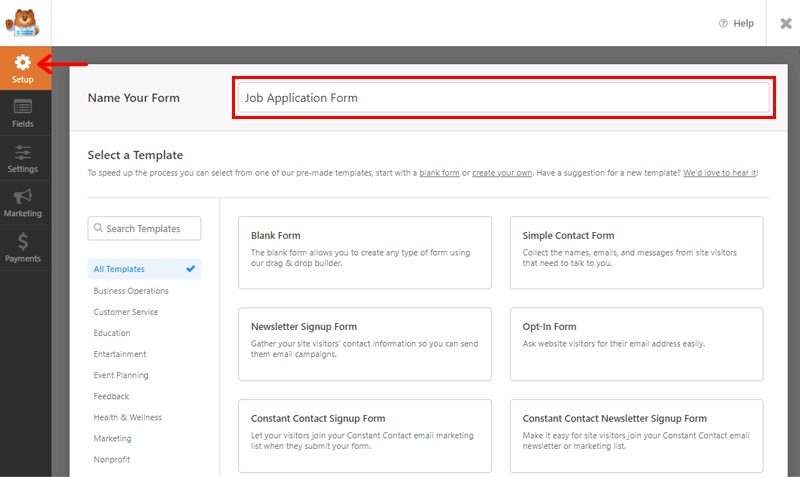
After that, the form setup page will appear. You can begin by writing the name of the form at the top of the page.
Following that, there are 2 methods to create a job application form. The first one is to start from scratch by selecting a blank template. And another one is to use the job application form template and begin editing it.
Let’s look into these methods in more detail.
Method 1 : Create a Job Application From Scratch
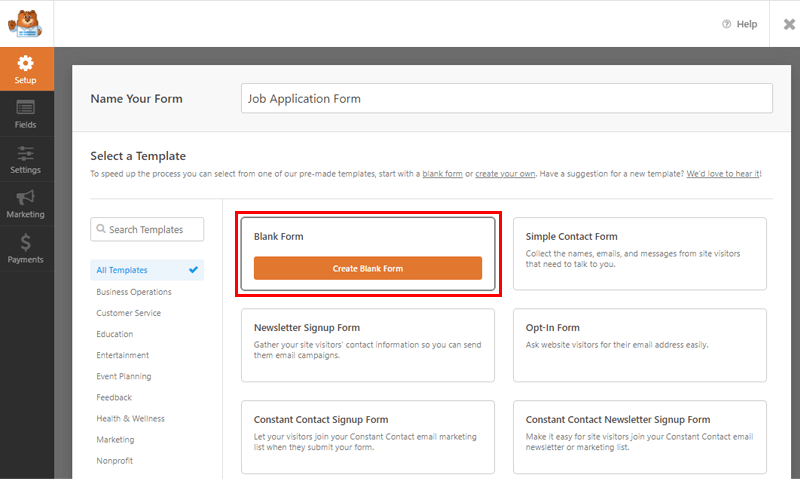
Go to the “Blank Form” area to start from scratch. Then click the Create Blank Form button while hovering over it.
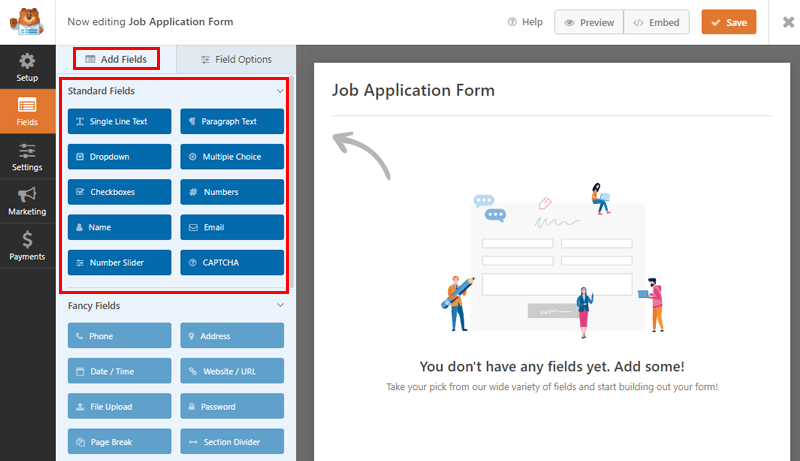
You’ll now be led to the “Blank Form’s” editing section. Using the “Add Fields” menu, you can view standard fields possibilities in the Fields section.
Following that, simply drag and drop the relevant fields into your form. You have the option of inserting whatever field you like.
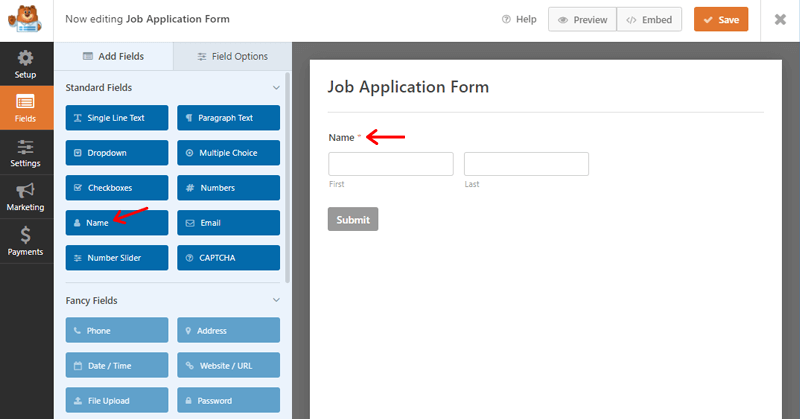
As you can see above, you can create the Name content on your form. Just by dragging the Name field in the job application form.
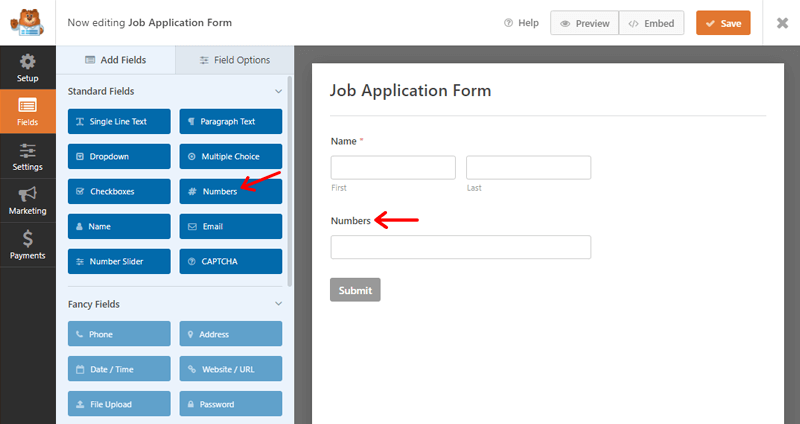
Likewise, you can move the Numbers field to create a Contact Number option.
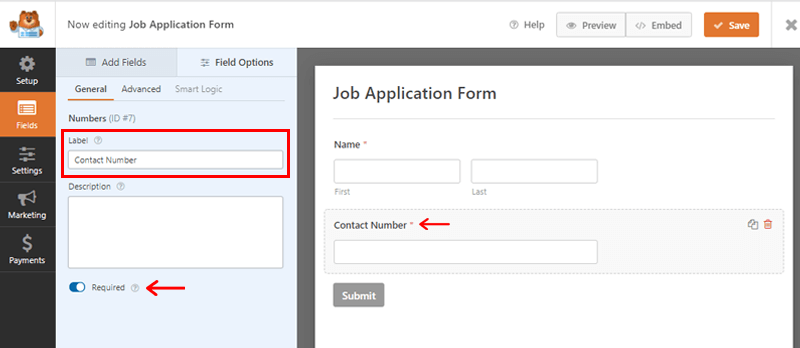
On clicking the Numbers field on the form you can edit the label and change it to Contact Number. You can also make it mandatory to fill by clicking on the required button.
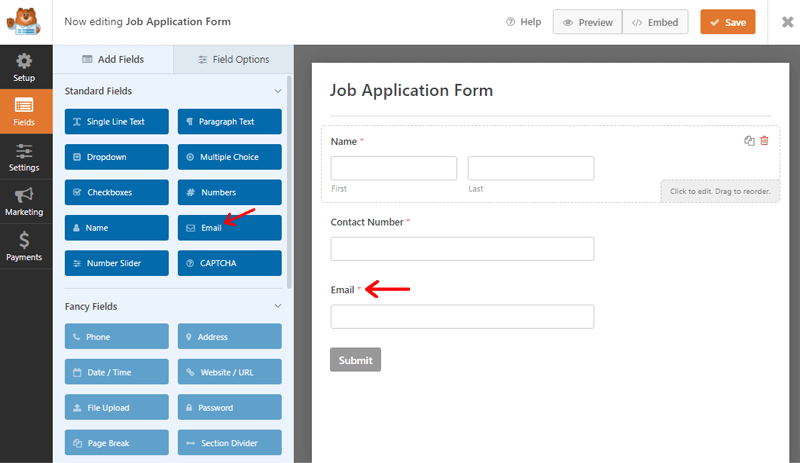
Following the same dragging method, you can add an Email field to the job application form.
Similarly, you can use Multiple Choice fields to put choices on criteria such as Academic Qualification.
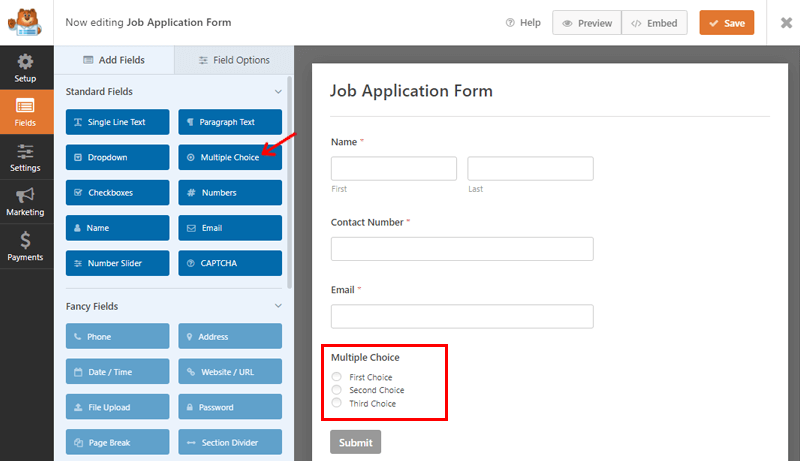
As shown above, first of all, drag multiple-choice fields to the job application form on the right. On clicking it, you can edit the content.
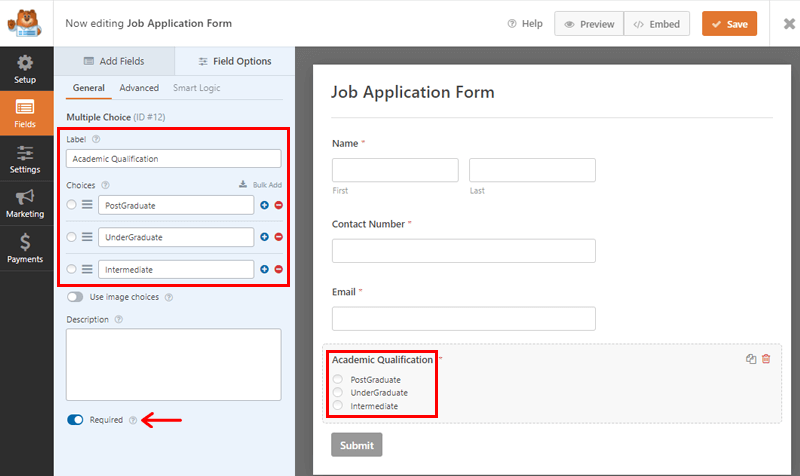
Here, you can see on the label we’ve kept Academic Qualification. And on the choices, we’ve PostGraduate, UnderGraduate, and Intermediate respectively. Further, you can click on the required option to make it mandatory.
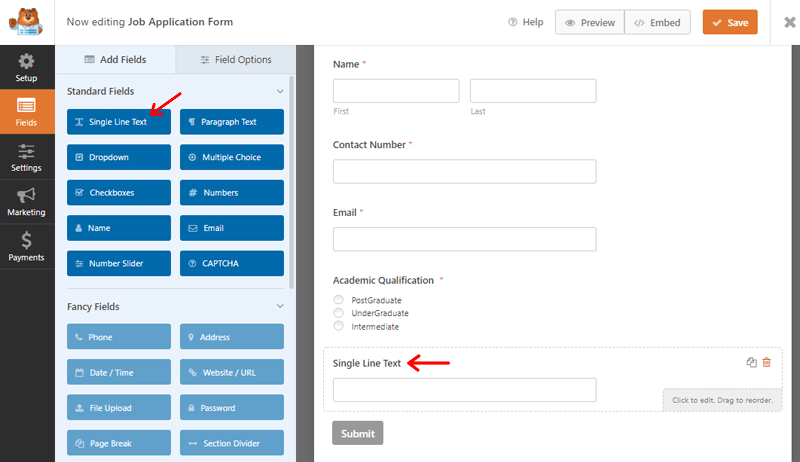
Similarly, you can move Single Line Text and change the label to the required contents.
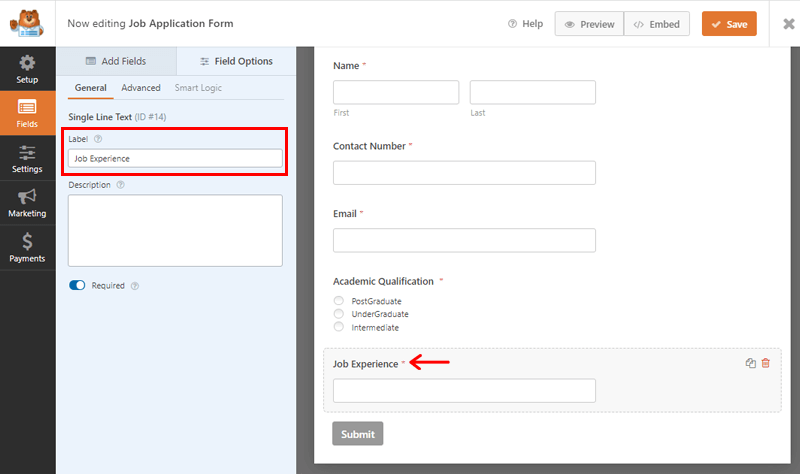
Here, for example, we’ve edited it as Job Experience. You can add more as per the requirement of your form.
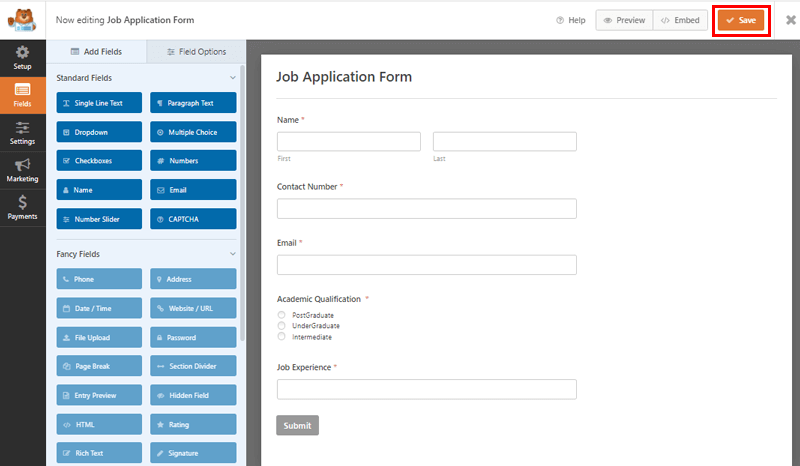
Once done, you can click the Save button at the top right corner. Pretty easy right?
By the way, want an easier method to create a job application form? Well, you can do that as WPForms provides a prebuilt job application form template in its pro version.
Method 2: Create Job Application Form From Template
Once you’ve upgraded to the pro version, you can easily use the job application form template.
You can upgrade to the premium WPForms plugin by directly going to their official website. All you have to do is choose the best deal available and fill in the required information. Following that, make the payment to get the license key.
Now, you’ve to add your license key to your WPForms settings.
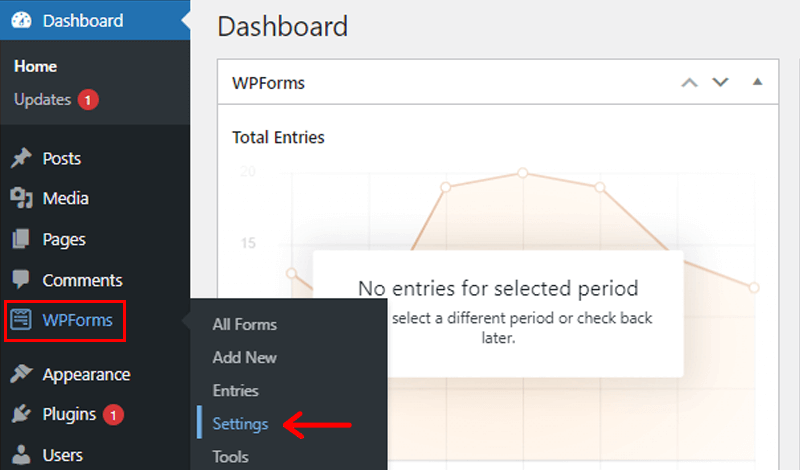
To do so, log in to your WordPress dashboard and navigate to WPForms and to the Settings section.
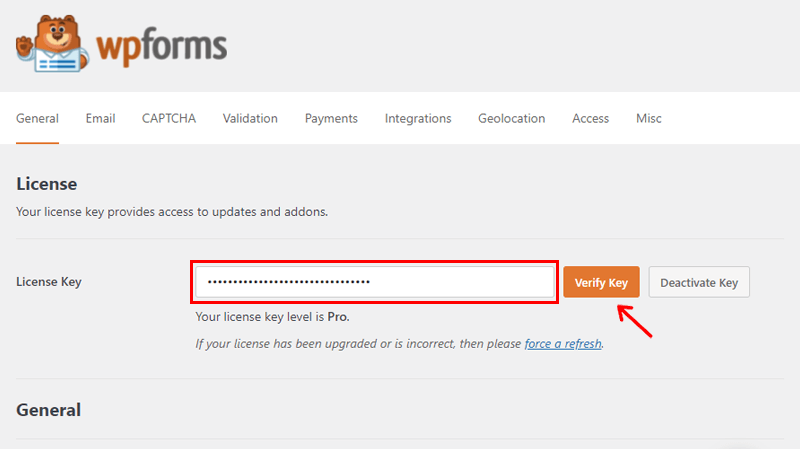
Afterward, you’ll be directed to a page where you’ve to enter the License Key. Then, click on the Verify Key button. Once verified, click on the Connect button. There you go with installing the premium WPForms plugin.
Once you’ve completed the premium WPForms installation process, you’ll have to deactivate the free WPForms Lite plugin. Also, you’ll lose no data doing so as the premium plugin now manages all forms and settings.
Simply navigate to Plugins and then to Installed Plugins. Then, hover over WPForms Lite, and click the Deactivate button.
Now, you’ll easily be able to import the prebuilt Job Application Form template.
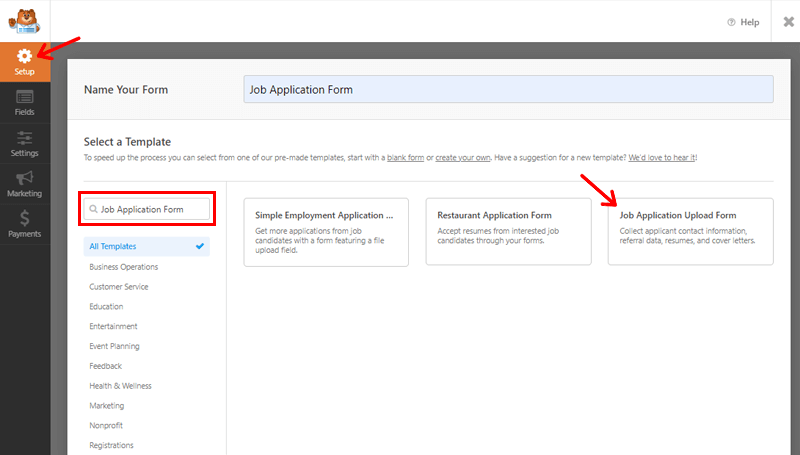
To do so, go to the setup page like before, and search the template “Job Application Form” on the search box. Then, you’ll see the template Job Application Upload Form.
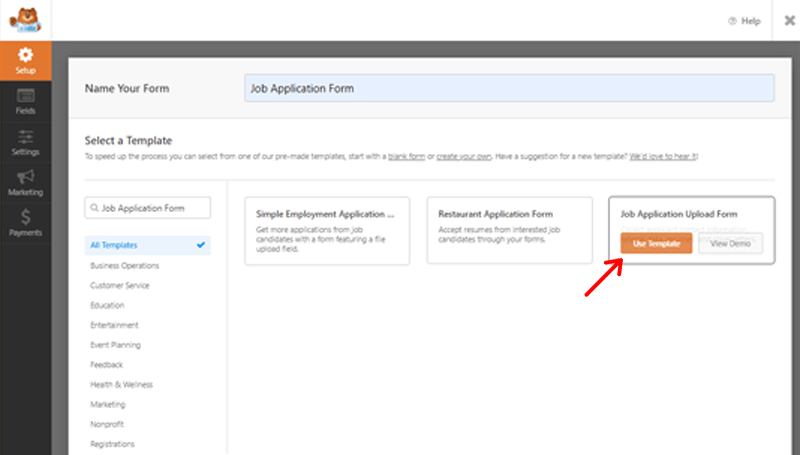
Click on the template and you’ll be given 2 options i.e. Use Template and View Demo. Then, click on the Use Template option. And, there you go with a ready-made job application form.
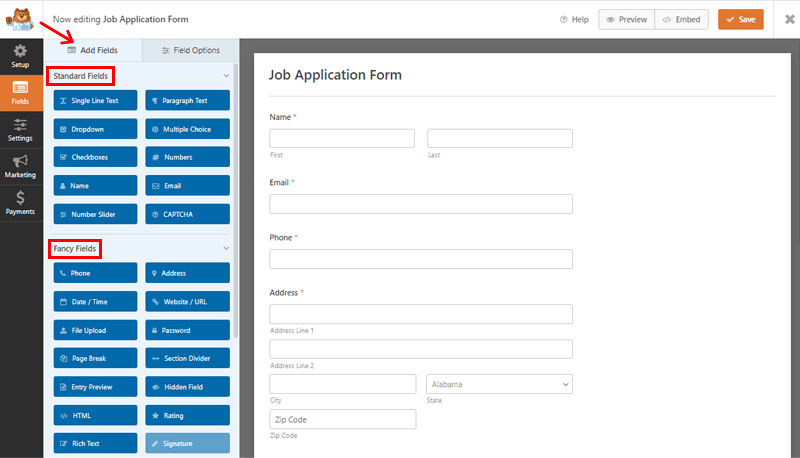
Here, the directed page is editing the form page. There, you can add any fields using the “Add Fields” menu in the field section on the left side. You can find Standard Fields and Fancy Fields. These fields can be dragged into the template as per need.
Likewise, you can also change the field contents of the form. To do so, go to the “Field Options” menu on the right side of the field section. There you’ll get 3 sub-options i.e. General, Advanced and Smart Logic.
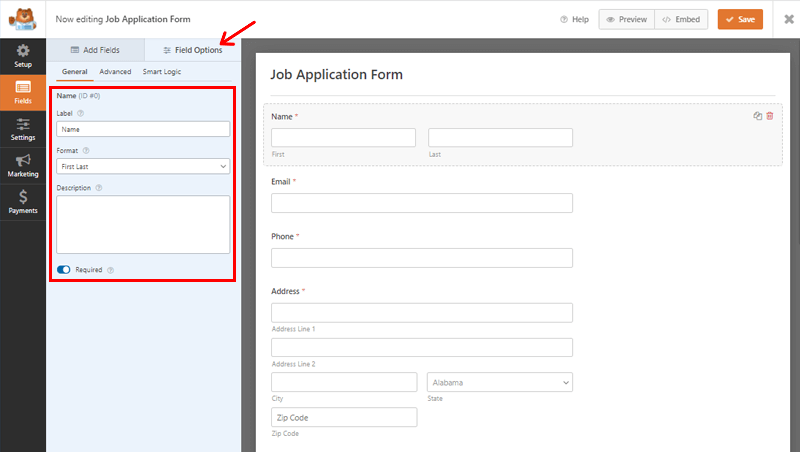
Here, you can easily change the general things like label, format, and description of a particular field of the form. Besides, you can also make other changes to your form. Such as making certain fields mandatory to fill, changing field size, enabling conditional logic, and so on.
Delete and Reorder
Felt the need to delete some of the content fields on the form? You really don’t have to worry.
Just click the field you feel is unnecessary. Then, you can see the delete icon, click on it, and then the OK option. And the field is removed from your form.
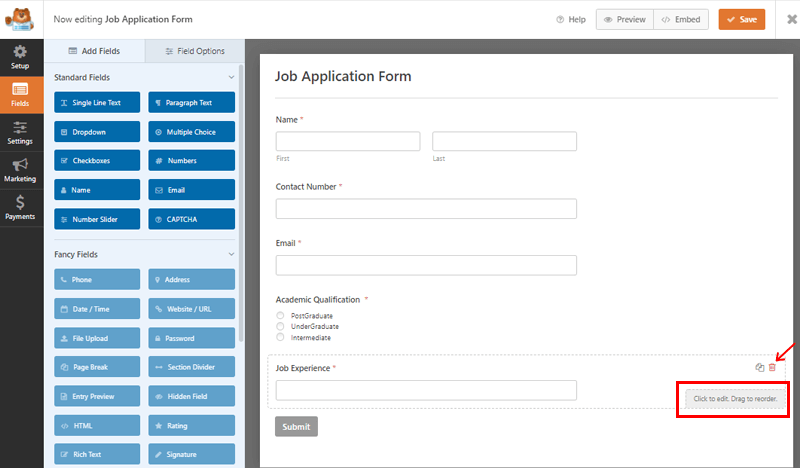
Similarly, for re-ordering, once you click on a certain field you’ll find the “Drag to reorder” button. You can use this to reorganize the fields. All you have to do now is drag and drop the fields into the desired order.
When you finish modifying your form, you can click on the Save Option at the top right corner.
Step 3: Configure the Job Application Form Settings
Now the next step you’ll need to do is configure the settings of the form you just made.
To do so, go to the Settings area on the left side of your WPForms screen. There are 3 major options available in settings of both free and paid versions. That is General, Notification, and Confirmations. Let’s look at them in detail.
General
The first setting option is General. Here, you’ll have complete control over the contents. You can alter form name, description, submit button processing text, etc. To do so, click on “Enable anti-spam protection” to avoid spambots and spam texts.

You can also set advanced elements below that, such as adding a CSS class for forms and buttons, and so on. Or you can leave the default settings alone, but don’t forget to save your changes.
Notifications
When applicants submit forms, the Notification feature allows you to be notified. You can choose how you want to receive emails or messages in this section.
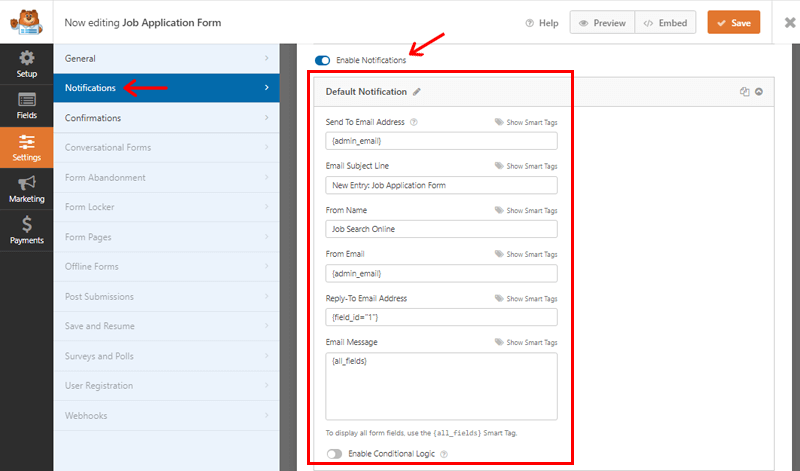
Here, as you can see above, the “Enable Notifications” button is activated by default. However, you may turn it off if you don’t want to be bothered with it.
You can configure the following elements:
- Send to Email Address: Here, you can specify a custom email address to receive job application form submissions here. If you want to add several recipients, then use commas to separate the addresses.
- Email Subject Line: Easily adjust the subject lines for the emails you receive from your job application form under ‘Email Subject.’
- From Name: With this option, you can tailor the content of the From Name field.
- From Email: This field defaults to admin email address. But, you can change it to any other email address if required.
- Reply To Email Address: You can set your specified email address as the receiver of any replies of the application.
- Email Message: It includes all fields by default. You can, however, change the email’s text.
- Enable Conditional Logic: Here, you can put the specific conditions to receive the notification. This helps you to sort out the best applicants for your job quickly.
Besides the above elements, you might notice the words “Show Smart Tags” next to each setting. They let you use form fields like name, email address, and so on to send notifications.
Confirmations
The final element of the configuration is confirmations. It enables you to personalize confirmation messages for job applicants who have filled forms.
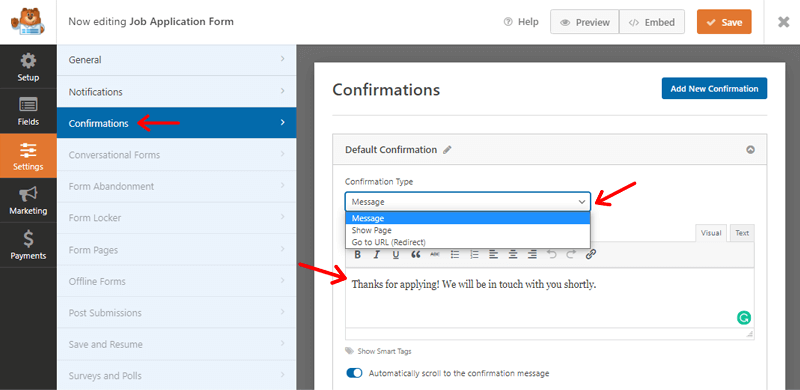
You have 3 options for the Confirmation Type element:
- Message: Once the job application successfully fills up the form, you can use this to show a success message. You can also show the success message you want to display. For e.g. “Thanks for applying!We will be in touch with you shortly.”
- Show Page: If you select “page,” readers will be sent to one of your website’s web pages.
- Go to URL(Redirect) : Alternatively, if you click “URL (Redirect),” you can direct readers to any other pages that have a URL. It allows you to specify the URL of the page to which users should be directed.
You can also enable/disable features such as automatically scrolling to the confirmation message.
Finally, click the Preview option in the top right corner, to see how your form will appear to your candidates. After you’ve double-checked that your form is accurate, click the Save button.
Step 4: Add the Job Application Form on the Page
After you’ve finished creating the job application form, you’ll need to add it to your website’s concerned page. Let’s have a look at how to do it.
Firstly, you should first create a new page on your website to which you will add forms.

To do so, go to the dashboard, click on the Pages option, and then on Add New.
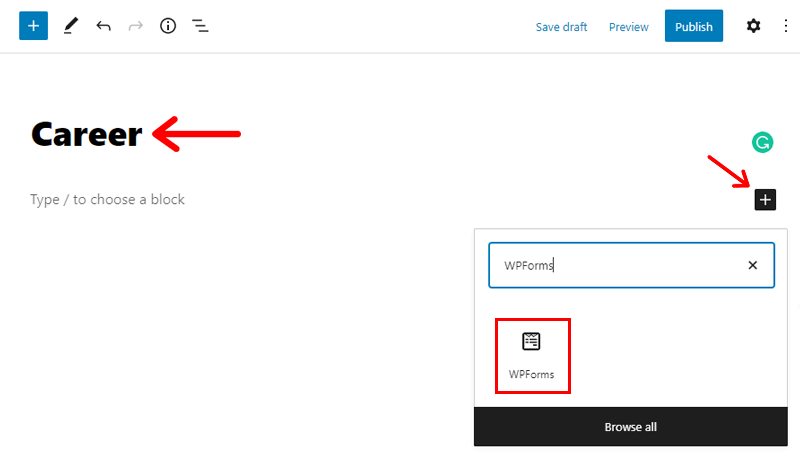
After you’ve created a new page, give it a suitable title. For e.g. “Career“.
Now, click the (+) button in the “Type/or choose a block” section. Then you’ll see the search bar, where you’ve to type “WPForms“.
When you’ve located WPForms, click on it to bring up the WPForms wizard in your text editor.
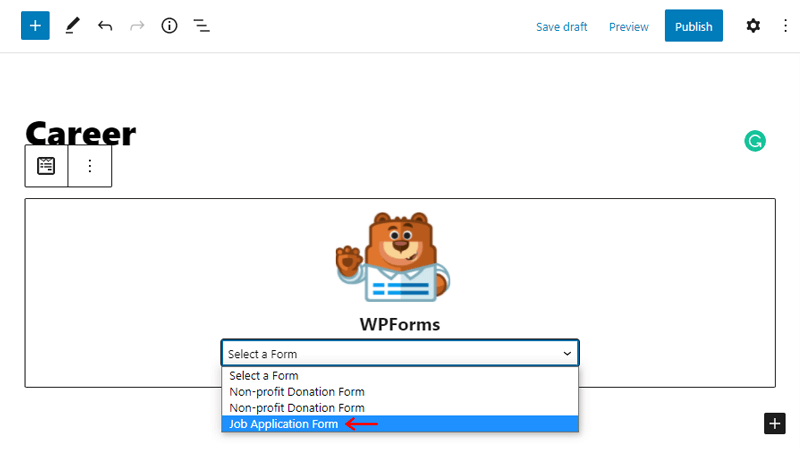
Now, click “Select a Form,” and you’ll get a list of the forms you’ve built. Any of the forms you wish to embed in your page will display in your text editor as you select one. Here, we choose the “Job Application Form”.
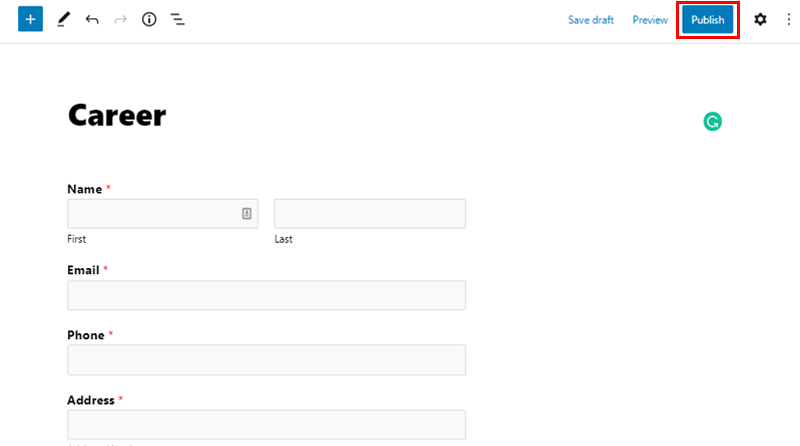
Finally, click the Publish button in the top-right corner after you’ve added the form to your page. And there you go your website live, along with a job application form!
Conclusion
That’s it for the time being, everyone! Our article on how to create a job application form in WordPress has come to the end.
We hope this article on how to create a job application form on WordPress was helpful. By following this step-wise guide, you can quickly create a job application form and add it to your website.
Please do not hesitate to contact us if you have any more questions regarding how to create a job application form. We’ll respond as quickly as we can. Also, please forward this article to your colleagues and friends.
You might also be interested in our articles on how to create a contact form in WordPress. Also, check how to create a table in WordPress using plugins and without plugins.
Remember to like us on Facebook and follow us on Twitter for more useful information.

