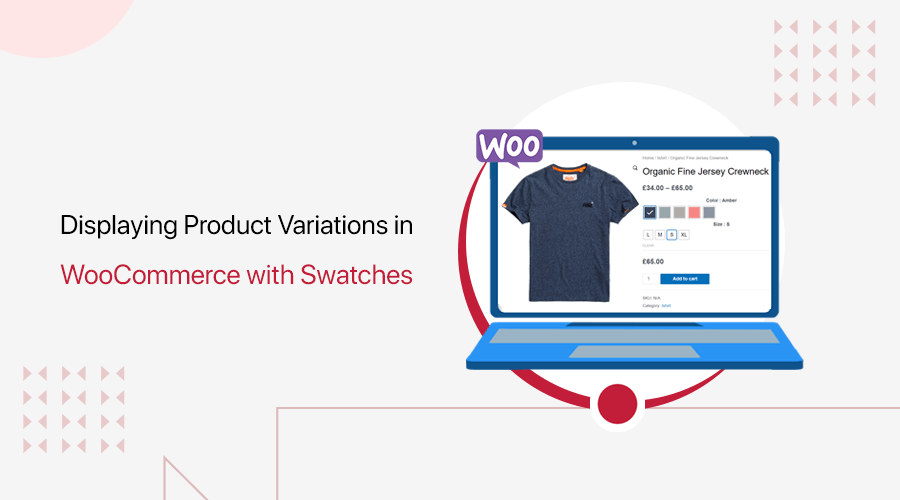
Are you eager to know how to display product variations in WooCommerce with variation swatches? If yes, then you’ve come to the right place to know that.
It goes without saying that WooCommerce is one of the prominent eCommerce platforms to build your online store. Since it provides you with sophisticated functionalities to operate your eCommerce store and display your products.
WooCommerce allows you to sell multiple variations of a single product in your store. Having multiple variations in your product gives more choice flexibility to your customers.
Therefore, in this article, we’ll show you how to display product variations in WooCommerce using one of the best variation swatches plugins in detail.
Without further ado, let’s dig in!
What is WooCommerce Product Variation? Why Do You Need it?
Before diving into the topic, let’s get to know about WooCommerce product variation from a close angle.
Beginning with, let’s suppose you visit an online WooCommerce store to buy a T-shirt. Now, you might not be satisfied if you only see a single product type on the cloth you want. It’s very obvious that you’ll want to see variations there. It could be the color, size, cloth material, and so much more.
Only when you get variations on the products, you’re more likely to purchase the best suitable one for you.
Therefore, as a store owner, you need to offer product variations, such as different colors and sizes for your products. This helps to improve user experience and increase sales. Product variations, in this context, refer to a single product that comes in a variety of colors, sizes, and other characteristics.
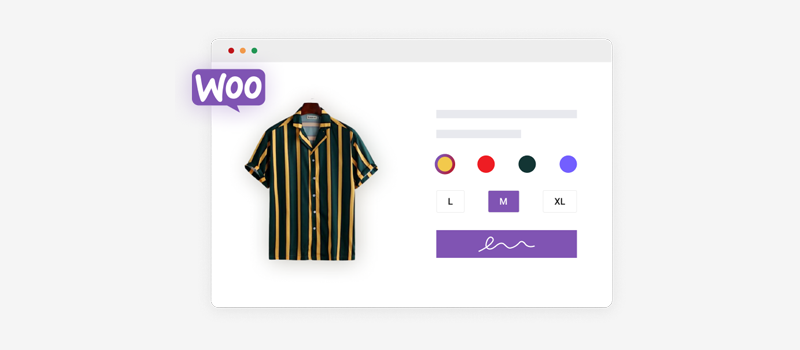
Consequently, you can quickly display all of the choices you have in your store with the help of product variation. It makes sense to show them on the product page so that the buyer may choose the one they desire.
It definitely goes without saying that after adding the product variation, your product page appears more detail-oriented. And customers exactly love that!
WooCommerce by default enables you to market different variations of a single product. But, the concern is that it’s quite hard to grab the needed amount of attention from your customers.
Thankfully, there are various WooCommerce extensions such as WooCommerce product variation plugins. That can completely act as a game changer to your online selling game.
Among such plugins, Variation Swatches for WooCommerce is one of the best available WordPress plugins out there. It comes with various product attributes and functionality to elegantly create product variations of your WooCommerce store.
Having said that, let’s begin by learning a little more about this variation swatches plugin.
Are you new to WooCommerce and accidentally landed up in this article?
Then, worry not! There is a high chance that you could also start creating your online store using WooCommerce.
Definitely check out our article on what is WooCommerce & what is it used for to get a comprehensive idea of it.
Want to know why? Also, look at the benefits of using WooCommerce.
Introducing Variation Swatches for WooCommerce Plugin
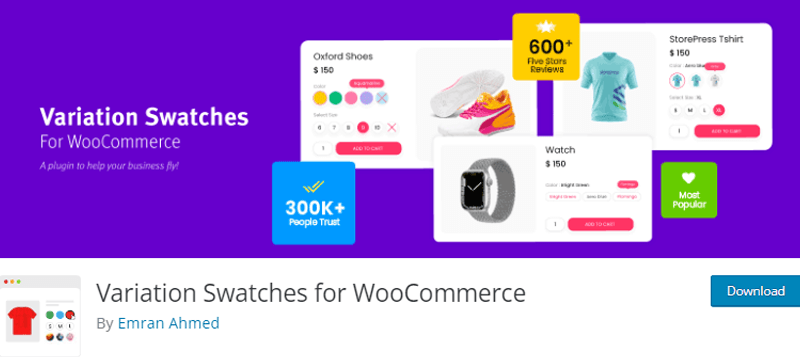
One of the most effective and user-friendly swatches plugins available is Variation Swatches for Woocommerce. It’s also one of the WooCommerce extension plugins. That’s to say, it extends the functionality of the core WooCommerce plugin.
It provides a professional and aesthetically pleasing experience for choosing qualities for different products. Simply put, you can count on it to display WooCommerce product variations items in photos, colors, and labels.
These features are available in a product quick view in addition to being offered in a single product. With it, you can make different variation swatches and arrange them in rounded or circular form styles.
Additionally, it gives you lovely tooltips when you hover over variation swatches. You can enable and disable hover from the settings according to your needs.
Moreover, the product attributes swatches offer the option to disable the standard plugin stylesheet. This way, you can even independently create your own CSS in order to optimize and tailor your design process.
Key Highlights of Variation Swatches:
Let’s explore a bit more into the key highlights of this Variation Swatches for WooCommerce plugin to get a better understanding of it:
- Customers can browse product variations on the archive page and add them to their shopping carts.
- Giving out all the essential information about a product enables you to turn browsers into buyers.
- Creates color swatches from the Filter Products by Attribute Widget. So, you can use the widget to make the filter dropdown’s swatches available.
- If variation has a featured image set, then it automatically converts dropdowns into image swatches.
- You can enable swatch in the catalog page to increase store engagement and conversion.
- Complete size control by setting the products’ height or width for the shop page swatches.
- Provides an option to enable quick view lightboxes to increase sales throughout the entire store.
- Compatible with the popular WooCommerce themes like OceanWP, Divi, and the Elementor page builder plugin.
Variation Swatches Pricing:
Variation Swatches for WooCommerce is a freemium plugin that’s available for both free and paid versions. You can directly install the free version of this plugin from the WordPress.org directory. Alternatively, you can also get one from its official website.
Nevertheless, you can upgrade to the premium version to explore its complete set of features. The premium version of the Variation Swatches for WooCommerce plugin is available at the following pricing plans:
i) Yearly Plans:
- Starter: Costs $49/year for a single domain along with premium support.
- Business: Costs $149/year for 5 domains along with premium support.
- Developer: Costs $299/year for unlimited domains along with premium support.
ii) Lifetime Plans:
- Starter: Costs $149 for a single domain along with premium support.
- Business: Costs $449 for 5 domains along with premium support.
Thinking of checking out a few more alternatives of product variations plugins? Then, check our article on the best WooCommerce product variations plugin.
Having said that, let’s move on to the following and the main portion of the article.
How to Display Product Variations in WooCommerce with Variation Swatches?
You can easily display product variations in WooCommerce with the Variation Swatches plugin in a few easy and simple steps. So, stick with us as we take you on this journey.
Step 1: Install & Activate the Plugin
Like any other WordPress plugin, you can easily install the Variation Swatches plugin. In fact, the setup process of this plugin is a lot easier.
Nevertheless, do remember that you need to first install the free version of the Variation Swatches for WooCommerce plugin so as to use its premium version. Therefore, we’ll first check out the installation process for the free version and proceed toward the premium.
I) Install & Activate the Variation Swatches Plugin (Free Version)
First things first, you need to log in to your WordPress dashboard from where we’ll download the plugin.
Once you do that, now navigate to the left-side navigation on your dashboard. Then, Plugins > Add New.
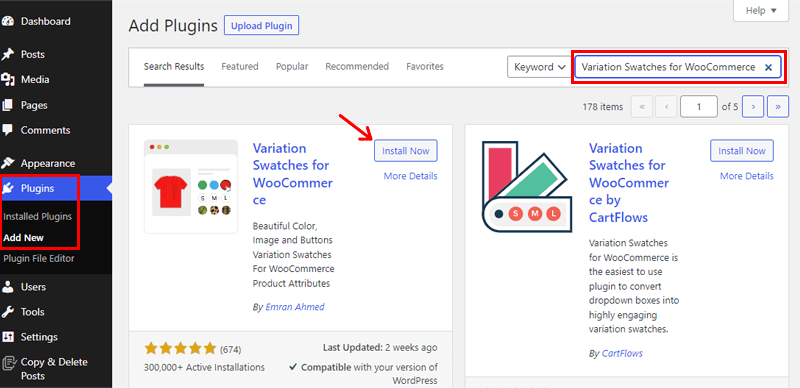
On the top right corner of your dashboard, type ‘Variation Swatches for WooCommerce’ in the search field. Once you locate the variation swatches plugin, click on the ‘Install’ button.
Once your installation process is completed, you’ll see the ‘Activate’ button. You ought to click on it.
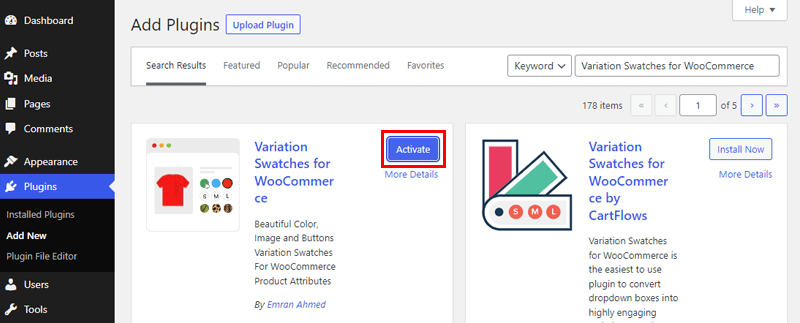
With that, the free version of the Variation Swatches for WooCommerce plugin has been successfully installed.
You might also be aware that Variation Swatches is a WooCommerce extension plugin. That’s to say, it enhances the core functionality of the WooCommerce plugin by providing additional functionalities.
Therefore, you need to install the WooCommerce plugin in case you haven’t so as to utilize the Variation Swatches plugin.
In fact, you’ve yet not installed WooCommerce, by now you’ll even get a notification that urges you to install it.

You can simply click on the ‘WooCommerce’ option of the notification to install it. Or, alternatively, you can also install the plugin as you do other WordPress plugins. And further, activate and set up your WooCommerce store.
For more comprehensive guidance, check our detailed beginner-friendly article on how to install the plugin.
II) Purchase the Premium Version of the Variation Swatches Plugin
Now, you need to go to the official website of Variation Swatches for WooCommerce to purchase its premium version.
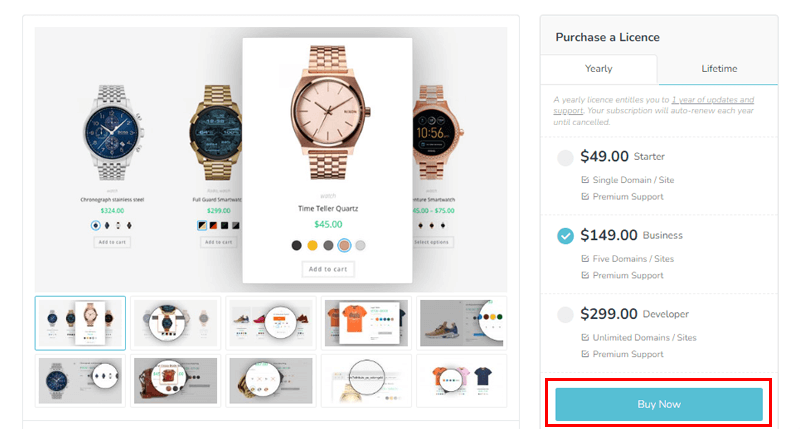
Then, you can simply choose the suitable plan and click on the ‘Buy Now’ option as shown in the above image.
Following that, you need to fill in the required billing details and create an account. If you have a coupon code, then you can also use it for a discount. And if not, then you can simply choose the available payment gateways to purchase the premium plugin.
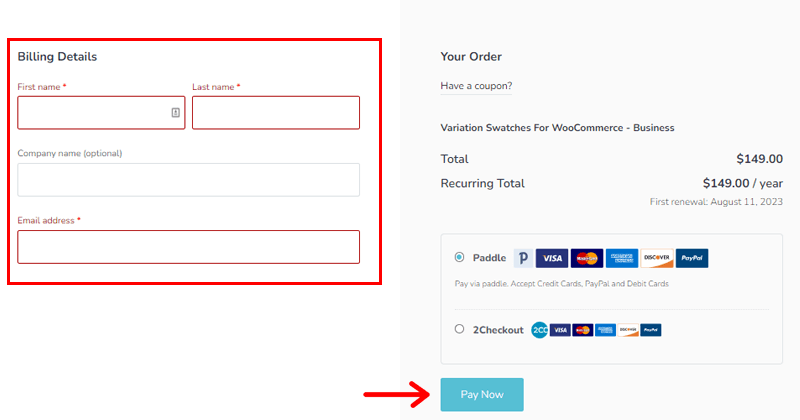
Upon successfully purchasing the premium version of Variation Swatches for WooCommerce, you’ll receive an email with the download link. Then, you can download the zip file of the premium Variation Swatches plugin.
III) Upload, Install & Activate the Variation Swatches Plugin (Premium Version)
Following that, you need to come back to your WordPress dashboard. So, you should first upload the previously downloaded zip file to install the premium Variation Swatches for WooCommerce plugin.
For that, go to the Plugins > Add New. Then, click on the ‘Upload Plugin’ option.
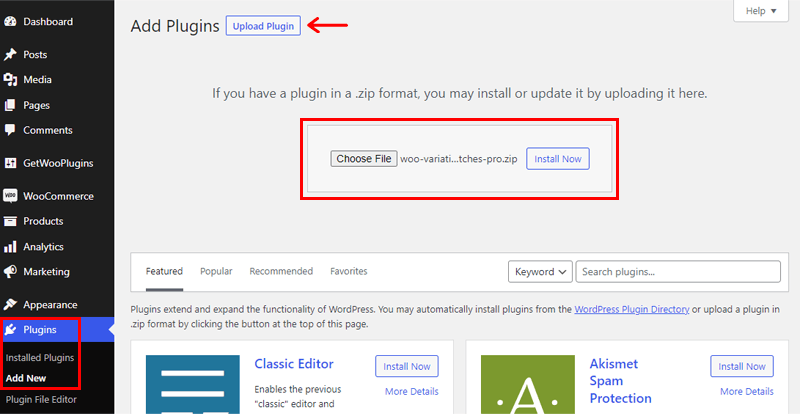
Afterward, click on the ‘Choose File’ option. Now, upload the downloaded zip file and click on the ‘Install Now’ option next to it.

Then, you’ll see the ‘Activate’ option. Once you do that, you’ve successfully activated the premium version of this product variation swatches plugin.
With that, let’s move on to the following step.
Step 2: Configuring Attributes
Essentially, you can understand attributes as the extra additional information that you can provide on your products. Such as size, color, patterns, and so on. This is particularly helpful to show the variations in the products that you sell on your WooCommerce store.
Additionally, attributes are particularly helpful when searching and filtering products. So, once your assign various attributes to your products, customers can easily filter them out. And get the product that they are looking for without wasting much of their time.
Now, the next step is to add the attributes and configure them. So, let’s see how to do that in this step.
I) Adding Attributes
So as to add the attributes, navigate to the Products > Attributes. From here, you can create any number of attributes that you want. With that, you’ll see the page as shown below.
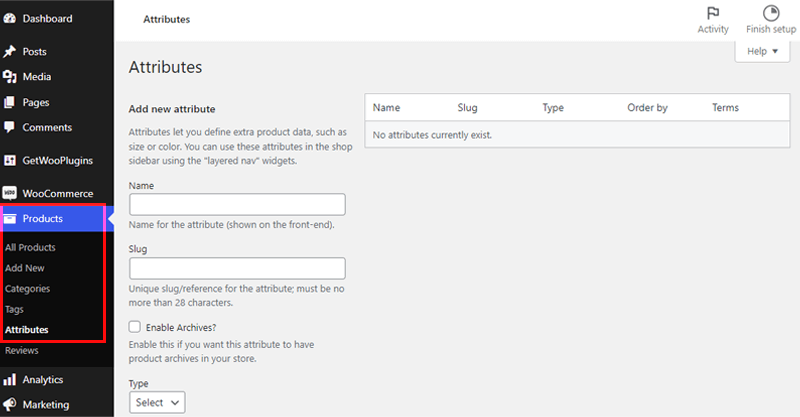
Now, it’s time to create a few attributes. To do so, let’s name the 1st attribute ‘Color’. Also, select the type as Color. For the rest of the others, you can leave it as it is.
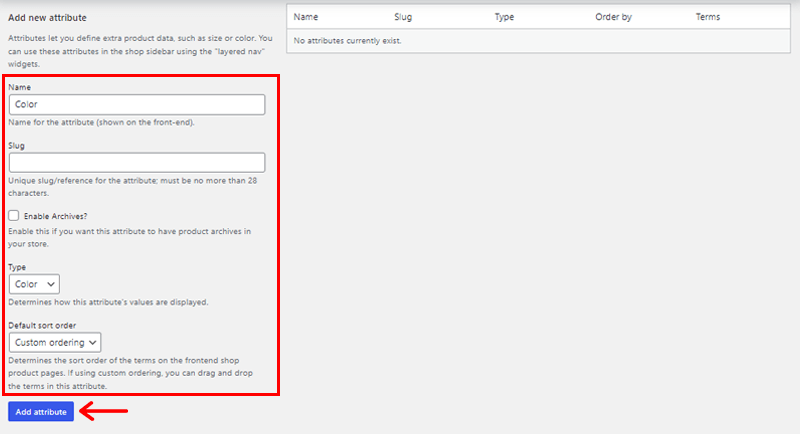
And then click on the ‘Add Attribute’ option at the bottom.
In a similar way, let’s add a few more attributes.
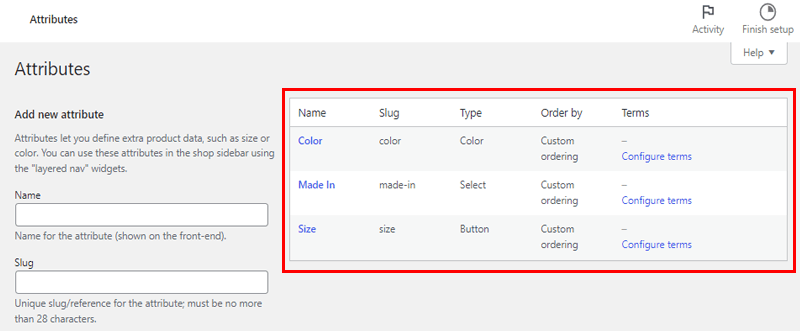
Here, we’ve added 2 more attributes. They are: Made In and Size.
II) Editing Attributes & Configuring Variations
With that, let’s move forward to editing the attributes that we just made.
First, let’s configure the Color attribute. To do so, click on the ‘Configure terms’ option just right to the color attribute option.
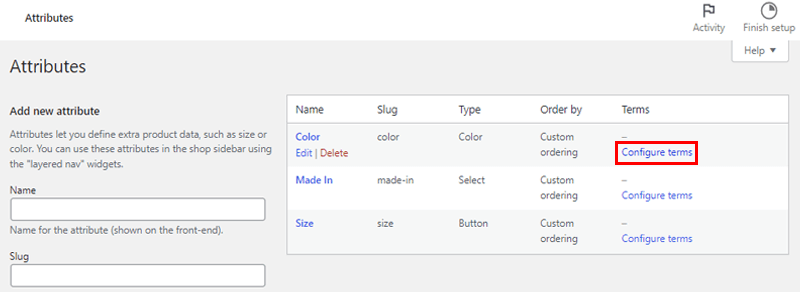
With that, you’ll be directed to a new page as shown in the below image.
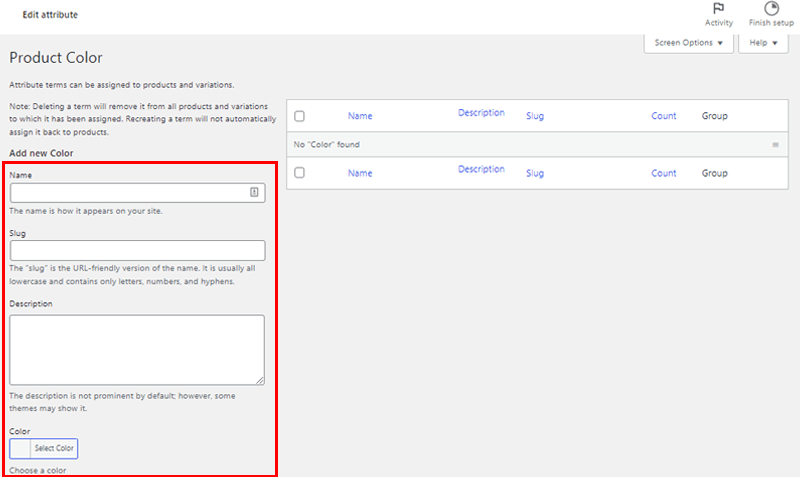
Here, you can add as many variations as you want under the color attribute. So, let’s add a few.
You can ‘Name the Color in the Name box’ and ‘Choose the Color from the Select Color box’. And then click on the ‘Add new color’ option at the bottom.
So, here as you can see we’ve added Red, Blue, and Yellow colors.
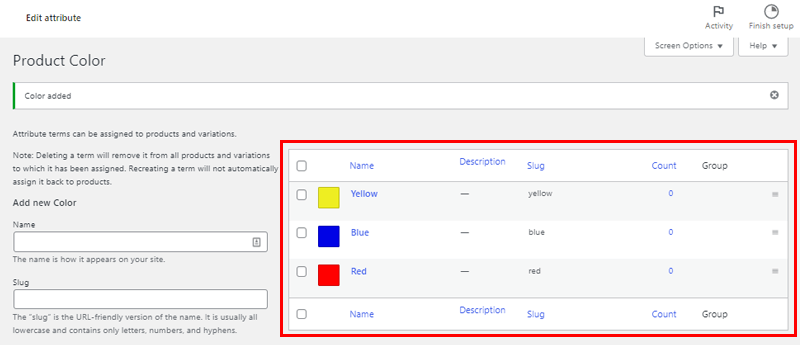
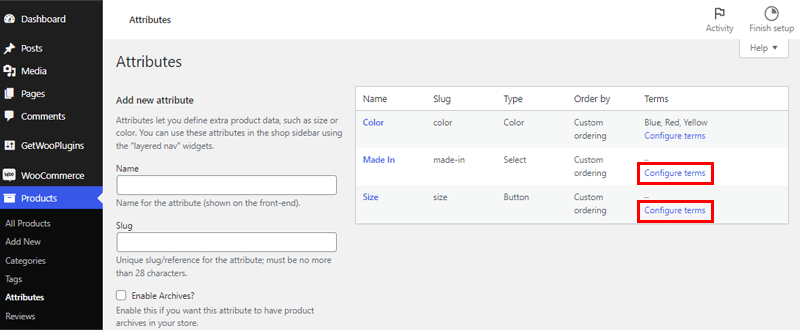
In a similar way, you can edit other attributes you’ve previously created.
From the left navigation, all you need to go is Products > Attributes > Configure terms of the attribute that you want to edit. And make the same changes as before.
Step 3: Customizing Swatches Settings
Following that, now let’s check the Swatches Settings offered by the Variation Swatches plugin.
To do so, navigate to GetWooPlugins > Swatches Settings.
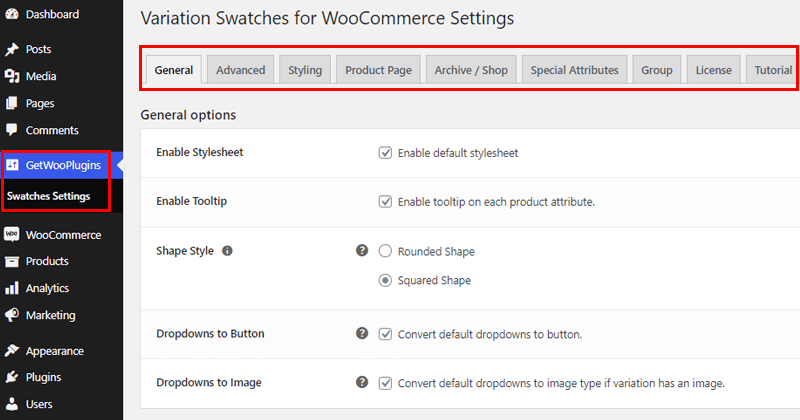
With that, you’ll get access to the available settings options. Basically, the settings options are categorized as General, Advanced, Styling, Product Page, and so on.
So, let’s check into the major Swatches Settings.
i) General
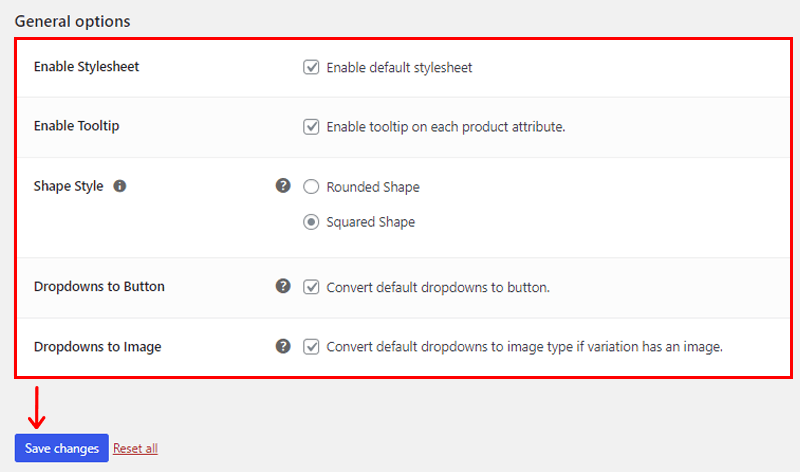
The first one is General. Here, you can find settings for:
- Enable Stylesheet: Using this option, you can enable/disable the stylesheet in your product variations.
- Enable Tooltip: This field allows you to enable/disable the tooltip on each product attribute.
- Shape Style: From here, you can configure the shape style whether you want it rounded or squared shape.
- Dropdowns to Button: You can enable this option to convert default dropdowns to buttons.
- Dropdowns to Image: If your variation has an image, then you can use this to convert default dropdowns to image type.
Once you make the changes to your product variation general settings, don’t forget to click on the ‘Save Changes’ at the bottom.
ii) Advanced
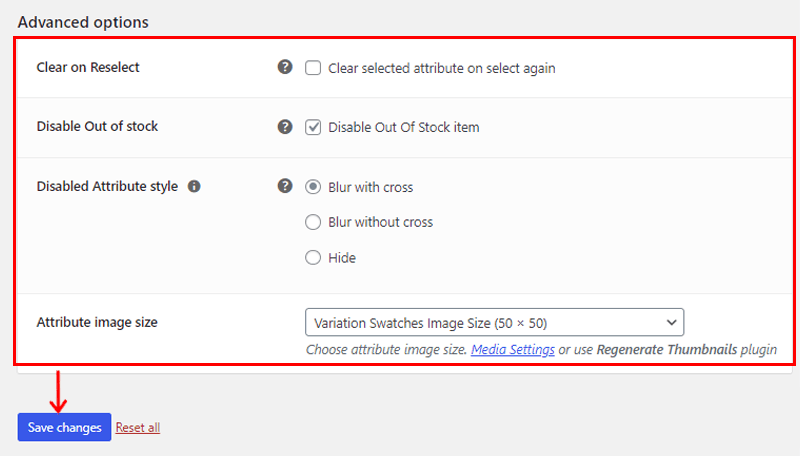
The next one is Advanced. Here, you can find advanced settings for your product variations. Such as:
- Clear on Reselect: Using this field, you can clear the selected attribute on the select again option. If not, then you can leave it as it is.
- Disable Out of Stock: You can enable this option to disable the out-of-stock items of your product variations.
- Disabled Attribute Style: Choose the attributed style of out-of-stock variable products. Whether you want to blur with a cross, blur without a cross, or even hide.
- Attribute Image Size: Using this field, you can tailor the variation swatches images that are displayed while showing product variations.
Like before, remember to click on the ‘Save Changes’ option at the bottom.
iii) Styling
Thirdly, we’ve got the Styling option in the Swatches settings option. It’s one of the important key settings that this product variation swatches plugin has to offer. Essentially, here you’ll find settings for:
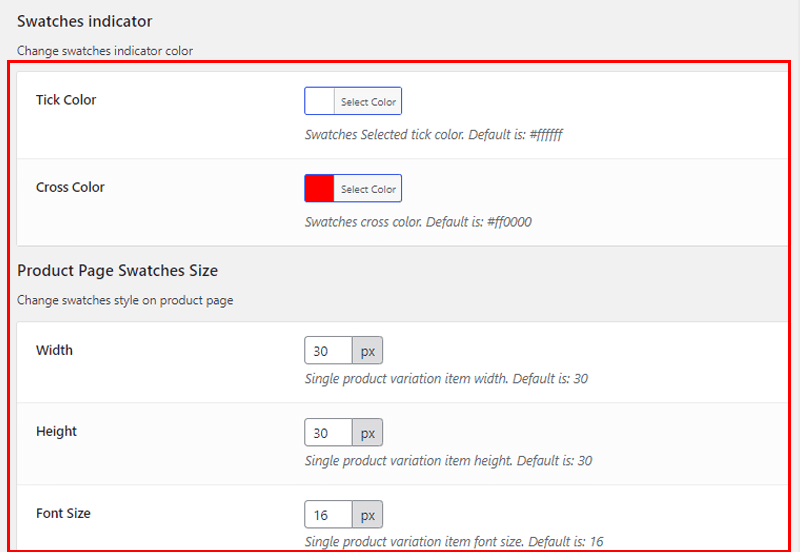
- Swatches Indicator: Here, you can place the swatches indicator color of your choice. You can style tick color and cross color.
- Product Page Swatches Size: Using this field, you can change the width, height, and font size of your swatches style on the product page.
- Archive Page Swatches Style: This field allows you to change the width, height, and font size of your swatches style on the archive page.
- Tooltip Styling: You can place the background color, text color, and image size of your choice of the tooltip.
- Variation Item Styling: Easily change the variation item display style with border color, border size, background, and text color of your choice.
- Variation Item Hover Styling: Place the border color, border size, text color, and background color of your hover display style of the variation.
- Variation Item Selected Styling: Here, you can place the color, text, and size of your choice on the selected items on your variable products.
Overall, you can configure the overall styling of your product variations using this Styling tab.
iv) Product Page
Another one we’ve got is the Product Page settings option. Here, you can find settings for a single product page. Such as:
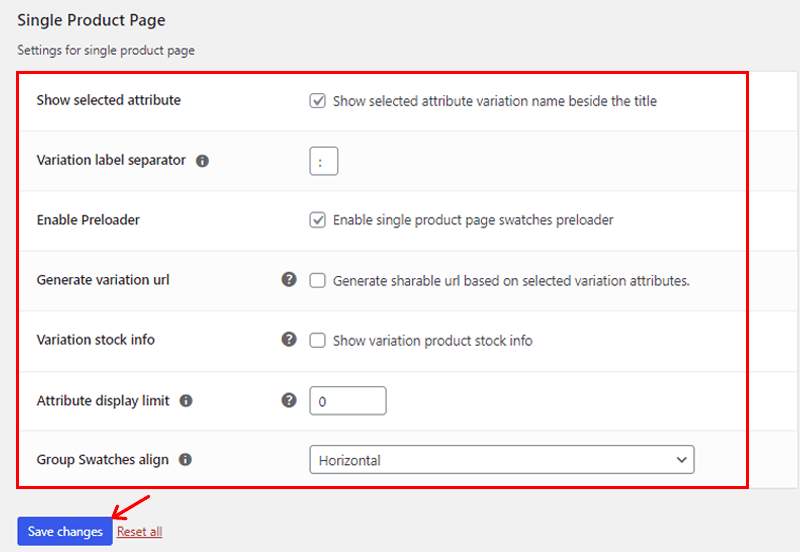
- Show Selected Attribute: You can enable this option to select the attribute variation name beside the title.
- Variation Label Separator: Here, by default, you can find the colon (:) as a variation label separator. If you wish to change, then you can do so.
- Enable Preloader: Using this field, you can enable/disable single product page swatches preloader.
- Variation Stock Info: You can create a shareable URL based on the selected variation attributes by enabling this option.
- Attribute Display Limit: You can specify the number to which you want to display the attribution on your variable products.
- Group Swatches Align: Here, you can choose between horizontal or vertical for your group swatches alignment.
Besides the Variation Swatches settings mentioned above, you can find settings for archive, special attributes, group, etc. In the same way, you can configure the choice available.
As a result, you can get the exact kind of product variations you want for your WooCommerce store.
Having said that, let’s move on to the next phase and the important phase of how to display product variations.
Step 4: Create Variable Product
Now, it’s time to link the created attributes with your products to create a variable product. So, stick with us as we guide you through this step.
I) Create New Variable Product
To do so, navigate to the Products > Add New from the left side navigation. With that, you are directed to a new page.
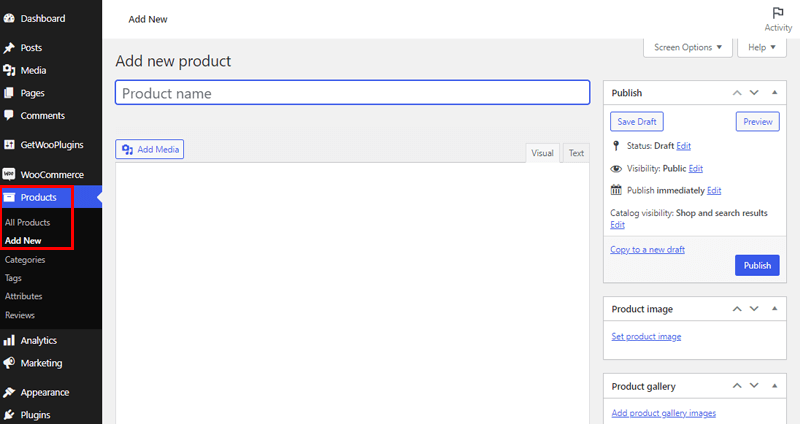
So, here you need to add the ‘Product Name’. For Example: ‘Clothings’. You can also add a short product description.
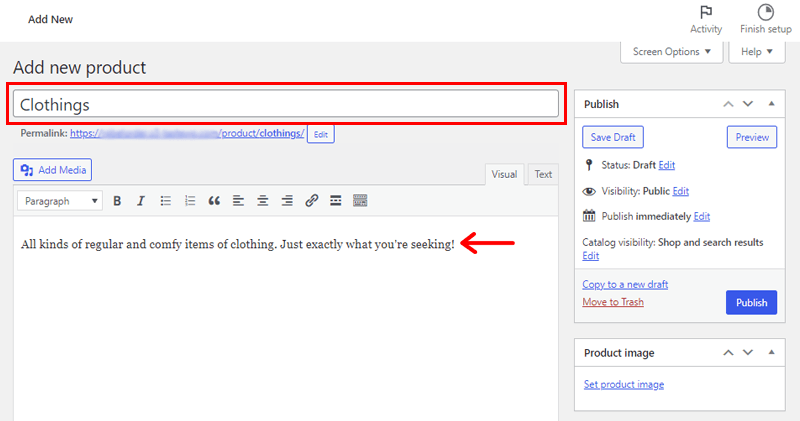
II) Configure Product Data Settings
On the same page, if you scroll a bit down, then you’ll see the Product Data settings option. There, you need to choose the ‘Variable product’ option.
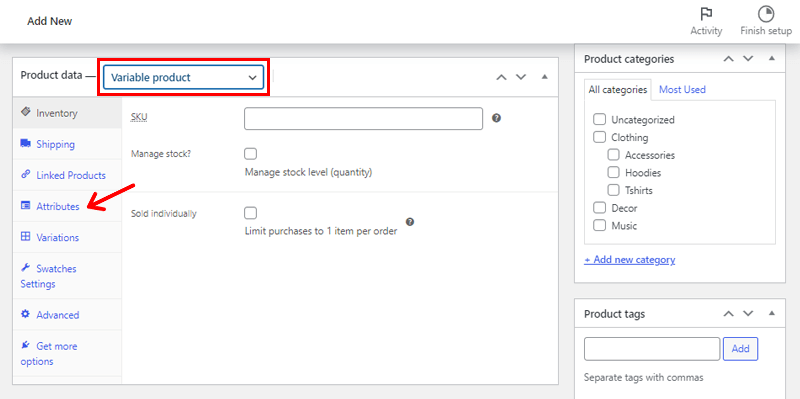
Then, navigate to the ‘Attributes’ options on the left as shown in the image above.
Adding Attributes
With that, you’ll see the page as shown below. Now, from the drop-down option, select the newly created attributes.
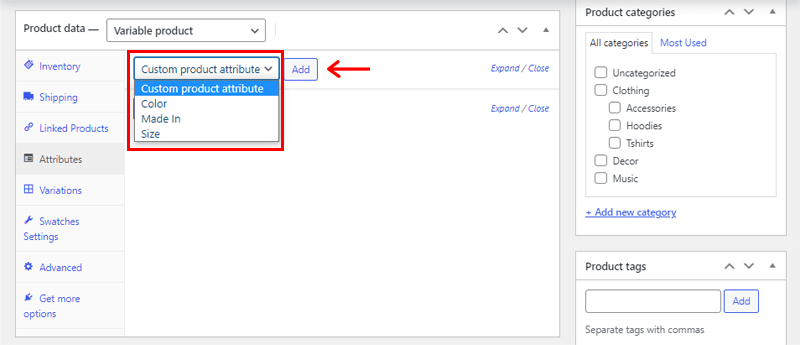
And simply ‘add them one by one’ by clicking on the ‘Add’ button located on the right side.
Following that, you need to click on the ‘Select All’ option to the right of each added attribute. And put a tick mark on the ‘Used for variations’ option.
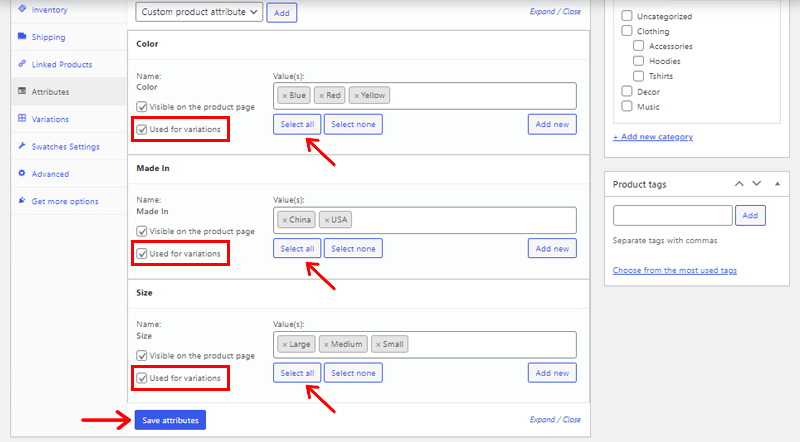
Once done, click on the ‘Save attributes’ option at the bottom.
Adding Variations
With that, navigate to the ‘Variations’ option on the left as shown in the image below. On the drop-down, you’ll also see 2 options. They are: Add variation and Create Variations from all attributes.
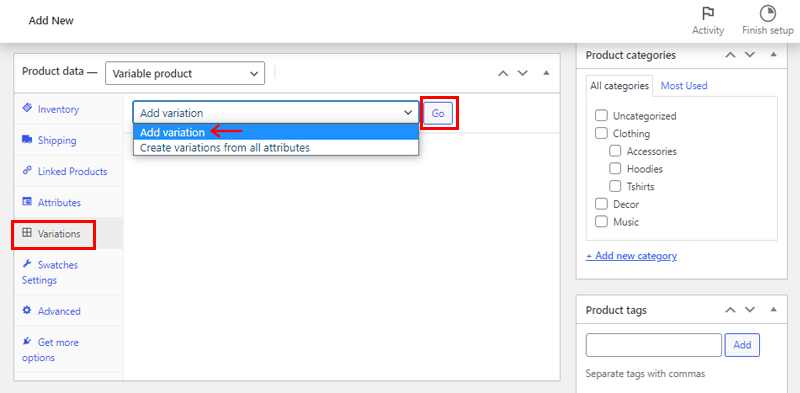
For now, you can click on the ‘Add variation’ option and add a few variations that you like. You can simply do so by clicking on the ‘Go’ option.
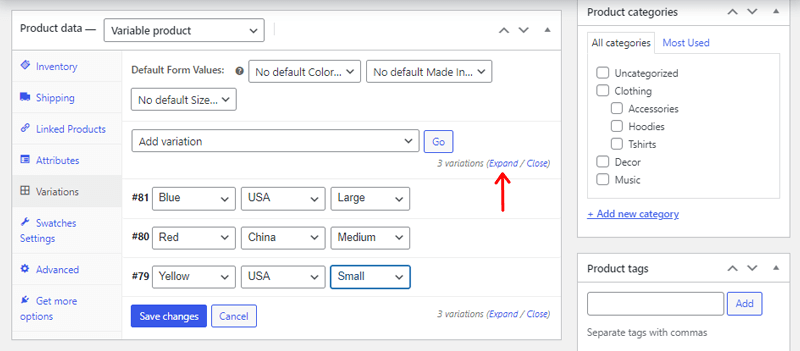
Then, add variations of your choice. And click on the ‘Expand’ option to access the settings of all the variations.
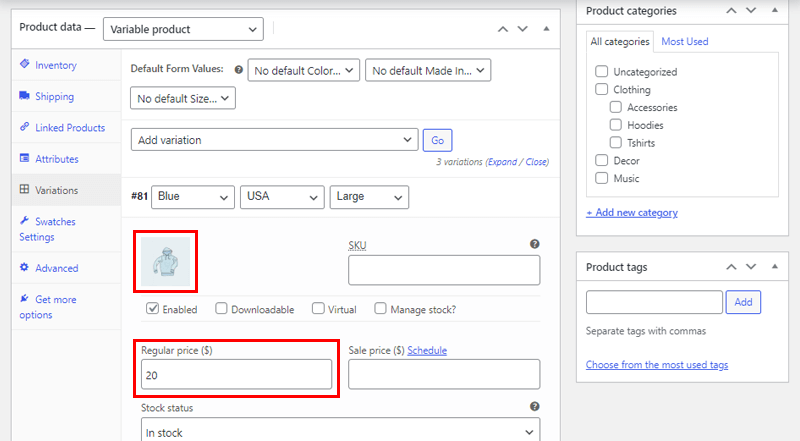
Here, the Price is a mandatory field for each variation meanwhile others are optional. So, it’s totally up to you if you want to make any changes.
Also, you can simply click on the ‘Image’ icon to set the images of your variable products. Once you do that click on the ‘Save Changes’ option.
Set the Featured Image
Following that, on the same page, you need to scroll a bit up. There on the right, you’ll see the ‘Set Product Image’ option.
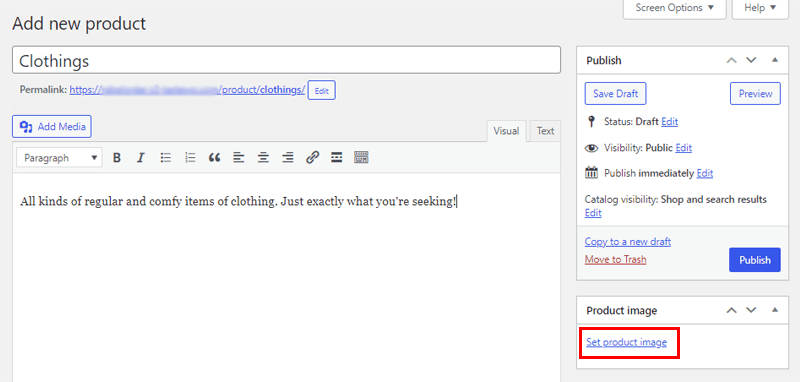
Click on it and choose the featured image for your variable product.
Step 5: Preview & Publish your Product Variations
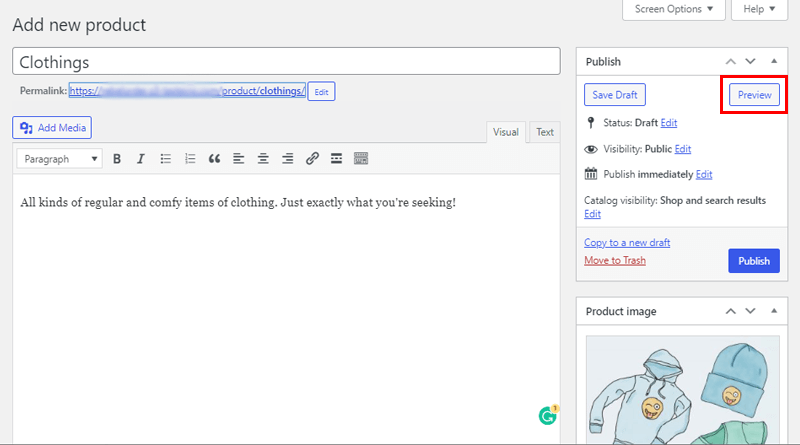
Following that, we’ve reached the last and final step of the process. So, now all you need to do is click on the ‘Preview’ button on the right corner. This way, you can check if you’ve made the product variations properly or not before publishing.
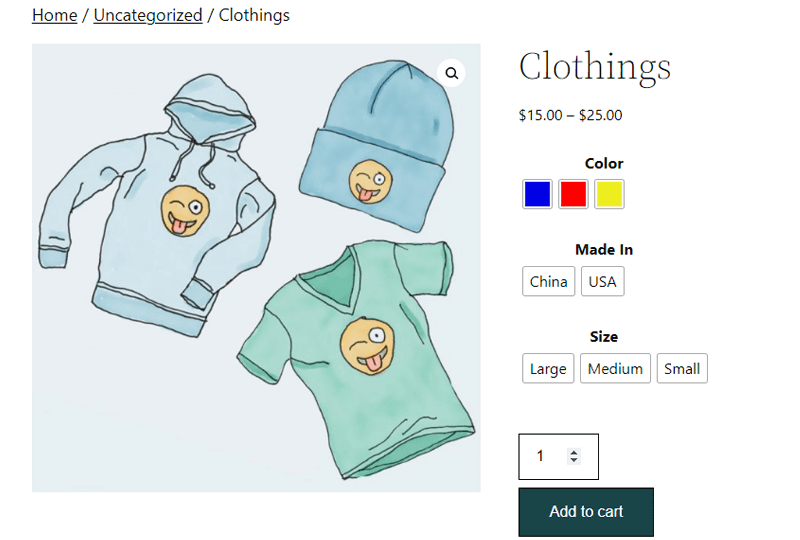
Also, you can check out the variations by clicking on the available options and customizations of attributes you previously made. Just as shown in the image below.
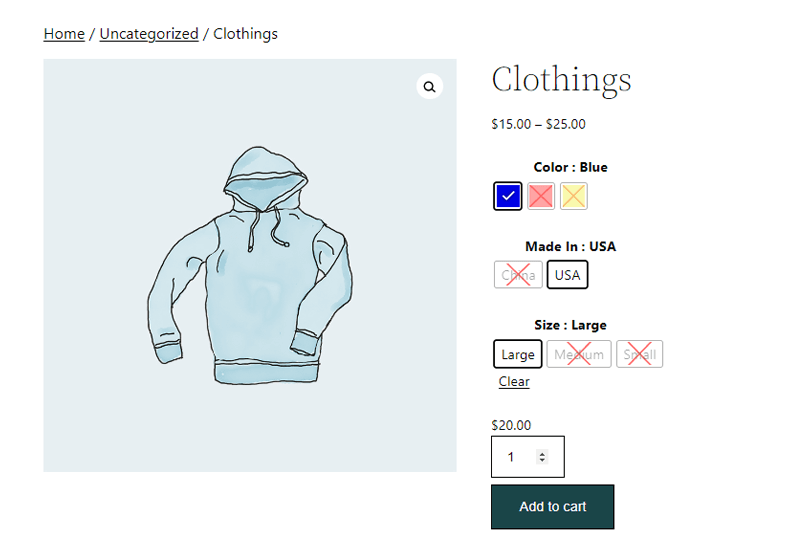
This way, your customers will get the exact information about your products. This not only improves your user experience but also enhances sales.
Once everything is finalized, come back to the previous page and click on the ‘Publish’ button.
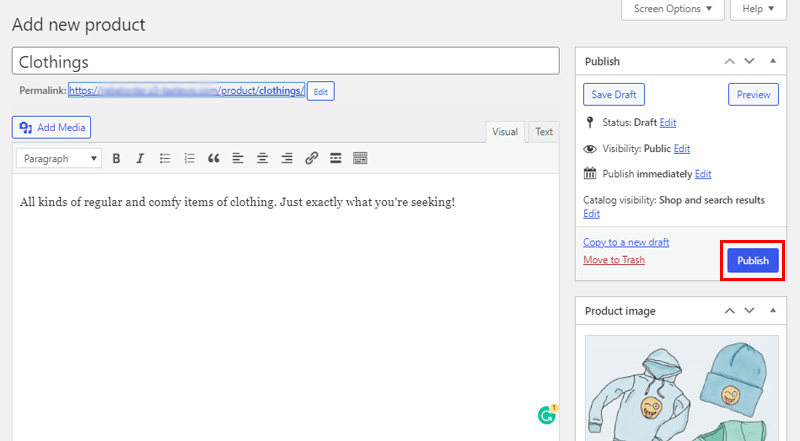
Now, if you go to your store, then you’ll already see the product variations that you just made using the Variation Swatches For WooCommerce plugin.
Final Verdict
Last but not the least, Variation Swatches for WooCommerce is definitely the way to go if you want to display beautiful product variations for your store. Its vast customization possibilities with beginner-friendly navigation make it stand out from the crowd.
Therefore, we definitely recommend using the Variation Swatches for WooCommerce plugin to display product variations for your online store. Rather than solely believing in our words, you can first try out its free version. And further upgrade to the premium one.
Conclusion
That’s it, folks! We’ve come to the end of our tutorial article on how to display product variations in the WooCommerce with the Variation Swatches plugin.
We believe now you can easily create elegant and beautiful variations for your WooCommerce products using the variation swatches. And further display such lovely product variations in your WooCommerce store. As a consequence, you can provide a better choice of flexibility to your customers that can increase your sales.
Please feel free to come forward if you’ve any kind of questions or confusion regarding this tutorial in the comment section below. We’ll be delighted to assist you in every way we can.
Enjoyed learning how to display product variations in WooCommerce? Then, please don’t hesitate to share it with your friends and family. So that they can also quickly create product variations in WooCommerce right away.
Also, do check our recent article on WooCommerce websites examples. You can definitely get some ideas to implement in your store from it.
Make sure to also look into our articles on the best WooCommerce loyalty points & rewards plugins and the best WooCommerce product category grid plugins.
Remember to like us on Facebook and follow us on Twitter to keep an eye out for our content.
