Are you looking for an honest Elementor review? Or wondering if Elementor is the best page builder WordPress plugin? If yes, then you’re at the right place.
If you want to build your website content from the front-end, then you must use a page builder plugin. It helps you to visualize how your content looks when you’re editing. Moreover, such plugins also come with a wide range of features to customize your site easily.
There are a handful of page builder plugins for WordPress websites. Which, Elementor is one of the most popular plugins with over 10 million active installations. It’s a full-featured page builder plugin, yet it’s also easy to use.
However, a question might strike your mind, is it the best page builder WordPress plugin? Well, we’ll answer that in this detailed Elementor review article.
So, let’s begin.
A) What is an Elementor Page Builder? – A Brief Introduction
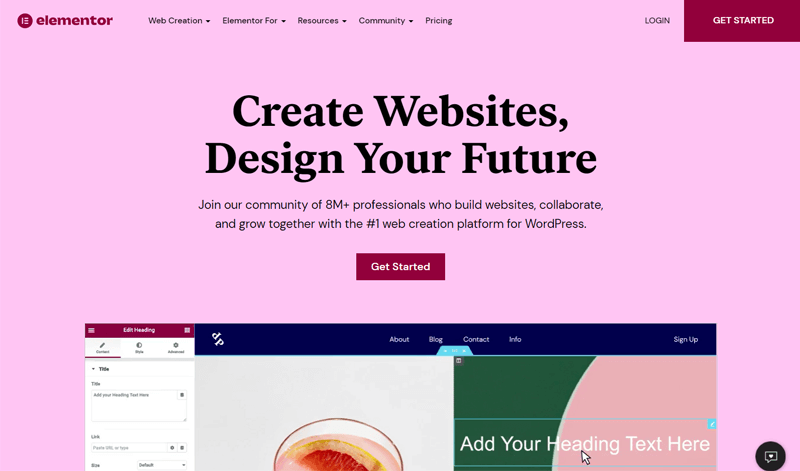
Elementor is one of the world’s leading free WordPress page builder plugins launched in 2016. It provides limitless design options and advanced capabilities that haven’t been seen on WordPress before.
It’s regarded as an intuitive drag-and-drop editor. As you can simply drag and drop the available elements on your site. And, you can perform live editing to customize your pages visually. This means there’s no requirement of entering a single line of code for customization.
You get an easy-to-use interface and powerful features to build your website quickly and easily. Using this plugin, your website will have a responsive and pixel-perfect design.
Plus, the features are not just limited to website design. You’ll also get to build a website that is fast and well-optimized.
Not to mention, Elementor has translated to over 50 different languages. And it also supports RTL (Right to Left) languages. Elementor is compatible with all popular WordPress themes.
To know more about the features of this plugin, let’s jump into the next section of this Elementor review.
B) Major Features of Elementor
The free version of Elementor itself contains tons of features. And if you use the premium version, you’ll get everything you may need for building a website.
Among them, we’ve made a list of most of its essential features. Let’s go through them.
1. Pre-designed Templates and Blocks
The template library of Elementor consists of 300+ beautiful free and premium templates. They are carefully designed by professionals that suit every industry you can think of. So, you can easily insert and customize them to make your unique website.
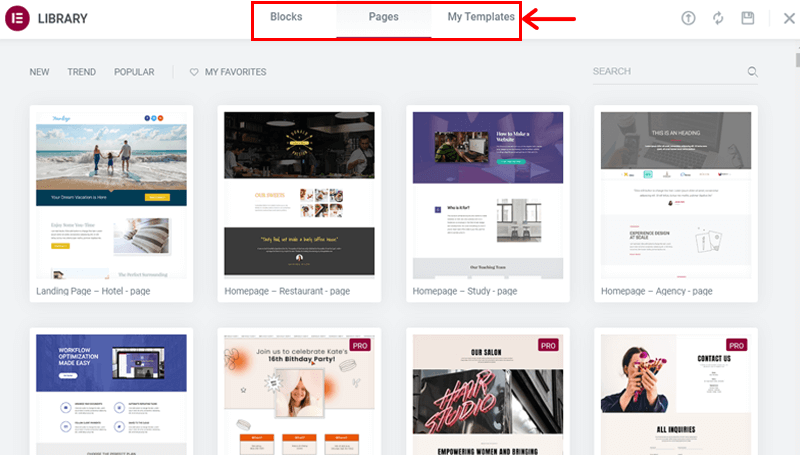
Additionally, it also consists of pre-designed section templates (or blocks). So, you can also use the available blocks to build sections of your pages. Blocks consist of different categories such as testimonials, call to action buttons, about, and more.
Plus, you can save and reuse the templates on different pages. With a click, you’re also able to export and import them on another website.
2. Multiple Widgets
There are 90+ free and premium widgets in Elementor. These widgets provide various design and layout options for you to use.
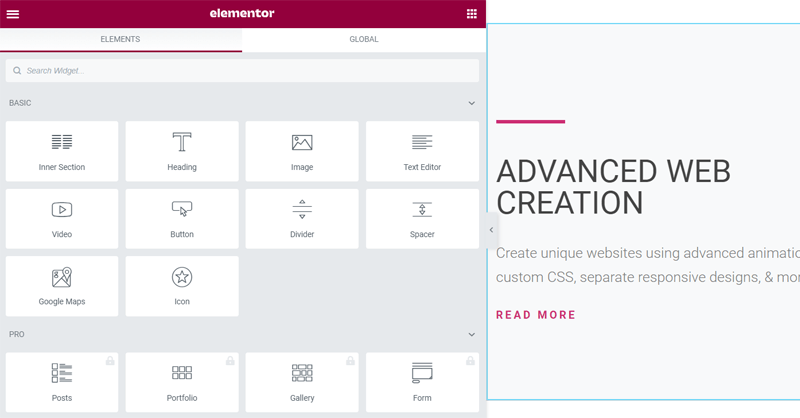
Apart from them, it also consists of widgets for marketing and WooCommerce purposes. Using them, you can create a complete online shopping experience on your eCommerce site.
Moreover, you’re also able to easily customize them. This means you can use these widgets to create any kind of content you want on your site.
3. Theme Builder
To have full control over every aspect of your site in a single place, you can use the theme builder. It has the ability to build separate elements for different pages to the entire website as well. Moreover, you’re also able to easily manage the website.
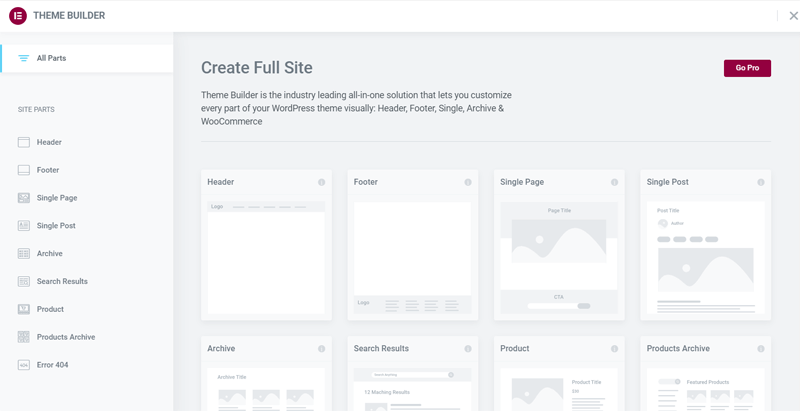
This also works well with the free Hello theme. It’s a lightweight theme that provides optimal performance and blazing-fast speed. Plus, it consists of minimal styling yet provides maximum design features. Using the available pre-built templates, you can customize them to build your entire website.
Furthermore, you can use your one layout design on multiple pages. Then you just need to simply customize and change the contents.
4. Popup Builder
Popup builder enables you to build pixel-perfect popups with advanced targeting options. With this drag-and-drop editor, you won’t have to code but easily create custom popups. This will help your visitors to stay engaged on your site.
Here, you can choose where you want to keep your popup. Plus, you’re able to customize and show popups at an accurate time. So, you can also set the triggers for page load, scroll, click, etc.
Furthermore, advanced settings also allow you to make your popups display as per different factors. Such as after a visitor views some pages, browses from a specific device, and more.
5. WooCommerce Builder
Elementor provides a platform to fully take control over your WooCommerce online store. Using this, you’re able to design from a single product to archive page templates.
It also consists of every widget that you may need for building a product page. These widgets are well-optimized to provide a superfast shopping experience on your site.
Some of the amazing widgets are price table, price list, add to cart, categories, PayPal button, and more.
6. Easy Workflow
Elementor provides an easy workflow for its users. Some of the options enable you to carry out the activities in a simpler way. Such as there’s a finder and a search bar to search the elements. You can also use hotkeys (or shortcut keys), redo and undo, autosave, and copy-paste options.
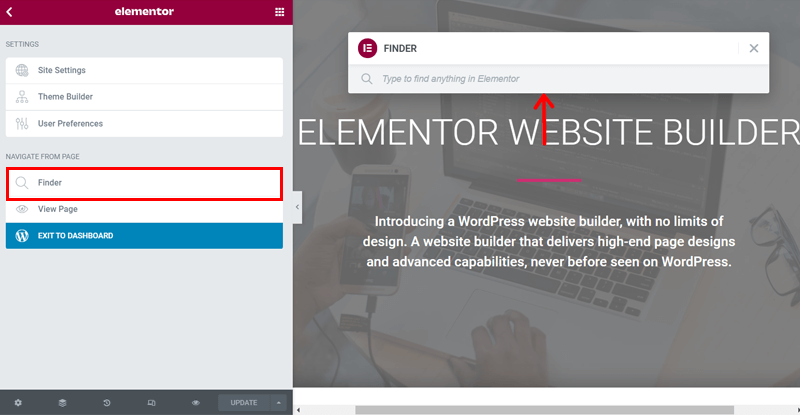
Apart from them, in-line editing also enables you to write your content easily from the front end. This makes creating a website a lot easier.
Plus, when using the global widget, you can also save your likable widget settings. This makes it easy to reuse the widgets on any page by simple drag-and-drop.
7. Design Options
There are tons of elements to stylize the designs of websites in Elementor. You can set global fonts, global colors, and global custom CSS. This allows you to save them once and apply them to any element or the entire website at once.
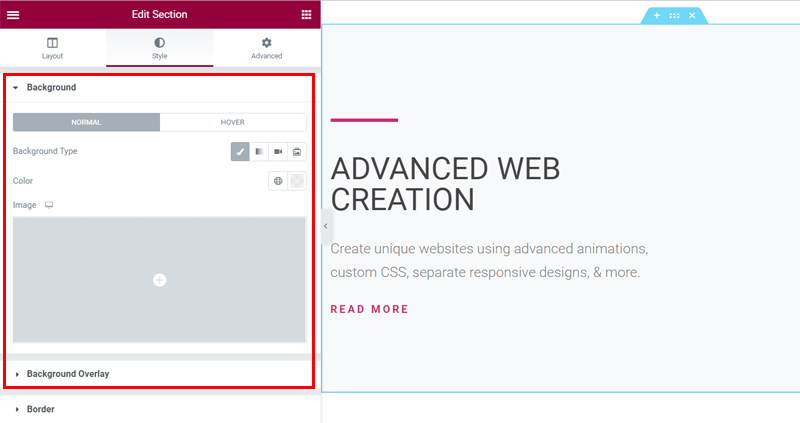
Additionally, there are various options to create beautiful backgrounds. It includes gradients, videos, overlay, slideshow, and more for background. You can also use a blend mode to mix backgrounds and background overlays for more attractive effects.
Apart from them, adding motion effects on different sections makes more user interaction with your site.
8. Flexible Forms
The premium version also consists of all the necessary form elements for a website. It includes contact forms, subscription forms, login forms, and more.
These forms can include custom messages and various field options. Such as advanced form fields (like file upload, date picker, etc.), hidden fields, and acceptance fields (for terms and conditions).
Plus, you can also decide what happens next after a visitor submits a form. You’re able to send a confirmation email to your visitors after they submit a form. For that, there are options to create plain email text or use HTML styling for emails.
9. Easy Integration
Elementor provides easy integration to various other plugins and marketing platforms. Some of them include the support of email autoresponders. Such as Mailchimp, ActiveCampaign, GetResponse, ConvertKit, and more. Using them, you can get your visitors added to your subscriber’s list.
Your forms can also be integrated with security verification services like ReCaptcha V3. This allows your legitimate visitors to only access the services of your website.
Moreover, it also supports the integration of Font Awesome 5 and custom icon libraries like Fontello. Using them, you get to use more icons. Adobe TypeKit is also another option where you can get awesome fonts in Elementor.
10. Social Media Support
Elementor also supports the integration of social media. You can easily add a share button to allow visitors to share your content on famous social media platforms. Plus, the social icons widget allows you to add social icons anywhere on your pages.
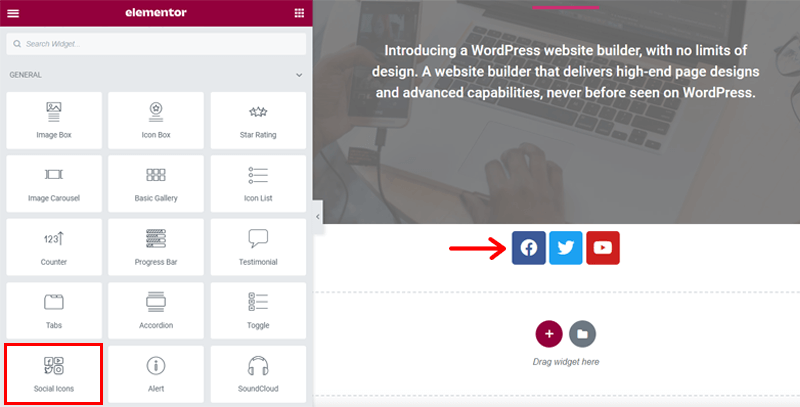
Your best lines or quotes from Twitter can also be shared on your site. This can be done by using a custom-designed blockquote box.
At last, embedding Facebook posts, videos, pages, and comments on your site is also possible. This enables you to increase your social media reach and get more attention from the audience.
C) How to Install and Setup Elementor Plugin?
If you’d like to use Elementor, then firstly you need to install and set up it on your WordPress website. The process is similar to any other plugin that you may have used.
So, simply follow these steps.
Step 1: Install the Plugin
To install Elementor, you have to first log in to your WordPress dashboard. Then, you must go to the Add New option in the Plugins section.
In this section, at the top right-hand side, you’ll see a search box. Here, type the keyword ‘Elementor’ and search the plugin.
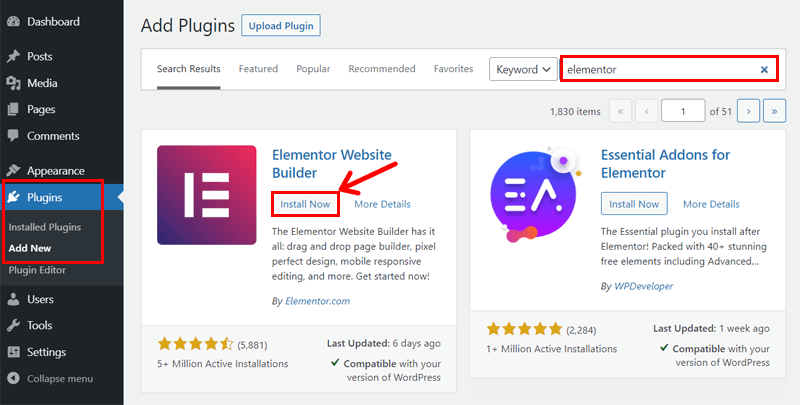
After you find the plugin ‘Elementor Website Builder’, click on the Install Now button. You’ll see the plugin showing ‘Installing’ right after that.
Step 2: Activate the Plugin
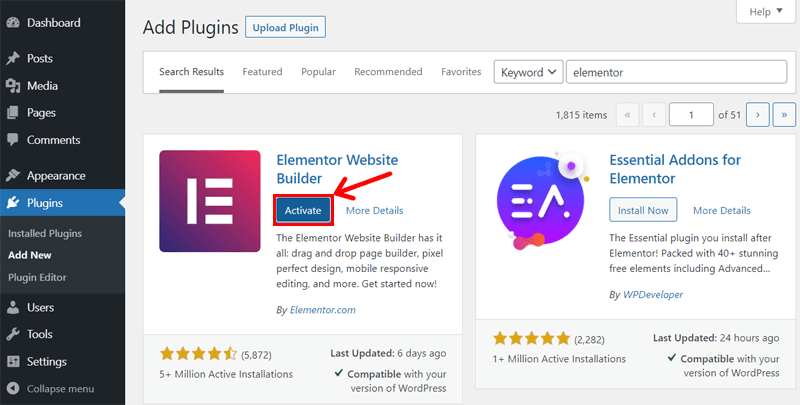
After the installation finishes, you can click on the Activate button. Then, the Elementor plugin gets activated.
Following these steps, the Elementor plugin is completely installed and activated on your WordPress website.
Step 3: Setup Elementor Settings
After successful installation and activation, you can see the Elementor menu added to your WordPress dashboard. You can click on that menu and check the Settings option of Elementor.
Here, there are various configuration options available. According to your needs, you can change them but it’s not compulsory.
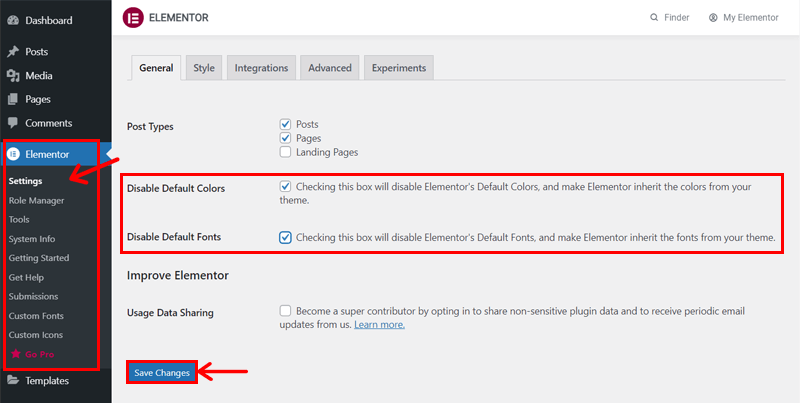
In the General settings, you can see that the fonts and colors are initially set to default. If you want to use the stylings from the theme instead, you must tick the checkbox. Instead of that, you can also customize each section as per your need later while editing.
After you define the changes to be made, don’t forget to click the Save Changes button.
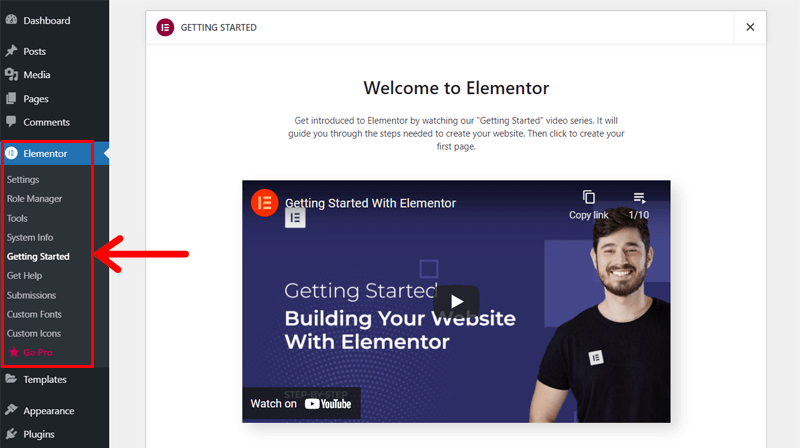
Similarly, there’s also a Getting Started option in the Elementor menu. When you click it, you’re able to see the welcome page. This determines that Elementor is completely installed and set up on your WordPress website.
Now, you can start building your site using the Elementor page builder plugin.
D) How to Create a Beautiful Page Using Elementor? (User Interface)
In this section, we’ll show you how to use this plugin to create a beautiful page. For that, we are taking an example to build a web page using the template library.
But before that, let’s start with creating a new page with Elementor. Plus, knowing the basics of its user interface. So, follow the steps given.
Note that you can insert any premium or free WordPress theme which is compatible with Elementor beforehand and use it.
Among the various WordPress themes, we recommend Astra as the Elementor compatible theme. It’s because Astra is a popular WordPress theme that provides seamless integration with Elementor. Plus, it provides you with endless customization options and dozens of pre-designed templates. Using it, you can easily build beautiful web pages in minutes.
1. Adding a New Page with Elementor
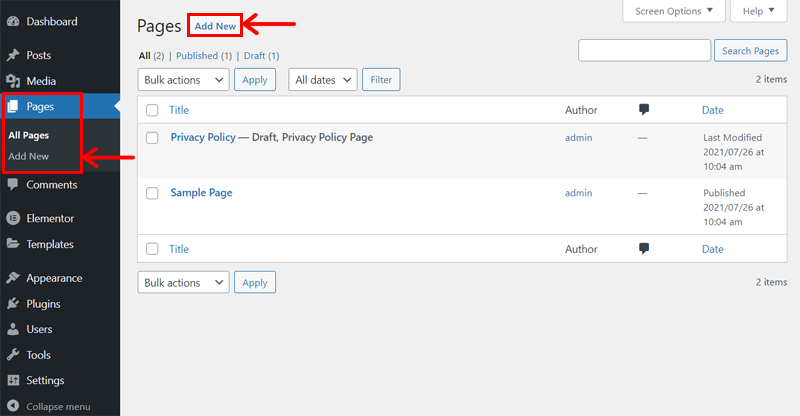
First, you can see that there’s a Page menu in the WordPress dashboard. When you click on it, the list of pages on your site gets displayed. Next, you’ve to click on the Add New option to add a new page on your site.
After that, you’ll see the default editing area of your page. On Add a Title space, you must enter the title of your page like Home for the home page.
Then, on the right side of the page section, you’ll see a template option. There are a few categories available for the kind of template you want to use. Here, click on Elementor Canvas.
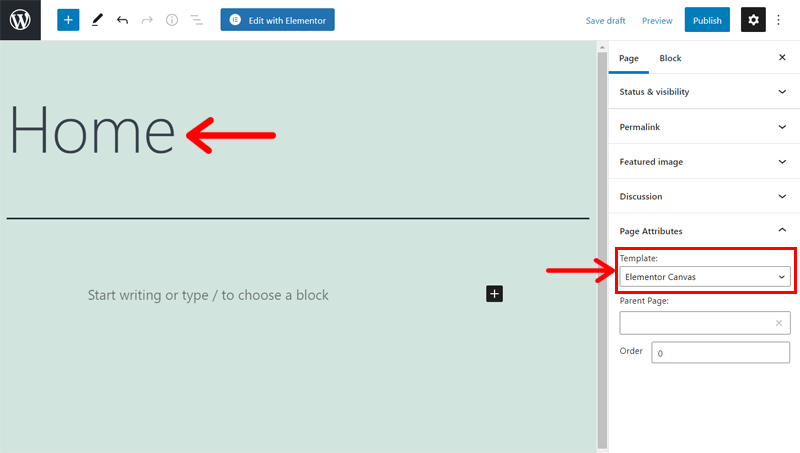
To save your work until now, click on the Save Draft or Publish button at the top right side of the navigation. You can also get to see the preview of your site from the Preview option.
Finally, click on Edit with Elementor button on the navigation to open Elementor.

2. Get to know the User Interface
Now you can see the user interface of Elementor. But before editing the page contents, you must know the basics of its user interface.
There are basically two sections of it. Each of which has its own functions. They are:
Left Side Section
The left side consists of all the free and premium elements of Elementor. There’s also a search bar from which you can easily find your required element.
You’re able to simply drag and drop the widgets from here to the right-side editing area. And, if you get the premium version of Elementor, you get to use the global widgets.
When you don’t require this section, you can also minimize it by clicking the Hide Panel arrow.
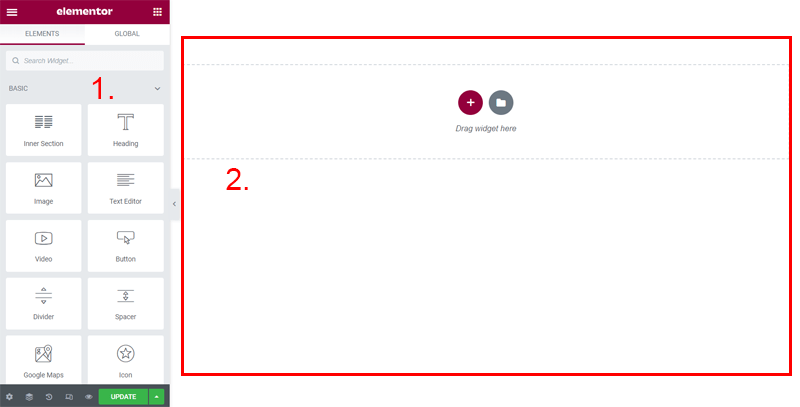
Right Side Section
The right side provides a front-end live preview of your page. It means you can visualize the changes that occur on your page in real-time. Moreover, you can also add a new section or a template from the options given in this area.
Additional Settings and Components
Furthermore, other settings and components are also present at the top and bottom of the left side section.
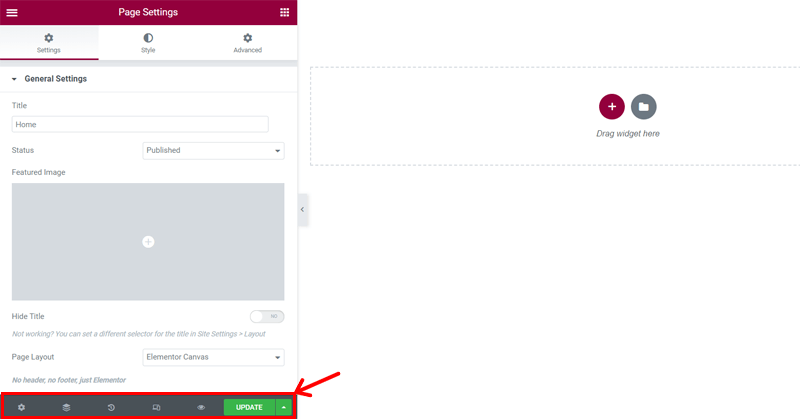
The bottom section options are pointed out below:
- Settings: The first one is the settings option. Here, it includes general settings, style, and advanced custom options for customizing the elements.
- Navigator: When you click navigator, a popup box displays. This shows the overview of your content. You can also easily move your content, widgets, and columns using it.
- History: The history option enables you to view the previous revisions in the current session.
- Responsive Mode: This mode allows you to view your page on mobile, tablet, and desktop screen sizes.
- Preview Changes: You can view the current preview of your page on a separate tab using this option.
- Save Option: From this option, you can publish a new page or update the published page that you’re working on. Moreover, if you don’t want to publish the page yet, then save it as a draft. To use the same page again, you can save it as a template as well.
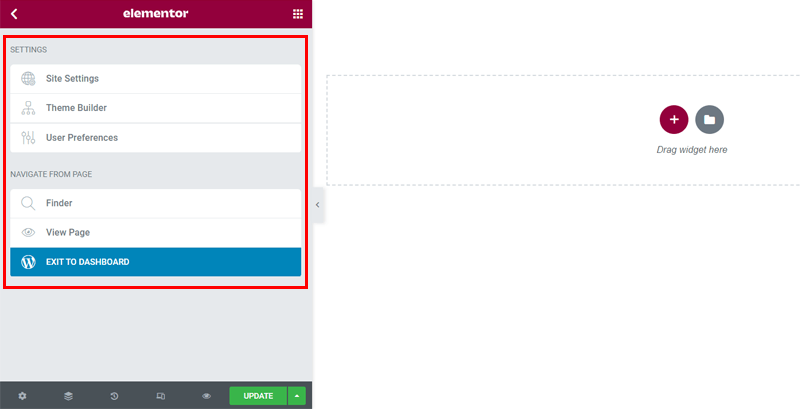
Lastly, when you click on the toggle button at the top-left, there are additional options on the left side. It includes theme builder and site settings.
3. Building a Page Using Template Library
Now we’re going to show you how to create a beautiful page in Elementor. We’ll first make it using the available options in the template library. So, please follow these steps.
Step 1: Insert a Template
At first, on the right side of the user interface, you can see two options as discussed before. Click on the second option that says Add Template.
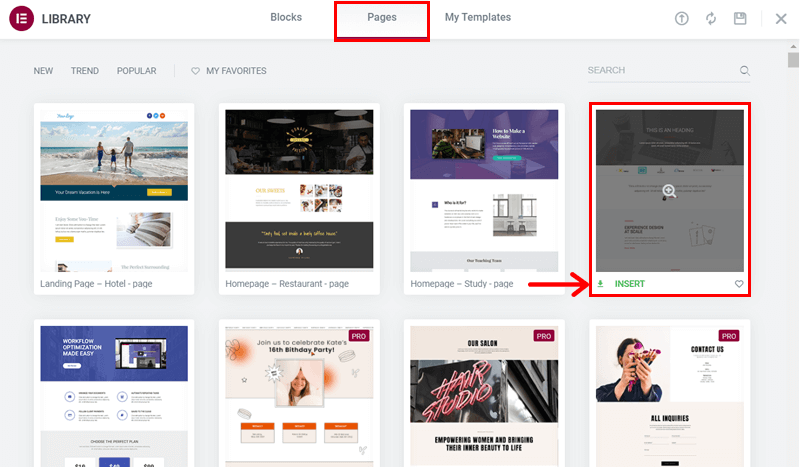
When you click on that, the Elementor library shows up. It includes Blocks, Pages, and My Template options. You can preview the pages available on the Pages option. Then, choose your desired template for the home page. When you hover at the page, you’ll see the Insert option so, click on it.
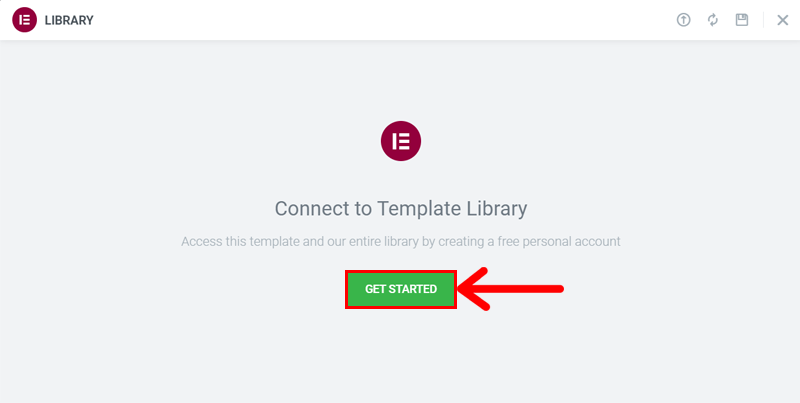
To get the desired template on your WordPress website, you need to connect with the template library. So, click on the Get Started button that appears on the screen.
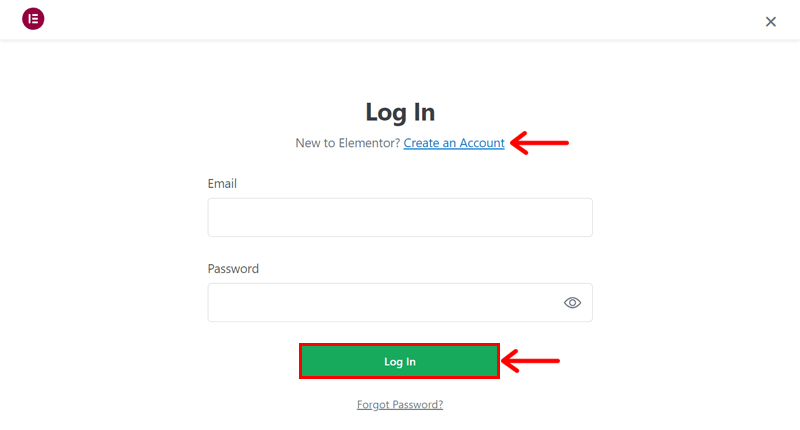
After which, in a new tab, a login form appears from Elementor. If you don’t have an account in Elementor, click on Create an Account. After which, you can log in to Elementor. And lastly, connect your site with the template library.
After successful connection, your right side working area of the website now contains the new template you just inserted.
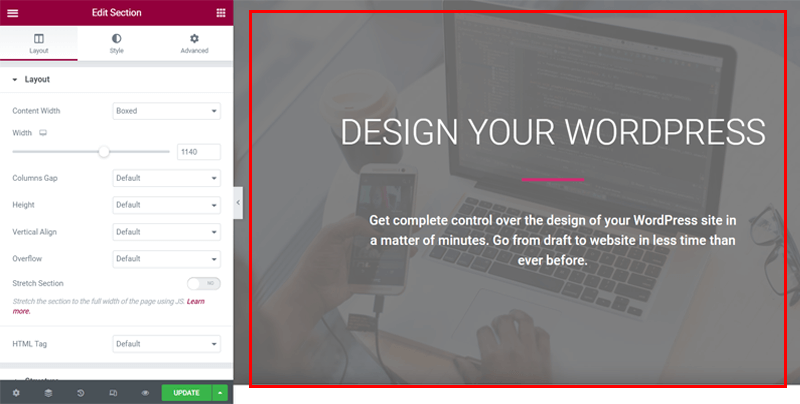
Step 2: Editing the Inserted Template
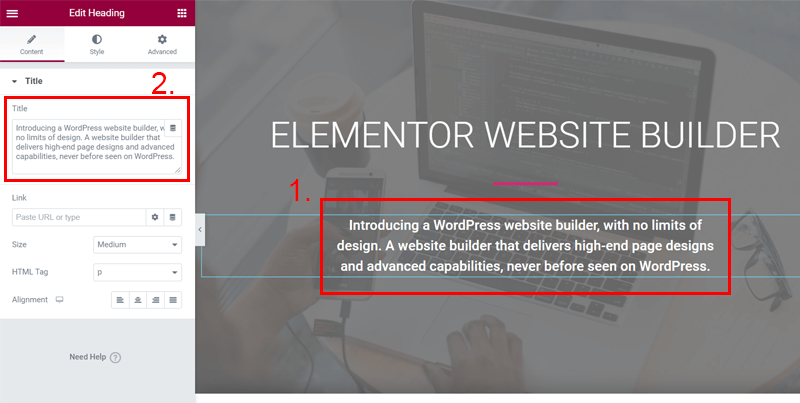
To change the texts of the template, click on the default text and remove it. Now you can write your web page texts. You can write it in two ways. Either from the front end of your page on the right side or from the content section on the left side.
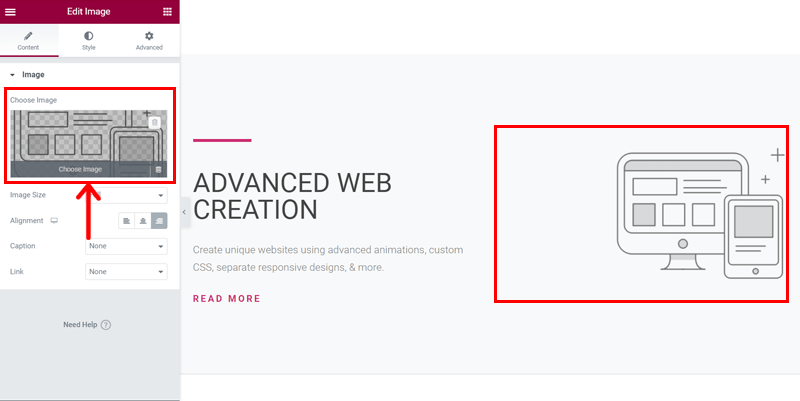
Next, change the images of the template with your web page images. Just click on the image and on the left side, you’ll see the Choose Image option. Upload your image there and click on Insert Media. Similarly, you can change each of the content of the template as you want.
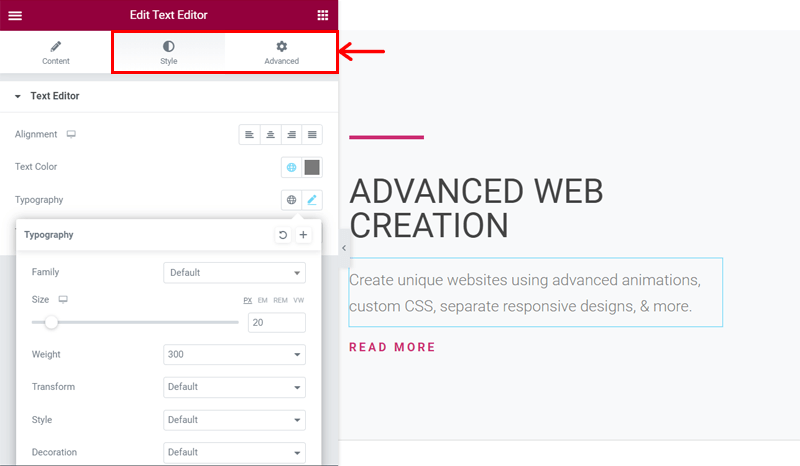
Moreover, you can customize each section the way you want from the options available on the left side. Click on the section either text or images and click on the Style and Advanced options. It includes customization options for colors, typography, layouts, background, motion effects, and more.
If you want to remove a section of the template page, you can also do so.
What you need to do is click on the desired section to remove it. Then, you’ll see a cross sign at the top center of that section. Click on it and the section you choose will be removed from the page.
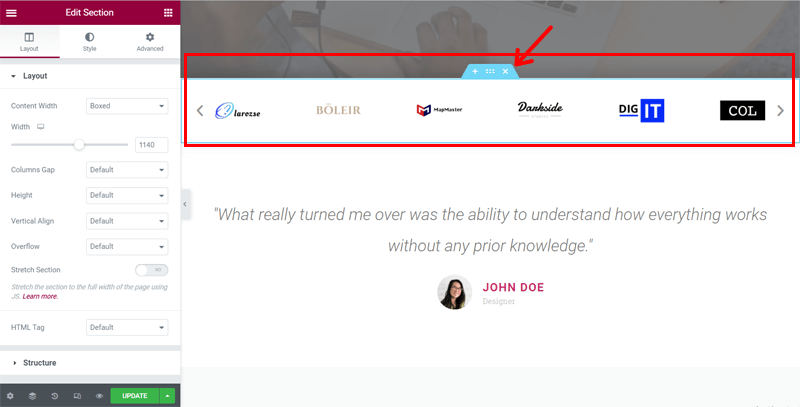
After making changes, always click on the Update button to save the changes.
Step 3: Inserting a Block
Furthermore, the template library also consists of blocks. If the template you choose doesn’t have a particular section that you want, you can use the pre-designed blocks. Blocks can be used even if you’re not using a template from Elementor.
The blocks can be inserted into your page following similar steps to inserting a template page. First, click on the Add Template option, then go to Blocks.
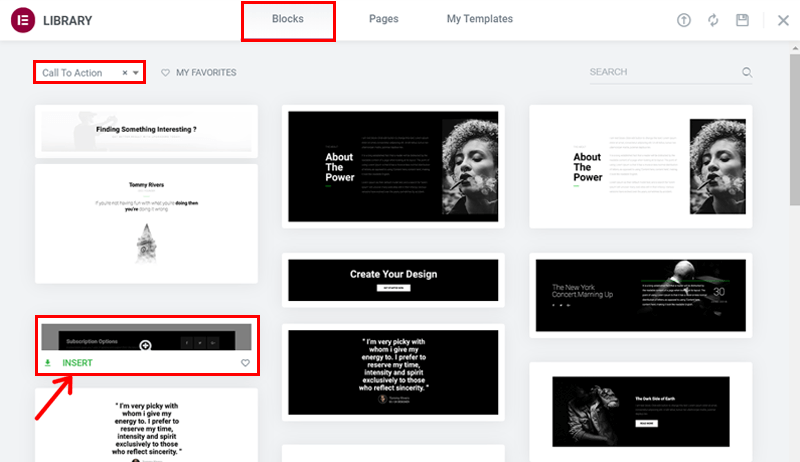
There you’ll find all the blocks available in Elementor. You can filter the blocks to make it easy for you to search your required block. You’re able to either search by entering the keyword or choose the category option given.
When you hover on the block you want to add to your page, you’ll see an Insert option. By clicking it, you can download the block and it’ll be inserted on the page. Then, you can similarly edit and customize them as well.
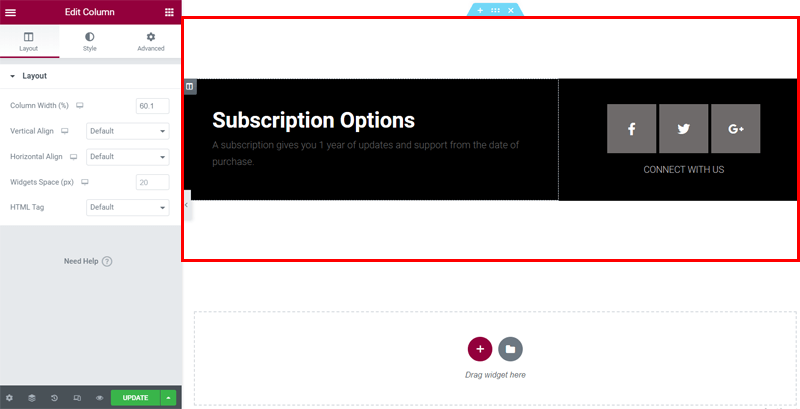
Step 4: Adding a New Section
Instead of using blocks, you can also add a new section and make your own section. You can do this even if you’re using a template page or not.
A new section can be added anywhere on the page. Just click on the section which is below the place where you want the new section. Then, click on the plus sign present at the center.
Now, on the Drag widget here option, click on the first option i.e. Add New Section. Then, you’ll see different layout structures for your section. Choose the suitable one of your choice. Accordingly, your columns will be made.
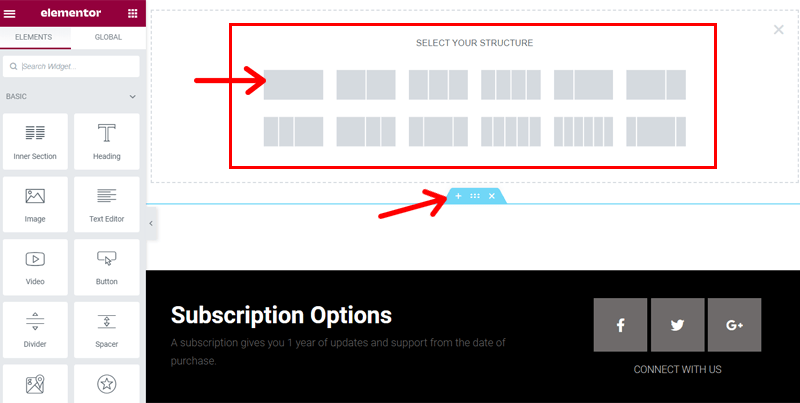
Then, drag and drop the widgets from the left side to the particular column where you want to keep it. Feel free to edit and customize the elements like before.
After you’re done with the customization, don’t forget to click on the update button to save changes.
Step 5: Preview Your Page
By clicking on the Preview Changes option, you can see what the recently created page looks like. Finally, your webpage is now ready to use!
The demo below is a beautiful home page that we’ve created using Elementor. It includes the use of a beautiful template, awesome widgets, layouts, blocks, and customization settings.
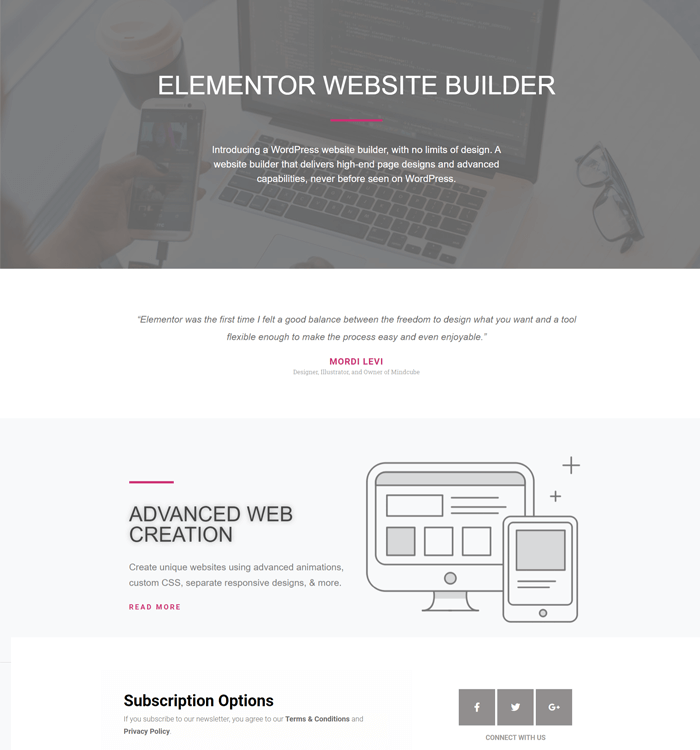
Similarly, you can also follow these steps and easily build your web pages.
E) Elementor Addons & Extensions for Additional Elements & Features
Elementor provides tons of features for building websites but at times the free features may not be enough. For adding more advanced elements and features, people tend to look for different add-ons and extensions of Elementor.
Elementor Pro is the premium version of Elementor that provides premium support and advanced features as described before. Apart from this extension, there are numerous other add-ons also available. They can be free, premium, or freemium (both free and premium) as well.
Among them, we’ve mentioned the top add-ons on this Elementor review below.
1. Essential Addons for Elementor
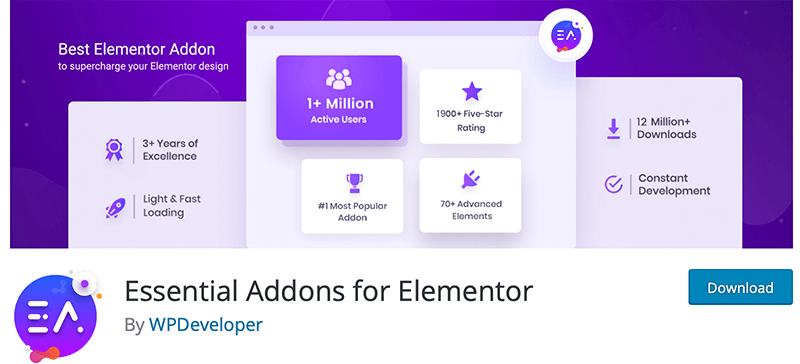
Essential Addons for Elementor is one of the best Elementor add-ons with over 1 million active installations. It aims to enhance the experience of building pages on Elementor.
Here, there are more than 70 different creative free and premium elements and extensions. It includes forms, galleries, carousels, progress bar, table of contents, parallax scrolling, and more. These elements and extensions lead to the designing of pages and posts much more simpler and beautiful.
Features:
- Consists of over 1000 pre-made templates and blocks.
- Provides instant live editing for a better user experience.
- Lightweight and optimized for super-fast loading.
- Compatible with any theme that Elementor works well on. Also, fully compatible with Flexia, a lightweight and multipurpose companion theme of Elementor.
- You can enable and disable individual elements for the smooth running of your site. The unrequired widgets can also be deactivated.
Pricing:
The premium version of this add-on is separated into 3 pricing plans. They are 1 Website, Unlimited, and Lifetime Unlimited that costs $39.97, $79.98, and $199.98, respectively.
The general features of all of them remain the same. The difference is the number of sites you can build and the years of support.
2. Ultimate Addons for Elementor
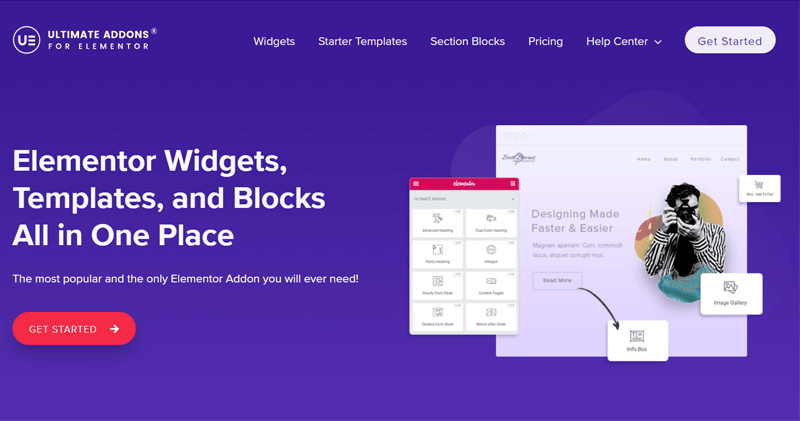
Ultimate Addons for Elementor is a popular premium Elementor add-on. It provides a complete toolkit for new design options in Elementor. So, you can have seamless integration of this add-on with Elementor on your WordPress website.
It also works well with major WordPress themes. Moreover, there are over 40 widgets and extensions from which you can stylize your site. Some of the new and popular ones are modal popup, display conditions, content toggle, and video options.
Features:
- Consists of 100+ pre-made templates and 200+ section blocks.
- The cross-site copy-paste feature enables you to reuse your website design and elements from one domain to another.
- Able to create attractive animated backgrounds for better user interaction when there’s mouse movement and clicks.
- Due to the use of modular architecture, you can deactivate any widget that you don’t require. This leads your site to be lightweight and well-optimized.
- Translation ready to build a multilingual website.
Pricing:
You need to purchase this add-on to add these amazing additional features for Elementor. The pricing plan is divided into 3 categories that are Ultimate Addons, Essential Bundle, and Growth Bundle. They costs $55, $169, and $249, respectively.
3. Premium Addons for Elementor

Premium Addons for Elementor is a freemium Elementor add-on. It consists of over 55 essential add-ons and widgets that you can easily use and customize. Some of the unique and useful content widgets present are divider, bullet list, tabs, team member list, and more.
The best thing about this add-on is the integration of Lottie animations. Lottie animations are free, lightweight, and open source. Any widgets of Elementor having image or icon options can have this animation. That’ll make your website more interactive and attractive.
Features:
- Consists of over 330 premade templates for building the website faster.
- You can keep equal height for the columns, widgets, or other selectors with a click.
- With a click, you’re able to duplicate posts, pages, or templates on your website.
- Able to enable or disable elements for fast loading of websites.
- Fully compatible with WPML (WordPress Multilingual) plugin to build multilingual sites.
- Cross-browser compatible and 100% responsive for any screen size.
Pricing:
The premium version of this add-on is divided into 3 pricing plans. They are Single-Use License, Unlimited Use License, and Lifetime License that yearly cost $39, $79, and $249, respectively.
F) Elementor Pricing
As you may have already known by now, Elementor is a freemium page builder plugin. You can also download its free version from WordPress.org.
For the premium version, Elementor is divided into five pricing plans. They are Essential, Advanced, Expert, Studio, and Agency. The most popular plan among all is the Expert plan.
The major features of all of them remain the same. They are that it provides a drag-and-drop live editor, responsive design, 90+ widgets, 300+ templates, theme builder, and premium support.
So, the plans are categorized based on the number of sites you can build. The details of each are:
- The Essential plan costs $49 per year for 1 premium website.
- The Advanced plan costs $99 per year for 3 premium websites.
- The Expert plan costs $199 per year for 25 premium websites.
- The Studio plan costs $499 per year for 100 premium websites.
- The Agency plan costs $999 per year for 1000 premium websites.

However, the Expert Plan also provides VIP support. Other than that, the Studio plan and Agency plan also consist of Elementor Expert Profile along with VIP support.
Plus, if you wish to discontinue the service of any of the plans, you can have a 30-day money-back guarantee.
G) Customer Support Options for Elementor
Are you facing any problems while using Elementor? Or do you have any queries about this page builder plugin that you want to know more about? Then, make sure to check the customer support options of Elementor.
There are multiple ways in which Elementor has been providing support to its customers. If you’re using the free version, you can visit the Support Forum on WordPress.org. There you can ask questions if you have any queries about the plugin
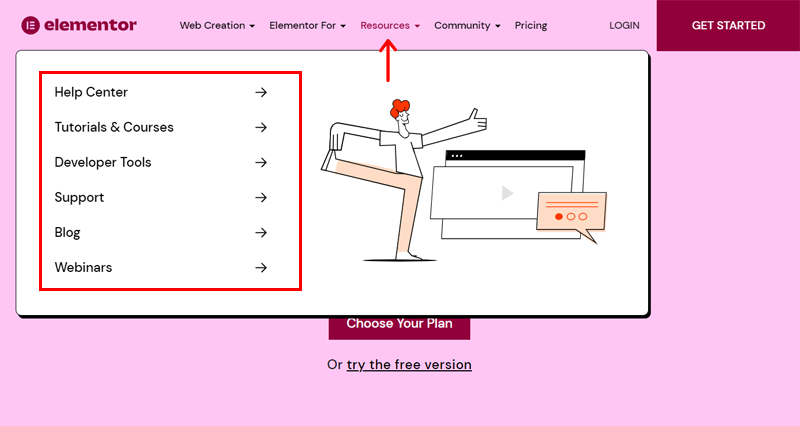
Plus, the official website of Elementor consists of the Resources section in the navigation menu. Here, you can check the various support options that Elementor provides for all of its users.
The easiest way to know more about Elementor is through its documentation. The Help Center has provided detailed and updated documentation about the plugin.
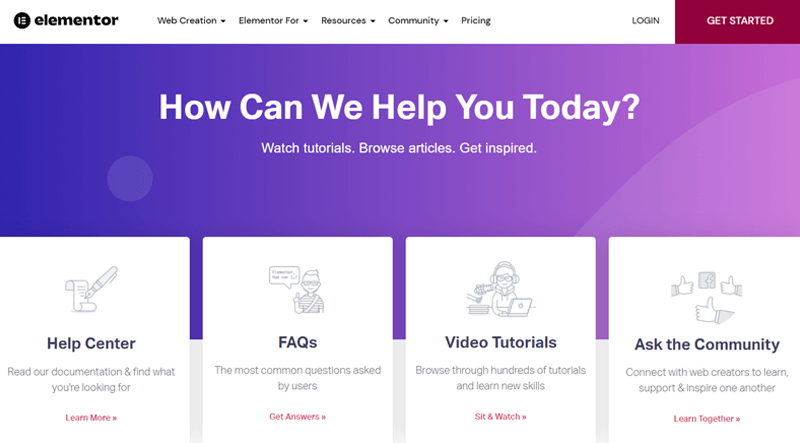
On the support menu, there are other additional options as well. You can check the FAQ section where answers to the most commonly asked questions are provided.
There’s also an Ask the Community option where you can ask the web creators for learning, support, and inspire each other. Plus, there are hundreds of video tutorials for the ones who want to learn and improve their skills in Elementor.
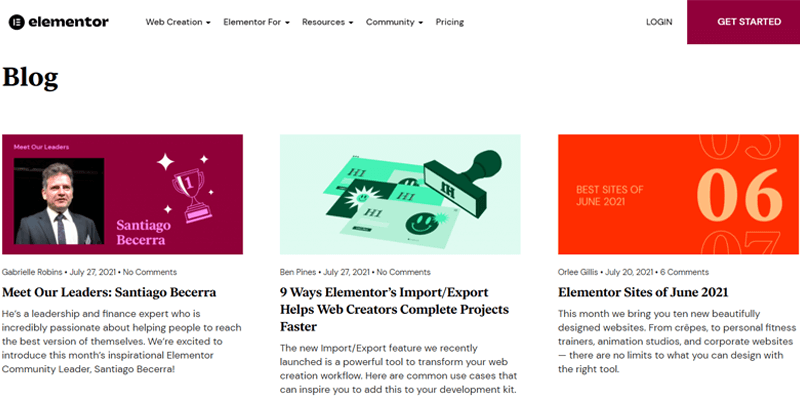
Not only that, you can find blog articles and webinar videos also. This will provide you with better knowledge from the experts on different topics to create better content.
Lastly, developers can check the separate section called developer tools. Here, it consists of explanations of the different tools of Elementor for writing better code.
H) Pros and Cons of Elementor
Until now, we discussed the positive aspects of Elementor in this Elementor review. However, there are certain limitations of this page builder plugin as well.
So, here are some of the pros and cons of Elementor that you must know.
Pros of Elementor
- Easy-to-use user interface and beginner-friendly.
- Allows drag-and-drop live editor.
- Provides a responsive design.
- Consists of Theme builder, Popup Builder, and WooCommerce Builder.
- Compatible with popular WordPress plugins and other third-party applications.
- Works well with most of the free WordPress themes.
- Delivers frequent updates.
Cons of Elementor
- Most of the useful widgets and templates are available in the premium version.
- Customer support is not quite good while answering the queries of users.
- The lifetime pricing option is not available.
Elementor has enough pros that make it one of the best page builder plugins. But if you are not sure about it yet, then you can firstly check other alternatives also.
We’ll talk about its alternative in the next section of this Elementor review.
I) Elementor Alternatives
Elementor is not just the only popular and best plugin available for WordPress websites. There are several other plugins that also provide amazing and unique features to use.
So, here are some of the good alternatives to Elementor.
1. Brizy Builder
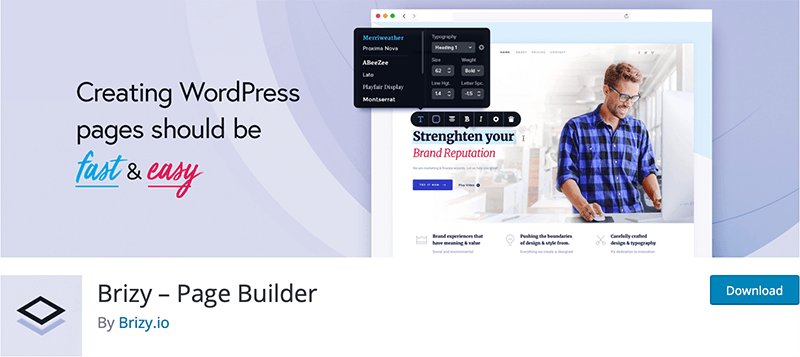
Brizy Builder is a freemium next-gen website builder WordPress plugin. The prominent feature of this plugin is that it’s smart and clutter-free. It’s because the user interface displays only the essential elements that you need for a task. You can also minimize the elements when you’re editing the content.
Moreover, it consists of 400+ pre-made designs of templates, blocks, and popups. Along with that, there are 4000+ icons that you can quickly find. This enables anyone with no designer or developer skill to build their WordPress sites in minutes.
2. SiteOrigin
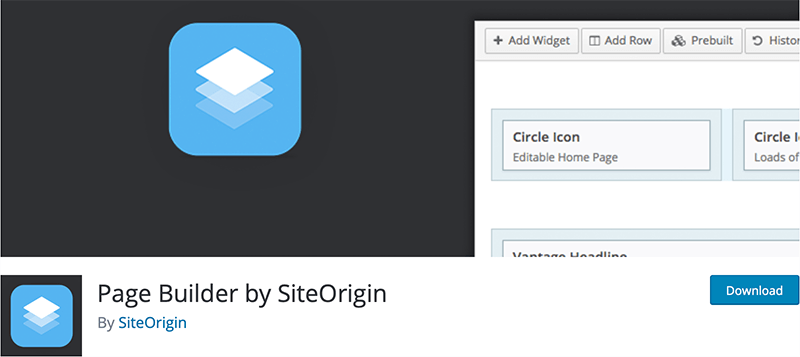
SiteOrigin is another freemium and responsive WordPress page builder plugin. It’s quite popular as it has over 1 million active installations. You can easily build grid-based page content for your site with this drag-and-drop live editor. Also, feel free to use any WordPress theme and change as much as you want.
Moreover, there are several awesome widgets that you may need. It also includes row and widget style options. This enables you to customize your content the way you want. For more advanced features, you can also use custom CSS and CSS classes.
3. Visual Composer
Visual Composer is another fast and intuitive freemium page builder plugin for WordPress sites. There’s a free cloud marketplace called Visual Composer Hub. This provides weekly content updates for elements, templates, images, and add-ons that you can download. Currently, there are 300+ unique content elements and 300+ pre-designed professional templates.
Along with features like theme builder and popup builder, there’s also a row layout builder. It allows you to easily build responsive rows and columns. This makes your website adjust to each screen size right from the beginning.
4. Beaver Builder
Beaver Builder is a flexible drag-and-drop page builder WordPress plugin with endless possibilities. You can use it to build any kind of websites such as a blog, eCommerce, membership, and more. The best thing about it is that you can build unlimited websites using any of the pricing plans of its premium version.
There are available shortcodes and widgets that you can easily use to build your website. Some of the awesome content modules include sliders, pricing tables, social icons, tabs, sidebar, and more. Plus, you have the ability to build your own custom modules.
Do you want to see more Elementor alternatives? Check our best collection of Elementor page builder alternatives and use your favorite page builder.
J) Final Thoughts – Should You Use Elementor?
This review definitely clarifies that Elementor is an excellent page builder plugin. We not only get to know the remarkable features that it provides. But after using the plugin, we are now able to know that it provides one of the best user interfaces as well.
Since Elementor gives a single solution for most people. So, whether you’re a web designer, marketer, developer, or from an agency, anyone can use it to build any kind of website. Even if you’re just a beginner, then you can also easily use the free version.
From inserting a template to integrating social media, we assure you that you’ll have a great experience while building your website.
However, we also recommend you all to first install and use the plugin yourself. That’ll help you to understand its overall functionality in a better way. We’ve already provided you with enough guidance for that in this Elementor review.
Conclusion
And that’s a wrap. We’ve come to the end of this Elementor review article. We hope that you’ll agree and consider Elementor as one of the best page builder WordPress plugins.
In case you’ve any more questions, then simply post a comment below. We’re eagerly waiting to hear from you. We’ll also try to provide you with a response as soon as possible.
If you like such articles, then don’t forget to read our reviews on SiteGround hosting and Essential Addons for Elementor.
To get notifications of our latest articles, follow us on Facebook and Twitter.
