Are you looking for an honest Tutor LMS plugin review? Or wondering if the Tutor LMS plugin is worth using? Also, if you are looking for the best WordPress LMS plugin, then you’ve come to the right spot to know that.
In general, you can understand LMS (Learning Management System) plugins as tools that let you develop web-based educational courses. Basically, if you want to establish an eLearning site with WordPress, then you’ll need a decent LMS plugin.
Tutor LMS is a feature-rich WordPress LMS plugin. It is very simple to use and elegant in design. With this plugin, you can create and sell online courses easily. Despite the fact that it is a young plugin, it comes from a reputable developer and has garnered widespread acceptance and usage.
So, do you think it’s a good idea to use it? Simply read the complete review article to find out everything you need to know about Tutor LMS.
Let’s get started!
A) Introducing Tutor LMS Plugin
Tutor LMS plugin is a powerful WordPress LMS plugin that allows you to effortlessly develop and sell online courses. This learning management system’s plugin meets all of the criteria for a fully functional online course marketplace or eLearning website.

In fact, it’s one of the growing freemium plugins with more than 70,000 active installs. With this plugin, you can easily build difficult and engaging quizzes, interactive lessons, sophisticated reports, and metrics.
It has various high-quality add-ons that you can use to extend the functionality of the main plugin. This lightweight WordPress LMS plugin includes extensions that provide certificates, email alerts, shopping carts, and much more.
And the best aspect of this plugin is its easy-to-use functionality and well-designed UI (Users Interface). Without writing a single line of code, you can manage, administer, and commercialize your online courses with Tutor LMS.
Udemy, for example, is an online learning platform that allows you to create online courses on any subject you want. It’s an ideal marketplace for educators looking to sell and acquire online courses in order to generate money.
With that said, let’s jump to the next portion of our review to learn more about the Tutor LMS plugin.
B) Key Features of Tutor LMS Plugin
We’ll go through the key features of the Tutor LMS in this section of our review. It comes with both free and paid functionality as a freemium plugin.
Let’s take a closer look at these features.
1. Easy-to-Use Course Builder
One of the significant features of the Tutor LMS plugin is that it has an easy-to-use course builder. This carefully crafted WordPress LMS plugin allows you to add courses on an easy user interface. That also comes with all of the necessary features to provide a high-quality learning system on your website. The user interface is developed in such a way that you won’t feel confused or bored.
Essentially, you can easily create comprehensive courses with details like videos, attachments, excerpts, and many more with this plugin. In fact, it facilitates creating a course for each topic with video and other materials for each lesson. We’re sure that students will love it while taking the class.
2. Frontend Dashboard
Another key feature of this plugin is that both students and instructors have their own dashboards. Not to mention, the dashboard is visible once you enter the Tutor LMS-powered site.
Moreover, you can keep track of all your course statistics from the dashboard. Basically, you can see how many courses you’ve completed, how many students are registered in, your overall earnings, and more.
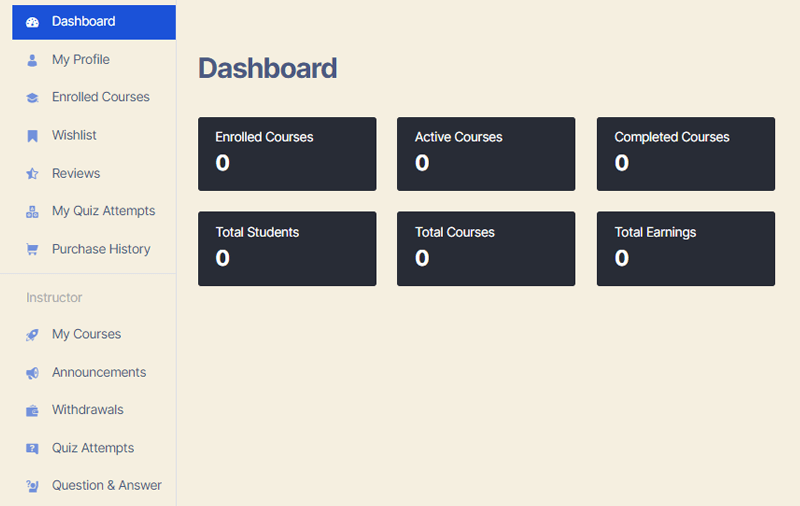
From the dashboard, you can also see a list of the most popular courses. Furthermore, you can add your profile whether you are an instructor or student, a wishlist, course reviews, and much more.
3. Quiz Creator
A quiz is one of the interactive methods of the learning process. As a result, Tutor LMS also provides easy quiz-creation capabilities. With it, you can create engaging and innovative educational materials and resources such as quizzes for your students.
Essentially, Tutor LMS includes 10 modern yet familiar question categories to assess students’ understanding of the topics that you’ve taught.
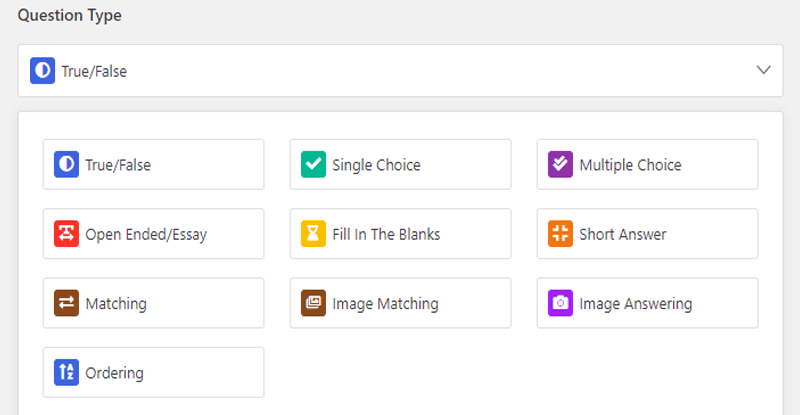
All you really need to do is navigate into a topic into the course builder whether from the frontend or backend. Then, click the ‘Quiz’ button and help your students know what the quiz is about, give it a name and brief description.
Then, you may begin adding questions one by one to the quiz. You can build true/false, single-choice, multiple-choice, matching, and other sorts of quizzes under the Quiz area.
4. Multi-instructor
You can build a dynamic eLearning platform by combining multiple teachers on an online learning platform. Tutor LMS also provides the multi-instructor capability to make a fully functional learning website.
In fact, it includes a separate Multi Instructor add-on that allows multiple instructors to participate in a course. After enabling this addon, you can easily add multiple instructors from the course creation page.
Moreover, when new instructors are assigned to a course, they’ll also have full control over the course as that of the main instructor.
5. Supports Multimedia
Basically, you can understand multimedia as a collection of text, graphics, animation, audio, and video. These days, various multimedia approaches are adopted as an effective teaching and learning strategy for both instructors and students.
With the use of this plugin, you receive complete multimedia support. It fully supports various video sources such as Vimeo or YouTube videos. As a result, you can easily upload these multimedia lessons to engage your learners in effective learning.
Moreover, you can also create an engaging introductory video at the beginning of your courses for more enrollment of students.
6. Easily Monetize Courses
One of the most crucial aspects of developing an eLearning platform is the ability to effortlessly monetize the courses you’ve built. And without a doubt, Tutor LMS provides this capability.
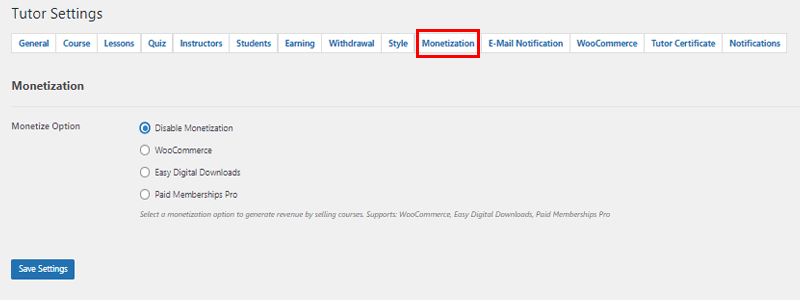
Basically, it supports Easy Digital Downloads (EDD) and WooCommerce for commercializing your courses. These platforms have various payment channels through which you can sell your courses without a hitch.
You can combine any of these options with your learning management system, depending on your preference, and sell your courses.
7. Compatible with WooCommerce
Another key feature of the Tutor LMS plugin is that it’s compatible with the popular eCommerce platform WooCommerce. As a result, you’ll get total eCommerce functionality to sell your courses on your website.
Moreover, with WooCommerce reports helps you to see various sales information, as well as completed and pending orders of your courses. Furthermore, you can also send out discount coupons or even a PDF invoice.
Along with the Tutor LMS plugin, you can also utilize any WooCommerce extension to track and enhance the sales and marketing of your e-learning site.
8. Elementor Compatibility
Tutor LMS plugin is compatible with one of the most popular page builders that is Elementor. As a result, this makes it quite a handy plugin for creating a dynamic eLearning website.
In fact, its extensive integration with Elementor allows you to create all of your course content using Elementor’s visual interface and 25+ custom widgets. With this combination, you’ll be able to develop adaptable courses while still being able to design your site with Elementor.
Furthermore, it also offers LMS Tutor Elementor Addons that integrate the Tutor LMS with the Elementor page builder. This way, you can create any type of eLearning course site you want with unique styling, distinct designs, and much more.
9. Reports and Analytics
Another cool key feature of Tutor LMS Pro is that it offers Tutor Report. Consequently, you can get access to advanced analytics for your platform. This way, you’ll get every single detail of your e-learning website.
With proper reports and analytics, you can know which courses are the most popular with students. Moreover, this also helps you to rate individual course popularity. Further, you can easily keep track of any course’s strengths and weaknesses and adapt your strategy accordingly.
10. Certificate Builder
Once students enroll in any sort of online course, it’s very normal to expect a certificate on the completion of their course. In fact, offering certificates with online courses provides a sense of accountability for your learning platform. So, it’s very crucial to have a certificate builder in the LMS plugin that you use.
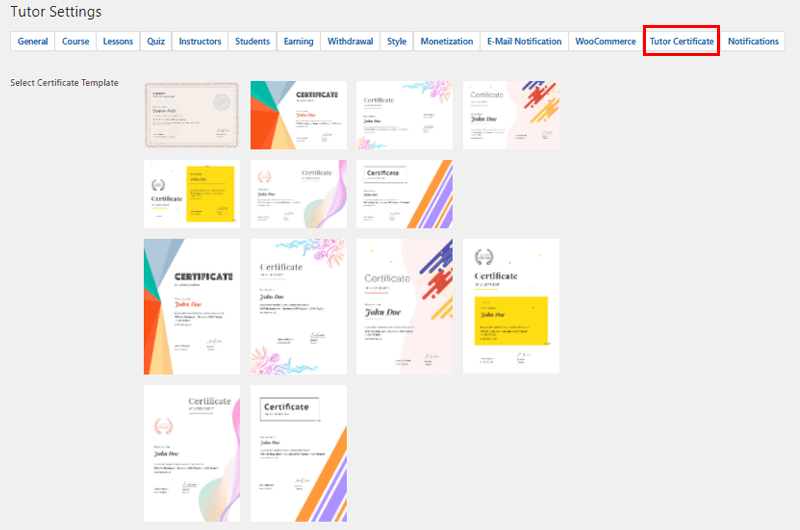
Tutor LMS provides a dedicated certificate builder so that you’ve got a dynamic eLearning website platform. This way, you can provide beautifully designed certificates for completed courses to the learners on your platform. Moreover, you can also submit your own certificates to provide uniqueness.
Let’s move on to the next portion of this Tutor LMS review.
C) How to Install and Set Up Tutor LMS Plugin?
We’ll walk you through installing and setting up the Tutor LMS plugin in this section of the review. Both the free and premium versions of the process are shown below.
Installing and Setting Up Free Version
Tutor LMS’s free version is quite simple to set up. You can directly install Tutor LMS from your WordPress dashboard like installing any other WordPress plugin.
So, kindly follow the instructions below:
Step 1: Install the Plugin
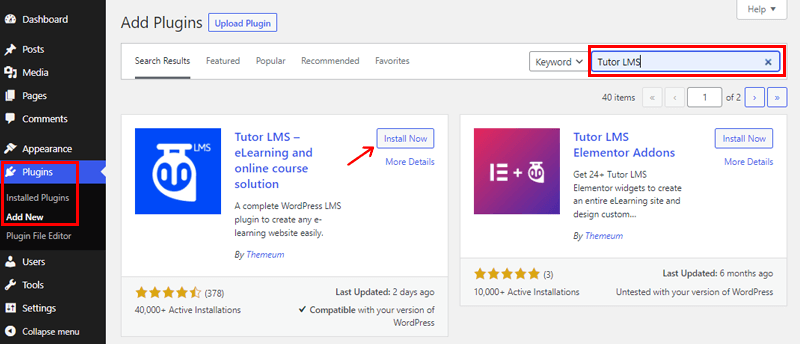
To begin, you should first log into your WordPress dashboard. Then, in the left navigation of the dashboard proceed to the ‘Plugins’ section. Following that, click on the ‘Add New’ option.
Now, you’ll see a search bar on the top right corner where you should type in ‘Tutor LMS’ and click enter to search the plugin. Once you find the plugin, click on the ‘Install Now’ button.
Step 2: Activate the Plugin
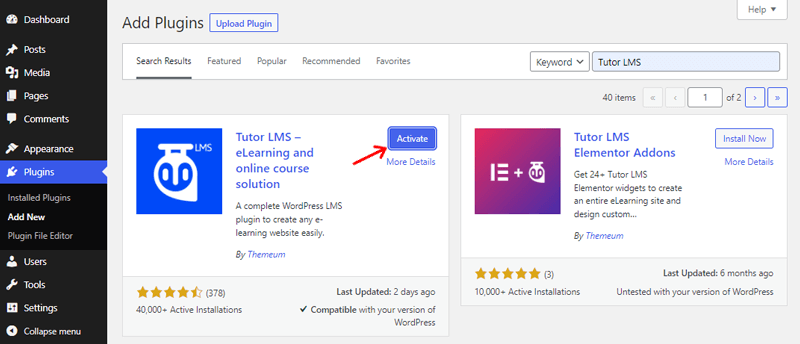
Once the installation process completes, you’ll see the ‘Activate’ option. Then, click on it.
Step 3: Setting up the Plugin
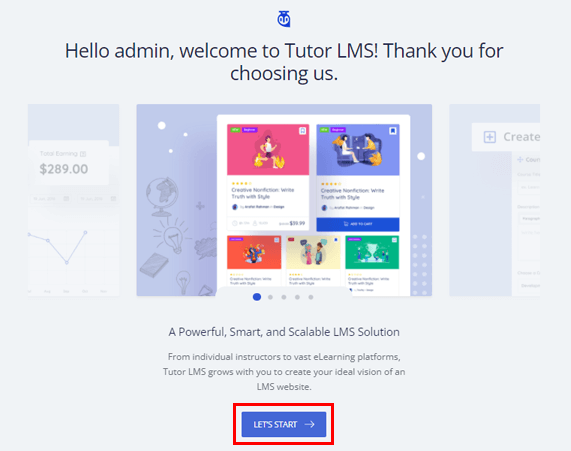
Following that, you’ll be directed toward a Welcome page. There, you need to click on the ‘Let’s Start’ button as shown below.
Then, you are directed to pick the category and other general settings for your LMS platform.
Once you configure all the settings as per your choice, you’ll see the page as shown below. Then, you can click on the ‘Create a New Course’ option which will direct you back to your WordPress dashboard. Now, you can start using this plugin to create your e-learning or educational website.
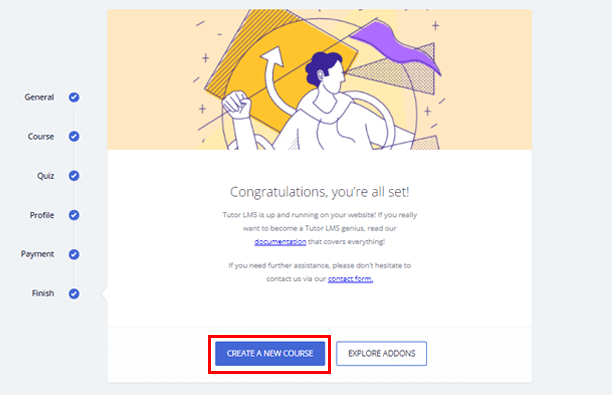
And that’s how you install the free version of the Tutor LMS plugin. Pretty easy right?
Installing the Premium Version
So, in order to utilize the premium version of the Tutor LMS plugin, first of all, you need to purchase the plugin. And in this Tutor LMS review, we’ll show you how to do it.
You can do so by visiting the Tutor LMS official website. If you already have the free version, you can upgrade from the Get Pro option in the Tutor LMS menu of your dashboard. That’ll further direct you to the Pricing section of the Tutor LMS website.
It’s important to note that in order to utilize the premium version of Tutor LMS, you must first have the free version active.
Now, let’s look at the following stepwise guide to installing the premium version.
Step 1: Purchase the Plugin
First of all, go to the official website of the Tutor LMS plugin and click on the Pricing section in the website’s navigation area.
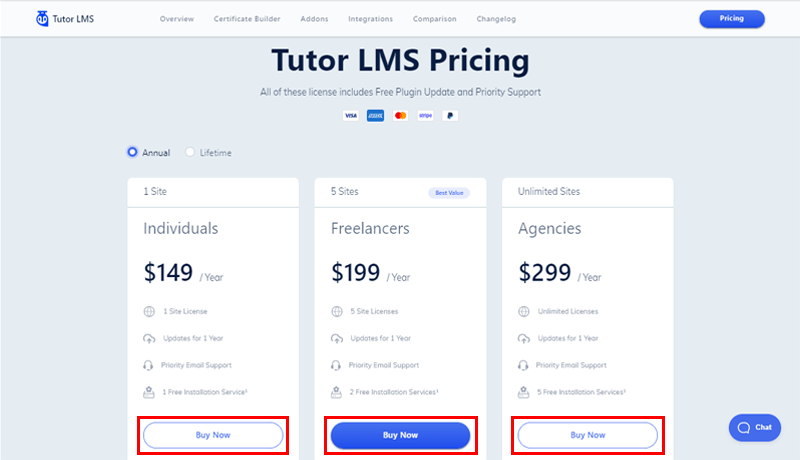
On clicking it, you’ll see the page as shown below. You’ll see 3 pricing plans in both Annual and Lifetime schemes each. On your chosen pricing plans, click on the ‘Buy Now’ button.
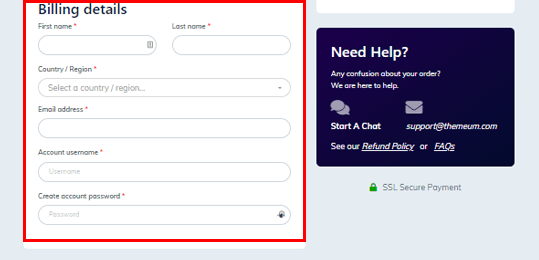
You’ll be directed to another webpage as shown below. Here, you need to put your personal and payment information. Also, you’ll create a Username and Password that you’ll later need to access the Tutor LMS dashboard.
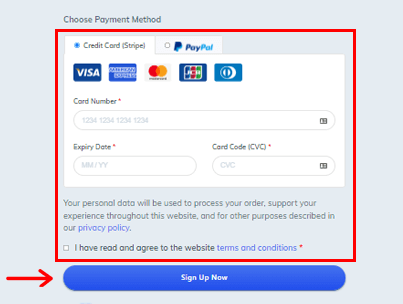
Once you’ve finished filling in the payment details, and agreed to its terms and conditions, you can click on the ‘Sign Up Now’ button.
After a while, you’ll receive an email from Tutor LMS with a link to access its dashboard. There you need to put the Username and Password that you previously created.
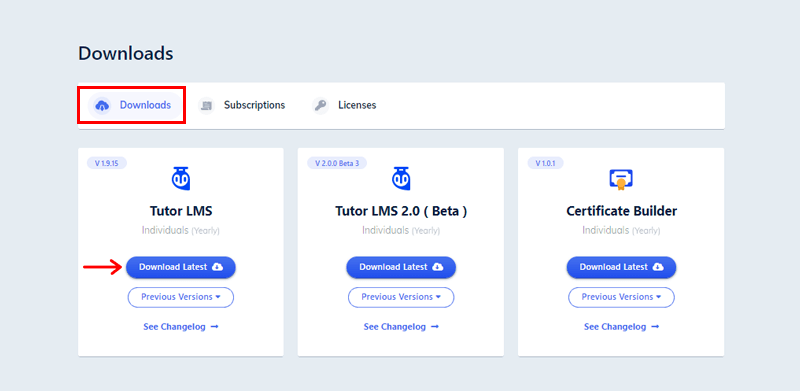
On the successful login, you’ll see the Tutor LMS plugin’s dashboard as shown below. Now, in the Download section, click on the ‘Download Latest’ option. On clicking it, you’ll have a premium Tutor LMS zip file downloaded on your computer system.
Step 2: Upload, Install, and Activate the Premium Plugin
Now, the next step is to upload the downloaded file to your WordPress dashboard in order to install the premium version of the Tutor LMS plugin.
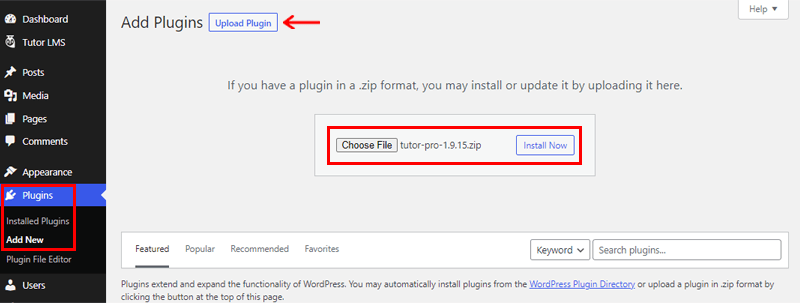
On the left navigation of your dashboard, go to the ‘Plugins’ menu and click on the ‘Add New’ option.
Then, on the top, you can see the ‘Upload Plugin’ option, click on it, followed by the ‘Choose File’ option. Now, drag or Upload the downloaded file into the box and click the ‘Install Now’ option next to it.
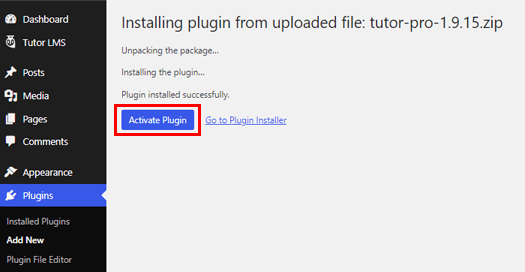
Following that, you’ll see the ‘Activate Plugin’ option, click on it.
Step 3: License Key Activation
Now, you’ll see the page as shown below. Click on the ‘Please check the license’ option.
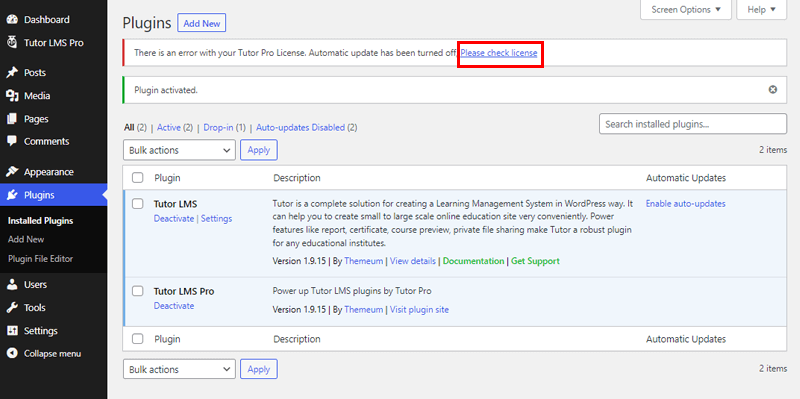
On clicking it, you’ll see a License Key box where you’ll need to put the license key.
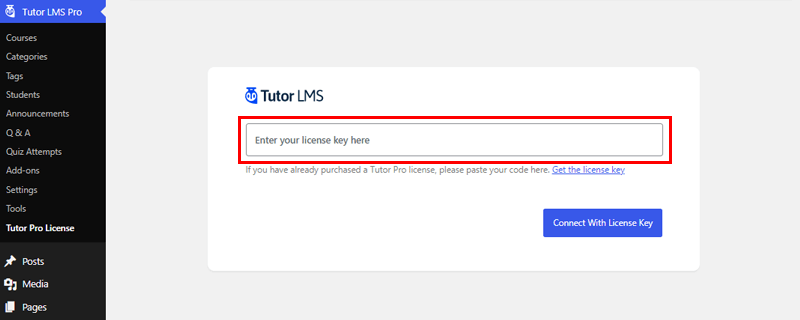
So to get the license key, you need to come back to the Tutor LMS dashboard, from where you previously downloaded the premium zip file.
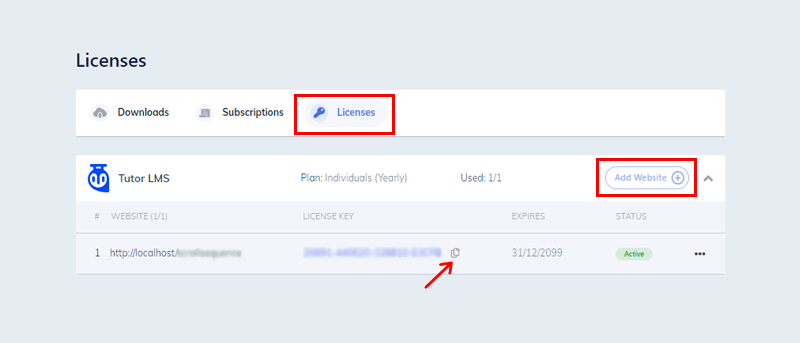
Here, you need to go to the ‘Licenses’ option in the navigation. And then click on ‘Add Website’ where you need to put in your domain name. Then, copy the license key by clicking on the icon just right to the license key as shown below.
Now, come back to your WordPress dashboard, and here paste the license key that you just copied. And, click on the ‘Connect With License Key’ option.
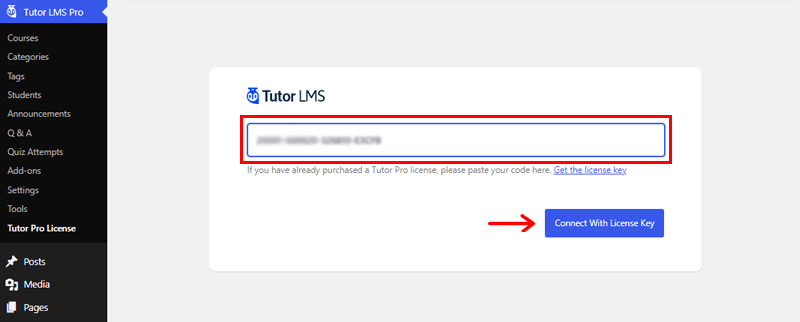
And finally, there you’ve your premium Tutor LMS installed on your WordPress site.
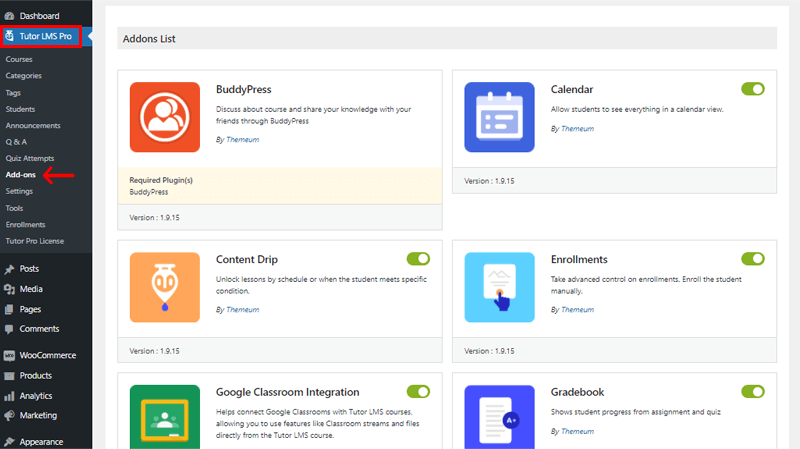
In addition, once you activate the premium version, make sure to activate all the addons from the Add ons navigation from your dashboard. And reload the site once.
With that, let’s move ahead to an important portion of this Tutor LMS review.
D) How to Add New Courses in Tutor LMS?
As of now, we just finished installing and activating the Tutor LMS plugin on our WordPress site. So, now let’s look at the main reason for installing Tutor LMS, which is to create online courses for your WordPress site.
In this portion of the Tutor LMS review, we’ll look at how to use the course builder in Tutor LMS to create courses. Also, not to mention, Tutor LMS is really a simple tool that allows you to create any type of course you want.
In addition, do note that if you’re using the free version of Tutor LMS, then you can create the course only from the backend. Meanwhile, the premium users of Tutor LMS have the freedom of creating courses from both front-end as well as backend.
So, now let’s look in detail at how to add or create new courses in Tutor LMS from both the front and backend in the coming review section.
Adding New Courses in Tutor LMS from Backend
The backend course builder is a simple course creation system that’s available to all users, free and paid alike. It allows you to build the complete course from the backend page, which saves you a lot of time.
So to use the backend course builder, firstly login to your WordPress dashboard.
Then, on the left navigation, go to ‘Tutor LMS’ and click on the ‘Courses’ option. Following that click on the ‘Add New’ button right on the top to begin creating a new course.
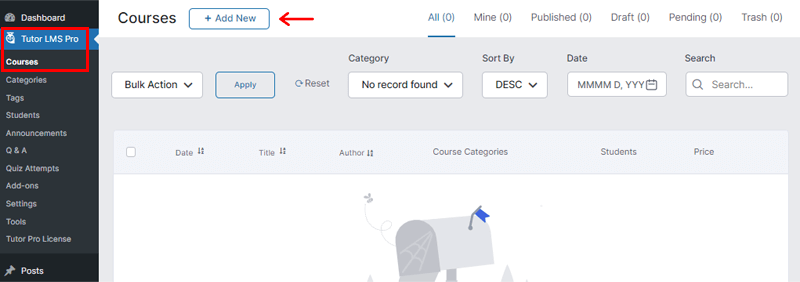
Now, you’ll be directed to a course-building page. So, let’s look at each setting detail and create a course accordingly.
Step 1: Add a Suitable Course Title
The first step is to choose a good course title that best describes the course that you’re going to create. Now, for the illustration in the ‘Add Title’ section, let’s put ‘Beginner’s Course’.
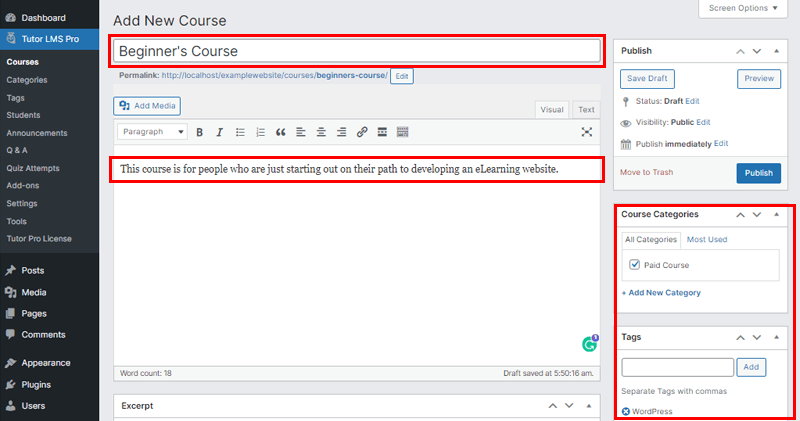
And just below that in the description box, you need to write the description for the course. So that your students get an overview idea of the outcome of the course. Here, we’ve written; ‘This course is for people who are just starting out on their path to developing an eLearning website.’
On the right, you can also add ‘Course Categories’ and ‘Tags’. For eg. in categories, we’ve added ‘Paid Course’ and ‘WordPress’ in the tag section.
Step 2: Configure Course Settings
On the same page, if you scroll a little down then you’ll see the ‘Course Settings’ option. So the second step is to configure the course settings.
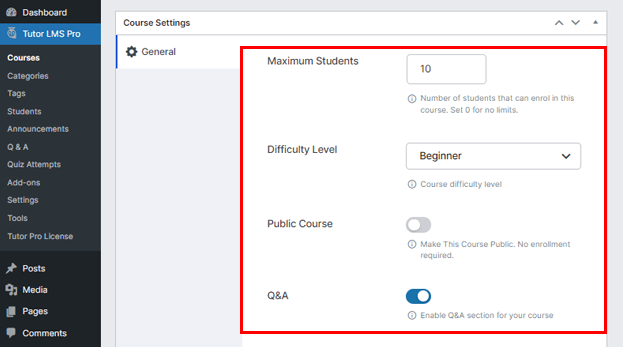
Here, you can make the following changes:
- Maximum students: The maximum number of students who can enroll at the same time is set here. If you’re in charge of an academic institution, this will come in handy. For e.g., If you’re taking only 10 batches of students, then let’s put 10 here. You can also put 0 if you don’t want to set any student limit.
- Difficulty Level: As the title suggests, you should limit the difficulty level so that students can get a sense of how advanced the course is before purchasing it. Here, we’ve set it to ‘Beginner’.
- Make This Course Public: You can enable this option to make this course public. There is no need to register. But, since we’re making a paid course, you can disable it.
- Q&A: You can enable the Q&A section for your course here.
Step 3: Build Course Using Course Builder
Again, if you scroll a little down, you’ll find the ‘Course Builder’ Section. This is one of the main foundations of the Tutor LMS plugin.
Basically, a course in the Tutor LMS has topics and topics containing lessons and quizzes.
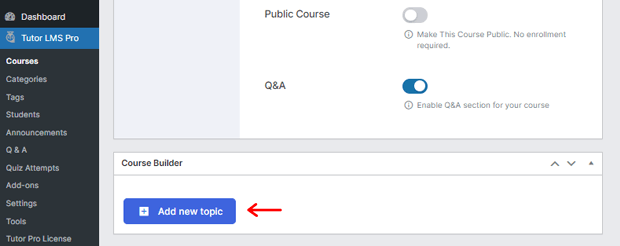
Now, in the ‘Course Builder’ section, you’ll see the ‘Add new topic’ button. Click on it.
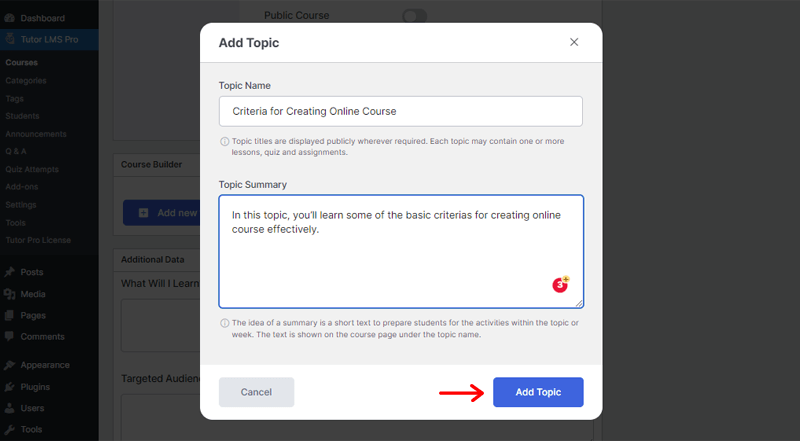
On clicking it, you’ll see the page as shown above. There you need to add Topic Name and Topic Summary.
For e.g. let’s put ‘Criteria for Creating Online Course’ as Topic Name. And in Topic Summary, we’ve put, ‘In this topic, you’ll learn some of the basic criteria for creating online courses effectively.’
Then, click on the ‘Add Topic’ button just below it. After that, you’ll see the page as shown below.
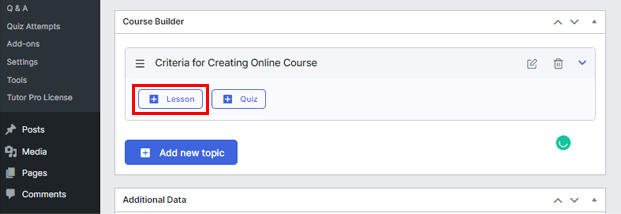
Here, you can see two options i.e. Lesson and Quiz.
1. Lesson
You can click on the ‘Lesson’ options to add lessons for your course.
Here, you’ll find the following options:
- Lesson Name: This field is where you need to put the title of your Lesson. For e.g. let’s put ‘Understanding Basics’.
- Lesson Content: Here, you can write the description of the lesson.
- Feature Image: In this field, you can add the related image that best suits your lesson to break the monotony.
- Video Source: Adding a source for the video lesson is possible with a video source. You can add external or internal sources. Also, you can set the video playback time to the needed area once you’ve added the video.
- Upload Attachments: You can also upload several documents as additional resources to your lessons.
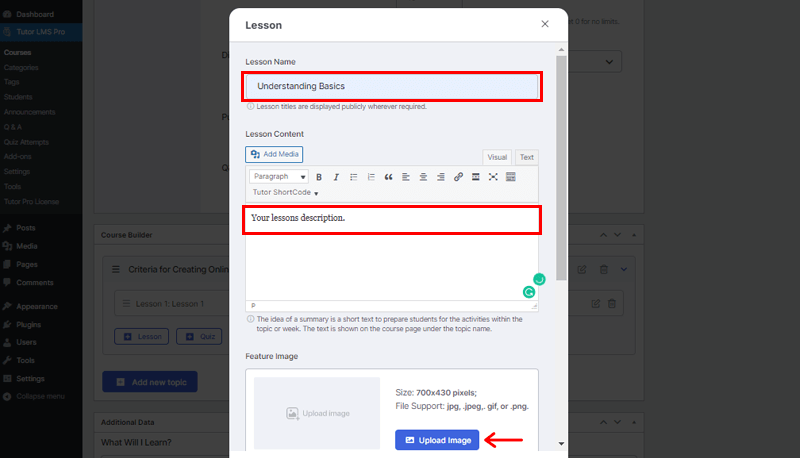
Once you fill in these details, you can click on the ‘Update Lessons’ just below it.
Similarly, you can add other lessons by following the same process as above.
2. Quiz
Likewise, you can click on the ‘Quiz’ option to add quizzes to make your course more interesting and engaging.
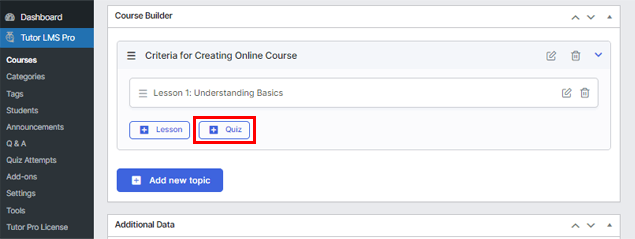
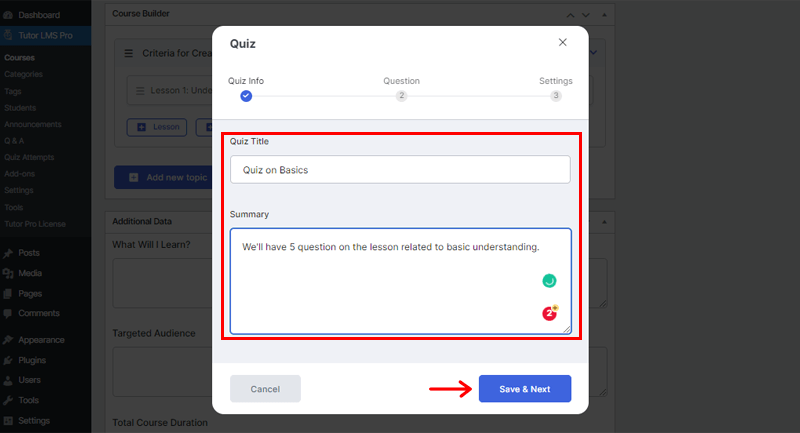
On clicking the ‘Quiz’ option, you’ll be directed toward a page. Here you’ll need to let students know what this quiz is about, give it a name and a brief description. Once done click on the ‘Save & Next’ option.
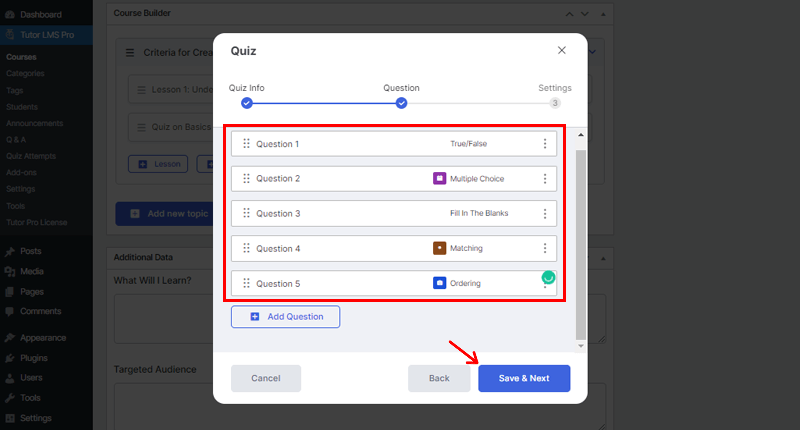
Following that, you can add various quiz questions in different forms. Such as true/false, multiple-choice, matching, etc to make it more interesting. After that, you need to click on the ‘Save & Next’ option.
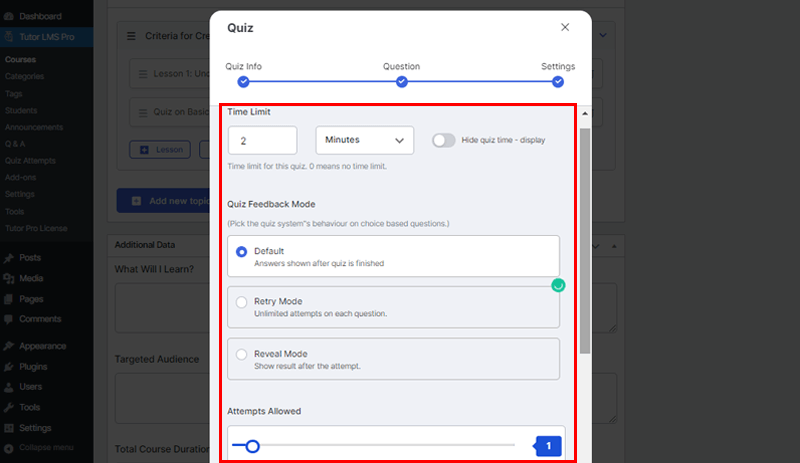
Lastly, you can set the time limit of the quiz, feedback mode, number of attempts allowed, passing grades, and much more.
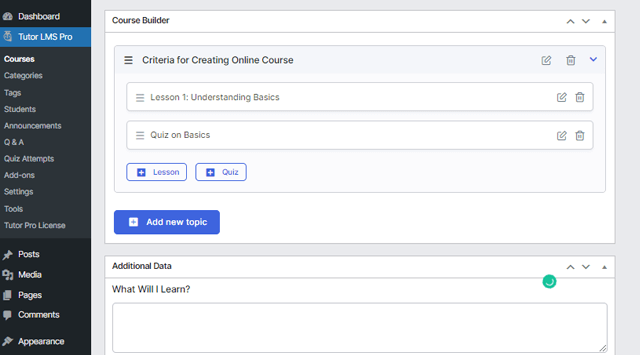
Once done click on the Save & Next option and you’ll be back to the previous page as shown below.
Step 4: Fill in Additional Data
Again, if you scroll a little down, then you’ll see the ‘Additional Data’ section.
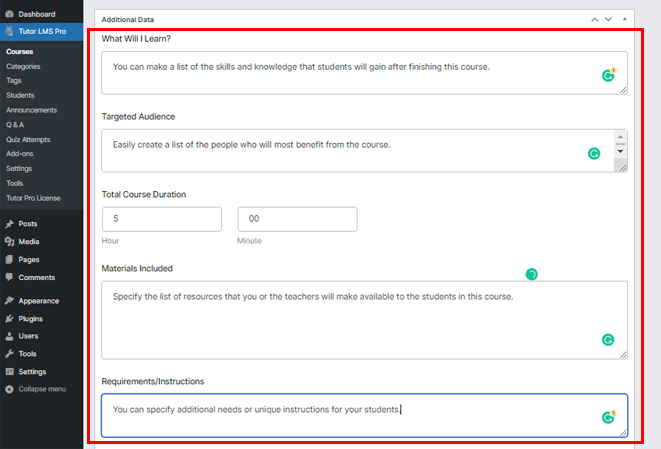
You’ll need to fill in the following additional data:
- What will I learn?: You can make a list of the skills and knowledge that students will gain after finishing this course.
- Targeted Audience: Easily create a list of the people who will most benefit from the course.
- Total Course Duration: Easily indicate the course’s overall duration, or how long it will take a student to complete the course.
- Materials Included: Specify the list of resources that you or the teachers will make available to the students in this course.
- Requirements/Instructions: You can specify additional needs or unique instructions for your students.
By filling in this information, it serves as both an educational resource for potential students and a marketing tool for your course.
Step 5: Add Video
Lastly, you can also add an introductory video on the course overview page. This way, potential students can obtain an idea of the course from this, just like they can from the course description. You can choose from a variety of sources, including self-hosted videos (mp4), YouTube, Vimeo, and Embedded links.

Also, if you don’t want to, you can leave it as it is.
Once you’ve done all of the above, you can click on the ‘Publish’ button on the top right corner of the page.
Adding New Course in Tutor LMS from Frontend
As mentioned earlier, the Tutor LMS pro version provides you with the Frontend Course Builder. As a result, this will help you as well as instructors to create courses without having to go through the WordPress backend.
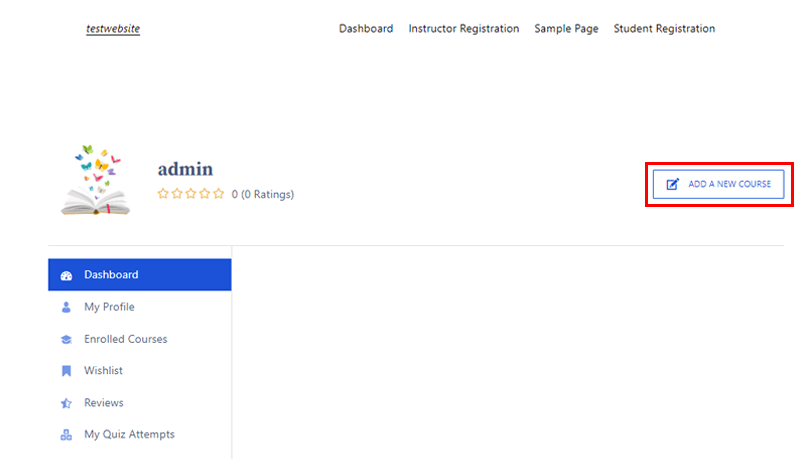
You can easily use the course builder after activating it by going to your frontend dashboard. Or you can also type in (yourwebsiteURL.com/dashboard).
It might look like something as shown in the image below. Then, click on the ‘Add a New Course’ button on the right.
Now, you’ll be directed to a course-building page. So, let’s look at each setting detail and create a course accordingly.
Step 1: Add Course Info
The initial step is to add all the required course information details. As a result, this will help students to get reliable information on the kind of courses you provide.
So, you need to fill in the following details:
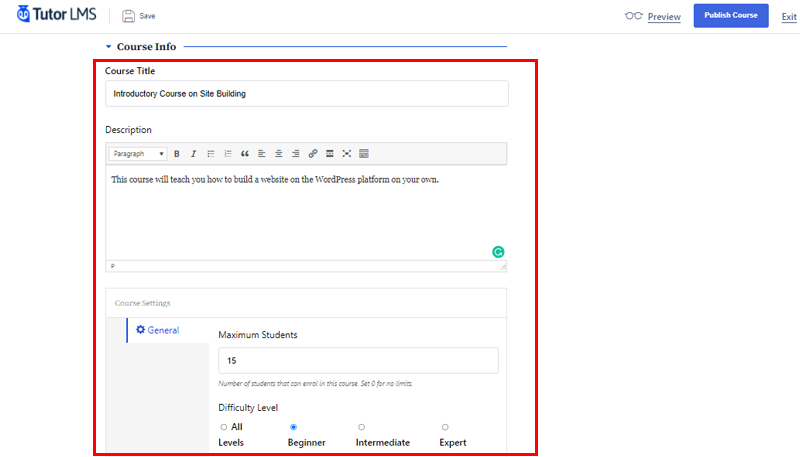
Course Title: Firstly, you should come up with a decent Course Title that accurately represents the course you’ll be creating. Let’s put, ‘Introductory Course on Site Building’ for illustration.
Course Description: Secondly, you need to give a brief overview of the course in the description section. This will help your students to have a general concept of the course’s outcome. For instance, we write, ‘This course will teach you how to build a website on the WordPress platform on your own.’
Course Settings: Here, these settings allow you to adjust a few more aspects of the course. Such as the Maximum Number of Students that you’re going to enroll for the particular course. Here, we’ve put 15. If you don’t want to set any number, then you can also leave it to 0.
In addition, you can also set the course level whether it’s for beginner, intermediate, expert, or all levels. As we’re creating the introductory course, here we’ve set the course level to ‘Beginners’.
Similarly, if you’ll scroll down below, you can choose the ‘Category’ for the course. Here, we’ve chosen ‘Premium Course’ as a category. And just below that, we’ve chosen ‘WordPress’ as a tag for this course.

Also, if you haven’t added any categories, then you can easily do so by going to the backend of your WordPress dashboard. Then, go to Tutor LMS Pro and then to the Categories section. Similarly, you can also add Tags by going to Tutor LMS Pro in the dashboard and then heading to the Tag section.
Course Thumbnail: Likewise, you can also add a thumbnail image to your course to give it a visual appeal and an entrancing image. This will appear on all required pages, such as course listings.
Step 2: Insert an Intro Video
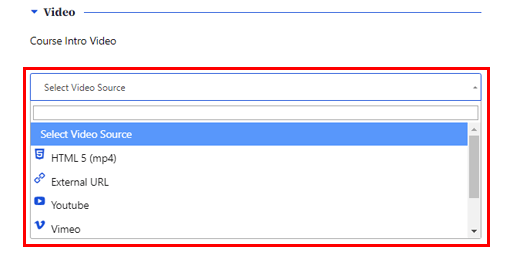
Following that, you can include an introduction video on the course overview page. This way, you’ll help the potential students to get a more detailed idea of the course from this, which is much similar to the course description.
In addition, you’ve got the option of choosing the video from a variety of sources such as YouTube, Vimeo, external URL, and so on.
Step 3: Build Course Using Course Builder
On scrolling down a little further, you’ll reach the ‘Course Builder’ section. As mentioned before, it’s one of the key pillars to building the course of this Tutor LMS plugin.
In the Tutor LMS, a course is divided into topics, each of which has lessons and quizzes.
You can see the ‘Add New Topic’ in the Course Builder area. Simply click on it.

You’ll be taken to the page shown below after clicking it. There are two fields to fill in: Topic Name and Topic Summary.
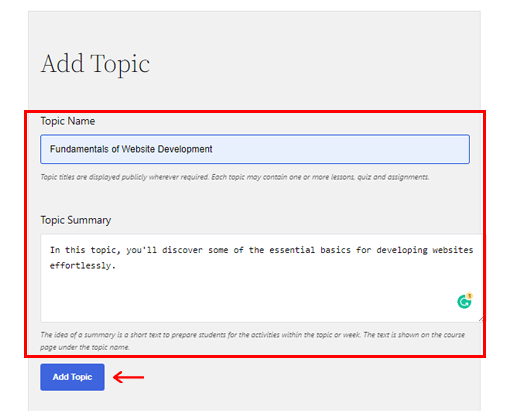
Let’s say the Topic Name is ‘Fundamentals of Website Development.’ And in Topic Summary, we’ve written, ‘In this topic, you’ll discover some of the essential basics for developing websites effortlessly.’
Then, right below it, click the ‘Add Topic’ button. Following that, you’ll be taken to the page displayed below. There are two options available here: Lesson and Quiz.
1. Lesson
You can click on the ‘Lessons’ options to add the lessons to your course.

You’ll find the following choices here:
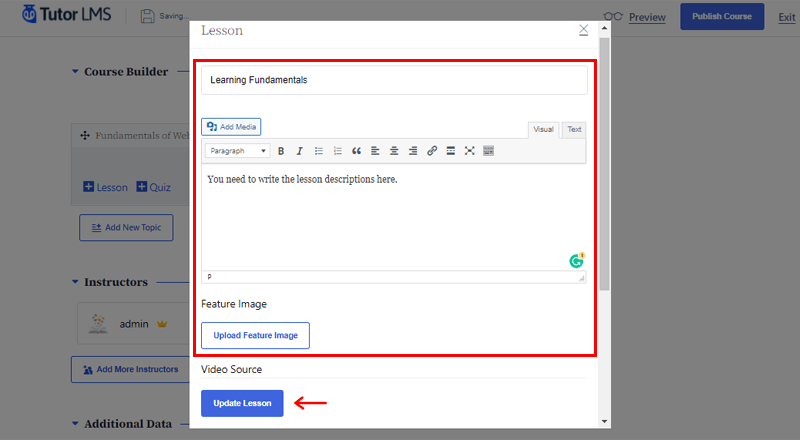
- Lesson Name: Enter the title of your lesson in this field. Let’s use ‘Learning Fundamentals’ as an example.
- Lesson Content: This is where you can write the lesson’s description.
- Feature Image: You can embed the related image that best complements your lesson in this section.
- Video Source: Using a video source, you can add a source for the video lesson. You’ve got the option of using external or internal sources. After you’ve added the video, you can also set the video playback time to the required duration.
- Upload Attachments: As an added resource to your lectures, you can also attach or upload a number of documents.
After you’ve filled in these details, right below it, click on the ‘Update Lesson’.
You can add other lessons in the same way by repeating the process described above.
2. Quiz
Similarly, you can add quizzes to your course by selecting the Quiz option.
You’ll be directed to a webpage after clicking the ‘Quiz’ option. Here, you need to give the quiz a name and a brief description here to let students know what it’s about. When you’re done, click the ‘Save & Next’ option.
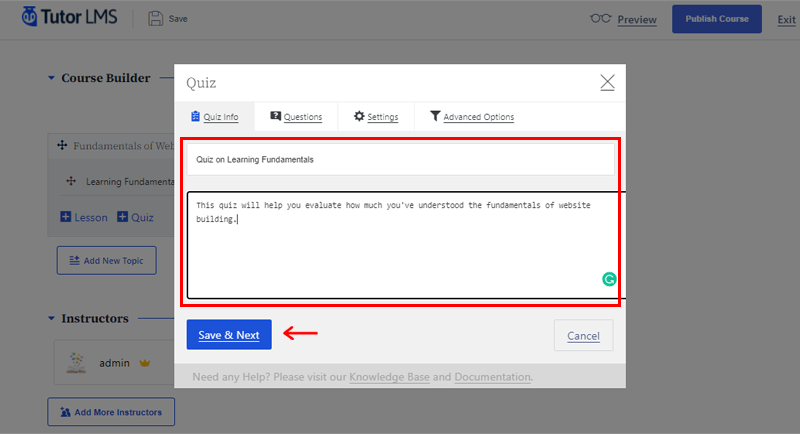
After that, you can add different kinds of quiz questions. To make it more engaging, use questions like true/false, multiple-choice, matching, and so on. Once done, click on the ‘Next’ option.
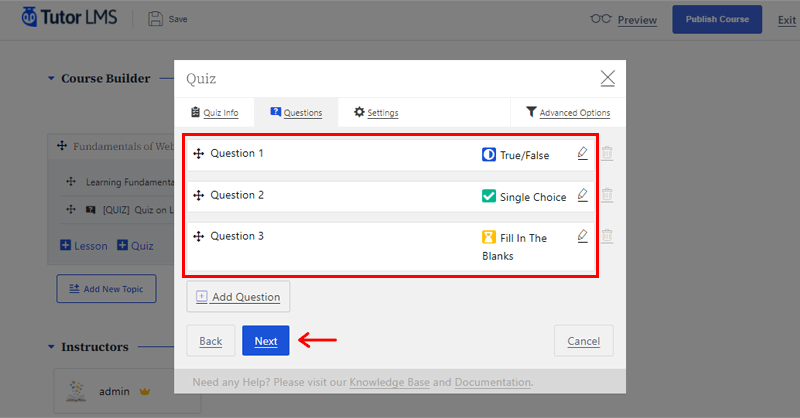
Eventually, you can customize the quiz’s time limit, feedback mode, number of attempts, passing grades, and more.
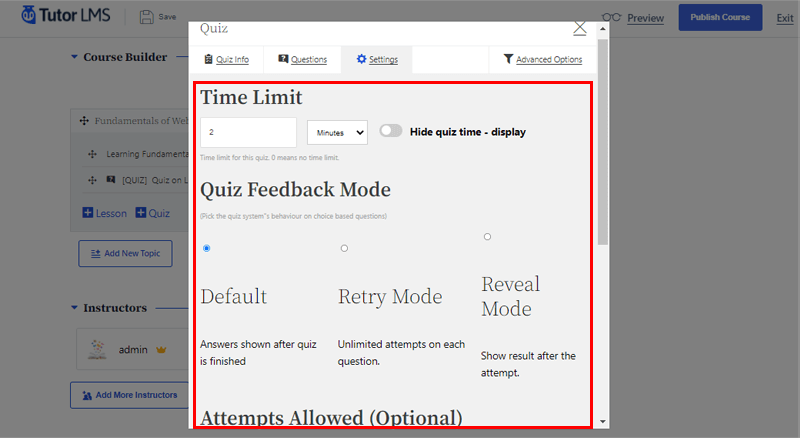
Once done, click the ‘Save button’ to return to the previous page, as shown below.
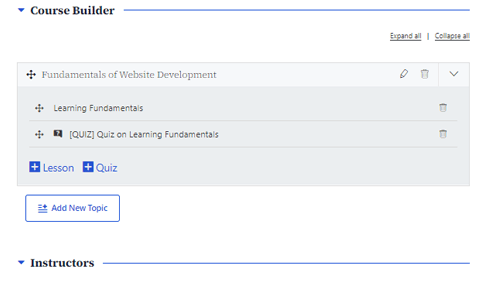
Step 4: Include Instructors
You can look up the names of the instructors in this section, as well as add more to the course. You can search for and add more instructors to the same course if the Multi-Instructor addon (Pro Feature) is enabled. This course can then be edited, moderated, and its own content can be added.

Step 5: Fill in Additional Data
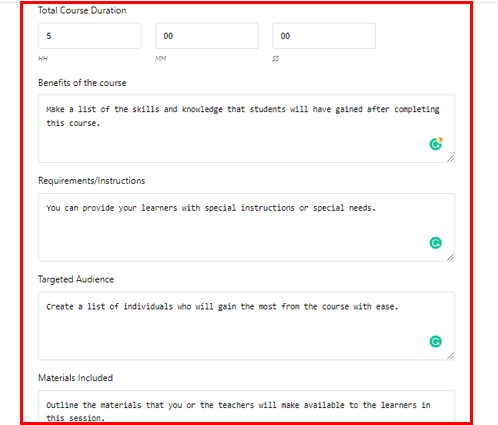
You’ll notice the ‘Additional Data’ section if you scroll down a little more.
Here, you’ll need to enter the following information:
- Total Course Duration: Indicate the total length of the course, or how long it will take a student to complete it.
- Benefits of the Course: Make a list of the skills and knowledge that students will have gained after completing this course.
- Requirements/Instructions: You can provide your learners with special instructions or special needs.
- Targeted Audience: Create a list of individuals who will gain the most from the course with ease.
- Materials Included: Outline the materials that you or the teachers will make available to the learners in this session.
Step 6: Configure Tutor Settings
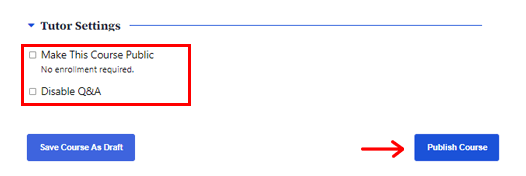
Lastly, you can find the ‘Tutor Settings’. This section includes the following things:
- Make this course public: If you’re making a free course, then you can use this option. This way, anyone who visits the website can access the course without having to enroll. However, if you’re making a paid course, then you can leave it as it is.
- Disable Q&A: This will turn off the course’s built-in question and answer forum.
Once you’ve done all of the above, you can click on the ‘Publish Course’ button at the bottom of the page.
Having said that, now let’s move on to the next section of this Tutor LMS review.
E) Who can use Tutor LMS?
As of now, you know how to add a new course using this versatile Tutor LMS plugin. So, now let’s check in to who can use Tutor LMS in this portion of the review.
1. Private Instructor
If you’re an individual wanting to create an eLearning website for a long time, then this plugin is definitely for you. That means the Tutor LMS plugin is built for private instructors.
As you might have realized above, creating the course with Tutor LMS is pretty easy and cool. It’s quite easy to use and a beginner-friendly plugin to create an online learning platform on your own.
As a result, you’ll be able to impart your knowledge and skills to a wider audience of learners. Moreover, you can earn a good amount of money doing so.
2. Marketplace
TutorLMS is not only limited to private instructors. You can establish a marketplace-like environment in which numerous teachers can publish courses. This plugin makes it possible to create educational marketplace such as Udemy, Coursera, and so on.
To enable this function, all you really need to do is from your dashboard, go to the ‘Settings’ section of the Tutor LMS plugin. Then, head towards Instructors and enable the ‘Course Marketplace’ option.
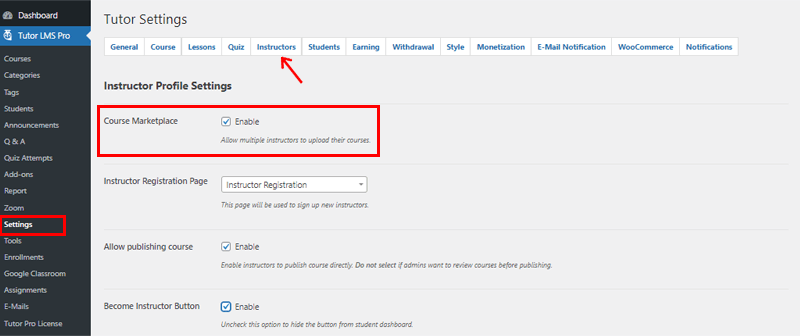
With this plugin, you can easily add multiple instructors to a particular course. This helps you create an even more diversified robust educational course. You can bring up skilled and insightful people together and collectively create an amazing educational marketplace.
3. Institutions
Similarly, are you one of the institutions or thinking of creating one, and want to create an education website for it? Then, the Tutor LMS plugin is suitable for you as well.
As with the Tutor LMS plugin, you can easily create various certificates to provide your learners with the successful completion of the course. As a result, you can create credible online courses for the students. This is especially beneficial if you are an institution, and it even promotes your institution.
F) How do students get enrolled or access the course?
So, in this section of the Tutor LMS review, let’s look into how students get enrolled or access your courses.
Firstly, once they visit your website, students need to register their names so as to get access to the dashboard and enroll in the courses.
To do so, firstly students should go to the ‘Student Registration’ section from the navigation menu on the website.
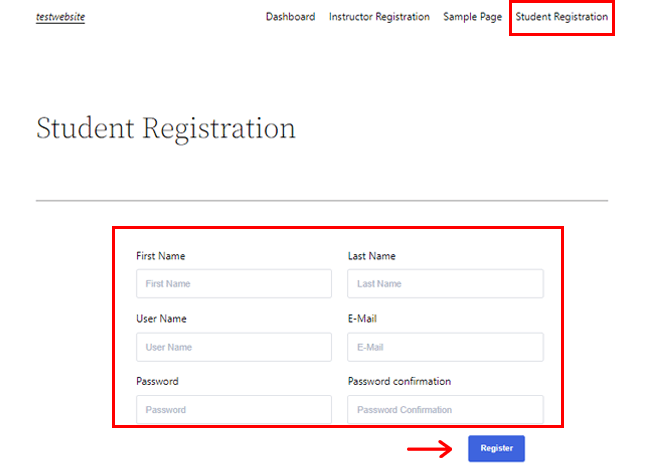
Following that, students will see the page as shown above. There, they need to register their name by filling out their first name, last name, and email. They’ll also need to create a Username and Password and click on the ‘Register’ option.
Once registered, now they’ll be able to access the Courses from your website.
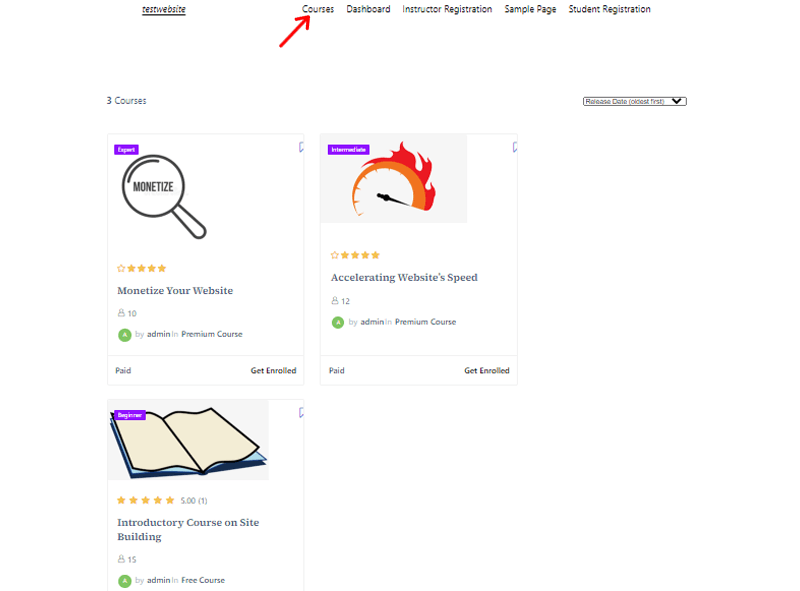
On clicking the ‘Courses’ from the navigation of your website, students will see the page as shown above.
So, for illustration, let’s get enrolled in the free Beginner course ‘Introductory Course on Site Building’. To get enrolled, click on the ‘Get Enrolled’ option just below it.
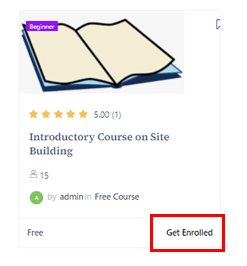
Following that, students will see the page as shown below. On the right, click on the ‘Enroll Now’ option to get enrolled in the course.
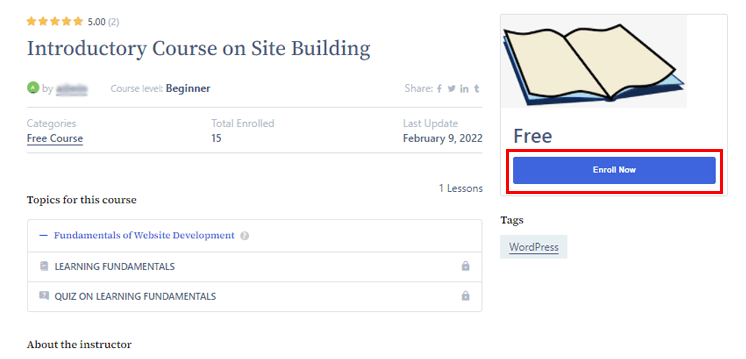
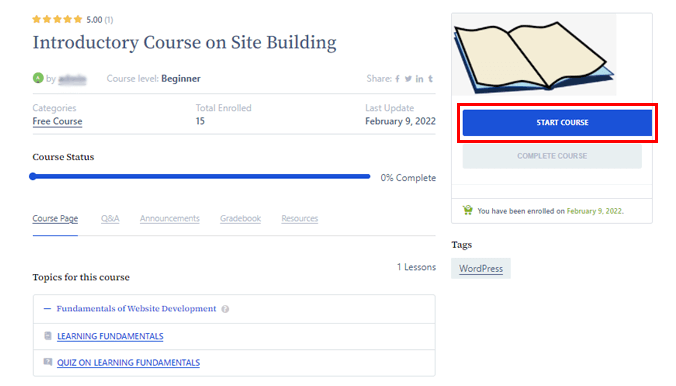
Once students click on the ‘Start Course’ option, then they can begin the course that you’ve created.
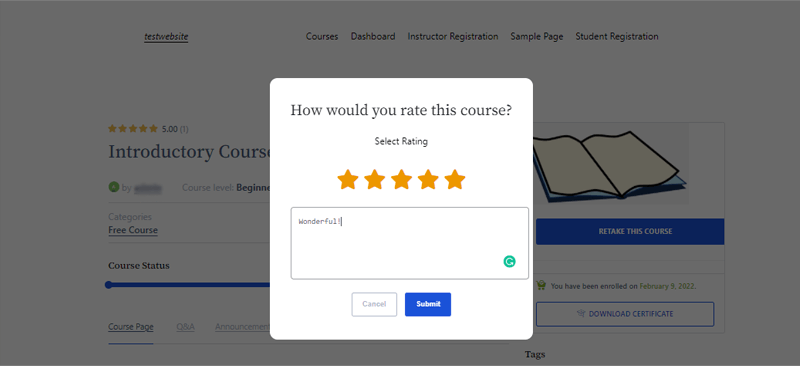
After students completed their course then they come back to their dashboard where they can rate the course as shown below.
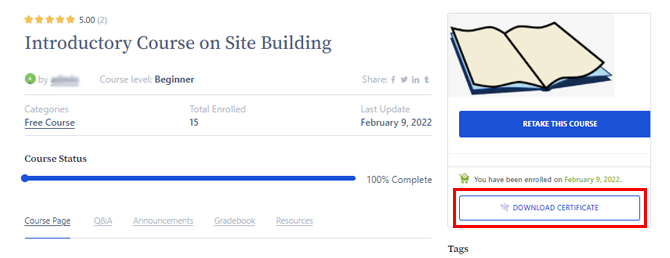
Now after they successfully complete the course, they can click on the ‘Download Certificate’ option at the right as shown in the below screenshot.
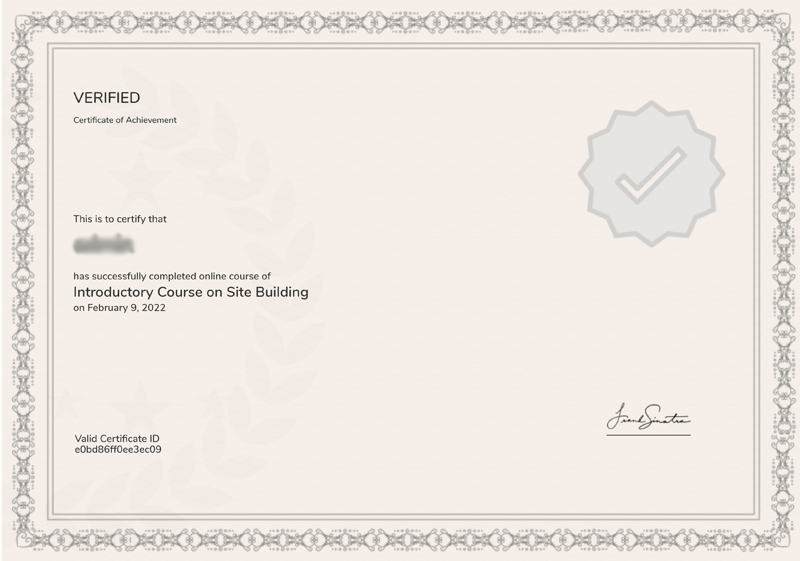
Finally, they would receive the certificate of successful completion of the course as shown below.
G) Free and Premium Addons
Tutor LMS includes a number of free and paid add-ons that you can use to enhance the value of your content. Similarly, you can enable or disable those add-ons whenever you choose, depending on your needs.
Let’s have a look at some of the Tutor LMS add-ons in this section of the Tutor LMS review:
| Addons | Description |
| WooCommerce Subscriptions | With a subscription-based pricing strategy, you can easily monetize your eLearning site. |
| BuddyPress | Using BuddyPress integration, you can create a community around your WordPress LMS website. |
| Restricts Content Pro | It allows you to sell site-wide memberships and restrict content to members only. |
| Google Classroom | Within the Tutor LMS course page, you can share classroom and other stream posts. |
| Paid Memberships Pro | Manage content and create membership-based monetization plans with ease. |
| Zoom | Conduct online live classes that are directly accessible from the lesson page. |
| Multi Instructor | Increase the site’s capacity by allowing multiple instructors to teach in the same course. |
| Quiz Export/Import | You can save time by effortlessly exporting and importing quiz data and improving your efficiency. |
| Report | On your eLearning site, generate detailed statistics on courses, sales, students, and more. |
| Enrollments | You can have extensive and direct control over student enrolment on your website. |
| Certificate | Create verified certificates for students to get after they have completed their course. |
| Gradebook | Show how far students have progressed on their tasks and quizzes. |
| Assignments | Make assignments to check students’ knowledge and perceptions. |
| Prerequisites | Indicate which courses a student must take before enrolling in a specific course. |
| Send personalized and automatic emails in response to Tutor LMS-generated events. | |
| Course Preview | Set up any lesson as a trial run for potential students before they pay. |
| Course Attachments | You can add an infinite number of attachments or private files to any of your courses. |
| Content Drip | Schedule the publication of lectures, tests, and tasks at specific times. |
H) Integrations with Different Platforms.
Now, in this area of the review, we’ll look at the various platforms with which Tutor LMS is integrated, which contributes to the plugin’s robustness.
1. Zoom Integration
As you might have known these days, Zoom is one of the most used platforms for online classes, meetings, and many other such events. One of the significant integrations of the Tutor LMS plugin is with Zoom.
As a result, instructors and administrators can use Zoom to host live courses, meetings, etc. This way, you’ll create a more engaging eLearning journey with the Tutor LMS interface.
To integrate Zoom, you’ll need to have the pro version of Tutor LMS. If you’ve got a pro version, then all you need to do is go to your WordPress dashboard. Then, enable Zoom from the Addons section. After enabled, you’ll see the sub-navigation Zoom in the Tutor LMS on your dashboard.
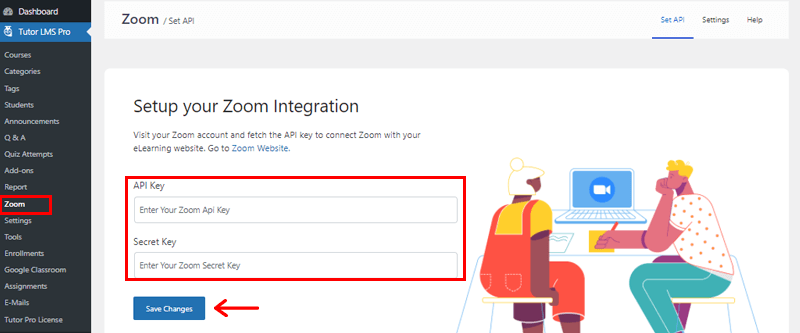
Following that, you’ll have to enter your API Key from the Zoom platform to set up Zoom on your website. Then, click on the ‘Save Changes’ option. You can read this detailed article by Tutor LMS on how to generate an API Key. Pretty easy right?
2. Google Classroom Integration
Similarly, if you’re willing to conduct your courses via Google Classroom, then Tutor LMS has good news. It’s also integrated with Google Classroom. This way, you can easily conduct your classes or courses via Google Classroom medium.
Moreover, you can also import assignments, quizzes, and shared resources notifications. And the best part is that Google Classroom students can be synchronized with Tutor LMS. Further, it even has a feature that sends Google Classroom invitations to Tutor LMS students.
Similar to Zoom, once you have the premium version of the Tutor LMS plugin, you can enable it from the Addons section on your dashboard.
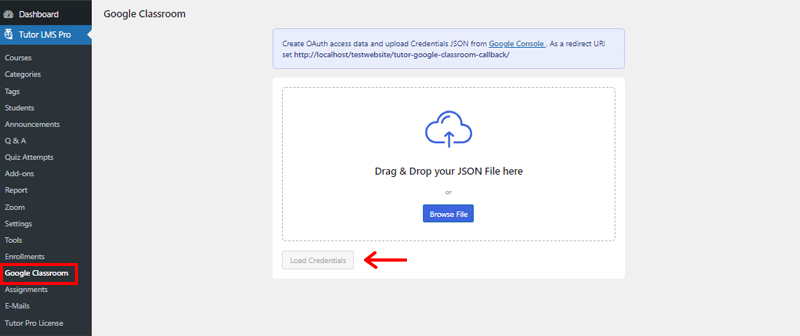
Then, go to Tutor LMS > Google Classroom and then upload your (JavaScript Object Notation) JSON file from the Google Classroom site. This will use the API credentials to authenticate your website. You can read this detailed article by Tutor LMS on how to configure app credentials.
Then, you’ll need to click the ‘Load Credentials’. Following that, the system will walk you through all the permissions procedures, which you must allow.
3. WooCommerce Integration
Likewise, Tutor LMS is integrated with WooCommerce, which is one of the versatile and open-source WordPress eCommerce solutions. As a result, you can easily sell your courses to learners.
So, to utilize WooCommerce as your eCommerce platform, you should first enable it from the WordPress dashboard.
To do so, go to ‘Tutor LMS’ in the left navigation and head into the ‘Settings’ and ‘Monetization’ tab. Then, select ‘WooCommerce’ and click on the ‘Save Changes’.
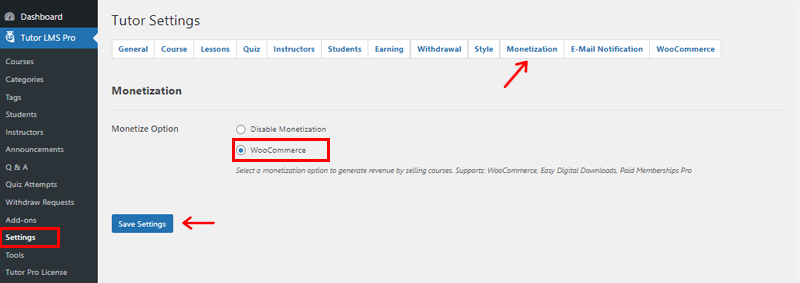
Also, do note that if you don’t see WooCommerce on the screen, it’s because the plugin isn’t installed on your website. Once you install it, it’ll automatically show there. This way, you can easily sell your courses with WooCommerce.
Having said that, now let’s move into the next section of the Tutor LMS review.
I) Tutor LMS Compatible Themes
Tutor LMS plugin is a comprehensive online learning platform solution. It should come as no surprise that Tutor LMS is compatible with practically all the best WordPress-based themes.
However, with the following themes, Tutor LMS gives the finest user experience and content display. So, let’s see them in this section of the Tutor LMS review.
1. Skillate

Skillate is a feature-rich WordPress eLearning theme that works with the Tutor LMS plugin and is powered by Gutenberg. This theme is built particularly by keeping students in mind. You can create a fully functional eLearning marketplace using this theme.
The best part about this theme is that it offers the finest navigation system for quickly finding courses. This makes the learning experience simple as well. Moreover, it has a mobile-specific design that gives it an app-like feel. As a result, students will be more engaged and have a more positive learning experience.
Besides, it’s a modern blog design theme that’s multi-instructor-ready and even provides eye-catchy instructor badges. This way, you can attract the attention of learners who are browsing your learning hub.
2. Edumax

Edumax is another WordPress eLearning theme designed specifically for educators, coaching centers, and academic institutions. It’s a totally Tutor LMS compatible theme for creating and selling online courses.
Moreover, this WordPress LMS theme comes with 2 different home versions. And each of them has a significantly diverse content presentation for different objectives. Thus, you can pick the one that best meets your website’s demand.
It also allows you to display multiple course categories along with their associated course numbers. In order to attract learners, there is also a section on the homepage that displays featured courses.
Not to mention, Edumax’s highly pleasant interface makes learning fun and exciting. It’s more than just a standard WordPress theme for online courses, with a lot to offer both students and teachers.
3. Astra

Astra is one of the prominent WordPress themes with over one million active installs and a user rating of 4.9/5. This very adaptable WordPress theme also qualifies as one of the most compatible Tutor LMS themes.
Moreover, it’s well-integrated with Schema.org code and Native AMP to keep your website search engine-friendly. Using the Astra theme with the Tutor LMS plugin can give you a perfect combination to enhance your educational website’s functionality and make it more vibrant.
Despite its small weight, Astra does not lack any essential features. This is what distinguishes Astra from the rest and you can use it for creating your eLearning website.
If you’re interested in learning more about LMS themes, then check out our article on the best LMS WordPress themes.
J) Tutor LMS Plugin Pricing Plans
Now, let’s move forward to the Tutor LMS pricing plans in this review. As mentioned before, Tutor LMS is a freemium plugin. You can download the free version of this plugin directly from the WordPress.org directory.
However, the pro version of the Tutor LMS plugin is more robust and powerful. You can take full advantage of this plugin using the premium version of Tutor LMS. Moreover, the pricing plans for the premium Tutor LMS are also quite reasonable.
There are three different sub-plans available in both of its Annual and Lifetime pricing schemes. The following is a quick explanation of each of them:
Under the Annual Pricing Scheme

It has the following 3 plans under the annual pricing scheme:
1. Individuals
This plan costs you $149/year for 1 site license. It provides the following features:
- Updates for 1 year.
- Priority Email Support.
- 1 Free Installation Service.
- Includes all Add-ons.
- 1 Year Product Support
- Third-party integrations
2. Freelancers
You can get this plan at $199/year for 5 site licenses. It includes the following features:
- Updates for 1 year.
- Priority Email Support.
- 2 Free Installation Service.
- Includes all Add-ons.
- 1 Year Product Support
- Third-party integrations
3. Agencies
At $299/year, you can purchase this plan for unlimited site licenses. It offers the following features:
- Updates for 1 year.
- Priority Email Support.
- 5 Free Installation Service.
- Includes all Add-ons.
- Live chat Support.
- 1 Year Product Support.
- Third-party integrations.
Under Lifetime Pricing Scheme
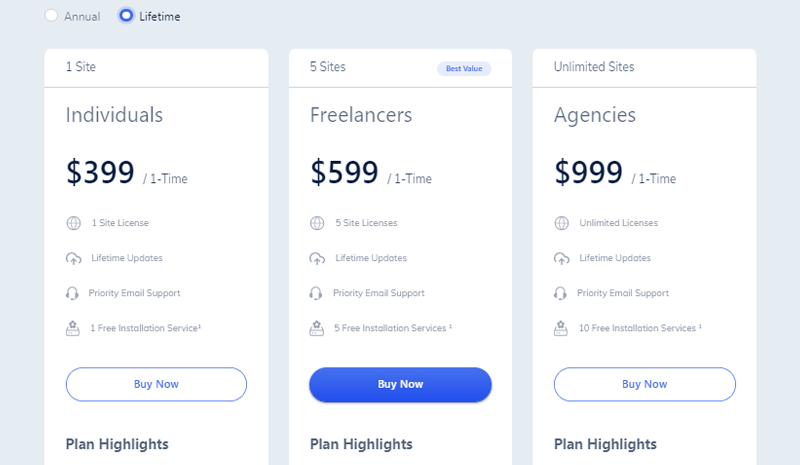
It has also the following 3 plans under the lifetime pricing scheme:
1. Individuals
This plan costs you a $499 one-time payment for 1 site license. It provides the following features:
- Updates for a lifetime.
- Priority Email Support.
- 1 Free Installation Service.
- Includes all Add-ons.
- Lifetime Product Support.
- Third-party integrations.
- 1 Site License.
2. Business
You can get this plan at an $899 one-time payment for 5 site licenses. It includes the following features:
- Updates for a lifetime.
- Priority Email Support.
- 5 Free Installation Service.
- Includes all Add-ons.
- Lifetime Product Support.
- Third-party integrations.
- 10 Site License.
3. Agencies
At an $1899 one-time payment, you can purchase this plan for unlimited site licenses. It offers the following features:
- Updates for a lifetime.
- Priority Email Support.
- 10 Free Installation Service.
- Includes all Add-ons.
- Lifetime Product Support.
- Third-party integrations.
- 50 Site License.
With that, let’s move forward to another section of this Tutor LMS review.
K) Customer Support in Tutor LMS
When you’re using any kind of plugin, it’s very crucial to check the plugin’s customer support. As we all know how important customer service is, whether you’re a pro or a newbie. So, let’s see the customer support of Tutor LMS in this section of the review.
Tutor LMS is a user-friendly and simple-to-use LMS plugin for beginners. However, you may find yourself in a circumstance where you require assistance. As a result, the Tutor LMS plugin provides excellent customer assistance to assist you with any questions or confusion.
First and foremost, if you’re using the free version of Tutor LMS, then you can ask your questions on WordPress.org’s support forum. They will respond as soon as possible to your questions.
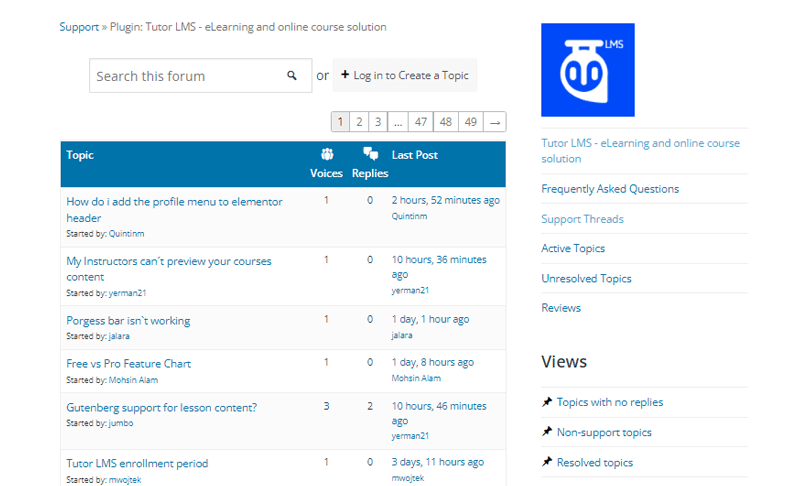
Then, if you go to their official Tutor LMS Documentation Guide in its Support section, you’ll find full documentation, step-by-step instructions, and other information regarding the plugin.
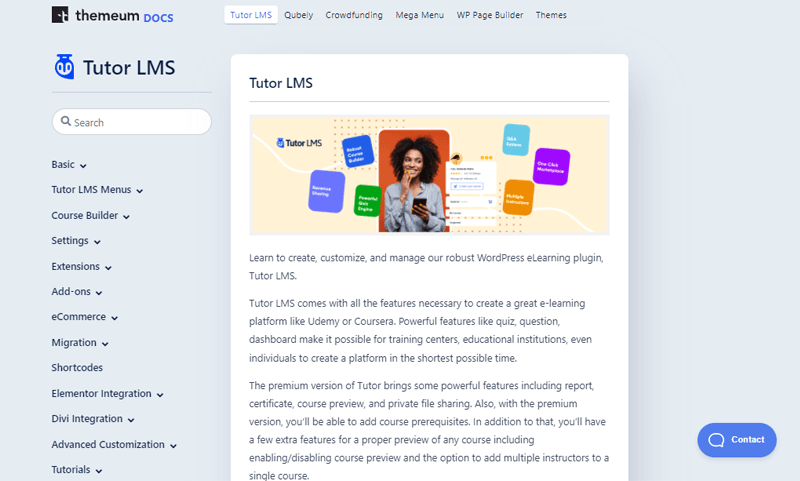
Following that, you can also discover answers to frequently asked questions in the FAQs area. In addition, you can also read its latest articles to get more insights and updates on the plugin.
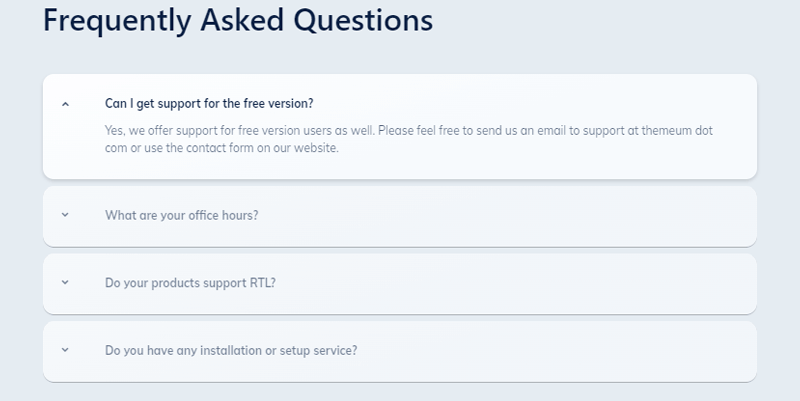
You can also send an email to support@themeum.com if you have a question about your order or need assistance setting up the plugin.
L) Pros and Cons of Tutor LMS
As we know every plugin has its own pros and cons. Now, we’ll go over the pros and cons of the Tutor LMS plugin in this section of the review.
Pros of Tutor LMS
The pros of the Tutor LMS plugin are as follows:
- Beginner-friendly User Interface that is easy to use to create a learning hub.
- Includes both frontend and backend course builders that you can use at your convenience.
- You can make entertaining quizzes as well as interactive tutorials.
- Offer certificates that help you create more credible online courses.
- You can have multiple instructors for different courses as well as the same course.
- Easily monetize your course through WooCommerce and many other platforms.
- Integration with various page builders such as Elementor and Divi.
- Comes with various add-ons to create a fully functional website.
- Provides you with insightful reports to know the statistics of your eLearning website.
Cons of Tutor LMS
The cons of the Tutor LMS plugin are as follows:
- It has limited integrations in comparison to other LMS plugins.
- The free version of the Tutor LMS plugin contains limited features.
M) Alternatives of Tutor LMS
Tutor LMS is one of the top WordPress LMS plugins because it has a lot of perks. However, if you’re still unsure or want to examine different types of LMS plugins, then you can look at their alternatives.
In this portion of the Tutor LMS review, we’ll go over a few of the alternatives that you might want to check out:
1. LearnDash

LearnDash is a popular premium WordPress LMS plugin. It allows you to create detailed, high-quality online courses with a wide range of features. You can easily add an unlimited number of lessons, courses, and quizzes to your WordPress site.
You can use it to build advanced quizzes and assignments for your students, making your course more involved. It also has a content-dripping feature that allows you to plan and distribute the course on a regular basis.
In addition, you can also sell your courses and charge fees in a variety of ways, such as membership, recurring subscription, one-time price, and so on.
Check out our LearnDash review if you want to learn more about this plugin.
2. LearnPress

LearnPress is a full-featured WordPress learning management system (LMS) plugin that makes it simple to design and sell online courses. In fact, its user-friendly interface makes it exceptionally simple to do all tasks with ease.
Similarly, you can use a drag-and-drop course builder to rapidly and easily create education, online school, and online-course websites. You can also sell your courses as a one-time purchase or a monthly subscription, for free or for a fee.
You can permit students and instructors to enroll for the site and be added to the course automatically. Alternatively, you can also add them to courses manually. Besides, it includes various free and paid add-ons for more functionality.
If you want to know more about this plugin, then you can check out our article on LearnPress Review.
3. LifterLMS
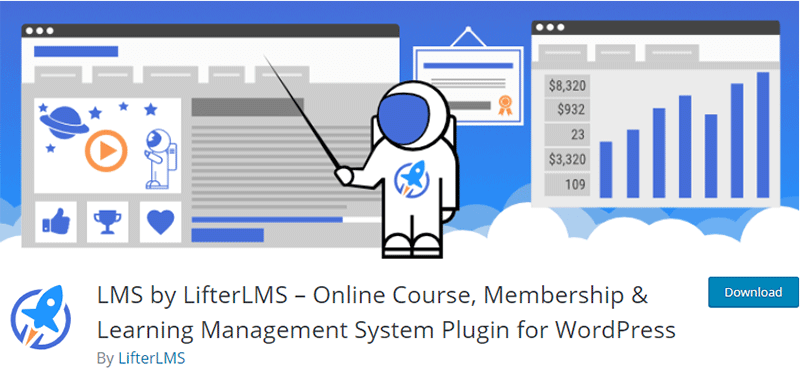
LifterLMS is another beginner-friendly LMS WordPress plugin with a slew of useful features for building online courses. With it, you can easily create extensive courses using audio, video, images, and text.
It includes a user-friendly drag-and-drop course builder that makes creating designs as simple as possible. Similarly, you may use its built-in content restriction to limit access to any WordPress page on your website to members only.
Furthermore, you can assign different instructors to each course. As a result, students will be able to connect with a variety of experts through forums, lesson comments, private lessons, etc.
You might want to check our article on LifterLMS vs LearnDash for a more in-depth comparison. Also, we have a review of the LifterLMS plugin.
N) Final Verdict- Is the Tutor LMS Plugin Worth Using?
With that, the Tutor LMS review comes to a close. We hope you’ve learned enough about it to make an informed decision about whether or not to use the Tutor LMS plugin.
To sum up, we reckon that Tutor LMS is a wonderful beginner-friendly WordPress plugin with an amazing front and backend User Interface. The backend interface is really simple to develop course content, unlike other plugins. Meanwhile, the frontend interface provides an amazing experience to course-takers.
So, if you want to start an educational website, then Tutor LMS is a definitely wonderful WordPress LMS plugin to kickstart with. It has everything you’ll need for the whole course lifecycle, including course creation, management and control, publishing, and commercialization.
Lastly, we recommend that you install and use the free version of the Tutor LMS plugin on your dashboard first. This will help you have a deeper understanding of its features and capabilities.
Conclusion
That’s everything there is to it. Our Tutor LMS plugin review has come to an end. We really hope you found this Tutor LMS review to be informative and interesting.
We believe that after reading this review, you’ve recognized that the Tutor LMS plugin is a growing robust LMS plugin with unique capabilities. And equally looking forward to using it to build an e-learning site.
Please feel free to ask any further questions in the comments section. We’ll do everything we can to help you. If you’ve used it before, you can also offer your thoughts about it.
You might also be interested in our articles on the best Google reviews WordPress plugins and the best WordPress multisite plugins.
Lastly, don’t forget to like us on Facebook and follow us on Twitter for more timely updates.


