Are you looking for an honest review on the LifterLMS plugin? Or wondering if it’s the best WordPress course builder? If that’s so, then here’s what you’re looking for.
LifterLMS is one of the most popular WordPress plugins to build an online course site. Using it, you can easily create lessons, courses, and quizzes for free. Thus, it contains an impressive number of features and you can also extend the functionality using its paid add-ons.
In this article, we provide you with a detailed review of the LifterLMS plugin. So, have a look at its features, pros, cons, pricing, and more. With that, we can state whether it’s the best WordPress course builder for you or not.
Now, let’s jump right into it.
A) LifterLMS – A Brief Introduction
What is LifterLMS?
LifterLMS is a powerful all-in-one WordPress LMS (Learning Management System) plugin that allows you to easily create and sell online courses. Also, you can use it for creating training-based membership websites.
In simpler terms, this plugin adds a complete eLearning solution to your WordPress website. So, with its user-friendly interface, you get to build engaging courses with lessons and quizzes.
Moreover, it’s a leading free open source WordPress LMS solution. So, the core LifterLMS plugin is completely free. And it contains tons of paid add-ons for more advanced features. Using them, you’re able to organize students in groups, add advanced quizzes, and more.
Plus, it’s so flexible that you can create a single online course site to a complex multi-instructor online school. This makes it one of the best choices for schools, colleges, and universities. Also great for businesses on a budget who want to run a world-class online course site.
A plus point is that you don’t need to have any technical or coding knowledge to create courses with LifterLMS. Not to mention, the plugin is built to provide a responsive and mobile-friendly design. So, your site will look good on any mobile, tablet, and desktop screen size.
Who Can Use the LifterLMS Plugin?
LifterLMS is a great solution to help you with building an LMS site. Generally, 3 types of users can use the LifterLMS plugin. They are:
1. Builders
Builders are WordPress developers, designers, or IT professionals/experts. They create LMS sites and training portals for clients, employers, and themselves.
2. Starters
Innovators who want to create online courses and coaching-based membership sites by themselves are the starters. All they need is a WordPress LMS solution to start with.
3. Switchers
Lastly, switchers are the people who have a hosted LMS platform. Or those with an incomplete WordPress LMS site. And now they’re looking for better power, control, and support to switch.
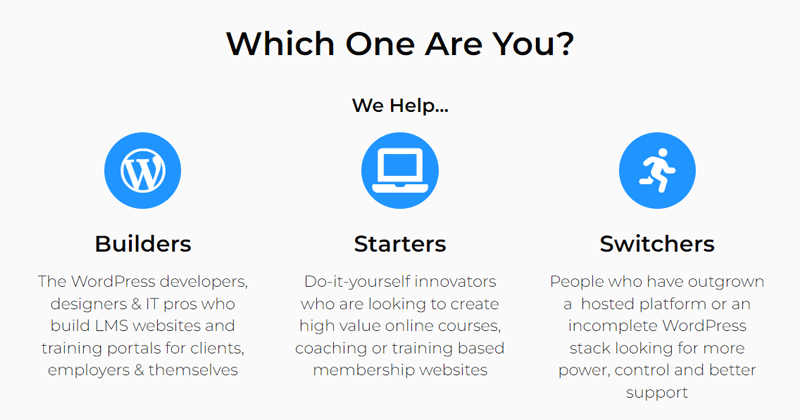
Therefore, whether you’re a builder, starter, or switcher, you can use this plugin to the fullest. With that being said, here’s a list of some of the users that can use LifterLMS for their site:
- WordPress Agencies
- Schools
- Organizations
- WordPress Freelancers
- Enterprise Companies
- WordPress Educators
- IT departments, etc.
B) Key Features of LifterLMS Plugin
Now, let’s have a look at the key features of the LifterLMS plugin in this review section. Since it’s a freemium (both free and paid) plugin, we’ll be looking at both the free and paid features that it provides.
So, let’s start.
1. Easily Create Impactful Courses
LifterLMS allows online course creators to easily create impactful courses. It’s because it provides an intuitive drag-and-drop course builder. Thus, using it, you can simply build an online course from one screen.
On top of that, you get to add multiple lessons to a course. Your lessons will definitely appeal to your users because it contains various multimedia learning styles. That includes video, audio, text, image, and more.
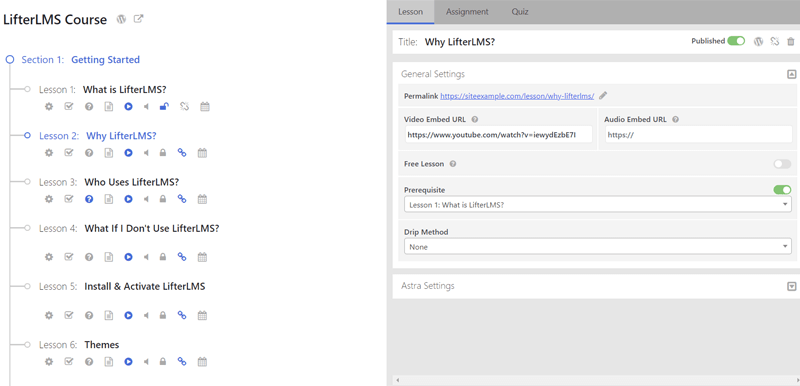
Not to mention, you can attach downloadable lessons to your courses. It means you get to add worksheets, ebooks, PDFs, audios, and other files for offline learning.
Moreover, each lesson can have dynamic multimedia quizzes and assignments. And you can also set a maximum time limit for a quiz. Now, students have to demonstrate their learning within a certain time.
2. Sell and Monetize Option
Sharing your expertise via online courses can also be in a form to earn income. So, you can use the plugin to make a strong income-generating teaching business or membership site. And there are several features in LifterLMS to sell and monetize from your courses.
First, your learners can use the credit card payment option. Other than that, you can sell your courses or memberships via PayPal, Stripe, etc. And it can be in one-time or recurring payment options. Note that it accepts any currency so you can sell your courses to any country.
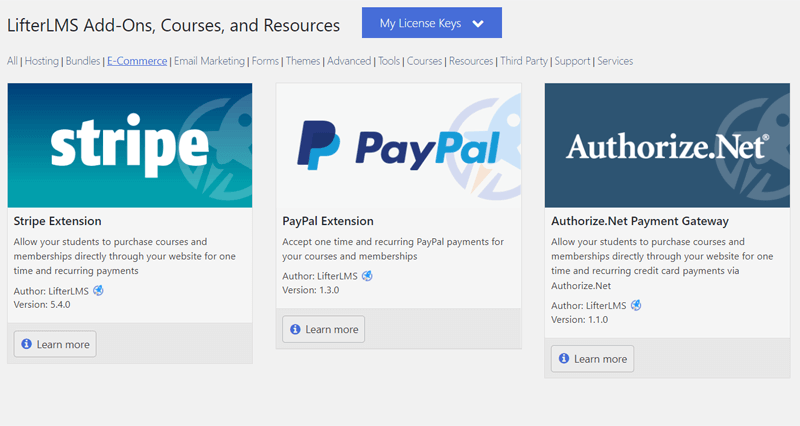
Furthermore, you get to also create and sell bundles of courses together. Not only that but if you wish, then you can also offer free courses to generate leads.
The analysis of all your sales can also be reviewed. And you can even create custom reports for business intelligence and accounting purposes.
3. Engaging Features for Students
With LifterLMS, the courses are not only impactful but also generate great engagement. So, the courses you create will make your students enjoy and fully complete them.
First of all, learners can get printable certificates on completion of a group of courses taken. Also, you can provide them with achievement badges through a gamification system. This makes students get addicted to progressing the online course.
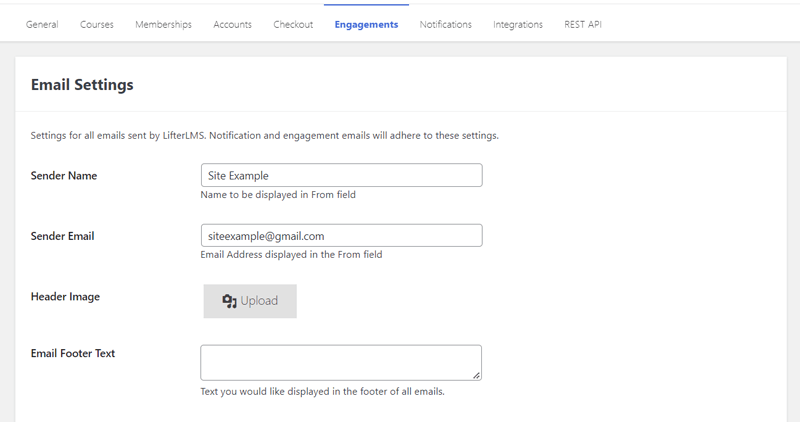
Other than that, you can also send emails for notification and engagement. Additionally, private coaching and text messaging for conversation are also possible. With that, learners get to discuss with maximum potential and get better results.
Yet another interesting feature is social learning. You can create a Facebook-like community on your site. This enables an increase in conversation and completion rates on your courses.
4. Multiple Membership Opportunities
The next feature is that LifterLMS provides a complete membership solution. You get to create a traditional membership site that restricts everything except the sales page.
Instead, you can also restrict access to certain courses, pages, posts, or forums. So, you’re also able to restrict access to certain memberships only.
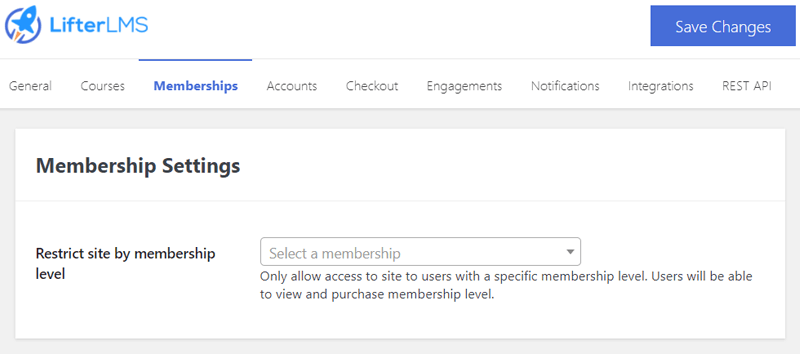
Furthermore, you can set it to have an automatic enrollment function. It means that the members will be automatically enrolled in some or all courses at checkout. Also, you can add the existing members to newly added courses with just a click.
5. Supports Integration to the Tools You Need
If you want to add extra functions to your site, then it’s possible. LifterLMS supports collaboration with any third-party tools available on the market.
No doubt that it integrates with many popular WordPress plugins such as WooCommerce and WP Forms. That also includes the best page builders like Elementor.
Some of the other different kinds of tools that you can integrate include:
- Payment gateways for receiving money worldwide.
- Email marketing tools to make a great email listing.
- Forums for having well-organized discussions.
- Multiple WordPress themes to get unlimited design options.
- CRM (Customer Relationship Management) tools to sync courses and memberships.
- Authoring tools to add a lesson, course, or quiz content from external eLearning sources.
6. Creates a Secure Platform
As mentioned before, LifterLMS enables you to lock down your content. It means people who are supposed to see can only view specific content at the right time. Ultimately, this maintains the security of your eLearning platform.
So, to protect your course content, only enrolled students can view the lessons and materials. While the non-members are redirected with custom messages to first join the membership. And then be able to view the course content.
To add more, new students get their own accounts on your site. Plus, learners can also choose their own passwords for your site. Also, they can reset it if they forget. Overall, this creates a secure platform for the online course.
7. Easy to Manage Your Platform
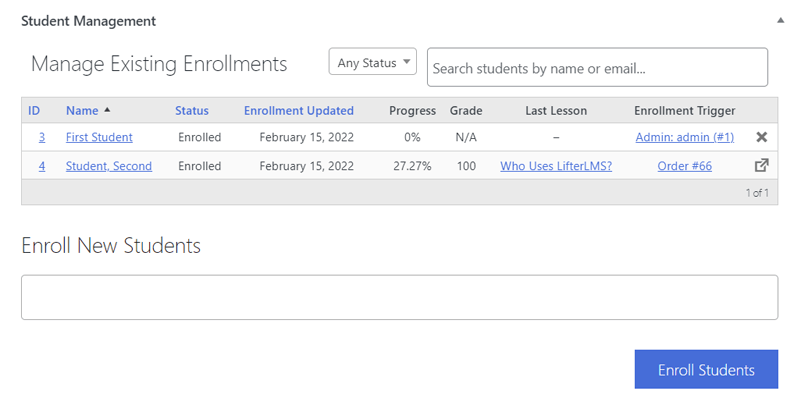
Lastly, it’s also easy to manage and control your course and WordPress site with LifterLMS. There’s a gradebook feature where you can see how your students are doing. Also, you get to manage the students for adding to new courses, viewing reports, etc. in the student management.
When talking about the design, you get powerful tools to control your site design. You can easily customize the layout of the site’s header, footer, sidebar, and whatnot. Also, there are 600+ Google Fonts for best typography. As a result, your platform shall align with your brand style.
C) How to Setup and Build an Online Course Site with LifterLMS?
In this section of the LifterLMS review, we’re going to show you the steps for setting up the plugin. And after that, also the process of building a basic online course site. It includes creating courses with lessons and quizzes.
So, without further ado, let’s follow them.
How to Install and Configure the LifterLMS Plugin?
The core LifterLMS plugin is totally free. So, you can easily install and configure it similar to any other WordPress plugin.
The core plugin offers all the necessary features to create courses, lessons, and quizzes of a basic LMS site. So, here, we’ll work with the core plugin only.
However, if you need to keep advanced features, then you must purchase the add-ons. And then upload them on your dashboard.
Now, let’s have a look at the steps to install and configure the core LifterLMS plugin.
Step 1: Install and Activate the Plugin
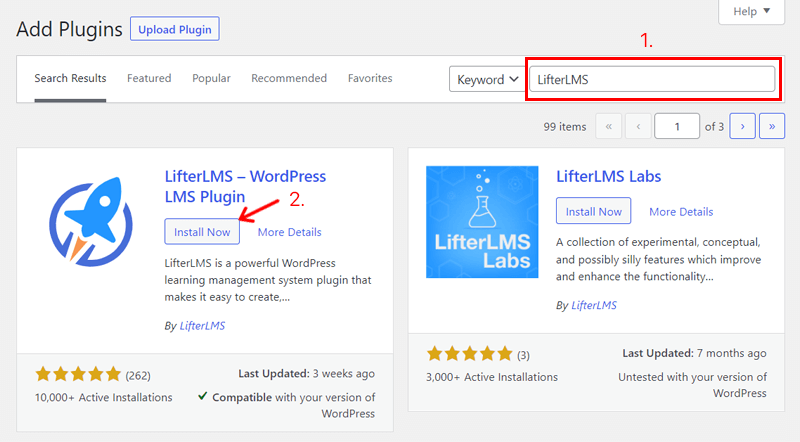
First of all, log in to your WordPress dashboard and hover to the Plugins section available in the left-side menu. There, you’ve to click on the Add New option.

Next, you’ve to type the keyword ‘LifterLMS’ on the search bar present at the right corner. After a while, you’ll get the search results including ‘LifterLMS – WordPress LMS Plugin’. Now, you’ve to click on the Install Now button present for the plugin to start the installation.
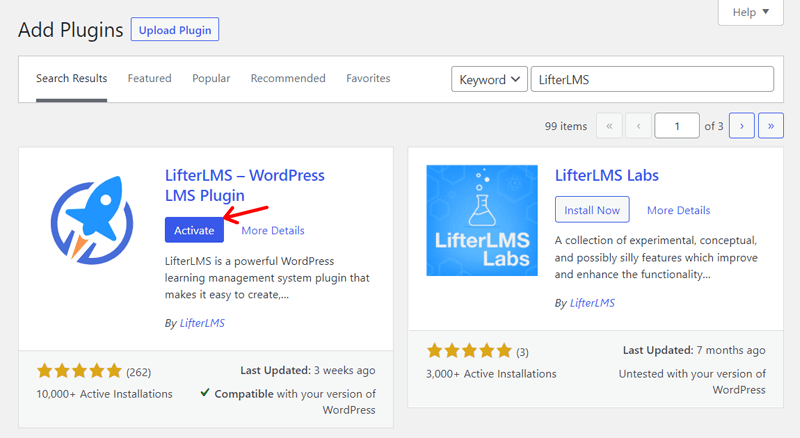
Once it gets installed, you can see an Activate button. So, you’ve to click on it to activate the plugin. By doing that, the plugin gets successfully installed and activated on your dashboard.
Step 2: Configure the Plugin
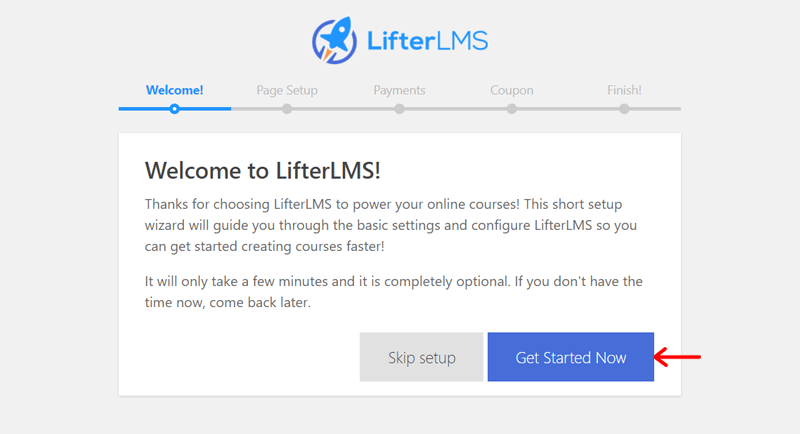
After the activation, you’re redirected to the LifterLMS setup wizard. First, you can see the Welcome page. So, you get to either skip the steps or continue with the configuration.
To start the configuration, click on the Get Started Now button.
Next, follow these configuration steps serially.
Step I) Page Setup
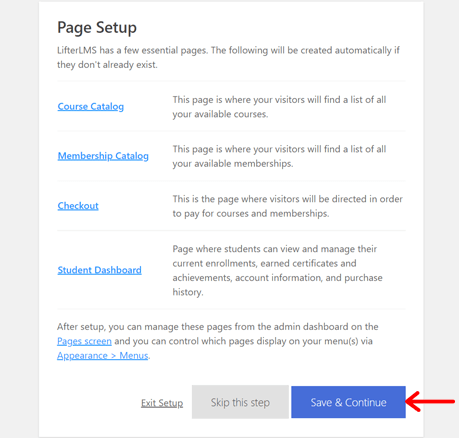
LifterLMS recommends you add some important pages for an online course. So, from this step, you get to automatically make these pages on your site.
The pages include the course catalog, membership catalog, checkout, and student dashboard. Thus, to create these pages, click on the Save & Continue button.
Step II) Payments
Students can purchase the pro courses and get a membership in an online course site. So, in this step, you can choose the criteria for registration and payment.
First, select the default country using the dropdown option. The country you choose is from where you’re expecting to have student registration.
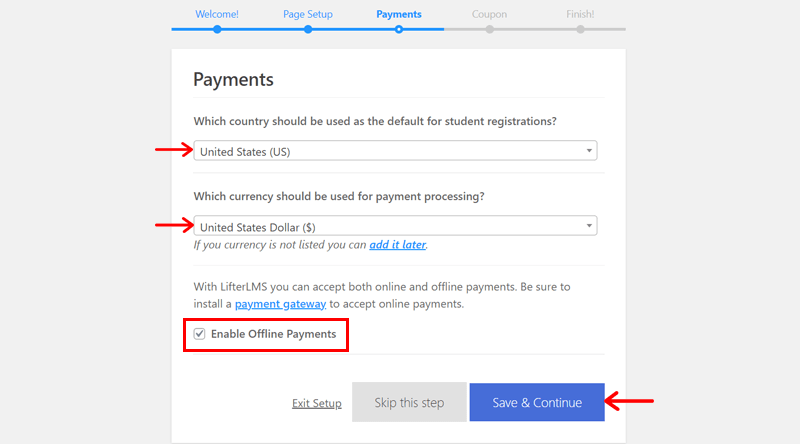
Next, choose the currency that should be used for the payment processing from the dropdown option.
Note that LifterLMS accepts both online and offline payments. So, you’ve to add a payment gateway to accept online payments. But, you can tick the option if you want to enable offline payments.
After making the choices, click on the Save & Continue button.
Step III) Coupon
In this step, you get to improve the LifterLMS services and get a coupon. If you click on the Allow button, then it allows them to collect your non-sensitive usage info and diagnostic data. This helps them to improve the updates of the plugin. Also, you’ll receive a coupon immediately.
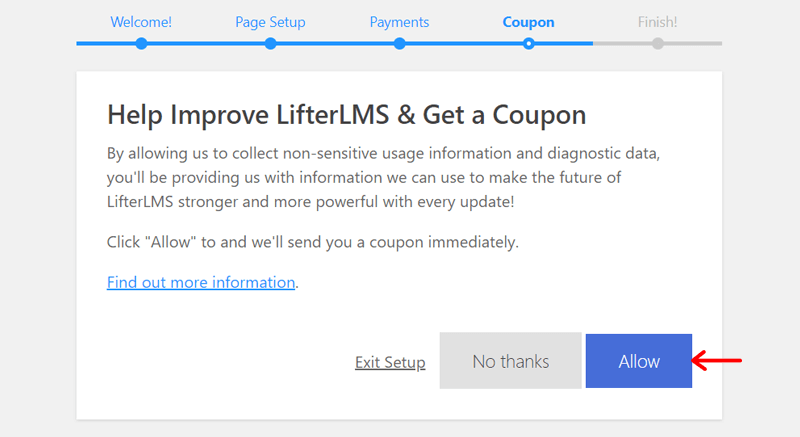
Whereas, if you don’t want to be involved, then you can click on the No Thanks button.
Step IV) Finish
Going through these steps, the setup is done on your dashboard. Although in the Finish step, you’re given a choice to add some sample course templates.
So, if you want to add them, then enable them among the given options and click on the Import Courses button. But in case you want to start yourself, then to not import them, click on the Start from Scratch button.
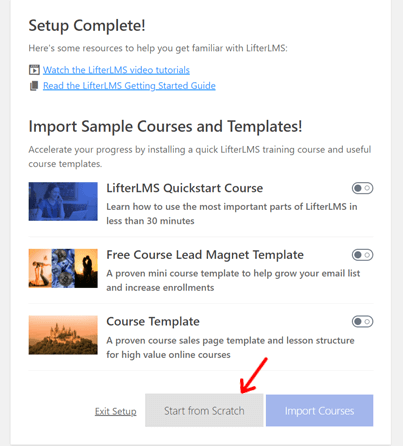
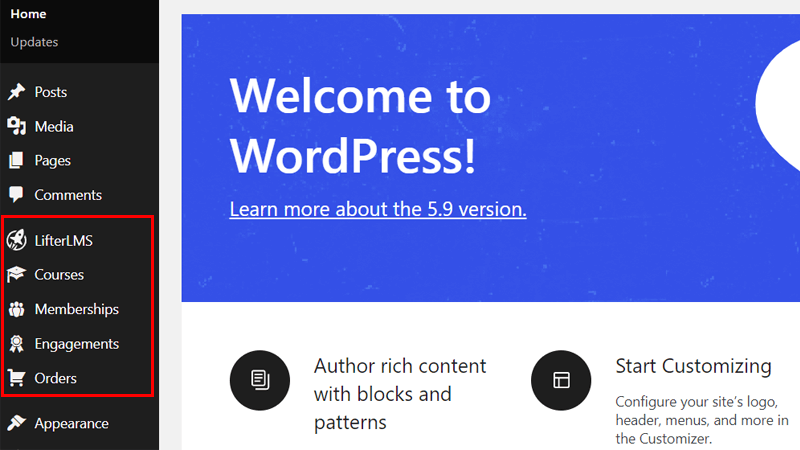
Here, we choose to start from scratch. As soon as you make your decision, you’re redirected to insert a course on your site. When you go to the dashboard, then you can see a few menus added there. It includes LifterLMS, Courses, Memberships, Engagements, and Orders.
How to Create a New Course with LifterLMS?
Here in this review section, we’ll be showing the steps to create a new course on your site with the LifterLMS plugin. Before that, you can install and activate any compatible WordPress theme. Here, we’re using Astra.
So, now follow them stepwise.
Step 1: Create a Course
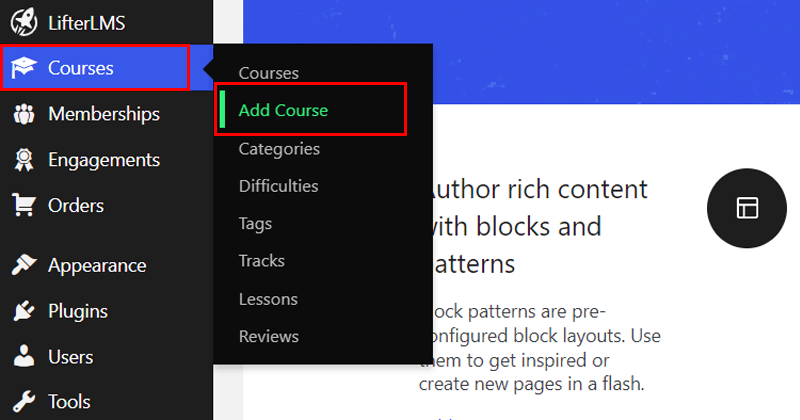
First, navigate to Courses > Add Course from your WordPress dashboard. In this interface, you can first fill in the information about your course.
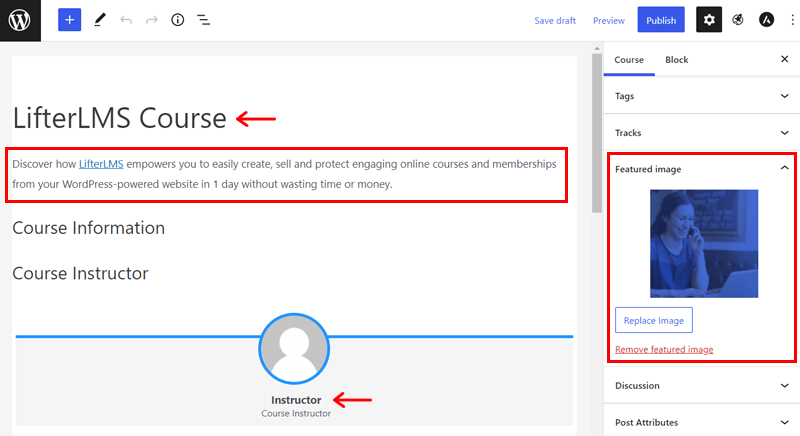
So, write down the title of the course in Add title space. Then, add a description right below it. Also, select and show the course instructor. You can even add the featured image for the course.
Step 2: Choose the Course Category
After that, it’s better to add the category of the course for ease in searching desired courses. So, go to the Course settings present on the right side of your screen.
There, scroll down and open the Categories option. Now, click on the Add New Course Category link. Then, fill the category name on the textbox, and lastly, click on the Add New Course Category button.
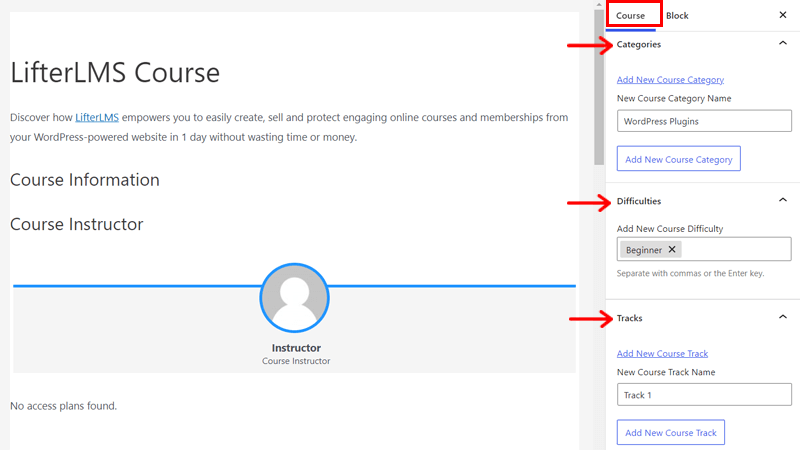
Similarly, you can also add and select the course difficulty category in the Difficulty option there. It can be advanced, beginner, or intermediate. Plus, you can insert the track of the course in the Track option.
Step 3: Configure the Course Options
You can see that there are some configuration options for the specific course under the section Course Options. Also, it contains 4 different tabs, each of them are briefly discussed here:
1. Sales Page
In the Sales Page tab, all you can do is select what your sales page content will be like for the course. And there are different options for that. Some of them are:
- Display default course content
- Show custom content
- Redirect to WordPress Page
- Redirect to custom URL
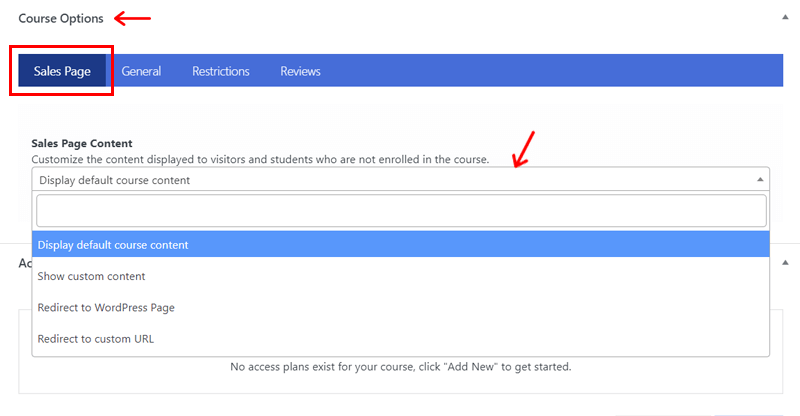
Based on what you prefer, you’ve to select the dropdown option here. And accordingly, fill in the information about it.
2. General
Now in the General tab, there are multiple options to configure. With that, it allows you to save and show in that way about the course. Have a look at what you’ve to configure there:
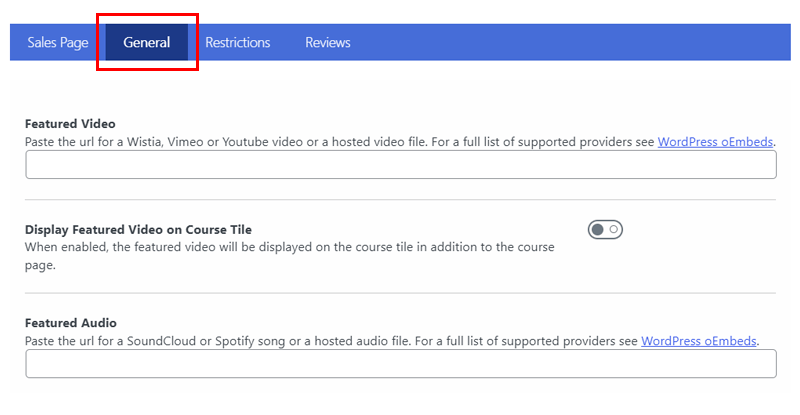
- Featured Video: Add a link to your Wistia, YouTube, or Vimeo video for featured video.
- Display Featured Video on Course Tile: Enable if you want to show the video on the course page.
- Featured Audio: Keep the link of your SoundCloud or Spotify audio for featured audio.
3. Restrictions
Here in the Restrictions tab, there are options available on how you can restrict your course content. First, you can edit the message that’ll be displayed in the Content Restricted Message option. This message is for those who haven’t enrolled in your course.
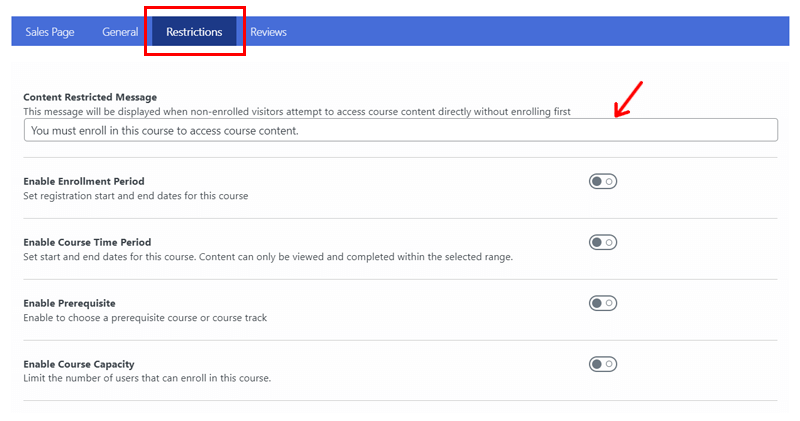
Next, there are some options that you can enable and accordingly set for restriction. They are:
- Enrollment Period: Start date, end date, and open/closed message to enroll.
- Course Time Period: Start date, end date, and open/closed message for the course.
- Prerequisite: Choose the courses required to complete for this one to start.
- Course Capacity: Capacity of the course and capacity reached message.
4. Reviews
Now, in the Reviews tab, you can manage the reviews section of the course. The options are:
- Enable Reviews
- Display Reviews
- Prevent Multiple Reviews
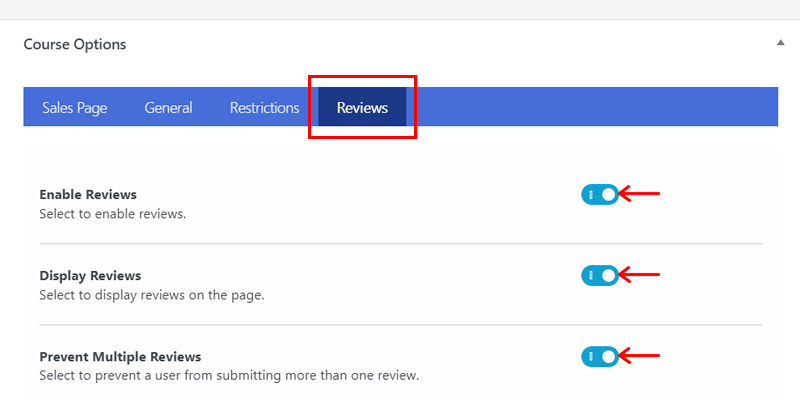
And these are to enable the review feature, display the reviews on the page, and prevent a user to post multiple reviews on a course, respectively.
Step 4: Setup the Access Plan
The next step is to set the access plan. Access plan means the payment option and access period of the course. To add an access plan for the new course, you can find the Access Plans section. There, click on the Add New button.
Now, a form opens up where you can fill in the info about the access plan. It includes:
- Plan Title
- Price
- Plan Description
- Frequency
- Enroll Text
- Plan Availability and more.
Also, you can provide your course for free. For that, mark tick on the No payment required option in the Is Free option.
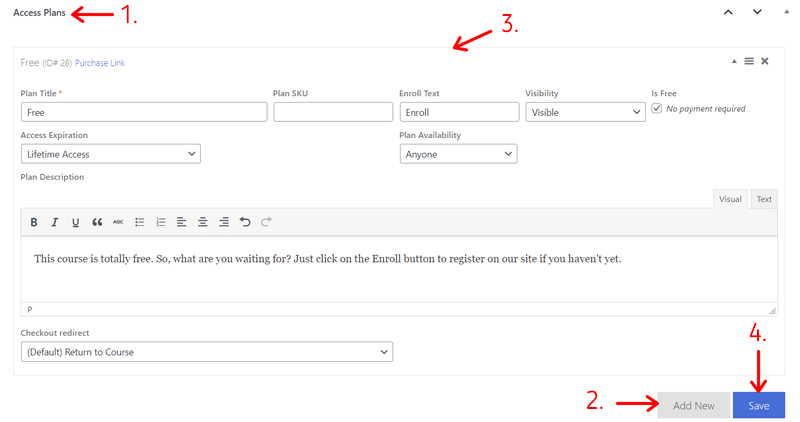
After you’re done, click on the Save button to save the plan. Note that you can make many different access plans in one course. But for payment features, you need to purchase an add-on for the payment gateway you want to use.
Step 5: Enroll and Manage Students
Finally, there’s a Student Management section at the bottom. There, you can enroll and manage the enrolled students for the course.
However, you get the options only after the course you’re creating is published. So, first of all, click on the Publish button right now. Then, reload the page.
Not to mention, you can enroll the students who are registered to your site. For that, click on the Select a student option, and then select the students to enroll in the course one by one. After that, click on the Enroll Students button again to save the student information.
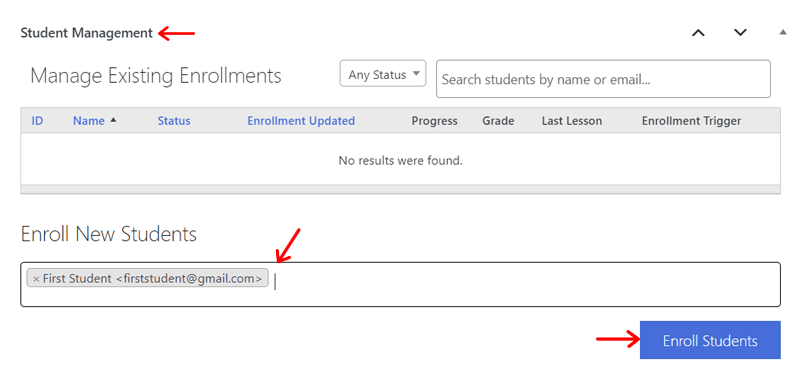
As soon as you click on the button, you can see the students enlisted on the table above. And it’s in the Manage Existing Enrollments section. Here, you can also see the students who enrolled in the course themselves.
Also, you get to search the students, filter them, view their progress, grade, and more. Plus, you can even cancel their enrollment.
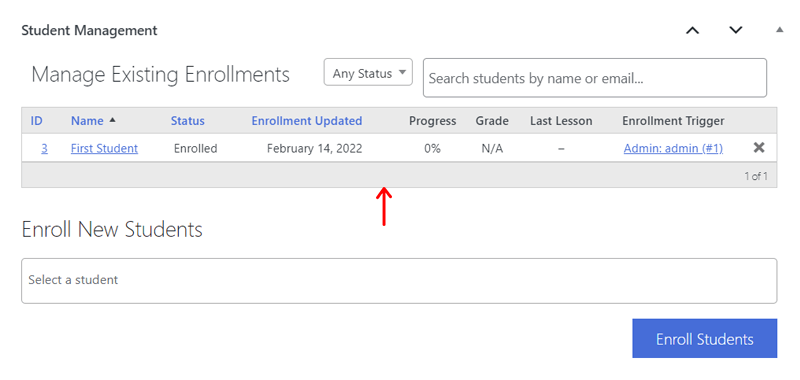
Lastly, don’t forget to click on the Update button. Hurray! Your course is ready to add lessons.
How to Create Sections with Lessons Using LifterLMS?
It’s time to now add lessons to the course you just made. For that, you need to create sections and add lessons to them. The entire process is done within the course builder.
So, let’s start the process to do so.
Step 1: Go to Course Builder
At the bottom of the Course settings, you’ll find a Course Builder section. There, you’ve to click on the Launch Course Builder button.
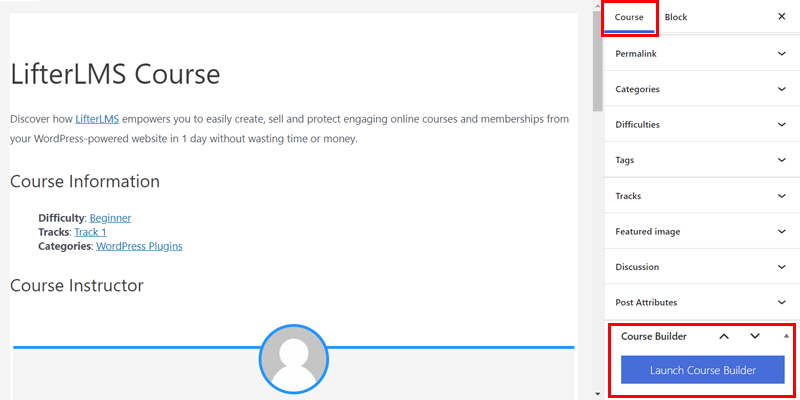
That’ll take you to the course builder interface. The right side has options to add sections and lessons. Whereas the preview of them will be shown on the left side.
Step 2: Add Sections with Lessons
Now, first of all, you need to click on the Section button on the Add Elements section. You can see a new section added as ‘Section 1: New Section’ on the left side of the course builder.
To change the section name, you can click on it and add your own section name. A section can be simply understood as the chapter of the course.
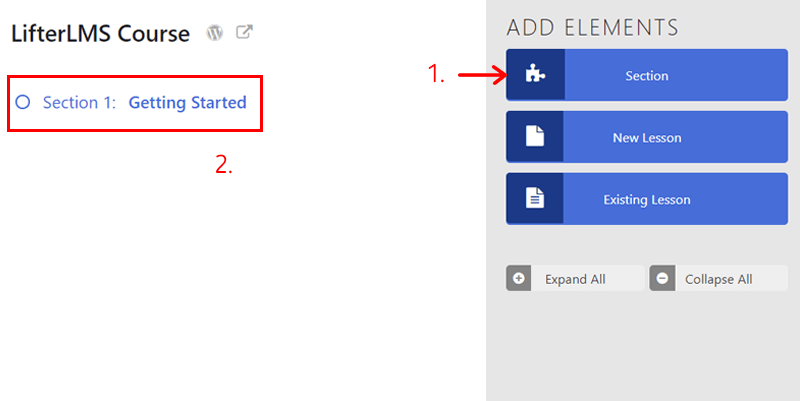
So after that, you’ve to add lessons to that section. To do that, click on the New Lesson button. This’ll add the new lesson as ‘Lesson 1: New Lesson’. Similarly, you can change the name of the lesson.
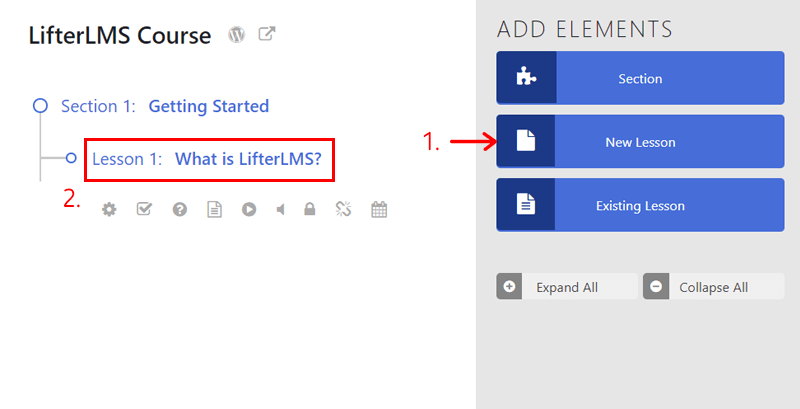
Now, you can create as many sections as you want. And each section can have as many lessons as you need. If you want to add an existing lesson to a section, then just click on the Existing Lesson button. And select that existing lesson to add.
Moreover, the course builder has drag-and-drop functionality. So, you can also drag and drop to add or change the position of the sections and lessons.
Step 3: Configure Lesson Settings
Next, you’ve to configure the settings on each of the lessons to have content how you want. And for that, you can already see that every lesson you’ve added has some options below it.
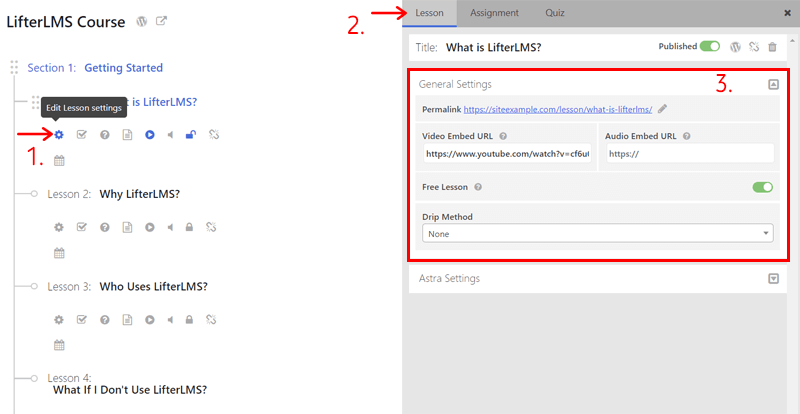
So, click on the first option for the first lesson that says Edit Lesson settings when you hover it. Now, you can see the General Settings for that lesson in the Lesson tab.
There, you get to edit the permalink of the lesson. And then, you can add a video embed URL or an audio embed URL for the lesson based on the type of lesson you want to deliver.
To make the lesson free without the need to even enroll, enable the Free Lesson option.
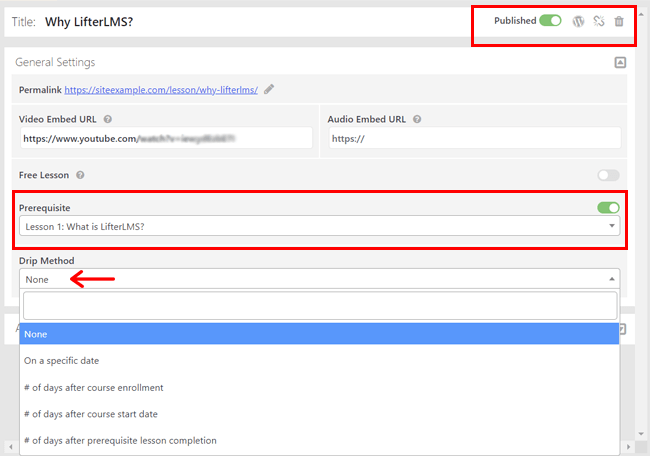
Lastly, you can drip the lesson which means to schedule the lesson to be visible on your site. So, choose the drip method from the dropdown option. It can be on a specific date, a number of days after course enrollment, or after the course start date.
At the top, there are other options for the lesson as well. One of them is to open the WordPress lesson editor where you can edit and publish the content of that lesson.
That’s it! Similarly, you can configure the lesson settings for all the lessons of the course. And for them, you can also see a Prerequisite option that states the necessity of a lesson beforehand to be completed to start the new one.
A great thing is that the changes are automatically saved.
How to Add Quizzes on Lessons with LifterLMS?
The core LifterLMS plugin also allows you to add quizzes to the lessons. So, here we’ll be showing you the steps on how to do so. That’s why you must follow these steps accordingly.
Step 1: Add a Quiz
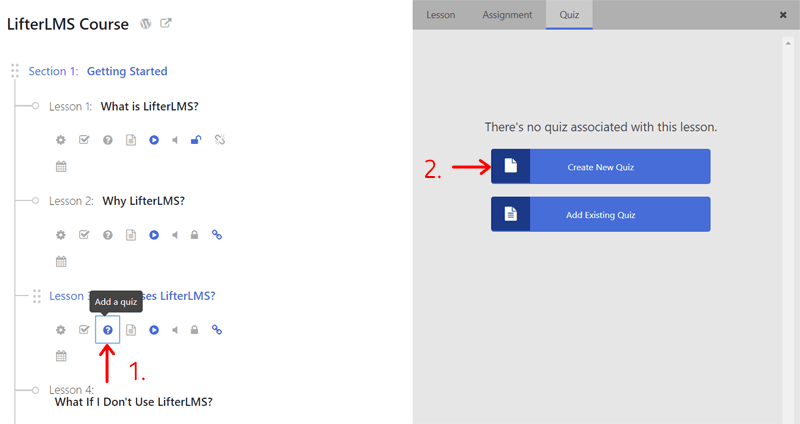
The initial step is to click on the third option available at the bottom of the lesson where you want to add a quiz. When you hover it, it says Add a Quiz.
By clicking on that, you can see 2 options. That’s to add a new quiz and an existing quiz. So, click on the Create New Quiz button to add a new quiz.
Step 2: Configure Quiz Settings
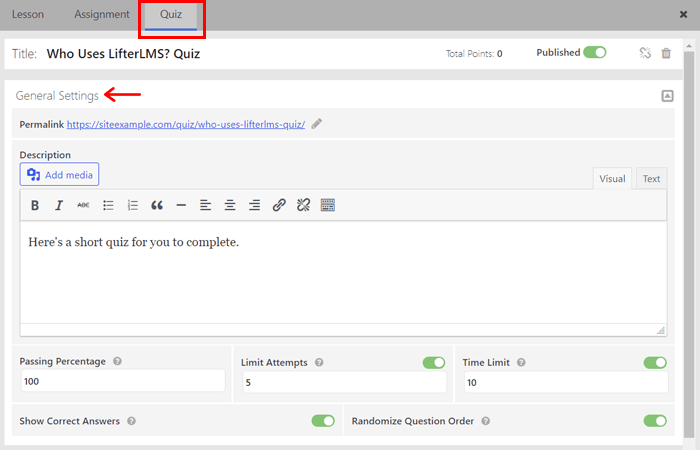
Similar to lessons, you can see General Settings for the quiz in the Quiz section. Here, you can first add the permalink to the quiz page. Then, add a short description of the quiz.
After that, you get to enter the passing percentage of the quiz. Right next to it are some options that you can enable. They are:
- Limit attempts by entering the number of attempts a learner can take.
- Time limit to give students certain minutes to complete the quiz.
- Show correct answers for the questions whose answers got wrong.
- Display the questions in random order.
Step 3: Add Questions
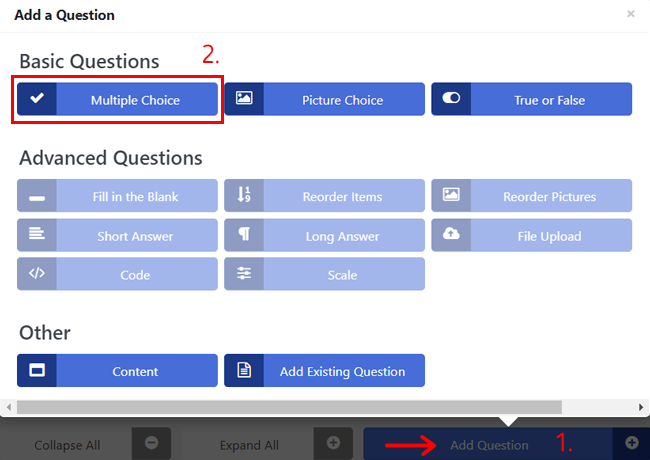
Now, to insert the questions, you’ve to click on the Add Question button. The free LifterLMS plugin allows you to add multiple choice, picture choice, and True or False questions. While the paid add-ons give you advanced options. Such as fill in the blanks, code, file upload, etc.
So, click on the button for the type of question you want to add first to the quiz. So let’s take an example of the multiple-choice question. For that, click on the Multiple Choice button.
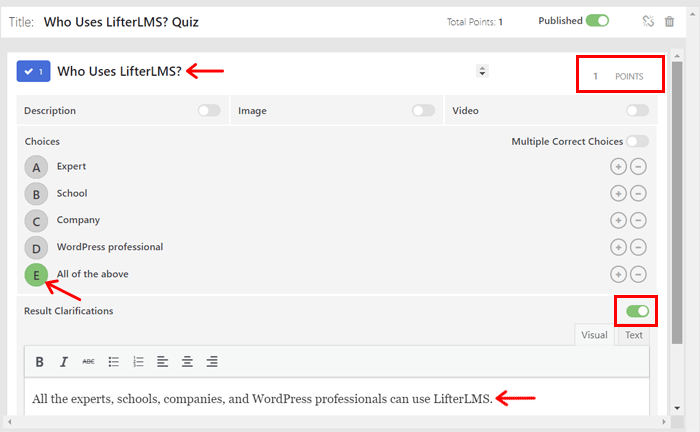
There, type down the question and state the number of points or marks for that question. Also, you can enable the description, image, or video options for that question.
Then, add the answer choices for the question as much as you like. To state the correct answer for the question, just click on the corresponding circular bullet option. And you can also make a question with multiple answers by enabling the Multiple Correct Choices option.
Lastly, there’s a Result Clarification option. If you enable it, then you can state the reason for the answer to that question.
Similarly, now you can add other kinds of questions to your quiz. And the changes you make will get automatically saved. Isn’t it so easy?
After everything completes, you can go back to the editor by clicking on the Exit button.
How Do Students Access Courses at the Front-end?
Once you’ve added the courses with lessons and quizzes, it’s time to look at how it’ll look at the front-end. This also states the steps students will take to access the course on your site.
So, as a visitor who wants to be a student, first, go to the Course Catalog page of the website. There, you can see the list of courses you’ve added. Now, click on one of them and it’ll redirect you to that course page.
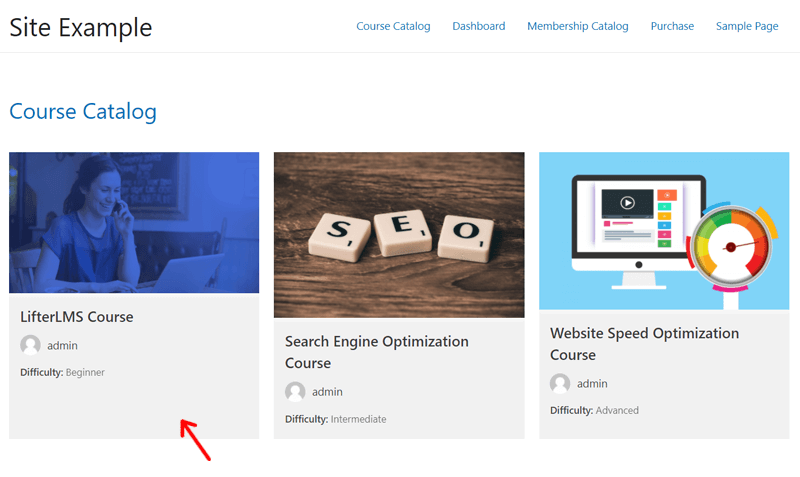
Here’s the preview of the course page.
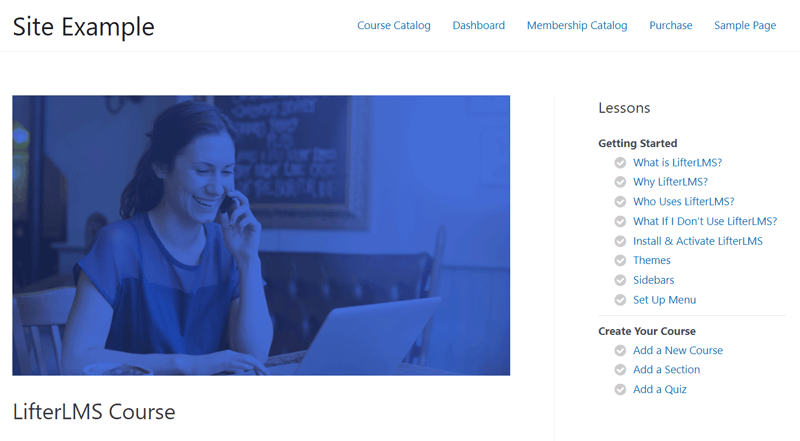
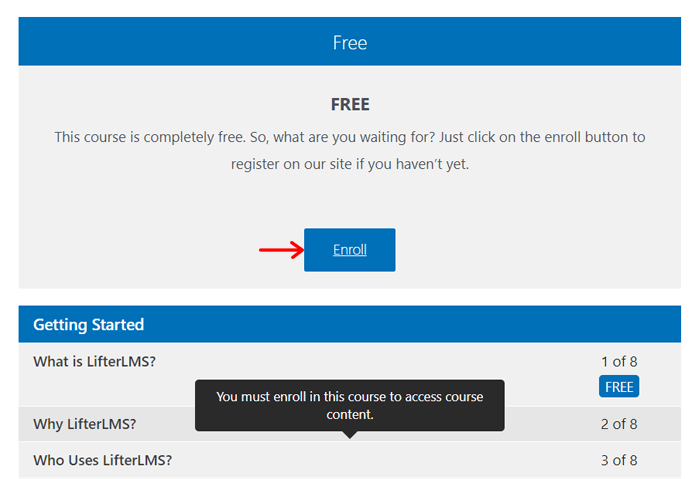
If you added a premium course, then the visitors need to buy the course first. Here, we’ve made a free course that just requires enrollment. And you can see the message it displays on the lessons as ‘You must enroll in this course to access course content’. But not for the free lesson.
That’s why you’ve to click on the Enroll button first to create an account.
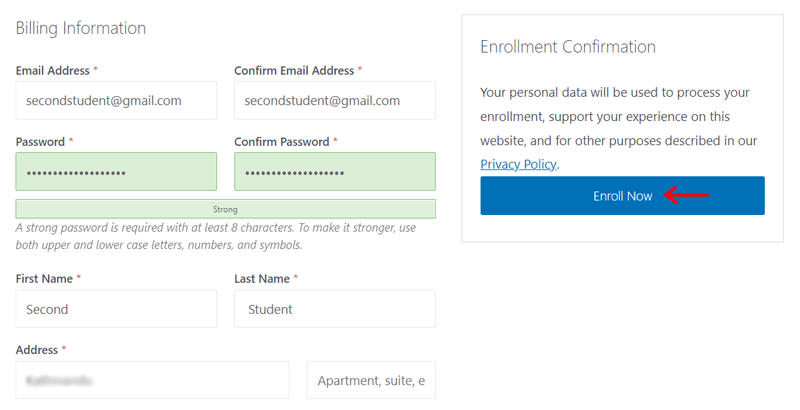
You’ve to fill in your personal information and other account details to enroll. And then, click on the Enroll Now button.
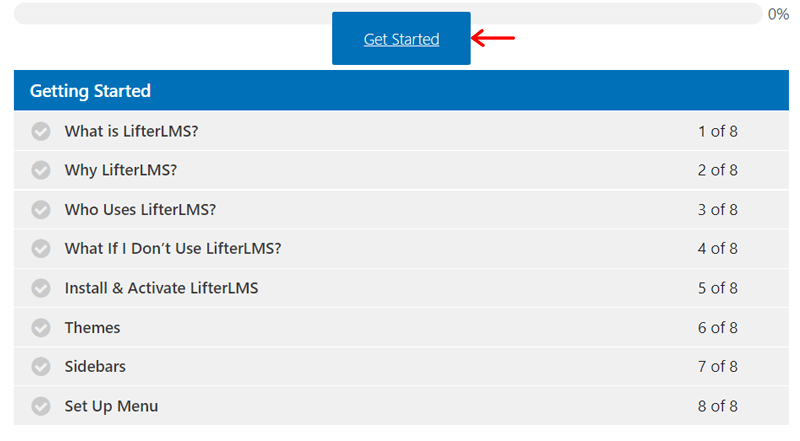
After you enroll in the course, you’re the student that can start the course. And you’re able to do that by clicking on the Get Started button. This redirects you to the first lesson of the course.
With that, you can now easily learn the lessons. Here’s a preview of the lesson page.
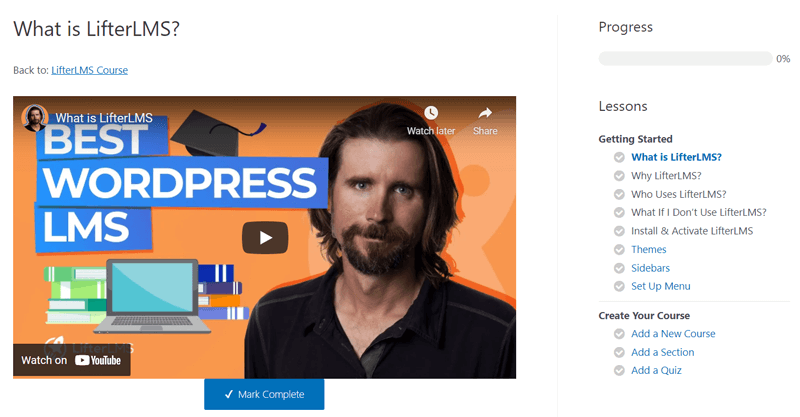
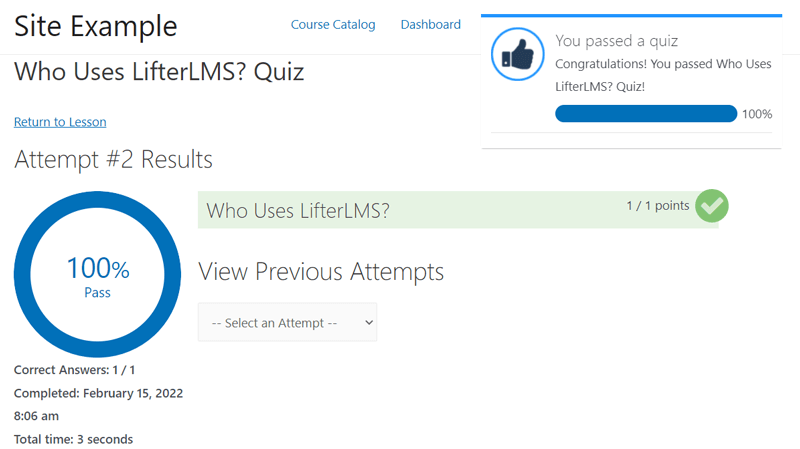
Lastly, have a look at the quiz results page below.
D) Premium LifterLMS Add-ons
There are several paid LifterLMS add-ons available to improve your online course. Using them, you can add more advanced features and functionalities to create an LMS site the way you like.
Saying that, let’s have a look at some of the premium LifterLMS add-ons you should check out now in this review.
| Premium Add-ons | Description |
| LifterLMS Groups | Create groups that offer courses and memberships with other group management features. |
| LifterLMS Advanced Quizzes | Make graded exams with manually graded question types, essays, short answers, etc. |
| LifterLMS Advanced Videos | Generate professional video experiences in your courses from a suite of video enhancements. |
| LifterLMS Private Areas | Create personalized content and also engage in personalized communication in a private area with every student. |
| LifterLMS Custom Fields | Add powerful and professional fields to customize, collect, and display the data as you like. |
| Stripe Extension | Accepts one-time and recurring payments via Stripe for courses and memberships. |
| PayPal Extension | Accepts one-time and recurring payments PayPal for courses and memberships. |
| WooCommerce Extension | Sell your courses and memberships from WooCommerce. |
| MailChimp Extension | Automatically adds the students to the MailChimp list and get benefitted from its advanced email marketing. |
| ConvertKit Extension | Effortlessly sync your users to ConvertKit and enjoy the advanced email marketing features. |
| WPForms Add-on | Integrate WPForms to your online course for a custom registration form, etc. |
| Twilio Integration | Send automatic notifications via text messaging (SMS), etc. |
| LifterLMS Powerpack | Get priority private support with the development team, graphic design assets, and more. |
E) Pricing Plans of LifterLMS Plugin
LifterLMS core is a free WordPress plugin. So, you can easily download it from the WordPress plugin directory. And then use it on your WordPress dashboard.
As mentioned before, tons of premium LifterLMS add-ons are present for adding advanced features. That’s why you can purchase the add-ons that you require. To know more about each add-on, there’s a Store page that you can visit.
In addition to that, there are 3 pricing plans for you to collectively get the add-ons based on your need. And you’re able to purchase them from your dashboard or at the Pricing page of its official site. Note that you can also pay $1 and use the paid version for 30 days to test your demo site.
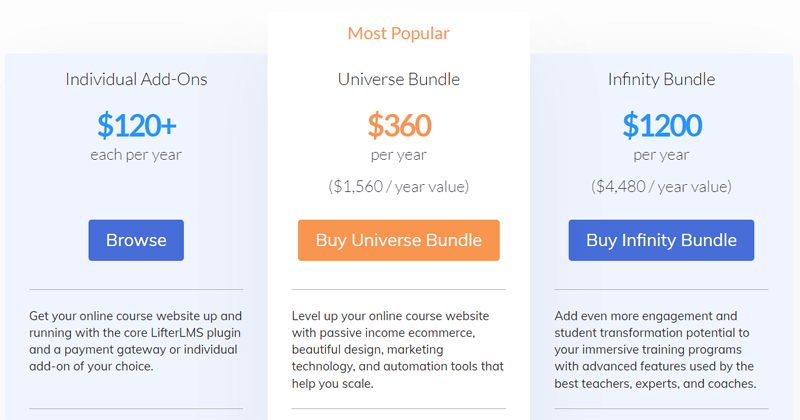
The plans are:
1. Individual Add-ons
You can set up your online course site with the core LifterLMS plugin. To add a payment gateway or individual add-ons of your choice to it, you can choose this plan.
Thus, with a cost of above $120/year, you can purchase the individual add-ons available with this plan. Also, you get standard support and 1 tech support account with it. Note that you can use it for only 1 active website.
2. Universal Bundle
This plan is for those who want to level up their online course site. And that by passive income eCommerce, beautiful design, automation tools, and marketing technology. As a result, it helps to scale up your site.
So, at $360/year, you get up to 2 tech support accounts. Also, you can use this plan for 5 of your active websites. The additional add-ons that you’ll receive are:
- Design add-ons
- eCommerce add-ons
- Marketing & CRM add-ons
- Form add-ons
3. Infinity Bundle
This plan offers add-ons for more engagement in the online courses. Also, teachers, experts, and coaches can deliver immersive training programs with their advanced features. This leads the students to transform in full potential from learning.
The price of this plan is $1200/year and comes with all the add-ons mentioned in the above plan. Plus, you get other features, which are:
- Advanced quizzes & assignments
- Private coaching
- Social learning
- Advanced video
- Custom fields
- Groups.
In addition to that, you’ll receive up to 3 tech support accounts. Not to mention, you can use this plan for unlimited active sites.
F) Customer Support Options in LifterLMS
Looking for customer support options is a very important factor to consider while choosing a plugin. So, in this section of the review, we’re discussing the support options LifterLMS delivers.
Overall, LifterLMS provides great support to its users. For those who are using the core plugin, they can simply go to its Support Forum in WordPress.org. There, you can check out how well they reply to the queries of the users. Also, you can post down your question if you have one.
Apart from that, anyone can visit the original website of LifterLMS and navigate to the Contact page. From there, you get help to know answers to your questions.
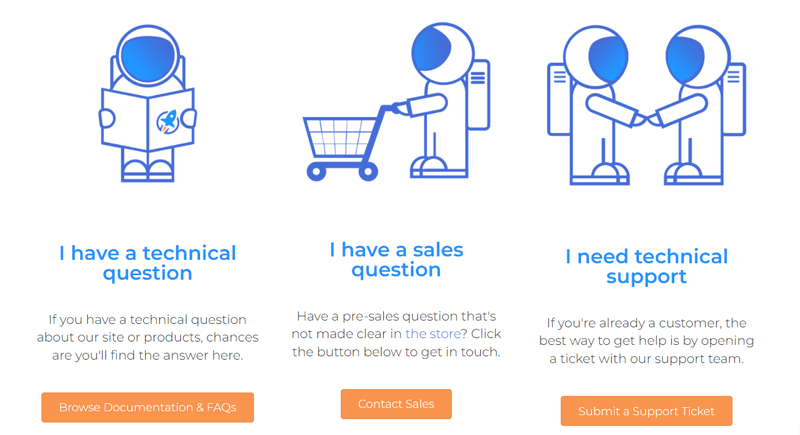
The following list shows the categories of support options available:
- Documentation & FAQs: In case you’ve got a technical question about the products, then you can first search for the answers yourself. And that’s from its comprehensive knowledge base containing the documentation and FAQs section.
- Contact Sales: You can get in touch with the sales team if you want to ask a pre-sales question that’s not clear to you.
- Support Ticket: If you’re already a customer, then it’s best to open a ticket for receiving help from the support team.
On top of that, there are other options in the Learn menu of its website. There, you can select the Blog submenu to read articles about the plugin.
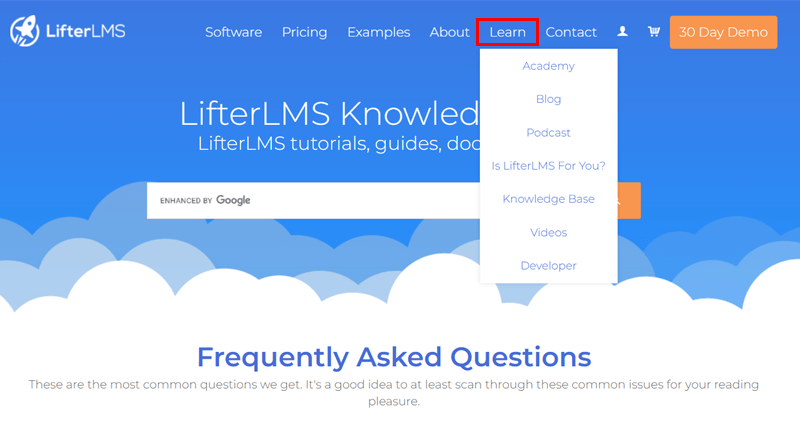
Similarly, there’s a Podcast page if you want to check out their conversations on the shows. Also, in case you’re a developer, then there’s a Developer page for helpful resources.
Lastly, you can learn how to use the plugin and build an LMS site by looking at their video tutorials on YouTube.
G) LifterLMS Compatible WordPress Themes
As said before in the previous review sections, LifterLMS is compatible with any WordPress theme that’s coded using WordPress standards. However, there are a few themes that LifterLMS recommends using.
So, let’s have a look at them.
1. Astra
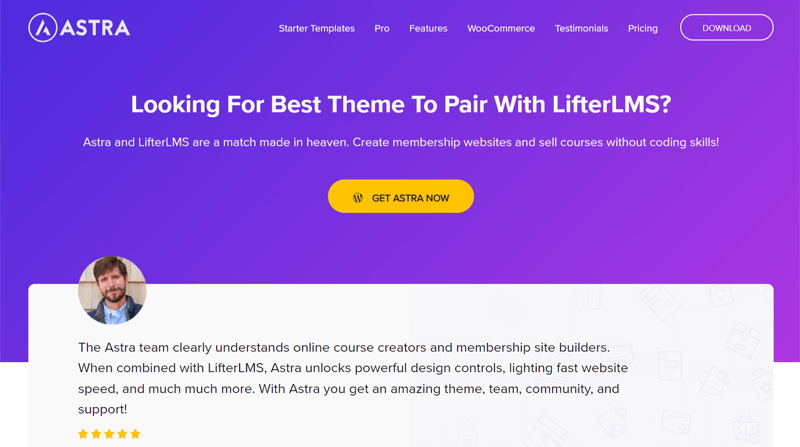
Astra is one of the best WordPress themes for online course creators and membership site builders. You can start building your online course site using the powerful free version of Astra. And combining LifterLMS with Astra Pro will unlock more powerful yet easy design controls.
Moreover, you’re able to deliver distraction-free learning. That’s because it provides simple and professional designs with a feature to remove disturbing elements and links. This also helps to have a conversion-optimized checkout.
Plus, your website will also have lightning-fast speed. Also, the theme is SEO-optimized (Search Engine Optimization) and schema integrated. And these are great necessities for online course sites.
2. OceanWP

Another WordPress theme on the recommendation list of LifterLMS is OceanWP. This theme is fully compatible so you can create an amazing online course and membership site with it.
There are several demo sites available in this theme that also includes some specifically for coaching sites. That’s why you can simply import one of them with one click to make your site.
Using this theme, you can also choose what to display in the courses. Also, you get to change the layouts, color, and more. Thus, you’ll have distraction-free learning and checkout. So, you can either use the free version or extend the features with its multiple free and pro extensions.
3. LaunchPad
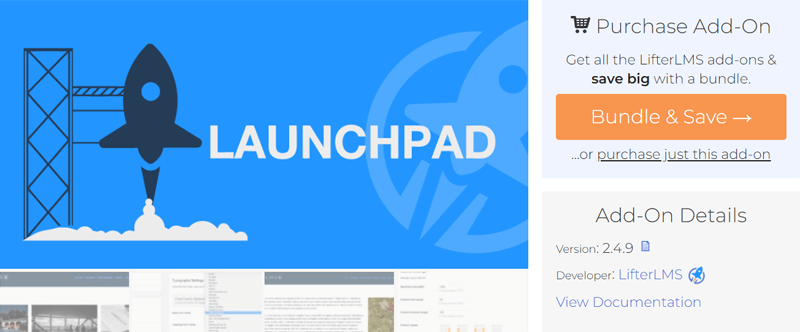
Apart from the above-mentioned popular WordPress themes, LMS themes like LaunchPad are built for LifterLMS. LaunchPad is a theme by LifterLMS to create an online course site for great online business. Without using the plugin also, you can use the theme for creating any kind of website.
Additionally, this theme suits best for various kinds of eLearning websites. Such as language learning, online music training, business marketing courses, fitness courses, etc.
And you get to easily modify the design, layout, and typography of various parts of the site. It includes the header, footer, logo, etc. to meet your brand style.
H) Pros and Cons of LifterLMS
After going through all of the sections on this review, here we’re looking at the pros and cons of the LifterLMS. So, let’s look at them.
Pros of LifterLMS
- The core LifterLMS plugin is free.
- Contains a drag-and-drop course builder.
- Supports integration to WooCommerce.
- Works well with many WordPress plugins, themes, and third-party tools.
- Provides great customer support.
- Support for multimedia lessons.
- Multiple flexible payment options such as one-time, free trials, bundles, etc.
- Offers a 30-day demo for $1.
Cons of LifterLMS
- Relatively, the add-ons are quite expensive.
- Doesn’t have any free add-on for extra features.
- Need to use add-ons for some basic features as well.
- Slight learning curve so can be a little hard for beginners.
I) Alternatives of LifterLMS Plugin
LifterLMS is a great WordPress LMS plugin. However, if you want to consider other plugins, then you can check out its alternatives. For a guide, look at our article on how you can choose the best WordPress plugins.
In this section of the LifterLMS review, we provide you with the best alternatives to the plugin. So, have a quick look to find out about them.
1. LearnDash

LearnDash is one of the most popular and best LMS WordPress plugins with robust features to build an online course site. Using it, you can create an unlimited number of lessons, courses, and quizzes on your WordPress site.
Similarly, you can also create advanced quizzes and assignments using LearnDash. Also, there’s the content dripping feature. By that, you can schedule and release the course on a timely basis.
In comparison to LifterLMS, the overall pricing plans in LearnDash are cheaper. But LearnDash is a premium plugin so the features you get in LifterLMS core aren’t free here.
Thinking of considering this plugin for creating your online course site? Then, to learn more about the plugin, check out our article on LearnDash review. Also, you can check its comparison with LifterLMS in our article LifterLMS vs LearnDash.
2. LearnPress
LearnPress is yet another WordPress plugin to easily create and sell courses online. The user interface of the plugin is very simple so you can do everything with much ease.
Setting up LearnPress on your WordPress dashboard may be relatively more difficult than LifterLMS. However, LearnPress is also a powerful plugin with lots of features even on its free version.
Along with that, there are multiple add-ons available on it. You can use them to add advanced features like payment gateways, certificates, announcements, and many more.
Want to learn more about LearnPress? If that’s the case, then here’s the detailed article on LearnPress review.
3. Tutor LMS
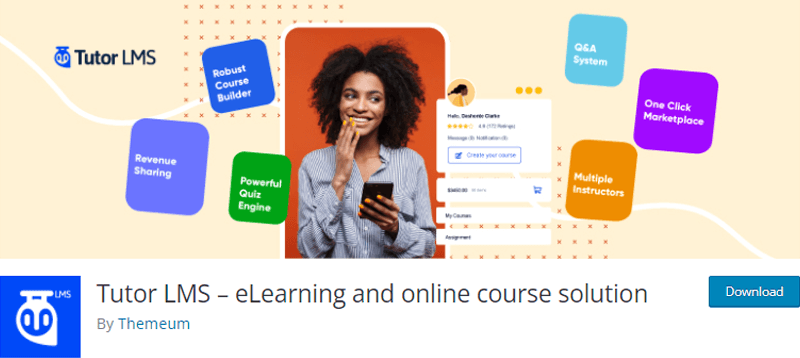
Another remarkable WordPress plugin with an extensive course builder on the list is Tutor LMS. It contains tons of features for creating, selling, and managing world-class online courses.
The best part about it is that there are great features on the free version of this plugin as well. And the pricing plans are also well divided based on the category of users. So, even if you’re an individual, freelancer, or agency, then you can use Tutor LMS to make sites in minutes.
Moreover, you get reports to analyze the best and worst-performing courses. Also, you can track the courses based upon the popularity, review, search, and multiple other filter options.
If you’re willing to consider this LMS plugin for your site, then you should check out its overall review. For that, stay tuned to see our article on the Tutor LMS review.
J) Final Thoughts – Is LifterLMS the Best Course Builder Plugin?
After going through this review, we can say that LifterLMS is an excellent course builder plugin. Here, we not only get to know its features for creating online course sites. But also how well it delivers customer support to its users.
The user interface is also very decent since there’s a powerful course builder. Using it, you can do almost everything in one place. So, this plugin suits best for any expert, school, or company willing to give courses or training online.
Thus, whether you’re a builder, starter, or switcher, you can try out the free version of the plugin. And if it meets your needs, then have a look at its paid add-ons with remarkable features.
So, we recommend you first install and use the plugin to understand its functionality. You can take the guide to do so with this LifterLMS review article.
Conclusion
Yipee! We’re at the end of this article. So, you may have clearly understood about the LifterLMS plugin. Also, we hope that you liked this article on the LifterLMS review.
LifterLMS is a great plugin so you may consider using it. If there’s any confusion or question, then make sure to post a comment below. We’ll try our best to respond to you right away.
Also, make sure to check out some of our latest articles on the cheap WordPress hosting services and best WordPress multisite plugins.
If you like our articles, then follow us on Facebook and Twitter to get more updates.


