Are you wondering what a private page in WordPress is? Or want to create a private page on your WordPress website? Look no further! You’re in the right place.
WordPress is a popular Content Management System that empowers users to create and manage websites easily. One essential feature it offers is the ability to create private pages.
Besides, a private page offers you a secure and exclusive space to share content with a select audience. Whether you want to protect confidential information, create a members-only area, or collaborate on draft content.
So, ready to dive into the world of private pages in WordPress? In this comprehensive beginner’s guide, we’ll walk you through everything you need to know.
Let’s walk together to know what a private page in WordPress is!
A. Exploring the Basics of WordPress Private Page
When we talk about a private page in WordPress, we’re referring to a page that’s only accessible to authorized users. Unlike public pages, private pages provide a level of exclusivity.

These pages are perfect for content you want to limit to a specific audience or keep confidential. Let’s look at some of the benefits of using private pages on your WordPress website.
Benefits of Using Private Pages
Using private pages in WordPress offers a multitude of benefits that can enhance the functionality and security of your website.
Let’s explore the key advantages of utilizing private pages:
- Content Privacy: Private pages are ideal for sensitive information that you don’t want to make available to the public. It ensures that only authorized individuals can access and view the content.
- Restricted Access: You’ll also have full control over who can view your content. You can limit access to specific user roles or even individual users.
- Collaboration: Private pages facilitate collaboration within your WordPress site. You can invite team members or clients to access specific private pages.
- Draft Sharing: Private pages enable you to share drafts without the risk of premature publication. By granting access to specific users, it ensures that only the intended individuals can view your work-in-progress.
- Customization: You can create a private page that serves as a personalized dashboard for each user. Displaying relevant information and resources tailored to their specific needs.
- Monetization Opportunities: Private pages can be leveraged to create premium content or membership areas. Offer exclusive access to valuable resources, tutorials, or services, and monetize your website.
These benefits make private pages a valuable tool for businesses. As well as content creators, and anyone seeking to enhance the security and functionality of their WordPress website.
B. Getting Started with a Private Page
Private pages in WordPress provide a powerful way to control access to specific content on your website. Whether you want to share confidential information with a select group or create exclusive member-only areas.
So follow our step-by-step instructions for creating a private page.
Creating a Private Page Using WordPress Editor
To create a private page or post on WordPress, follow these steps:
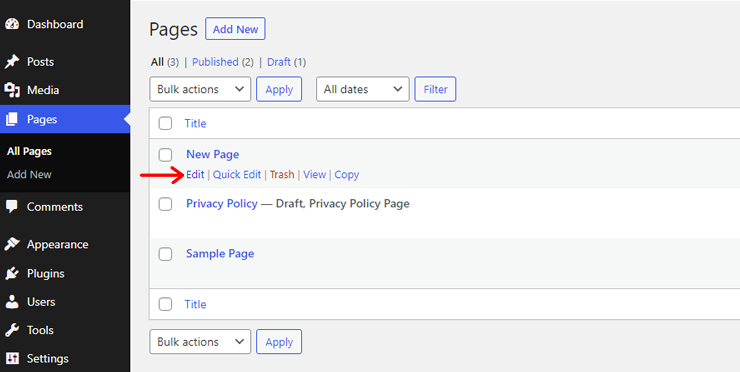
Start by logging into your WordPress dashboard. If you want to make an existing page private, then go to “Pages” and click on “All Pages.”
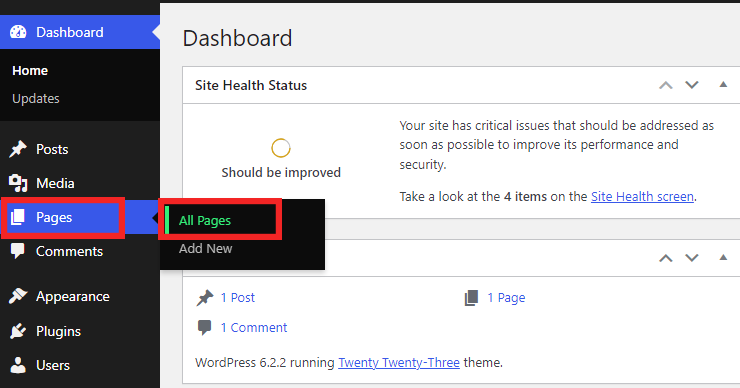
Now select a page you want to make private and click “Edit.”
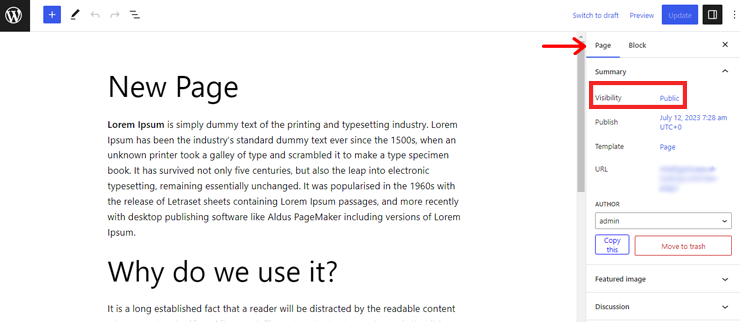
Now, under the “Page” tab, find the “Visibility” option.
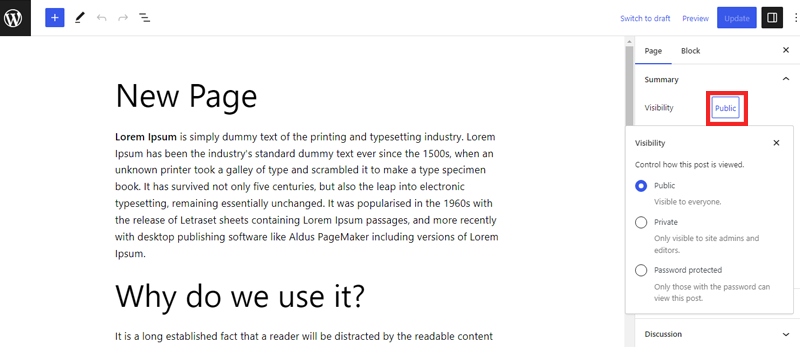
By default, it’ll be set to “Public.” Click on the “Public” link to open the dropdown menu.
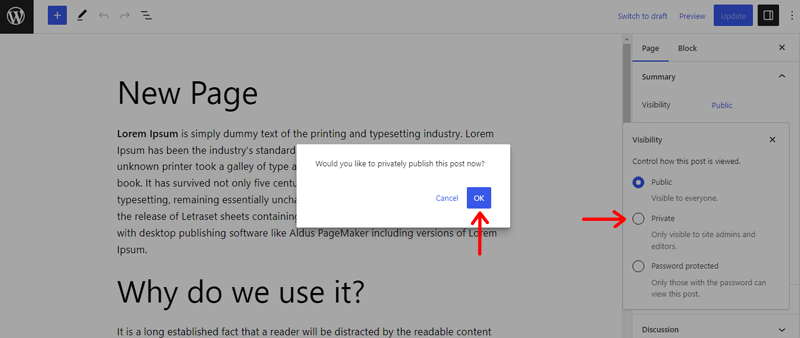
Choose “Private” from the options to restrict access to only admin and editor user types. A pop-up box will appear, there click on the “OK” button.
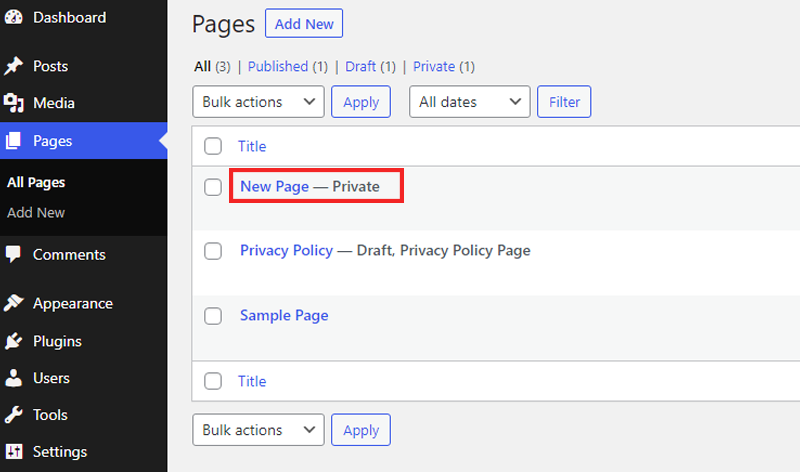
When logged in as an admin or editor, the page content will still be visible, but it’ll be labeled as “Private.”
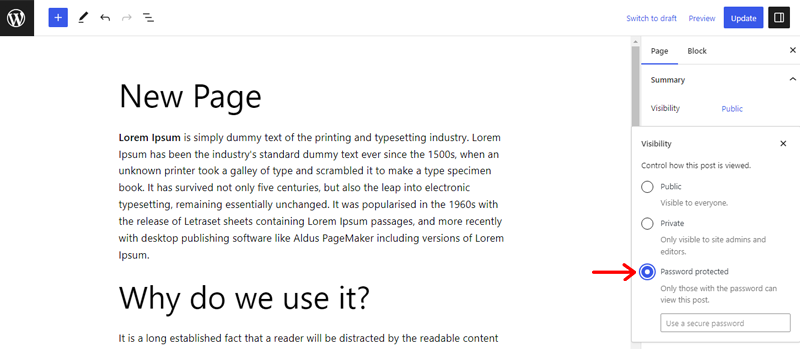
Alternatively, you can set a password to access the private page. Select the “Password Protection” option from the “Visibility” dropdown.
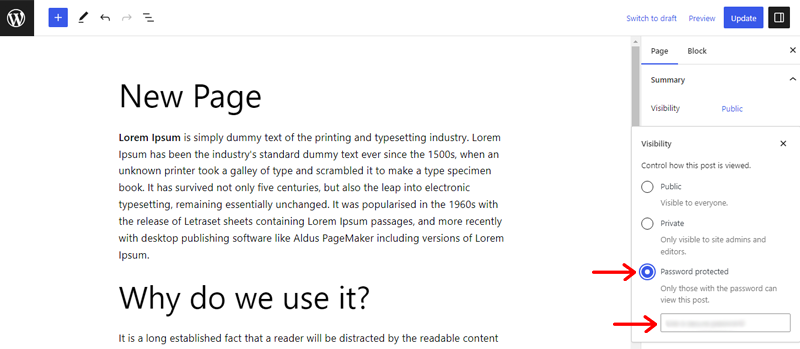
Enter a password that users will need to enter to unlock the page.
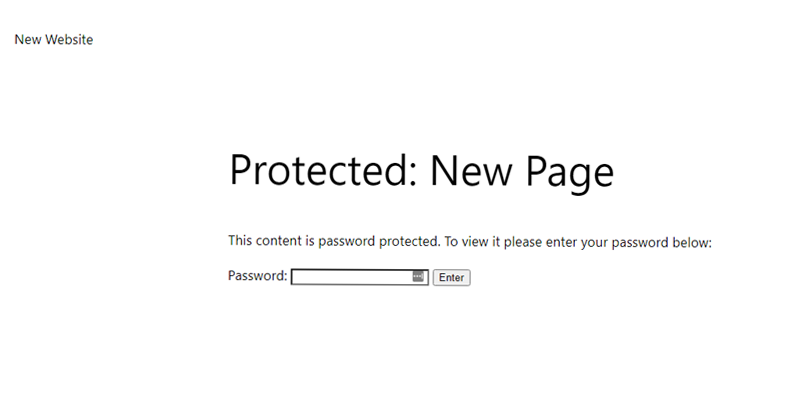
To test the password-protected page, visit the page URL. It’ll be categorized as “Protected,” and users will be prompted to enter the password you set earlier.
By following these steps, you can create private pages or posts on your WordPress website, allowing you to control access and protect your content.
Creating a Private Page Using a WordPress Plugin
Unlock the potential of your WordPress website with the WP Private Content Plus plugin. This powerful tool allows you to create exclusive content for specific user roles or individual users.
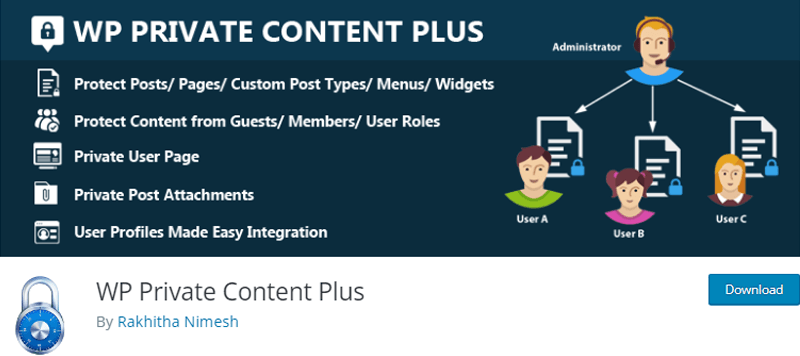
Moreover, with its intuitive interface and extensive features, you can effortlessly protect and manage private content. Hence, making it accessible only to those who have the necessary permissions.
Say goodbye to generic content and hello to a personalized user experience. Learn how to use this plugin below. And discover the possibilities of creating a VIP zone on your website.
Install the Plugin
To install the “WP Private Content Plus” plugin follow these simple instructions:
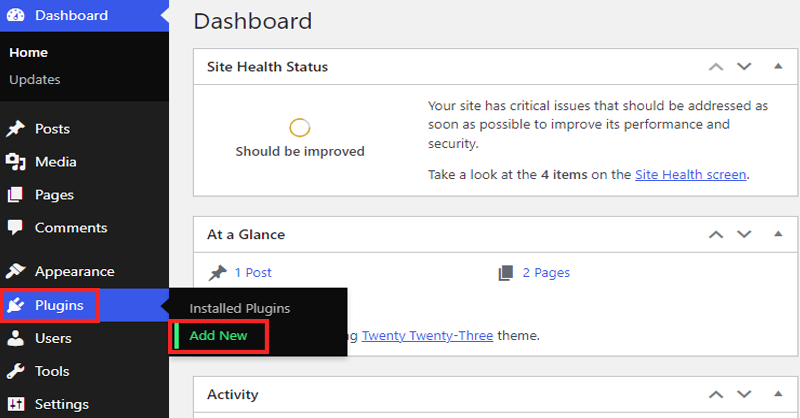
Start by logging in to your WordPress dashboard. Once you are logged in, locate the “Plugins” menu in the left-hand sidebar of your dashboard. Then, click on the “Add New” option.
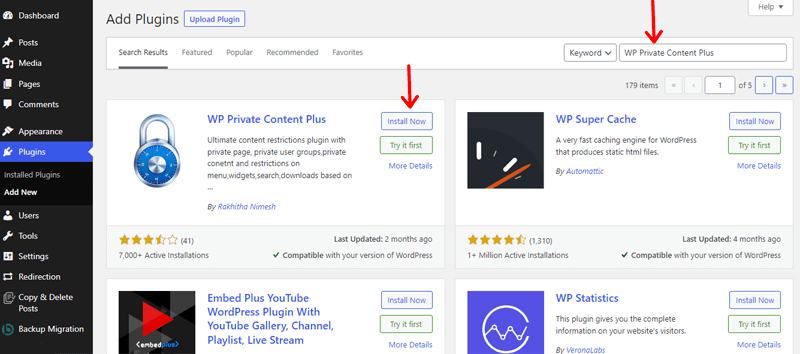
Here you’ll see a search bar, type in “WP Private Content.” Look for the plugin, then click the “Install Now” button located next to the plugin’s name.
Once done, you’ll see an “Activate” button. Click on it to activate the plugin.
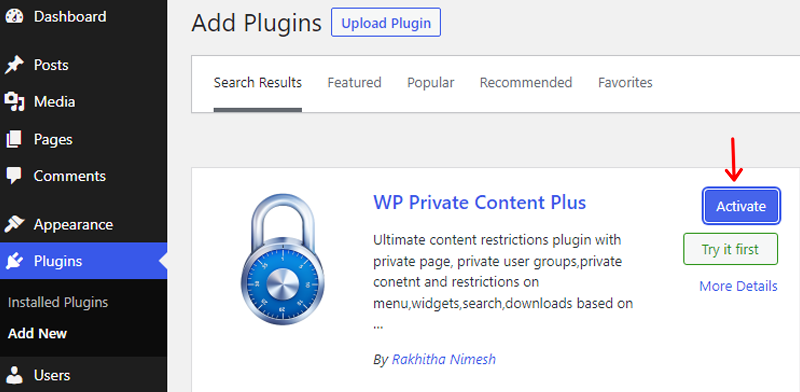
Congratulations! You have successfully installed and activated the WP Private Content plugin on your WordPress website. Learn the detailed process of installing a WordPress plugin from here!
Adding and Creating Private Page Content
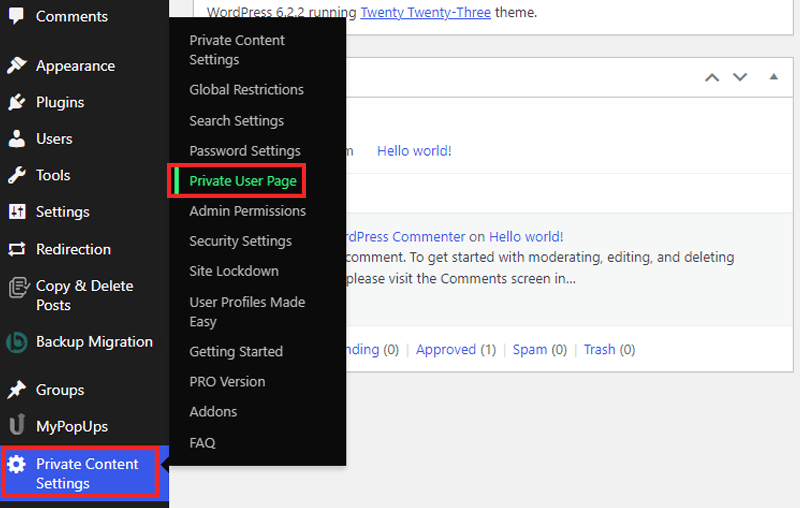
In the left menu of your WordPress dashboard, navigate to “Private Content Settings.” Then, click on “Private User Page” to proceed.
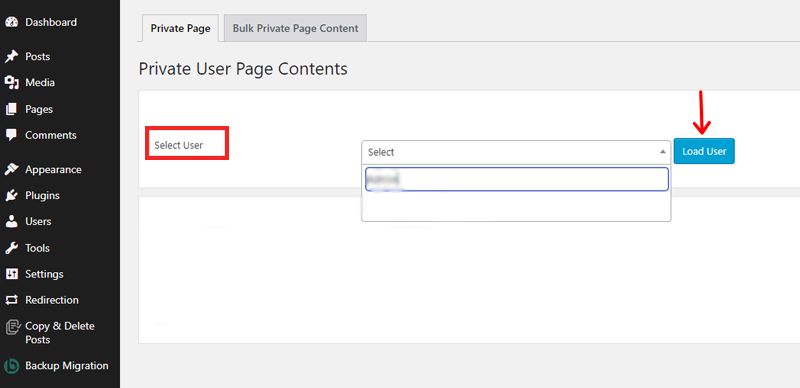
Begin typing the first few characters of the username or display name of the desired user. Then choose the user from the list and click on the “Load User” button.
Further, you can add any type of content specific to that user.
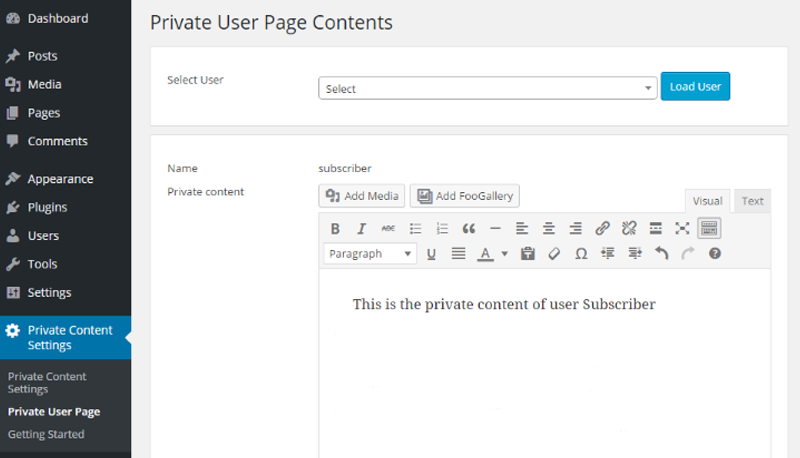
The content added here will only be visible to the selected user on the private page.
In the previous section, we added private content for specific users. Now we need a way to display private content to users.
Create a new page in WordPress where you want to display the private content. Inside the page editor, you’ll see the “Visibility” option. There you can choose who can view this page.
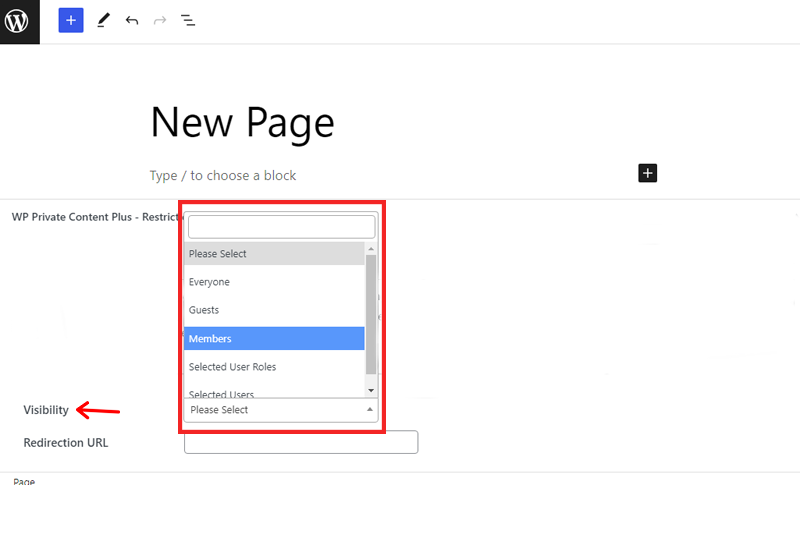
Save the page to ensure your changes are applied.
Once a user logs in and views the private page, they’ll see the private content assigned to them. It’ll remain exclusive to that user, and no other user will be able to view their private content. If the user doesn’t have any private content assigned, a message as “Private Page” will be displayed.
By following these simple steps, you can effectively add and display private content to specific users.
For further help, you can read our guide on how to choose the best WordPress plugins.
C. Understanding Page Visibility Option
When it comes to page visibility in WordPress, you have three primary options: public, private, and password-protected. Each option serves a distinct purpose, and understanding their differences is crucial for managing your website’s content effectively.
Let’s take a closer look at them.
Public Visibility
By default, when you create a page in WordPress, it’s set to “public” visibility. This means that the page is accessible to anyone who visits your website.
Besides, search engines index public pages and display them in search results. Therefore, making them widely visible to the online community. Also, they are suitable for content that you want to share with the general public, like blog posts.
Private Visibility
On the other hand, private pages are designed to restrict access to specific users. When a page is set as private, it remains hidden from the public eye. Only logged-in users with the necessary permissions can view the content.
Moreover, private pages are valuable for sharing sensitive or confidential information, like internal documents. They also provide an extra layer of privacy and exclusivity. Ensuring that only authorized individuals can access the content.
Password-protected Visibility
Another option for controlling access to your pages is the password-protected visibility setting. With this option, you can assign a unique password to a specific page. So, users who possess the correct password can access the content.
Besides, it allows you to share confidential information with a select group of individuals without requiring user accounts. This feature is useful when you want to grant access to a limited audience for a temporary or one-time purpose.
Moreover, to set the visibility of a page, you can easily navigate to the “Post” tab in the WordPress page editor.
Here, you’ll find the “Visibility” option, which allows you to choose between public, private, or password-protected settings.
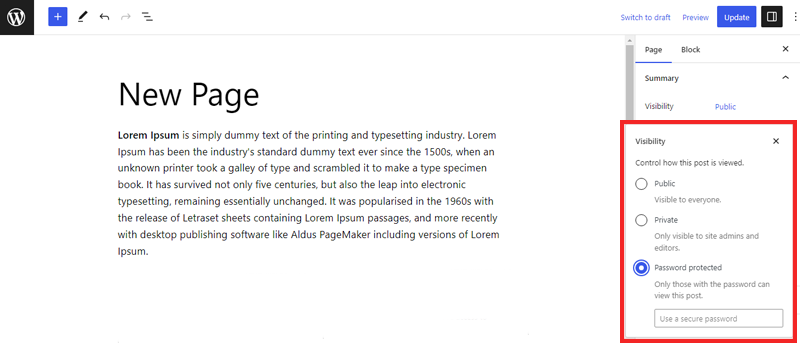
Select the option that aligns with your content’s intended audience and privacy requirements.
Hence understanding these visibility options empowers you to manage your website’s content effectively.
D. Customizing Access to Private Pages
In WordPress, user roles define the level of access and permissions granted to individuals on your website. Understanding user roles is essential for customizing access to private pages.
Besides, WordPress provides several default user roles. Including Administrator, Editor, Author, Contributor, and Subscriber. Let’s explore!
- Administrator: This role has full control over the website, including the ability to create, edit, and delete content.
- Editor: An editor can publish and manage their content and content created by other users.
- Author: Authors can write, edit, and publish their content. However, they cannot modify or publish content created by other users.
- Contributor: Contributors can write and edit their content, but they cannot publish it.
- Subscriber: Subscribers have the most limited role and can only manage their user profile. They do not have access to create or edit any content on the website.
Specifying Access Permissions for Private Pages
To customize access to private pages, you can leverage the capabilities assigned to different user roles. By default, only Administrators and Editors have access to private pages. However, you can modify these permissions using WordPress plugins or custom code.
Here, we’ll show you how to specify access permission to private pages in WordPress using the plugin.
Restricting Access with Plugins
WordPress offers a wide range of plugins that allow you to fine-tune access restrictions for private pages. These plugins provide additional functionality and control over user roles and capabilities.
Here, we’ll show you a demo of restricting access using the Content Control Plugin.
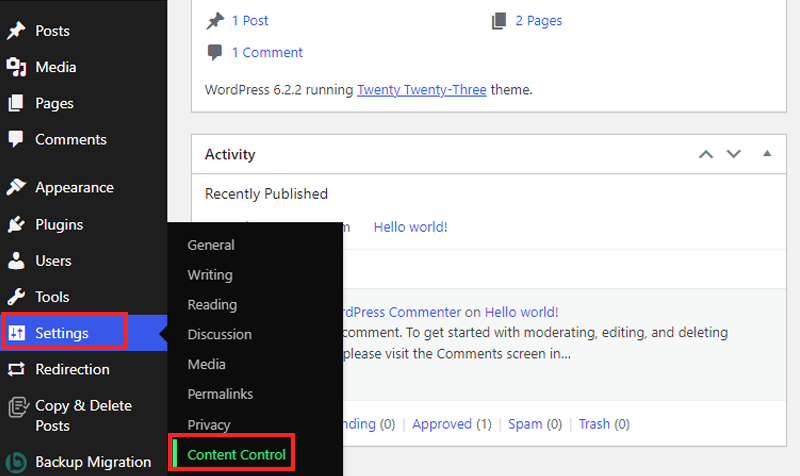
To begin, install the plugin and activate it on your WordPress website. Once the plugin is successfully installed, navigate to the “Settings” option in the dashboard menu and click on “Content Control.”
There, locate the “Restriction” option and click on the “Add Restrictions” tab.
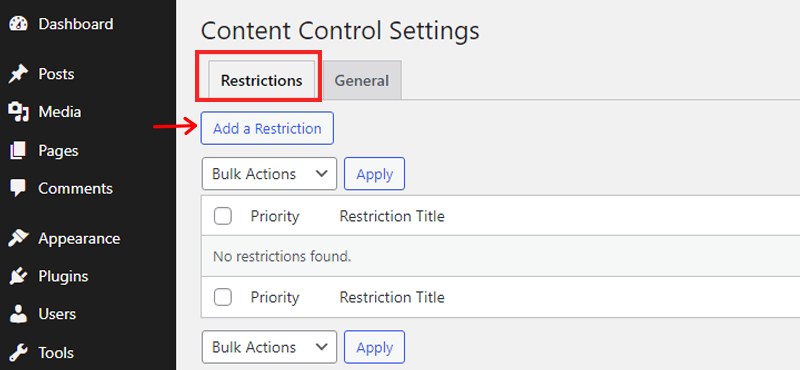
This will open a pop-up window with three distinct options: “General,” “Protection,” and “Content.”
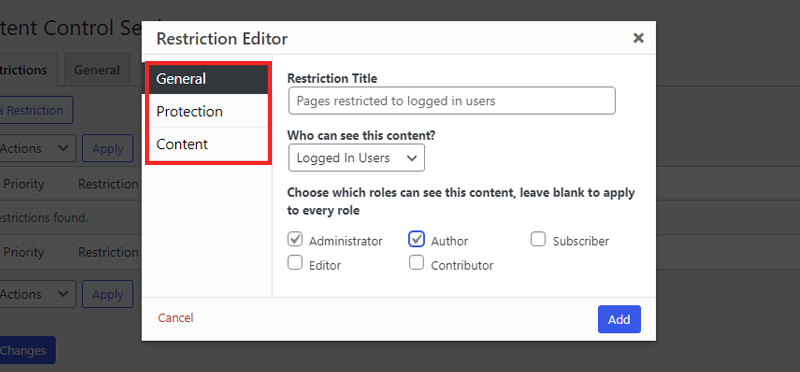
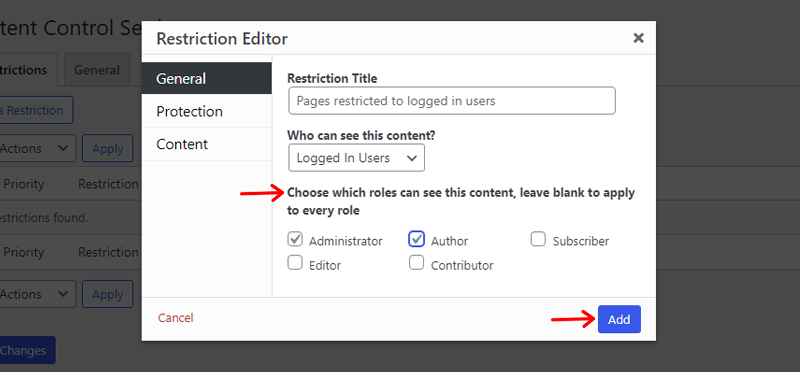
Under the “General” option, you can specify who should have access to the content. Once you have made your selections, click the “Add” button to save the settings.
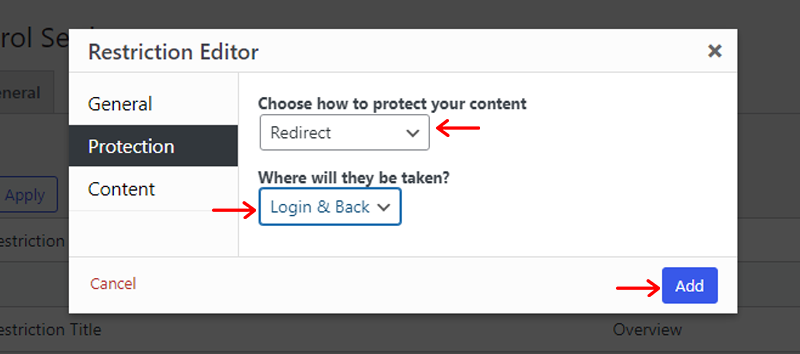
Similarly, under the “Protection” option, you can customize the display for restricted content. You have the option to show a message instead of the restricted content. Or redirect users to log in, or redirect them to another page.
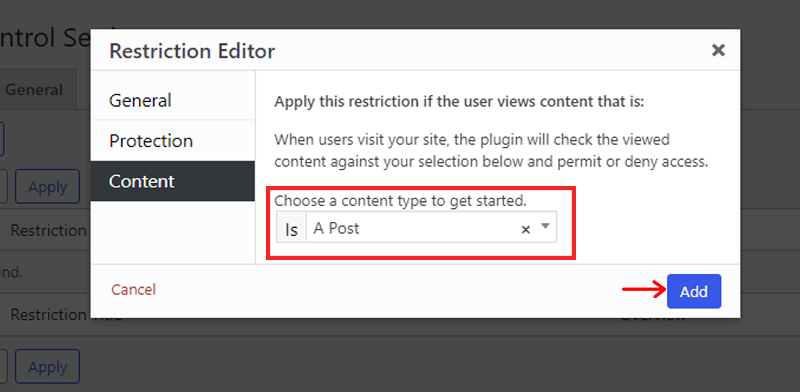
Moving on to the “Content” option, you can select the specific content from your website that you wish to protect. This can include pages, posts, or any other type of content on your site.
Simply choose the desired content and click the “Add” button to save your selection.
By following these steps, you can effectively utilize the Content Control Plugin to restrict access to specific content.
Exploring Other Popular Access Restriction Plugins
When it comes to managing access restrictions for your WordPress website, there are several popular plugins available. Here, we’ll explore three of the most widely used access restriction plugins.
1. Ultimate Members
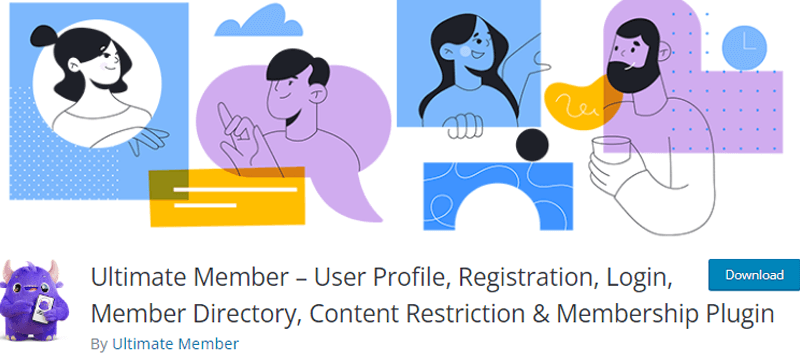
Ultimate Member plugin is a powerful tool that enhances your WordPress website’s user registration and membership functionality. It’s a popular choice for creating user profiles, front-end registration forms, and member directories.
Moreover, this feature-rich plugin allows you to effortlessly create and manage user profiles, and restrict content based on membership levels. As well as facilitate user interactions through private messaging and social connections.
2. User Role Editor
User Role Editor is a powerful plugin for WordPress that allows you to manage and customize user roles on your website. This plugin provides an intuitive interface and extensive functionality for fine-tuning user permissions.

Additionally, you can create new user roles from scratch or modify existing roles to suit your specific needs. Also, this plugin enables you to assign granular capabilities to each role. So, you can grant or restrict access to various features, pages, and functionalities.
3. Advanced Access Manager
Advanced Access Manager plugin is a powerful tool that enhances the access control capabilities of your WordPress website. You can fine-tune and customize access to your content. Ensuring that only authorized users can view and interact with specific pages.

Moreover, you can easily define and manage user roles, modify capabilities, and set access rules for different content types. Also, the intuitive interface allows you to navigate through various settings and configure access permissions with ease.
Managing Private Pages
Once you’ve created private pages, it’s essential to know how to manage and work with them effectively. In this section, we’ll explore the various aspects of managing private pages.
Viewing and Editing Private Pages
Once you’ve set a page as private, it’s crucial to understand how to view and make changes to its content.
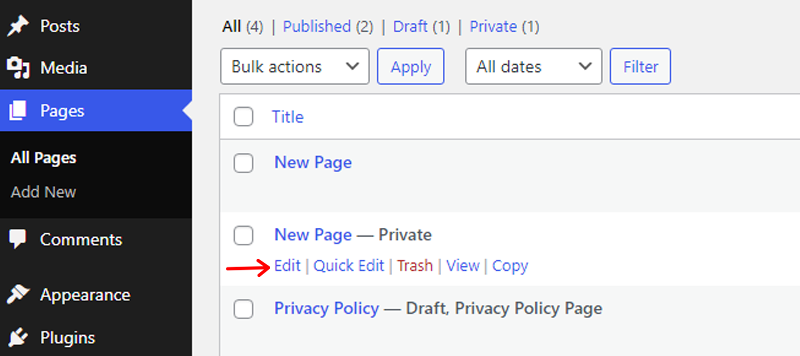
To do this, log in to your WordPress dashboard and navigate to the “Pages” section. Here, you’ll find a list of all your pages, including private ones.
Private pages are often indicated with a specific label “Private” to differentiate them from public pages.
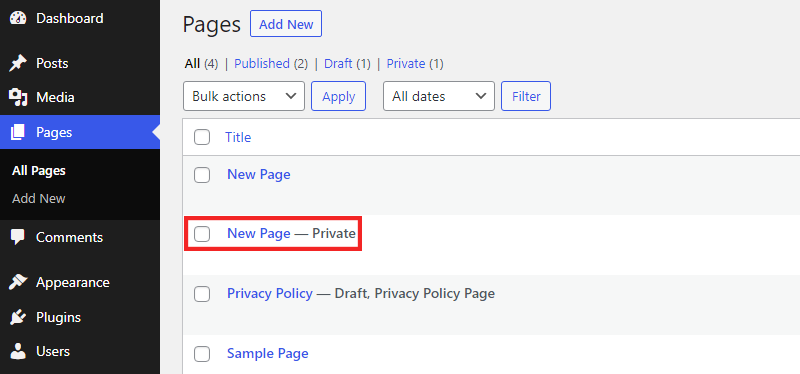
By selecting the desired private page, you can access its content and make edits as needed.
Modifying Content and Settings
When managing private pages, you have the flexibility to modify both the content and settings associated with them.
To edit the content of a private page, click on the “Edit” option within the admin dashboard.
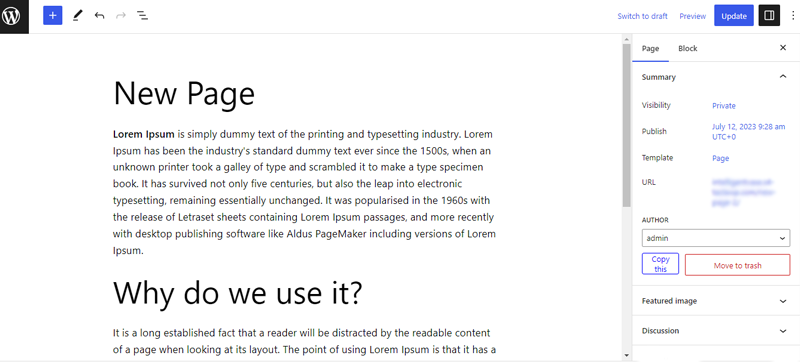
This will open the page editor, where you can make changes, and add or remove text, images, etc.
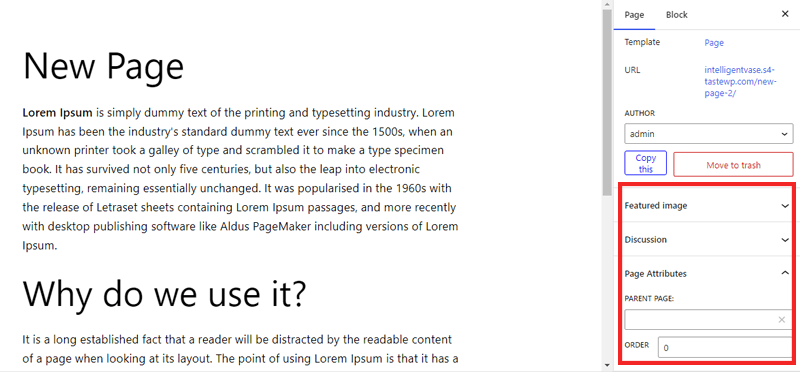
Additionally, you can adjust page attributes, like the featured image or parent page, to align with your preferences.
So, that’s all for our beginner’s guide on what is a private page in WordPress. Below, we’ll provide answers to some of your burning questions regarding this article.
If you’re new to website creation, then learn the fusll guide on how to create a website from scratch here.
Frequently Asked Questions (FAQs)
1. What is the difference between private and public pages in WordPress?
The difference between private and public pages in WordPress is that public pages are accessible to anyone who visits your website, while private pages are restricted and only accessible to authorized users with the necessary permissions.
2. Can I change a public page to a private page?
Yes, you can change a public page to a private page in WordPress. Simply edit the page’s visibility settings and switch them from “Public” to “Private.”
3. How can I troubleshoot issues with private page visibility or access restrictions?
You can start by double-checking the visibility settings of the page. Ensure that it’s set to “Private” and that the appropriate user roles or individuals have the necessary permissions to access the page.
4. Can I monetize private pages?
Yes, you can monetize private pages in WordPress. By creating exclusive or premium content, and charging users for access to these private pages. You can do this by using membership plugins or e-commerce solutions that allow you to manage subscriptions or one-time purchases.
5. Can I track and monitor who accesses my private pages in WordPress?
You can utilize third-party analytics tools or plugins to track and monitor user activity on your website. These tools can provide insights into who accesses your private pages, how they engage with the content, etc.
Conclusion
This ends our blog on what is a private page in WordPress. Hopefully, you understand this guide to a private page and its benefits on a website.
In a nutshell, private pages in WordPress offer a valuable solution for controlling access to specific content. By creating and managing private pages, you can protect sensitive information and provide exclusive content on your website.
Please feel free to comment below if you have any queries about this article ‘What a private page in WordPress is’. We’ll try our best to respond with answers.
Also, please read our article on how to make money with a blog and how much it cost to start a blog. Please share this article with your acquaintances if you like it.
Last but not least, follow us on Twitter and Facebook to come across similar articles like this.

