
You might be wondering how to add a logo slider in WordPress? If that’s the case, then you’ve landed on the right page.
Adding logos to your WordPress site is one of the best ways to make your visitors trust your website. There, you can showcase the logos of your partners, clients, sponsors which reflects the transparency of your products or services. Along with that, it increases your brand value and trust among your visitors.
Therefore, it is recommended to add a collection of logos using a slider on your website. Because your visitors will be fully aware of your companies or clients you worked with by sliding the logo. This way, you can obtain new customers easily.
Having said that, you might still be curious about how to add a logo slider in WordPress. Don’t worry! We’ve prepared a complete guide, especially for you.
In this article, we’ll discuss 2 easy ways to add a logo slider in WordPress. So, let’s begin!
Why Would You Want to Add Logo Slider in WordPress?
Before moving to the different ways to add a logo slider in WordPress, let’s discuss the reasons for it.
Logo slider is an excellent way to engage your audience with compelling designs. It enables you to show off your clients, supporters, affiliates, rather than including details about them. As users won’t go through details instead, they’ll consider surfing the slider.
Besides, you can include different aspects of your services within one section using aesthetic and elegant designs in the logo slider. Or, upload your own designs to display your business’s service with a few descriptions.
Moreover, you can also add your customer’s review to the testimonial page with the same format as the logo slider. So, other visitors can view them and trust your website even more. This way, you can enhance the brand image of your website.
Now, let’s dive into the ways!
2 Easy Ways to Add Logo Slider in WordPress
We’ve listed some of the easiest ways to add a logo slider to the WordPress website. So, let’s start!
Method 1: Using Logo Slider WordPress Plugin
One of the easiest methods to add a logo slider in WordPress is using a plugin. As there are several plugins available it might be a hassle to go through each plugin to select one suitable for you.
So, here’re some of the best plugins to add logo slider in WordPress. Let’s go!
Best Logo Slider Plugins
Go through the description of each plugin we’ve handpicked to determine which is best suited for you.
1. GS Logo Slider
GS Logo Slider is one of the best WordPress slider plugins for displaying your client’s logo on your website. You can display a slider carousel with a ticker style flow and the logo image with or without clickable caption. Also, you can display multiple logo sliders on the same page from categories.

Along with that, you can have control over slider sliding speed, autoplay, pagination, color settings, etc. You’ll be able to set the logos moving direction, such as right to left or left to right.
Besides, its easy-to-use interface allows you to manage, edit, create and delete logos within a click. And, this plugin is a simple yet powerful plugin that won’t slow your site like many other slider plugins.
Pricing:
You can download the free version of the GS Logo Slider plugin from WordPress.org. Or, you can directly install and activate the free plugin from your WordPress dashboard.
However, if you want to unlock more features, then you can upgrade it to the premium version where the pricing plans are:
- Starter Plan: $30/year, for a single site, 1 year of support & updates, 7 days money-back guarantee, email support, more.
- Business Plan: $35/year, for up to 5 sites, 1 year of support & updates, 7 days money-back guarantee, priority support, more.
- Agency Plan: $79/year, for unlimited sites, 1 year of support & updates, 7 days money-back guarantee, priority/chat support, more.
2. Logo Carousel
Logo Carousel is yet another stunning logo showcase and client logo gallery plugin. It’s aesthetically designed for designers, developers, beginners, and is perfect to display your clients, sponsors, partners, affiliates, supporters, brand logos.

While creating a logo carousel, you can control the number of logos, sections, margin, border width, hover color, etc. Along with that, you can turn on/off autoplay, speed of autoplay, infinite loop for the carousel, and so on.
Moreover, this plugin being responsive, you can also define the number of logo columns to keep in different devices. So, the carousel fits and slides perfectly on any device.
Pricing:
Logo Carousel comes with both free and premium versions. The free version is available from the official WordPress plugins directory.
For the premium version, there are 3 different pricing plans:
- Personal Plan: $29/year, for 1 site
- Business Plan: $99/year, for 5 sites
- Agency Plan: $199/year, for unlimited sites
If you want one-time payment for the same plan, then here are the costs of those plans:
- Personal Plan: $129 One-time Payment, for 1 site
- Business Plan: $229 One-time Payment for 5 sites
- Agency Plan: $399 One-time Payment for unlimited sites.
3. Logo Slider WP

Logo Slider WP is another powerful and easy-to-implement logo showcase carousel sliders for WordPress. With this plugin, you’ll be able to display a list of clients, supporters, partners, or sponsor logos on your website.
In addition, you can display an unlimited logo with an infinite slides loop. It also allows you to create an image grid and add an appropriate link to those images.
Along with that, you get to arrange your logos in the slides by dragging and dropping in ascending or descending order. Or, you can sort the logo by specific category like date, ID, title, and much more.
Pricing:
Although you can download the free version of Logo Slider WP from WordPress.org, it also has a premium version.
You can purchase the premium version at $9.99/year with 1-year update and support. And, for the lifetime update and support, it costs $14.99.
For more lists, check our article on the best logo slider WordPress plugins.
Our Recommendation – GS Logo Slider
Among the mentioned plugins, we’ve chosen the GS Logo Slider plugin for this tutorial.
Because GS Logo Slider is one of the most user-friendly plugins to add logo slider. It offers you complete control over adding the logos, arranging them in a certain order, and inserting them in your slides. Along with that, it also lets you customize your slider and add them to your website.
Add Logo Slider using GS Logo Slider WordPress Plugin
Here, we’ll go through the step-by-step process to add a logo slider in WordPress by using the GS Logo Slider plugin.
Now, let’s check out the steps given below:
Step 1: Install and Activate GS Logo Slider Plugin
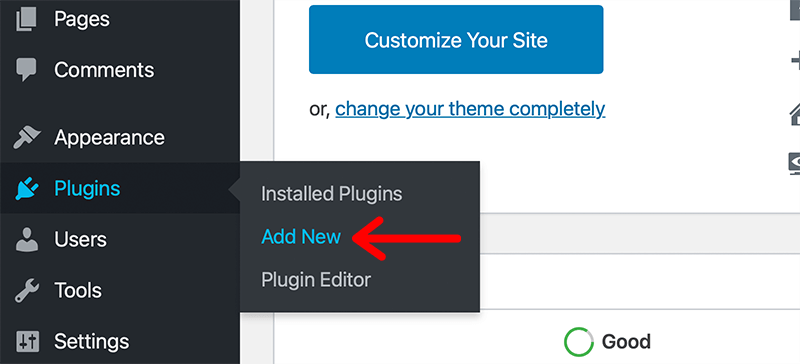
First of all, log in to your WordPress dashboard and click on the Plugins menu and go to the Add New option.
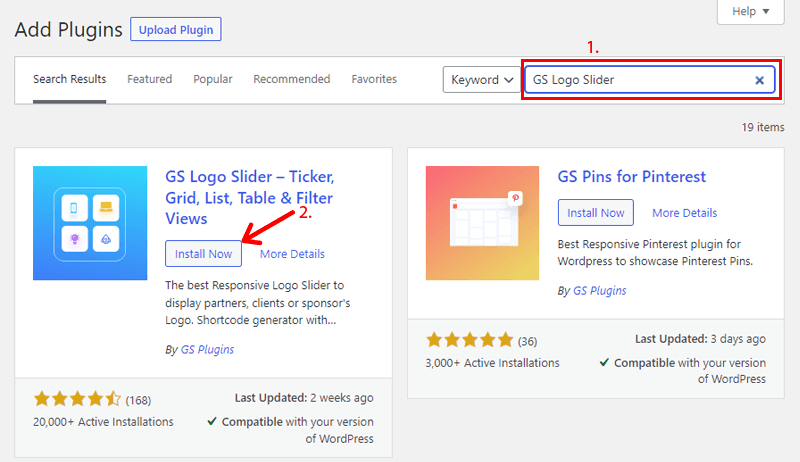
After that, you’ll see a search bar on the right side. There, you need to type “GS Logo Slider” and search the plugin.
Once you’ve found the plugin click on the Install button.
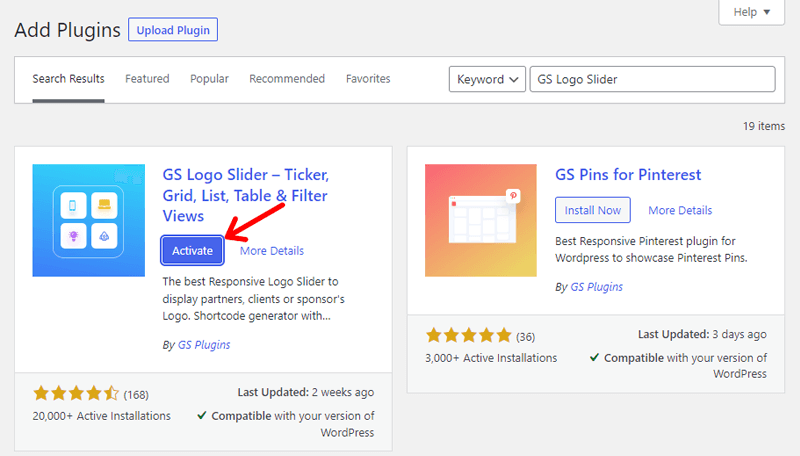
Now that installation is completed, you’ll see an Activate button. Simply, click on that button to check whether the plugin is working or not.
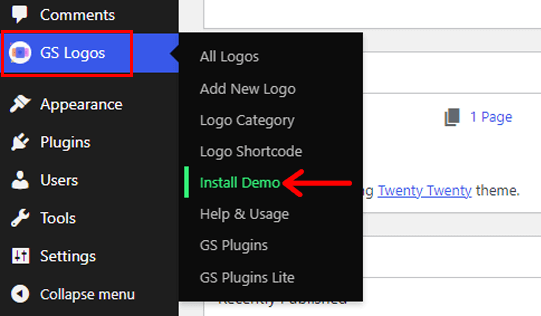
Once the activation is completed, you can see a new menu on your dashboard “GS Logos”.
Step 2: Import Demo Logos
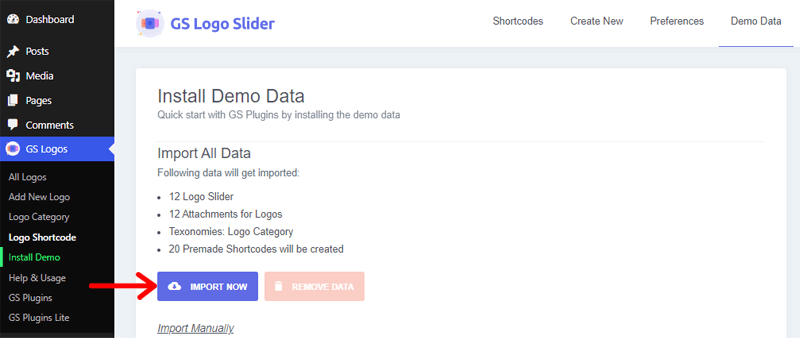
Now, you need to import demo data, which includes logos and shortcodes. For that, go to the GS Logos menu and click on the Install Demo.
After that, you can see the Import Now button. Click on it and it’ll take a few seconds.
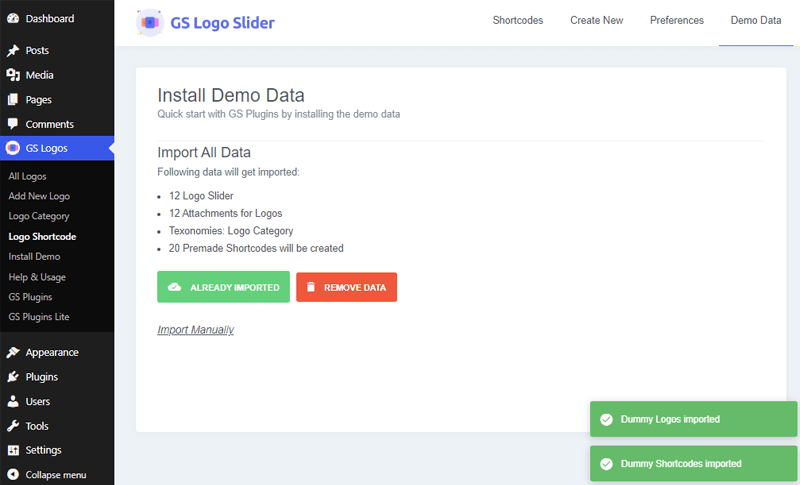
Since all the data are imported, you can see the following page:
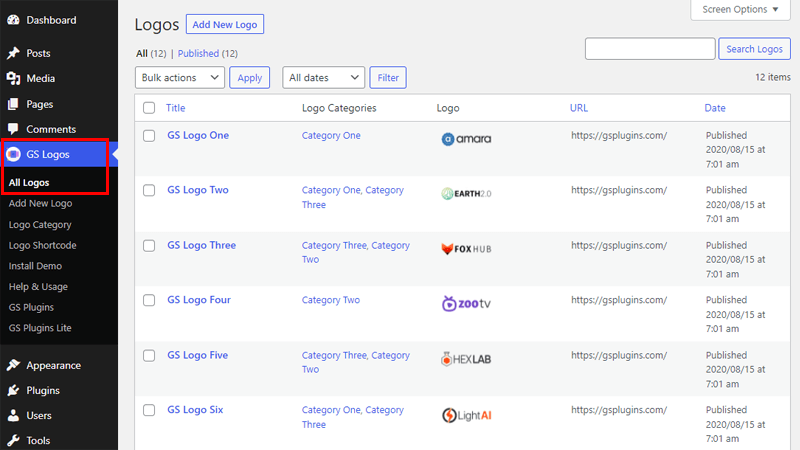
Moving forward, go to the GS Logos>All Logos menu to see all the demo logos that we’ve imported a few moments ago.
Step 3: Add New Logo
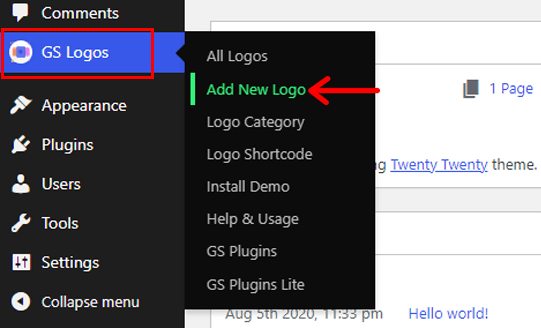
Now, you can see all the imported logos, click on the GS Logos, and go to Add New Logo. There, you’ll see a new interface to add a new logo. Since the GS Logo Slider plugin comes with a custom post type, you can easily add a logo carousel to display anywhere.
On the top, you can see the Add title under Add New Logo. You need to enter the title of your logo. Below, there, you’re able to view a description box. There, you can write the description of the new logo.
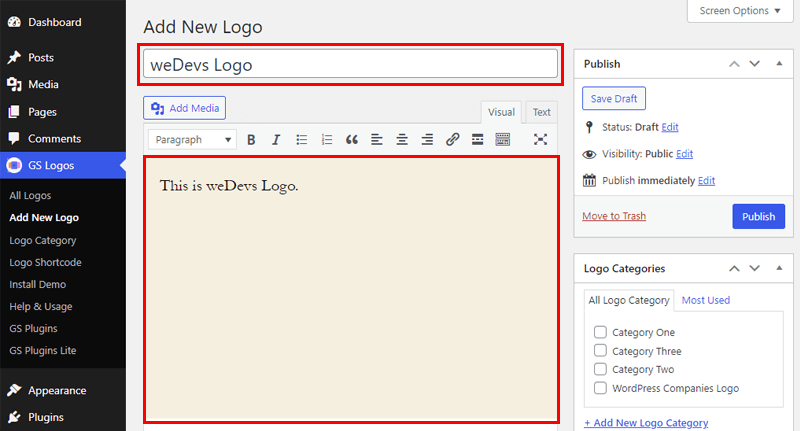
Scrolling down, there’s an Enter Site URL element under the Client’s URL, where you need to type the URL of the logo’s site. So when users click on the logo, they’ll be redirected to the official site of that logo.

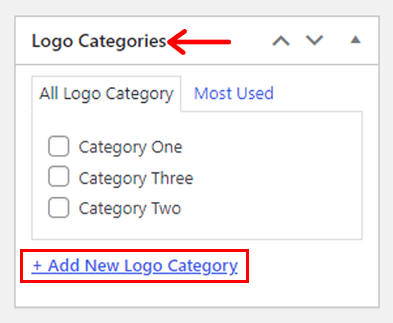
Once the URL is set, explore the existing Logo Categories located on the right side where there are few categories.
If none of the categories are useful, then you can just click on the +Add New Logo Category that expands to configure the category.
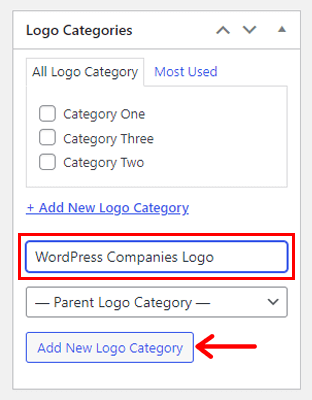
You can name any category suitable for you such as Client Logo, Sponsor Logo, etc. Here, we’ve added “WordPress Companies Logo”. Moving down, you can leave the Parent Logo Category as default. And, then click on Add New Logo Category.
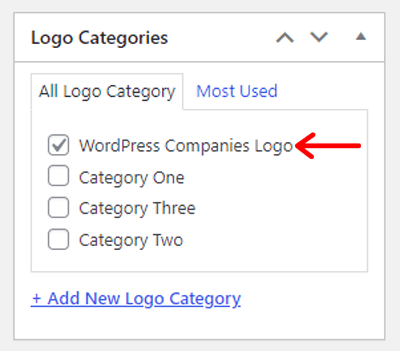
After the new category will be added, you can see as it appears on the Logo Categories as:
Moving on to the most important part is to add the logo. For that, below the “Logo Categories”, there’s Add New Logo Category and you’ll see the Add New Logo link. You just need to click on that link.

After clicking on it, you’ll be switched to the files tab. Now, click on the Select Files button and choose the image you want to upload. Or, you can drag and drop the logo file into the files tab.

Once the file is selected, write the fields like Alt Text, Title, etc. Then, click on the Add New Logo button on the bottom right.
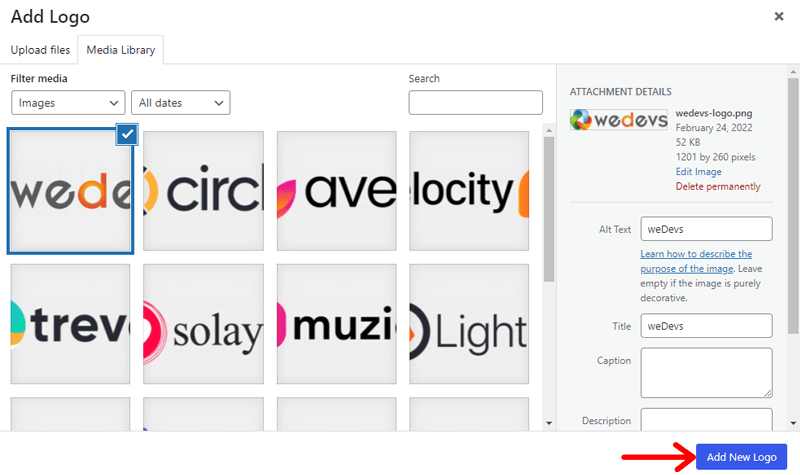
After that, the image has been added. Then, you can hit the Publish button.
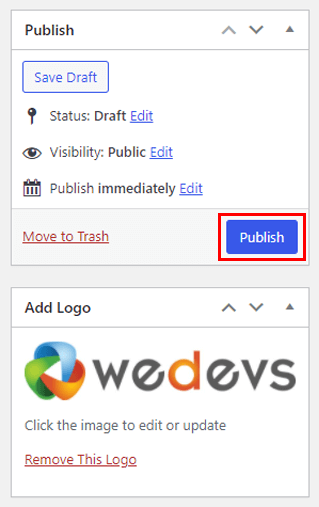
To add more logos, you can repeat the same steps.
Step 4: Editing Existing Logos
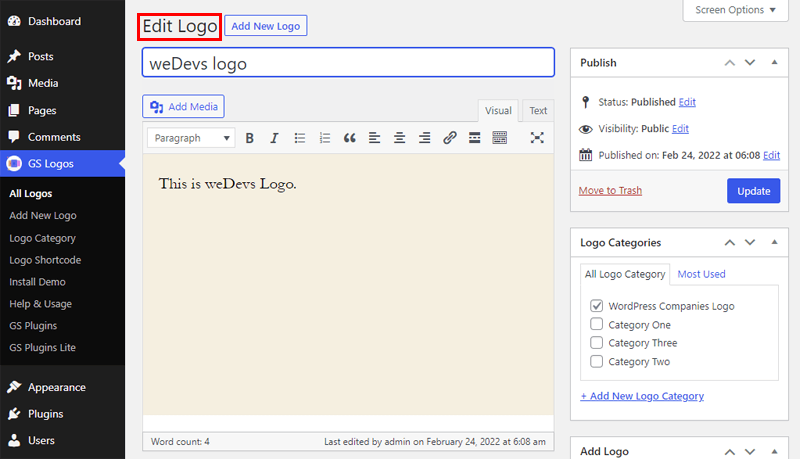
Now, let’s edit an existing logo. Go to the GS Logos>All Logos. Here, you can see the existing logos and the latest one we just added. Once you hover on any logo, there you’ll get the links to edit, quick edit, and trash. So, click on the Edit link.

There, you’ll be able to change the title, description, the client’s URL, category, and edit or change the logo image. Editing or changing the logo image means simply clicking the image and changing the fields like Alt Text, Title, etc.
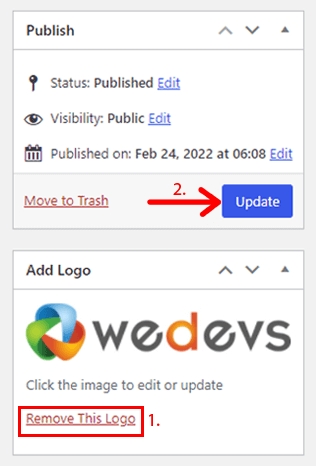
However, if you want to change the image, then first click on the Remove This Logo and upload another image. Once you’ve done all the necessary changes, click on the Update button.
Step 5: Display Logo Slider on WordPress Website
Now, you need to display the logo slider on the website which is the final step of this method.
To do so, you need to create or copy the logo shortcode. Just click on the GS Logos>Logo Shortcode. Here, you’ll find the shortcodes for the slider which is provided by the GS Logo Slider plugin.
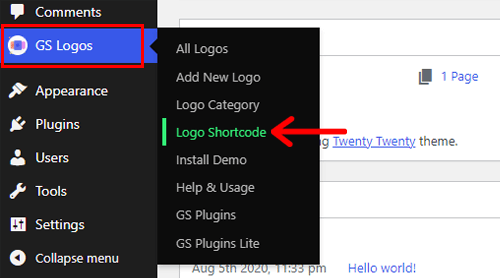
Simply, click on the Create Shortcode button.
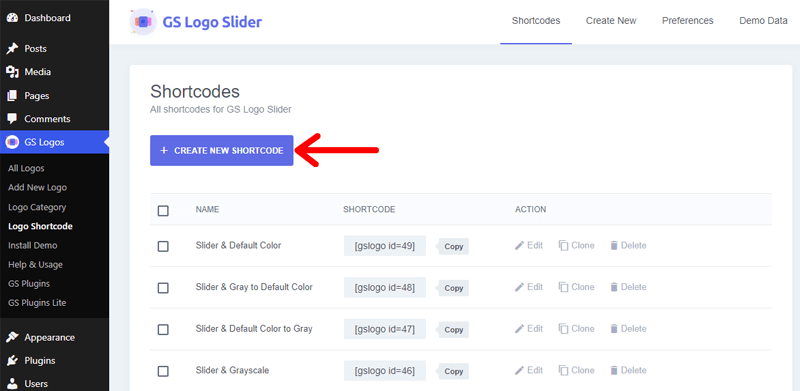
After that, write the name of the Shortcode as Client Logo or Sponsor Logo, WordPress Companies Logo or any, etc. Then, hit the Save Shortcode button.

Now, you need to configure the settings of that shortcode. On the left side, you can see General Settings, Style Settings, and Query Settings.
- General Settings: You can choose the options for Style & theme and Image Size, sliding speed, Navs Position, etc. In contrast to some elements like Logo Title, it’s mostly preferred to Turn Off.

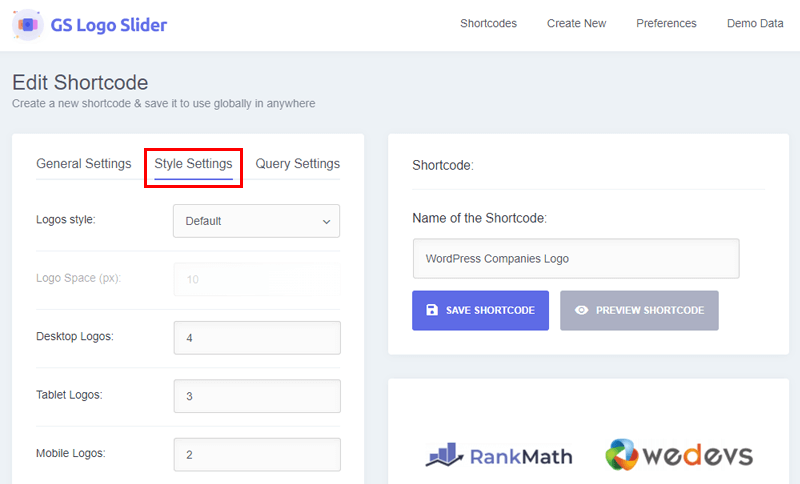
- Style Settings: Select an option for the Logos Style. Also, being the responsive plugin, choose a number of logos to display on desktop, tablet, and mobile. And, the Move Logos element shows how many logos can move at a time which can be left to default. Lastly, checkmark to display the URL of logos on the same tab/new tab.
- Query Settings: Here, you can set the maximum number of logos you want to display in the slider, order, order by, categories, etc. These configurations totally depend on your requirement.
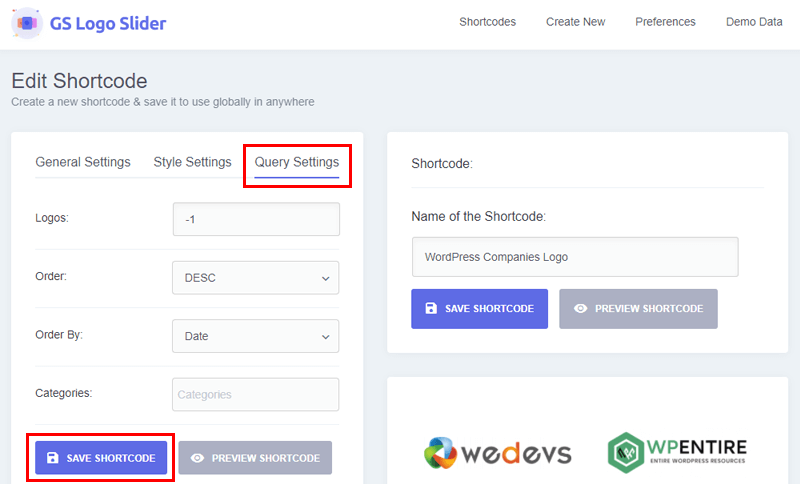
Also, don’t forget to click on the Save Shortcode button after each setting.
After that, on the right side, you can see the shortcode, so click on the Copy button beside it.
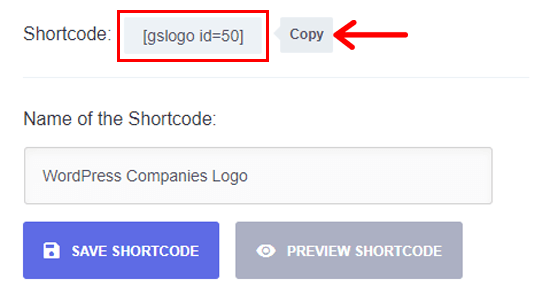
Now, go to the Pages menu of the dashboard and navigate to any page to edit.
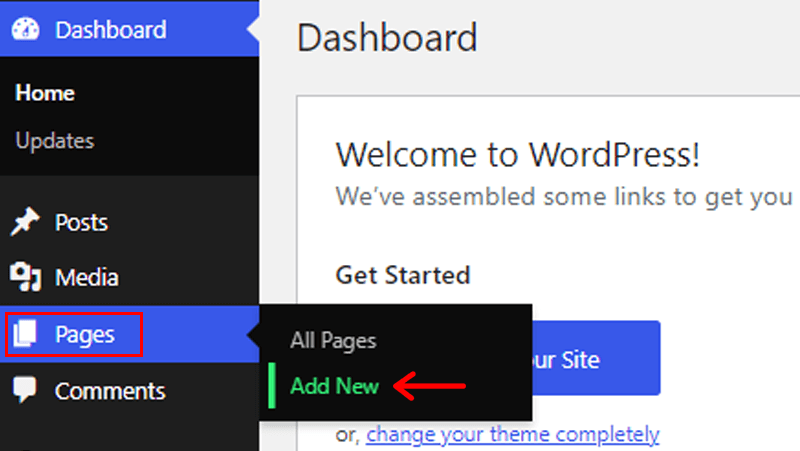
Then, select an ideal block and click on the + icon. There, you can search for the GS Logo Slider, and click on it.

Now, you can click the dropdown list and choose the one that you need to insert on your page. Then, hit the Update button on the top right side of the page.
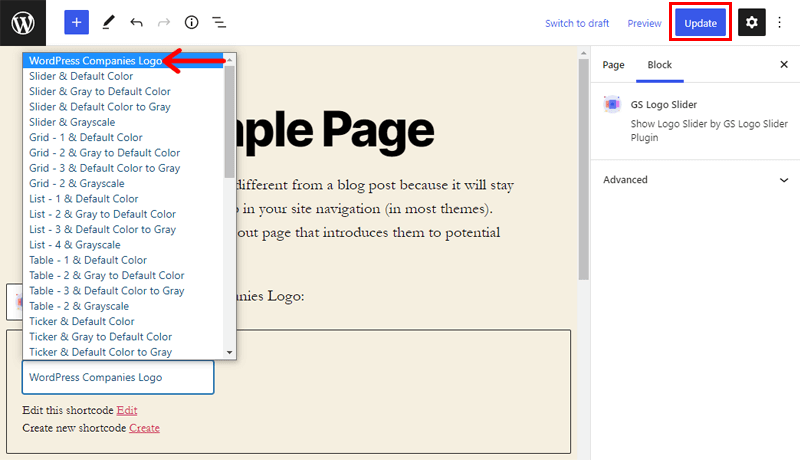
Lastly, you can preview your page to see how your slider appears on the page.

That’s how you can easily add the logo slider on your WordPress website. Lastly, we hope that you’ve found this method quite easy to add the logo slider on your WordPress website.
However, if not then, we’ve included another method too, for adding the logo slider. Let’s have a look at it.
Method 2: Use the Image Carousel Element in Elementor Page Builder Plugin
The next method to add a logo carousel to the WordPress website is to use the Elementor page builder plugin.
Elementor is one of the leading website and page builder plugins which is an intuitive drag and drop editor. It comes with 100+ beautiful full-page templates that you can customize to make your website.

It also has 300+ blocks with pre-designed section templates. The blocks include a variety of categories like service, testimonials, carousel, call-to-action, etc. You can simply save and reuse the blocks and templates on different pages of your website.
For detailed information, check Elementor Review.
Now, let’s move on to the steps to add a logo slider with this method.
Step 1: Install and Activate Elementor
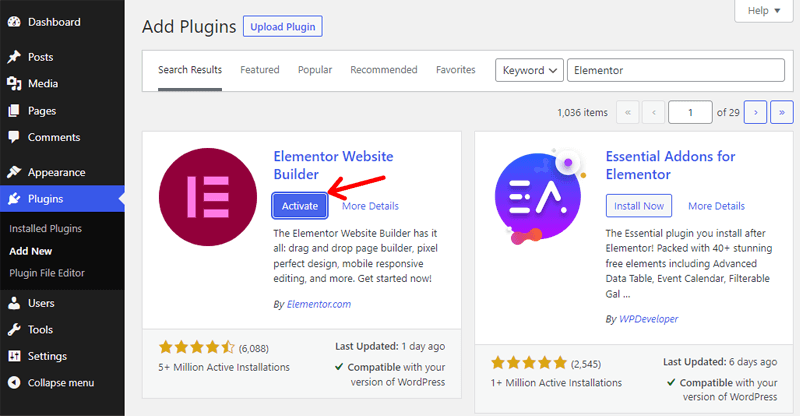
Log in to the WordPress dashboard and go to the Plugins>Add New. Once you’ve found the search bar, type “Elementor” and enter to search. Then, click on the Install button.
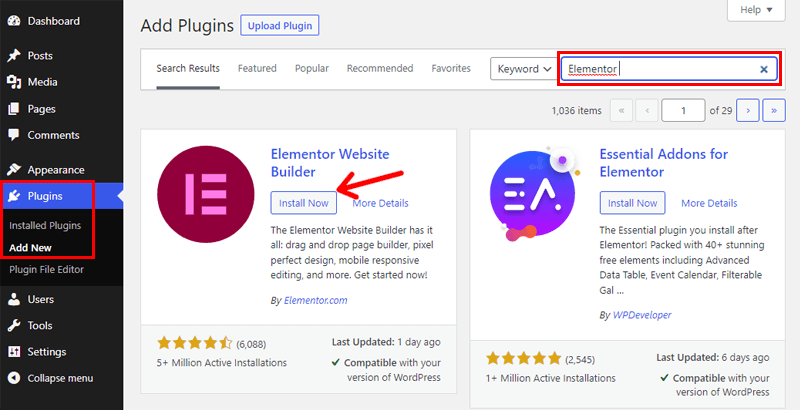
Once the plugin is installed, click on the Activate button to see whether the plugin is working.
Step 2: Edit with Elementor and Add New Section
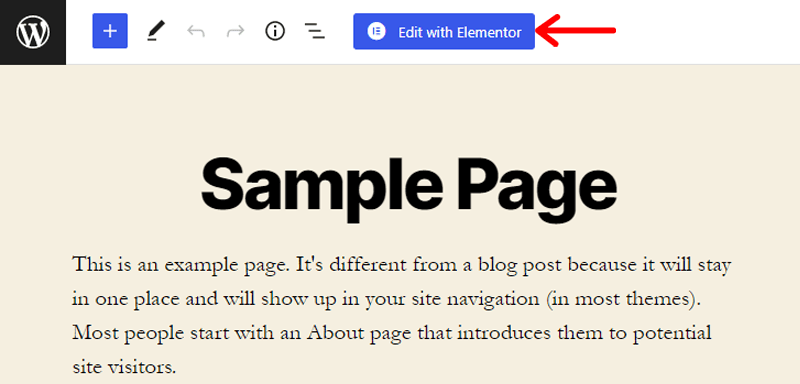
Now, go to the Pages>All Pages menu. There, you can select any page to edit where you want to add a logo slider.

Once you’ve opened the editing page, click on the Edit with Elementor so you can access all the elements of Elementor.
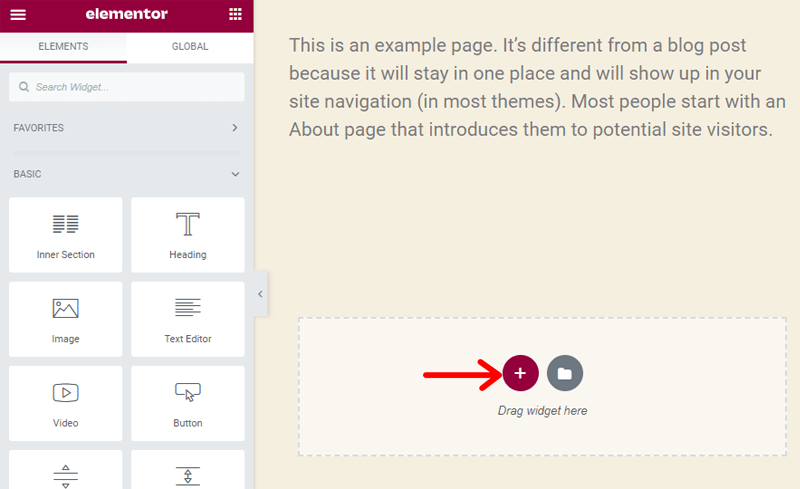
Now that you’re inside the Elementor editor, click on the + icon to add a new section.
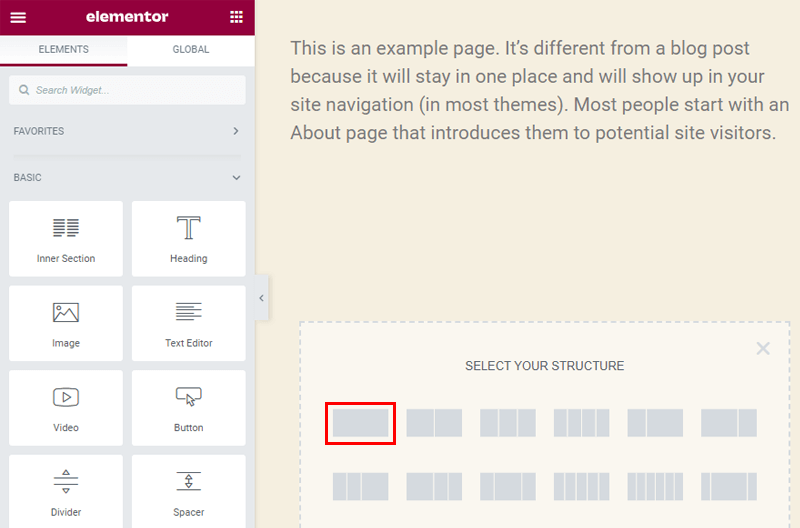
After that, you can select a single column structure.
Step 3: Drag & Drop Image Carousel
You can see a blank section after you’ve selected the single-column structure.
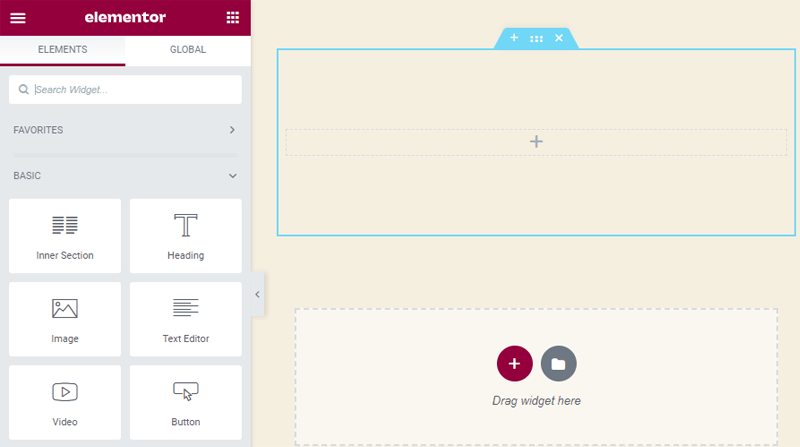
On the blank section, you can drag the widgets from the left side where all the elements are available. So, firstly, search for the Image Carousel element.
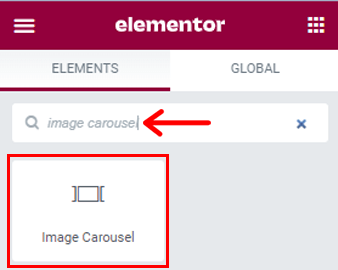
Once you’ve found the Image Carousel element, you can simply drag that element and add it into the blank section.
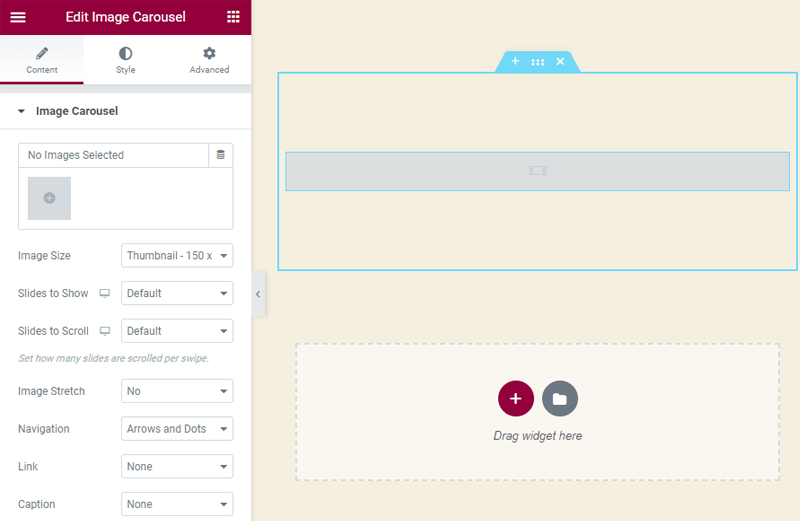
Step 4: Add Logos
Now, you’ll need to add the logo images. On the left side, you can see the section to add images.

Click on the square box with the + icon, and you’ll see the files tab. There, you can upload your own logo or use images of the media library.

Once you’ve uploaded the file, you can configure the fields of that image like Alt Text, Title, etc. then, click on the Create a new gallery button.
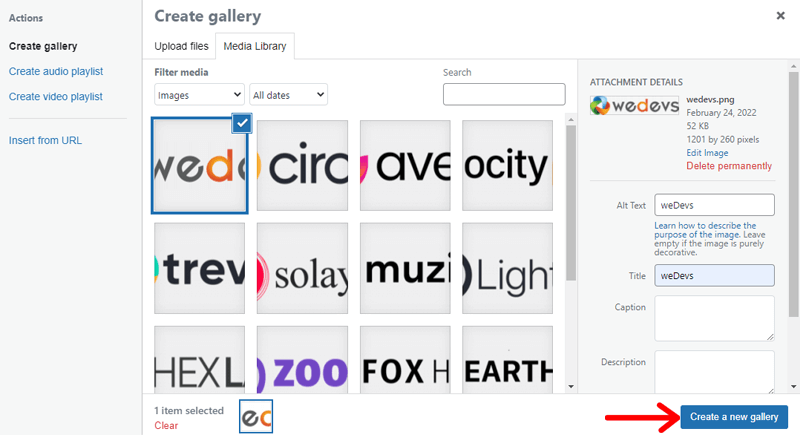
After that, you can click on the Add to gallery which is on the left side.
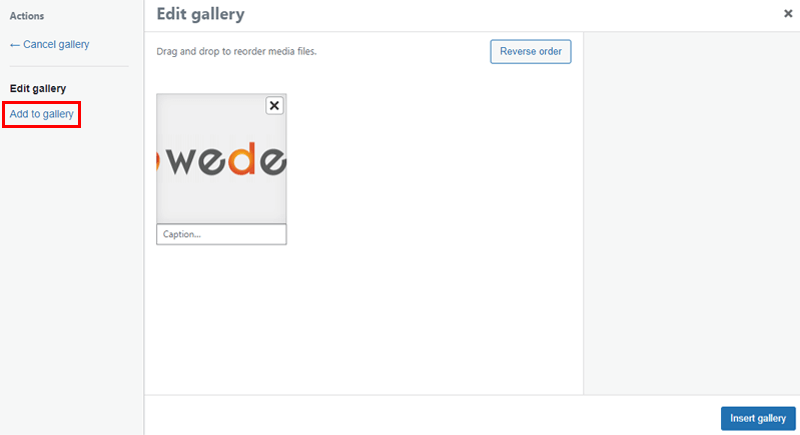
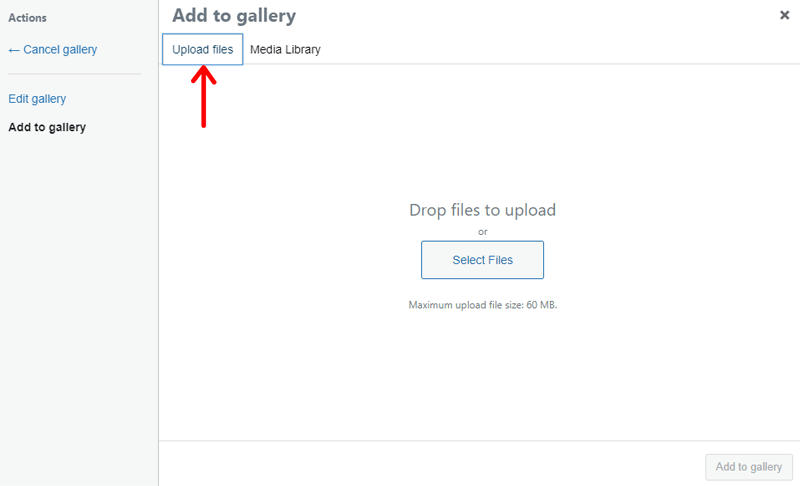
Again, you’re able to click on the Upload files and upload more logo images. Then, hit the Add to gallery button on the bottom right.
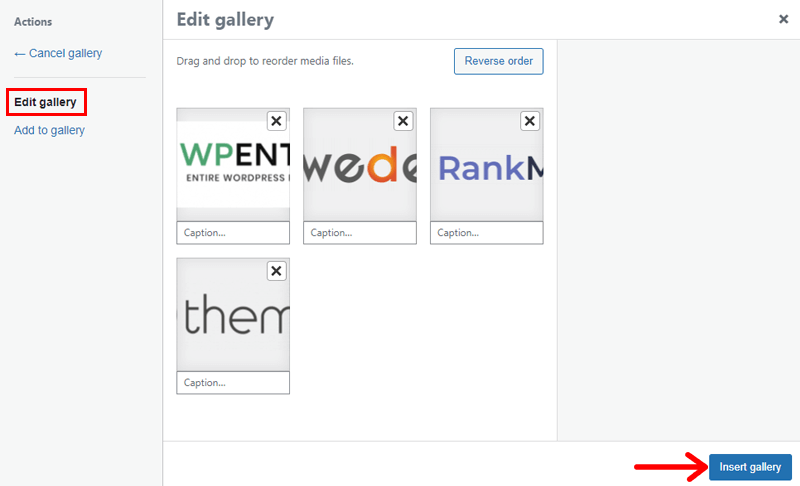
Moreover, you can also click on the Edit gallery to arrange those uploaded files. Once the editing is completed, click on the Insert gallery button.
Step 5: Configure Settings of Carousel
Now, you can see the slider, some configurations are still left to be done.
On the left side, you can change the Image Size to Medium, or the size you want. Also, configure the slides to show, slides to scroll. You can leave these 2 elements into default as well.

Moving below, you get to see the Link element where you can select the Custom URL option. There, you can add the link where the logos will be redirected once users click on them.
Also, click on the settings icon and check-mark to Open in new window and Add nofollow.

You can also add a caption, title, or description of the logos.
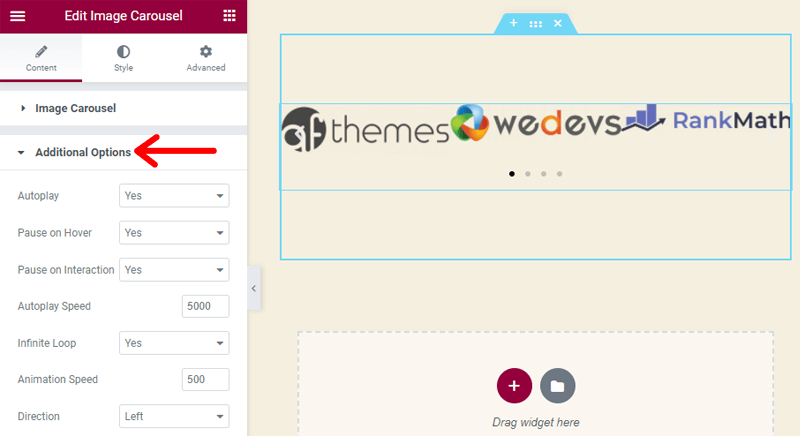
Furthermore, go to the Additional Options which expands with lots of elements to configure. You can configure the settings for autoplay, pause on hover, speed, infinite loop, etc.
Now, you’re all set to go!
So, this is how you can add a logo slider using the Elementor plugin. We hope this method will be useful for you.
Conclusion
That’s all folks! We’ve arrived at the end of this article.
We’ve discussed different methods that can be helpful to add logo slider in WordPress. We hope this article helped you to know how to add logo slider in WordPress. Now, you can easily add logo slider in WordPress using any of these easy methods.
We recommend you to go with the first method, i.e., using the logo slider plugin among the listed methods. This method is easier, convenient, with lots of easy-to-access features.
Also, if you’ve tried any of these methods mentioned above, then do leave us a comment below.
In case you’ve any more queries about adding a logo slider in WordPress, then feel free to ask us. We’ll get back to you as soon as possible. Also, share this article with your friends and colleagues.
You may also like our article on the best Google reviews WordPress plugins & most popular WordPress themes.
Follow us on Facebook and Twitter for more helpful articles.


