Do you want to know how you can easily customize your WordPress dashboard? If that’s a yes, then here it is.
Crowded dashboards are very confusing. There isn’t even a need to access all of its functions. Maybe you’re here because you’re feeling the same with your WordPress dashboard. Isn’t it?
Also, you may want to have a dashboard that matches your brand but you don’t know how to do it. So, the solution to these queries is by customizing the WordPress dashboard. With that, you’ll get a better experience when creating WordPress websites.
For your ease, we’re providing some customization steps for you to follow on how to customize your WordPress dashboard. And you can do all of it with a simple yet powerful dashboard plugin, WP Adminify. So, let’s start.
Why Should You Customize Your WordPress Dashboard?
The WordPress dashboard is like the control panel of your WordPress website. It’s the first screen that you’ll see when you log into the administration area of your site. Here, you get to see an overview of what’s happening on the site. Also, you can perform actions to manage it.
If you want to easily manage your site at the back-end, then you must customize your WordPress dashboard. And in case you’re building websites for your clients, then you can do so according to their needs.
Thus, customizing the dashboard has many advantages. But there remain some disadvantages as well. So, let’s have a quick look at both of them.
Advantages
A custom WordPress dashboard has the following advantages:
- Makes your dashboard lighter and load quicker if you remove unnecessary widgets.
- Easily search and find the desired functions you want.
- Personalizing your dashboard allows you to use your own logo. Also, you can match the panel to your brand and make it look professional.
- Hides the fact that the site is built on WordPress. So, you can use it when your clients don’t want to expose that their site uses WordPress CMS.
Disadvantages
1. Performance Issue
The disadvantage you can have while customizing the dashboard is degradation in its performance. That also only if you heavily customize your WordPress dashboard.
Note that changes in performance depend on what you’re doing for the customization. So, heavy customization can slow back-end performance. However, it doesn’t affect the front-end.
But, maintaining good performance is important if you’ve clients working at the back-end.
2. Less Familiarity With the New Dashboard
Other than that, even if you’re familiar with the WordPress dashboard, then you may get confusion using the new layout. So, it can take some time to get familiar with using it for your work life.
On that note, it’s important to test before and after you make the changes. Or you can first do them in the staging environment. And after you’re good to go, apply it for the live site.
Now, let’s move forward to the major section of this article.
How to Customize Your WordPress Dashboard?
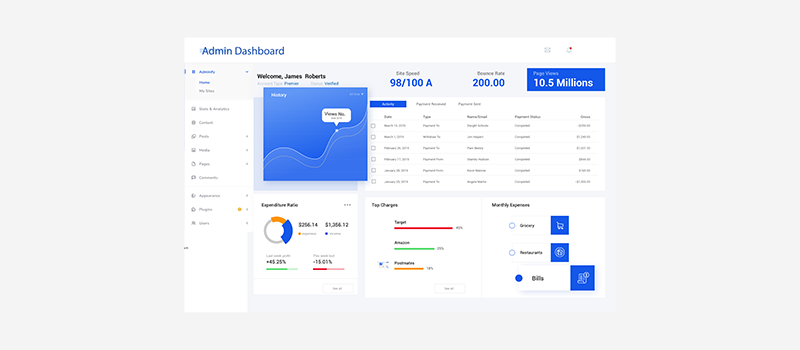
Here, we’re showing you the steps on how to customize your WordPress dashboard. Before that, we want to point out that there are basically 2 ways to do that.
- One, you can alter the code yourself and build everything from scratch.
- Second, you can use a plugin that provides several options to customize your dashboard.
Note that, the option to code yourself is only suitable for the coding experts. On top of that, it’s time-consuming and a long process. Also, it’s not always that your coding will help you to improve your site’s performance. Coding can also get you with something wrong.
On the other hand, using a WordPress plugin simplifies your dashboard customization. With minimal effort, you get lots of features for creating a better user experience on the dashboard.
So, why bother to code when there are tons of amazing plugins for customizing the dashboard.
To inform you, such plugins are specifically called dashboard plugins. And here, we’re determining the steps when using a dashboard plugin.
Therefore, the first step you should do is to choose the best dashboard plugin. So, without further ado, let’s begin.
Step 1: Choose the Best Dashboard Customization Plugin
There are several plugins that allow you to customize your dashboard. So, for the first step, let us help you to find the best dashboard customization plugin.
WP Adminify is one of the best WordPress dashboard customization plugins available in the market. And we highly recommend you to try and use it. It contains both free and premium plans. So, you get to choose and use it according to your needs.
The major reasons why it’s the best plugin to use are:
- If you don’t like the default WordPress dashboard, then this plugin is the best option to completely recreate and customize it.
- Provides a clean and modern user interface for your dashboard.
- Supports the major WordPress themes and plugins. So, freely use them for your site.
- Contains features like hiding comments, suggestions to improve website speed, etc. So, there’s no need to use additional plugins for those features.
These are just some of the reasons. We’ll know more of them when looking at its features and settings when guiding you for the customization steps.
Now, let’s quickly get to know about the WP Adminify plugin first.
An Introduction to WP Adminify – Powerhouse Toolkit for WordPress Dashboard
WP Adminify is a spectacular lightweight WordPress dashboard plugin. It comprises several powerful toolkits with which you can redesign your dashboard as you like. Ultimately, it’ll improve your workflow and experience.
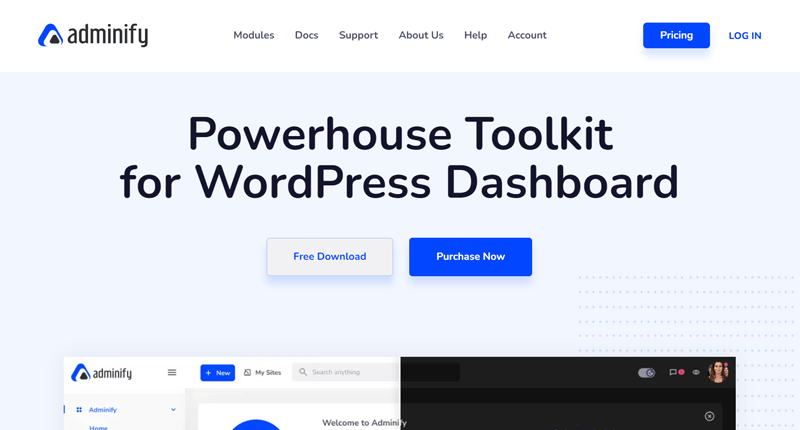
It was recently released in 2021, however, it’s quite a popular option. The sole reason behind it is that it’s a user-friendly plugin and completely white-labeled.
To add more, you can also view all the essential information about your site. It also includes a Server Info option where you get to see the information about your server, database, WordPress, etc.
Not only that but finding a specific component is also quite easy. This is because of the full admin panel search option. Here, you can easily search your posts, pages, themes, plugins, and more. Also all of that from a single place.
Step 2: Install and Activate the WP Adminify Plugin
After you’ve known the basics of the WP Adminify plugin, now decide if you want to try it. If you want to try it to customize your WordPress dashboard, then let’s move forward.
For that, you need to install and activate the plugin. And the process is similar to any other plugin. Here are the steps for both free and premium versions. So, follow them accordingly.
1. Free Version
First, you’ve to log in to your WordPress dashboard and then go to Plugins > Add New.

On the right-hand side, you can see a search box. There, type the keyword ‘WP Adminify’ and enter to search it. Once you find it in the search results, click on the Install Now button. This installs the plugin on your dashboard.
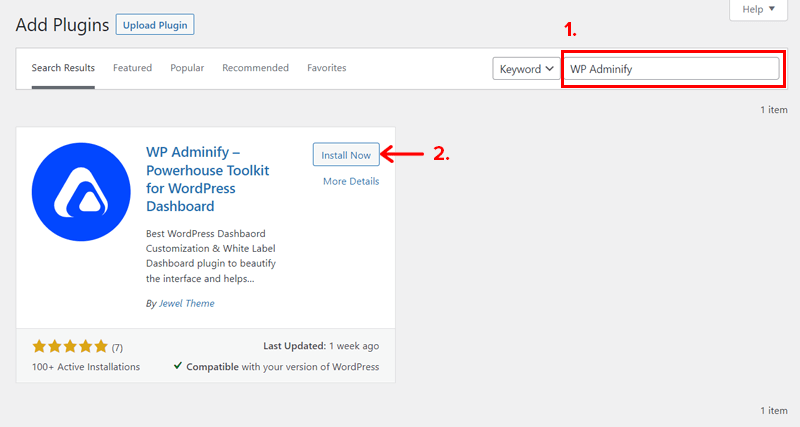
Now, you must click on the Activate button for the activation.

After a while, the free plugin becomes successfully installed and activated on your dashboard. You can see that the dashboard from WP Adminify has taken control over the original WordPress dashboard. Also, there’s a newly added menu ‘WP Adminify’.
Moreover, on that menu, you first see an option to activate the Freemius service. It’s beneficial when you want to receive updates or upgrade to the premium version of the plugin.
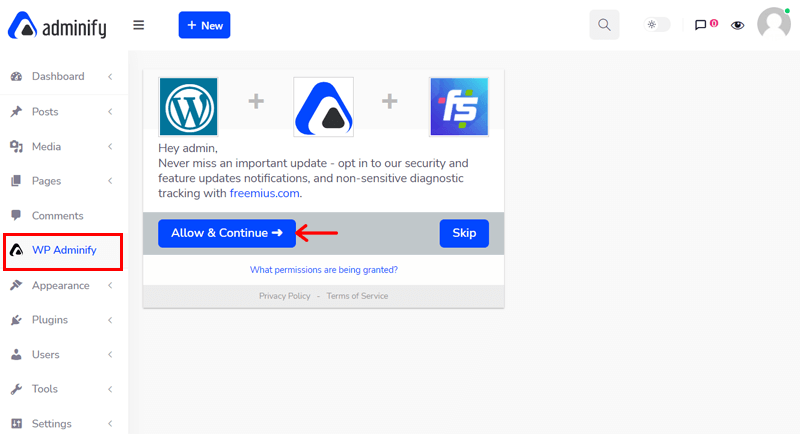
For that, click on the Allow & Continue button first. Then, you’ll receive an email with the activation link. Once you open the link, the service gets activated and you’re ready to go.
2. Pro Version
The free version of WP Adminify contains good features for starting. For more exclusive features, you can purchase its pro version. So, follow these steps.
Step I) Purchasing the Pro Version
First of all, you need to go to the Pricing page on the official website of WP Adminify. Or, you can also go to the Upgrade option on the WP Adminify menu of your WordPress dashboard.
There are 4 pricing plans available namely Personal, Business, Agency, and Enterprise. So, choose one of them that suits your needs. Then, click on its Buy Now button.

After you click it, you will see a purchase form. There, enter your personal and payment information. Also, you can add a coupon code if you’ve one.
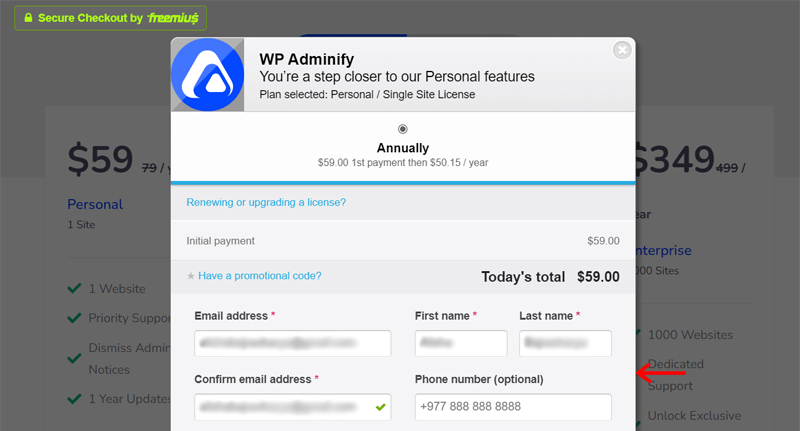
Next, click on the Review Order button. After the purchase becomes successful, you’ll receive an email. It contains the license key, username, password, and download link of the pro plugin.

So, download the plugin on your device. And it’ll be in the form of a ZIP file.
Step II) Upload, Install, and Activate the Pro Plugin
After you get the premium plugin, the next step is to upload it to your dashboard. For that, go to Plugins > Add New first. Then, click on the Upload Plugin button present at the top of this page.
Now, click on the Choose File button and then upload the downloaded ZIP file there. Right after that, click on the Install Now button.
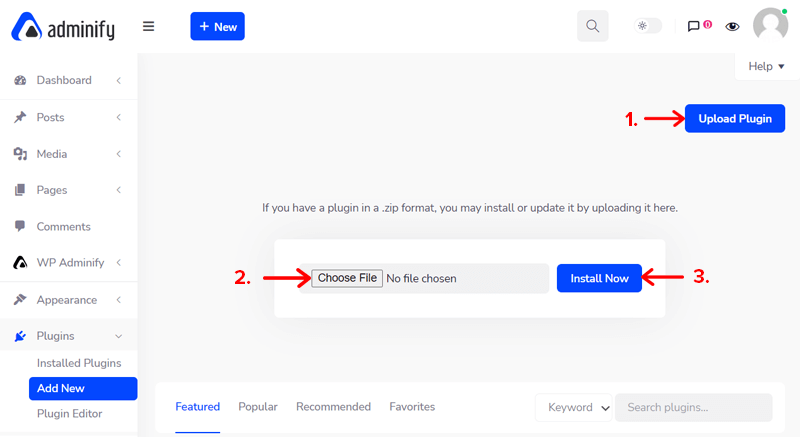
Once the installation is done, lastly click on the Activate link for activation.
Yipee! You’ve completely installed and activated the WP Adminify plugin on your WordPress website.
Step 3: Start Customizing Your WordPress Dashboard Easily (Step-by-Step)
There are many changes that you can notice on your new dashboard. Some functions remain the same as the original WordPress dashboard. While some are replaced with more exciting features.

Some eye-catching options or changes you see clearly on the top bar of this dashboard are:
- WP Adminify logo at the top-left corner.
- + New button to easily create a new post, media, page, and user.
- Light/dark mode option for instant theme change of dashboard, etc.
- Full admin search panel to search anything.
Along with that, the new menu also has some changes. There’s a WP Adminify menu that contains all of the functions to customize your dashboard. So, first, click on that dropdown menu and open the WP Adminify option.
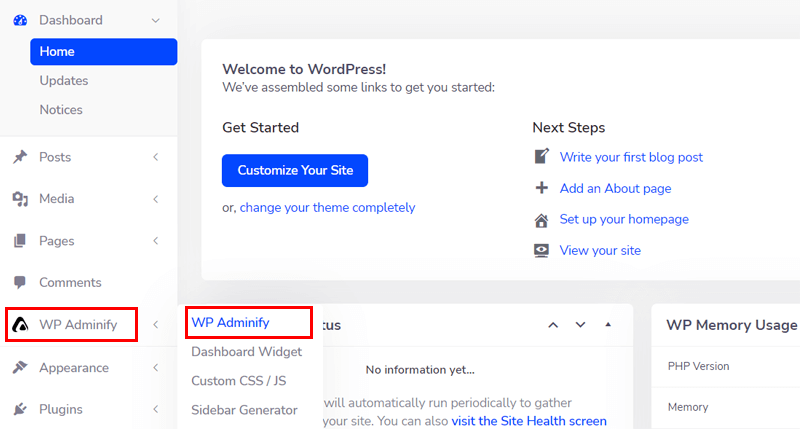
Now, let’s start the steps to easily customize your WordPress dashboard using WP Adminify.
Step I: Enable or Disable the Modules
At first, you can see the option Modules. There, it includes all the modules that are provided by this plugin for customizing your dashboard. As well as some additional functions to add value. Some of the helpful modules are Folders, Admin Notices, Menu Editor, Login Customizer, etc.
Each of the modules is enabled by default. However, you look at each of them and disable the ones that you don’t require.
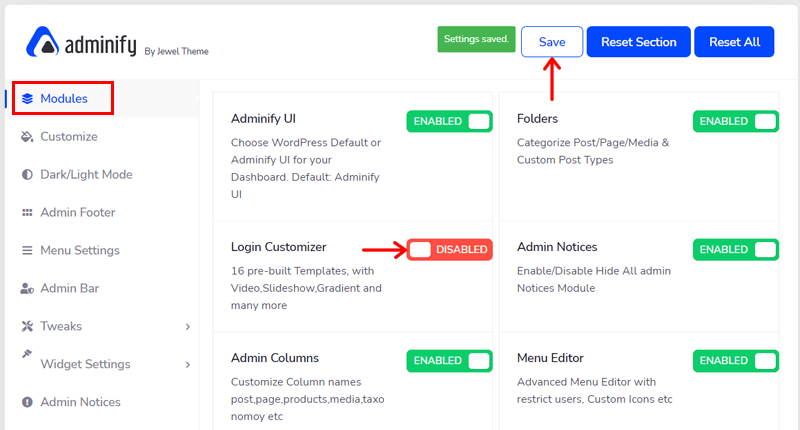
For example, if you don’t want to customize your WordPress login form, then you can disable the Login Customizer module. But don’t forget to save the changes by clicking on the Save button. By doing that, the option to customize your login will not be visible until you enable it.
So, while performing any customization step to your dashboard, make sure that the corresponding module is enabled here.
Step II: Customize the Design
Next is the Customize option. Here, you can customize your dashboard to look the way you want. So, you get to change the body font, background type, background color, button color, etc.

On the free version, you can easily change the background type/color, and button color. Although for body font, you need to purchase the paid version of WP Adminify.
Step III: Switch in Between Light or Dark Mode
Want to have a dark theme dashboard for your WordPress site? No worries! WP Adminify also has that option for you.
You can easily do so from the quick option on the top bar of your dashboard. Here, you can switch the light mode to dark mode and vice versa.
Moreover, to manage this, there’s a Dark/Light Mode option on the WP Adminify menu. So, from here you can change the color mode and also the logotype of the dashboard.
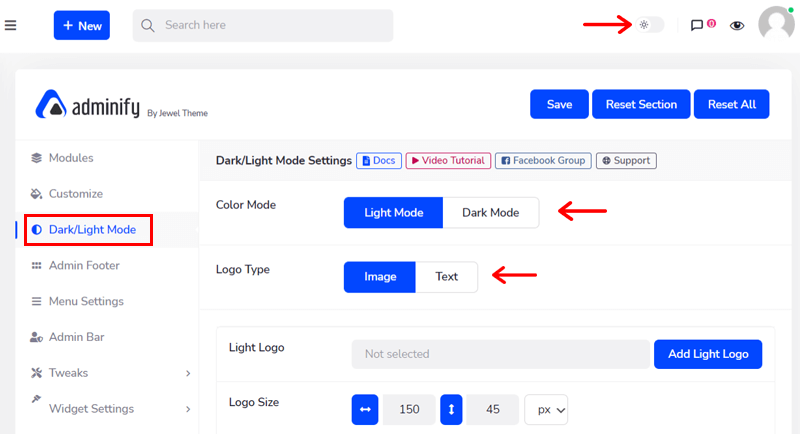
But there are more options here. So, let’s look at their steps.
How to Keep Your Company Logo?
The free version also allows you to keep your own company logo instead. And you can do so from this Dark/Light Mode option.
For that, see the Light Logo section and click the Add Light Logo button. Now, upload the logo of your company there.

Next, choose the size of your logo in the Logo Size option. Lastly, click on the Save button.
Hurray! Now the dashboard looks like your own brand.
How to Schedule Dark Mode?
The paid version of WP Adminify comes with more customization options for you. And that’s for scheduling the dark mode.
If you want to schedule your dark mode, then it’s better to keep 2 sets of logos. The first one is for light mode and the other for dark mode. It’s important for having good readability on both modes.
Now, let’s discuss the steps briefly.
After you activate the pro plugin, you see that there are 4 new options in the Schedule Dark Mode section.
First, you need to enable the Enable Schedule Dark Mode option. Then, there are 2 options in choosing the Schedule Type. They are:
- Custom: To schedule the dark mode manually.
- System: That enables the system to take over.
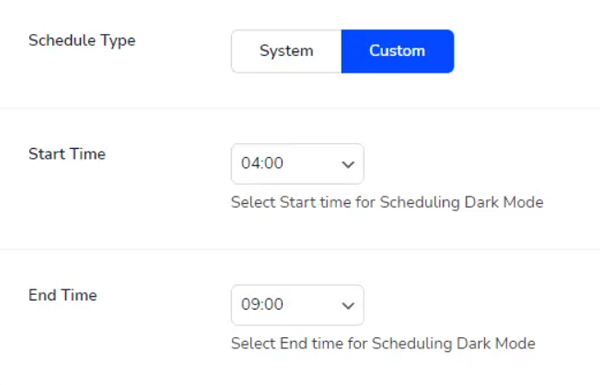
If you choose the Custom option, then you’ve to also select the Start Time and End Time. Again, click on the Save button to save it.
Step IV: Manage the Admin Footer
You may see that there’s some information at the bottom of your dashboard. It includes PHP version, WordPress version, IP, WP Memory Usage, etc.

By default, all this information is enabled by WP Adminify to show on your dashboard. But if you don’t want to show or need them, then you can easily disable them.
For that, you need to go to the Admin Footer option. There, you can disable all info or even certain info that you don’t want to show.
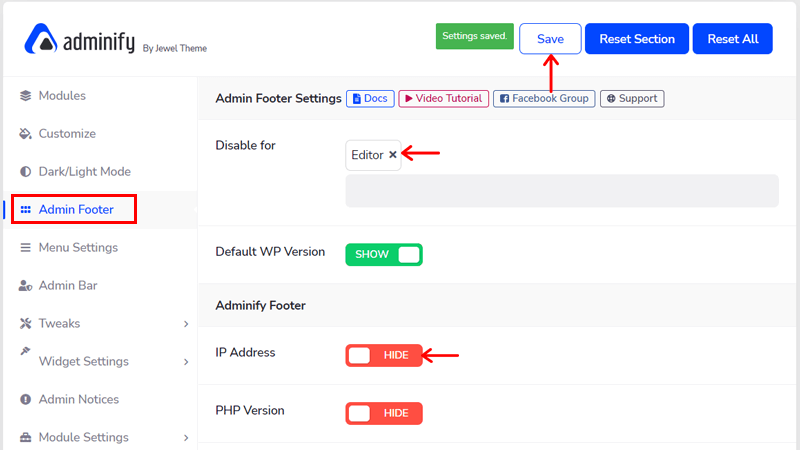
Furthermore, you can disable the info based on the role of the users as well. To do that, choose the user role to whom you don’t want to show and then the info. For example, disable IP address and PHP version for the Editor role.
Lastly, click on the Save button.
Step V: Customize Your Menu
Do you prefer having a horizontal menu on your dashboard? Or want to customize the menu to look the way you want? If that’s so, then you can do all of that from the Menu Settings of WP Adminify.
The Menu Settings option has 2 sections namely Settings and Styles. In the Styles section, there are several styling options for the font, menu, sub-menu, icon, color, etc.
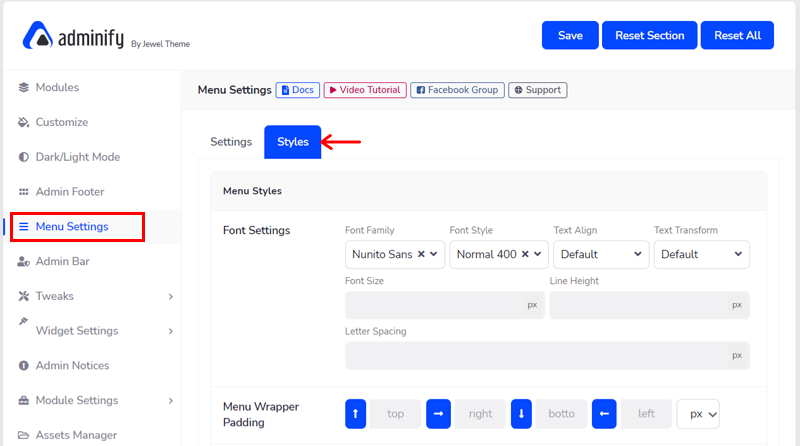
Whereas on the Settings section, you can choose the Menu Type to be vertical or horizontal. And each of the two shows its own settings when you click on one.

Note that keeping a horizontal menu is possible only when you use the pro version of the plugin.
How to Keep a Horizontal Menu on Your Dashboard?
Now, let’s see how you can customize the menu of your dashboard to be horizontal.
First, you need to click on the Horizontal Menu in the Menu Type option. Then, you get to choose the Menu Item Style to be Icon Only, Text Only, or Both.
Also, you can enable or disable some other options to display or hide on your new menu, respectively.

For instance, you can enable Break Long Lists. By doing that, you can break the long menu list that results in not covering the screen width.
In the end, click on the Save button every time you make any changes.
That’s all! Now, you’ve got a horizontal menu on your dashboard.
Step VI: Manage the Admin Bar
After you’ve customized your menu, now you can also customize the top bar. For that, there are Settings and Styles sections in the Admin Bar option.
On the Settings section, you can see the option to enable or disable the admin bar. If you enable it, you get to choose which information to show or hide on the top bar. It includes the comments icon, search form, website icon, etc.

Plus, you can also set the position of the admin bar as top or bottom.
On the other hand, the Style section allows you to customize the top bar. Here, you get to change the background type, background color, text color, button style, and icon color.
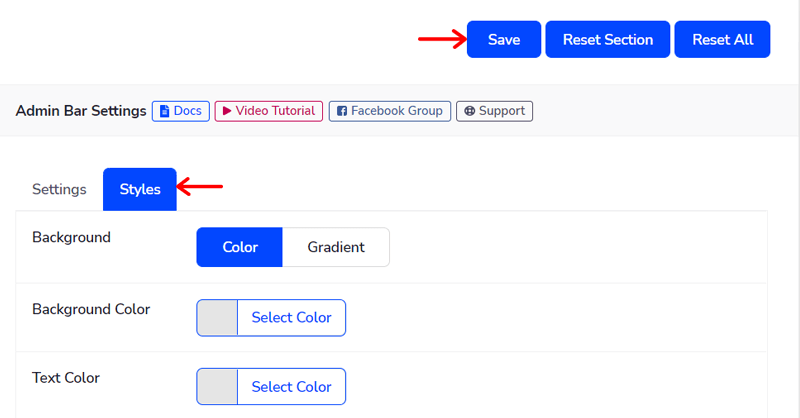
By doing that, you can now click on the Save button.
Step VII: Manage Your Dashboard and Sidebar Widgets
Another thing that you can customize on your dashboard is the widgets. On the Widget Settings option, there are 2 categories i.e. Dashboard Widgets and Sidebar Widgets.
Here, you can determine which widgets to show or hide on the dashboard and sidebar, respectively. That is also based on the user roles at the back-end of your website.

So, select a user role and choose their unnecessary widgets. Like select the Editor user role and choose Activity, At a Glance dashboard widgets, etc. Then, press the Save button.
Overall, this enhances your dashboard performance.
Step VIII: Hide All Admin Notices
Just like the unnecessary widgets, the admin notices are also sometimes bothersome. Generally, they appear at the top of every page in your WordPress dashboard.
With the Admin Notices option, disabling them is easy. Go to this option and disable the types of notices that you don’t want to see.
And you can also do that for every user role separately. For example, select to remove the welcome panel for the Editor role. Finally, don’t forget to save it.
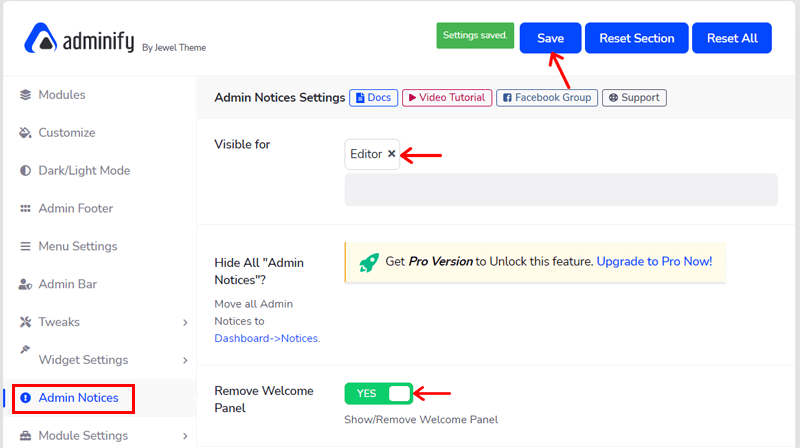
However, when using the free plugin, you can only disable the welcome panel, try the Gutenberg panel, etc.
For hiding all the admin, WordPress core/theme/plugin, and PHP update notices, you need to have the pro plugin.
Step IX: Configure Module Settings
The Modules option already has most of the settings to enable/disable the functions of the plugin. However, some modules require additional settings within them.
And these additional settings are available in the Module Settings option. So, you can configure them to show or hide them as you want. For that, click on this option first.
The important modules that you can set to customize your dashboard are briefly discussed below.
1. Folders
Enabling the Folders module allows you to categorize the posts, media library, and pages in folders. And you can create as many folders as you can. Also, you’re able to simply drag and drop the posts, media files, or pages on the folder you want.

Making folders helps you to easily organize the files. On top of that, you’re able to find and access the posts, media files, and pages you need.
However, each user role may not need to access all the folders. So, on this Folders setting, you can disable them if you don’t want to show them for specific user roles.
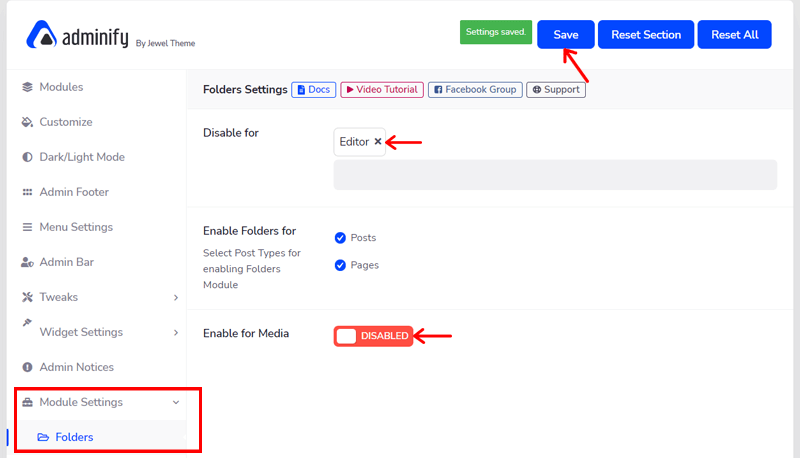
For instance, select Editor role and disable media library to be in folders. To save changes, you must click on the Save button. With that, it’ll remove the folder system from your WordPress dashboard.
2. Post Types Order
WP Adminify supports you to sort any post type in different orders. That also with simple drag and drop.
And the Post Types Order setting contains the option to enable/disable the ability to sort pages, posts, and media files. Moreover, for different user roles, you can choose to allow or deny this ability.
For instance, you can select the Editor role, and then enable sorting by posts. After you make the changes to this setting, click on the Save button.
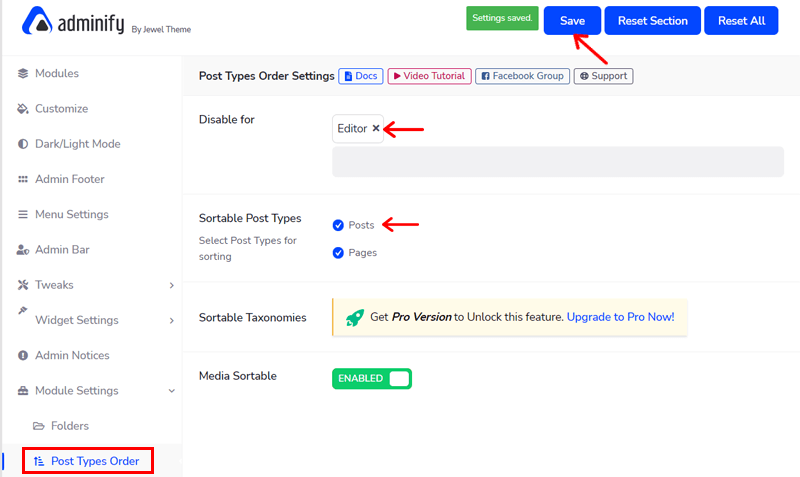
Furthermore, if you use the premium plan, then you also get to sort the WordPress taxonomies. This means you can also sort the categories and tags easing to create the posts and pages.
3. Quick Menu
Did you notice that there’s a floating dashboard menu on your new dashboard? If not, then look at the bottom-right corner of the dashboard. There’s a toggle button and if you hover it, then options to create a new post, page, and media file show up.
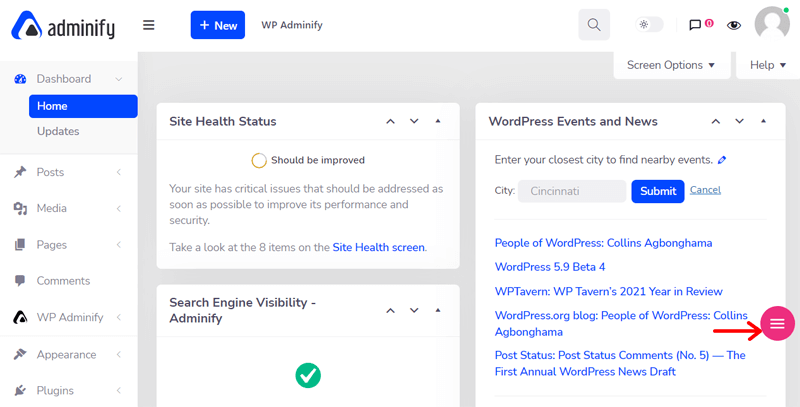
To add more, you get to add the items on this quick menu. With that, you can easily and quickly perform the task you want to do.
In order to do so, go to the Quick Menu option. There, you can also disable this menu for certain user roles. Moreover, you get to alter the menu info, sort, copy or delete the existing menus.

And to add a new one, click on the Add New Quick Menu button. Then, add the title, icon, and link to open it. But it’s only possible when you’re using a premium version of the plugin.
4. Disable Comments
Disabling the comments is difficult on the original WordPress dashboard. You may even need a separate plugin to do that.
However, with your new dashboard from WP Adminify, you can easily disable the comments. On the Disable Comments setting, you get to see multiple options to enable/disable the comments on different sections.

Using the free version, you can enable/disable comments on posts, pages, admin menu, admin bar, etc.
And with the paid version, you get more. Such as removing comments for attachments, hiding existing comments, etc.
According to your needs, you can use these options but don’t forget to click on the Save button.
5. Activity Log
When you go to WP Adminify > Activity Log, you get to see info about the activities of each user. It contains the date, time, author, and more.
But you may not want to show them to all of your team members. So, when you go to Module Settings > Activity Log, you can hide the activity log based on the user role.
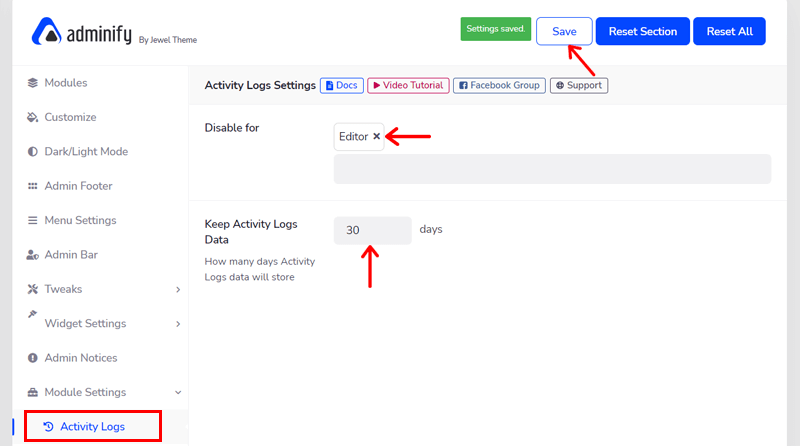
Also, you get to fix the number of days that this info will store on the back-end of your site. After you’re done changing it, click on the Save button.
Step X: Use the Asset Manager
A way to improve your website performance is by enhancing its speed. And you can improve the speed of your site by removing all the unnecessary scripts and styles of your site.
Removal of the scripts and styles is also a way to customize your dashboard. For that, there’s an Assets Manager option.
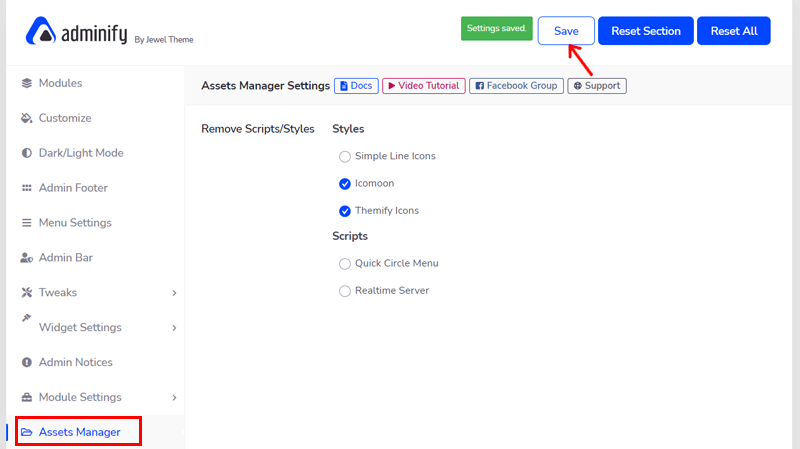
Here, it contains 2 sections i.e. Scripts and Styles. So, you can select the scripts and styles that you want to remove and then click on the Save button.
Step XI: Add a Custom CSS/JS
If you’re a developer, then you can code to customize your WordPress websites. WP Adminify also provides this opportunity for you to code if you’re able to.
On the Custom CSS/JS option, 2 admin areas are there to write your custom CSS and JavaScript code, respectively. So, you get to create unique and attractive websites.

Note that the code you’ll write will override the default styles. And you can run it for a specific page, post, category, tag, or the full website. Also, the JS code can be placed in the header and footer locations. With that, your website speed will be fast.
Step XII: Completely White Label
The most important feature of WP Adminify is that it’s a complete white-labeled solution. It means that you can change the logo, plugin name, description, plugin URL, developer name, etc. With that, you can fully make your WordPress dashboard match your brand.
However, to use this function on your site, you need to use the premium plugin (Agency Plan).
Now, let’s look at some additional modules on how you can easily customize your WordPress dashboard. We’re sure that you’ll like them.
How to Create a Dashboard Widget?
Did you know that you can also create a custom widget for your WordPress dashboard? If not, then here’s how you can do that from WP Adminify.
By default, you can see that there are already some dashboard widgets like WordPress Events & News, Activity, etc. So, to easily make a new custom widget, follow the steps below.
Before that, check if the Dashboard & Welcome Widget module is enabled in the Modules option mentioned before.
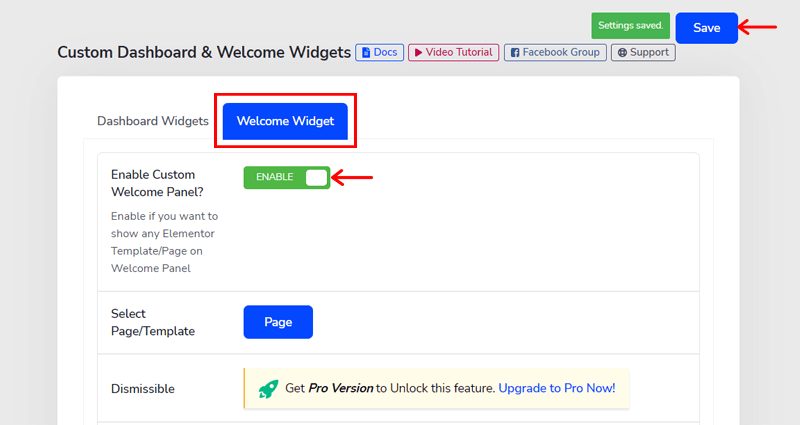
Now, go to WP Adminify > Dashboard Widget option. Here, you can see 2 tabs namely Dashboard Widgets and Welcome Widget.

On the Welcome Widget option, you can enable the custom welcome panel. With that, you get to create and show a custom welcome dashboard message using the Elementor page or template. This creates a better user experience to welcome your users.
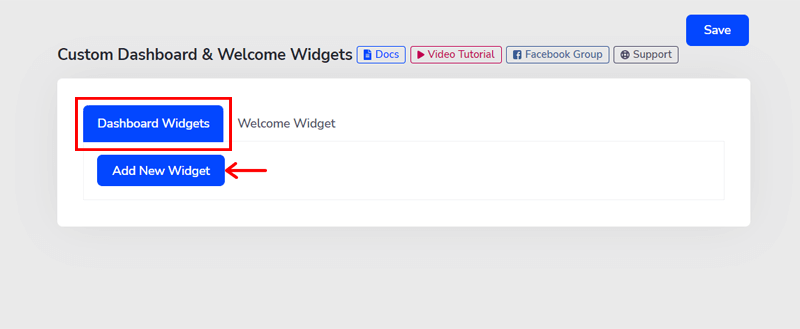
For a custom dashboard widget, look at the Dashboard Widget option. There, click on the Add New Widget button.
Now, you’ve to fill in the form about your widget. They are:
- Widget Title: Here, you must give a title for your new dashboard widget.
- Widget Position: Choose its position to be Side or Normal.
- Content Type: Select the type of your content in this widget. It can be Editor, Icon, Video, Shortcode, and RSS Feed.
- Content: According to the content type, here you’ll see the layout of the content. Like it displays a default Editor to write your content if you choose Editor content type.
- Allowed User Roles: Lastly, choose the user roles that can see this particular widget on your dashboard. You can assign one or more user roles for a single widget.
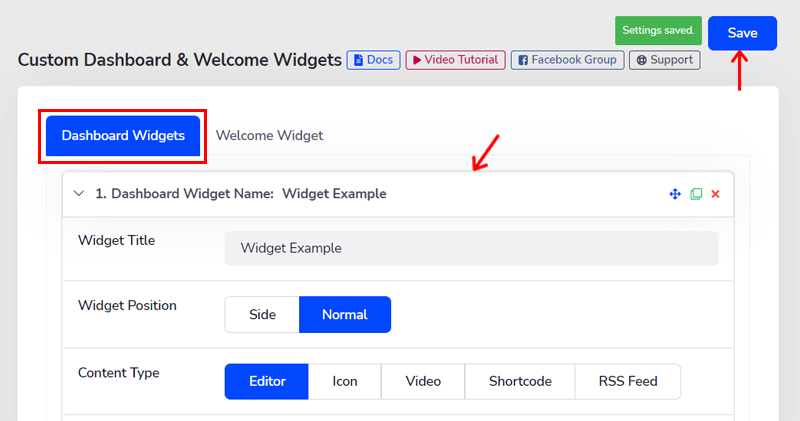
After you’re done, click on the Save button present at the top-right.
How to Make a Custom Sidebar and Add Widgets in it?
Similarly, you can also create a custom sidebar for your WordPress website using WP Adminify. Also, you can add widgets on the new sidebar you create.
This is also a great way to customize your website even if you’re a beginner. As you can add multiple features like images, content, ads, social media icons, or buttons there.
Before going to the steps, note that this works only if you use the version before WordPress 5.8. If you’re using the newer versions, then you can install and activate the Classic Widgets plugin. It’s the official plugin by the contributors of WordPress to make custom sidebars.
Also, have a quick check whether the Sidebar Generator module is enabled in the Modules option.
With that, let’s move to the steps to create a custom sidebar and add widgets to it.
Step 1: Creating a Custom Sidebar
First of all, go to WP Adminify > Sidebar Generator. Then, click the Add New Sidebar button.
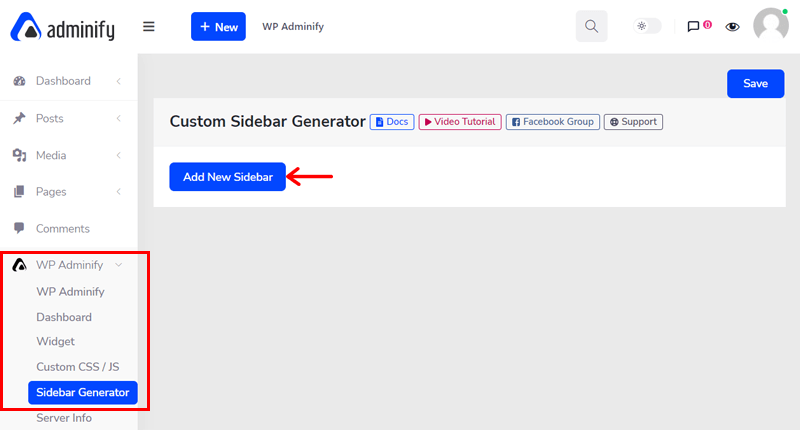
Once you click it, a form appears to create a new sidebar. It contains 2 fields that you must fill. They are:
- Sidebar Name: Here, write the title to your new sidebar.
- Sidebar Description: Provide a short description of the sidebar.
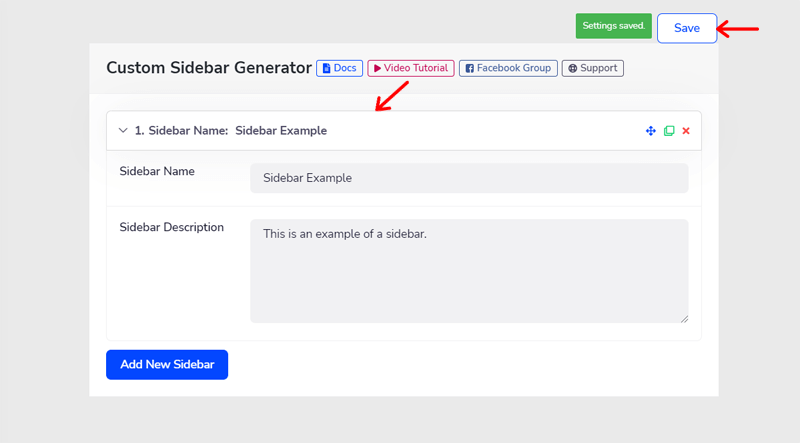
Lastly, click on the Save button to save the changes you made.
Step 2: Adding Widgets to the New Custom Sidebar
After you successfully create a custom sidebar, it’s time to add some WordPress widgets to it.
For that, go to Appearance > Widgets first. There, you can see the new sidebar you just created. Now, all you need to do is drag and drop any widgets you want to keep in that custom sidebar.
Let’s take the example of the Image widget. So, drag the Image widget and then drop it on the sidebar. Now, you can display an image on your new sidebar.
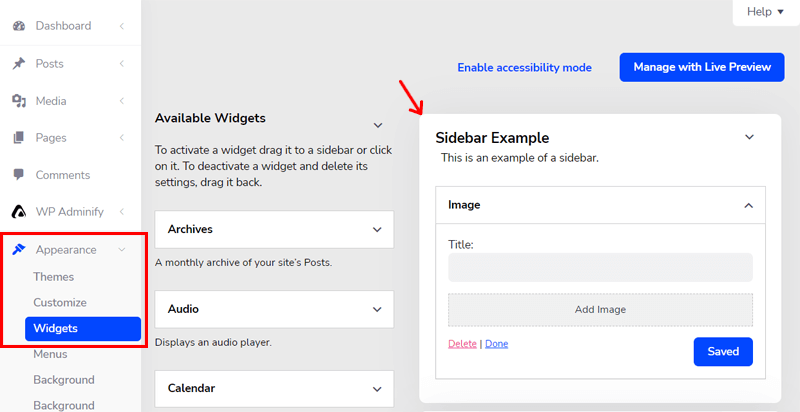
Isn’t it so easy to do? Your custom sidebar with all the necessary widgets is ready in minutes!
How to Customize Your WordPress Login Page?
Some clients don’t want other people to know that their site is built on WordPress. A way to hide this fact is by customizing the WordPress login page.
Along with customizing the dashboard, you can also use WP Adminify to customize your login page. And it’s great that it enables you to entirely change each element of your login form.
Not only that, you can see the live preview when making the changes to the layout. So, let’s go step-by-step on its process.
First, check if you’ve enabled the Login Customizer module on the Modules option.
Now, on your WordPress dashboard, go to WP Adminify > Login Customizer option.
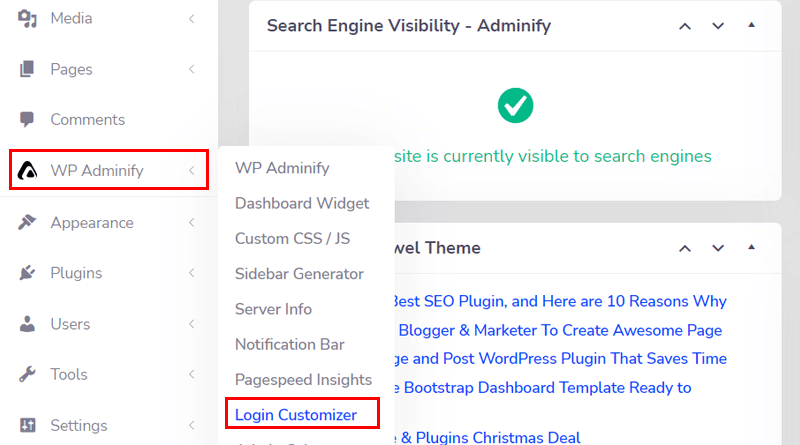
As soon as you click on it, it’ll take you to the live login customizer page. There, click on the Templates option present at the top of the new left-side menu. This redirects you to the template library.
Here, you can see that there are 16 login page templates. So, you choose any one of them for your login page. However, the free version of WP Adminify provides access to only 4 templates.
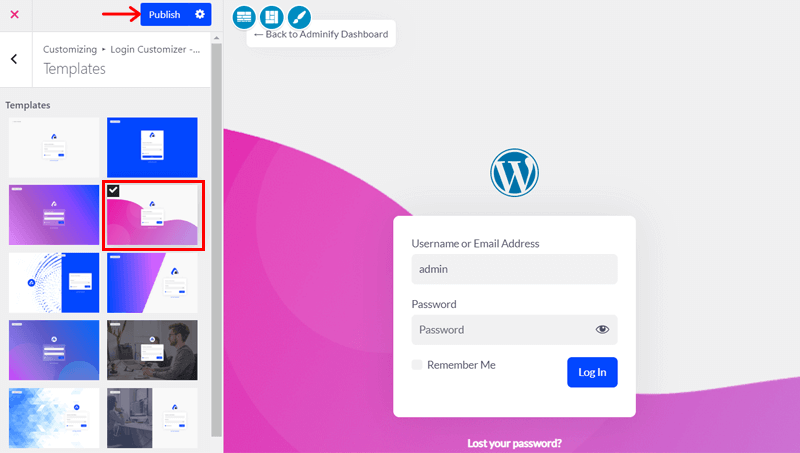
Apart from the Template option, there are several other options below it. Using them you can customize the logo, background, layout, form, form fields, button, etc. So, you can freely use them to make your login form the way you want.
At last, click on the Publish button to make the form go live.
How to Manage Your WordPress Admin Columns?
By default, WordPress contains some columns for the posts and pages. Like for the post, it includes title, author, tags, categories, folders, comments, and date.
Also, the taxonomies i.e. category and tag contain such columns. As for category, it includes name, slug, description, and count.
If you want to customize these WordPress admin columns, then it’s also possible with WP Adminify. In a nutshell, you can rename the title, rearrange the order, or change the width of them.
So, let’s look at its steps.
In the beginning, check whether the Admin Columns module is enabled in the Modules option.
Then, you must navigate to WP Adminify > Admin Columns option. There, you can see 2 tabs namely Post Types and Taxonomies.

Post Type contains Post and Page sections. Whereas Taxonomies contain Category and Tag sections.
The customization process is the same for all of them. So, let’s take an example by going through the steps for customizing the columns of the posts.
So, go to Post Types > Post. Here, you can drag and fix the position of the columns of the posts.
Furthermore, by clicking on the dropdown arrow, you get to change the column type, label, and width of it. Also, you can delete the unwanted ones.
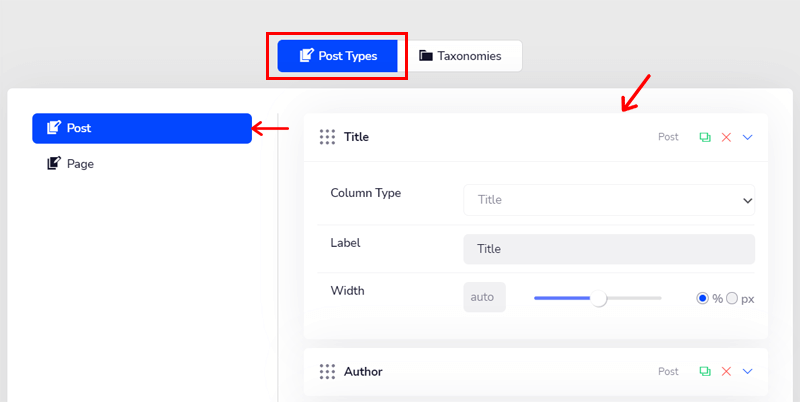
Making a copy and adding a new column is possible only if you deleted a column type previously. So, if you want to add the missing column, then you can do so with the Add new button.
Lastly, click on the Save Settings button. Similarly, you can do it for the pages and taxonomies.
How to Edit and Arrange Menus Using Menu Editor?
The new dashboard from WP Adminify brings you a different menu for you. A fact that you may not know is that you can also customize it.
And it’s by using the Menu Editor module of the plugin. Using it, you get to use tons of controls to make the menu look like you want. So, check if it’s enabled on the Modules option first.
Want to know what those control options are? Then, without any delay, let’s see them.
Now, go to WP Adminify > Menu Editor option from your dashboard. There, you’ll see a list of all the menus in the order it’s placed on your dashboard.
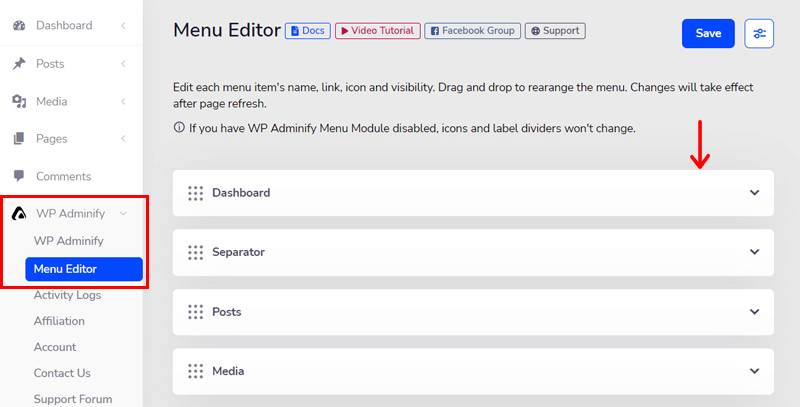
Here, you can edit the menu items and even their submenus. For that, click on a menu and you can see 2 tabs. They are:
- Settings: Here, you can rename, change the link, and set an icon for that menu item. Also, you get to hide it from certain user roles.
- Submenu: When you click on this tab, the list of submenus under this menu shows up. And each has the same options as you did for the menu.
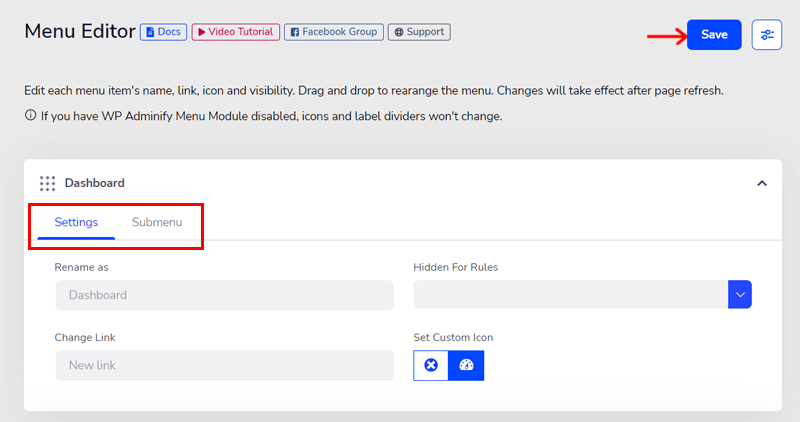
After that, you can drag the menu items to keep in the order you prefer. But do you know what? We think that the default order is perfect so you won’t need to rearrange them.
However, if you do make some changes, then click on the Save button to save the changes.
We’re at the end of the customization options that you can do for your WordPress dashboard using WP Adminify.
But we want to point out more powerful features of the plugin that you’ll get. So, stick with us.
Other Powerful Features Offered by WP Adminify Plugin
Now, we’ve talked about all the important customizations options you can do on your dashboard. So, let’s see the additional powerful features that the WP Adminify plugin brings you.
How to Use Google PageSpeed Insights for Improving Your Performance?
Google PageSpeed Insights is a great feature in WP Adminify. Generally, you need to use a plugin for doing this function on a normal WordPress dashboard.
However, WP Adminify provides this in-built tool that enables you to determine how you can make your site faster. For that, it also integrates with Google Lighthouse. With that, you get the in-depth optimization suggestion to help you improve the speed of your site.
Therefore, you get to first analyze a webpage. And then look at a complete history of your site speed. So, you can browse and compare the current speed of the web pages with the past.
To do so, first enable the PageSpeed Insights module on the Modules option if it’s not. After that, follow these steps.
Open WP Adminify > Module Settings > Google PageSpeed option on the WP Adminify menu. There, you must keep your Google API key.
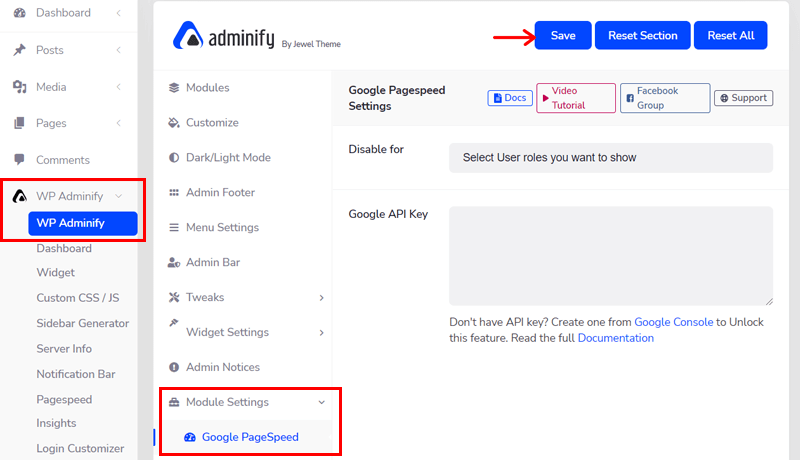
If you want, then you can also disable this feature for specific user roles. Also, don’t forget to save it by clicking on the Save button.
After you do that, you can now access the page speed insights. So, go to your dashboard and navigate to WP Adminify > Pagespeed Insights. There, it contains 2 sections. They are:
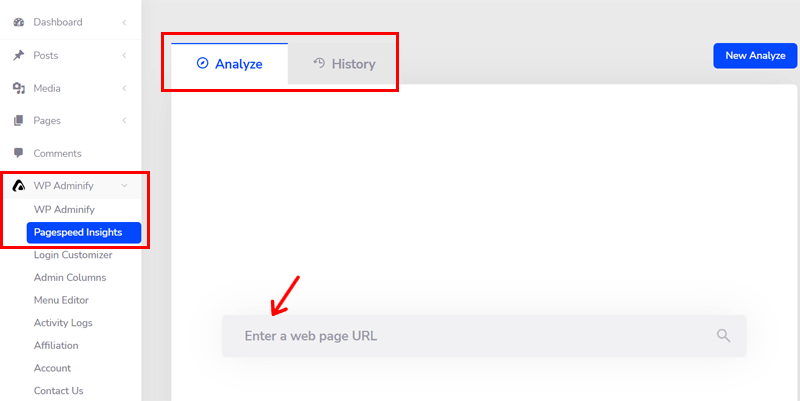
1. Analyze
When you use the feature for the first time, you can see a field in the center. There, you’ve to keep the URL of the webpage or website whose speed you want to check. By doing that, you’ll get its analysis result.
For the next time, you must click on the New Analyze button on the top-right side. After that, you can check it again.
2. History
All the previous analysis data is stored and you can see them here. So, you can check them at any time and from anywhere. Also, you can delete the history after you’ve finished looking at the speed optimization data.
How to Build Affiliation with WP Adminify?
After looking at all the features and using them, you may want to associate with the plugin. And being an affiliate also benefits you in certain ways.
When you conduct affiliate marketing, you’ll become one of their brand ambassadors with it. So, you’re able to also earn some cash from that.
Moreover, you can refer this plugin to your friends and they may become new customers of this plugin. With that, you get to earn a 25% commission on each successful sale you refer.
Now, let’s see the steps to build this affiliation with the plugin.
First of all, from the dashboard, go to WP Adminify > Affiliation option. There, look at the summary of this affiliation program. When you’re willing to be an affiliate, click on the Become an affiliate button.
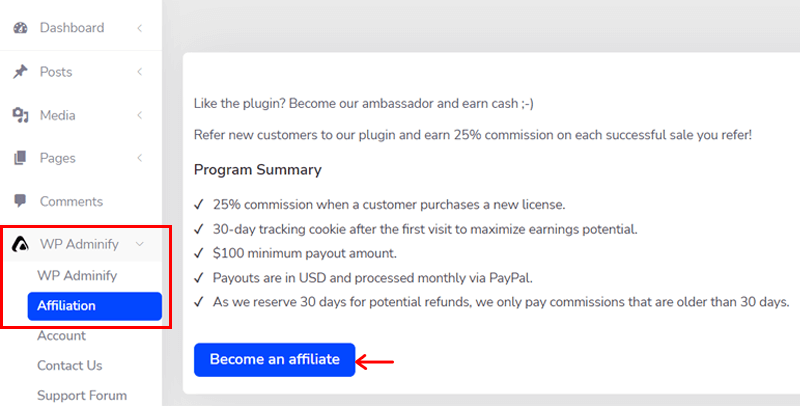
In a short while, a form shows up. So, you must fill it in and provide your personal information. It includes your full name, email address, PayPal account email address, etc.
Don’t forget to tick the box to agree with their terms and conditions. Lastly, click on the Apply to become an affiliate button.

Now, all you’ve to do is wait for the team’s official confirmation for the affiliation.
How Can You Fix the Issues from Tweaks?
Tweaks module helps you to solve issues if there are any specific issues on your site. To find out about the settings, go to WP Adminify > Tweaks option in the WP Adminify menu.
There, you can see multiple submenus available. It includes Head, Feed, HTTP Response, WP JSON API, Comments, Post/Archives, Attachments, and Performance.
Every menu here is responsible for solving some of the ongoing issues that are occurring while you build your site.
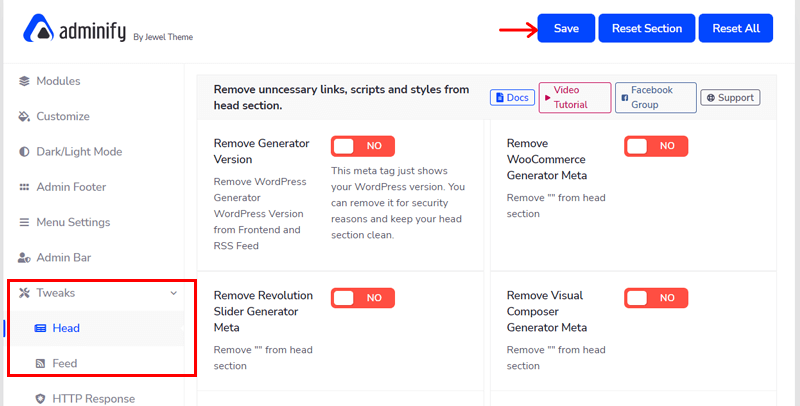
Let’s take some examples for better clarity. The Head menu guides you to remove links, styles, and scripts that are unnecessary on the head section.
Similarly, the Comments menu enables you to remove notes before comment form, author link, etc. on the comment section.
So, go through each of them and enable/disable them according to your needs. Like always, click on the Save button to save changes.
How to Take Backups in WP Adminify?
WP Adminify also has a backup option. With that, you can take backups of the website files and store them in a safer place.
So using this plugin, you can import or export files, themes, or plugins.
By doing so, you get to use the same plugin of a website to multiple other websites. So, if you’re running multiple sites, then this is the best option for you.
To do that, go to WP Adminify > Backup option from the menu. And there, you’ll see 2 separate areas for importing and exporting the files.
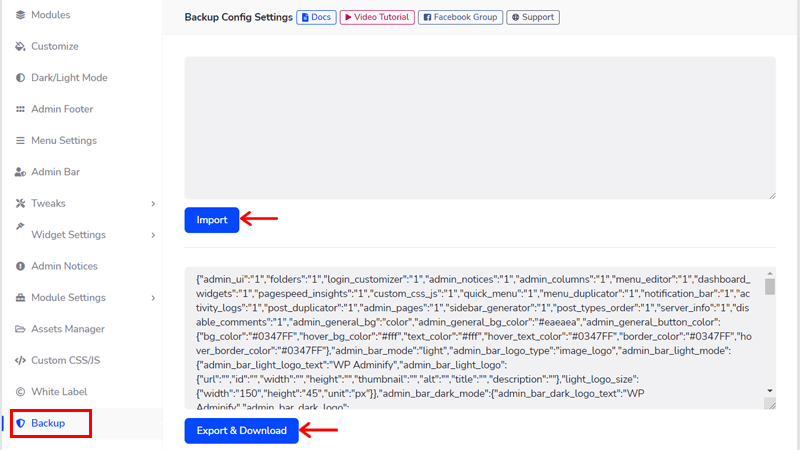
All you need to do is keep the content and click the respective buttons. It means you must click the Import button to import something. And Export and Download button to export the files.
How to Duplicate Post and Menu?
Looking at the topic, you may be wondering why you would need to duplicate a post/page and menu. The reason behind it is for saving your time and energy.
As a blogger, you may publish numerous posts/pages regularly. So duplicating a post will help you to clone a post, easily edit the necessary parts, and quickly publish them.
Similarly, if you like to have more than 1 menu on a webpage, then duplicating the menu is a great option. You get a clone of your menu and now you can easily edit just its menu items, etc.
In the WP Adminify dashboard, you can duplicate a post, page, menu, and also menu items. So, let’s see how you can do that for each of them.
To start, first, enable Post Duplicator and Menu Duplicator modules on the Modules option.
1. Duplicating a Post/Page
Duplicating a post or page is very simple. And the process for a page and post is the same. So, let’s the steps when making a clone for a post. Note that you first need to have a post/page already made to make its clone.
From your dashboard, go to Posts > All Posts where you’ll see the list of posts on your site. On a post, there’s an Adminify Clone option. So, click on it.
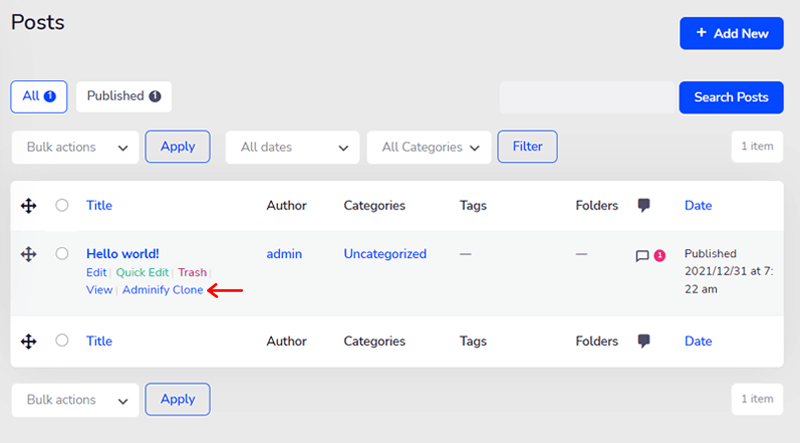
With that, the clone will be created with the same name. And, it’ll be saved as a draft instead.
2. Duplicating a Menu
To duplicate a menu, you need to have a menu first. With that, you can make a clone of it. So, from your dashboard, go to Appearance > Menus.
To create your first menu, here are the steps. On the Menu Structure form, write the Menu Name. And then choose the Display location to be either a primary or secondary menu. After that, save the menu first by clicking on the Create Menu button.
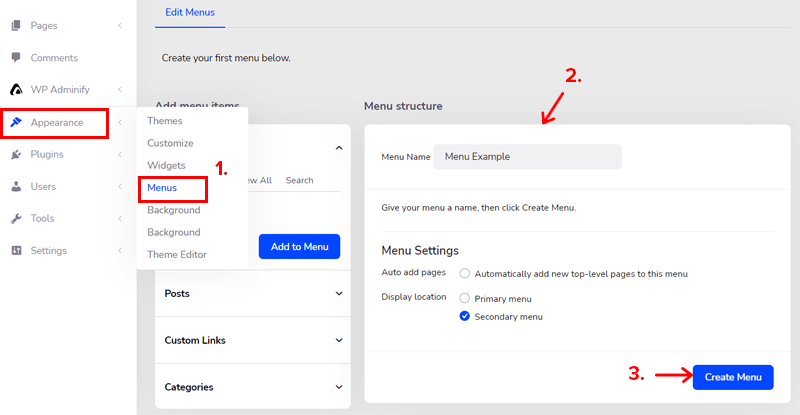
Next, you’ve to add the menu items from Add Menu Items section. To do that, select the different items from the given options. The options are pages, posts, custom links, and categories. And click on the Add to Menu button.

When you’re done adding the menu items, click on the Save Menu button.
Now, to duplicate it, just click on the Duplicate Menu button. By doing that, you can now see the clone of the menu and the menu name will have a ‘(Copy)’ added to the previous name.

Duplicating a menu item is also simple. Just click on the dropdown arrow of a menu item. Then click on the Duplicate link.

And that’s it!
Conclusion
That’s all folks! We’re at the end of this article on how to customize your WordPress dashboard easily.
This guide has all the steps that you can do to customize your dashboard. And that also by using a simple yet powerful plugin, WP Adminify. We hope that you were able to understand each step properly and do it for your dashboard.
If there’s any confusion that you have, then quickly post a comment below. We’re eagerly waiting to provide you with solutions for those queries.
Similarly, you may also like some of our similar articles. Like how to check the WordPress version of your website and how to create a table in WordPress without plugins.


