Do you want to know what Shopify is? Or wondering what Shopify is used for? If yes, then stay right here.
Shopify is a leading eCommerce platform ideal for businesses of all sizes. It offers numerous tools and features to simplify launching and running an online business. But you want a detailed guide to understand it better. Isn’t it?
In this blog post, we’ll delve into the world of Shopify. We’ll explore its features, use cases, support options, and pricing plans. Also, this article provides valuable insights into how you can use Shopify for your online marketplace.
So, let’s get started and discover the possibilities that await you with Shopify!
A. What is Shopify? – Explained with Real Examples
Shopify is one of the most popular eCommerce platforms that lets individuals and businesses create their own online stores. You can find many tools and features in Shopify to set up and manage an eCommerce business without needing technical skills.

As a fully hosted platform, you don’t need to worry about hosting or managing servers. It takes care of all the hosting infrastructure to give you a hassle-free experience. Indeed, you can focus on building and growing your online business.
Moreover, it has a user-friendly interface to customize your store’s design. Also, add product listings and set up payment gateways to securely process transactions. Hence, you can showcase and sell your products or services to customers globally.
Further, Shopify has built-in features to manage your business efficiently. It lets you track inventory, handle shipping and fulfillment, and analyze sales data to make data-driven decisions. You can also integrate other 3rd-party tools and services for more functionality.
Real Examples of Shopify Stores
Before moving forward, here are some real Shopify store examples:
| Shopify Store | Short Description |
| Gymshark | A fitness apparel and accessories brand popular among fitness enthusiasts. They offer many athletic wear items, showcasing high-quality product images and a seamless shopping experience. |
| Allbirds | A sustainable footwear brand selling comfortable and eco-friendly shoes. Their Shopify store has a minimalist design, clear product descriptions, and easy navigation. |
| Kylie Cosmetics | Founded by Kylie Jenner, this Shopify store is a beauty brand offering makeup products. It has high-resolution product images and a straightforward checkout process. |
| Studio Neat | A tech accessories brand perfect for tech enthusiasts. This store is built with minimal design and offers a smooth shopping experience. |
| Flourist | Produces and sells 100% premium-quality grains, beans, and freshly milled flours. You’ll find easy navigation and a clean design. |
Now, let’s learn all the key features of Shopify in the next section!
B. Major Highlights of Shopify
Shopify offers numerous features for merchants like you to create and manage their online stores. Now, we’ll look at some major features of this platform to understand the platform better.
Here we go!
1. Powerful eCommerce Website Creation
Shopify has a fully customizable website builder with drag-and-drop functionality. This means you don’t need coding skills to build a stunning website. But you can still edit the HTML and CSS files for additional adjustments.
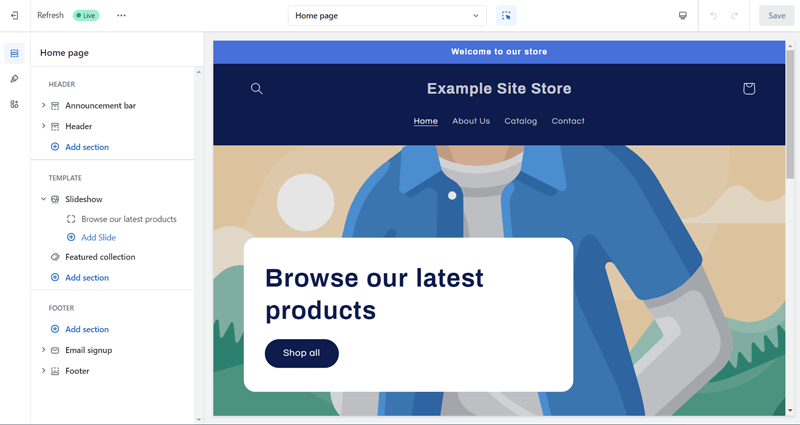
Moreover, it offers thousands of themes in the Shopify Theme Store. These themes are customizable to make every element of the store match your brand. This captures the attention of your customers.
Further, Shopify includes the following tools to launch your eCommerce website:
- The Business Name Generator tool helps you find a business name that fits your idea and personality.
- Offers a Logo Maker tool that lets you make a logo that stands out from the competition.
- You can find and use a custom domain for your business using the Domain Name Generator tool. Or use any domain generator tool on the market.
- Easily personalize your site with free and high-resolution images from Burst.
In fact, Shopify websites are secure. As it offers fraud analysis for all domains and is Level 1 PCI DSS compliant for all financial transactions.
Curious about how long it takes to build an eCommerce site? Here’s a guide on that just for you!
2. Efficient Product Management
Overall, the Shopify dashboard gives a detailed view of your online store. This lets you easily manage your products, sales, and orders.
Indeed, you can easily create and add products to your Shopify store with vital details. That includes the title, pricing, description, inventory levels, etc.
Not to mention, you can add as many products as you like to your shop. Plus, it lets you stock and sell a variety of products that customers demand. Best of all, you can categorize and organize the products for easy navigation and display.
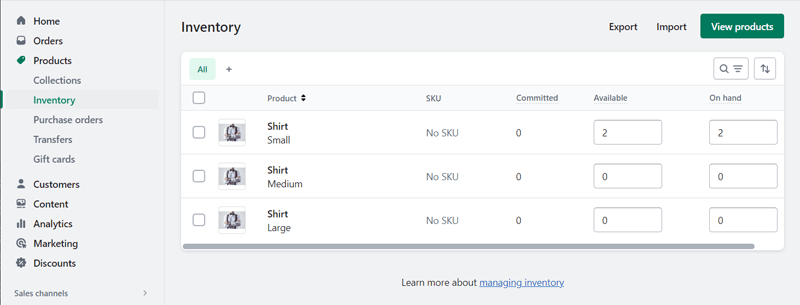
If you have a product catalog, then use Shopify tools to import and export product data using CSV files. This simplifies migration and managing product updates. In fact, you can bulk edit to make changes to several products simultaneously.
Fun fact, your inventory is synced across all the sales channels at all times. This centralized inventory tracking lets you efficiently manage your products and sales.
3. Convenient Order and Fulfillment Processes
You’ll get a customized order dashboard in Shopify. It gives you a simple view of orders from all your sales channels in one place. Hence, you can manage and update order information once it’s been fulfilled, shipped, refunded, or returned.

Apart from that, some Shopify highlights on its ordering system are:
- You can add custom fields to your order form to gather specific information.
- Shopify sends automated notifications to you and your customers about order-related events.
In the case of fulfillment, you’ll get a smart order routing system. This lets you allocate orders to your preferred distribution location. Furthermore, you’ll also get:
- Various shipping options are available to configure your shipping rates.
- Shopify Flow automates everyday tasks.
- Enhanced bulk actions for simplifying common tasks.
Here’s a list of the best eCommerce automation tools to improve marketing. You can use them on your Shopify store if you want.
4. Seamless Payment Integration
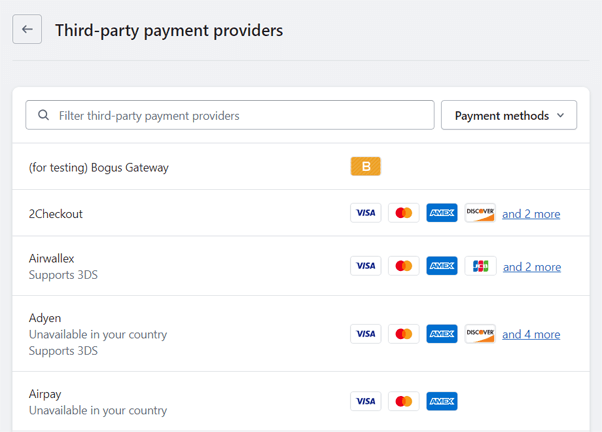
Undoubtedly, Shopify supports various payment gateways to accept payments from different providers. That includes PayPal, Stripe, Authorize.net, etc.
Moreover, you can customize the payment process by inserting branding elements, personalizing checkout fields, and configuring the order confirmation page.
In addition, it accepts payments in multiple currencies, simplifying purchases for international customers. Most of all, you can offer subscription-based services or products to automate regular payments from customers.
5. Feature-rich Marketing and SEO Tools
Moving forward, Shopify has a wide range of marketing and SEO (Search Engine Optimization) features and tools. Learn them from the list below:
- Shopify Email: This built-in email marketing tool can create and send email campaigns to your customers. Emails can be product promotions, sale announcements, etc.
- Abandoned Cart Recovery: Shopify can auto-send email reminders to customers about their abandoned carts, recovering potentially lost sales.
- Social Media Integration: You can connect your store to social media sites. Then, showcase products, run ad campaigns, or engage the audience.
- Content Marketing Tools: It involves built-in blogging and content marketing tools to drive traffic to your website.
- SEO Tools: Some built-in SEO features include canonical tags, sitemaps, etc. You can also find SEO tools to edit meta descriptions, product details, etc.
- Shopify Inbox: This tool lets you chat with your customers. Ultimately, you can answer customer questions and turn browsers into buyers.
Notably, you can connect to online marketplaces to boost your product sales on popular platforms. And with Shopify’s POS (Point of Sale) system, you can integrate your online and offline store sales.
Other than Shopify, check out the list of the best eCommerce platforms ideal for SEO.
6. Mobile Commerce
Clearly, Shopify provides mobile-responsive themes, ensuring your shop looks and works perfectly on mobile devices.
Essentially, the checkout process is user-friendly for customers using any device. On top of that, Shopify supports numerous mobile payment options. Some of them include Apple Pay, Google Pay, and Shopify Payments.
Most of all, you’ll find many mobile marketing features on this platform. That involves SMS messaging and mobile-specific discount codes.
Thinking about your experience on mobile devices? Don’t worry! There’s even a dedicated mobile app for merchants. This means you can easily manage your store, track sales, fulfill orders, and communicate with customers.
7. Performance-enhancing Analytics and Reporting
Importantly, Shopify provides an overview of your shop’s key metrics on the dashboard. All of that is to learn about the performance of your online store. After which, you can make informed decisions to optimize the store.
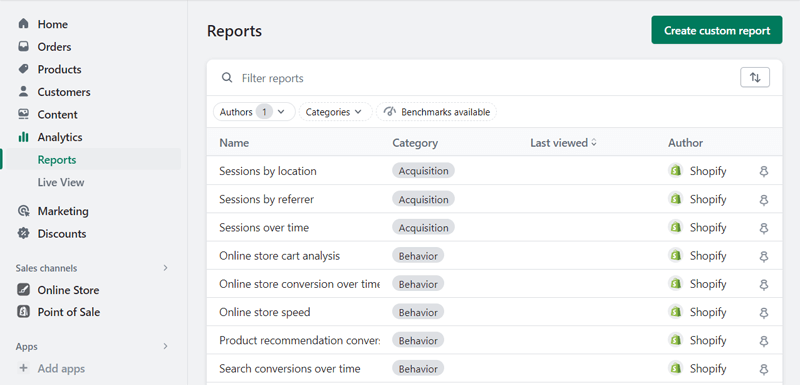
Here’s a quick snapshot of the various reports from Shopify:
- Sales: You can measure your sales, sessions, orders, etc., across each channel. With that, you can follow the sales trend and sell popular products.
- Sessions: The sessions report gives insights into your web traffic. That includes the number of visitors, their locations, the devices being used, etc.
- Conversion: Knowing the conversion rate at different stages of your customer’s journey is helpful. Because it helps you identify opportunities for improvement.
- Customers: Shopify lets you understand your customers’ behavior and find loyal customers. Now, you can optimize marketing and retention strategies.
- Competitors: You can compare your data to stores like yours. Ultimately, you can uncover growth opportunities to stay competitive.
8. Extensive App Store
By now, you may already know some of the apps and integrations available on Shopify. But did you know that there are thousands of them?
Yes, you learned it right! If you want any function on your eCommerce site, then all you must do is check out its app store.
There, you can find all sorts of apps under various categories. That includes:
| Categories | Some Apps |
| Finding Products | Printful: Print on Demand, DSers – AliExpress Dropshipping, CJdropshipping, etc. |
| Selling Products | Facebook & Instagram, Google & YouTube, etc. |
| Orders and Shipping | ShipStation, Parcel Panel Order Tracking, etc. |
| Store Design | Product Reviews, Shopify Search & Discovery, etc. |
| Marketing and Conversion | Shopify Email, Shopify Inbox, etc. |
| Store Management | Shopify Flow, Buy Button Channel, etc. |
Hopefully, these features will clarify your confusion about what Shopify is. Now, let’s move ahead and learn about what Shopify is used for.
C. Applications of Shopify (What is It Used For?)
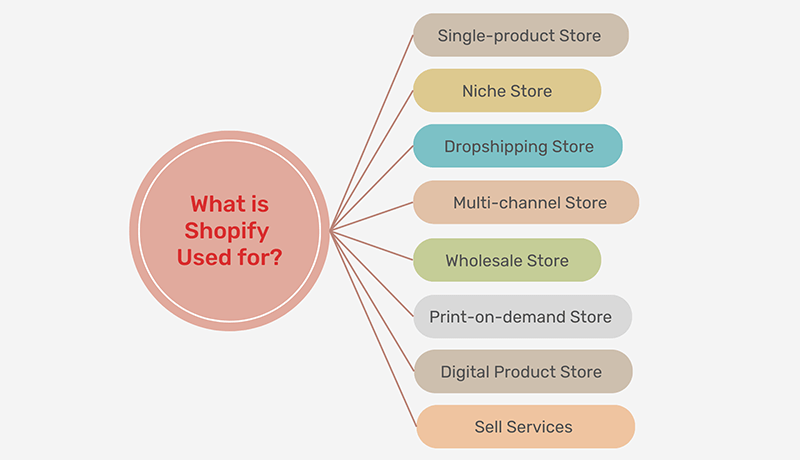
Shopify is a versatile platform that you can customize to suit different business models and industries. So, you can use Shopify to create various kinds of sites for eCommerce. That’s why it’s a popular choice for eCommerce entrepreneurs.
Here are some Shopify applications that define what this platform is used for. Now, look at them!
1. Single-product Store
You can use Shopify to build single-product stores. A single-product store is a business that sells a specific item.
Suppose your business specializes in a particular product. If you want to showcase it prominently on the website, then you can utilize Shopify for your store.
For example, Snooz is a single-product Shopify store that sells a white noise machine to help people sleep better. But customers can find some variations of it.
2. Niche Store
Shopify is popular for niche stores that target a certain audience or market niche. Moreover, it can be about any particular interest, hobby, or lifestyle. Just like that, you can target a focused customer base.
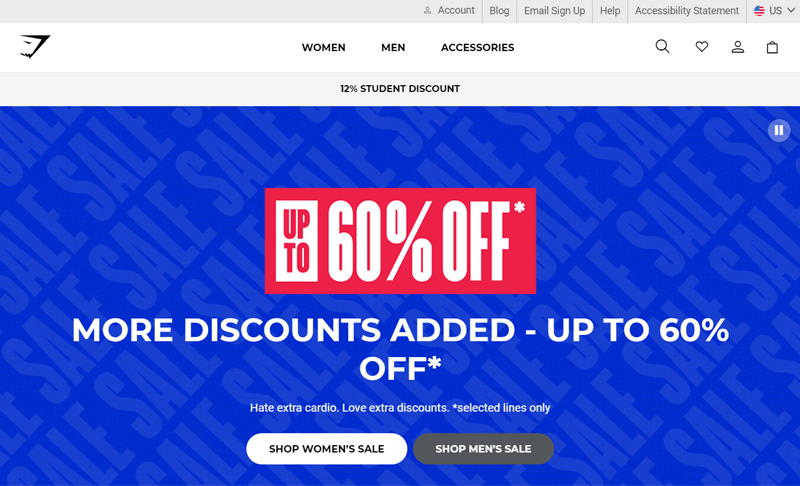
For instance, Gymshark is a Shopify niche store that focuses on fitness enthusiasts. So, you’ll find many fitness apparel and accessories there.
3. Dropshipping Store
Best of all, Shopify comes with robust features for configuring a dropshipping store. A dropshipping store lets you sell products that are stocked and shipped by a 3rd-party supplier.
Basically, you can easily integrate dropshipping apps and platforms with Shopify. Then, automate the order fulfillment process in your dropshipping store.
An example of a Shopify-built dropshipping store is Fresh Juice Blender. It sells fresh juice bottle blenders using the CJdropshipping platform.
4. Multi-channel Store
As mentioned before, you can sell your products through multiple channels with Shopify.
So, it’s not just your online store but also social media platforms like Facebook and Instagram. Plus, marketplaces like Amazon and eBay. On top of that, using its POS system, you can also sell the products in person.
Hence, you can reach customers across different channels and increase your sales opportunities. All of that is because of your multi-channel Shopify store.
For example, Red Dress Boutique is a multi-channel store built with Shopify. It leverages social media platforms and influencer marketing for improved sales.

5. Wholesale Store
Moving forward, you can launch a wholesale store for your business with Shopify. Because it involves features to set up separate pricing, discounts, and shipping options for wholesale customers.
Most of all, your wholesale stores can have password protection. With that, only approved retailers can access the wholesale catalog and place orders.
For instance, Endy Sleep is a wholesale store using Shopify. It sells mattresses, pillows, and bed frames to retailers and direct customers.
6. Print-on-demand Store
Unquestionably, Shopify integrates with print-on-demand services. Now, you can create and sell custom-designed products, such as mugs, t-shirts, etc.
In fact, these products are only manufactured when an order is placed. Overall, it reduces upfront costs and inventory management.
For example, Classic Dad is a print-on-demand store. This Shopify store sells printed t-shirts for dads.
7. Digital Product Store
Using Shopify, you can sell any product or service to your audience. Notably, it’s also suitable for selling digital products like ebooks, music, software, courses, or other downloadable content.
Don’t worry! It provides secure file hosting and restricts authorized customer access.
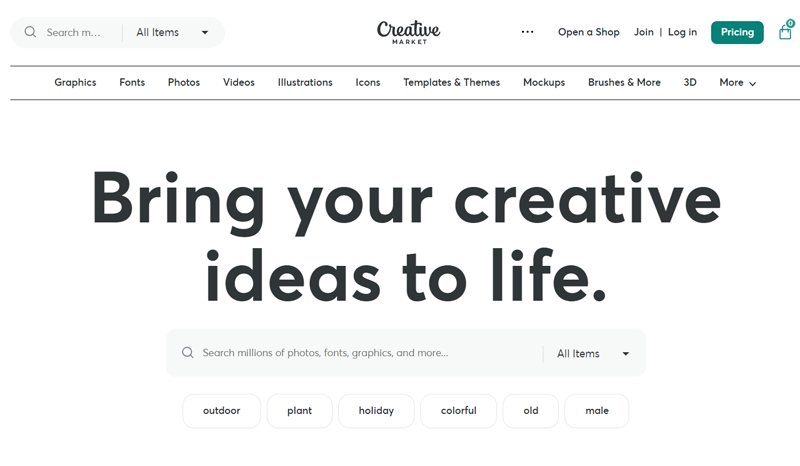
An example of a digital product store is Creative Market. It’s a popular marketplace offering digital products like graphics, templates, themes, fonts, etc.
8. Sell Services
Shopify focuses on making online stores that sell physical and digital products. However, you can also use it for selling services.
Hence, you can create a website that accepts bookings or appointments. As always, you can manage payments for these services from your website.
For example, service-based Shopify websites can be about providing consultation, coaching, housekeeping, etc.
Plus, You can use Shopify for your multivendor marketplace. If you want other options, then here’s a list of the best multivendor eCommerce platforms to choose from.
Keep reading to find out how you can use Shopify!
D. How to Get Started with Shopify?
Now, we’ll walk you through the process of using Shopify. With that, you’ll learn the working mechanisms of Shopify, which will help you start your online store.
So, let’s dive right into it!
Step 1: Sign Up for a Shopify Pricing Plan
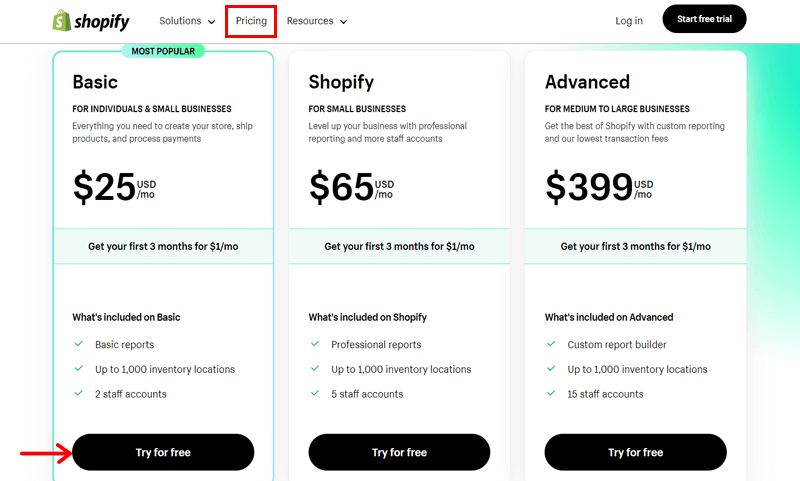
First, you must set up your Shopify plan. So, open the Shopify website and click the ‘Pricing’ menu. On this Pricing page, you’ll find the various price options.
Now, hit the ‘Try for free’ button for the plan you want. Here we’re going with the ‘Basic’ plan.
This redirects you to the signup steps. You can skip some or all of the steps to do them later. But we’ll quickly show you the configuration steps now.
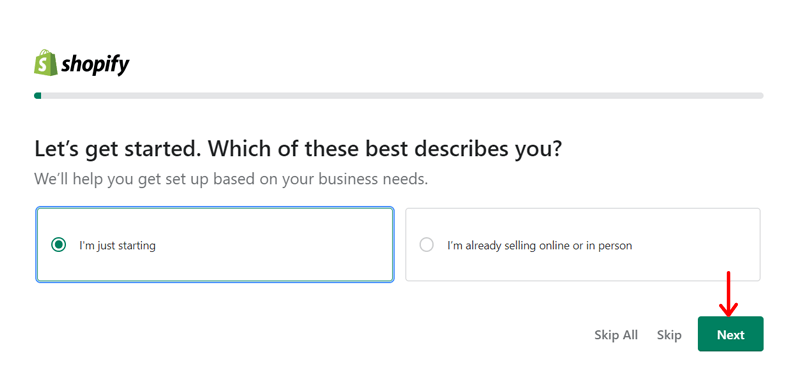
Firstly, you must choose whether you’re just starting your online store or have already been selling. This lets Shopify understand your business needs. Once you select, click the ‘Next’ button.
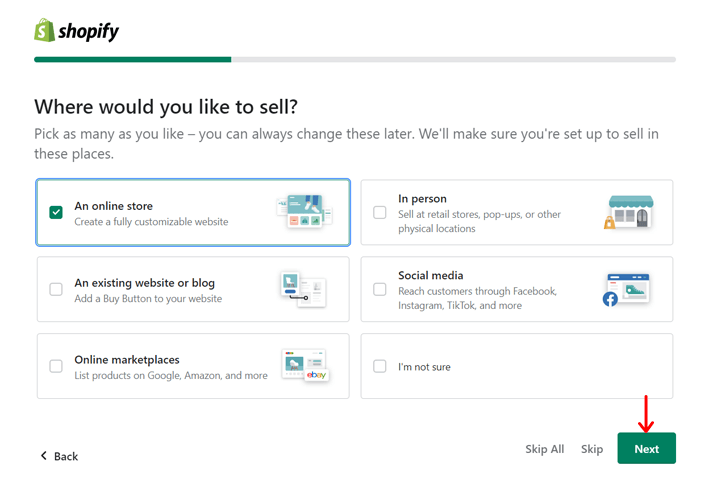
Next, you should pick the sales channels among an online store, in-person, existing website or blog, social media, and online marketplace options. There’s also an ‘I’m not sure’ option if you haven’t planned.
After you select your preferred channels, click the ‘Next’ button. Here, we chose the ‘An online store’ option.
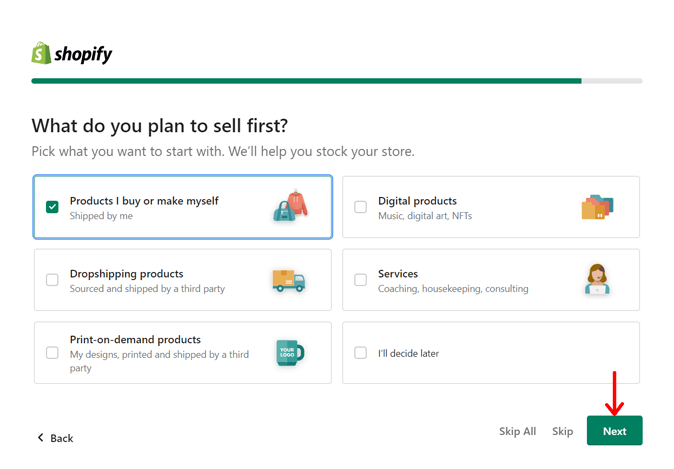
Then, you must select the types of products among products you make, digital products, services, print-on-demand products, and dropshipping products. Also, there’s an ‘I’ll decide later’ option if you are unsure.
Right after you choose them, hit the ‘Next’ button.
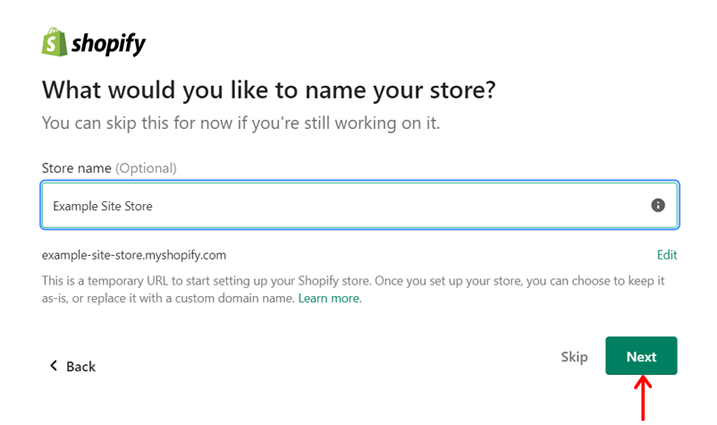
Moving forward, you can give a name to your store and then click the ‘Next’ button.
Lastly, you must create your Shopify ID. And you can sign up using your Apple, Google, or Facebook account.
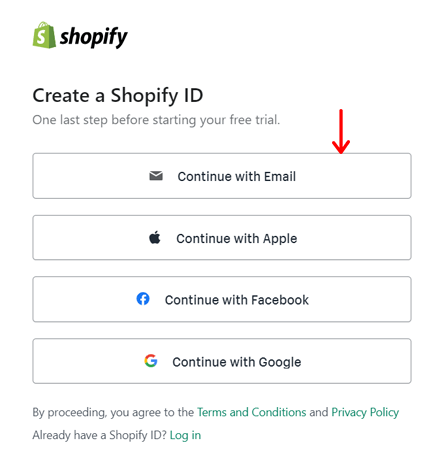
Here we’ll go with a different option, i.e., Email. This lets you enter your email and a password. Then, you need to click the ‘Create Shopify ID’ button.
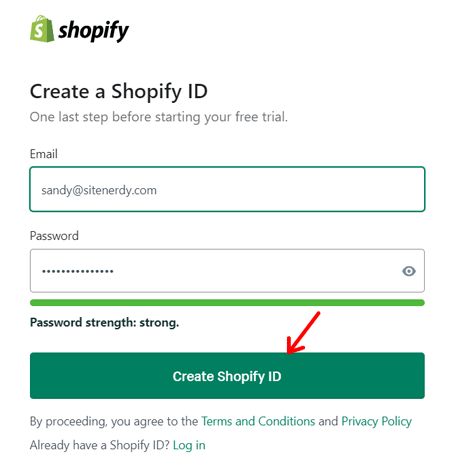
Soon after, your Shopify dashboard opens up. That’s all for the signup step!
Step 2: Shopify Dashboard Walkthrough
In your Shopify dashboard, you’ll find all the vital options in the left-side menu. While the changes you make will appear on the right side of the dashboard.
Before using this eCommerce site builder, let’s take a snapshot of its dashboard menus. Here we go!
- Home: The Home menu has a setup guide with steps to start using Shopify.
- Orders: You can manage your online or offline orders and abandoned carts.
- Products: Here, you can manage your products, collections, inventory, etc.
- Customers: It lets you add, manage, or import your customers’ details.
- Content: Upload and manage files, like images, videos, and documents.
- Analytics: Check out the reports and live view of your store’s performance.
- Marketing: Create and view your marketing campaigns and automation.
- Discounts: Add and manage discounts and promotional activities from here.
- Sale channels: Build, customize, and set up your sales channels. For example, the online store, POS system, etc.
- Apps: Insert a new app into your shop from Shopify or other providers.
- Settings: The settings at the bottom include several store and plan settings.
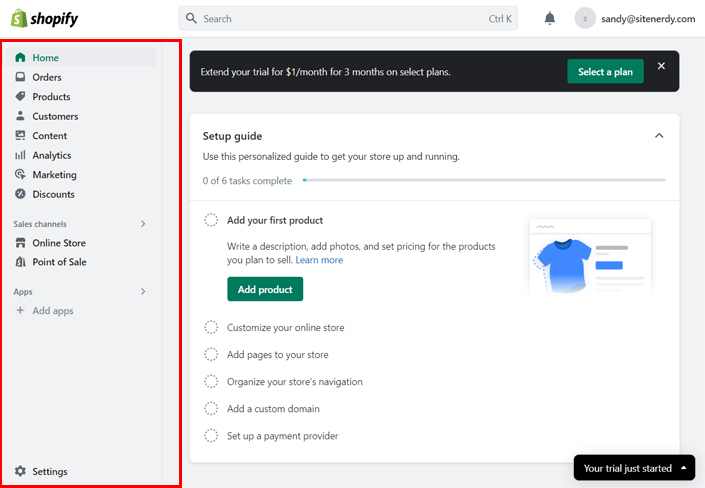
Now, you can begin setting up your eCommerce website with Shopify.
Step 3: Add Your Products or Services
To help you with the entire process of using Shopify, the ‘Home’ menu contains a guide. We’ll also follow the steps from there. Here we go!
First, you can start by adding your products or services. On the Setup guide of the Home menu, you’ll see the first step, ‘Add your first product’. There, click on its ‘Add product’ button.
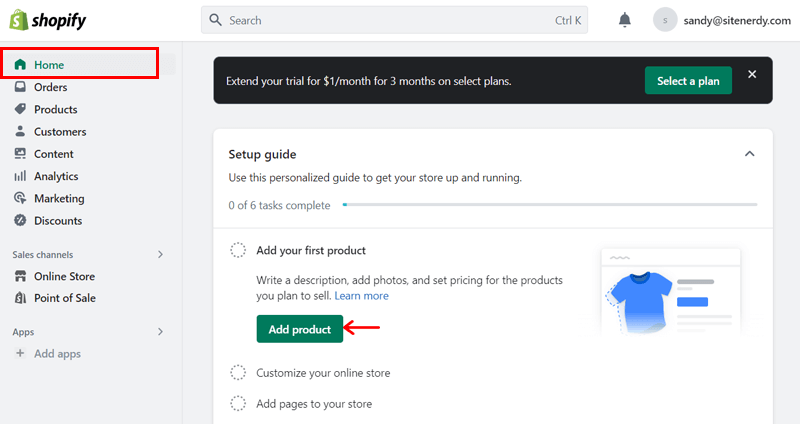
Now, you should fill out the form, including the product name, description, and media files. You can also mention the price, inventory details, and shipping information.
After that, add your product variants, if you have them. That can be different colors or sizes. Right after it, you can add a product title and description that’ll appear in the search engine listing.
On top of that, you can mention the product status, state your sales channels, and choose the markets. Following that, you can set up the product organization. That includes adding the product category, type, vendor, collections, and tags.
Plus, you can select the theme template for your product. Lastly, hit the ‘Save’ button to save the product in your store.
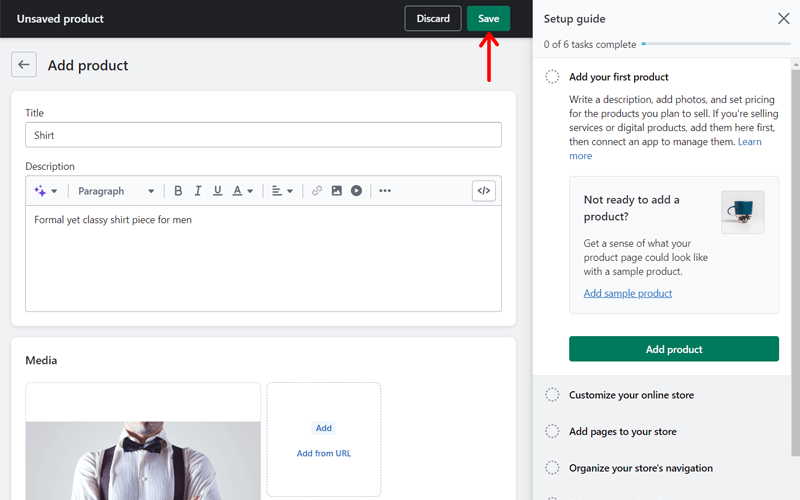
That’s how you add a product to Shopify. Similarly, you can insert all products.
Step 4: Customize Your Online Store
Now, open the ‘Customize your online store’ step on the setup guide present on the right side. Then, click the ‘Customize theme’ button.
Currently, you can see a default theme used in your store. If you want a different free theme, then scroll down to the ‘Popular free themes’ section. There, click on the ‘Add’ button for your preferred theme.
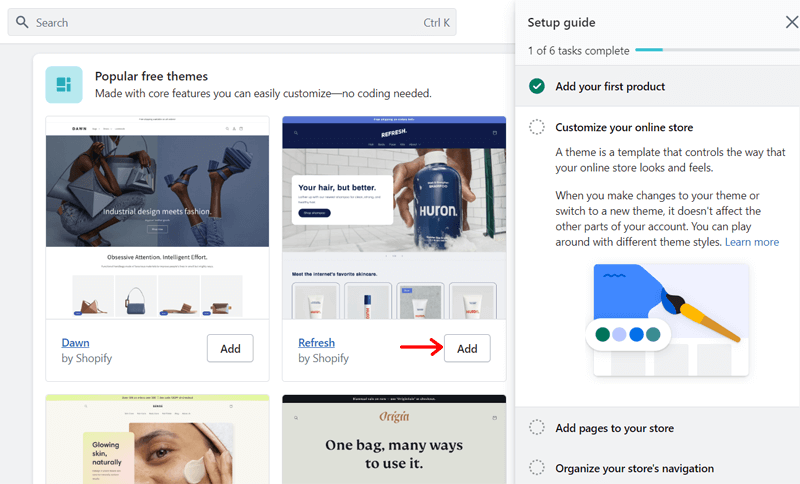
This installs the theme on your dashboard. But you must click the ‘Publish’ button to replace the current theme.

Next, you can start customizing the theme as per your needs by clicking the ‘Customize’ button.
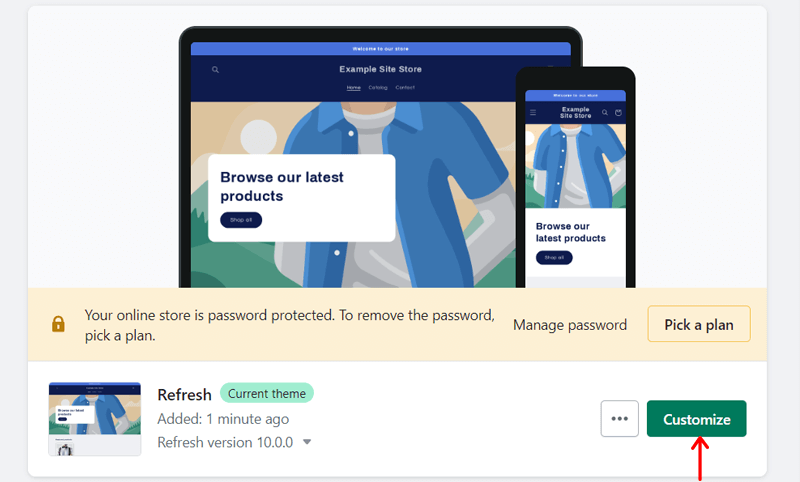
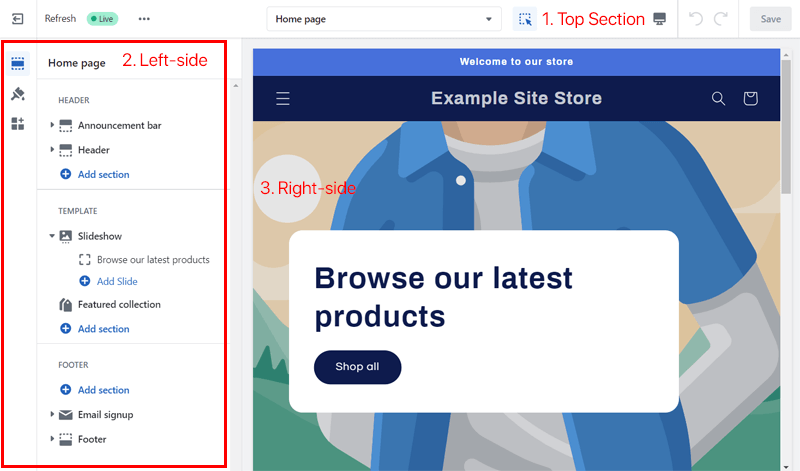
Now, you’ll be redirected to the website editor. It has 3 sections for various needs. So, learn each of them below:
I. Top Section
Here’s a list of options you’ll find in the top section:
- On the left side, there are options to exit the editor, edit code, view the website, get support, etc.
- In the middle, you can select which page you want to customize.
- On the right side, it lets you customize and view the site on different devices. Also, you can revert your changes and save them.
II. Left-side Options
The left side contains 3 options. They are:
- Sections: Here, you can add a section or block. Plus, it lets you sort and hide the existing sections and blocks.
- Theme Settings: It contains several customization options. Those are for a logo, colors, layout, animation, media, and others.
- App Embeds: You can search for and embed apps on your website from here.
III. Right-side Display
The right side displays your website. As you make changes from the top and left-side options, the preview is shown here. Moreover, you can also add a new section or block to this area.
Now, you can customize your entire website using the editor. Don’t forget to hit the ‘Save’ button at the top-right once you’re done. Lastly, click the ‘Exit’ button at the top left to close the editor.
Note that you can use a premium Shopify theme instead. For that, you’ll need to purchase it from the Theme Store.
Step 5: Insert the Necessary Pages into the Store
Moving forward, open the ‘Add pages to your store’ step on the setup guide. Then, click the ‘Add pages’ button.
This displays the pages present on your website. To create a new page, click the ‘Add page’ button.
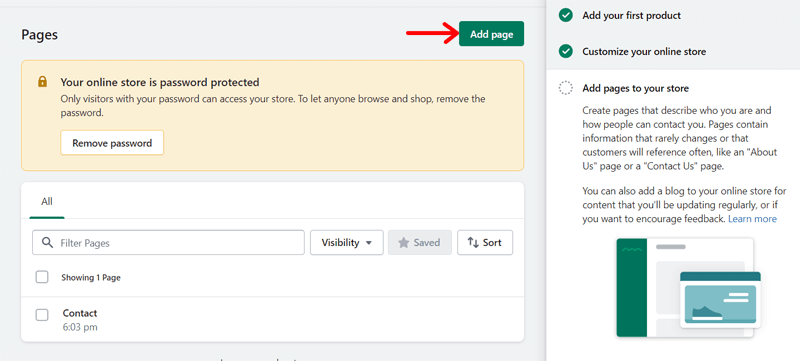
Now, add your new page title and content. Further, you can give a title and description for the search engine listing. Lastly, click the ‘Save’ button.
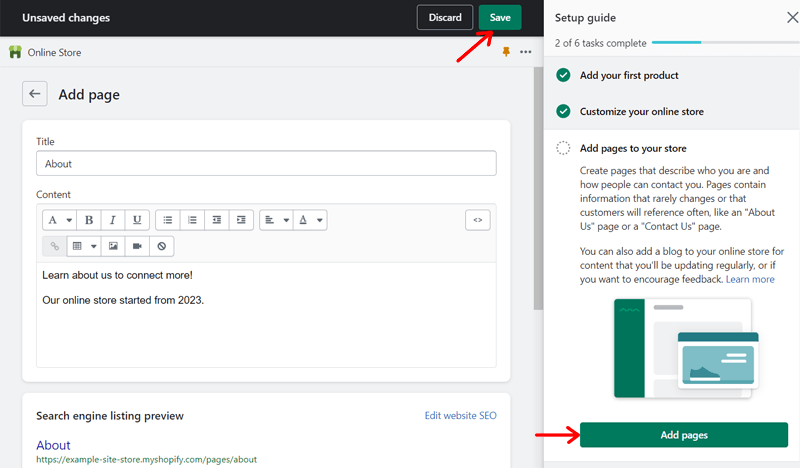
For example, we created the About page for the website. Similarly, you can build other crucial pages like Contact, Privacy Policy, Refund Policy, etc.
Step 6: Organize Your Store’s Navigation
Once you create all the pages, you can edit your store’s navigation. So, open the ‘Organize your store’s navigation’ option. Then, hit the ‘Organize navigation’ button.
There, you can find options to organize your main menu and footer. Also, you can add a new menu if you want.
For example, let’s add some new pages to the main menu. So, click the ‘Main menu’ option.
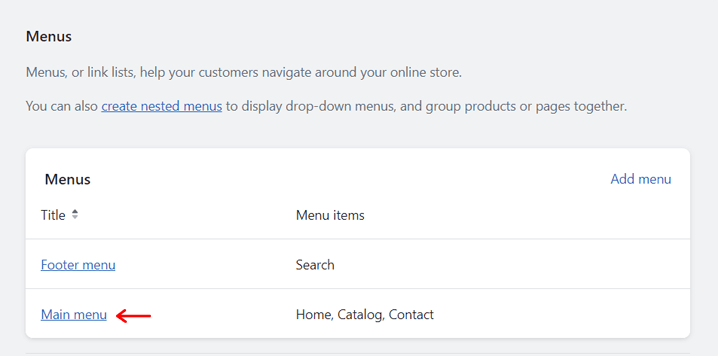
Afterward, click the ‘Add menu item’ option. Next, enter the menu item name and add the link to the page. Then, click the ‘Add’ button.
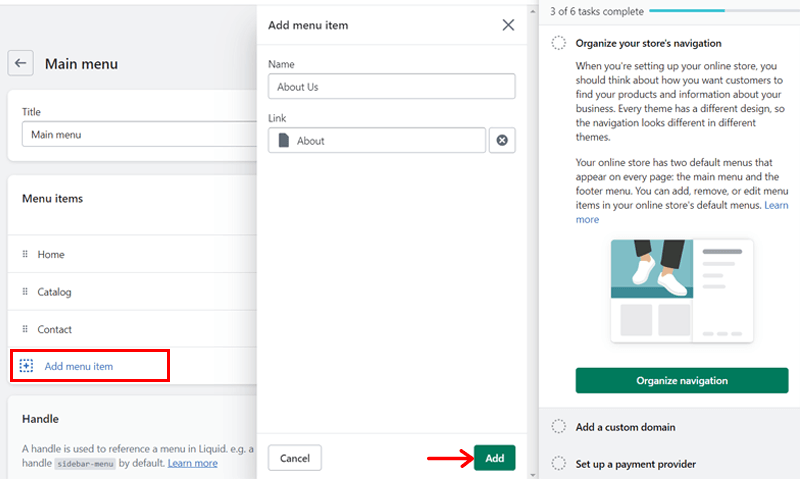
Lastly, you can sort the menu item’s position on the navigation menu. Once you’re done, hit the ‘Save’ button.
Step 7: Keep a Custom Domain Name
The next step is to use a custom domain. So, open the ‘Add a custom domain’ step and click the ‘Add domain’ button.
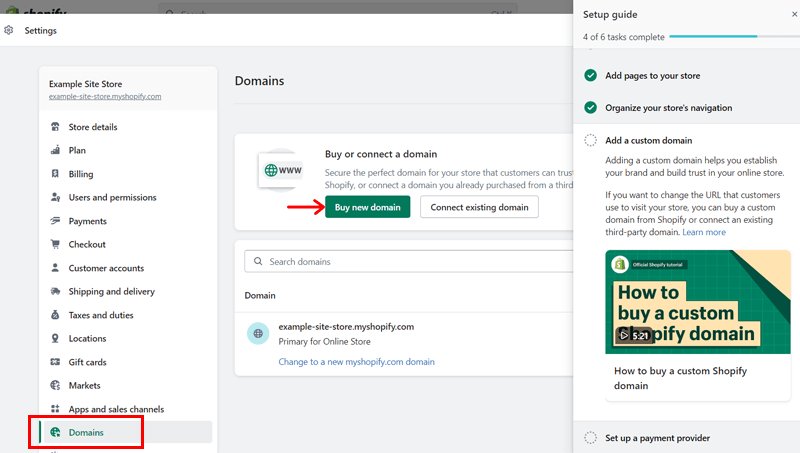
This opens the ‘Settings’ box, and you’re in the ‘Domains’ settings. Here, you can change your existing domain to another myshopify.com domain.
On top of that, it has ‘Buy new domain’ or ‘Connect existing domain’ options. Respectively, they let you purchase a new domain name or use an existing one that you may have. Let’s click the ‘Buy new domain’ option here.
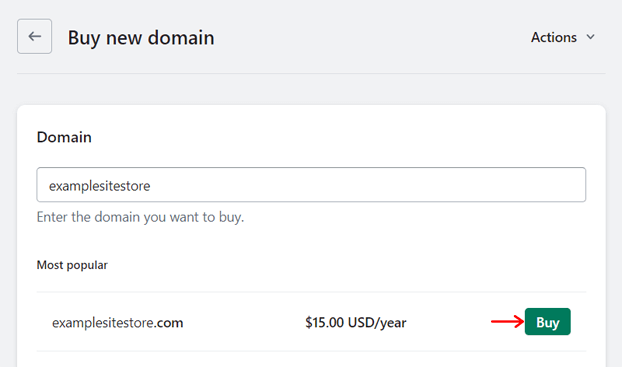
Now, enter the domain name you want for the store. If you aren’t sure, then learn how to choose a domain for your business here.
As soon as you type, you can see the availability of that domain using different extensions. Once you find a suitable one, click its ‘Buy’ button.
This redirects you to the ‘Billing’ settings. Here, you must enter your address and choose a payment method for the purchase. Learn the entire process of adding a domain name in this guide.
Plus, you can register a domain with any popular domain registrar and use it on Shopify.
Step 8: Setup a Payment Provider
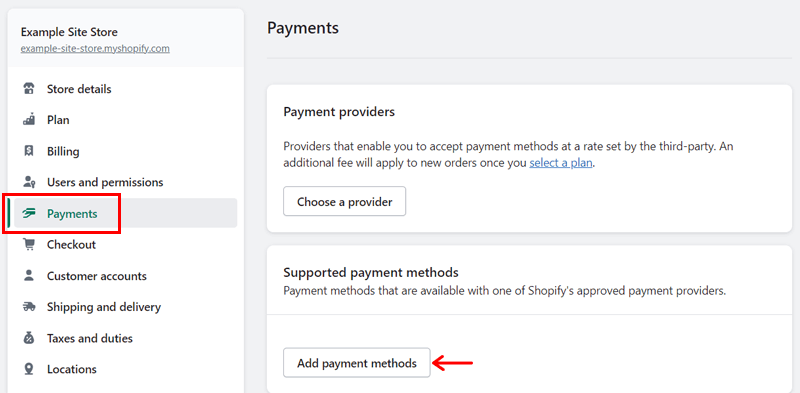
Following that, you can click the ‘Setup Payments’ button in the ‘Set up a payment provider’ step. This brings you to the ‘Payments’ settings.
Here, you can choose a payment provider and add payment methods. Also, customize the payment methods and manage payments.
First, you can find a payment method approved by Shopify. For that, click the ‘Add payment methods’ button in the ‘Supported payment methods’ section.
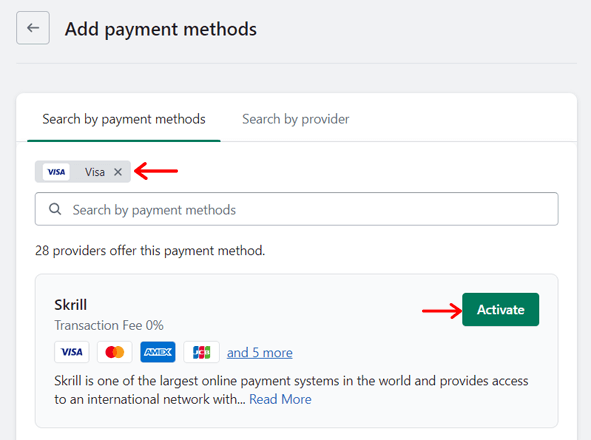
Now, you can find and select payment methods based on their name or provider. Suppose we’re searching for a payment method by its name.
Once you find a method, click on it. Then, you can click the ‘Activate’ button on your preferred payment provider from the list that shows up.
Afterward, you can fill out the account information using the payment provider. Also, pick the different methods offered by it. Then, click the ‘Activate’ button and configure them.
If you don’t find your preferred payment provider on the list, then you can hit the ‘Choose a provider’ button.
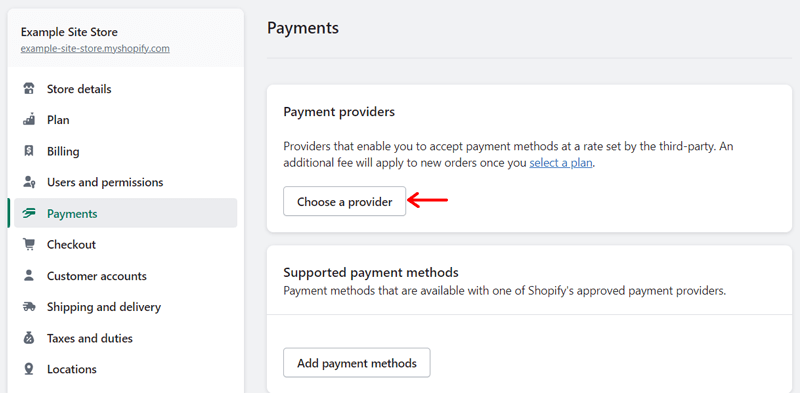
Now, you’ll find a list of several 3rd-party payment providers. You can click on the ones you want to configure. That’s how you can set up payment providers in your store.
Learn how to use this setting in detail in this documentation.
Step 9: Configure Additional Settings
Apart from these steps, you must configure other settings for your store. You can get access to them by clicking the ‘Settings’ option in the Shopify dashboard.
The following list shows some vital additional settings we missed out on before:
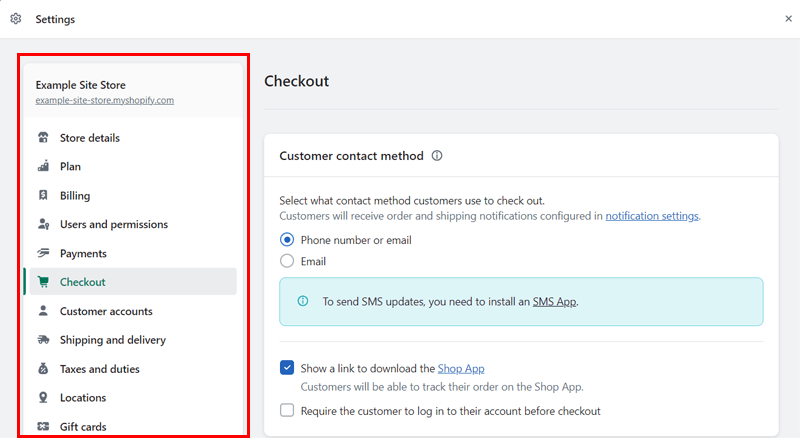
- Users and permissions: If you want to add staff or collaborators, then do that from here. Also, you can set their permissions for restricted access.
- Checkout: It lets you set up the various information you want to collect from customers during checkout. Learn about the checkout settings here.
- Shipping and delivery: You can configure shipping rates, delivery dates, shipping packages, and more. Here’s a guide to using this setting.
- Taxes and duties: This setting allows you to manage sales tax collection, decide how taxes are charged, etc.
- Apps and sales channel: From here, you can view, open, and delete your installed apps. Further, you can add new apps from the Shopify App Store.
- Brand: In this setting, you can add your store logo, colors, slogan, social links, etc.
Congrats! This concludes our steps for using this outstanding platform. You can now visit your website and start your selling business.
Learn what customer support options Shopify provides in the next section!
E. Customer Support Choices in Shopify
Undoubtedly, Shopify stands out as one of the most user-friendly eCommerce platforms. But it’s always wise to anticipate potential challenges while using any platform. In such instances, having reliable customer support becomes vital for businesses.
Fortunately, Shopify excels at offering comprehensive customer support under one roof. On its website, you’ll find various customer support options.
First, this platform lets you get support via email and live chat for all its plans. Further, it has a Help Center with detailed documentation. There, you’ll find guides on starting, managing, marketing, and expanding your Shopify store.
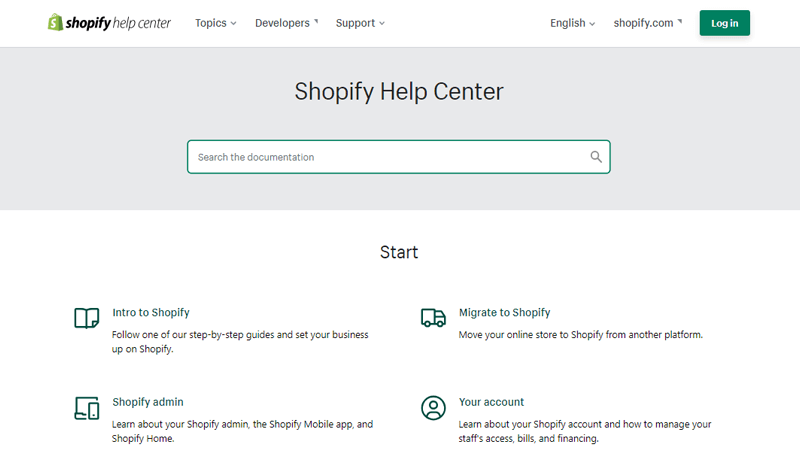
If you want a better way to learn about Shopify, then here’s the link to its video tutorial on YouTube. Plus, Shopify Learn offers courses to help you start and grow your eCommerce business with this builder.
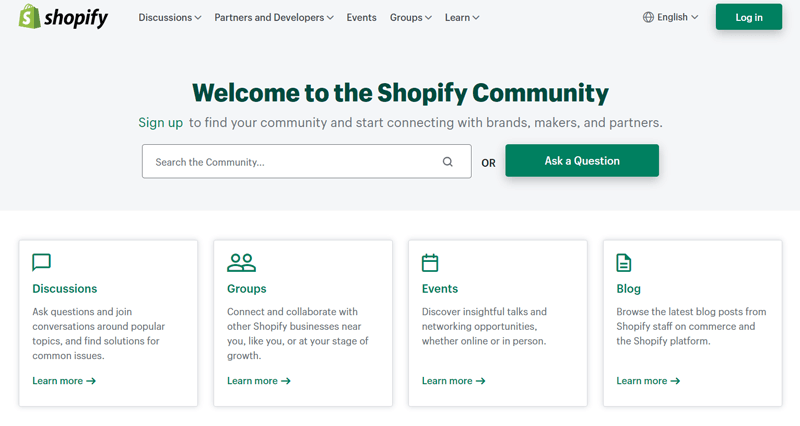
Moreover, you can join the Shopify Community to get help from its users. Or hire an expert to grow your business. Not to mention, developers get different support options separately.
F. Comparing Shopify Pricing Plans
Once you decide to use Shopify for your online selling business, you must check out its pricing plans. Here, we’ll point out those price options to help you pick one.
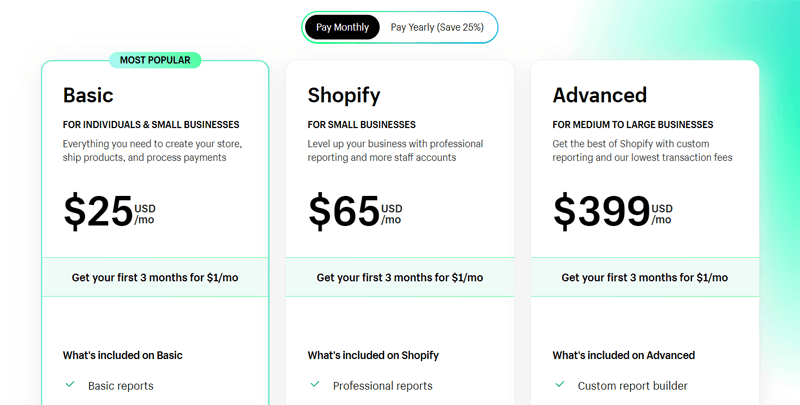
Shopify provides 3 premium pricing plans for contrasting needs. Each of which contains a 3-day free trial to help you get started. The plans are:
- Basic: $25/mo billed monthly, $19/mo billed yearly, $1/mo for the first 3 months, basic reports, 2 staff accounts, and up to 1000 inventory locations.
- Shopify: $65/mo billed monthly, $49/mo billed yearly, Basic features, professional reports, 5 staff accounts, and more.
- Advanced: $399/mo billed monthly, $299/mo billed yearly, Shopify plan features, custom report builder, 15 staff accounts, etc.
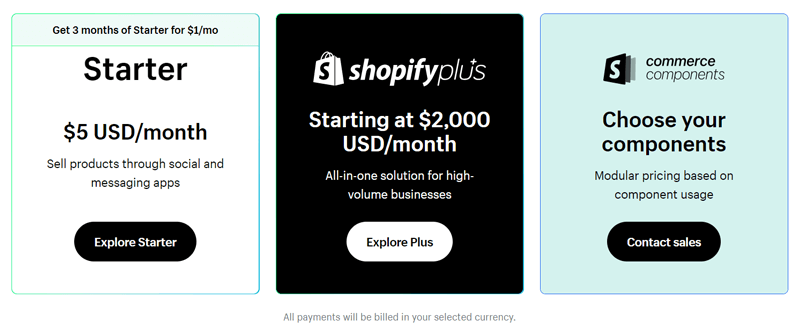
Other than that, you’ll also find alternative Shopify solutions for your business. They are:
- Starter: $5/mo, $1/mo for the first 3 months, and selling products through social and messaging apps.
- Shopify Plus: Starting at $2000/mo for an all-in-one solution for high-volume businesses.
- Commerce Components: Contact sales if you want modular pricing based on the components you want.
In conclusion, we recommend using the Basic plan if you’re a beginner wanting an online store website.
G. Pros and Cons of Shopify
In summary, let’s quickly look at Shopify’s pros and cons. Starting with the pros:
Pros of Shopify
- Fully-hosted platform. It means you won’t have to look for a hosting platform.
- It’s easy to set up and use.
- Ideal for both small and big eCommerce websites.
- Offers several attractive and responsive templates.
- Lets you manage your store with iOS and Android mobile apps.
- You can sell products across multiple channels like Facebook, eBay, etc.
- Offers a 3-day free trial without needing to enter credit card information.
Cons of Shopify
- Shopify Payments aren’t available everywhere. Also, it charges a transaction fee.
- Relatively, the customization options are limited compared to other website builders.
- It doesn’t have a free plan or a money-back guarantee policy.
- Requires improvements in providing more app options.
That’s all! This concludes our guide to what Shopify is and what it is used for.
Frequently Asked Questions (FAQs) about Shopify
Have any basic questions on your mind? Here are the FAQs on Shopify that you may want to learn about. Let’s see them!
1. How does Shopify protect my store?
Shopify provides many security measures to protect your store and customer data. They use SSL (Secure Sockets Layer) for secure information transmission between your store and customers. Other features are bug fixes, automatic updates, security audits, etc.
2. Can I integrate Shopify with my existing website?
Yes, you can integrate Shopify with your existing website in various ways. You can embed Shopify’s ‘Buy Button’ for eCommerce features on specific pages. Or use Shopify’s APIs (Application Programming Interface) and SDKs (Software Development Kits) for more customized integration.
3. How simple is it for developers to integrate Shopify with their platforms?
Shopify offers detailed documentation, APIs, and SDKs, making it simple for developers to integrate Shopify with their platforms. In addition, it has an active developer community and support channels to guide developers throughout the integration process.
4. Does Shopify support multiple languages?
Yes, of course, Shopify supports many languages. Shopify itself is present in multiple languages, including English, Italian, German, etc. Also, you can translate your content into different languages using its built-in language settings or 3rd-party translation apps.
5. Can I migrate my existing store to Shopify?
Yes, you can migrate your existing store to Shopify. You can import your products, orders, or customers using CSV files or direct integrations with popular eCommerce platforms. Its migration experts can also help you with the migration without disrupting your business.
Conclusion
This ends our blog on what Shopify is and what it is used for. Hopefully, you understand this guide to Shopify and its many applications in the world of eCommerce.
In a nutshell, Shopify stands as a powerful eCommerce platform, empowering businesses of all sizes. It has an intuitive interface to create and manage online stores with extensive features and seamless integrations. All of that helps you succeed in your selling business.
Please feel free to comment below if you have any queries about Shopify and its applications. We’ll try our best to respond with answers.
Overall, is Shopify worth it? Yes, if it meets all your needs and demands.
If not, then you can go through our list of the best Shopify alternatives to find a better platform. Also, read comparison articles on WooCommerce vs Shopify, Ecwid vs Shopify, BigCommerce vs Shopify, and Wix vs Shopify.
Please share this article with your acquaintances if you like it. Last but not least, follow us on Twitter and Facebook to come across similar articles like this.
