Are you searching for an honest review of AidWP? Or wondering if it’s the easiest WordPress plugin for Stripe donations? If yes, then stay right here!
If you’re a creator or part of a nonprofit or charity striving to make a positive impact. Then, harnessing the capabilities of WordPress for fundraising campaigns is a strategic move.
However, navigating the complexities of payment gateways and integrations can be a daunting task. That’s when AidWP steps in. This plugin simplifies receiving donations or payments through the Stripe payment processor in WordPress.
Throughout this review, we’ll delve into the features, pricing, workings, and support options of AidWP. With that, you can revolutionize the way charitable contributions are made.
Let’s start!
Overall Rating
AidWP is one of the best WordPress donation plugins for accepting donations and receiving payments. It uses Stripe as the payment gateway, making the process smooth and safe.
Moreover, AidWP scores 5 out of 5 stars on the WordPress.org plugin repository. Best of all, 21 users gave 5 stars out of a total of 22.
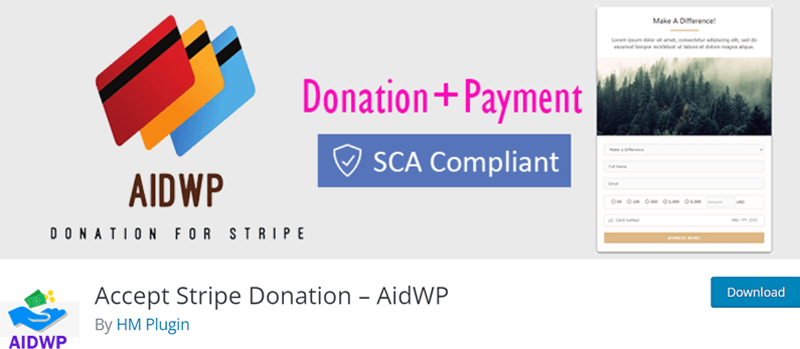
Undoubtedly, we’d also give AidWP a solid 4.9 out of 5 stars. Here, we removed the remaining 0.1 rating as it doesn’t have a large community or support resources.
Overall, we recommend using it for your website if it fulfills your requirements. However, you should try and test the free plugin and go through its demo.
Afterward, you can upgrade to a premium plan if you need to. Further, it also has a 14-day money-back guarantee policy. So, you can determine if you want to continue using the paid version within 14 days.
With that, let’s move ahead with this review and learn the pros and cons of AidWP!
Pros and Cons of AidWP
Find out the AidWP pros and cons below to analyze the capabilities of this plugin:
Pros of AidWP
- Integrated with Stripe, one of the most reliable payment processors.
- Easy-to-use and user-friendly WordPress donation plugin.
- Offers a simple shortcode to incorporate donation forms on your site’s pages.
- Lets you view and manage the donors in the backend.
- It can send email notifications with receipts to both the admin and donors.
- Provides many customization options for the forms, email receipts, etc.
- Supports 150+ currencies, letting you accept donations in your comfortable currency.
Cons of AidWP
- It doesn’t have a large community or adequate support resources.
- You won’t find a free trial for its premium plans.
- Some necessary features are present only in the premium plans.
Get AidWP Selecting an Ideal Plan
You may have figured out that AidWP is a freemium WordPress plugin. Meaning, it has both free and premium pricing schemes.
The free plugin is available for download in the WordPress.org plugin directory. Another simpler way is to install the plugin right from your admin dashboard.
Additionally, its premium version has the following options to choose from:
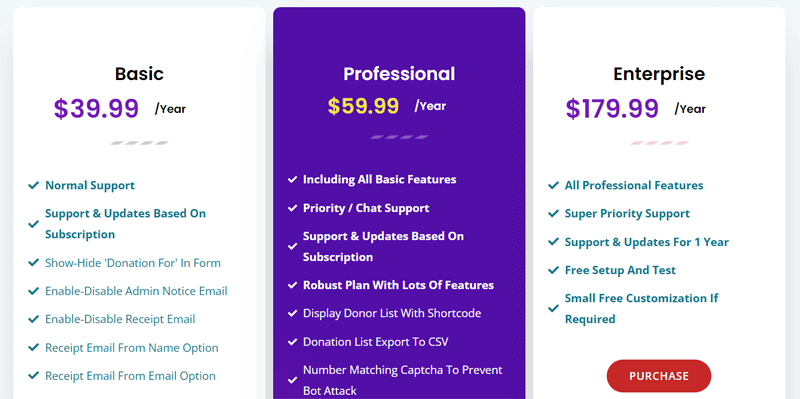
- Basic: $39.99 per year, $119.99 for lifetime use, and normal support.
- Professional: $59.99 per year, $179.99 for lifetime use, and priority support.
- Enterprise: $179.99 per year, $539.99 for lifetime use, and super-priority support.
We’ll get a more detailed explanation of its pricing options later. But for now, let’s begin this AidWP review with a brief introduction.
A. What is AidWP? – A Brief Overview
AidWP is one of the most reliable WordPress donation plugins on the market. Simply put, it lets you accept donations or receive payments from your WordPress website. Donors or buyers can use popular credit cards via the trusted Stripe payment gateway.
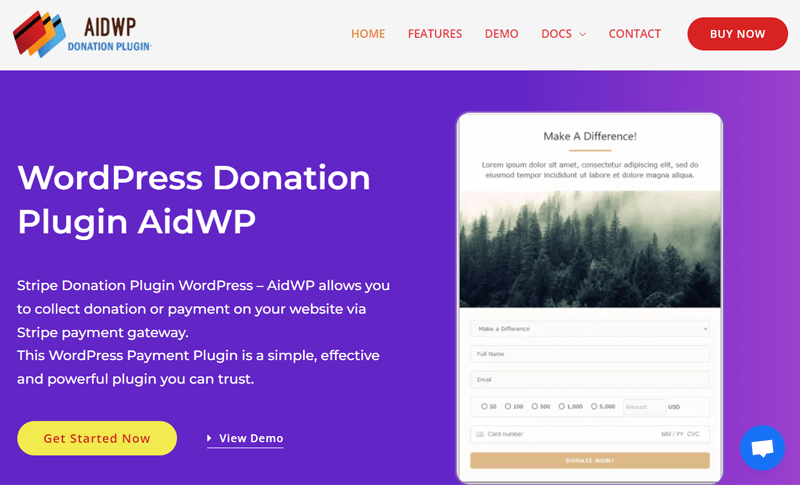
Moreover, AidWP is easy to use and configure because of its simple user interface. So, anyone (including beginners) can quickly create and insert donation or payment forms on any page of their site. Thanks to the shortcode that allows easy insertion.
In addition, it’s a translation-ready plugin. Meaning, you can use a POT (Portable Object Template) file to effortlessly translate the plugin into multiple languages. Also, donors across the world can comfortably utilize your site in a familiar language.
On top of that, you can use this plugin when working with any WordPress theme. Also, AidWP is completely responsive. Hence, your site and the process will work smoothly on any device, despite the use of any theme.
But these are only some notable features. There’s more you must learn about. Hence, let’s jump right into the next section of this review to explore AidWP.
B. Key Features and Highlights of AidWP
Now, let’s focus on all the features and highlights of AidWP, whether it’s free or premium.
Getting to know them will help you understand the plugin and recognize its significance for your business. Also, it helps you determine if it’s worth using for your website.
So, without any delay, let’s start!
1. Easily Accept Donations and Receive Payments
The main objective of using AidWP is to accept donations from donors. So, this plugin lets you set up the donation form and easily place it on any page of your site with a shortcode.
The shortcode is ‘[wp_stripe_donation]’.
Moreover, this plugin allows you to collect payments from buyers when you’re selling any product or service. Hence, you can insert a payment form with the help of AidWP.
In a nutshell, your job is to use this plugin to create and maintain your donation or payment form by following simple steps. Donors and buyers can use them via credit cards to donate money or make payments.
What’s more? Here’s a list of features revolving around these donations and payments:
- You can set predefined donation amounts that will show up in the donation form.
- Set your currency from the variety of currencies in your WordPress dashboard.
- Also, you’ll get to offer different donation options for donors to choose from.
- Further, you can set the minimum amount that people can donate.
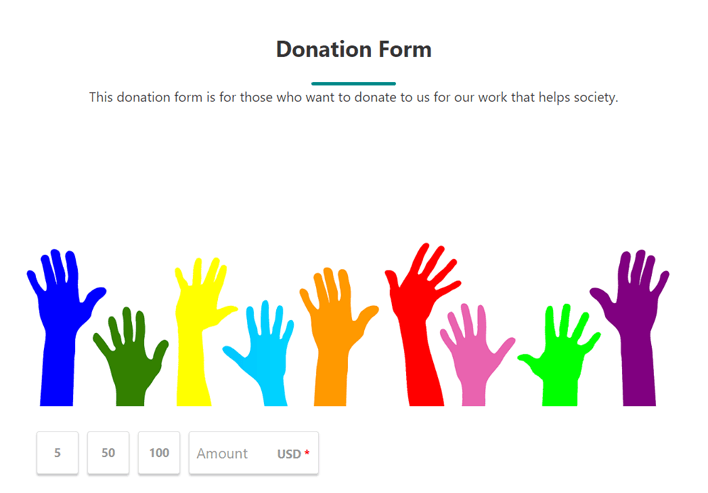
All the configuration options are present in the ‘WP Stripe Donation > General Settings’ menu of your admin panel.
2. Trusted Stripe Payment Gateway
By now, you may have figured out that AidWP uses Stripe as the payment gateway. But why Stripe?
Unquestionably, millions of businesses of all sizes use Stripe to accept payments. Moreover, it’s a fully integrated suite with several payment products. Hence, using Stripe lets your donors use credit cards like Visa, Mastercard, American Express, etc.
As a trustworthy payment processor, AidWP uses Stripe for your transactions. Meaning, you can easily collect funds and payments to your account via Stripe.
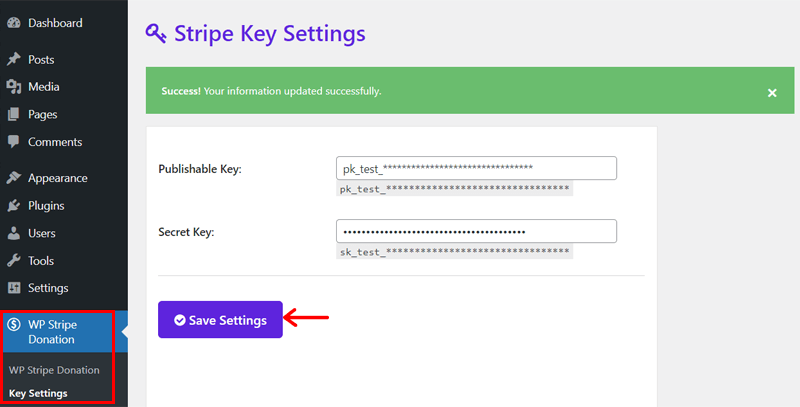
For that, you must connect your Stripe API (Application Programming Interface) keys to the plugin. By adding the publisher key and secret key to the ‘WP Stripe Donation > Key Settings’ menu, you’re all set!
3. Highly Customizable Forms
Creating a donation form from scratch is a hassle because it takes a lot of time and effort. But don’t you worry! The AidWP plugin team is fully aware of this situation. That’s why using this plugin lets you easily configure a donation form visually and strategically.
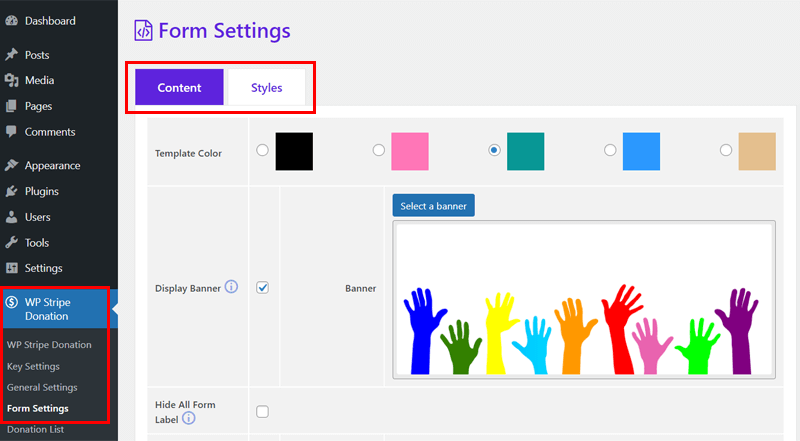
Right on the ‘WP Stripe Donation > Form Settings’ menu, you’ll find all the content and style settings. Using them, you can insert a personalized form into your site. Have a look!
On the ‘Content’ tab, you can find settings and options like this:
- Choose a template color among 5 different options.
- Showcase a banner to make the donation form attractive.
- Set the label name of fields like name, email, amount, and more.
- Adjust the form’s width, heading, button, etc.
Similarly, the ‘Style’ tab includes more customization options, like below:
- Form container options like border color, width, padding, etc.
- Input field options such as font size, color, border radius, and more.
- Button options like background color, hover font color, etc.
In a nutshell, you can insert a fully-featured form with several options. That includes the form title, banner, description, donation amounts, donation options, donor name, etc.
But all these fields aren’t compulsory. You can also set up a minimal form with basic options to receive donations. This form can include the donation amount, name, and email. That’s it!
4. Personalized Email Receipts
Another intriguing feature of AidWP is email notifications. Meaning, this plugin can automatically send email notifications to the admin whenever a donation is made. Also, donors will receive an instant email notification after a successful donation.
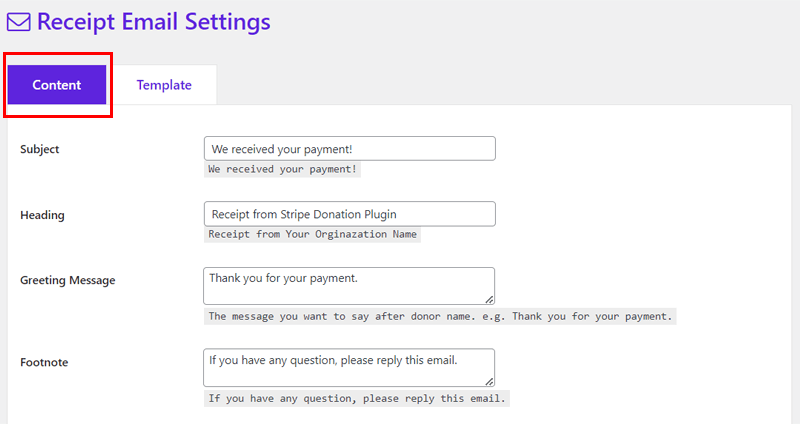
Best of all, you can personalize how the email receipts will look and work. All those options are present in the ‘WP Stripe Donation > Receipt Email’ menu.
Now, let’s learn the basic tweaks you have to make. On the ‘Content’ tab, you can:
- Adjust the subject, heading, greeting message, and footnote of the email.
- Mention the values to show in the ‘From Name’ and ‘From Email’ sections.
- Disable the receipt email functionality for the admin and recipients.
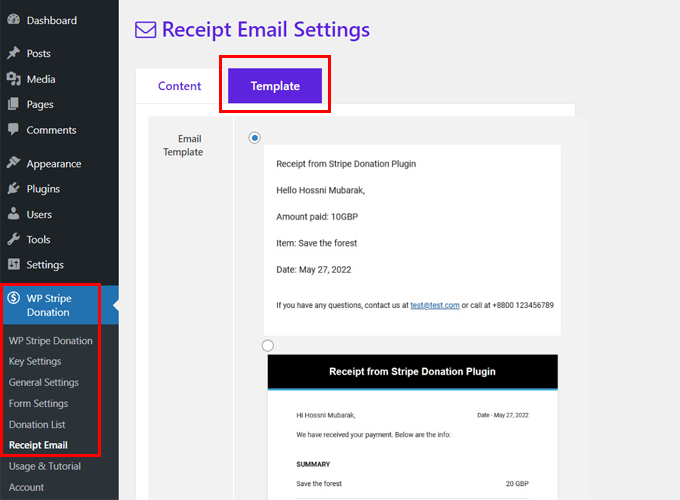
Further, the ‘Template’ menu lets you pick a predesigned email template from 2 options.
5. Sophisticated Donor List Panel
Once your site starts getting donations for a cause, you may know who those donors are. Isn’t it? Of course, these insights are vital to properly knowing the donations occurring on your website. And AidWP comes to the rescue!
This plugin provides a sophisticated donor list panel for premium plan users. On the ‘WP Stripe Donation > Donation List’ menu of the dashboard, you’ll find this list. There, you can see the values for amount, name, email, date, etc.
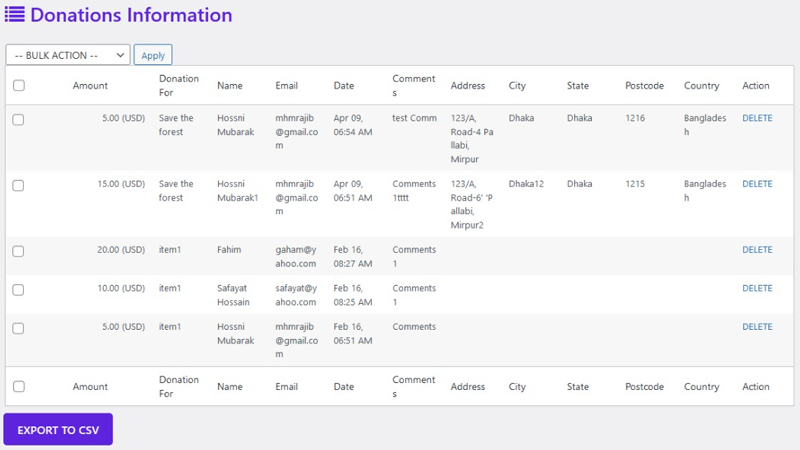
On top of that, it lets you export the donor information as a CSV file. Also, you can delete the test data one by one or in bulk.
6. Outstanding Security Features
Using a trusted Stripe payment gateway makes the donation process secure itself. Other than that, it has a built-in number-matching captcha to prevent bot attacks.
In addition, AidWP also supports Strong Customer Authentication (SCA) for European customers. That way, donors and customers can easily authenticate on your site while performing transactions. This results in a secure process.

For those who don’t know, SCA is a new rule in Europe that concerns how your European customers authenticate online payments. Hence, card payments need 3D Secure to meet SCA requirements.
Failure to comply with new authentication guidelines may result in customer bank declines for your website’s transactions. But you don’t have to worry about that when using AidWP.
Learn the entire process of securing your website with this ultimate guide.
7. Adjustable Thank You Page
Having a ‘Thank You’ page after a donation is complete is crucial for many reasons:
- It gives immediate confirmation to donors, reassuring them that their contribution was successfully received.
- Lets you give a sense of gratitude and connection to the donors.
- Offers an opportunity to communicate further or enhance the user experience.
Hence, it’s a good practice to thank your new and returning customers or donors. Keeping that in mind, AidWP has a built-in ‘Thank You’ page. And you can completely customize it using the Elementor page builder.

Fascinating, isn’t it?
8. Additional AidWP Features
Apart from the above-mentioned features, some notable AidWP features to point out are:
- Supports 150+ currencies to accept donations in your chosen currency.
- Displays the total donations made today.
- Offers a shortcode ‘[wpsd_donors]’ to let you show the donor list on your website.
- The plugin won’t charge you any extra amount per transaction.
- Provides 3 header options for the donation form based on the placement of the title, description, and banner.
Hence, these are all vital highlights of this plugin. Now, let’s proceed to the next section of this AidWP review.
C. How to Install and Activate the AidWP Plugin?
Once you’re clear about all the features of AidWP, why not try using it? Here, we’ll first show you the process to install and activate it on your WordPress website.
Depending on your plan, follow the steps. Let’s go!
Note: You can use famous WordPress themes that support this plugin. Here, we’ll go with Kadence. This popular theme works well with several plugins (including AidWP) and has an intuitive design and interface.
If you’re in a dilemma, then learn how to pick a WordPress theme and install this theme.
1. Installing the Free AidWP Plugin
The process of the free AidWP installation and activation is similar to that of all WordPress plugins. And the quickest method is to do that from your WordPress admin dashboard.
Step 1: Install the AidWP Plugin
First, log into your WordPress dashboard, and open the ‘Plugins > Add New’ menu.

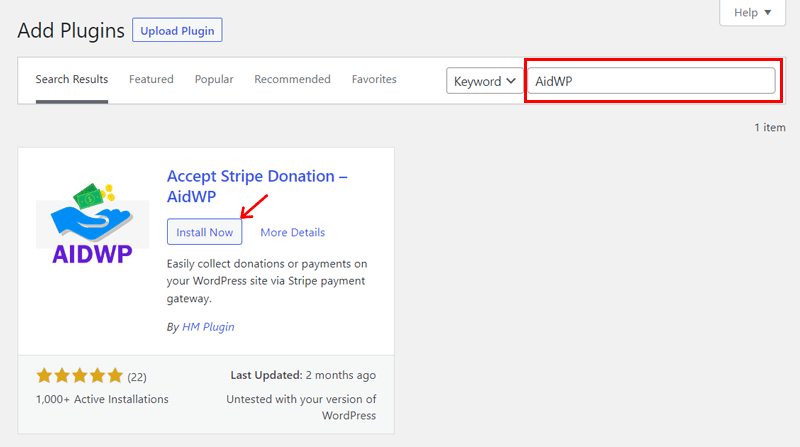
Now, search for the keyword ‘AidWP’ on the search bar. Once you find the plugin by HM Plugin, click on its ‘Install Now’ button. After a while, it gets installed!
Step 2: Activate the AidWP Plugin
Following that, you must activate the plugin. Hence, you should hit the ‘Activate’ button after it replaces the ‘Install Now’ button.
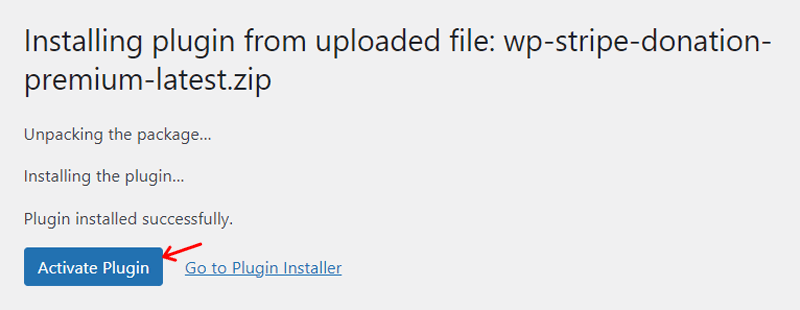
Congrats! Following these steps successfully installs and activates the free AidWP plugin.
Want to know the other method? Then, check that out in our guide on how to install a WordPress plugin.
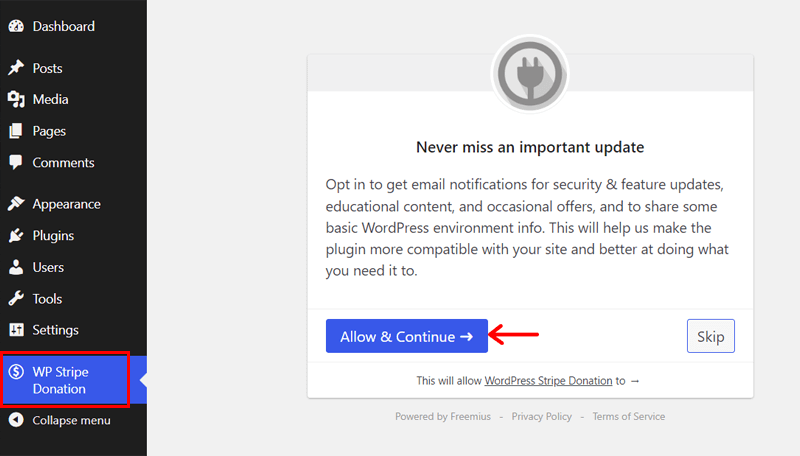
Notably, you can see a newly added menu on your panel, i.e., ‘WP Stripe Donation’. Also, this menu currently shows a notice.
There, you can hit the ‘Allow & Continue’ button if you want to receive email notifications. And they are about security and feature updates, educational content, and occasional offers. Otherwise, click the ‘Skip’ button to ignore the notice.
2. Installing the Premium AidWP Plugin
In the case of a premium plan, you must buy it from its official website first. Then there’s the installation and activation of the plugin. So, follow these steps carefully:
Step 1: Purchase a Premium AidWP Plan
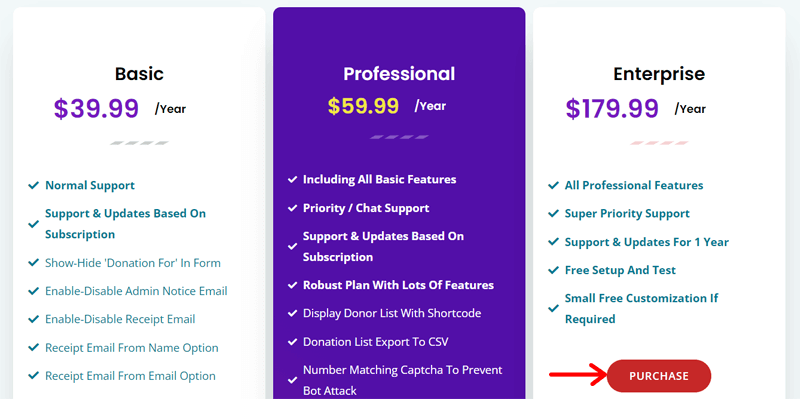
First, visit the AidWP website and click the ‘Buy Now’ button present in the navigation. On the Pricing page, there are 3 premium pricing schemes for AidWP.
Among them, select the one that contains the features you want. Once you decide, click on its ‘Purchase’ button.
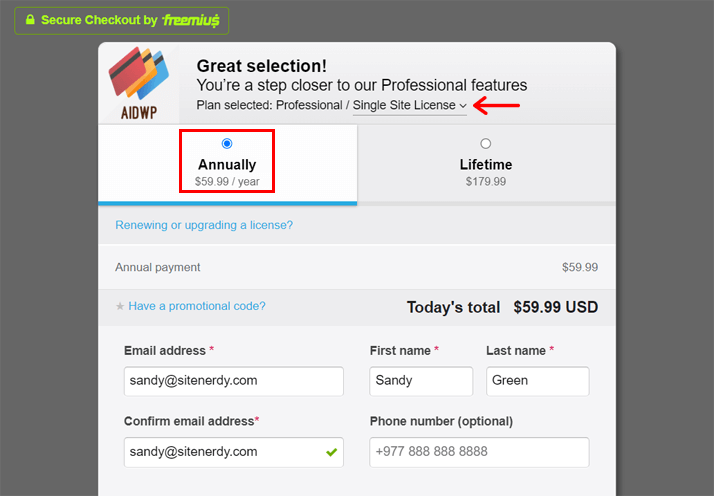
Now, you’ll be redirected to the secure checkout page by Freemius. There, pick the type of license you want. It can be a Single Site, 5-Sites, or 20-Sites. Also, determine whether to go with an annual or lifetime plan.
Moving forward, insert the promotional code if you’ve one. Afterward, enter your personal information. Next, select the payment method between credit cards or PayPal payments.
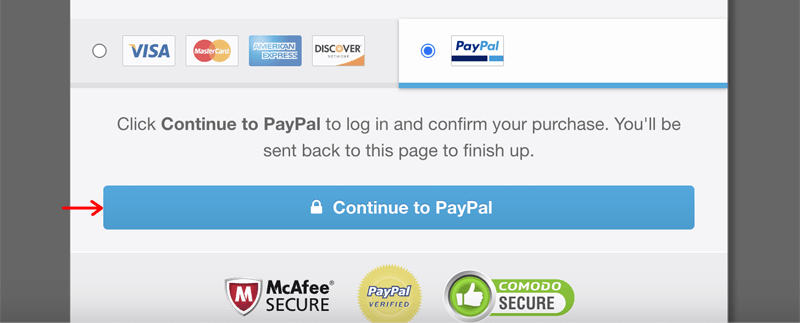
If you’re moving ahead with a credit card, then enter the payment information. Lastly, hit the ‘Review Order’ button to purchase the plan.
While choosing PayPal, click the ‘Continue to PayPal’ option and complete the process.
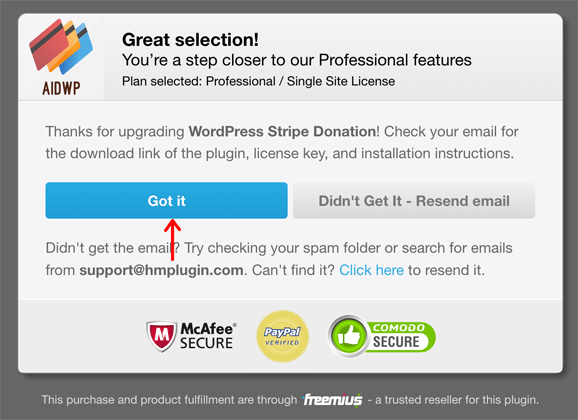
After the process is complete, you’ll get a notification about an email you’ll receive with your account and payment details. There, you can also find the download link, license key, and installation instructions.
Hence, hit the ‘Got it’ button. Afterward, download the paid AidWP plugin from the link and save its activation key.
Step 2: Upload, Install, and Activate the Premium Plan
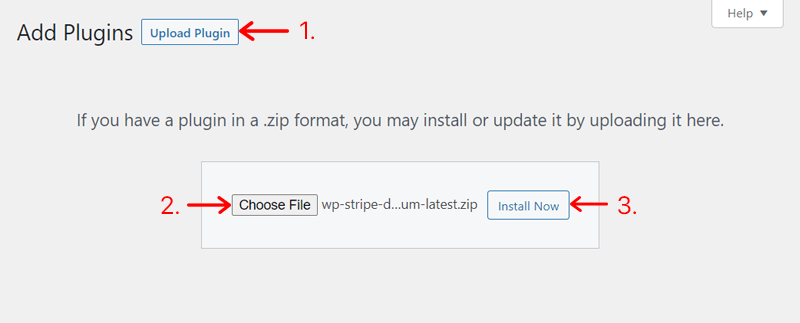
Following that, you can now open your WordPress dashboard and go to the ‘Plugins > Add New’ menu. There, click the ‘Upload Plugin’ button.
Next, click the ‘Choose File’ button and upload the ZIP file you downloaded. Then, hit the ‘Install Now’ button next to it.
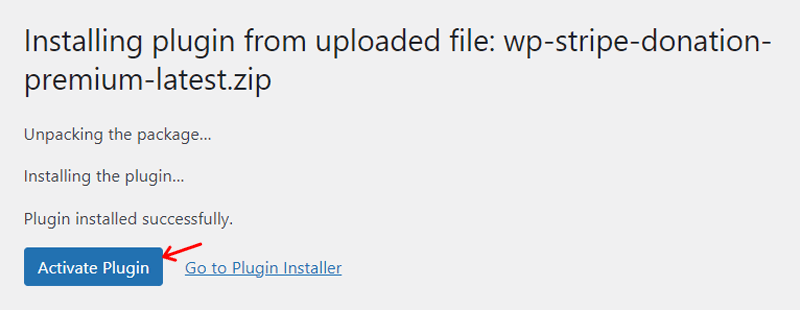
After a while, the installation process finishes, and you must click the ‘Activate’ button.
Step 3: Activate the License Key
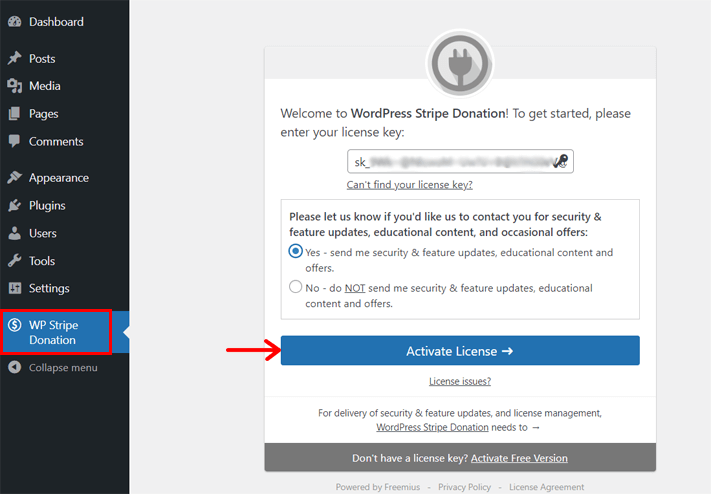
Now, you can see the new ‘WP Stripe Donation’ menu on your admin panel. There, you’ve to add the license key to activate the plugin.
Thus, insert the license key from the email in the text box. Then, select if you want to be notified of new features and updates. Afterward, press the ‘Activate License’ button.
With that, the premium AidWP is ready to use on your WordPress site.
D. How to Create and Configure a Donation Form Using AidWP?
Currently, you’re on one of the most crucial parts of this AidWP review. Here, we’ll guide you through the process of creating and configuring a donation form using AidWP.
Notably, the steps included are from both the free and premium versions. So, you may not get all of them if you choose a different plan.
Now, fasten your seat belts and get ready to begin the journey by following these directions.
Step 1: Connect the Stripe Payment Gateway
After the free or premium AidWP plugin is ready to use, you must first connect your site with Stripe. For that, go to the ‘WP Stripe Donation > Key Settings’ menu.
There, you’ll find a short form to fill out. All you need to do is keep the ‘Publishable Key’ and ‘Secret Key’ that you’ll find in your Stripe account. Then, click the ‘Save Settings’ button to connect with Stripe.

In a while, you’ll get a notification message on this interface regarding a successful update.
Step 2: Configure the General Settings
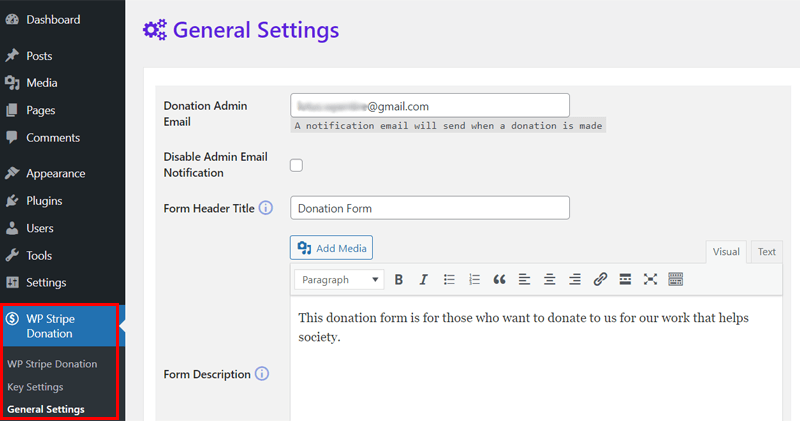
Following that, you can navigate to the ‘WP Stripe Donation > General Settings’ menu. There, you’ll find some vital settings for the plugin’s functionality.
Specifically, here’s a list of descriptions of some crucial settings present on this menu:
- In the ‘Donation Admin Email’ textbox, add an email to which you want to be notified about donations.
- Tick the ‘Disable Admin Email Notification’ option if you don’t want it.
- Add a title to your form in ‘Form Header Title’, like we placed ‘Donation Form’.
- Mention the purpose of asking for donations in the ‘Form Description’ text area.
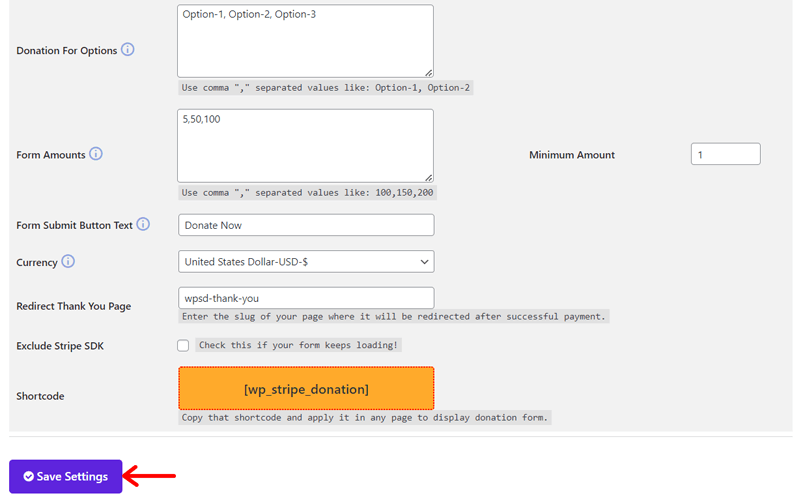
- In ‘Donation For Options’, keep the different donation options to offer. And separate the options using commas (,). For example: Option-1, Option-2, Option-3.
- Similarly, you can set predefined amounts as options in ‘Form Amounts’. For example; 5, 50, 100.
- Place the minimal amount that donors have to donate in ‘Minimum Amount’.
- Insert the button text in the ‘Form Submit Button Text’, like ‘Donate Now’.
- Pick a currency among the 150+ options in the dropdown menu for ‘Currency’.
- Enter the slug of the ‘Thank You’ page in the ‘Redirect Thank You Page’.
Lastly, hit the ‘Save Settings’ button to save these general settings.
Step 3: Adjust the Form Settings
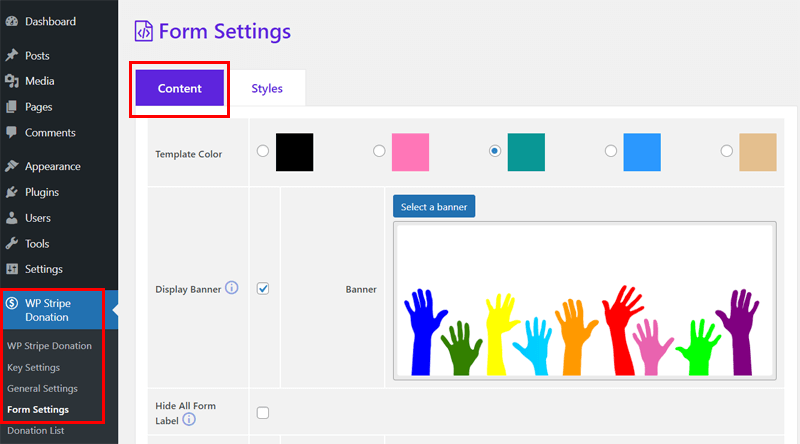
Now it’s time to configure the settings for the donation form. So, navigate to ‘WP Stripe Donation > Form Settings’ on your admin panel.
There, you’ll find 2 tabs, namely Content and Styles. With the free plan, you’ll get basic settings for the form. But with a paid plan, you’ll receive more settings and styling options.
On the ‘Content’ tab, first:
- Choose a template color among the 5 different options.
- Then, tick the ‘Display Banner’ option and click the ‘Select a banner’ button. This lets you insert a banner image to attract visitors.
- Next, you can adjust the labels for all the fields you’ll add to your form. Some notable exclusive ones are comments, captcha, address, donate/payment for, etc.
- Set the width of the form and button.
- Pick 1 among the 3 options in ‘Form Header Type’, i.e., Title-Description-Banner, Banner-Title-Description, and Title-Banner-Description.
- Enable or disable the option to show the total donations made today.
- Apply conditions to the donors, if you have any.
Once you complete the Content tab settings, click the ‘Save Settings’ button.
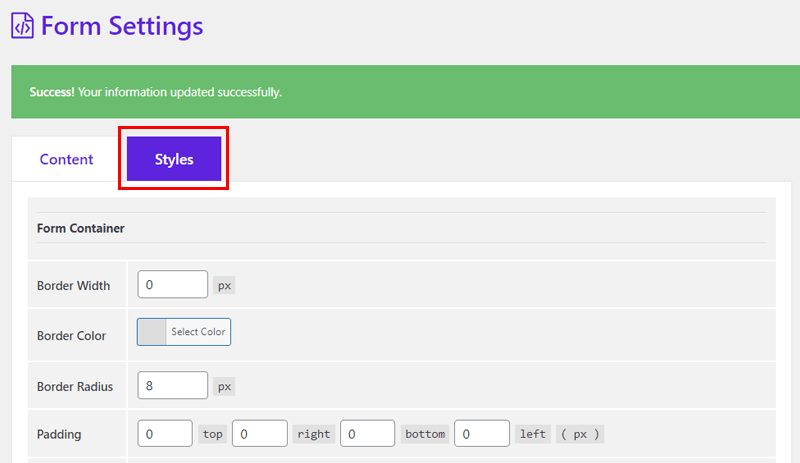
Afterward, move to the ‘Styles’ tab and use the customization options for the form container, input fields, and button. The options are regarding the color, size, radius, width, and other criteria.
Last but not least, hit the ‘Save Settings’ button to save the styling options.
Step 4: Set Up the Email Receipt Settings
If you enabled the email notification feature previously, then make sure to adjust the email receipt settings. Move to the ‘WP Stripe Donation > Receipt Email’ menu.
On your interface, you’ll see 2 tabs, namely Content and Templates. On the ‘Template’ tab, you can simply pick one of the two email templates to use. Then, hit ‘Save Settings’.
Moreover, you can set up the entire email on the ‘Content’ tab. Now, follow these steps:
- Subject: Insert the subject you’ll show in the email notifications.
- Heading: Add the heading of the email.
- Greeting Message: Keep the greeting message focused on what the email is mainly about.
- Footnote: Place a call-to-action for donors to reply to the email.
- From Name: Mention the name you want the donors to receive the email from.
- From Email: State the email address donors can see when they get a notification.

Once you’re done, press the ‘Save Settings’ button.
Step 5: Create a Donation Form Using a Shortcode
This completes the configuration process, so now you can insert the donation form on a page. And AidWP makes it easy with the utilization of a shortcode.
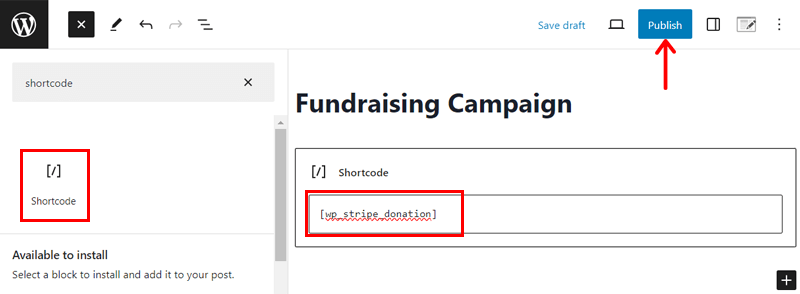
For that, go to the ‘WP Stripe Donation > General Settings’ menu. At the end of this interface, there’s a ‘Shortcode’ option. So, copy the shortcode ‘[wp_stripe_donation]’.

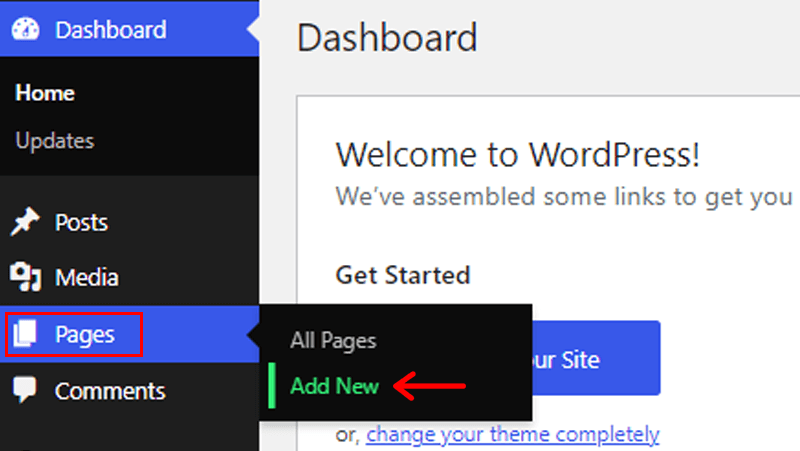
Following that, navigate to the ‘Pages > Add New’ menu to create a new page.
On the page editor, add its title, like ‘Fundraising Campaign’. Next up, search for and insert a ‘Shortcode’ block from the ‘+’ option present at the top-left side. And on that block, paste the shortcode you just copied.
Finally, click on the ‘Publish’ button to make your donation form live.
If you want to create a donation form using a form builder plugin, then learn how to do so in this complete guide.
That’s all! Now, you can preview your donation form and check out its working process.
Step 6: Preview How AidWP Works
As said before, we’ll review how AidWP works on our demo WordPress website. That’ll let you visualize the steps your donors will go through on your site. Here we go!
First, donors will open your website and find a menu item on the navigation called ‘Fundraising Campaign’.
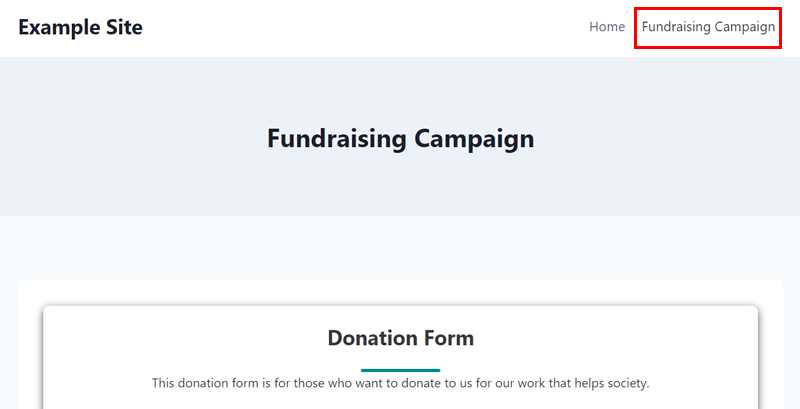
When they click on it, the pages load with the donation form. There, people can choose the donation amount from the given options and pick a donation category you added.
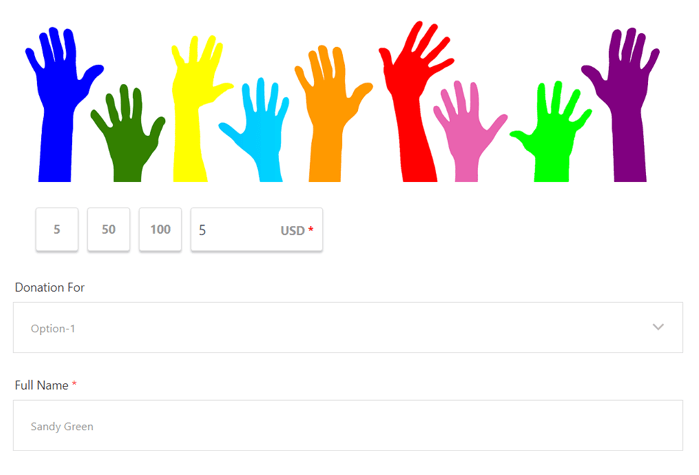
After that, they can enter their personal information based on the fields that you enabled. Next, donors have to fill out their card details.
Lastly, they must complete the number-matching captcha. Only after that can donors click the ‘Donate Now’ button for a successful transaction.
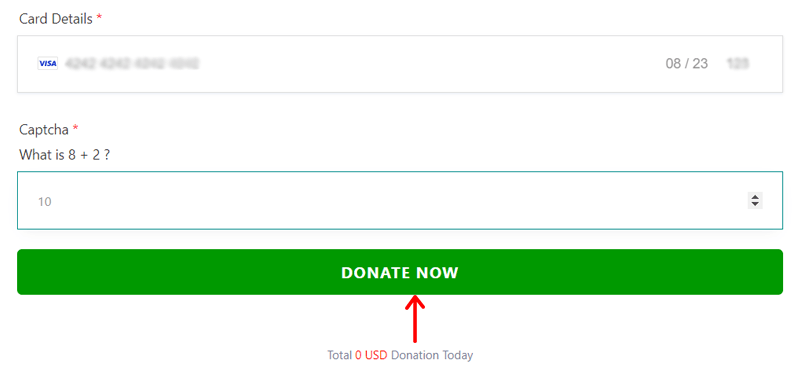
Best of all, donors will get a ‘Thank You’ page after the donation. Also, they’ll get a confirmation email.

Similarly, you can also visit the donation information on the ‘WP Stripe Donation > Donation List’ menu of your dashboard. Plus, you’ll also get an email about the donation.
That’s all for now! Hopefully, you completed the entire process as in this review using AidWP.
E. How Much Does AidWP Cost?
Now, a question may strike your head. How much does it cost to get AidWP? Get answers!
AidWP is a freemium WordPress donation plugin. So, you’ll find both free and premium plans for it. Its free plugin lets you simply create donation forms and embed them on your site. Further, the premium plans come with additional features and settings.
In fact, the free plugin is available in the WordPress.org plugin directory to download and upload to your website. Another way is to directly install it from the admin dashboard.
If the features you desire aren’t present in the free plan, then grab a premium plan. You can purchase a premium plan from its official website. Exactly, it has 3 price options:
- Basic: $39.99 per year; $119.99 for lifetime use, normal support, enable-disable admin notice email, enable-disable receipt email, etc.
- Professional: $59.99 per year; $179.99 for lifetime use, Basic plan features, priority support, form button width, receipt email HTML template, and more.
- Enterprise: $179.99 per year; $539.99 for lifetime use, Professional plan features, free setup and testing, super-priority support, etc.
Best of all, it comes with a 14-day money-back guarantee policy. Hence, you can use the plugin and judge whether you should continue using it within 14 days. Discontinuing the service within the limit lets you get your money back.
With that, let’s jump into the next section of this AidWP review.
F. How Good is the Customer Support in AidWP?
Moving forward, another important criterion to check before using a plugin is its support. Here, we’ll dive into the different customer support options offered by AidWP to determine their value. Shall we begin?
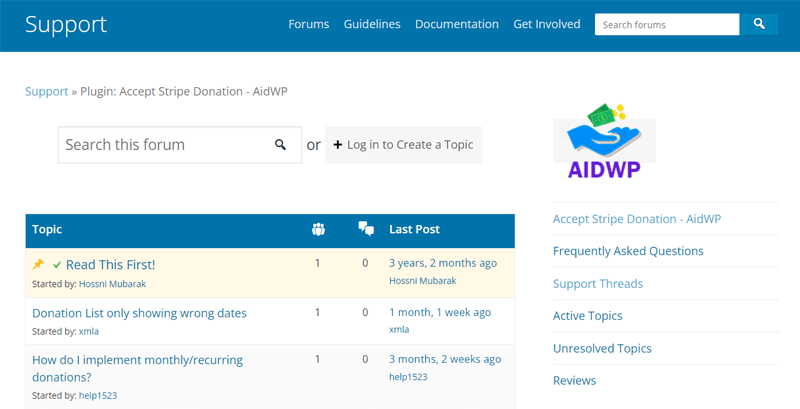
AidWP provides various free and premium support options to its users. For free plugin users, you can simply visit its Support Forum on the WordPress.org site. There, post your questions and get answers from the team, experts, or users.
If you have a basic query, then you may find its answer in its documentation. On this page, you’ll find guides on purchasing, installing, and activating both versions. Moreover, its video tutorial page contains videos for its configuration and usage.
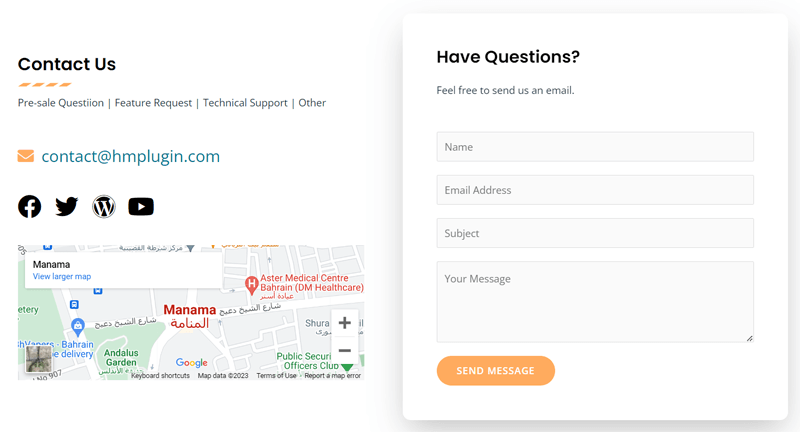
In addition, you can find the email and Skype ID of the team lead on the site’s footer. So, connect or contact AidWP for help. Also, you can visit the Contact page to fill out a form. It can be about a feature request, a pre-sale question, or when you require technical support.
Furthermore, your WordPress admin dashboard has customer support options depending on your plan. Notably, AidWP aims to give priority support to higher-plan owners. Overall, we can say that AidWP offers phenomenal customer support to its users.
G. 2 Best AidWP Alternatives
By now, we’ve learned everything about AidWP in this review. So, you may already have decided whether you’ll be using it. If not, then we’re here to help you find some good alternatives to AidWP.
Go through them and check if they meet your demands. With that, move forward with your choice, whether AidWP or any other plugin. Now, without any delay, let’s go!
1. GiveWP
GiveWP is a popular WordPress donation plugin with great ratings and active downloads. Other than Stripe, it supports other payment services like offline donations and PayPal.
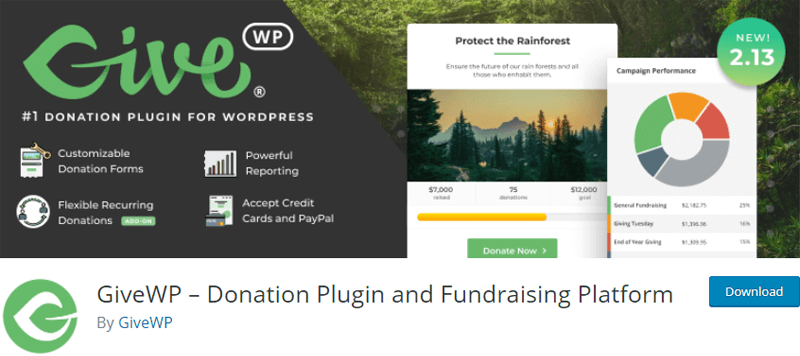
Furthermore, it lets you track your donors and learn from fundraising reports. Ultimately, this maximizes your online donations and streamlines donor management. Further, you can easily measure your donation progress for possible enhancements.
On top of that, this plugin includes several free and premium add-ons. Some of them let you add more payment methods, integrate email marketing services, etc. So, you can use them depending on your growing needs.
Pricing:
GiveWP is a freemium WordPress plugin. The free plan is downloadable from the WordPress.org plugin directory or its site. You can also install it right from your dashboard.
When it comes to its premium version, you’ll get 3 pricing schemes, as below:
- Basic: $149 per year, basic add-ons, all payment gateways, a license for 1-site, and priority support.
- Plus: $349 per year, Basic plan features, premium add-ons, recurring donations, etc.
- Pro: $499 per year, Plus plan features, peer-to-peer fundraising, and VIP support.
2. Charitable
Another good alternative to AidWP with several payment processor options is Charitable. The free plugin lets you use Stripe or PayPal, while the paid plans support other gateways.
Overall, this plugin is ideal for fundraising and charitable purposes. You can easily create a form for ongoing or recurring donations. The donation forms can load in a popup, on a different page, or on the same page of the campaign.
In addition, it supports several WordPress plugins suitable for your donation website. Some email marketing services like Mailchimp, MailPoet, etc., automation tools like Zapier, Zoho Flow, etc.
Pricing:
As a freemium WordPress plugin, you’ll find both free and paid versions of Charitable. You can install the free plugin on your WordPress dashboard. Or download it from the plugin directory at WordPress.org.
Further, there are 4 different pricing options available for exclusive features. They are:
- Basic: $99 per year, 1 website, unlimited campaigns, unlimited donors, accepts payment from Authorize.net, offline payments, etc.
- Plus: $249 per year, Basic plan features, recurring donations, email marketing integration, gift aid, and more.
- Pro: $299 per year, Plus plan features, donation teams, automation integration, etc.
- Agency: $449 per year, 5 websites, Pro plan features, client management, and more.
With that, we’re almost at the end of this AidWP review. So, let’s have a quick verdict on AidWP as a Stripe donation plugin for WordPress.
Final Verdict – Is AidWP the Best Stripe Donations for WordPress?
Thanks for reading this AidWP review article till the end. Hopefully, you have learned everything about this plugin. Also, this guide helped you decide on using it for your site.
In a nutshell, AidWP is ideal for your website if you want to accept donations or receive payments. This plugin lets you insert a well-thought-out donation form into your website. And donors can securely complete the transaction via Stripe.
Best of all, you can configure and style the donation form and email notification as needed. This lets the campaign reflect your business requirements.
However, we recommend installing and using the free plan initially. Also, you can check out its demo, including the premium features. Depending on that, you can decide to use a free or premium plan according to your needs.
We’d be glad if you bookmark this guide so that you can revisit it when you make your choice.
If you’re a newcomer looking for a beginner’s guide, then here’s our full guide on how to create a website from scratch.
Frequently Asked Questions (FAQs) on AidWP
Quickly find answers to some common questions people have regarding AidWP. Let’s start!
1. Can I add multiple donation items or product items with AidWP?
Yes, you can add multiple donation items or product items with AidWP. Go to ‘General Settings’ and find ‘Donation For Options’. There, keep your items like “Item One, Item Two, Item Three”. Consequently, you can see them in the form of a drop-down section.
2. How can I display multiple amounts in the donation form when using AidWP?
To display multiple amounts in the donation form, go to ‘General Settings’ in AidWP. There, find the ‘Amounts’ option. Now, add the amounts, like “5, 10, 50”. With that, your donation form will show the amounts similarly.
3. How can I change the currency when using AidWP?
To change the currency, open ‘General Settings’ and find the ‘Currency’ option. There, pick your currency among the given options in a dropdown and save it. Ultimately, you can find the changes in the amount section of the donation form.
4. AidWP supports which payment methods?
AidWP accepts all major credit cards. That includes Visa, Mastercard, American Express, etc. All of which are through the Stripe payment gateway.
5. Can I cancel my AidWP account at any time?
Yes, of course, you can cancel your account from your Account panel. It can be done at any time when you decide AidWP isn’t a suitable plugin for your business.
Conclusion
That’s how we come to the end of this AidWP review article!
Hopefully, you liked this AidWP review and are now aware of everything related to the plugin. Also, we’d be happy if you continued using it with the help of our guide!
In a nutshell, AidWP is a trustworthy WordPress plugin for donations and payments. You can start with a free plan and upgrade it as per your growing demands.
If we missed out on anything about this plugin that you want to know, then comment on it. We’re looking forward to helping you whenever you need it.
Additionally, you can also read some articles in return. They are the best WooCommerce payment gateways, and how to create a wholesale website with WooCommerce.
Last but not least. Follow us on Facebook and Twitter to come across recent articles like this!
