Do you feel confused and unsure of how to create a wholesale website that truly stands out? If this is the case, then you’ve come to the correct place.
Today, establishing a wholesale website has become a strategic endeavor for businesses aiming to tap into the world of B2B transactions. One powerful tool that empowers entrepreneurs and enterprises alike to create an efficient wholesale platform is WooCommerce.
Not to worry. This beginner’s guide will explain the secrets of creating a wholesale website, which will attract customers and increase your business’s success.
So you can confidently begin on your path to creating a wholesale website that will take your business to new heights. Let’s get started!
A. What is a Wholesale Website? – Overview
A wholesale website is like a big online shop where businesses buy products in large amounts straight from manufacturers and distributors. Unlike regular online stores, where people buy one or two things, wholesale websites sell big bundles at lower prices.
Moreover, these websites sell various products, such as clothes, electronics, and accessories. However, before seeing prices or ordering, businesses usually need to create an account.
Additionally, wholesale websites make bulk buying easy by showing product catalogs and prices and even letting buyers negotiate deals. Businesses save money by buying in bulk, and sellers get to reach more customers.
Besides, wholesale trade is a huge part of the economy! In 2022, U.S. wholesalers sold around $9.7 trillion worth of goods.
That’s a lot of business happening online!
B. Understanding the Significance of Wholesale Websites
Today, wholesale websites play a crucial role in the supply chain. They ensure smooth and economical transactions between manufacturers, distributors, and businesses and are central to this process.
Here are the key points that underscore the significance of wholesale websites:
- Efficient Transactions: Wholesale websites streamline connections between manufacturers, distributors, and businesses for seamless trade.
- Cost Savings: Bulk purchasing lowers per-unit costs, boosting profit margins.
- Transparency: Clear product details and pricing enable informed decisions and fair competition.
- Market Competition: Transparent pricing and broad product access drive healthy competition.
- Scalability: Small businesses expand offerings without high inventory or upfront costs.
- Supply Chain Efficiency: Automated processes, order management, and real-time tracking enhance procurement.
- Global Reach: Businesses connect with manufacturers and distributors worldwide.
- Adaptability: Wholesale platforms help businesses stay competitive by adjusting to market trends and demands.
In essence, wholesale websites play an important part in modern commerce. They provide various benefits that improve the purchasing and selling processes for businesses of all sizes.
C. Top 3 Best WooCommerce Wholesale Plugins
Several WooCommerce wholesale plugins are available to businesses looking to add a wholesale feature to their online stores. Some of the best options include:
1. WholesaleX
WholesaleX is a feature-rich WooCommerce wholesale plugin that streamlines and improves your online store’s wholesale activities. It offers customizable dynamic pricing rules for personalized discounts through segmentation, targeting, and multi-tier structures.
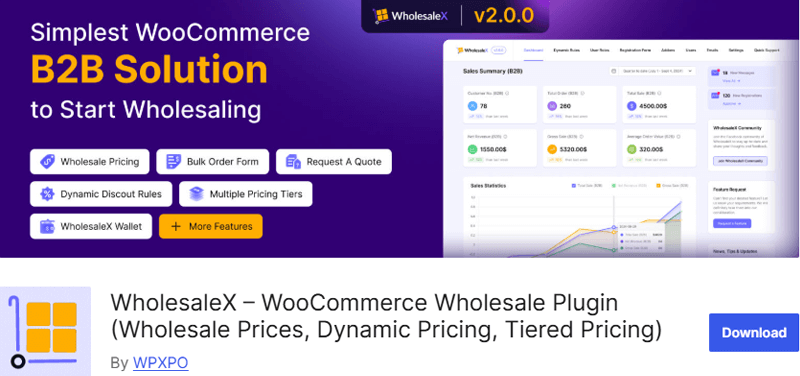
Moreover, the built-in form builder lets you create tailored registration forms with options for automated or manual approval processes. And with a single click, you can transform your storefront into a private store, controlling product and category visibility.
Additionally, the “Request a Quote” feature helps in price negotiations. Here, your customers can easily submit and manage quote requests. It also includes an in-built conversation system for direct communication between customers and store owners.
Key Features:
- Configure multiple pricing levels based on user roles to provide customized wholesale pricing for specific customer groups.
- Set minimum and maximum quantities for products to ensure that wholesale orders satisfy your requirements.
- Provide a simplified bulk order form for wholesale customers, allowing them to rapidly add several products to their cart.
- Control which goods are exposed to particular user roles, allowing you to personalize product offerings to wholesale customers.
- Only show wholesale prices to logged-in wholesale users to keep pricing information private.
Pricing:
WholesaleX is available on both the free and premium plans. The free plan can be downloaded from WordPress.org’s official plugin repository or easily installed from your WordPress dashboard.
You can purchase the premium version from its official website. It’s available in 3 pricing plans.
- Starter: Costs $109 per year or $199 for a lifetime for a single website.
- Business: Costs $149 per year or $279 for a lifetime for 5 websites.
- Agency: Costs $194 per year or $419 for a lifetime of 20 websites.
2. Wholesale Suite
Wholesale Suite is a robust solution that allows WooCommerce store owners to integrate wholesale features seamlessly. Upon installation, it introduces a new user role, “Wholesale Customer,” so you can assign specific wholesale prices to both simple and variable products.
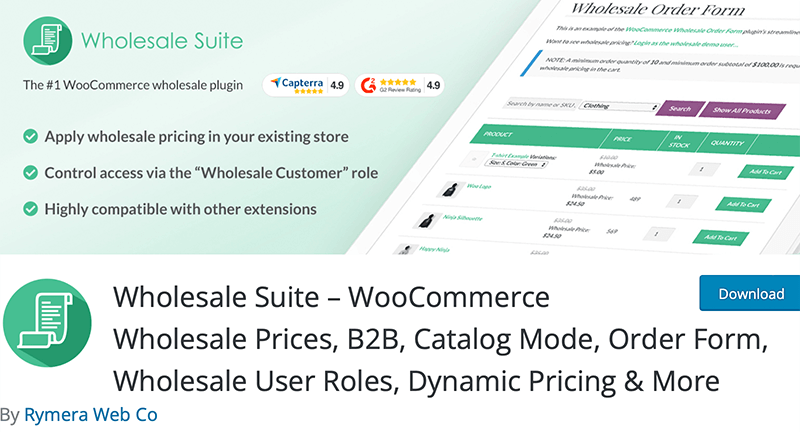
It also offers a private store or catalog mode, hiding prices and the “Add to Cart” button until a user logs in. Additionally, the plugin provides multi-currency support through integrations with tools like Aelia Currency Switcher and WPML Currency.
Moreover, you can manage product visibility by choosing to display or hide retail prices for wholesale customers. As well as you can disable standard WooCommerce coupons for these users.
Key Features:
- Set distinct pricing tiers for different user roles, offering personalized wholesale pricing to various customer groups.
- Create a separate registration process for wholesale customers, distinct from typical retail customers.
- Set up shipping and tax procedures that are specific to wholesale customers, assuring correct computations based on their requirements.
- Manage user roles, permissions, and access levels for various wholesale customer categories with ease.
- Control which goods are exposed to specific user roles, providing wholesale customers with a customized product list.
Pricing:
Wholesale Suite offers both free and premium options. The free version can be downloaded from the official WordPress.org plugin repository.
The premium version, which costs $299/year on its official website and includes all Wholesale Suite plugins, comes with a 14-day money-back guarantee.
3. B2B for WooCommerce
B2B for WooCommerce plugin is a comprehensive wholesale solution to seamlessly integrate B2B features into your online store. You won’t need separate platforms for B2B and B2C operations. It allows the creation of custom user roles, such as B2B or Wholesale.
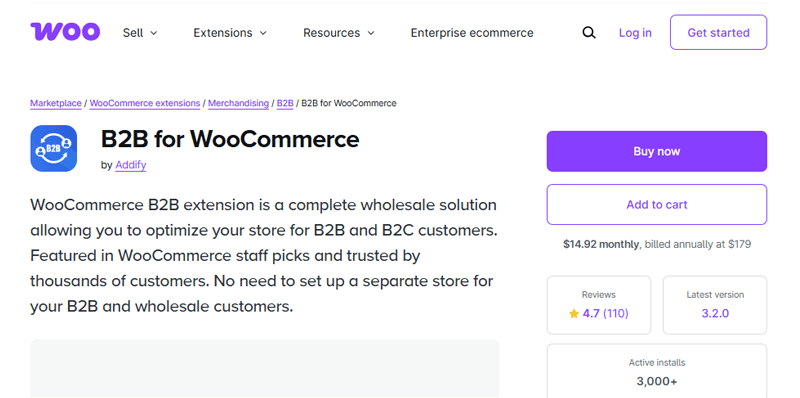
It also enhances the default registration form to accommodate B2B registrations with various field types. For instance, dropdowns, text inputs, and multi-select options. Moreover, you can manage product visibility by hiding specific products or categories based on user roles.
Additionally, it supports role-based pricing, so different prices and quantity-based discounts are available for various user roles or individual customers. It also includes tax display settings based on user roles and tax exemptions. Plus, it restricts shipping and payment methods for specific user roles.
Key Features:
- For added convenience, allow B2B clients to manage their accounts, explore purchase history, and track shipments.
- Allow B2B customers to request quotations for specific items or orders, which simplifies negotiation and customized pricing.
- Set credit limitations for B2B customers in order to regulate their purchasing capability and keep a sustainable credit line.
- Allow B2B clients to rapidly enter SKUs or product codes for quick and effective ordering of frequently purchased items.
- Create thorough invoices for B2B transactions that include item, quantity, price, and total cost breakdowns.
Pricing:
WooCommerce B2B is a popular WooCommerce plugin that offers best-selling tools worth $14.92Per month billed annually at $179.
D. How to Create a Wholesale Website with WooCommerce? (A Step-by-Step Guide)
Now, we’ll walk you through the process of creating a wholesale website with WooCommerce.
So, let’s dive right into it!
Step 1: Requirements to Build a WooCommerce Site
Before building a WooCommerce site, certain prerequisites should be in place to ensure a smooth and successful development process:
i. Domain and Hosting
To create a WooCommerce website, start by acquiring a domain and hosting. Choose a relevant and easy-to-remember domain name.
You can use domain registrars like Domain.com, GoDaddy, Namecheap, or Name.com to search for available names and purchase the chosen domain.
Next, select a WooCommerce hosting provider to store your website’s files and data. Opt for reputable hosts like Cloudways, Bluehost, SiteGround, or Kinsta. Sign up for a hosting plan that aligns with your needs, such as shared hosting for beginners or more advanced options for larger websites.
Once you’ve signed up, link your domain and hosting. This involves updating your domain’s settings to point to your hosting server. Most hosting providers offer guidance on this process.
ii. WordPress Installation
After linking, install WordPress, a popular Content Management System (CMS). Many hosts offer one-click installations.
Next, access your hosting control panel and find the ‘One-Click Install’ option. Select WordPress and provide details like your domain and site name.
Click ‘Install,’ and the system will set up WordPress for you. After installation, you can access your website’s admin dashboard by adding ‘/wp-admin’ to your domain URL. Here, you can customize your site’s design, add content, and manage its functionality using themes and plugins.
For more information, check out our guide on how to install WordPress.
iii. Install WooCommerce Plugin
To install the WooCommerce plugin, go to the Plugins menu and click on ‘Add New Plugin.’ Then, type ‘WooCommerce’ in the search bar at the top right corner.
Once you’ve found the plugin, click the ‘Install Now’ button. After the installation, click on the ‘Activate’ button, and you’re done.

Following that, it’ll ask you to complete the setup wizard. Basically, it’ll request information such as your location, business type, product kind, and so on. Make sure to provide the required information correctly.
iv. Choose a WooCommerce Theme
Now that you’ve installed the WooCommerce plugin, it’s time to select a theme and customize it according to your business needs.
Make sure that you choose a suitable theme that best suits your WooCommerce site.
To your surprise, WordPress has a plethora of free and paid themes available in the market. However, if you’re overwhelmed by that, then we’ve compiled a list of the best eCommerce WordPress themes for your convenience.
Once you’ve decided which theme to use for your wholesale website, the next step is to install your theme.
All you need to do is log in to your WordPress dashboard and then navigate to ‘Appearance > Themes > Add New Theme’.
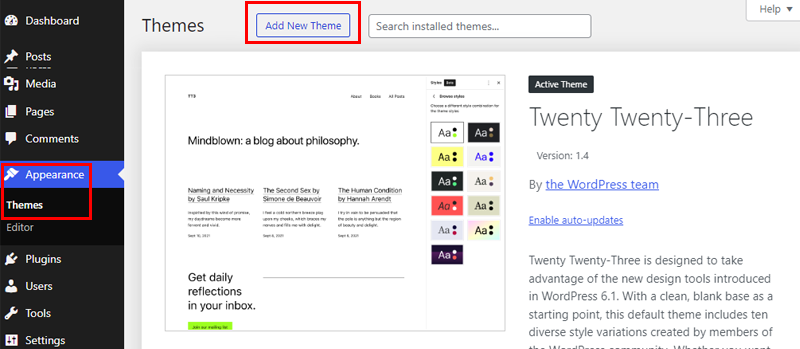
Following that, search for the theme in the search bar at the top right side of the page and click on the ‘Install’ button. After the installation, click on the ‘Activate’ button and you’re done.
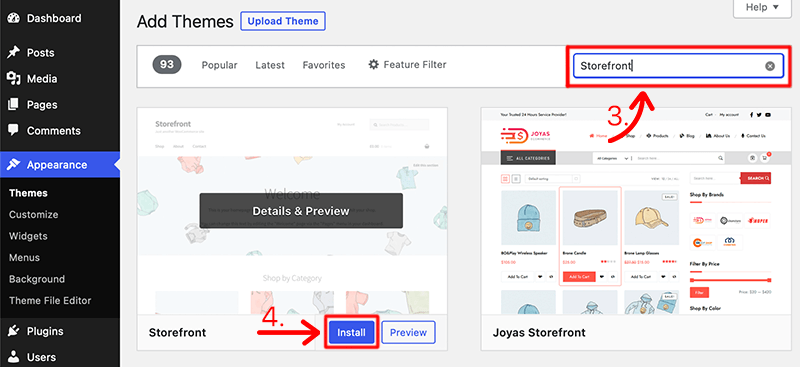
For instance, in the above images, we’ve installed and activated the Storefront theme on our site.
To learn more, check our complete guide on how to install a WordPress theme.
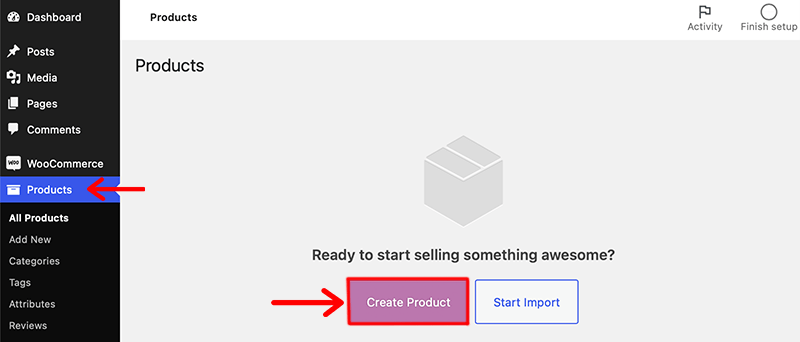
v. Add Products
To add products to your WooCommerce store, you have to go to ‘WooCommerce > Products’ from your WordPress dashboard. Then, click on the ‘Create Product’ button to create and add your first product to your store.
Following that, it’ll redirect you to the WordPress editor you’re already familiar with, which has some new additions, too.
Next, enter the product’s name in the title section and then add the description.
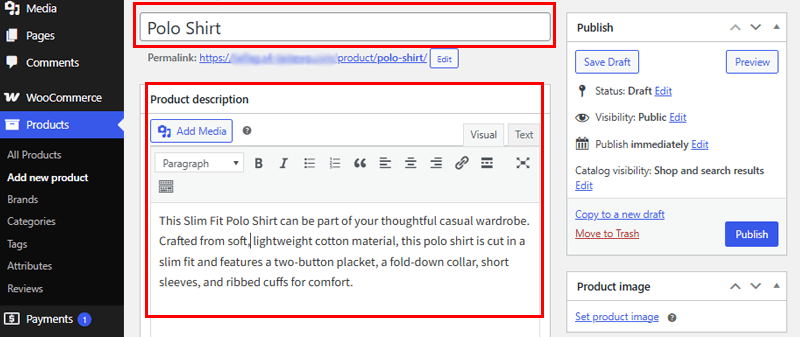
Similarly, in the ‘Product Data’ box, under the ‘General Tab’, add the price of the product for regular and sale prices.
Lastly, you can hit the ‘Publish’ button to make your product live for your customers.
vii. Configure WooCommerce Settings
Configuring WooCommerce settings to build a WooCommerce website involves several key steps. After installing the WooCommerce plugin on your WordPress site, navigate to the WooCommerce settings under the WordPress dashboard.
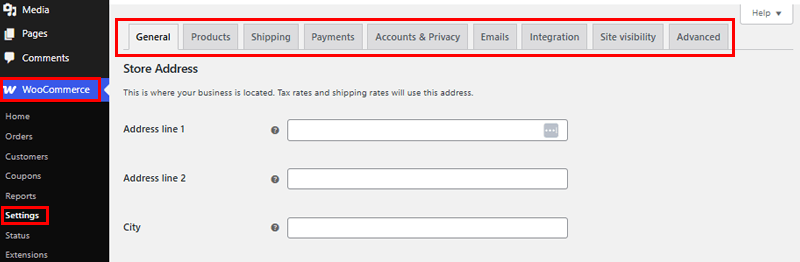
From there, let’s configure WooCommerce settings to build an eCommerce website:
- General: This is where you add your business location. Tax rates and shipping rates will use this address.
- Products: Generate product pages and categories and add product specifics, images, and pricing. Employ attributes such as size or color to manage variations effectively.
- Shipping: Establish shipping zones, rates, and methods aligned with your business’s shipping needs. Arrange flat rates, offer free shipping, or integrate real-time carrier options for a comprehensive shipping setup.
- Payments: To facilitate smooth and secure transactions, set up your preferred payment gateways, including PayPal, Stripe, and credit card processors.
- Accounts and privacy: This tab will let you configure Checkout, Account creation, Account creation options, Account erasure requests, Privacy policy, and more.
- Emails: Here, you’ll find the email notifications sent from WooCommerce in the list format.
- Integrations: Integrates to MaxMind to do Geolocation lookups, but only for country lookups.
- Site Visibility: You can manage how your site appears to visitors.
- Advanced: It’s for page setup, these pages need to be set so that WooCommerce knows where to send users to checkout.
Step 2: Install WholesaleX – WooCommerce Wholesale Plugin
As we look into this tutorial, we’ve already completed building our online store with WooCommerce. With that, we can start selling our products/services to our customers.
Nevertheless, it’s essential to utilize the WooCommerce wholesale plugin to develop an effective wholesale website exclusively tailored for retailers.
Thus, we’re going to use one of the plugins from the above list of WooCommerce wholesale plugins, WholesaleX. This will help convert your regular eCommerce website into a wholesale website.
It’s a freemium plugin that comes in both free and premium versions. You can start with its free version, which is easily available in the WordPress plugin directory.
However, if you want to build a comprehensive wholesale website with advanced features, you should purchase one of its premium versions. We highly recommend you all go with the premium version. (We’ve already mentioned its pricing plans above in this article.)
Installing and Setting Up Free Version
WholesaleX’s free version is quite simple to set up. You can directly install WholesaleX from your WordPress dashboard like installing any other WordPress plugin.
Therefore, please stick to the instructions provided below:
To begin, you should first log into your WordPress dashboard. Then, from the sidebar of the dashboard, proceed to the ‘Plugins’ section. Following that, click on the ‘Add New Plugins’ option.
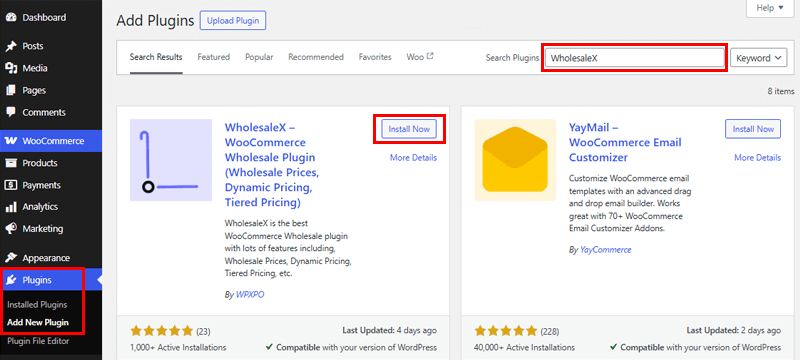
Now, you’ll see a search bar on the top right corner where you should type in ‘WholesaleX’ and click enter to search the plugin. Once you find the plugin, click on the ‘Install Now’ button.
Once the installation process is successfully completed, you’ll see the ‘Activate’ option. Then, click on it.
And that’s how you install the free version of the WholesaleX plugin. Pretty easy, right?
Installing the Premium Version
So, to utilize the premium version of the WholesaleX plugin, you need to purchase the plugin first. Now, let’s look at the following stepwise guide to installing the premium version.
Step 1: Purchase the Premium WholesaleX Plugin
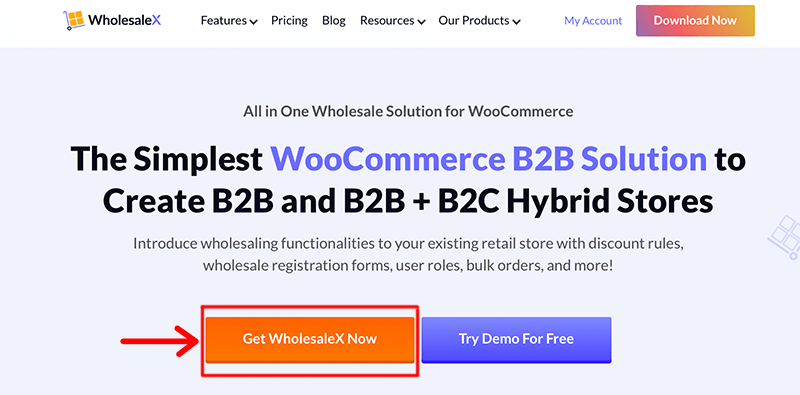
Go to the official WholesaleX website and click on the ‘Get WholesaleX Now’ button.
After that, you need to choose the plan that best suits your needs. You can browse through the different pricing plans available: Starter, Business, and Agency.
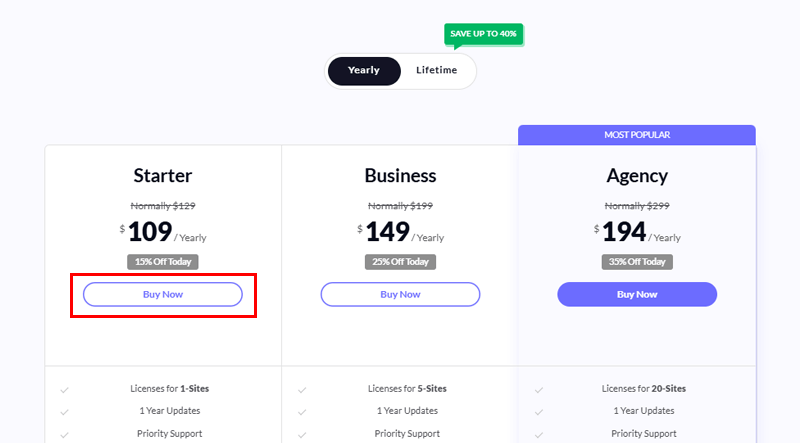
After that, click on the ‘Buy Now’ button to add the chosen plan to your cart. Next, provide your personal and billing details, such as your name, email address, and payment information.
After successful payment, you’ll receive a confirmation email with a download link for the WholesaleX plugin. The downloaded file is in ZIP format.
Step 2: Upload, Install, and Activate WholesaleX
Next, log in to your WordPress dashboard. Then, navigate to the ‘Plugins > Add New’ option from the sidebar. Click on the ‘Upload Plugin’ button.
Then, click the ‘Choose File’ button and select the downloaded file from your local drive.
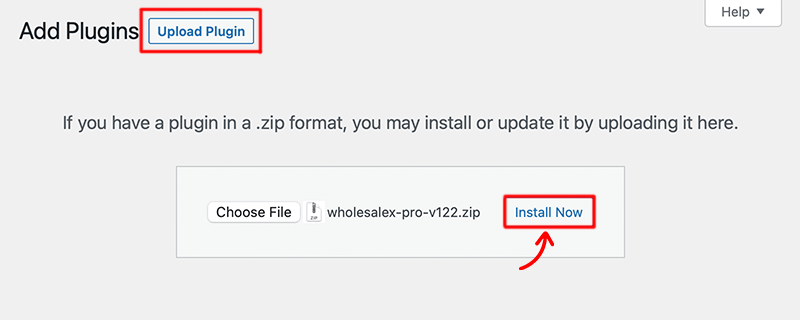
After that, click on the ‘Install Now’ button to install the plugin. Then, in a while, click on the ‘Activate Plugin’ button to activate the plugin.
Congratulations, Now you’ve successfully installed and activated the premium WholesaleX to your dashboard.
Step 3: Create a Wholesale Website with WholesaleX
Now that we’ve witnessed how to install WholesaleX, let’s dive into how we can use it to create a wholesale website. Let’s explore this process further.
i. Create Wholesale User Roles
WholesaleX simplifies B2B Wholesale in WooCommerce by enabling easy management of users through various roles. Unlike the single Customer Role, it lets you create unlimited roles with tailored offerings and restrictions.
This approach streamlines customer types, allowing simultaneous effective facilitation and control, enhancing the management process.
Now, let’s see how to create a user role with these easy steps.
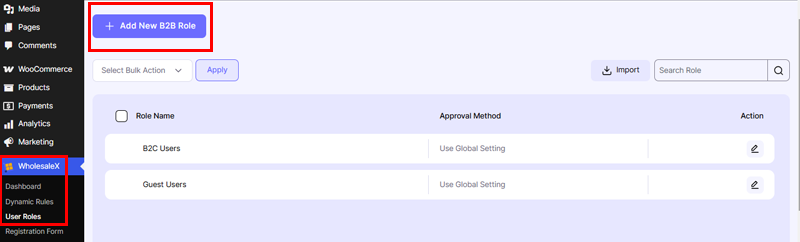
Firstly, go to the ‘User Roles’ section of the ‘WholesaleX’ menu from the dashboard.
Next, we’ll create a new user role, for that, click on the ‘Add New B2B Role’ button.
Then, it’ll ask you to set the necessary conditions and options for creating different user roles. Such as
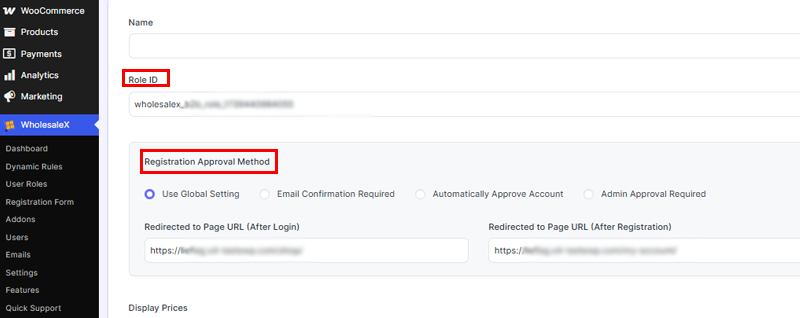
- Display Price: You can choose to display the prices including or excluding tax. You can even select the default option.
- Payment Method: Select the payment method, your customers under this user role will only see the selected payment method.
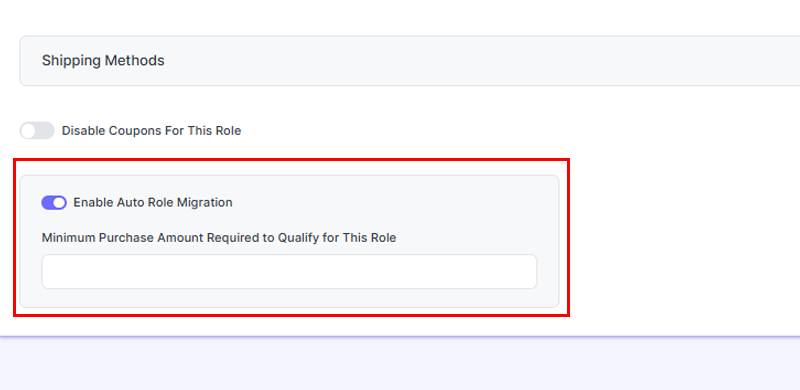
- Shipping Method: Let’s offer a flat rate or free shipping from the shipping method option.
- Coupons – Allows you to enable or disable coupons for this user role.
After that, you can either enable or disable the Auto Role Migration option. This will allow you to migrate the customer who spends the set amount to the current role automatically.
Once everything is configured, you can clock on the ‘Save’ button to save the changes and add a new user role to your website.
ii. Dynamic Rules
For WooCommerce B2B stores, WholesaleX presents an exclusive and dynamic rules system. This system offers a holistic approach to configuring worldwide pricing, wholesale discounts, payment methods, tax exemptions, and shipping guidelines.
This innovative rules system enables the concurrent modification of prices and discounts. Thus, it caters to individual customers as well as groups of customers and products.
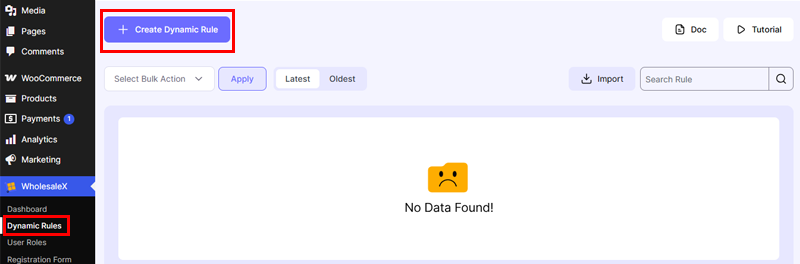
To establish wholesale pricing using WholesaleX, users must initially navigate to their WordPress dashboard and proceed to ‘WholesaleX > Dynamic Rules’. Within this interface, they can initiate the creation of a customizable rule section by selecting ‘Create Dynamic Rule.’
a. Product Discount
Offering product discounts serves as a powerful strategy to encourage customer engagement with your business.
The process of configuring a product discount becomes notably smoother and more effective when utilizing WholesaleX.
To begin, click the Create Dynamic Rule option and click the untitled Rule to expand further. Next, name the Rule, which will help you find it easily when you have quite a few rules for your store.
Your next step involves choosing the discount format. Within WholesaleX, you’ll find an array of diverse discount choices for your store.
Since we focus on product discounts, proceed to the Rule Type dropdown menu and opt for ‘Product Discount.’

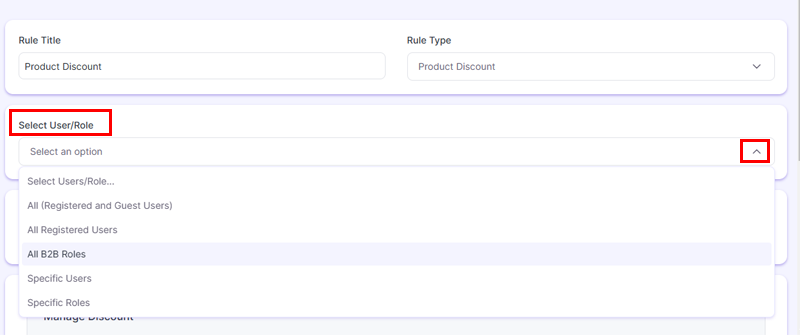
Following that, select the category of users or roles for which you wish the discount to be relevant.
Choose the user type that aligns with your needs, granting customers access to the discount. WholesaleX provides you with the option of selecting from All Users, All Roles, Specific Users, or Specific Roles.
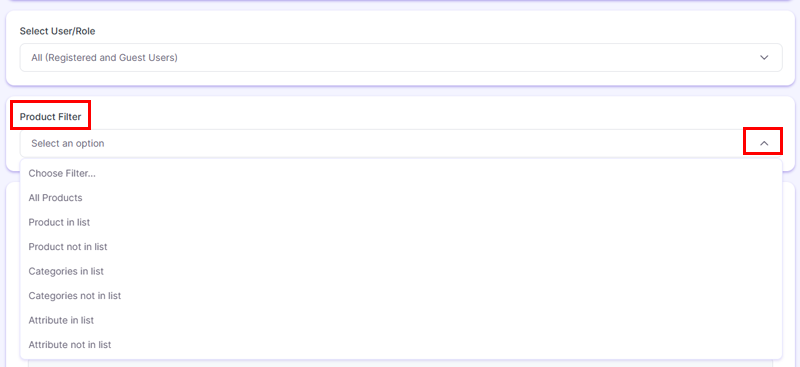
Subsequently, pick the product filter from the provided dropdown menu to which you intend to assign the discount. Remember that your discount can be tailored not only to users and user roles but also to specific products.
Therefore, it’s essential to make these selections for a more precise discount application.
Moving forward, your next task involves determining the kind of discount you wish to extend. You can select from Percentage, Amount, or Fixed Price.
Following this, input the desired Discount amount. You can also modify the discount name, which is an optional feature.
Upon finalizing the setup of the product discount, simply save your changes, and the discount will become active. Using product discounts can significantly boost sales and motivate customers, and WholesaleX simplifies the setup process for your convenience.
b. Minimum Order Quantity
In business, as you start to receive a significant amount of orders on your WooCommerce store, opting for reliable payment gateways can save you a lot of headaches.
For that reason, it’s beneficial to set how your customers use the available payment options. One of the best ways to control the use of payment methods in WooCommerce is setting a minimum order quantity rule.
Go to to WholeSaleX > Dynamic Rules > Create Dynamic Rule,
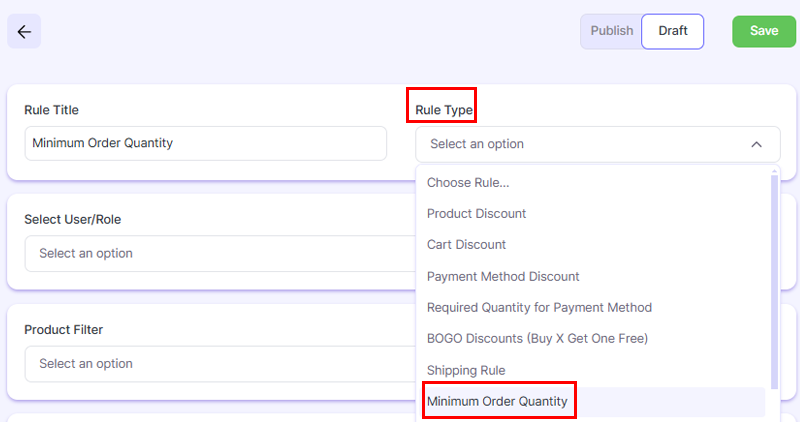
Following that, select the category of users or roles to which you intend to apply the quantity control.
Choose the user type that matches your requirements for implementing quantity restrictions. WholesaleX provides you with the option of selecting from All Users, All Roles, Specific Users, or Specific Roles.

Subsequently, choose the product filter to which you wish to assign the rule from the dropdown menu provided. Remember that you can customize quantity limits for users, roles, and products.
Next, it’s time to set the Minimum Order Quantity, ensuring users cannot place orders below the specified threshold. For instance, you can set 10 as your minimum payment order quantity.

Step 4: Set Duration & Usage Limit
You can set a Start and End Date. This feature is particularly useful for restrictions with a defined time frame.
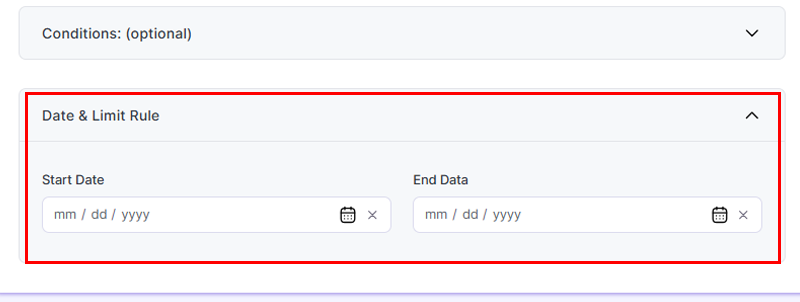
Hence, it allows you to effortlessly specify the precise time and date for the restriction to take effect. Furthermore, you can establish restrictions ahead of time, minimizing the requirement to set new rules on specific days.
Once you have configured your quantity restriction, save the rule.
And you have done it! You have successfully set up a minimal order amount rule for WooCommerce payment gateways.
iii. Create a Custom Registration Form
The following step involves creating a personalized registration form tailored for B2B users. Hence, it significantly streamlines the customer acquisition process.
Now, let’s delve into the process of crafting this custom registration form alongside a login form.
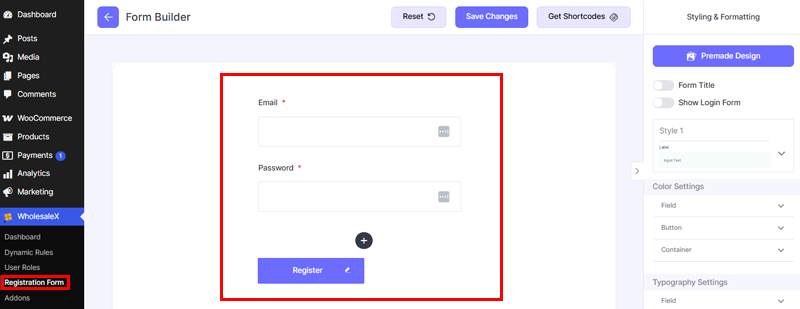
Step 1: Start Creating a Custom Registration Form
To begin, navigate to WholesaleX and select ‘Registration Form.’ A basic form featuring essential fields like Email and Password will already be in place. Your next task involves tailoring this form to your specific requirements.
Step 2: Add Custom Fields
As you build the form, your initial consideration will likely be adding custom fields. WholesaleX’s Form Builder offers a wide array of pre-defined and customizable fields, accessible via the ‘Add New’ button.
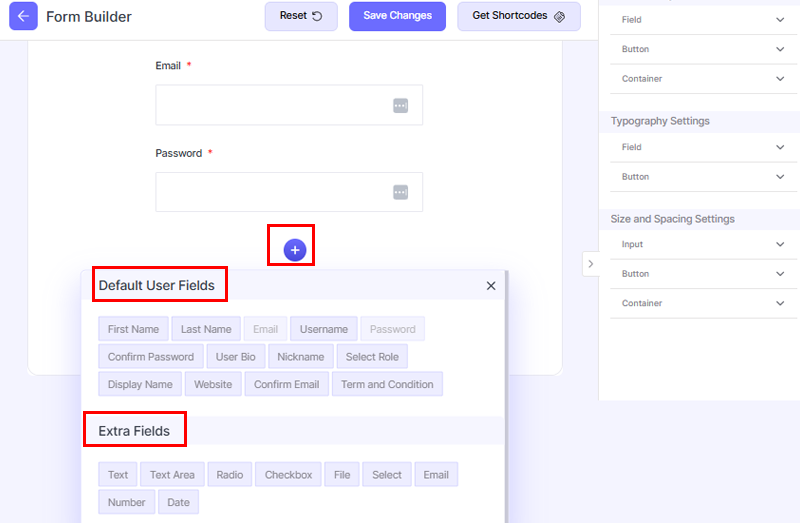
Next, let’s incorporate and adapt custom fields to meet our specific needs. For example, suppose we intend to gather User Names from our users. To achieve this, we must introduce an input field.
After adding the field, it’s time to configure it. Let’s explore it in the next step.
Step 3: Configure the Registration Form
Let’s set up the configuration possibilities as we set up the recently added field. To configure any specific section, simply give it a click. Upon clicking, a display of all the available options will appear on the left-hand side.
Initially, adjustments can be made to the Label, Field Name, and Placeholder texts. Subsequently, you can make that field mandatory by activating the toggle.
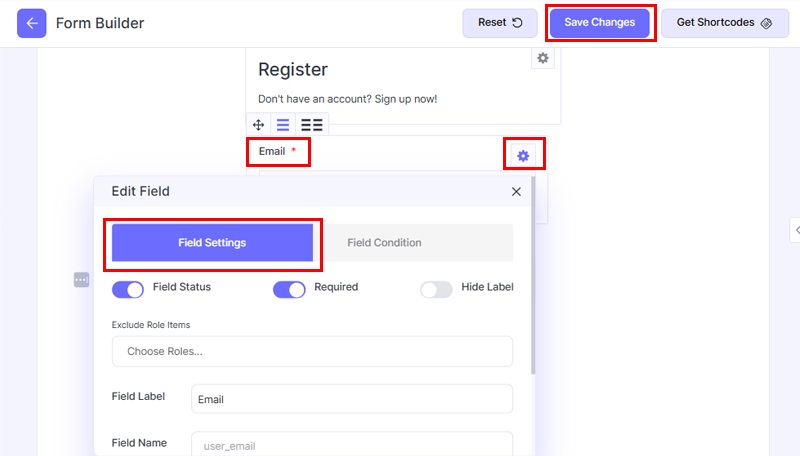
Furthermore, a ‘Help Message’ can be added to offer customers clarity on the required input for this field. Also, specific user role(s) can be chosen to be excluded from viewing this field.
Upon completing the form’s configuration, the last step includes clicking the ‘Save Change’ button.
iv. Change Store Mode (B2B, B2C, B2B+B2C)
We’ve already learned that WholesaleX is not just a B2B wholesale plugin. Rather, it lets you create a complete B2B, B2C, and B2B+B2C hybrid store.
Thus, the plugin lets you switch the store more anytime you want. To do so, go to ‘WholesaleX > Settings’ from your dashboard.
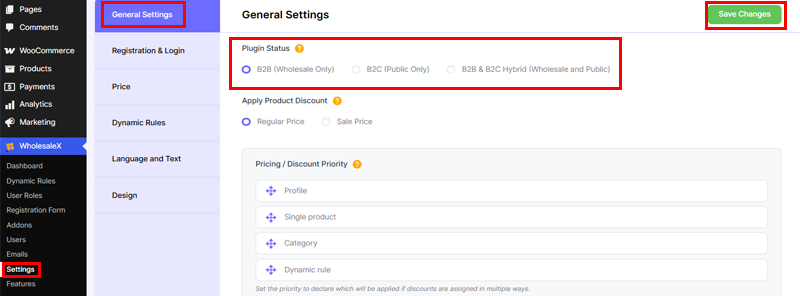
Next, in the General Settings tab, under the ‘Plugin Status’ section, you’ll see different modes to select:
- B2B (Wholesale Only)
- B2C (Public Only)
- B2B & B2C Hybrid (Wholesale and Public)
Now, you need only select your desired mode and click the ‘Save Changes’ button.
In this way, you can easily switch your store mode with WholesaleX. Try it yourself.
v. Prioritize Pricing and Discounts
Given the scale of your website, you’ve got the option to apply multiple discounts to a product or product group. As well as you can implement multiple discounts for an individual user or user group.
WholesaleX lets you determine discount priority for users or products with multiple assigned discounts.
Access WholesaleX via your website’s dashboard, then navigate to ‘Settings.’ On the settings page, select the ‘General Settings’ tab.
WholesaleX offers Pricing/Discount Priority settings based on Profile, Single Product, Category, and Dynamic Rules.
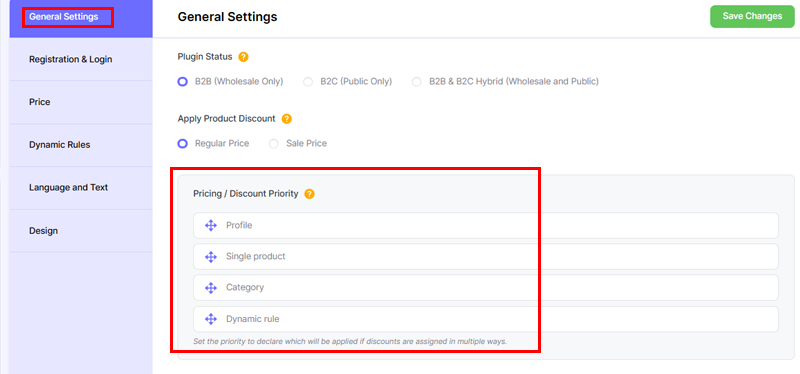
Thus, you can easily establish priority by arranging the desired discounts/pricing using drag-and-drop features.
Finally, click on the ‘Save Changes’ button. Once the changes have been saved, the priority you set for discount types will process.
Using WholesaleX, you can effortlessly change the priority of discount types anytime through a few simple clicks
vi. Product Visibility Control
Enhance product exclusivity through controlled visibility, granting access solely to privileged customers. Configure user roles to require higher spending for privileged status.
Utilize WholesaleX’s User Role feature to upgrade customers who exceed a specified spending threshold automatically.
To change your product visibility, you must make adjustments within WholesaleX’s settings page, such as hiding items from B2C or guest users.
For that, within your WordPress dashboard, go to WholesaleX and click on the ‘Settings’ option.
After that under the General Settings tab, you can see there are two options, ‘Hide All Products from B2C Users’ and ‘Hide All Products from Guest Users’. All you need to do is check the box next to the option from which you want to hide your products.
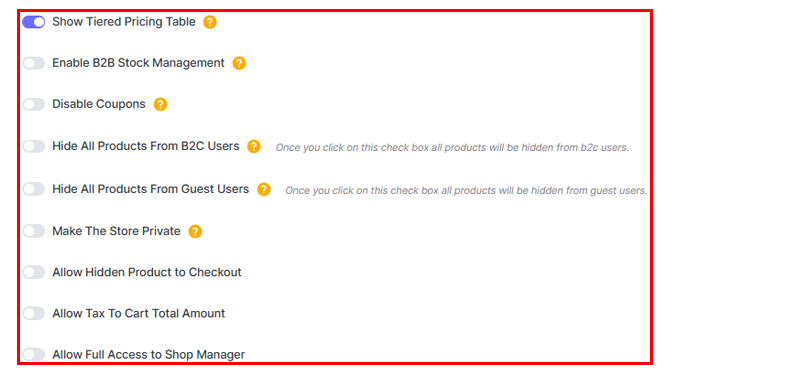
Similarly. with WholesaleX, you can also change the visibility of coupons from your wholesale users. To hide coupons, check the box next to ‘Disable Coupons’.
Upon clicking the ‘Save Changes’ button, changes made to your product visibility settings will become active on the front end of the website
Step 4: Check Everything & Launch Your Wholesale Website
Before launching a wholesale website live, there are several critical things to check and consider to ensure a smooth and successful launch. Here’s a comprehensive list:
- Test all website functions thoroughly, including navigation, search, forms, shopping cart, checkout, and account creation.
- Ensure that wholesale and retail products are properly categorized and labeled.
- Verify that wholesale discounts, tiered pricing, and minimum order requirements are applied correctly.
- Ensure wholesale customers can access order history and invoices and manage their accounts.
- Implement proper security measures, including SSL (Secure Socket Layer) certificates and data encryption.
- Verify compliance with relevant regulations such as GDPR or CCPA.
- Optimize meta tags, descriptions, and other SEO (Search Engine Optimization) elements to improve search engine visibility.
- Proofread all website content for accuracy, consistency, and professionalism.
- Implement robust backup solutions to ensure data protection and the ability to restore the website in case of issues.
- Create a detailed launch plan outlining the steps to take the website from its current state to being live.
When you take care of these considerations, you boost the chances of a successful launch of your wholesale website.
FAQs on Creating a Wholesale Website from WooCommerce
1. How can I sell products on my WordPress website?
Install WooCommerce to sell products on your site. Set prices and add product details, then customize your store’s look and settings. Set up secure payments and promote your products with engaging content to start selling.
2. How do I create a wholesale website in WordPress?
Plugins like WholesaleX help you build a wholesale WordPress site. You can set custom pricing, minimum orders, and bulk order forms for user roles. You can also configure role-based catalog views and wholesale registration, customize your store, and add payment gateways to launch your platform.
3. What is a wholesale market?
A wholesale market is a trading platform where goods are bought and sold in large quantities from manufacturers or distributors at discounted rates. These products are then resold to retailers or businesses for resale to end consumers, facilitating efficient distribution and cost-effective transactions in the supply chain.
4. What is the wholesale price?
The wholesale price is the discounted cost at which products are sold in bulk quantities to enterprises, which is often lower than retail prices to allow for resale.
5. What is the minimum order for wholesale?
The wholesale minimum order is the minimum number of products that a buyer must purchase to access wholesale prices. This assures bulk purchase benefits for cost-effective transactions.
Conclusion
That’s all! We’re at the end of this guide on how to create a wholesale website with WooCommerce. Hopefully, you can understand the concept and learn its significance.
In conclusion, creating a wholesale WooCommerce site empowers efficient B2B market entry. Careful configuration of settings, like visibility, pricing, and shipping, ensures a tailored experience.
Also, using WooCommerce features boosts engagement, while ongoing maintenance and testing are crucial for sustained success.
Finally, if you have any further questions about creating a wholesale website with WooCommerce, please leave a comment below. We’ll try to get back to you as soon as possible.
You may also want to explore our comprehensive guides on the best ways to secure an eCommerce site and how long it takes to build an eCommerce website.
If you like this article, please share this guide on your social media accounts and spread the word!
Lastly, don’t forget to follow us on Facebook and X for more updates.
YOU MIGHT ALSO LIKE...
We've picked you some best articles that you might be looking for. Check them now!