Are you looking for a genuine All in One SEO review? If yes, then you’re on the right page.
As we know, SEO (Search Engine Optimization) is a must-have factor for your WordPress website. Here, we bring you the All in One SEO (AIOSEO) plugin; ideal for any type of website. It comes with all the features to improve your search rankings and ease your struggle with SEO.
However, you may find it overwhelming to go through its features, description, setup and configuration, and how it works. Even if you take your time to explore this plugin, you may find it confusing whether it’s a good plugin. So, to help you out, we present you with a straightforward review for beginners on the AIOSEO plugin.
Let’s divide our All in One SEO review into different sections that include key features, install & setup, pricing, pros, cons, and more.
Let’s get started!
A) All in One SEO – An overview
All in One SEO is one of the best plugins and world-leading WordPress SEO plugin, launched in 2007. Over 2,000,000+ professional site owners use the AIOSEO plugin and rely on it to improve their website’s search rankings. It’s highly optimized for Google and other popular search engines. This plugin follows the most up-to-date SEO standards and practices.

It is proven that to rank your website higher in search engines, you should write high-quality content. Hence, AIOSEO analyzes your content and suggests improvements in real-time. It checks keyphrase and density, internal/external links, SEO title length, meta description & content length, links, and many more.
In addition to that, it also checks whether the content is readable or not. It analyzes the usage of images/videos, sentence and paragraph length, passive voice, transition words, consecutive sentences, Flesch reading ease, and more. After analyzing, it gives you suggestions and indexes in ratio to your content length. Additionally, it gives feedback for improvements with red color and all good with green color.
The most comprehensive SEO plugin to use as no coding skill or hire an SEO expert is required. Prioritizing user experience, it’s easy to set up and follow SEO workflows to outrank your competitors in search results. This is why it’s called the most beginner-friendly plugin that’s both easy and powerful.
Besides, there’re other important features which we’ll discuss further. So let’s jump into another section of our article on All in One SEO review to know about more features of the AIOSEO plugin.
B) How to Install and Setup an All in One SEO Plugin?
It’s quite trivial to install and configure the All in One SEO plugin just like any other WordPress plugin. You can set up your SEO plugin within a few clicks without any inconvenience.
So, let’s briefly look at the steps of installation and configuration of the All in One SEO plugin:
1. Installing and Activating the Plugin
At first, you need to log into your WordPress dashboard to install and activate the All in One SEO plugin. So, from your admin panel go to the Plugins section and click on Add New.

After that, you’ll find a search bar at the right top of your dashboard and type “All in One SEO” to search the plugin.
Now, click the Install Now button once you’ve found the plugin.

After installing the plugin, you’ll find an Activate button. Click on the Activate button to see whether the plugin is working.
2. Configuring All in One SEO Plugin
Now, you’ll go into the setup wizard after installing and activating the plugin. Click on the Let’s Get Started button to configure your site’s SEO settings.
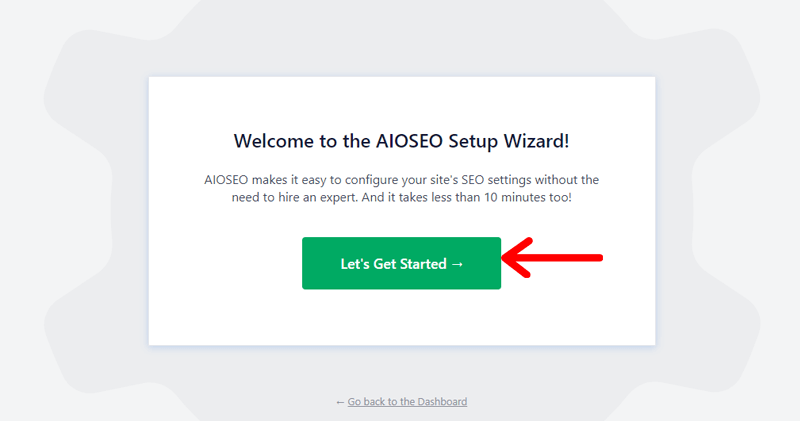
So, let’s get into configuration.
Step 1:
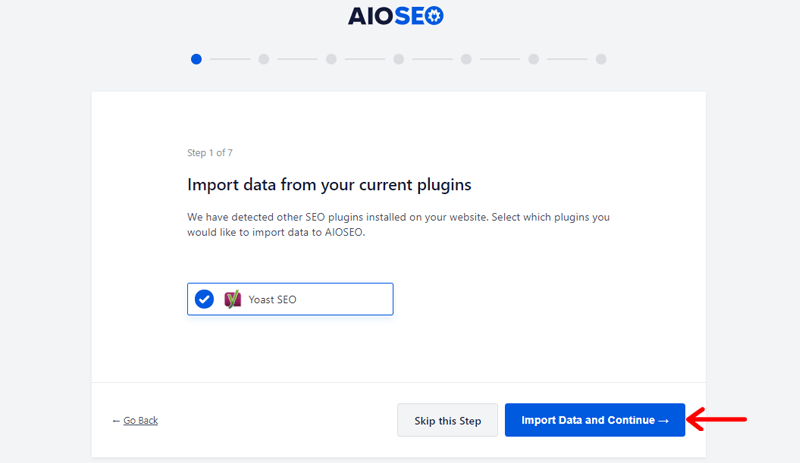
Firstly, you’ll get the option to import data from your current plugins such as Yoast SEO as given in the figure. There, just check-mark the circle box of the plugin whose data you want to import to AIOSEO. Then, click on the Import Data and Continue button.
However, if you don’t want to import any data into your AIOSE, just go to the Skip this Step button.
Disclaimer: If you don’t have Yoast SEO or any other SEO plugin installed on your WordPress website, then you won’t see this option. You’ll directly see the Step 2 configuration.
Step 2:
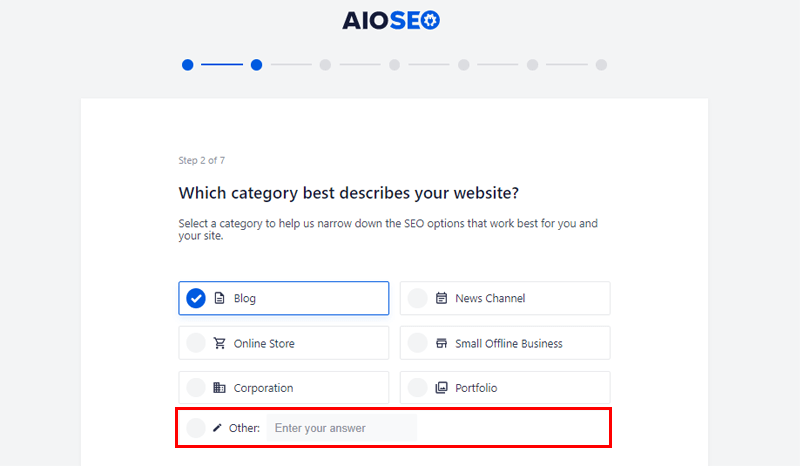
You need to select the category that describes your website such as blog, online store, etc. Or, you can add any Other type of website that better suits your company.
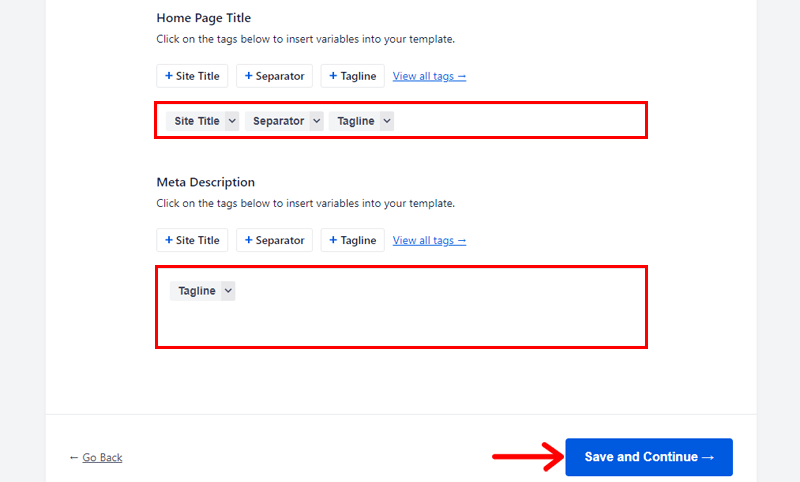
Below, there’re other elements as well such as Site Title, Separator, and Tagline. You can insert and remove those elements in Home Page Title and Meta Descriptions. Furthermore, you can choose different options from those elements such as Author Name, Author First Name, Current date, and more.
Then go to the Save and Continue button to move further.
Step 3:
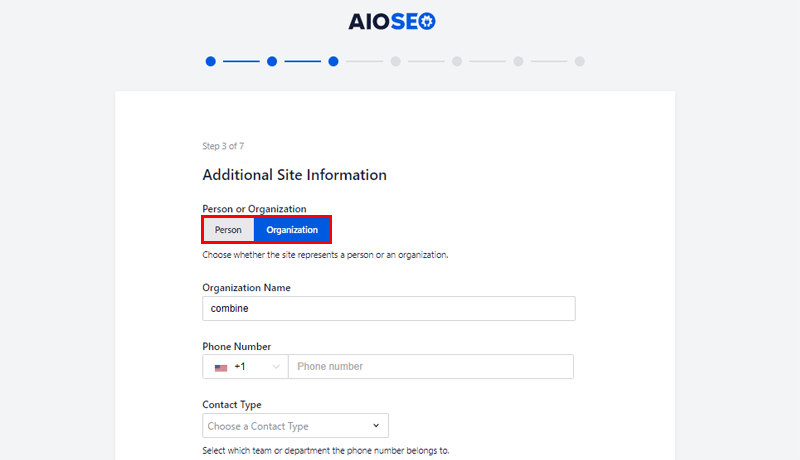
Secondly, you’ll provide additional site information such as whether it’s a personal website or organizational. The rest of the configuration comes according to a selection of Person or Organization.
For example: if you’ve selected an organization, you can add contact info, logo, default social media share image. Similarly, if you’ve selected Person, you’ll select for admin or other users, default social media share image, and so on. You’ll also be able to manage your Social Profile in this step.
Step 4:
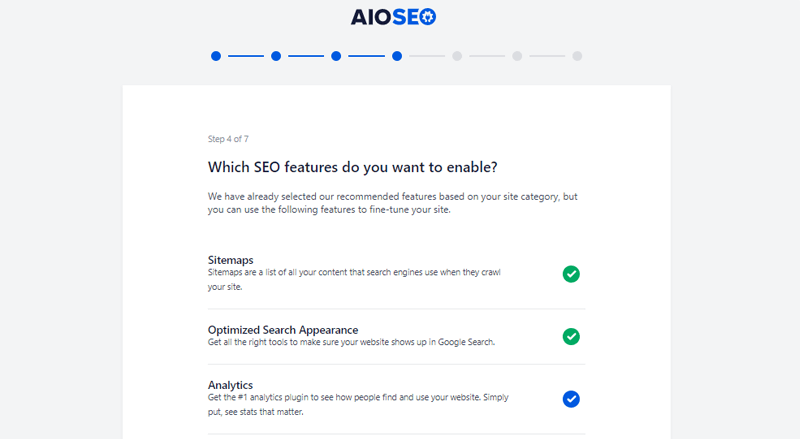
This step requires you to enable the SEO features you want for your website. You just need to mark the circle icon of the corresponding feature. The features include sitemaps, optimized search appearance, image SEO, local SEO, and many more. It includes both free and pro features.
Step 5:
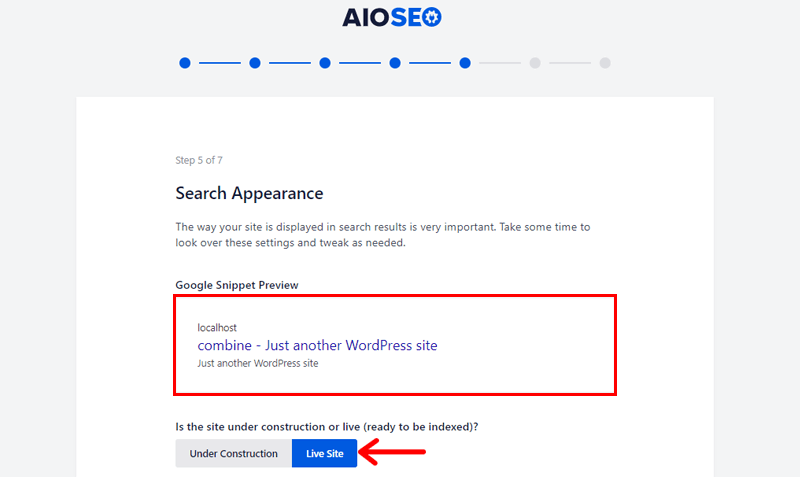
Moving on to the next step, which shows you how your search appearance visually looks. It provides you with a Google Snippet Preview. Here, you can configure whether your site is Under Construction or Live.
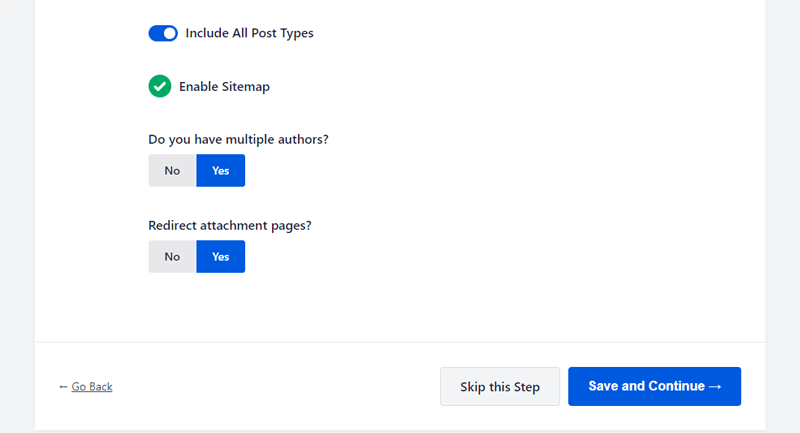
Enable/disable Including All Post Types and Sitemap. You can also select whether you want to have multiple authors and redirect attachment pages.
In this step, we just leave the default settings.
Step 6:

You just need to add your email address in this step. You’ll receive helpful suggestions from AIOSEO on how to optimize your website content. You can also enable in Yes, count me in to help AIOSEO make better for everyone by giving valuable feedback.
You can also skip the configuration settings steps as most of the things are left in its default. None of the steps are compulsory to configure.
Step 7:

Now, if you’re going to use the premium version, enter the License Key and connect your site with the pro version. However, if you’re going to use the free version, simply Skip this Step.
After completing the setup of the wizard, go to Finish Setup and Go to the Dashboard button. Then, you’ll get access to your dashboard.
3. General Settings Configuration
After completion of the setup wizard, you can access your admin dashboard. You may have left many settings as default, but you may also require to change them according to need.
To configure some of the general settings, here we bring you some of the important menus.
You can find AIOSEO Settings in your dashboard, then you can go to General Settings. You’ll find 6 different menus under the general settings.
So, let’s go through each of the menus.
General Settings
In this menu, it asks you for a License Key. For free users, you can upgrade to the premium version from here as it provides you a link to purchase. Also, if you’ve already purchased, you simply need to enter your license key to connect with your AIOSE Pro version.
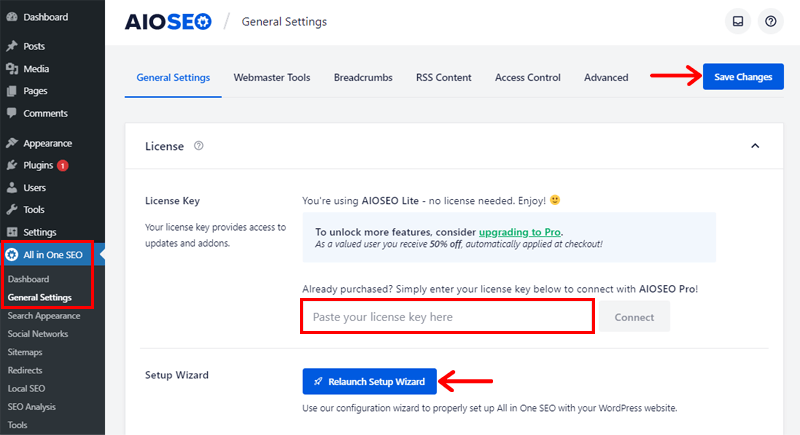
You can even run a whole setup wizard to properly configure AIOSEO for your website with Relaunch Setup Wizard.
Don’t forget to click on the Save Changes button after any update.
Webmaster Tools Verification
Now, moving on to the next menu, where we’ll activate webmaster tools. AIOSEO makes it extremely easy for you to verify webmaster tools.
The webmaster tools that the AIOSEO consists of are Google Search Console, Bing, Yandex, Baidu, Pinterest, and Google Analytics.
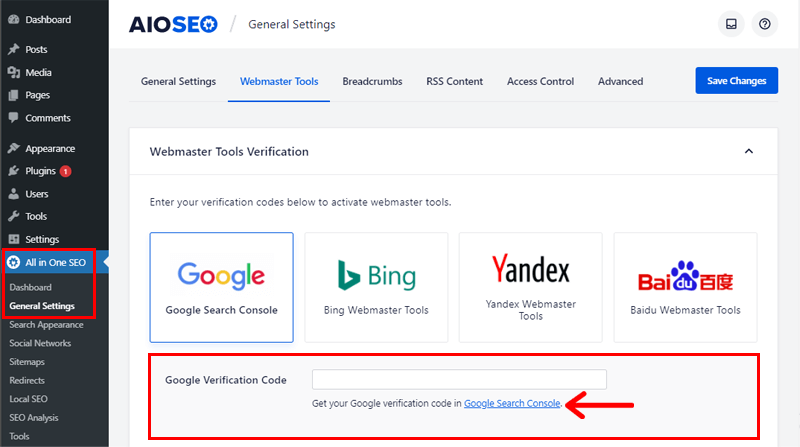
If you already know the activation code, you just enter them. But if you don’t know, then you can see a link below the text box where you can enter the code. The link provides you with the verification code of the webmaster tool. You can get verification codes for each of the webmaster tools separately.
Hence, you can effortlessly activate your webmaster tools.
Breadcrumbs
Breadcrumbs can be used as secondary navigation telling visitors where they are on a website. It gives search engines information on the structure of your site.
You need to click on Enable Breadcrumbs which displays the settings. Now, you’ll see 4 ways to display your breadcrumbs on a website given as shortcode, Gutenberg block, PHP code, and widget.
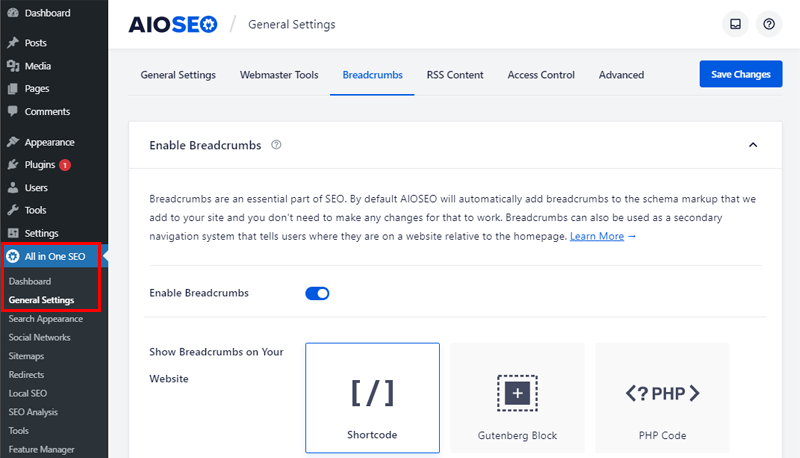
Below, there’s the Breadcrumb Settings section. In the Preview part, it shows how breadcrumbs will display on your website, based on settings.
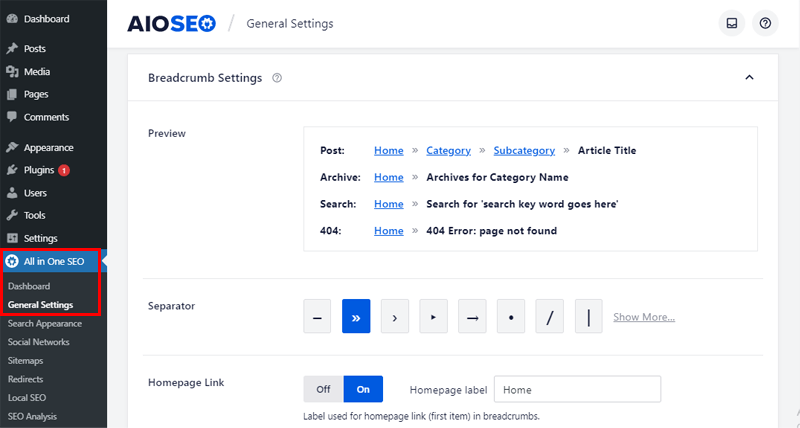
Next, Separator allows you to select available characters which are shown in the Preview part to see the appearance of breadcrumbs. You can also enter HTML code for custom separator characters.
Then there’s a Homepage Link. you can change the Homepage label by entering any text you want to display such as ‘Home’.
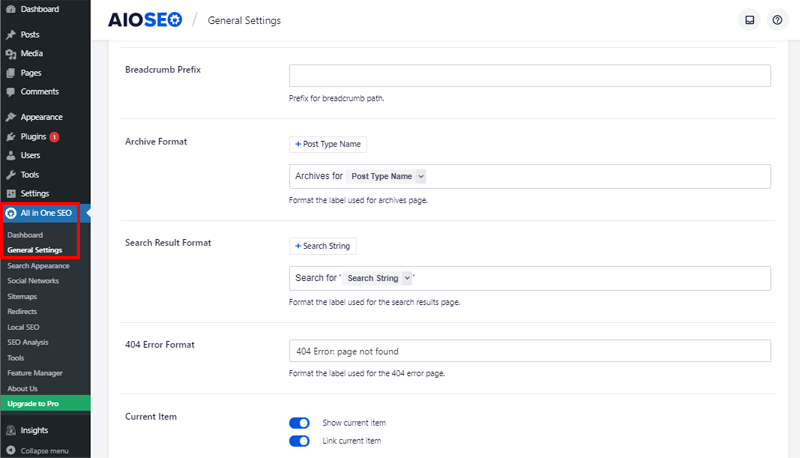
After that, you can enter Breadcrumb Prefix to appear in front of breadcrumbs on your site. Then, you can see format fields as Archive Format, Search Result Format, and 404 Error Format. They control the appearance of breadcrumbs in their respective fields.
Finally, you need to configure the Current Item. You can enable Show current item to display the name of the current page as the last breadcrumb. Also, enable Link current item to display the name of the current page.
RSS Content
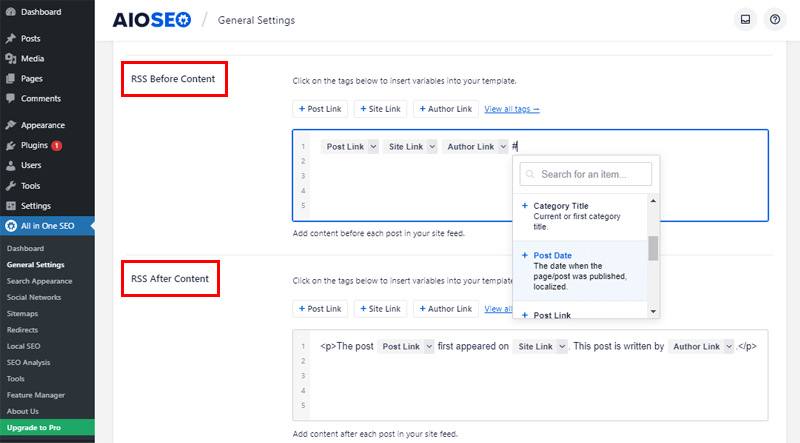
You’ll see RSS Content Settings in this menu where you Preview your RSS feed. Then, you’ll see 2 sections: RSS Before Content and RSS After Content.
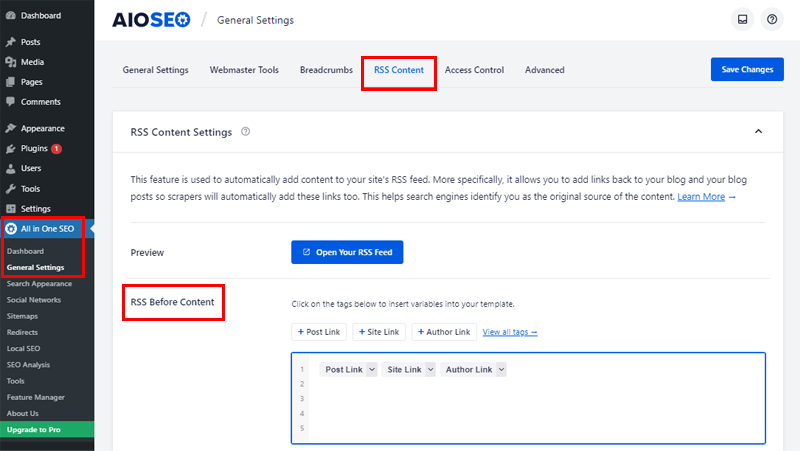
There are some tags like Post Link, Site Link, Author Link. If you click on any tags or options from the tag, it’ll be added, and enter any text with tags. You can see example after adding tags given below:
Access Control
Access control is available only for the Pro users which allows you to assign roles with access control of users. You can specify users to access certain features instead of giving complete admin access to all users. There’re roles such as admin, WP roles, SEO manager, editor, and so on.
Advanced

This Advanced menu consists of Advanced Settings. Enable TruSEO Score & Content, Headline Analyzer, and check-mark to Post Type Columns to Include All Post Types. It allows you to Hide/Show any announcements or update details of plugins. You can also enable Usage Tracking or Uninstall AIOSEO to remove data upon plugin deletion.
The rest of the settings are available for Pro users.
C) Using All in One SEO – How to optimize your Posts/Page for SEO?
In this section, we’ll be discussing those features of AIOSEO that’ll help you to optimize your posts/pages for SEO. These features are nothing otherworldly but, focusing on them assists for a higher ranking in search engines. It shows you whether you need any improvements with red color and for no improvements, it shows green color.
So, let’s move into those features individually and see how they help out for making your posts/pages SEO-friendly.
1. Using Keyphrase
Using focus keyphrase/keyword is a search term that you most want your page or blog posts to rank for. It lets potential visitors and search engines find your article. AIOSEO allows you to add focus keyphrases and analyze your whole content based on the keyphrase you’ve entered.
In this plugin, if you’re using a free version, it lets you add only 1 focus keyphrase. However, you can add unlimited focus keyphrases for your article if you’ve purchased any premium plan of AIOSEO.
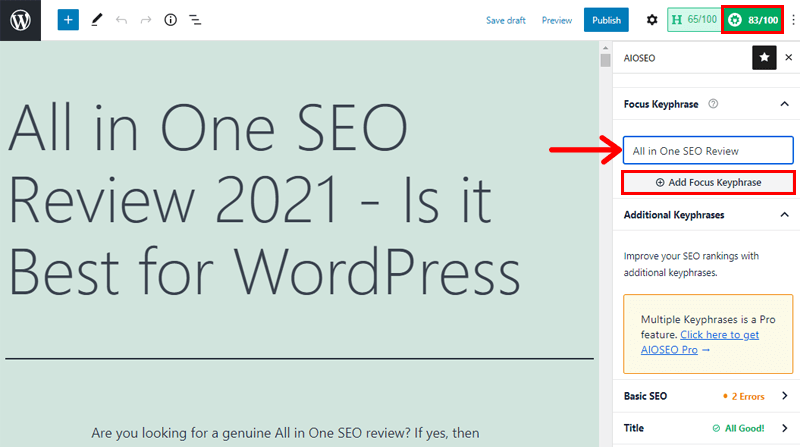
To enter your focus keyword, click on the AIOSEO Settings button on the top right side of your post editor. Then you can see the Focus Keyphrase text box. There, you can enter the key phrase and click Add Focus Keyphrase.
For pro versions, below the text box of the Focus Keyphrase, you can find the Additional Keyphrases text box for unlimited keywords.
Hence, with the help of the keyword you’ve added, the plugin helps your post to optimize and analyze SEO.
2. Snippet Preview
The snippet preview feature allows you to see how the search preview of your page or post appears in search results. You can see previews of the appearance in both the mobile and desktop results.
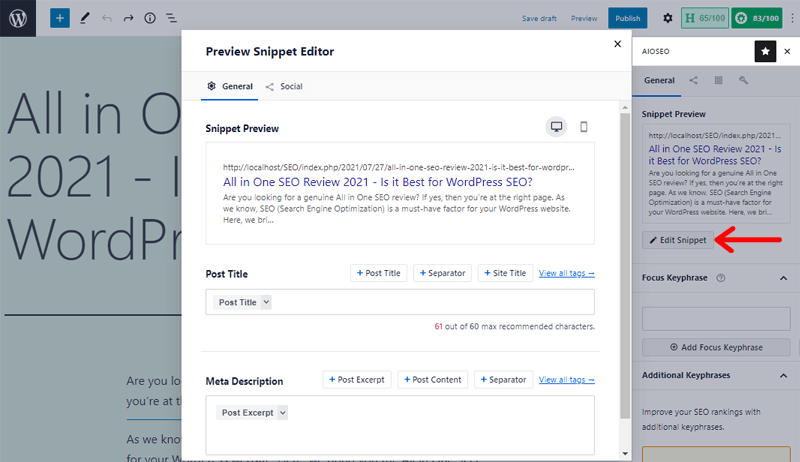
Snippet preview is the first factor to edit in your post editor after clicking the AIOSEO Settings button. Then, go to the Edit Snippet button where you’ll be able to edit Post Title and Meta Description.
You simply need to click on Post Title, Separator, or Site Title buttons to edit your post title and meta description. Also, there’re other options such as Author First Name, Post Year, Post Content, and so on within those buttons. You should include the focus keyword in your meta descriptions for finer SEO results.
Hence, it’s easy to customize the appearance of your search results.
3. Page Analysis
Page analysis is a salient feature of the AIOSEO plugin which helps to analyze the SEO requirements of your post/page. All in One SEO reads your content thoroughly and gives feedback for each factor. By indicating green color for all good and red color for improvements and suggestions.
The page analysis checks for 3 categories: Basic SEO, Title, and Readability.
Basic SEO
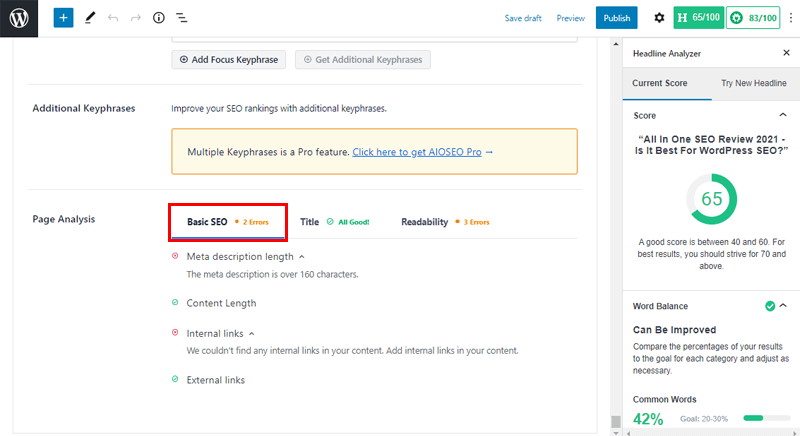
Basic SEO focuses on meta description length. It suggests it should not be over 160 characters. Also suggest not minimum words than a recommendation. Also, it checks whether there’s internal and external linking in the whole content.
In the premium version, it gives more suggestions, such as adding focus keywords in the meta description, the beginning of the content, and more.
Title
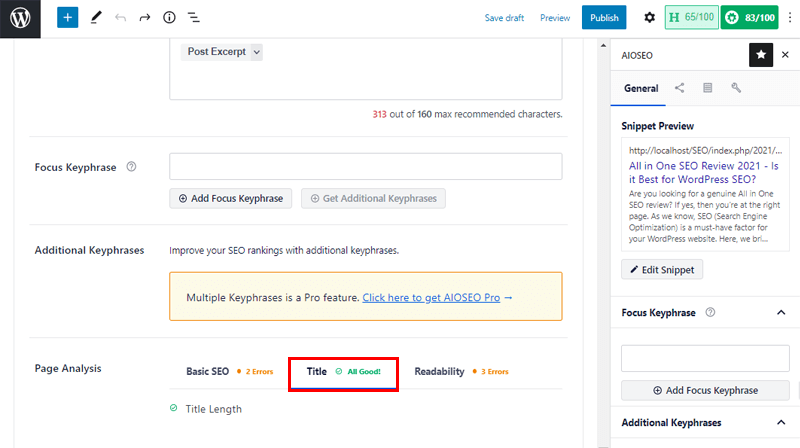
This section checks whether the length of your SEO title is too short or it’s all good. However, it gives more feedback to pro users. Such as title should consist of numbers, keyphrases in SEO title & at the beginning of SEO title, and many more.
Readability
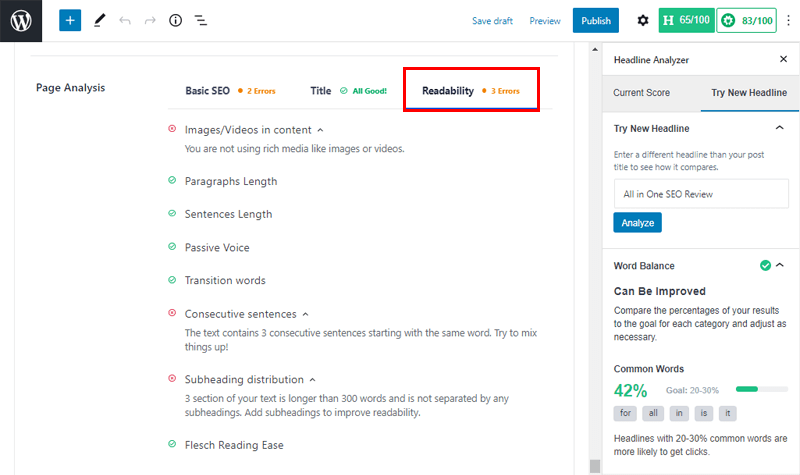
Readability analysis covers the rest of the factors. This is an important factor for quality content that helps readers and search engines receive information you want to give. It focuses on the use of images/videos in content, appropriate paragraphs & sentences length, and use of passive voice.
Also, it gives you scoring of transition words and Flesch reading ease if not used enough. Similarly, it also denotes the consecutive sentences in red color if used more. Additionally, it also checks whether the subheading is distributed after 300 words or not.
4. Overall Analysis Score
After improving all those above-mentioned factors with the help of suggestions, you can check for the overall analysis score. It’s called a Headline Analyzer which is on the left side of the AIOSEO settings button at the top-right of your editor.
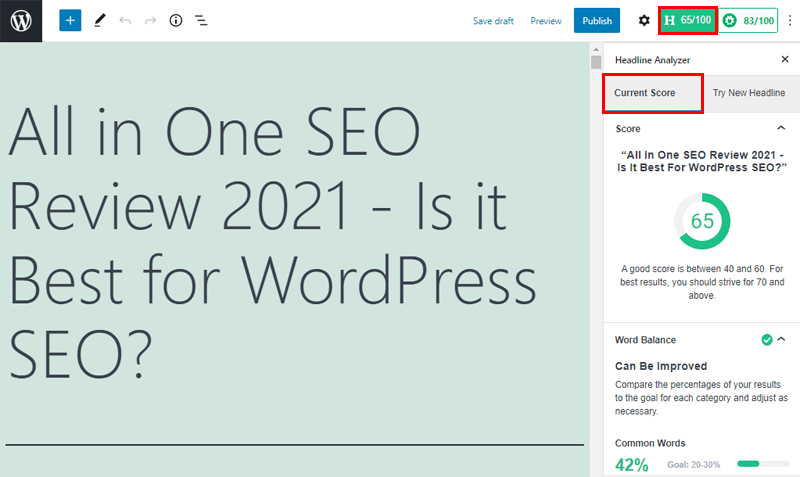
Once you click, it gives you the score of your article with an index of good scores between 40-60. For best results, the score should be 70 and above.
It also gives you improvements and suggestions on what more can be improved to increase the score. Such as the use of emotional words, power words, a score of using uncommon words, and so on.
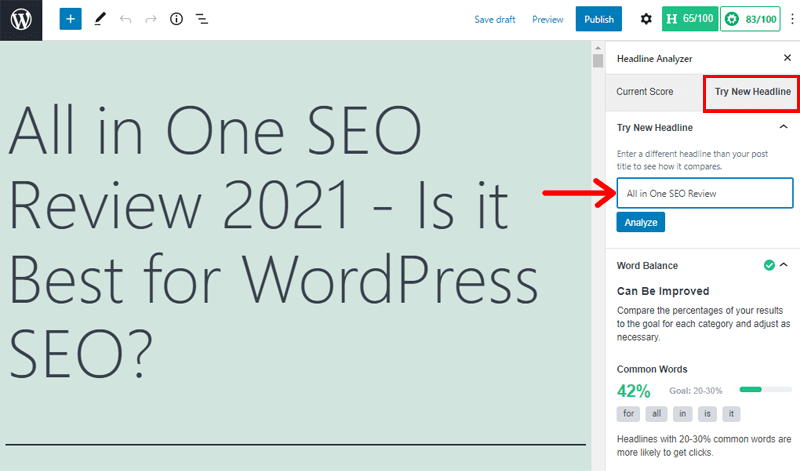
Furthermore, you can go to “Try New Headline” which helps you compare with the score of your current headline. Also, give you suggestions on what can be improved in new headlines as well.
Once you’ve improved based on suggestions, it’ll show a new increased score with a reduced number of suggestions.
D) Important Settings and Features of All in One SEO
Here are some of the important settings and features of All in One SEO plugins that we all must know.
So, let’s get into the settings and features of the All in One SEO review.
1.Sitemap Settings
What is Sitemap and How does it help Search Engines?
As we know sitemaps is a specific webpage with a list of all of your contents. It contains details such as the last time your content was updated. We’ve already discussed some scrap of XML sitemaps in the above feature topic.
So let’s discuss how it helps to rank for SEO.
Sitemaps are an important aspect of SEO as it assists search engines in finding your content. Also, notifies search engines when you’ve updated or removed it. With the help of this information, search engines determine what should be included and updated in search results.
But if there’s no sitemap, your content takes longer to appear or to be removed from search engines. Therefore, it’s critical to understand what your sitemaps should contain. So, check often to make sure you’re including proper content and removing things you don’t want search engines to view.
How to Configure Sitemap Settings?
Are you wondering how to set up your XML sitemap? If yes, then here we bring a series of steps on what and how your site should be configured.
Let’s start!
Step 1:
In your WordPress dashboard, come down to the All in One SEO menu then go to Sitemaps. There, you can see different tags: General Sitemap, Video Sitemap, News Sitemap, and RSS Sitemap. Here we’ll configure on General Sitemap but you can configure other tags according to the contents you’ve.
In the General Sitemap screen, you should Enable Sitemap. Even if it’s turned off, make sure to turn it on.
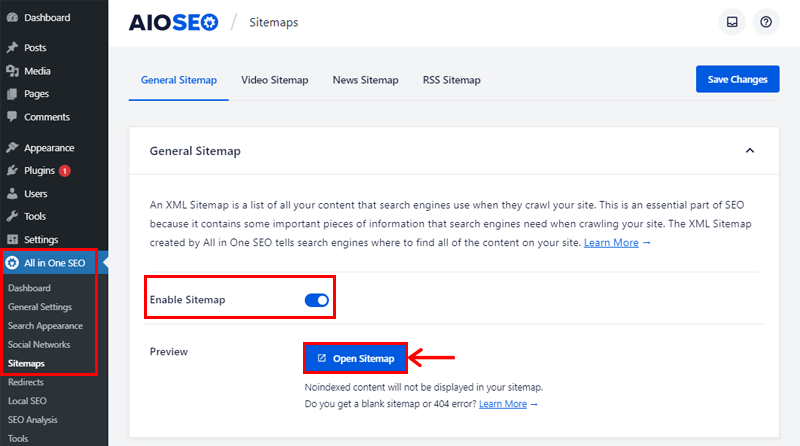
Then go to the Preview part and click on the Open Sitemap button to view your XML Sitemap.
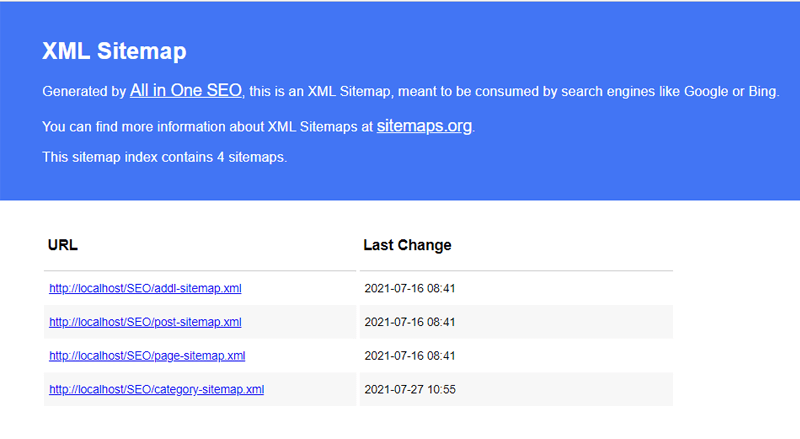
After clicking the Open Sitemap button, you’ll be directed to the index page of your XML Sitemap as shown above.
There you’ll see a list of sitemaps of your site on the index page. Each sitemap contains different types of content such as one for page and one for posts.
You can go through each link in the index to view the list of content that specific link consists of.
This is how you view the XML Sitemap of your website.
Step 2:
Now, back to the setup page; you’ll find Sitemap Settings after the Preview section. You’ll see Enable Sitemap Indexes. By default, it is enabled. But if you’re in any confusion, you can leave it to its default setting.
However, here’s a basic tip: for smaller sites with less than a few hundred URLs, set it to Disabled. But with sitemaps of more than 1,000 URLs, it is recommended to go for the Enabled button.
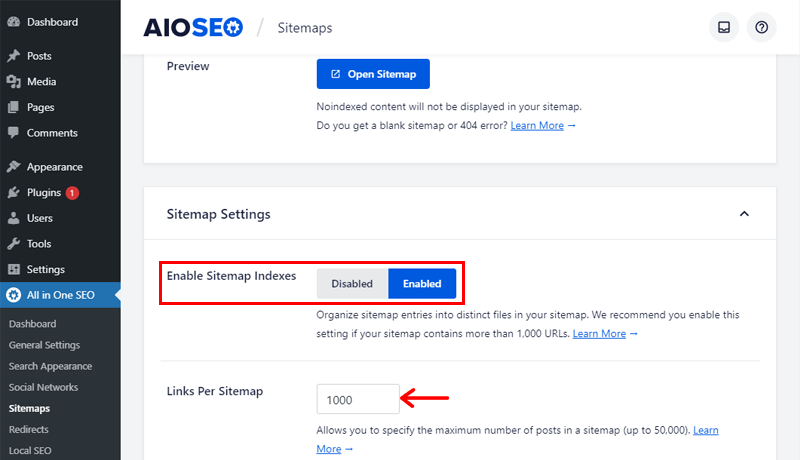
Below Enable Sitemap Indexes, you’ll be able to decide the number of URLs listed in each sitemap. By default, Links Per Sitemap is set to 1,000.
You can set it up to 50,000 but pages will take longer to load. Google or other search engines may time out and not load your whole XML page, so it’s not recommended.
If you’ve more than 1,000 links per sitemap, break the sitemaps into multiple paginations with 1,000 URLs on each page.
Step 3:
Next, we’re moving into Post Types and Taxonomies.
In the Post Types, you can decide the types of posts you want to include for your sitemaps. By default, all post types are included. If you uncheck the box, you can see options like posts, pages, and attachments. It’s better to check the box with Include All Post Types.
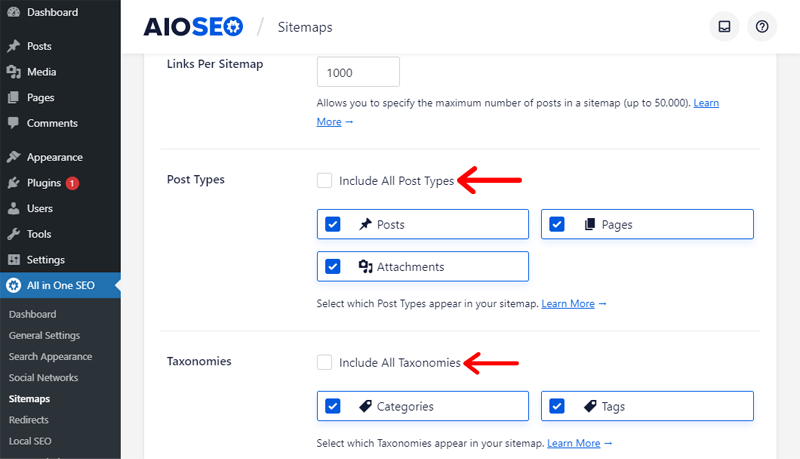
The same goes for the Taxonomies section as well. It consists of Categories and Tags. If you don’t want to include tags in your site, you can simply uncheck the Tags to leave only categories. Or check the box of Include All Post Types to include both categories and tags.
Lastly, we’ve Date Archive Sitemap and Author Sitemap. These are created by WordPress when you publish posts. Generally, they’re not included in the sitemap as they’ve less value in search results. But if you do want to include it in your sitemaps, you can simply Enable the settings.
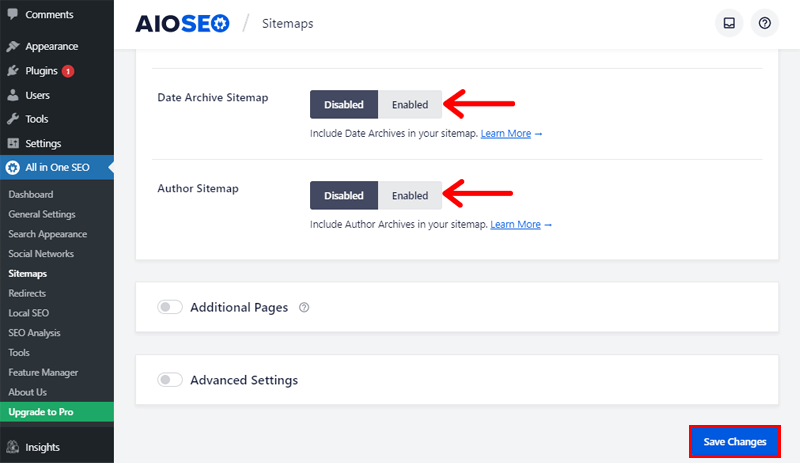
A quick note your content will still index in search engines and display in search results even if not included. However, including them basically means it’ll be updated/removed on search engines much faster than waiting till they find your content.
Make sure to click on the Save Changes button after complete the configuration
2. RSS (Really Simple Syndication) Content:
RSS is an XML-based data format for syndicating (or contributing) the contents of web pages, particularly dynamic web pages.
In AIOSEO settings, you can find General Settings, if you click Genera Settings, you can find the RSS Content menu. Click on it for your RSS content settings.
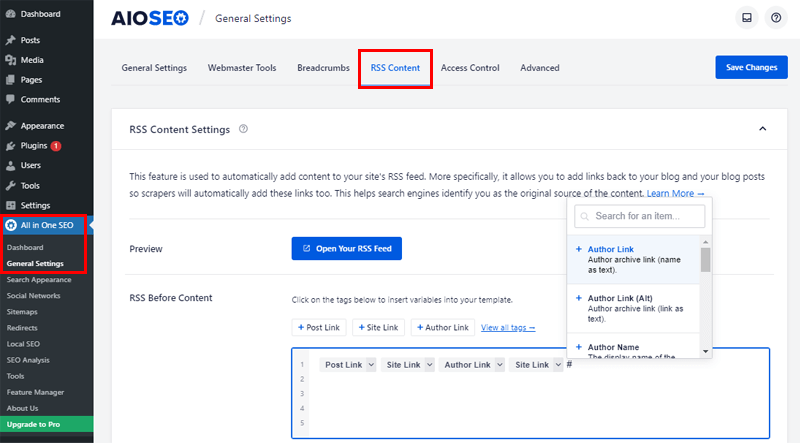
RSS content helps you to monetize your feeds by adding Google AdSense, affiliate links, or banner advertisements. It also increases reader engagement by interlinking additional material. In addition, you can link to your highest-converting pages to increase conversions.
3. Smart XML Sitemaps:
An XML sitemap is a list of all the contents and URLs of your site that search engines use while crawling in your site. All in One SEO’s XML Sitemap instructs search engines where to go for all of your site’s content. Dynamically generated sitemaps are always up-to-date and notify Google and Bing.
To configure your sitemap settings, go to AIOSEO Settings, then go to Sitemaps. You’ll be able to manage the General Settings and also for news, videos settings.
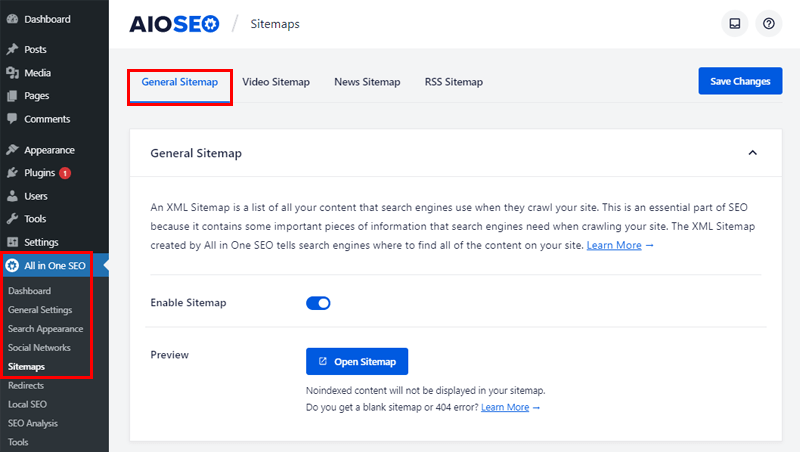
You need to ensure that all of your critical posts and pages are correctly indexed. It supports all sorts of content including custom post types and taxonomies.
4. Integration with Social Media and Webmaster Tools:
All in One SEO for WordPress integrates with popular social networking platforms seamlessly. It includes Facebook, Twitter, Pinterest, YouTube, Linked In, Instagram, and other social media sites. This ensures that the preview of your website is optimized for search engines (SEO) as well as social media networks.
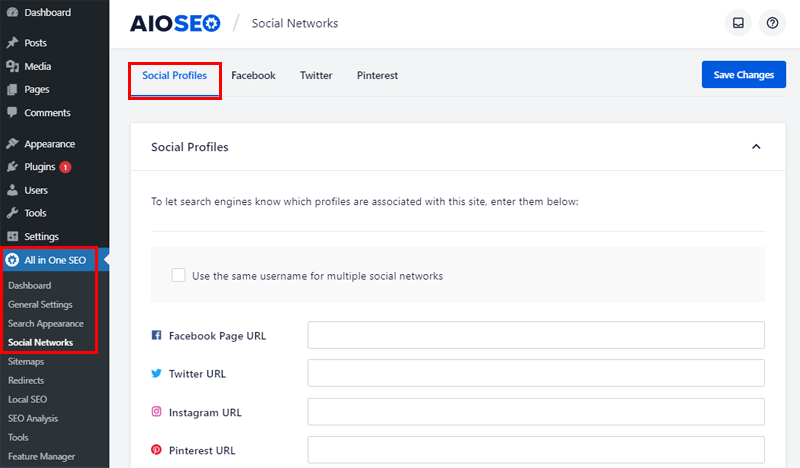
To set up your social profiles, you can go to the AIOSEO Settings of your dashboard, where you’ll find Social Networks. You’ll be able to separately ensure a preview of your posts on Facebook, Twitter, and Pinterest as shown in the menu.
AIOSEO also makes it simple to integrate webmaster tools with your website. Google Search Console, Bing, Yandex, Baidu, Google Analytics, and all other SEO webmaster tools are a few examples.
To find Webmaster tool integration settings, visit AIOSEO Settings>General Settings>Webmaster Tools from your menu.
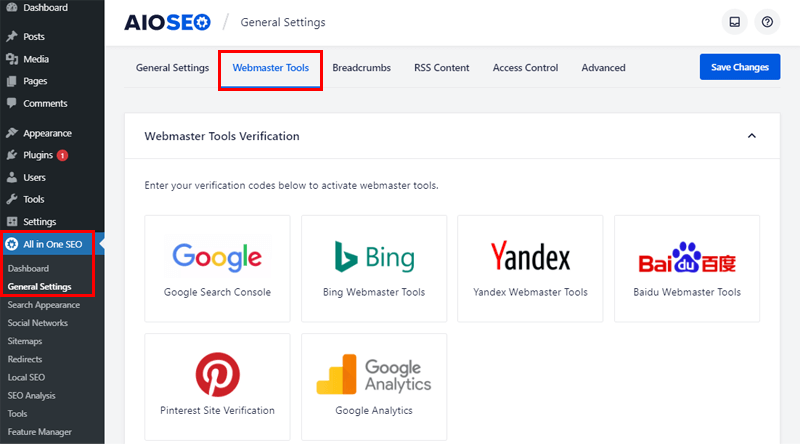
You need to enter verification codes for each tool to activate them. If you click on any Webmaster tool, it gives you a link to get a verification code for that specific tool.
5. TruSEO On-Page Analysis:
With a comprehensive on-page SEO checklist, you can get actionable insights. TruSEO score provides a more detailed analysis of your optimization efforts than a simple pass or fail. You’ll be able to get the most traffic out of each page with TruSEO.
You can easily configure TruSEO On-Page Analysis even during the configuration setup wizard. Also, during post formatting of your article, you can go to AIOSEO Settings at the top-right side. There you can find the General, Social, Schema, Advanced menu. Those menus analyze your page or post.
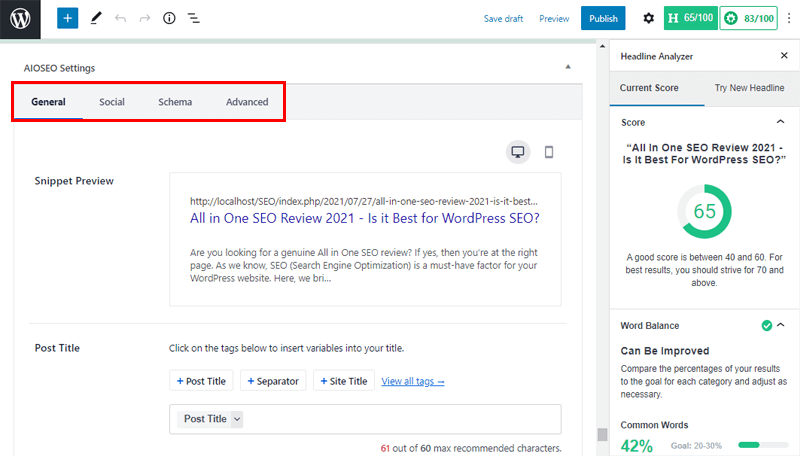
Furthermore, add title tags, meta descriptions, keywords, and anything else you need for appropriate on-page SEO optimization with ease. You can make your title tag and meta description unique. Also, add the main keyphrase plus additional relevant keyphrases.
6. Robots.txt Editor:
Search engines use programs called spiders, bots, or crawlers. They collect content such as text, images, videos, news items that’ll be interesting for search engines to show. The robots.txt file notifies search engine crawlers of which URLs on your site they can access. This is mostly used to prevent overloading your site with requests.
Within the AIOSEO Settings of your dashboard, you can find Tools. Once you click on Tools, you can find Robots.txt Editor to configure your robots.txt file.
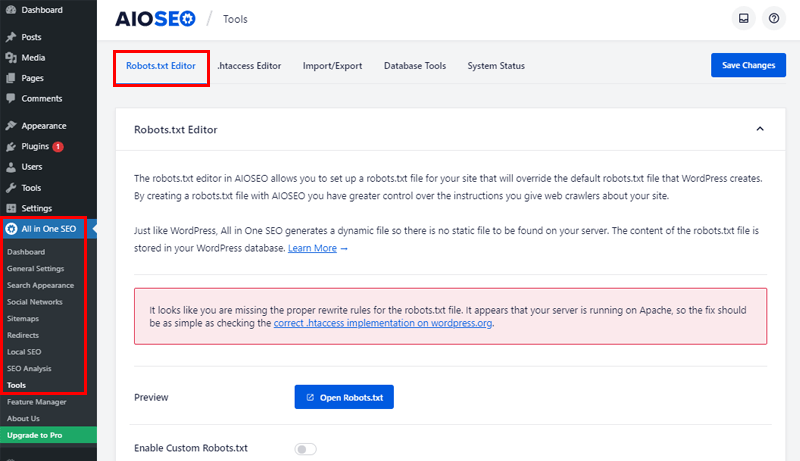
Therefore, AIOSEO offers a robots.txt editor. With this editor, you’ll be able to configure and take full control of the robots.txt file. This helps to give instructions to web crawlers about which folders and files they should crawl on your WordPress site.
7. SEO Audit Checklist:
To check the analysis of your website, you can go to AIOSEO>SEO Analysis>SEO Audit Checklist.
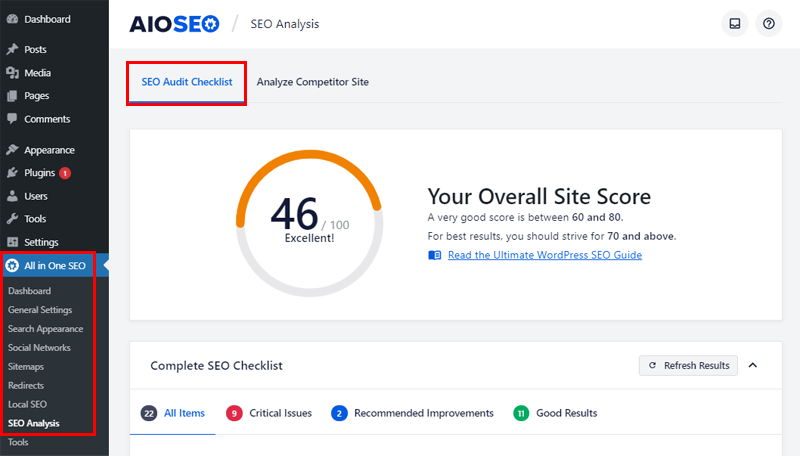
You can analyze your entire WordPress site to identify critical errors that may harm your rankings using SEO Audit. After detecting errors, you’ll get step-by-step guidance on how to fix errors. All critical faults are described in detail with resources. Then, provide actionable insights to improve your SEO and increase visitors.
Moreover, SEO Audit Checklist examines and improves the speed and performance of your website. As the speed of a website is becoming more relevant ranking criteria. All in One SEO analyzes your site’s speed and provides detailed instructions on how to improve it.
8. Local SEO:
You can configure your local business schema (structured data for you to add your business’s website) by just filling the premade schema which appears as form. It allows you to tell Google about your company, its name, address, contact info, opening hours, and price range.
The plugin shows this data in the form of a knowledge graph card (knowledge-base used by Google and its services). Hence, it increases visibility on Google Maps to rank higher.
You can find the settings of local SEO, in the AIOSEO>Local SEO from your dashboard menu.
9. Rich Snippets Schema:
Do you want rich snippets in search results?
All in One SEO Pro provides full support for schema markup (semantic vocabulary that you put on your website). This gives Google a better understanding of your content and matches it with the people searching your articles. Hence, your article will gain more clicks and traffic.
Moreover, you can set up knowledge graph data. All-in-one SEO provides Google with the formatted structured data it requires to properly interpret and include your content in knowledge graph results.
10. Redirects:
Redirection manager enables to effortlessly create and manage redirects for broken links (links displaying the message as 404 error page). This avoids confusing search engines and users as well as losing valuable backlinks (links created when one website links to another).
Therefore, users and search engines will be instantly redirected from your old URLs (Uniform Resource Locator) to new ones.
You find the redirect settings from the AIOSEO Settings of your dashboard and then go to the Redirects menu.
11. WooCommerce SEO:
AIOSEO also simplifies WooCommerce SEO. You can improve your SEO ranks by optimizing your product pages and categories. Besides, you can easily enhance the titles and meta descriptions of your products.
It enables optimizing every page by setting sitewide defaults. Then, dynamic content tags automatically update titles and descriptions with the appropriate information. You’ll be able to optimize each product, category, and tag archive page separately to improve rankings.
E) All in One SEO Pricing
As we know, AIOSEO is a freemium plugin, i.e., it has both free and premium versions. You can download the free version from WordPress.org. For the premium version to purchase, it offers 4 different plans.
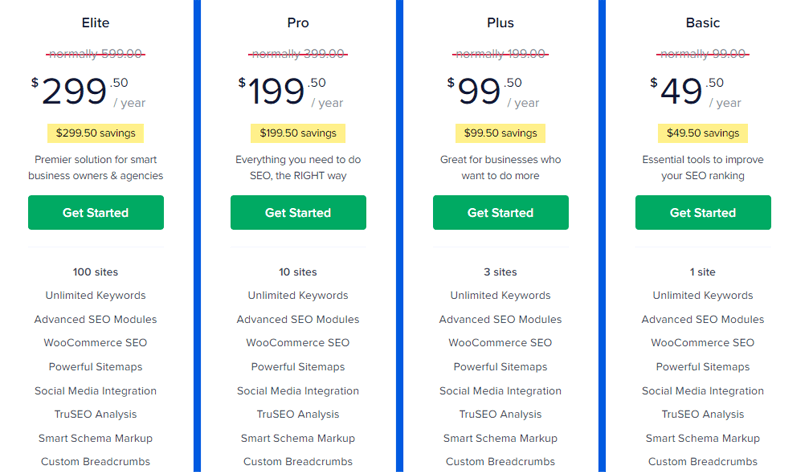
The Basic Plans cost $49.50/year, used for 1 site. It unlocks many features such as in the free version you can use 1 focus keyphrase. But with Basic Plan, you can use unlimited additional keyphrases. Other features are Advanced SEO modules, Smart Schema Markup, Custom Breadcrumbs, Sitemaps, Standard Support along with all free and more.
Likewise, the other plan is Plus Plan, which you can purchase at $99.50/year. It’s used for up to 3 sites and includes all the features that the Basic Plan offers. Also, it unlocks more features than Basic Plan such as Local SEO Module, Image SEO Module, and so on.
The further plan is Pro Plan costs $199.50/year which is the best deal and most recommended plan among all. It can be used for up to 10 sites and includes all the features of Basic and Plus Plans along with free versions. Extra features of this plan are News Sitemap, Video Sitemap, Redirection Manager, 404 Error Tracking, Priority Support, and many more.
Similarly, the last plan is Elite Plan which can be purchased at $299.50/year for up to 100 sites. It has all the features that the above-mentioned plans have. However, it has more features such as Client Management, Multi-site Support, Premium Support, and so on.
It also guarantees you money back within 14 days of purchase if you’re not satisfied with their plans.
F) Customer Support Options
Customer support is one of the important factors before selecting a plugin. Fortunately, AIOSEO provides full documentation and customer support.
Now let’s talk about how you can get support for your queries and issues on the All in One SEO review.
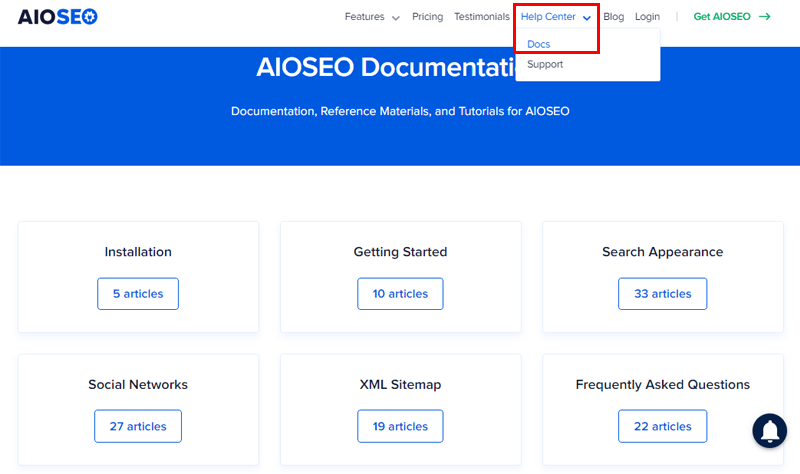
You can go to the official site of AIOSEO and click on the Help Center in the navigation bar. There, you’ll get full access to its complete documentation. It comprises articles from the installation of plugins to frequently asked questions. Those articles have extensive information with a handful of guidelines and reference materials.
So, if you’re ever stuck in any settings, configuration, or features, you can quickly find answers within the documentation. Plus, it frequently provides tutorials to help you know more about AIOSEO.
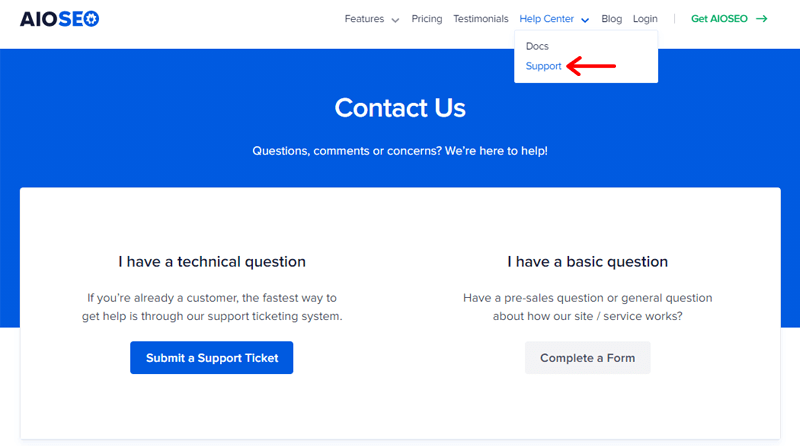
It also has a Support button in the dropdown menu of Help Center. Here, you can go to Submit a Support Ticket for technical questions, ask any questions, then click on Submit Ticket. But to submit your ticket, you need to create an account on AIOSEO. Furthermore, you can also submit a form for basic queries or additional information that may not be on site.
However, customer support can be limited to free versions compared to premium versions. As we’ve mentioned in the above topic, the Elite and Pro Plans offer priority customer support, i.e., 24/7. It means that, if you’ve any of those plans, your request will be handled faster than other plans.
Besides, you can also check out the support forum from WordPress.org, if you’re using the free version.
G) Pros and Cons of All in One SEO
Till now, we’re assured that AIOSEO is one of the robust plugins with lots of features to increase your rankings. But none of the plugins can be flawless.
So, here we exhibit to you some of the pros and cons of the All in One SEO plugin review.
Pros:
- It’s simple to set up and offers a user-friendly interface.
- Easy settings of SEO for individual posts; edit the title and meta description, check on-page SEO and readability.
- Preview of content not only in search engines but also in different social media platforms.
- Can be used for any types of websites and also for client websites.
- You can turn off indexing and search engines following for particular posts.
- On-page analysis such as basic SEO, title and readability.
Cons:
- Allows you to add only 1 focus keyphrase in the free version.
- Doesn’t have breadcrumbs navigation and is unavailable to import data from Google Search Console.
- No customer support for the free version.
However, these limitations can’t drastically affect the SEO of your websites and pages.
Besides, it has been offering lots of features that help you to cope up with these limitations. But, if you want to check the differences with other SEO plugins, you can install and use them as well.
H) All in One SEO Alternatives
Undoubtedly, All in One SEO is one of the best SEO plugins with its own distinctive features and functionalities. This makes them stand out among other plugins and is a reason people prefer them out of unlimited SEO plugins.
However, there are other SEO plugins available with their own unique features.
So, let’s take a look at some of the popular SEO plugins that can be an alternative to All in One SEO.
1. Yoast SEO

Yoast SEO, an alternative to AIOSEO, is the most-used SEO plugin that has helped millions of users to remain ahead of the competition. It comes with a plethora of features to assist visitors and search engines to get the most out of your website. This plugin is immensely user-friendly with a good interface and easy to use.
It improves readability, manages title, meta description, URL slug, minimizes content duplication and other indexing issues, etc. Moreover, it integrates with Schema.org that helps to structure your results in search engines. And most importantly, it allows you to define cornerstone content (the core of your website) for your important content.
2. Rank Math
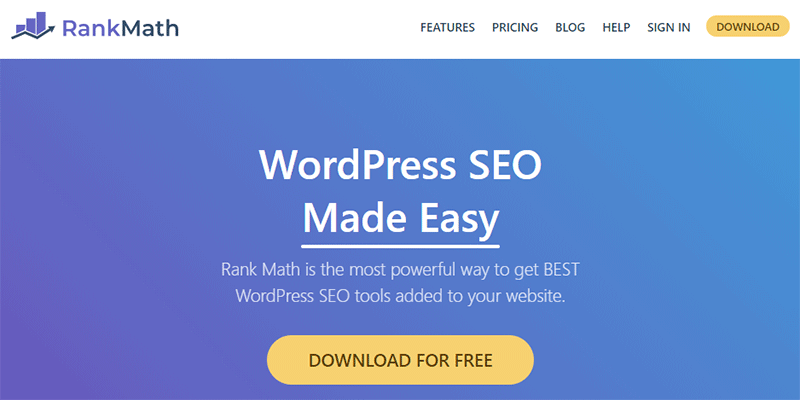
Rank Math is a rising SEO plugin, launched in 2018. It has been used widely on many websites due to its exclusive features. Rank Math consists of similar features as the All in One SEO plugin. Such as customizable title, URL, meta description, internal linking, 404 error monitor, checks keyword density, and more. Besides, you can also track your keyword rankings in Google and give you suggestions for improvements.
When compared, it offers many features in the free version that are available only in premium versions of other plugins. One of its stand-out features is to optimize your content by allowing you to add up to 5 keywords. You can use this feature even in the free version, unlike the AIOSEO plugin. Hence, its intelligent features allow you to control entire SEO abilities within a few clicks.
You can also check our article on a detailed comparison of Yoast SEO vs Rank Math to know more about these alternate plugins.
3. SEOPress

SEOPress is yet another alternative to AIOSEO, which is a powerful WordPress SEO plugin to optimize the SEO of your site. It helps to increase traffic, improve social sharing, optimize breadcrumbs, manage 301 redirects, and so on. Also, to assist you in writing optimized content, it analyzes your content for search engines.
The plugin doesn’t contain advertisements both in the front-end as well as back-end. You can also delete all the references to SEOPress and customize them with your logo, labels, and icons. Above all, it is the most affordable plugin in contrast to the AIOSEO plugin and other SEO plugins.
You can use them to know more about these alternatives and competitors of AIOSEO. To see whether any of these alternates may have features that fit in your website. You can install plugins for a test try on your WordPress localhost.
I) Final Verdict on All in One SEO – Should You Use All in One SEO?
We’ve written an All in One SEO review based on our usage. You must have understood that the All in One SEO plugin is one of the best plugins with everything you need regarding SEO.
Also, AIOSEO being the original WordPress plugin, offers integrations with all popular WordPress plugins. Such as membership plugin SEO, SEMrush SEO integrations, landing page plugin, and so on.
It also integrates with Google AMP (Accelerated Mobile Pages) and works well with popular speed and caching plugins. Because the code is highly optimized for maximum speed performance. Keeping in mind that quicker websites score higher in search results.
Although the features are overwhelming, this plugin is lightweight and easy to use. It also has been in use for over a long time because it has been manifesting its worth.
However, we can all have different perspectives on whether an AIOSEO plugin is best among other SEO plugins.
Since we went through in-depth research and use, we suggest all use the All in One SEO plugin by themselves. We assure you that it’ll be much more effective for your site in SEO without any doubt.
Conclusion
That’s all folks! We’ve arrived at the end of All in One SEO Review. We expect that you’ve understood about AIOSEO and be able to use it on your site also.
We hope you liked our article on All in One SEO review. If you’re using the AIOSEO plugin for your website, then please share your experience below in the comment section.
However, if you’ve any further queries about AIOSEO, please feel free to ask us. We’ll try to get back to you as soon as possible. Also, share this article with your friends and colleagues.
You may also check out our article on Search Engine Optimization (SEO) for Beginners and Best SEO Tools for Better Ranking.
Don’t forget to follow us on Facebook and Twitter for more helpful articles.


