
Are you searching for an Astra WordPress Theme Review? Though you’re unsure of its performance, are you eager to use it on your website? If so, you’ve come to the perfect place to get all the information you need to understand the theme.
Astra has become a prominent name in the world of WordPress themes, celebrated for its user-friendly design and versatile features. It caters to both beginners and experienced users, offering a seamless website-building experience.
From its lightweight structure t
o its customizable pre-built templates, it simplifies the process of creating a visually appealing and functional website. Now, let’s discover how Astra might be the perfect fit for your next web project.
We provide you with a thorough review of the Astra theme in this article so you can decide whether it makes a decent host or not. It contains key features, setup processes, pricing, support, and so much more.
So, without further ado, let’s dig in!
Overall Rating
Astra is one of the most popular WordPress themes available on the market. It’s a powerful and highly customizable responsive theme that you can use to create various types of websites.
Not only that, it has more than one million active installations at the moment. Therefore, it makes it a beautiful WordPress theme suitable for blogs, personal portfolios, businesses, and eCommerce websites.

When we look into the official rating of Astra in WordPress.org then, it has a 4.9 out of 5 star rating given by 5,421 real users. Awesome, isn’t it?
Moreover, if we look into the user rating of Astra on Trustpilot, then, it scores 4.8 out of 5 stars based on 1,892 user reviews. Similarly, according to G2 Reviews, Astra has an amazing rating of 4.6 out of 5 stars given by 73 user reviews.
Further, we also strongly believe in those ratings, so we would also like to give a solid 4.9 out of 5 stars to the Astra theme. We deducted the remaining 0.1 ratings since beginners might find the sheer range of customization options a bit overwhelming. Even more than that, we definitely recommend you all try it yourself.
With that said, let’s explore even more and try to find out whether Astra is worth it or not.
Pros and Cons of Astra WordPress Theme
First, let’s look at the pros and cons of the Astra WordPress theme. Here we go!
Pros of Astra WordPress Theme
- Astra provides an interface that lets you modify the code of your website along with a drag-and-drop builder.
- Its premade layouts make it simple to begin creating a new website.
- This theme loads swiftly, giving your users instant access to your content.
- It includes more than 180 demo sites available in its gallery.
- Astra seamlessly supports WooCommerce and helps to elevate your online sales.
Cons of Astra WordPress Theme
- Advanced customization possibilities are restricted due to limited features in the free version.
- A steep learning curve that lessens its suitability for beginners.
With that, let’s kickstart the Astra theme review. First, let’s begin with a brief introduction to Astra.
A. What is Astra WordPress Theme? – Overview
The Astra WordPress theme is a user-friendly and multipurpose theme that helps you create a visually appealing website. Designed for simplicity, Astra is particularly popular among beginners and experienced users alike.
With a lightweight structure, Astra ensures your website loads in less than 0.5 seconds It offers a range of pre-built templates that you can easily customize to match your brand or personal style.
The theme is compatible with popular page builders like Elementor and Beaver Builder, allowing you to design your pages with a drag-and-drop interface.
Astra is also known for its lightweight, optimized for SEO, and mobile responsiveness. Hence, it makes your site accessible and appealing across various devices.
Now, with this short introduction, let’s move forward and learn more about Astra WordPress theme features.
B. Major Features of Astra WordPress Theme
Astra offers a wide range of features to help you build and expand your WordPress website.
So, let’s explore the features of Astra in detail to make sure that this theme is worth the price it has.
1. Lightweight Theme
First things first, Astra is a lightweight theme that makes your website work faster and better. When your site is speedy, more people come to check it out, and it even helps your site show up better in search engines.
Why is Astra so good at this? It’s because the developers who made Astra kept the code clean and minimal. This means there’s not a bunch of heavy stuff slowing things down. They didn’t use heavy codes like JQuery, and they structured everything in the best way possible.
Even though Astra gives you lots of options and templates, it doesn’t mess with your site’s speed. It uses Vanilla JavaScript instead of jQuery, which is a good thing for performance.
So, if you want a website that not only looks good but also runs super fast, Astra’s got you covered!
2. 250+ Demo Templates
If you want to get your website up and running fast, Astra has something cool called starter templates. They have a massive collection of over 250 templates – one of the biggest you’ll find in any WordPress theme.
You can import the demo data with just one click using starter templates. Your website will then be ready for publication after you have edited the text, photos, and other elements. incredibly time-saving!

With the free Astra theme, you get a bunch of templates to choose from. You can save your favorite layouts or pick the one you want to use.
Some templates even let you adjust a few important settings before you install them. It’s a quick and easy way to make your website look awesome without starting from scratch.
3. Unlimited Customization
Astra scores big in the customization area by giving you tons of options to make your website truly yours. Even if you go for the free version, you get a bunch of cool customization features. And if you decide to go for the premium version, there are even more things you can change.
To find the customization options, navigate to Appearance > Customize from your WordPress dashboard. After that, you’ll find bunch of amazing options on the left-hand side of the WordPress Customizer.
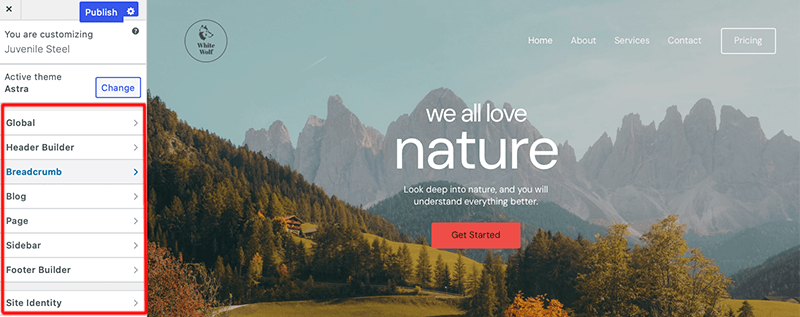
This is like your control center where you can tweak everything in your theme. You can play around with colors for the theme, text, buttons, and more, making sure they match your brand.
You get more than 800+ Google fonts to pick from, and there are ready-made styles to save you time. If you have your special fonts, you can add them too.
Not stopping there, Astra lets you switch up the layouts for your posts, pages, headers, footers, menus, and more. So, whether you go with the free or premium version, Astra lets you create a website that’s uniquely yours.
4. Header and Footer Builder
Astra’s newest version, Astra 3.0, comes with exciting features: header and footer builders that make designing your website a breeze. Creating attractive headers and footers in the WordPress Astra theme is now super easy.
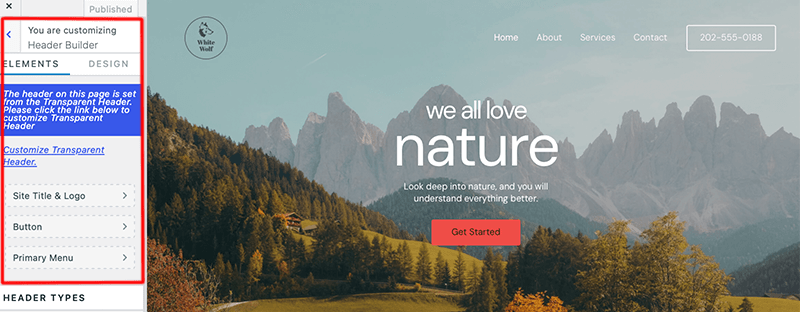
These builders are visual, meaning you can drag and drop elements to create professional-looking headers and footers effortlessly. You have creative control over various elements like texts, widgets, menus, and more.
Plus, you can design custom headers and footers specifically for mobile with different elements and styles. Astra makes designing your site’s headers and footers fun, user-friendly, and visually engaging!
5. WooCommerce Support
Astra comes with special features focused on making it easy to create an online store using WooCommerce.
The best part is that you can find bunch of WooCommerce-supported templates in its starter templates. And with those templates, you can use cool things like infinite scrolling, grid settings, and an off-canvas sidebar.
You can customize your WooCommerce site by navigating to Appearance > Customize > WooCommerce. From there, you’ll be able to customize product catalog, cart, single product, product image, checkout, and more.

Whereas with Astra Pro, it opens up more opportunities with advanced features. Such as built-in gallery options, a sales blue bubble style, and a default dropdown to show off your products.
These features make Astra a great choice for creating a smart and stylish online store with WooCommerce.
6. Site Layouts
With Astra Pro, you get to create and use different layouts for your site and blog. These templates make your content and blog posts look really good and easy to use. You can pick from cool layouts like Full Width, Padded, and Boxed content.
These styling options come with Astra Pro, so if you’re using the free version, you’ll have a default look for your content and blog posts. But you can always choose an Astra starter site that already has the look you want.
This is a premium feature available with Astra Pro Addon plugin. To use these Pro features, you need to activate the module from Astra > Astra Pro Modules.
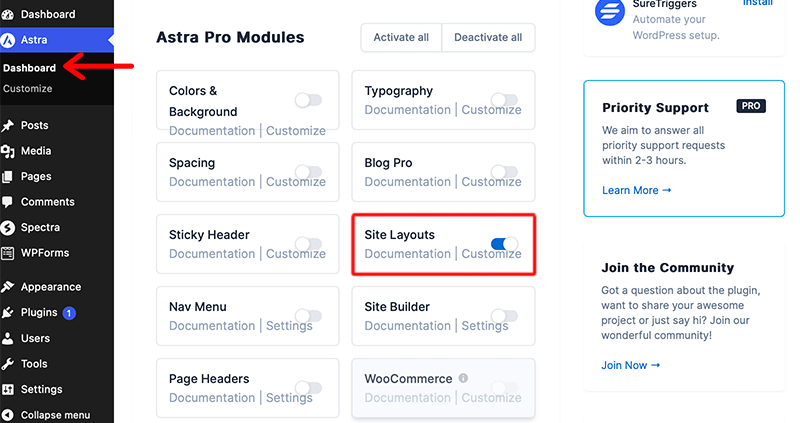
With the Site Layout module, it allows you to manage the overall layout of the website.
Once you’ve activated the module you can find the Site Layout setting under Appearance > Customize > Global > Container > Site Layout.
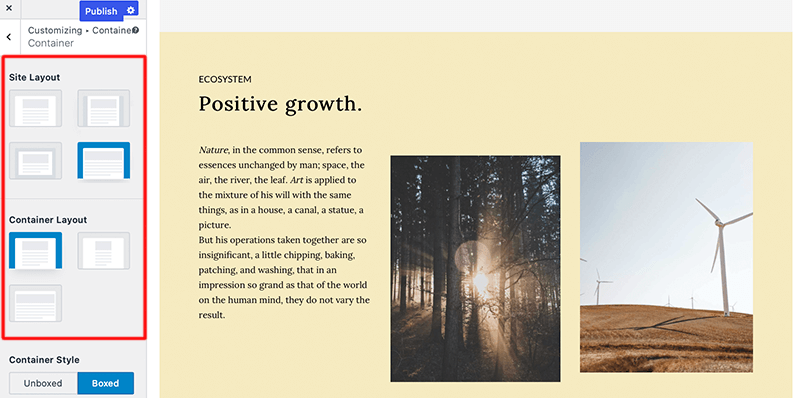
Nonetheless, it also gives you a default container, called the primary container with its own specific layout and settings within the customizer itself. Besides that, it allows you to manage the margins and paddings around all the elements and overrides the default space settings.
7. Compatibility with Third-Party WordPress Plugins
Let’s talk about integrations in this Astra theme review. Before that, we all know how frustrating it becomes when your favorite theme isn’t compatible with your desired WordPress plugin.
However, with Astra you won’t have to face such harsh situation. Because Astra seamlessly integrates with all the popular WordPress plugins.
For instance, if you’re into selling online courses, Astra seamlessly integrates with LMS plugins like LearnDash or LifterLMS. You can control everything right from the WordPress Customizer.
Moreover, Astra gets along just fine with major plugins for things like SEO, memberships, and eCommerce in WordPress. So, whether you’re boosting your site’s visibility, creating courses, or selling stuff online, Astra seamlessly integrates with the plugins you need.
Even more, it comes with the basic schema markup implementation that helps search engines understand your website better.
8. Works Perfectly with Popular Page Builders
Are you worried about your theme being limited to creating and editing your web pages easily with drag-and-drop tools? Don’t worry, you can rest assured of Astra’s compatibility with popular page builders.
Page builders are WordPress plugins that use drag-and-drop tools to create and build webpages in real-time. No doubt, Astra works great with most major page builders but especially with the following three – Gutenberg, Elementor, and Beaver Builder.
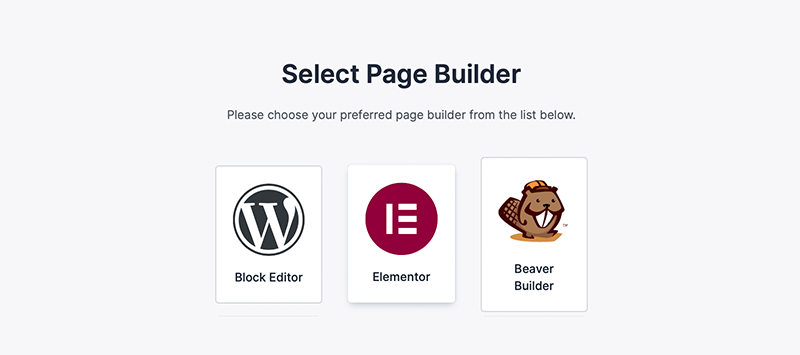
Nevertheless, Starter Templates are available for each of these builders. This means that you get to choose your own page builder and use it to build your webpage.Even more, it has its own addons for these page builders.
For example, you can check Spectra, Ultimate Addons for Elementor, and Ultimate Addons for Beaver Builder. As a result, it provides extra powerful features with addons for each builder. Isn’t it what we’re looking for?
Upon installing Astra, you can enjoy these several benefits. Let’s proceed and examine the installation process for Astra in the upcoming section of this review.
C. How to Purchase and Install Astra WordPress Theme?
To begin, Astra is available in both free and premium versions. In this next section, we’ll look at the process of seamlessly installing both versions of it.
Anyway, first let’s look at how we can install the free version of the Astra WordPress theme.
Install the Astra WordPress Theme (Free Version)
Did you know that you can quickly install the Astra free theme directly from your WordPress dashboard?
First of all, you need to log in to your WordPress dashboard.
After that, on the left sidebar of the dashboard, navigate to the Appearance > Themes section and click on the Add New button.
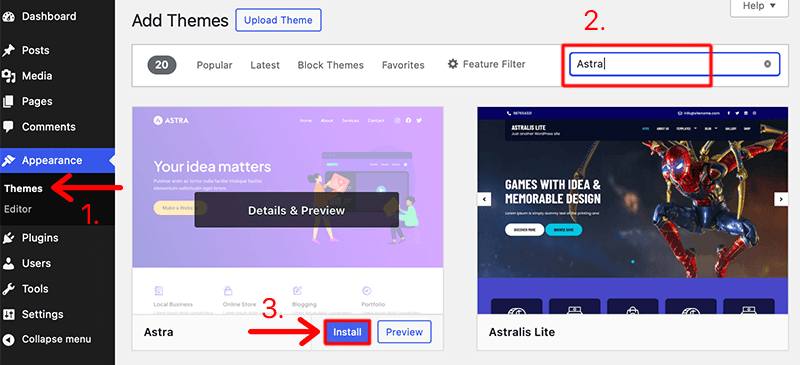
Now, type the ‘Astra’ theme in the search field at the very top right-hand side of your dashboard. After you’ve found the theme, click on the Install button.
Once the installation is completed, you’ll need to click on the Activate button as shown above.
That’s it! This is how you can easily install and activate the free version of the Astra theme in 2 steps.
The Astra theme’s zip file is required if you wish to manually install the theme. Here is a link to download it from the WordPress Repository → HERE.
If you want to learn more, check out our detailed guide on how to install WordPress plugins.
Purchase and Install Astra Pro
No doubt, Astra’s free version comes with some solid templates that help you get started in no time. However, if you want more features and customization, you should definitely upgrade to its premium version – Astra Pro.
Astra Pro is a premium add-on that adds advanced features with which you can perform more site customization.
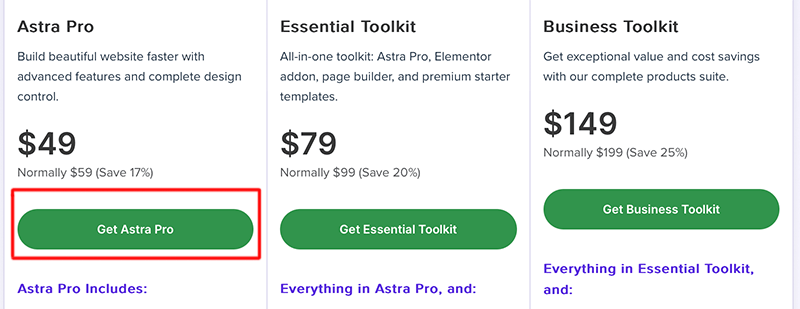
To purchase it, you should go to Astra’s official pricing page and click on the Get Astra Pro button. Then, you need to provide your payment detail and you’re ready to purchase it.
Once you’ve purchased it, it’ll redirect you to your official Brainstorm Force account. Now from its menu, go to Accounts > Downloads where you can see your product information and downloads.
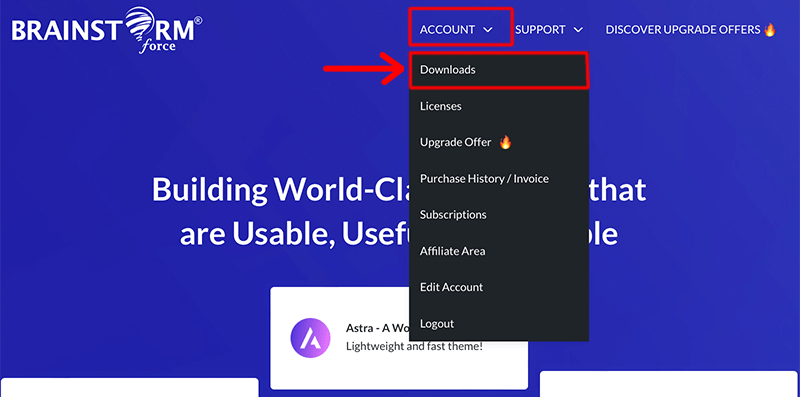
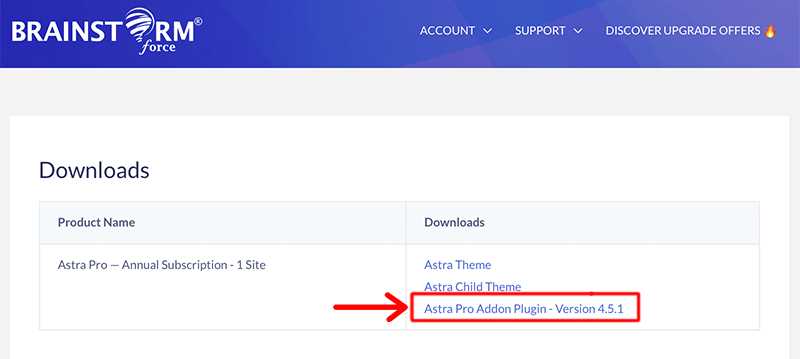
From there, you can simply download the Astra Pro Addon Plugin to add to your site.
Next, we’ll add that addon to our WordPress dashboard. For that, log in to your WordPress site’s dashboard and go to Plugins > Add New > Upload Plugin.
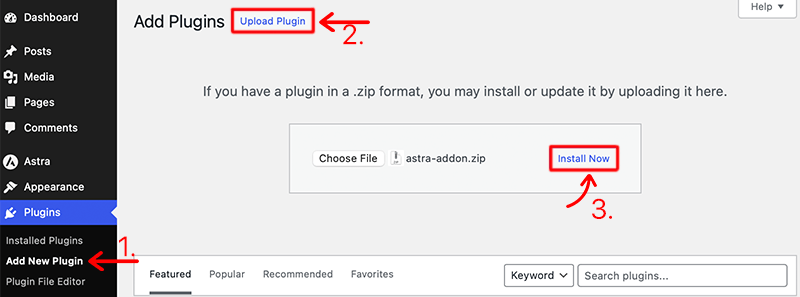
Then, upload the zip file, and then click on the Install Now button. Once the installation is completed, click on the Activate button to activate the plugin.
Next, you’ll have to activate your product license. For that, go to your Brainstorm Force Account page, click on the Licenses option, and copy the license key from there.
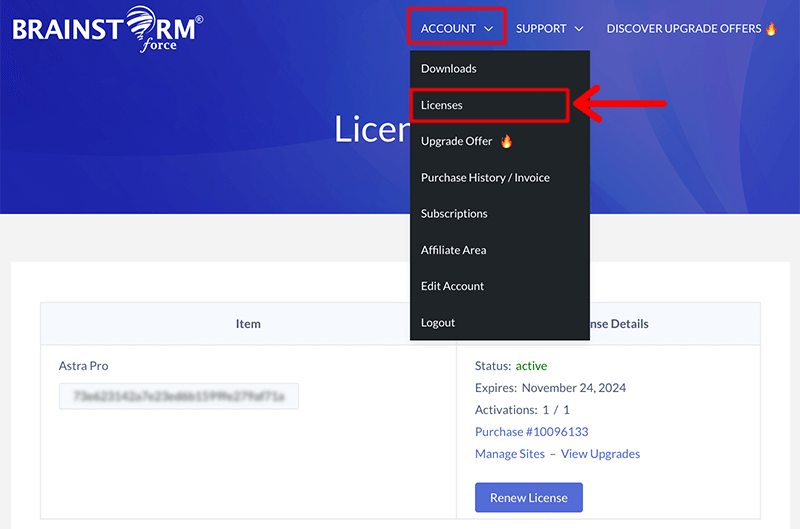
Then, go back to your WordPress Dashboard, and navigate to Astra > Dashboard > Settings. Now paste the license on the right where it says ‘Astra Pro License’ and activate it.
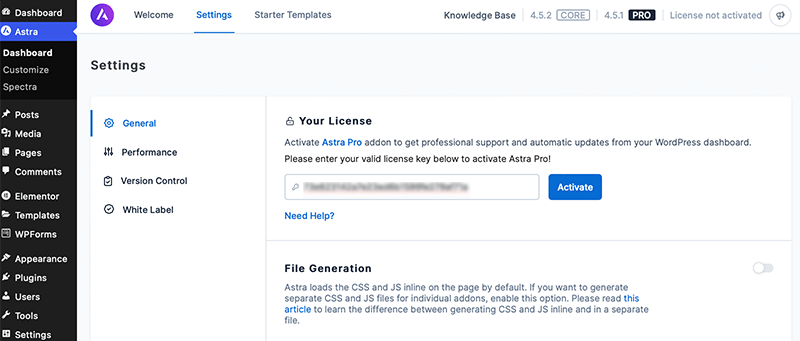
In this way, you can quickly and easily purchase and upgrade your Astra theme to the premium version in no time.
Congratulations, if you’ve followed these steps so far as it pretty much sums up the installation process for the Astra theme.
D. What are Astra Starter Templates?
Astra makes building awesome websites super fast, thanks to its Starter Templates collection. They’ve got over 100 free templates in their library that anyone using the Astra theme can use. If you go for the Essential or Growth Bundle, you get an extra 120+ premium templates.
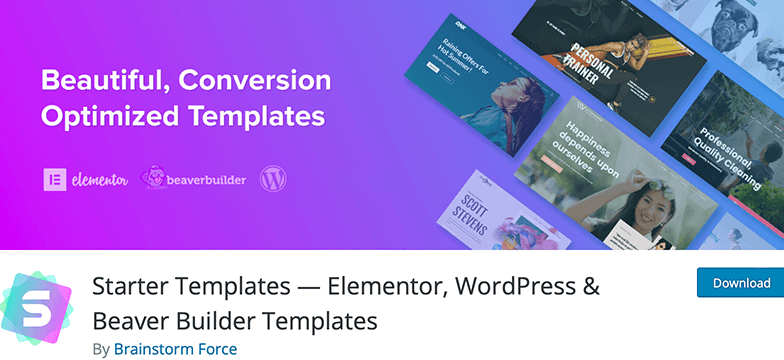
Imagine starting a project with a whole team already there to help you out. That’s what Astra does with these templates. The Astra team made these ready-to-use templates, so you don’t have to start everything from the beginning.
These Starter Templates are like fully designed websites you can import using Astra’s free plugin. For the premium ones, you’d need the Premium Starter Templates plugin, which you can get from the Brainstorm Force Store.
When you import a whole template, it brings everything you need – plugins and dummy content. This means you don’t have to worry about extra plugins to make the templates look just like the ones in the Starter Templates library. You can also import just single pages or ready-made blocks if you want.
Once your template is in, all you have to do is replace the dummy content with your own, and you’re good to go. Plus, you can change things around in the template designs however you like. Astra’s Starter Templates are like a shortcut to making a great website without the stress of starting from scratch!
Install Astra Templates Plugins
First of all, you need to log in to your WordPress dashboard. After that, navigate to the Plugins section and click on the Add New button.
Now, type the ‘Starter Templates’ plugin in the search field at the very top right-hand side of your dashboard. After you’ve found the plugin, click on the Install button.
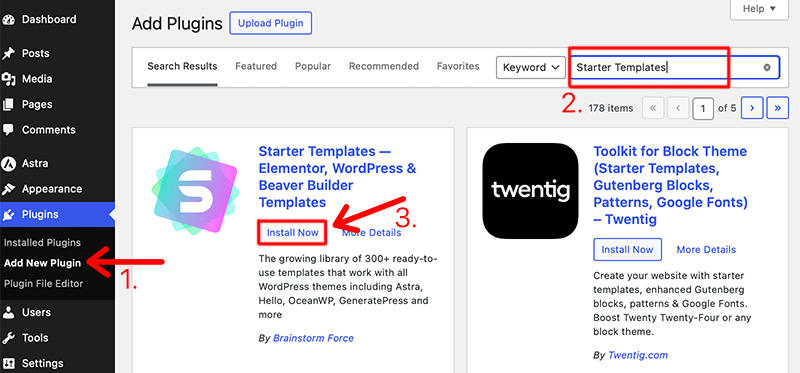
Once the installation is completed, you’ll need to click on the Activate button as shown above. After activating it, you’ll see a new submenu on the Appearance menu named Starter Templates. Just click on it to see the available options.
That’s it! This is how you can easily install the Astra Starter Templates plugin. Isn’t it easy?
Import Complete Site from Starter Templates
You can begin importing Starter Templates as soon as the plugin is installed and activated.
Step 1: Select Page Builder
Navigate to Appearance > Starter Templates from your WordPress dashboard. After that, it’ll ask you to select your preferred page builder – Block Editor, Elementor, or Beaver Builder. Then, it’ll pop up the website templates library and styling options to choose from.
For instance, we’ve selected Elementor Page Builder for this article.

Step 2: Preview and Choose the Template
In this step, you’ll browse and choose the desired template from the Library for your selected page builder.
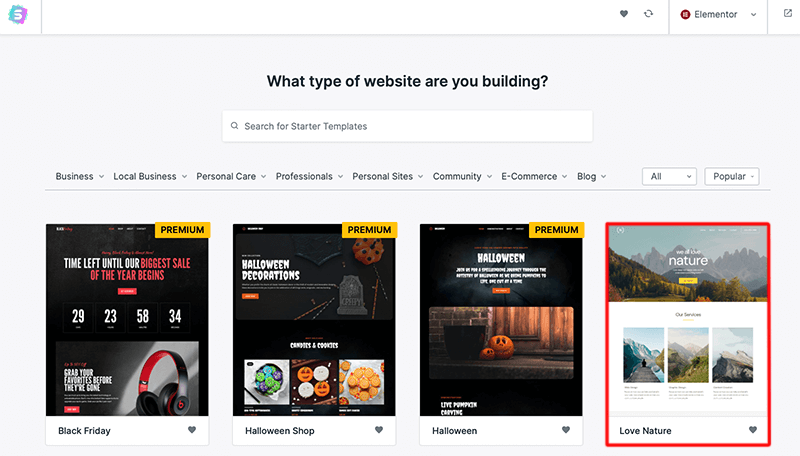
Once you’ve found the template you like, click on it to preview your template. Following that, it’ll redirect you to customize several pages with styling settings like logo, colors, and typography.
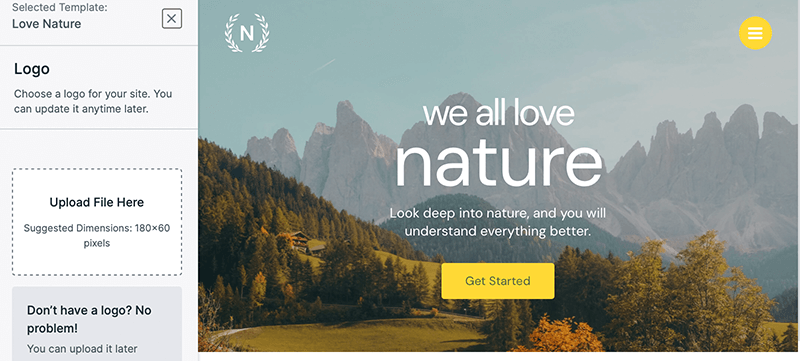
As long as you use the live preview on the right side, make sure you preview the full template. Simply click on any page in the menu, just as you would on an actual website.
Step 3: Add Logo
Firstly, add your logo to see how it would look with the selected template – click on the Click to Upload button.
For instance, we’ve added the new logo to our template and have also changed the width of the logo as shown in the image below.
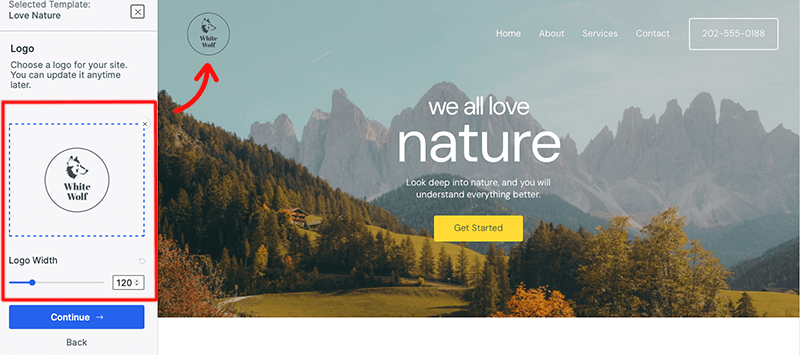
Meanwhile, you can also try different variations of your logo to find which one fits the best. Once you’ve added the logo, click on the Continue button to save the changes.
If your logo isn’t ready, you shouldn’t worry. Simply select Skip & Continue from the menu below. This will apply the template’s default logo, which you may afterward change.
Step 4: Select Color Palette and Fonts
The next option is to choose from one of the ready-made global palettes. Any premade palette you choose will cause the template preview to adjust in color. You can also stick with the built-in color scheme.
As per your requirement, you can change the color palette of your template from the default color.
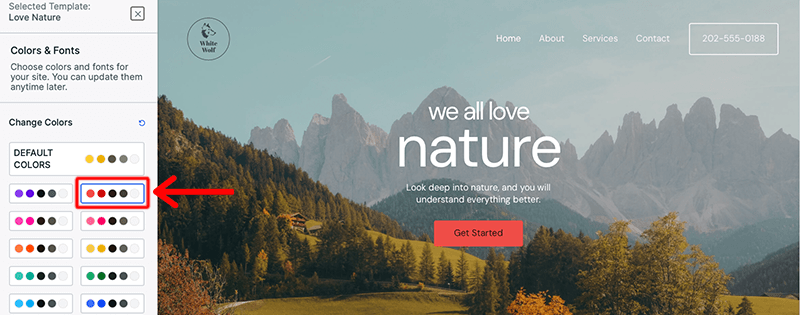
Lastly, you could play with various font styles by choosing one of the available typography presets. The template preview’s text will adjust in style accordingly.
Choose the color scheme and font style you want to use, then click on the Continue button.
Step 5: Import a Complete Site Template
After you go through the template preview and settings, you’ll come to the importing page. Here, you’ll make sure that you take care of all the issues and requirements before you start imprinting the site template.
Make sure to provide a little bit of information about yourself and either enable and disable the options before you start building your website.
Following that, click on the Submit & Build My Website button to initiate the import process. However, you make sure that you don’t close the window until the template import process is finished.
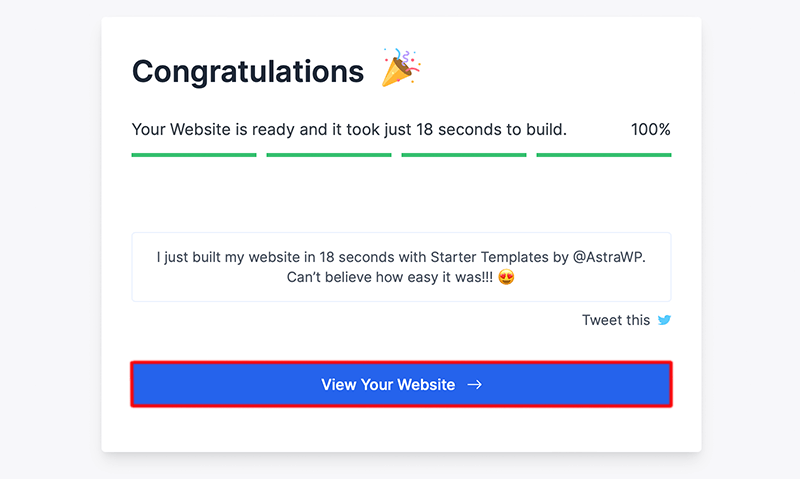
Once the import process is completed, you can click the View Your Website button.
That’s it! In these 5 easy-to-follow steps, you’ll be completely able to import the Astra starter template and build your website within less than 18 seconds. Finally, your starter site would look like this as in the image below:
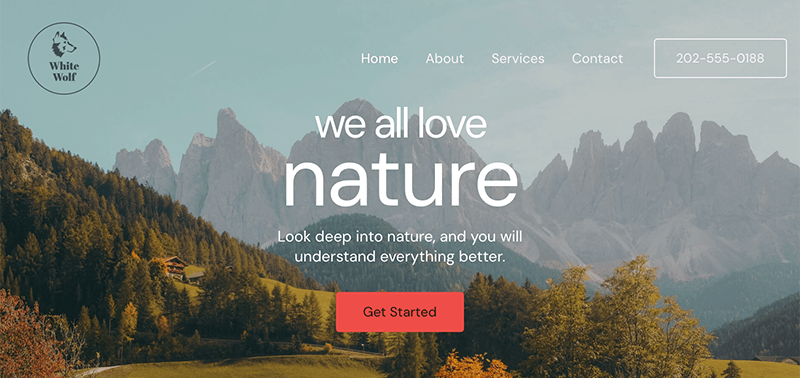
Next into the Astra theme review, let’s look at how we can customize our Astra WordPress theme.
E. How to Customize Astra WordPress Theme?
So with the purchase of an Astra Pro plan and having access to all its features, it’s time to look more into it. In this section of the Astra WordPress theme review, let’s look at how easy it is to work with Astra.
For now, let’s start with how we can easily customize Astra WordPress themes.
I. Header and Footer Builder
Being the first and last sections of your website, the header and footer are important. On your website, the header appears first to visitors, while the footer often appears last.
With the header builder, you can make a cool header for the top of your website. You get to add things like buttons, social media buttons, menus, widgets, plain text, and more to make it look awesome.
And guess what? You can do the same for your website’s footer using a drag-and-drop interface, just like with the header builder. It’s all about making your website look great with easy tools!
a. Header Builder
To build your header section, navigate to Appearance > Customize > Header Builder.
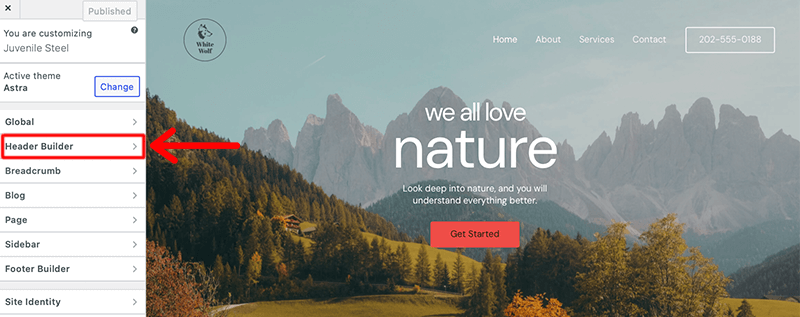
As you can see in our header section, we’ve got a logo, a primary menu, and a button. Now you can individually customize them as per your needs.
Earlier we’ve already added a logo to the template so let’s customize the button.

Under the General section of the Button option, you can add text and link to that button. Also, you can enable that link to open in a new window.
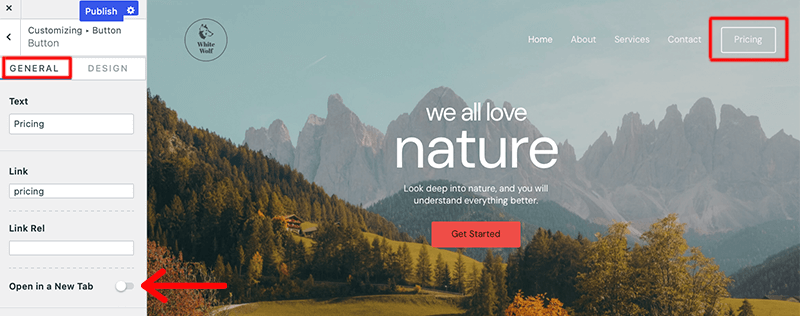
Likewise, you can change the font and color of the button by clicking on the Design option.
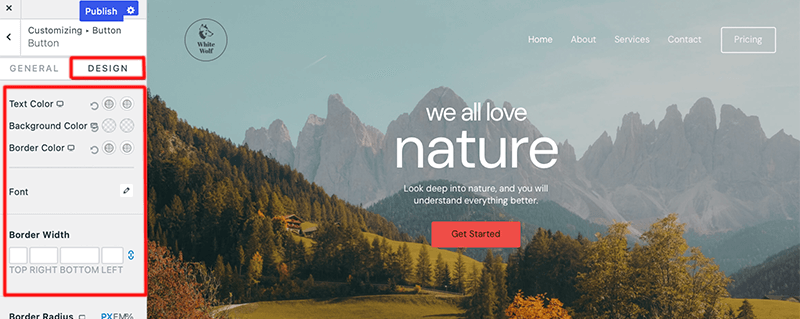
For instance, you can change the text color of the button. In fact, you can also customize the border radius, width, padding, and margin of the button.
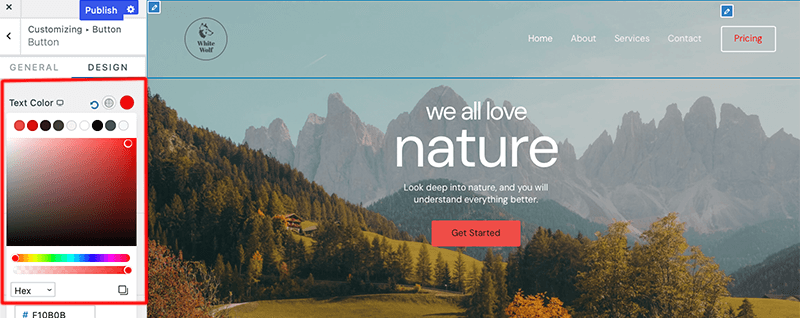
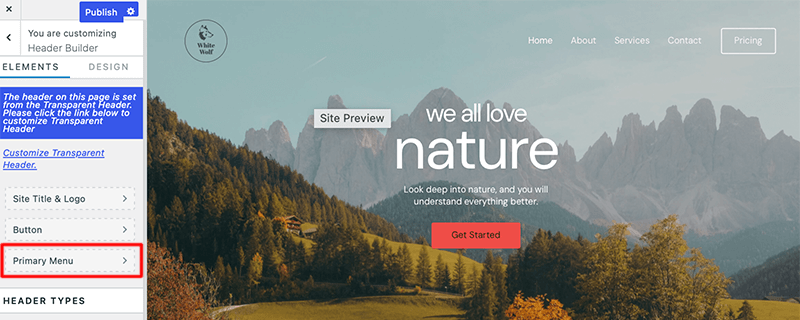
Similarly, in the same manner, you can customize the primary menu of the header section.
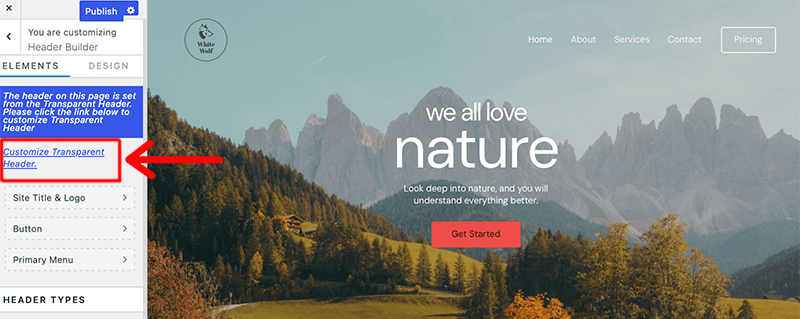
As we move back to the Header Builder, since our header is the part of the transparent header, we can customize it too. For that, click on the Customize Transparent Header link.
b. Footer Builder
In the same way, for building your footer with Footer Builder. To build your footer section, navigate to Appearance > Customize > Footer Builder.
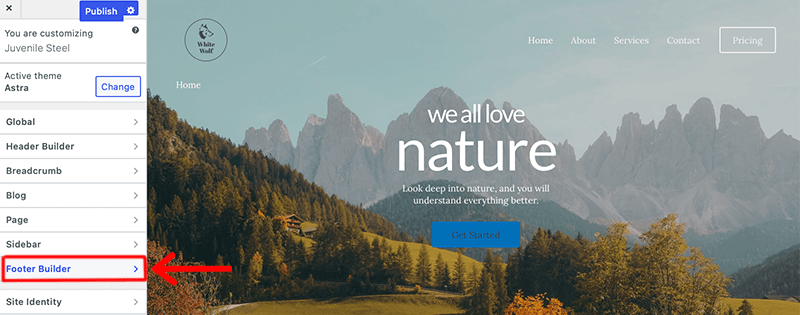
Inside the Footer Builder, you’ll find the list of elements present in your footer displayed at the left sidebar. You’ll find that we’ll have Copyright, Footer Menu, and HTML 1(i.e. logo).
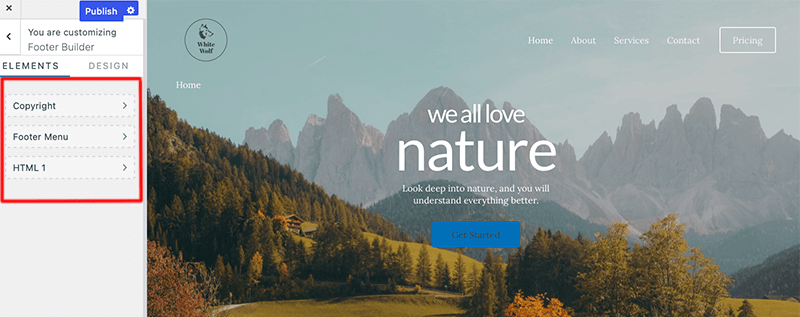
Following that, you can individually customize those elements or remove and add another element in place of that.
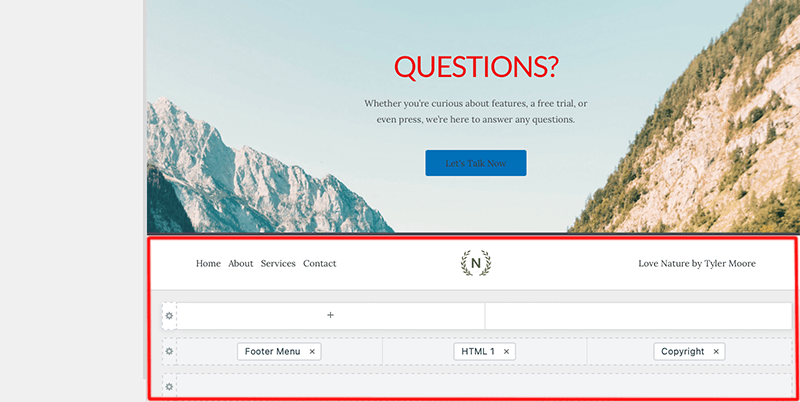
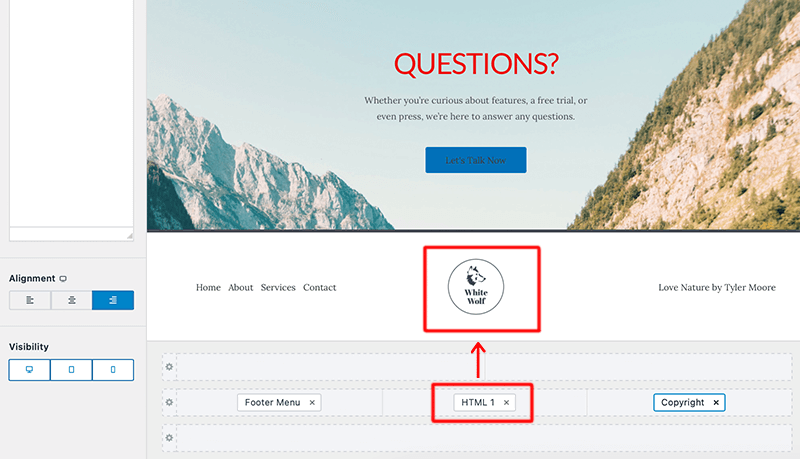
For instance, let’s customize the HTML 1 element. To customize it, click on that element and it’ll open a respective customize tool for that element.
In this case, our HTML 1 consists of an image which is the logo. Thus, we can replace that demo logo with our own logo or brand asset.
Similarly, you can change the copyright statement with your own one too. Just you need to click on the Copyright tab and then you can start to change it into your own.

While designing your header and footer, check whether they’re responsive by switching the viewport (desktop, tablet, and mobile). Hence, make sure to use different elements, and modify, and position them differently for each viewport.
At last, click on the Publish button to save changes. Once you’ve created your header and footer, you can start adding content to your pages and posts.
II. Add Breadcrumbs in WordPress Site
Astra is a popular theme for WordPress, and it comes with its built-in breadcrumb feature. To enable breadcrumbs you just need to navigate to Appearance > Customize > Breadcrumb.
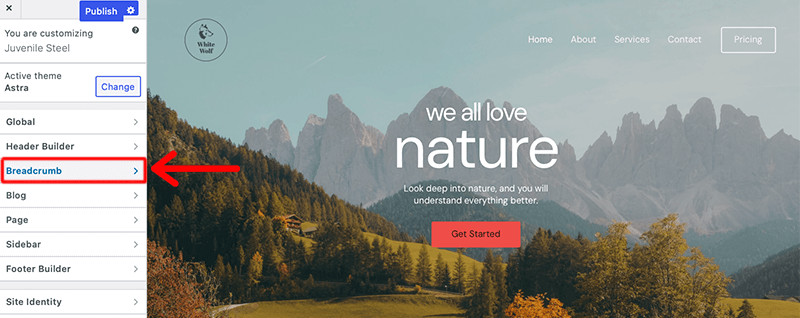
Once you’ve clicked into that, the first thing it’ll ask is to decide whether you’d want to place your breadcrumb in the Header section. You can place it either Inside, After, or Before Title in the header section.
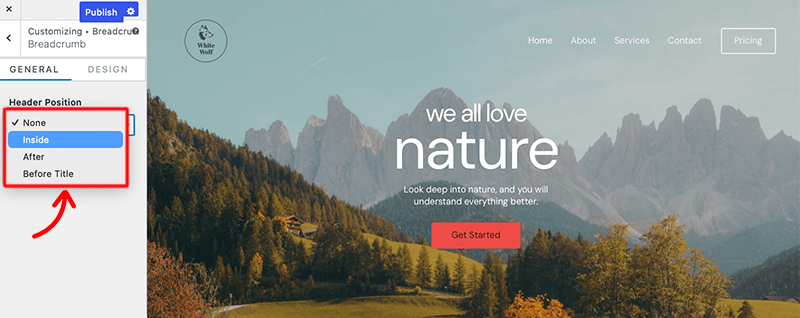
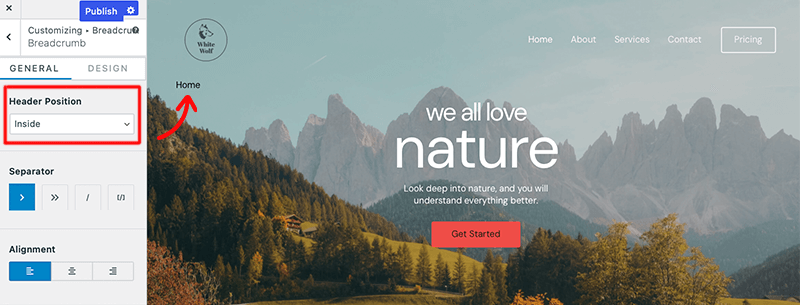
After that, you’ll find the following settings for Breadcrumbs.
- Separator – Set custom separators between breadcrumb links.
- Alignment – Select the alignment to display your breadcrumb
- Display Settings – Displays a list of pages and posts where you can disable breadcrumbs. These include categories, archive pages, 404 pages, etc.
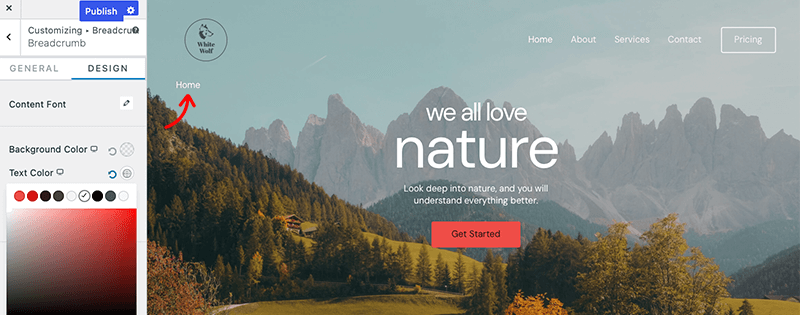
Similarly, by default, breadcrumbs will utilize the theme’s font and color scheme. However, if you want to highlight them with different colors and typography, navigate to – Customize > Breadcrumb > Design.
For instance, we’ve changed the text color from Black → White for the breadcrumb in the image below.
III. Global Color Palette
The Global Color Palette is like a special tool in Astra that helps you pick and control colors for your whole website. You can set up one or more color palettes, making it easy to manage colors from one spot.
If you want to change the colors for your whole website, you can do it in a snap by just switching to a different color palette. It’s a quick and simple way to make your site look exactly how you want it.
You can find the settings under Appearance > Customize > Global > Colors.
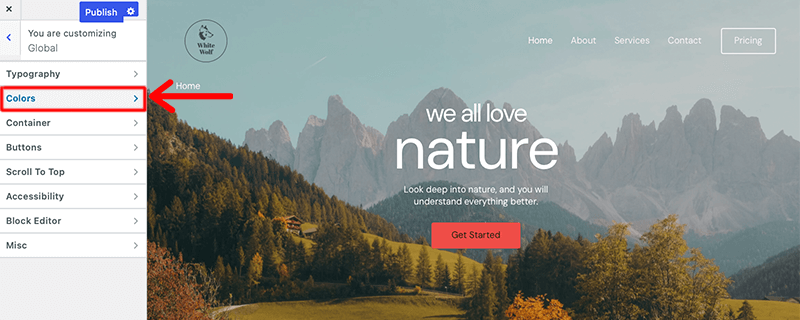
After that, you’ll discover that three palettes are accessible, with a total of nine colors in each palette. The palettes all share a connection with these colors. This means that colors in the palettes that are currently active will be replaced with their corresponding colors when you switch between them.
Now, click on one of the three available palettes to start editing. Then, it’ll display the available color slots.
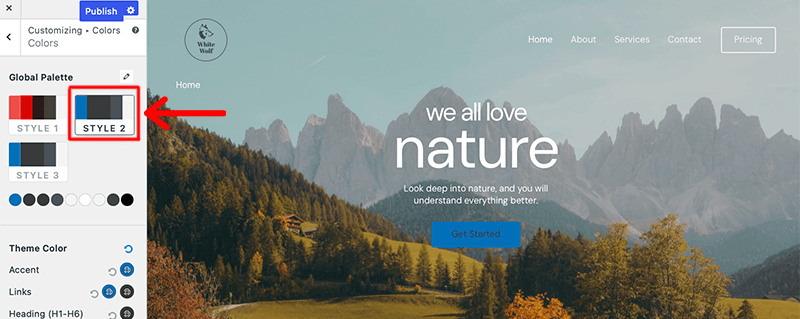
Next, it lets you set each of these colors by clicking on the color slot. Then, choose the color you want to apply to this slot. Similarly, you can set all other colors for your website.
Furthermore, you can customize the color palette for even headings, borders, links, and more.
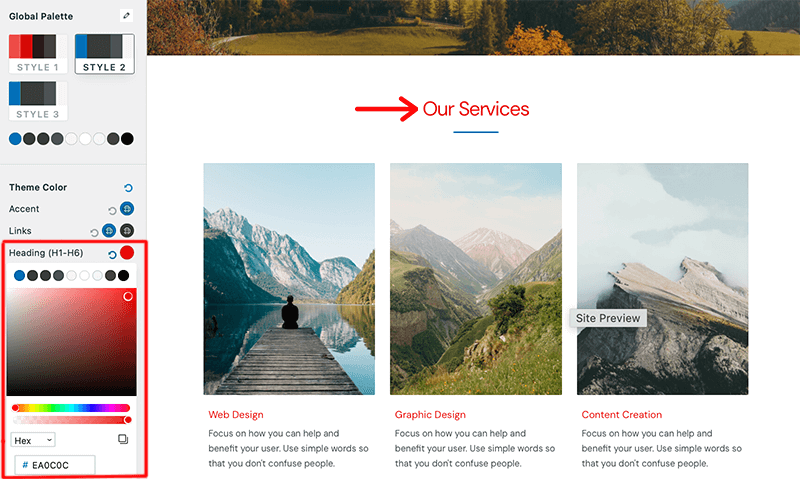
Lastly, click on the Publish button to save changes.
IV. Typography Presets
With presets, you can get an excellent range of font families bundled with additional font attributes. Additionally, whatever preset you apply will change all of the text on your page to reflect its style.
Each typography preset includes these font properties – font family, weight, size, line height, and text transform.
Here are the steps on how to use typography presets in Astra theme.
Step 1 – Navigate to Appearance > Customize > Global > Typography.
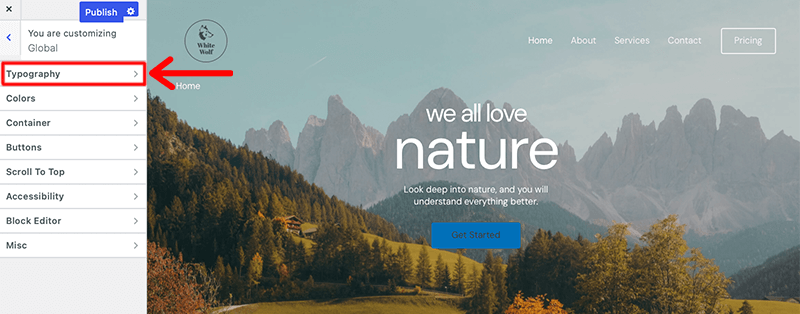
Step 2 – From there, select the desired preset. As you select the preset, keep in mind that it’ll be applied to all typography settings in both your content and Customizer options.
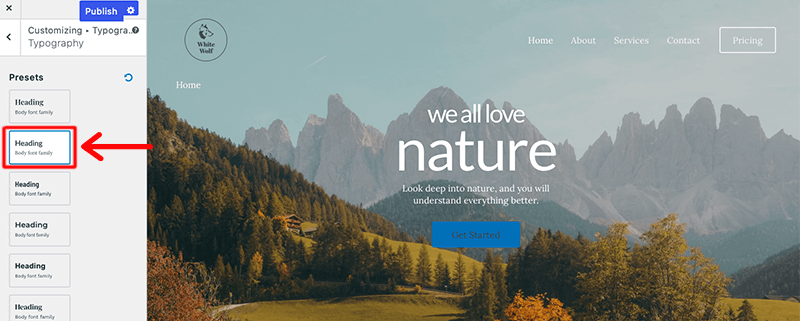
Step 3 – After that, you can also modify and change the font for each individual headings too. For instance, in the image below, we’ve changed the font of the heading 2.
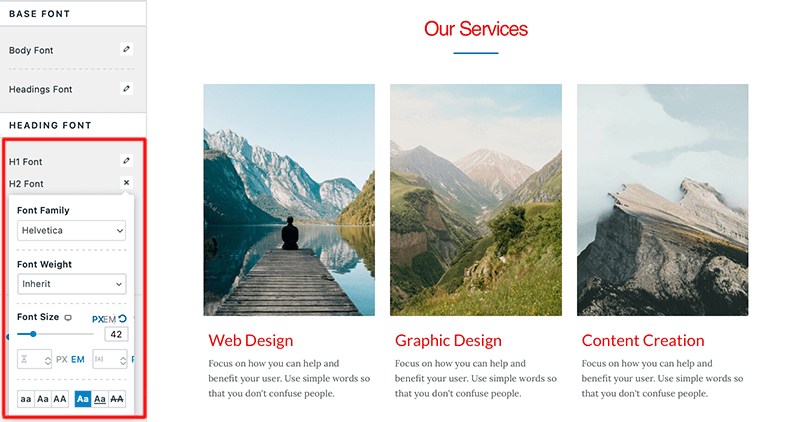
Step 4 – Lastly, click on the Publish button to save the changes.
Likewise, if you want to revert the typography settings to your default settings (before using presets), you can click on the Reset button.
V. Homepage Settings
In the Homepage settings, you can choose what page you would like to display as your homepage for your website. You can either display a list of posts in the order they were published (like a classic blog) or a fixed/static page.
However, to have a static homepage, you first need to create two different pages. So, one will act as your main homepage, while the other will be where your posts will be displayed.
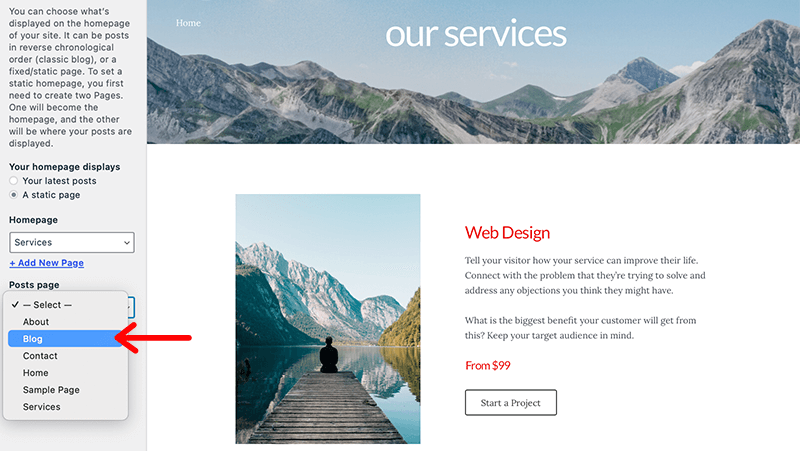
To customize homepage settings you just need to navigate to Appearance > Customize > Homepage Settings.
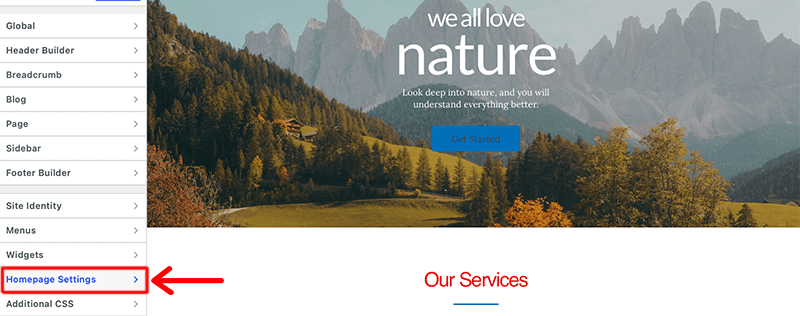
By default, you’ll have a static page as your homepage. Within that also, Home will be set as your main homepage.
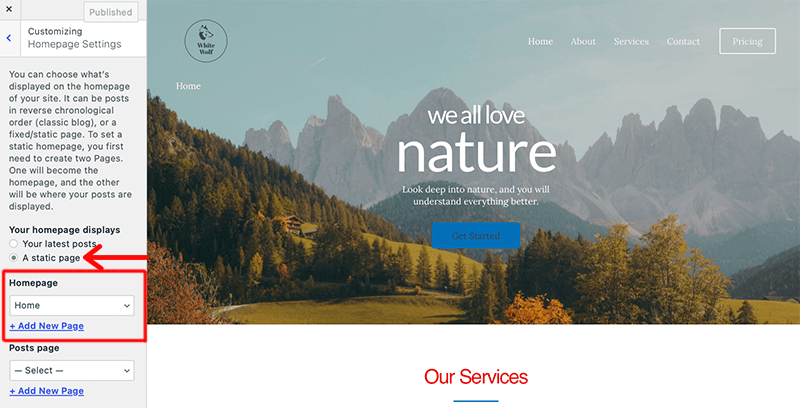
Likewise, if you want to change the homepage to something else, then click on the Homepage drop-down menu select your next homepage. For instance, now we’ve set the Services page as our new homepage.
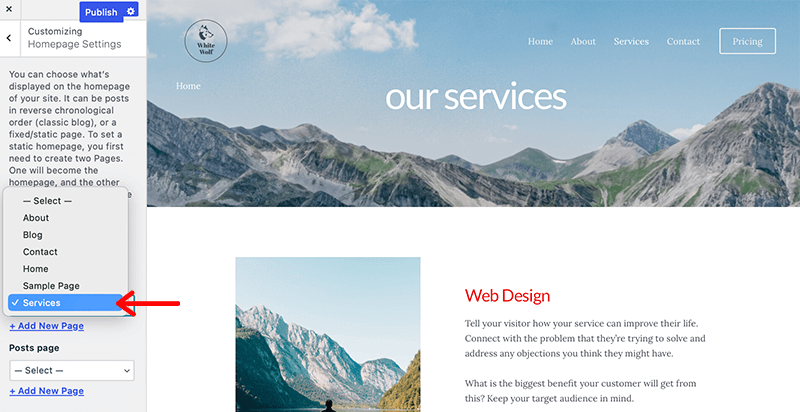
However, we think that the homepage should be something that visitors would want to see as soon as they land into your website. Hence, it’ll be better if you keep Home as your default homepage for now.
After that, make sure to choose your post page where you want to display your content.
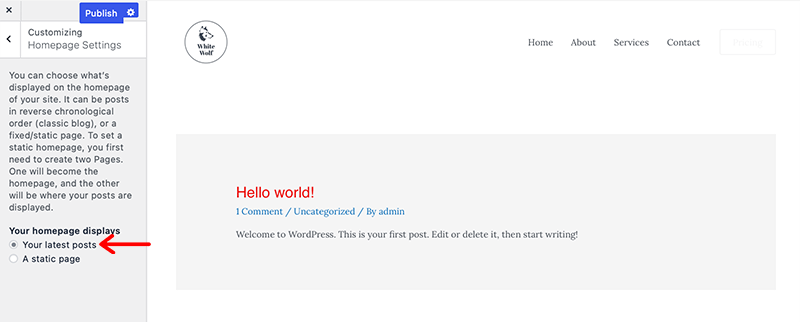
No, if you don’t want a static page but instead you want your latest page as your homepage, then enable the Your Latest Posts option. In this way, your visitor will directly introduce you to your latest post as soon as they land on your website.
These are a few of the significant customization that Astra allows for. But you can’t just import an appropriate Astra demo if you don’t want to get involved in the chaos.
Having said that, let’s move to the next section of this Astra WordPress theme review.
F. Adding Power With Spectra
Spectra is a powerful Gutenberg block formerly known as Ultimate Addons for Gutenberg. It’s developed by Brainstorm Force, the same team behind popular plugins like Astra, Schema Pro, and Ultimate Addons for Elementor.
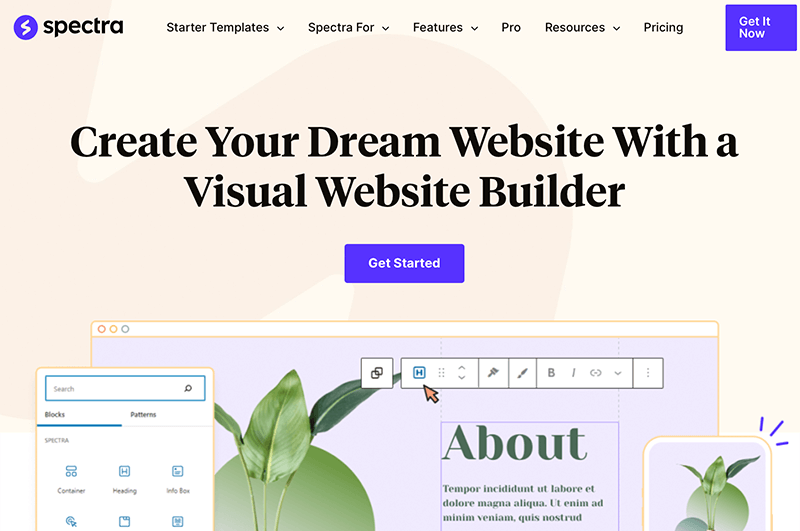
It comes with an extensive block library that enables users to create engaging layouts and captivating content effortlessly.
Besides that, it offers an easy-to-use interface, customization options, and a library of pre-built Starter Templates to help you build awesome websites in minutes. The best thing about this versatile toolkit is that it eliminates the need to install multiple plugins for various functionalities.
Hence, it’s an all-in-one solution for building websites that effortlessly create professional websites tailored to your unique requirements.
But first, let’s start with installing and activating the Spectra Gutenberg Blocks to work properly with your Gutenberg editor.
Spectra Key Features
Let’s take a look at some of the cool features of Spectra.
- 28 Creative and Unique Blocks – Get a plethora of creative page building blocks and several options to design stunning websites quickly.
- Flexible Containers – Get easy-to-use layouts that make it simple to build and design websites of any kind for any niche.
- Complete Design Control – Full control over how you want your website to look by customizing every aspect.
- Dynamic Content – Build content-driven websites with ease and make use of dynamic data such as featured images, post authors, etc
- Animations – Add a touch of life and interactivity to your website with Spectra’s wide range of animations.
Install Spectra from WordPress Astra Dashboard
Did you know that you can directly install Spectra from the Astra dashboard? If not, then don’t worry, we’re here for you.
As soon as you install the Astra theme to your WordPress dashboard. You’ll notice the Astra menu appearing in the sidebar of your WordPress dashboard.
Then, navigate to Astra > Dashboard, this will take you to the official Astra Dashboard in your WordPress dashboard.
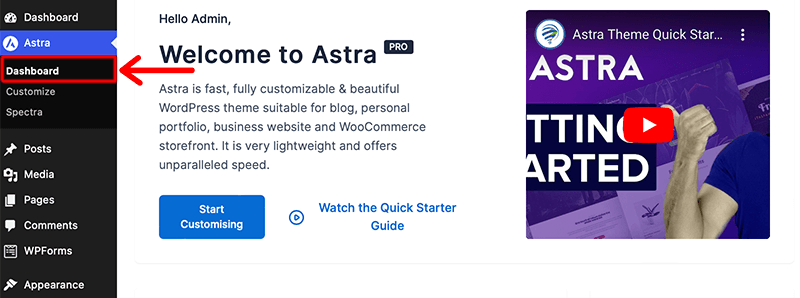
After that, in the Useful Plugins section of your Astra dashboard, you’ll find the Spectra plugin among the other plugins. Now, you need to simply click on the Install button next to it.
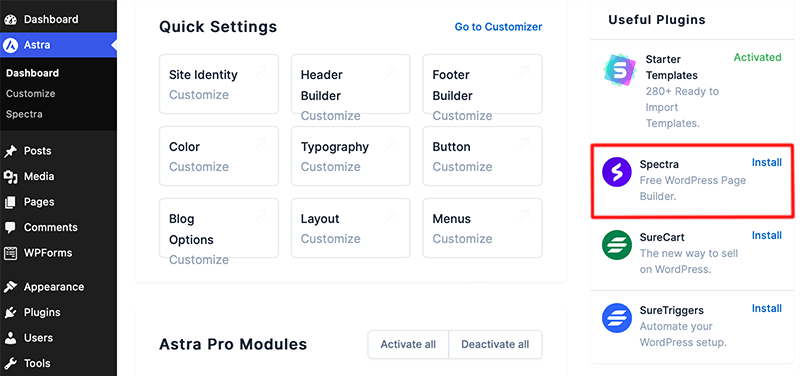
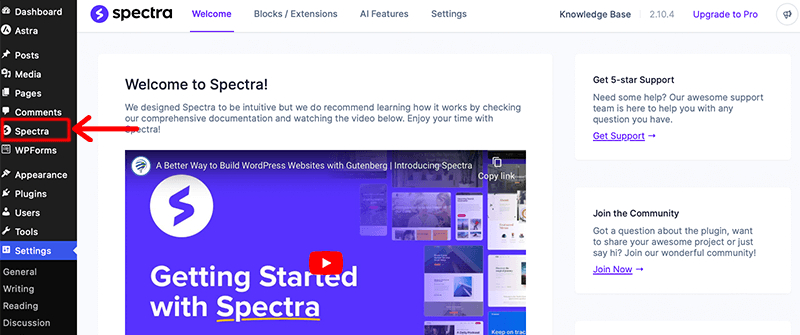
Once the plugin is completely installed and activated, it’ll redirect you to the Spectra Dashboard. Also, you’ll find the Spectra menu appearing in the sidebar of your WordPress dashboard.
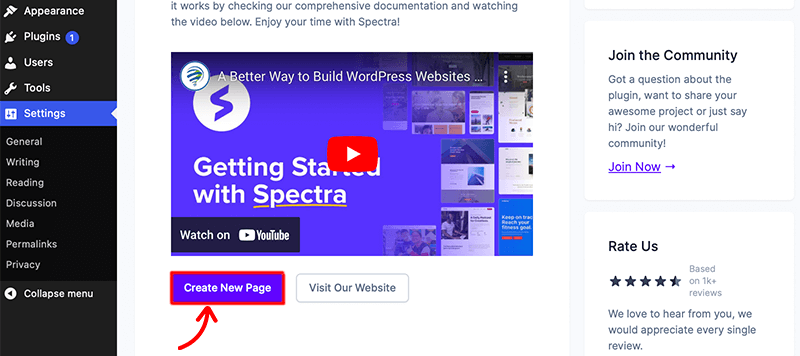
Now to get started with Spectra, click on the Create New Page button from the Spectra dashboard. Then, it’ll redirect you to the WordPress Gutenberg editor.
Get Started with Spectra WordPress Gutenberg Blocks
Once you’ve been redirected to the WordPress Gutenberg editor, to add blocks click on the “+” icon from the top left-hand side menu bar.
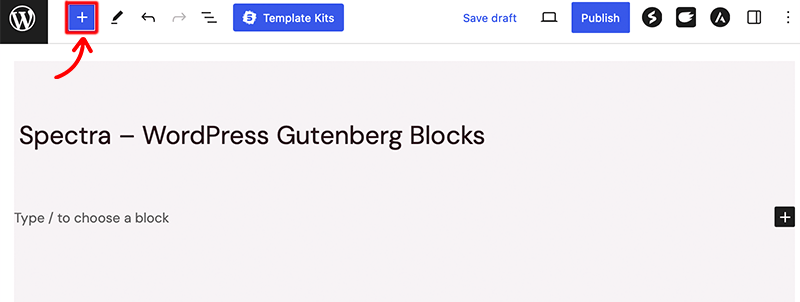
After that, it’ll drop down a library full of blocks, patterns, and media. Among them, under the Blocks sections, you’ll find the list of Spectra Blocks at the very beginning.
Now from here, you can choose the block you want to add to your website and drop it in the WordPress editor.
i. Add Container Block
To add this block, simply click on the Container Block and it’ll be directly added to your editor.
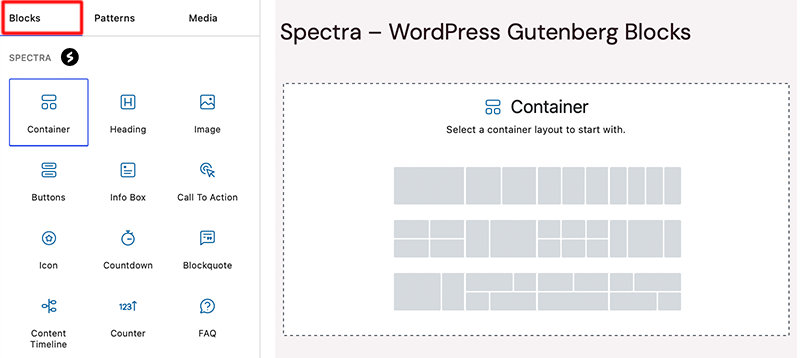
After that, it’ll ask you to choose the layout for your container. Your container can have more than one flexbox representing one element block in each.
For instance, we’ve selected a container with two flexboxes in it.
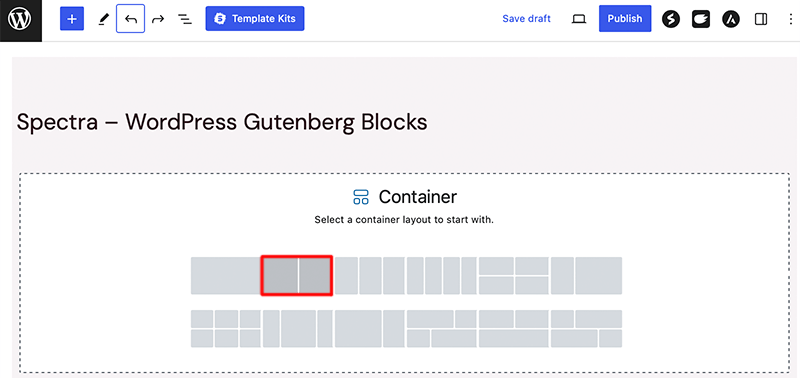
Now, you’ll notice that it has beautifully created layouts with 2 flexbox-powered container blocks.
Besides that, you’ll find 3 customization options on the right sidebar, General, Style, and Advanced.
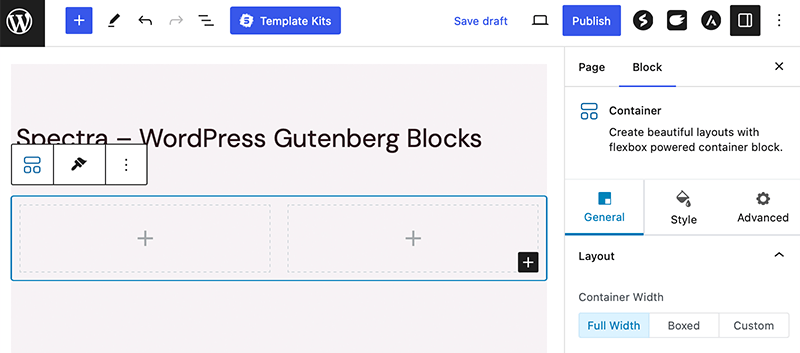
To add a block to those boxes, click on the “+” icon inside the box. Select the block that you want to add to that container.
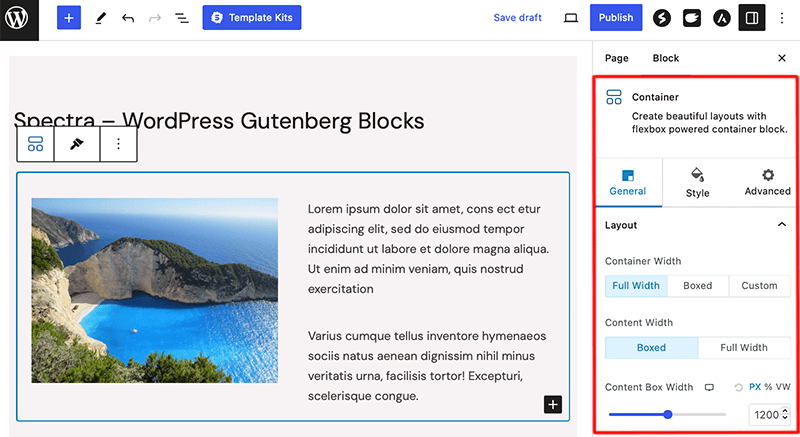
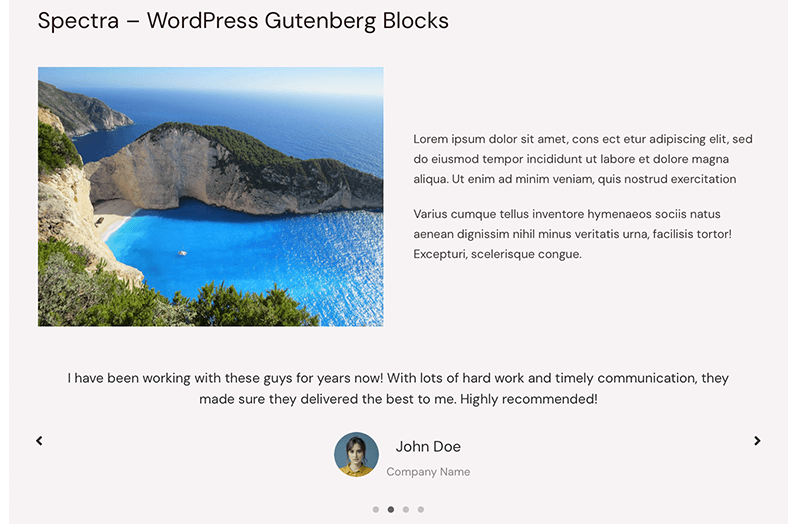
For instance, we’ve added an image on the left flexbox and paragraphs on the right flexbox of the container. Following that, you can customize each element of that block from the left sidebar.
ii. Add Testimonial Block
Next, we’ll be adding the Testimonial block. Simply click on the Testimonial block and it’ll be added to your page.
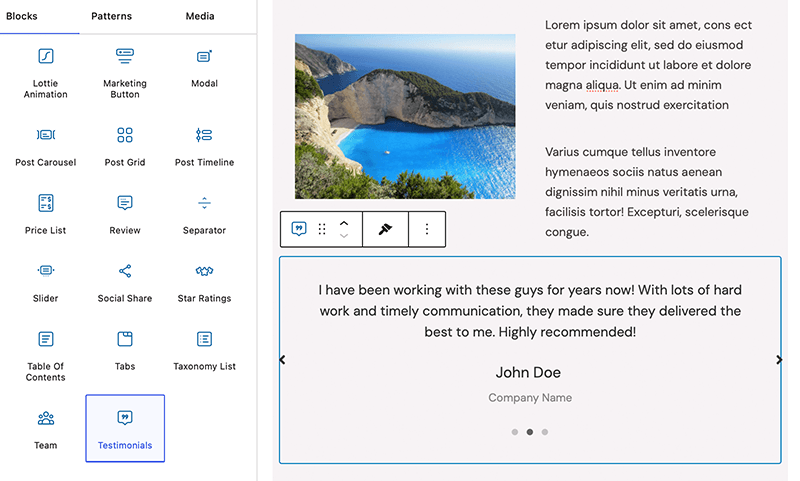
After adding the block, you’ll find that by default, it has three testimonials in that block. Now, if you want to add more than 3 testimonials, then head over to the settings of that block in the sidebar.
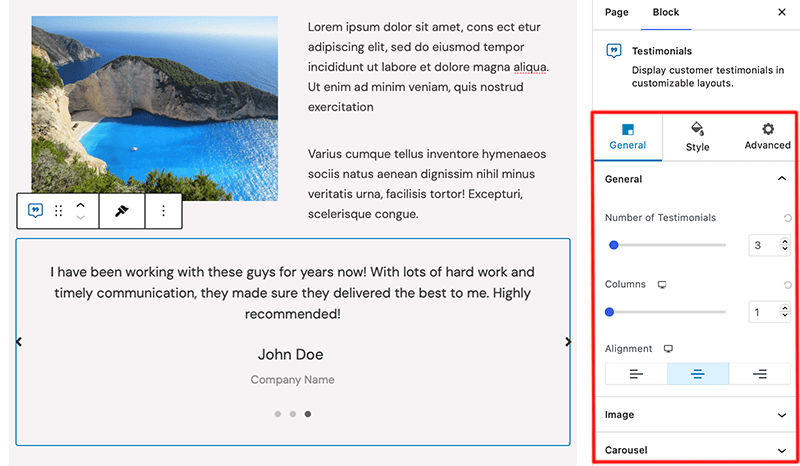
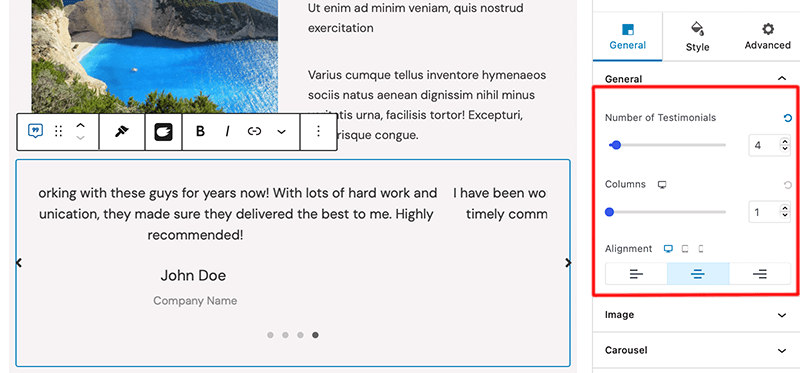
Under the General tab, you’ll find the “Numbers of Testimonials” option where you can add the number of testimonials you want to add.
Similarly, you can also set the number of columns to be displayed in each testimonial too. Besides that, you can also arrange the alignment for the testimonial.
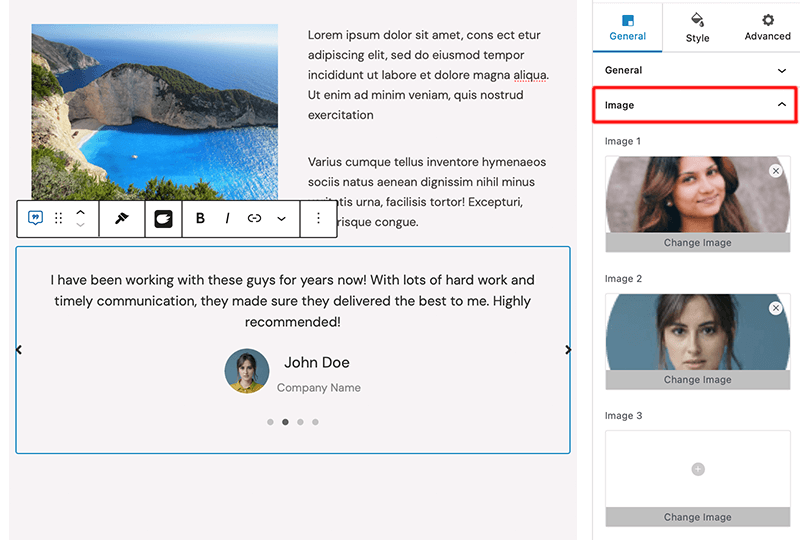
Further, you can add images to each testimonial too. For that, click on the Image section and it’ll drop down a field to add images for each testimonial.
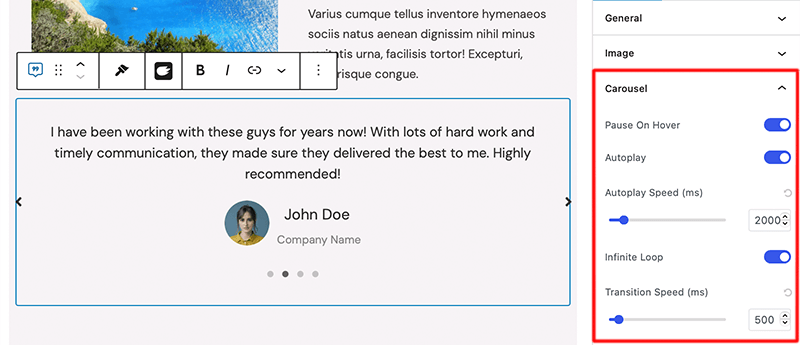
Now, besides adding images and columns, you can even customize the carousel setting for that block. Under the Carousel section, you’ll find numerous setting options such as autoplay, infinite loop, transition speed, and more.
iii. Add Form
Next, we’ll add a form block that will allow you to display conversion-friendly contact forms for various purposes.
Once you’ve added the Form block to the page, it’ll first ask you what type of block you want to add to your webpage. You can choose between Simple Contact Form, Newsletter Form, and Suggestion Form.
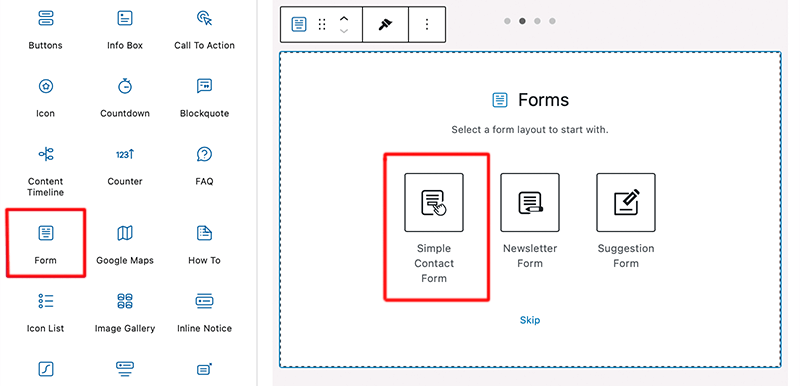
For now, we’ll simply add a simple contact form to our website. Once you’ve clicked on that, it’ll automatically display a well-structured contact form on your page.
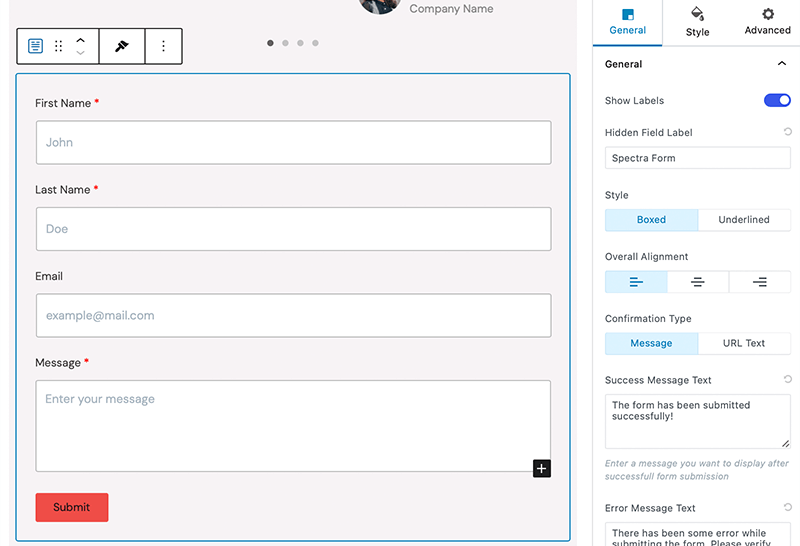
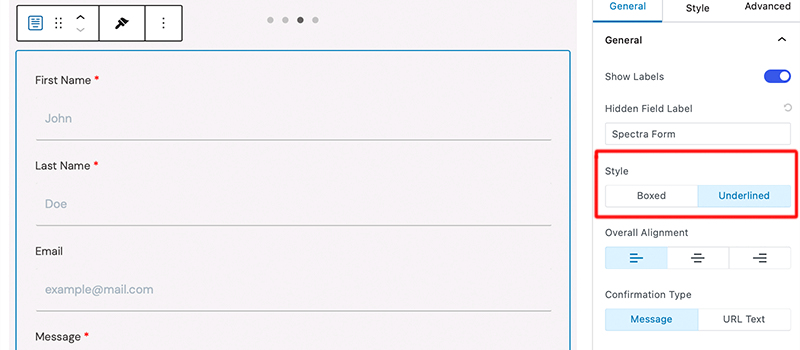
Following that, you’ll find many settings options that you customize according to your needs. For example, you can choose the style for your field – Boxed or Underlined.
Meanwhile, you can also create a Successful Message Text and Error Message Text to notify your users about their form submission.

Moreover, you can go through its settings and change the background color, title size, fonts, etc.
Once you’re done with your settings, this is how your page will look something like this on a live site.
G. Astra WordPress Theme Pricing
Astra comes in two versions: free and premium. The free one is pretty strong, offering over 100 templates and letting you control your site’s look using the header footer builder.
If you want more cool options, there’s Astra Pro. It’s $49 a year or a lifetime license for $199 for one website.
Meanwhile, the pricing plan varies based on the number of websites. For instance, it costs $59 a year or a lifetime license for $279 for ten websites.
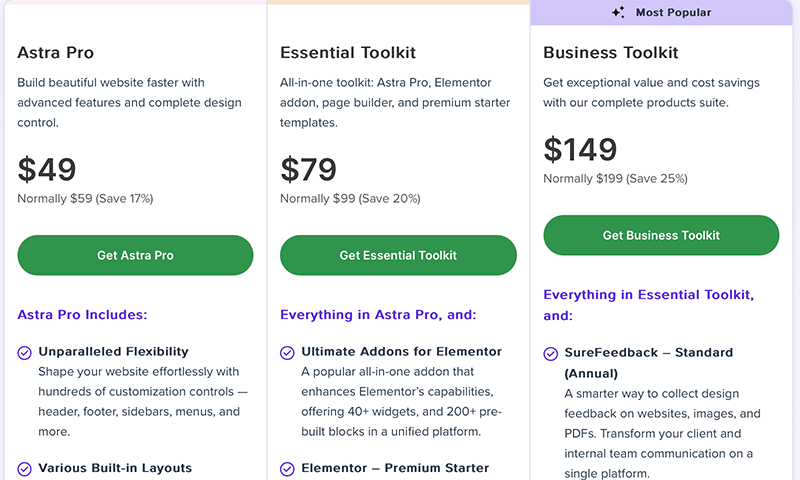
Astra Pro lets you create custom layouts for headers, footers, and 404 pages. It adds neat things like sticky headers and mega menus. But, if you’re eyeing those fancy premium starter sites, you’ll need the Essential Bundle, starting at $79 per year.
The good news is that Astra has a refund policy. If you’re unhappy or face issues within the first 14 days, they’ll give you a full refund.
So, Astra gives you options, a strong free version, and advanced features with Astra Pro, and even a chance to get your money back if things don’t click within the first two weeks.
Astra Free vs Pro Comparison
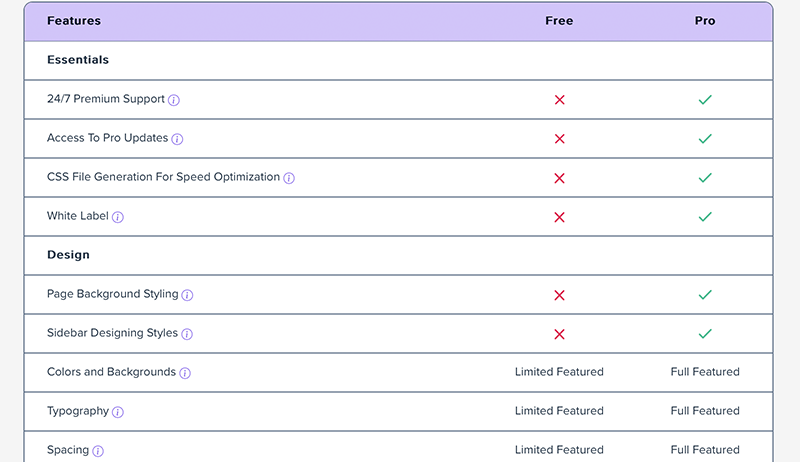
Astra is completely free, both now and in the future. However, a reasonably priced premium version of the theme is available if you’d like to access exclusive extra features, and it includes elements like –
- Get over 800+ Google fonts to make sure you use the best typography that stands out on your website.
- With Astra Pro you can manage any area’s colors and the background on your website. It gives you complete control to manage every section carefully.
- You get a variety of headers you can choose from. It allows you to add a header above and below the primary header, or make it transparent or sticky as per your needs.
- With the white label feature, you can take complete credit for building and designing a website.
- Allows you to create interactive mega menus that are user-friendly and attractive.
- You can manage spacing within layouts and modules to create a beautiful and readable website.
So, if you need a little extra, investing in Astra Pro might be the right choice for you.
Who Should Get the Astra Pro Version and Why?
If you’re looking to take your website to the next level, the Astra Pro WordPress theme version is perfect for you. Astra Pro is ideal for business owners, bloggers, or anyone wanting more advanced features and customization options.
With Astra Pro, you gain access to premium features, allowing you to create a website that perfectly matches your vision. For those focused on eCommerce, the Pro version seamlessly integrates with WooCommerce, providing enhanced tools for crafting a professional online store.
In summary, Astra Pro is a wise investment for individuals and businesses seeking to elevate their online presence. Whether you’re a developer or a beginner, the enhanced features and dedicated support of Astra Pro empower you to build feature-rich websites with ease.
H. Astra WordPress Theme Support
Getting help when you’re building your website is super important, especially if you’re just starting. With Astra, you can create your whole site without complicated code.
However, sometimes things might get a bit confusing, or you could face some technical hiccups. That’s where support comes in handy.
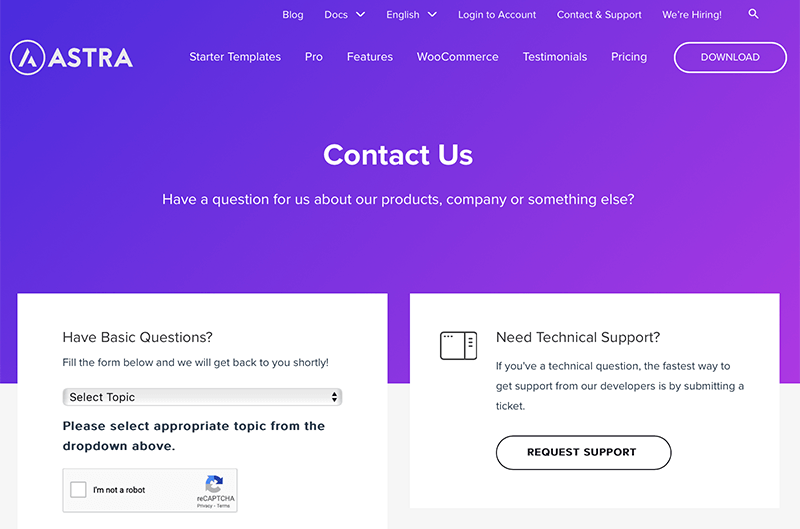
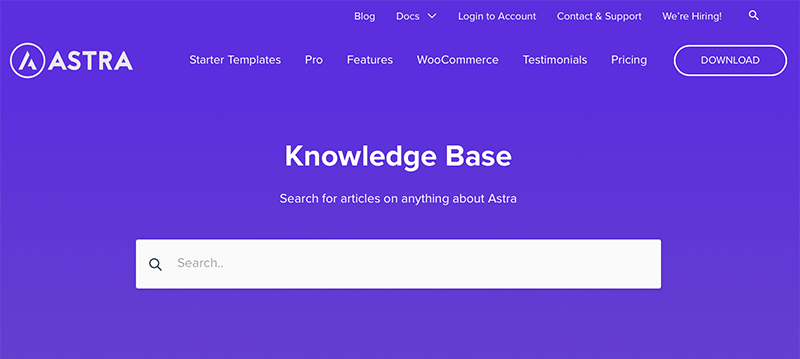
Astra has different ways to help you out. The easiest is to go to their support page and type in your question. They’ve got a knowledge base with over 300 articles that might have the answers you need.
If you still need help, you can send them a ticket. This is available for both free and paid users, but if you’re a paid user, you get extra premium support. After you send your questions through a ticket, the support team will get back to you with a solution. It might take a bit longer on weekends, but they’ll definitely get back to you.
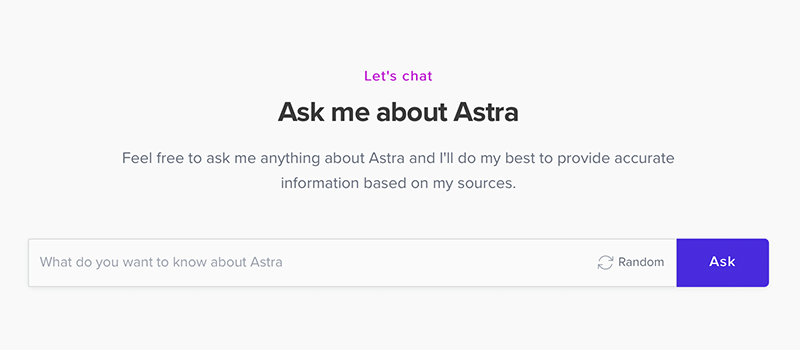
And there’s more help! You can find lots of video tutorials on YouTube. Just search for what you need, and you’ll find step-by-step guides from the Astra team and other folks who use it.
So, even if you’re a bit stuck, Astra’s got your back with different ways to make sure you get the help you need.
I. Astra WordPress Theme Alternatives
By far, we’ve already come to know that Astra has everything that you need to build your website. It’s best known for providing stunning yet responsive themes for WordPress.
However, along the way, besides Astra, other options provide excellent WordPress themes and templates. It’s always a good idea to look for other alternatives to that same product that can fit your needs better.
Therefore, without wasting any time, let’s look at some of the best alternatives to the Astra WordPress theme. Let’s go!
1. Divi
Divi is a powerful and user-friendly tool that simplifies website design for both beginners and experienced users. Developed by Elegant Themes, it’s known for its intuitive drag-and-drop builder, allowing you to create a visually stunning website without any coding skills.
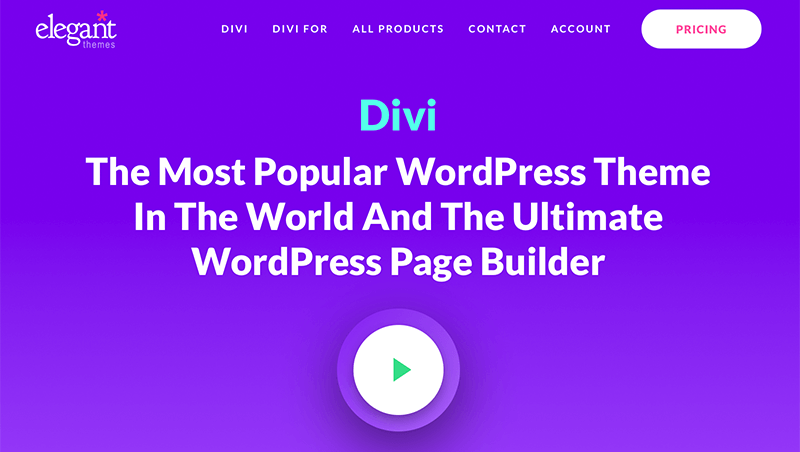
Divi comes with a wide range of pre-made layouts, making it easy to customize your site to suit your unique style or business needs. The theme is responsive, ensuring your website looks great on various devices.
One standout feature is the Divi Builder, which lets you visually construct your pages in real-time, seeing changes instantly. Hence, it’s a popular choice for those seeking a versatile and user-friendly WordPress theme to bring their creative visions to life.
Pricing:
Divi is available in two premium pricing schemes. They are:
- Yearly Access – Costs $67 for unlimited website usage. Comes with hundreds of website packs, product updates, and premium support.
- Lifetime Access – Costs $187 for unlimited website usage. Comes with lifetime updates, support, and more.
2. Blocksy
Blocksy is a WordPress theme designed for simplicity and versatility, making it a great choice for users of all levels. Developed by Creative Themes, Blocksy is known for its modern and lightweight design, ensuring fast loading times for your website.
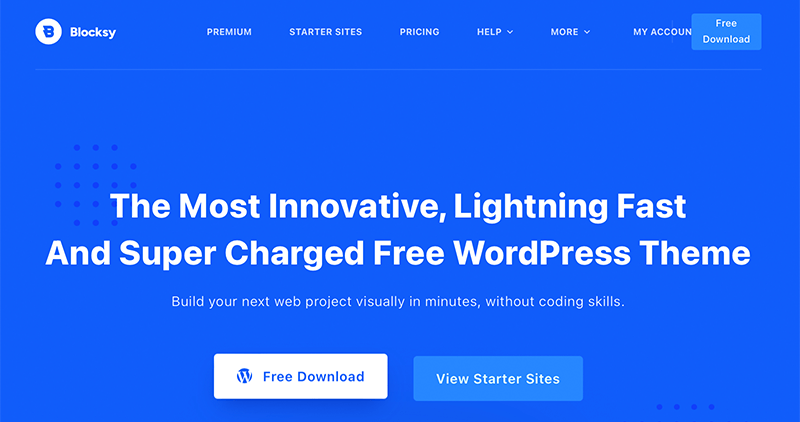
Indeed, it integrates with the WordPress block editor, allowing you to customize your site using the new block-based approach easily. The theme provides a range of customization options, giving you full control over your site’s appearance.
Blocksy is responsive, meaning your website will look great on various devices, and it also supports popular page builders like Elementor. Hence, it’s an excellent choice for those seeking a straightforward yet powerful WordPress theme for creating a visually appealing website.
Pricing:
Blocksy is downloadable from the WordPress.org theme directory like any other free theme. You can even download it from its official site.
Now, the premium version i.e. Blocksy Pro contains 3 pricing plans:
- Personal – $69/year or $149 for lifetime use, and use for 1 website.
- Professional – $99/year, or $299 one-time payment, and usage for 10 sites.
- Agency – $149/year, or $499 for lifetime use, and unlimited site license.
3. GeneratePress
GeneratePress is a user-friendly WordPress theme recognized for its simplicity and speed. It provides a solid foundation for building websites, whether you’re a beginner or an experienced user. It’s known for its lightweight nature, contributing to faster loading times for your website.
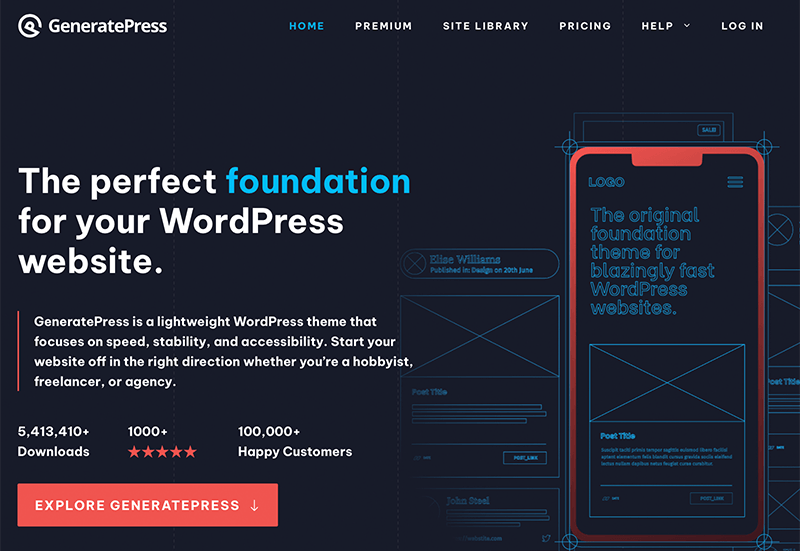
One of its key features is customization flexibility. It allows you to easily tweak the appearance of your site using a variety of customization options. The theme is also compatible with popular page builders like Elementor, providing additional design flexibility.
GeneratePress is responsive, ensuring your site looks good on different devices, and it follows best coding practices. With its simplicity, speed, and versatility, it’s a reliable choice for creating a professional and efficient WordPress website.
Pricing:
GeneratePress is a freemium WordPress theme. So, you can download and install the free version from the WordPress.org theme repository or its original site. Installation right on the WordPress dashboard is also possible.
For exclusive features, you can use the paid version of GeneratePress with the following plans:
- Yearly – $44/year, all paid features, use for 500 sites, 1 year of updates, and paid support.
- Lifetime – $219, all paid features, use for 500 sites, lifetime updates, and premium support.
J. FAQs – Astra WordPress Theme
1. Is Astra a good WordPress theme?
2. Does Astra allow you to upgrade your current plan?
3. Does Astra come with any refund policy?
4. Is Astra a good WordPress for blog websites?
5. What are Astra’s Starter Templates?
K. Final Verdict – Is Astra WordPress Theme Worth It?
Concluding whether Astra theme is the best responsive theme for WordPress or not.
To be honest, the Astra WordPress theme stands out as a versatile and user-friendly option for building websites. With its extensive customization options and fast performance, Astra caters to both beginners and experienced developers.
The built-in features, including the header and footer builders, global color palette, and WooCommerce-focused functionalities, make it a compelling choice for various website projects.
However, while the free version offers impressive features, opting for Astra Pro unlocks advanced tools and premium support. Even though there are a few things to think about. Astra is a great choice if you want a WordPress theme that’s flexible in design and works efficiently.
It’s worth the investment, especially if you’re looking for a theme that not only works well but also looks good on your website.
Similarly, for your convenience, Astra offers a 14-day money-back guarantee policy. Therefore, if you aren’t satisfied with their service, then you can discontinue the service within 14 days of its purchase.
That’s why you all make sure that you try this WordPress theme on your own and find its usefulness by yourself.
If you’re a newcomer looking for a beginner’s guide, then here’s our full guide on how to create a website from scratch.
Conclusion
That’s about it. This is a brief review of the Astra WordPress theme. We hope that you’ll agree with our review.
In a nutshell, we’ve discussed everything about this WordPress theme. So, we hope we’ve been able to cover everything from its features to pricing and support.
Overall, Astra is a popular WordPress theme that’s best known for its affordable pricing, responsiveness, support, ease of use, etc. Thus, we recommend Astra to our readers.
If you’ve any further queries about the Astra WordPress theme, then please leave a comment below. We’ll try to get back to you as soon as possible.
Also, let us know if you’re using Astra and please share your review with us in the comments section below.
Next up, you can check out our other articles such as the WordPress themes vs templates and how to sell WordPress themes and plugins. Be sure to go through it once.
If you like this article, then please share it with your friends and colleagues. Also, don’t forget to follow us on Twitter and Facebook.
