Do you want to learn how to create a newsletter in Mailchimp to communicate with your customers, prospects, and followers? If yes, then stay right here!
An effective newsletter helps you build trust, loyalty, and brand awareness and increase your sales and conversions. But, creating a newsletter that stands out and delivers results is not easy.
You need a clear strategy, a compelling design, and a reliable platform to send and manage your campaigns.
That’s exactly where Mailchimp comes in. It’s one of the most popular and user-friendly email marketing platforms to create and send beautiful newsletters to your subscribers. Plus, track and analyze their performance.
In this article, you’ll learn how to create a newsletter in Mailchimp in easy steps that your audience will love and look forward to receiving.
Now, let’s dive in!
Benefits of Creating a Newsletter for Your Business
Before we move ahead, let’s explore the benefits of creating a newsletter for your business.
No doubt, a newsletter is more than just a way of sharing news and updates with your subscribers. It’s also a powerful marketing tool that can help you grow your business and achieve your goals.
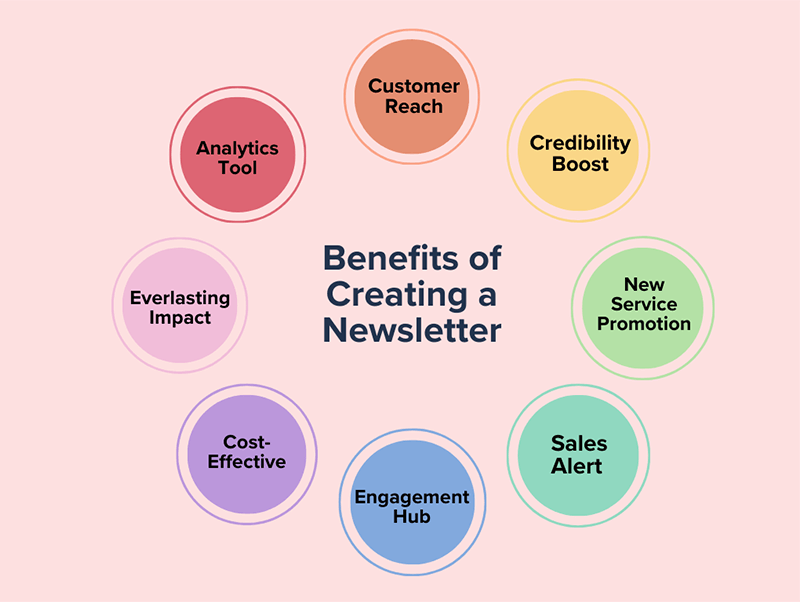
Here are some of the benefits of creating a newsletter for your business:
- Customer Reach: You can find new customers by showcasing products and offering discounts.
- Credibility Boost: Helps to establish expertise by sharing insights and addressing industry pain points.
- New Service Promotion: Introduce and promote new products, creating excitement and boosting sales.
- Sales Alert: Inform subscribers about deals, creating urgency and motivating action.
- Engagement Hub: Keep subscribers engaged with news, events, and stories, maintaining strong relationships.
- Cost-Effective Marketing: Newsletters offer a low-cost, high-return marketing channel.
- Everlasting Impact: You can save the newsletters and further repurpose them into various content forms.
- Analytics Tool: Provide insights, allowing testing, segmentation, and content tailored for improvement.
As you can see, creating a newsletter for your business can bring you many benefits and advantages. It can help you attract more customers, increase your sales, and grow your brand.
Check out our article on the best eCommerce automation tools to improve your marketing.
What are the Qualities of a Good Newsletter?
A good newsletter is not just a collection of news and updates. Rather, it’s a way of engaging your audience, building your brand, and achieving your goals.
To create a good newsletter, you must pay attention to some key elements that make it successful.
Here are some of the qualities of a good newsletter that you should consider:
- Clear Mission: Your newsletter must have an engaging subject line and introduction that communicates the newsletter’s purpose and goals clearly.
- Crisp Design: Professional design with quality visuals ensures readability on both PCs and mobile devices, maintaining a consistent style.
- Unique Voice: Reflects brand personality using language and style suitable for the industry, building a connection with readers.
- Relevant Content: Provides valuable insights, tips, and updates related to the industry, products, or services.
- Logical Flow: Organized structure with clear headings and transitions guides the reader seamlessly, ending with a specific call to action.
- Security and Compliance: Follows email marketing best practices, respects subscriber consent, and complies with privacy laws. Further, it ensures data protection and avoid spam.
These are some of the qualities of a good newsletter that you should keep in mind when creating your own.
Having said that, let’s move forward to learn how to create a newsletter in Mailchimp in the next section.
How to Create a Newsletter in Mailchimp?
Now, let’s learn how to create a newsletter in Mailchimp in 7 simple steps.
Whether you are a beginner or an expert, you will find useful tips and best practices to make your newsletter more effective and engaging.
Now, let’s dig in!
Step 1: Develop an Email Marketing Strategy
Before you create your newsletter, you need to have a clear and effective email marketing strategy. This will help you define your goals, target your audience, and optimize your results.
Here’s how you can develop your email marketing strategy for your newsletters:
i) Set out your goals
What do you want to achieve with your newsletter? Do you want to increase traffic, sales, loyalty, or awareness? How will you measure your success?
You need to have specific, measurable, achievable, relevant, and time-bound goals that align with your overall business objectives.
ii) Develop your KPIs
How will you track and evaluate your progress toward your goals? You need to have Key Performance Indicators (KPIs) that reflect your newsletter’s performance.
Some common KPIs for newsletters are open rate, click rate, conversion rate, unsubscribe rate, and revenue.
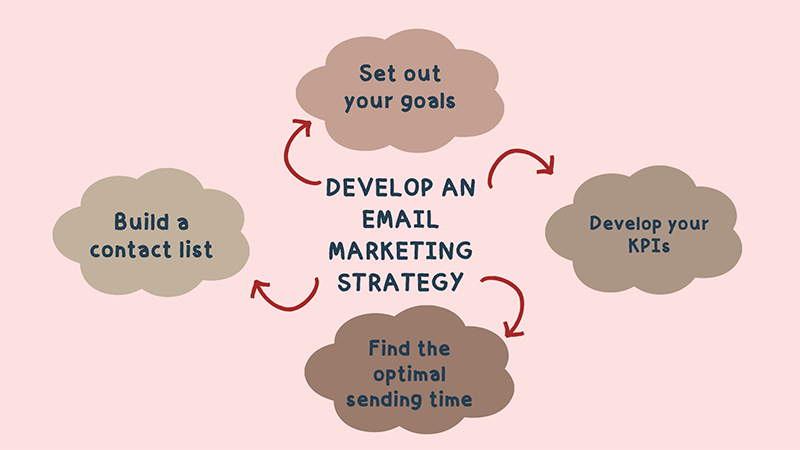
iii) Find the optimal sending time
When is the best time to send your newsletter to your subscribers? You need to consider factors like your industry, your audience, and your content.
You can use data and testing to find out when your subscribers are most likely to open and engage with your newsletter.
iv) Build a contact list
Who will receive your newsletter? You need to have a list of contacts who have given you permission to send them emails.
You can use various methods to grow your email list, such as offering incentives, creating landing pages, adding sign-up forms, etc.
These are some of the steps to develop your email marketing strategy for your newsletter.
Browse our article on what is email marketing to learn about email marketing in detail.
Step 2: Create a Mailchimp Account
To use Mailchimp, you need to create an account and provide some basic information about yourself and your business.
For that, go to Mailchimp’s signup page.
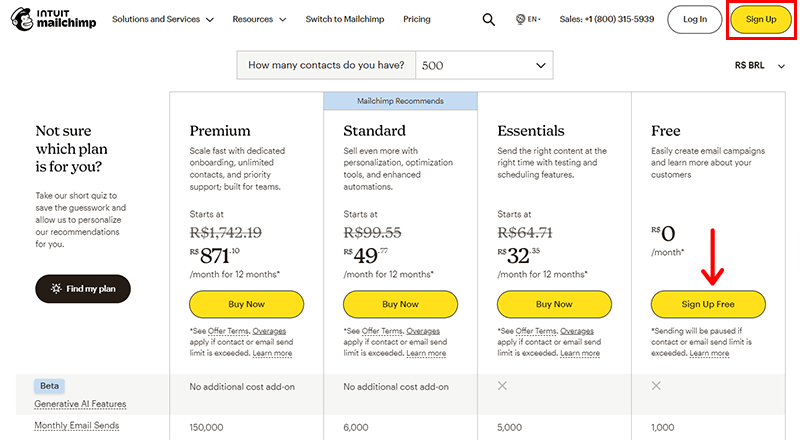
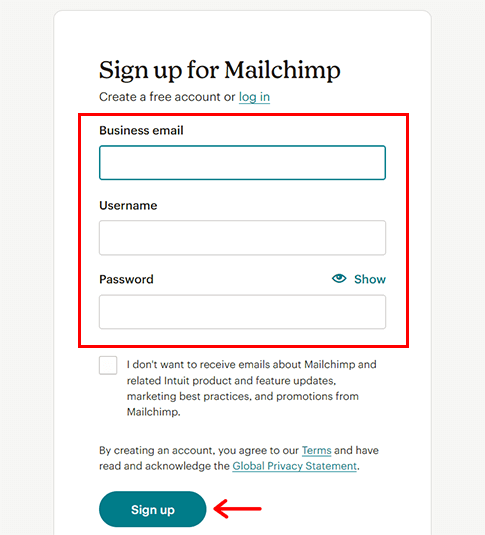
Then, type in your email, username, and password, then click ‘Sign Up’.
Next, check your inbox for the account activation email and click on ‘Activate Account’.
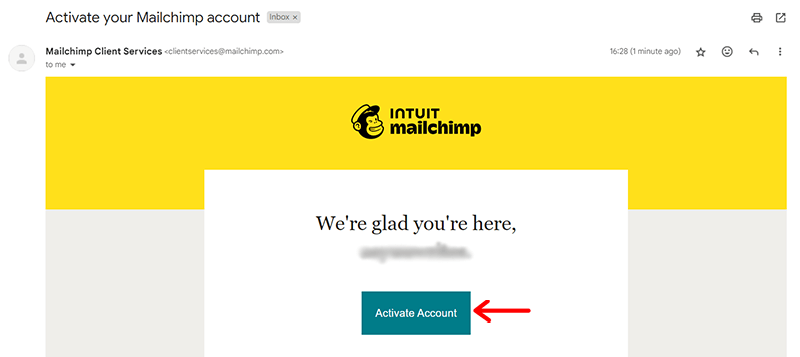
Following that, you’ll see an account setup process. Here, you need to enter your profile details, such as your name, business name, contact number, and business address.
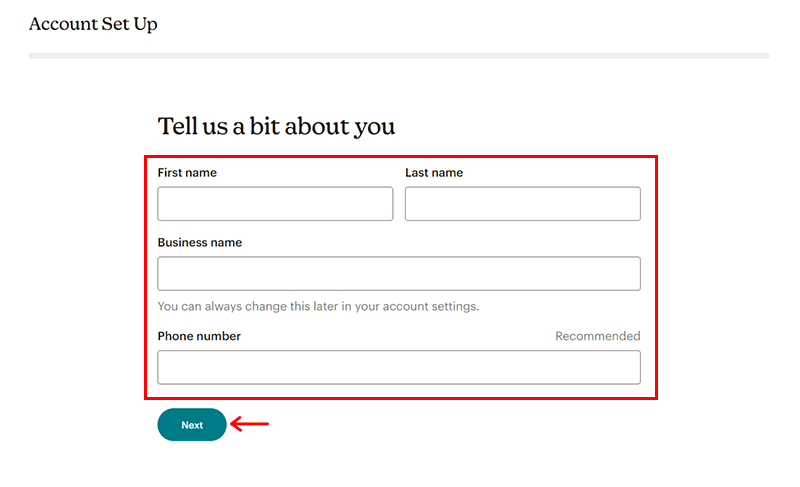
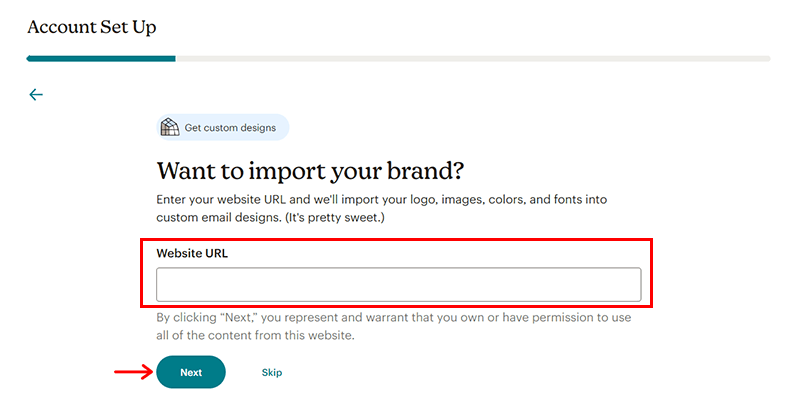
Afterward, it asks you to enter your website URL. So, it can quickly import your logo, images, colors, and fonts into custom email designs.
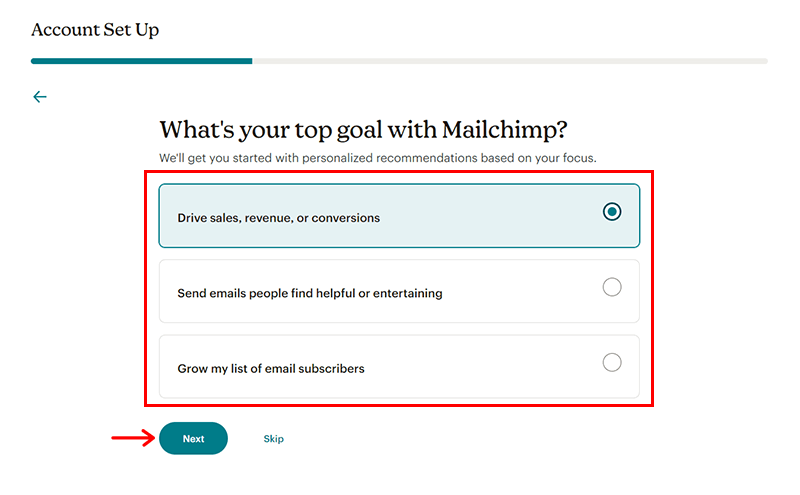
Then, you can specify your top goals with Mailchimp as shown in the below image. Here, we’ve chosen Drive sales, revenue, or conversions for now.
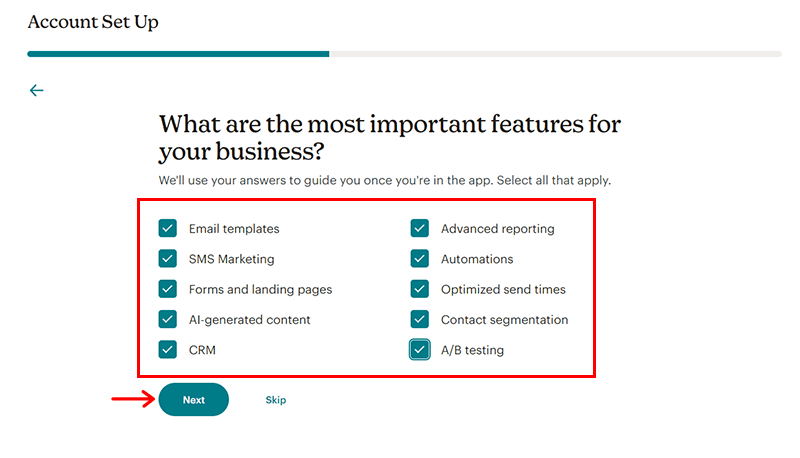
Meanwhile, you can also specify the most important features of your business and click on the ‘Next’ option.
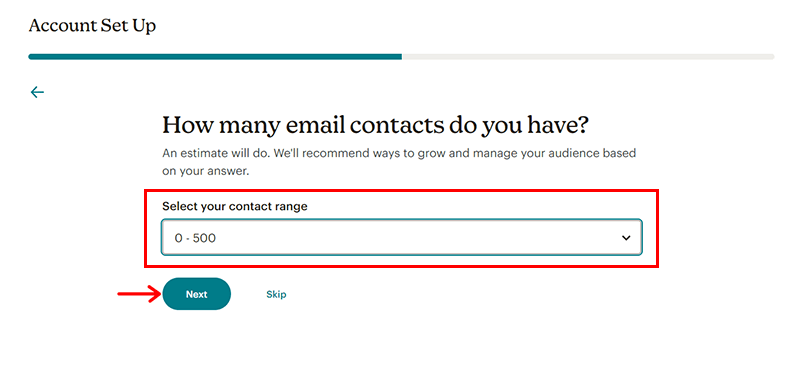
With that, you can also select your contact range number for your newsletters.
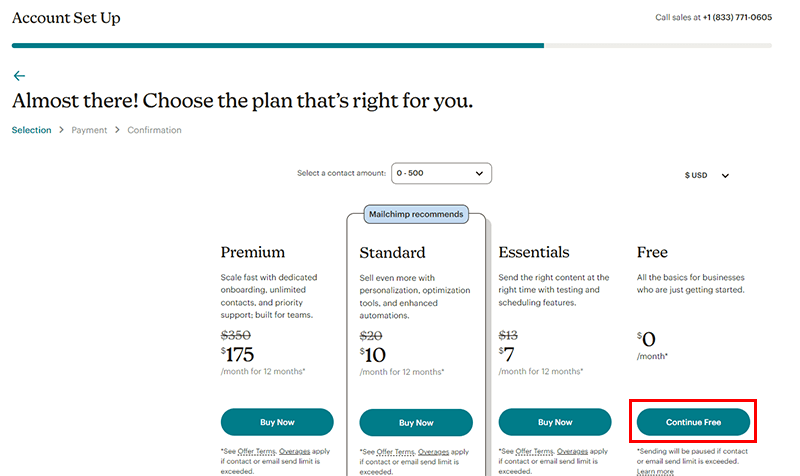
Based on your chosen contact range, you can click on your chosen Mailchimp plan. For now, let’s choose the ‘Continue Free’ option.
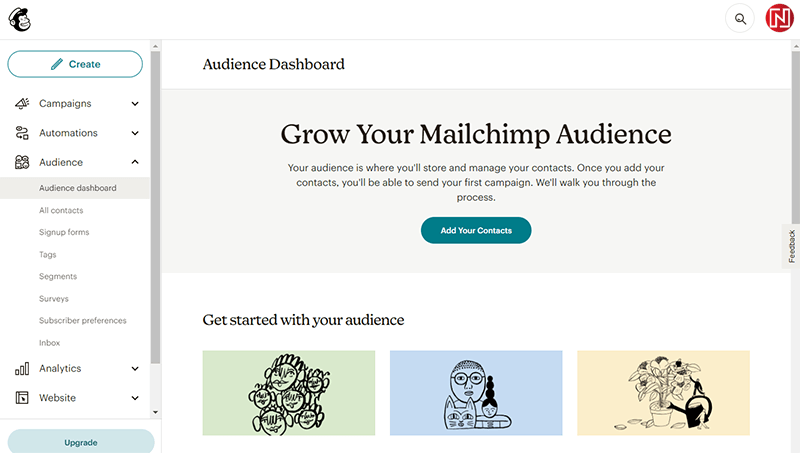
Once done, you’ve successfully created your Mailchimp account. You are now ready to start building your contact list and creating your newsletter.
In the next section, we’ll show you how to add contacts to your Mailchimp account.
Step 3: Add the Email List to Your Account
After you create your Mailchimp account, you need to add your email list to your account. This is the list of contacts who have permitted you to send them newsletters.
You can add contacts to your Mailchimp account in different ways, Such as importing from a file, copying, and pasting from a spreadsheet, or typing in manually.
In this step, we’ll show you how to import contacts in 2 ways.
I) Importing Contacts From a File
Just to let you know, to import contacts from a file, you need to have a spreadsheet program like Microsoft Excel or Google Sheets. And save your file as a Comma Separated Value (CSV) file.
The CSV file should have a column for Email Address, which is the only required field. And any other columns you want to import, such as First Name, Last Name, etc.
Next, you need to click the ‘Audience > Audience dashboard’ tab in your Mailchimp dashboard.
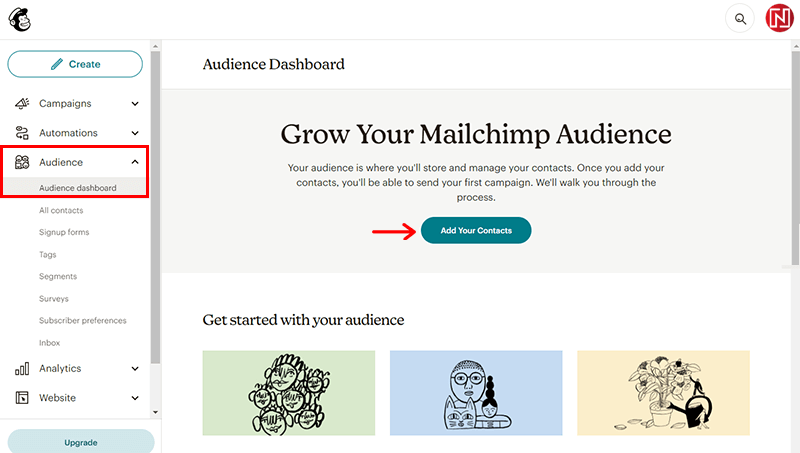
Then, click on the ‘Add Your Contacts’ option.
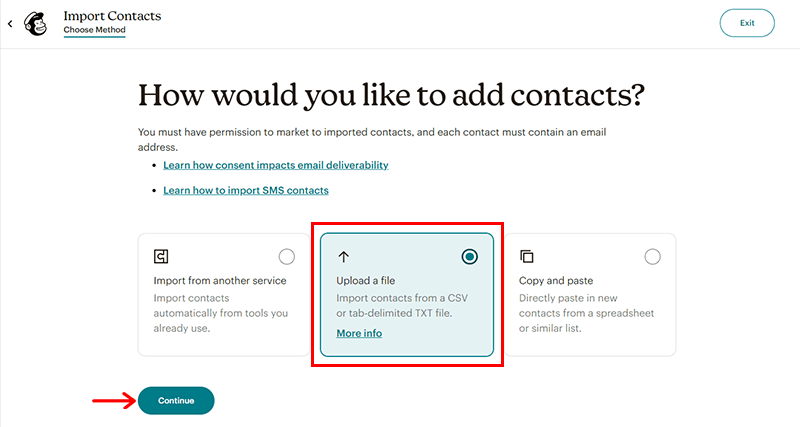
With that, you’ll see the ‘Upload a file’ option and click on ‘Continue’ option.
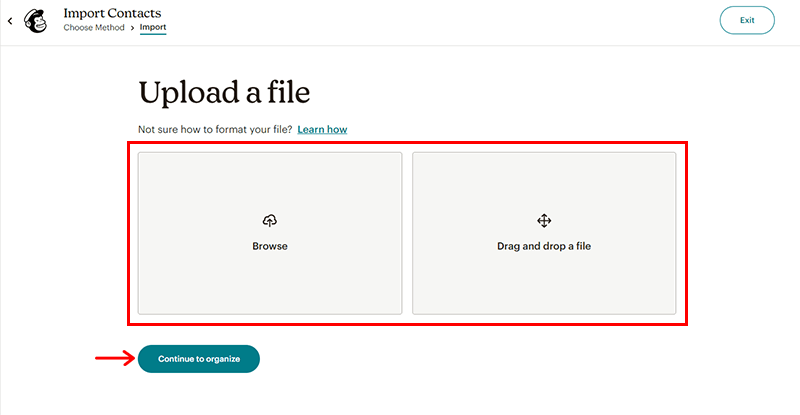
Finally, you can upload your CSV file and further organize it.
II) Via Mailchimp API Key
Meanwhile, if you’ve created a website using WordPress, then you can import the contacts to your Mailchimp account via API key.
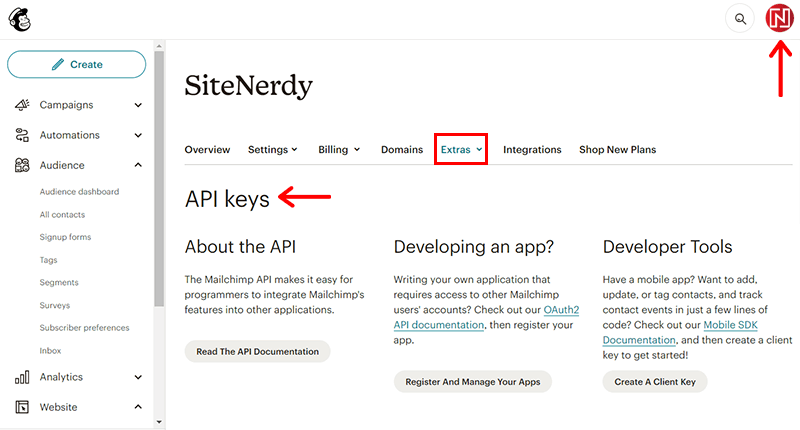
For that, in your Mailchimp account, go to the ‘Profile > Extras’ tab.
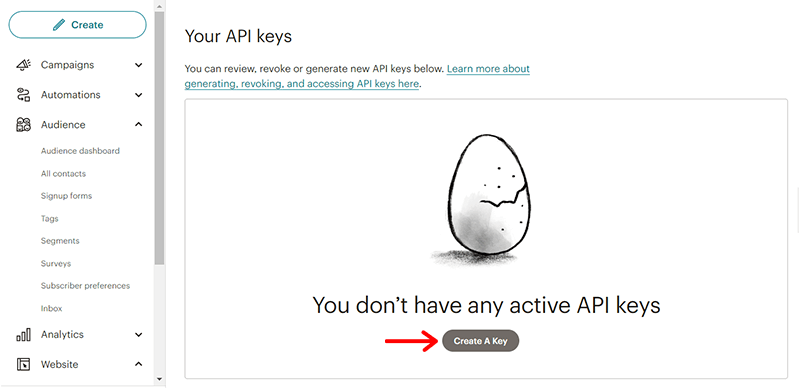
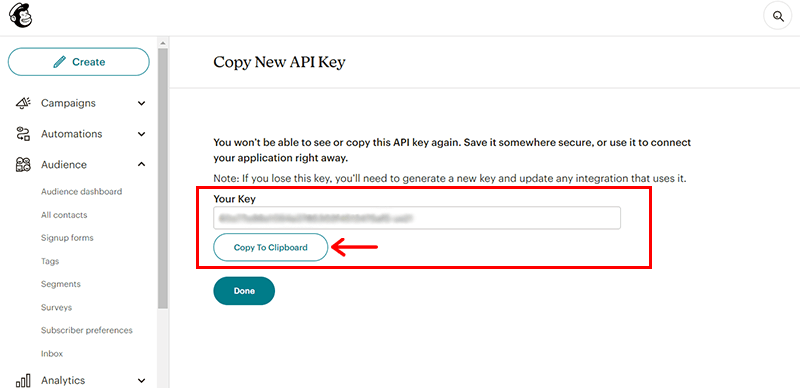
There, you can generate a new key and copy it to your clipboard. You can also name your key and revoke it if needed.
Next, log in to your WordPress admin panel, and click ‘Plugins > Add New’. Then, search the ‘Mailchimp for WordPress’ plugin.
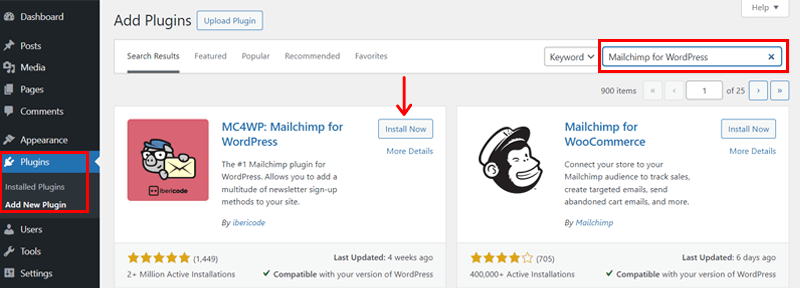
Once you locate it, click on the ‘Install Now’ button, followed by the ‘Activate’ button.
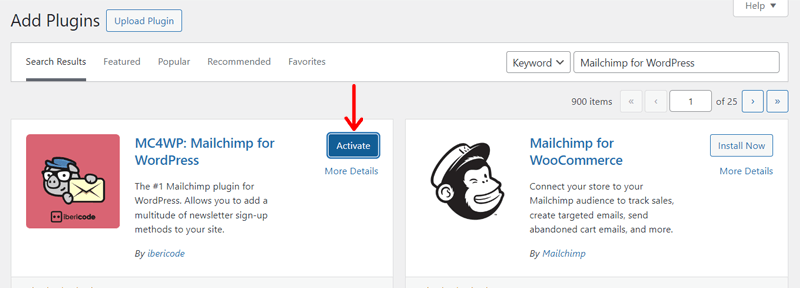
After the plugin has been activated click on the ‘Settings’ option.

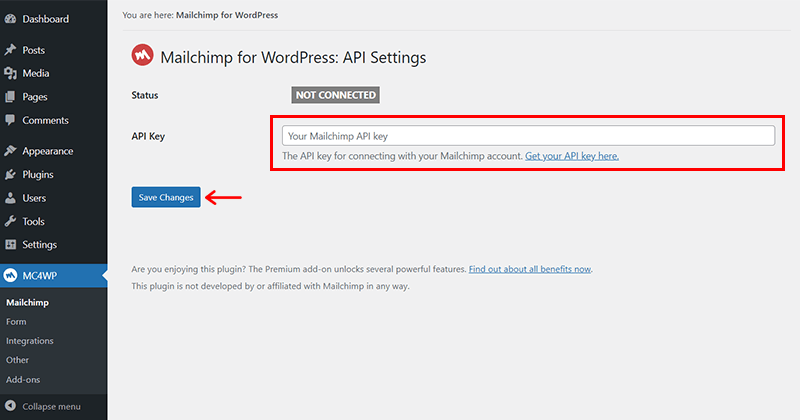
Now, enter the Mailchimp API Key you copied earlier and click the ‘Save Settings’ option.
Once the API Key is validated, you should see the name of your Mailchimp mailing list.
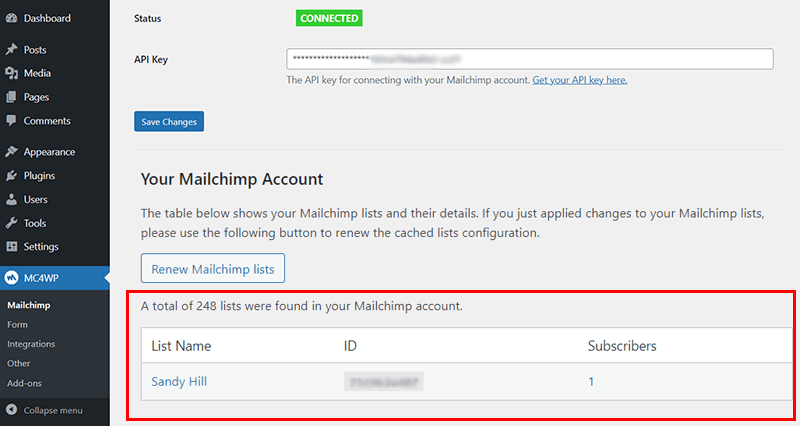
That’s it! You have successfully added your email list to your Mailchimp account from your WordPress website. You can now use the plugin to display a signup form on your site clearly.
Check this Mailchimp documentation for more detailed guidance on importing contacts.
Step 4: Create or Use a Pre-Developed Newsletter Template
After you add your email list to your Mailchimp account, you need to create or use a pre-developed newsletter template. This is the layout and design of your newsletter, which will determine how your content looks and feels to your subscribers.
You can create your template from scratch, use one of Mailchimp’s templates, or import a template from another source.
In this step, we’ll show you how to use one of Mailchimp’s templates, which is the easiest and fastest way to get started.
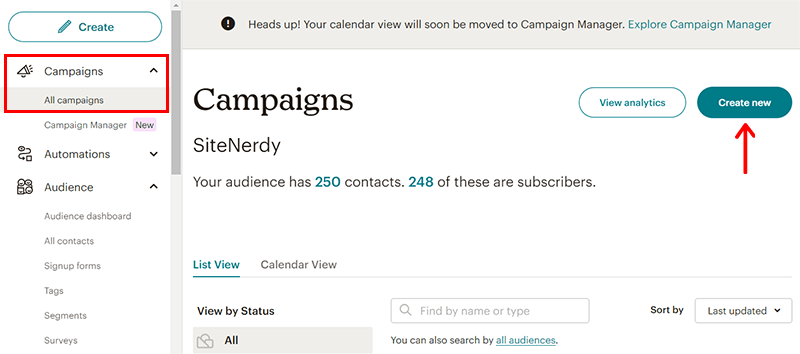
First thing first, click on the ‘Campaign’ tab in your Mailchimp dashboard. Then, click on the ‘Create New’ option.
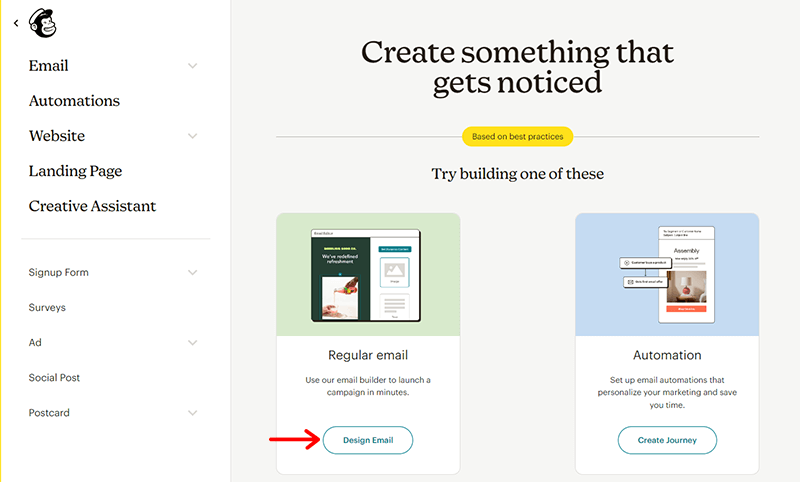
Now, you need to choose between the Regular Email or Automation Email. Here, let’s choose the Regular Email for newsletter, and click on the ‘Design Email’ option.
Then, you’ll see the page as shown below. Click on the ‘Edit name’ option and name your newsletter. For instance, here we put ‘Newsletter Demo’ for now.
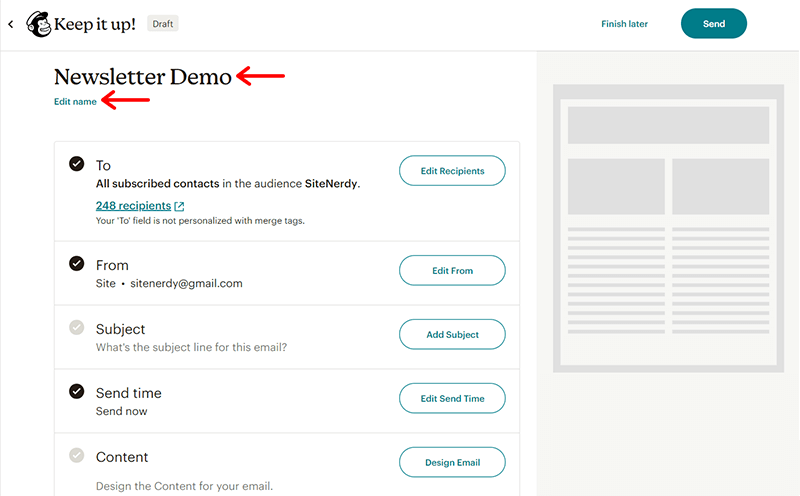
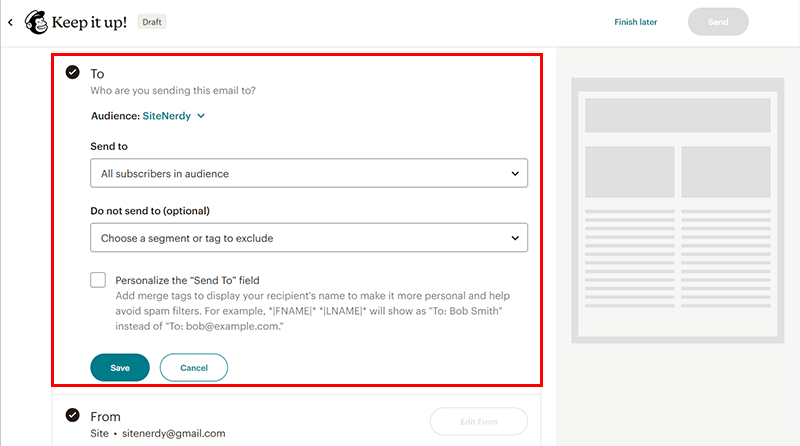
So, in the To section, you can choose the audience you want to send your newsletter to. What’s more, you can also segment your audience based on various criteria, such as location, interests, or behavior.
In the From section, you can find the email address from which the newsletter will be provided.
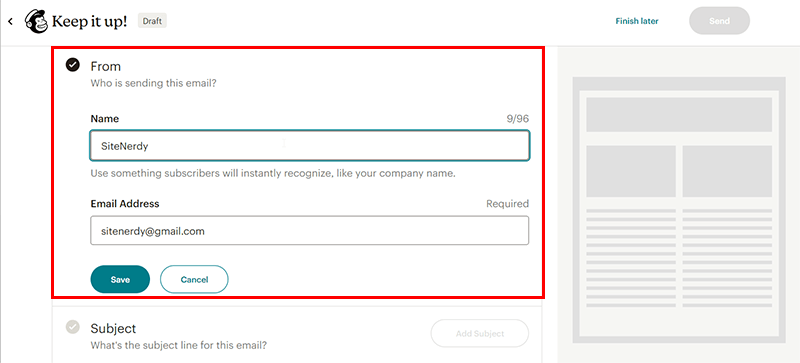
You can quickly edit the gmail From section via the ‘Edit From’ option. Once done, click on the ‘Save’ button.
Next, in the Subject section, you need to enter a catchy and relevant subject line for your newsletter. You can also add a preview text, which is a short snippet that appears next to your subject line in the inbox.
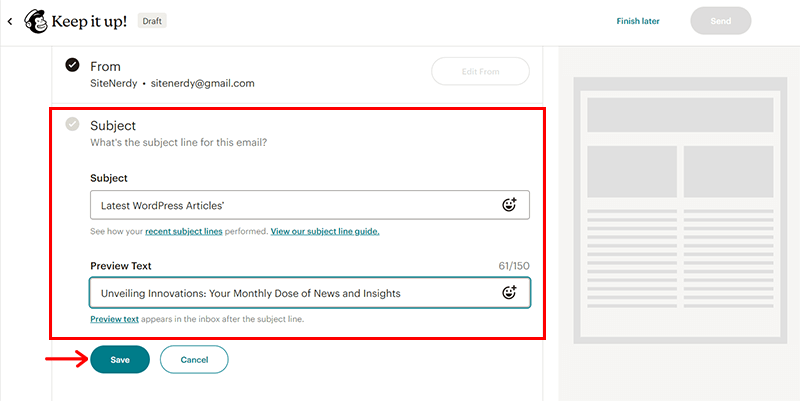
For instance, here we’ve added ‘Latest WordPress Articles’ in the Subject. And, ‘Unveiling Innovations: Your Monthly Dose of News and Insights’ as Preview Text. Again, don’t forget to click on the ‘Save’ button.
Similarly, in the Content section, click on the ‘Design Email’ option.
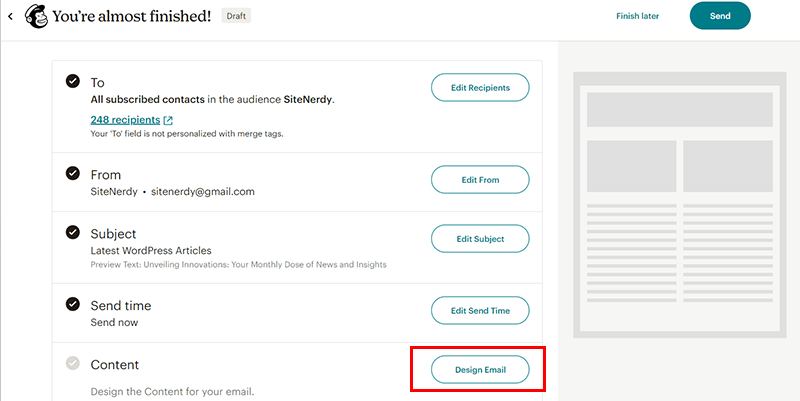
With that, you’ll see the ‘Select a template’ page. Now, you need to choose a template that suits your needs and goals.
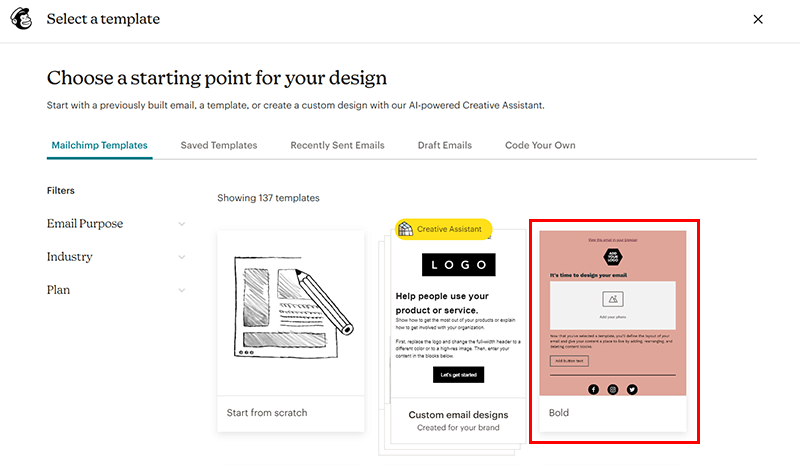
Then, click on the template you want to use. For instance, here, we’ve chosen the ‘Bold’ template for the newsletter. Then, hover over your chosen template, and click on the ‘Apply’ button.
Step 5: Customize the Content of Your Newsletter
Once you’ve chosen your newsletter template, by double-clicking it, you’ll land up to the editor interface.
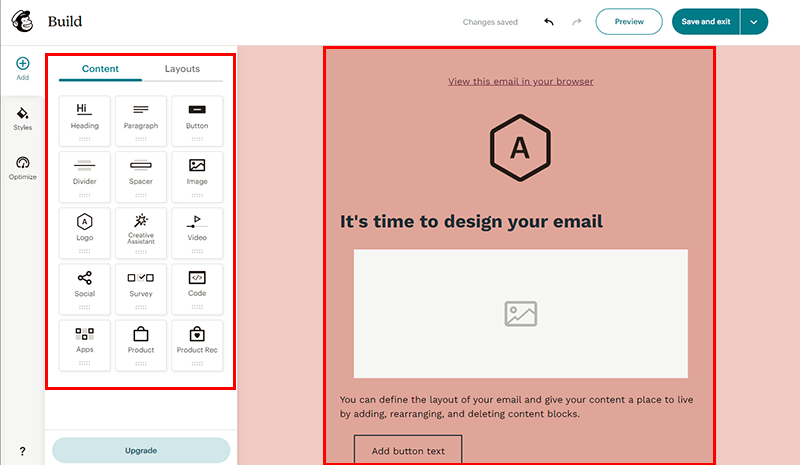
Here, you can customize your template using the drag-and-drop editor. You can add, edit, or delete content blocks, such as texts, images, buttons, or social media icons.
For example, when you hover over the ‘Logo’ section in your template, you’ll see several options.
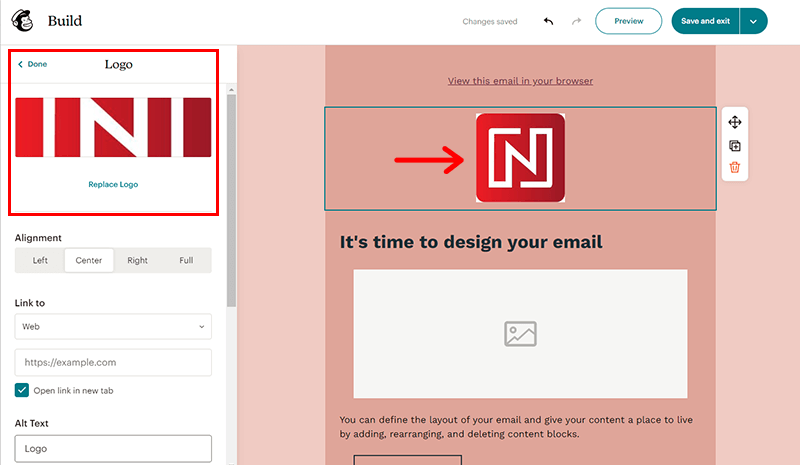
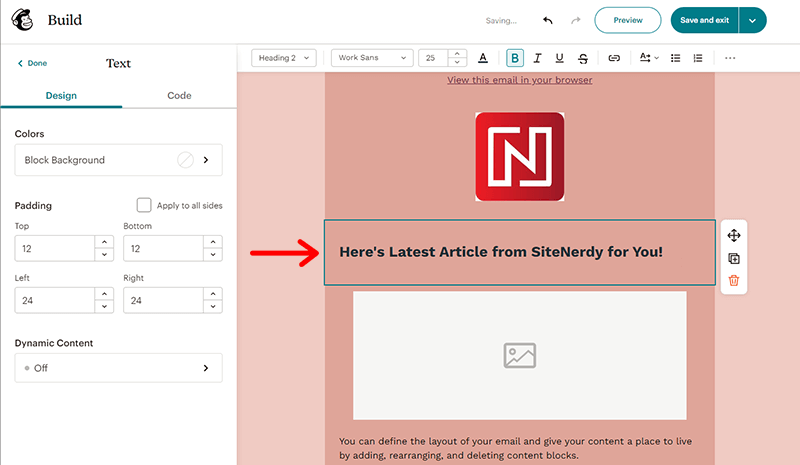
Next, you can edit the heading content of your newsletter to your choice. For instance, we’ve kept ‘Here’s Latest Article from SiteNerdy for You!’
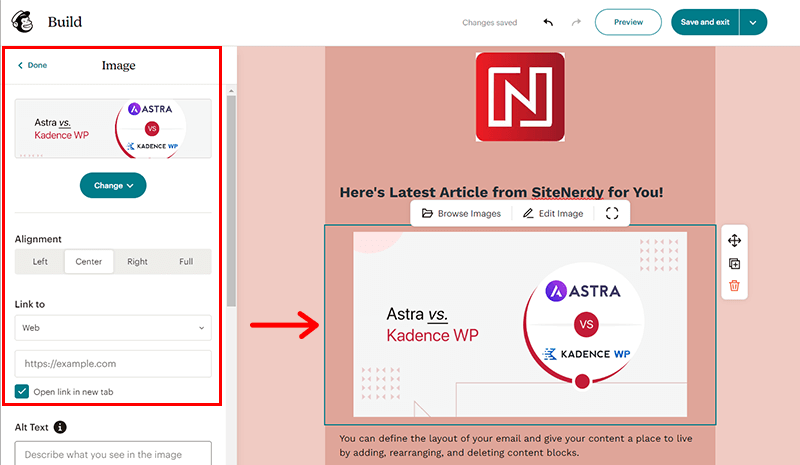
Afterward, you can add the image as shown below for your newsletter from the editor panel on the right.
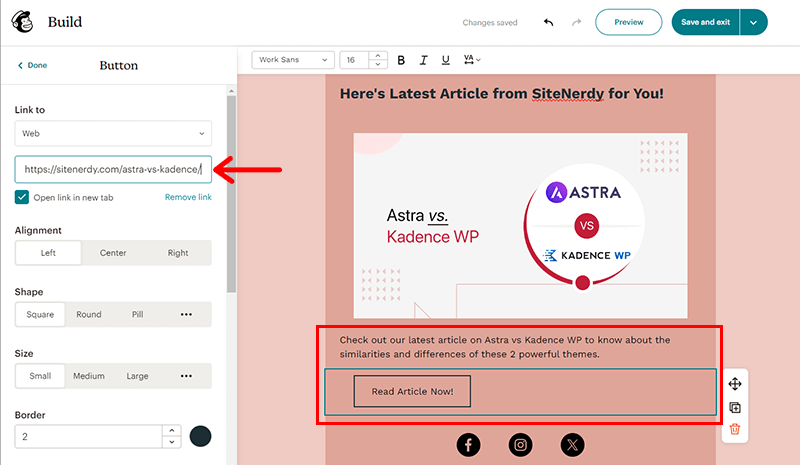
Following that, you can tailor the content of the newsletter to your choice. Also, you can add the respective link in the button section.
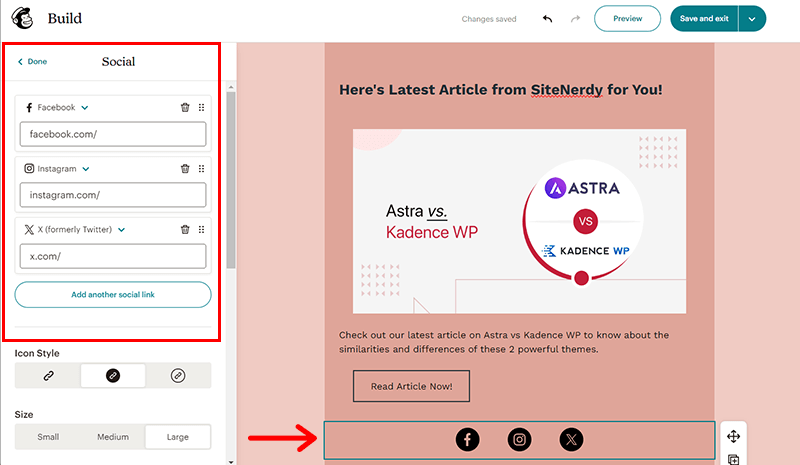
What’s more, you can quickly edit and add the required social media link to your newsletter. This helps to improve your social media following.
With that, you’ve now personalize the newsletter to your content.
Step 6: Double Check Everything Before Sending
Once you’re done with customization, you need to double-check everything to make sure it’s error-free and ready to go.
You don’t want to ruin your reputation or waste your efforts by sending a newsletter that has broken links, typos, or spammy content.
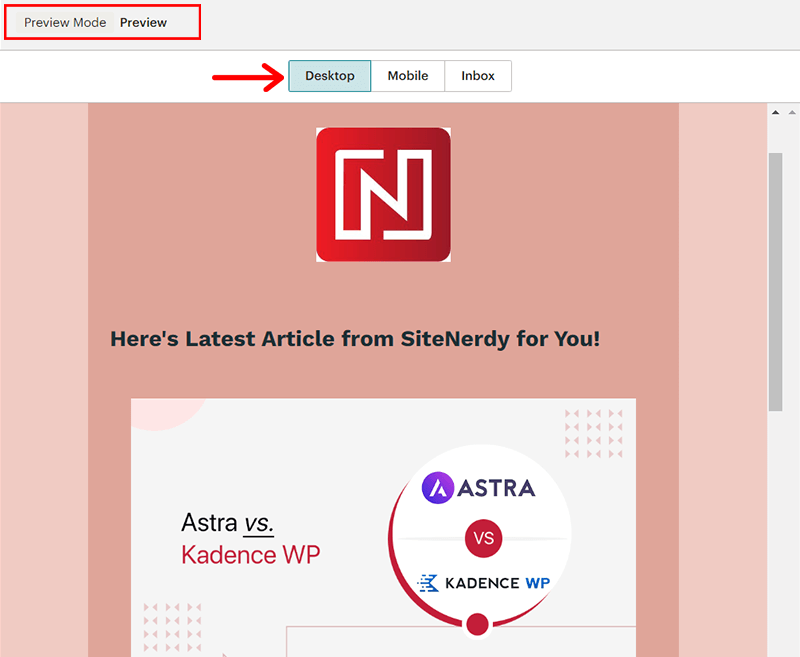
The best part is you can utilize Mailchimp’s preview and testing features to assess the visual and functional aspects of your newsletter before dispatch. You can preview in 3 options. They are ‘Desktop’, ‘Mobile’ and even ‘Email’.
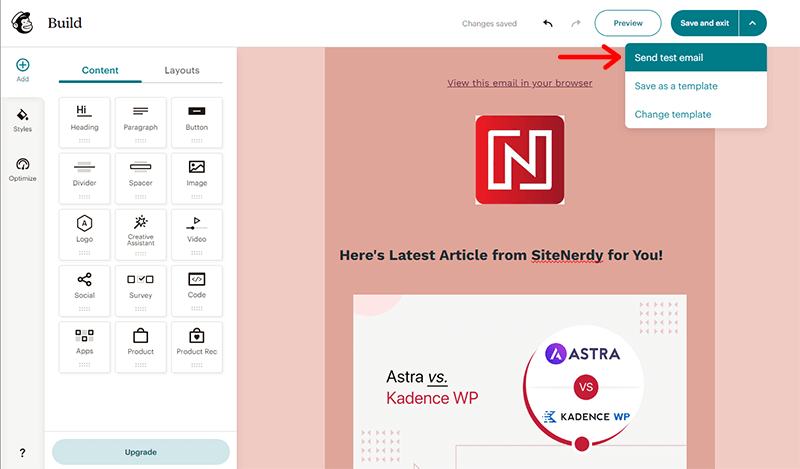
What’s more, you can even send a test email to your personal email to see how your newsletter appears on your prospects’ Gmail. For that, simply click on the ‘Send Test Email’ button at the top right.
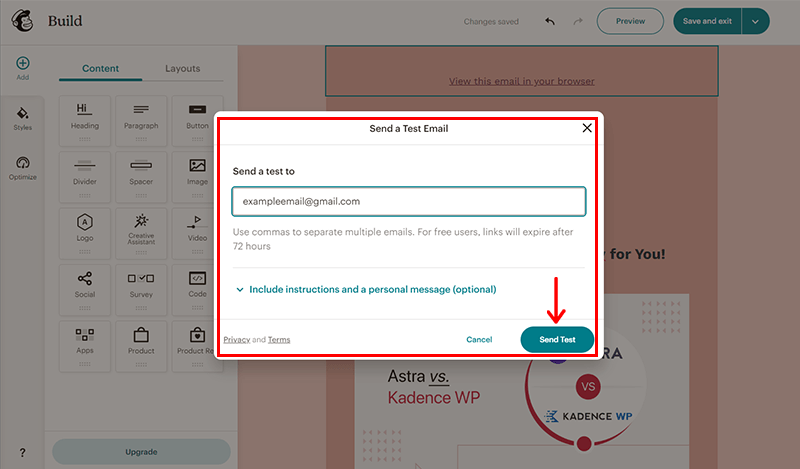
Then, enter the gmail you want to put for testing and hit the button ‘Send Text’. With that, you can do a final check of your newsletter.
Step 7: Schedule Your Mailchimp Campaign
After you double-check everything and even check the test email, you’re all set to schedule your Mailchimp campaign.
This means you can choose a date and time for your newsletter to be delivered to your subscribers, instead of sending it immediately.
Scheduling your campaign can help you reach your audience at the optimal time, and avoid sending too many emails at once.
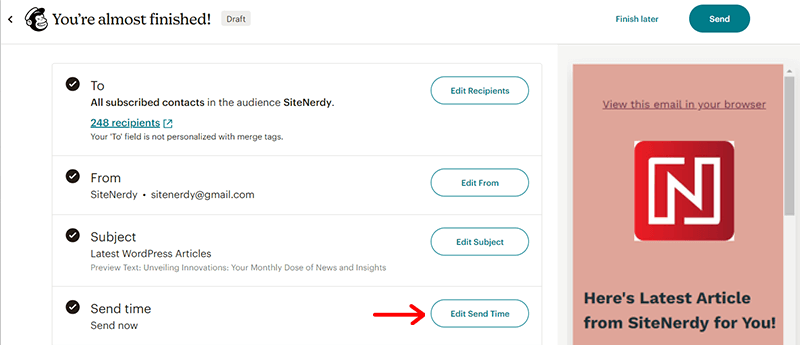
For that, all you’ve to do is click on the ‘Edit Send Time’ option just as shown in the image below.
Now, you can use the date picker to set the delivery date along with the delivery time from the drop-down.
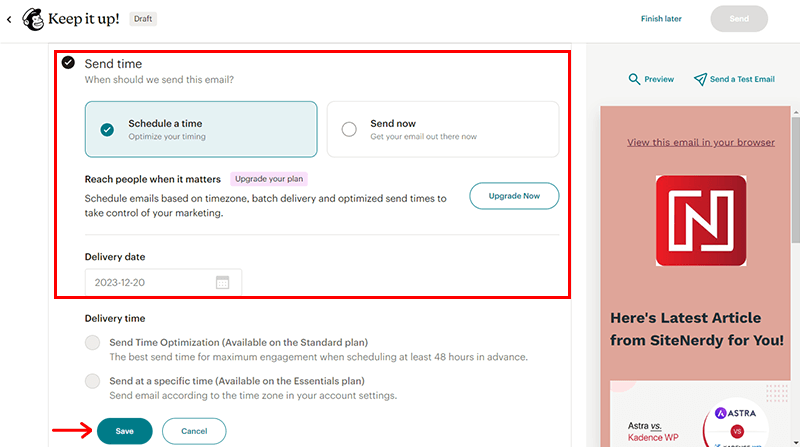
To let you know, if you have a Standard or Premium account, then you can choose to send your campaign in:
- Batches: Split your campaign into smaller groups. And send them gradually over time to avoid server overload and reduce the risk of spam.
- Timewarp: Send your campaign according to your subscribers’ time zones. Further, ensuring they receive it at the same local time, regardless of their location.
- Time Optimization: Base your campaign send time on your subscribers’ engagement history. This helps to determine the optimal time for each subscriber, maximizing open and click rates.
Once done, click on ‘Save’ to confirm.
That’s it! With that, you’ve successfully created and scheduled the newsletter in Mailchimp. You can also track and measure your campaign performance using Mailchimp’s analytics and reports feature.
Frequently Asked Questions (FAQs) on Creating a Newsletter in Mailchimp
Here are some frequently asked questions along with their answers to clear your pathway.
Q.1 How do I create a new newsletter in Mailchimp?
Q.2. Can I customize the appearance of my newsletter?
Q.3. How can I avoid my newsletter being marked as spam?
Q.4. Can I schedule my newsletter to be sent at a specific time?
Q.5. How do I track the performance of my newsletter?
Q.6. What support does Mailchimp offer if I encounter issues?
Do you want to explore more about marketing? Then, you might love checking out our comprehensive article on content marketing and social media marketing.
Conclusion
And that’s all, folks! We’ve come to the end of our tutorial article on how to create a newsletter in Mailchimp.
With these easy steps, we believe you can create a newsletter that will help you grow your audience, increase your sales, and achieve your goals.
No doubt, Mailchimp is a powerful and user-friendly platform that makes creating a newsletter easy and fun.
If you haven’t tried it yet, then sign up for a free version and see for yourself. Any confusion? Then, do let us know in the comment section below.
You might like our other similar articles such as the best email marketing services and best email subscription plugins.
Do share this article with your friends and family who are looking to create a newsletter in Mailchimp.
Remember to follow us on social media handles on Facebook and Twitter to stay updated with our content.
