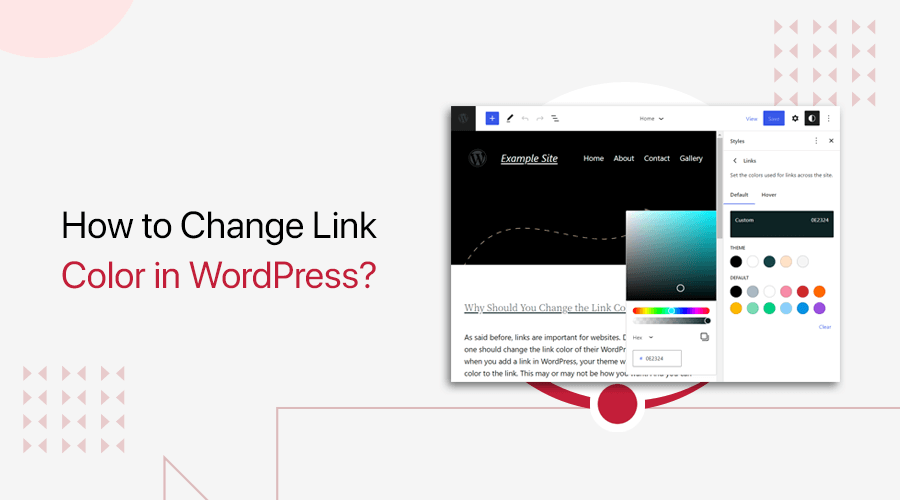
Do you want to know how to change the link color in WordPress? If yes, then stay right here.
Links are a crucial part of sites to help users navigate and drive conversions. However, the default links in your WordPress site may be falling short.
For that, you can change the link color of your site. As a result, it makes your website easier to navigate and looks better in design. But how can we do so?
Fortunately, there are many simple ways to change the link color in WordPress. In this article, we’ll give you a complete tutorial on changing the link color undergoing 6 methods.
So, without any delay, let’s start rolling!
Why Should You Change the Link Color in WordPress?
As said before, links are important for websites. Due to its significance, one should change the link color of their WordPress site.
By default, when you add a link in WordPress, your theme will automatically add color to the link. This may or may not be how you want. And you can always take control of how your link looks.
Now, let’s check out the different reasons to alter the link color:
- You can change the hyperlink color to match your business’s brand or logo.
- Choosing the right color is necessary to improve web accessibility for readers with limited vision. So, it’s necessary for better visibility.
- Links drive visitors from one webpage to other pages. So, your links must look attractive to enhance the overall website’s visual appearance.
- Improves your website’s SEO (Search Engine Optimization). Since Google uses link click-through rates for ranking. So, it becomes important to rank your site higher.
Overall, changing the link color in WordPress is a must for improving user experience. With that being said, let’s check out the different ways to do so.
How to Change the Link Color in WordPress? (6 Methods)
Here, we’ll go through 6 different methods to change the link color in WordPress websites. And they can be helpful for your various needs. So, go through them rigorously.
Method 1: Using the Global Styles Feature (Block Themes)
Block themes are themes built with templates composed of blocks. It means all the components of the themes are made up of blocks.
These themes use the WordPress Full Site Editing (FSE) function. Here, WordPress FSE is the new set of features introduced in WordPress 5.9.

So, you won’t find a WordPress customizer there. You can customize everything from the powerful site Editor. Whether it’s blogs, archives, header, or footer.
To know more about it, read our full guide on WordPress FSE. Also, check the best WordPress block themes for WordPress FSE.
Note that you need to use a block theme to enjoy the WordPress FSE features. And here, we’re first guiding you to change the link color when using a block theme.
So, let’s look at the steps to change the link color from the Editor when using a block theme. Now, let’s begin!
Step 1: Open the Editor
First, log in to your WordPress dashboard. If you’re using a block theme, then you’ll see the Editor option on the Appearance menu of your dashboard.
Here, we’re using the default Twenty-Twenty Two theme. So, let’s click on the Editor.
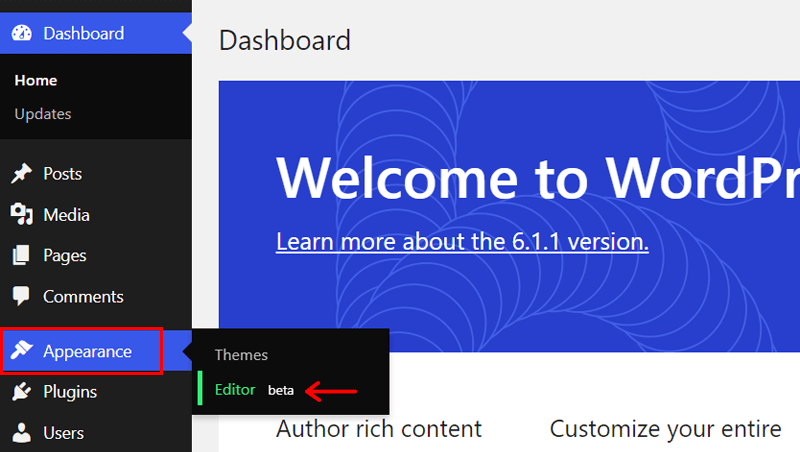
This opens the WordPress FSE interface.
WordPress FSE also includes the new Global Styles function. Here, you can customize the entire sections of your site easily without having to edit every block/page. It means you can also change the colors of all the links on your site at once.
So for the link colors, we’ve to open the Styles option at the top right corner. Then, click on the Colors option there.

Step 2: Select Link Color on the Styles Option
In the Colors option, you can find the Links element. So, click on the Links option.
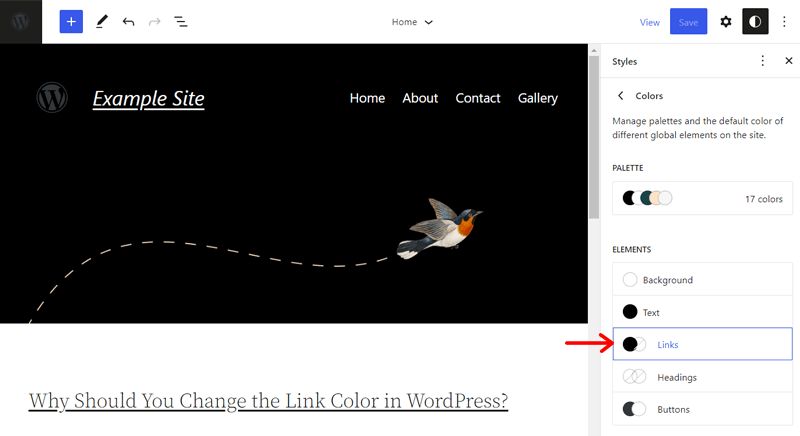
There, you’ll see color options for default and hovered links. For each of them, there are a few theme color choices and default choices. So, you can select any one color that pleases you.
Moreover, you can even click on the Foreground option and choose a color from the color picker. Further, adding a custom hex code is also possible.
The screenshot below shows how we changed the color for default links.

Once you’re done, click on the Save button to save changes to the website.
That’s all for here!
Method 2: Using the WordPress Customizer
Now, we’ll look at the methods when you’re not using a block theme. This method is for those who are using a regular WordPress theme.
Here, we’ll show you how to choose the desired link color from your theme’s options. Also, the steps may differ according to the theme you use.
For example, we’re using Astra. It’s one of the most popular multipurpose WordPress themes to build any kind of website. So, let’s change the link color with its theme’s customizer.
Step 1: Open WordPress Customizer
First, open the WordPress customizer from the Appearance > Customize menu.
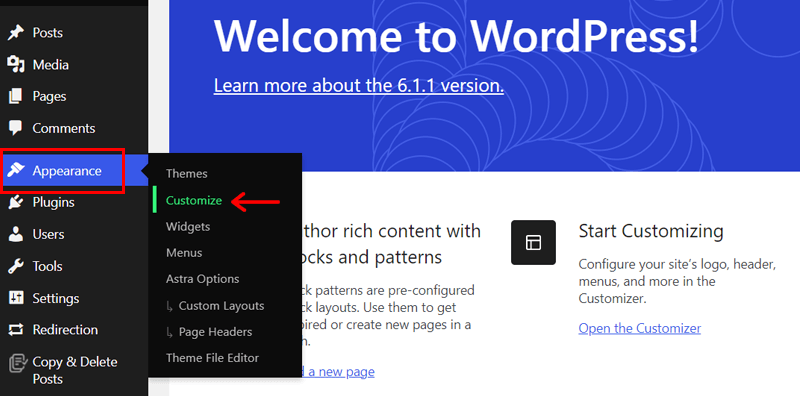
Then, search for options labeled Color. These settings vary based on the themes.
When using Astra, go to the Global option. And then, click on the Colors option.

Step 2: Choose the Link Color Option
In the Colors option, you can find options to change the hyperlink colors.
For Astra, there’s a Links option, as shown in the screenshot below. From Links, you can choose a color for your normal links and hovered links. For example, let’s change the normal link color.
First, click on the Normal option and then select a palette. After that, you can choose a color from the color picker. Or, you can also add a hex code that you have in mind here.

Once you made your choice, save the changes by clicking the Publish button. That’s it!
Method 3: Adding CSS Code
This method is for altering the WordPress link color by adding a custom CSS code. In this method, you need to write the hex code for the color you want for your website links.
To know the various codes, you can use online services like color-hex.
Step 1: Open WordPress Customizer
After you know the hex code you’ll use, navigate to Appearance > Customize menu on your dashboard.
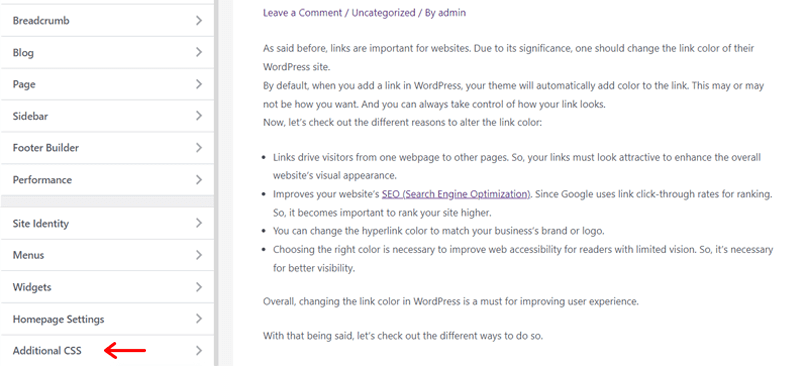
As a result, the WordPress customizer opens up. There, on the left-hand menu, you can find the Additional CSS option that you’ve to click on.
Step 2: Add Code in Additional CSS
There’s a coding section at the bottom of the Additional CSS option. There, you can enter the following CSS:
a {

color: #7a5524;

}
Don’t forget to add your own hex code value on the code instead of our example. Now, click on the Publish button to save the changes live.
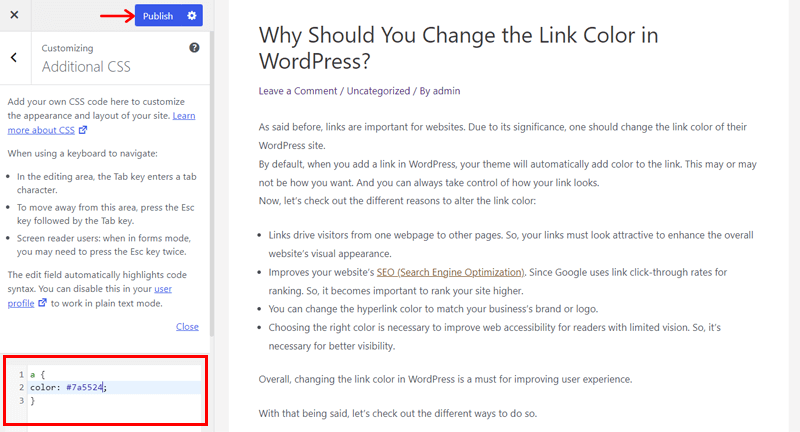
By adding this code, all the links on your website will change. If you want a different color later, then simply change the hex code and update your site.
In case you’re familiar with coding, you can also add your own codes to add different link colors to a single website.
Let’s take some examples.
I. Change the link color when they are on hover
You can also change the hover link color of your website. Doing that, when a user hovers their cursor over a link, it’ll change the color to get their attention.
For that, you can use the following CSS code.
a:hover {

color: #ff7f00;

text-decoration: underline;

}
This code changes the link color to orange and underlines the texts when visitors hover over it. You can use any other hex code for the color you prefer.

II. Change the link color once they are already visited
On top of that, you can also change the link color after a user clicks the link. This helps visitors to navigate your articles and see which links they’ve already visited.
For that, you can add the following CSS code.
a:visited {

color: #ff0000:

}
Using this code, the link’s color will become red after visitors click on the link. Make sure to change the color according to your preference by adding its hex code.
In this way, you can have full control of your site links. Now, let’s move forward.
Method 4: Using the Elementor Page Builder
Page builder plugins ease you in customizing the front end of your site. So, you can find options to change the link color in them.
Here, we’re using Elementor since it’s the most popular and widely-used WordPress page builder. Similarly, you can use any page builder with this feature. But make sure it’s compatible with your theme.
Step 1: Install and Activate Elementor
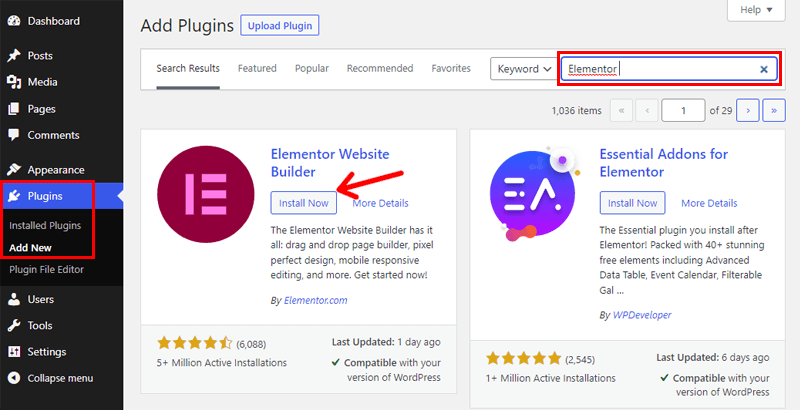
First, you must install and activate Elementor in WordPress. For that, go to Plugins > Add New menu on your WordPress dashboard.
There, type ‘Elementor’ on the search bar. Once you find the plugin, click on the Install Now button.
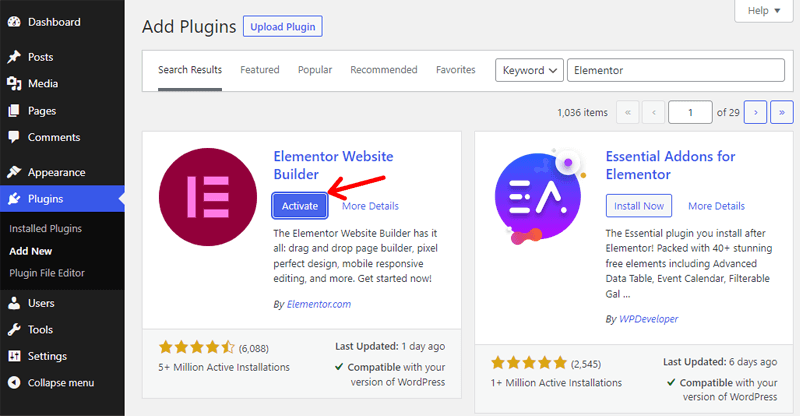
And then, click on the Activate button. In this way, the plugin gets installed and activated on WordPress.
Step 2: Edit with Elementor
Now, open a page or post on your website. After that, click on the Edit with Elementor button.

This opens up the Elementor editor with settings on the left side. There, click on the hamburger menu at the top left first.
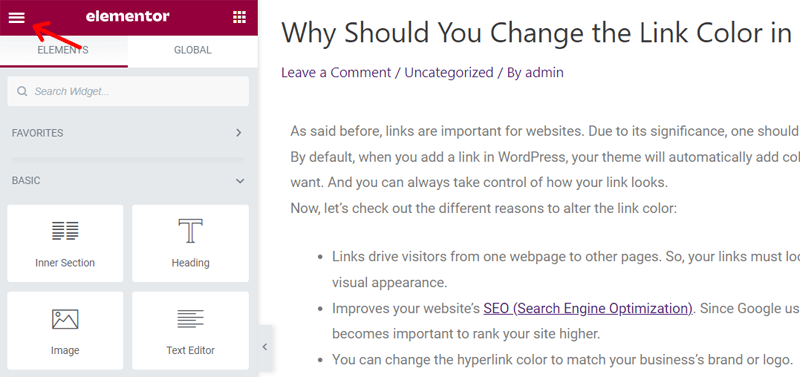
Next, click on the Site Settings option.

Step 3: Change the Link Color in the Site Settings
In the Site Settings, go to the Typography option. There, you can find options for links.
First, you can choose to alter normal links or hovered links. Then, accordingly, choose the desired color and typography for those links.
For example, let’s change the color of the hovered links.
Click on the Hover option first. Then, click on either of the Color option’s icons. One lets you choose from the global options, while the other lets you select any custom color.

Here, we selected the second option. There, choose a color from the color picker or add a hex code for your link color.
Lastly, save the changes by clicking the Update button. That’s all you’ve to do. Ultimately, you can see the changes on the live site.

Method 5: Altering Individual Links from WordPress Editor
Until now, we looked at the different methods to change the link color of your entire WordPress site. This maintains a consistent and professional look of your site.
But you can always override these site-wide settings and add a unique color to a link. To draw the user’s attention to that specific link or to make a contrasting landing page.
And you can easily change the individual link color from your WordPress editor. Let’s see how.
Step 1: Open WordPress Editor
First, open a page or post on which you want to change a link’s color. This shows the WordPress editor with the page/post.
Now, select the word/words with the link on the left side editor. Then, click the downside arrow on the toolbar for that word/words. There, select the Highlight option.
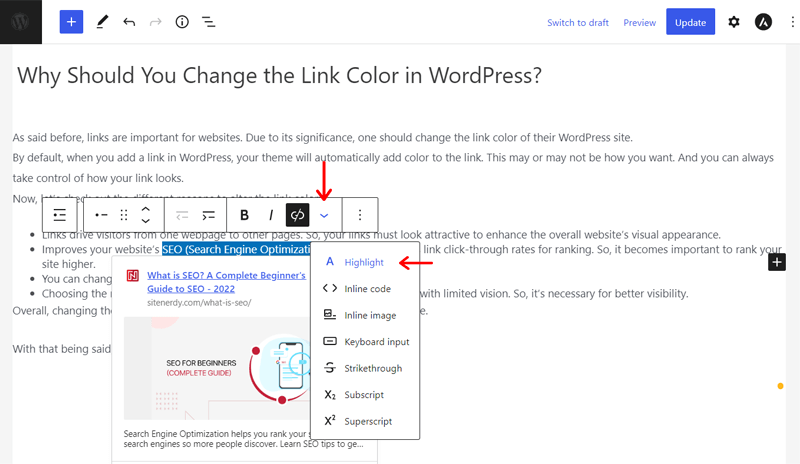
Step 2: Select Link Color
The highlight option now opens a box with color options for the text and background. In the Text tab, you can select a default color or choose a color from the color picker. Also, adding a hex code for the link is possible.

Lastly, click on the Update button to save the changes. This changes the color of that specific link.
Method 6: Using the CSS Hero WordPress Plugin
Last but not least. You can also use a WordPress plugin to change link colors. For example, CSS Hero is a premium and user-friendly plugin with a lot of features.
Also, it lets you change link colors effortlessly. So, if you already have this plugin, then we suggest using it for changing the link colors. And if you don’t, then first check its compatibility with your theme.
Now, let’s go through the steps using the CSS Hero plugin.
Step 1: Purchase and Install the Plugin
If you don’t have the CSS Hero plugin, then first, you must purchase it from its official website. For that, open the website and click on the Get it Now button.

There, select one of its 4 pricing plans that suits your needs. And then, click on its Signup and buy button.
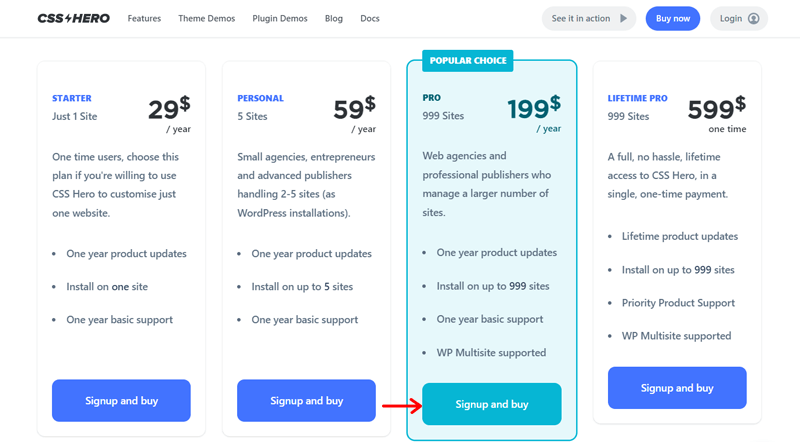
After that, sign up for an account and again select the plan by clicking the Choose Plan button.
Next, you can complete the payment process and download the plugin. Now, you’ll have the CSS Hero plugin to install and use on your website.
So, open your WordPress dashboard and upload the plugin to the Plugins > Add New menu.
For reference, you can read our complete guide on how to install a plugin.
Step 2: Customize with CSS Hero
Once the plugin gets installed, activate it and connect with your account. Just follow the instructions you’ll see on the interface and you’re ready to go.
Now, let’s see how to use this plugin. First, go to the live preview of your website. There, click on the Customize with CSS Hero option at the top.
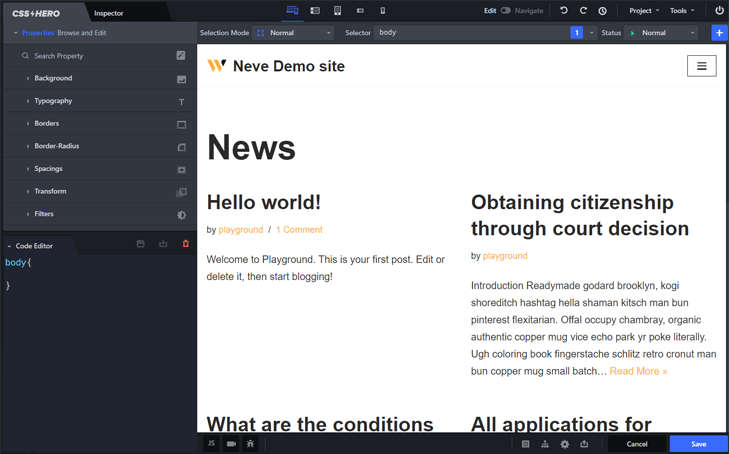
This redirects you to the CSS Hero interface. There, you can see the plugin settings on the left side and the front end of your site on the right side.
Step 3: Change the Link Color from Typography
For changing link colors, you need to first select a link on the left side preview. After that, click on the Typography option on the right side.
In Typography, you can alter the color, font size, font weight, and others. For colors, you can do this by adding the RGB color format, hex code, or from the color picker.
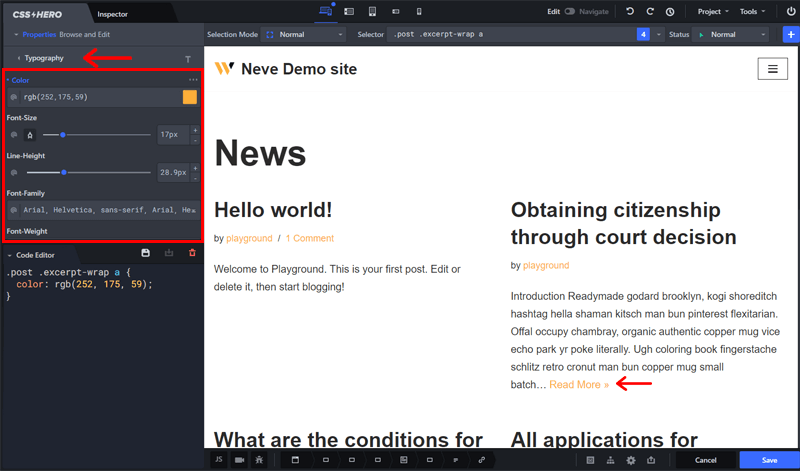
For example, click on the color picker option, then select any color there. After that, save the changes by clicking the Submit button. Lastly, click the Save button.

Note that when you select a link to change its color, this plugin changes the color for all the similar links on the post. This means you can add a different color for other types of links on your site.
In this example we’ve shown you, we’ve changed the colors for the Read More links of the blog. Similarly, you can have different link colors for other links.
In this way, you can change the link color of your WordPress website.
Are you a beginner and having second guesses about creating a website? Don’t worry! We have a full guide to creating a website from scratch. So, make sure to read it out.
Conclusion
That’s all! Hopefully, you understand how to change the link color in WordPress with this tutorial. Also, we hope you were able to easily change the link colors of your WordPress site.
Depending on your WordPress version and the theme, you may find one of the above methods best suitable. So, make your choice wisely. However, all these methods are very simple and straight.
But if there’s any confusion, then comment with your queries below. We’ll respond to your questions with the most suitable answers possible.
Moreover, please check out our other tutorials. Like how to change the footer text in WordPress and how to change the ‘Just Another WordPress Site’ text.
Lastly, follow us on Facebook and Twitter. Also, don’t forget to share our blogs and posts online.


