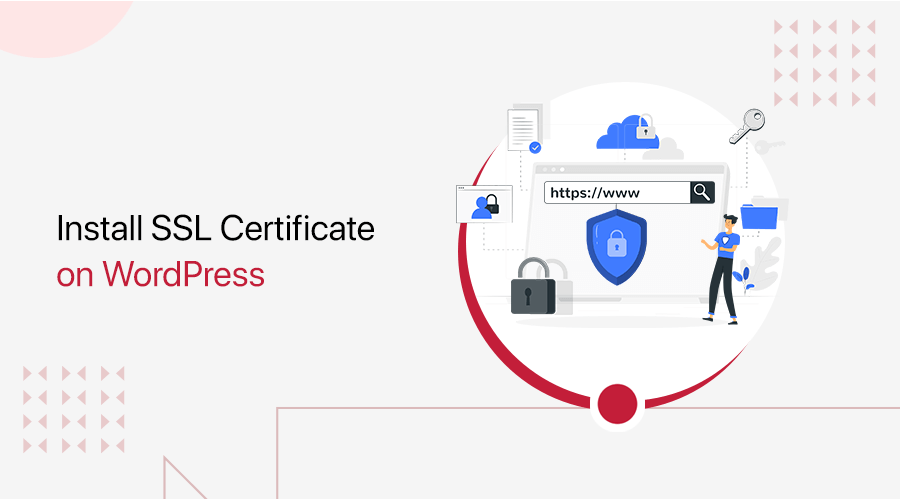
Are you wondering how to install SSL certificate on WordPress? If yes, then you’ve come to the right place.
When you’ve got a WordPress website, keeping your visitors’ information safe and gaining their trust is crucial. This is where SSL (Secure Sockets Layer) certificates come into play.
SSL certificates are your trusty allies in this endeavor, encrypting data and providing a secure environment for online interactions. Think of SSL certificates as the protective shield for your website, keeping data secure and ensuring safe online interactions.
If you’re wondering how to harness the power of SSL certificates for your WordPress site, then, you’re in the right place. In this comprehensive guide, we’ll walk you through the straightforward process of installing an SSL certificate on your WordPress site.
Now, let’s get started!
A. What is an SSL Certificate? – Overview
An SSL (Secure Sockets Layer) certificate is a critical component of web security. It plays a fundamental role in ensuring the confidentiality, integrity, and authenticity of data transmitted over the Internet.
Indeed, it acts as a digital passport, ensuring secure, encrypted communication between your web browser and a server. It’s a crucial component of the broader Transport Layer Security (TLS) protocol. TLS is the modern successor to SSL, although the term SSL is still commonly used to refer to both.
SSL certificates primarily encrypt data during transmission, rendering it unreadable to potential interceptors for enhanced security.
Complex mathematical algorithms encrypt data on the user’s device and decode it at the intended web server for security. This encryption ensures that sensitive information, including login credentials and credit card numbers, remains confidential. It safeguards data from prying eyes during user-website exchanges.
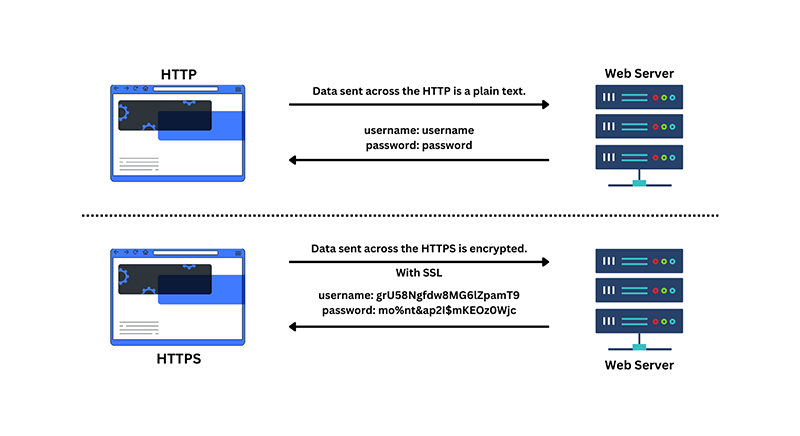
Moreover, SSL certificates verify website authenticity. Browsers confirm site legitimacy through certificates issued by trusted Certificate Authorities (CAs). A padlock icon or green address bar indicates a secure connection, assuring users they are on a legitimate website and not a malicious one.
SSL certificates also serve as a means of ensuring data integrity. Through cryptographic hashing, SSL certificates create a unique fingerprint of the data being transmitted. This helps protect against data manipulation by malicious actors.
An SSL certificate is crucial for securing internet connections, protecting data, authenticating websites, and ensuring data integrity. It’s essential for security in eCommerce, online banking, and other privacy-focused online activities, forming a foundation of trust.
B. How Does an SSL Certificate Work?
An SSL certificate is a crucial part of web security, enabling secure, encrypted connections between a user’s browser and a web server. Understanding how SSL certificates work involves a closer look at the processes involved in securing online communication.
When a user accesses an SSL-secured website, their browser initiates a handshake with the server. The server shares its SSL certificate, containing its public key and CA-verified details. This certificate establishes trust, ensuring secure communication through encryption during online interaction.
The browser verifies the SSL certificate’s authenticity by checking its digital signature against trusted CAs. This crucial step ensures the website’s legitimacy, safeguarding users from potential imposters. If the certificate is valid and from a trusted CA, then the browser establishes a secure connection for safe online interaction.
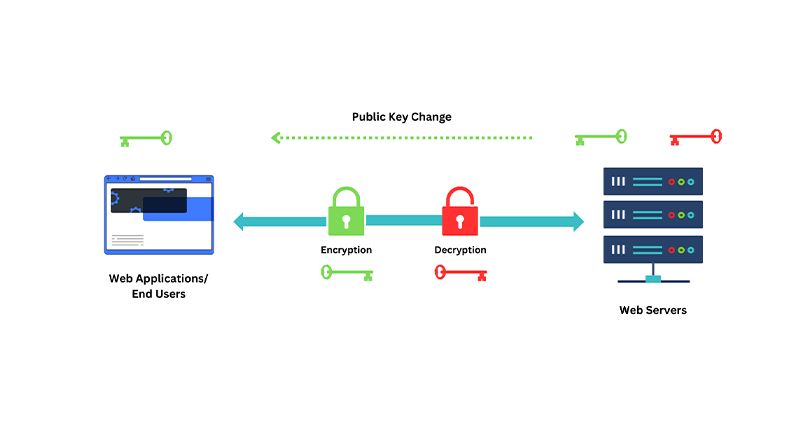
The next step involves asymmetric encryption (public-key cryptography). The server’s SSL certificate holds its public key, used by the browser to encrypt a session key. This session key, generated randomly, serves as a temporary encryption key exclusively for that specific session, ensuring secure data transmission.
Once the session key is encrypted, it’s sent back to the server. The server, with its securely stored private key, is the only entity capable of decrypting this key, ensuring the confidentiality of the session’s data. This process establishes a secure channel between the user’s browser and the web server.
After establishing a secure channel, all user-website data is encrypted and decrypted with the session key. Encryption safeguards data in transit by denying unauthorized access and ensuring confidentiality and security through the session key.
In summary, SSL certificates establish trust, secure connections, and encrypt data for online security. It safeguards sensitive information, making it crucial for eCommerce, online banking, and privacy-focused online activities. They ensure data confidentiality and protect against potential threats, contributing to a secure online environment.
C. Different Types of SSL Certificates
SSL certificates come in various types, primarily based on the number of sites they protect and the level of validation they offer. For most websites, a domain validation certificate is sufficient.
However, it’s essential to understand your options and choose the SSL certificate that best suits your website’s needs.
SSL Certificates Based on Validation
i. Domain Validation (DV)
Domain Validation SSL certificates are easy to obtain and offer minimal assurance and encryption. They are suitable for blogs and informational websites that don’t handle sensitive data or online payments.
These certificates are budget-friendly and quick to acquire, typically requiring website owners to prove domain ownership through email or phone verification. They display HTTPS and a padlock in the browser bar without showing the business name.
ii. Organization Validation (OV)
The Organization Validation (OV) SSL certificate offers a high level of assurance, similar to the Extended Validation (EV) certificate. Website owners must undergo a rigorous validation process.
These certificates display the website owner’s details in the address bar to enhance trust. OV SSL certificates are expensive, yet they’re essential for securing sensitive user data during transactions. They are a vital component for commercial or public-facing websites.
Installing an OV SSL certificate ensures the confidentiality and security of customer data.
iii. Extended Validation (OV)
The most premium and costly SSL certificate is the EV SSL certificate, typically reserved for prominent websites handling data and online payments.
It’s easily recognizable by the padlock, HTTPS, the business name, and the country in the browser’s address bar. To obtain an EV SSL certificate, the website owner undergoes a strict identity verification process to prove their legal rights to the domain.
SSL Certificates Based on the Number of Websites
iv. Single Domain SSL Certificate
A single-domain SSL certificate is designed to secure just one website, making it ideal for personal websites and small businesses. Its specific purpose is to protect one web domain.
It serves as the foundational level of security, providing encryption for the data exchanged between users and the website.
This basic certificate can often meet the needs of numerous online platforms. Yet, bigger companies with many domains or subdomains might need advanced SSL solutions to secure their online presence effectively.
v. Wildcard SSL Certificate
A wildcard SSL certificate is a versatile solution that extends its security to cover multiple subdomains associated with a primary domain.
For instance, if your website’s main domain is example.com, then you can employ a wildcard certificate to safeguard subdomains. Such as blog.example.com and shop.example.com.
This provides a cost-effective and efficient way to ensure the security of various subdomains under the same domain without needing separate certificates for each.
vi. Multi-Domain SSL Certificate
A multi-domain SSL certificate is also referred to as a Subject Alternative Name (SAN) certificate. It’s a valuable choice for businesses managing multiple domains or websites.
It provides an efficient and cost-effective solution to secure various domains using a single certificate. This certificate type offers the flexibility to protect multiple websites, making it a preferred option for businesses with diverse online presence.
Whether you have multiple domains or subdomains, a multi-domain SSL certificate simplifies the process of ensuring their security with a unified solution.
D. Why Does Your Website Need an SSL Certificate?
Your website requires an SSL certificate for security, trust, and a positive user experience. SSL certificates have become a standard requirement for modern websites, and here’s why:
1. For Protecting User’s Data
An SSL certificate encrypts data transmitted between a user’s web browser and your web server. This encryption safeguards sensitive data, including login credentials and credit card numbers. It prevents malicious actors from intercepting and reading this information.
Without SSL encryption, this data is vulnerable to interception, potentially leading to data breaches and the compromise of user privacy.

For example, consider an online store that doesn’t have an SSL certificate. When a customer enters their credit card information during checkout, this data is transmitted in plain text.
Hackers could intercept this data, leading to financial losses for both the customer and the business. A website with an SSL certificate encrypts payment information, ensuring a secure shopping experience and building customer trust.
2. Provides Authenticity to Your Website
SSL certificates verify the authenticity of your website. When visitors spot the padlock icon or a green address bar in their browser, it signifies your website’s authentication by a trusted Certificate Authority (CA). This builds user confidence in your site’s legitimacy.
Hence, this verification assures users that they are interacting with a legitimate website and not a fraudulent one.
Imagine a banking website without an SSL certificate. Users would be hesitant to log in and conduct financial transactions. Since they couldn’t be sure if the site is genuine or a phishing attempt.
On the other hand, a bank website with a valid SSL certificate displays trust indicators, making users confident in its legitimacy.
3. Improves Your Website’s Search Engine Ranking
Lastly, having an SSL certificate can improve your website’s search engine rankings. Major search engines like Google consider SSL encryption as a ranking factor. Websites with SSL certificates tend to rank higher in search results, potentially attracting more organic traffic.
An SSL certificate is essential for your website, ensuring data security, user trust, and search engine visibility. Without it, your site is vulnerable to breaches, trust issues, and lower search rankings; investing enhances credibility and online success.
E. Things to Know Before Installing an SSL Certificate
Before installing an SSL certificate on your website, there are several important considerations to keep in mind. These factors affect the certificate’s effectiveness, functionality, and alignment with your website’s requirements.
- Certificate Type – There are different types of SSL certificates, including single-domain, multi-domain, and wildcard certificates. Understanding which type suits your website’s structure is crucial.
- Certificate Validity Period – SSL certificates have a validity period, typically ranging from one to several years. You need to plan for regular renewal and ensure the certificate remains valid.
- Certificate Authority (CA) Selection – Choose a reputable CA to issue your SSL certificate. For instance, an eCommerce site using a certificate from a lesser-known CA might face trust issues with its customers.
- Server Compatibility – Verify that your web server supports the SSL certificate type you intend to install.
- SEO – When moving to HTTPS, be aware of SEO implications. Properly implemented HTTPS can boost your website’s search engine rankings.
- Pricing – SSL certificates can range from free (e.g., Let’s Encrypt) to several hundred dollars per year. Consider your budget and the level of security required for your website when choosing a certificate.
In conclusion, these factors will ensure that your SSL implementation enhances your website’s security, trustworthiness, and overall functionality.
F. How Much Does an SSL Certificate Cost?
An SSL certificate encrypts data sent from a user to your website’s server. SSL pricing is primarily influenced by the number of protected domains and the verification process for domain ownership.
i. SSL Certificate Cost by Type
There are three types of SSL certificates based on how many domains they can protect. In short, the more domains covered, the higher the SSL certificate’s price.
ii. Single Domain SSL Certificate
Typically the most cost-effective option, single-domain SSL certificates provide protection for a single domain, excluding its subdomains.
For example, if you own “yourwebsite.com,” then this certificate won’t secure “about.yourwebsite.com” or “contact.yourwebsite.com.”
Although it offers limited coverage, it can be suitable for smaller websites, such as a contact page or a basic blog. Single-domain SSL certificates typically cost around $10 per year.
iii. Wildcard SSL Certificates
Available from $50 per year onwards, a wildcard SSL certificate can secure a primary domain and all its associated subdomains.
Unlike the previous option, this certificate can protect subdomains like “about.yourwebsite.com” or “contact.yourwebsite.com” as well.
iv. Multi-Domain SSL Certificate
A multi-domain SSL certificate, known as Subject Alternative Name (SAN), offers the ability to secure multiple domains. With this type, you can include multiple hostnames, such as websites or IP addresses, under a single certificate.
For example, it can protect domains like “yourwebsite.com,” “yourwebsite.net,” and “yourwebsite.xyz” for approximately $45 per year.
If your aim is to secure multiple domains and their subdomains, then you should consider purchasing a Multi-Domain Wildcard SSL certificate. Its cost starts at $90 per year.
SSL Certificate Price by Validation
In addition to the number of domains, SSL certificate prices differ depending on the validation process conducted by the certificate provider before issuance.
v. Domain Validation (DV) Certificate
The validation process for this DV certificate is straightforward. You only need to demonstrate domain ownership, and the certificate authorities can issue it within minutes.
The straightforward validation process might make some customers uneasy. It’s important to know that this certificate provides the same high-level encryption as the others, ensuring your data’s security.
DV SSL certificates are available starting at $8 per year.
vi. Organization Validation (OV) Certificate
To get OV certificates, certificate authorities check if your organization is legitimate by asking for business documents like records or an address.
Consequently, this type of SSL certificate often garners higher trust from customers, making it an excellent choice for e-commerce websites. The annual prices for OV certificates typically begin at approximately $102.
vii. Extended Validation (EV) SSL Certificate
EV certificates, as the name suggests, require comprehensive validation, including legal documents, the organization’s trade name, address, phone number, and the names of key individuals.
Consequently, EV certificates offer the utmost reliability, making them an ideal choice for banking, insurance firms, government agencies, and more. Hence, it’s perfect for handling confidential and sensitive information.
However, it’s important to note that EV SSL certificates are the costliest, with prices starting at $140 per year.
G. How to Get an SSL Certificate for FREE?
Many website owners hesitate to use SSL because of the added expense, leaving small websites at risk of data breaches.
To address this, Let’s Encrypt, a non-profit initiative, was established. Its aim is to simplify the process of obtaining free SSL certificates, promoting a safer internet through widespread SSL adoption.
However, installing Let’s Encrypt’s free SSL certificate can be challenging for beginners. As it demands heavy coding and server system expertise.
Fortunately, leading WordPress hosting companies now include free SSL certificates in their hosting plans. Opting for such providers simplifies SSL setup, sparing you with the complexities of self-installation.
Some of the WordPress hosting services that offer free SSL certificates with their hosting plans are listed below:
If your website is hosted by one of these companies, then you can activate your free SSL certificate in your hosting dashboard.
Just log in to your hosting account’s dashboard and find the option to enable the SSL certificate. If you can’t locate it, then don’t hesitate to ask your hosting provider for assistance.
H. How to Install SSL Certificate on WordPress?
After purchasing the SSL certificate, the next step is installation. You must select the domain that will receive the certificate.
If your hosting account allows for multiple domains and oversees several websites, then you must choose the specific website to receive the new SSL certificate.
Or else you can use SSL WordPress plugins that are freely available in the WordPress plugin directory.
Using the WordPress Plugin
Using a plugin smooths the SSL implementation process for your website. Many of these plugins automatically make the necessary adjustments once you’ve purchased the SSL certificate.
Some even set up the site without needing additional input from you. Here are some top SSL plugins for WordPress, all accessible from your WordPress admin dashboard’s plugin page.
Simply search for the plugin name, install it, and activate it directly from there. Once activated, configure the settings by visiting the respective plugin’s settings page.
We’ll begin by installing an SSL for WordPress using a plugin called Really Simple SSL. This plugin handles the task of transitioning your website to SSL automatically. If your website’s URL still shows HTTP instead of HTTPS, then this plugin will resolve that issue and enhance your site’s security.
Let’s get started!
Install and Activate Really Simple SSL
To begin, you should first log into your WordPress dashboard. Then, from the sidebar of the dashboard, proceed to the ‘Plugins’ section. Following that, click on the ‘Add New’ option.
Now, you’ll see a search bar on the top right corner where you should type in ‘Really Simple SSL’ and click enter to search the plugin. Once you find the plugin, click on the ‘Install Now’ button.
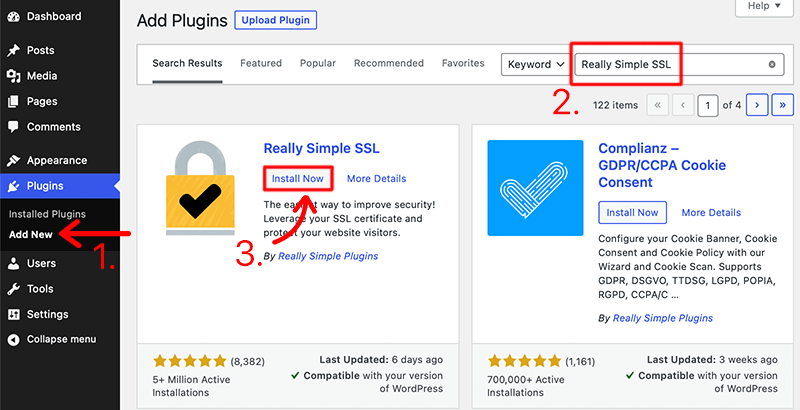
Once the installation process is successfully completed, you’ll see the ‘Activate’ option. Then, click on it.
And that’s how you install the free version of the Really Simple SSL plugin. Pretty easy right?
To learn more on how to install the plugin, check out our article on how to install WordPress plugin.
Scan and Detect SSL
After you’ve successfully installed the plugin, it’ll redirect you to the Really Simple SSL dashboard. Or else you can navigate yourself through ‘Settings > SSL & Security’ from your dashboard.
Next, the plugin will do the full scan and monitoring of your website and it’ll ask you to complete a few of the tasks before you can activate the SSL.
- Http references in your .css and .js files: change any http:// into https://
- Images, stylesheets or scripts from a domain without an SSL certificate: remove them or move to your own server.
- You may need to log in again.
- No SSL certificate has been detected. Please refresh the SSL status if a certificate has been installed recently.
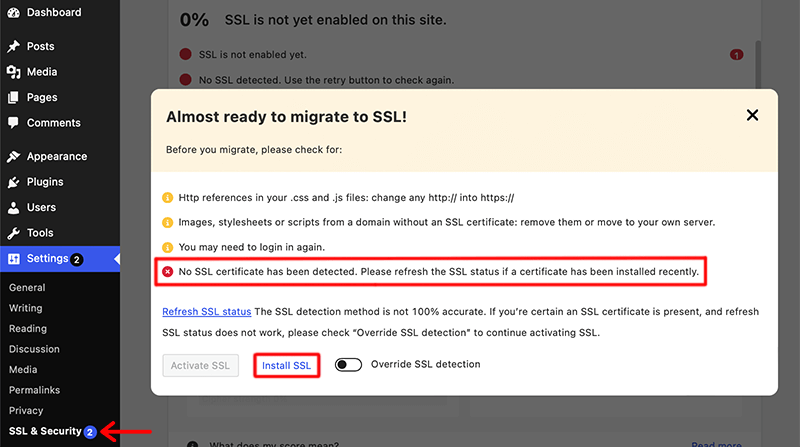
Among all the above-mentioned tasks, if you look at the last task it says ‘No SSL certificate has been detected’. This means that your website doesn’t have SSL activated. Hence, you need to click on the ‘Install SSL’ button.
Once you’ve clicked on the button, you’ll need to provide your email address and cPanel login credentials. After that, the certificate will be available to use, and then select the domain where you want to install the SSL.
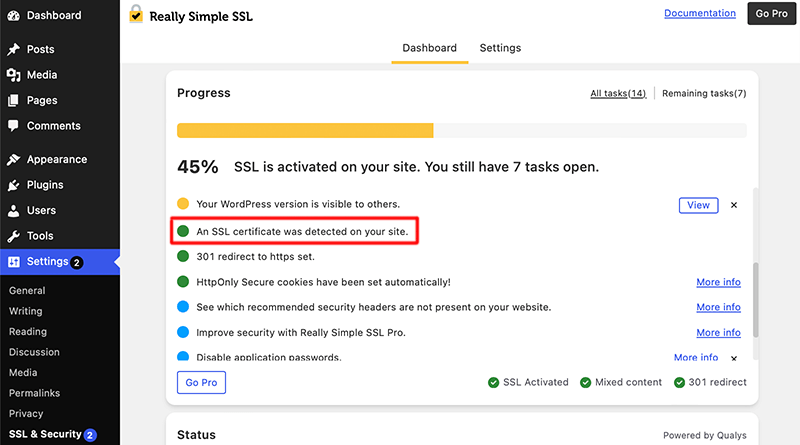
If the SSL certificate has been detected, then the ‘Activate SSL’ button will be visible on your screen.
With SSL activated, the plugin will guide you on additional steps to enhance website security. It offers articles and resources for optimizing security settings one by one.
In this way, you can easily install and activate the SSL certificate on your WordPress site using the Really Simple SSL plugin.
Free SSL Certificate Provided by Different Hosting Providers (Kinsta, Cloudways)
Many web hosting companies offer free SSL certificates with their plans. Although some free web hosting services may charge extra for SSL.
It’s a cost-effective option for budget-conscious users. However, budget-friendly hosting providers also provide free SSL certificates to enhance your hosting experience.
Let’s look at how some of the hosting services provide free SSL certificates with each hosting plan:
Using Cloudways
Discover the simplest process of installing and configuring Let’s Encrypt SSL certificates for your WordPress site using Cloudways.
Cloudways offers hassle-free support for Let’s Encrypt, making it easy to install and renew free SSL certificates for all your web applications.
If you’re using Cloudflare Enterprise, then an additional SSL certificate may not be necessary. However, for increased security, you have the option to install Let’s Encrypt on your Cloudways origin server.
Remember when you install a new SSL certificate, it’ll replace any existing certificate. This is because each application can utilize only one certificate at any given time.
Prerequisites
Prior to installing an SSL certificate on your WordPress website, ensure that you go through the following prerequisites:
- Before SSL certificate installation, confirm that your website is live, with correctly mapped domains and accurately configured DNS records.
- If you’re using any Web Application Firewall (WAF) services such as Cloudflare or Sucuri, then refer to the instructions in the following sections.
Cloudflare
When using Cloudflare for SSL certificate deployment, be cautious as it may necessitate temporary protection disabling, potentially exposing your site. WordPress users can enhance security with Bot Protection.
Cloudflare acts as a reverse proxy, making DNS changes and routing traffic. After certificate deployment, clear the Cloudflare cache.
Sucuri
When deploying an SSL certificate with Sucuri, temporarily disable their protection by reverting DNS records to your server.
Exercise caution, especially if your website is vulnerable to attacks. Contact Sucuri support to enable “Forward Certificate Validation” and you’ll be set to deploy the SSL certificate.
Other WAF Services
With other WAF services, temporarily disable WAF protection until the SSL certificate is deployed. Exercise caution, particularly for attack-prone sites.
With that, let’s see how to install SSL certificates on your WordPress site. Following these steps:
Step 1: Navigate to SSL Management
Firstly, you’ll need to log in to your Cloudways Platform. After that, you’ll reach your official Cloudways Dashboard. From the Dashboard, click on the ‘View all Servers’ link.

Next, you’ll need to choose the target server where your desired application is deployed.
Following that, click on the ‘www’ icon on the right side of your desired application. After that, select your application.
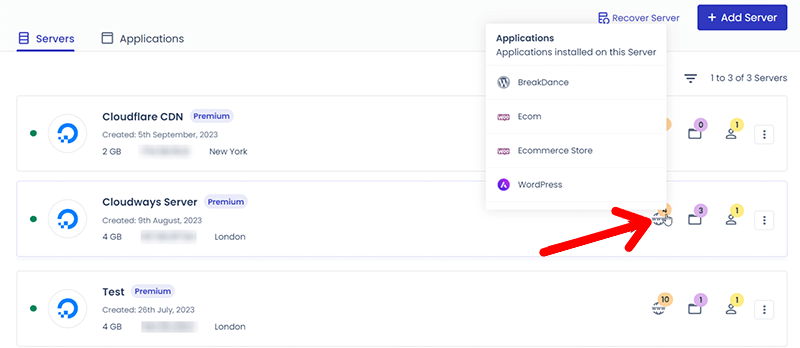
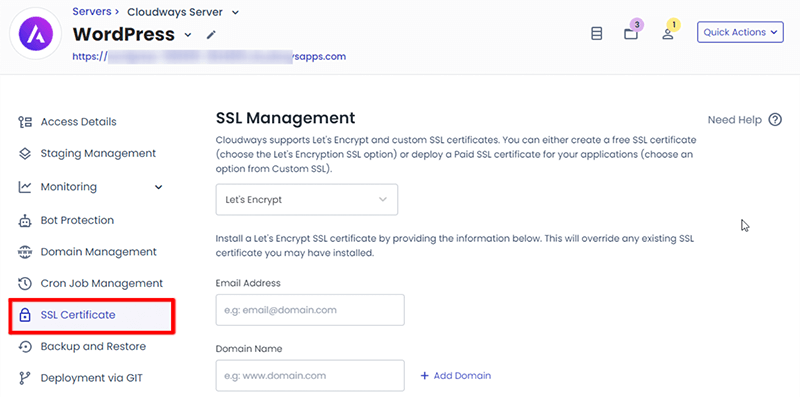
With that, it’ll redirect you to the application settings, and under the Application Management, click on the ‘SSL Certificate’ option.
Step 2: Deploy SSL Certificate
Once you click that, under the SSL Management section, you need to select the ‘Let’s Encrypt’ option from the dropdown menu.
Here comes the important part, you’ve two different choices to choose from – a single domain or multiple domains to secure with an SSL certificate.
Decide between two options: securing a single domain or multiple domains using an SSL certificate.
#1 Single Domain
As the name suggests, a single domain only secures just one domain, like sitenerdy.com. Hence, to deploy an SSL certificate on a single domain, follow the steps:
- Select the Let’s Encrypt certificate.
- Enter your email address and domain name.
- Next, click on the Install Certificate button.
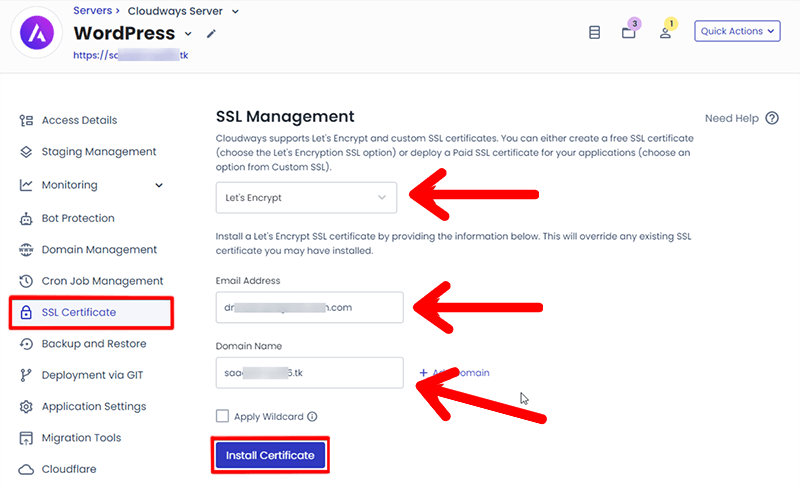
In this way, within a few minutes, The Let’s Encrypt SSL Certificate will be deployed to your WordPress website.
#2 Multiple Domain
On the other hand, multiple domains include additional domains and subdomains, such as cloudways.com, support.cloudways.com, and so on.
In this also, you get two choices for securing multiple domains: Multi-domain (SAN) Certificate and Wildcard Certificate.
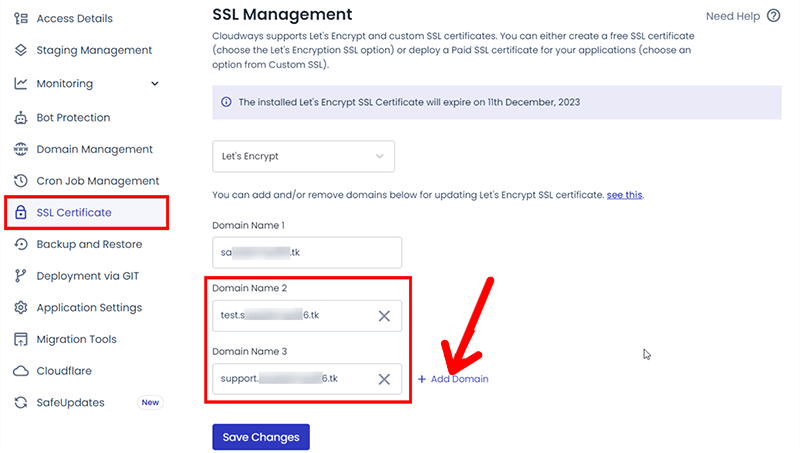
Option#1 Multi-domain (SAN) Certificate
- Enter your email address.
- Add your domain name. Also, you can add additional domains by clicking ‘Add Domain’.
- Click on the Install Certificate button.
Option#2 Wildcard Certificate
- Enter your email address.
- Add your root domain (without any prefix, e.g., “www”) in the Domain Name.
- Enable the Wildcard option.
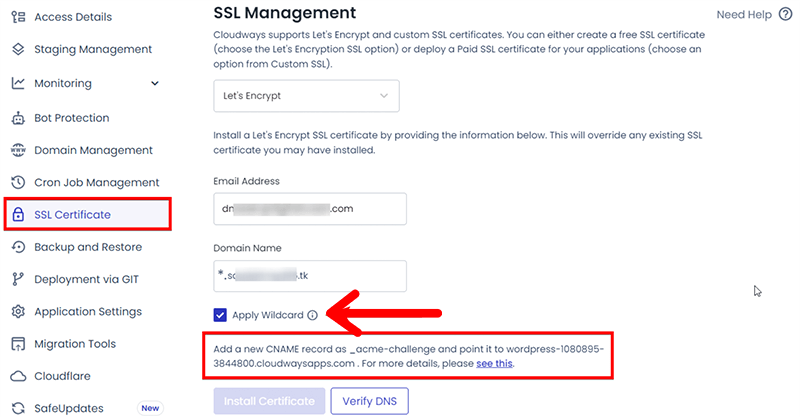
Important – To acquire a Let’s Encrypt Wildcard SSL Certificate, you must go through DNS authentication. This involves setting up a CNAME record for your domain within your DNS or domain registrar panel.
Congratulations! If you’ve followed these steps, then you know how to install and configure SSL certificates using Cloudways.
Using Kinsta
Learn how to install a new SSL certificate for your WordPress site on Kinsta by following the steps below.
Option 1 – Free Cloudflare SSL Integration
Kinsta automatically protects all verified domains using Cloudflare integration. Hence, it offers free SSL certificates with wildcard support. So, unless you have a specific need for a custom SSL, you won’t have to worry about manual SSL configuration on Kinsta.

This option is great for those who find it hard to configure the settings on their own. Not just that, Cloudflare itself is a great security enhancement for protection against DDoS attacks and more.
Option 2 – Install Custom SSL Certificate
Custom certificates are for Business and Enterprise customers who prefer to use their SSL certificates. Therefore, you need to obtain the certificate from any vendor you like, such as Comodo, DigiCert, GeoTrust, Thawte, or Trustwave.
Once you’ve purchased your custom SSL certificate, you’re ready to install it in MyKinsta.
Step 1 – Add Custom SSL Certificate
Firstly, you need to log in to your MyKinsta account and it’ll redirect to your MyKinsta Dashboard.
From your dashboard, navigate to ‘WordPress Sites > sitename > Domains’. Then, under the Domains List, click the three-dot icon next to the domain you want to add a custom SSL certificate to.
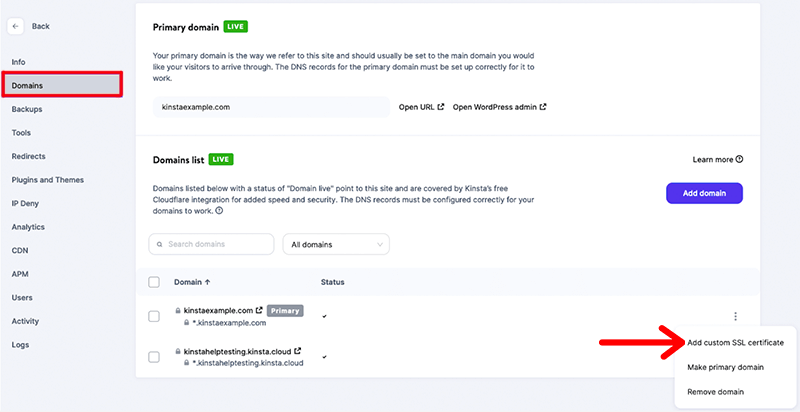
After that, select ‘Add custom SSL certificate’ from the dropdown menu.
Step 2 – Confirm Domains Covered by SSL
Following that, it’ll popup a confirmation box showing the domains that the custom SSL will cover. Here, all you need to do is click the ‘Next’ button to proceed ahead.
Step 3 – SSL and Private Key
This final step will ask you to add your private key (.key) and certificate (.cert, .cer., or .crt file).
Many SSL providers will send you a .crt or .cer file and a .ca-bundle file via email. You can open these files using a text editor such as Notepad++ or Visual Studio and copy the content from each file.
Begin by pasting the contents of your .crt file into the field labeled ‘certificate contents’. Afterward, paste the contents of the .ca-bundle file below the .crt content within the same field.
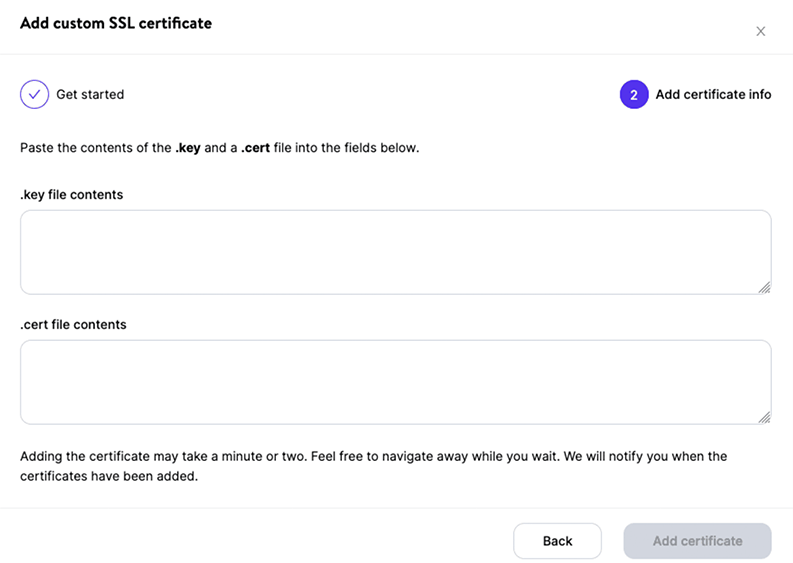
At last, click on the ‘Add certificate’ button to complete the configuration process.
In these ways, you can install an SSL certificate on your WordPress site on Kinsta.
Enabling Free SSL Certificate with Bluehost
Bluehost offers free SSL certificates for all domain names within your account. While SSL is typically assigned and installed automatically, some users may need to enable the certificate manually.
First of all, you’ve to log in to your Bluehost control panel. This will take you to the official Bluehost dashboard.
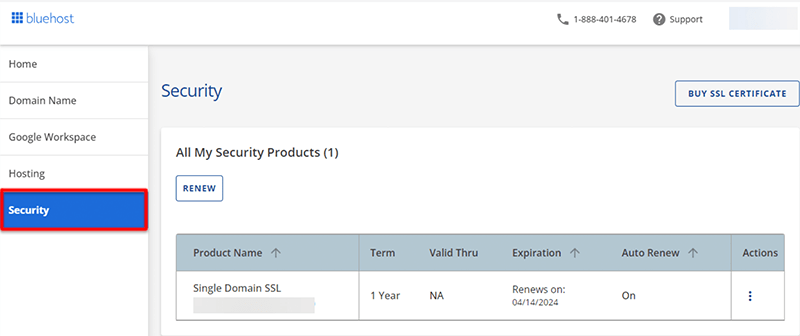
Next from the sidebar, click on the ‘Security’ tab. Once done, it’ll list out all your security products on the right-hand side screen. From there, you’ll be able to see the Single Domain SSL Active product in the list.
Following that, to check your website, click on the ‘Hosting’ option from the sidebar.
Then, you need to select the website you’re working with under the ‘Site’ section by clicking on the ‘Manage’ button.
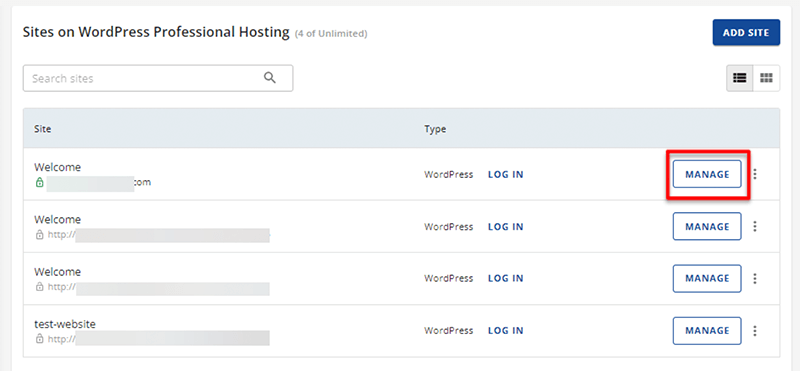
Lastly, click on the Security tab. A properly set up SSL certificate will display an ‘Active’ status. If it shows ‘In Progress’, you should expect an email with a link to your account for additional instructions.

In this way, you can make sure that your WordPress is always activated with an SSL certificate. The best part is that Bluehost automatically activates the SSL certificates when you host your website on their server. Isn’t it wonderful?
I. What to Do After Installing an SSL Certificate on WordPress?
Installing an SSL certificate is just the beginning. You must also make sure it’s correctly set up on all your posts and pages. Let’s explore what comes next after adding an SSL certificate to your WordPress website.
How to Force HTTPS?
Congratulations! You’ve successfully installed and activated the SSL certificate into your WordPress website. However, are you sure that your website is completely secured now? We’ve got a doubt.
Although installing an SSL certificate enhances your security, you must provide a more secure experience to your visitors.
For that, you need to force HTTPS into your WordPress site. This means that you need to use the secure URL version with HTTPS instead of HTTP.

Once you’ve installed the SSL certificate, you’ll notice that you’ve now two website URL versions:
- The old HTTP version http//example.com
- The secure https version https://example.com
Hmm, this would definitely create a chaos of madness with which one of the URLs versions to use. We all know which one to use. Do you know?
Thus, we’ve to redirect all traffic from the old version of our URL site to the new one. It means that if someone attempts to visit the old, unsecured version of your website (HTTP), they’ll be redirected to the new, secure version (HTTPS) automatically.
There are a few ways to do this, let’s check out some of the easiest and fastest ones to do so:
Option 1 – Force Redirect to HTTPS using Really Simple SSL WordPress Plugin
Redirecting your WordPress site to go to HTTPS is now simpler. Use the ‘Really Simple SSL’ plugin, and you can make the switch with just a few clicks.
In our previous step, we’ve already learned how easily the plugin can be installed. With that, it also automated the process for you to activate the SSL certificate.
Hence, once the SSL certificate is activated, it automatically does your job to force redirect HTTP to HTTPS. That’s it! Now all the traffic of your website will be redirected to the HTTPS version.
Option 2 – Force Redirect to HTTPS using the .htaccess file
Next, we’ve got the quick-fix solution. That is to use the htaccess file to redirect all visitors to the HTTPS version of the site.
Here’s the simple step you can follow to use .htaccess to redirect your WordPress site from HTTP to HTTPS:
- Check for a .htaccess file in your website’s main directory.
- If there is, then open it and add the following code:
- If not, then create a new .htaccess file, followed by adding the code.
RewriteEngine On
RewriteCond %{HTTPS} off
RewriteRule ^(.*)$ https://%{HTTP_HOST}%{REQUEST_URI} [L,R=301]
If you’re unsure about where to insert this code in the .htaccess file, then it’s often best to place it at the top of the file.
The code within the .htaccess file has specific functions:
- Activates the RewriteEngine, enabling request redirection.
- Verifies if the request is made over an insecure HTTP connection (RewriteCond %{HTTPS} off).
- If it is, the code employs RewriteRule (RewriteRule ^(.*)$ https://%{HTTP_HOST}%{REQUEST_URI} [L,R=301]) to redirect the request to the HTTPS version of the site.
After adding the code, remember to save the .htaccess file and upload it to your website’s main folder.
To confirm the redirection is functioning correctly, attempt to access both the HTTP and HTTPS versions of your site. When properly configured, all HTTP requests should automatically redirect to the HTTPS version. You can also utilize online SSL checker tools to ensure your site is correctly configured and redirects to HTTPS.
Option 3 – Using Web Hosting (via Kinsta)
We added this option 3 too to let you know that most of the hosting providers do come up with an option to force HTTPS. Among them, Kinsta is one such hosting that lets you enable ‘Force HTTPS’ via MyKinsta Dashboard.
Once your SSL certificate is installed, you can enable HTTPS redirection in the ‘Tools’ section of MyKinsta. This feature ensures that all requests to your website are automatically forwarded to HTTPS.
Kinsta’s HTTPS redirection tool offers two choices: ‘Force all traffic to the primary domain’ and ‘Use requested domain’. For standard WordPress sites, we suggest the first option, as it enforces a 301 redirect to the HTTPS version of your main domain.
Similarly, the second option is handy for WordPress multisite setups with multiple domains assigned to the same site.
How to Check Your SSL Certificate?
To check if a website has an SSL certificate, just look at your browser’s address bar.
- If the website’s address starts with HTTPS instead of HTTP, then it’s secured with an SSL certificate.
- Secure websites display a locked padlock symbol. You can click it to view security details. The most reliable sites have green padlocks on the address bar.
- When a connection is insecure, browsers show warning signs. These signs may include a red padlock, an open padlock, a line through the website’s address, or a warning triangle on the padlock symbol.
3. How to Renew an SSL Certificate?
Renewal of SSL Certificates is one of the crucial parts of the certificate lifecycle. SSL certificates have an expiration date, just like passports. Trying to use them before or after this date won’t work for authentication.
SSL certificate renewal involves obtaining a new certificate for the same public key used in the expiring one. The certificate mostly expires after one or two years from the purchase date.
To ensure the trust of your website visitors, it’s important to renew your certificate during the last quarter of its validity period. Renewing your SSL Certificate also keeps you up to date with the latest SSL versions and encryption methods.
Renewing an SSL Certificate is a straightforward process. If you’re an existing customer of a certificate provider, then you don’t need to worry about the expiration date. The system ensures you’re reminded of the expiration date, providing a smooth experience and preventing last-minute hassles.
You can renew SSL Certificates starting 60 days before they expire, and reminders will begin during this period.
Renewing your SSL Certificate before it expires is crucial to maintain website protection. If it expires, then renewing means repurchasing, requiring you to go through the initial process. Until the renewal process is complete, your site remains unprotected.
Renewing an SSL certificate before it expires not only reduces the workload on Certificate Authorities but also streamlines the process. CAs often retain validated information, simplifying renewal when business details remain unchanged. This approach can save you from going through the entire process, making the renewal smoother and more efficient.
Plus, renewing a certificate is not the end; you must also install it. New certificates require validation to ensure continued protection once the old one expires.
J. Common SSL Certificate Errors (& How to Fix It)
SSL certificates are essential for websites today, but like any website component, they can sometimes cause errors. The good news is that many common SSL errors are easy to fix.
Renewing or reinstalling the certificate can often be done quickly. Additionally, your web host might even assist you, making it one less concern for you!
Many types of SSL certificate errors can happen on your site. Let’s explore the most common ones.
SSL Certificate Not Trusted
SSL certificates are essential for website security and trust. These certificates are issued by certificate authorities like Comodo SSL, DigiCert, and Let’s Encrypt. Choosing a reputable authority is crucial, as self-signed certificates or those from untrusted sources can lead to errors.
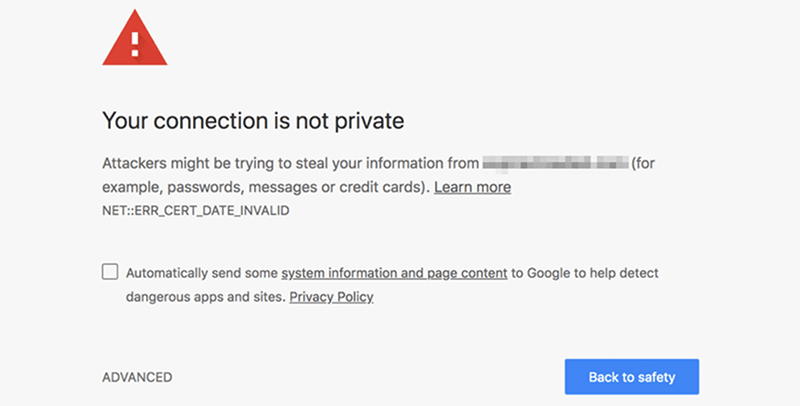
One common error is the ‘certificate not trusted’ issue, which can even occur with certificates from well-known authorities. In such cases, the browser can’t verify the certificate’s validity, possibly due to a temporary glitch. Reloading the page might resolve it.
While this error usually doesn’t block access, it raises security concerns. Browsers may warn visitors about potential risks, which can deter them from using the site. Trustworthy SSL certificates from reputable authorities are vital for a secure and user-friendly website experience.
Expired SSL Certificate
SSL certificate renewal is crucial to verify website ownership and security. Authorities notify you before certificates expire, ensuring timely renewal.
Renewing SSL certificates is straightforward, particularly with free certificates like Let’s Encrypt. These certificates enable renewal through terminal-based processes. Moreover, some web hosts automate or offer manual renewal.
In cases where errors persist despite having valid certificates, clearing the Operating System (OS) SSL cache becomes essential. This step helps eliminate outdated information that might be the root cause of certificate errors.
Mixed Content Error
This is one of the few SSL errors that doesn’t refer to certificates in its message. The ‘mixed content’ error arises when a page loads over HTTPS. This error occurs when the page contains elements that load via HTTP, such as images or scripts.
Depending on your browser, you might encounter a complete error message. Alternatively, you might just receive a warning through the HTTPS icon in the navigation bar.
This error might not significantly impact the user experience. However, it’s important for every component of your website to load over HTTPS to ensure the security of data transmission. This way, you can ensure that all the data sent from your website is secure.
SSL Certificate Revoked
The ‘Revoked Certificate’ error typically signifies that your SSL certificate has been invalidated by the issuing authority. This could result from inaccuracies in your certificate setup or the compromise of your security key.
Usually, you can resolve this issue by requesting a re-issued certificate. If you can’t get a new certificate, reach out to the certificate authority to find out why it was revoked.
How to Fix Common SSL Certificate Issues in WordPress?
In this section, let’s just look at how to fix the most common SSL issues in WordPress.
Diagnose the Problem
If you’re uncertain about the error causing the SSL error, then use this method to gather more information about it.
You can find dozens of SSL diagnostic tools online that can help you find and fix any issue related to the SSL certificate. Some of them are SSL Checker, CSR Decoder, SSL Certificate Checker, Certificate Key Matcher, and more.
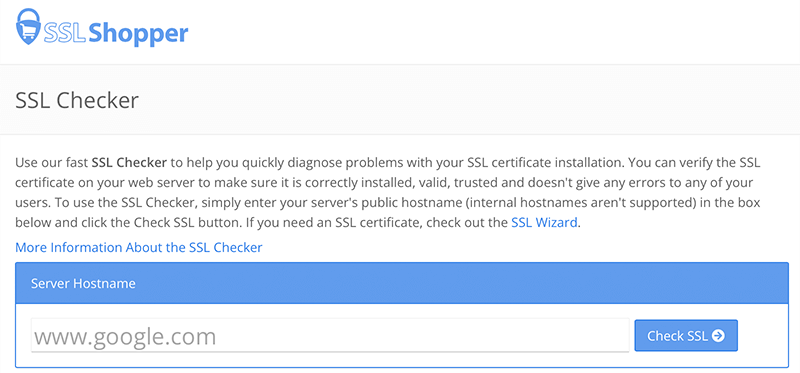
Running an SSL certificate test on your website provides a detailed report highlighting any errors. Focus on the errors indicated, which may include issues with trust or expiration, clearly presented in the report.
Reinstall the SSL Certificate
The process of installing an SSL certificate varies based on the certificate type and web host. For free certificates like Let’s Encrypt, installation and renewal can be done via the terminal. Typically, the terminal or hosting dashboard is used for installation.
Many web hosts automate SSL certificate generation when you direct your domain to their nameservers. If your host lacks this feature, then consider switching to a provider offering free SSL certificates with their hosting services.
Get a Wildcard SSL Certificate
If you’re experiencing a name mismatch error, then consider getting a wildcard SSL certificate. This certificate secures your main domain and all its subdomains, providing comprehensive coverage.
For instance, you can get one multi-domain SSL certificate for the following names –
- names:example.com
- mail.example.com
- blog.example.com
- support.example.com
K. FAQs – Frequently Asked Questions
1. Why do you need an SSL certificate?
An SSL certificate is essential for website security, encrypting data, verifying authenticity, and building user trust. It protects sensitive information during transmission, making it crucial for safeguarding user privacy. Especially in eCommerce, online banking, and any activity where security is crucial.
2. What is Let’s Encrypt?
Let’s Encrypt is a free certificate authority that automates the issuance of TLS/SSL certificates, ensuring secure communication between your web server and users. It offers various client options and seamless integrations.
3. How to install SSL without cPanel?
Installing an SSL certificate without cPanel access is achievable by utilizing your web host’s proprietary control panel. Notably, not all web hosting providers offer cPanel for site management. In such cases, they provide their own custom hosting dashboard, which you can use to install your SSL certificate successfully.
4. How many SSL certificates can be used on one website?
Currently, you can only use one SSL certificate for each application. When you clone your server, the SSL certificate doesn’t duplicate. You’ll need to install a new SSL certificate on your new server.
Conclusion
That’s the end of our easy beginner’s guide on how to install an SSL certificate on WordPress. We hope that it’ll help you understand the importance of SSL on your website.
In conclusion, securing your WordPress website with an SSL certificate is an essential step. It protects your users’ data, builds trust, and improves your site’s search engine ranking.
With this easy guide, you can navigate the process of SSL certificate installation, whether you opt for a free certificate from Let’s Encrypt or a paid one from a trusted provider. Take this proactive step to ensure a safer and more trustworthy online experience for your audience while staying ahead in the digital landscape.
If you have any further queries on how to install an SSL certificate on WordPress, then please leave a comment below. We’ll try to get back to you as soon as possible.
You may also want to explore our guide on the best redirect plugins for WordPress and how to update WordPress to the latest version.
And, if you like this article, then please take a second to share this guide on your social media accounts and spread the message!
Lastly, don’t forget to follow us on Facebook and Twitter for more updates.
