Do you want an honest Kinsta WordPress hosting review? Or, planning to build and host your website on the internet? If yes, then here we go!
No doubt, managed WordPress hosting providers are quite reliable and offer great performance and lightning-fast support. Kinsta hosting is one such managed WordPress hosting service.
Kinsta is a WordPress-specific host that offers managed plans with various types of web hosting solutions. It allows you to create, manage, and grow your site without technical skills.
At the same time, Kinsta hosting isn’t that exactly cheap though. Now the real question arises – whether this hosting provider is worth its cost?
To answer your question, in this article we’ve got a complete review of the Kinsta hosting service. In this review, we’ll try to provide you with an unbiased review of its key features, installation, pricing, support, and more.
So, let’s dive in!
Overall Rating
Kinsta is one of the best cloud hosting services that come with managed WordPress hosting solutions. It guarantees to provide industry-leading speed with its fastest CPUs and other infrastructure.
Not just that, but its infrastructure is also powered by the Google Cloud Platform. Therefore, it makes your web hosting faster, highly scalable, and more secure.

Moreover, if we look into the user rating of Kinsta on Trustpilot, then, it scores 4.3 out of 5 stars based on 530 user reviews. Similarly, according to G2 Reviews, Kinsta has an amazing rating of 4.8 out of 5 stars given by 439 user reviews. Awesome, isn’t it?
Further, we also strongly believe in those ratings, so we would also like to give a solid 4.5 out of 5 stars to Kinsta hosting. We deducted the remaining 0.5 ratings since the monthly visits and storage allocation are a bit low relative to the high cost. Even more than that, we definitely recommend you all try it yourself.
Further, we also strongly believe in those ratings, so we would also like to give a solid 4.5 out of 5 stars to Kinsta hosting. We deducted the remaining 0.5 ratings since the monthly visits and storage allocation are a bit low relative to the high cost. Even more than that, we definitely recommend you all try it yourself.
With that said, let’s explore even more and try to find out whether Kinsta is worth it or not.
Pros and Cons of Kinsta Hosting
First, let’s look at the pros and cons of Kinsta hosting. Here we go!
Pros of Kinsta
- It guarantees 99.9% uptime.
- Powered by Google Cloud Platform, making it a reliable and scalable cloud hosting provider.
- Comes with a user-friendly MyKinsta dashboard.
- Further, it offers daily backups and free migration of sites to Kinsta.
- Allows its users to scale up and down their resources and plan based on site needs.
- Provides customer support in several languages. Such as Spanish, Italian, Portuguese, and more.
- Also, includes a 30-day money-back guarantee policy.
Cons of Kinsta
- Comparatively, its plans are a bit expensive compared to other hosting service providers.
- It doesn’t include any email hosting service.
- Kinsta cannot be installed on any other CMS except for WordPress.
- Also, it doesn’t include premium support options like tickets and phone support.
With that, let’s kick start the Kinsta hosting service review. First, let’s begin with a brief introduction to Kinsta.
A. What is Kinsta? – Overview
Kinsta is a popular managed WordPress hosting provider that was founded in early 2013. It’s a cloud-based hosting powered by Google Cloud which gives you access to the same infrastructure that Google uses.
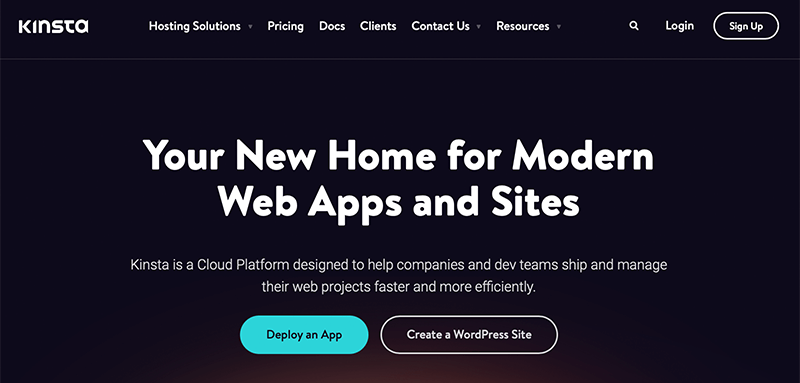
As it’s a managed hosting company, it handles everything related to web hosting including managing and maintaining a server. As a result, their customers won’t have to get their hands dirty. Instead, they can focus on creating content for their site and marketing it.
Kinsta offers various types of web hosting solutions such as WordPress, database, WooCommerce, and application hosting. Similarly, you can use it to create and host any kind of website – eCommerce site, enterprise, online course, or membership site.
Moreover, it comes with a user-friendly MyKinsta dashboard from where you can effortlessly scale your resources as per your need. Even more, it comes with a built-in Kinsta APM (Application Performance Monitoring) tool that identifies the performance issues slowing your site down.

In addition, it has over 35 data centers across 5 continents. Plus, it offers a free Cloudflare CDN service for faster and more secure WordPress sites. This will work across 200 cities in 100+ countries.
Additionally, it offers exclusively the highest-end CPUs and global availability thanks to Google’s C2 machines. Thus, it seems to improve the performance of your site from 30% all the way up to 200%!
Some of its notable features include a free SSL certificate, Cloudflare CDN integration, a local site staging environment, premium migration, multilingual support, and more.
Therefore, Kinsta is undoubtedly one of the best-managed WordPress hosting providers.
Now, with this short introduction, let’s move forward and learn more about Kinsta hosting features.
B. Major Features of Kinsta WordPress Hosting
Kinsta offers a wide range of features to help you launch and expand your WordPress website.
So, let’s explore the features of Kinsta in detail to make sure that this hosting is worth the price it has.
1. Easy-to-use MyKinsta Dashboard
You’ll find that most other hosting providers have been using cPanel to manage the servers. Although it’s pretty functional, still most users find it flexible and beginner-friendly.
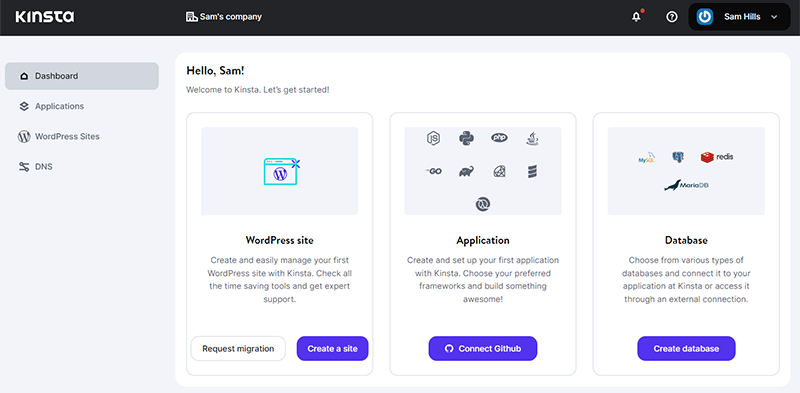
Now, on the other hand, Kinsta comes with an intuitive custom dashboard (MyKinsta) to manage your site. It’s a pretty simple and easy-to-navigate dashboard that manages all your WordPress sites, apps, and databases from one place.
Nevertheless, Kinsta has developed its very own WordPress platform. And has taken it upon itself to build and configure every setting to already fit your WordPress needs.
As we look into the MyKinsta dashboard, we’ll find all the tools and features to manage your website hosting on the left side.
Similarly, on the right, you’ll get the respective stats and options for the menus that you’ve selected from the left sidebar.
Moreover, through your custom dashboard, you can track your plan usage, site metrics, and hosting tools. Plus, you can conduct manual and external backups.
Indeed, it allows you to manage the cache, debug your site, switch on the CDN, and many more. And can add unlimited colleagues or clients, manage their access settings, plus customize the development workflow.
2. Dedicated Hosting Solutions
Another best feature of Kinsta is that it offers dedicated solutions with tailor-made WordPress hosting solutions. This means that you can use it to host any kind of site. As a result, you can find the perfect plan that fits your business the most.

With that, let’s lets look at the list of dedicated solutions for different businesses that Kinsta has to offer –
- Agencies – Kinsta introduced an Agency Partner Program that lets you build, manage, and launch client sites with ease. It’s a dedicated solution for web and creative agencies.
- Enterprise – It’s a flexible enterprise hosting solution designed for large-scale WordPress projects. It’s best known for performance, security, scalability, availability, and expert support.
- Small Business – For those growing small businesses, Kinsta’s small business hosting is the best. It provides great usability, conversion, and visibility features for your small business site.
- eCommerce Sites – To your surprise, Kinsta also includes managed WooCommerce hosting services. It guarantees to speed up your website by up to 200%.
- LMS (Learning Management System) – For building online courses to coaching, LMS WordPress hosting is there for you. It includes LMS tools, server-level caching, free DDoS protection, and more.
- Multisite – It’s the best WordPress multisite hosting solution to build and manage a community network for colleges, universities, etc.
- Membership Sites – Kinsta offers performance-focused hosting for growing communities of WordPress membership sites.
3. Powered by Google Cloud Platform and Infrastructure
We all know Google, it has got a pretty good handle on web performance and scalability.
Now when its power indulges with Kinsta it’s definitely going to provide pretty awesome speed and reliability.
Therefore, Kinsta is backed up by our very own Google Cloud Platform. This means that Google will give Kinsta access to the same infrastructure that Google uses for Google Search and YouTube.

Further, Kinsta uses the Premium tier instead of the cheaper Standard tier from Google. Indeed, it uses Google’s global network with unparalleled quality of service.
Besides powering its hosting with Google, Kinsta also uses a hosting stack composed of the latest technologies. Such as
- PHP 8.0/8.1; It offers performance and security benefits over older versions of PHP.
- NGINX; It can easily beat out the Apache server used by many hosts, especially when it comes to performance under scale.
- MariaDB; This offers better performance than MySQL databases.
- Premium DNS; Unlike free DNS, it offers faster performance.
Above all, it also includes developer-friendly tools such as SSH, Git, support for reverse proxies, power built-in caching, etc.
4. Hack-free Security Options
In today’s day of time, WordPress has power over 43% of all the websites on the internet. As a result, it becomes an attractive target for hackers and other malicious users to screw up your website.
Therefore, it’s really important to secure your WordPress site if you want to stay safe.
While looking into it, Kinsta takes the responsibility to handle a lot of WordPress security for you.
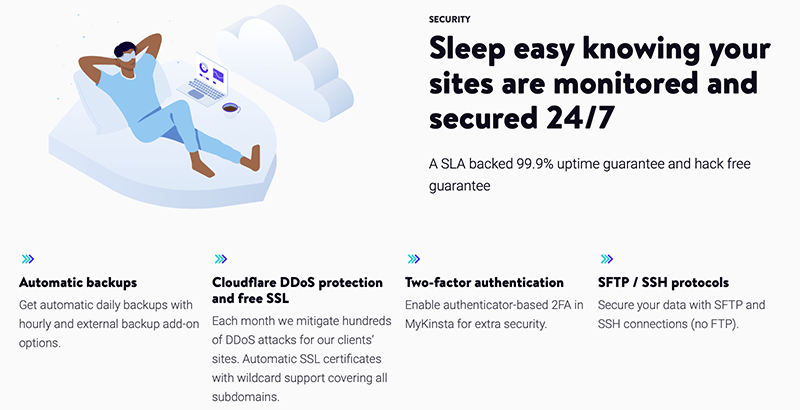
With each Kinsta plan, you’ll get Cloudflare Enterprise CDN without any additional cost. Similarly, it offers free SSL certificates for your websites. Indeed, it supports free wildcard SSL that secures your root domains having unlimited subdomains.
Additionally, it helps with detecting and blocking DDoS attacks or any malicious activities. For your good, it conducts daily backups and also lets you perform manual and external backups too.
Another part about Kinsta is that if anything goes wrong, Kinsta offers a hack-fix guarantee. This means that the company will clean your site and get it back in working order for free. Isn’t it GREAT!
Beyond that, Kinsta also offers two-factor authentication for your hosting account and GeoIP blocking to block IP addresses from specific places.
5. Hassle-Free Migrations
If you want to move your existing WordPress site from any host to Kinsta, then you don’t have to worry about it.
As Kinsta provides unlimited free migrations from any host in all of its plans. To your good, they’ve got a dedicated team of experts who will migrate your WordPress site to Kinsta in no time. This is how you save your time and money!
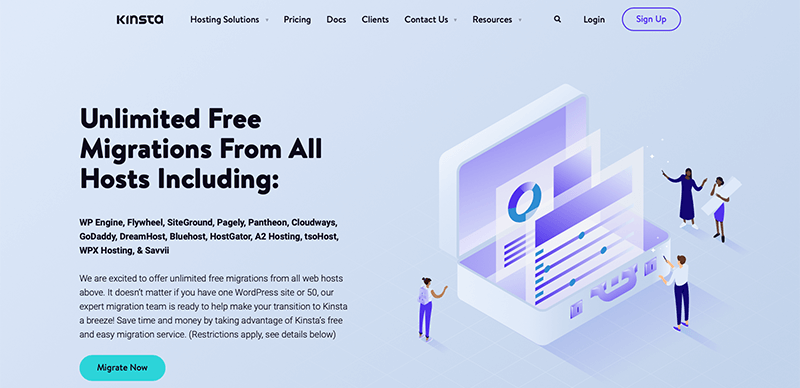
All you need to do is sign up for an account, and use the migration form from your Kinsta dashboard to migrate your website. After that, your request will be sent to their migration team and they’ll schedule a time and migrate your site for you.
Not just that, they’ll even test your site before making it live to make sure that everything works as intended.
Likewise, Kinsta offers both free and premium migration plans. Although the free one is good for the moment it still comes with some restrictions. Such as:
- It doesn’t support multi-site websites.
- Normally, it’ll take upto 2 business days to migrate your website to Kinsta. However, in some cases, it has even taken longer.
- Besides that, it’s not ideal for complex dynamic sites like eCommerce or membership.
Therefore, if you don’t want such restrictions, then go with a premium migration. And each premium migration will cost you $100.
6. DevKinsta – Local WordPress Development Suite
Did you know that with Kinsta you can create a copy of your live site as a staging site and can make all the changes there?
A staging environment is a developer-friendly tool that helps test new features, updates, plugins, and themes on your website’s clone. Once you’re done and satisfied with the changes, you can push your stage site to the live website.
With this, Kinsta offers a free standard staging environment with all its plans. This will allow you to create and use up to 6 stage sites for testing and development separately.
It makes it easier for its users to switch between their live site and their staging site environments. Indeed, Kinsta will automatically create a backup of the live version of your site whenever you push your staging site live. This will make it easier to roll back the change if needed.
On the other hand, Kinsta also offers premium staging environments. This premium staging environment will cost $20/month which includes 12 CPUs and 8 GB memory.
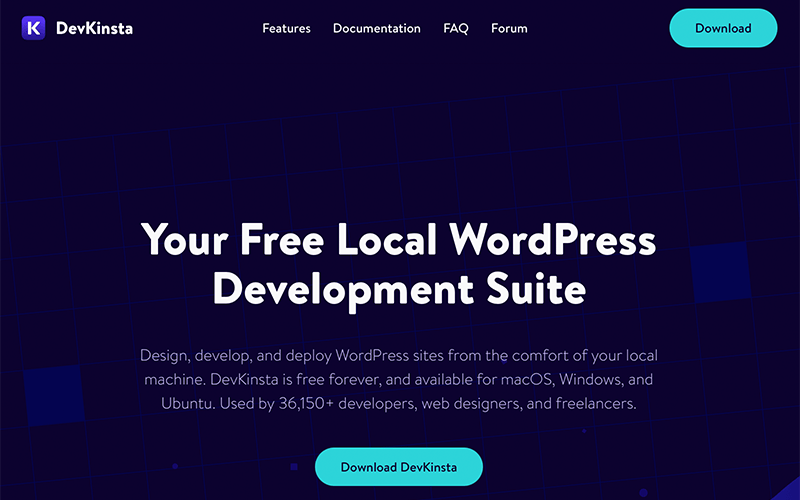
Additionally, Kinsta offers a free local WordPress development suite called DevKinsta. It’s a dedicated local development tool for WordPress to design, develop, and deploy WordPress sites on your local machine. Further, it lets you add a local database and use email management tools for your sites.
7. Site Management
We’ve already mentioned how amazing the Kinsta dashboard is. But did we mention how well it’s able to manage your site right from the dashboard?
With Kinsta, you can easily save time on repetitive site management tasks. Not just that, the MyKinsta dashboard would not only manage your sites but also prioritizes performance and security.
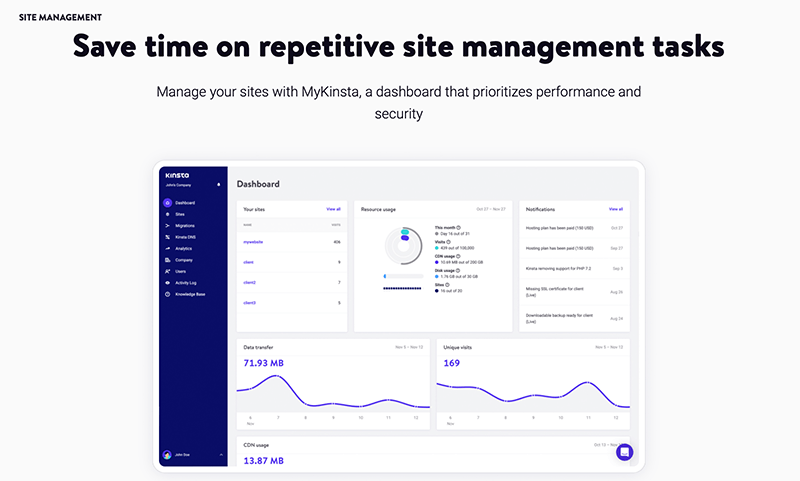
At first, it allows you to assign unlimited colleagues or client user roles to your live and staging sites. Even more, you can quickly and easily change PHP versions. As for now, it offers PHP 8.1 for all environments.
Likewise, it provides access to multiple environments including production, non-production, additional, and template. Indeed, you can add sites with a few clicks, update all plugins and themes, or transfer a site to another company.
Moreover, it even lets you add your logo to the Kinsta-branded parts of your WordPress admin.
8. Kinsta Add-ons
By far we’ve already mentioned several cool features of Kinsta in the above points. However, if you want to supercharge your site even more, then Kinsta comes with a selection of premium add-ons.
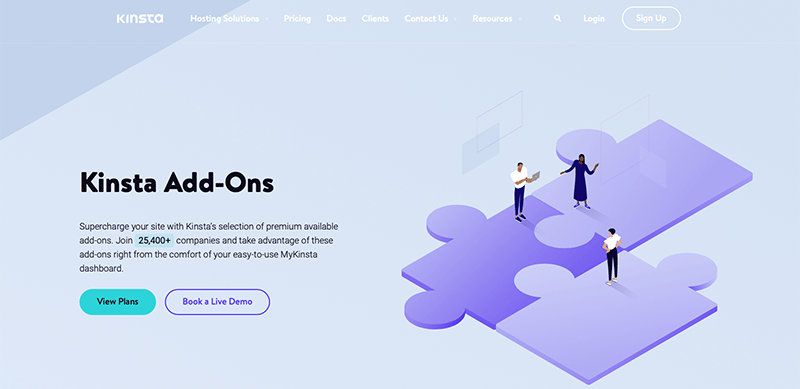
Although the available free tools and features that come with Kinsta are as good as they should be. But if you’ve got a budget and desire to push even much further, then you much definitely check out Kinsta Add-ons.
Some of the premium add-ons that can help you take your site to the next level are as follows. In fact, you can access them all right from your MyKinsta dashboard.
- Nginx Reverse Proxy ($50/month/per site) – It supports loading WordPress from a subdirectory while a separate website loads at the root domain.
- Redis ($100/month/per site) – It’s an open-source in-memory data structure store that is used as a database, cache, and message broker.
- Premium Staging Environments ($20/month per environment) – Each premium staging environment comes with 12 CPUs and 8 GB of Memory.
- Scale Disk Space (20 GB increments at $20/month per hosting plan) – It comes with transparent overage pricing that allows you to plan and calculate exactly what you need in advance.
These are the few key features of the Kinsta hosting platform that you shouldn’t miss out on in this review. With that, let’s move to the next section to learn how to get started with Kinsta.
C. How to Purchase a Kinsta Hosting Plan?
Before we begin, let’s look at how we can purchase a Kinsta hosting plan.
Like any other hosting solution, Kinsta is also extremely easy to purchase and use. Indeed, it’s so easy that even beginners can purchase and set up the hosting without any hassle.
Now let’s look at how you can choose and purchase the hosting plan on Kinsta within a few clicks:
Step i: Choose a Plan
Go to the Kinsta official website and click on the Pricing option from the top menu bar. Then, it’ll navigate you to the pricing page where you’ll find various price options for its hosting solutions.
For now, we’re going with a managed WordPress hosting plan. In this managed WordPress hosting plan, you’ll find 7 different plans available.
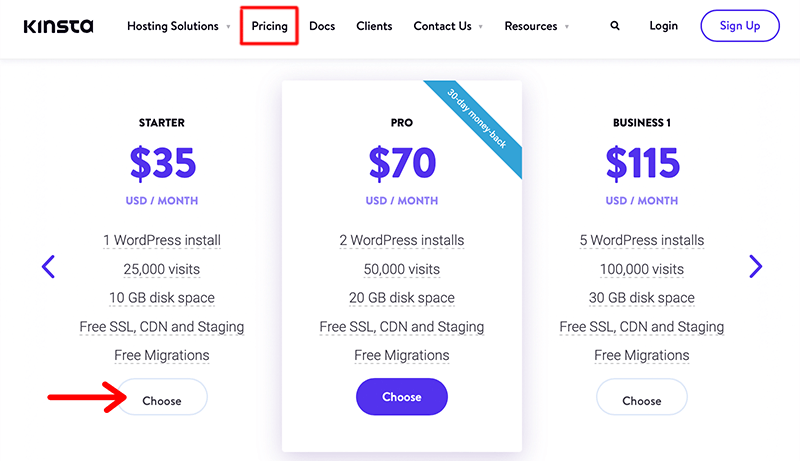
Once you’ve decided on your plan based on your website requirements, click on its Choose button.
Step ii: Create an Account
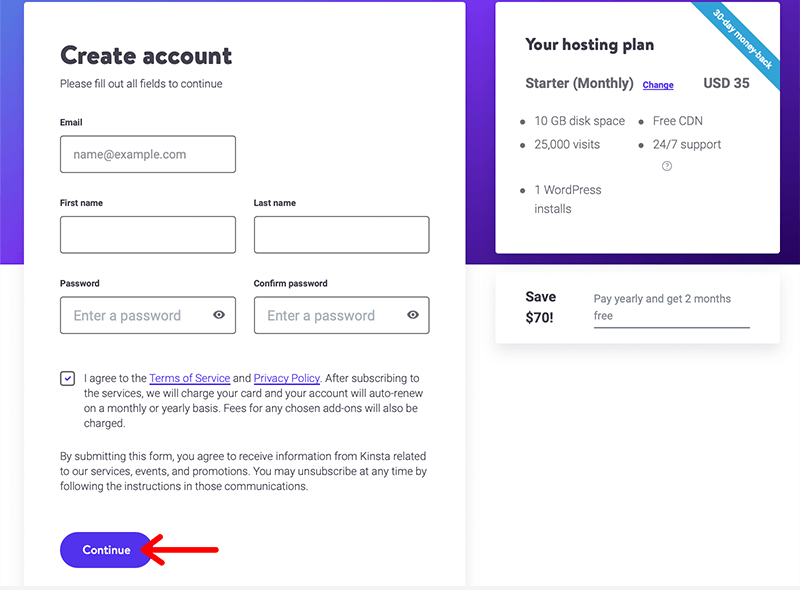
Now that you’ve selected a plan, it’ll ask you to create a Kinsta account. For that, it’ll take you to the Signup page. Here, you’ll find a signup form that’ll ask you to fill up the form with your account information. Such as email address, username, and password.
Once you’ve filled in the required information, click the Continue button.
Step iii: Fill up the Payment Information
After that, it’ll redirect you to the Payment process. In this, you need to provide genuine payment information if you want to purchase the solution.
After the purchase has been completed, it’ll navigate you to the MyKinsta dashboard.

In this way, you can easily choose the desired plan and move toward purchasing that plan. Congratulations, if you’ve followed these steps and have been successful in purchasing your Kinsta plan.
D. Creating a Website with Kinsta Hosting
So with the purchase of a Kinsta plan and having access to your MyKinsta dashboard, it’s time to look more into it. In this section of the Kinsta WordPress hosting review, let’s look at how easy it is to work with MyKinsta.
For now, let’s start with how we can add a site to Kinsta.
i. Add a Site to Kinsta
From your MyKinsta dashboard, click on the Create a site button of the WordPress site option.
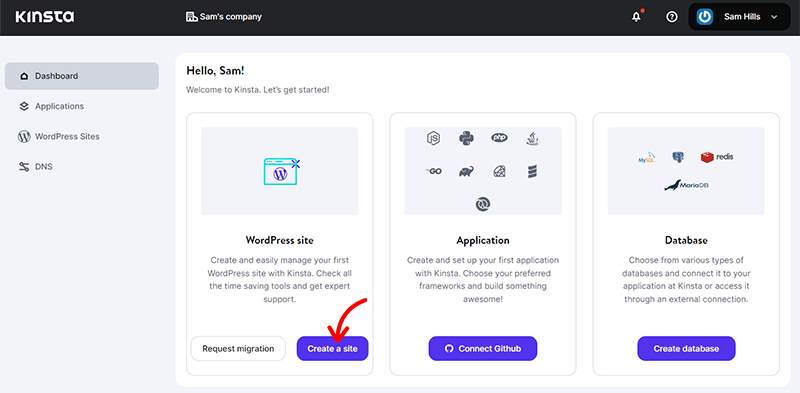
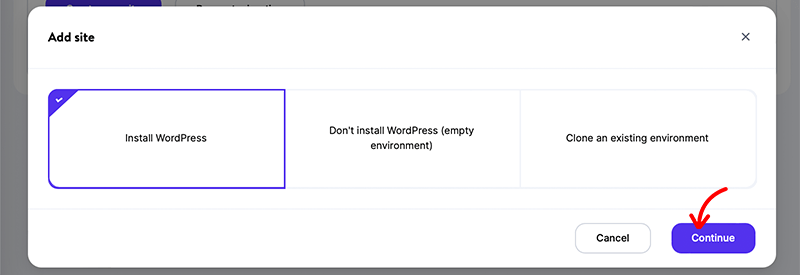
With that, it’ll pop up an Add Site dialogue box which will display three different options. They are:
- Install WordPress
- Don’t install WordPress (empty environment)
- Clone an existing environment
For this tutorial, we’re going to create a WordPress site, so click on the Install WordPress option. Then, click on the ‘Continue’ button.
With that, it’ll ask you to enter the name of your site. Following that, you need to select a preferable data center location among 35 options. This will allow you to place your website in a geographical location closest to your visitors.
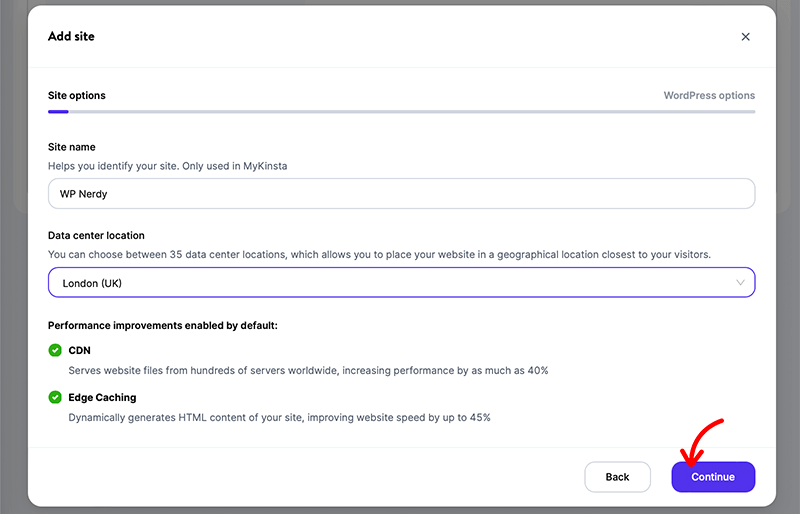
Then, click on the Continue button to move forward to the next step.
After that, you need to enter the WordPress site title that will appear across the top of every page of the site. Likewise, you also need to fill out a suitable WordPress admin username, password, and email for your WordPress site. Also, make sure to choose a language for your site.
Besides that, you’ll also find a list of tools that you can choose for setting up your WordPress site. They are:
- Install WordPress multisite
- Install WooCommerce
- Install Yoast SEO
- Install Easy Digital Downloads
Now, with respect to your website requirement, select the desired tools that you want to install on your website. Lastly, click on the Continue button to save the changes.
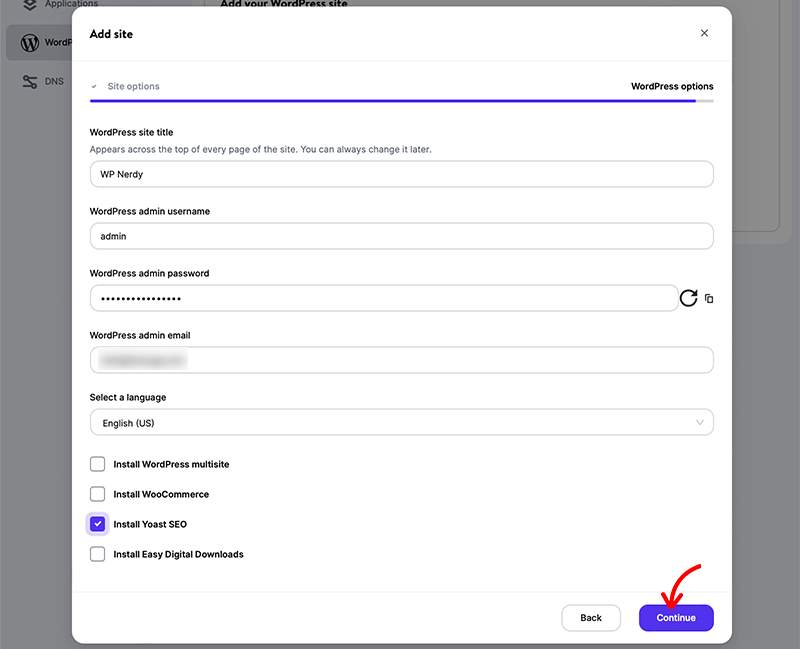
Finally, with that click, Kinsta will start creating a site for you. Although, it might take some time to complete creating your website, so be patient.
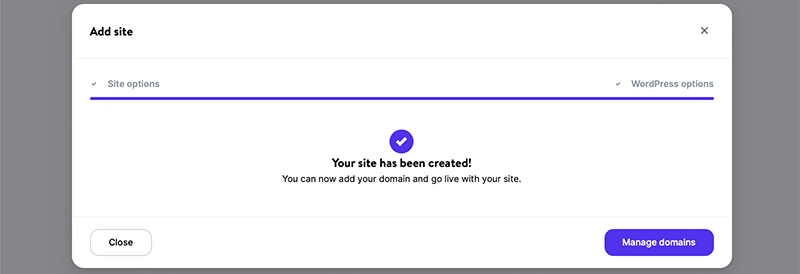
Therefore, in these few simple steps, you can easily add and create a WordPress site through your custom dashboard.
ii. My Kinsta Dashboard – Ease to Use
We’ve already mentioned earlier that Kinsta comes with an intuitive yet easy-to-use custom dashboard. To prove that, let’s explore more into the MyKinsta Dashboard.
As we look through our MyKinsta Dashboard, we’ll notice that our WordPress site has been added to the dashboard.
Along with that, in our version of the dashboard, we’ll find the following menu options in the dashboard. However, the number of menus and other options may vary depending on the plan.
- Dashboard
- Applications
- WordPress Sites
- DNS
Dashboard
In this very first option, you’ll find the Dashboard menu. Through this, you’ll be able to view the recent services and activities in your account. In fact, it also displays all the notifications related to your account and site.
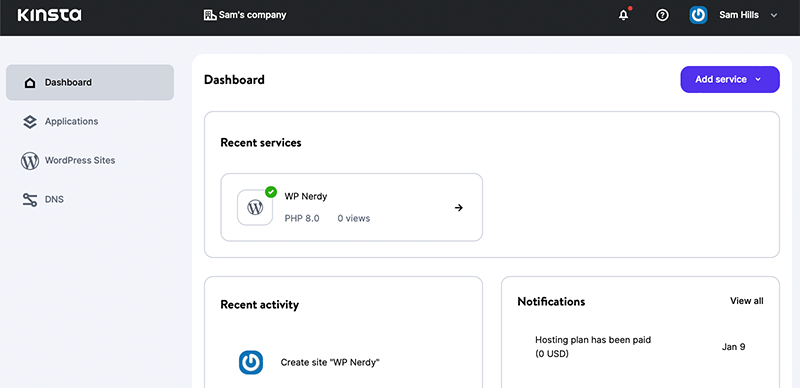
Not just that, you’ll find a dedicated WordPress analytics stat section. In this section, you can find real-time stat on resource usage, bandwidth, unique visits, and CDN usage.
Similarly, at the bottom of the page, it has listed some important links that navigate to the resource center for support.
Applications
Second, to the Dashboard menu is the Applications menu. This can be an optional option if you’re going with the managed WordPress hosting plan.
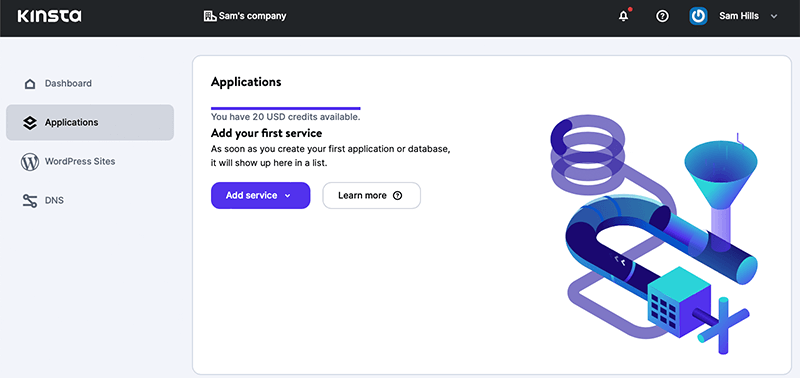
However, through this menu, you can add a new application and database to your website.
WordPress Sites
This MyKinsta menu called WordPress Sites holds all the sites on your account. It will list out all the WordPress sites that you’ve created so far using Kinsta. Besides that, you can check out essential details related to the site, like location, visits, bandwidth, and more.
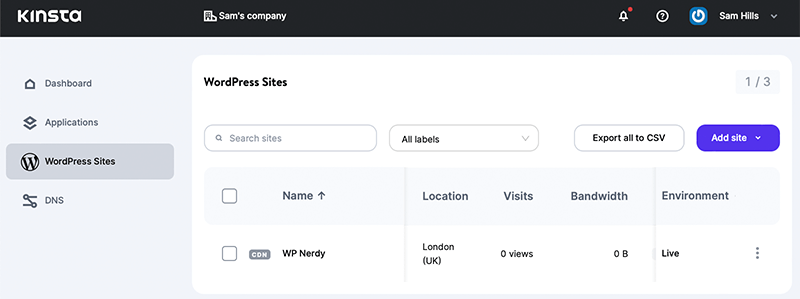
From this very point, you can also add a new WordPress site to the list. For that, click on the Add Site button and click on the Create new site option.
Also, it lets you label, transfer, and rename your site.
Along with that, you can export them to a CSV file. Moreover, it allows you to label, transfer, rename your site, and request migration when necessary.
DNS
Finally, we’ve got the DNS menu. Through this, you can easily manage your domains, and zone records and use Amazon Route 53 for a faster domain name-resolving experience.
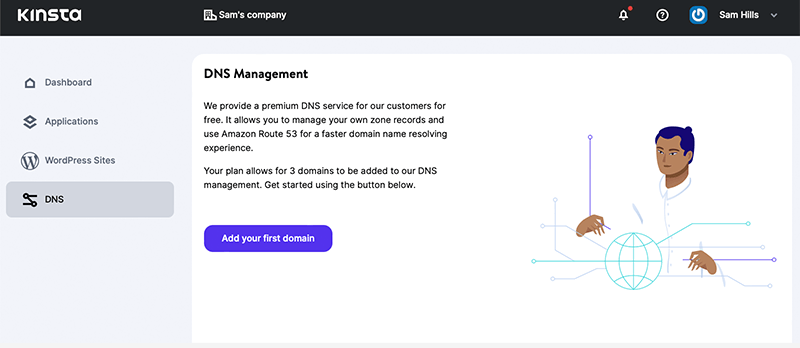
As mentioned earlier, Kinsta offers premium DNS (Domain Name System) service for free This means you’ll be able to add as many domains as your chosen plan allows.
With this, we can conclude that the Kinsta dashboard is quite well-organized and has all the tools and options within the reach of the users. Therefore, MyKinsta definitely deserves to get a 5 out of 5 points for its super easy-to-use dashboard interface.
iii. Setting up Your WordPress Site
Now that we’ve looked at how to add a site to Kinsta and have a walkthrough of our Kinsta dashboard, let’s set up a WordPress site.
Step i: Open WordPress Dashboard
For that, navigate to the WordPress Sites menu in your MyKinsta dashboard. And then click on your site name.
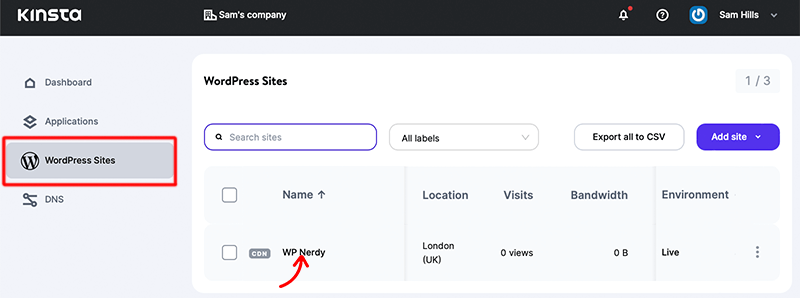
With that, click on the Domains option from your left sidebar of the dashboard. Now under the Primary Domain section, you’ll find the Open WordPress admin link. Then, click on that link to visit the admin dashboard.

However, to be able to login into the WordPress dashboard, you must enter the username and password. If you don’t remember the login credentials, then it’s the same ones as when you’re creating this site on MyKinsta.
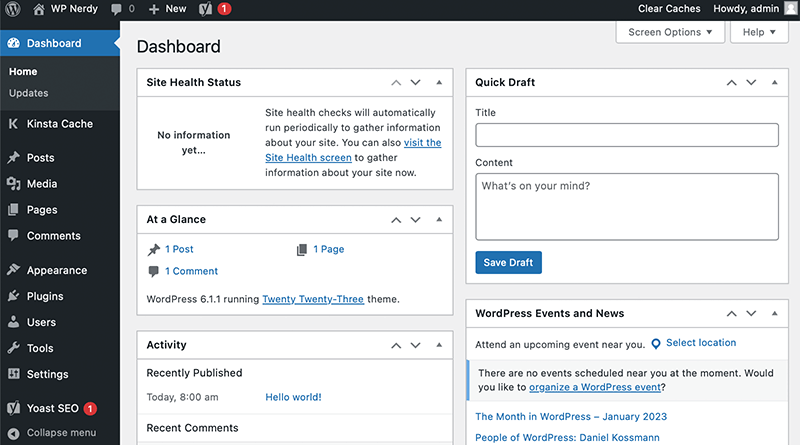
Once you’ve logged into your account, it’ll open the WordPress dashboard. Similarly, in the image below, you’ll notice that Yoast SEO has been automatically installed on the dashboard. This is because we had selected the option for the Thai tool to be installed when creating our WordPress site.
Step ii: Kinsta Cache Menu
In this step, we’ll navigate to the Kinsta Cache menu located in your WordPress dashboard.
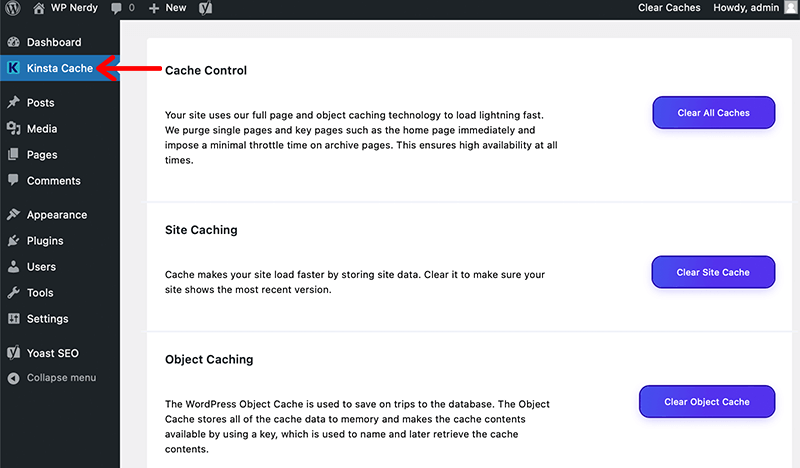
Here, you’ll find different cache options such as site caching and object caching. Along with that, you can clear all the caches from your WordPress site by clicking the Clear All Caches button in the Cache Control option.
Step iii: Insert a WordPress Theme
Now, it’s time to build a website, but first, let’s add a WordPress theme to our site. A WordPress theme is a good way to kick-start building the front end of your site. For that, go to Appearance > Themes from their dashboard.
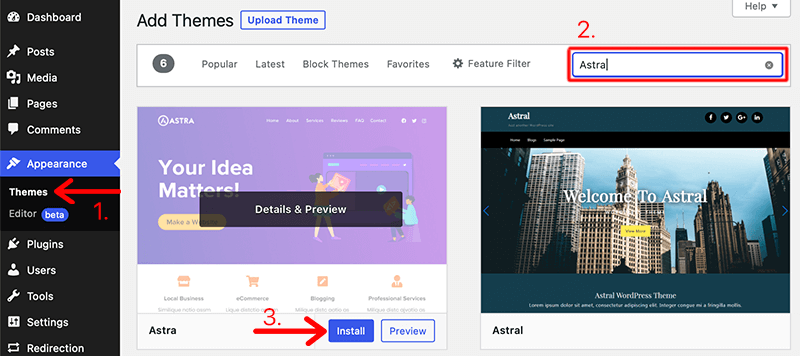
Click on the Add New button and search for a suitable theme from the search bar. Once you’ve found the desired theme, click on its Install button followed by the Activate button
In this way, you can install the theme to your WordPress site. To learn more on how to install a WordPress theme, check out our complete guide.
Step iv: Install WordPress Plugins
Similarly, to install a WordPress plugin, navigate to the Plugins > Add New menu. After that, search for the required plugin from the search bar.
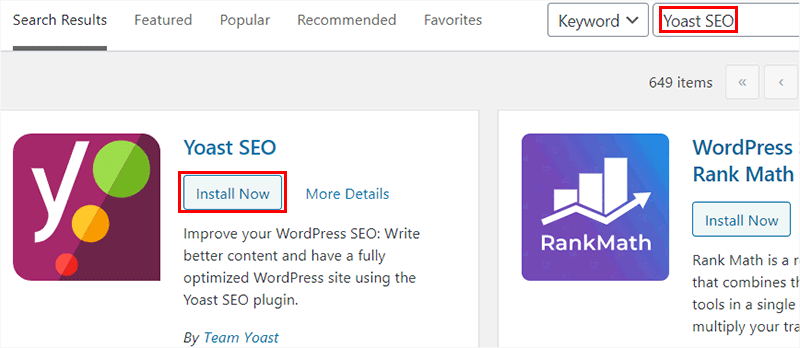
Next, once you’ve found the plugin of your choice, click on its Install Now button followed by the Activate button.
In this way, you can install the plugin to your WordPress site. To learn more on how to install a WordPress plugin, check out our complete guide.
Step v: Add Site Content
The very next thing important for any WordPress would be its content. You can create two different types of content – pages, and posts. A page is static content of your site, like contact, about us, pricing, etc. Whereas a post is a dynamic content, like news, articles, etc.
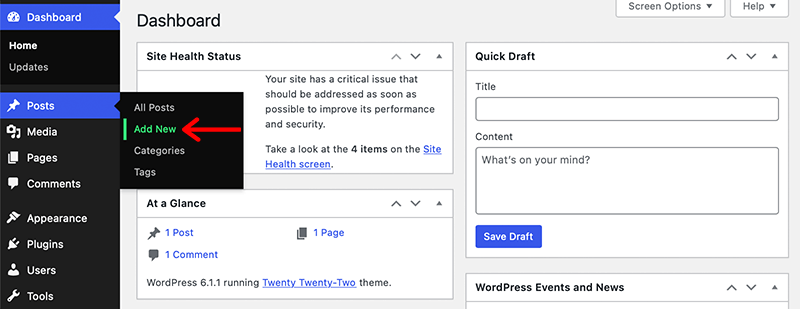
In order to create a post, go to Posts > Add New menu. Then, it’ll redirect you to the WordPress editor from where you can add your desired content to it. Such as titles, text, images, videos, and anything you want on your WordPress site.
Once everything is done, click on the Publish button to make that content live for your audience. Similarly to this, the same way, you can create pages for your WordPress site.
Step vi: Previewing Site and phpMyAdmin
Finally, once everything is done, you can proceed ahead to preview your site and database from your MyKinsta dashboard. For that, navigate to the WordPress Sites menu and click on your site title.
To preview your database, under the Info menu, scroll down in the Database access section. Click on the Open phpMyAdmin option. Following that, it’ll redirect you to the new window of phpMyAdmin. Now to be able to access those data, log in using the username and password provided.

Likewise, if you want to preview your website, then go to the Domains menu. And under the Primary Domain section, click on the Open URL link. This will then open your live website in the new browser window.
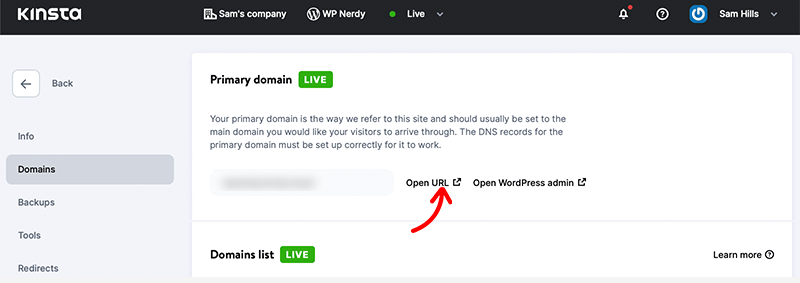
That’s all! Following this small easy step, you can easily build your WordPress site using your custom Kinsta dashboard.
Hopefully, this will encourage you to get started with Kinsta hosting from our review. Now, let’s learn about what different hosting plans Kinsta has to offer. Here we go!
E. Kinsta Hosting Pricing
Now that we’ve looked into the key features and have shown you how to create a WordPress site using Kinsta. We hope that this has given you an idea of whether this hosting solution is best suited for your business model or not.
If you’re now wondering how much it cost and whether it’s worth the price then let’s look at its pricing plan.
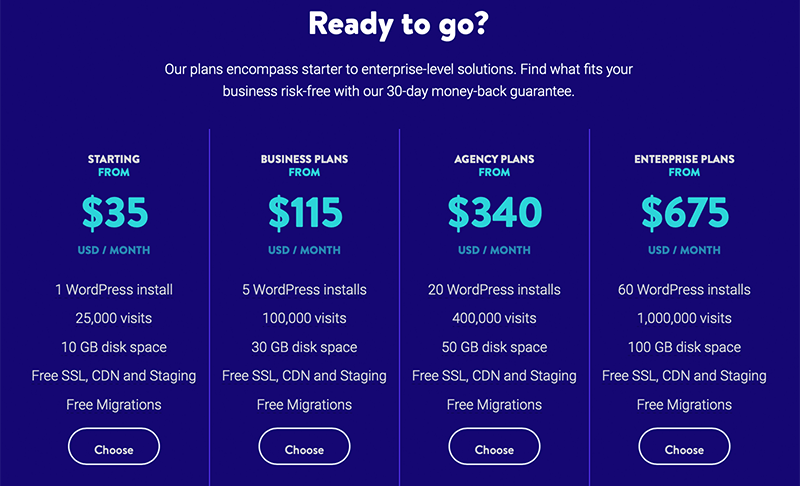
To your surprise, Kinsta comes with flexible pricing options that cater to various customer needs. If we look into its pricing plan then, Kinsta comes with 3 different pricing models. So, let’s check out each pricing plan of Kinsta in detail.
1. Managed WordPress Hosting
Kinsta offers managed WordPress hosting services with 7 price options –
| Plan / Features | Starter | Pro | Business 1 | Business 2 | Enterprise 1 | Enterprise 2 |
| Price Per Month | $35 | $70 | $115 | $225 | $675 | $1,000 |
| Price Per Year | $350 | $700 | $1,150 | $2,250 | $6,750 | $10,000 |
| No. of Site(s) | 1 | 2 | 5 | 10 | 60 | 80 |
| Storage | 10 GB | 20 GB | 30 GB | 40 GB | 100 GB | 150 GB |
| Visits Per Month | 25K | 50K | 100K | 250K | 1M | 1.5M |
2. Application Hosting
Kinsta also offers an application hosting service. It’s a Software as a Service (SaaS) solution that allows businesses to run their applications on servers or in a cloud. Besides that, its pricing plans are resource-based.
Therefore, the cost of the plan may differ depending on the resources you select. To work with application hosting in Kinsta, you first need to choose a container for your application. After that, you need a machine for your application size and then pay for the bandwidth to use.
Firstly, here are the pricing plans for the Standard pods available for your application:
| Plan / Features | Standard 1 | Standard 2 | Standard 3 | Standard 4 | Standard 5 |
| Price Per Month | $20 | $40 | $80 | $160 | $320 |
| CPU | 0.5 | 1 | 2 | 4 | 8 |
| RAM | 1 GB | 2 GB | 4 GB | 8 GB | 16 GB |
Once you’ve selected a pod, you need to choose one of the following plans for the machine.
| Plan / Features | Standard | Medium | Plus |
| Price Per Second | $0.0003333300 | $0.0003333300 | $0.003000000 |
| CPU | 1 | 8 | 32 |
| RAM | 4 GB | 8 GB | 32 GB |
Lastly, the price for the bandwidth would be $0.14 per GB. Indeed, Kinsta offers the first $20 for free for a limited time in application hosting.
3. Database Hosting
At last, Kinsta offers database hosting services. It offers the following pricing plans. Not just that, Kinsta offers $20 free for a limited time.
| Plan / Features | Database 1 | Database 2 | Database 3 | Database 4 | Database 5 |
| Price Per Month | $18 | $34 | $65 | $145 | $310 |
| CPU | 0.25 | 0.5 | 1 | 2 | 4 |
| RAM | 256 MB | 2 GB | 4 GB | 8 Gb | 16 GB |
| Storage | 1 GB | 5 GB | 10 GB | 20 GB | 40 GB |
To learn more about the pricing plan of Kinsta in detail, make sure to check out their official Pricing page here.
F. Customer Support Options in Kinsta
Kinsta should be your go-to cloud hosting platform for hosting your next website. It has got everything you need starting from a free SSL certificate and migration to a user-friendly MyKinsta dashboard.
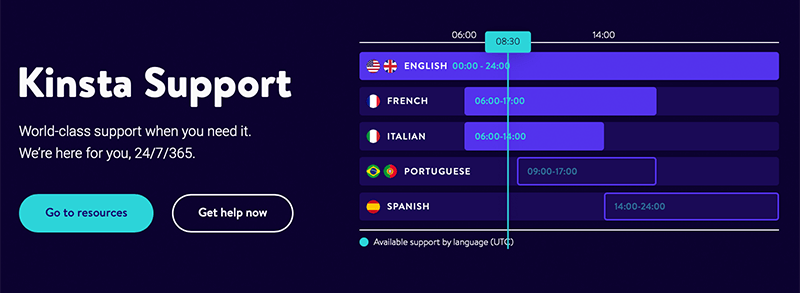
However, along with that, Kinsta also provides excellent customer support to its customers. To know more about what kinds of support options they offer, you must check out their Support page.
Indeed, for the best and quick support option, you can look into their Kinsta Resource Center. To your surprise, it includes all you need resources such as blogs, documentation, top articles, WordPress guide, and more.
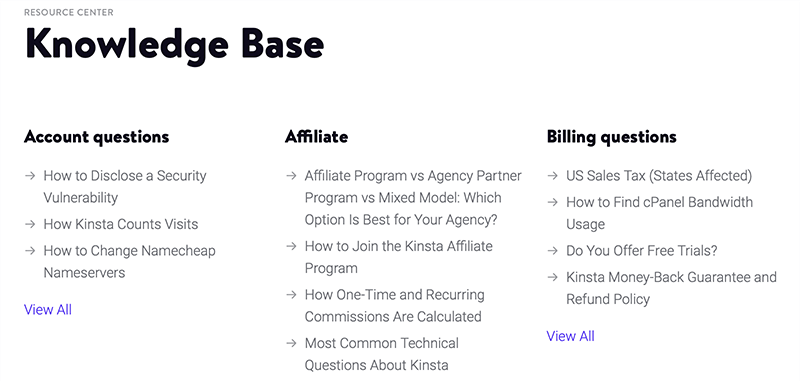
Inside its knowledge base, you’ve everything you need from the best WordPress tips to how to optimize your website. Likewise, if you check out their Documentation you’ll get every step-by-step guide on MyKinsta, site setup, and more.
Nevertheless, Kinsta Blogs includes the latest articles on WordPress, web development, and more. You shouldn’t miss out on it if you want to be instantly updated with WordPress and its updates.
Similarly, if you’re a beginner or someone who wants to develop their skills and grow their business, then enroll yourself in Kinsta Academy. It’s a free online training campaign started by Kinsta to help you grow your business and website skills.

Moreover, all its WordPress includes 24/7 fast chat support from experts with full, unrestricted access to our best-in-class support staff. In fact, it provides support in English, Spanish, French, Italian, and Portuguese.
On top of that, Kinsta also helps with free updates and migration. Therefore, Kinsta doesn’t seem to disappoint its users with unsatisfactory customer support. They are always there 24/7 whenever you need them the most.
G. 3 Best Kinsta Alternatives and Competitors
By far, we’ve already come to know that Kinsta has everything that you need to host your website. It’s best known for providing managed hosting service for WordPress.
However, along the way, besides Kinsta there are other options too that provide excellent managed WordPress hosting services. It’s always a good idea to look for other alternatives to that same product that can fit your needs better.
Therefore, without wasting any time, let’s look at some of the best alternatives to Kinsta. Let’s go!
1. Nexcess
Nexcess is a fully managed WordPress hosting provider that is better known for faster speed, more robust security, and inherent scalability. It provides unmatched bandwidth and storage space for high-performance sites for your small to big business.
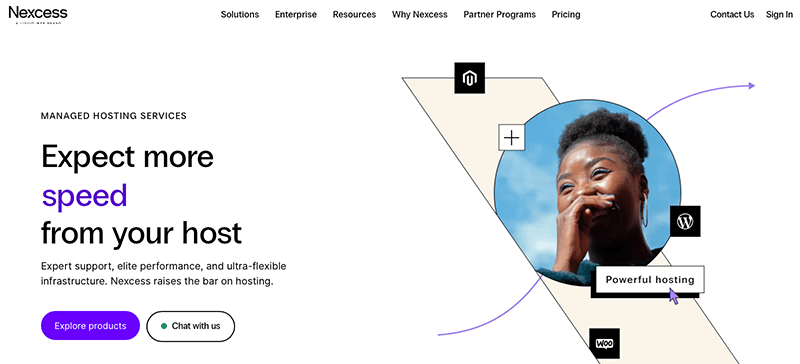
On top of that, it comes with its eCommerce builder, Nexcess StoreBuilder. It allows you to instantly build an online store with WordPress. Also, it offers a free WordPress cache plugin called Breeze for better and smooth WordPress performance.
Not just that, it offers hosting solutions for different CMS platforms like WordPress and Magento. This solution provides you with a 99.99% uptime guarantee, making sure that your website is always up and running.
Pricing:
Here are the 7 managed WordPress hosting plans offered by Nexcess are as follows:
| Plan Features | Spark | Marker | Designer | Builder | Producer | Executive | Enterprise |
| Annual Price | $190 | $790 | $1,090 | $1,490 | $2,990 | $5,490 | $9,990 |
| Monthly Price (3 months) | $19 | $35.55 | $49.05 | $67.05 | $134.55 | $247.05 | $449.55 |
| No. of Sites | 1 | 5 | 10 | 25 | 50 | 100 | 250 |
| Storage | 15GB | 40GB | 60GB | 100GB | 300GB | 500GB | 800GB |
| Bandwidth | 2TB | 3TB | 4TB | 5TB | 5TB | 10TB | 10TB |
2. Cloudways
Cloudways is a super-fast WordPress cloud hosting solution. It offers 5 top cloud platforms to choose from. That includes Google Cloud, Linode, DigitalOcean, AWS, and Vultr.

Furthermore, it has over 60+ data centers across the globe. Hence, it guarantees excellent response time wherever you are. Also, it comes with Cloudways CDN service and uses 3 times faster SSDs for fast-loading websites.
Nevertheless, you get auto-healing managed cloud servers that can resolve your issues with auto-healing restarts. Besides that, it lets users whitelist IP addresses and gain unregistered access across several networks using SSH and SFTP.
Pricing:
Cloudways offers different pricing plans according to the cloud provider you select. However, let’s look at the Standard pricing plans for the DigitalOcean cloud host.
| Plans | Plan 1 | Plan 2 | Plan 3 | Plan 4 |
| Price Per Month | $10 | $22 | $42 | $80 |
| Memory | 1 GB | 2 GB | 4 GB | 8 GB |
| Processor | 1 core | 1 core | 2 core | 4 core |
| Storage | 25 GB | 50 GB | 80 GB | 160 GB |
| Bandwidth | 1 TB | 2 TB | 4 TB | 5 TB |
| Free Migration | Yes | Yes | Yes | Yes |
| Free SSL | Yes | Yes | Yes | Yes |
For more information, check out our blog post on the best Cloudways competitors and alternatives.
3. WP Engine
WP Engine is a fully managed WordPress hosting platform that gives expert support to businesses for fulfilling their client’s needs. It lets you build a website from your WP Engine account without having to wait for the client to add you to their WordPress site.

Additionally, in partnership with Google Cloud Platform, it has several servers across North America, Europe, and Asia. Likewise, it seamlessly integrates with WooCommerce and lets you build an online store in no time.
Moreover, all its plans include premium StudioPress themes as well as Genesis block-building tools. Also, it provides a free WP Engine Automated Migration plugin to help you migrate your WordPress site to its hosting.
Pricing:
WP Engine comes with 4 managed WordPress plans that are – Startup, Professional, Growth, and Scale.
| Plan | Startup | Professional | Growth | Scale |
| Price Per Month | $20 | $39 | $77 | $193 |
| Number of Sites | 1 | 3 | 10 | 30+ |
| Local Storage | 10 GB | 15 GB | 20 GB | 50 GB |
| Bandwidth | 50 GB | 125 GB | 200 GB | 500 GB |
| Monthly Visits | 25K | 75K | 100K | 400K |
| Free Migration | Yes | Yes | Yes | Yes |
Looking forward to learning more about WP Engine? If yes, then why not read our full guide on WP Engine from our review article?
H. Frequently Asked Questions (FAQs) on Kinsta
1. Can I try Kinsta hosting for free?
When you sign up in Kinsta for a free trial, you can use their Application Hosting or Database Hosting for free. However, this trial is limited to $20 in server credits and applies only to your first billing month.
2. What does Kinsta hosting include in this plan?
Each Kinsta hosting plan includes a MyKinsta dashboard, free SSL certificate, HTTP/3 support, enterprise-level firewall, Cloudflare CDN, DevKinsta, multilingual support, and more.
3. Does Kinsa offer a domain registration service?
No, Kinsta doesn’t offer any kind of domain registration services. However, if you’re looking for a place to register your domain, check out places like Name.com, Domain.com, Namecheap, and Google Domains.
4. Does Kinsta support HTTP/2 (HTTP2)?
As Kinsta is powered by Google Cloud infrastructure, it does support HTTP/2 for all of its clients.
5. Does Kinsta provide any money-back guarantee?
Yes, Kinsta does offer a 30-day money-back guarantee for a risk-free start-off.
I. Final Verdict – Is Kinsta Hosting Worth it?
Coming to the conclusion of whether Kinsta hosting is the best-managed hosting solution for WordPress or not.
To be honest, Kinsta is a powerful managed WordPress hosting that takes care of your hosting completely. It surely offers a dedicated managed hosting solution for your WordPress hosting requirement.
Along with that, it’s powered by Google Cloud and uses its premium infrastructure making it robust in speed, security, and scalability. Nonetheless, it guarantees incredible uptime and uses the highest-end CPUs and global availability from Google’s C2 machines.
Having said this, Kinsta falls among the expensive hosting services with limited premium support. However, if the budget isn’t the issue and you’re someone of an expert then you’d definitely try Kinsta for hosting your next project.
Overall, this hosting service is an ideal option for those who want to run a site that’s on the rise and growing month after month. Indeed, it’s probably not a suitable option for sites that are just starting out and have a low traffic volume.
Similarly, for your convenience, Kinsta offers a 30-day money-back guarantee policy. Therefore, if you aren’t satisfied with their service, then you can discontinue the service within 30 days of its purchase. In fact, the annual plans offer 2 months of free hosting as well.
That’s why you all make sure that you try this hosting service on your own and find its usefulness by yourself.
Conclusion
That’s about it. This is a brief review of the Kinsta WordPress hosting. We hope that you’ll agree with our review.
In a nutshell, we’ve discussed everything about this managed hosting service. So, we hope we’ve been able to cover everything from its features to pricing and support.
Overall, Kinsta is a WordPress-managed hosting service that lets you create and host your WordPress website in one place.
If you’ve any further queries about the Kinsta hosting, then please leave a comment below. We’ll try to get back to you as soon as possible.
Also, let us know if you’re using Kinsta hosting and please share your review with us in the comments section below.
Next up, you can check out our other articles such as the best SSD WordPress hosting providers and how to choose the best web hosting company. Be sure to go through it once.
If you like this article, then please share it with your friends and colleagues. Also, don’t forget to follow us on Twitter and Facebook.
