Are you looking for honest Master Addons for Elementor review? Or want to know if Master Addons for Elementor is worth using to enhance your page-building experience? If yes, then you’ve landed in the right place.
Master Addons for Elementor is a third-party addon designed for the Elementor page builder. It works with the Elementor plugin to make your ordinary-looking website into an interactive and visually appealing site.
Do you have any doubts about Master Addons for Elementor being a reliable plugin for your page-building experience? Not to worry! To assist you to understand that, this unbiased review provides Master Addons’ features, costs, pros and cons, support, and so on.
Let’s get going!
A. Master Addons for Elementor – Overview
Master Addons for Elementor is a powerful add-on that extends the features and functionalities of the Elementor page builder. This plugin comes with a large option of 70+ widgets and extensions, templates, elements, sections, and so on to greatly enhance your WordPress website.
Along with lots of elements, this plugin is completely customizable. You can customize each element as it comes with lots of options to control every possible thing. In addition, you’ll also have the power to customize the blocks as per your preference.
Moreover, it’s really easy to get started right away. Because you won’t need to configure this addon. All you need to do is turn on/off the addons you need. This will make your website load faster.
Besides, it’s a completely beginner-friendly plugin that is easy to use. Also, with a vast range of elements, even the newbies can boost creativity to build stunning websites without any coding skills.
So let’s move on to the next section of the Master Addons for Elementor review.
B. Key Features/Advantages of Master Addons for Elementor
Master Addons for Elementor comes with many features to enhance your website building experience. Therefore, we’ve compiled a list of Master Addons for Elementor’s key features in this review.
Let’s look at them now!
1. Basic Widgets and Elements
Master Addons comes with around 70+ free and premium widgets and extensions. Some of them are animated headlines, dual heading, progress bar, tooltip, timeline, particles, background, background slider, positioning, etc.
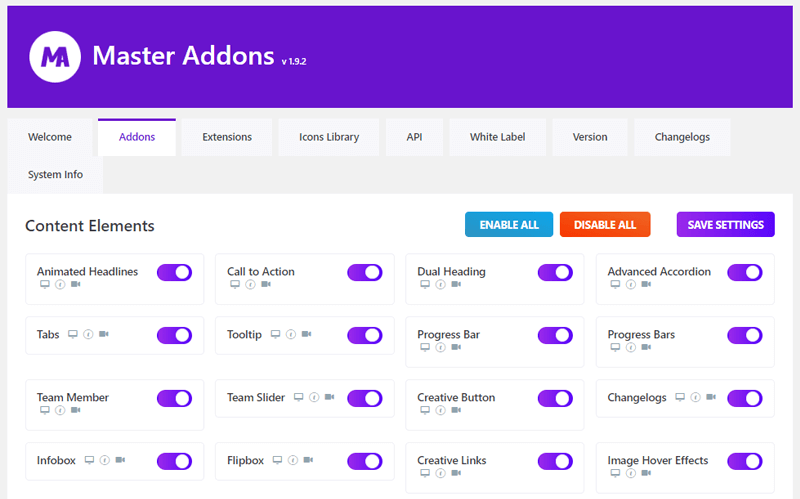
With all those elements, you can select to enable or disable each element. You can do so according to your needs. Along with that, you can enable or disable those elements in bulk as well.
Further, each of these elements comes with a demo, documentation, and video tutorial on how to use them. Therefore, if you’re stuck somewhere, then you can get help from these options.
2. Custom Breakpoints
It’s crucial to offer a better user experience across all device types unless you want to lose visitors. Therefore, the custom Elementor breakpoint offers different layouts for websites for different devices.
Hence, with custom breakpoints, you can create a fully responsive website and by default, Elementor comes with 3 breakpoints. This is quite a unique feature of the Master Addons plugin.
You can create as many breakpoints as you want using Master Addons. It also allows you to define your breakpoints, save them, and import them to another site as well. Thus, you don’t have to recreate them from scratch every time.
Further, each breakpoint lets you set device orientation giving you complete control and the ability to develop a responsive website.
3. Restrict Content Element
Yet another fantastic feature of the Master Addons plugin is the ability to restrict content elements in your Elementor designs. Similar to a membership plugin, this feature prevents your visitors from seeing the page or certain content.
Additionally, you can restrict static content or an entire Elementor template. Alternatively, you can restrict content via an in-page message or use a popup to block access to restricted content. This way, users can click the button to open restricted content in a popup, and access is permitted.
Further, this feature includes different restriction methods. Therefore, you can enable user-based, passwords, age restrictions, a math captcha system, and so on. Along with that, you can block any type of content like image, video, pdf, or text, with this element.
4. Custom CSS
By default, Elementor allows you to add custom CSS in its free version as well. However, it doesn’t specifically let you add custom CSS to individual widgets, columns, or sections.
To overcome this issue, Master Addons provides you with new custom CSS settings. With these settings, you can add custom CSS to each individual item. This obviously gives you more control over your sections like adding responsiveness, hover effect, typography, spacing, etc.
On top of that, this feature is available for both free and premium users which is great. Therefore, you can apply your own CSS code inside any section, column, or element.
5. Header, Footer, and Comment Builder
Master Addons has another incredible feature to offer and that is a header, footer, and comment form builder feature. You’ll be happy to know that it provides preset header and footer elements that you can customize for your website.
Thus, using this plugin, you’ll be able to define the header for your entire website or a specific page.
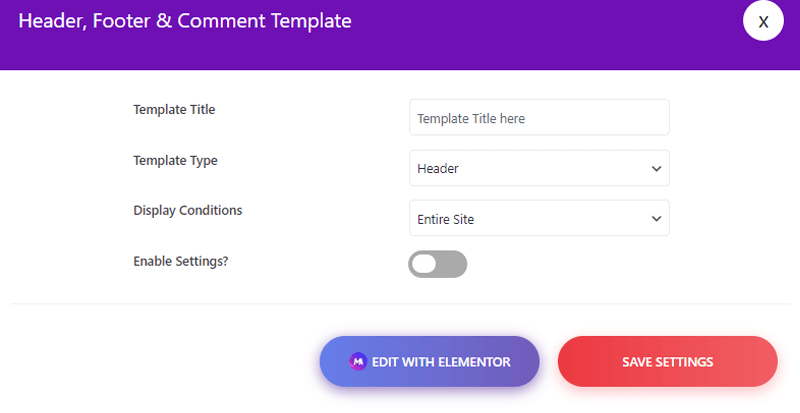
Further, you can choose a premade template for the header or a footer to get started from its template library. With that, it also comes with elements and design options. Once you’ve added the header to your page, it lets you update the content, change the styles, and add more widgets.
Additionally, you can easily add navigation menus to your website and make the header sticky. Along with that, it gives you the option to manage your menu individually for desktop and mobile devices. Also, it lets you customize the appearance of your menu regardless of the type of device.
On top of that, you can also design a mega menu. This helps to manage a lot of categories or pages without overwhelming your visitors.
6. Template Library
Master Addons provides prebuilt demos and templates along with specific features for the templates. Those templates come in different categories, i.e., business, creative, education, and medical. Thus, you can surf through those templates, preview them, and import them to your website.

However, the drawback is that not many templates are available in this plugin. This implies that you will still need to start from scratch to create new pages for your website.
Along with the prebuilt templates, it also offers prebuilt sections which are categorized by widgets. Similar to page demos, there aren’t many options, but they do provide a good place to start.
C. Difference Between Free and Pro Version of Master Addons
In this review section, we’ll look at the number of free and premium elements of the Master Addons for Elementor plugin. There are usually additional elements in the pro version. So, let’s take a look at that!
| Elements | Free Master Addons | Pro Master Addons |
| Content Elements (41) | 34 – Animated Headlines, Call to Action, Dual Heading, Advanced Accordion, Tabs, Tooltip, Progress Bar, Progress Bars, Team Member, Team Slider, etc. | Additional 7 – News Ticker, Image Hotspot, Restrict Content, Domain Search, Toggle Content, Gallery Slider, Source Code. |
| Form Add-ons (6) | All Available | All Available |
| Marketing (3) | 1 – Mailchimp | Additional 2- Comparison Table, Featured Product |
| Extensions (22) | 14 – Particles, Reading Progress Bar, Background Slider, Custom CSS, Custom JS, Positioning, Container Extras, Mega Menu, Header, Footer, & Comment Form, Dynamic Tags, Wrapper Link, Post/Page Duplicator, Glassmorphism, Icons Extended. | Additional 8 – Animated Gradient BG, Entrance Animation, Transforms, Rellax, Reveal, Display Conditions, Floating Effects, Tooltips. |
| Third-Party Plugins (2) | All Available | All Available |
D. Get Started with Master Addons for Elementor
Before we start, note that you need to install and activate Elementor first to use the Master Addons. Or else, the Master addons won’t work if Elementor isn’t activated.
A general reminder that Master Addons is an extension of the Elementor plugin which is built to work with the Elementor page builder.
We’ve pre-installed the Elementor plugin for this review, so we’ll begin with installing the Master Addons plugin.
Now, let’s get into the steps!
Step 1 – Install & Activate the Free Version of the Master Addons Plugin
To install the Master Addons, you need to log in to your WordPress dashboard. There, on the menu, you can find the Plugins section where you need to click on the Add New option.

After that, you can see a search box on the right side. There, you need to type “Master Addons”. Then, you can find the filtered results.
Once you’ve found the Master Addons plugin, click on the Install Now button.
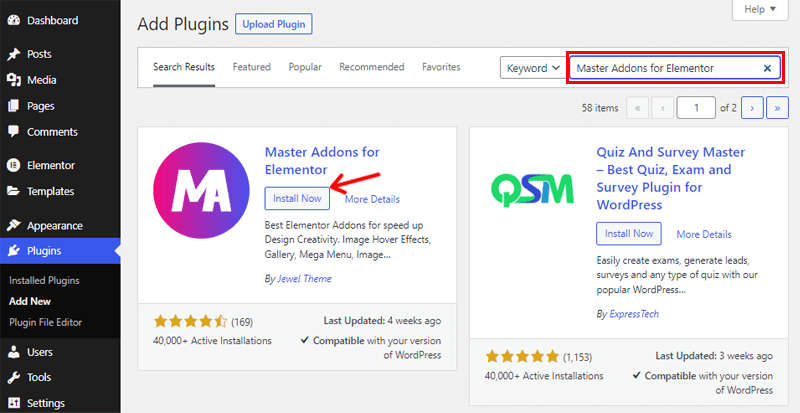
Now that your plugin is installed successfully, you can see an Activate button. Just click on it to check whether the plugin is working or not.

So that’s how you install and activate the free version of the Master Addons plugin.
Step 2 – Purchase the Pro Version of the Master Addons Plugin
Now that you’ve got the free version, let’s check out how to install the pro version.
First of all, go to the official website of Master Addons, and click on the pricing option. There, you need to select your plan and click on the Purchase Now button. Here, we’ve selected a Business Plan.
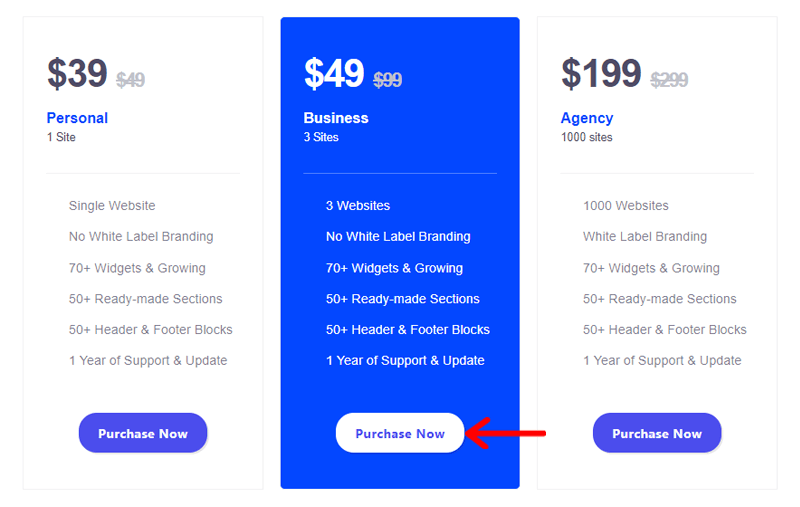
To purchase the premium version, you need to create an account and fill in all the details. Also, you can apply a coupon for a discount if you’ve got one. Once you’re done, you can purchase the pro version.
After successfully purchasing the Master Addons Pro, you’ll get the download link and license key in your email. From there, you can download the ZIP file of Master Addons pro and hold the license key for later use.
Step 3 – Upload, Install and Activate the Master Addons Pro Plugin
The installation process for Master Addons Pro is a little different than its free version. Because the premium plugin isn’t accessible from the dashboard as they are not available through the WordPress plugins directory.
Previously, we downloaded the plugin from the official website of Master Addons. So, the first few steps are similar to the free version.
Log into your WordPress dashboard to get started. After that, select Plugins from the menu and then click Add New.
Then select a file by clicking the Upload Plugin button. Next, select the Install Now option next to the downloaded ZIP Master Addons file.
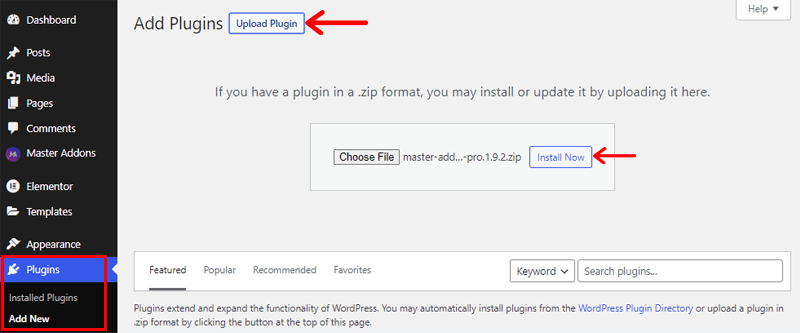
After installing, you can see the Activate button. Simply, click on it!

You will then be taken to the license key page. There, you need to enter the license key you previously received in the mail. After doing so, checkmark for security & feature updates, and click on the Agree & Activate License button.
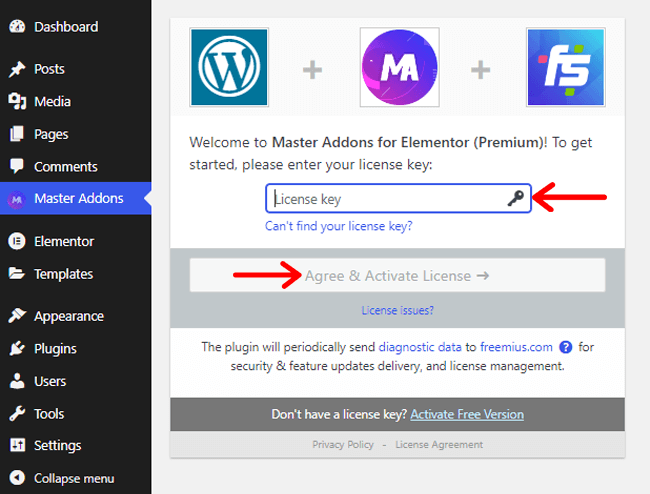
After activating your license key, you’ll receive a successfully activated message on top of your dashboard
There you go! You now have the premium version of Master Addons on your dashboard.
Step 4 – Content Elements and Settings of Master Addons for Elementor
Now, let’s take a look at the few elements and settings of the Master Addons!
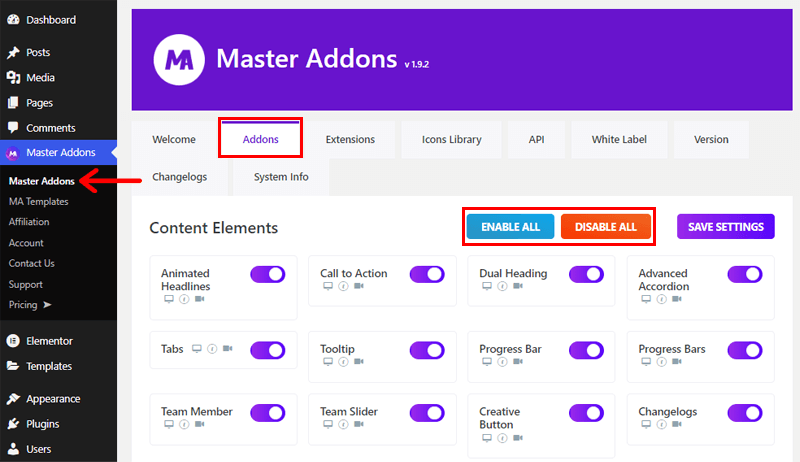
Then, click on the Master Addons menu from the dashboard and you’ll be directed to the Welcome tab.
From there, you can go to the Addons tab where you can see the Content Elements, Form Addons, and Marketing elements. All of these elements are enabled by default.
But you can see the option to Enable All or Disable All the elements on the right side. Or, you can individually enable or disable them as per your need.
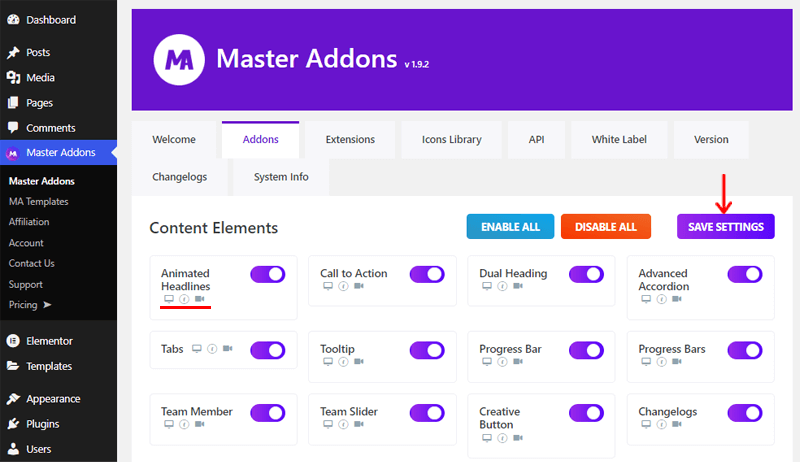
Moreover, for each of the elements, you can see an icon for demo, documentation, and preview. So, before taking any action, make sure to check out the element. And, lastly, don’t forget to click on the Save Settings button after making any changes.
Moving on to the Extensions tab!
Here, you’ll find different extensions like particles, custom CSS, mega menu, reveal, and so on. Along with that, you can also see 3rd party plugins like Custom Breakpoints and WP Adminify. All of them are enabled by default.
Therefore, here, also, you can find a similar configuration as in the Addons tab.
Similarly, you can also check out other tabs like Icons Library, API, White Label, and so on.
Hence, these are the elements and settings of this plugin that are almost negligible to configure any element.
E. How to Use Master Addons for Elementor?
Now that we’ve known the elements of Master addons, we’ve also included how to use its elements in this Master Addons for Elementor review.
So, let’s check out how to use those elements.
Let’s go down!
Step 1 – Add New Page and Edit with Elementor
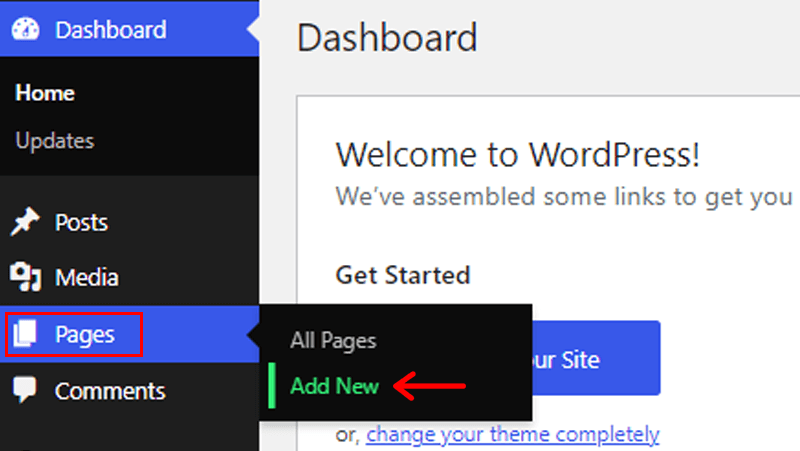
First of all, on your dashboard, go to the Pages menu and click on the Add New option.
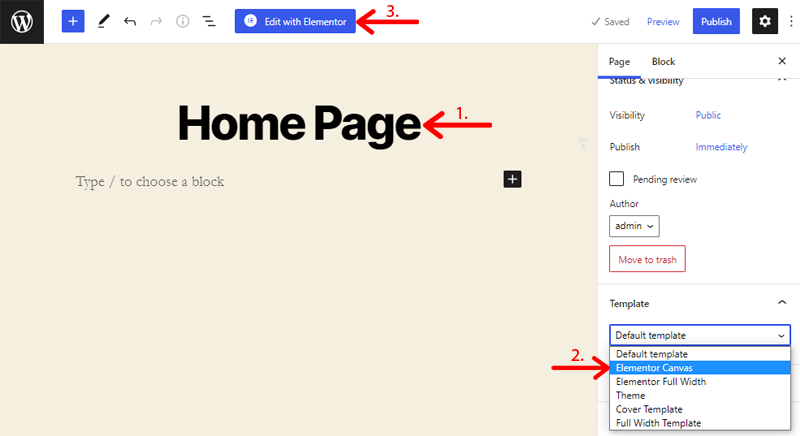
After that, you’ll go to that page editor interface. You can Add a Title like a home page or anything and change the template to Elementor Canvas on the settings side. Then, click on the Save draft button.
Then, on the top, you can see the Edit with Elementor button. Click on that button!
Following that, it’ll redirect you to the Elementor editor. There, you can see all the elements of the Elementor plugin.
Therefore, you need to scroll down and you can see the elements of Master Addons as well in the Elementor sidebar.
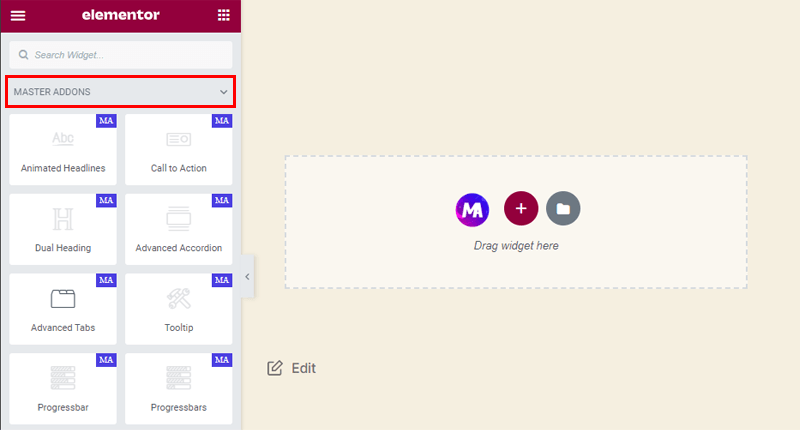
Step 2 – Use Master Addons
Now that you can see the elements of Master Addons, we’ll first use the ready pages and then add a few elements.
Method 1: Use Prebuilt Pages
So, to add prebuilt pages, you can see the Master Addons icon, click on that. Then, you’ll see all the sections with the Ready Pages tab. On the right side, you can also filter the pages by widget like creative button, flip box, heading, etc. in the dropdown option.
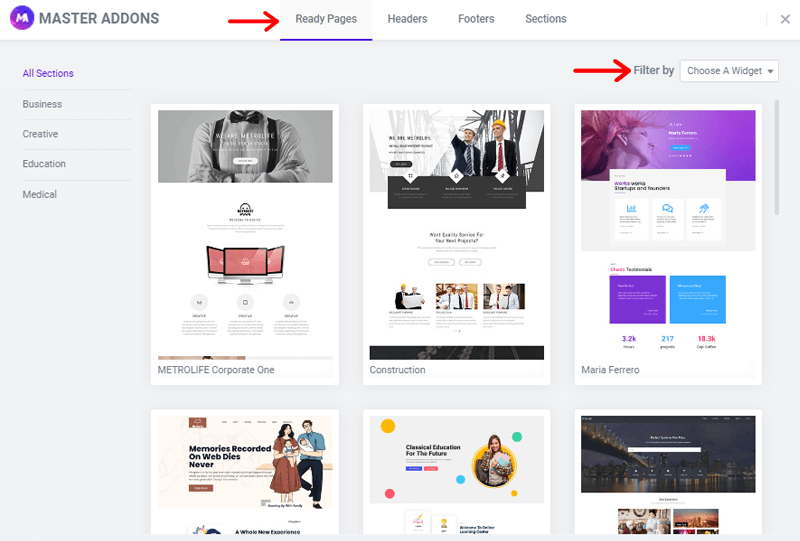
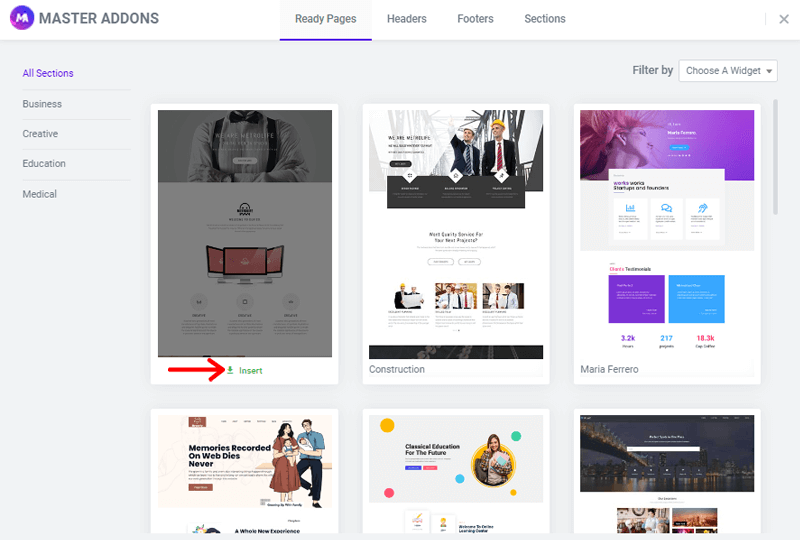
Hence, you can find different options for the prebuilt pages. So, once you hover on any page, you can see the Insert option. Simply, click on that option!
Note that, here we’ve selected the page namely “METROLIFE Corporate One”. You can select the one you prefer.
And there you go! You can see that page on your editor which appears to like this:
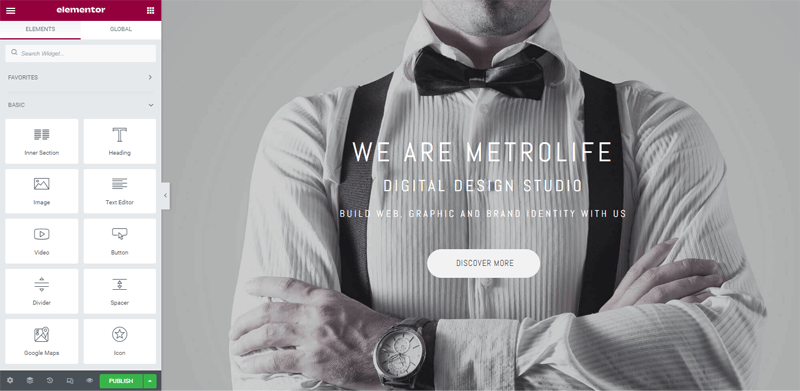
Now that you have a ready-made page, you can customize each of the elements the way you want.
But before that, let’s see how to add specific elements of Master Addons.
Method 2: Add Element of Master Addons
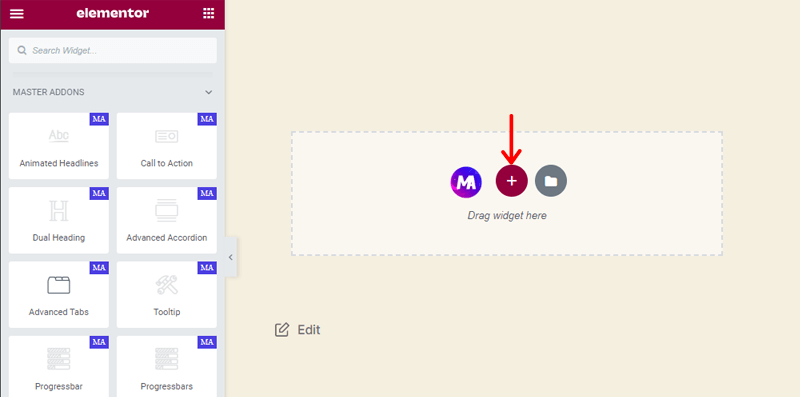
Since you’re in the Elementor editor, click on the + icon to add a new section.
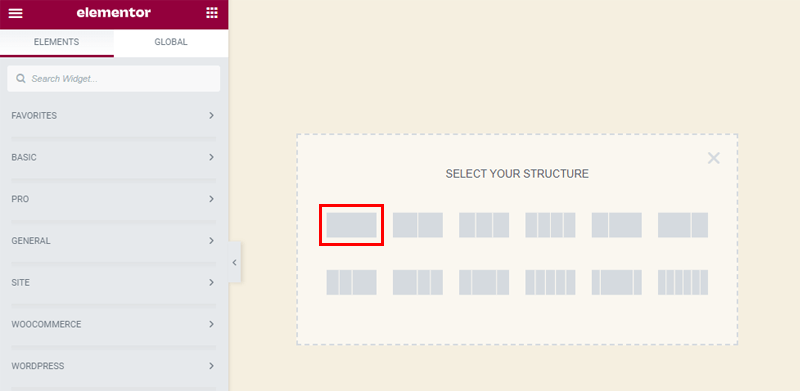
After that, you can select a single-column structure.
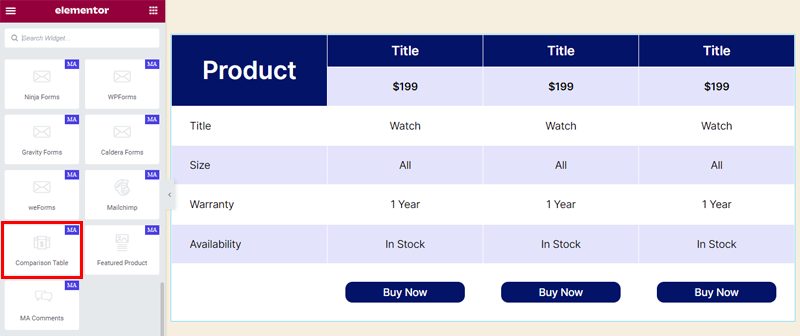
Next, you can surf through the elements of the Master Addons or also search it to filter from the search box. Once you’ve found the element you want, you can simply drag the element you want and drop it into the blank section. So, here, we’ve dragged and dropped the Comparison Table element.
After that, all you need to do is customize this widget the way you want.
For that, let’s go forward to the customization section!
Step 3 – Customization and Settings
Now, on the customization part, simply select the section or widget that you want to customize. We’ve selected the team slider element to customize. There, you’ll get 3 different customization options: Content, Style, and Advanced.
Content:
This section usually differs according to the element you’ve selected. Since we’ve selected the Comparison Table element, the customization options are accordingly.
Here, you can select the layouts from 4 different options and the number of products as well. It also comes with a feature box where you can edit the heading, add or remove items, duplicate products, and so on. Similarly, you can also add the image, customize the details, add wrapper links, and more about each product.

Style:
Here, you can customize your widget with general styles like background color, content alignment, designation, description, and carousel items. Also, you can customize social icons with normal and hover effects as well.

Advanced:
In the advanced section, you can change the margin, width, padding, position, and more of the layout. You can add additional CSS classes as well. Further, it also comes with other varieties of options like transforms, rellax, reveal, display conditions, custom CSS, positioning, tooltip, floating effects, etc.

So that’s all for the customization part. You can further explore the customization options as you add different elements and try to make them more stylish and creative.
Now, let’s move to the next section of this Master Addons for Elementor review!
F. Pricing Plans of Master Addons for Elementor
Master Addons comes in both free and premium versions. You can download the free version from WordPress.org or you can directly install it from the WordPress dashboard. Alternatively, you can also download it from its official website.
Meanwhile, for the premium version, there are 3 different pricing plans of Master Addons:
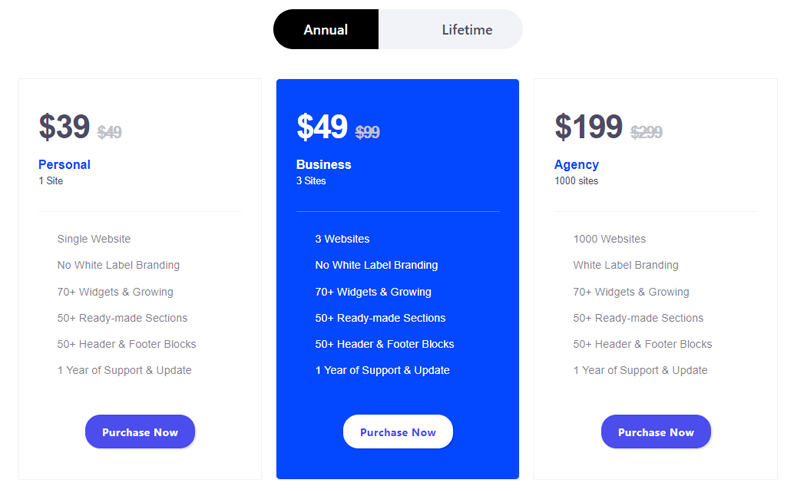
- Personal Plan: Costs $39/year. Includes single website, 70+ widgets & growing, 50+ ready-made sections, 50+ header & footer blocks, etc.
- Business Plan: Costs, $49/year. Includes 3 websites, 70+ widgets & growing, 50+ ready-made sections, 50+ header & footer blocks, etc.
- Agency Plan: Costs $199/year. Includes 1000 websites, white label branding, 70+ widgets & growing, 50+ ready-made sections, 50+ header & footer blocks, etc.
Meanwhile, if you aren’t satisfied with Master Addons, then it provides a 100% refund within 14 days of purchase. So, make sure to contact them to get your money back.
G. Customer Support in Master Addons for Elementor
Any plugin you use could cause you to become stuck and Master Addons is no different. Therefore, you need excellent customer support.
Fortunately, Master Addons provides 24/7 customers to all of its users. On its website, you can find the Support menu which shows the popular topic that is discussed via an open community.
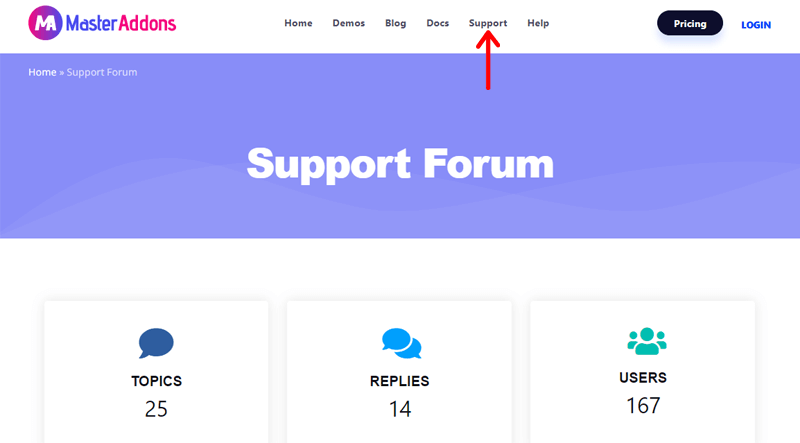
Further, in the footer area, you can find useful links for the support options. You can go to the Support Request, where you can fill out the form with your query and issues. Along with that, you can always submit a ticket for serious issues.
Besides, you can also check out its documentation. There, you’ll find lots of documents, guides, and articles from purchasing, and installing to getting started and using different elements. Also, you can check video tutorials for common problems.
H. Pros and Cons of Master Addons for Elementor
In this article of Master Addons for Elementor review, we’ve also included the pros and cons of this plugin. So, let’s take a peek!
Pros of Master Addons for Elementor
- Simple and easy to use.
- Comes with unique custom breakpoints features.
- Allows you to disable any of the extensions and elements which you don’t want to use.
- It offers complete customization by providing elements with lots of options to control every possible thing.
- Affordable cost with lots of available elements.
Cons of Master Addons for Elementor
- Doesn’t offer any WooCommerce widgets.
- It’s difficult to find the free trial option.
- There are not as many page or section templates as offered by similar addons.
- Although it gives a 14-day money-back guarantee, some conditions need to be met.
I. Final Verdict – Is it Worth Using the Master Addons for Elementor?
Overall, Master Addons is definitely a good and worthy plugin to use if you want to enhance Elementor’s features. This plugin can help you to create appealing, modern layouts for your site.
To begin with, the custom breakpoints functionality allows you more flexibility over how your website looks on various screen sizes. Additionally, unless you need the advanced features of Elementor, you can apply custom CSS even to the free version of the plugin.
Therefore, if you want to create a magazine-style site, then it offers blog posts, tickers, animated headlines, image galleries, etc. It also offers varieties of other widgets to use. Similarly, it’ll also be perfect if you want an online portfolio as it offers different elements. Such as creative links, flip boxes, hotspots, image hovers, tooltips, and much more.
However, If you have an online business, then Master Addons may not be the best plugin for you. Because it doesn’t provide any WooCommerce widgets.
Further, Master Addons come with pretty distinctive features. It does offer plenty of standard widgets that are comparable to other Elementor addon plugins, but it also has unique features.
Conclusion
That’s all folks! We’ve arrived at the end of our Master Addons for Elementor review. We expect that you’ve understood Master Addons for Elementor and be able to use it on your site also.
We hope you liked our article. If you’re using the Master Addons for your website, then please share your experience below in the comment section.
However, if you’ve any further queries on Master Addons for Elementor review, then please feel free to ask us. We’ll try to get back to you as soon as possible. Also, share this article together with your friends and colleagues.
You may also check out our article on Essential Addons for Elementor review & the best Elementor alternative WordPress plugins.
Don’t forget to follow us on Facebook and Twitter for more helpful articles.


