
Do you want to make a marketplace website using WordPress? Are you looking for a guide for starting your own multivendor marketplace? Then, you’ve got to come to the right place.
WordPress is a Content Management System (CMS) that allows you to easily create and manage any kind of website without writing a single line of code. It’s a free and open-source platform that you can also use to create an online marketplace like eBay, Amazon, and Flipkart.
Further, it provides you with everything that you need to create your online marketplace. Such as an extensive range of themes and plugins, customizable designs, high security, SEO-friendly, and more.
In this article, we’ll show you how to easily make an online marketplace website using WordPress with an easy-to-follow guide.
Let’s get started!
What is a Marketplace?
A marketplace is an online eCommerce platform where multiple users can sell and list their products or services for sale in one place. It’s a perfect platform to connect sellers with buyers.
You’ll find all sorts of products and services on sale within a single roof. Just like any big shopping mall, you’ll find multiple vendors setting up their stores and selling their products.

However, don’t confuse the marketplace with an eCommerce website. As the marketplace website is one of the types of eCommerce websites.
The main difference is that in a marketplace you sell products from multiple sellers. Whereas in an eCommerce website you sell products of a single vendor to multiple customers.
As a marketplace owner, you don’t have to worry about inventory, packaging, or anything else. As you just need to allow your users to list their products on your website.
Plus, the best thing is that you can earn some money by earning a commission for each sale on your marketplace.
Some of the popular online marketplace currently available are Amazon, AliExpress, eBay, Etsy, Flipkart, and many others.
What are the Requirements to Make a Marketplace Website?
Before we look at the steps to make a marketplace WordPress website, let’s first look at the things that you need. Here are some of the following things you may need to make a marketplace website:
- Domain Name – Make sure that you choose a simple yet catchy domain name. It makes it easier for your visitors to find and connect to your marketplace on the internet.
- Good Web Hosting – Your marketplace will have several vendors on your platforms promoting their products. This can lead to a higher number of website visitors, you’ll need fast, stable, and secure WooCommerce hosting.
- Install WordPress – To build your marketplace, you’ll need powerful CMS platforms like WordPress. WordPress gives you access to thousands of plugins that will help you with everything to make a website quickly and easily. Hence, you need to install WordPress.
- SSL Certificate – You need to have an SSL certificate on your website because it provides increased security, privacy, and data protection for your marketplace and users’ information. Also, Google makes sure that SSL-enabled websites rank higher on the search results.
- Add WooCommerce – You must use an eCommerce plugin to get eCommerce functionality on a site. For WordPress, we recommend using the popular and powerful WooCommerce plugin. It’s free to use and offers several extensions for adding more functionalities.
- Use Dokan – With a multivendor plugin, you can convert your shop into a marketplace. Since we’re using WooCommerce, it’s best to use its top extension, that’s Dokan. This plugin includes several features for your vendors and their products.
How to Make a Marketplace Website Using WordPress?
Here we present to you a comprehensive guide on how to make an online marketplace website using WordPress. We’ve put forward a step-by-step process to teach you how to start making money from your marketplace.
Let’s begin with the first step – choosing the right niche for your online marketplace.
Step 1: Choose the Right Niche for Your Online Marketplace
The very first thing you need to do is choose the right niche industry for your online marketplace. There are so many options that you can go with such as clothing, home decors, books, electronics, furniture, jewelry, digital products, and more.

You should go with selling such products that you are passionate about. In this way, you can emotionally invest yourself in your business and product. Besides that, it’ll help you better deliver its goal and mission into the market.
After that, you should also be able to study the current trends and market status before joining it. You should stay up-to-date on recent trends in products and services. This way it makes it easier to decide which industry you should join to start your online marketplace.
For instance, if you’re a tech enthusiast who loves new gadgets and all then you can start your own tech-related business. Similarly, if you’ve got a keen interest in books and literature then you can start your online book store.
Step 2: Install Required Themes and Plugins
After you’ve chosen your niche, it’s time to install all those necessary themes and plugins that help you build a powerful marketplace website. The very first thing that we’re going to install into our WordPress would be the WooCommerce plugin.
WooCommerce is the popular WordPress-compatible open-source eCommerce plugin. It helps you turn your website into a full-fledged eCommerce store literally in a few clicks.
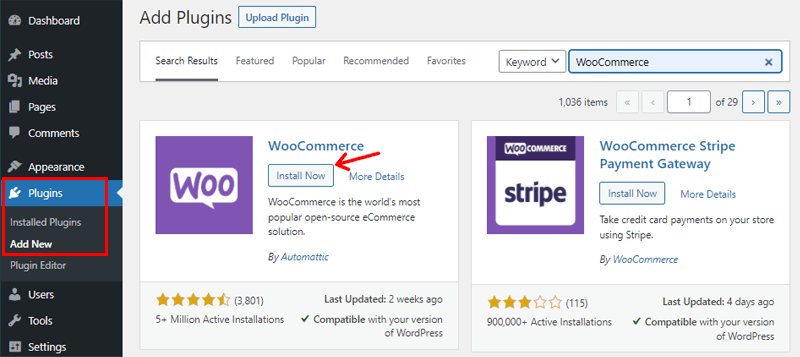
To install WooCommerce, all you need to do is navigate to Plugins> Add New> WooCommerce> Install> Activate. For more detailed steps, learn how to install a plugin.
Now that we’ve installed WooCommerce, it’s time to install a theme.
When you’re installing a theme, you need to make sure that the theme that you’re going with is seamlessly compatible with the WooCommerce plugin.
In that case, we’d like to suggest the Astra theme to you all. Astra is a lightweight WordPress theme that comes with tons of pre-starter templates that load fast and are built for performance.
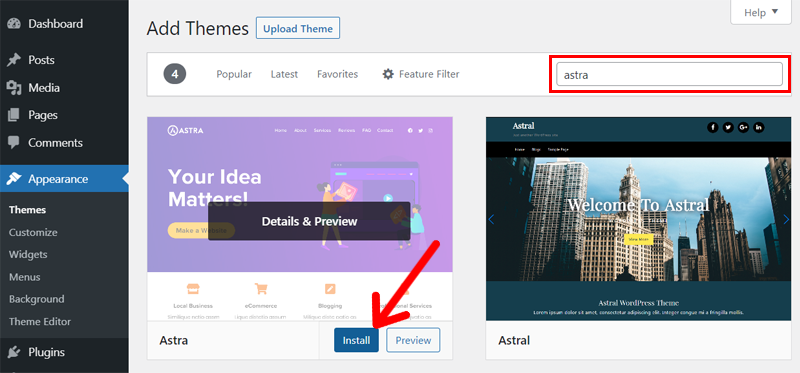
To install the Astra theme, you need to head over to Appearance > Themes > Add New and search for Astra. Then, click on the Install button and then Activate the theme.
Besides the Astra theme, there are other popular eCommerce WordPress themes to look at such as Storefront, Zakra, Kadence, Shoppe, OceanWP, etc. For ease, check out the list of the best WooCommerce themes.
Step 3: Configure Dokan Plugin to Make Multi-Vendor Marketplace
Once you’ve completed these first two steps, it seems you’ve already built a solid foundation for your online store.
But now it’s time to turn your online store into a marketplace on your WordPress website. In order to turn your WooCommerce store into an online marketplace, we’ll need to install and activate the marketplace plugin.
If you look closely then, you’ll find several marketplace platforms on the market that you could consider installing. Some of them are the best marketplace add-ons for WooCommerce such as Dokan, WCFM, WC Vendors Marketplace, WCFM Marketplace, etc.
We’ll get to know some of them later, but for now, we’re going with the Dokan WordPress multivendor plugin.
Read the full review on Dokan here! That’ll clarify why we choose Dokan.
What is Dokan Multivendor Plugin?
Dokan is a popular WordPress multi-vendor marketplace plugin that lets you create your own multi-vendor marketplaces like Amazon and eBay. It is the most popular product developed by weDevs that helps you build a full-fledged multi-vendor online marketplace.

You can get this plugin in both free and premium versions. You can download its free version called Dokan Lite from the WordPress plugin directory.
With its free version, you’ll get free updates, community support, and all the basic features for expanding your business online. However, the free version isn’t good enough to let you build your full-fledged marketplace on your own.
Hence, you need to purchase one of the Dokan premium plans to build a complete WordPress marketplace. With its premium version, you’ll get an advanced frontend dashboard for vendors, admin reports, coupon creation, shipping management, storefront widgets, product bulk edit, and more.
How to Install and Active Dokan Multivendor Plugin?
Before we purchase and install the premium plugin, we’ll have to install its free version which acts as a core plugin to make the premium version functional.
However, if you wish to install the core plugin later, then you can do that too once the premium version is installed.
To install and activate the free version, first, log in to your WordPress dashboard and then navigate to the Plugins > Add New button.
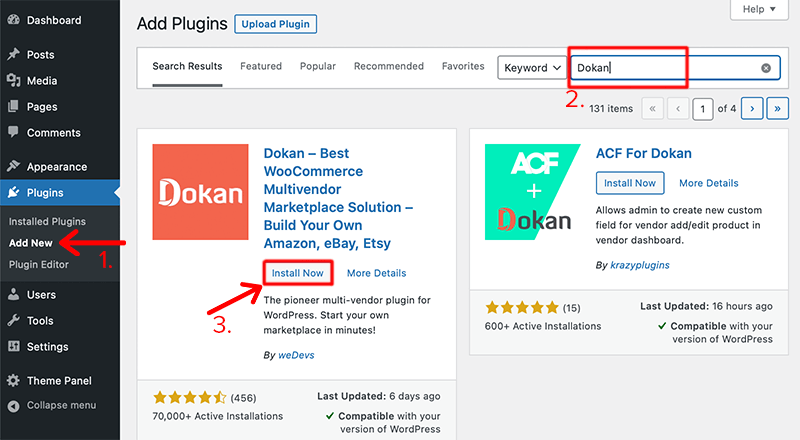
After that, search for the Dokan plugin in the search field. After you’ve found it, click on the Install Now button followed by the Activate button.
Now to install the premium plugin, you’ll first have to purchase the premium version of Dokan. Once it’s purchased, download it to your local device in the form of a zip file.
Next, you’ll upload that downloaded zip file to your WordPress site. For that, navigate to Plugins > Add New, and then click on the Upload Plugin button.
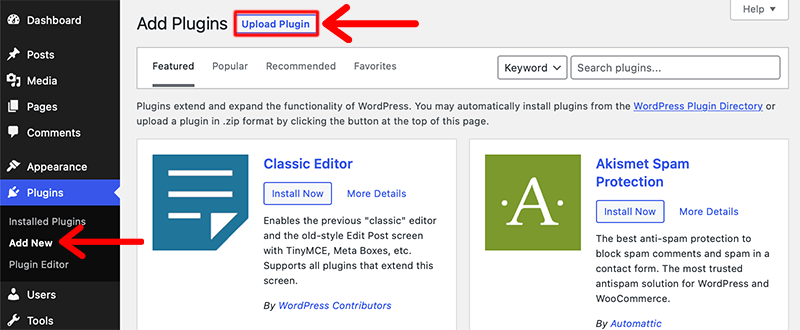
Once you’ve uploaded it, click on the Install Now button. After the installation has been completed, click on the Activate Plugin button. This will then make your site ready to create your very first marketplace.

This is how you fully install and activate the Dokan multivendor plugin on your WordPress website.
How to Set up Dokan Marketplace Plugin?
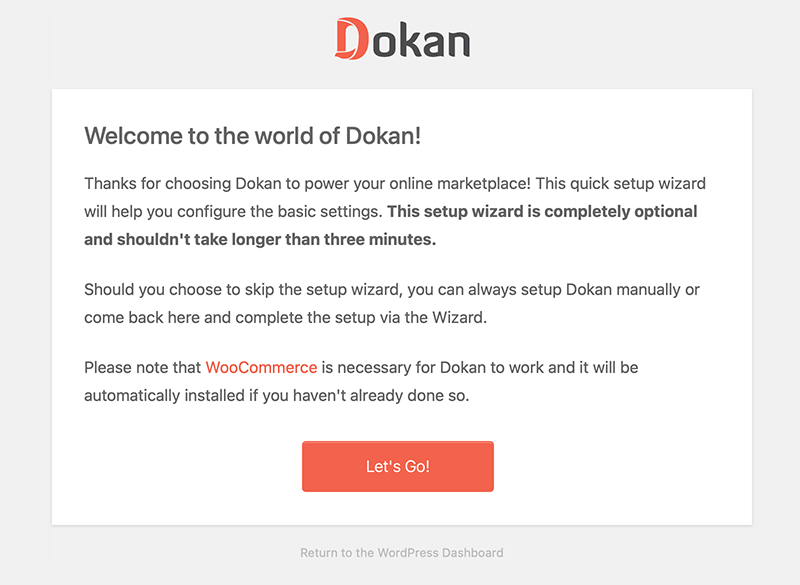
Once you’ve installed it, don’t forget to set up the configuration wizard. In doing so you’ve to configure the following settings:
- Provide vendor store URL
- Add Google Map API to display a map on the store page
- Set your commission type to a flat rate or percentage
- Assign your percentage amount from each order
- Enable PayPal or bank transfer as a payment gateway
- Set a minimum balance required for your vendors to make a withdrawal request
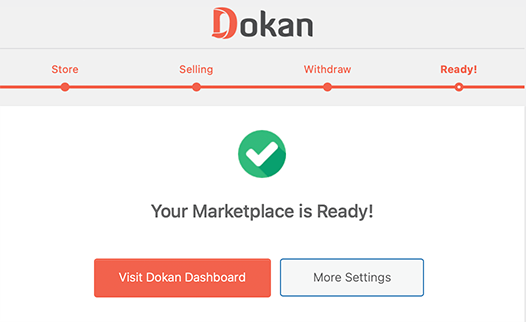
Once you’ve completed your setup wizard, you’re ready with your marketplace. If you want to configure more settings, you can click on the More Settings option, or else you can directly Visit your Dokan Dashboard.
What is Dokan Dashboard?
A Dokan Dashboard holds all the precious information regarding how well your marketplace is performing. With this, you’ll find on your dashboard the number of vendors registered, amount of commissions, sales per month, number of withdrawals, and more.
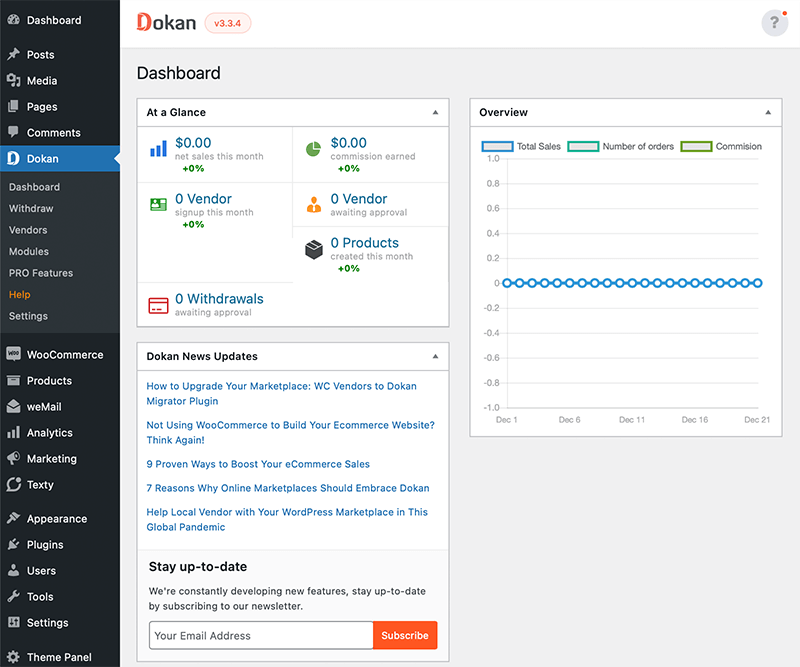
This dashboard is run by the main administrative head who owns the marketplace. It’ll allow the admin to control what vendors can sell or what customers can see on the website.
Also, it gives you a quick overview of your store’s insights without having to check each vendor’s profiles to investigate their sales, reviews, updates, and more.
Do you want to learn more about this multivendor marketplace plugin for the WordPress website? If yes, then check our comprehensive Dokan review blog to know everything about it.
Step 4: Add Vendors and Products to the Marketplace
With that let’s add vendors to the marketplace. Then, as a vendor, let’s see how adding a product works.
i. Adding Vendors
First, navigate to the Dokan > Vendors from your dashboard and click on the Add New button.
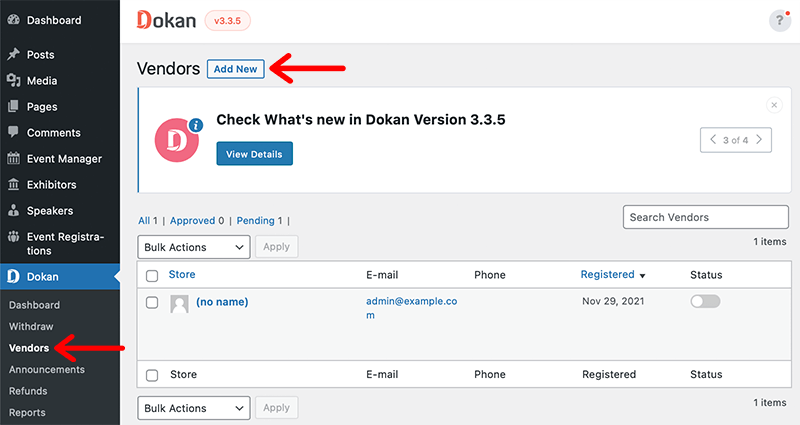
After that, it’ll open a popup form asking you to provide all the necessary information to add new vendors.
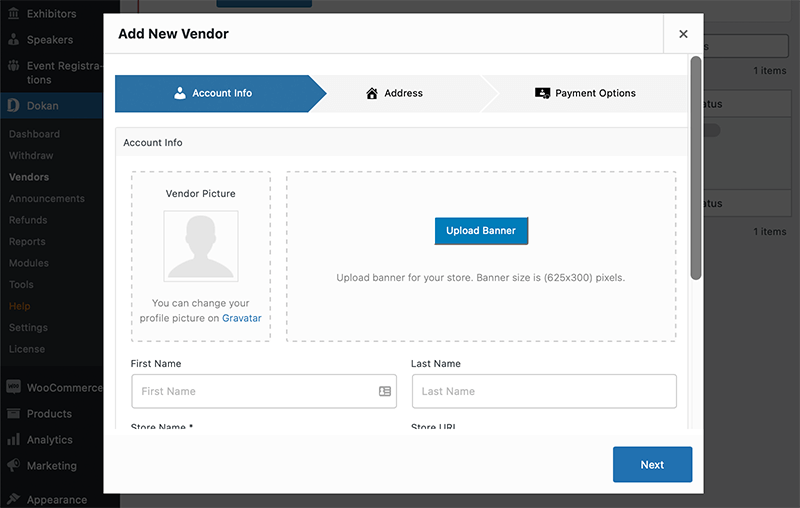
Once you’ve provided all the details, you can send a notification to the vendor via email that they’ve been added to the system.
Lastly, don’t forget to activate the button to allow your vendor to start selling in your store.
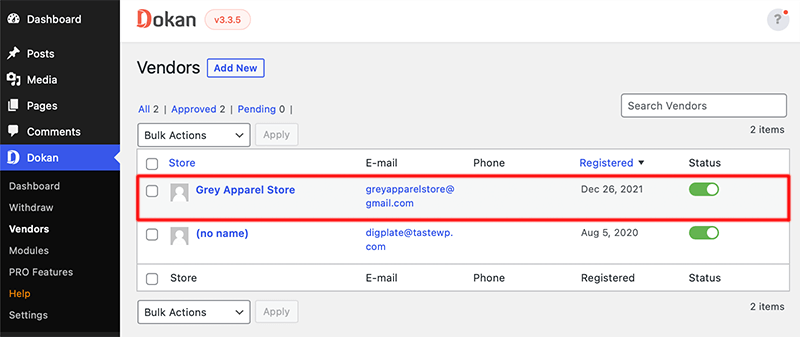
With that, it’s time to let your vendor start adding products to their store.
ii. Adding Products
So, the vendor needs to navigate to their vendor dashboard and click on the Products menu. Then, click on the Add New Products button from the top right corner.
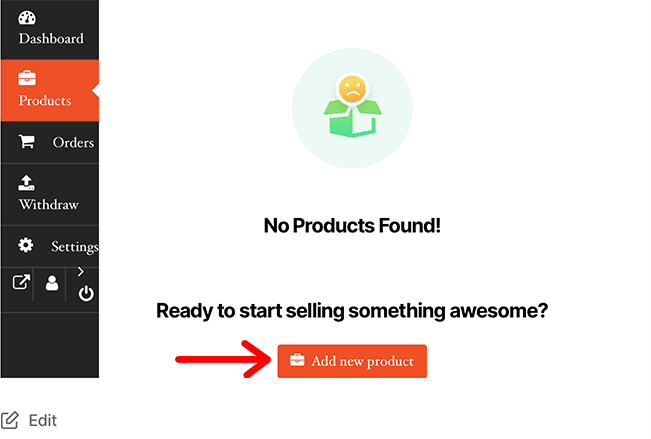
This will then open a new window that allows you to fill out a form to create a new product. You need to provide all the information about the product like product name, image, price, and description. After that, you can now click on the Create Product button.
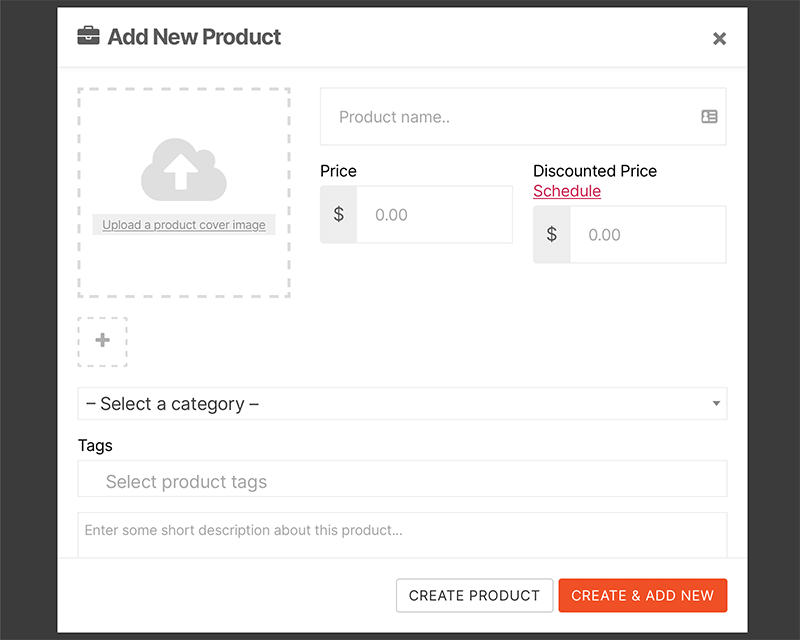
Once your vendors create a product, they won’t see their products live on the marketplace. Moreover, the product is mentioned as Pending Review. This means the admin is responsible for approving/denying the products to sell on their marketplace by default.
Now, to approve the products, you (as an admin) must go to the Products>All Products menu on your dashboard. And then publish each of the product items of vendors to display on your site.
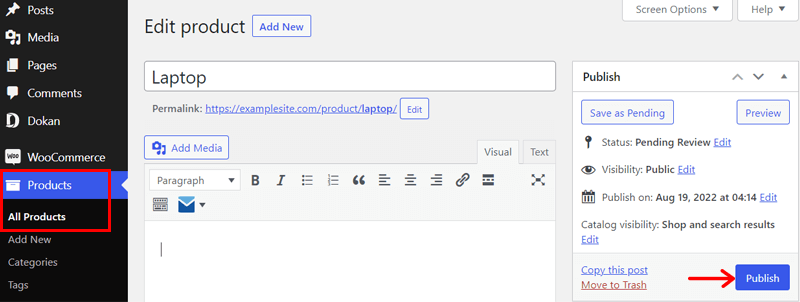
In this way, vendors can easily add new products to their stores in your marketplace.
Step 5: Set up Other Marketplace Options
So, by far our marketplace is almost ready, we’ve our vendors and the products. But before we go live, let’s look at other configurations to set up in our marketplace. So, let’s check them out.
i. Allow Registration
We’ll look at how we can enable the registration option for anyone who wants to become a vendor on our marketplace. By default, when you install WordPress, the registration form is not enabled. Hence, you’ve to enable the registration feature to view the vendor and customer registration form.
Navigate to WordPress Dashboard > Settings > General Settings. Then, check the box that says Membership – Anyone can register and click on the Save Changes button to save your settings.
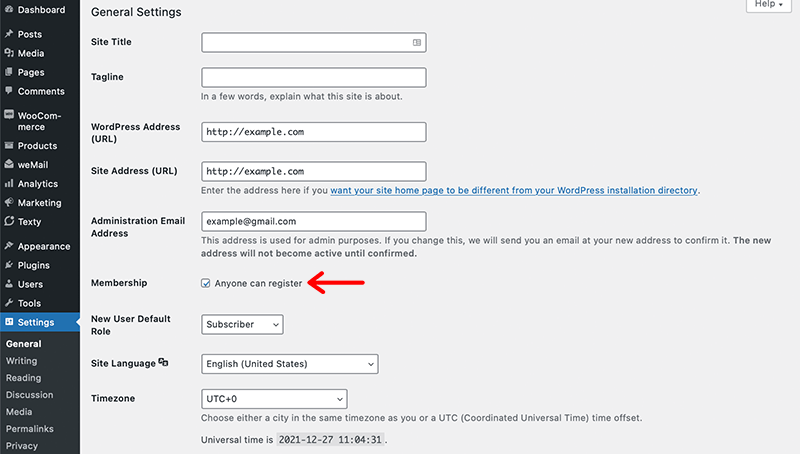
Once you check that box, you’ll allow your vendors to register themselves in your store.
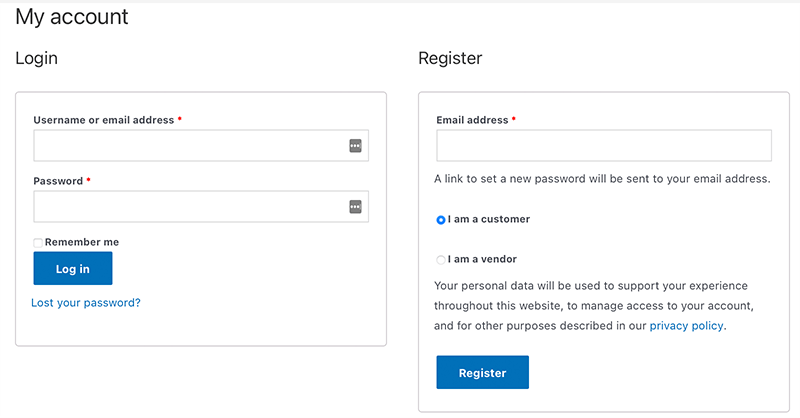
ii. Payment Options
The next thing we’re going to look at is how we can accept our payments. WooCommerce makes it quite easier for you to set up your payment option.
WooCommerce offers different payment options like direct bank transfer, cheque payment, and cash on delivery. You can configure it by navigating to WooCommerce > Settings > Payments.
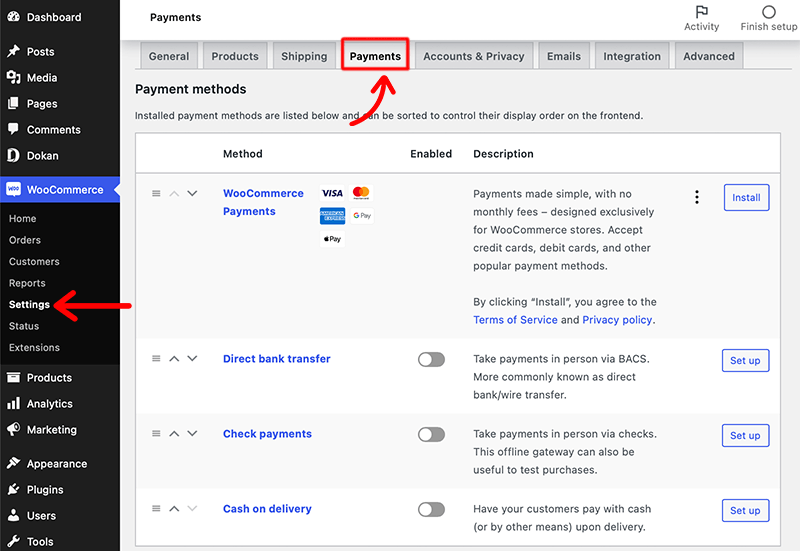
However, you can integrate with credit cards, PayPal and Stripe. At the same time, these payment gateways seamlessly work with the Dokan plugin too.
iii. Tax Settings
After that, we shall look at how we can enable taxes on our sales. Plus, Dokan provides built-in support for WooCommerce taxes. In this way, vendors will be able to select the tax classes set by the admin.
For that, head over to WooCommerce > Settings > General.
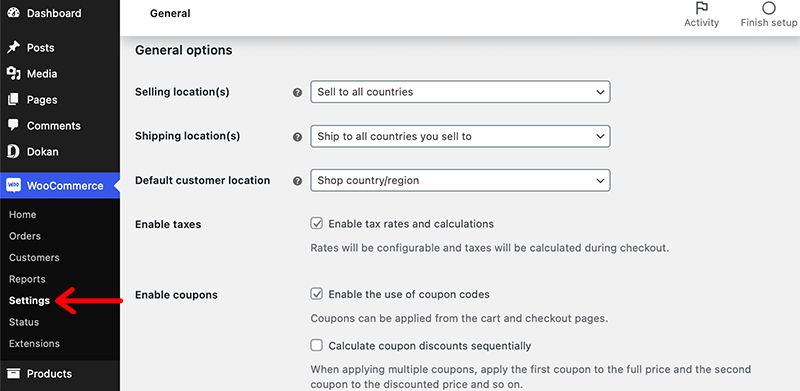
Following that, scroll down a page and check on the ‘Enable tax rates and calculations’ box beside the Enable taxes option. With that, don’t forget to click on the Save Changes button.
As soon as you save it, you’ll notice that a new Tax tab will appear under the WooCommerce settings.
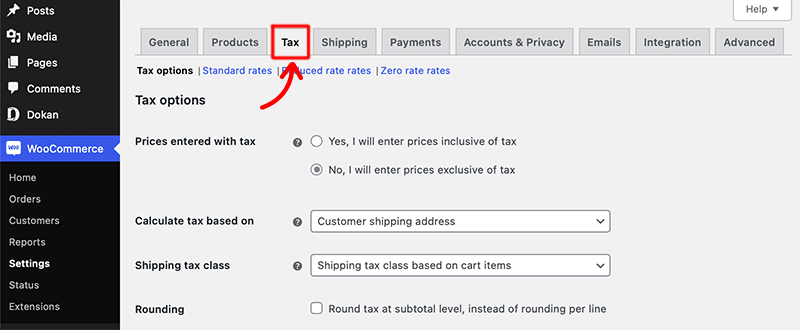
Inside that Tax option, you’ll find many settings options and components that you can configure. However, make sure that you’ve good knowledge about tax and its components before configuring it.
iv. Shipping Options
Similarly, there are various shipping options you can find here. Basically, you can create shipping zones, shipping options, and shipping classes from WooCommerce.
For example, let’s make a shipping zone. For that, go to the Shipping tab on the Settings menu in WooCommerce. There, you click on the Add a Shipping Zone button.
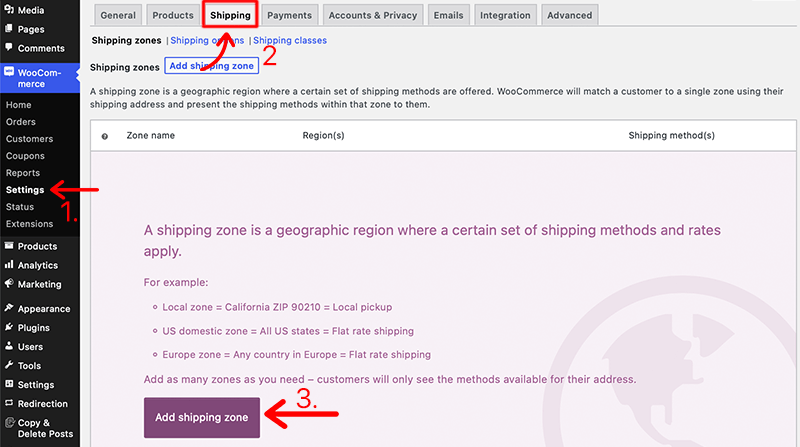
Now, enter the name and regions for the shipping zone. Next, click on the Add Shipping method button and save the type of shipment. It can be a flat rate, free shipping, or local pickup. Lastly, click the Save Changes button.
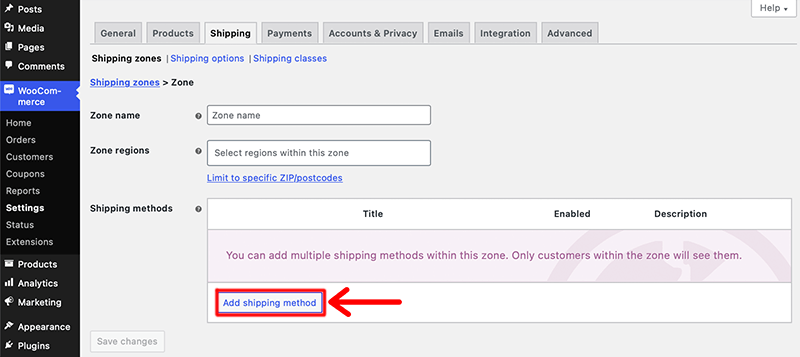
Other than that, there are more settings that you can configure. Make sure to go through them.
v. Dokan Settings
Moreover, if you want to change the settings you set up while installing Dokan, then it can be done from the Dokan>Settings menu. Now, let’s look into some of the settings by Dokan:
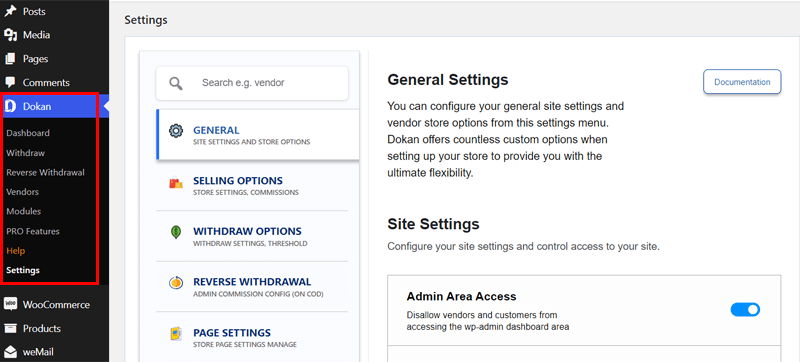
- General: It contains basic site settings and vendor store settings. Here, you can alter the vendor store URL, set the number of products to display on a store page, etc.
- Selling Options: This tab includes various options to configure your commission, vendor capabilities, and product catalog.
- Page Settings: Here, you can configure the necessary page settings. Such as selecting the pages you want to display for the dashboard, store listing, etc.
- Appearance: With this setting, you can configure the store appearance options, configure map API, select store header template, etc.
That’s all! Now, after you set up your multivendor marketplace options, let’s move forward to test your WordPress website.
Step 6: Test Your Store
With the completion of the setup, it’s time to test-run your online marketplace. All you need to do is visit your website in a new browser window and create a few accounts and register as a vendor. Once you’ve done that, you can add products and see what your store page looks like.
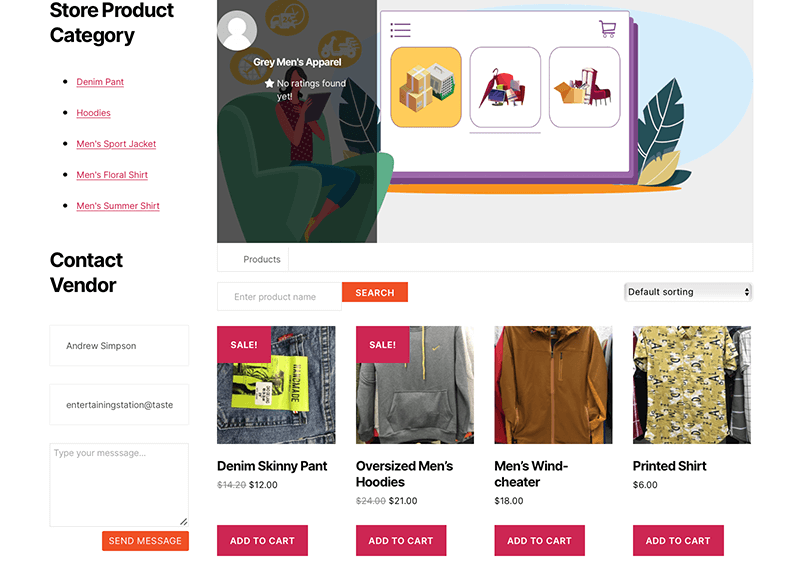
Finally, don’t forget to optimize your marketplace to achieve a brilliant user experience, performance, and SEO. We’ll know about all of the important things you should keep in mind for your marketplace next.
How to Grow Your Multivendor Marketplace Website?
There are millions of sites on the internet, so you must put effort into promoting your marketplace. So, after you set up your WordPress marketplace website, you’ll have the responsibility to grow it.
As a result, there can be an increase in the number of vendors to sell products on your marketplace. Also, this may raise the number of customers purchasing on your site.
So, if you’re concerned about how you can grow your multivendor marketplace website, then don’t worry. Check out our list of the ways to promote your business online:
- Write Blogs: You can write articles about your marketplace or even blogs on high-ranking keywords. That’ll help you get organic traffic to your site, which may result in getting more customers.
- Placing Ads: Using Google Ads is a great way to attract and get potential sellers to your marketplace. That too in a very short period, which is incredible. However, it may be costly.
- Email Marketing: Another way is to create a mailing list and send emails to new and existing customers. Simply, email marketing. For that, there are many email marketing services available.
- Other Plugins: Some must-have plugins to grow a marketplace are Rank Math (SEO plugin), OptinMonster (conversion optimization plugin), WPForms (form builder for surveys/polls), etc.
That’s all for here! Now, let’s move into the next section.
Which are the Other WordPress Multivendor Marketplace Plugins for WooCommerce?
Dokan is an outstanding WordPress plugin for making a multivendor marketplace website. However, it’s not the only plugin available for WooCommerce.
Here, we’re listing some of the top competitors of Dokan that you can use for creating your site.
1. WCFM Marketplace
A popular WordPress multivendor plugin with 30K+ active installations is WCFM Marketplace. Using this plugin, your vendors can individually configure the SEO (Search Engine Optimization) options for better search results. And that’s by adding appropriate keywords from the front-end.
Furthermore, the best about this plugin is its advanced store list and filtering options. As you can allow your visitors to search the vendor’s store by city, zip code, category, etc. Moreover, with its radius search, users can find products that are near their location.
Key Features:
- Contains a powerful commission system with options like fixed, percent, product wise, vendor wise, and more.
- Includes flexible shipping management options. Such as shipping rate by zone, country, weight, distance, etc.
- Integrates with well-known payout options such as PayPal, Skrill, MangoPay, Stripe, etc.
- Comes with some widgets and multiple shortcodes to customize the store.
- Consists of multiple withdrawal options based on schedule, order status, or manually.
- Fully compatible with the Elementor page builder plugin to easily make the marketplace.
Pricing:
WCFM Marketplace is a free WordPress plugin for multivendor marketplace functionality. So, you can simply download it from the WordPress.org plugin repository or its website. Another way is to install the plugin right from your dashboard.
This plugin offers several premium modules for additional features. Now, let’s look into them.
- Ultimate: Includes lifetime and recurring plans that cost $59-$299. Some of its features are filters, customization options, reports, etc.
- Group & Staff: Contains $49-$249 price options. Using it, you can categorize vendors, assign their respective capabilities, etc.
- Delivery: Costs $39-$149 and consists of features like adding unlimited delivery people, getting delivery notifications, and more.
- Analytics: At $19-$99, you’ll get to analyze the store and store products from the front end.
- Affiliate: Price ranges between $39-$149 and contains features to run affiliate programs.
- Product Hub: Price options are between $19-$99 and include features to improve the products on the front end.
Additionally, you can buy all these add-ons with 1-year, 3-year, and lifetime pricing plans. Further, you can use them for up to 2 to unlimited sites. And the price options range from $224 to $1044.
2. WC Vendors Marketplace
Next, WC Vendors Marketplace is a fast and easy-to-use WordPress multivendor plugin. Since it comes with a simple setup wizard allowing you to easily and quickly set up your marketplace.
Moreover, you can use it to make a variety of multivendor marketplace like an online art gallery, book store, etc. Further, there are no restrictions on the number of vendors or products you can add. Your vendors can easily sell a wide range of products that can be physical, digital, variable, etc.
Key Features:
- Includes multiple ways for you to earn money. Since it supports several commission types. Such as percentage, fixed, sales by vendor, sales by products, etc.
- Gives full control of the products and vendors. As you can control how your products are published, whether manual or automatic vendor registration and more.
- Contains vendor-specific shortcodes and multiple widgets for easy customization.
- Compatible with over 100 payment gateways like Stripe, MangoPay, Square, Escrow, etc.
- Vendors get their own dashboard where they can manage products, orders, discounts, etc.
Pricing:
WC Vendors Marketplace is a freemium WordPress plugin. It means it has both free and premium plans. The free plugin is downloadable from WordPress.org.
Now, for the premium version, you need to purchase one of the following plans:
- WC Vendors Pro: $249/year, unlimited vendors, order management, coupon management, advanced commission system, etc.
- WC Vendors Pro Bundle: $499/year, all premium features, and add-ons like Tax, Stripe Connect, Membership, and more.
3. WC Marketplace
Yet another WooCommerce multivendor plugin that you can use to make a top-class marketplace is WC Marketplace. It comes with a powerful dashboard for vendors to manage their entire store. Vendors can track and manage their tasks, orders, products, etc., from one place.
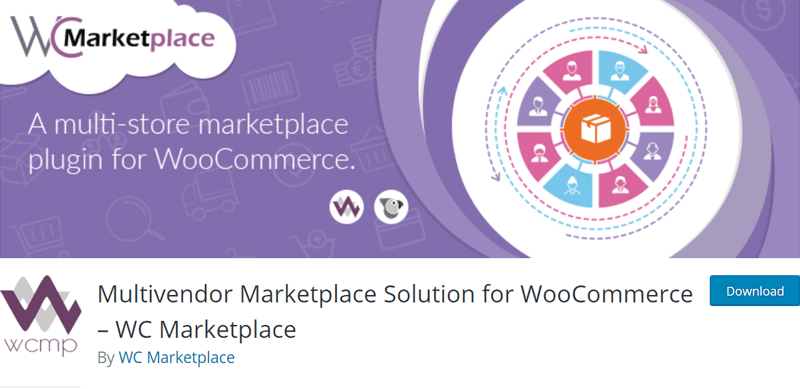
On top of that, this plugin also helps you create a social marketplace such as a Facebook marketplace. With the power of social media, you can sell products instead of just using them just for communication. And plugins like bbPress will help you track the customers on your site easily.
Key Features:
- Uses a refund management software with which users will get refund options for products.
- Vendors can create coupon codes, discount codes, and promo codes for more store traffic.
- Includes powerful product tools like bulk upload, import/export, and more.
- Supports multiple product types like simple, downloadable, virtual, variable, bookings, etc.
- Gives various reports on sales, products, vendors, earnings, tax, and much more.
- Integrates well with tools like Yoast and Google Analytics for better SEO.
Pricing:
The core WC Marketplace plugin is totally free to use. So, you can download it right from WordPress.org.
Further, it also includes several premium add-ons to add exclusive features to the marketplace. Some of them are:
- WCMp Vendor Live Chat: For real-time chat communication, this costs $73-$177.
- WCMp Vendor Frontend Reports: To receive the reports for vendors, it costs $45-$135.
- WCMp Vendor SEO and Analytics: For the power of SEO and Google Analytics, that’ll cost you $15-$45.
What are the Pros and Cons of Online Marketplaces?
Just like every other thing, an online marketplace also comes with its own set of pros and cons. Especially after we looked at the steps to create a marketplace using WordPress, it makes it easier to decide how good it is.
Hence, let’s look at the pros and cons of online marketplaces:
Pros of Online Marketplaces
- Allows you to sell from a single product to several thousand products.
- Let’s sell different product types like physical products, downloadable products, bookable products, etc.
- Gives you the opportunity to earn some commission on each product sold.
- Best for smaller store owners with no investment to build an online store and gives higher visibility.
- Gives your buyers an option to buy the same product from different vendors at competitive pricing.
Cons of Online Marketplaces
- Takes time and effort to build.
- Can be expensive to set up an online marketplace.
- Competitive business platform with other popular marketplaces like Amazon and eBay.
- Requires good technical knowledge of WordPress and the online marketplace.
Frequently Asked Questions (FAQs)
1. Is WordPress good for creating a marketplace website?
No doubt, WordPress is one of the best marketplace CMS that offers unlimited customization options, scalability, and flexibility for your online store.
2. What are the WordPress alternatives for creating an online marketplace website?
To be honest, WordPress is a pretty good platform for creating any kind of website including a marketplace website. However, some of the other best alternatives to WordPress for creating an online marketplace website are Shopify, Wix, Magento, etc.
3. What are the different multivendor marketplace plugins available for WordPress?
Other than Dokan, there are quite a good number of WordPress multi-vendor marketplace plugins available in the market. Such as WCFM Marketplace, WC Marketplace, WCFM, etc.
Conclusion
That’s it! With this, we come to the end of this article.
We hope this article helped you to make an online marketplace using WordPress. Now, you can easily create any kind of online marketplace in WordPress following these steps.
In case you’ve any more queries about making an online marketplace using WordPress, then feel free to ask us. We’ll get back to you as soon as possible. Also, share this article with your friends and colleagues.
You may also like our article on the best multivendor marketplace WordPress themes & the best WooCommerce alternatives.
Also, read the benefits of using WooCommerce for building an online store. Be sure to go through it once.
If you like this article, then please share it with your friends and colleagues. Also, don’t forget to follow us on Twitter and Facebook.


