
Do you want to learn how to create and sell an online course so you can monetize your skills? If yes, then stay right here.
In today’s interconnected world, knowledge knows no boundaries. No matter your expertise, an eager audience is out there waiting to learn from you.
Undoubtedly, online courses have transformed education, empowering creators like you to share their expertise with a global community.
Imagine waking up to find learners from different time zones grasping your carefully crafted lessons. But, how do you transform your passion into a thriving online course business?
Fear not! We’ll walk you through each step, as you embark on this journey to create and sell an online course. Just follow us as we guide you through.
What Type of Online Course to Build? (Popular Ideas + Example)
Before we move forward, let’s explore some popular online course ideas along with real-life examples to inspire your creativity.
Here are some exciting options:
| Course Type | Description | Example |
| Health and Wellness | Nurture mind and body. | Ekhart Yoga |
| Cooking Tutorials | Learn culinary secrets from experts. | Cookable |
| Digital Advertising and Marketing | Dive into the world of online marketing. | Udemy |
| Photography Skills | Capture moments with fineness. | Skillshare |
| Video Production and Editing | Create complete visual content. | edX |
| Business and Entrepreneurship | Master the art of business. | Coursera |
| Language Learning | Unlock new cultures and connections. | Verbling |
| Coding and Development | Build digital wonders. | Codecademy |
Besides, the list can go on and on. Remember, the key is to align your course topic with your expertise and your audience’s needs.
You can check out our article on the popular online course websites for inspiration.
Having said that, let’s jump into creating and selling online courses step-by-step.
Creating and Selling an Online Course (Step-by-Step)
Hopefully, you’ve chosen your online course niche. With that, you’re all set to dive further. So, follow us as we guide you through. Let’s go!
Step 1: Develop a Proper Course Plan
Creating an effective online course begins with thoughtful planning. A well-structured course plan ensures that your content is organized, engaging, and aligned with your learners’ needs.
Here’s how to get started:
i) Define Your Audience:
Imagine your ideal student. Who are they? What are their goals, challenges, and preferences? Create learner personas to guide your course design. Then, consider diverse perspectives and ensure your content is inclusive.
ii) Choose Your Course Topic:
Next, select a topic that aligns with your expertise and passion. What knowledge or skills can you share effectively? Then, research if there’s demand for your chosen topic. Validate it through surveys or pre-selling.
iii) Build Your Course Outline:
Thirdly, divide your course into logical modules or sections. Each module should cover a specific aspect of your topic. Then, outline individual lessons within each module. What concepts, skills, or activities will you cover?
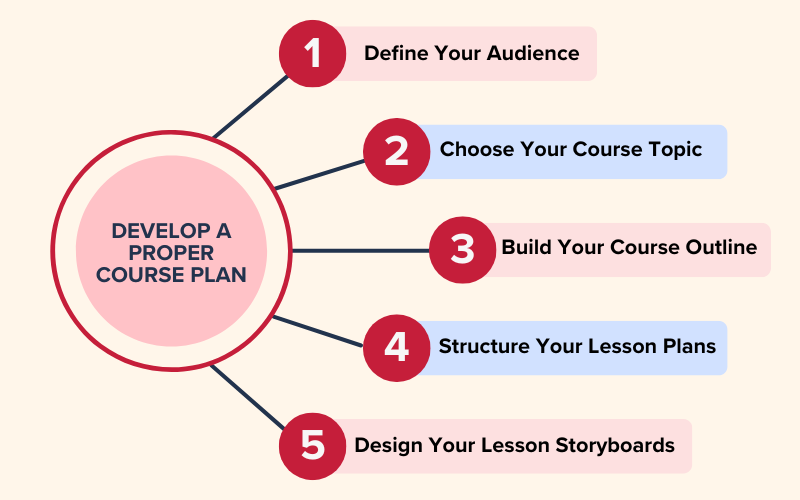
iv) Structure Your Lesson Plans:
Design activities that engage learners actively. Include quizzes, discussions, case studies, and practical exercises. Plus, write with clarity and a global perspective. Remember, your narrative should resonate with learners worldwide.
v) Design Your Lesson Storyboards:
Create storyboards for video lessons. Plan visuals, slides, and any multimedia elements. Next, ensure a smooth flow between lessons. How will one topic lead to the next?
Note that a well-crafted course plan sets the foundation for an exceptional learning experience. Take the time to develop it thoroughly, and your learners will thank you!
Once done, you’re all good to go for the next step.
Step 2: Choose the Right Platform
Selecting the right platform for your online course is crucial. It’s like choosing the perfect canvas for your masterpiece.
Let’s explore three popular options and reveal our top recommendation:
1. WordPress.org
WordPress.org is a powerful, open-source Content Management System (CMS) that allows you to create and manage your website with ease.

With it, you can customize your course website extensively using LMS themes and LMS plugins. On top, it seamlessly integrates with various tools and services. Plus, you can benefit from a vast community of developers and users.
Nevertheless, you might require some technical knowledge. Also, you’ll need to arrange hosting and domain separately.
Pricing:
WordPress.org is an open-source platform, hence it’s free to use. But, you must select a web host and domain. Thus, the cost of setting up a WordPress online course website depends on your host, domain, and other premium tools.
Browse the detailed guide to WordPress here. Also, you may want to explore WordPress alternatives to have more options.
2. Wix
Wix is a user-friendly website builder that offers drag-and-drop functionality. You can choose from a variety of templates for your online course website.

No coding skills are needed; create visually appealing sites effortlessly. Plus, Wix provides hosting as part of its service.
However, it’s not as flexible as WordPress. So, it may be less suitable for complex courses. Nevertheless, you can consider Wix if you prefer simplicity and want to get started quickly.
Pricing:
Wix is a premium website builder where the Business Basic plan starts at the cost of $17/month. Further, you can opt for other plans for advanced and sophisticated features.
Not sure which to choose between Wix and WordPress? Next, read this blog for a comparison. Further, browse the better Wix alternatives here.
3. Thinkific
Thinkific is an all-in-one platform designed specifically for online course creators. It’s primarily built for course creation and delivery.

Moreover, it has an easy interface for beginners. Along with several features for sales and marketing. It’s excellent for beginners and those who want a dedicated course platform.
Again, it’s not as flexible as WordPress and the costs may increase as your course grows.
Pricing:
Thinkific is a freemium platform. Using a free plan, you can create a single course for a community with 1 administrator.
Meanwhile, its $36/month Basic Premium edition offers unlimited courses, affiliate marketing, a personalized domain, and other free services.
Our Recommendation: WordPress.org
If you’d like us to recommend, then we say WordPress.org is ideal for those who want full control and scalability. It’s a versatile choice for building your online course empire.

It offers unparalleled customization, a thriving community, and endless possibilities. With the right plugins, you can create a seamless online course experience.
Note that your platform choice impacts your course’s success. Evaluate your needs, explore the options, and make an informed decision.
Step 3: Pick a Domain Name and Web Hosting
Your online course needs a home – a digital address where learners can find you. Let’s break down this step into two essential parts:
Register a Domain For Your Online Course
Your domain name is your online identity. It’s like the signboard outside your virtual classroom.
For instance, ‘sitenerdy.com’ is the domain of our blog website.

First, use domain name generators to find a unique domain. Once you’ve chosen one, check if it’s available and register it with a domain registrar.
Interestingly, many hosting providers offer domain registration services. So, why not get both from the same place instead of separately?
Buy and Configure a Web Hosting Plan For Your Online Course
Likewise, your web host is like the foundation of your virtual classroom building.
A web hosting platform stores your online course website files on servers connected to the internet. Further, making your course materials accessible worldwide.
There are several web hosting platforms that you can choose from for your online course website. Pick the best one with the help of our article on choosing the best web hosting provider.
If you need a recommendation, then we suggest hosts like Hostinger, Bluehost, Cloudways, Kinsta, etc.
Bluehost, for example, not only offers web hosting but also domain registration services. It’s also a WordPress-recommended host and provides a website builder, SSL certificate, etc.

The starting price for its shared hosting solution is $1.95 per month billed annually. Including 10 GB of storage, custom WordPress themes, and hosting for one website.

Talking about its configuration, then all you’ve to do is click on the ‘Get Started’ button on their website.
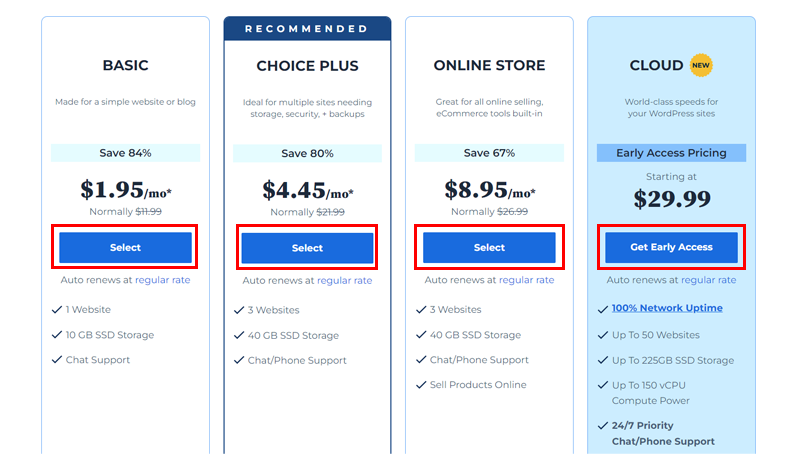
Then, select your desired plan, set up your domain, create a Bluehost account, and complete the payment process.
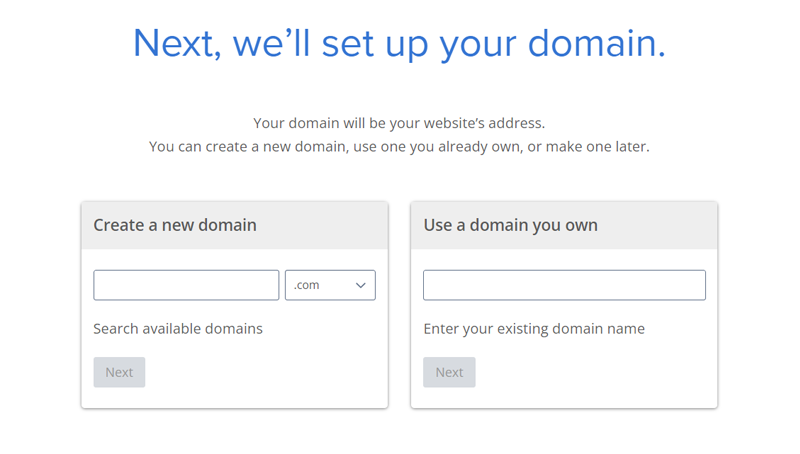
Once configured, WordPress is auto-installed on your Bluehost plan, simplifying the setup process for your online course site.
You can then log in to your Bluehost account, create your site, and customize details such as the name, tagline, and category for your online course website.
Finally, you can log in to the WordPress dashboard to start building your online coaching website, following the provided steps.
Step 4: Select a Suitable Online Course Plugin
Choosing the right plugin for your online course platform is like selecting the perfect set of tools for your online course website.
Several LMS plugins like Tutor LMS, LifterLMS, LearnDash, etc help you create an online course website with ease.

Here, we’ll be using Tutor LMS, a remarkable WordPress plugin designed specifically for creating and managing online courses.
For more details on why, you can check our detailed article on Tutor LMS review.
Install & Activate Tutor LMS (Free Version)
From the WordPress dashboard, you can directly install the Tutor LMS plugin. Simply go to the ‘Plugins > Add New’ menu.
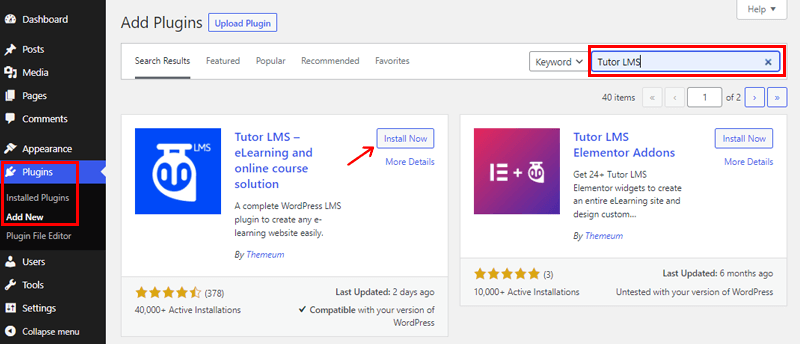
In the search box, type ‘Tutor LMS’ and click the ‘Install Now’ button for the plugin.

Once installed, click the ‘Activate’ button when it appears.
For alternative installation methods, refer to our guide on how to install a WordPress plugin.
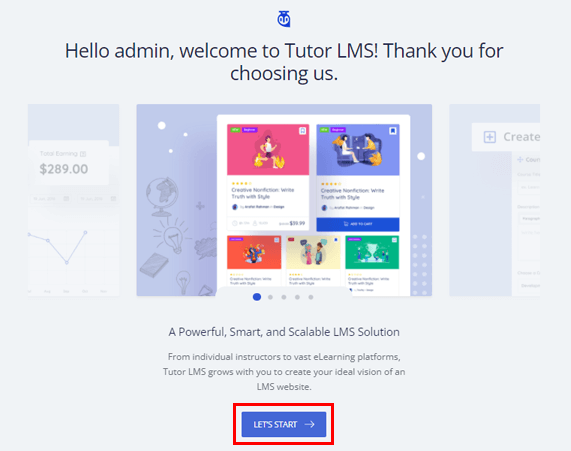
After activation, you’ll be directed to the setup page. Click the ‘Let’s Start’ button to begin.
Choose your LMS platform category: ‘Individual’ if you’re offering your online course program, or ‘Marketplace’ if others can also teach and earn with their materials.
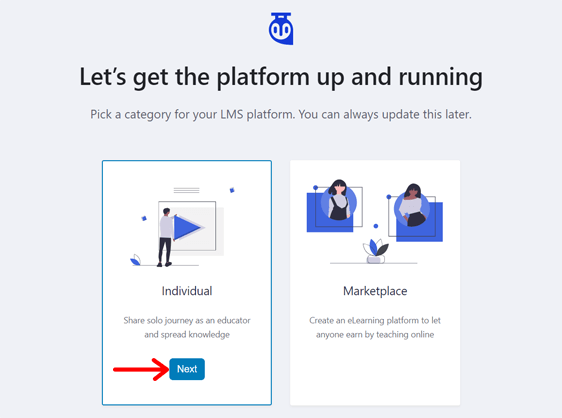
Click ‘Next’ for your chosen category.
Then, proceed to configure settings step by step.
- Start with General settings, including options for instructor and student profiles, and lesson permalink.
- Then, move to Course settings, which involve instructor bio, courses per row, and courses per page.
- Lastly, configure Payment settings for guest checkout, commission rate, and payment withdrawal method.
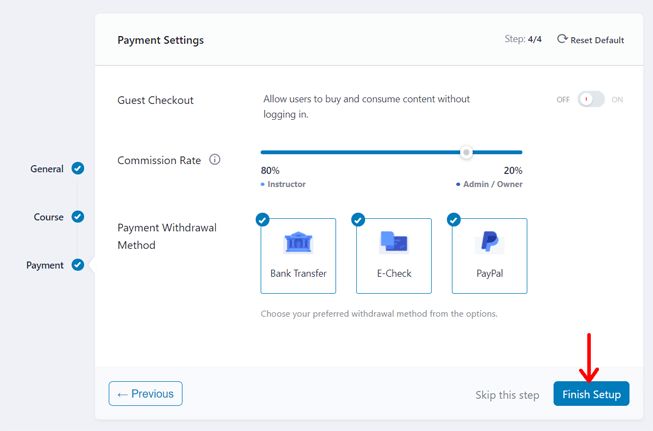
Once done, hit ‘Finish Setup’.
You’ll then be redirected to the WordPress dashboard.
Purchase & Install Tutor LMS (Premium Version)
Meanwhile, for the premium version, go to its official website Pricing page and click on the ‘Buy Now’ button of the suitable package.
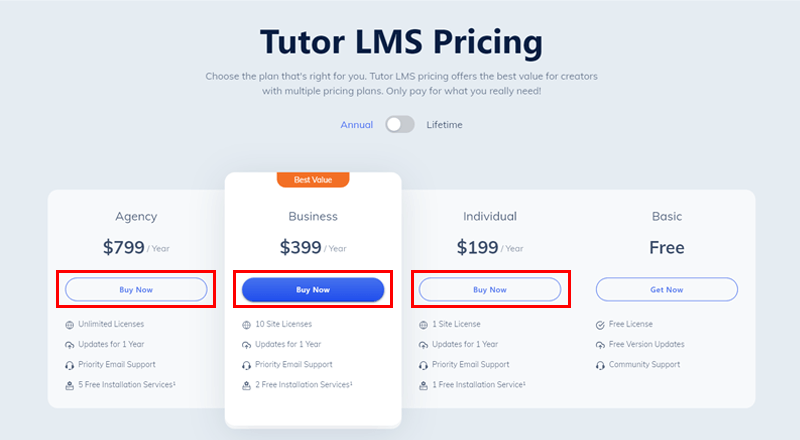
Next, type in your personal and payment details to make the purchase. Once done, you’ll receive the Tutor LMS account access in your email. On logging it, you can download the premium zip file.
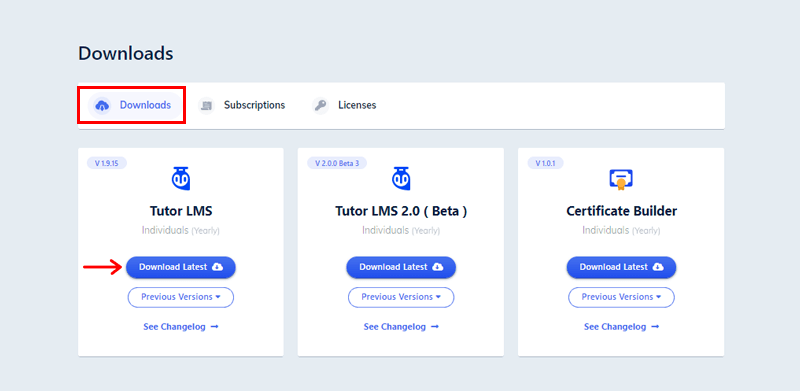
Also, you’ll get the license key from the ‘License’ tab, hold onto it, and come back to your dashboard.
Go to the ‘Plugins > Upload Plugins’. Then, upload the previously downloaded Tutor LMS zip file and click on the ‘Install Now’ button.

Shortly, you’ll see the ‘Activate Plugin’ button, click on it.

Following that, paste your previously copied license key to activate all the premium features of Tutor LMS. And, click on the ‘Connect With License Key’ option.

Done? If yes, then congratulations! You’re all set to enjoy the Tutor LMS pro version.
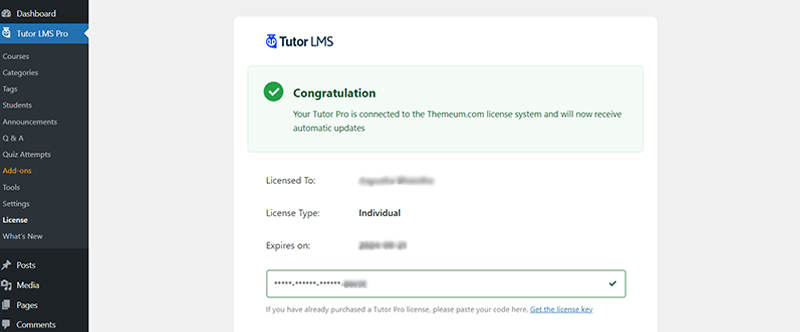
Now, navigate to the ‘Tutor LMS Pro > Add-ons’ and enable all the required addons that you want on your online course website.
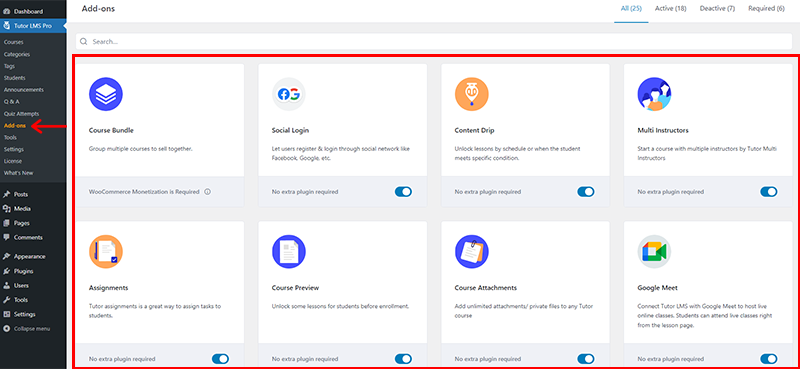
Then, refresh the site once.
Step 5: Installing a Suitable Theme For Online Course Website
Before adding content, it’s essential to choose a suitable WordPress online course theme. There are several top LMS WordPress themes available for online course sites.
However, since we’re using Tutor LMS and it provides built-in themes, we’ll utilize one of them. Specifically, we’ll use Tutor Starter, a free WordPress theme by Tutor LMS.
Let’s begin!
To install the theme, go to the ‘Appearance > Themes’ menu in your dashboard, and then click on the ‘Add New’ button.
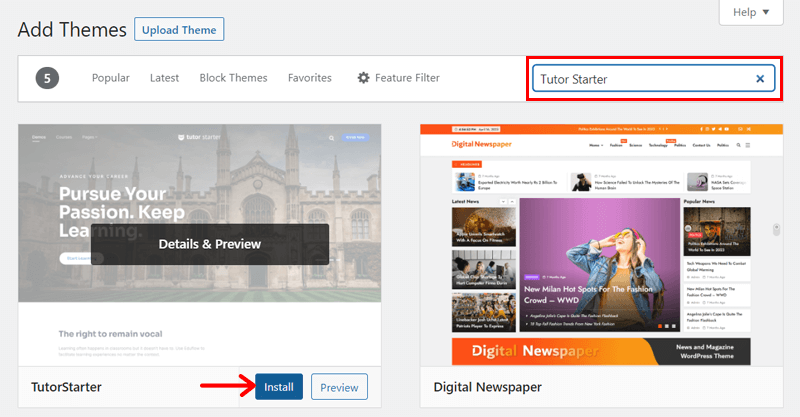
Search for the ‘Tutor Starter’ theme, and once found, hover over it and click the ‘Install’ button, followed by the ‘Activate’ button.
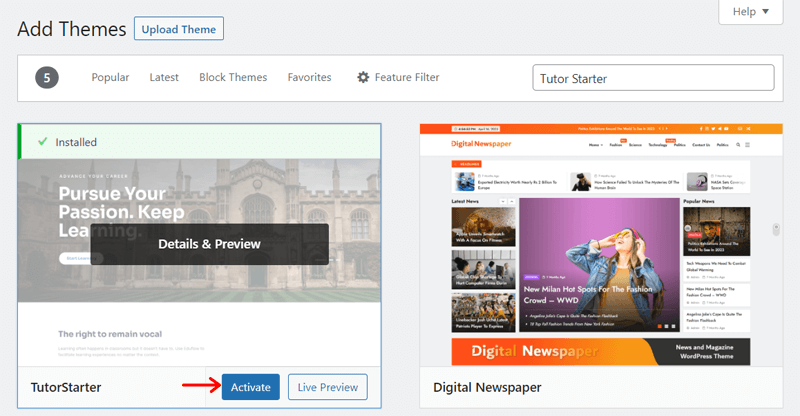
This theme recommends installing a plugin called TutorMate. Click on the ‘Begin installing plugin’ option shown in the notice, then click ‘Install’ and ‘Activate’.

Once the theme and plugin are set up, navigate to ‘Tutor Starter > Starter Sites’.
Choose the template you prefer; we suggest the ‘Marketplace’ template for offering your online courses.
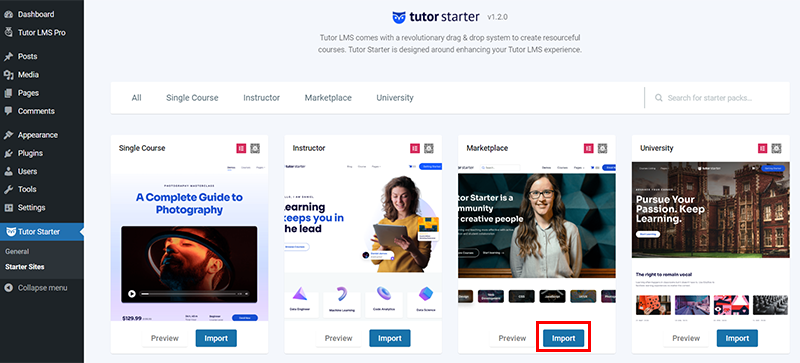
Click the ‘Import’ button for the chosen template. Select your preferred website builder (Elementor or Gutenberg), and click ‘Import Now’.
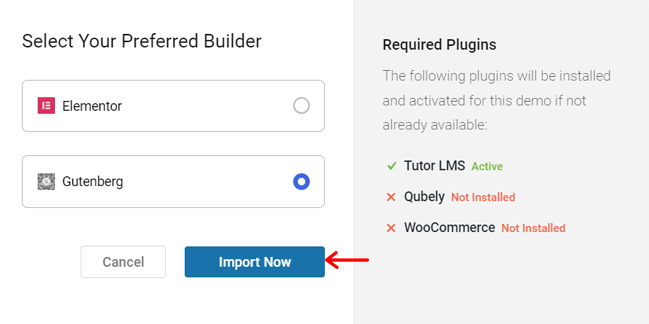
This process installs the template, demo content, and necessary plugins.
You can check its documentation to know more about its customization.
Step 6: Setting Up the Online Course Content
Now that both Tutor LMS and Tutor Starter are installed and activated on our WordPress site, let’s focus on the main purpose: setting up the online course content.
In this step, we’ll explore how to use the course builder in Tutor LMS. It’s a straightforward tool that allows you to create various types of courses.
Note that course creation is limited to the backend in the free version. Premium users, however, enjoy the flexibility of creating courses from both the front and backend.
1. Creating a Course in Tutor LMS
Let’s delve into the detailed process of adding or creating new courses in Tutor LMS from the backend.
The backend course builder is a straightforward course creation tool accessible to all users, whether free or paid. It enables you to construct the entire course directly from the backend page, saving considerable time.
To utilize the backend course builder, come back to your WordPress dashboard.
Then, navigate to ‘Tutor LMS Pro’ in the left-hand navigation menu and select the ‘Courses’ option.

From there, click on the ‘Add New’ button at the top to commence creating a new course.
Now, you’re guided to a course-building page. Let’s examine each setting in detail and design the course accordingly.
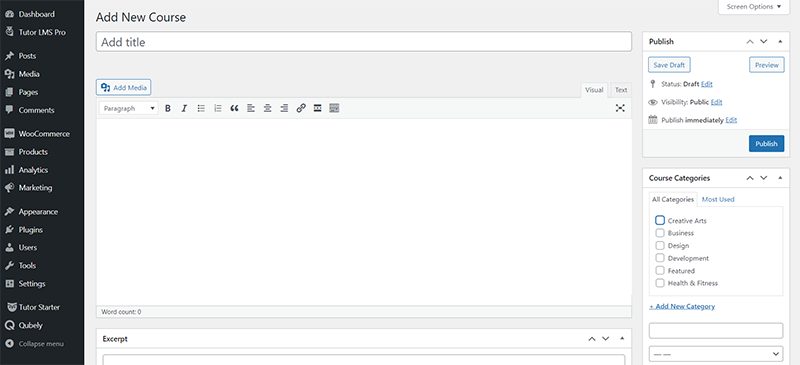
I) Choose a Catchy Course Title
First, pick a title that describes your course well. For example, type ‘Introduction to Photography’ in the ‘Add Title’ section.
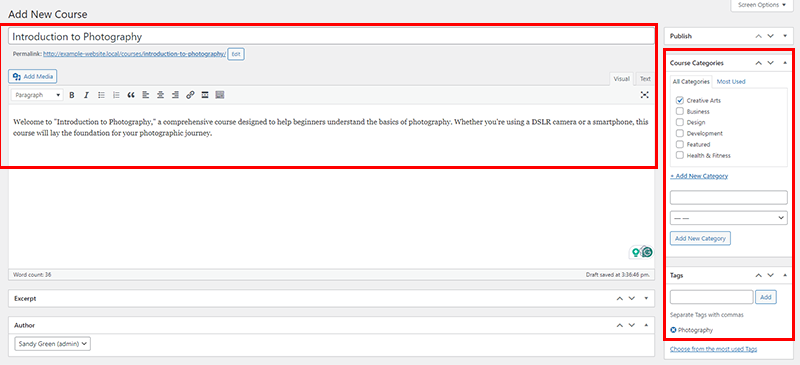
Below that, write a short description so students know what to expect.
On the right, you can select categories and tags. For categories, choose options like ‘Creative Arts’, and for tags, add words like ‘Photography’.
II) Adjust Course Settings
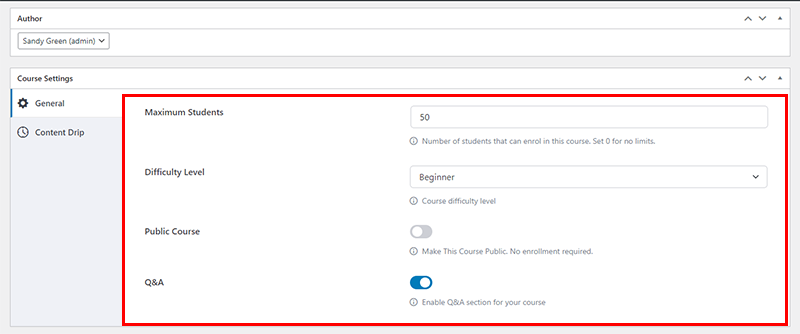
Once you scroll down on the same page, you’ll encounter the ‘Course Settings’ section. Here, you’ll find two tabs: ‘General’ and ‘Content Drip’.
Under the ‘General’ tab, you can set various parameters. Such as the maximum number of students allowed and the difficulty level of the course. Also, whether to make the course public or private, and whether to enable Q&A.
In the ‘Content Drip’ tab, you can toggle content drip on or off. Also, specify the type of drip schedule you prefer to release course content gradually using the available options.
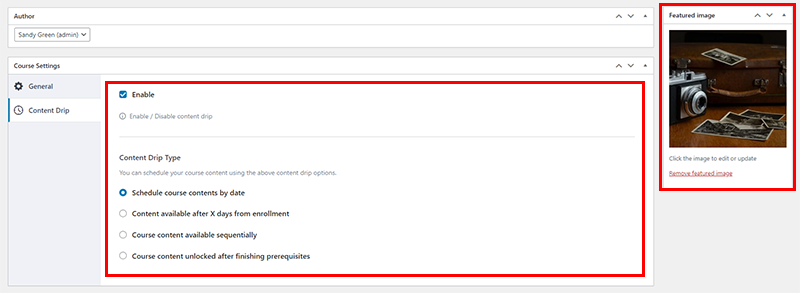
Likewise, on the right-hand side, you’ll also see the ‘Featured image’ section, where you can upload the core image for your course.
Similarly, do you’ve any brochures or prospectus that you’ve created for your online course? If yes, then you can upload it via the ‘Upload Attachments’ option.

Also, if your online course has some prerequisites that have to be taken first, then you can specify it in the ‘Course Prerequisites’ box. If not, you can leave it as it is.
III) Use Course Builder to Create Your Course
Once again, as you scroll down, you’ll come across the ‘Course Builder’ section. This is a fundamental feature of the Tutor LMS plugin.
In the ‘Course Builder’ section, a course is structured with topics, each containing lessons and quizzes.
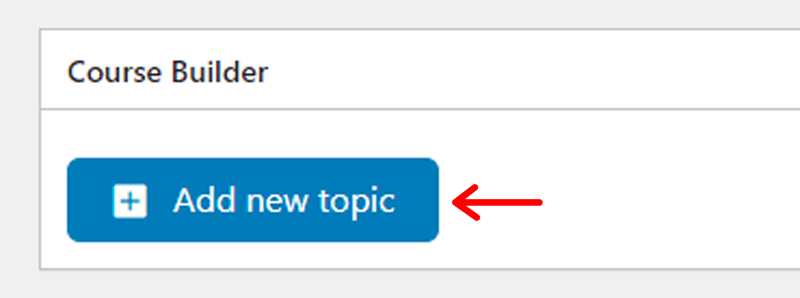
To begin, click on the ‘Add new topic’ button. This action will prompt a page to appear where you can input the Topic Name and Topic Summary.
For example, let’s name the topic ‘Getting Started with Photography’. And provide a summary like, ‘Introduction to different types of cameras and essential equipment. Learn the basics of handling a camera and understanding its settings.’
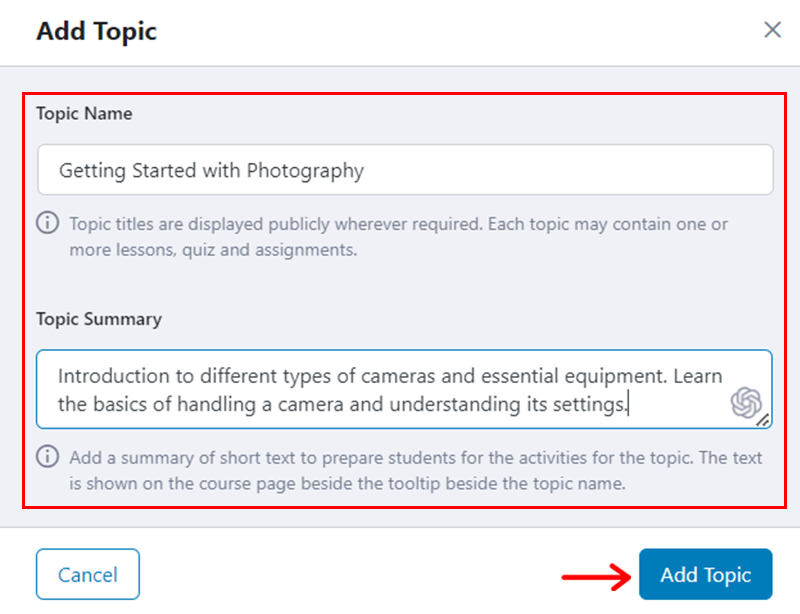
After filling in the details, click on the ‘Add Topic’ button below.
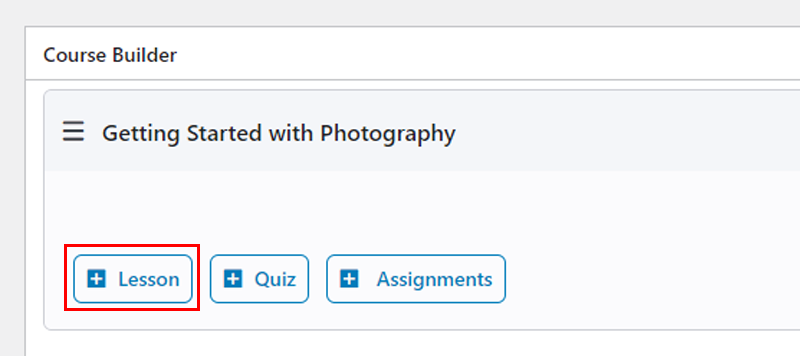
Following this, you’ll be presented with 3 options: Lesson, Quiz, and Assignments.

Creating Lesson
To add lessons to your course, select the ‘Lesson’ option.
Here are the available options:
- Lesson Name: Enter the title of your lesson here. For example, let’s use ‘Understanding the Camera’.
- Lesson Content: Write the description of the lesson here.
- Feature Image: Add an image relevant to your lesson to enhance engagement.
- Video Source: Include a video source for the lesson. You can use external or internal sources. Additionally, set the playback time if needed.
- Content Drip Settings: Specify the date to unlock the lesson.
- Upload Attachments: You can upload documents as additional resources.
- Enable Course Preview: Activate for free courses and deactivate for paid ones.
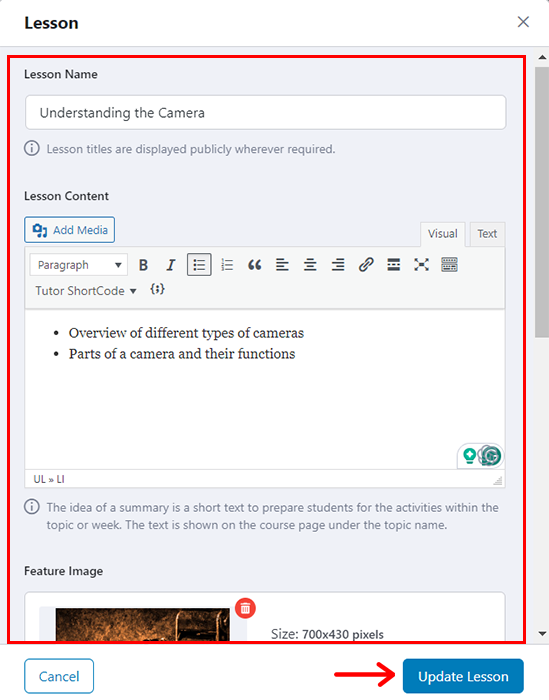
After filling in these details, click on ‘Update Lesson’ below.
Repeat the same process to add more lessons.
Creating Quiz
Similarly, you can choose the ‘Quiz’ option to incorporate quizzes into your course, making it more interactive and captivating. If you already have a quiz prepared, you can also opt for the ‘Import Quiz’ feature.
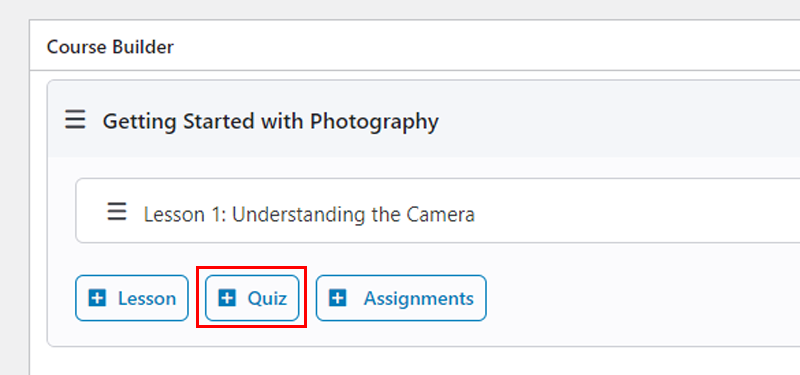
If not, then select ‘Quiz’ to create a new one. Here, you’ll need to provide a name and a brief description to inform students about the quiz’s purpose. Afterward, click on ‘Save & Next’.
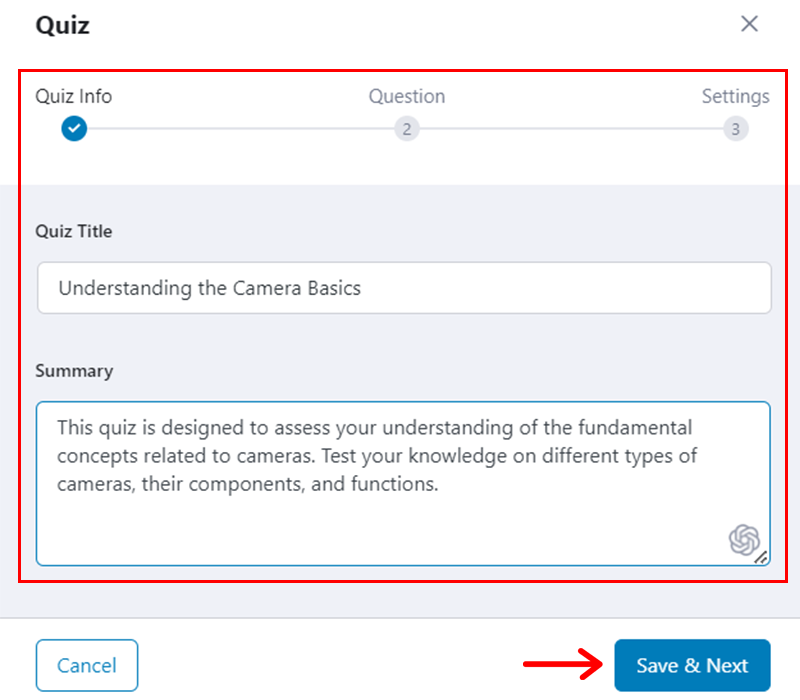
Next, you can add various types of quiz questions such as true/false, multiple-choice, matching, etc., to enhance engagement. Once you’ve added your questions, click on ‘Save & Next’.
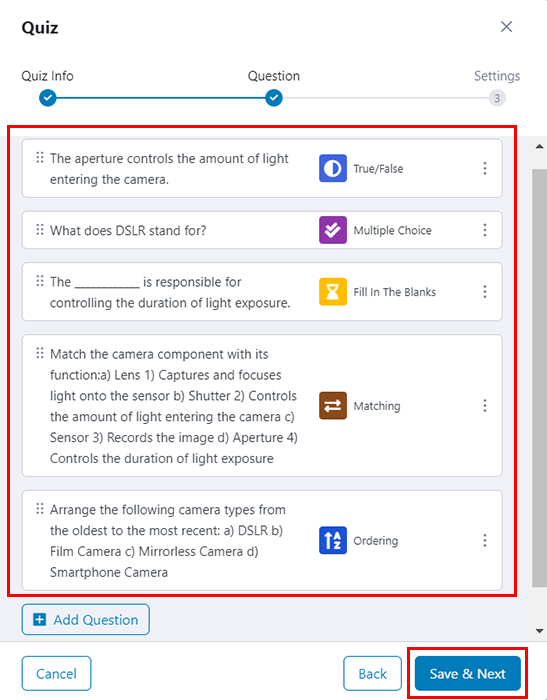
Finally, you can customize additional quiz settings such as the time limit, feedback mode, number of attempts allowed, passing grades, and more.
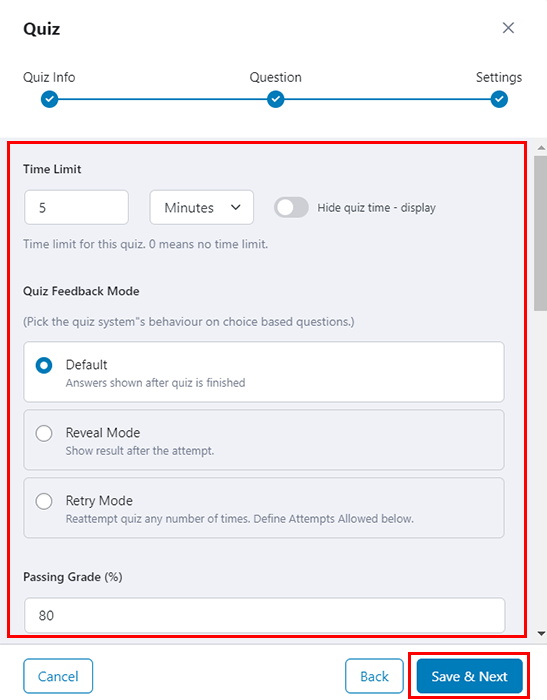
After configuring these settings, click on ‘Save & Next’ to return to the previous page.
Creating Assignment
Likewise, you can also give assignments to students via the ‘Assignment’ tab.
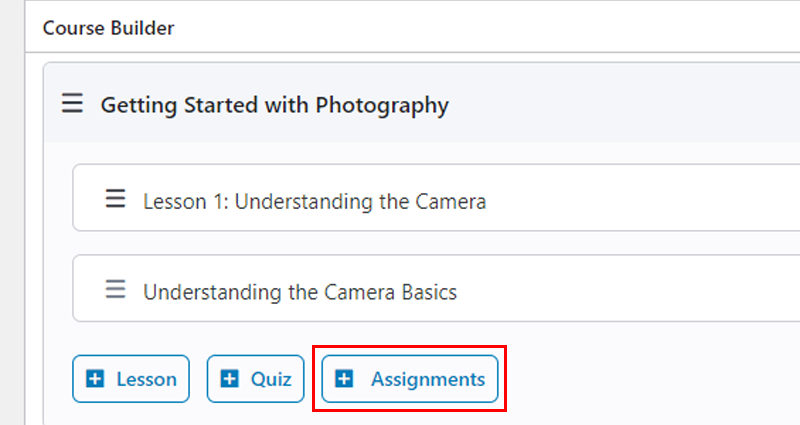
Here are the available options:
- Assignment Title: This is where you write the name of your assignment.
- Summary: A brief description or overview of the assignment.
- Attachments: Here, you can add any additional files or resources related to the assignment.
- Content Drip Settings: Specify when you want the assignment to become available to students.
- Time Limit: Decide how much time students have to complete the assignment.
- Total Points: Assign a total point value to the assignment.
- Minimum Pass Points: Set the minimum number of points required to pass the assignment.
- Allow to Upload Files: Choose whether students can upload files as part of their submission.
- Maximum File Size Limit: Specify the maximum size allowed for uploaded files.
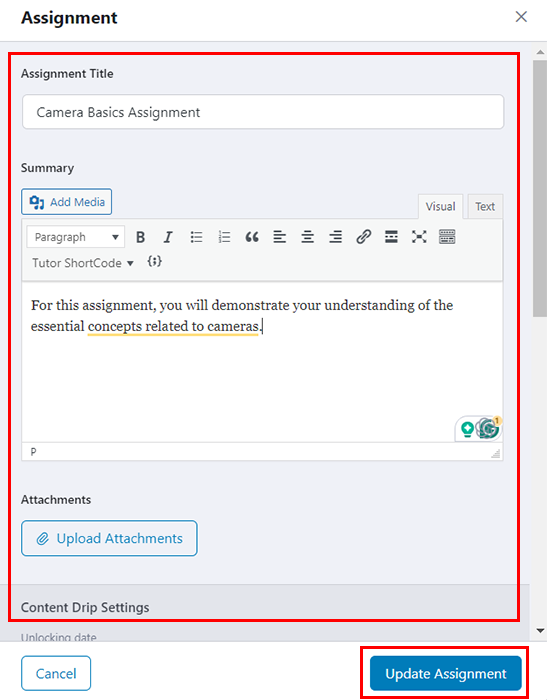
Once done, click on the ‘Update Assignment’ option.
IV) Provide Additional Information
Once again, as you scroll down, you’ll come across the ‘Additional Data’ section.
Here, you’ll need to provide the following additional information:
- What will I learn?: List the skills and knowledge that students will acquire upon completing the course.
- Targeted Audience: Specify who will benefit most from the course.
- Total Course Duration: Specify the overall duration or the time it will take for a student to complete the course.
- Materials Included: Outline the resources that will be available to students throughout the course.
- Requirements/Instructions: Specify any additional prerequisites or special instructions for your students.
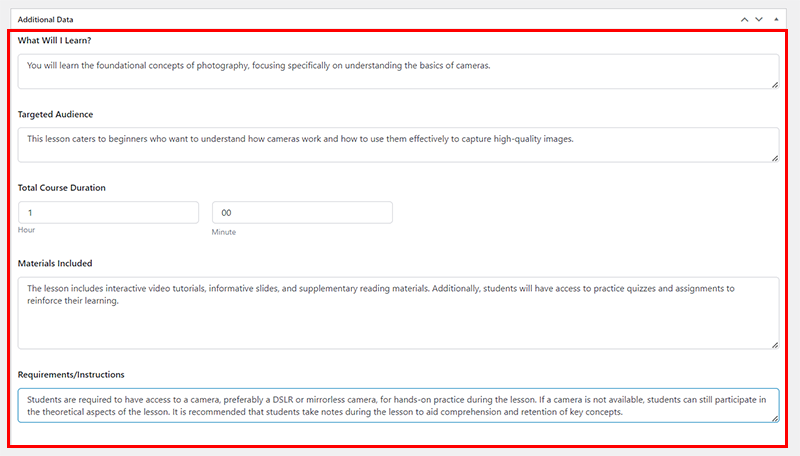
By completing this information, you’ll not only provide valuable guidance to potential students but also enhance the marketing appeal of your course.
V) Include Video and Google Meet Link
Similarly, you have the option to add any supplementary video to the course overview page.
This allows potential students to get a sense of the course content beyond the written description. You can select from various sources such as self-hosted videos (mp4), YouTube, Vimeo, and Embedded links.

Additionally, you can create a Google Meet link directly from the dashboard, facilitating one-on-one learning sessions for students.
If you prefer not to include these features, then you can simply leave them as they are.
VI) Certificate Template
Last but not least, you can specify which certificate template you want to provide your students after they successfully completed their course.
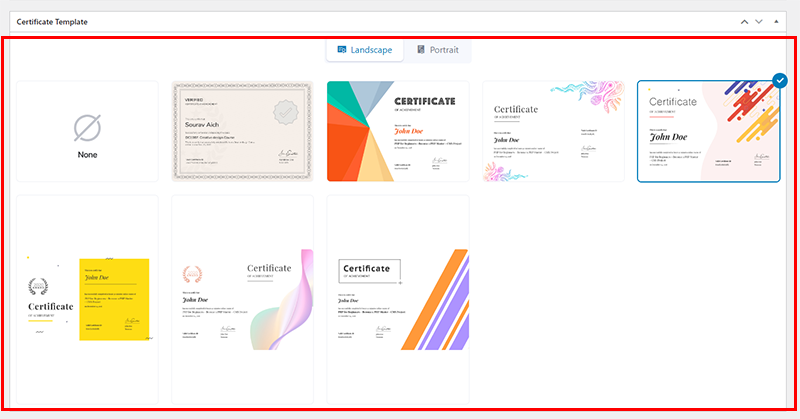
For that, all you’ve to do is, hover over your preferred certificate and click on ‘Use This’ option.
Likewise, as mentioned earlier, you can create the same course content right from the front end too. The process is exactly similar. For more guidance, you can check out its detailed documentation on creating courses on the frontend.
2. Setting Up an eCommerce With Tutor LMS
Now, to monetize your course, you’ll need an eCommerce solution. There are several eCommerce engines that Tutor LMS supports. Such as:
Here, we’ll be using WooCommerce. It’s the heart of WordPress eCommerce that you can easily use to sell your courses.
Browse our article on the benefits of using WooCommerce to know more.
To let you know, we’ve already installed WooCommerce right when we imported the Tutor Starter theme template. In case, if you’re using any other theme, then you can easily install it like any other plugin.
Once you’re done with the WooCommerce setup process, you can add the necessary payment gateways. There are several Woo payment gateways that you can consider.
Following that, go to the ‘WooCommerce > Settings’ and ‘Payments’ tab.
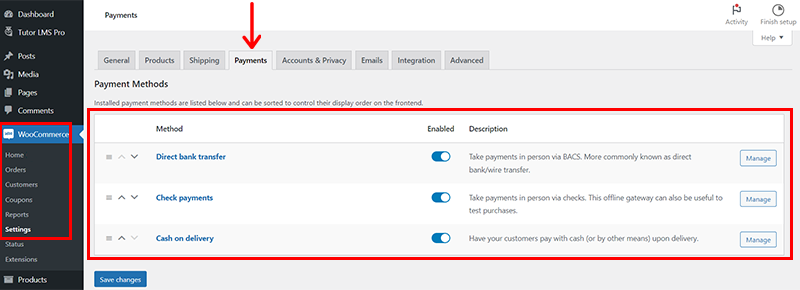
Here, you need to enable the available and required payment methods. Also, you can click on the individual ‘Manage’ tab to configure each payment method.
For instance, let’s click on the ‘Direct bank transfer’ option. Now, you can add the required bank account details and other required information.
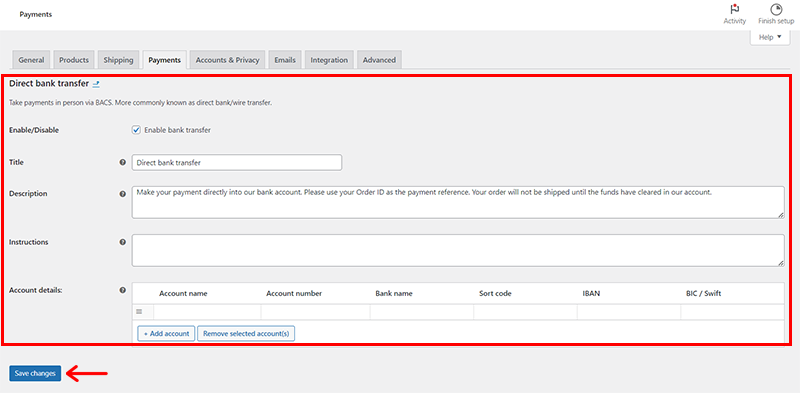
Once done, don’t forget to click on the ‘Save Changes’ button.
In the same way, you can configure other payment gateways that you’ve installed.
3. Enabling Monetization
Before beginning to sell courses using Tutor LMS and WooCommerce, it’s essential to enable the Monetization feature from the Tutor LMS Settings.
To enable Monetization, go to the ‘Tutor LMS > Settings > Monetization’.
In the ‘Select eCommerce Engine’ section, click the drop-down menu and choose WooCommerce.
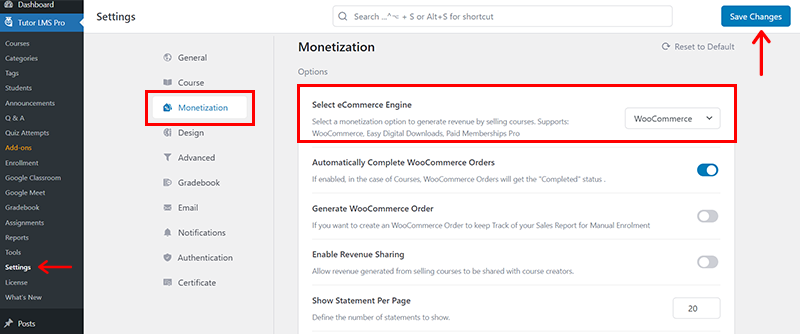
And, click on the ‘Save Changes’ option to apply the settings.
Now, if you come back to your ‘Course Builder’, then you’ll see the ‘Add Product’ settings.
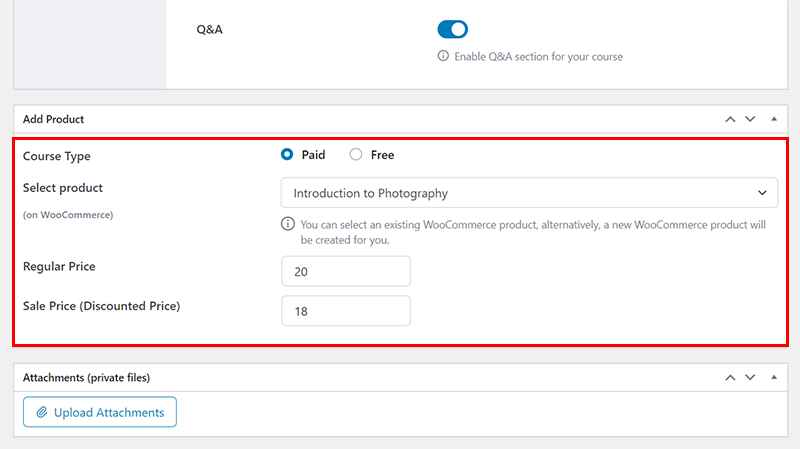
Here, you can specify the ‘Course Type’ to ‘Paid’. Select the product i.e. the course and set the regular and discounted price.
Once done, don’t forget to click on the ‘Publish’ button located at the top-right corner of the page to finalize your created course.
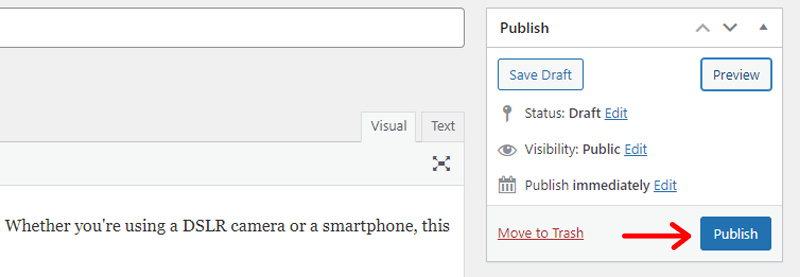
Now, click on the ‘View Course’ option to preview your course.

Step 7: Integrating Required WordPress Plugins
Assembling your online course platform is like adding the finishing touches to a masterpiece.
Let’s explore essential WordPress plugins that will enhance your online course platform experience:
| WordPress Plugins | Description |
| Rank Math | This plugin is a robust AI-powered (Artificial Intelligence) SEO (Search Engine Optimization) tool. Its purpose is to elevate the ranking of your online course website in search results, thus enhancing its visibility. |
| Gravity Forms | This plugin stands as one of the most favored WordPress form builders. With its functionality, you can seamlessly integrate a variety of forms into your website. |
| UpdraftPlus | For saving and securing your files, consider using this WordPress backup plugin. It ensures the protection and preservation of your data. |
| Wordfence Security | This security plugin includes features such as malware scanning, a firewall, and login security, providing all-around protection for your website. |
| WP Rocket | WP Rocket is a high-performance WordPress caching plugin designed to optimize website speed and performance. |
| Sassy Social Share | It’s a helpful plugin for effortlessly sharing your website content across various social media platforms. |
| Video Conferencing with Zoom | Designed to facilitate seamless handling of meetings, recorded coaching sessions, webinars, and more through the Zoom platform. |
If you want to know more about such plugins, then check out the article on the best WordPress plugins and tools.
Step 8: Promote & Monitor Your Online Course Website
Congratulations on building your online course platform! Now, let’s focus on promoting it effectively and keeping a close eye on its performance.

Here are smart strategies to boost visibility, attract learners, and ensure success:
- Create a Lead Magnet: Craft an irresistible offer, such as a free mini-course, eBook, or webinar, to entice potential learners and build your email list.
- Start a Waitlist: Utilize waitlists to generate anticipation and urgency, pre-sell courses, and segment your audience based on genuine interest.
- Run a Presale: Offer discounted rates to early adopters, generating revenue upfront while rewarding supporters who believe in your content.
- Conduct a Pre Launch Survey: Gather insights from potential learners on topics, learning format preferences, and pricing expectations. So, you can tailor content and understand audience needs better.
- Persuade With Social Proof: Leverage testimonials and reviews to showcase positive feedback and highlight transformations.
- Target Engaged Visitors: Use retargeting ads to remind users who visited but didn’t enroll. Further, encouraging them to reconsider the value your course offers.
- Track Metrics: Keep monitoring metrics like enrollment rate, conversion rate, and engagement to track course performance.
Remember, promoting your course is an ongoing process. Be creative, adapt to learner feedback, and celebrate every milestone!
Step 9: Insight into How Learners Purchase & Access Course
Understanding how learners purchase and access your course is essential for optimizing their experience.
Let’s delve into the specifics of this process:
Upon visiting your online course website, students can navigate courses in 2 ways.
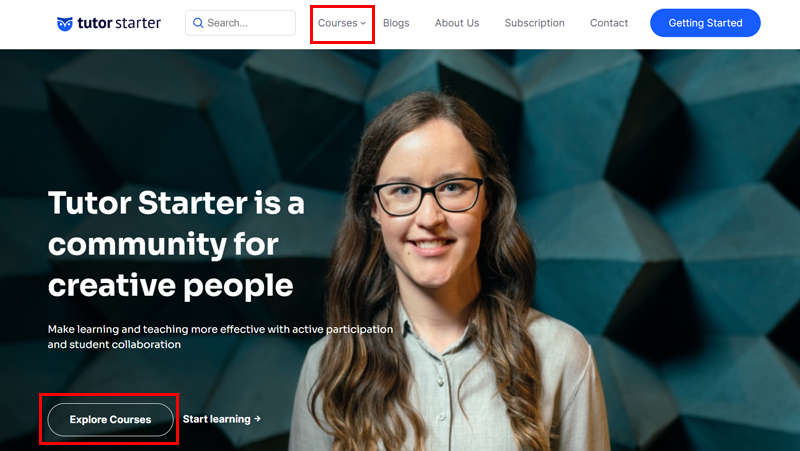
One is via the ‘Courses’ option in the navigation menu or through the ‘Explore Courses’ option on the homepage.
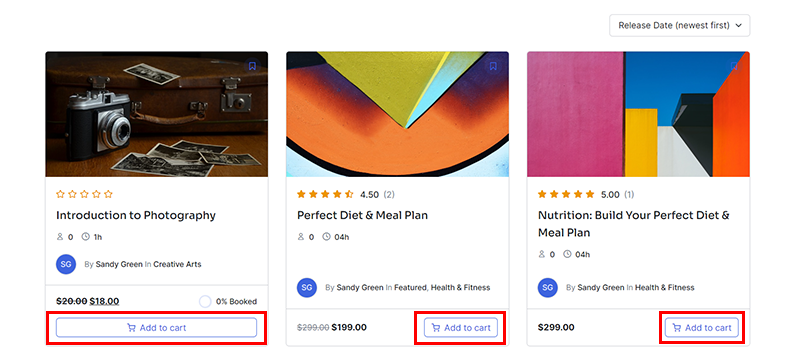
Subsequently, students can pursue all available courses. For premium ones, they must click ‘Add to Cart’ before proceeding to the checkout page.

Further, provide necessary personal and payment details.
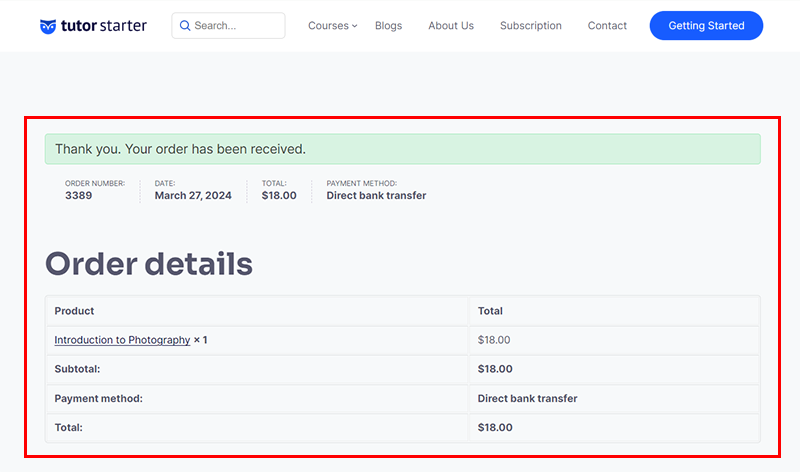
Once payment is approved, they can click ‘Enroll Course’ for their desired course. And then ‘Start Learning’ to access lessons, quizzes, assignments, and course content previously created.
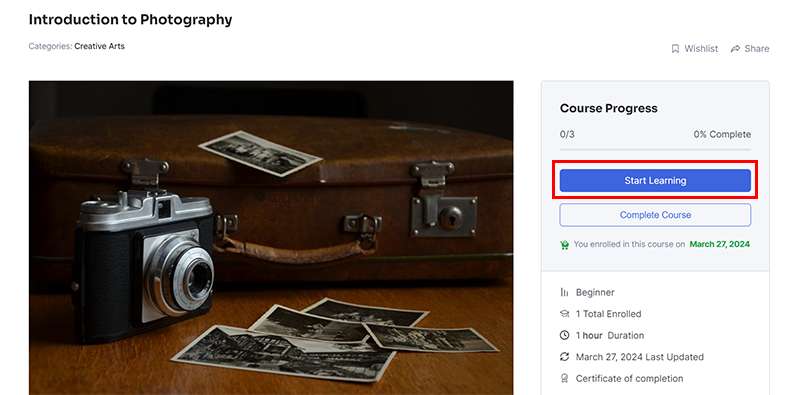
After completing lessons and assignments, students can click the ‘Complete Course’ option.

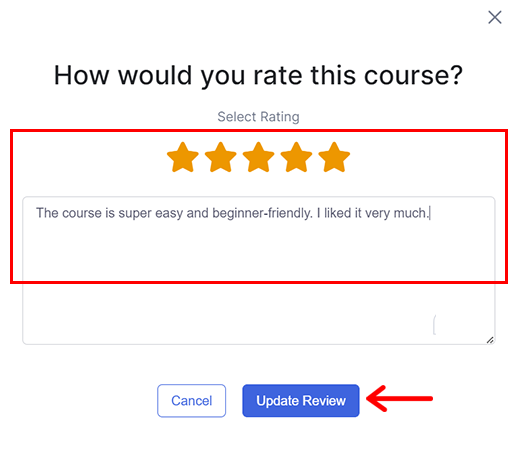
Then, optionally rate the course, and share their experience.
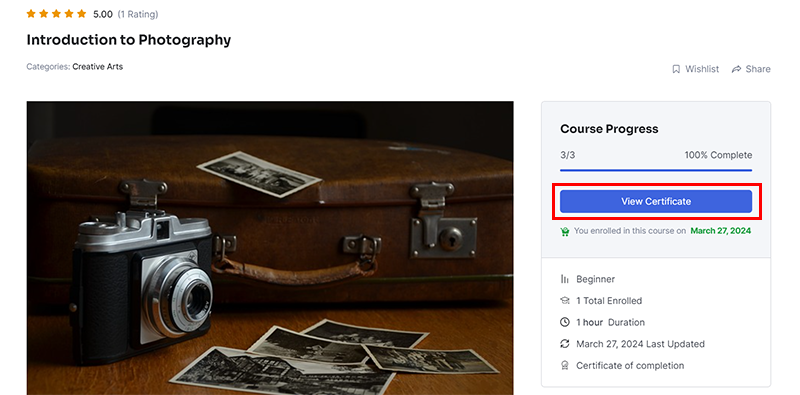
Upon successful completion, students can access their ‘Certificate of Achievement’ by clicking ‘View Certificate’.
Further, they get options to download, copy, print, or share from the available menu.
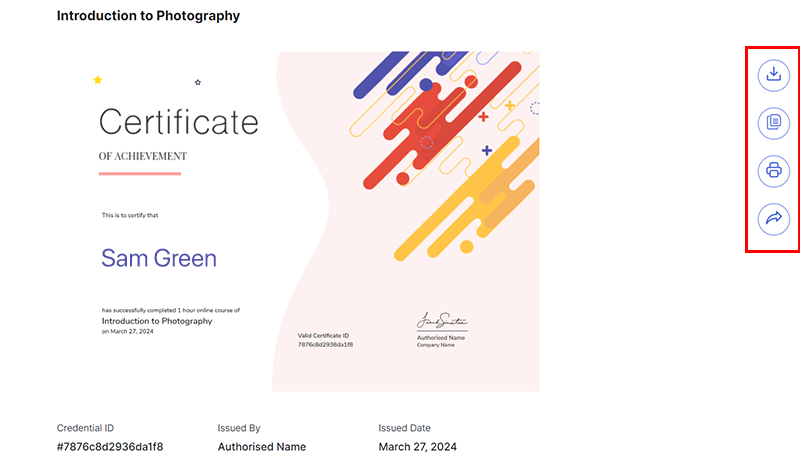
This overview showcases the seamless experience students will encounter on your online course website. It’s designed to be engaging, user-friendly, and focused on facilitating their educational goals effectively through Tutor LMS.
That’s all! This concludes the ultimate guide on how to create and sell an online course.
Frequently Asked Questions on Creating and Selling an Online Course
Here are some frequently asked questions on how to create and sell an online course.
Q.1 How do I create an online course?
A: To create an online course, first, determine your topic and target audience. Then, outline your course content, create engaging lessons, add multimedia elements, and choose a platform to host your course.
Q.2 What types of content should I include in my online course?
A: Include a mix of video lectures, written content, interactive quizzes, assignments, and downloadable resources. That caters to different learning styles and enhances engagement.
Q.3 How can I price my online course effectively?
A: Consider factors like the value of your content, your target audience’s budget, competitors’ pricing, and your expertise. Offering discounts, payment plans, or bonuses can also influence pricing decisions.
Q.4 Do I require coding expertise to develop an online course website?
A: No, coding skills are unnecessary. Many website-building platforms such as WordPress, Wix, etc offer drag-and-drop interfaces. Using it, you can effortlessly create and maintain online course websites without any coding knowledge.
Q.5 What are the initial steps to begin creating my online course website?
Q.6 What are some key metrics to track the success of my online course?
A: Monitor metrics such as enrollment rates, completion rates, student satisfaction scores, revenue generated, and feedback from students. Use these insights to refine your course content, marketing strategies, and overall user experience.
Conclusion
That’s all, folks! This concludes our tutorial article on how to create and sell an online course website.
We hope you’ve learned how to effectively create and market your online course website using WordPress and the Tutor LMS plugin.
With focused effort, you can make your online course website a top choice for potential students.
If you have questions about any steps or need advice, then please comment below. We’re here to help.
Explore our other articles, like best teacher website examples and proven ways to make money online.
Share this article with friends and family interested in starting their online course website.
Follow us on Facebook and Twitter for updates on more useful articles.


