Do you want an honest review of the Masteriyo plugin? If yes, then stay right here.
Masteriyo is an emerging WordPress LMS (Learning Management System) plugin for creating online course sites. It allows you to include certificates, quizzes, and other engaging features in your courses. You can also use various add-ons to extend the site’s functionality.
If you’re wondering if Masteriyo is the best WordPress LMS plugin, then don’t worry. In this article, we came up with a detailed review of Masteriyo. So, look at its features, pros, cons, pricing, support options, etc.
Ultimately, you can determine if Masteriyo is ideal for your eLearning site. Now, without any delay, let’s begin!
Overall Rating of Masteriyo
Masteriyo is one of the best online course plugins for WordPress websites. It guarantees to elevate your eLearning business with powerful features.
Moreover, it scores a perfect 4.8 out of 5 stars in the WordPress.org plugin directory. And according to 41 user reviews, 38 of them gave a 5-star rating for it. Brilliant, isn’t it?
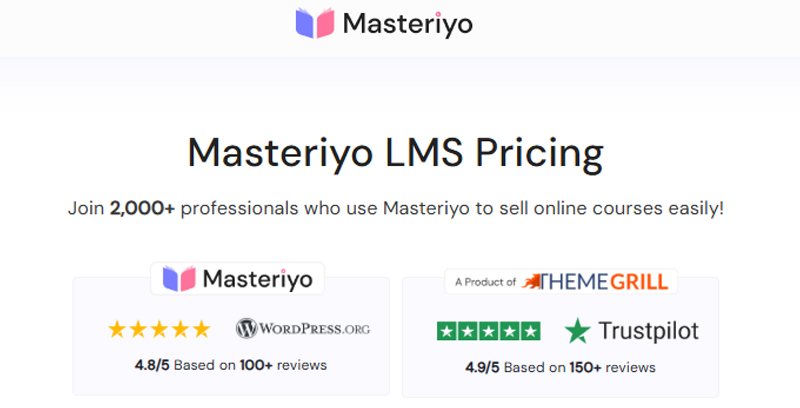
Best of all, we strongly believe in those ratings. So, we would also give Masteriyo a solid 4.8 out of 5 stars. We deducted the remaining 0.2 ratings as it may need improvement in its memory usage and page speed. Plus, it doesn’t offer a free trial or add-ons.
Overall, we highly recommend using it for your website once it meets your requirements. But make sure to try and test the free plugin first.
Now, let’s quickly look at the pros and cons of Masteriyo before starting the review.
Masteriyo Pros and Cons
Every WordPress plugin has a set of pros and cons you’ll encounter. Here, we’ll help you by stating the facts on the Masteriyo plugin. So, go through its pros and cons.
Pros of Masteriyo
- Includes the powerful and advanced course, certificate, and quiz builders.
- Contains a built-in order system. Also, you can integrate WooCommerce.
- Offers many engagement features for learners, like a review system, content drip, etc.
- It provides a highly customizable WordPress LMS theme called eLearning.
- Secure your website with the password strength checker tool.
- Seamlessly works with Elementor and other WordPress page builders.
- Comes with a strong course archive filter section for learners to easily find courses.
- Gives excellent customer support to its users.
Cons of Masteriyo
- Memory usage is higher than the average memory usage of other plugins.
- The impact of Masteriyo on PageSpeed is more than the average impact of other plugins.
- It doesn’t include a free trial. However, you can discontinue using the premium version within 14 days.
- You won’t find free add-ons. So, you need a premium plan to use the add-ons.
Now, let’s start this review by knowing about Masteriyo in detail!
A. What is Masteriyo? – A Brief Overview
A Learning Management System (LMS) is software to build online courses and training websites. Further, it allows you to manage, track, report, and deliver educational materials, training programs, and coaching services to learners.
Similarly, Masteriyo is a powerful WordPress LMS plugin for creating and selling online courses on eLearning websites. It’s ideal for individuals and educational institutes to conduct online classes or training at any time and from anywhere.
You won’t need any technical or coding knowledge or experience to build an LMS site with Masteriyo. Effortlessly, your online courses will look attractive and responsive on all mobile devices.
Moreover, this plugin gives a smooth user experience for you, instructors, and learners. In fact, it has a setup wizard that lets you create the required pages. Also, you’ll get to quickly configure the general settings of the courses on your platform.
In addition, it has an easy-to-use drag-and-drop course builder. Hence, you can add and manage the sections and lessons on all the courses from a single place. Plus, there isn’t any limitation on the number of courses, lessons, quizzes, instructors, and students.
Now, let’s move forward with this review and learn the major features and add-ons of Masteriyo.
B. Major Features of Masteriyo
Masteriyo contains many features for setting up and growing your LMS website. We’ll go through them one by one here.
This will clarify your queries about the site functionality when using this plugin and help you determine whether to use it for your LMS.
Now, let’s get started!
1. Advanced Course Builder
Masteriyo has an advanced course builder with drag-and-drop functionality. It’s highly intuitive and user-friendly to let you create, edit, quickly preview, and manage the courses.
Moreover, it has a single-page application interface. So, you can create an entire course from a single place without page reloading.
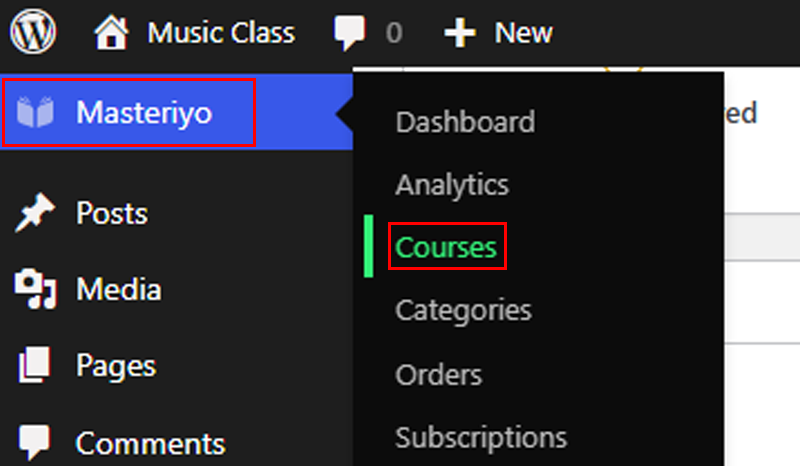
Go to Masteriyo > Course from your dashboard. Then click on the Builder Tab.
Here, you can add unlimited lessons, quizzes, and assignments to each course by switching between the course builder tabs, menu, and settings.
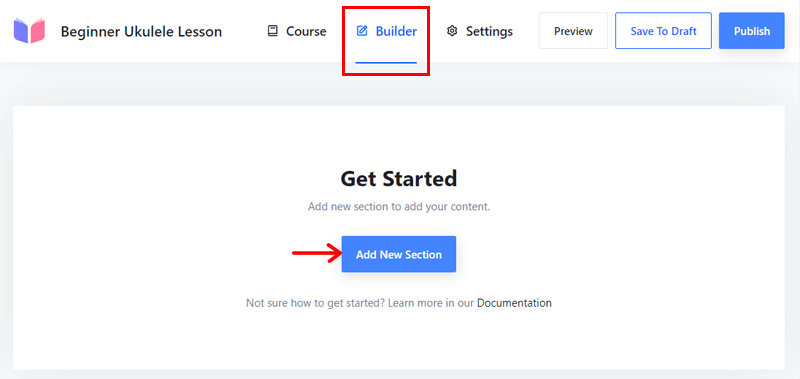
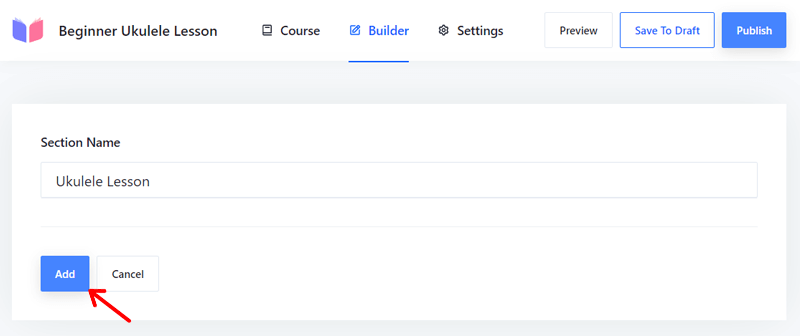
To build a course, simply click on the Add New Section button. There, you can give your course a name and click Save. Following that, click on the Add New Content button under that course name and give it a name.
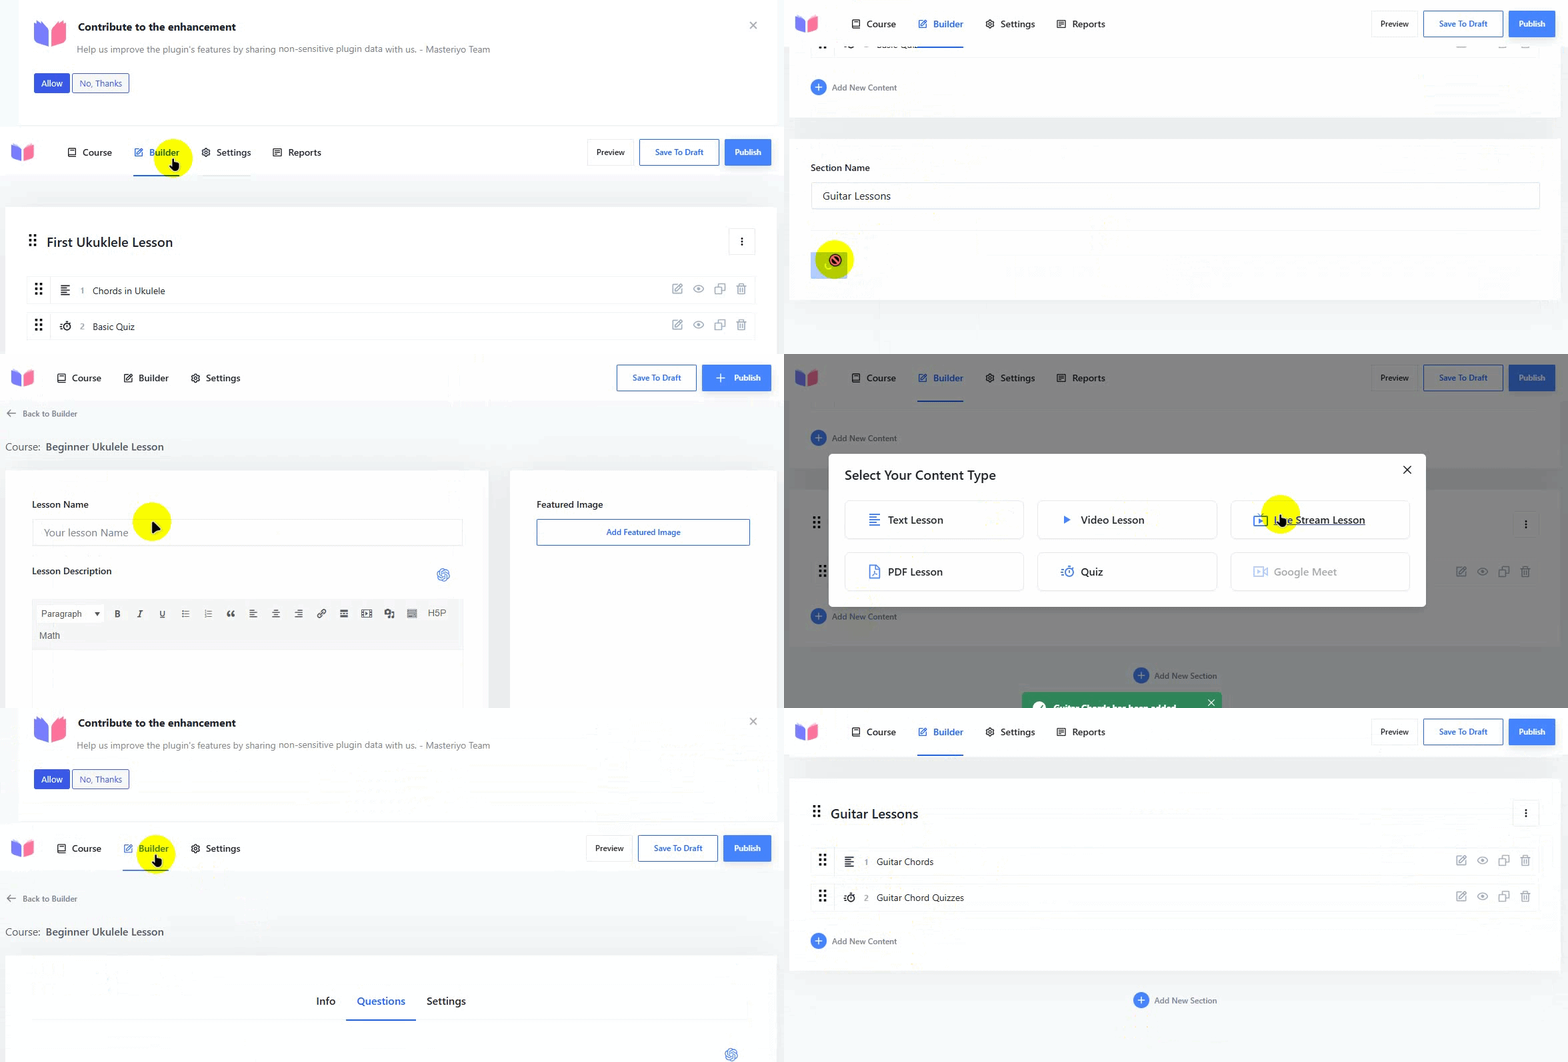
Here, you can create text, video, live streaming, pdf, and quizzes. As you can see in the video above, we’ve created a text and quiz in the course builder.
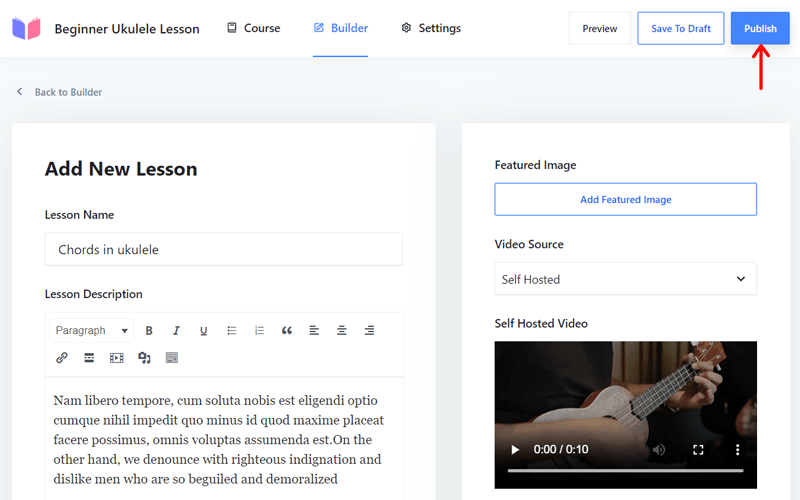
Once you’re done, hit the Publish button at the top right corner of your builder page, and your course will be live.
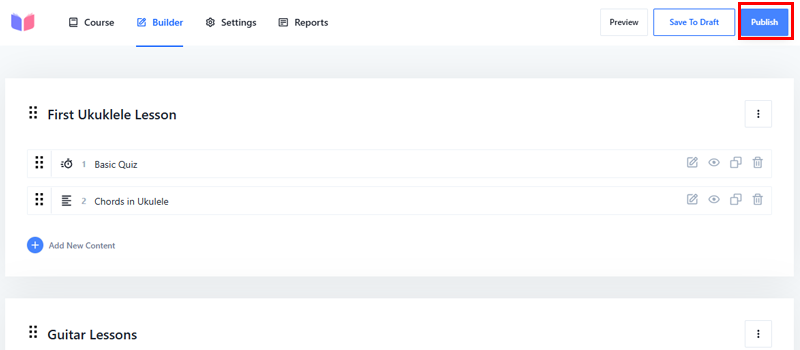
Other than that, here’s a list of features of the Masteriyo course builder:
- You can filter the courses by pricing (free / paid), categories, keywords, etc.
- Able to indicate the course difficulty level.
- Plus, you can determine the number of students allowed to enroll in each course.
- Gives the option to let everyone or enrolled students see the curriculum.
- Ability to set the estimated course duration in hours or minutes.
- Displays a featured course on the front end and course highlights of all courses.
- Supports YouTube, Vimeo, and self-hosted videos. Also, add a featured image/video.
Additionally, the following list contains the add-ons you’ll get for your courses.
- Keep downloadable course materials using the Course Attachment add-on.
- You can add a new FAQ tab on the course page with the Course FAQ add-on.
- The Course Prerequisites add-on can allow learners to enroll in specific courses only after they complete certain courses.
2. Eye-catching Certificate Builder
The Certificates add-on is a paid extension of Masteriyo on all of its pricing plans. It allows a certificate builder to create unlimited attractive certificates. You can also provide certificates for each course to reward learners.
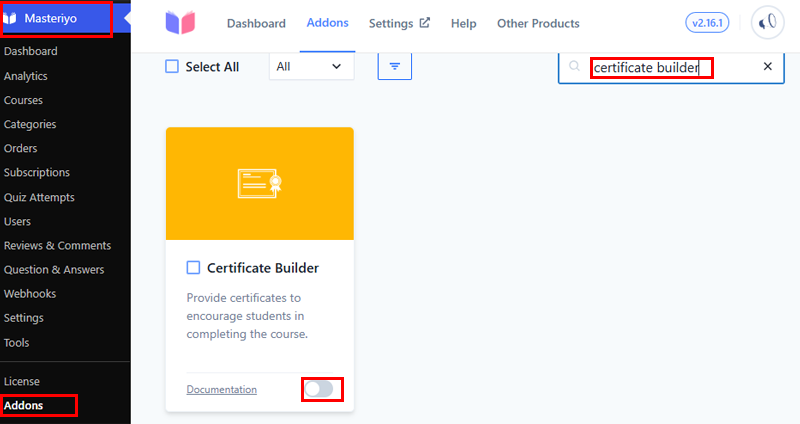
First, go to Masterio > Addons and search for the certificate builder. Once you find it, enable the Certificate Builder add-on.
Now, you’ll see the Certificate menu; click on it. Then click the Add New Certificate button at the top right corner. There, you’ll see different certificate templates, or you can choose a black sample and design your own.
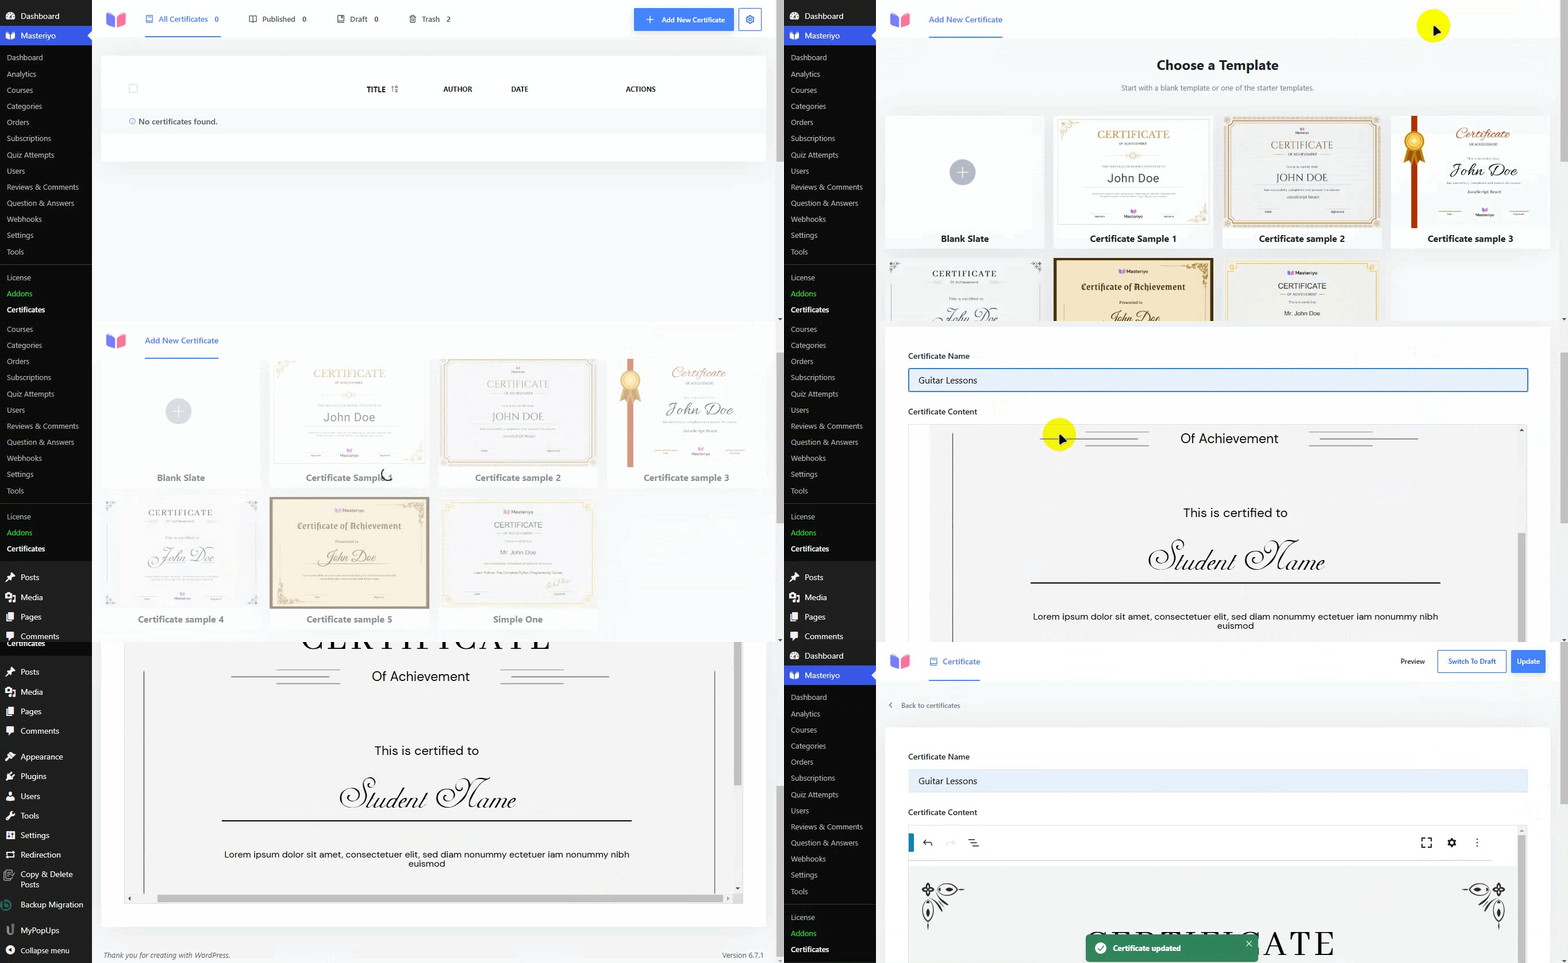
Now, choose a template, name it, and publish it.
Check out the list below to learn the certificate builder’s capabilities:
- Uses the Gutenberg block editor to let you customize the certificates. There, you can add a background and design its layout.
- Offers 3 customizable certificate-building blocks. They are the course title, student’s name, and course completion date to display the corresponding data of learners.
- Includes a pre-designed certificate template that you can customize and edit.
- Create and manage all the certificates from a single place in the Certificates tab.
- Gives separate sections for the published, draft, and deleted certificates.
3. Built-in Order System and eCommerce Integration
Another intriguing feature of Masteriyo is its built-in order system. So, you don’t have to add additional eCommerce plugins to start selling courses and managing orders.
In fact, it comes with a wide range of features. Some of them include:
- Ready-to-use checkout page that you can customize to match your brand.
- Pre-built Add to Cart and Wishlist features.
- Lets you set up the store locations and currency options.
- 4 built-in payment options for learners (manual payment, PayPal, Stripe, and Razorpay).
- You can easily create, edit, trash, sort, and categorize orders.
- Use the coupon codes add-on for paid courses. This gives fixed or percent discounts to learners having usage limits.
On top of that, Masteriyo works seamlessly with WooCommerce, the most popular eCommerce plugin. As a result, you’ll get access to features like:
- 300+ payment gateway integrations like Amazon Pay, Authorize.Net, Razorpay, etc.
- Easily lets you add new products and associate them with a course.
- Students can add courses to their cart and proceed to checkout.
- A separate analytics dashboard is used to analyze orders, sales, products, customers, etc.
4. Advanced Quiz Builder
As said before, the advanced course builder can build quizzes. The Masteriyo quiz builder precisely gives drag-and-drop functionality to create engaging quizzes.
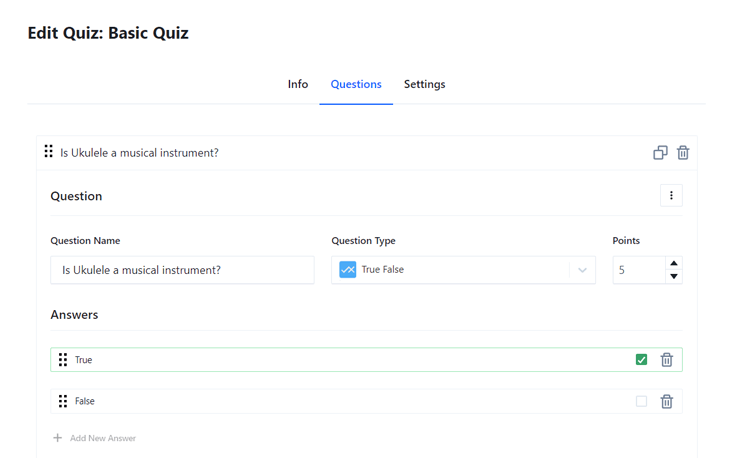
Moreover, you can add unlimited questions and answers to the quiz. And you’ll get to use 9 different question types. They are – True / False, Single Choice, Fill in the blanks, Sortable, Text Answer, Multiple Choice, Match the Following, Video, and Audio.
Further, this plugin also has the following quiz features:
- You can edit, add, or delete questions and answers from one place.
- Creates a smart grading system if you point out the marks for every correct answer.
- Randomizes the quiz questions and answers every time someone takes part.
- It gives insights into the students’ performance on the quiz.
- Auto-calculates the quiz points and shows the pass mark in percent or points.
- Choose if learners can retake quizzes multiple times or a certain number of times.
- Set the quiz time duration. Also, it can auto-submit quizzes once the time is over.
5. Learner’s Engagement Features
To retain students on your online course site, you must focus on providing engagement features. In Masteriyo, you’ll get many features that build learner excitement. The following list shows some notable ones:
- Q&A Section: You can add Q&A sections to your lessons, quizzes, and assignments. Here, your students can ask general questions to receive answers.
- Review System: Your logged-in learners can give text reviews and star ratings to every course. This helps you improve the course materials.
- Content Drip: Content drip lets you schedule your materials to be available online regularly. That too under action-based conditions to build students’ interest.
6. Integration with Other WordPress Plugins
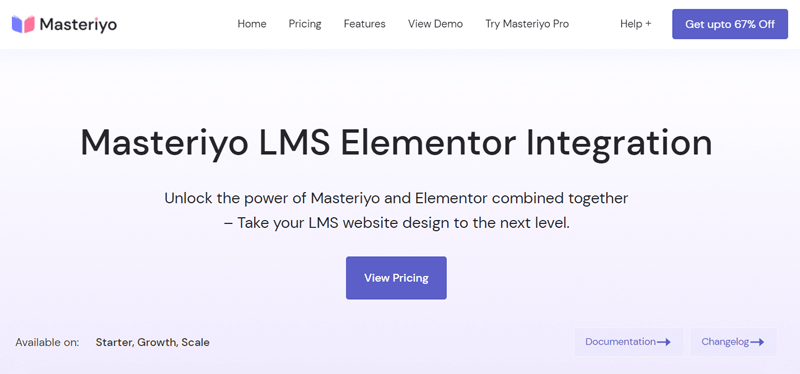
Other than WooCommerce, Masteriyo supports several WordPress plugins to extend your LMS site functionality. Among them, it fully supports Elementor and Zoom.
Elementor is one of the well-known page builders for WordPress sites. If you integrate Elementor with your Masteriyo website, then you’ll get 2 LMS widgets. They are Course List and Course Category.
You’ll also get to customize the Masteriyo widgets from Elementor with a live preview. Because it gives more advanced styling and editing options. This eases the process of launching courses that match your needs.
On top of that, Zoom integration can be another valuable asset to your LMS site. Its integration with Masteriyo lets you schedule and manage Zoom meetings. Hence, you can create virtual classrooms on your platform. Great, isn’t it?
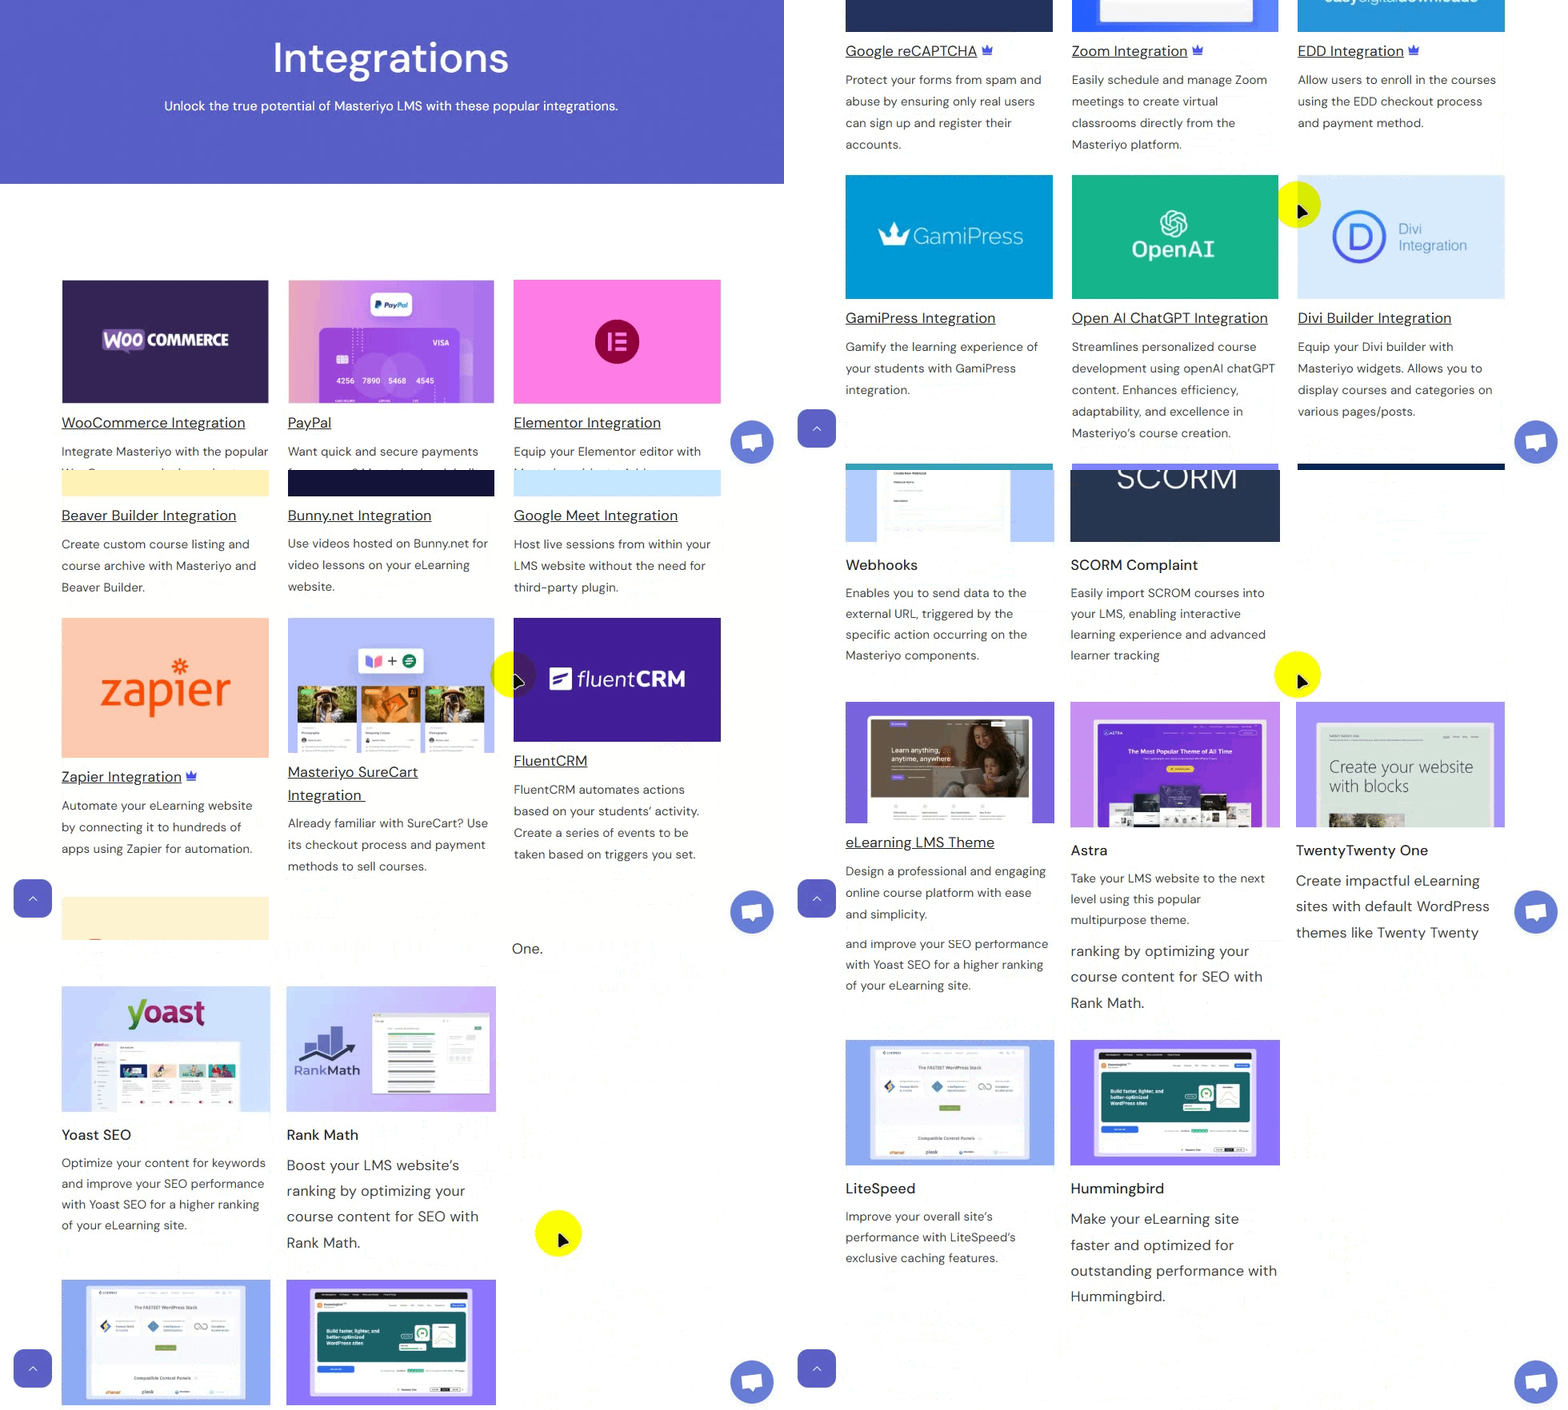
Besides, there are tons of other integrations that can be useful for your LMS site.
7. Strong Security Features
Another crucial feature to look for in any WordPress plugin is its security. Thankfully, Masteriyo follows the highest WordPress and security standards. Also, it gets regular security and performance updates. Hence, your website will be relatively secure.
Further, this plugin also builds secure registration and login pages. Because it has Google reCAPTCHA and Password Strength Checker. Ultimately, it prevents spam registrations and hacking attempts, respectively.
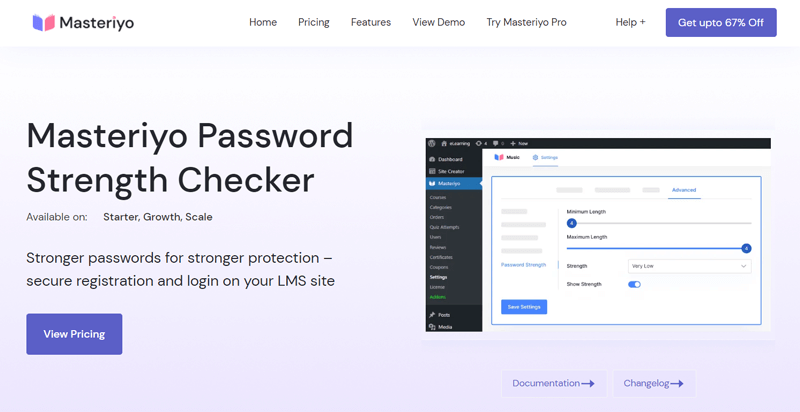
Most of all, setting up the Password Strength Checker add-on is easy. It has these features:
- You can configure the minimum and maximum length of the password.
- Choose the password strength that is ideal for students and lecturers. The options are very low, low, medium, or high.
- Determine if you want to show/hide the strength of the password in the registration form.
8. Other Features and Add-ons
Apart from these features, here are the features and add-ons of Masteriyo:
- Learners get a distraction-free learning page for an engaging experience. Exactly, it can remove the header/footer and collapse the sidebar to eliminate distractions.
- The gradebook gives a grading system to evaluate quiz or assignment results. Plus, instructors can mark and manage those students’ grades.
- Students can filter courses on the Course Archive page using options such as categories, pricing, rating, difficulty, and rating.
- Offers a built-in eLearning LMS theme to launch a professional online course site.
- You can translate your site into multiple languages, which is ideal for local students.
That’s all for the Masteriyo features in this review. If you think it’s worth trying for your eLearning site, then keep reading!
C. How to Set Up an LMS Website with Masteriyo?
In this Masteriyo review section, we’ll show you how to use this plugin. We’ll go through the steps to purchase, install, configure, and use Masteriyo.
So, without further ado, follow these steps serially.
How to Purchase and Install the Masteriyo Plugin?
Masteriyo has free and premium versions. So, the steps to add them to your site are different. Here, we’ll show you the process of adding the free plugin and a paid plan.
Let’s go!
1. Installing and Activating the Free Masteriyo Plugin
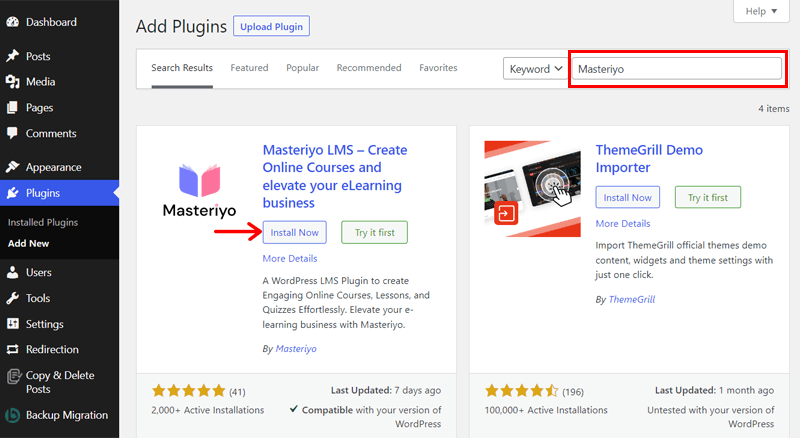
First, log in to your WordPress dashboard and look at its left-side menu. There, navigate to the Plugins > Add New menu.

Now, type the keyword ‘Masteriyo’ on the search bar of the Add Plugins page. In the search results, you can find the Masteriyo plugin. So, click on its ‘Install Now’ button to start the installation.
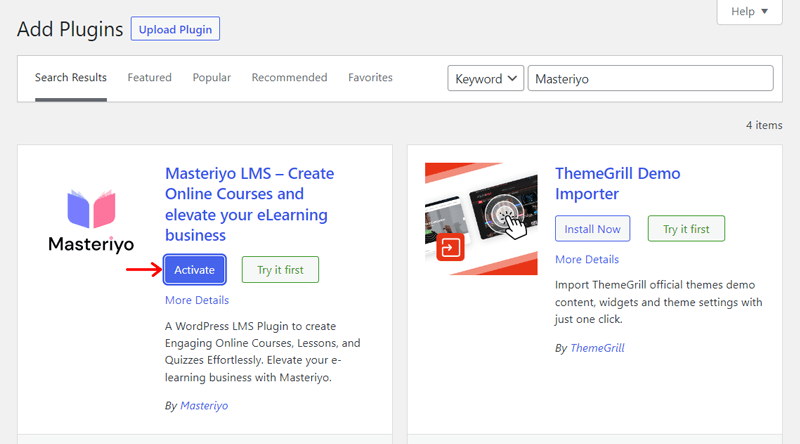
Afterward, click on the ‘Activate’ button to activate the installed plugin.
This successfully installs and activates the free Masteriyo plugin on your dashboard.
Learn the process in detail from our How to Install a WordPress Plugin guide.
2. Purchasing and Installing Masteriyo Pro
For the paid version, visit the Masteriyo website. There, click the ‘Get Started for Free’ button, which opens the Pricing page.
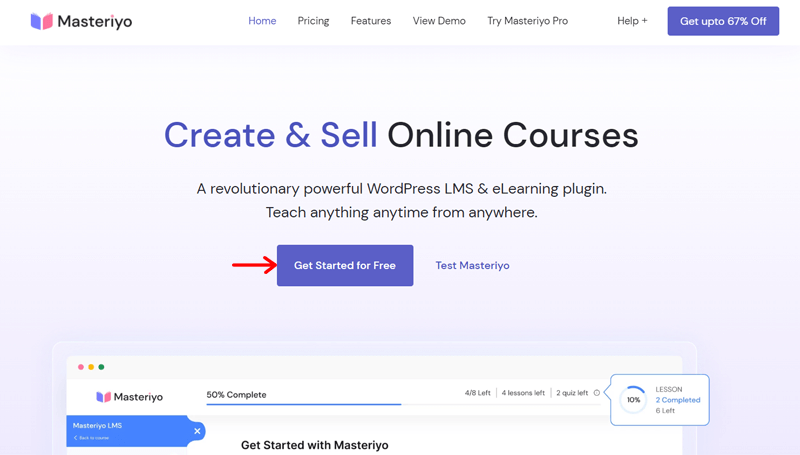
On this page, you’ll find all the pricing plans available. So, click the ‘Buy Now’ button of the plan you want.

This redirects you to the checkout page where you must enter your payment details like an email address. And then, you can complete the purchase after clicking the ‘Pay’ button.
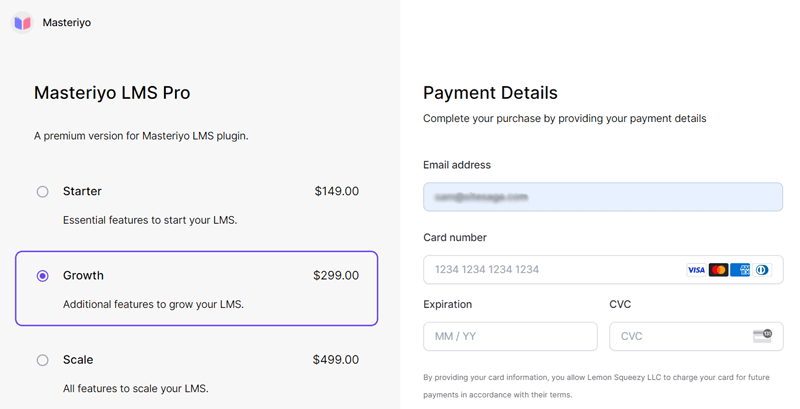
Once you finish your order, you’ll get an email with the downloadable link and the license key. Open the downloadable link and click the ‘Download Masteriyo Pro’ button. On the order page, you can download the latest Masteriyo version.
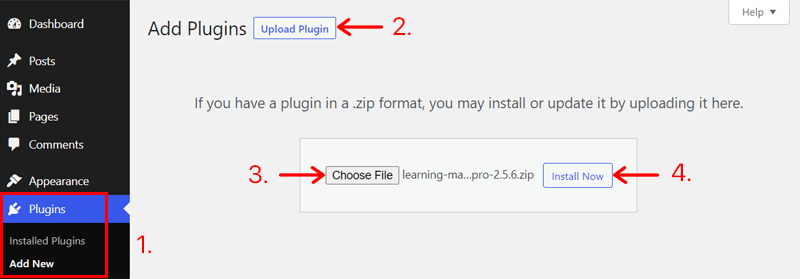
Now, open your WordPress dashboard and go to the Plugins > Add New button. There, click the ‘Upload Plugin’ option at the top.
Afterward, press the ‘Choose File’ button and upload the ZIP file of Masteriyo Pro that you downloaded. Next, click the ‘Install Now’ button for its installation.
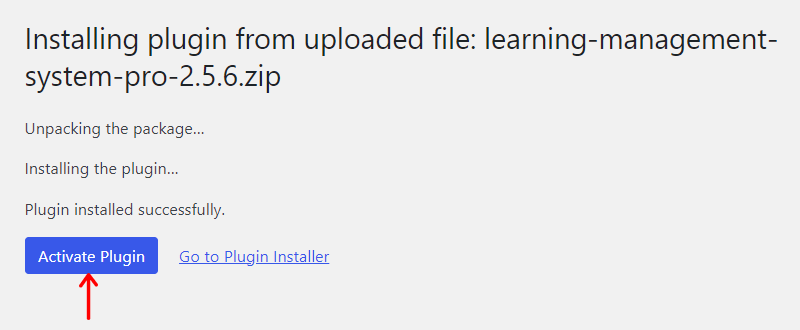
Moving forward, click the ‘Activate Plugin’ button to activate it.
How to Configure Masteriyo Using the Setup Wizard?
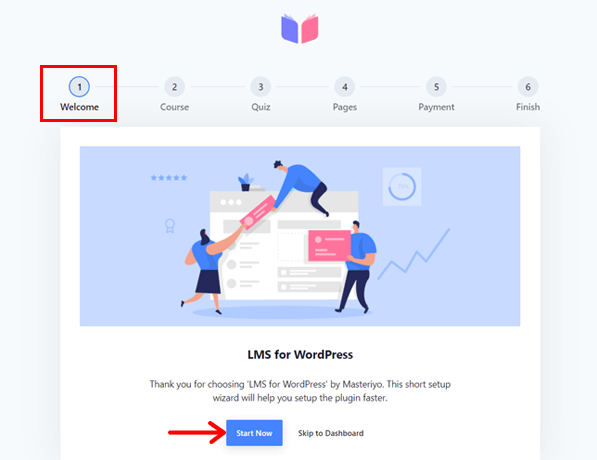
Once your Masteriyo plugin (free or pro) is installed and activated, it opens the setup wizard. There, you must follow these steps:
Step 1: Welcome
First, you’ll find a welcome page. Here, you can either start the wizard by clicking the ‘Start Now’ button. If you don’t want to run it now, then click the ‘Skip to Dashboard’ button. But we recommend using the setup wizard.
Step 2: General
Let’s start with the general settings of this plugin.
here, you’ll be able to set the primary color of your site and enable many features. Including reviews, question & answer, anyone can register, and an instructor register page.
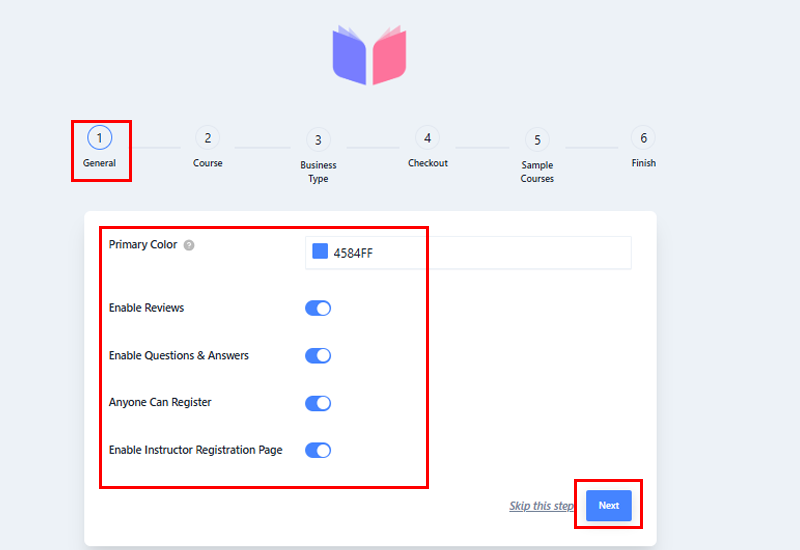
Once you’re done, hit the Next button.
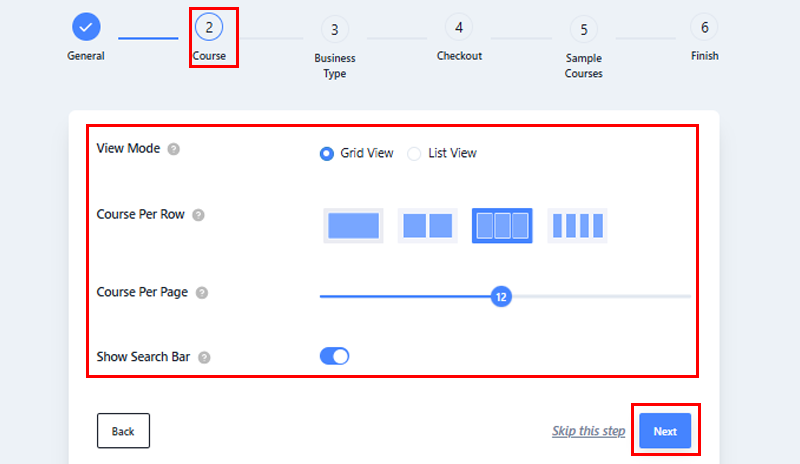
Step 3: Course
Here, it includes some course page-related options. They are:
- View Mode: You can choose between grid and list view mode.
- Course Per Row: Choose the number of rows you want in a single row of the courses listing page.
- Course Per Page: Select the total number of courses you want on the courses listing page.
- Search Bar: This lets you enable or disable the search bar.
Once you press the options you want, click the ‘Next’ button to move forward.
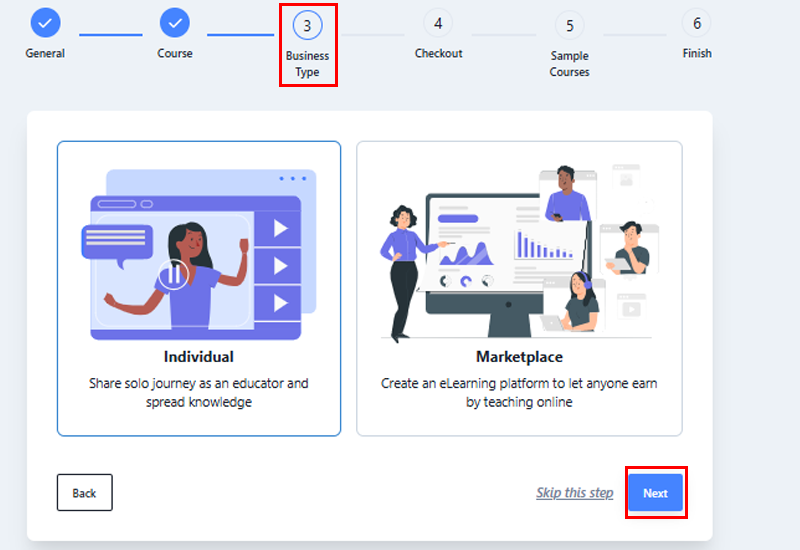
Step 4: Business Type
This step lets you choose the type of business you’re creating. You can choose individual or marketplace. Once you’ve made your choice, hit the ‘Next’ button to proceed to the next step.
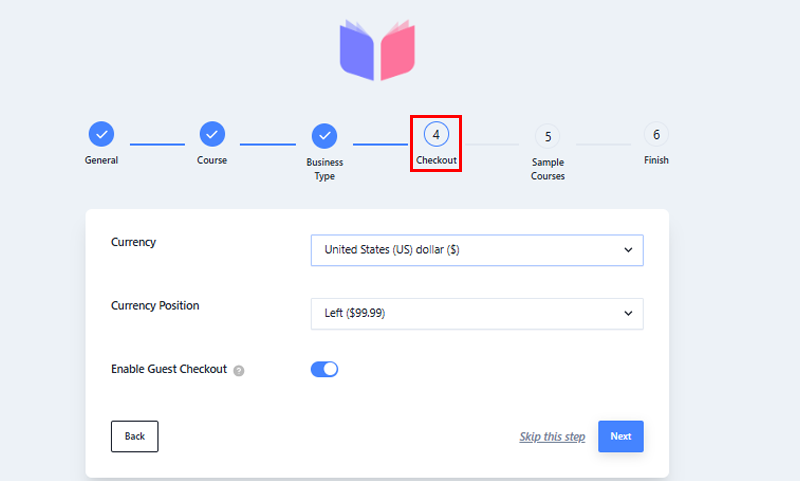
Step 5: Checkout
Here, you can configure some checkout pages for your LMS website. The options are:
- Currency: Choose currency from the available options.
- Currency Position: Pick where to place the currency (left, right, left space, or right space).
- Enable Guest Checkout: If you’d like, you can enable the guest checkout.
Make sure to click the ‘Next’ button.
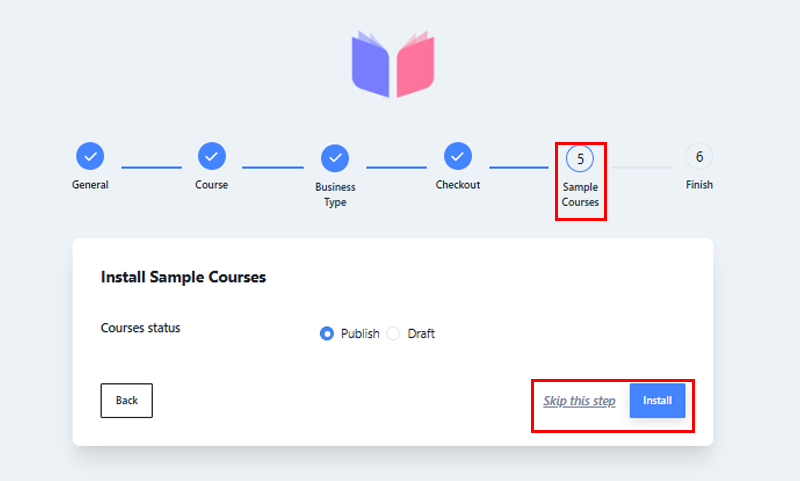
Step 5: Install Sample Courses
In this step, you can choose to either sample courses by Masteriyo or skip them for now.
Step 6: Finish
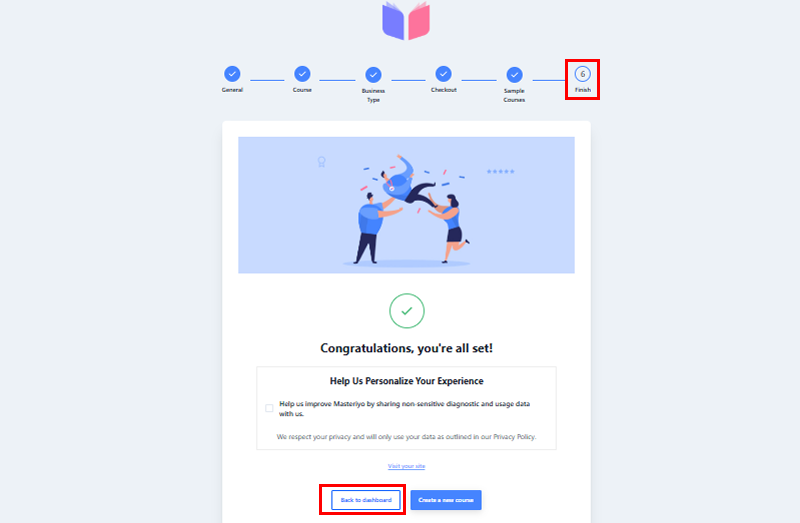
Lastly, this final step shows the end of the setup. So, you can either go to the dashboard by clicking the ‘Back to dashboard’ button. Or begin creating a new course from the ‘Create a new course’ button.
Note that we need to configure and adjust more things on the website before making a course. So, click the ‘Back to dashboard’ button.
For the official guidance, here’s a link to the Masteriyo guide on using the setup wizard.
How to Enable Premium Add-ons of Masteriyo?
Now, you’ll see the new Masteriyo menu on your WordPress dashboard.
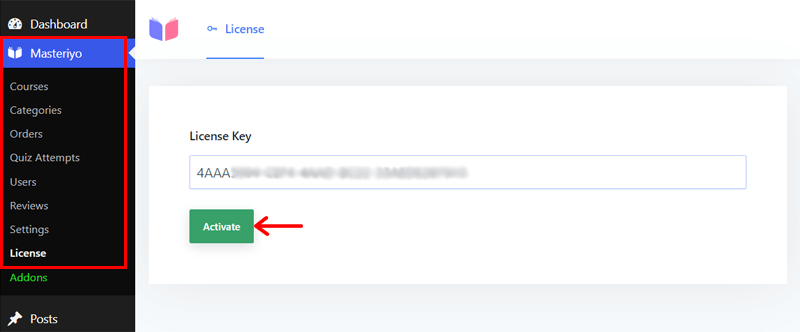
Here, we’re using a premium plan, so we need to activate the license key. Only after that you can access its add-ons.
To activate the license, open the Masteriyo > License menu. There, paste the license key of the plugin you received. Lastly, hit the ‘Activate’ button.
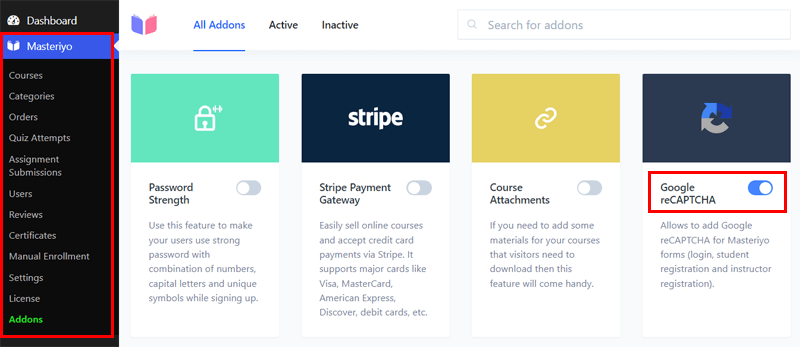
Once you activate the license, you can enable/disable the add-ons available from the plan. Open the Masteriyo > Addons menu and browse the add-ons. Enable the ones you need for your online course website.
For example, we allow add-ons like Prerequisites, Google reCAPTCHA, Certificate Builder, etc. After you enable them, the respective menus will be added to the dashboard.
How to Configure the Masteriyo Website Settings?
Moving forward, you can configure your LMS website further. Since the setup wizard may not have all the settings. So, open the Masteriyo > Settings menu.
There, you can find many tabs for different settings. So check the additional settings here:
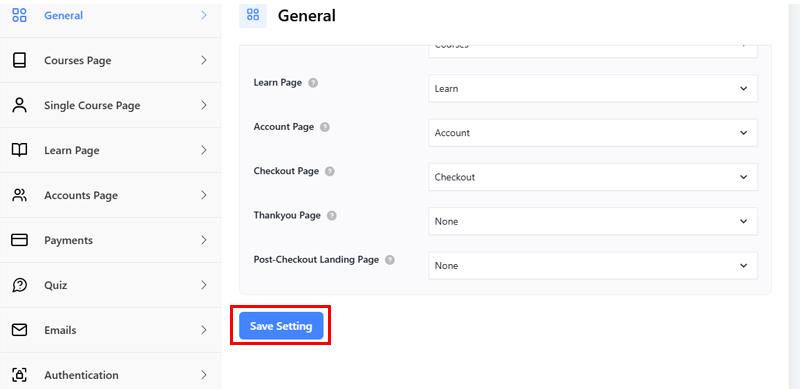
- General: Choose the instructor registration page. Also, pick the primary color and button color for your website.
- Single Course Page: Allow the review option for each course. Plus, configure the options available for related courses.
- Learn Page: Upload a logo and enable the Q&A option for the starting course page.
- Accounts Page: You can choose to enable/disable quiz attempts, order history, order invoice, zoom sessions, etc.
- Payments: It includes settings for your store, currency, PayPal, and Offline Payment.
- Quiz: Choose whether or not to enable quiz access for guest users, auto-submit the quiz, and calculate the grade.
- Emails: Enable emails for orders that are new, completed, on hold, and canceled.
- Authentication: Here, you can enable email verification and the QR login option. Also, you can choose the number of limit login sessions.
- Advanced: Contains advanced settings for permalinks, recaptcha, debug, etc.
- Notification: This option, depending on what you choose to enable, will notify your students about course enrollment, order completion, order on hold, course completion, etc.
Lastly, make sure to click the ‘Save Settings’ button.
How to Install and Use the eLearning Theme?
This completes the vital website configuration. Now, you can install and activate a WordPress theme of your choice, select its template, and customize it to match your needs.
Masteriyo provides a free eLearning theme, so we’ll use it for this review. Let’s see!
Step 1: Install and Activate eLearning
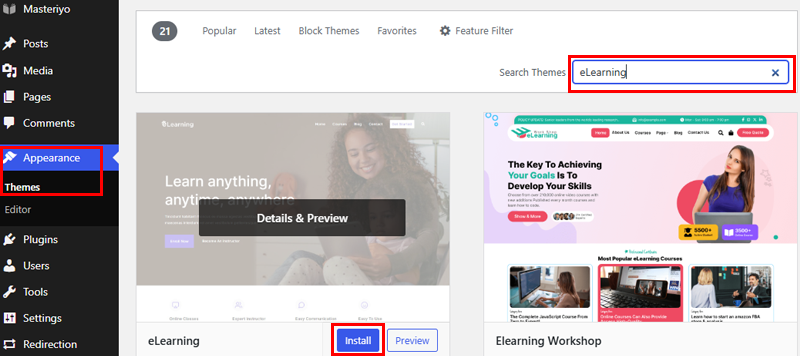
First, navigate to the Appearance > Themes menu and click the ‘Add New’ button. Then, search ‘eLearning’ on the search bar and wait until the theme appears in the search results. Once you find it, hover over it and click its ‘Install’ button.
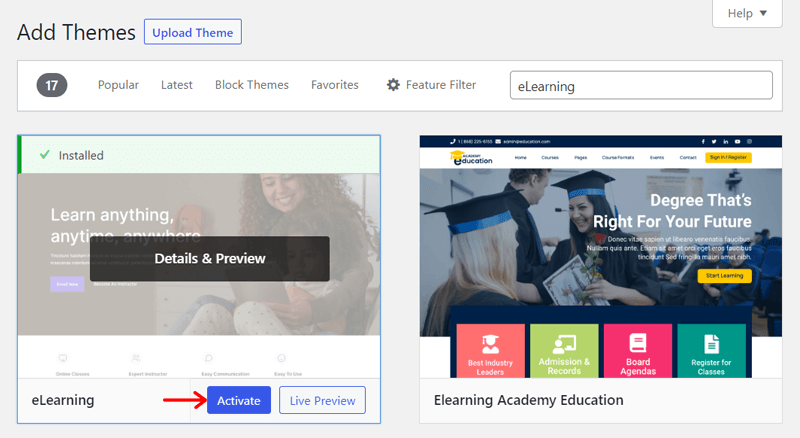
After that, click the ‘Activate’ button to activate eLearning.
Learn how to install a WordPress theme in detail from this guide.
Step 2: Import a Demo
Next, you must import a demo template to start designing your site easily. For that, click the ‘Get started with eLearning’ button on the notice.
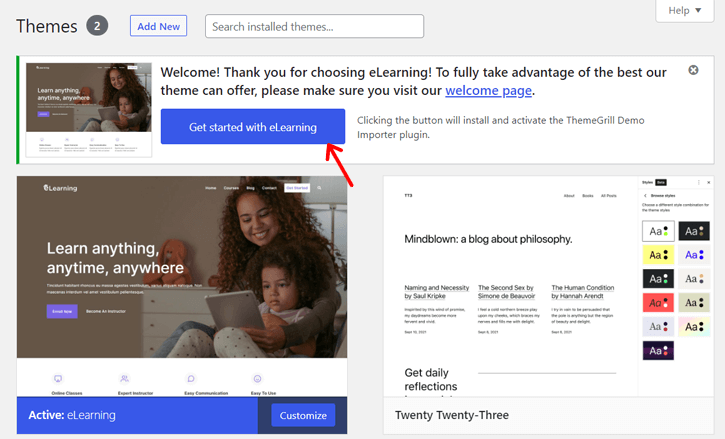
This automatically sets up the Quick Demo import plugin and opens the demos page. If you didn’t find the notice, then there are other methods. Learn them from this guide.
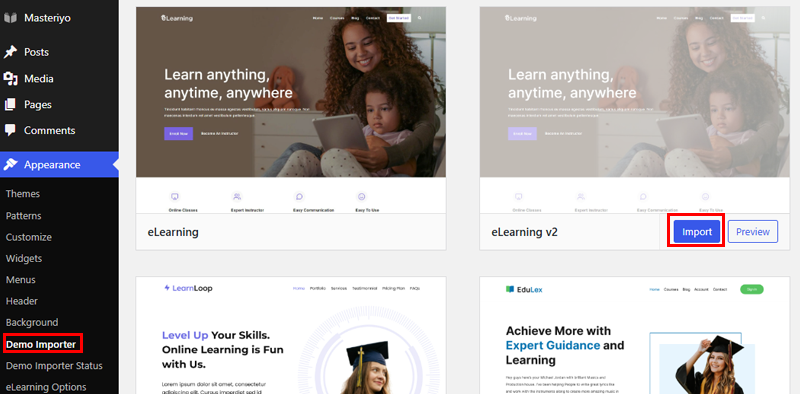
Currently, you’re in the Demo Importer menu. There, hover over a template and click its ‘Import’ button.
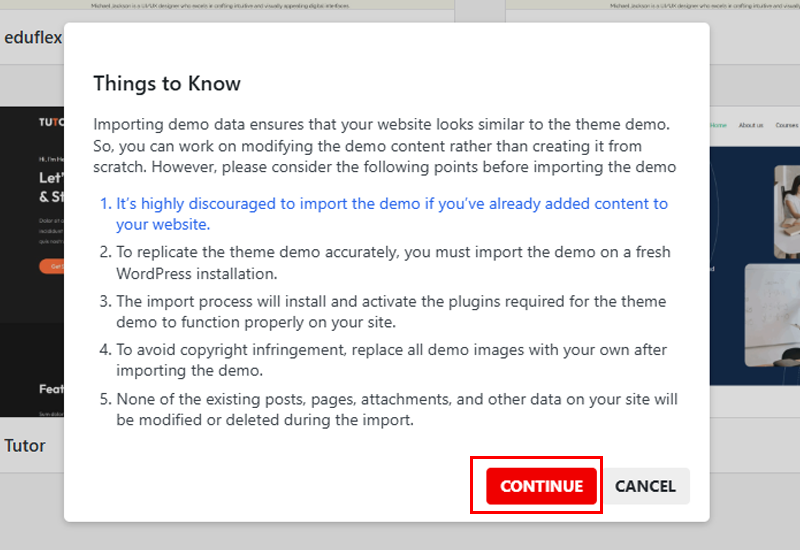
Right after that, you’ll see a popup message. Read it thoroughly and click the ‘Continue!’ button.
Step 3: Customize the Demo
Suppose you want to modify the demo’s content and design. You can use either the WordPress customizer, Elementor, or both.
You can access the WordPress customizer from the Appearance > Customize menu. While you must install and activate Elementor on the dashboard to edit each page with Elementor.
Learn about the customization process from this guide.
How to Create a New Course with Masteriyo?
Now, we’re at the crucial step of using Masteriyo.
This Masteriyo review section contains steps for creating a new course for the LMS website. This includes creating sections with lessons and quizzes. Here we go!
Step 1: Add a New Course
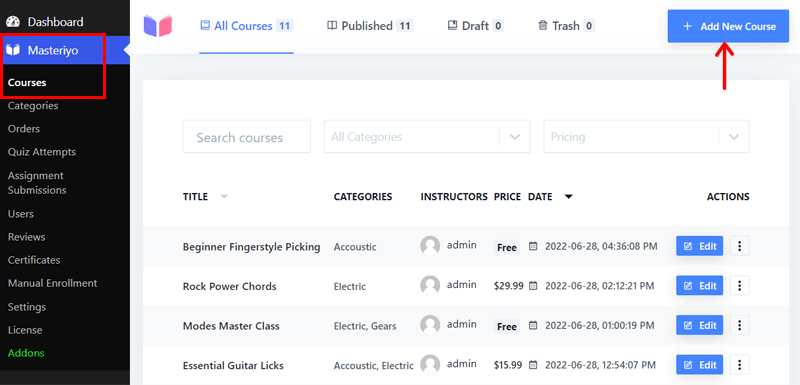
First, go to the Masteriyo > Courses menu. There, you can find several courses that came from the template. You can edit, replace, or delete them as you want. For a better idea of the course builder, click the ‘Add New Course’ button to create a new course.
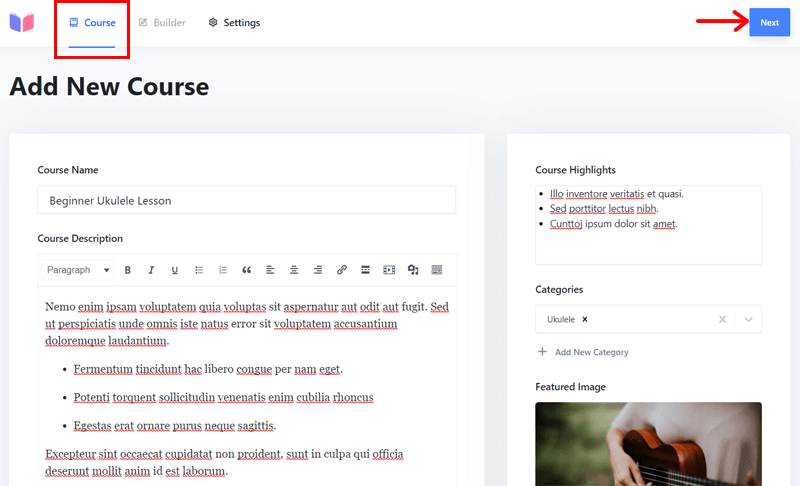
Next, you can enter the Course Name, Course Description, and Course Highlights. Also, select the Categories, Featured Image, and Featured Video.
Then, click the ‘Next’ button.
Step 2: Create Sections with Lessons and Quizzes
This moves you to the next tab called Builder. Creating sections helps you divide your course lessons and quizzes cleanly. So, click the ‘Add New Section’ button here.
Now, you can provide the section name and click the ‘Add’ button.
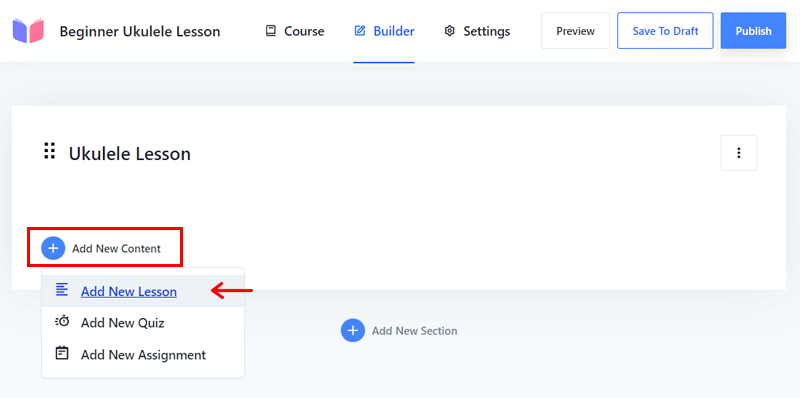
Within that section, you’ll find the ‘Add New Content’ button. Click on it, and it’ll show multiple options depending on the add-ons you use.
Here, we’ll demonstrate creating a lesson and a quiz. Let’s go through the steps.
Creating a Lesson
Among the options, click ‘Add New Lesson’ to launch a lesson.
Then, you can keep the Lesson Name, Lesson Description, Featured Image, Video Source, and Self Hosted Video. After that, hit the ‘Publish’ button to make the lesson go live.
Creating a Quiz
Similarly, you should click the ‘Add New Quiz’ option on ‘Add New Content’ to add a quiz to that section.
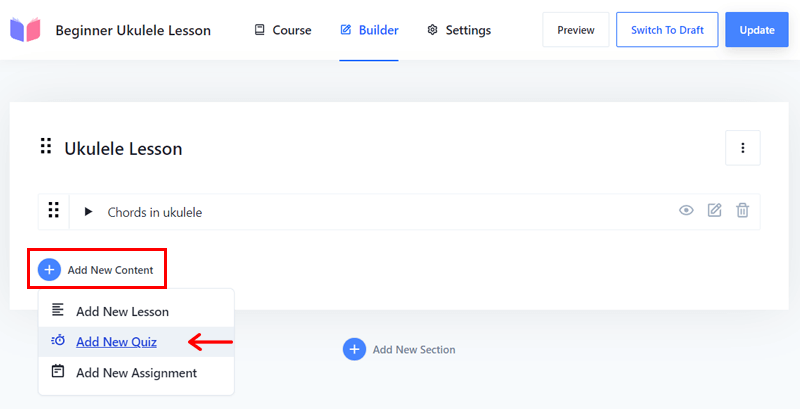
This opens the quiz builder having 3 tabs. Let’s configure them:
In the Info tab, you can enter the Quiz Name. Then, click the ‘Publish’ button.
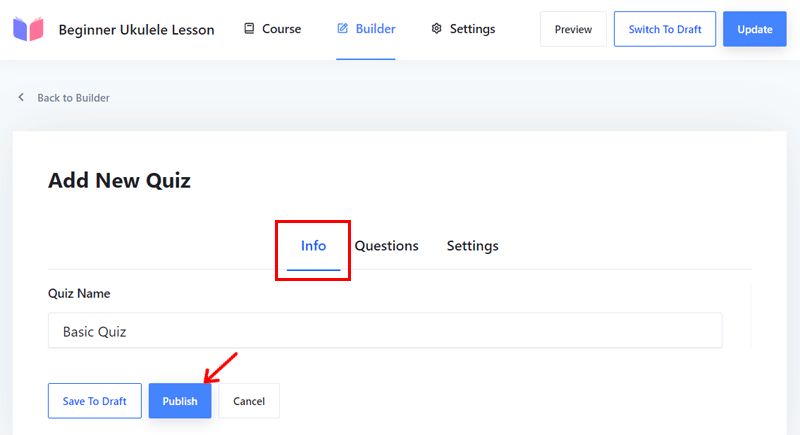
As soon as you publish your quiz, the Questions tab opens. Here, click the ‘Add New Question’ option.
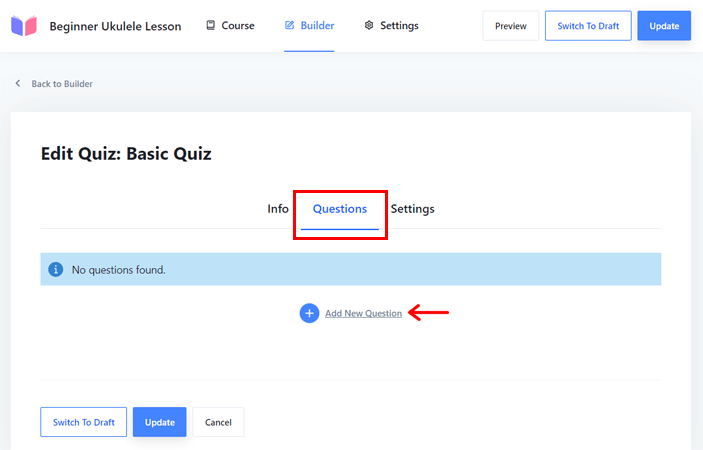
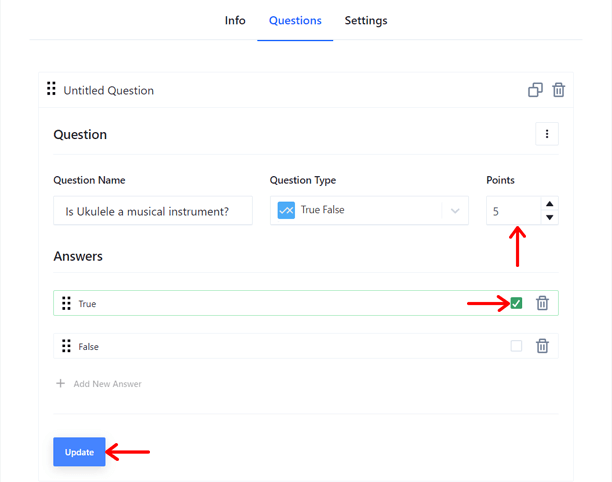
Next, open the Untitled Question accordion. There, you can add your Question Name, select the Question Type, give the Points, and edit the Answers.
Moreover, you can specify the correct answer by enabling a tick mark on the answer. Once you complete it, click the ‘Update’ button.
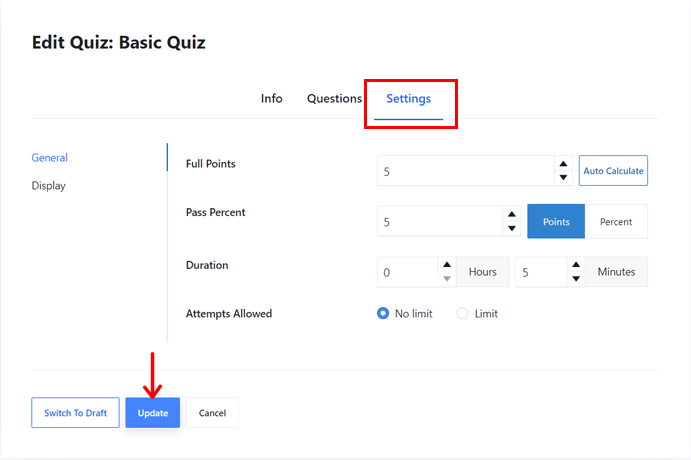
In addition, the Settings tab contains more configuration options for the quizzes. That includes the General settings like full points, pass points, duration, etc. Also, it has Display settings for questions per page and randomizes questions.
Make sure to hit the ‘Update’ button to save the changes you’ve made.
Step 3: Configure the Course Settings
Other than Course and Builder, another tab left is Settings.
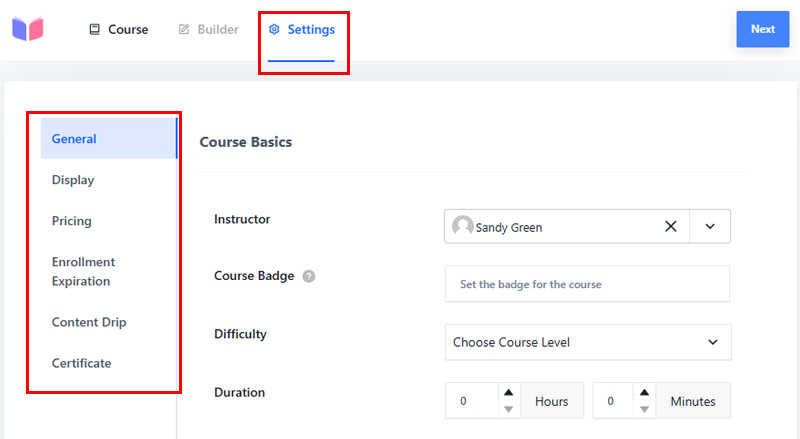
And the course settings you’ll find here depend on the add-ons you use. Some of them are:
- General: Choose the instructor, difficulty, duration, and maximum student limit.
- Display: Make your curriculum visible to everyone or only to enrollers.
- Pricing: Set the pricing as free or paid. Also, choose if registration is required for a free course.
- Prerequisites: Allow prerequisite courses and pick the courses learners should finish.
- Content Drip: Select the content drip type among free, sequential, date selection, and X days after enrollment.
- Certificate: Enable the certificate option and choose the certificate to display.
And that’s it!
Step 4: Create a Course Completion Certificate
If you’re done creating your course, another necessary adjustment is creating certificates. In this Masteriyo review, we’ll help you add the default certificate for your students who complete the courses.
Now, let’s get moving!
First, make sure the Certificate Builder add-on is enabled. After that, move to the Masteriyo > Certificates menu. There, you should click the ‘Add New Certificate’ button.
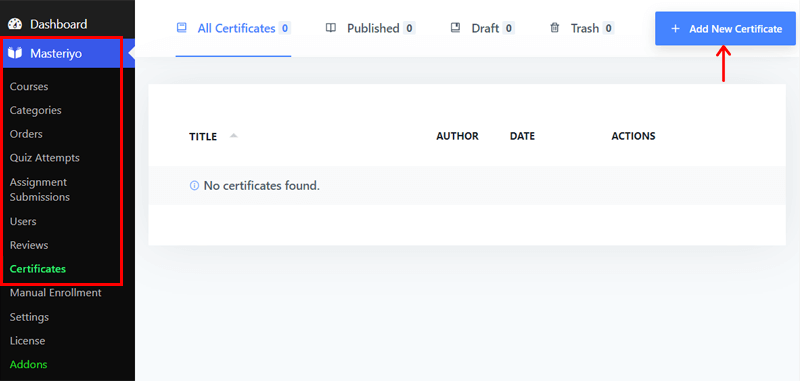
Now, you’ll get 2 options to create your certificate. They are Blank Slate and Simple One.
You can choose the from the different certificate templates. If you want a custom design, then go with the ‘Blank Slate’. Here, we’ll go for the a template, so click on it.
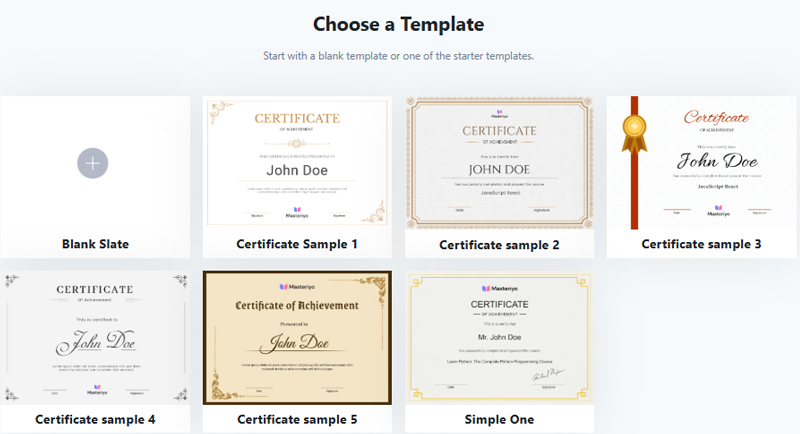
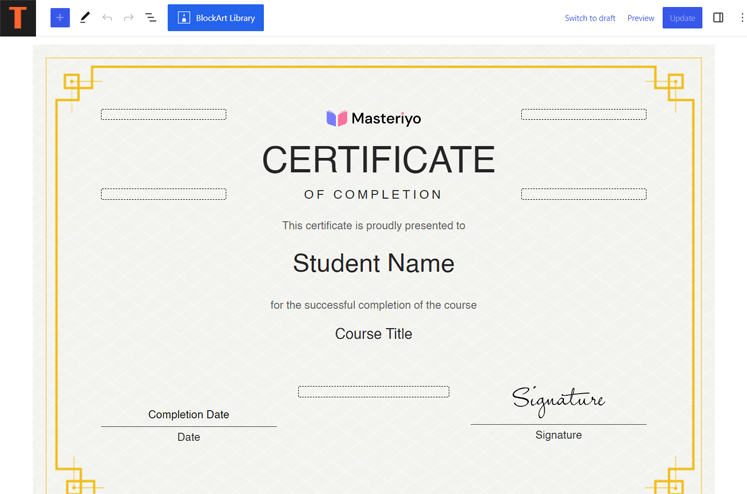
With that, the WordPress editor opens up. Hence, you can customize it the way you want. You can also see the widgets being used to display the course and student information.
Lastly, click the ‘Publish’ button.
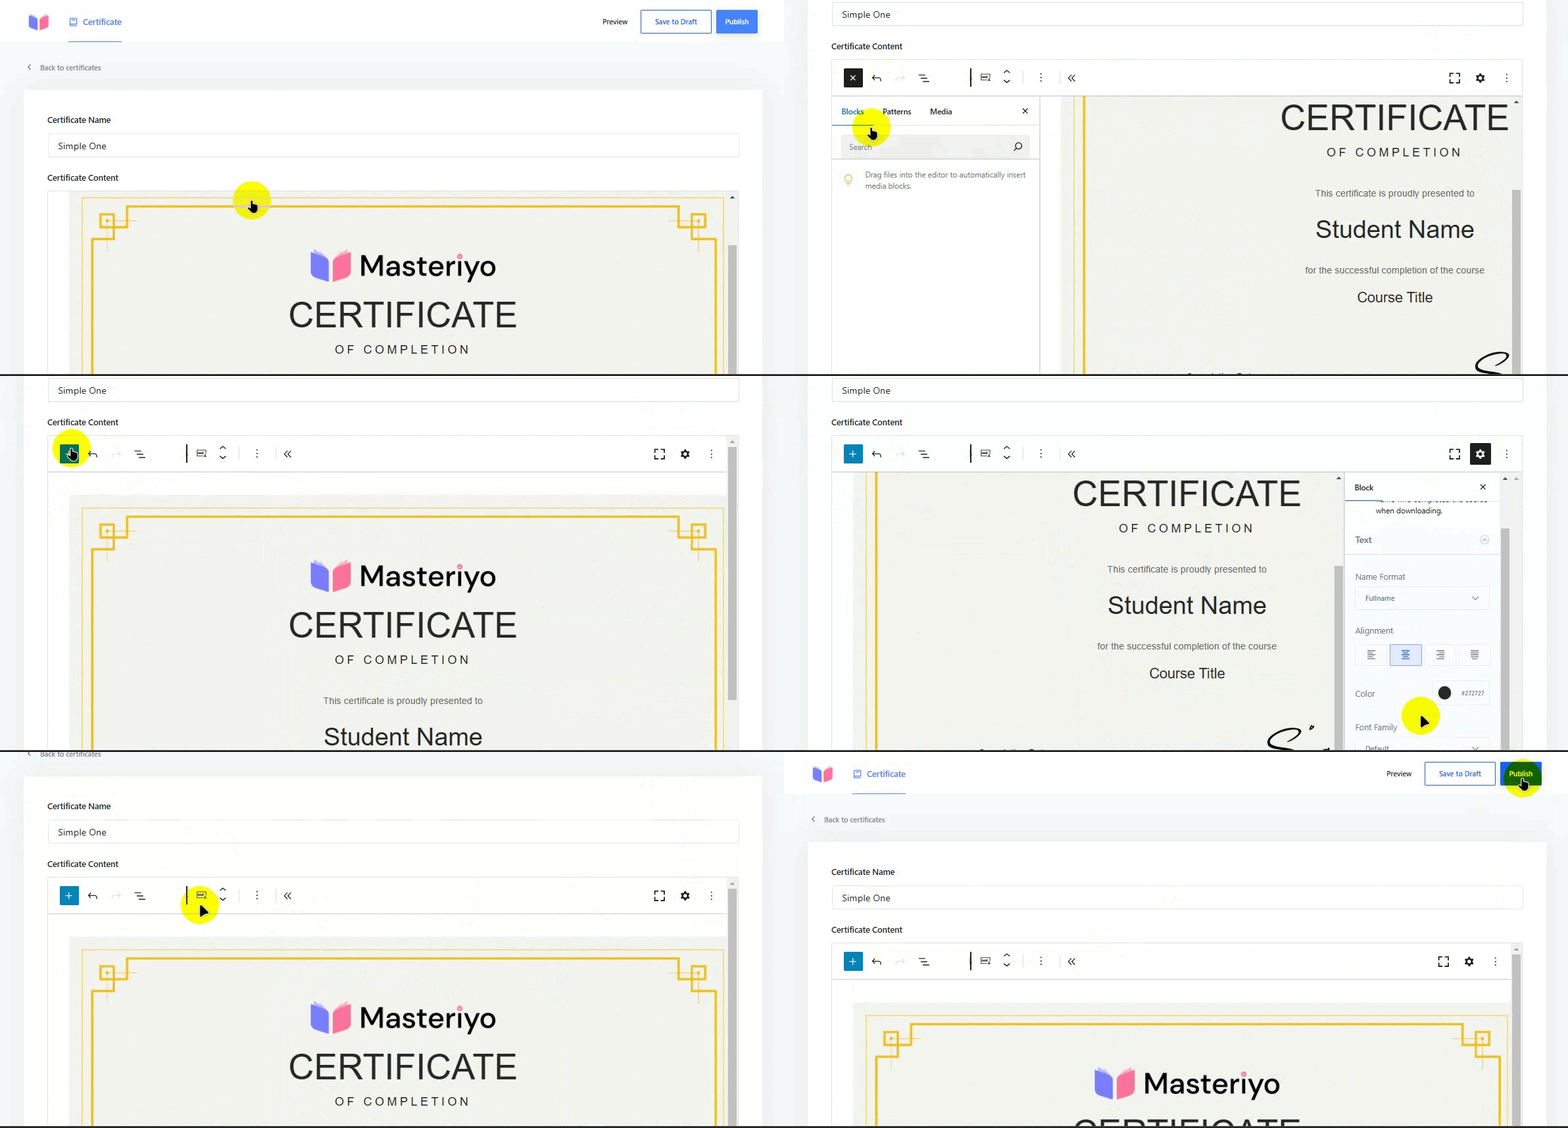
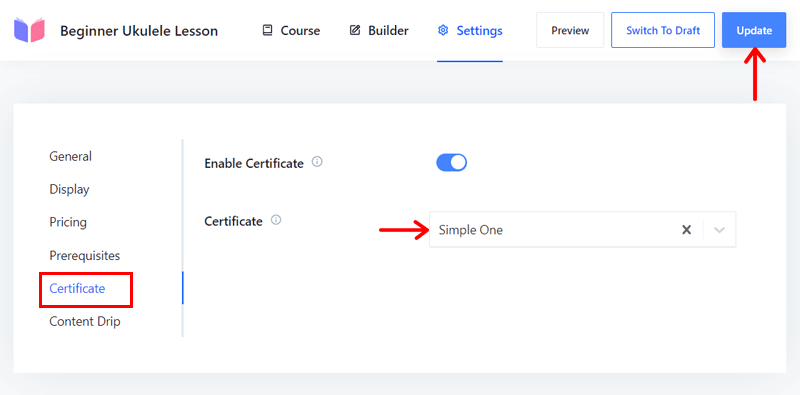
Further, you can create several certificates for different courses. So, to declare this specific certificate to a course, you must configure the course settings.
To do so, go to Settings for that course and open the Certificate tab. There, choose the certificate of the course as the one you just made. Finally, click the ‘Update’ button.
Congratulations! This completes our review of setting up and using Masteriyo. But how will your online course website look? Find out in the next section!
How Do Students Access Your Course at the Front-end?
Here, we’ll explore how learners can enroll in and access your courses. The settings you used may differ, so keep reading!
A learner can open your website and then the Courses page from the navigational menu. After that, they can open the course they want to enroll in.
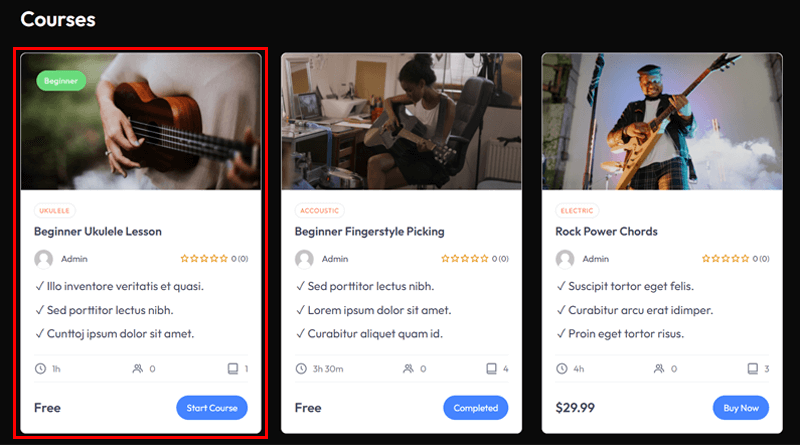
Next, they should click on its ‘Start Course’ button to begin.
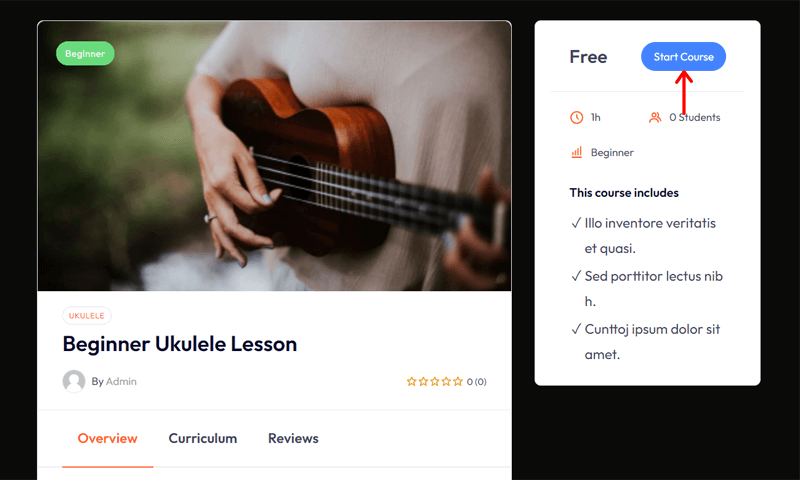
Because we customized the course to let students enroll without registration, they can directly access the course materials.
After they finish a lesson, they can click the ‘Mark as Complete’ button. And move to the next lesson or section.
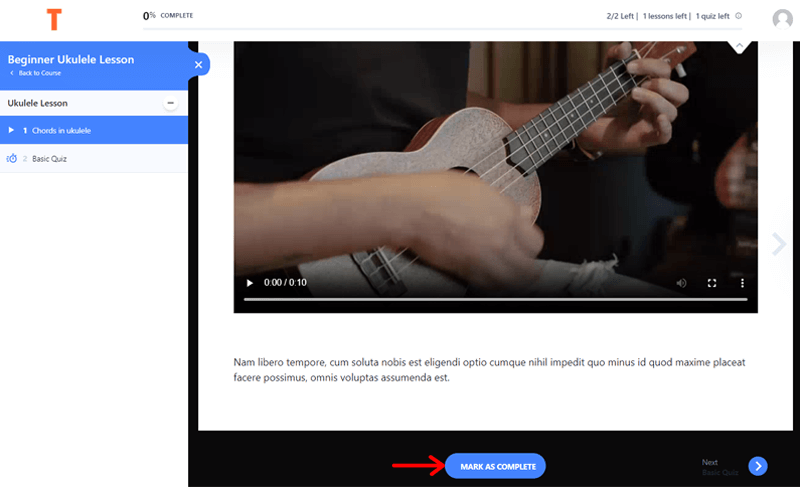
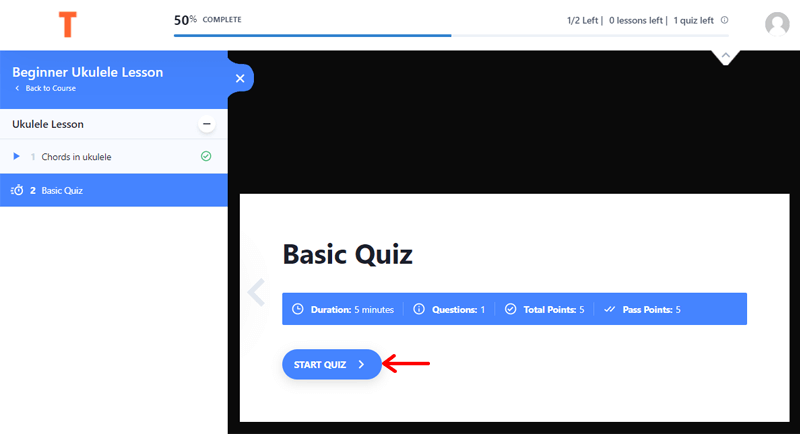
Similarly, they can complete all the lessons. If they land up in the quiz section, then they can click the ‘Start Quiz’ button.
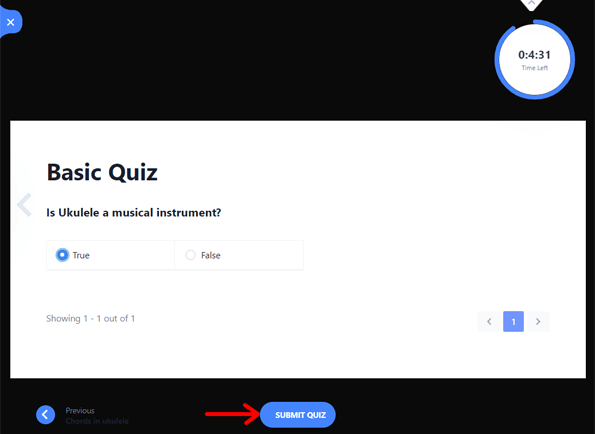
The quiz section looks like the screenshot below. Once you choose the answers, hit the ‘Submit Quiz’ button.
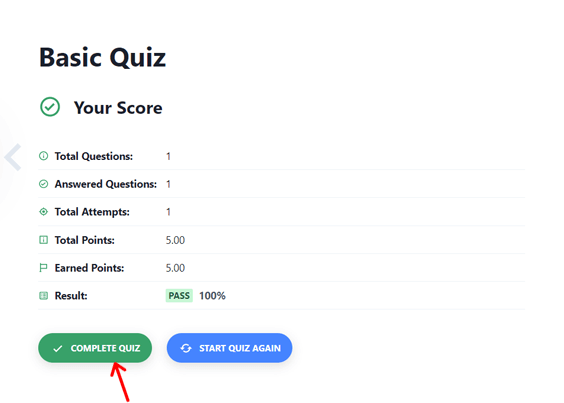
Once they finish the quiz, they can view their quiz test report and click the ‘Complete Quiz’ button.
Finally, students can download the certificate of successful course completion. It’s available for those who completed the course and passed the test. And it looks like this:
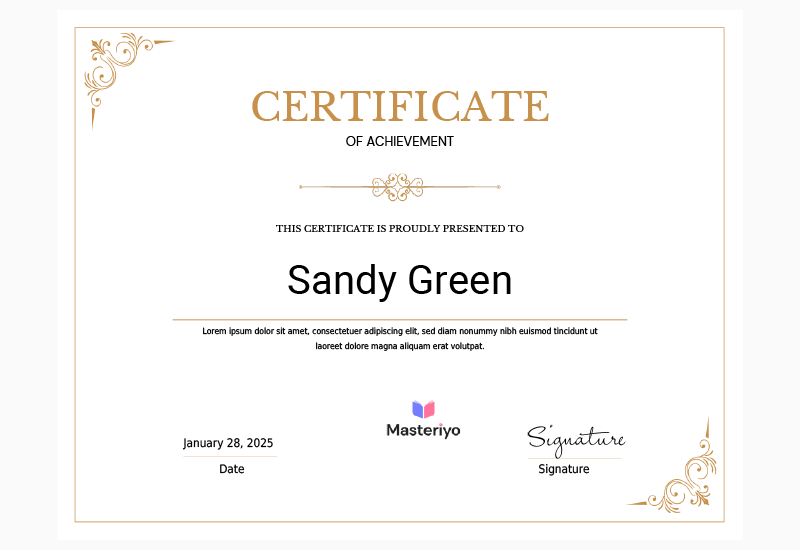
Quite intriguing, isn’t it?
This completes our guide for the Masteriyo review. In the later sections, we will learn more about the plugin in terms of cost, support, etc.
D. How Much Does Masteriyo Cost?
Masteriyo is a freemium WordPress online course plugin. So, it’s available in free and premium versions namely Masteriyo and Masteriyo Pro, respectively.
You can download the free plugin from its website or the WordPress.org plugin directory. And then add it to your website dashboard. Best of all, you can install the plugin right from your WordPress dashboard. We explained both of these ways earlier.
If you want exclusive features, then purchase a paid plan. The following list shows those Masteriyo Pro price options:

- Starter: Costs $74/year for 1 site, course archive filter, assignments, wishlist, etc.
- Growth: Costs $149.50.year for unlimited sites, Starter features, gradebook, coupons, content drip, etc.
In addition, all these plans contain a 100% risk-free 14-day money-back guarantee policy. So, you can use Masteriyo for 14 days and then determine if it fits your needs. If it doesn’t, then you can discontinue using it and get a full refund.
Hence, there isn’t any free trial for the premium plans. But you can check out the demo or test it. Learn more from Masteriyo’s pricing page.
E. What are the Customer Support Options in Masteriyo?
Customer support is vital for setting up and using any WordPress plugin. Because you never know when you might need the help of the experts when you’re stuck.
Now, let’s go through the Masteriyo customer support options. Afterward, we can specify if this plugin offers good customer support. So, here we go!
Masteriyo has an extensive Support page. There, you can find a collection of links to various support options. Now, let’s know them one by one.
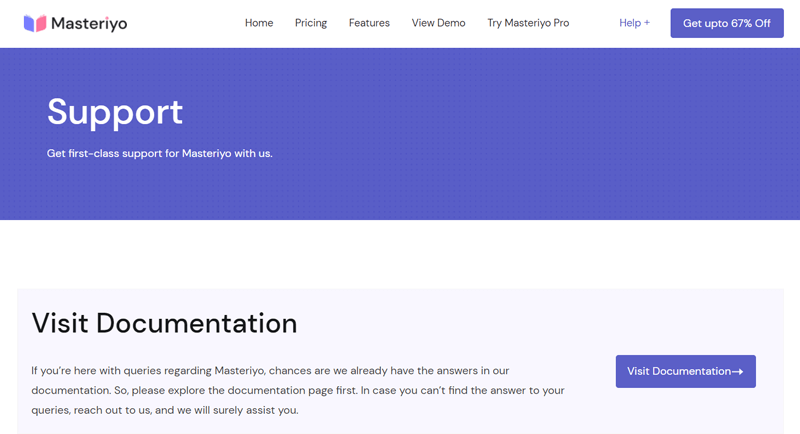
For complex issues, you can use the live chat option in the site’s button-right corner. After filling out your information and queries, you can also submit a support ticket.
In addition, if you’re using the free plugin and have simpler confusion, you can visit the WordPress.org forum. There, you can post your queries and get a reply for support.
In fact, it also has comprehensive documentation. Guides on categories like getting started, course creation, integrations, and more can be found there.
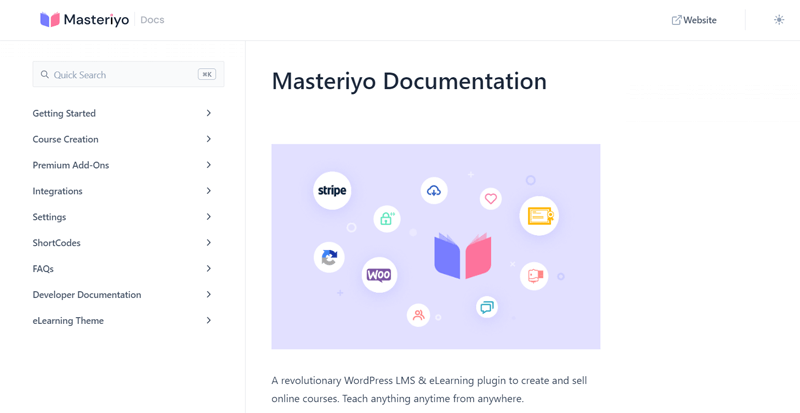
Furthermore, the homepage also contains FAQs that answer basic and common queries. Apart from them, you’ll also find the link to the YouTube tutorial videos.
Overall, Masteriyo performs great in providing support to its customers.
F. Masteriyo Compatible WordPress Themes
We assure you that all the themes coded using WordPress standards work with Masteriyo. Hence, you can use any WordPress theme to build your LMS site from this plugin.
But, there are a few themes that Masteriyo recommends for your online course site. So, we’re looking at those Masteriyo-recommended themes below. Let’s jump right into it!
1. eLearning
eLearning is the ultimate WordPress online course theme by Masteriyo. It lets you easily build professional and engaging LMS websites. So, it supports the Gutenberg WordPress editor and page builders like Elementor, Beaver Builder, etc.

Currently, it has 8 templates that you can import and use. Plus, you can auto-install the LMS pages for courses, registration, etc., along with the demo.
Further, you can customize the template according to your brand theme. That’s by using various options for header/footer, blog, color/typography, layout, etc.
In addition, this theme supports multiple Right-to-Left languages, such as Arabic, Urdu, Persian, and Hebrew.
2. Zakra
Zakra is one of the best WordPress themes, ideal for every website type, including online courses. It has a collection of site demos suitable when using page builders like Gutenberg, Elementor, Brizy, and BlockArt Blocks. Among the demos, you’ll also find those for LMS.

On top of that, you’ll find customization options for the header, menu, blog, typography, and footer. Also, it offers multiple layout options for the website and its sidebar. With that, you can organize your courses and lessons.
Best of all, this theme is AMP-optimized (Accelerated Mobile Pages). Hence, your courses will look and perform smoothly on mobile devices.
Not to mention, Zakra supports the major WordPress plugins, including Masteriyo. Other plugins contain Yoast, WPML, Jetpack, The Events Calendar, etc.
3. Astra
Astra is the #1 WordPress theme with integration to LMS plugins, including Masteriyo. You can find several Astra starter templates for building online course sites.

Additionally, it has powerful design options for headers, menus, sidebar, colors, layouts, typography, etc. Further, you’ll get global design options to easily customize all the courses or lessons in the same way at once.
Moreover, Astra is compatible with WooCommerce. It also offers features like an off-canvas sidebar, dropdown cart, quick view, and more.
In fact, this theme comes with powerful widgets: the address widget (which shows the business address), the info list widget (which gives an informational list), and the social icon widget (which links to social networks). All of them are useful for your LMS website.
Check out more WordPress LMS themes for online courses from this list.
With that, let’s move ahead to the next Masteriyo review section.
G. The Masteriyo Plugin Alternatives
By now, you may have decided to use Masteriyo for your LMS website. We have learned details about this plugin so far.
However, it’s not the only online course plugin. Many WordPress plugins exist for online courses, so it’s okay to know them and see which is better.
To help you out, we’ve listed some great Masteriyo alternatives. Here we go!
1. Tutor LMS
Tutor LMS is a popular WordPress LMS plugin for creating, managing, and selling courses. Unlike Masteriyo, it gives front-end dashboards for both learners and teachers. Ultimately, learners and teachers can access and manage their respective activities from one place.
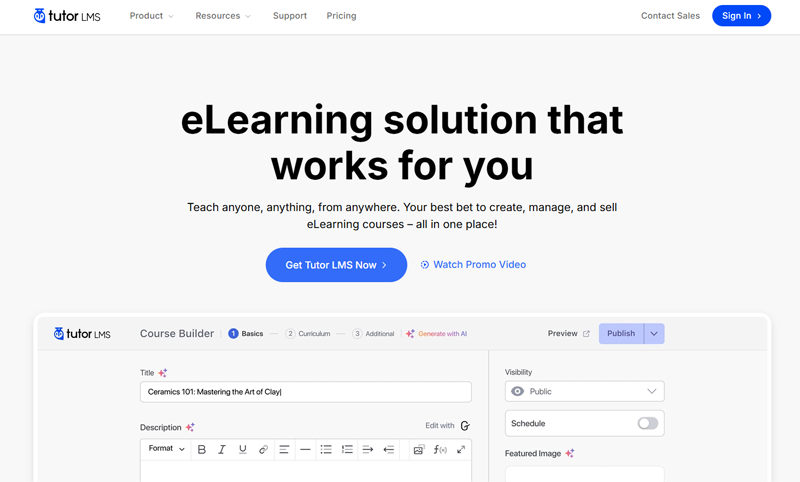
Moreover, a course can have more than one teacher. And every time a new teacher joins, they can control the course materials.
Further, it offers a dedicated certificate builder. With that, you can design the certificates you’ll give to the students who complete the courses on your platform.
Pricing:
The core Tutor LMS plugin is free. You can download it from the WordPress.org plugin directory or its site. Instead, you can also install it directly on your WordPress dashboard.
Further, it also has a premium version categorized into 3 pricing plans for various needs. And each of them includes a 30-day money-back guarantee policy. The plans are:
- Individual: $199/year, $499 for lifetime use, 1 website, updates for a year, etc.
- Business: $399/year, $999 for a one-time payment, 10 sites, and Individual features.
- Agency: $799/year, $1999 for lifetime use, unlimited sites, and Business features.
If you want to learn more about this LMS plugin, then check out the Tutor LMS review.
2. LearnDash
Another robust and advanced WordPress online course plugin on our Masteriyo alternatives list is LearnDash. Despite being a premium plugin, it’s one of the most popular plugins. Because it doesn’t restrict the number of lessons, courses, and quizzes you can add.

Best of all, every plan has all the premium features you may need on your eLearning site. So, you can easily choose a plan depending on the number of sites you want to build.
Some notable features are quizzes, assignments, content drip, leaderboards, etc. Overall, you’ll get lots of features in LearnDash compared to others.
Pricing:
LearnDash is a premium WordPress LMS plugin that you must purchase from its site. It doesn’t have a free trial but includes a 30-day money-back guarantee policy.
Depending on the number of sites you can use this plugin, there are the following 3 plans:
- 1 Site: $199/year, all premium features, updates, and support.
- 10 Sites: $399/year, all paid features, updates, and support.
- Unlimited: $799/year, all pro features, updates, and support.
Are you thinking about using this plugin? Then, read the complete guide on LearnDash.
3. LifterLMS
Even if you’re a beginner or expert, you can use LifterLMS for your online course website. It’s a flexible WordPress LMS plugin to create single online course sites and complex multi-instructor course websites.

Moreover, it has an easy-to-use course and quiz builder, so you can easily build engaging courses, lessons, and quizzes. The lessons can have various learning styles, including video, audio, text, image-based, etc.
In addition, LifterLMS can be a great Masteriyo alternative. It also lets you build unlimited websites, and its plan contains all the add-ons you may need.
Pricing:
LifterLMS is a free WordPress plugin. You can download it from WordPress.org’s plugin directory or its official website. Then, upload it to your site.
If you want to add more functionality, then you can use its premium add-ons. In fact, you can purchase one of the following pricing plans with a collection of add-ons for your needs.
- Earth Bundle: $149.50/year, 1 site, eCommerce add-ons, and support for 1 user.
- Universe Bundle: $249.50/year, 5 sites, support for 2 users, form integration add-ons, Earth Bundle features, and more.
- Infinity Bundle: $749.50/year, unlimited sites, support for 3 users, Universe Bundle features, and other advanced add-ons.
Plus, it offers a 30-day risk-free money-back guarantee policy. Learn more about it from the LifterLMS pricing page.
Here’s the link to our LifterLMS review. So, make sure to have a look to know more. If you’re confused, read the comparison article on LifterLMS vs LearnDash.
H. Final Thoughts – Is Masteriyo the Best WordPress LMS Plugin?
This review determines Masteriyo as an outstanding WordPress online course plugin. After reviewing all its features, pricing plans, support options, etc., we can say that.
Overall, Masteriyo has an easy-to-use user interface for the dashboard and course builder. Best of all, you can create courses, sections, lessons, and quizzes from one place. Also, there are course settings to configure these course materials in the same place.
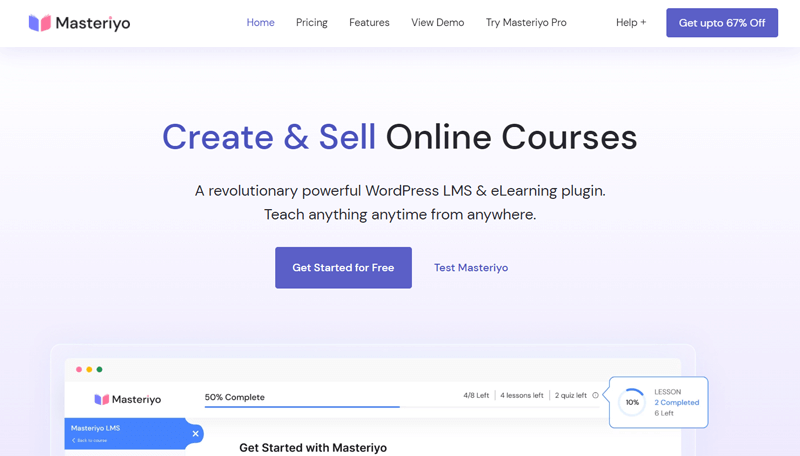
You can use Masteriyo for your individual teaching business, educational institute, or company because this plugin lets you launch your courses, training, classes, and coaching.
In fact, we recommend trying and using the free Masteriyo plugin first. Then, you can check the demo and test Masteriyo Pro.
To learn more, go ahead and use the paid plugin. It has a 14-day money-back guarantee policy. So, you can confirm whether to continue using Masteriyo during these 14 days.
For guidance, you can always read this Masteriyo review article!
If you’re a newcomer, then read our complete guide on how to create a website.
Conclusion
And that’s a wrap! We’re at the end of this article on Masteriyo review.
Hopefully, you learned about the Masteriyo features, pricing, support, and other sections. We also hope you understood them and liked our review of Masteriyo.
Overall, Masteriyo is a top-notch WordPress LMS plugin. So, if you find it compelling for your eLearning site needs, then go ahead.
Moreover, if we missed anything, then mention them in the comment. Also, post your queries. We’ll gladly come up with more information to solve your confusion.
Additionally, we recommend reading our comparison article between LMS and CMS. You can also look at the best blogging online courses and SEO certification courses. These can be great inspirations for starting your own online course site.
Last but not least. Follow us on Facebook and X (formerly Twitter) to go through our new blogs.


