Wondering how to start a WordPress blog for yourself? Or do you want to make a professional career in blogging? Then, WordPress is clearly the best platform to start with.
To create a blog in WordPress, you need to find a good domain and hosting. Then, you need to install WordPress on the server. Next, you can pick a blogging theme and start adding blogs.
The process of getting started in WordPress may look like an overwhelming task. It’s not as complex as it seems. With a proper guide, you can easily get around how WordPress works and start creating your own blog with no coding required.
Here, we’ve a stepwise guide to help you create your WordPress blog easily. We’ve included everything you need to know from the setup process to optimizing and monetizing your blog.
Let’s get started!
Pre-Blogging Checklist (Before You Start)
Before diving into the process of creating your WordPress blog, it’s essential to lay a strong foundation.
A well-planned approach ensures that your blog has a clear direction, a defined audience, and the right resources to grow successfully.
This pre-blogging checklist will help you prepare for a smooth blogging journey.
- Define Your Niche & Audience: First of all, choose a niche that interests you, has demand, and solves a problem for your target audience.
- Choose a Blog & Domain Name: Pick a short, memorable, and keyword-friendly name, then check domain availability on platforms like Namecheap.
- Plan Your Content Strategy: Create a content calendar with at least 5-10 blog post ideas based on keyword research.
- Create Social Media Profiles: Set up social accounts on Instagram, X, Facebook, and Pinterest to drive traffic and engage readers.
With these steps complete, you’re ready to start your WordPress blog. Let’s go!
Step 1. Why Start Your Blog in WordPress?
There are various ways to start making your blog on the web. You can code your website from scratch, hire a professional with programming knowledge or you can go for website builders that need the least coding knowledge to start.
WordPress is one such website builder that lets you make a website or blog easily and quickly. It’s the most popular content management system (CMS) tool which controls over 43% of the total websites on the web. A CMS is a software that lets you create, manage, and publish content online.
WordPress comes in two flavors, WordPress.com and WordPress.org. WordPress.com is a fully hosted platform that lets you make your WordPress blog on its own servers.
WordPress.org is an open-source self-hosted platform. You must find hosting and install WordPress by yourself.
For a detailed comparison, you can check out our article on WordPress.com vs WordPress.org. We’ll be talking about WordPress.org as the blogging platform in this article.
You can easily start creating every type of blog like personal, travel, lifestyle, and many more using WordPress. You can make any type of blog as you want. Aside from that, here are the top reasons why we suggest WordPress as the best blogging tool.
Top Reasons Why We Suggest WordPress
- It’s the most popular blogging platform which controls over 43% of the total websites online.
- It’s very easy to use and beginner-friendly.
- Comes with tons of free and premium plugins that allow you to add any functionality you want.
- There are thousands of free and paid themes you can choose from and make your site beautiful and attractive.
- Easily optimize for SEO, speed, and performance.
The most important point is that it’s a self-hosted service which allows you to use your domain name and your choice of hosting service. We’ll be talking about both of them below in the article. To understand better you can quickly check our article on domain name vs web hosting.
It might seem like a disadvantage at first. You have to take care of hosting and domain name yourself and pay for it however that is far from the truth. Having your choice of the domain name and hosting service means that:
- You’re in complete control of your site.
- The domain name is yours as long as you pay for it.
- You can display ads and monetize your site and get the full benefit with no cutback.
- You get to design, control, and make rules on how your site operates.
All these should be more than enough reasons to prove why you should start your blog in WordPress.
Step 2. What Do You Need to Start a Blog in WordPress?
Now you know why WordPress is the best blogging platform to go for. But it’s a self-hosted open-source platform. This requires you to take care of hosting and domain name yourself. So, what are these hosting and domain names, and how to get around these to start working on your site?
i. Domain Name
A domain name is a unique address or name for your website which helps visitors identify and get to your blog or your site. It’s a gateway to the internet and people can search up your domain name to locate your site.
For example, google.com is a domain name for Google. Domain names are more often the same as the name of your site or your company as sitenerdy.com for our SiteNerdy site.

They are also called site addresses. Users can type it into their browsers’ address bar and easily get to the corresponding site.
How to Select the Best Domain Name?
Choosing a good domain name for your blogging site is clearly very important as it’s your internet identity. So, here are the tips for selecting a proper domain:
- Get a domain name that corresponds to your site name, brand, or company.
- The domain name should be short, easy to pronounce, and spell but still catchy.
- Avoiding the use of numbers and hyphens in your domain.
- Ensure the domain includes keywords that reflect your business.
- Check if the domain doesn’t have any copyright or trademark previously.
- Using popular extensions like .com. Importantly, you can go for .com domains.
- Use different domain name generators to help you generate domain names for your site.
Learn how to choose a domain name for your blog here! Also, find the best domain extensions!
3 Best Domain Name Registrars
Ok, so you’ve figured out your domain name but what next? You still have to check if it’s available and register it to your name. That is where the domain registrar comes in.
Domain registrars are the companies that allow you to register a domain name for your blog or site. They’re Internet Corporation for Assigned Names and Numbers (ICANN) accredited businesses and they allow you to buy and register domain names.
Here’s a list of the best domain registrars you can consider using:
- Namecheap – Affordable with free domain privacy. (.com starts at $6.49/year)
- Domain.com – AI-powered suggestions and security features. (.com starts at $11.99/year)
- Bluehost – Free domain for the first year with hosting. (Renewal starts at $12.99/year)
ii. Web Hosting
The service that provides you with the ability to upload your site on the internet is web hosting. It’s an actual location where your site data is stored and can be viewed and accessed from the internet.
It’s different from your domain. Learn the differences between domains and web hosting here. In short, a host stores your blog on servers at a remote location. Those files are accessible through your domain.

How to Choose a WordPress Blog Hosting Service?
Choose a web hosting service depending on the resources you need to host your site. Most importantly, there are some tips to keep in mind while selecting the best hosting service.
- Your chosen host should provide appropriate bandwidth according to expected traffic.
- Ensure the hosting plan you pick fulfills your storage space needs.
- Compare different hosting services in terms of price, support, and features.
- Select the hosting server according to location. Servers near your physical location can help you cut down on latency and improve performance and speed.
- Check if the host offers excellent performance, speed, and security features.
3 Best WordPress Hosting Providers for Blogs
There are many different web hosting service providers. They have varying packages and options to choose from for your site hosting purpose.
You need to look into the long-term cost and efficiency before getting yourself web hosting. There are also different types of hosting you can get so proper research is very crucial to get the best result.
Here are the top 3 WordPress hosting providers we recommend going with for your blog:
- Hostinger – Budget-friendly, includes free domain. (Starts at $3.49/month billed yearly)
- Cloudways – Cloud-based hosting for better performance. (Starts at $14/month)
- Kinsta – Premium managed hosting with high security. (Starts at $0 today and then $30/month)
iii. Getting a Domain Name and Web Hosting
You can get domain names for your site by going through different domain name registrars and looking for a plan that satisfies your requirements. You don’t buy a domain name rather register it for a fixed set of time however you can extend the duration each time the subscription ends.
You can get yourself a web hosting separately too from different web hosts. However, you can also find both domain name and web hosting in a single package and save some money and time along with it.
One such platform is Hostinger. So, let’s use it for our blog. Here, you can easily get these hosting and enjoy the free domain name you get by following a simple set of steps.
Step i: Choose a Hosting Plan
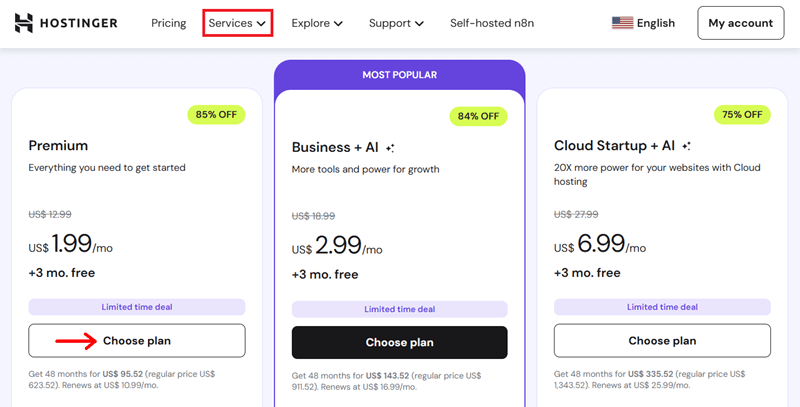
First, visit the Hostinger website and press the ‘Services‘ menu, followed by ‘Managed hosting for WordPress.’ The pricing page has 3 different pricing options, namely Premium, Business, and Cloud Startup. Now, click ‘Choose plan‘ for your blog plan.
Step ii: Select a Payment Duration
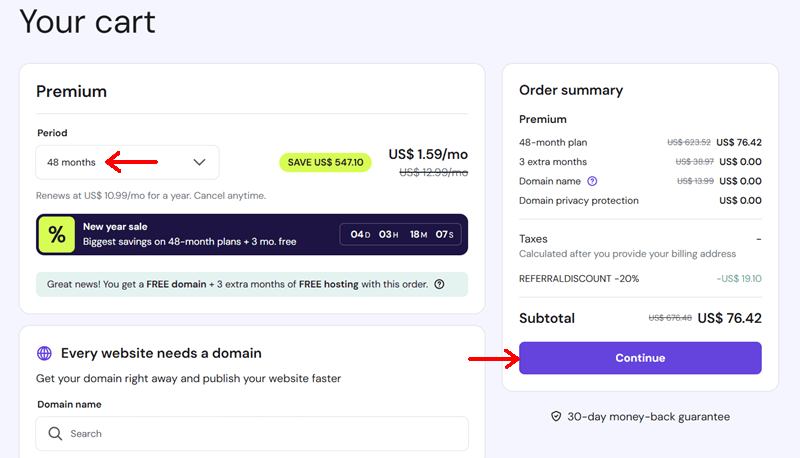
Following that, choose a payment period for your plan. For example, the ‘Premium‘ plan contains 4 periods determining the different duration of payment.
You can also search for a domain for your site. Then, hit the ‘Continue‘ button.
Step iii: Create Your Hostinger Account
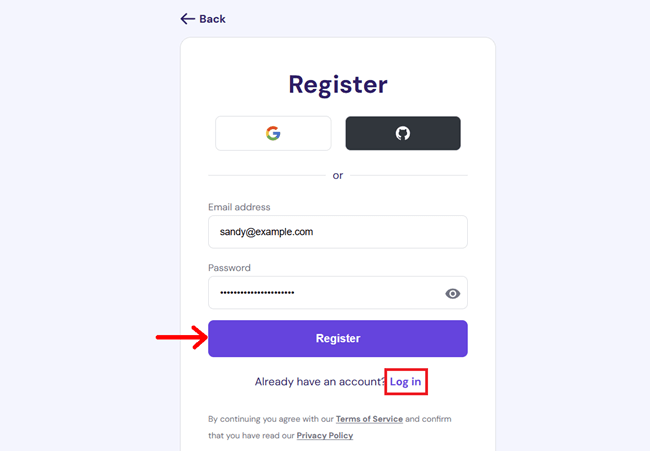
Now, create your Hostinger account with an email address or through your GitHub or Google profiles. In case you already have one, then click ‘Log in‘.
Step iv: Complete the Payment Process
Next, select a suitable payment method among the given options as per your ease. Also, insert a coupon if you have any. Then, complete the purchase by clicking ‘Submit Secure Payment‘.
Step v: Claim Your Free Domain
Now, log into your account and click ‘Start Now‘ along with email verification. In your panel, press the ‘Claim domain‘ button and enter a domain name of any extension you want for 1 year of free access. Yes, you heard it right! Hostinger also provides domain registration, which too free for 1 year!

Remember, some hosts send you login credentials via email whereas some require you to set them yourself. Either way, you must have strong login credentials and save it in some password manager.
That’s how you purchase and set up the hosting and domain from one platform. But the platform is still not ready to use, so keep reading!
Step 3. How to Start a WordPress Blog?
Your next step is to completely set up the host, create a website, and install WordPress for your blog. Hostinger’s WordPress hosting plan gives a one-click installation option for WordPress, solving the hurdles of manually doing the process of other kinds of hosting solutions.
So, once you claim the domain on Hostinger, follow the steps below.
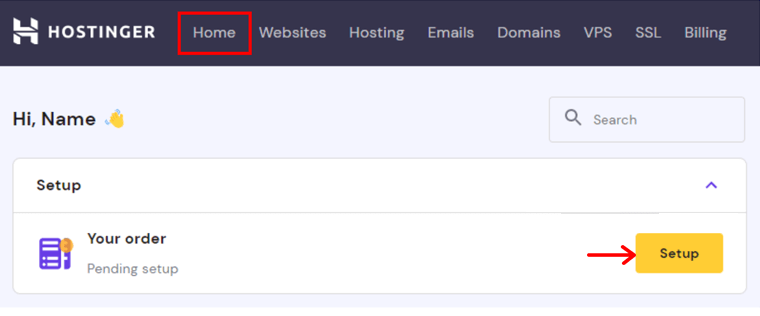
Step i: Initiate the Hosting Setup
First, press the ‘Setup‘ button for the plan to begin the onboarding process.
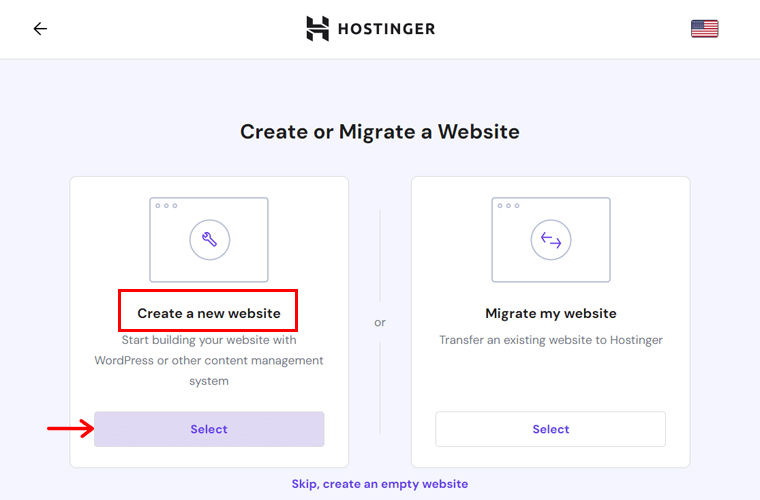
Once you declare information about the blog, click ‘Create a new website‘.
Then, pick ‘WordPress‘ and create your WordPress account. Also, you can enable some plugin recommendations and click ‘Continue‘.
Step ii: Connect Your Domain and Finalize Setup
Afterward, select your domain again and point it to the servers. Lastly, choose the data center location and click the ‘Finish Setup‘ button.
Step iii: Access Your WordPress Dashboard
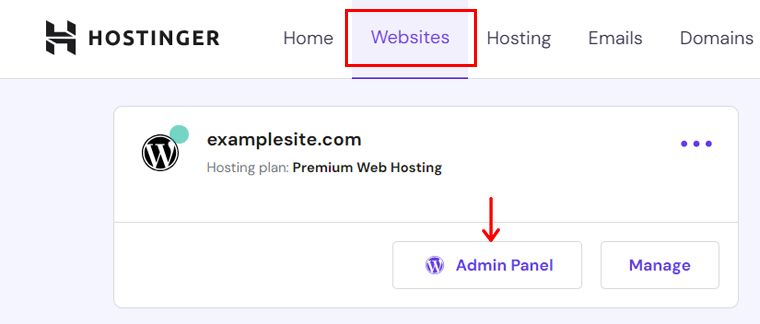
Moving forward, you can open the dashboard from the Hostinger hosting panel. Just click the ‘Admin Panel‘ button on your blog present in the ‘Websites‘ menu.
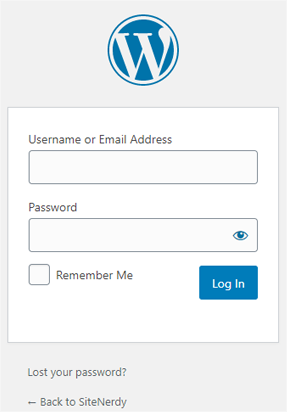
This redirects you to the login page, where you can log into the WordPress dashboard. Just enter your credentials and click the login button. With that, you can now start customizing your blog!
Step 4. Choose a Blog Theme and Start Customizing It
Themes are an easy way to customize and change how your blog looks. It allows you to make your site attractive and elegantly present your content.
WordPress provides you with tons of themes that you can choose to make your site unique and fit your niche. You can also customize and control them to determine how your content looks on the site.
You can check our article on what is a WordPress theme to know the detailed information about themes.
i. Choosing the Best WordPress Blog Theme
Many themes are optimized for different types and niches. Choosing the theme that fits your niche is very important while setting up your blog. As they determine the structure and style of your blog, it’s important to get the best theme for your blog.
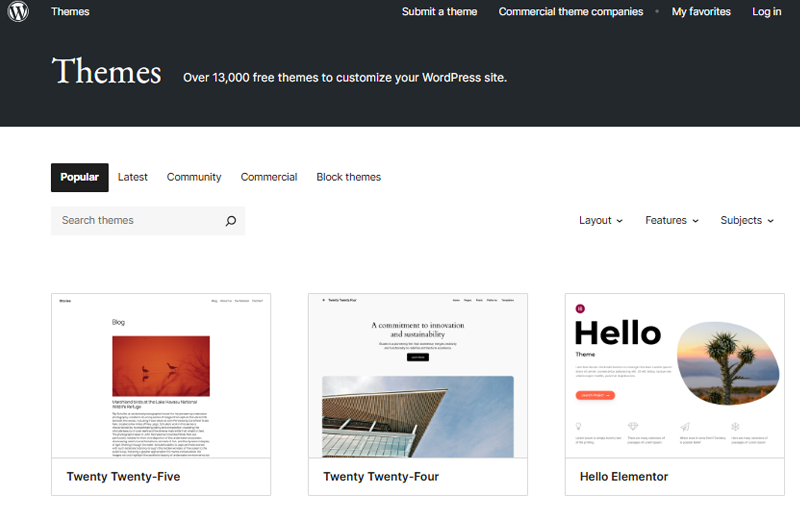
Be careful about figuring out the blog niche for picking a similar theme. With that, you can considerably cut down on time for customization if you go with the theme that fits your niche.
For example, if you want to start a blog as an author, you can get tons of themes that are optimized for the author. Some have built-in features that allow you to showcase books and sell them.
WordPress has thousands of free and premium themes that cover almost every kind of niche you want. Themes like Astra, Soledad, and Ashe blogs are pretty famous for blog themes.
You can check out our article on ‘how to choose the best WordPress theme’ for more information.
We would like to suggest the Astra, whether free or paid. It’s an easy-to-use and user-friendly theme. You can design any kind of blog using powerful page builders like Elementor and Beaver Builder. Learn everything about Astra in this Astra review.
After you choose the best blogging theme, you can now move on to installing it and start customization.
ii. Installing Free Astra WordPress Theme
You can install the theme of your choice on your WordPress site with some simple steps.
Step 1: Login into your WordPress dashboard

Go to your WordPress dashboard from yoursitename.com/wp-login.php and log in with your WordPress credentials. You’ll be redirected to the WordPress dashboard after login.
Step 2: Go to Appearance>>Themes
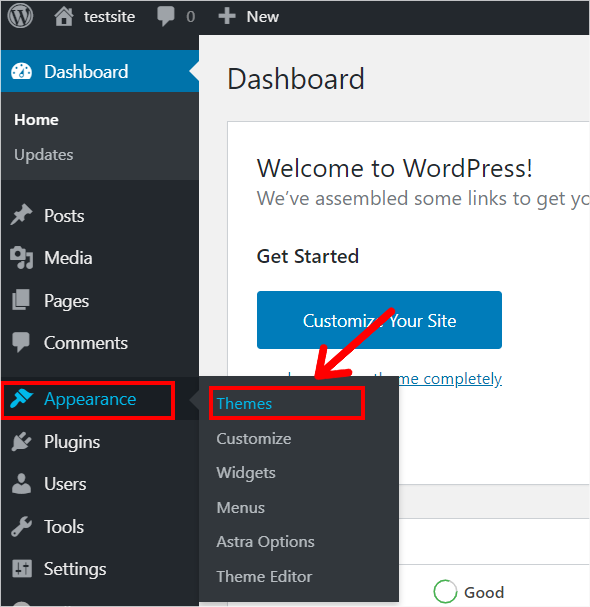
From the WordPress dashboard, select the Appearance tab on the left side and go to the Themes section. WordPress comes with preinstalled themes like Twenty Twenty. You’ll see all the installed themes and buttons to add new themes in this tab.
Step 3: Click the ‘Add New’ button or ‘Add New Theme’ box
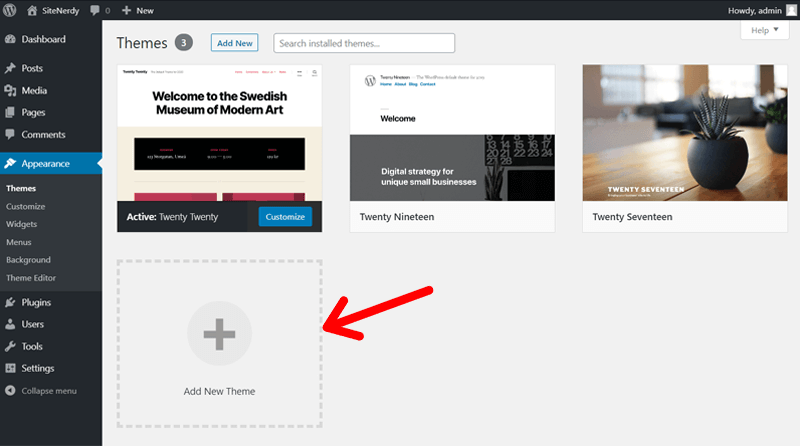
You can click on the ‘Add new’ button on the top or ‘Add new themes’ box on the bottom of pre-installed themes to move on to the next step of adding your theme.
Step 4: Browse through and search for themes of your choice using the search bar
You can look for a theme from its featured, popular, latest, and favorite sections. Or, search for the theme of your choice and preview it or install it.
Step 5: Click on the ‘Install’ button
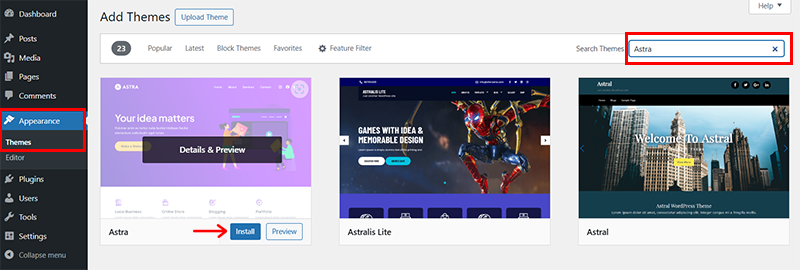
Your theme will start installing on your WordPress.
Step 6: Click on the ‘Activate’ button
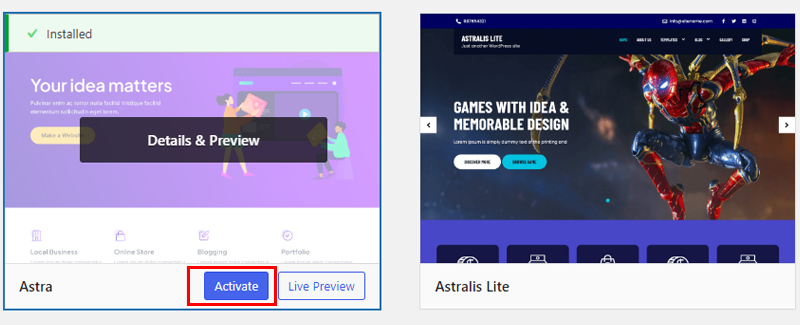
Go over to the themes tab and activate your theme by clicking on Activate. Your theme will be activated. You can see it as your active theme on the Themes tab.
iii. Installing Premium Astra WordPress Theme
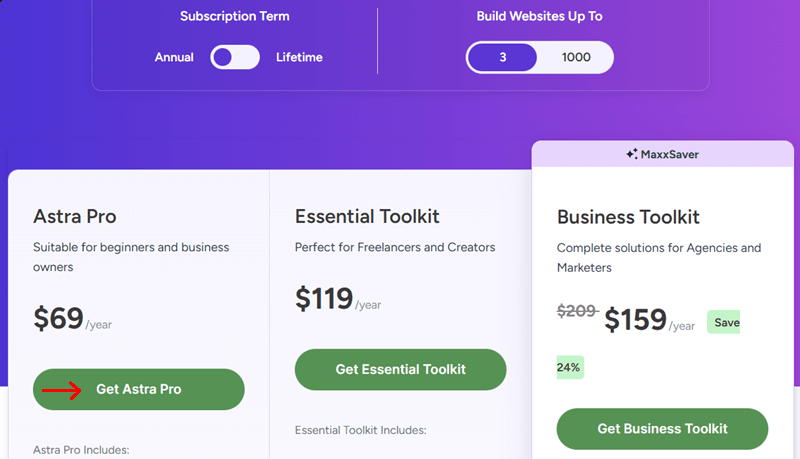
The free Astra theme is ideal for blogs, but for advanced features, upgrading to Astra Pro is essential. It’s a premium extension for additional customization. To purchase it, open Astra’s pricing page, pick the subscription term, select the number of sites, and click ‘Get Astra Pro‘.
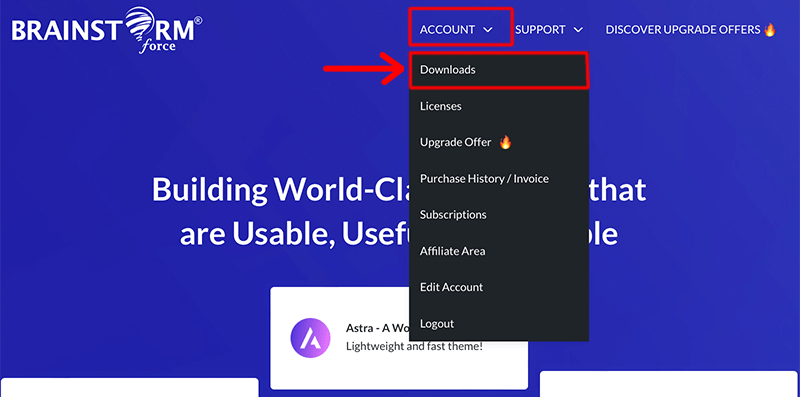
Now, fill up your payment and account information. Then, complete the purchase process. After that, you’ll find yourself in the Brainstorm Force account. There, navigate to the ‘Accounts > Downloads‘ menu and find your download options.
On that page, download the Astra Pro Addon plugin as shown in the figure below.
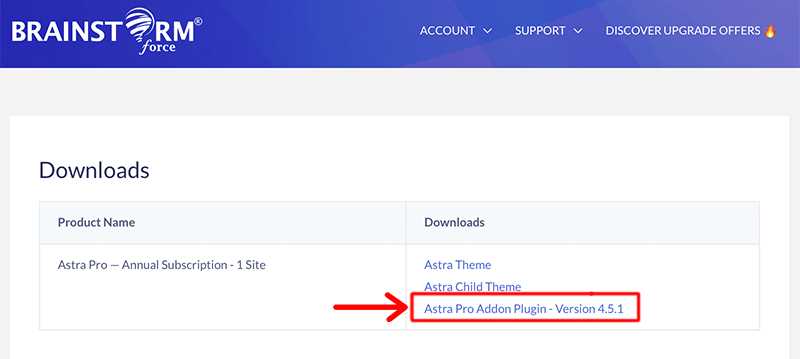
Once you download it, you must insert it into your blog dashboard. Open your dashboard and navigate ‘Plugins > Add New > Upload Plugin‘.
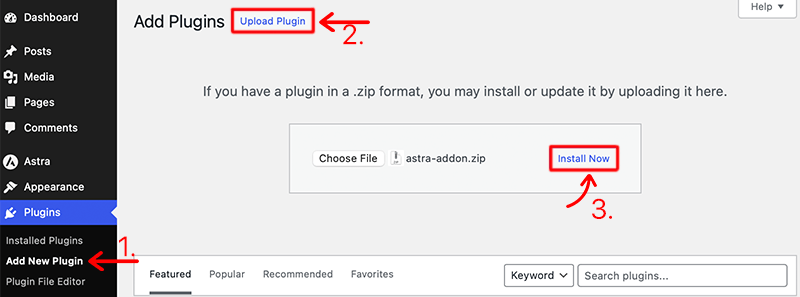
After that, upload the downloaded file and press the ‘Install Now‘ button. Later, click on the Activate button to activate the plugin.
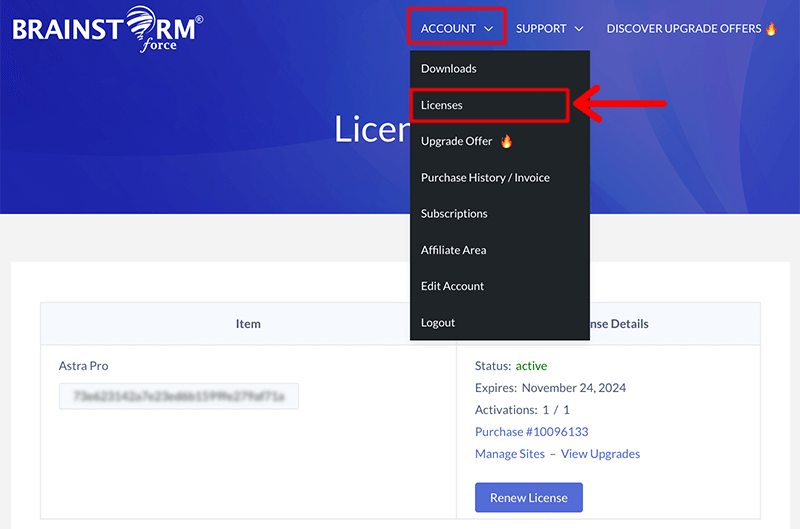
Following that, you’ll have to activate its license. To do so, open your Brainstorm Force Account page and click on the ‘Licenses‘ option. There, please copy the license key.
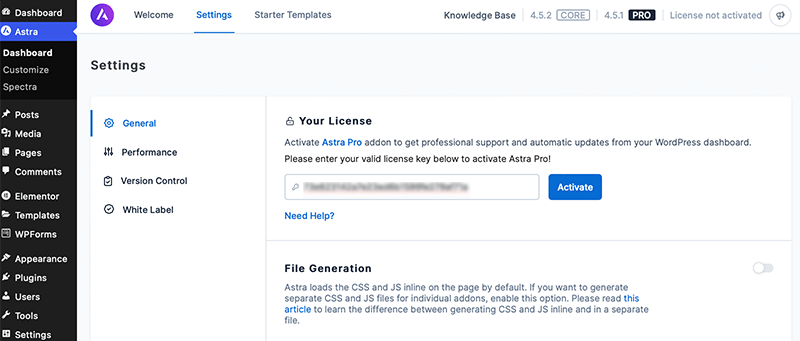
Now, go back to your admin area, and navigate to ‘Astra > Dashboard > Settings.’ Afterward, paste the license on the placeholder ‘Astra Pro License’ and then activate it.
That’s how you can quickly purchase and upgrade your Astra Pro theme.
iv. Install Starter Templates
To access around 100 free ready-to-use templates, Astra offers Starter Templates. Similarly, you can access the premium ones using the plugin’s premium version.
Get started by navigating to the ‘Plugins > Add New‘ menu. There, search for ‘Starter Templates’ and click its ‘Install‘ button once you find it.
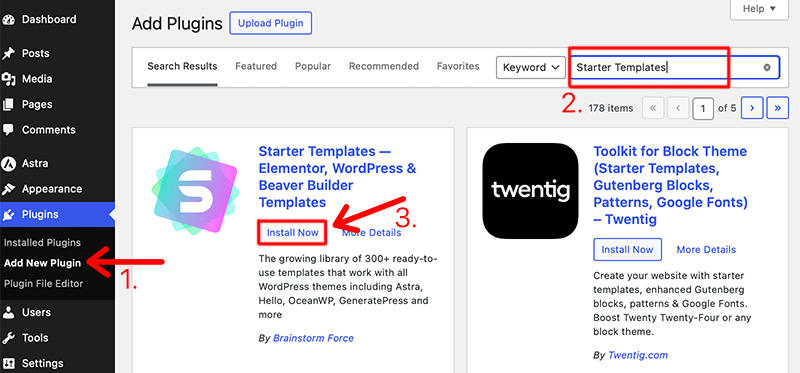
Right after that, click on the ‘Activate‘ button. This adds a new submenu on the Appearance menu called Starter Templates that you must open.
v. Import a Pre-designed Template from Starter Templates
With that, now, you can start using Starter Templates for your blog. It involves a series of steps like:
Step 1: Choose the Page Builder
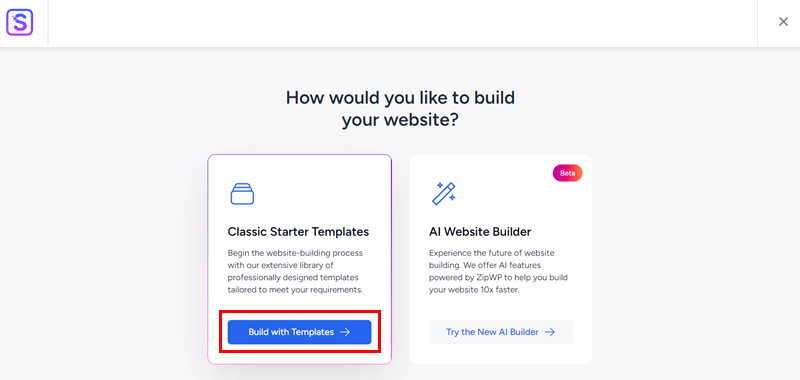
First, open ‘Appearance > Starter Templates‘ and pick your preferred page builder. It can be classic templates or by using the AI website builder. Here, let’s click ‘Build with Templates‘.
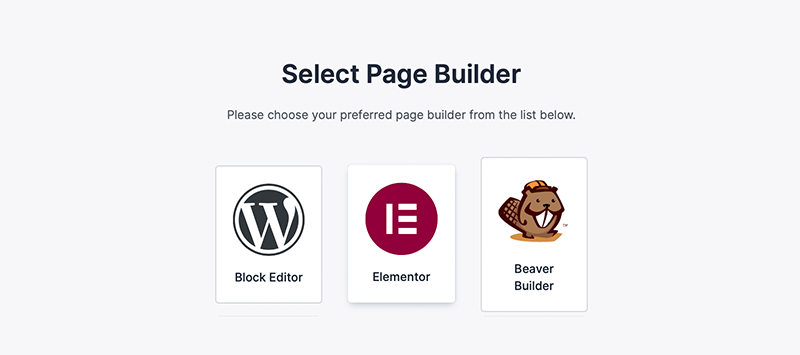
It can be Block Editor, Elementor, or Beaver Builder. Next, it’ll pop up the website templates library and styling options accordingly.
Let’s say, we’ll go for Block Editor for this article.
Step 2: Select a Suitable Template
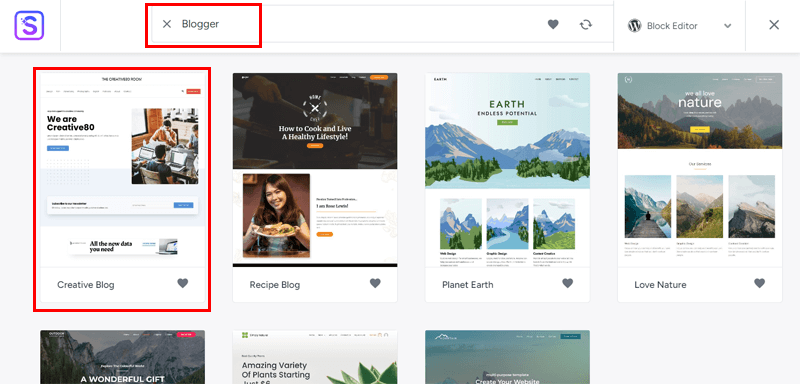
Following that, you can browse and pick the desired blog template from the ‘Blog‘ category. In this guide, we’ll show you the creation process of a real blog website, i.e. the blog of Matt Mullenweg.
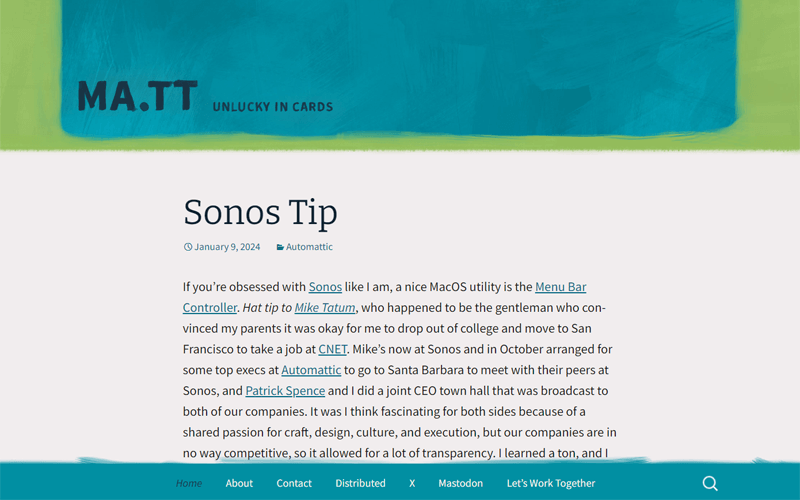
So, let’s go for a similar Blogger template. Just click this template and you’ll be redirected to another page.
This page includes various styling settings like the logo, colors, and typography. So, complete the process based on your requirements. Ensure you check its preview on the right side.
Step 3: Insert the Logo
As said before, press the ‘Click to Upload‘ button on the left side. There, upload the logo, adjust its size, and click ‘Continue‘ as shown below:
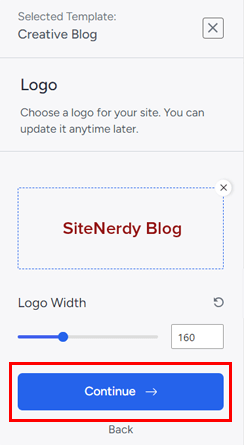
If your logo hasn’t been made yet, then select ‘Skip & Continue‘ to do it later.
Step 4: Choose the Color Palette and Fonts
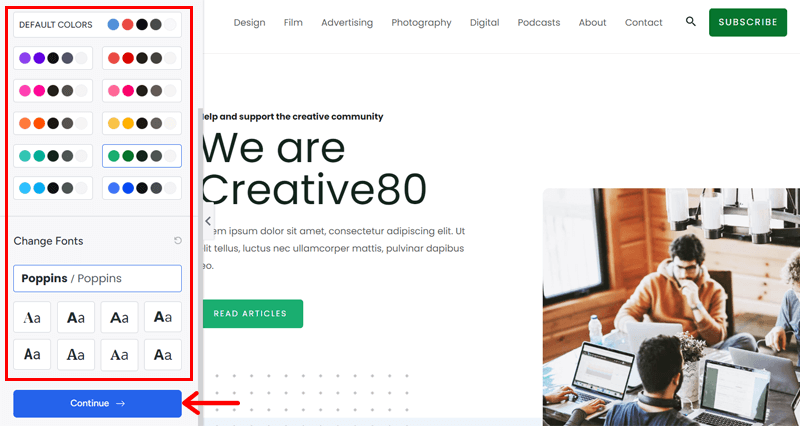
After that, select the ideal ready-made global palettes. Also, choose one of the available typography presets. Use these options, preview the changes, and fix your choices. Lastly, click ‘Continue‘.
Step 5: Import a Complete Site Template
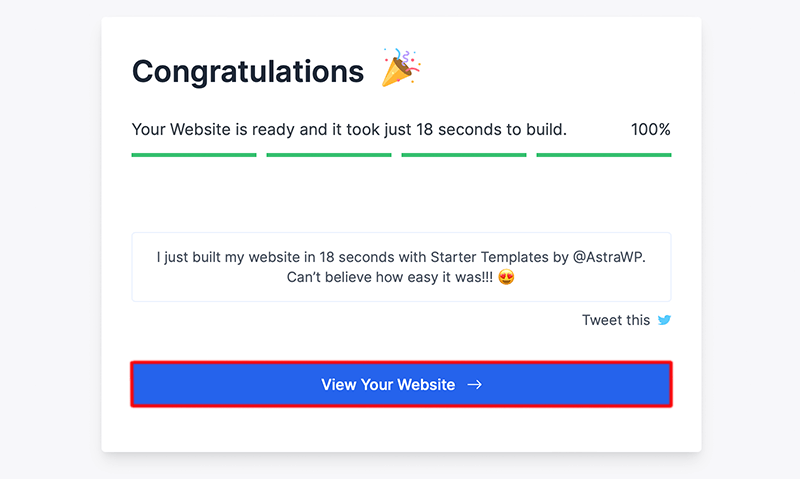
Now comes the import process where you need to first tell about yourself and choose the advanced options. Then, click on the ‘Submit & Build My Website‘ button which takes a while. Next, click on ‘View Your Website‘ or close the area to move back to the dashboard.
vi. Utilize Spectra for Additional Blocks
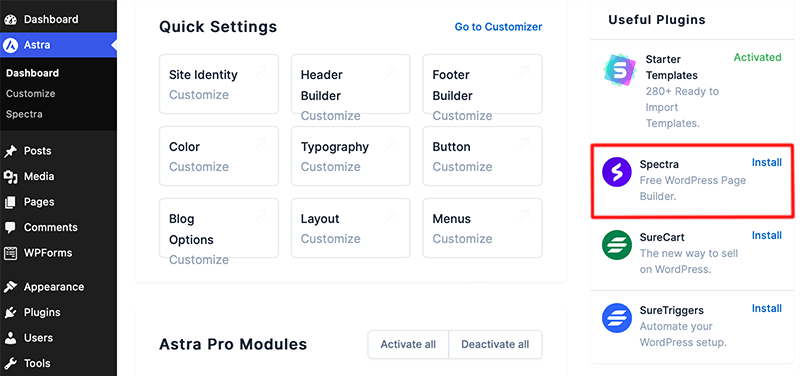
If you want professional sections on your blog, then you can use the free Spectra blocks plugin by Astra. Sometimes essential plugins like Spectra are already downloaded along with your template.
If not, then you can find the ‘Astra > Dashboard‘ menu with the option to install this plugin directly.
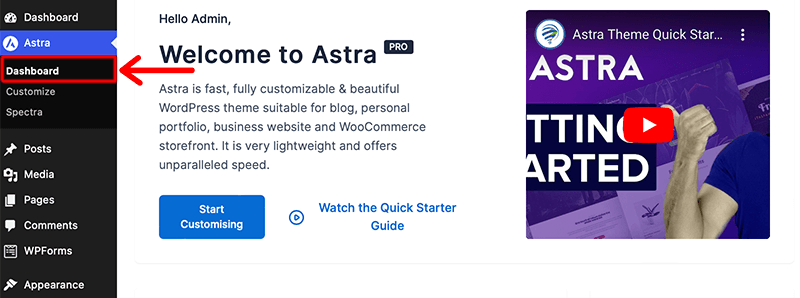
Just view the ‘Useful Plugins‘ section and click the ‘Install‘ button for Spectra.
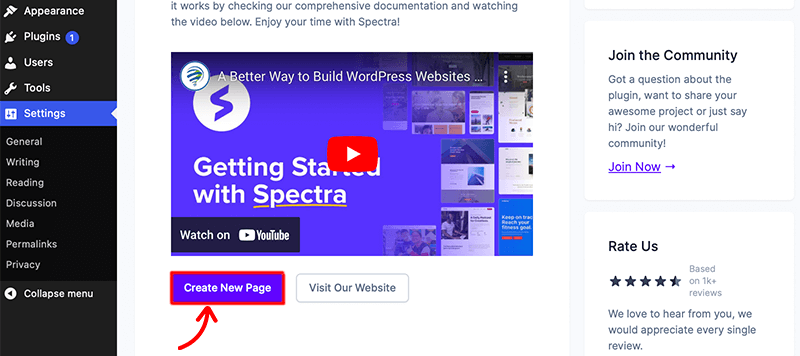
Now, on its new Spectra dashboard, click on the ‘Create New Page‘ button. This redirects you to the WordPress Gutenberg editor.
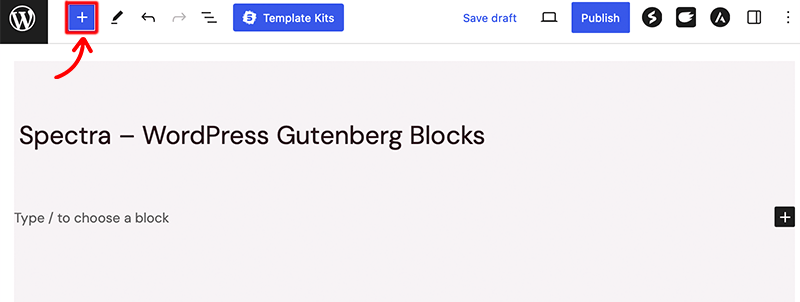
After the editor opens up, add blocks by clicking on the “+” icon from the top left-hand side menu bar.
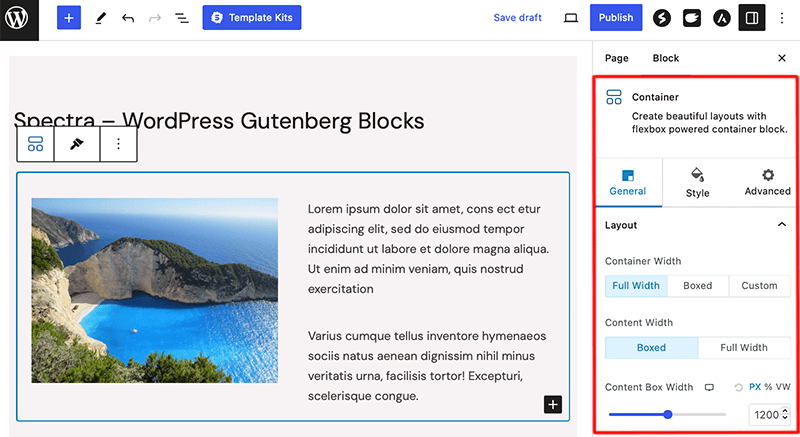
Among the given blocks, you’ll find the Spectra options under the Blocks section at the top. Now from here, you can pick the block you want to add to your blog and drop it in the Gutenberg editor.
For example, the screenshot below shows the usage of columns, images, and paragraph blocks. Next, you can customize every element of that block from the left sidebar block settings.
Step 5. Adding Blog Posts and Pages
After you’re done with customization, you can start adding articles to your blog. However, before you add them, you need to know what types of content you can add to your WordPress site.
You can have 2 types of content on your WordPress site.
- Pages
- Posts
Posts and Pages mostly differ on the use. Pages are used to display static content of a site like the about us page, landing page, contact page, etc., that don’t change frequently. Whereas posts are those dynamic contents like articles, daily updates, news, etc. that often change.
However, you need to have some basic information on adding pages to get started with a beautiful blogging website.
i. WordPress Block Editor
WordPress comes with its easy-to-use block editor for adding both posts and pages. Often called ‘Gutenberg Editor’, it’s also known as ‘Block Editor’, ‘WordPress Editor’, and ‘WordPress Block Editor’. So, don’t be confused if these terms are used interchangeably.
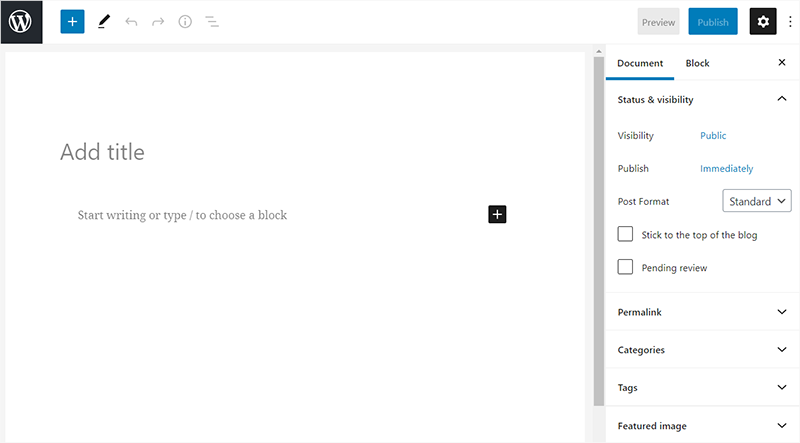
WordPress Block Editor is a block-based editing area. That is to say, every content and media can be edited in the form of a block. You can add the heading and title of your content using specific ‘Heading’ blocks, paragraphs using ‘Paragraph’ Blocks, and images or media using ‘Image’.
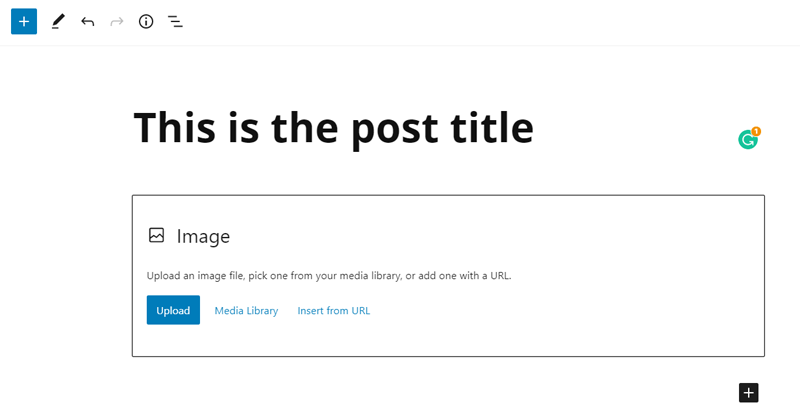
You can add a variety of content using the specific blocks. These blocks also come with their own set of controls for customization like color, width, and alignment. This allows people with no technical knowledge to edit them individually and add their blogs beautifully to the site.
Adding pages and posts to WordPress is very easy and pretty similar too. Let’s move on to how easy it is to add pages, posts, and different aspects of a website to make your site functional.
ii. Adding Posts
Posts are all the articles, informational content, and reviews that your blog is based on. Moreover, these are important parts of a blog website and you’ll be spending most of your time adding new posts or updating previous articles for your WordPress blog.
Adding and updating these posts is very easy and takes no time if you follow the simple steps below.
- Step 1: Go to your WordPress Dashboard.
- Step 2: Go to Posts >> Add New
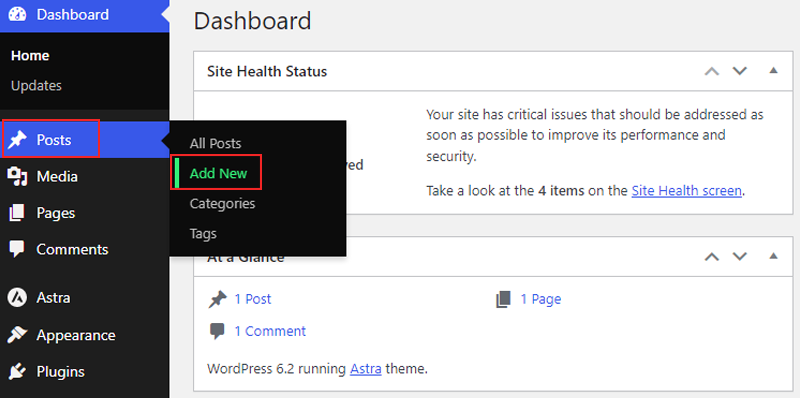
You’ll be prompted to a WordPress editor which allows you to add content in a block-based style. This has 2 main sections: Content Area and Settings Panel.
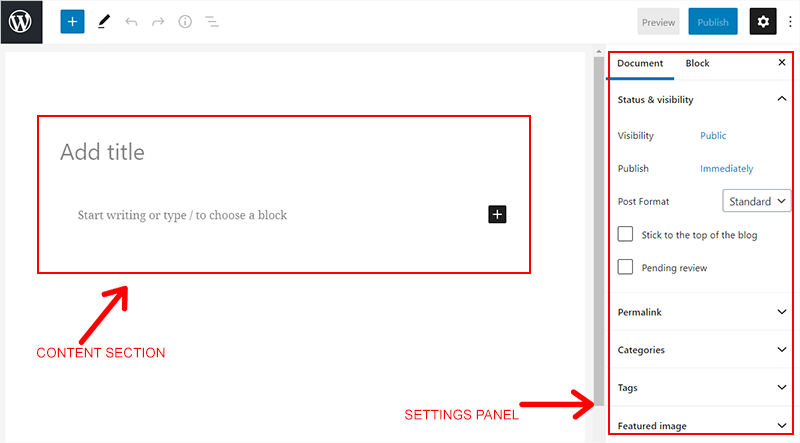
You can add all the content you want in your article in the Content Area in the middle. And you can use the settings panel on the right to edit and change how it looks.
The ‘Add Title’ area is for the post title. We’ve added ‘Your First Post’ as a sample post for the demo.
Just below the title, you can start writing your content, adding headings, and images, and making your article interesting. As you start writing, you’ll see it as a Paragraph block in the settings panel. This means you are currently working on a paragraph block.
a. Content
If you want to change it to anything else, then you can type ‘/’ in the text area.
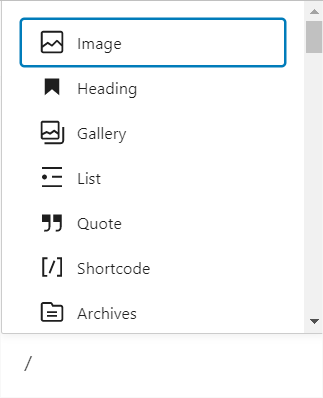
It will give you a drop-down box of every available block on the editor like page break, image, video, heading, and more. Clicking the small ‘Plus sign’ will allow you to do the same.
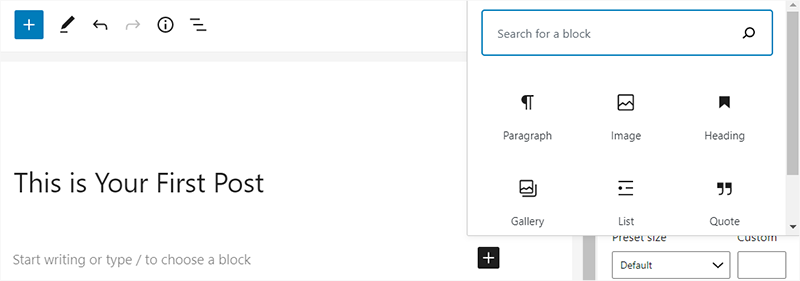
- If you want to add images to your post, then you can add the image block. Click on the ‘Upload’ button or ‘Media Library’ and then you can drag and drop images from your computer or choose the already existing image in your WordPress library.
- Separating your content by headings is possible by simply adding a Heading block which allows you to choose the heading from H1 to H6.
- There are other various blocks that you can add according to your requirements.
You can also easily move to another block by ‘Enter’ or choose where to add the block in the content by selecting blue ‘Plus’ in between contents. You can again choose what kind of block you want to add.
If you’re proficient in coding, then the WordPress block editor also allows you to add custom HTML and code to further customize the layout and how each block works.
It offers a wide range of choices like common content blocks, formatting, layout elements, widgets, and embeds. You can easily add these different blocks and widgets together in your content to make it interactive, interesting, and informational.
b. Publishing Post
After you’re done with adding all content elements and changing up the settings from the settings panel, then you can move on to configuring Documents Settings. Go to the Document tab in the settings panel on the right.
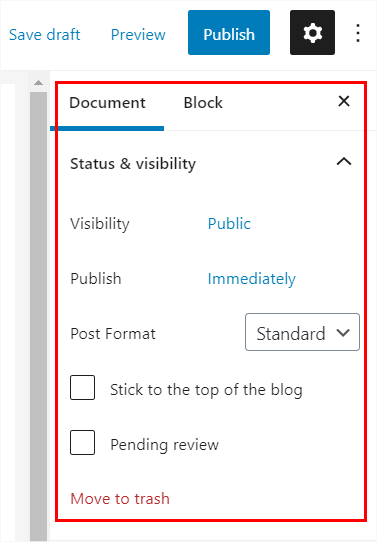
You can see lots of options to configure and manage your current post. It also gives you the option to make it visible to the public, your site admins, and editors or have it protected by a password.
You can also choose when to publish the content and schedule it according to your needs. Adding your featured image, editing your permalink, and many more are also available in the Document settings.
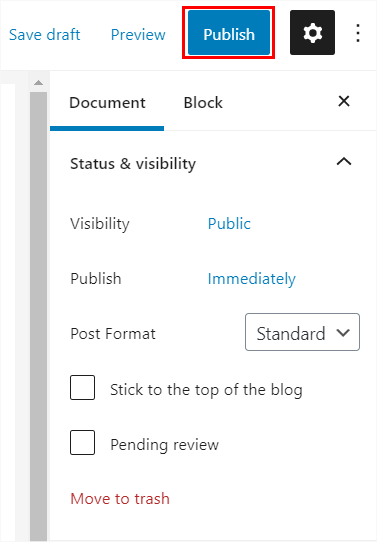
After you have finalized everything, you click the ‘Publish’ button to immediately publish or schedule publish the content.
c. Editing Post
You can view all your posts from the ‘Posts >> All Posts’. If you need to update the already published article, then you can edit it from the ‘Edit’ link below the article title.
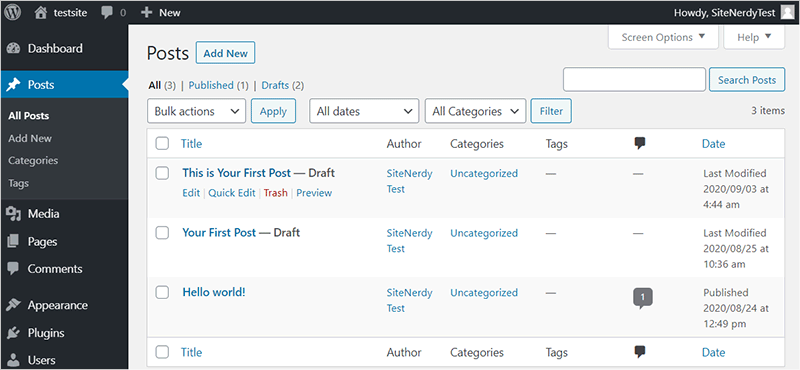
‘Quick Edit’ allows you to quickly edit the title and slug of your article. Changing its category, adding and removing tags, changing published status, and editing date is also possible using ‘Quick Edit’.
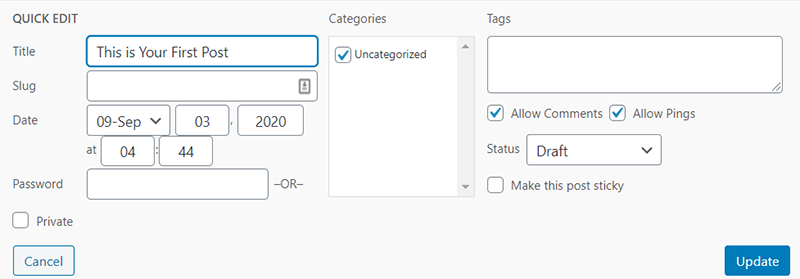
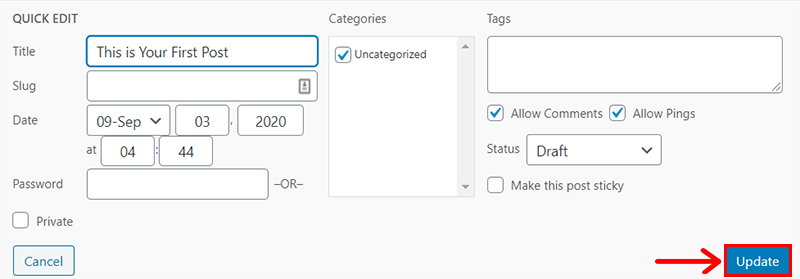
After you’re done with some quick and simple edits, click on the Update button to update the article with new information.
However, if you need to edit the article to optimize it or update it with new information, you can do that by the ‘Edit’ button. It takes you to the same page editor as adding blog posts.
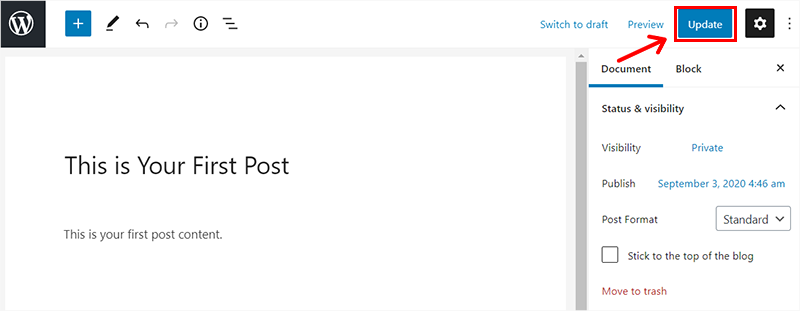
You can easily change up any information and ‘Update’ it after you’re done or save it to draft.
iii. Adding Pages
Pages help give information about the company and allow you to connect with your visitors easily. Most websites have similar types of pages on their site like the About page and the Contact page. These are probably the most important pages on a site.
You can easily add these pages by going over similar steps as adding posts.
Go to the Pages>>Add New tab from the dashboard.
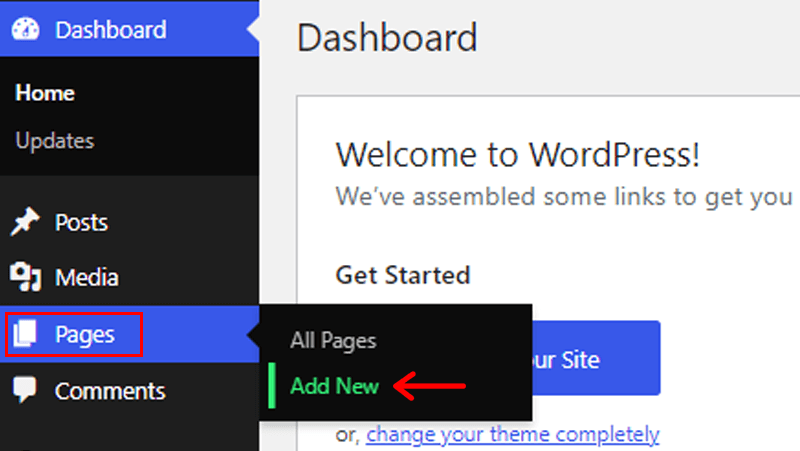
You’ll be taken to the block editor and you pretty much follow the same steps as adding posts to make your pages. Firstly, you can start by adding a title and insert everything you want with the help of specific blocks.
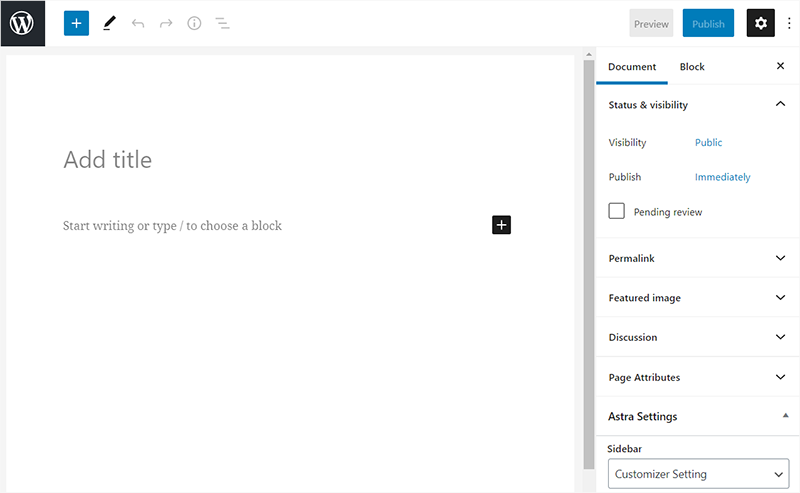
Similar to adding posts, after you’re done making your page, you can publish it straight away or have it scheduled. You can also change the visibility to public or private.
Creating a Professional Homepage
After you create the other pages of your website, your homepage should be made up to mark. For that, it involves multiple steps. Since we’re taking reference from a popular blog, so accordingly let’s create a homepage.
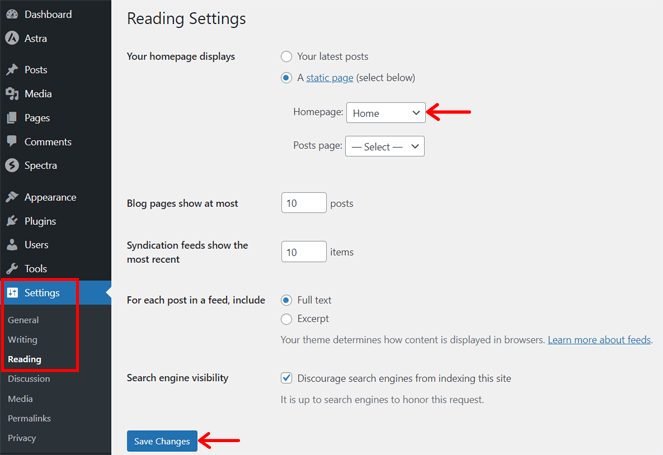
For that, first, create a new page and name it ‘Home‘ following the steps we mentioned before. Then, you must specify WordPress that this is the main page to load when people open your blog. For that, open ‘Settings > Reading‘, pick the Homepage option as Home, and click ‘Save Changes‘.
Adding a Navigation Menu
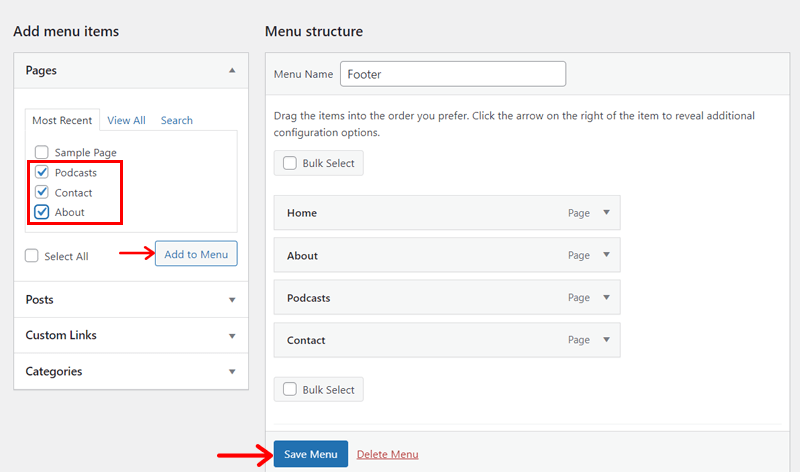
First, you must open the ‘Appearance > Menus‘ option on your dashboard. There, click the ‘create a new menu‘ option. Now, add the menu name ‘Footer‘ and select the display location as ‘Footer‘ for navigation on the footer area. Lastly, click ‘Create Menu’.
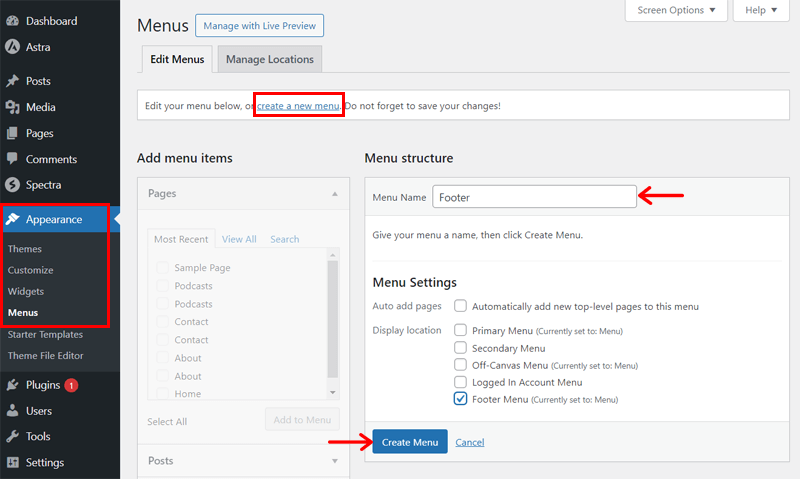
Following that, select the pages to include in the navigation from the menu items section and click ‘Add to Menu‘. Then, press ‘Save Menu’.
Forming Blog Header and Footer
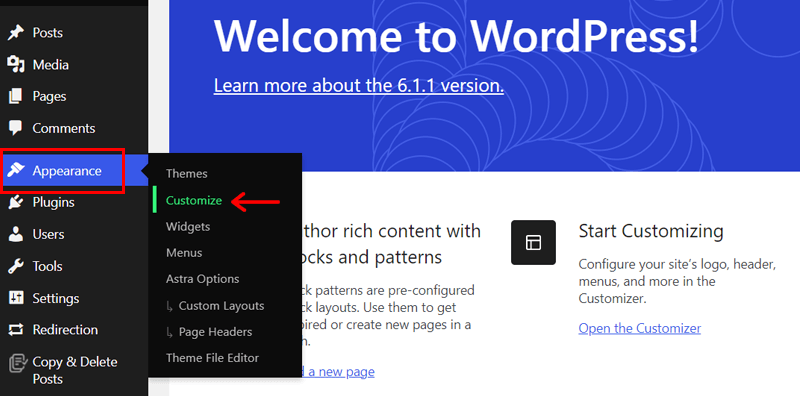
Once your navigation is ready, you can navigate to the ‘Appearance > Customize‘ menu. This opens the WordPress customizer.
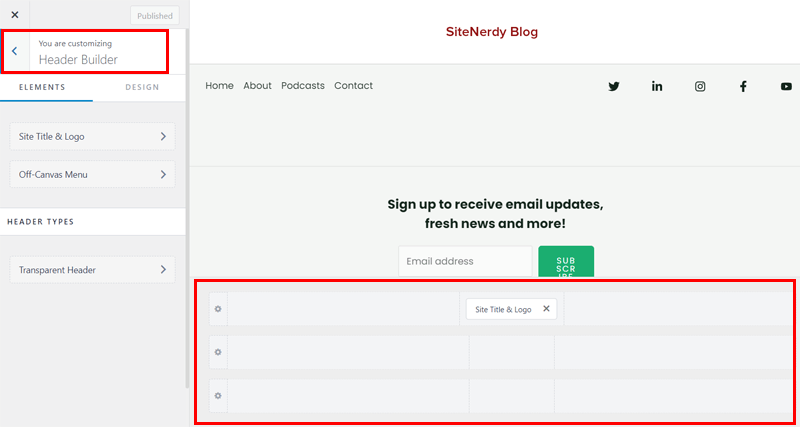
Afterward, click the ‘Header Builder‘ options by Astra. Now, on the bottom, you’ll find the builder items. As per the need, we require the site logo and title only on the header. So, keep that and remove others.
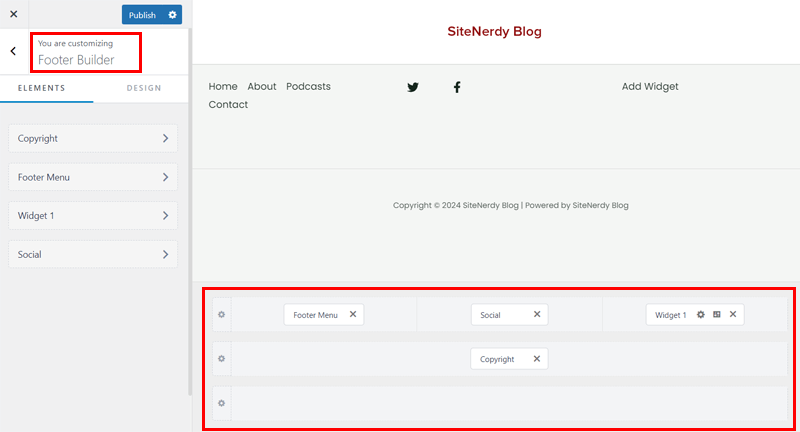
Similarly, open the ‘Footer Builder’ and adjust the widgets as required. For instance, keep 3 columns in the main row and add the footer menu you created. Besides that, click the ‘+‘ icon and add the social widget that comes with your template. Lastly, insert an unused widget at the end.
Then, keep the copyright widget in a row below in the center.
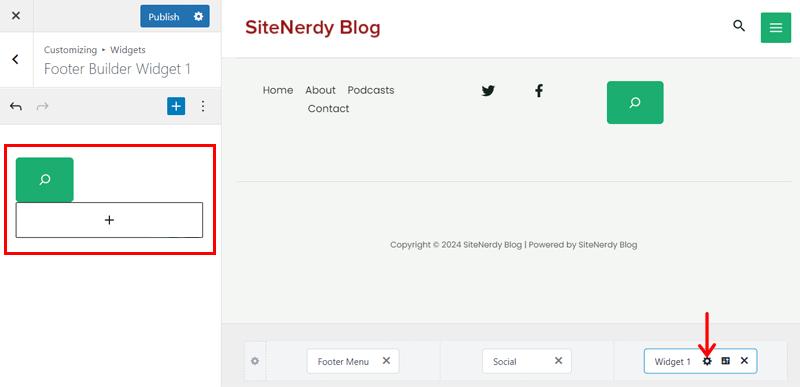
Now for the unused widget, which is actually for the search option, click its setting icon and move forward to create the widget. On the miniature WordPress editor, click the ‘+‘ option and add the ‘Search‘ block. Also, customize it to meet your requirements.
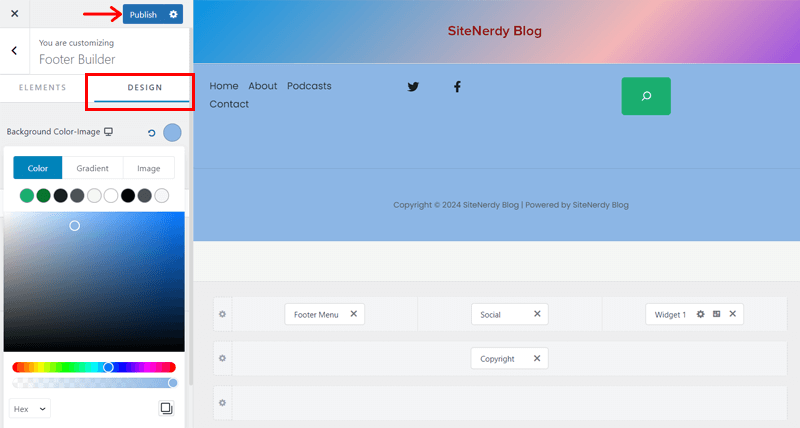
Soon after, you can customize the header and footer, for instance, by changing the color. Here, the screenshot shows the same for the footer. Just open ‘Footer Builder > Design‘ and pick the color. Once you complete it, hit ‘Publish‘.
Editing the Body Section
Now, go back to your dashboard and open your Home page. But before that ensure you have published some blogs that you want to show on a dynamic homepage.
Here, all you need to do is insert a query loop and adjust it according to your liking. So, click the ‘+‘ option in the top bar and search for the ‘Query‘ loop. Click on it and select ‘Start Blank‘.
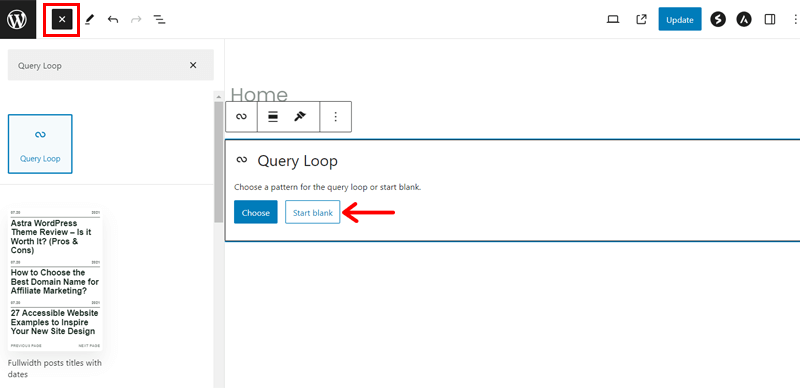
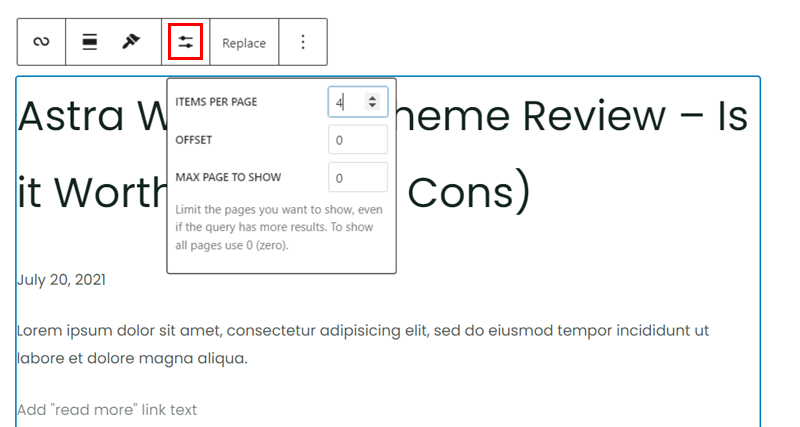
Among the given layouts, select ‘Title, Date, & Excerpt‘. Then, select the entire block and open the display settings on its bar. There, choose how many blogs to show on the homepage.
If you want to add elements to a post separately, then you can do that. Just add a query loop and limit it to 1 post. Then, add the elements.
For example, let’s add videos to some posts as in the real blog. Just add the ‘YouTube‘ block, insert the video link, and click ‘Embed‘.
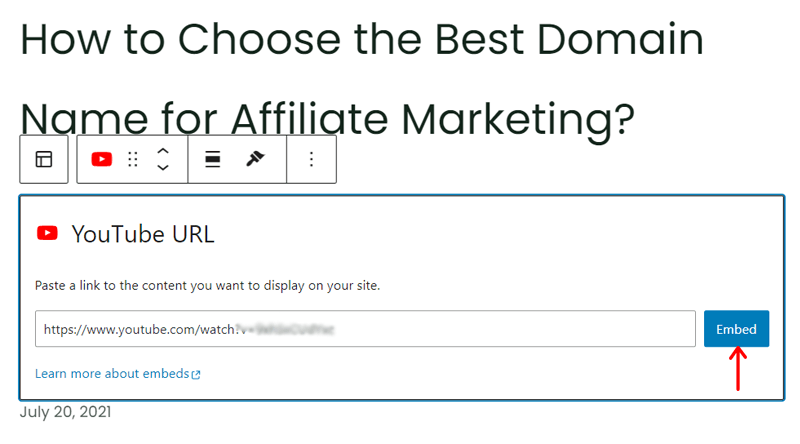
In addition, you can customize the posts, like changing the background color. The options are present in the right-side block settings. Lastly, click ‘Update‘.
Here’s a preview of the new homepage of the blog.
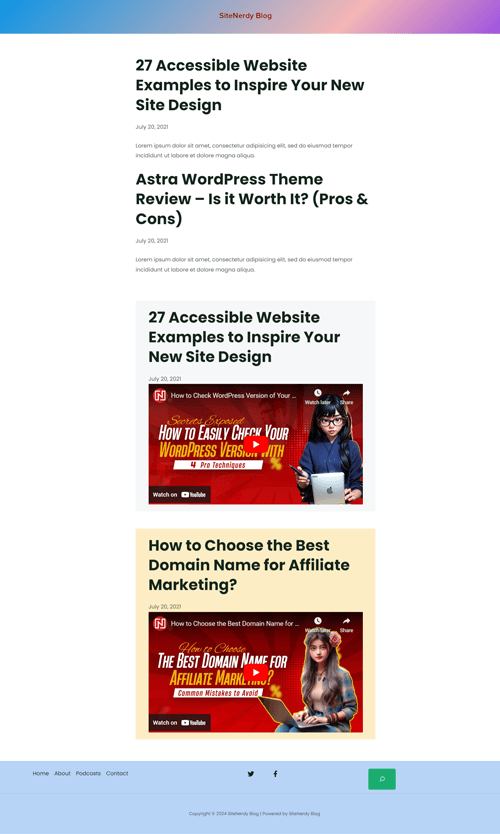
That’s all on the designing part of how to start a WordPress blog.
iv. Adding Widgets
Widgets are the small snippets of code that are used to add features to your website’s widgets area. Generally, websites have a footer and sidebar as their widget areas where you can add different widgets to make your site easy to use.
WordPress allows you to easily add some of the important widgets like a search bar, calendar, and more. Some of the themes and plugins come with different widgets that can help you increase the functionality of your blog.
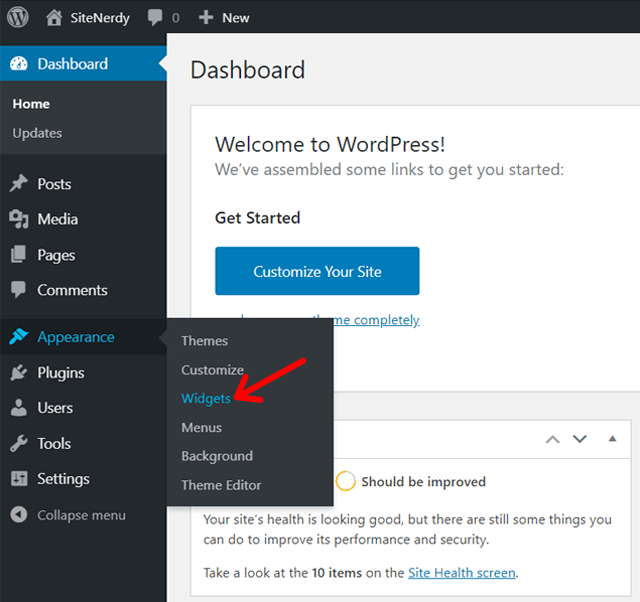
We already showed you doing so from the header and footer builder. But you can also do that from the dashboard. Firstly, go to Appearance > Widgets from the WordPress dashboard.
You can see all the available widgets on the left side and all the available widget areas on the right side. These widget areas often differ from one another according to the theme you’re using. As for Astra, these are the widget areas you can add widgets in.
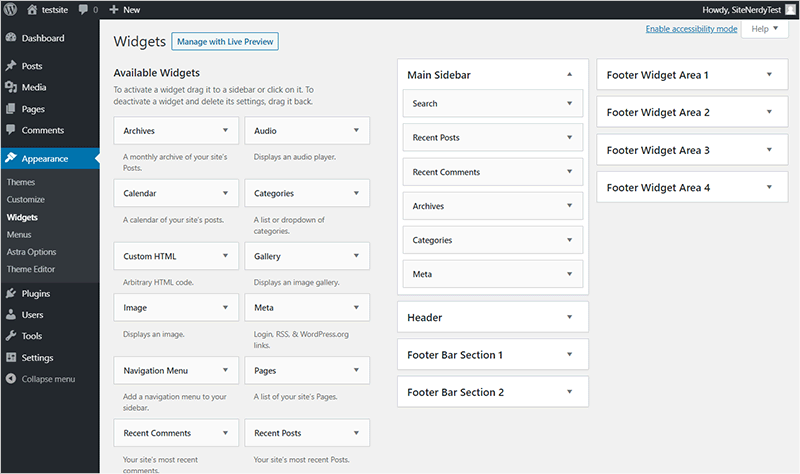
If you want to add any widgets like a search bar, audio player, etc. you can drag and drop it to the widget area.
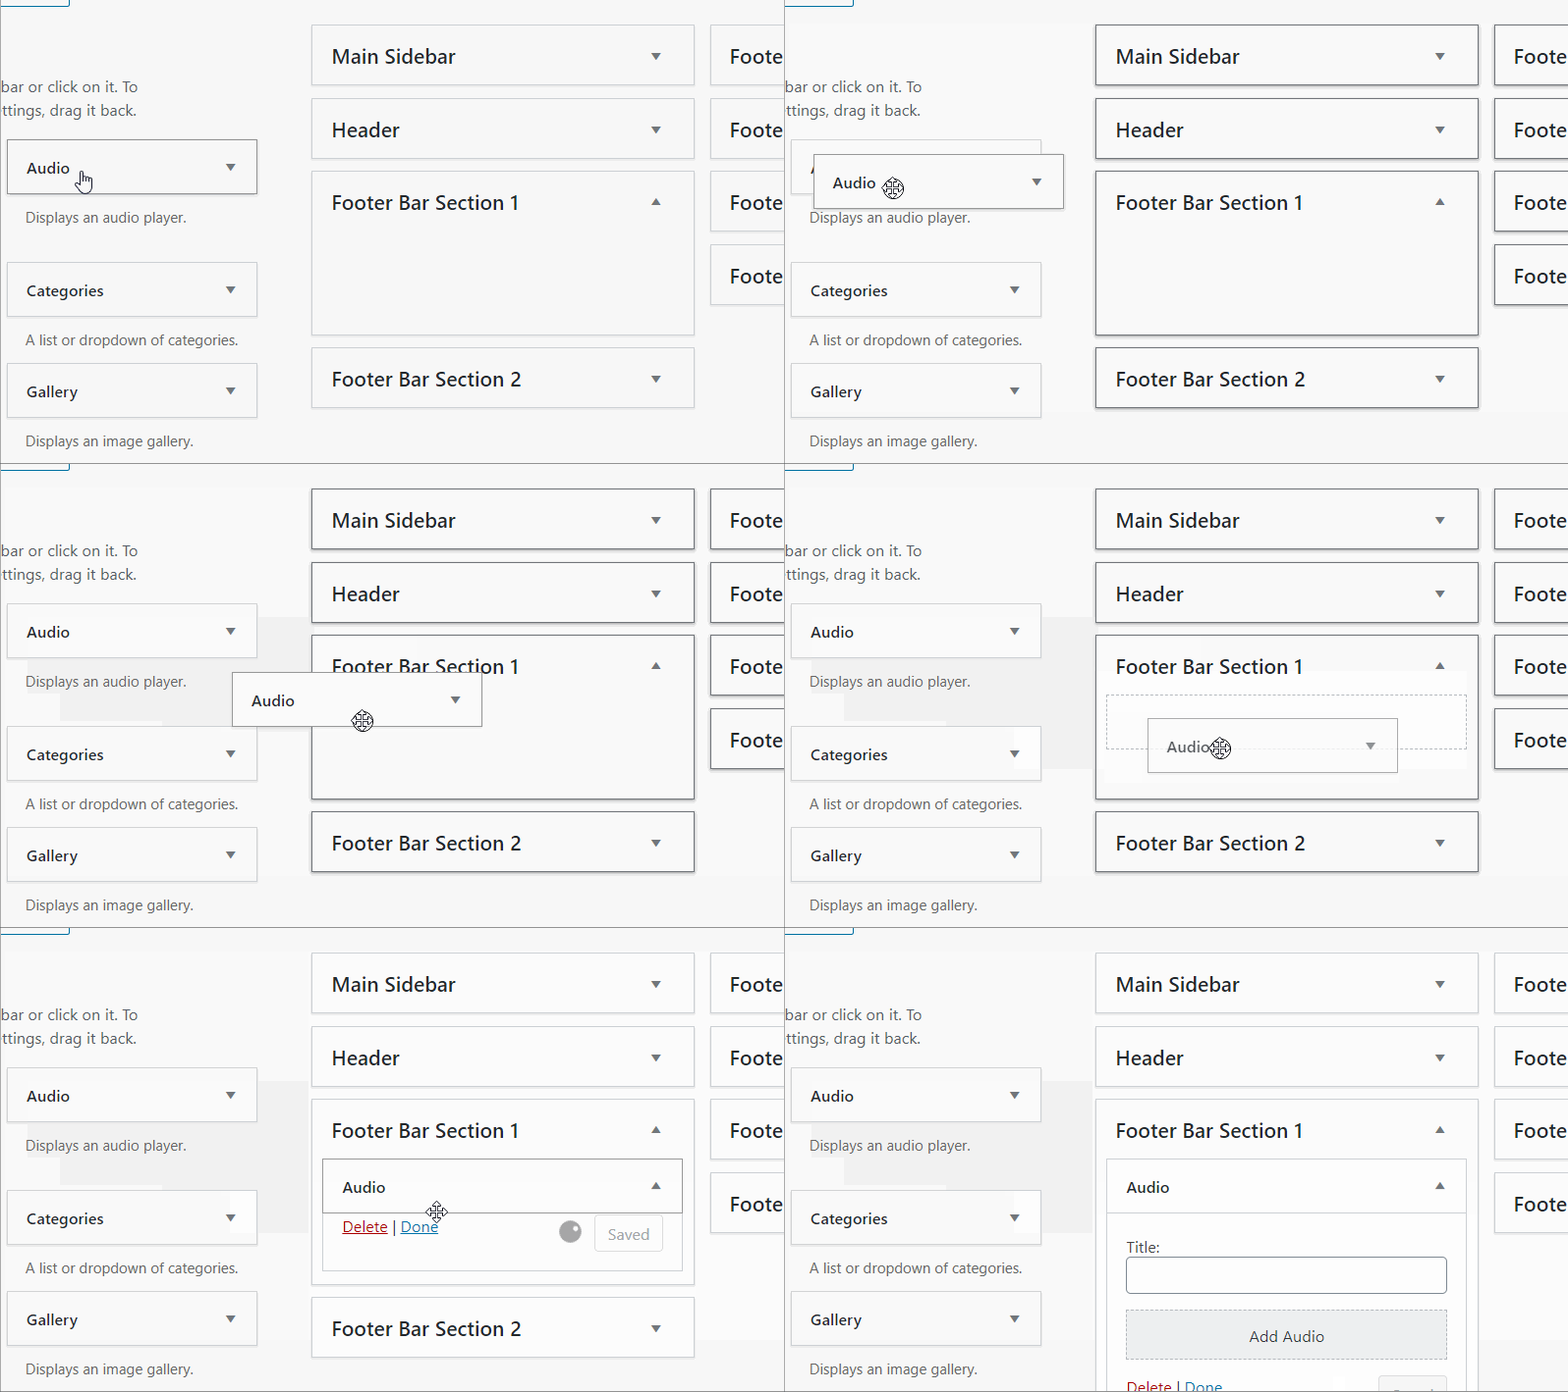
Or, you can also click on the particular widgets, for example, the audio player widget, and select where you want to add it. Then click on ‘Add Widgets’ to add it.
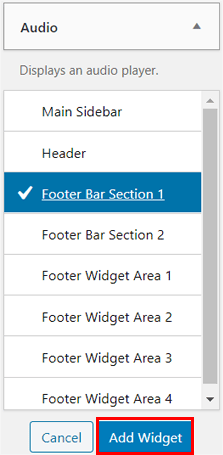
You can easily add any widgets you want to the available widget area.
Step 6. Configure Your WordPress Settings
It’s wise to configure your WordPress according to your needs, preferences, and functionality. Proper configuration allows your site entities to function better and set how they appear to your visitors.
WordPress offers extensive configuration ability which you can access from its settings. There are some settings you might want to configure if you’re just starting. We’ll be talking about them but you can check others out yourself or play around with them in your backup.

Firstly, you can access all the configurations for your WordPress under ‘Settings’ from the WordPress dashboard.
i.General Settings Configuration
Changing your site title, tagline, or admin email is all possible from the general settings. To configure them, you just have to go to ‘Settings>>General’ from the WordPress dashboard.
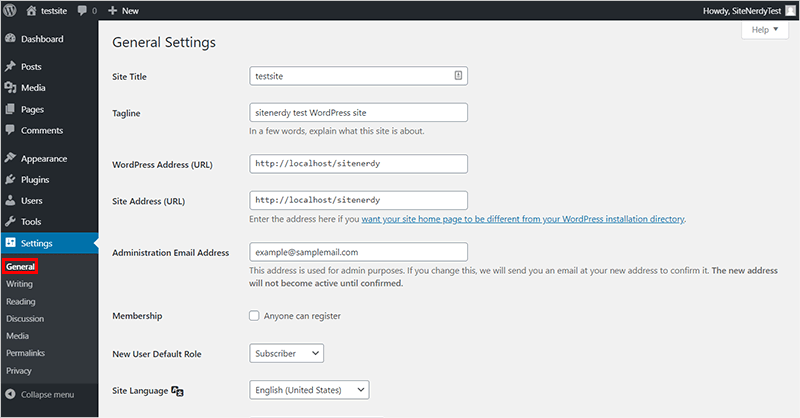
You can make lots of major changes to your site from here. Things you can do from here are:
- Change site title and tagline.
- If you’re changing your domain name, you can do it from here. However, if you don’t have a registered domain name, then it might crash your site and we don’t recommend this.
- Configure membership registration authority and new members’ type.
- Change your time zone and language.
All your changes will be saved after you click on the ‘Save Changes’. We suggest you go through all the changes carefully and not meddle around with it much before you save the changes. Having the wrong configuration can crash your site so you have to be cautious of changing these settings.
ii. Permalink Configuration
Permalink is a unique address for particular posts on your blog site. Every post and page have different permalinks which work similarly to web addresses as an identity to the post.
Permalink has a domain name of your site before a unique address which is called a slug. For example, in our site sitenerdy.com/how-to-start-a-wordpress-blog/, the slug part is /how-to-start-a-wordpress-blog/ and domain is sitenerdy.com.

You can easily edit your permalink in WordPress. Firstly, you have to go to ‘Settings >> Permalink’ from the WordPress Dashboard.
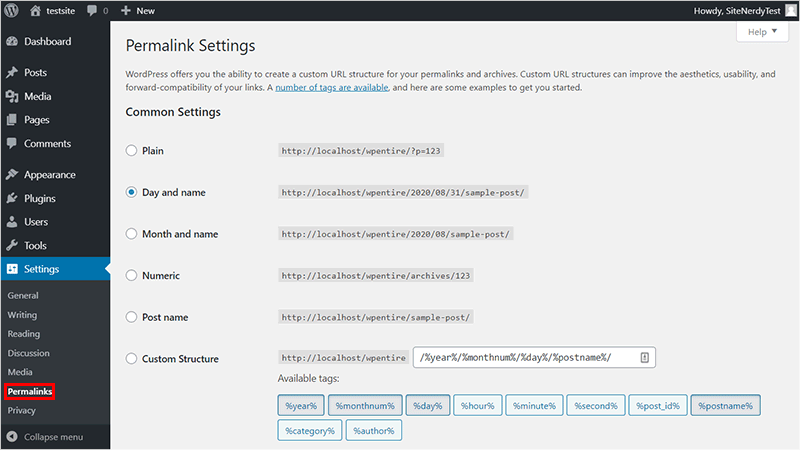
WordPress allows you to choose the display pattern for these slugs and edit them accordingly. They have different options for you to choose from like displaying slug with:
- Post ID
- Day and post name
- Month and post name
- Post number
- Post name
- Or custom
Permalink readability is important for good Search Engine Optimization (SEO) too. Your visitors and search engine can easily access and understand your content using a readable permalink.
Also, going with a post name format to display your permalink helps your site have good SEO and rank better in search results. Therefore, you have to be cautious about your permalink for better SEO.
After you are done, ‘Save Changes’ will commit your change. However, you can still change your slug for each post before you publish it.
iii. Search Engine Visibility Configuration
It’s important for your blog to always have better search engine recognition and visibility. However, when you’re just starting your blog and have not properly designed or ready for publishing, you must disable the visibility.
This visibility configuration is available from the ‘Settings >> Reading’ section in WordPress. You can search for the ‘Search Engine Visibility’ option and discourage the search engine to index your site.

You can also configure what your site homepage is and how many posts can a Blog page display from the Reading section.
After you’re done with all your configurations, clicking ‘Save Changes’ will commit those configurations.
These are the most important configurations you have to check while you’re getting started with your WordPress blog. But there are also other configurations that you can check and change according to your requirements.
- You can manage all your comment section settings including approval, display name, and others in the ‘Discussion’ section of the ‘Settings’ tab.
- Change the default post category and format in the ‘Writing’ section.
- Image sizes and scaling in the ‘Media’ section.
- And change your privacy policy in the ‘Privacy’ section.
Going through those settings will help you uncover all the functionality so we recommend you go through it once.
Step 7. Best WordPress Plugins and Tools for a Blog
When you’re just starting with your WordPress blog, your blog will have the least number of functionalities. However, WordPress comes with a wide range of plugins that you can use to add functionality and features to your blog.
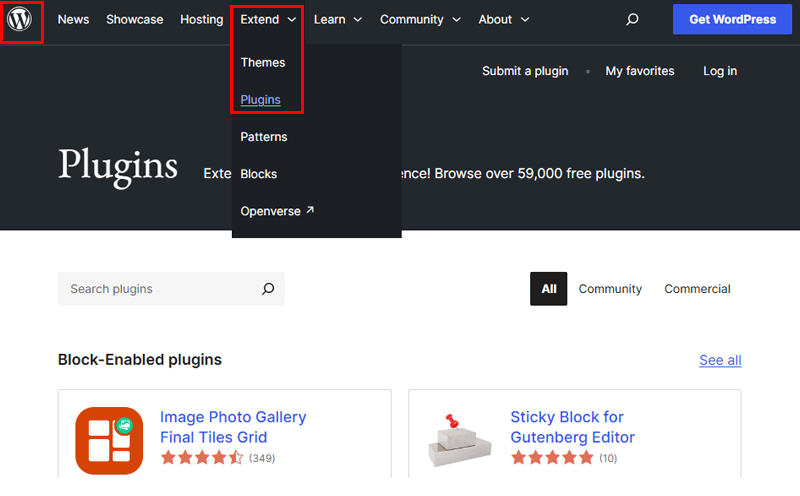
Those WordPress plugins are a piece of software that adds features or extend features of your WordPress site. Every plugin comes with a different set of features that you can add to your blog.
Some plugins help you optimize your site for better SEO, security, speed, and more whereas some extend your design capability and function. For example, WooCommerce plugins enable you to add eCommerce features to your blog.
i. Best WordPress Plugins
Some of the best WordPress plugins and tools that you can add to your blogs are:
1. Rank Math
Ranking better in search engine results helps your site gather more traffic and grow. To achieve good optimization in our blog content, you can use Rank Math, one of the most popular all-rounder SEO WordPress plugins.
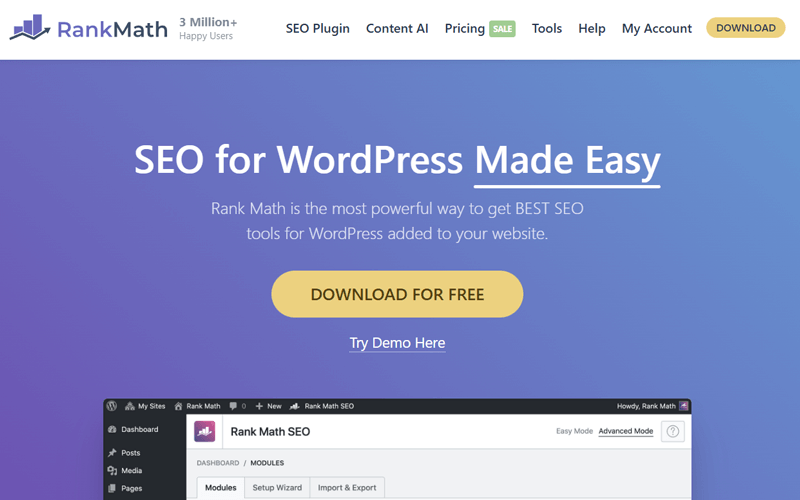
Rank Math offers a simple setup wizard to configure the SEO settings of your blog. Further, it contains many modules for site optimization. For instance, it lets you optimize the content based on several keywords, adjust rich snippets, and more.
Pricing: Free and Paid versions are available. The premium plan starts at $5.75 per month.
Learn how to use Rank Math from our complete Rank Math review.
2. WP Rocket
WP Rocket fulfills your blog’s speed and performance demands as a WordPress caching plugin. It comes with features like database cleaning, lazy loading, Domain Name System (DNS) perfecting, etc.

As a result, it helps in the improvement of SEO, impressions, and conversions. This is the most vital thing for your blog, which is possible by using this caching plugin.
Pricing: Free and Paid versions are available. The premium price starts at $59 per year.
Learn how to begin using WP Rocket from this documentation.
3. Wordfence
We all know how cyber attacks are on the rise. Your WordPress blog is also vulnerable to many cyber attacks especially if you don’t have any security measures implemented. Luckily for us, WordPress has many different security plugins that you can integrate into your blog.

Wordfence is one of the most popular WordPress security plugins that protect your blog from attacks like forceful login, spam flood, and more. That’s because of features like the malware scanner, firewall, and login security.
Pricing: Free and Paid versions are available. The paid plan begins at $149 per year.
Find the process of utilizing this plugin on the Wordfence documentation.
4. WooCommerce
Official eCommerce plugin for WordPress, WooCommerce powers over 40% of all online stores on the web. If you’re starting a blog relating to eCommerce, then WooCommerce will provide you with all the eCommerce features that you need.
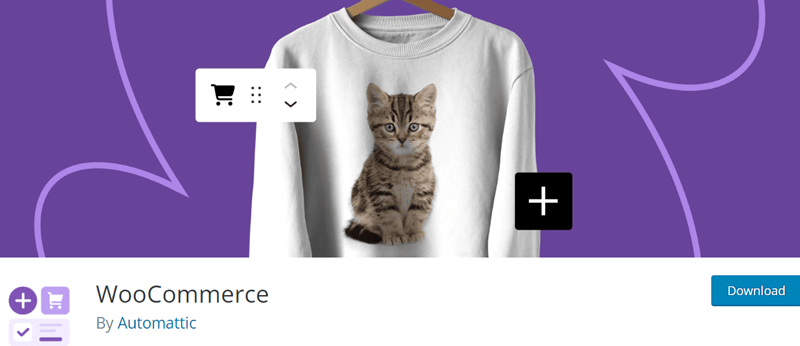
It allows you to add features like cart, showcasing your products, and many more in your blog. It also works with most of the WordPress themes and is very easy to install.
Pricing: Free with multiple freemium extensions
Learn what WooCommerce is and how to set up a WooCommerce store here!
5. Akismet
Spamming is sending unwanted and unsolicited messages in bulk. Every kind of blog or site is prone to spamming in the form of comment flooding or unwanted advertising. It can really affect the speed of your blog and user experience for the visitors.
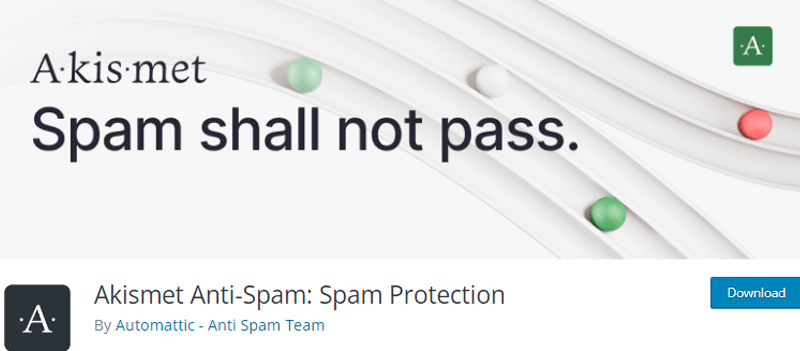
Therefore, you need to deploy plugins to control it and we suggest you go with Akismet. It is a free anti-spam plugin for WordPress. It checks the comments and form submissions on the site and filters out any spam or malicious content.
Pricing: Free for personal use. The premium plan starts at $9.95 per month.
Here’s a link to its resources for easily start using this plugin.
6. UpdraftPlus
There is always a chance of loss of data due to an accident or malicious attack. You always have to be prepared for the worst situation to not let those accidents hamper your efficiency. So, it is important for you to periodically back up your blog and avoid any accidental deletion of data.
For this purpose, UpdraftPlus is one of the most popular and loved WordPress backup plugins. It can easily backup all your blog files in a remote or cloud location. You can also easily restore them in no time and get back to work.
Pricing: Free and Paid version are available. Premium starts at $70 per year.
Learn how to backup your website from this plugin here!
7. WP Forms
Your blog must have different types of forms that the users can use to communicate with you or share their feedback. Forms like contact forms, feedback forms, subscription forms, etc encourage visitors to share their feedback or connect with you.

And, you can use WP Forms, which is one of the best WordPress contact form plugins to add those forms to your blog. You can easily make those forms using simple drag and drop features. Adding elements like checkbox field, combo box, sliders and more to your form is easy too.
Pricing: Freemium. Premium starts at $49.5.
Here’s the link for our guide on how to create a contact form using WPForms.
8. MonsterInsights
MonsterInsights is a WordPress analytics plugin that helps you grow your business. Basically, it integrates with Google Analytics to provide insights into your blog within the WordPress dashboard.

Moreover, it points out the metrics for your pages, affiliate links, forms, and other sections of the blog. Further, you can add notes based on the analysis you understood when using its features.
Pricing: Free. The premium plan starts at $99.5 per month.
Find the guides on this MonsterInsights documentation page.
9. Imagify
It’s important to add images and media to your blog to make it interesting and fun to read. However, adding a large size image can affect your site load time. However, Imagify helps you compress the images to make your site load faster.
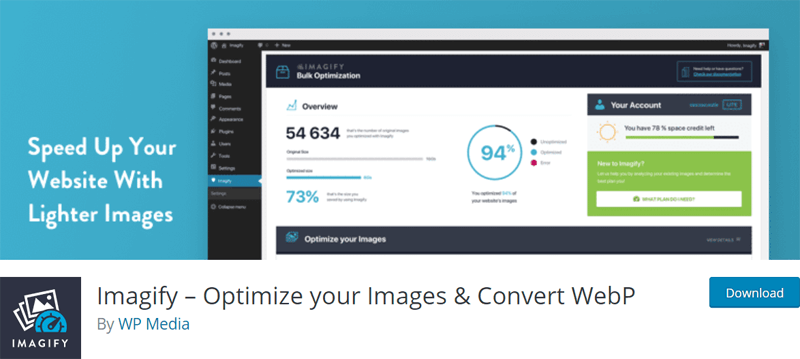
Imagify is a WordPress image compressor plugin that automatically compresses your images and eliminates the manual hassle of compressing. It also doesn’t reduce the quality of your images while compressing and optimizes it using advanced compression algorithms.
Pricing: Free and Paid versions are available. The paid plan begins at $4.99 per month.
Check out its documentation if you want to learn how to use this plugin.
10. Mailchimp for WordPress
Mailchimp for WordPress is an email marketing plugin for WordPress sites. It lets you grow your email list from your forms. These forms can be created by this plugin or any other tool you use.
Moreover, you can create any type of form to collect email addresses. That can be login, sign up, contact, etc. All you need to do is use its block to insert the form into your blog pages.
Pricing: Freemium plugin. The pro plan starts at $70 per year.
Here’s the link to its documentation if you want to learn how to use it.
ii. How to Install WordPress plugins
These plugins bring lots of different functions and services to the table. So, how do you get the best of the functionalities from them and install them on your WordPress blog? That’s what we’re going to do here.
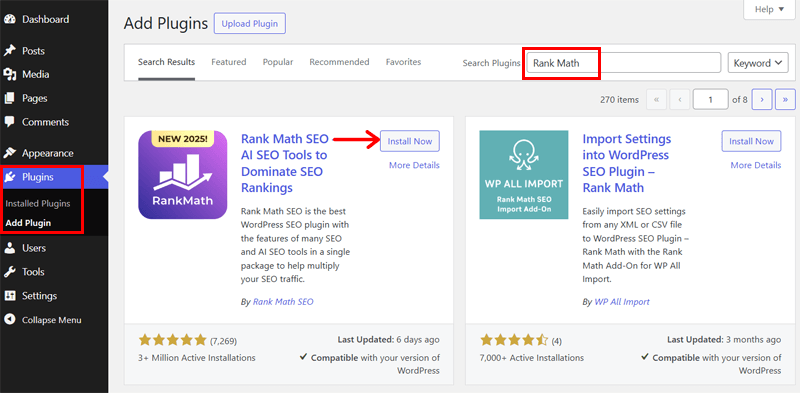
To install your plugins, go to ‘Plugins >> Add New’ from your WordPress dashboard.
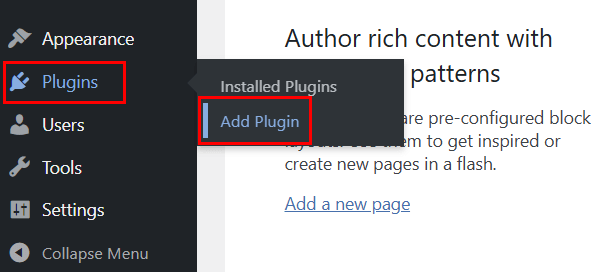
You’ll be able to see every WordPress plugin from the official WordPress repository. You can search for any free WordPress plugins from its repository that you want to install.
And, click on ‘Install Now’ to start the plugin installation.
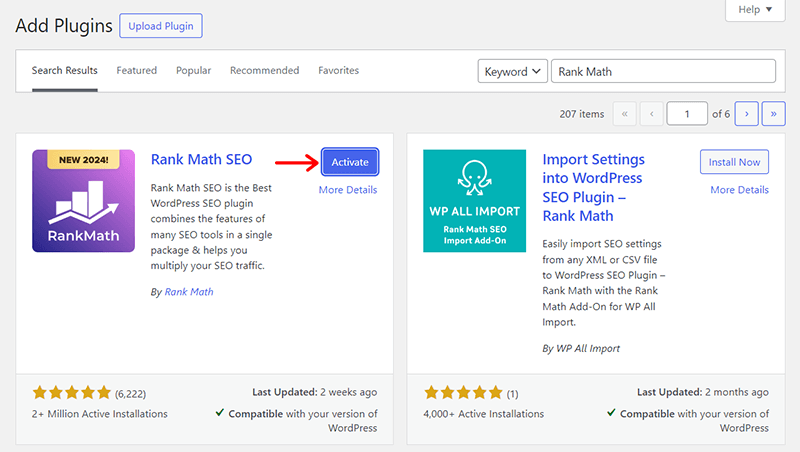
You can click on ‘Activate’ to activate the plugin right away.
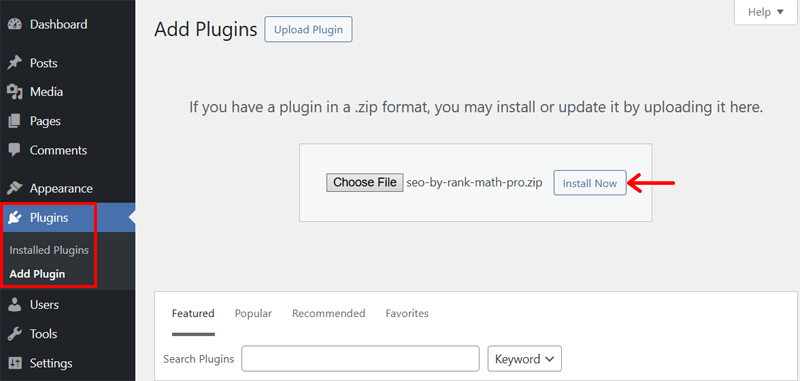
However, for premium or custom plugins, you need to upload the plugin from your system by clicking on the ‘Upload Plugin’ button. After that, you can follow the same step to install it.
Now that you have them installed, you can activate them or see what plugins are already installed from the ‘Installed Plugins’ tab in the ‘Plugins’ option. You’ll see every installed plugin and choose to either ‘Activate’ them or ‘Delete’ them.
Step 8. Optimize Your Blog for Better SEO, Security & Speed
While having a slow-loading and unsafe website is scary to think about, it can especially affect you when you’re just starting. For better recognition and good search engine ranking, your site must have proper SEO, security, and performance optimization.
Although having an elegant design and consistent content is important, you also have to be cautious about how your site performs for your users. Users visiting your site expect your page to load fast, perform better, and be secure.
Moreover, search engines love a site with optimized speed and security and rank you higher in search results. This is crucial to get more traffic and grow your site so optimizing your blog for better SEO, security, and speed should be on your top priority.
So how can you optimize your blog to not lose out on good search engine ranking? Well, there are some things you have to follow.
i. Use Keywords
After you know what you’re writing about and what is your targeted keyword, you have to include it often and have a good keyword density. Having a good density of keywords can make your content stand out. Besides, search engines also love them and rank you better.
Find the best keyword research tools on this list. Among them, we recommend using Semrush as it contains a set of tools for multiple purposes aiming to improve your blog’s SEO.

Once you collect the keywords, you must include them in the most impactful places like:
- Title
- Headings
- Introduction
- Conclusion
- Meta description and slug
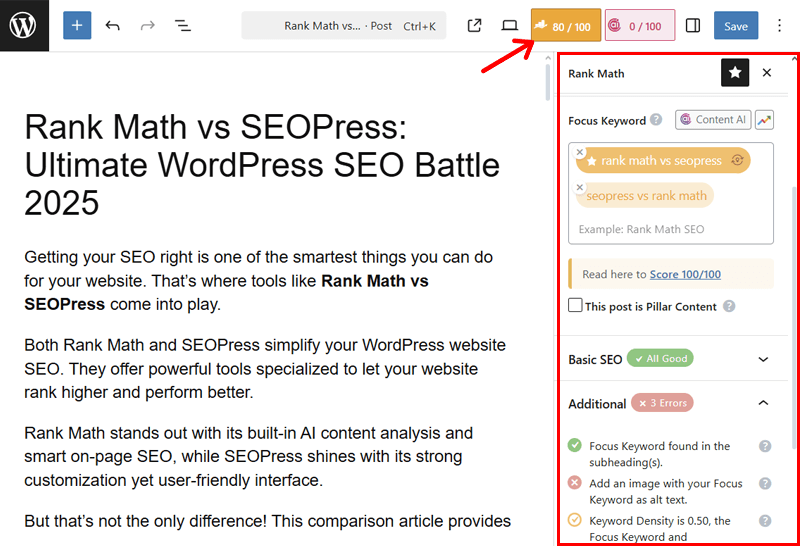
When you’re using SEO plugins like Rank Math, it lets you utilize your focus keywords in the right places. The screenshot below shows the keyword count on a blog and how much it should be.
Learn how to use Rank Math for optimizing the content in this Rank Math review.
ii. Optimize Your Images and Media Files
If you’re not optimizing your images, then it often will slow down the site and take a huge amount of time to load. Optimizing your images and media files can take away the load time when users visit your site.
Most importantly, you should upload your image files in a PNG or JPG format. And, you should also limit your usage of Gifs as they are larger and slow down your site. Finally, try to host your media on a third-party service like YouTube and SlideShare.
For example, image optimization can be possible using online tools like TinyPNG (for PNG format). Otherwise, utilizing the previously mentioned Imagify plugin is also reliable. This will automatically compress the images used on your blog.
Here’s a list of the best WordPress image optimizer plugins.
iii. Include Keywords in Media
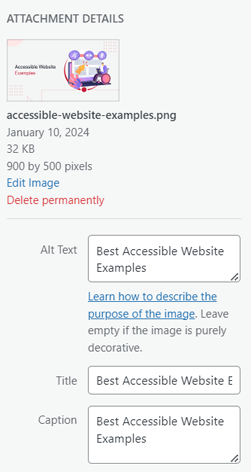
Including important keywords on your images and media’s filename and alternate text can help gather good keyword density. Similar to the 1st point, it helps you rank up keywords and works as a good search engine optimization.
iv. Use CDN
If possible, it’s important to use a Content Delivery Network (CDN). Its main function is to help your server files load faster by storing them in the cache. Therefore, using CDN for heavier media and images can help you increase your site load time considerably.

Learn why we need CDN here. Also, find the best CDN services for WordPress.
v. Go for Dedicated or Managed Hosting
Although shared hosting is cost-efficient, it can have an impact on your site load time and performance in the long run. If your web host’s server resources are all clogged up, your overall site speed will be considerably slower.
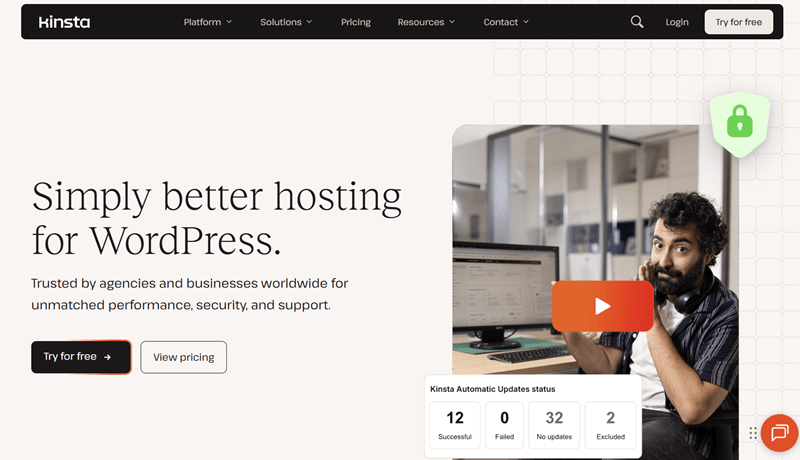
In addition, you might also be vulnerable to a security risk if any other site in shared hosting is attacked. As your web host is not responsible for the security, this can especially have a huge impact.
Here’s a detailed guide on what managed hosting is.
vi. Implement Cloud WAF
Web application firewall (WAF) secures your site by filtering different spambots and malicious agents trying to infiltrate your blogging site. These spambots can also clog up your server resources which can slow down your performance.
However, implementing a WAF can help you avoid it and optimize your blog’s security and speed. Hosting platforms like Clioudways come with intelligent WAF functionality. So, you just need to configure them for a secure blog website.
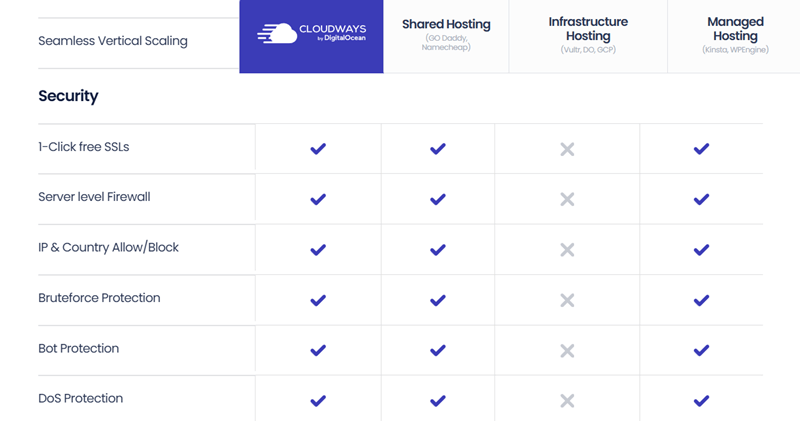
Here’s how you set up WAF on your blog host when using Cloudways.
vii.Using the Best WordPress Optimization Plugins
WordPress offers you a wide range of free and premium plugins. Its free plugin directory has plugins for speed, security, and SEO optimization plugins. Using authentic and popular WordPress optimization plugins can help optimize your blogs to work faster and have better SEO-optimized content.
For more information about SEO optimization, check out our article on ‘How to optimize your site for better SEO’. Also, learn how to optimize your blog’s speed.
Step 9. Finalize Your WordPress Blog for Deployment
Once you have designed your blog, added basic functionality, added blog posts, and configured the required settings, then you might think you are ready for deployment. However, there are still some small steps you have to follow before you deploy your WordPress blog.
You have to finalize your blog by refining and correcting small things that can have a big impact on the quality of content. Things you have to cover before you deploy your blog are:
i. Proofread Your Content
Although you write your content with full concentration and try to make the least mistakes, some faults are bound to go unnoticed. However, these small faults can affect your content quality. This is why proofreading is crucial.
Re-reading your articles, using different tools to check your grammar like Grammarly, or consulting with an expert is important to make your content as flawless as possible. You should always proofread your article to avoid any unnoticed mistakes.
ii. Check Images
Images break off blocks of paragraphs to make your site look interesting and fun to read. However, in this process, there are high chances of accidentally deleting or adding the wrong images. Adding images without optimization and of big dimensions can also impact your blog.
It can make your site load slower and reduce your blog quality. Therefore, you have to always recheck your images and optimize them if possible. Luckily, you can use many different plugins to optimize your images or minify them like Smush, Imagify, etc.
You also have to check for your image titles and alt tags before you publish your site.
iii. Test Responsiveness and Mobile Scalability

To capture a large number of audiences, your blog must work well with a wider range of devices. More than 50% of internet lurkers are mobile devices users. If your blog is not responsive and lacks mobile-friendliness, then you’ll be missing out on a huge number of potential visitors.
Having a responsive and mobile-friendly blog not only increases your range but search engines also prefer those sites. Therefore, it is crucial your blog is responsive and works well on a variety of devices.
You can easily check for the responsiveness of your blog by resizing your browser by narrowing and widening it. You can also use Google’s Mobile-friendly test to test the mobile-friendliness of your site.
Learn how to make a mobile-friendly website in this guide.
iv. Check Browser Compatibility

Your site should not only work on different mobile platforms but also on different browsers. If your blog lacks compatibility with those browsers, then you will be missing out on many audiences and potential traffic.
Although making your blog compatible with every browser out there might not be possible, you have to make sure at least the popular browsers like Opera, Edge, Safari, and more run your site perfectly.
Some sites and tools like Browsershots, Turbo Browser Sandbox, and more allow you to check your blog’s compatibility with different browsers.
v. Check WordPress Configurations
You must check all your configurations one last time before deploying your blog. Some of the configurations were done before finishing your blog so they might need chances. You can easily check them from the ‘Settings’ tab.
You also have to remember to turn the search engine visibility on which we turned off during configurations. Go to the ‘Reading’ section from ‘Settings’ and just untick the ‘Discourage search engines from indexing this site’. You also have to re-check all other configurations.

vi. Test all Links
It is recommended to provide sources of all statistical data or facts. And an easy way to do that is to link it to the source data. However, sometimes the link you provide might be invalid because of site migration or other errors.
You need to avoid those problems by rechecking all links in your blog before deployment. It is also recommended to often check links after you publish your article and blog.
vii. Test Speed
All the visitors prefer a fast experience when visiting a blog. Search engines also prefer faster and optimized sites and rank them better. So, you must test your blog speed and optimize it the fullest.
There are various tools you can use to test your blog speed like GTmetrix, Pingdom, and more. You can also use different performance plugins like WP Super Cache to make your site load faster.
Take the help of the best WordPress speed optimization plugins to optimize your blog speed.
viii. Check Backup
Finally, after you are done with every optimization and rechecks, you have to check if your site is backed up and secure. Having a proper backup means that you can come back to this point if any accident occurs.
You have to check if the backup is working and set scheduled backups for the future. There are many different plugins you can use to backup your site like UpdraftPlus.
Find all the other WordPress backup plugins here!
Step 10. Market and Advertise Your Blog
After you have deployed your blogs, you’re done with the production process. However, the process of running a successful blog doesn’t end there. You need to be able to gather traffic and grow your followers.
You can’t just deploy your blog and expect people to stumble upon it. Marketting and advertising your blog and content is equally important too. You need to be able to attract people to your blog first.
Moreover, for a starting blogger, it can be very confusing to gather an audience and visitors. However, we’ll be talking about some of the ways you can advertise and market your blog to gather the starting traffic.
i. Email Marketing
Email marketing is a very popular method of connecting with new audiences and gathering traffic for your blog. You can update new content, product, or update your blog which encourages more traffic by email.
Plugins like Mailchimp also help you run different email marketing campaigns. You send emails in bulk to the number of email addresses gathered by subscription or contact form.
ii. Social Media Marketing
Social media is a huge platform for people to communicate, try, and learn new things. Around 3 million active people are on social media like Facebook and Twitter. This huge number of active users means a huge potential for gaining traffic.
You can use social media to market and promote your blog to a wider range of audiences. You can promote your content and link your site to your targeted audience if you can engage and interact with them on social media platforms.
Get in-depth knowledge about social media marketing.
iii. Blogger Outreach
Reaching out to reputed or influential bloggers for collaboration, partnerships, backlink acquisition or guest blogging is a great way to advertise your blog to different audiences.
You will be able to present your blog to different audiences or other party’s followers. This can help you increase your exposure and be recognized by a wider range of people.
iv. Paid Marketing and Promotion
All the previously mentioned methods are mostly ‘free’ methods to market and advertise your blog. However, paid marketing, as the name suggests, costs you money depending on the promotions.
You can pay for your content to be promoted on different social media. Promoting your blog on social media can help get huge exposure. However, because of the huge number of social media users, it can be expensive to promote your blog.

You can also advertise your blog in search engines. Search engines place your blog at the top as an advertisement for related keyword searches. You need to pay per click (PPC) to market your blog. Although your site can get good traffic, with each click your cost also increases.
v. SEO (Search Engine Optimization) for Blog Growth
SEO (Search Engine Optimization) is a crucial factor in driving organic traffic to your blog. By optimizing your content for search engines, you can ensure that your blog appears in relevant search results, increasing visibility and attracting potential readers.
To be precise, you can focus on keyword research, on-page SEO, quality content, technical SEO, backlinks and authority to enhance your chances of ranking higher on search engines like Google. Ultimately, this drives more organic traffic to your blog.
vi. Content Repurposing
Content repurposing is a smart marketing strategy that involves transforming your existing blog posts into different formats to reach a broader audience. Instead of constantly creating new content, repurposing allows you to maximize the value of your existing work.
Few ways to do so are converting blog posts into videos, creating infographics, crafting e-books and guides, and so forth.
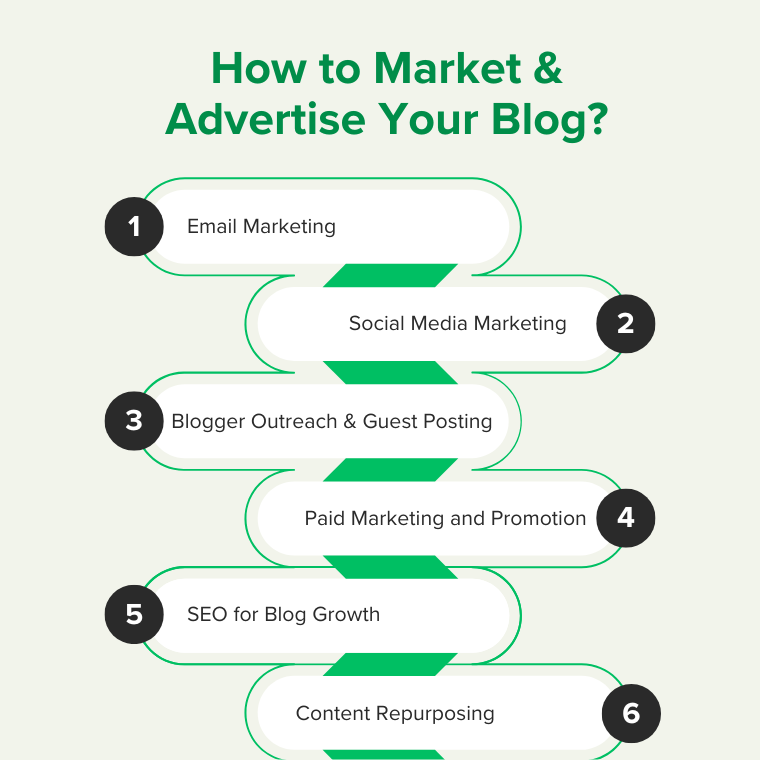
These are some of the methods you can deploy to advertise and market your blog. The easiest and effective of it can be paid marketing, however, it can be very expensive. But if your blog earning is high then you can easily deploy this method.
So how do you exactly earn for your blog to tackle the paid marketing expenses? Let’s talk about that.
Step 11. Monetize Your Blog
Starting earning money from your first blog is pretty much impossible. To have blogging as an income source, you need to be able to provide visitors with great content, updated information, and also be able to have a good number of constant traffic.
Although for a starting blogger it is very hard to start earning, it is important to know what can be different methods you can use to earn money off your blog.
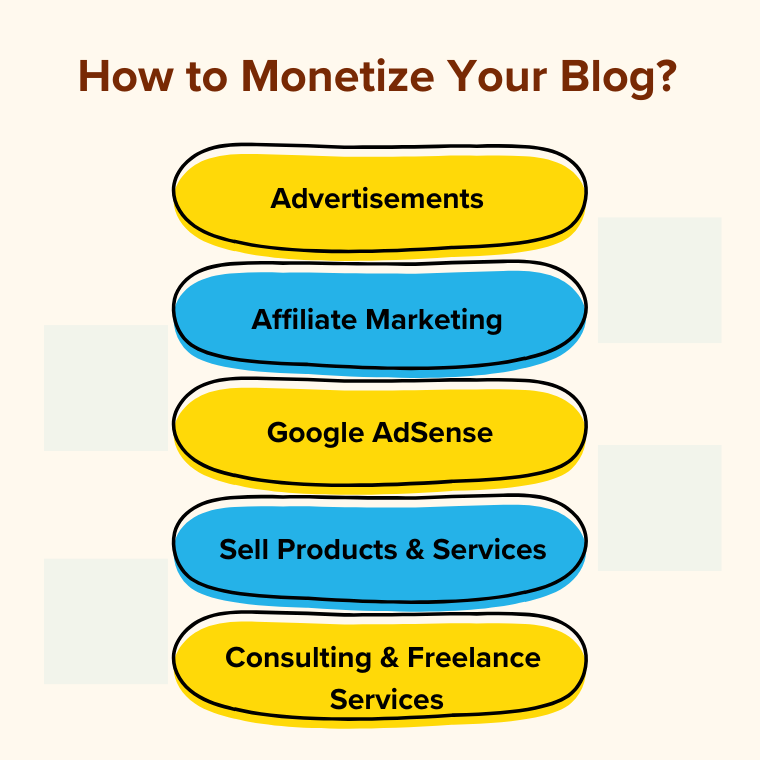
Some of those methods are:
i. Advertisements
Although you can deploy PPC ads to your site, it is hardly marginal unless you have a huge amount of traffic. PPC ads get profitable and recognizable if you have traffic in lines of 10,000/day. For someone that is just starting a WordPress blog, it is hard to get.
However, you don’t have to be fixated on PPC ads only. If your blog niche matches some products that are looking for advertisement, you can negotiate for a good amount. Even, if you are starting out, you can advertise their product on your blog and make money off it.
ii. Affiliate Marketing
Affiliate marketing has been a pretty popular form of making money off your blog. You need to promote other people’s products and you can get a commission off it. If you are just starting and don’t have your product to promote, then you can do affiliate marketing to promote other products.

You need to have content that matches up the product and you can easily sell the affiliate products and gain commission on each sale.
iii. Google AdSense
Displaying ad is a common way of monetizing your blog. And, Google Adsense helps you with it. It is an ad network that shows relevant ads on the ad space of your blog. It analyses your blog and shows ads based on your content. And, with each view and interaction of users with ads, you get paid a certain amount.

You can apply for Google AdSense by offering your advertisement space. AdSense analyses your blog and displays ads on your blog once it meets its criteria. You will be paid according to their policies and interaction with the ads displayed on your site.
iv. Sell Products
If you are an eCommerce blog or a business blog, you can easily promote and sell your products. A blog with constant traffic can be an influential factor for the sales of any product. You can easily showcase the different services and products you provide and also write about your products in detail.
A detailed description and information about a product and influence your visitors or followers to buy the product which can help you generate some revenue.
v. Consulting and Freelance Services
Likewise, if you have expertise in a particular niche, you can monetize your blog by offering consulting or freelance services. A blog is an excellent platform to showcase your knowledge, skills, and experience, making it easier for potential clients to trust your services.
For example, if your blog is about digital marketing, you can offer SEO consulting, content writing, or social media management services. Similarly, if you run a tech blog, you could provide web development or software troubleshooting services.
For more information, you can check out our article on different ways to make money online.
Frequently Asked Questions on How to Start a WordPress Blog?
Q.1 Is WordPress still the best platform for blogging in 2026?
Yes! WordPress remains the most popular and powerful blogging platform in 2026. It offers flexibility, scalability, and full ownership of your content, unlike free blogging platforms. With thousands of themes and plugins, you can customize your blog exactly how you want.
Q.2 Do I need technical skills to start a WordPress blog?
No, you don’t need coding or technical skills. WordPress has a user-friendly interface, and most hosting providers offer one-click installation. Plus, there are drag-and-drop builders like Elementor to help you design your blog easily.
Q.3 How much does it cost to start a WordPress blog?
The cost of starting a WordPress blog depends on your choices. Generally, a domain name can cost you around $10 – $20 per year and hosting might cost you $2.95 -$ 10 per month depending on the provider.
Q.4 Can I start a WordPress blog for free?
You can start a blog for free on WordPress.com, but it has many limitations (e.g., no custom domain, ads displayed by WordPress). For full control, it’s better to use WordPress.org with paid hosting.
Q.5 How long does it take to set up a WordPress blog?
You can set up a basic WordPress blog in 1–2 hours if you follow a step-by-step guide. However, customizing your design and publishing content may take a few days.
Conclusion
We assume this article was a helpful guide on how to start a WordPress blog. We are sure that you’ll be able to start your WordPress blog easily by following this step-by-step guide.
You can go through the article or any point in the article again if you are confused. You can also leave your question in the comment section. We’ll be happy to help you with any confusion.
Also, check out our article on how to create an affiliate marketing website and how to create a website.
And, follow us on Facebook and X (Formerly Twitter) for content updates.
