Are you looking to create a teacher website to boost your teaching career and connect with more students? If yes, then stay right here.
Today, with a well-crafted teacher website, you can share your invaluable teaching resources along with monetizing your expertise. That too, from the comfort of your home.
Imagine reaching students far and wide, regardless of geographical boundaries. And making a living doing what you love most – teaching.
But where and how do you start? Well, we got you covered.
In this easy-to-follow guide, we’ll walk you through every step to create a teacher website. From choosing the right website builder to promoting your teacher website.
So, tighten your seatbelt and just follow as we guide you through!
Significance of Having a Teacher Website
Whether you are a seasoned educator or embarking on your teaching journey for the first time. Having an online presence is a must-have digital accessory. Indeed, it’s a powerful tool that can be a game-changer to transform your teaching career.

Here are just a few of the benefits of having a teacher website:
- Personal Branding and Credibility: Establish a professional online identity to enhance your credibility as an educator.
- Enhanced Communication: Create a central hub for sharing class updates, assignments, and resources with students and parents.
- Expanded Reach: Extend your educational influence beyond physical classrooms to reach a global audience.
- Resource Central: Centralize lesson plans, study guides, and educational materials for easy access by students and parents.
- Portfolio and Achievements Showcase: Showcase your accomplishments, awards, and innovative teaching methods to inspire and motivate.
- Adaptability and Flexibility: Easily adapt to changing educational landscapes, such as remote or hybrid learning models.
- Job Opportunities: Use your website as a digital resume to attract potential employers and collaboration opportunities.
Thus, having a teacher website elevates your professional image, enhances communication, and expands your reach. Ultimately, providing a platform for personal and professional growth.
What Type of Teacher Website You Can Build? (Popular Examples)
Now, when it comes to creating a teacher website, the possibilities are as diverse as the subjects you teach. Your teacher website can reflect your unique style, goals, and teaching methods.
Here are some examples of teacher websites created by teachers who teach online:
| Real Teacher Website Examples | Description |
| Udemy | Hosts courses on a wide range of subjects taught by various instructors. Teachers can create and sell their courses on Udemy, providing students with access to their expertise and knowledge. |
| Codecademy | Offers online courses or programs for students to learn a specific skill or subject. Includes modules, quizzes, assessments, and interactive learning activities. |
| ReadWriteThink | Provides resources and tools for educators to teach a specific curriculum. Includes lesson plans, activities, assessments, and interactive tools. |
| Wyzant | Promote your tutoring services and connect with potential clients. You can include information about your rates, availability, and contact information. |
| Khan Academy | Offers free online educational resources for students of all ages. Includes lessons, practice problems, and assessments in a variety of subjects, including math, science, and history. |
| Kidblog | Lets students showcase their work, share feedback, and engage with peers. A platform for students to create posts, share comments, and participate in class discussions. |
These are just a few examples, and there are many other great teacher websites out there.
You might check our article on best teacher website examples and popular online courses website examples for inspiration.
When choosing what type of teacher website to build, it’s important to consider your needs and goals. What do you want to achieve with your website? Who is your target audience?
Once you have a good understanding of your goals, you can start to build a website that will help you achieve them.
How to Create a Teacher Website?
Now, we’ll take you through the easy step-by-step process to create a teacher website that’ll not only impress but also inspire.
From choosing the right platform to designing a pleasing layout, incorporating essential features to optimizing your content for search engines. We’ll cover it all!
So, let’s dive in and unlock the secrets to create a captivating teacher website that will leave a lasting impression.
Step 1: Pick a Suitable Website Builder
Creating a teacher website doesn’t have to be difficult or expensive. There are many easy-to-use website builders available that can help you create a professional-looking teacher website in no time.
Yet, selecting the right website builder is the first crucial step to create your teacher website. It forms the foundation upon which your digital classroom will be built.
Let’s explore some popular options.
1. WordPress.org
WordPress.org is an open-source Content Management System (CMS) that offers unparalleled flexibility and customization options. This means you adapt to it for your various teaching needs. No doubt, it’s favored by educators worldwide for its robust features and extensive capabilities.
With WordPress.org, teachers have the freedom to design and structure their websites exactly as they envision. Further, this makes it a powerful platform for creating personalized digital classrooms.
Moreover, its extensive plugin library and themes provide endless possibilities for customization. Ultimately, making it suitable for educators looking to establish a unique online presence.
Key Features:
- Select from a vast array of themes and plugins to create tailored websites that align with their teaching style.
- Renowned for its robust blogging features. So, you can seamlessly share insights, educational resources, and updates via an integrated blog.
- It’s scalable to accommodate evolving needs. Whether for a small personal website or building a comprehensive educational platform.
- Easily integrates with various Learning Management Systems (LMS) for creating a seamless online learning experience.
- WordPress is a vast community with several forums, tutorials, and resources. So, any educator can build a teacher website without technical expertise.
Pricing:
The WordPress.org platform itself is free to use. However, you’ll need a domain name and web hosting. Which typically cost around $10-$15 per month. Nevertheless, some premium themes and plugins may have additional costs too.
Check out our article on what is WordPress and what is it used for to know more.
2. Wix
Wix stands out as a fully hosted website builder known for its drag-and-drop functionality. Further, this makes it an excellent choice for educators aiming to create visually appealing websites without technical complexities.

On top of that, it comes with several professionally designed templates. Including education-focused options. This streamlines the website creation process. Further, it enables teachers to choose a template that suits their style and customize it according to their preferences.
Not to forget, Wix prioritizes ease of use. This empowers teachers from all technical backgrounds to design polished, professional-looking websites with minimal effort.
Key Features:
- Places a strong emphasis on visual design. This makes it a preferred choice for educators who want to present their work in a captivating manner.
- Straightforward interface to ensure that you can create a polished, professional-looking teacher website without coding complexities.
- Offers an app market where educators can find tools to enhance their websites. Such as calendars, events, and online forms.
- A diverse array of professionally designed templates. What’s more, teacher website templates simplify the teacher website creation process.
- Ensures mobile-friendliness to accommodate students and parents accessing the site on various devices.
Pricing:
Wix offers a free plan with Wix-branded domain names and limited features.
However, you can opt for its premium plans with custom domain names and advanced features. Its pro version starts at around $4.50 per month and extends up to $24.50 per month.
Check out our comparison article on WordPress vs. Wix to know the similarities and differences between these platforms.
3. Weebly
Weebly is another user-friendly website builder known for its simplicity and straightforwardness. This makes it an excellent choice for educators seeking to establish a basic teacher website quickly.

On top of that, it comes with a drag-and-drop builder similar to Wix. This simplifies the process of designing website layouts and content. As a result, teachers can create a teacher website without any coding knowledge.
No doubt, you get a variety of templates designed for educational purposes. This provides teachers with a starting point for their online presence.
Key Features:
- Simple and easy interface for creating a teacher website without requiring much technical know-how.
- Manages hosting and security, reducing technical upkeep. As a result, you can totally focus on content creation and teaching.
- Offers a range of templates tailored to educational purposes. Further, this provides a solid foundation for creating teacher websites.
- Includes eCommerce functionality. This makes it valuable for educators interested in selling educational materials, courses, or other resources online.
- Handy pricing, including a free plan with a Weebly-branded domain name. This makes it an affordable choice for educators with limited budgets.
Pricing:
Similar to Wix, Weebly also offers a free plan with Weebly-branded domain names.
However, you can definitely opt for paid plans. That includes custom domains and more advanced features. Normally, its premium plan starts at around $10 per month and can go up to $26 per month.
Also, browse our comparison article on WordPress vs. Weebly to know the similarities and differences between these platforms.
Our Recommendation: WordPress.org
While all the given 3 website builders have their merits, our top recommendation to create a teacher website is WordPress.org.

Its unparalleled flexibility, extensive plugin library, and scalability make it an ideal choice for educators looking to create a teacher website.
While there may be a slight learning curve. However, the long-term benefits and customization options it offers are well worth the initial effort.
Now that you’ve chosen your website builder, let’s move on to the next step i.e. choosing a domain name and hosting.
Step 2: Choose a Domain Name, Web Hosting Provider, and Install WordPress
Before you start designing your website, you need to choose a domain name and web hosting provider.
A domain name is the web address that people use to find your website. Meanwhile, web hosting provides the storage space and bandwidth needed to host your website on the internet.
Here’s how you can start:
Choosing a Domain Name
Your domain name should be memorable, easy to spell, and related to your teaching services. Consider using your name or a variation of it as your domain name.
For example, if your name is Sandy Hill and you’re an English teacher, your domain name could be sandyhillenglish.com or englishwithsandy.com.
You can acquire a domain name from a domain registrar such as Namecheap or GoDaddy.
Check out our article on how to choose a domain name for your business for comprehensive guidance.
Choosing a Web Hosting Provider
There are many web hosting providers available, and it’s important to choose one that meets your needs and budget.

Some popular options for WordPress hosting include Kinsta, Cloudways, Bluehost, WP Engine, etc.
When selecting a web host, look for features such as 24/7 support, fast loading times, and automatic backups.
Our Recommendation: Cloudways
For those looking for an excellent all-in-one solution, we recommend Cloudways. It only offers robust hosting but also includes a free domain for the first year. This can significantly ease your website setup process and keep your costs down.

Check out our article on how to choose a web hosting company for comprehensive guidance.
Installing WordPress
Now, your next job is to install the WordPress software. Many web hosts offer one-click WordPress installation, which makes it a quick and easy process. Once WordPress is installed, you can customize your website using themes and plugins.

Regardless of whatever hosting service you use, you can install WordPress in three simple steps. As an example:
- Access your hosting account.
- Look for a ‘WordPress Installation’ option in the Control Panel.
- Follow the directions exactly as written. You’ll have WordPress up and running in no time.
Shortly after installation, you’ll receive access credentials via email from the hosting provider. With that, you can quickly log in to your WordPress dashboard.
Congratulations, you’ve now chosen a domain name, selected a web hosting provider, and installed WordPress!
In the next step, we’ll discuss how to choose a teacher website theme and customize your website design.
Step 3: Select a Suitable Learning Management System Plugin
As you step onto create your teacher website, it’s essential to choose an LMS plugin that aligns with your teaching goals.
An LMS plugin allows you to manage and deliver online courses, assignments, and educational content to your students.
Here are three popular LMS plugins you can consider to create your teacher website:
1. Tutor LMS
Tutor LMS is a comprehensive LMS plugin designed to transform your website into a powerful online learning platform. With Tutor LMS, you can easily create and manage courses, quizzes, and assignments. Its user-friendly interface and extensive features make it a top choice for teachers.

Moreover, it’s known for its ease of use, powerful features, and large and active community. For instance, you get powerful grading and reporting capabilities, integration with Zoom and Google Meet, etc. As a result, Tutor LMS is a good choice for teachers of all levels, from beginners to experts.
Key Features:
- Create engaging courses effortlessly using the drag-and-drop course builder.
- Design quizzes and assignments, and track student progress with detailed analytics.
- Sell courses through various payment gateways, making it suitable for educators interested in earning revenue from their online courses.
- Release course content gradually, ensuring a structured learning experience.
- Easily incorporate videos, images, and other multimedia elements into your courses for a dynamic learning environment.
Pricing:
Tutor LMS offers a free version with basic features. You can readily install the free version directly from your WordPress dashboard.
Meanwhile, its premium plans start at $199/year, providing access to advanced functionalities and priority support.
Learn more about this plugin from our article on the Tutor LMS plugin review.
2. Masteriyo
Masteriyo is another robust LMS plugin that empowers you to create, manage, and deliver online courses seamlessly. It provides a user-friendly interface and an array of features tailored to meet the needs of teachers.
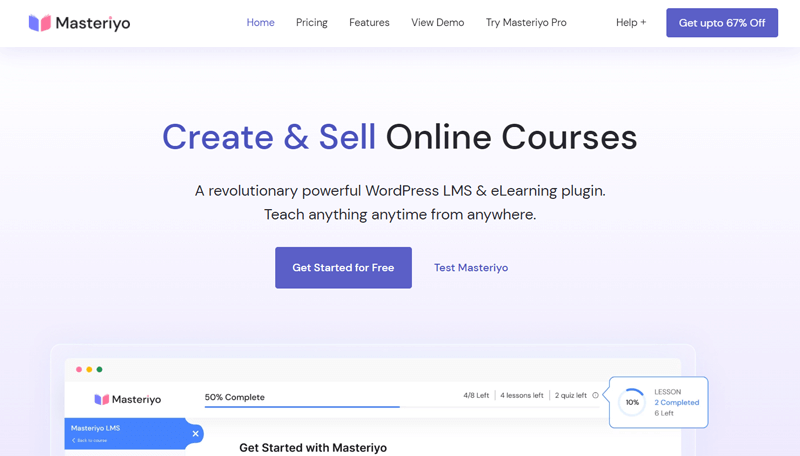
What’s more, is that it focuses on student engagement and distraction-free learning mode. This makes it a good choice for teachers who want to create and deliver interactive and engaging online courses.
Key Features:
- Build and customize courses with ease using Masteriyo’s intuitive course builder.
- Assess student performance with quizzes, assignments, and grading tools.
- Foster student interaction and collaboration through discussion forums.
- Gain insights into student progress and course effectiveness with in-depth analytics.
- Reach a global audience by offering courses in multiple languages.
Pricing:
Similar to Tutor LMS, Masteriyo is a freemium plugin. You can easily download the free version with core features from the plugin directory.
However, you can opt for the premium plans. It starts at $49.17/year, providing advanced capabilities and support.
Check out our article on Masteriyo review to know more about it.
3. LearnDash
LearnDash is a highly customizable and feature-rich LMS plugin used by many educators and institutions worldwide. It offers a wide range of tools for creating and managing online courses effectively.

With LearnDash, you can create and deliver online courses, quizzes, assignments, and other learning materials to your students. Also, track student progress, generate reports, and award certificates of completion.
In addition to its core features, it also offers a wide range of premium add-ons. For example, you can add features such as course prerequisites, drip content, social learning, and gamification.
Key Features:
- Create courses with lessons, topics, quizzes, and assignments to suit your teaching style.
- Integrates with popular payment gateways, so you can easily sell your courses online.
- Design quizzes with various question types and grading options.
- Schedule course content releases to maintain a structured learning experience.
- Award certificates and badges to students upon course completion.
- Monetize your courses through membership and subscription models.
Pricing:
LearnDash offers premium tiered pricing based on the number of sites you intend to use it on.
The pricing starts at $199/year for a single site. Meanwhile, you can get the additional add-ons available for enhanced functionality starting at the cost of $49/year.
Browse our article on the LearnDash review to explore more on this plugin.
Our Recommendation: Tutor LMS
While all three LMS plugins have their merits, our top recommendation to create a teacher website is Tutor LMS.
All thanks to its easy yet powerful course builder, versatile quiz and assignment management, monetization options, and multimedia integration. This makes it an ideal choice for educators looking to provide a rich and engaging online learning experience.
What’s more, Tutor LMS offers a free version and competitive pricing for premium plans. Further, it ensures accessibility for educators at all budget levels.
Step 4: Choose an Attractive Teacher WordPress Theme
Now that you have WordPress installed, it’s time to choose an attractive theme that suits your teacher website.
A theme determines the overall appearance, layout, and functionality of your website.
So, look for features that align with your needs as a teacher. Such as
- Customizable Homepage Sections
- Integration with Popular LMS
- Easy Navigation Menus
- Clean Layout and Appealing Color Schemes
- An Overall Professional Look.
Well, having considered the above aspects, one highly recommended theme for teacher websites is ‘TutorStarter’. Here’s how you can install it:
Installing and Activating Tutor Starter Theme
To install the Tutor Starter theme, first of all, login to your WordPress dashboard.
Now, navigate to ‘Appearance > Themes’. Then, click on the ‘Add New’ button.

Then, search for ‘Tutor Starter’ in the search bar. Once you find it, click on the ‘Install’ option.
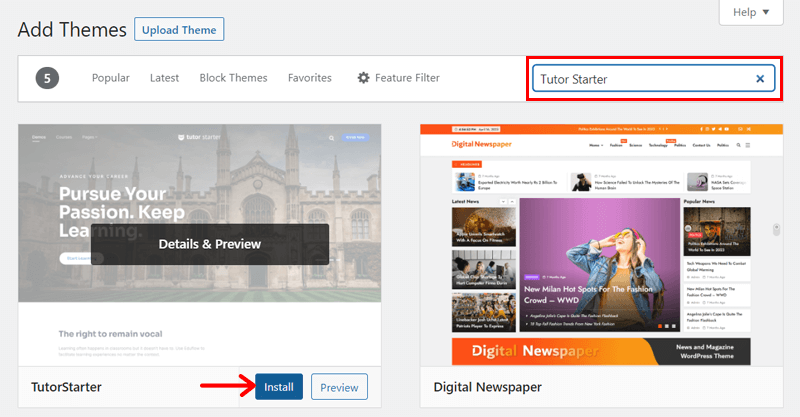
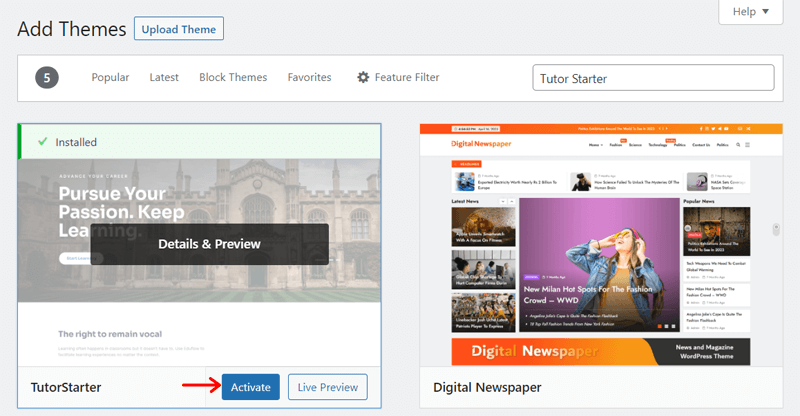
Shortly, ‘Activate’ it.
Importing Your Chosen Teacher Template
Now, on successfully activating the TutorStarter theme, you’ll see the notification to install the ‘TutorMate’ plugin. Just to let you know, this plugin is required to import the several starter templates offered by TutorStarter.
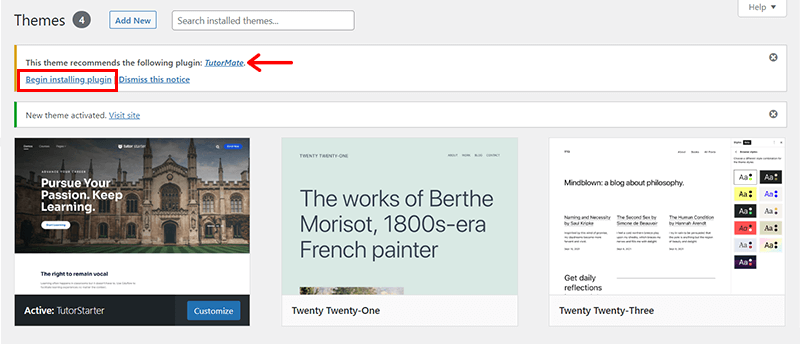
So, click on the ‘Begin installing plugin’ option. With that, you’ll see the page as shown below. Alternatively, you can also go to this page from ‘Appearance > Install Plugins’.

Simply click ‘Install’ below TutorMate, and you’ll soon spot the ‘Activate’ button; click it.

Now, navigate to the ‘TutorStarter > Starter Sites’. There, you’ll find several templates for your teacher’s website. Such as a Single Course, Instructor, Marketplace, or University.
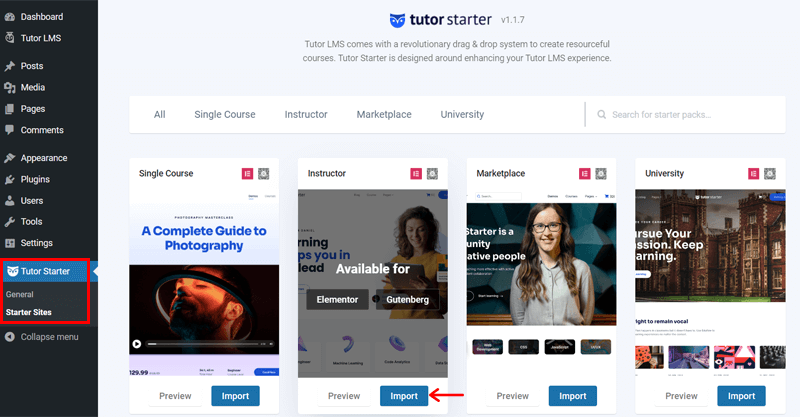
Here, let’s import the ‘Instructor’ starter site template. Simply click on the ‘Import’ button to proceed.
With that, you’ll see the popup notification box. That asks you to select your preferred builder. Also, you can see the required plugins to import the template and click on the ‘Import Now’ option.
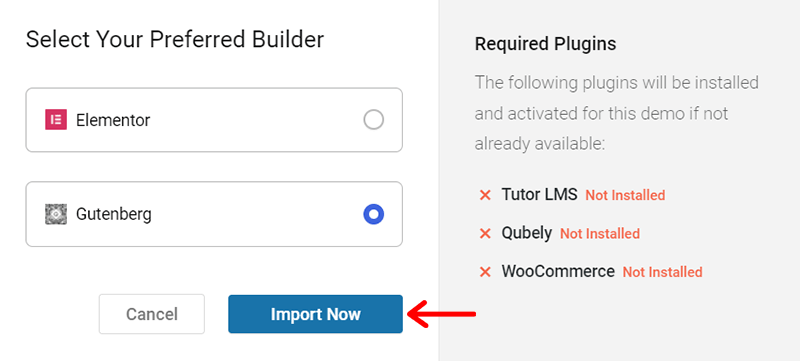
Shortly, you’ll see that the starter site is successfully imported along with the required plugins.
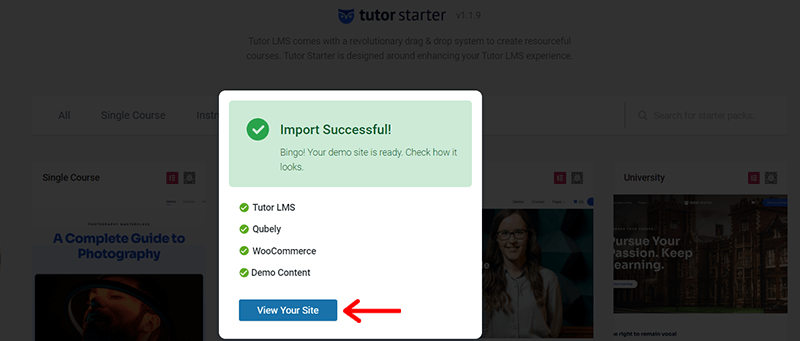
Also, here is some good news for you. The free version of the Tutor LMS plugin is also automatically installed. You can click on the ‘View Your Site’ to have a preview of your imported teacher website.
Customizing Your Chosen Teacher Template
Now, if you go to the ‘Tutor Starter > General’, then you can access quick links to several customization options.
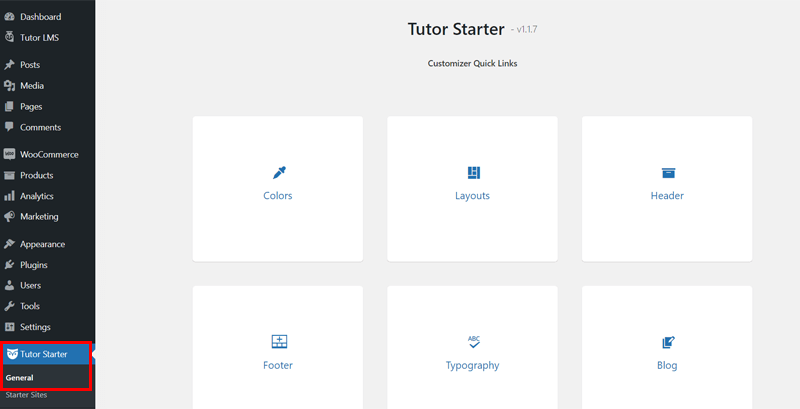
You can customize your teaching website using the following options:
- Color: Modify the body background, body text, and primary color here.
- Layouts: Select the content width for your website layout.
- Header: Options for the logo, header type, menu, and button are available in this section.
- Footer: Configure the logo, footer type, widgets, and bottom text here.
- Typography: Choose typography for body content and various headings.
- Blog: Toggle elements like the author, featured image, post title, and more.
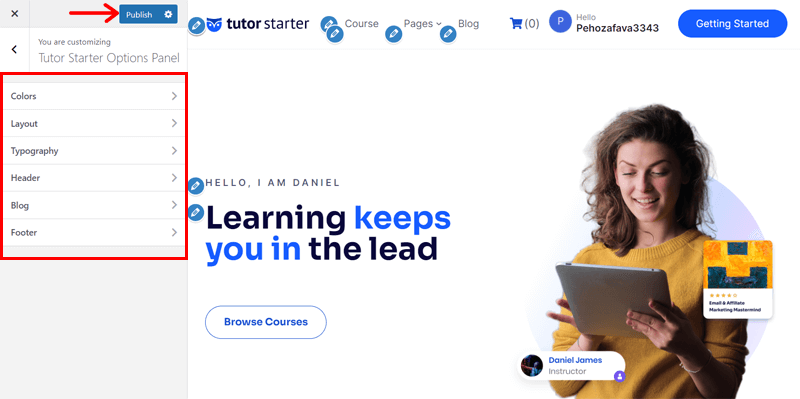
Finally, save your changes by clicking the ‘Publish’ button. and then return to your dashboard.
Step 5: Setup & Configure Your Chosen LMS Plugin
Since we’ve chosen Tutor LMS as the preferred LMS plugin, it’s time to set it up and configure it to meet your teaching needs.
Follow the below actions to get started:
1. Purchase and Install the Tutor LMS Plugin
As mentioned earlier, Tutor LMS is a freemium plugin. This means it’s available in 2 flavors.
One is a free version with basic features and the other is premium with advanced and sophisticated capabilities. So, let’s look at how to install it.
i) Installing the Free Version
Previously, we’ve already installed the free version of Tutor LMS during the installation process of the Tutor Starter theme. In this case, you can skip this step and move forward to the installation process of the premium version.
However, if you’re using or planning to use any other LMS WordPress theme, then you must install the free version manually.
To do so, navigate to the ‘Plugins’ section. And, click on the ‘Add New’ option.

Then, type ‘Tutor LMS’ in the search bar. Once you locate the plugin, click on the ‘Install Now’ option.
Shortly, you’ll see the ‘Activate’ button. Click on it.

Configuring the Initial Setup Process
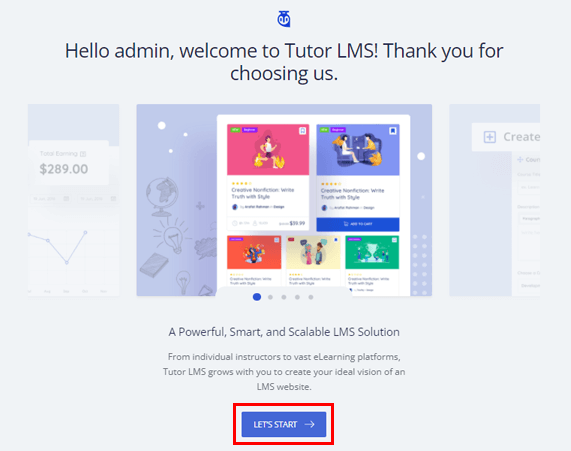
After activation, Tutor LMS will display a setup wizard. Simply, click on the ‘Let’s Start’ option to proceed.
Then, follow the on-screen instructions to configure basic settings. Such as your currency, course setup, payment gateway preferences, and more.
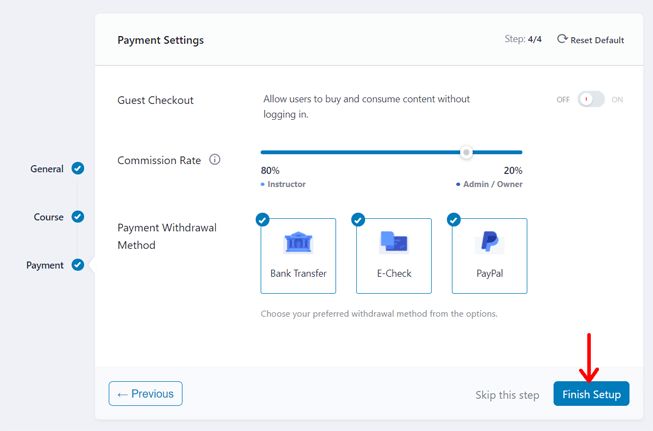
Following that, click on the ‘Finish Setup’ option to conclude the initial setup process.
With that, you’ve successfully installed the free version of the Tutor LMS plugin. Easy, right?
ii) Installing the Premium Version
Now, to install the premium version of the Tutor LMS plugin, first of all, you’ve to purchase it.
Also, it’s important to note that you must first have the free version active to utilize the premium version of Tutor LMS.
Purchasing the Premium Tutor LMS Plugin
If you already have the free version of Tutor LMS installed, you can upgrade it right from your dashboard.
Simply, click the ‘Get Pro’ option in the Tutor LMS menu on your dashboard. This will take you to the Pricing section of the Tutor LMS website, where you can purchase the pro version.
Nevertheless, you can visit the official Tutor LMS website. And head towards the Pricing page to purchase the plugin’s premium version.
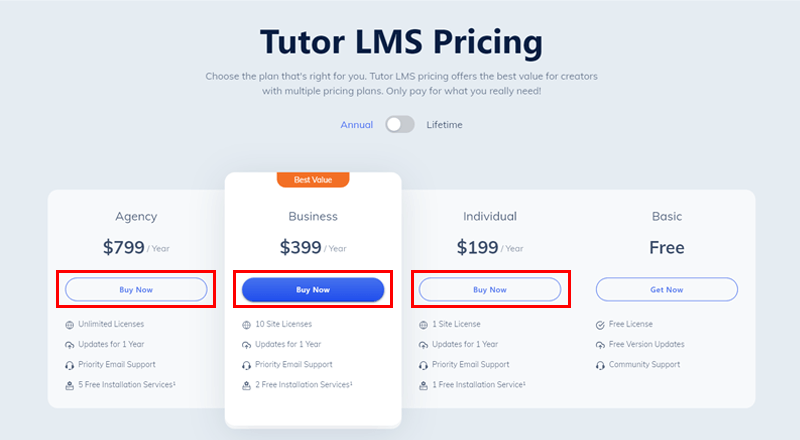
Then, click on the respective ‘Buy Now’ option of your preferred package.
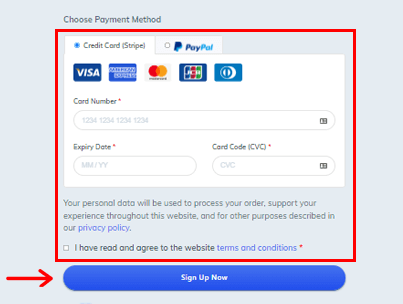
With that, you’re directed towards the Billing details page. Here, you must type in the asked details. You’ll also need to create a Username and Password for accessing the Tutor LMS dashboard later.
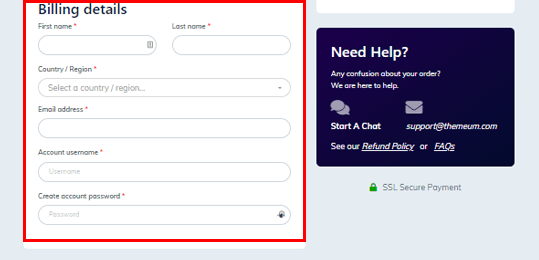
After you’ve finished entering your payment information and accepted the terms and conditions, click the ‘Sign Up Now’ button.
Shortly, Tutor LMS will send you an email with a link to its dashboard. You must enter the previously generated Username and Password there.
After logging in successfully, you’ll see the Tutor LMS plugin’s dashboard, as seen below. Now, in the Download area, select ‘Download Latest’.
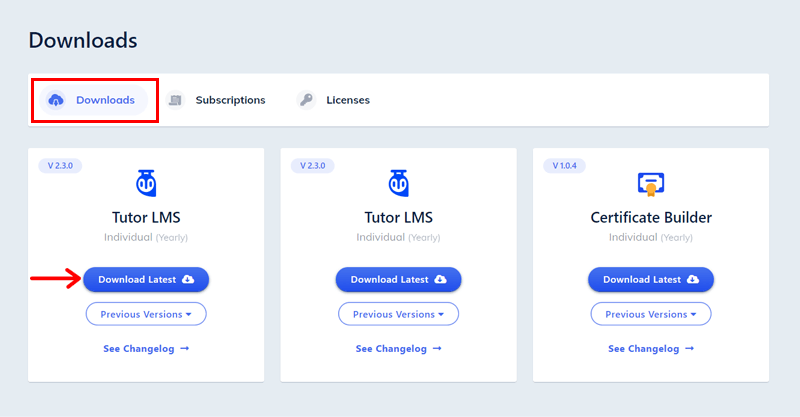
When you click it, a premium Tutor LMS zip file is downloaded to your computer.
Uploading, Installing, & Activating the Premium Plugin
Now, your next task is to upload the premium downloaded file of the Tutor LMS plugin to your WordPress dashboard.
For that, come back to your dashboard. Then, go to the ‘Plugins > Add New’ option.
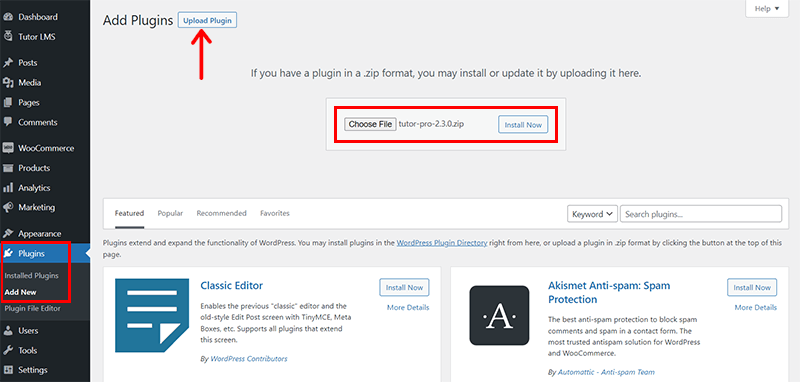
On the top, you can see the ‘Upload Plugin’ option. Click on it. Now, upload the previously downloaded file into the box and click the ‘Install Now’ option.
Shortly, click on the ‘Activate Plugin’ option.

Activating License Key
For the license key, return to the Tutor LMS dashboard, from where you previously got the Tutor LMS premium zip file.
Here, navigate to the ‘Licenses’ option in the navigation. Then, under the ‘Add Website’ section, enter your domain name. Then, as seen below, copy the license key by clicking on the symbol just to the right of the licensing key.
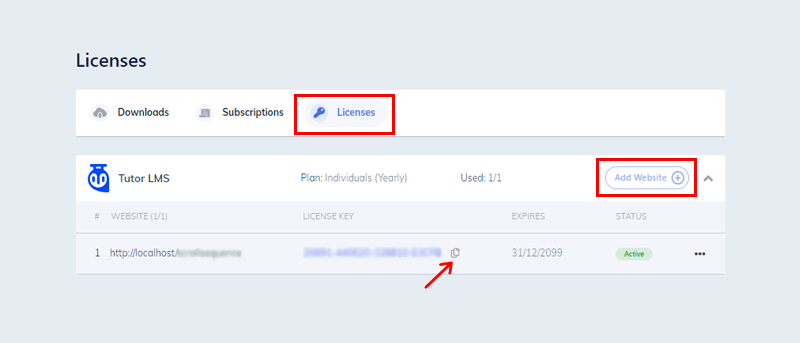
Now, coming back to the WordPress dashboard, you’ll see the screen displayed below. Click on the ‘Please check the license’ checkbox.

When you click it, you’ll see a License Key box where you can paste the copied license key. Then, hit the ‘Connect With License Key’ option.
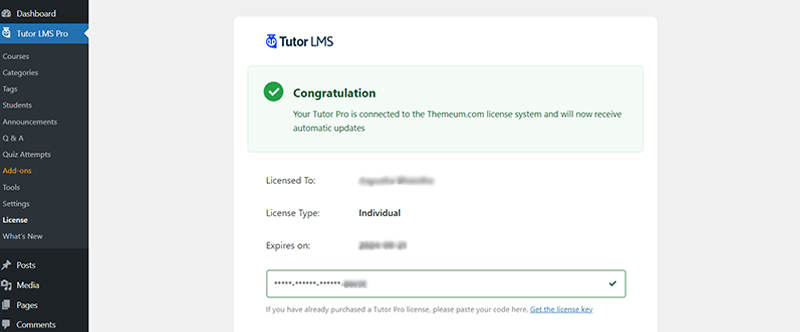
With that, you get a Congratulatory notification of the premium Tutor LMS installed on your WordPress site.
2. Enable the Premium Add-ons
Now, make sure to enable all the Tutor LMS addons. For that, go to the ‘Tutor LMS Pro > Addons’ on the navigation menu from your dashboard.
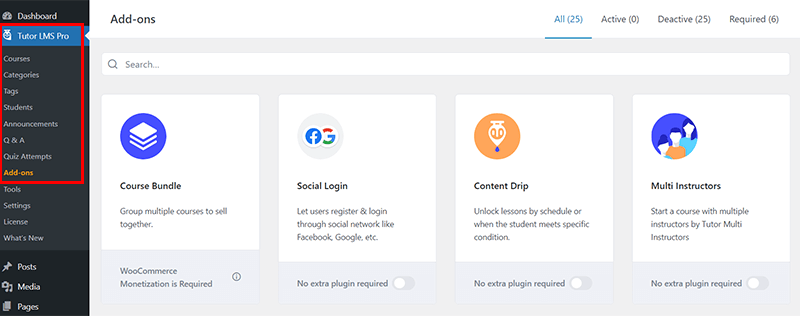
And ‘activate all the required add-ons’ to get the additional functionality. Here, choose add-ons that align with your teaching requirements, such as certificates, email notifications, or content drip. Then, reload the site once.
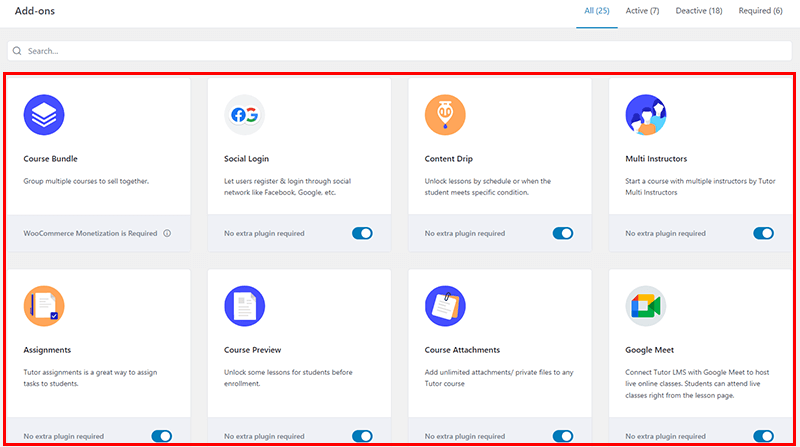
3. Configure the Tutor LMS Settings
Now, ‘Under Tutor LMS > Settings’, you can access several settings. You can configure these settings to tailor your teacher website exactly as you wish.
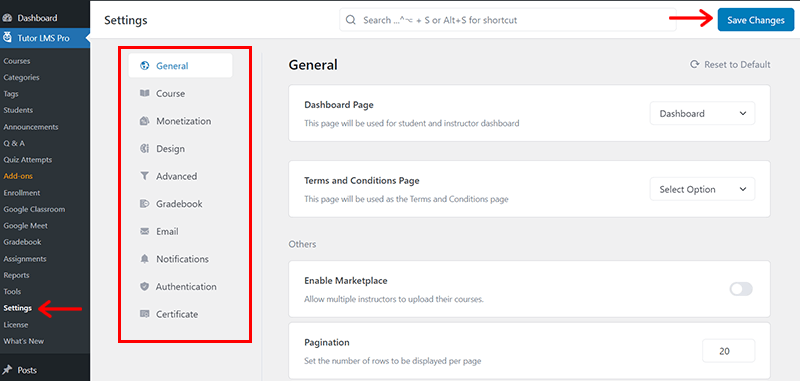
- General: Include options for configuring course enrollments, terms & conditions, and site-wide settings for your online teaching platform.
- Course: Define course-related preferences such as enabling course attachments, course prerequisites, and defining course badges.
- Monetization: Set up payment gateways, pricing models for courses, and currency options. To manage the financial aspects of your online courses.
- Design: Set course layouts to control the appearance of course listings, single course pages, and more.
- Advanced: Offer additional control over aspects like course progress, student enrollment, and default roles within the LMS.
- Email: Customize email notifications sent to students. And manage templates and content for various emails related to course activities.
Besides, you can find other setting options for Gradebook, Notifications, Authentication, Certificate, and so forth. You can individually look into them and tailor them to your preferences.
Lastly, don’t forget to click on the ‘Save Changes’ button at the top.
With that, you have successfully set up and configured the Tutor LMS plugin on your teacher’s website.
Now, let’s move on to the exciting part: creating and managing your courses, quizzes, and educational content. This will allow you to provide a seamless and engaging online learning experience for your students.
Step 6: Creating a New Course with Tutor LMS
Now that you have Tutor LMS set up, it’s time to start creating your first course. Here’s an easy-to-follow guidance to get you going:
Please note that in the free version of Tutor LMS, you can only create courses from the backend. In contrast, premium users of Tutor LMS can create courses from both the front-end and back-end.
Now, let’s delve into the detailed process of adding or creating new courses in Tutor LMS from the back-end first.
Creating New Courses From Backend
All users, both free and paid, can access the backend course builder right from your WordPress dashboard.
For that, navigate to ‘Tutor LMS Pro’ on the left-hand menu and select the ‘Courses’ option. Afterward, click the ‘Add New’ button at the top to initiate the creation of a new course.

You will now proceed to a course-building page. Let’s examine each setting detail and create a course accordingly.
1. Adding a New Course
Begin by selecting a suitable course title that accurately conveys the content of the course you intend to create. For example, in the ‘Add Title’ section, input ‘Beginner’s Course’.
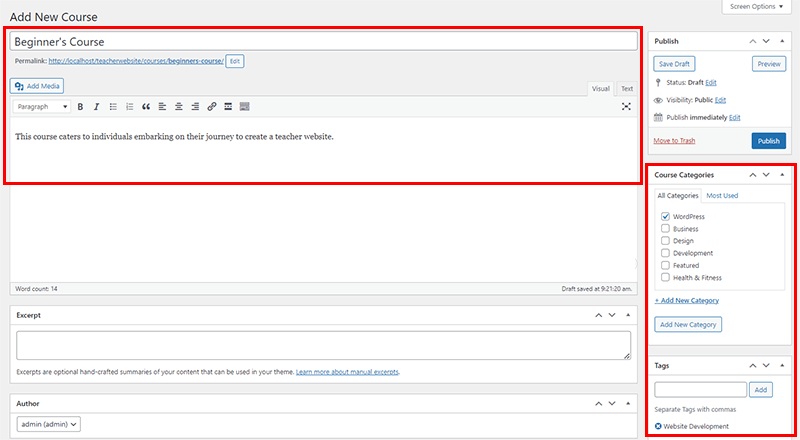
Beneath that, within the description box, write a Course Description to provide your students with a concise overview of what the course entails.
For instance, you can write, ‘This course caters to individuals embarking on their journey to create a teacher website.’
On the right-hand side, you also have the option to set ‘Course Categories’. Let’s put ‘WordPress’ in that. And for ‘Tags’, let’s set it to ‘Website Development’.
Also, you can leave the Excerpt and Author setting as it is.
2. Configuring the Course Settings
If you scroll down a bit on the same page, then you’ll find the ‘Course Settings’ option. Therefore, the second step involves configuring the course settings.
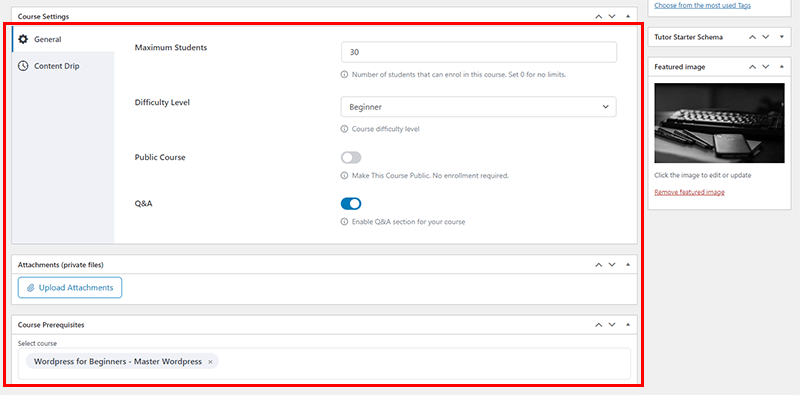
You can edit the following things here:
- Maximum Students: Specify the maximum enrollment capacity. For instance, input ’30’ for 30 student batches or ‘0’ for no limit.
- Difficulty Level: Set the course difficulty level to ‘Beginner’ to give students an idea of its complexity.
- Make This Course Public: Choose to make the course public (no registration required) or disable it for a paid course.
- Q&A: Activate the Q&A section for your course here.
Also, you can attach any brochures or soft copies related to your course via the ‘Upload Attachments’ option. Also, specify the ‘Course Prerequisites’ if necessary.
On the right-hand side, also set the featured image for your course.
3. Creating Lessons, Quizzes & Assignments via Course Builder
Now, if you scroll down slightly, then you’ll discover the ‘Course Builder’ Section. It’s one of the primary foundations of the Tutor LMS plugin.
Just to let you know, a course in the Tutor LMS consists mostly of topics, each of which has lessons and quizzes.
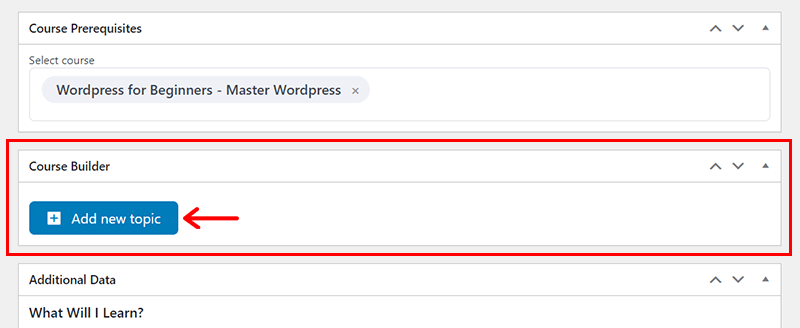
Now, click on the ‘Add new topic’ button.
Upon clicking it, you’re directed to the page depicted below. Here, you’re required to input a Topic Name and Topic Summary.
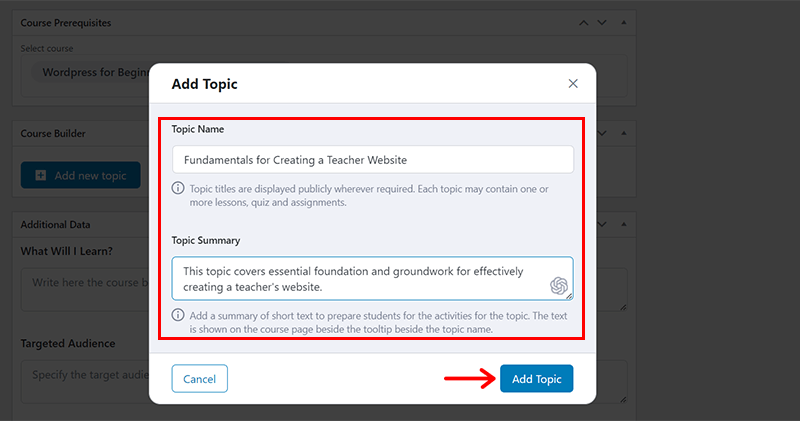
For instance, let’s give it the Topic Name ‘Fundamentals for Creating a Teacher Website’. Meanwhile, for the Topic Summary field, we have set, ‘This topic covers essential foundation and groundwork for effectively creating a teacher’s website.’
Subsequently, click the ‘Add Topic’ button just below it. With that, you’ll see the following page.
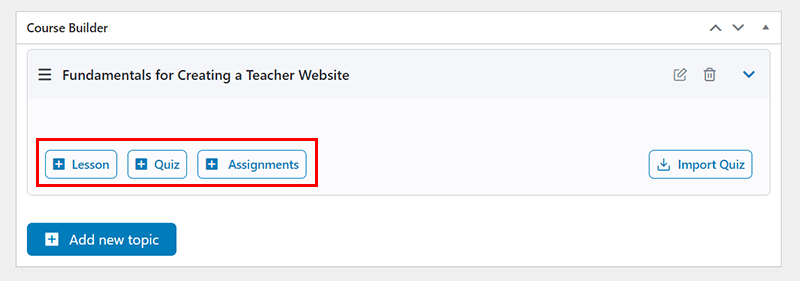
On this page, you’ll find 3 options: Lesson, Quiz, and Assignments.
i) Creating Lessons
Click on the ‘Lesson’ options to create lessons for your course. Here, you’ll discover the following choices:
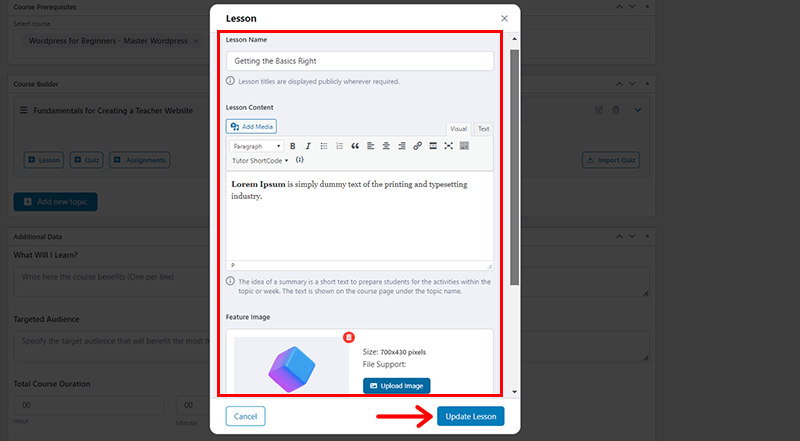
- Lesson Name: Input the title of your lesson in this field, for example, ‘Getting the Basics Right’.
- Lesson Content: Compose the lesson description here.
- Feature Image: Attach a relevant image to enhance your lesson’s engagement.
- Video Source: Specify the source for the video lesson, either external or internal. Adjust the video playback time as needed after adding the video.
- Upload Attachments: Include various documents as supplementary resources for your lessons.
- Enable Course Preview: Activate this option only if you want your students to access the lesson without enrolling in the course.
After completing these details, click ‘Update Lessons’ located just below. Likewise, you can incorporate additional lessons by replicating the same procedure.
ii) Creating Quizzes
You can enhance engagement and interest in your course by adding quizzes. For that, click on the ‘Quiz’ option.
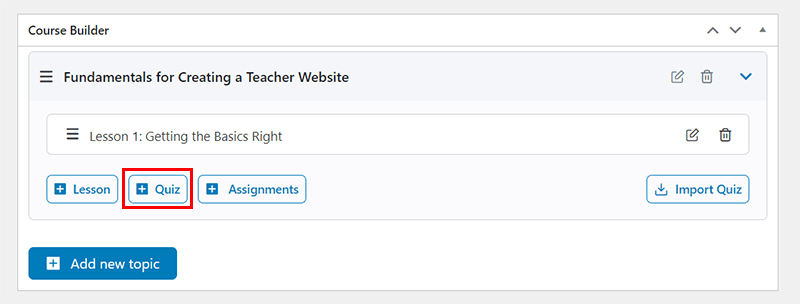
With that, you’ll see the page as shown below. Here, you must provide students with information about the quiz, including its name and a brief description.
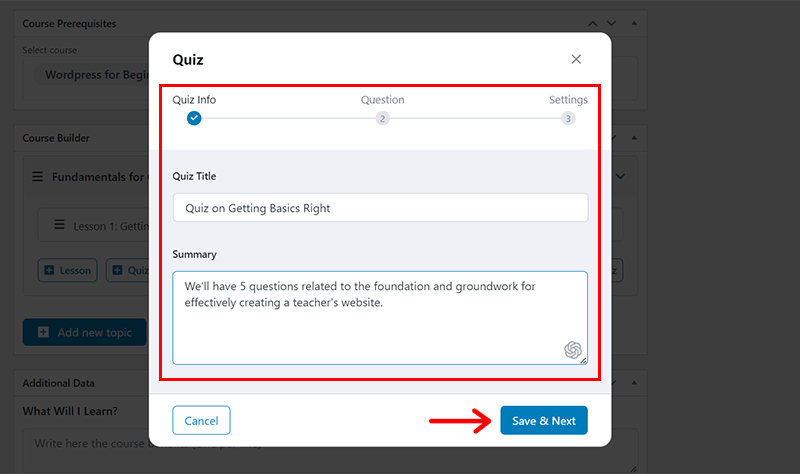
Afterward, click on the ‘Save & Next’ option.
Next, diversify your quiz by adding questions in various formats such as true/false, multiple-choice, matching, and more.
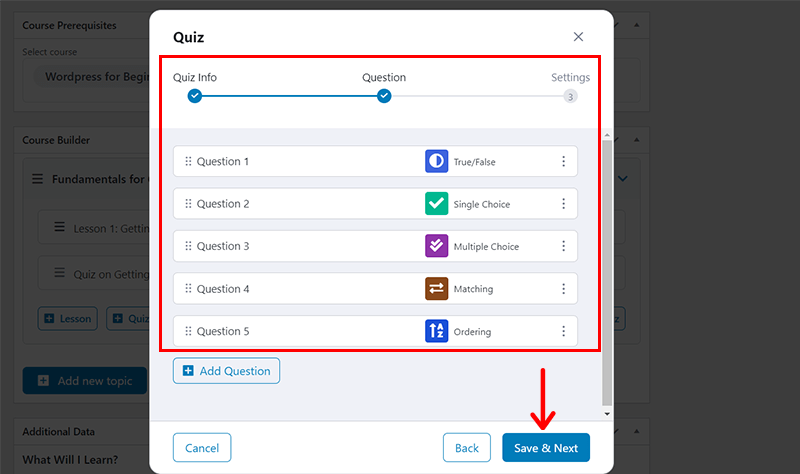
Following this, click on the ‘Save & Next’ option.
Finally, configure settings like the quiz’s time limit, feedback mode, passing grade, and other options.
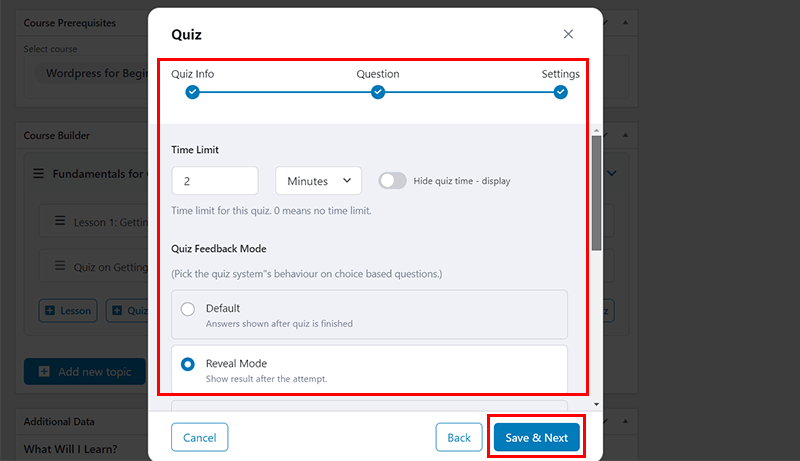
Once you’ve made your selections, click on the ‘Save & Next’ option to return to the previous page.
iii) Creating Assignments
Similarly, click on the ‘Assignments’ tab to allow students to submit their required works and tasks.
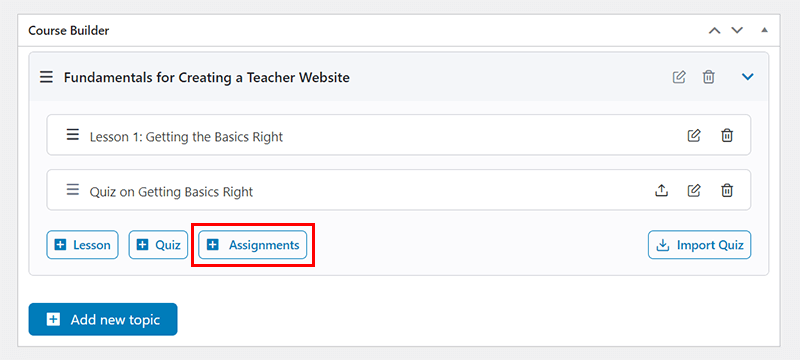
With that, you’re directed to a new page. Here, you can give an ‘Assignment Title’. Then, write a short summary regarding what the assignment is about.
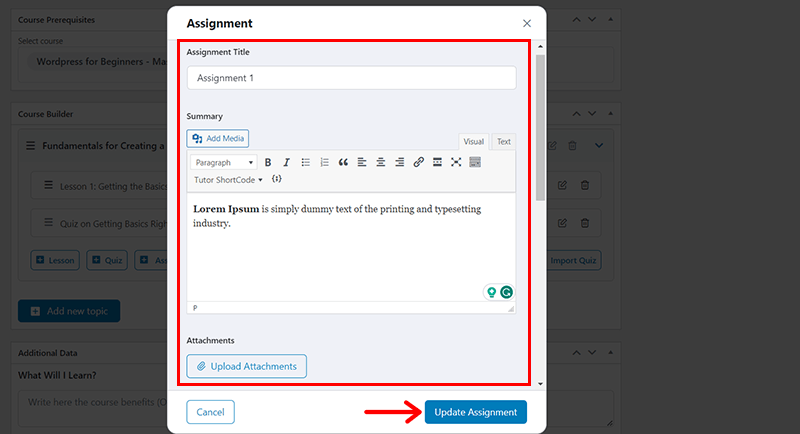
Also, you can upload attachments if any related to assignments. Plus, set the time limit to submit the assignments, total points, minimum pass points, and maximum file size limit.
Then, click on the ‘Update Assignment’ button.
4. Filling in Additional Data
If you scroll a bit further down, you will encounter the ‘Additional Data’ section.
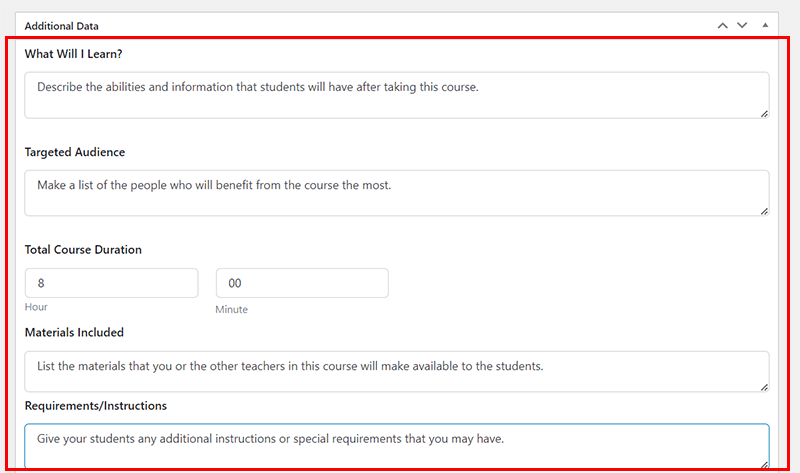
Here, you can add the extra details of your course. Such as:
- What Will I Learn?: List the skills and knowledge students will acquire upon completing this course.
- Targeted Audience: Create a list of the individuals who will derive the most benefit from the course.
- Total Course Duration: Clearly state the course’s total duration or the time it will take for a student to finish it.
- Materials Included: Enumerate the resources that you or the instructors will provide to the students in this course.
- Requirements/Instructions: Specify any additional requirements or unique instructions for your students.
Hence, filling out these details serves as both an educational resource and a promotional tool for your course. Ultimately, attracting your potential students.
5. Adding Video and Creating a Google Meet Link
Similarly, you can also include an introductory video in the Add Video section. This helps potential students to gain an understanding of the course, similar to what they can do through the course description.
Precisely, you have the option to select from various sources such as External URLs, YouTube, Embedded links, and more.
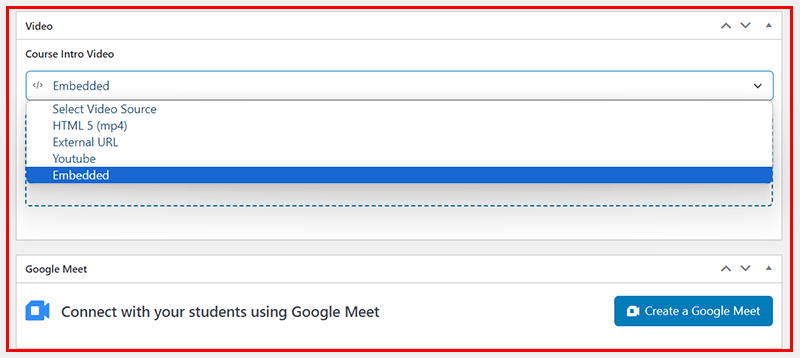
Also, you can provide real-time visual courses via Google Meet. All you’ve to do is click on the ‘Create a Google Meet’ option.
Meanwhile, you can leave this section as it is if you don’t want to.
6. Choosing the Course Completion Certificate
Last but not least, you can choose the ‘Certificate Template’ of course completion for your students.
Precisely, you get to choose 2 options i.e. Landscape and Portrait for your certificates. Also, there are several certificate templates that you can pick from.
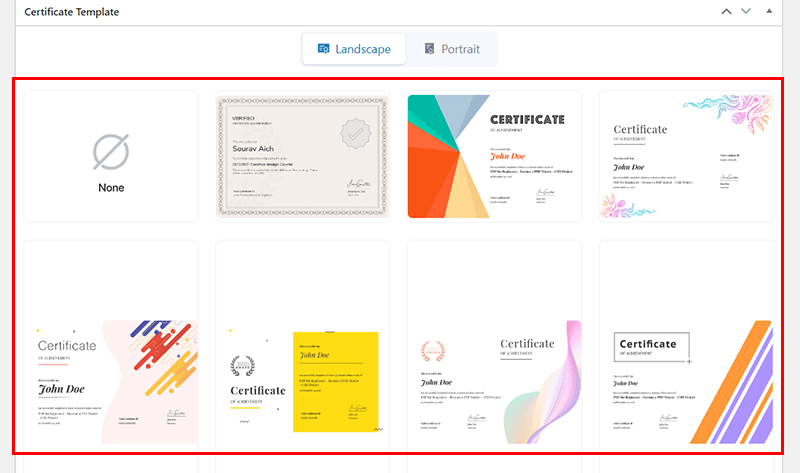
And hover over your chosen template and click on the ‘Use This’ option.
Once configured, Tutor LMS will automatically issue certificates to students who meet the criteria upon course completion.

After you’ve completed all of the above steps, click the ‘Publish’ button in the top right corner of the page.
Creating New Courses From Frontend
As previously mentioned, the Tutor LMS pro version empowers you with the Frontend Course Builder. As a result, you can create courses without the need to access the WordPress backend.
This feature is particularly helpful when you’re working with other teachers and instructors. As you don’t have to provide backend access to all.
After activation of the Tutor LMS premium version, you can easily utilize the course builder by navigating to your frontend dashboard.
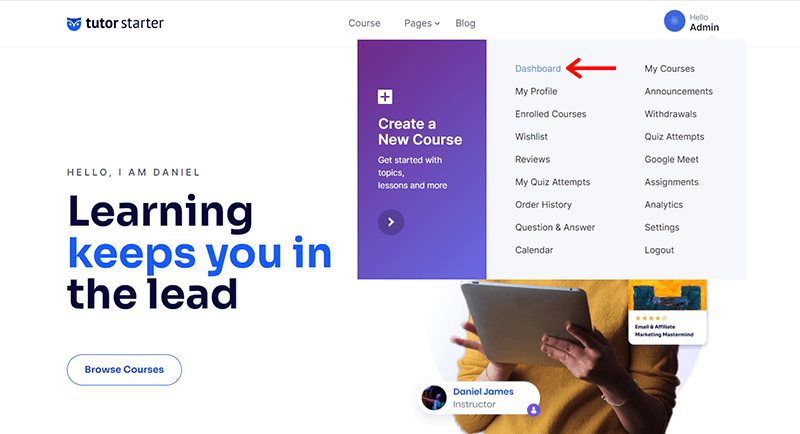
Alternatively, you can enter your website URL followed by “/dashboard.” Meaning, type in (yourwebsiteURL.com/dashboard). The interface may resemble the image below.
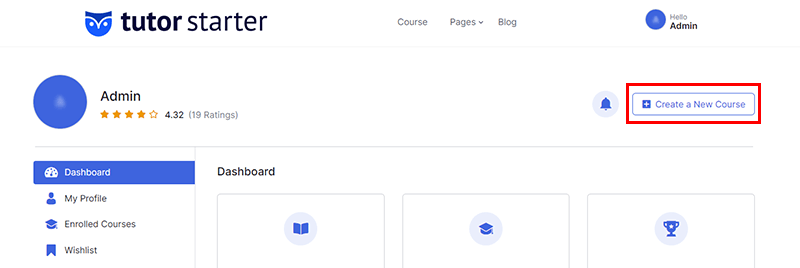
Subsequently, click the ‘Create a New Course’ button located on the right.
Then, you’re taken to a course-building page.
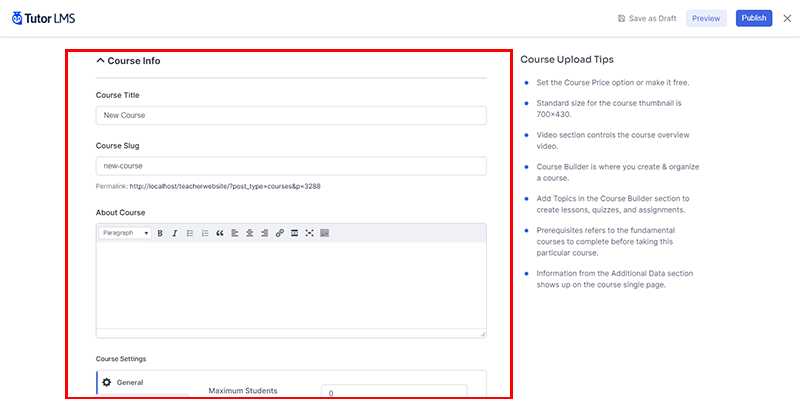
This process mirrors the steps we took earlier when creating a course from the backend.
Now, you can conveniently create courses for your teacher’s website in the manner that suits you best.
With that, you’re able to create engaging and well-structured courses on your teacher website using Tutor LMS. This empowers you to provide a valuable and organized learning experience for your students.
Step 7: Sneak View of How Students Access Your Courses at the Front-End
Now that you’ve crafted and configured your courses with Tutor LMS, it’s time to see how your students will experience your teacher website.
Here’s a sneak peek of how they can access your courses at the front end:
Firstly, once students visit your teacher’s website, they can browse your courses in 2 ways. One is from the ‘Course’ option in the navigation menu. Another one is via the ‘Browse Courses’ option on the homepage.
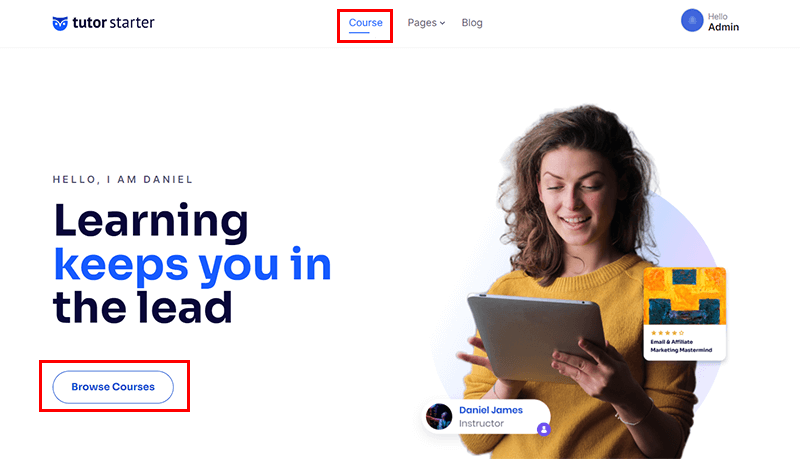
Next, students can explore all the available courses that you’ve created. And they can click on the ‘Enroll Course’ of their desired course to proceed.
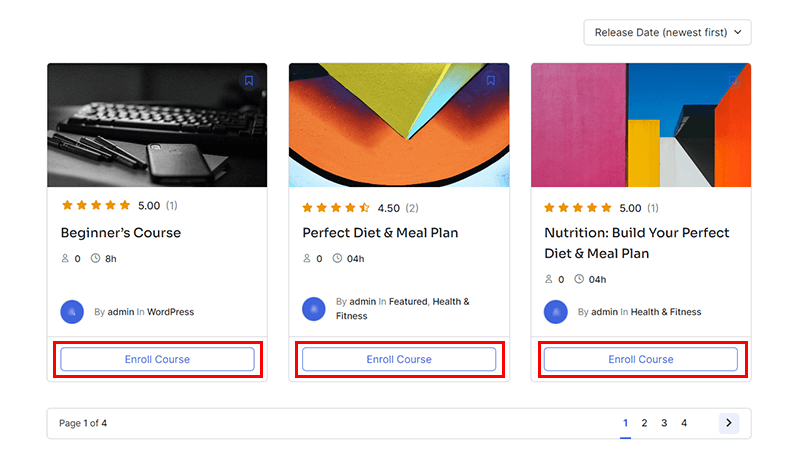
Since previously we’ve created the ‘Free Course’ for a demo, students can easily access the course via the ‘Enroll now’ button.
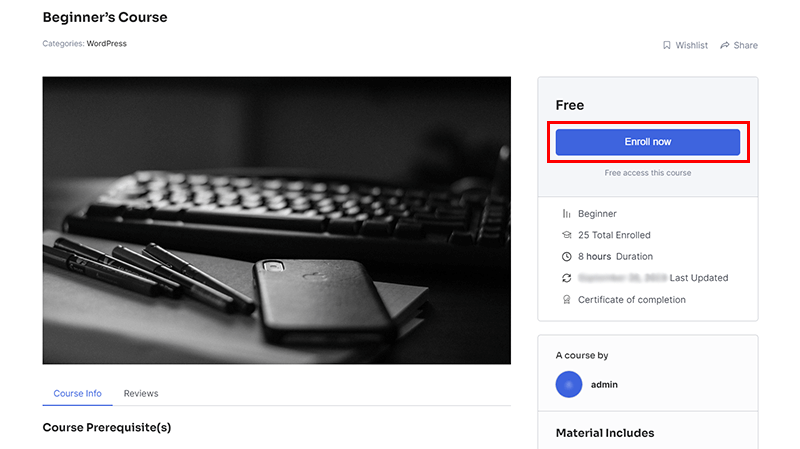
Meanwhile, in case you’ve created the paid course, then they would have to pay the required fees via the mentioned payment gateway. To access the course further.
Following that, students can simply click on the ‘Start Learning’ option to get the learnings from the course.
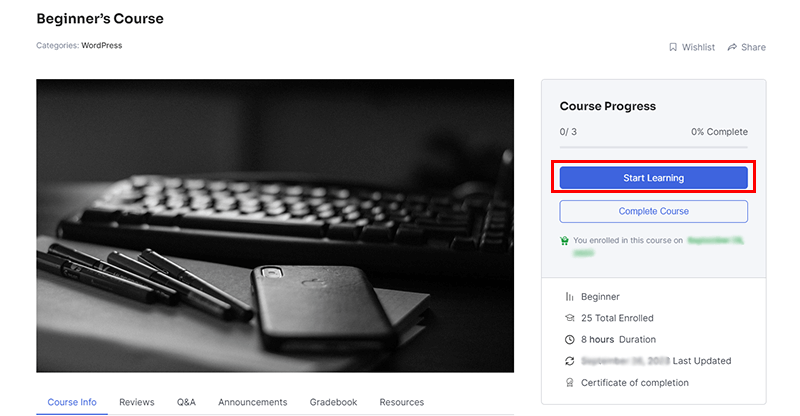
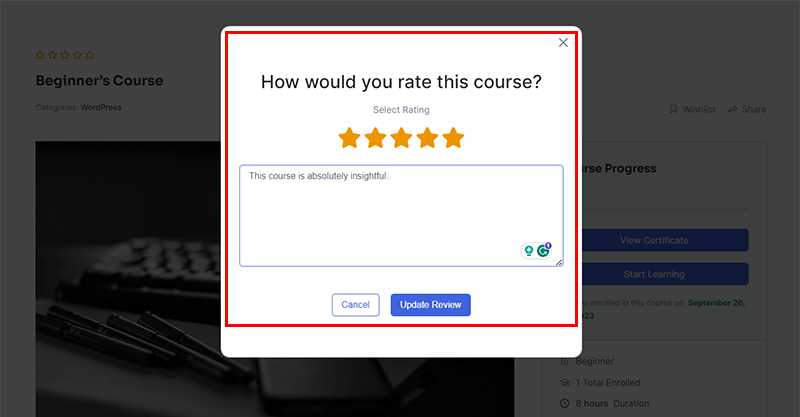
With that, they can assess the lessons, quizzes, assignments, and all that you’ve put in while creating the course earlier. Once they complete the course, they can even rate the course and share their experience.
On successful completion of the course, students can click on the ‘View Certificate’ option.
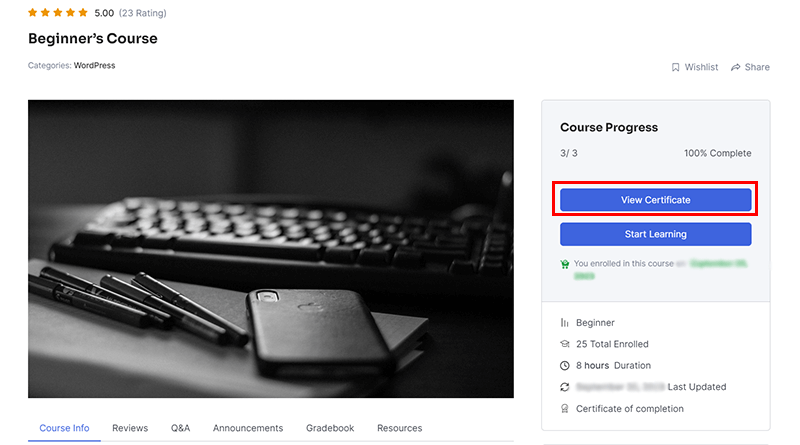
With that, they get the ‘Certificate of Achievement’. They can Download, Copy, or even Print from the available options on the side menu.
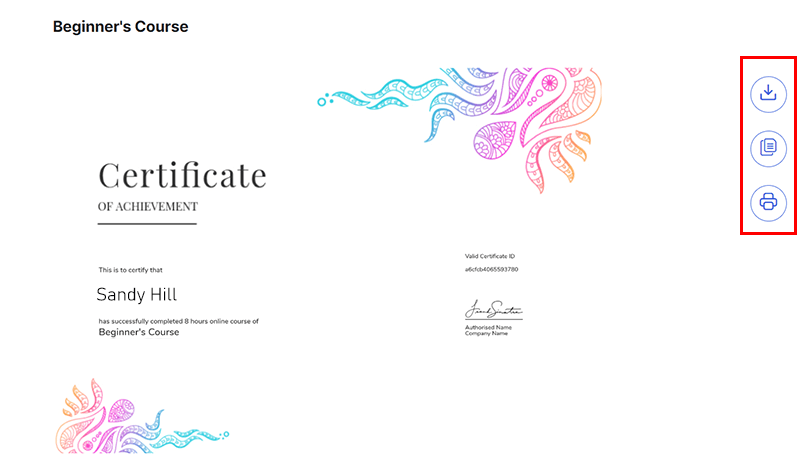
This sneak view illustrates the seamless experience your students will have when accessing your teacher’s website courses.
No doubt, the courses are designed as engaging, and user-friendly. Further, ensuring that your students can focus on learning and achieving their educational goals.
With Tutor LMS, you’ve created an effective platform to deliver high-quality education to your students online.
Step 8: Monitor & Promote Your Teacher Website
Creating a teacher website is just the beginning and the stepping stone! Your job is not done yet.
You need to actively monitor and promote your teacher website to ensure its success and reach a wider audience.

Here’s how to effectively manage your online teaching platform:
- Monitor Progress: Use analytics and feedback to track student engagement, course completion rates, and overall curriculum quality.
- Keep Content Fresh: Keep your courses up to date with relevant and timely material. And expand your offerings to cater to different skill levels.
- Effective Promotion: Use social media marketing, email marketing, SEO optimization, etc. to engage your audience and increase website visibility.
- Technical Support: Address technical issues promptly, and provide reliable technical support for your students.
- Build Credibility: Collect and display student testimonials and encourage online reviews. To establish credibility and trust among potential learners.
- Community Engagement: Foster a feeling of community and stimulate student connection via interactive webinars and live sessions.
- Continuous Growth: Stay current with teaching methodologies, attend workshops, and network with other educators to enhance your skills.
With these strategies, you can foster a thriving and vibrant teacher website. Ultimately, this ensures that your teaching efforts reach a wider audience while meeting the changing needs of the education landscape.
Frequently Asked Questions (FAQs) on Creating a Teacher Website
Here are some frequently asked questions (FAQs) on how to create a teacher website.
Q.1 Why do I need a teacher website?
A: A teacher website serves as a platform to connect with students and the broader educational community. You can share resources, course materials, and so much more. This enhances your teaching presence and provides a digital classroom.
Q.2 Do I need coding skills to create a teacher website?
Q.3 How do I get started with creating my teacher website?
A: Select a website builder, domain name, and hosting. Install your chosen teacher website theme and update it with your desired website content. For platforms like WordPress, use an LMS plugin and configure it to create and publish courses.
Q.4 Is it possible to monetize my teacher website?
A: Yes, you can monetize your website by offering paid courses, selling educational materials, or accepting donations. Some website builders and plugins offer built-in eCommerce features to facilitate this.
Q.5: What is the role of a LMS plugin in creating a teacher website?
A: An LMS plugin, such as Tutor LMS, helps you manage and deliver courses, quizzes, and educational content to your students. It provides structure to your online classroom and enhances the learning experience.
Q.6 How can I ensure the security of my teacher website and student data?
A: Ensure website security by using strong passwords, keeping software up to date, and selecting secure hosting providers. Additionally, choose website builders and security plugins known for their security features.
Thinking of hiring a WordPress developer to create a teacher website but are unsure of how much it will cost? Then, check our article on how much it costs to hire a WordPress developer.
Conclusion
And that’s a wrap! We’ve come to the end of our tutorial article on how to create a teacher website.
Hope, you’ve learned how to create a teacher website, preferably with the perfect duo of WordPress and the Tutor LMS plugin.
You can definitely create your teacher website a top preference among your potential pupils with a slight effort and focus.
Still, have questions about any of the steps or require any sort of advice? Then, please comment below. We’ll be delighted to help you.
Also, explore our other tutorial articles. Such as how to create a hotel booking website and how to build an eCommerce website.
Don’t hesitate to share this article with your friends and family looking to create their teacher website.
Lastly, do follow us on our social media handles Facebook and Twitter to get updates on more useful articles.


