How to start a coaching business online? If you’re here to find the answer to this question, then stay right here.
Online coaching is a rewarding career for people who enjoy guiding others. If you want to start a business with a small investment, then online coaching may be perfect for you. But you must commit to a significant investment of time and effort.
Moreover, creating an online coaching business includes multiple vital steps. That includes finding your niche, defining your services, building a website, etc. This ultimate guide explains this stepwise process to help you get started.
So, without any delay, let’s begin!
What is an Online Coaching Business? What are Some Popular Coaching Niches?
Before diving into the main topic, why not learn more about the online coaching business?
Online coaching is a business that lets a coach offer expertise, guidance, and support to its clients through digital platforms. The coach and clients connect virtually through video calls, phone calls, emails, or messaging apps.

Moreover, online coaching can be in a group or private. Group coaching involves a group of clients taking part in the coaching sessions. Private coaching includes one-on-one coaching sessions between you and your client.
Overall, both coaching types let your clients get personalized guidance and assistance. That too remotely, regardless of their geographical location.
Hence, online coaching is flexible for both coaches and clients. You and your clients can schedule the sessions mutually at convenient times.
What are the Popular Online Coaching Niches?
Online coaching can be further categorized into many niches. Here are some popular ones:
- Life Coaching: It helps clients set goals and overcome challenges in various aspects of their lives. That includes personal development, relationships, anger management, etc. Example: Melissa Ambrosini.
- Health and Fitness Coaching: This improves the physical and mental well-being of clients with guidance on nutrition, stress management, fitness, and a healthy lifestyle. Example: Ciara Foy.
- Dating Coaching: It helps individuals or couples improve their dating skills and grow their romantic relationships via communication, self-confidence, etc. Example: Anna Morgenstern.
- Career Coaching: Here, people get assistance in making career decisions, finding job opportunities, boosting their professional skills, etc. Example: Linda Raynier.
- Business Coaching: This coaching involves business-related guidance. That can be making a marketing strategy, building the right team, refining management skills, etc. Example: Arianne Zucker.
- Financial Coaching: Lastly, financial coaching helps individuals or businesses create budgeting and saving strategies, achieve financial goals, control debt, etc. Example: Money School.
These are just a few online coaching niches. There can be numerous other areas depending on the needs and interests of people seeking support.
How Profitable is the Online Coaching Business?
Now you know about an online coaching business. But don’t you want to learn about its benefits or profitability before you start your own? Why not?
Here’s a list of benefits that generate profit from your online coaching business. Let’s go!
- Scalability: You and your other coaches can work together with many clients through virtual platforms. This increases the revenue potential.
- Global Reach: If you start your coaching business online, then it helps you reach a global audience. This widens your potential client base and improves revenue opportunities.
- Lower Cost: Running a coaching business online lowers overhead costs more than physical location-based coaching. It saves on office rent, utilities, and other expenses.
- Passive Income: You can record your coaching programs once and let clients take them after payment. This earns passive income as long as the coaching is online.
- Diverse Revenue Streams: Online coaching can generate additional revenue streams from online courses, workshops, membership plans, etc.
Overall, the profitability of your online coaching business depends on many factors. That includes your niche, target audience, marketing strategies, pricing structure, etc. So, if you offer excellent coaching strategies, then it can become a profitable business.
How to Start a Coaching Business Online?
To start a coaching business online, there involve several key steps. Here, we’ll walk you through the vital steps to getting started.
Get ready to positively impact people’s lives with a successful online coaching business. Let’s go!
Step 1: Discover Your Niche, Refine Your Skills, and Craft Your Coaching Plan
The first step in starting an online coaching business is to realize your expertise. Accordingly, you must define your coaching niche. It can be life coaching, business coaching, fitness coaching, etc. You learned about them earlier!
Next, you should determine your target audience within that niche. Then, learn about their needs, challenges, and goals. With that, you can tailor your coaching services to meet their requirements.
Before going online, you can also work on your coaching skills and knowledge. That can be done by joining training programs or getting relevant certifications.
After that, outline your business plan, which will guide your decision-making. Also, this will lay the foundation for your online coaching business. So, make sure to plan these:
- Point out the business goals of your coaching program.
- Choose if you’ll provide one-on-one, group, or both kinds of coaching services.
- Decide how you’ll reflect your personal brand in your coaching.
- Select between 2 coaching channels. Primary coaching uses video conferencing, chat, documents, etc. Secondary coaching involves creating an eLearning platform.
- Build the pricing structure for your coaching services.
- Collect the marketing and communication strategies to connect with clients.

Step 2: Pick the Most Reliable Coaching Platform
Once you’re sure about your coaching services, select a platform where you can deliver them online. So, you must search for and pick the most reliable coaching platform available.
Several platforms are present, each with its own set of features for making a coaching business go online. You can use a website builder platform among these outstanding suggestions to create an eLearning platform offering coaching resources.
Now, let’s get to know them!
1. WordPress.org
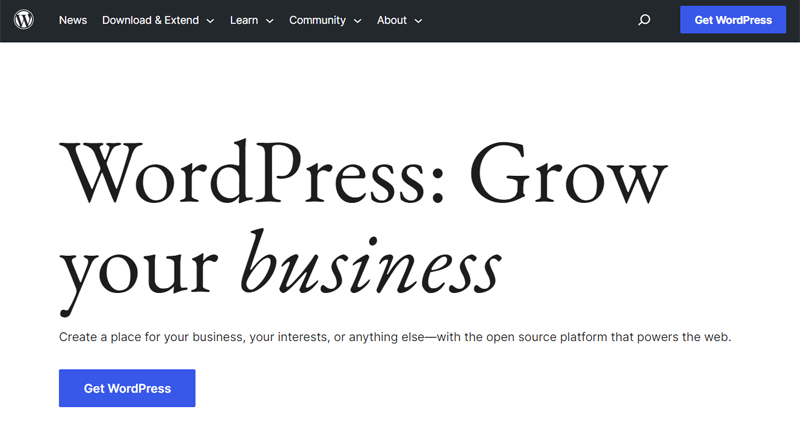
WordPress.org is the #1 most renowned website builder, powering more than 40% of websites worldwide. Previously, it was designed to create blog websites. But now, you can utilize it to launch any website niche. That includes a powerful coaching business website.
Pros:
- Contains a huge collection of WordPress themes and WordPress plugins.
- Servers flexibility to let you select your web hosting service.
- As open-source software, you’ll find numerous support materials online.
Cons:
- You should have some technical knowledge or invest time in learning WordPress.
- Managing domains and web hosting are all up to you.
Pricing
WordPress.org is a free and open-source platform. So, you can install it on your hosting plan. However, you must select a web host and domain. Thus, the price of setting up a WordPress coaching website depends on your host, domain, and paid tools.
Read the complete guide to WordPress here. Also, you may want to learn about WordPress alternatives to have more options.
2. Wix
Wix is a fully-hosted platform for creating a variety of websites. In fact, you can use it to build a booking system for your coaching business. Also, it lets you add appointments, classes, courses, and workshops to your website.

Pros:
- Most suitable for starters who don’t want the hassle to choose a hosting service.
- Comes with several eCommerce features and third-party apps.
- Its free plan gives a subdomain having your site name, like ‘examplesite.wix.com’.
Cons:
- Relatively, the customization options are lesser.
- You have to choose your template carefully. Because once you select it, you can’t alter it.
Pricing
On the other hand, Wix is a paid website builder. So, you must buy a plan to get started. Each of the plans includes a 14-day money-back guarantee. The business plans are:
- Basic: $17/mo, accepts payments, custom domain, unlimited bandwidth, 20 GB storage, 5 hours of video, etc.
- Unlimited: $25/mo, all Basic features, 35 GB storage, 10 hours of video, selling on marketplaces, subscriptions, and more.
- VIP: $35/mo, all Unlimited features, 50 GB storage, unlimited video hours, and a loyalty program by Smile.io.
Unsure which one to go for, WordPress vs. Wix? Then, read this comparison blog. Further, learn about the better Wix alternatives here.
3. Thinkific
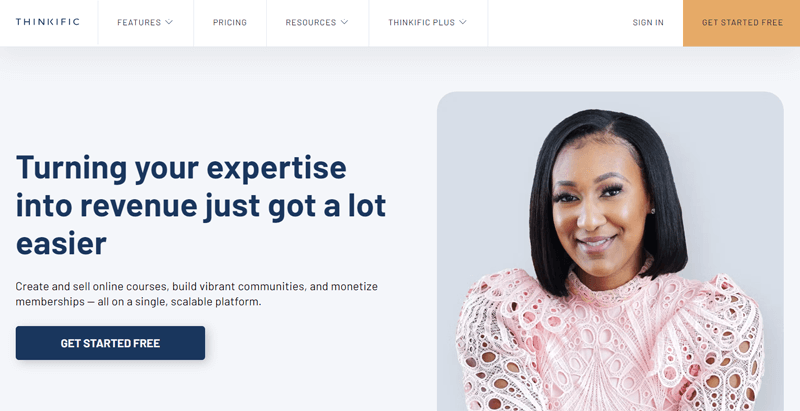
Thinkific is a site builder specializing in creating and selling online courses and coaching services. It has a drag-and-drop course builder to help you design your lessons with ease. Also, you can choose templates from the experts or start from scratch to build your online coaching business.
Pros:
- You can seamlessly create scalable programs with additional tools and extensions.
- Gives insights into your client’s behavior and interests to refine coaching sessions.
- You’ll have full control over your price, income, coaching information, etc.
Cons:
- Many features you may require on your coaching website are included in its paid plans.
- It doesn’t offer a chat support option.
Pricing
To your surprise, Thinkific is a freemium platform. This means Thinkific has both free and premium plans. The free plan can create 1 course, 1 community, and 1 administrator.
For your growing coaching business, you can choose one of these pricing plans:
- Basic: $36/mo, unlimited courses, affiliate selling, custom domain, and free features.
- Start: $74/mo, live lessons, assignments, membership plans, and Basic features.
- Grow: $149/mo, 3 communities, 2 admins, bulk enrollment, and Start features.
Our Recommendation: WordPress.org
If you want us to recommend it, then we’d go with WordPress.org. To explain our pick, here’s a list of features and benefits of this platform for online coaching.
- A freemium platform with the flexibility to use any feature and design for the site.
- You can find many WordPress themes to kickstart your coaching website design.
- Able to start with a simple online coaching business website that you can scale later.
- Provides vital WordPress plugins to use in the coaching business. That includes LMS (Learning Management System) plugins, membership plugins, email opt-in plugins, social sharing plugins, etc.
Hence, we’ll use WordPress.org to show you the following steps for coaching site creation.
Step 3: Use a Domain Name and Web Hosting Service
If you choose WordPress as your coaching site-building platform, then you must buy a domain and web host. So, here we’ll look at the process of doing that. Here we go!
Use a Captivating Domain for Your Coaching Business
A domain name denotes the address of your coaching website, which separates it from others on the web. Using a domain, visitors can open your website via search engines.
For example, the domain name of our website, SiteNerdy, is ‘sitenerdy.com’.

In addition, you can learn how to choose the perfect domain name for your business from this guide. Also, you can take help from the domain name generator tools.
Once you select your domain, you can purchase it from the best domain name registrars. However, we recommend using a hosting service that offers a domain registration service.
Pick a Web Hosting Plan to Launch Your Coaching Empire
A web hosting platform stores your coaching website files on servers connected to the web. This makes your coaching materials accessible to clients across the world.

But there are many web hosting platforms ideal for your coaching business website. Grab the most suitable host, taking help from how to choose the best web hosting provider.
If you want us to suggest a host, then we recommend using Bluehost, Cloudways, Kinsta, etc.
In fact, you can go with hosts like Bluehost that offer web hosting and domain registration services. Moreover, it’s a WordPress-recommended host. You’ll also get a website builder, an SSL (Secure Socket Layer) certificate, etc., for your website.
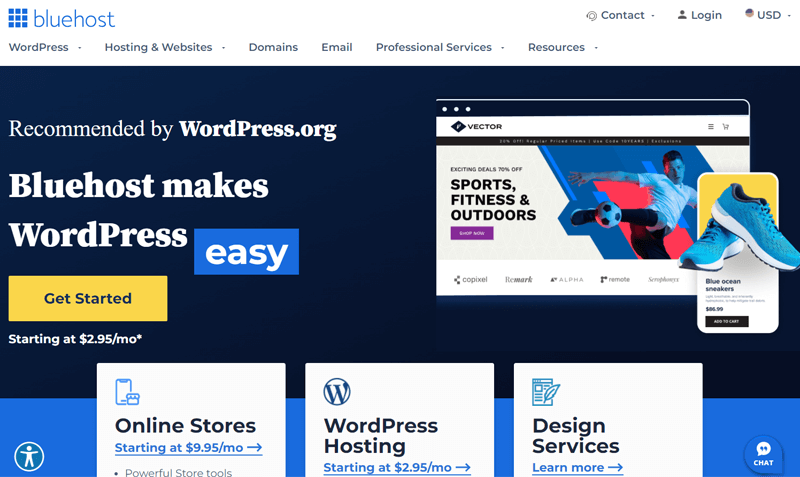
The starting price of its shared hosting solution is $2.95/mo billed annually. This plan contains 10 GB of storage, custom WordPress themes, 1 hosting website, etc.
For a better host, you can look at the best Bluehost alternatives.
Mastering Your Web Host Configuration
Let’s take the example of configuring Bluehost. Similarly, you can set up your hosting plan for your chosen web hosting platform. Alright, let’s start!
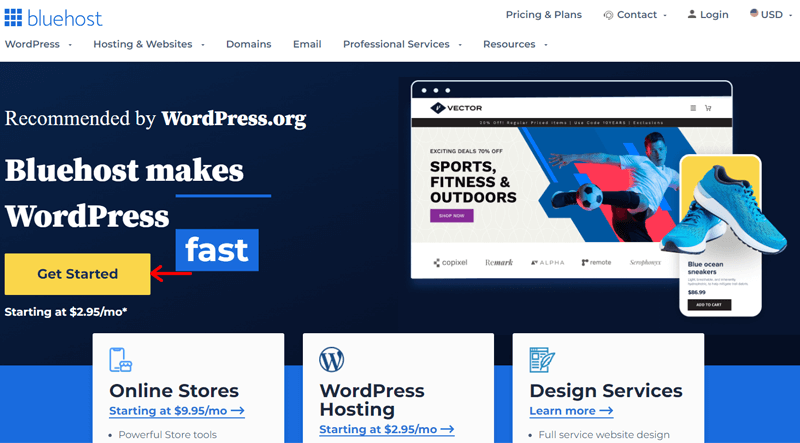
First, open the Bluehost website and click the ‘Get Started’ button. Now, hit the ‘Select’ button for the plan you want.
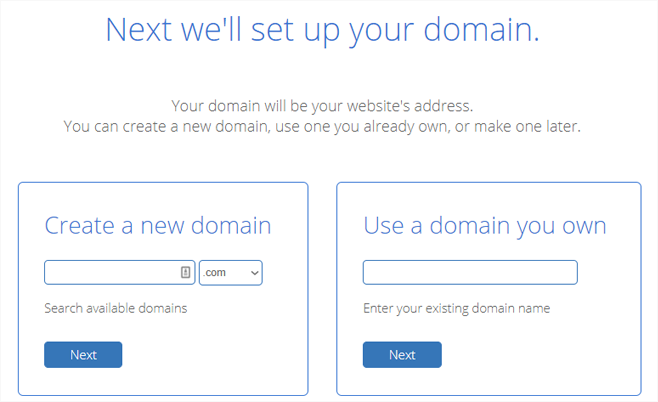
After that, set up your domain name. You can either create a new domain or use an existing one. Once you’re done, hit the ‘Next’ button to move forward.
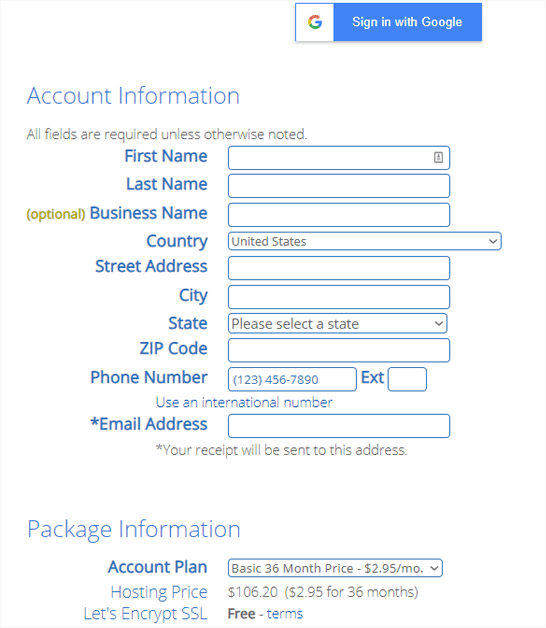
Next, you’ll have to create a Bluehost account. So, fill in your personal, package, and payment information. Afterward, click the ‘Submit’ button.
Congratulations! This ends the configuration of your hosting plan. Best of all, WordPress is auto-installed on your Bluehost plan. Another reason to use this host for your coaching site.
With that, you can log into your Bluehost account. Then, open the ‘My Sites’ menu and click the ‘Create site’ option. There, add the correct name, tagline, and category for your coaching business website.
Lastly, you can log in to the WordPress dashboard to start your online coaching business website. Follow the upcoming steps to move forward.
Step 4: Tailoring Your WordPress Website for Maximum Impact
Once you open your WordPress dashboard, you can begin creating your coaching site. Note that the features you add depend on the ways you plan to provide coaching services.
Here, we’ll guide you through making a coaching site, focusing on the secondary channel. That’s building an eLearning platform and giving coaching programs.
Apart from that, you’ll know about some necessary coaching systems, tools, and plugins. So, let’s start!
Use a WordPress Coaching Plugin (Tutor LMS)
First, you must choose a suitable WordPress plugin to show your coaching programs. Here, we’ll use an LMS plugin.
But there are several WordPress LMS plugins. Some recommendations are Tutor LMS, LifterLMS, LearnDash, etc.
Among them, we’ll use Tutor LMS for this ultimate guide. We chose it over others because it’s a freemium plugin with built-in themes that have coaching templates. Moreover, you can create your coaching website from both the front end and the back end.

Now, have a look at the process!
Step i: Install and Activate Tutor LMS
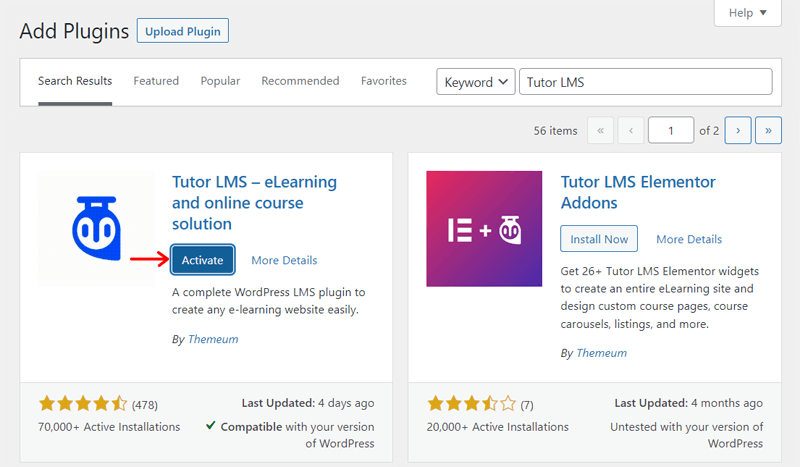
You can install the free Tutor LMS plugin directly from the WordPress dashboard. To do so, navigate to the ‘Plugins > Add New’ menu.

Next, type ‘Tutor LMS’ in the search box. Then, click the ‘Install Now’ button of the plugin.
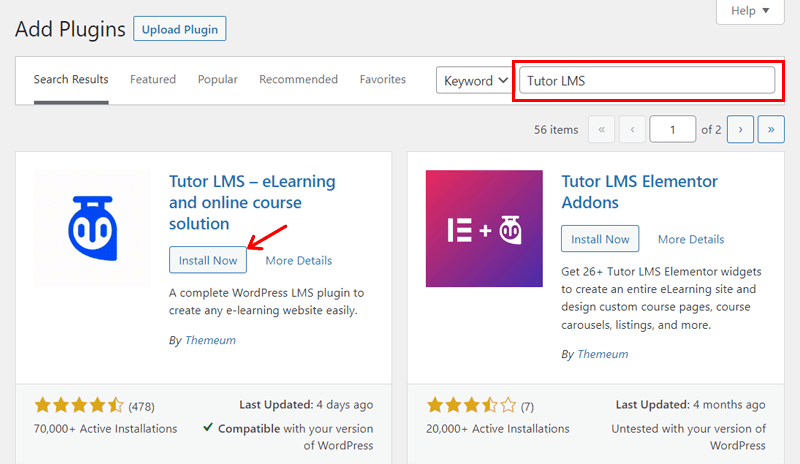
After a while, you’ll see the ‘Activate’ button. So, click on it.
To learn about other installation methods, read our guide on how to install a WordPress plugin.
Step ii: Set Up the Tutor LMS Plugin
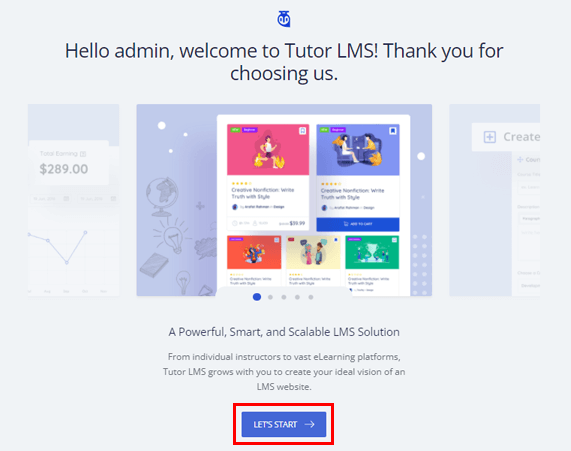
As soon as the plugin activates, you’ll move to the setup page. You can begin the process by clicking on the ‘Let’s Start’ button.
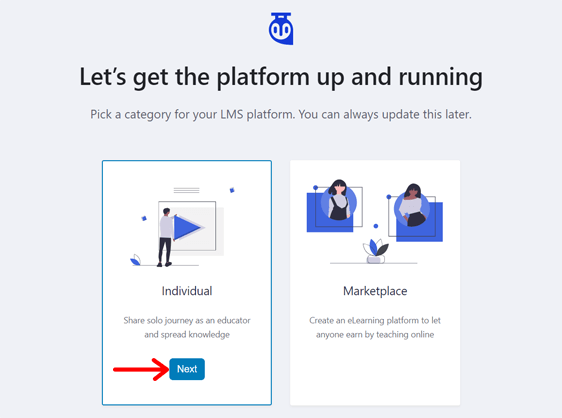
Now, you must pick your LMS platform category. The options are:
- Individual: You can offer your coaching program.
- Marketplace: Allows others to coach and earn with their own materials.
So, click the ‘Next’ button for your chosen category.
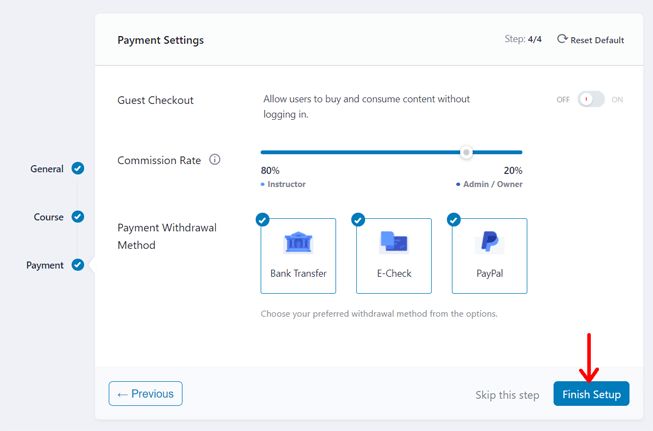
Next, you’ll move on to some settings to configure. Follow them one by one.
First, the General settings include options for instructor profile, student profile, and lesson permalink. Moving to the Course settings, this involves options for instructor bio, courses per row, courses per page, etc.
Lastly, the Payment settings involve options for guest checkout, commission rate, and payment withdrawal method. Once you finish, hit the ‘Finish Setup’ button.
With that, you’ll be redirected to the WordPress dashboard. There, you can see a notice at the top to enable membership. You can enable it so that clients and coaches can sign up. Also, configure the additional settings present in the Tutor LMS > Settings menu.
Step iii: Insert an Ideal WordPress Coaching Theme
Before adding any content, it’s best to insert a suitable WordPress coaching theme. For online course sites, there are several best LMS WordPress themes. However, you must pick the theme with coaching templates.
But since we’re using Tutor LMS and it offers built-in themes, we’ll be using one of them. And that’s Tutor Starter, a free WordPress theme by Tutor LMS. Now, let’s start!
Install and Activate the Tutor Starter Theme
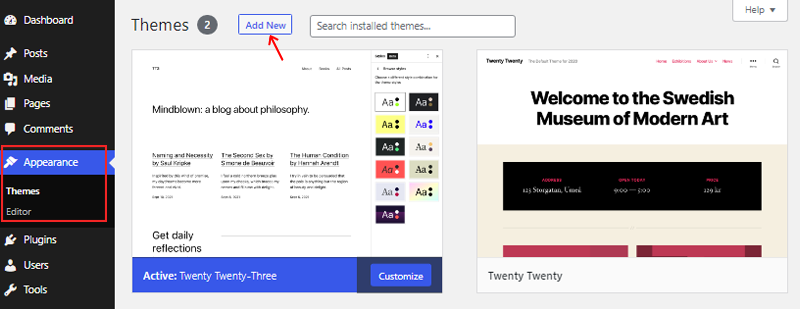
To install the theme, open the Appearance > Themes menu from your dashboard. Then, click on the ‘Add New’ button.
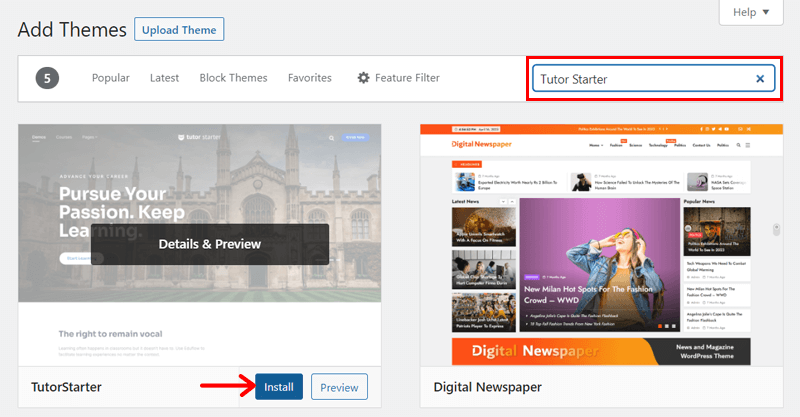
Now, search for the ‘Tutor Starter’ theme. Next, hover over the theme to click on its ‘Install’ button.
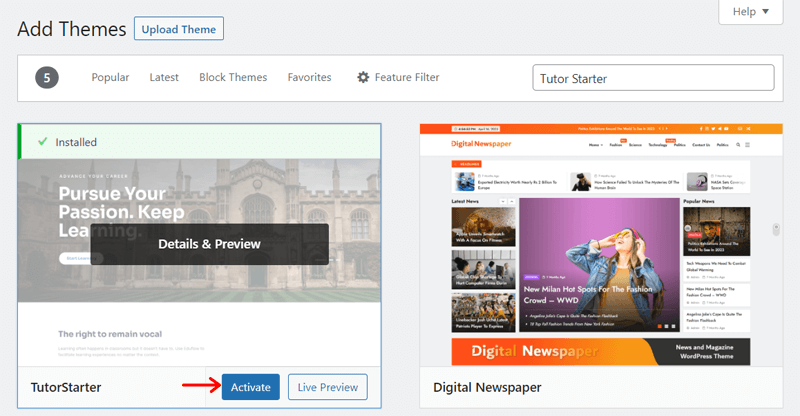
After some time, you can click the ‘Activate’ button.
This particular theme recommends installing a plugin called TutorMate. So, you can hit the ‘Begin installing plugin’ option shown in the notice. Then, you can click the ‘Install’ option followed by the ‘Activate’ option.
Once you have the theme and plugin working, you can insert the coaching template into the website. For that, navigate to the Tutor Starter > Starter Sites menu.
There, select the template you want. We recommend going with the ‘Instructor’ template. Because it’s ideal for a coach to offer coaching services.
Hence, you can click the ‘Import’ button for the template.
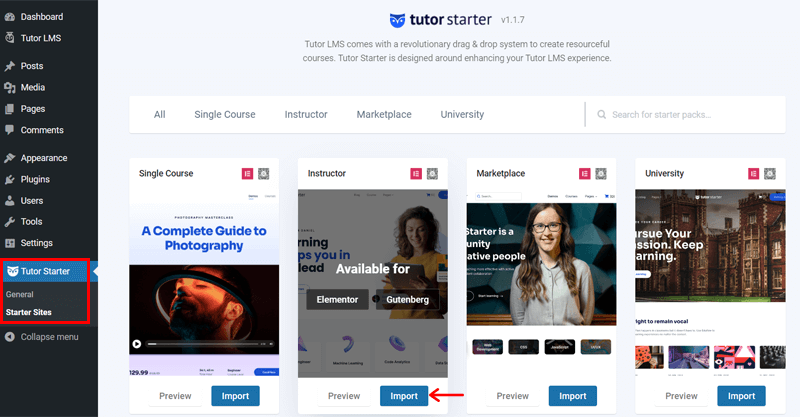
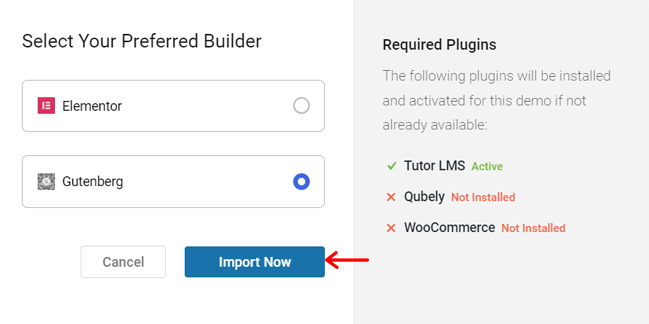
Then, pick your preferred website builder from Elementor or Gutenberg. Lastly, click the ‘Import Now’ button. This installs the template, demo content, and necessary plugins.
Here’s a guide on how to install a WordPress theme containing more methods.
Customize Your Coaching Business Site
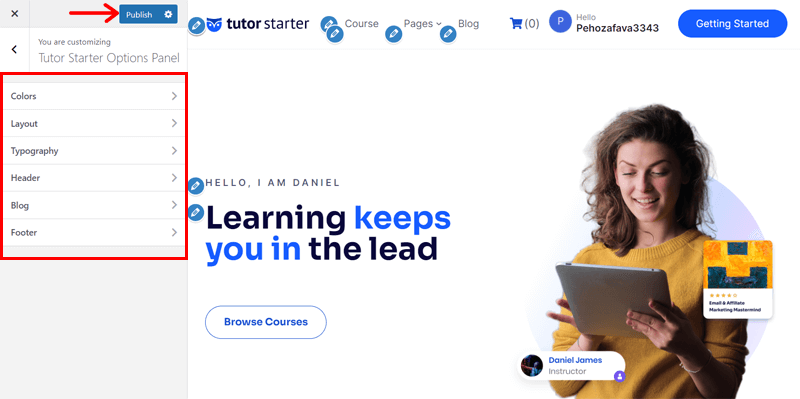
Now, you can start customizing your online coaching business website. Like any other WordPress theme, it’s possible to use the WordPress customizer.
On top of that, you’ll also get the additional Tutor Starter theme options. You can access them from the Tutor Starter > General menu.
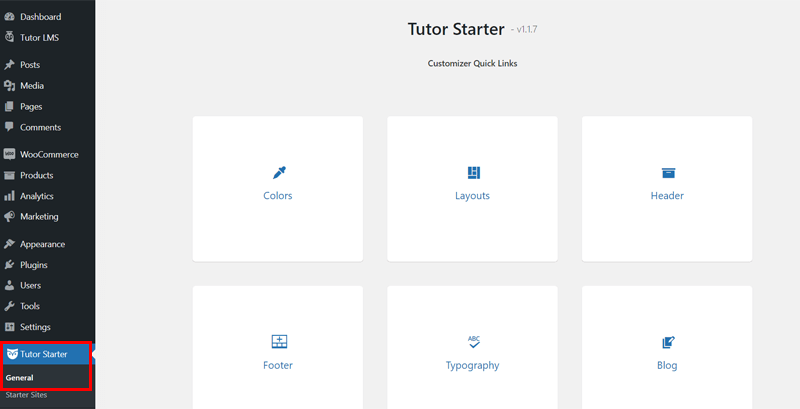
There, you’ll find these customization options to personalize your online coaching business:
- Color: Here, you can alter the body background, body text, and primary color.
- Layouts: This lets you select the content width of your website layout.
- Header: It contains options for the logo, header type, menu, and button.
- Footer: This includes options for the logo, footer type, widgets, and bottom text.
- Typography: Choose typography for body content and different headings.
- Blog: Show or hide elements like the author, featured image, post title, and more.
Lastly, you should click the ‘Publish’ button to save the changes you have made. After that, you can move back to your dashboard.
Step iv: Create Online Coaching Materials
This coaching website includes courses to coach clients. So, let’s learn how to add the coaching materials. Here we go!
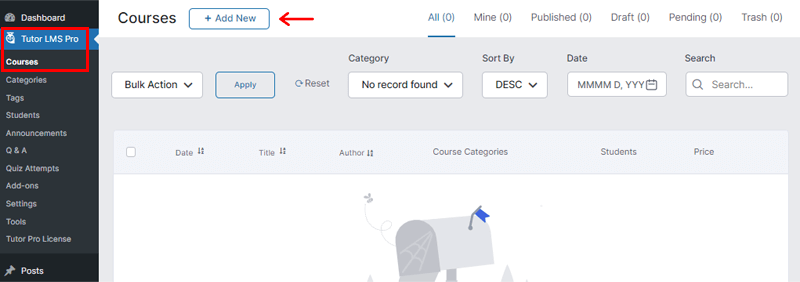
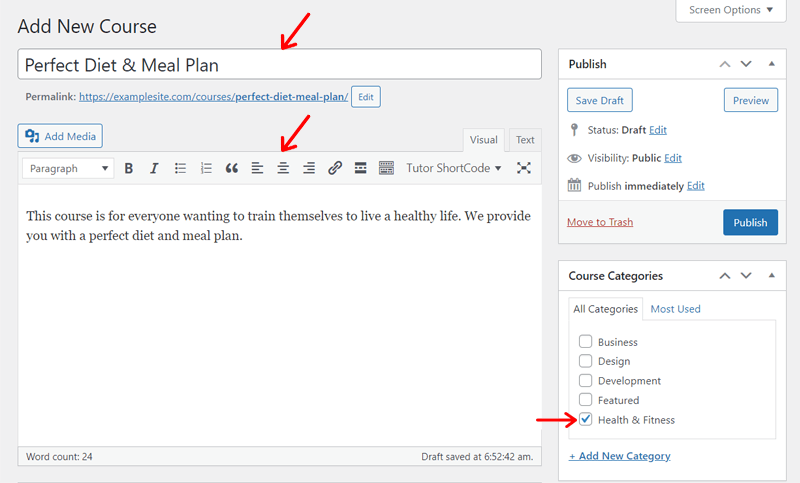
First of all, go to the Tutor LMS > Courses menu and click the ‘Add New’ button.
Now, you can add the course information, including title, description, category, author, etc.
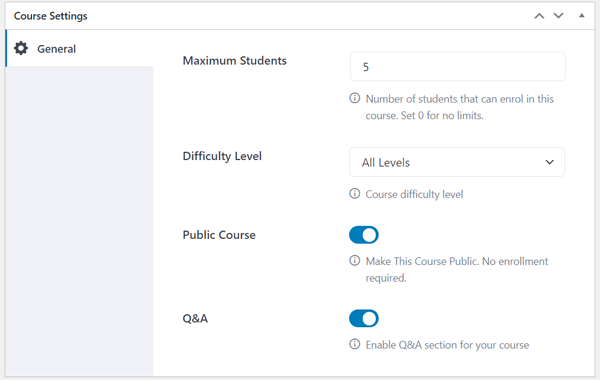
Also, there are some General course settings. You can set up the course, which includes picking the number of clients, difficulty level, etc.
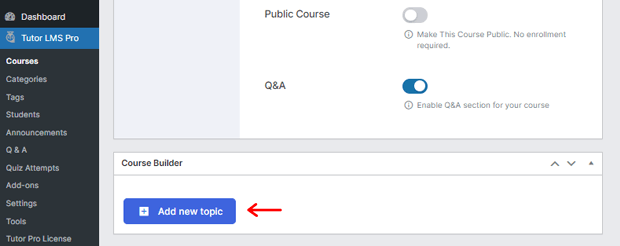
Now, you must use the course builder to add various topics within the course. For that, click the ‘Add new topic’ button as shown in the screenshot below:
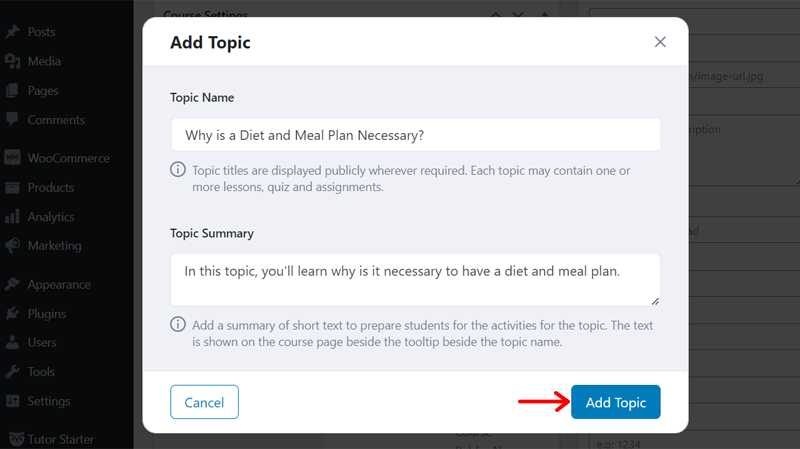
This opens a popup where you can give a name and summary for the topic. Then, click the ‘Add Topic’ button.
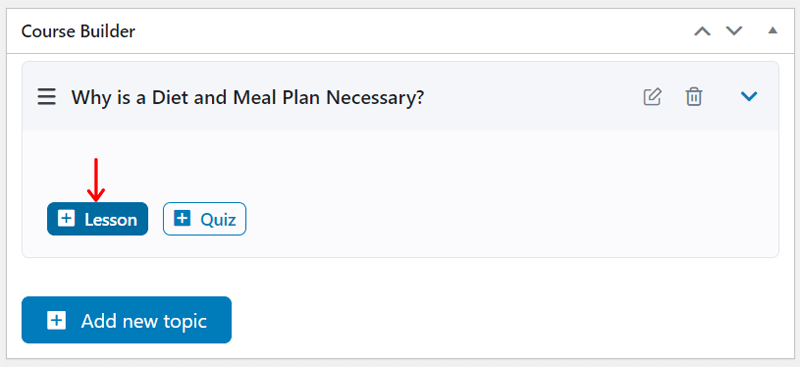
Next, you can start adding your coaching lessons or quizzes. Suppose you want to add a lesson to your coaching session. Then, click the ‘Lesson’ button.
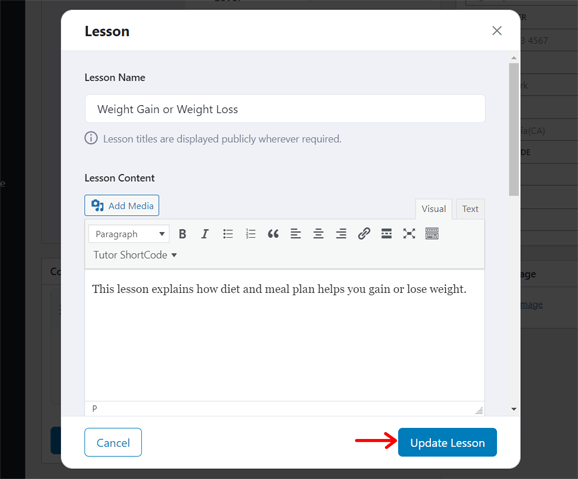
In the new popup, you can add the lesson name, content, and featured image. Also, it lets you upload necessary coaching attachments and videos. Afterward, click the ‘Update Lesson’ button.
Lastly, you can insert additional course data. That includes mentioning the target audience, requirements, materials required, featured video, etc., for the course.
Once you’ve added all the coaching materials, hit the ‘Publish’ button.
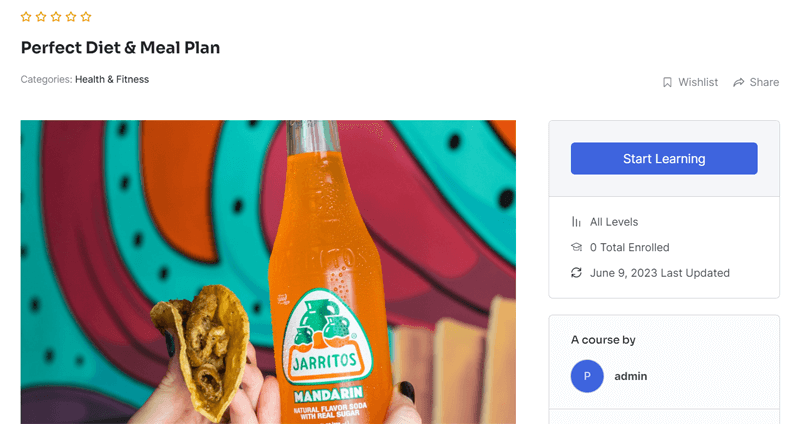
The screenshot below shows what your course looks like:
To get a detailed guide, you can go through our Tutor LMS review.
Integrate Crucial WordPress Plugins and Coaching Systems
An online coaching business website doesn’t only contain coaching courses. But a wide variety of features to connect with the different clients. So, we’ll look at some WordPress plugins for generating coaching systems. You may use them depending on your needs.
In addition, this table also contains some crucial WordPress plugins to use. Let’s begin:
| WordPress Plugins | Description |
| WooCommerce | If you want to sell coaching services or digital products with eCommerce functionality, then use WooCommerce. The template we chose from Tutor LMS automatically installs it. |
| Rank Math | It’s a powerful AI-powered (Artificial Intelligence) SEO (Search Engine Optimization) plugin. It helps your coaching services rank higher in search results. |
| WP Forms | It’s one of the most popular WordPress form builder plugins. Using it, you can insert various forms into the website. |
| UpdraftPlus | If you want to save and secure your files, then use this WordPress backup plugin. |
| Wordfence Security | It’s an all-in-one WordPress security plugin featuring malware scanning, a firewall, and login security. |
| Sassy Social Share | This plugin is useful for sharing your website content on social media platforms. |
| Paid Memberships Pro | This is a freemium WordPress membership plugin to add subscription levels to your coaching programs. |
| Video Conferencing with Zoom | A video conferencing WordPress plugin to handle meetings, recorded coaching sessions, webinars, etc. |
| Amelia | Event and appointment booking plugin with several management options for you and your clients. |
Note: Adding plugins for events, appointments, video conferences, and memberships depends on the features you want. Apart from them, other plugins in the table are necessary.
Add Necessary Website Content
Other than coaching materials, your site should include various pages and posts. Adding blog posts helps your site content be visible in search engines, increasing visitors.
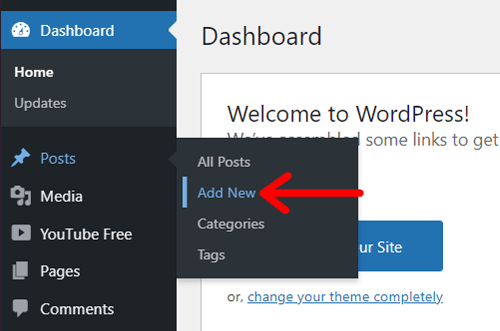
All you need to do is go to the Posts > Add New menu.
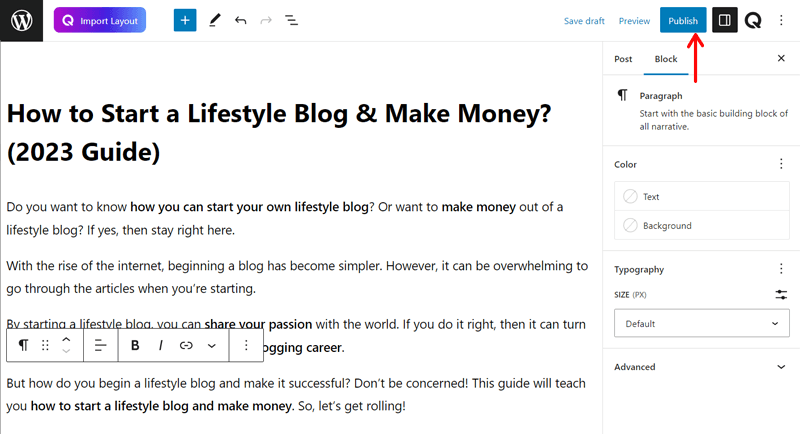
In the post editor, you can add the title and blog content using various blocks. Afterward, use the block and post settings to customize them. Lastly, hit the ‘Publish’ button.
For Example: Create a Testimonial Page
To build a strong online presence, your coaching website should be professional. It means it must show:
- Your qualifications and certifications.
- Client testimonials and reviews.
For that, you can add separate pages to your coaching website. For instance, let’s create a page to add client testimonials. Here we go!
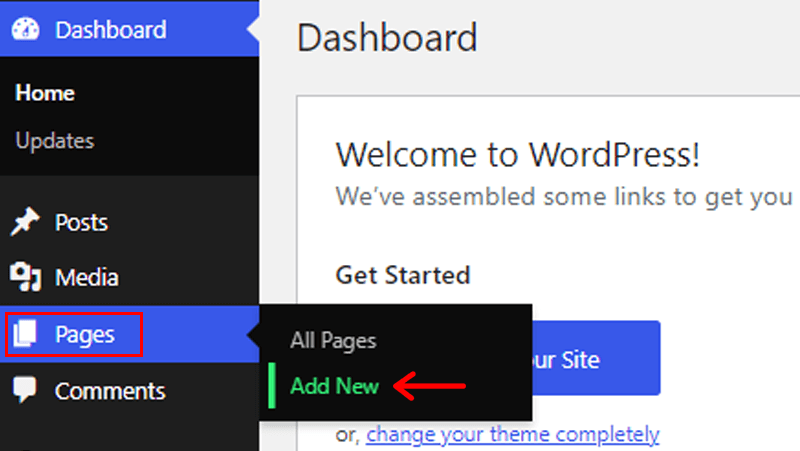
Open the Pages > Add New menu from the WordPress admin area.
In the page editor, add the page title as ‘Testimonials’. After that, add different kinds of blocks to add content.
Good news! The Qubely plugin that comes with the Tutor Starter theme gives pre-built sections made up of attractive blocks. So, let’s use a testimonial section for our page.
Here, you must click the ‘Import Layout’ button, which opens a popup. There, open the ‘Sections’ tab and search for ‘testimonial’ sections. Among the available options, select any one and click its ‘Import’ button.
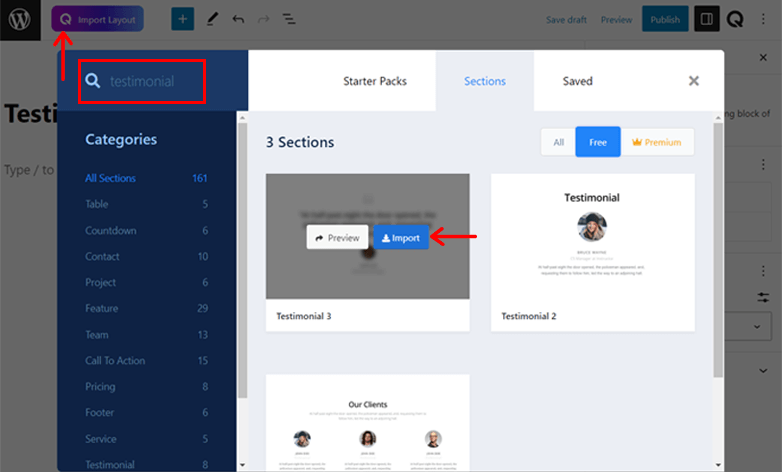
Now, you can edit the content. Then, customize them using the block and page settings. After you complete it, click the ‘Publish’ button.
But your new page isn’t visible on your website. Is it? That’s because you haven’t added it to the menu.
To do so, open the Appearance > Menu option and select the primary menu. There, tick the ‘Testimonial’ page and click the ‘Add to Menu’ button.
Lastly, hit the ‘Save Menu’ button.
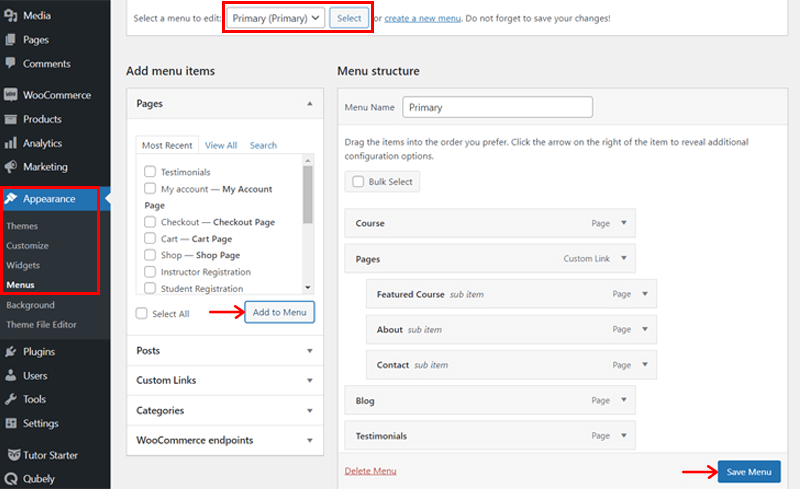
That’s all! Hope, all your pages, course materials, and blogs are ready for the launch.
Step 5: Promote and Scale Your Coaching Site
Now that you’re offering your coaching materials, clients won’t know about your business themselves. You’ve got to make an effort so that they know about your services. By utilizing different marketing channels, you can reach your target audience.
In addition, when the audience of your coaching website grows, you must also add additional resources. Giving something new can entertain clients for recurring purchases. Ultimately providing more revenue streams to your business.
Here are the promotional and scalable steps to consider if you start your online coaching business:
1. Improve SEO and Content Marketing
SEO and content marketing are strategies you must apply from the start. If not, then you can refine your content for better results.

Having an optimized website ranks your content higher in search results. So, utilize these!
- Identify and use relevant keywords in your content and coaching materials.
- Make sure to optimize the on-page elements of your blogs and site content.
- Write for influencers or other coaches to gain backlinks to your website.
Hence, you can choose from the best SEO tools and WordPress SEO plugins. Previously, we had already suggested using the Rank Math plugin.
Further, adding marketing content boosts the user experience and grabs their attention. For that, use infographics, videos, podcasts, etc., in your coaching programs.
2. Perform Social Media Marketing
Social media marketing lets you promote your business on social networking sites. So, follow these steps:
- Pick the right social media platforms where your target users are most active.
- Build a community to engage your potential clients. That can be through messages, discussions, Q&A, interactive posts, etc.
- Add eye-catching images, videos, and graphics to capture the user’s attention.

If you want to directly share your website content on social media, then use a WordPress plugin. Here are the best WordPress social media plugins. That’s why we recommended the Sassy Social Share plugin before.
3. Conduct Email Marketing
You can use email marketing to promote your online coaching business. Check out the list below on how you can do so:
- Capture leads via your website, landing pages, or social media. Then, give free resources or exclusive content to your email list that encourages sign-ups.
- Build automated email sequences or drip campaigns to nurture leads. With that, you can introduce them to your coaching services.
- You can offer special offers, promotions, or discounts on your coaching programs. And mention them in your emails to encourage leads to take action.

Here’s a list of the best email marketing services to choose from. Among them, we recommend using Mailchimp.
4. Connect or Add Other Coaches
You can network with other coaching professionals in your industry. Or join the coaching communities and groups online.
With that, you can build relationships and get partnerships for your business. On top of that, you may collaborate on joint ventures or guest appearances to expand your audience reach.
Additionally, you can also hire more coaches if you have a growing business. This brings new expertise, increased coaching session availability, and marketing efforts. But ensure your coworkers have coaching experience, a good portfolio, and match your style.
5. Use Advertising
Crafting persuasive ad copy that highlights your coaching services is another marketing method. Make sure you add your coaching benefits and strong call-to-actions to the ad.
Before that, you should select the right advertising channels to reach your audience. It can be social media advertising, search engine advertising, or ads on relevant websites.

Best of all, remarketing is an effective strategy to apply. You can show ads about your coaching services to potential clients who have previously visited your site. This reminds them about your program and boosts conversion.
Do you want to add banners to your website for additional revenue? Here’s a guide on inserting banners into a WordPress website.
6. Sell Digital Products
Other than offering your coaching services, you can create relevant products, aligning your coaching expertise. That can be e-books, video tutorials, online courses, audio recordings, templates, worksheets, etc.

This method not only markets your coaching programs but also brings in additional revenue. And you can get better results when considering these strategies:
- You can provide product bundles with multiple similar products. This encourages people to purchase the products at once.
- Better if you configure a sales platform. It can be with a dedicated eCommerce site, a sales page on your coaching site, or via marketplaces.
If you want the eCommerce functionality, then here’s a guide on creating an eCommerce website.
7. Use Affiliate Marketing
Affiliate marketing is another approach to scaling your online coaching business. You can build an affiliate program that lets others promote your coaching services.

In fact, you can find affiliates that align with your target market, like bloggers, influencers, podcasters, etc. After that, reach out to the potential affiliates using networking platforms.
Best of all, you should equip your affiliates with your marketing materials. That can be banners, content, social media graphics, email templates, etc. This helps in the promotion of coaching services by maintaining brand consistency.
Go through the list of the best WordPress themes for affiliate marketing. If you want to focus on affiliate marketing, then your web design should suit that.
8. Add Membership Plans
Another business strategy you can use to offer your coaching materials is to add membership plans. It’s perfect to get recurring revenue streams monthly or annually.
On top of that, membership plans establish long-term relationships with clients. Also, your continuous coaching services can engage and gain loyalty among the audience.
Hence, you can create membership tiers with different access levels and benefits. That can be exclusive content, additional benefits, or extra products or services.
If you want to add membership features to your coaching website, then pick among the best WordPress membership plugins. As said before, we suggest using the freemium Paid Memberships Pro plugin.
That’s all! This concludes the ultimate guide on how to start a coaching business online.
Clearing the Path: Frequently Asked Questions (FAQs)
Last but not least. Look at some FAQs on starting an online coaching business.
1. What technology or tools should I use for online coaching?
The technology or tools you should use for online coaching depend on your business plan. It can include video conferencing platforms, scheduling software, eLearning platforms, payment processing systems, etc.
2. How do I set my coaching fees and pricing structure?
You can set your coaching fees and pricing structures after evaluating your expertise, target market, expenses, and desired income. Hence, you can select a pricing structure, test it out, and get the client’s feedback. Accordingly, adjust the fees for a sustainable program.
3. Can I transition from offline coaching to online coaching?
Yes, of course, you can transition from offline coaching to online coaching. Several coaches have done this to benefit their businesses. So, you can also plan and prepare to smoothly start a coaching business online.
4. How can I manage my time effectively as an online coach?
Managing your time effectively as an online coach requires setting boundaries for your availability. You can use a calendar or scheduling system to plan sessions and prioritize tasks. Further, you can automate repetitive tasks and use efficient communication channels.
5. How do I provide a good client experience in my online coaching business?
You can provide a good client experience in your online coaching business in many ways. That includes focusing on client communication, active listening, personalized services, etc. Also, you must provide continuous support, reward clients, and share relevant resources.
If you’re new to creating a business online, then here’s a complete guide. It’s about the process of creating a website from scratch.
Conclusion
That’s all, folks! In a nutshell, this article guides you on how to start a coaching business online. Hopefully, you understand all the steps and can follow them to create your website.
As mentioned before, we recommend using WordPress.org for your coaching business site. Since it offers plugins, themes, and integration with tools for a complete coaching website.
If you need help to start your coaching business online, then we’re right here! Just your queries in the comment section. We’ll try to guide you as much as possible.
In addition, you can read our other articles on LMS vs. CMS and the best teacher website examples.
Lastly, follow us on Facebook and Twitter to keep reading more articles like this.


