Are you trying to figure out how to create a website, especially with so many tools and platforms available?
If yes, you’re not alone!
With around 252,000 new websites being created every day, having your own site has become essential for sharing ideas, growing your business, or showcasing your skills.
All thanks to user-friendly website builder platforms like WordPress, which offer powerful capabilities to help you create a website. That too without coding.
But how do you get started, and is it really as simple as it seems?
In this guide, we’ll walk you through everything you need to know to create a website, including choosing the right platform, designing your site, and adding all the features you need.
It’s a simple, step-by-step process that anyone can follow.
So, let’s dive in and start building your dream website!
Why Should You Create a Website in 2026?
As of recent statistics by Siteefy, there are around 1.3 billion websites on the internet. So, you might be wondering, why even bother to create a website? Here’s what we have to say!
A website is always a good choice to showcase your talents on the internet. And if you own a business, then it’s even more important to have a business website on the internet.
Even if your website isn’t the most popular, then having one still has a lot of benefits. Such as:
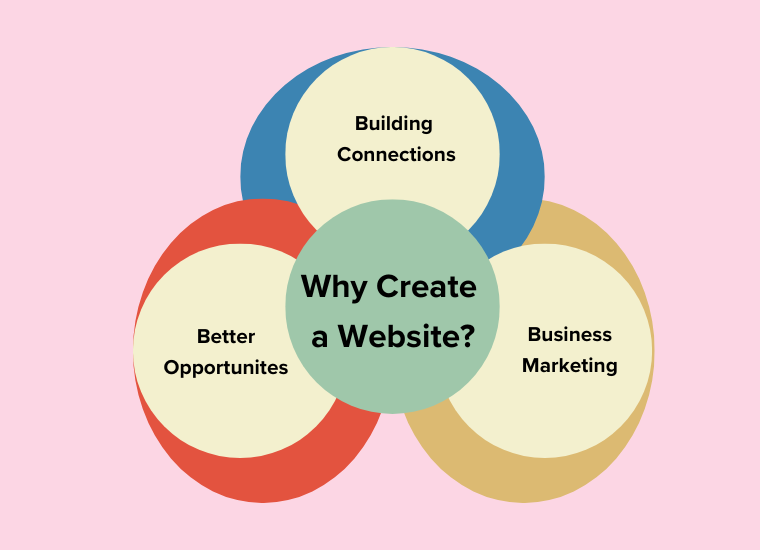
- Building Connections: You might want to share your talents and meet someone with similar talents. Building a site is a great way to connect with new people of similar mindsets.
- Better Opportunities: A CV with a linked portfolio website boosts job prospects by showcasing skills and achievements, increasing your chances of landing a job.
- Business Marketing: Also, make some extra money with ads and affiliate marketing on your site. In fact, companies pay site owners for ad placement, while also providing a platform for promoting your own business.
Having a website nowadays has a lot more benefits than them. You can check our detailed guide on why do you need a website to know more about its importance.
Now that you know why you should create a website, let’s get into how to create one.
Step 1: Choose What Type of Website You Want
Before you create a website, deciding on what type of website you want to make is important. With that, you’ll understand how you’re going to build it. Moreover, it also helps in figuring out how you want your website to look and what you need on your website.
So, let’s go over the most popular types of websites that you can create with the help of this guide.
i. Blog
Blogs are the most common types of websites. A blog is an informational website. If you’re only looking to share your interests, then a blog is the best fit for you.
You can use your blog in a variety of ways. You can upload your day-to-day activities in text or video on your blog. And of course, you can share your knowledge, interests, or hobbies with people on the internet through your blog.
For example, SiteNerdy.com (our site) is also a blog. Here, we write about website making, SEO (Search Engine Optimization), making online money, etc.

Blogs are very popular so getting a blog is a great idea if you’re looking for a casual website. If you’re confused about what type of blog you should start, then we recommend you choose from the following popular types of blogs:
- Personal blog
- Educational blog
- Lifestyle blog
- Fitness blog
- Travel blog
- Finance blog
- Tech blog
- Business blog
To get more ideas, here are some of the popular blog sites on the internet that you can check out:
- Mashable (Personal Blog)
- My Wife Quit Her Job (Business Blog)
- TechCrunch (Technology Blog)
Make sure to also have a look at our article on the list of popular lifestyle blog examples.
Additionally, you could also monetize your blog to earn some side cash. Some of the ways are by adding advertisements to your site or performing affiliate marketing as we mentioned before.
You can make a blog and start sharing your stories, articles, and other creatives online. Among the various free blog platforms, you can choose either WordPress, Wix, Blogger or Medium. We’ll talk more about our recommendation later. Stay here and keep reading.
ii. Business Website
A business website is another popular website type. If you have a business that is not related to eCommerce, then this is your go-to. In this age of the internet, you need to get your business on the internet for various reasons.
Getting your business out on the internet means that more people know about your brand and you get more new customers. Even potential investors may want to invest in your business.
The benefits are limitless and business websites do just that. They are made to represent your business on the internet and attract clients and investors.
Business sites are usually static with a few information pages. They usually include a home page, a product page, an about page, and a contact page.
The best example of a business site can be The New York Times Company. This site runs the online newspaper business by showcasing the daily news across the globe.

Other than that, here’s a list of some other sites of big businesses on the market.
To conclude, a business site is necessary for any business. So, if you have a business or planning to, then make sure to create a business website.
iii. eCommerce Website
eCommerce websites are for people who want to sell their products online. If business websites are a company, then eCommerce websites are the stock market. You can buy and sell things through eCommerce websites.
Some examples of popular eCommerce sites are,

eCommerce websites include a lot of things from the customer login page to the checkout page. They are always dynamic, meaning that you can have live interactions within the website. You can chat with your potential customers and respond to their pre-purchase questions.
There are some best eCommerce platforms to get started. You can choose any one of them and go with it. For eCommerce, we recommend WooCommerce or Shopify the most. Because they are more popular these days. Read more about WooCommerce here.
If you have a business that sells a variety of products, then an eCommerce website is the right type of site for you. By putting out your business on the internet, you can gain a lot of profit.
iv. Personal Portfolio Website
A personal portfolio website is for people who want to make an attractive personal presence online. However, they are popular among people looking for a job. If you have the skills required for a job and you’re looking for one, then we highly recommend you create this website.
Many employers look for employees online. And if you can demonstrate your skills on your very own website, then you’ll most likely get hired.
Different kinds of examples of personal portfolio websites are:

These types of sites are only used to display your information, they are usually static. You can have a home page, a gallery, an about page, and a contact page for your personal portfolio website.
Personal portfolio websites can help you earn some side cash as well. All you need to do is enable ads on your website and even if you’re currently working for a client, you’ll be earning some extra money.
Personal portfolio websites are usually owned by freelancers who are constantly looking for a job. If you happen to fall under this category, then you need to consider creating a personal portfolio site.
v. Forum
A forum is a website where people can discuss or post on a variety of topics. They’re like a high school message board. People can have their opinions posted on the website and everyone else can view them anytime they want to.
Reddit and Quora are the two titans of forum websites. You can check them out if you want to create one.
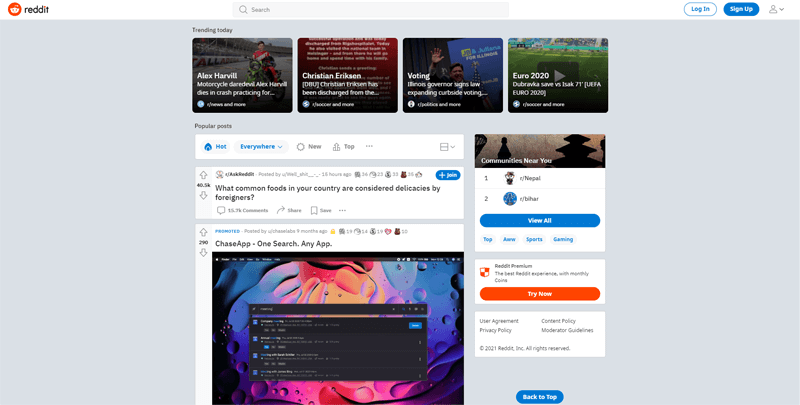
Forums aren’t very popular nowadays because some websites have dominated them so much that people aren’t willing to create a new ones. But, if you’re passionate about people sharing ideas on your website, then you should definitely create a website regarding forums.
In a nutshell, a forum is a dynamic website. These websites are usually organized into different topics so that people can choose to view what they want. So, if you’re interested in making a discussion platform, then you can prefer creating a forum site.
There are several other kinds of sites that you can build. Like education, news, magazines, etc. To know the examples of every kind of site, check this blog for the best site examples.
Step 2: Choose a Perfect Website Platform
In the past, if you wanted to create a website, then you’d have to build it yourself by piling up hundreds of lines of code. That’s suitable only if you’re a developer and can build your site from the scratch.
Another way is to hire a developer who will build the site for you. But both these ways are too expensive and time-consuming.
On the other hand, with the power of website builders like WordPress, building a website is just a couple of clicks away. And having a little bit of knowledge to use computers and software also, even a beginner can create his/her site.
In addition to that, some of the major benefits of using a website builder platform are:
- Includes lots of themes with templates to easily get started with your site’s front-end design.
- Offers tons of plugins and tools to add extra functionalities to your site.
- Uses the latest software standards and security techniques.
- Comes with a handful of SEO tools, by using which your site can rank better on search engines, etc.
Overall, using a website builder platform is the best and most preferable choice to create your site. Not only you’ll get the authority to make the site from scratch leading the site to be what you like or prefer. But also you don’t need to have any coding knowledge!
Which Website Builder Should You Choose? (5 Best Platforms)
Now, you may have decided to choose a website builder. However, there are many great site platforms out on the market. So, you may be wondering which site builder should you go for?
Since all websites aren’t the same, let us help you decide which builder you should go for. Here’s a quick review of the top 5 website builders.
1. WordPress.org – Most Famous Website Platform
From WordPress.org, you’re able to download and use the most famous site builder i.e. WordPress for free. It’s basically a Content Management System (CMS) where you can easily start building and managing your site. Literally, there are over 43% of sites on the web built on WordPress.
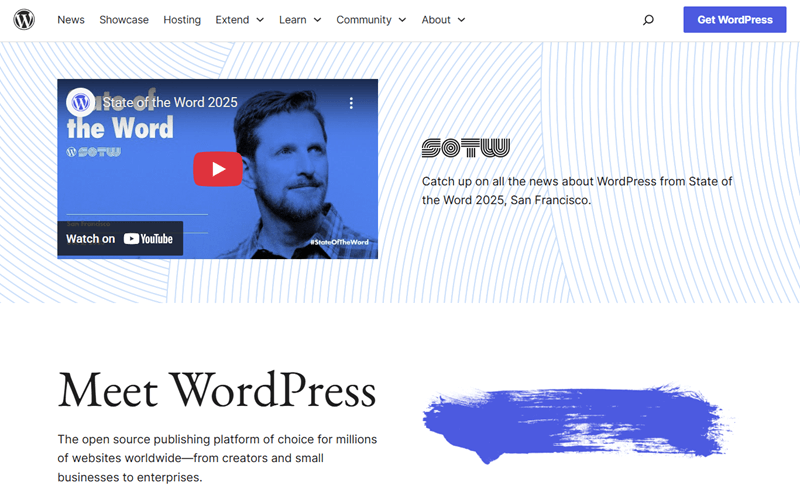
Alongside the free core software, there are lots of plugins and themes that you can use to create a fully-functional and beautiful site. However, this platform doesn’t provide any hosting service.
It means you need to choose and get a web hosting service to host your site so that everyone can see your site online. Also, you’ll need to get a domain name for your site. But, it’s pretty easy to do so!
If you’re a beginner, then check this blog to know the difference between web hosting and domain.
Now, let’s look at the pros and cons of WordPress.org:
Pros:
- WordPress.org is absolutely free. There’s no money involved in installing or using WordPress at all. You can create a website just like you want, without having to pay a dime.
- WordPress is so flexible that you can use it to create any kind of website. It can be a blog, portfolio, eCommerce, and others.
- There are several free and premium themes, plugins, and tools that WordPress offers. To be exact, 14000+ themes and 60,000+ plugins that are free.
- As a popular platform, you can find tons of tutorials on using WordPress. Also, it provides good support to its users.
- WordPress sites have an easier time exposing their content to Google. That’s because of the easy integration of Google Analytics. Also, you can customize your content for better SEO.
Cons:
- Doesn’t provide web hosting and domain registration service. So, you need to carefully choose a good hosting platform that gives the best security features for your site.
- WordPress and its resources give the latest updates every time. That’s why you need to be aware of that and regularly update them for better performance and features.
To summarize, WordPress is free and the best platform that you can find. You can create any type of website with it. Beginners may get overwhelmed first. But, we are going to show you the steps to create a website with this platform. So, keep reading!
Yet, want to know more about it? Then, be sure to check out our article on what is WordPress? Also, check the difference between WordPress.org vs WordPress.com.
2. Wix – Easiest Website Builder for Beginners
Wix is a drag and drop website builder with which you can make any website pretty easily. And it’s really the easiest way to create a website. Since you have a lot of themes to choose from for your site’s design.
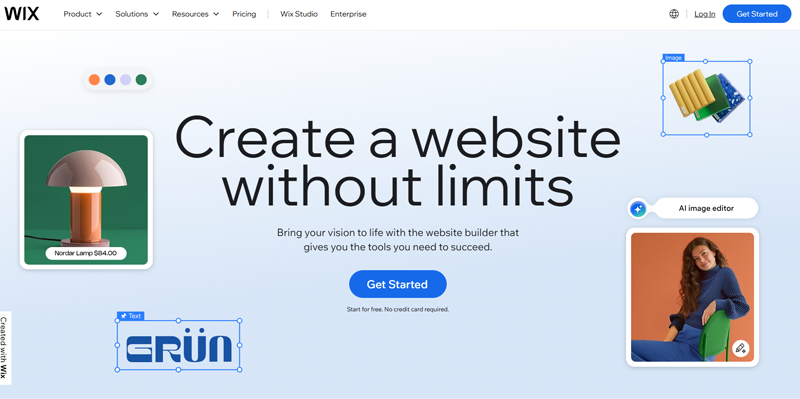
There are over 160 million websites on the internet hosted by Wix. Unlike WordPress, Wix has its own hosting service and offers domain registration. The App Market within Wix also makes it easy to add extra functions to your website.

Here’s our comprehensive article on WordPress vs Wix to make a better choice between them. If you are always using Wix and want to switch to WordPress, then comment below. We’ll provide you with exclusive resources to get started with WordPress.
Now, let’s look at some pros and cons of Wix:
Pros:
- Websites built on Wix are always responsive i.e. they’re well optimized for any kind of device. Hence, your customers will have no trouble going through your site when using any device.
- Wix app market is similar to the plugin store in WordPress. It lets you add extra functions to your website. You can also add eCommerce, live chat, and much more using this feature to convert your site into an online store.
- Offers you domain registration and web hosting services.
Cons:
- Wix displays its brand ads if you choose to take the free plan making your site look congested. They can’t be removed by any means other than subscribing to a premium plan.
- Even with features like the app market, Wix is less customizable as compared to other website builders. So, you won’t be able to design your site to its fullest and need to pay to get some extra customizations.
- Doesn’t offer data export. This means that if you want to change platforms, then you can’t take your site data with you. So, if you’re going with Wix, then there’s no option to change platforms.
To summarize, if you want to create a website for small businesses, personal portfolios, and products showcase, then Wix is recommended. This is also perfect for beginners who want to create a website on their own using drag and drop builder.
You might love exploring our article on WordPress vs Wix. Also, check out our article on how to build a website on Wix for free.
3. Squarespace – Site Platform with Unlimited Resources
Another popular website builder available on the internet is Squarespace. It’s a great website builder for creating a personal as well as a professional website.

It offers a wide range of customizations to its websites. They have themes and templates for almost any website niche and each template comes with several customizable features.
Some of its pros and cons are:
Pros:
- A flexible website builder that gives you unlimited bandwidth and storage on any plan. This means that you have the freedom of adding as much content as you’d want to on your site.
- If you choose to create a website for selling products, then they won’t charge you any transaction or subscription fees at all. While some other website builders may do. This helps you (especially supermarkets and retailers) to run the business with a lot of profit.
Cons:
- This platform doesn’t offer a free plan. But offers a free trial for some days when you can try it and decide whether to use it or not. The cheapest plan starts at $16 per month.
- Sometimes even with all those customization options, you’ll need something more to make your site complete. Due to restrictions, you can’t use third-party SEO tools or monitoring apps on your site.
To summarize, Squarespace is perfectly suited for small business websites, personal blogs, and small-scale eCommerce websites. It’s a hosted platform, so you don’t need any idea about hosting and security. You can just signup and be ready to go.
4. WordPress.com – Fully Hosted Platform for WordPress
WordPress.com is the same as WordPress.org when it comes to the CMS i.e. WordPress. But it’s an easier way of using WordPress software. As you don’t need to download it and neither do you need to look for hosting.
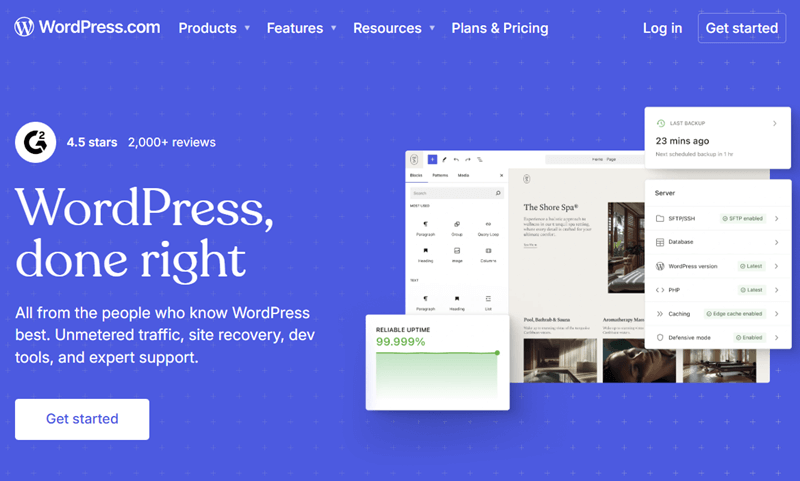
That’s because WordPress.com itself provides web hosting services. Although, having a WordPress account is necessary.
Read our complete guide on WordPress.com vs WordPress.org to know more about these site builders.
Now, let’s look at its pros and cons:
Pros:
- With a WordPress account, you can easily set up and start building your site yourself. After that, your website will be running in a couple of clicks. This is the biggest reason why it’s popular.
- It has a simple user interface. This makes it easy for people to navigate the website and create their website in a couple of minutes.
- Gives great technical support to its users with good backup and maintenance services.
Cons:
- Very little flexibility regarding modification on your website, even for paid plan users. Regardless, you can buy some flexibility with money. There’s a VIP account at a rate of $2000/mo with which you can install more plugins and themes.
- All free accounts are hosted as subdomains. This means if you have a free plan, then your site’s URL will have ‘wordpress.com’ in it. Example: sitenerdy.wordpress.com. That’s not ideal for any site.
To summarize, if you are looking for a free blogging platform, then WordPress.com will be the best option for you. The free option has some limitations, however, it is perfect for beginners to start a blog.
You might love reading our article on WordPress.com 100 year plan article for some exciting deal.
5. Shopify – The Ultimate eCommerce Platform
If you are looking for the most popular eCommerce platforms, then Shopify is the best on the internet. It’s mostly used to create a website with eCommerce features. As we’ve talked about above, eCommerce websites are very important for your business to grow if you have a product selling business.

This eCommerce platform offers you incredible features and customizations possibilities to help you grow your business. This website builder gives you a lot of features right off the bat from online payment to live customer chat.
Have a look at our comparison article on Shopify vs Wix for more clarity.
So, let’s look at its pros and cons:
Pros:
- Able to have online payment transactions directly linked to your website. So, you don’t have to go through the hassle of installing external apps. Customers also feel secure about sending money to your site. However, this great feature comes at a price.
- Contains great marketing tools for your site such as SEO and an in-built blog that you can use to attract more people. Moreover, it also offers basic analytics for your website that gives reports on how well your site is doing and finds your monthly site visits.
- Gives responsive design to your site, making your site optimized for any type of device. This helps your customers stay on your site longer as everything is smooth and as easy to use.
Cons:
- Relatively charges a large amount of transaction fee. You’ll be charged an amount per transaction that can range from 0.6% to 2% of the transaction. This is a large amount to give away if you sell expensive stuff like automobiles.
- Offers a 14-day trial but after that, you need to pay $29/mo just for the Basic plan. For a small business, that’s a lot to pay. The prices can go up to $299/mo for an Advanced plan. These plans do reduce your transaction fee but they’re still a lot.
To summarize, Shopify is a powerful eCommerce platform to start an online shop. It is a simple and easy-to-use platform even for beginners. You can sign up and start selling the products.
Want to know more? You might want to check out our article on what is Shopify and its alternatives.
Besides the above-listed platforms, there are other popular website builders as well. You can check them out so that you can find the right fit.
Our Recommendation is WordPress.org!
So, what do we recommend?
Of course, we highly recommend WordPress.org to create your website. And there are various factors to support why we recommend using WordPress.
So, here are the top reasons:
- First, if you create a website with WordPress.org, then you own your site for free. So, you don’t have to worry about any sort of terms and conditions.
- Another advantage is that it’s self-hosted by you. This means that you can choose whichever hosting platform you want. As a result, you can save a lot of money in the long term if you choose a separate hosting platform that matches your needs.
- Further, it has a huge directory for free and premium WordPress themes and WordPress plugins. Using them, you can create any kind of professional site with any functionality you want.
- Moreover, if you know how to code, then you can create a website of your liking. WordPress.org also allows you to add external themes and plugins for free. That means even more customization to your very own website.
- WordPress offers free support. You can get support from experts all around the globe totally free. Also, you can attend WordPress meetups and WordCamps to get more knowledge about WordPress.
So, we recommend using WordPress among other website-building platforms.

Everything from here will be about how to create a website using WordPress as it’s the best platform to do so. With that, let’s get into the next step.
Step 3: Get a Domain Name and Web Hosting
As we said above, WordPress.org is a self-hosted platform and you need your own domain name and web hosting. In the case of a self-hosted platform, you will get more flexibility and control over your site. So, the next step is to have a domain name and a web hosting platform.
i. What is a Domain Name?
A domain name is the identity of your website on the internet. Simply, it’s what your visitors type in the web browser address bar to visit your site.
Actually, your website identity is given by the IP address of your server. The IP address is a series of numbers that are difficult to remember. So instead of that, domain names came into use replacing the IP addresses.
For instance, SiteNerdy.com is an example of a domain name.

There are some domain name registrars from where you can search the domain and register it.
Moreover, domain names generally reflect your identity on the internet. So, we suggest you choose a good domain name. Here are some beneficial points you should keep in mind while creating your site’s domain name:
- Make a short and catchy domain name easy for anyone to remember or notice.
- Must depict the main purpose of your website.
- Best to use the .com extension for the domain.
- Recommended to not use any numbers or hyphens.
If you are not able to get an idea about the domain name, then you can take help from domain name generators. They will provide you with a good domain name based on your keywords.
ii. What is Web Hosting?
In short, a web hosting platform is a medium through which you can host your website on the internet. Web hosting platforms are bridges between your website and the internet. All your website files will be stored in web hosting. They are remote computers and are accessed via the internet.

You can also make your own web hosting. But it required lots of knowledge regarding servers. So, we won’t recommend you to make your own. Instead, we recommend going with one of the best web hosting companies. They offer,
- Up to 99% uptime.
- Dedicated support via chat, email, and support ticket.
- Website backup and restore if necessary.
- Easy to use hosting dashboard, etc.
Some of the things that you must consider while choosing a web host are:
- First, estimate your monthly site visitors and accordingly select a host that matches the bandwidth you need.
- Also, estimate the storage space your site requires to store all of your files.
- Look and compare the pricing plans of the different hosting providers. Then, choose the one that gives quality service at a better price matching your needs.
- Search for the user reviews of the hosts and select the host with the best customer support.
Affordable and reliable hosting plans for your new site will usually cost around $2.99 to $9.99/mo. This is relatively cheaper but it’s very important to choose a host that helps to improve your site.
As a beginner, you can select the cheapest host that gives quality service. Then, you can scale your plan. So, in our further steps, we’ll be showing the steps using a cheap and reliable host. Let’s go!
iii. Which Domain and Web Hosting Platform to Choose?
There are plenty of domain registrars and hosting companies. Some of the best domain registrars are Name.com, Domain.com, GoDaddy, Namecheap, etc. While some of the top web hosting providers are SiteGround, Bluehost, DreamHost, and more.
Moreover, some companies even provide both of these services. Some hosts give domains at an additional price. While some offer domains for free when purchasing an annual hosting plan.
Some hosts give both the domain and hosting services like Bluehost, DreamHost, Namecheap, etc. Overall, these hosts provide cheap plans for beginners to kickstart their site. Although there can be some limitations, they are enough for a small site.
Note that, every host gives one or multiple kinds of hosting services. Such as WordPress hosting services, cloud hosting services, and WooCommerce hosting services. Also, there are managed hosting providers like Cloudways that have powerful features like advanced security and speed.
Here, we’re focusing on hosting a WordPress website for beginners. So, you can check out the following hosting platforms.
1. Bluehost
Bluehost is one of the leading web hosting providers, powering over 2 million websites worldwide. It offers various plans and packages for web hosting, domain, WordPress, and online stores. Particularly, with features like free domain name, free site builders, free SSL certificates, and more.
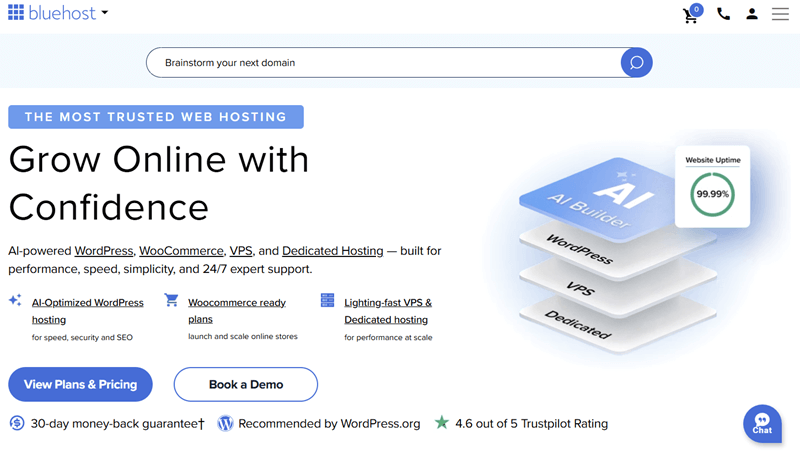
Key Features:
- Utilizes specialized caching technology to enhance your site’s speed and efficiency when loading content optimally.
- Enhances your site’s security through multi-tiered measures, including Web Application Firewall (WAF), DDoS protection, etc.
- Features a domain manager for centralized management, updates, exchanges, and purchases of all your domains from a single location.
- Incorporates a site staging area that enables the adoption of innovative designs without impacting your current website.
- Offers assistance from trained experts through chat or phone. Plus, you can access guides, video tutorials, and other resources too.
Pricing:
Bluehost offers 3 different plans under shared hosting for your WordPress website.
| Plan Features | Starter | Business | Ecommerce Essentials |
| Initial Cost (2-Year) | $3.79/month | $6.79/month | $14.79/month |
| No of Websites | 10 | 50 | 100 |
| SSD Storage | 10 | 50 | 100 |
| Managed WordPress | Yes | Yes | Yes |
| Free Domain | Yes | Yes | Yes |
| Support | Chat | Chat/Phone | Chat/Phone |
2. Hostinger
Hostinger is another affordable WordPress-specific hosting with a reliable 99.9% uptime guarantee. This ensures your WordPress website runs continuously. Also, it offers a suite of developer-friendly tools such as WP Starter site-building wizard, controlled auto-updates for core software and plugins, etc.

Key Features:
- Enjoy faster website loading speed with LiteSpeed Web Server technology that reduces website response times by up to 3 times.
- Provides an SSL (Secure Socket Layers) certificate to enhance the security and SEO performance of your website.
- Includes pre-installed caching plugins and other security features, facilitating a swift website launch.
- Equips you with FTP (File Transfer Protocol) accounts for easy data transfer and storage.
- Grants GIT (Global Information Tracker) access, simplifying the tracking of file changes on your site.
Pricing:
Hostinger also provides you with the following 3 plans for WordPress hosting to choose from.
| Plan Features | Premium | Business | Cloud StartUp |
| Initial Cost (Billed Yearly) | $3.49/month | $4.49/month | $9.99/month |
| No of Websites | 3 | 50 | 100 |
| Performance | Standard | Increased | Maximum |
| Free Domain | Yes | Yes | Yes |
| Bandwidth | Unlimited | Unlimited | Unlimited |
| SSD Storage | 20 GB | 50 GB NVMe Storage | 100 GB NVMe Storage |
3. Cloudways
Cloudways is a managed cloud hosting platform that simplifies the complexity of setting up and maintaining the website. It offers various plans with features like a free SSL certificate, website migration, caching plugin, etc. It’s also known for its excellent customer support, available 24/7.
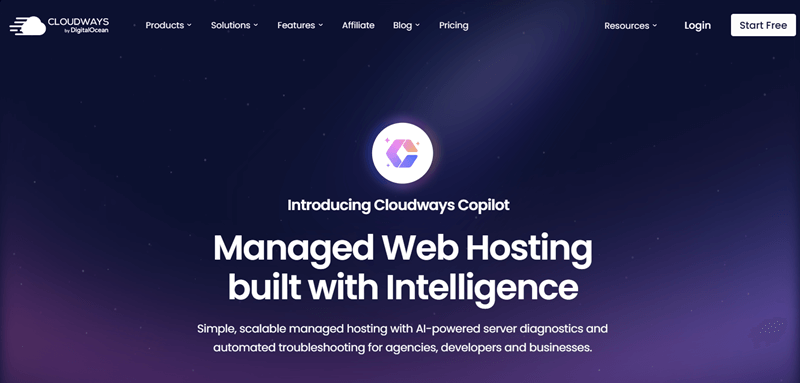
Key Features:
- You can choose from DigitalOcean, AWS, Vultr, Linode, or Google Cloud Platform for your hosting.
- Activates HTTP/2 within its hosting, enhancing the speed of interaction between web servers and users.
- Ensures site stability with an auto-healing restarts feature, effectively addressing most server issues.
- Improves performance with SSDs (Solid State Drive), making your site run 3x faster.
- Easily integrates with Cloudways cache and CloudwaysCDN, ensuring a smooth hosting experience for your site.
Pricing:
Cloudways offers you the following pricing plans under Digital Ocean’s Basic scheme:
| Plan Features | Micro | Small | Medium | Large |
| Initial Cost | $14/month | $28/month | $54/month | $99/month |
| RAM | 1 GB | 2 GB | 4 GB | 8 GB |
| Bandwidth | 1 TB | 2 TB | 4 TB | 5 TB |
| Processor | 1 Core | 1 Core | 2 Core | 4 Core |
| Storage | 25 GB | 50 GB | 80 GB | 160 GB |
4. Kinsta
Kinsta is another managed WordPress hosting platform that leverages the power of Google Cloud Platform. So, you can get a fast, secure, and scalable web hosting solution. What’s more, it includes a strong, specially designed WordPress hosting tool together with a centralized management interface.
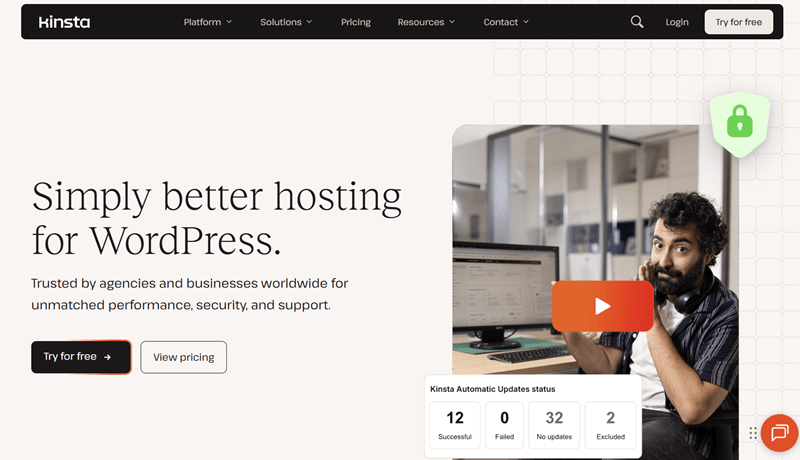
Key Features:
- Comes with a MyKinsta dashboard that makes managing your WordPress site simple and easy.
- Its global network of CDNs ensures fast loading times for visitors worldwide.
- Utilize the latest PHP versions (PHP 8.0, 8.1, 8.2) for faster execution and improved security.
- Keeps your site safe with automatic daily backups and on-demand restore points.
- You get additional features like application hosting, eCommerce hosting, automatic database optimization, built-in monitoring tools, and more.
Pricing:
Kinsta offers different pricing plans under managed WordPress hosting for your website. They are:
| Plan Features | Single Site Plans | Multiple Site Plans | |
| Initial Cost | $0/month for the first month. & $30/month billed annually. | $0/month for the first month. & $59/month billed annually. | |
| WordPress Installs | 1 | 2 | |
| Monthly Visits | 65000 | 125000 | |
| SSD Storage | 20 GB | 40 GB | |
| Free Migration | Yes | Unlimited | |
| 24/7 Support | Yes | Yes |
Keeping that in mind, we recommend using Bluehost. As it gives both web hosting and domain name registration services at a cheaper starting price of $3.79/mo. Also, Bluehost offers a free domain for the first year if you host your website through them.
If not Bluehost, then make sure to check out the best alternatives to Bluehost.
iv. How to Purchase a Domain Name and Web Hosting?
Now, in this section, we’ll be showing you how you can purchase a domain name and web host in Bluehost. With that, you can set up your hosting platform and create your website easily.

To host your WordPress website, first, we must get a hosting plan. In Bluehost, there are 3 kinds of hosting services. They are:
- Shared: Cheap and basic hosting (Starts at $3.79/mo for 12 month term)
- Dedicated: Hosts on dedicated servers for better speed and control (Starts at $144.19/mo)
- VPS: Securely hosts on Virtual Private Server (Starts at $4.99/mo billed yearly)
Here we will show you step-wise instructions on finding a domain name and purchasing a shared WordPress hosting.
Step 1:
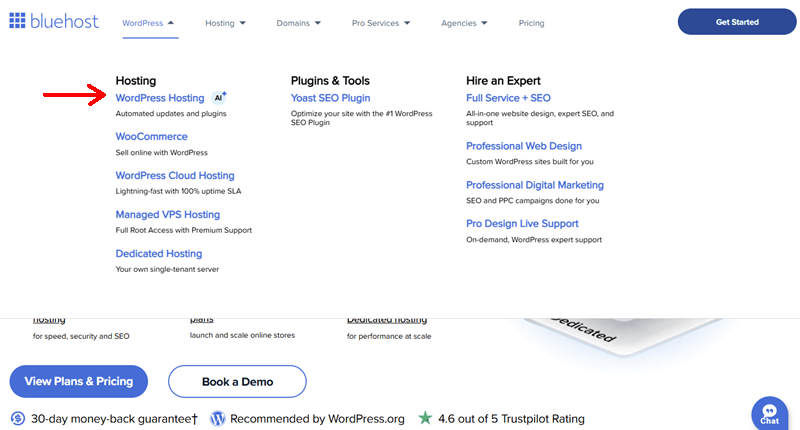
So, go on to Bluehost.com and hover on the WordPress option in its navigation. Then click on the WordPress hosting option. Or, directly visit the WordPress hosting service on Bluehost from here.
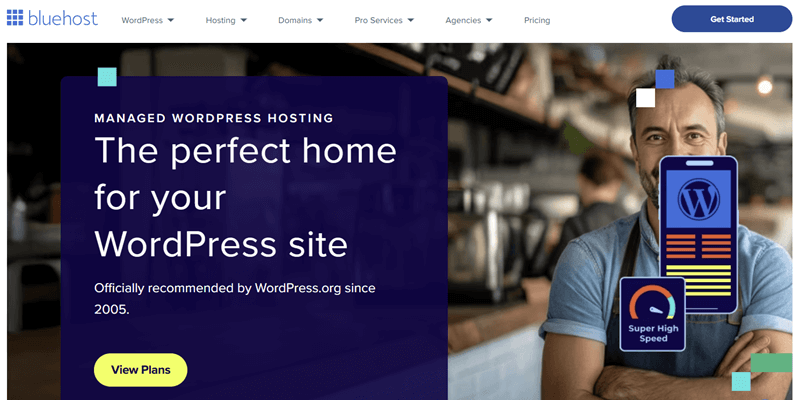
Now, click on the View Plans button to check the pricing plans on Bluehost.
Step 2:
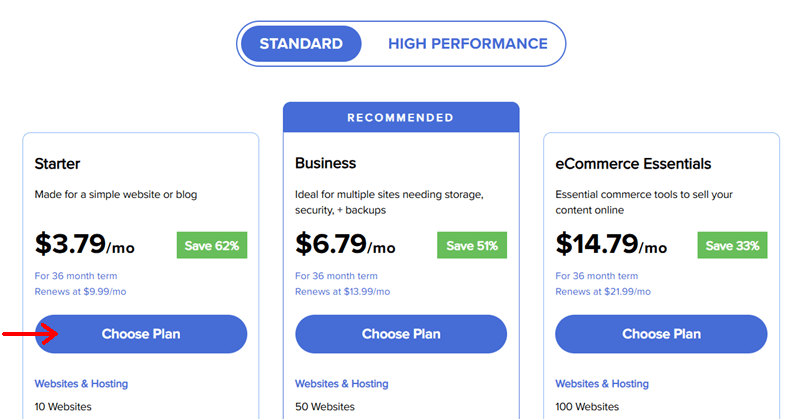
On the following page, you’ll be asked to choose a hosting plan. Choose one that fits your budget and interest.
If you’re just getting started with your first website, then we recommend you pick the Starter plan which costs $3.79/mo. This plan includes one domain name, and a free SSL certificate.
So, click on the Choose Plan button of the plan you prefer to use.
You can always upgrade your plan when your website gains more reach.
Step 3:
After clicking the Choose Plan button, you’ll be taken to the next page. Here, it’ll ask you to create a domain name or enter your existing domain name for the site.
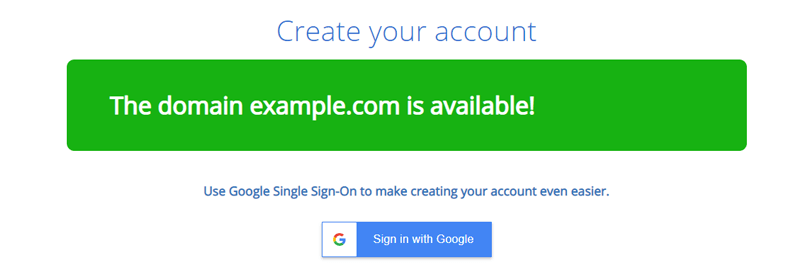
Since we don’t have a domain name, let’s type out your domain name under “Create a new domain”.
Not to forget, your domain name must be easy to remember, represent your website, and be short and unique. We recommend you don’t go any longer than 10 characters. If it’s taken, then try out another alternative.
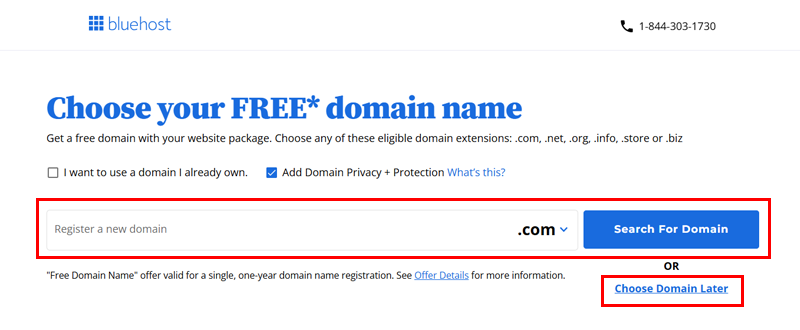
You will see a notice about the availability of the domain name. Check to spell once again and make sure that the entered name is fine.
Step 4:
After you find yourself a suitable domain, click the Next button and you’ll be taken to the checkout page. If you haven’t signed up on Bluehost, then it’ll prompt you to sign up first.
Next, enter the required information in the form and that’s your personal details and a valid email. Your receipt will be sent to that email address.
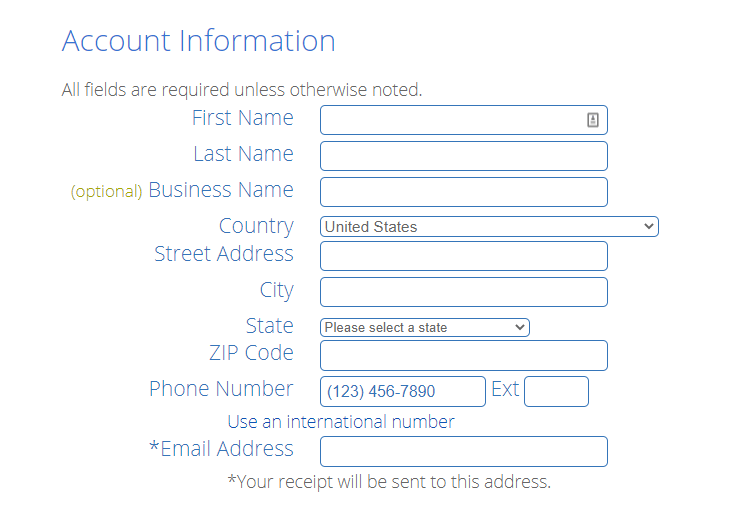
Just below the signup form, you can see the package information that you have selected before. You can also change your package here. Also, the extra package section will offer you some free and paid services too. You can select if you need them.
Step 5:
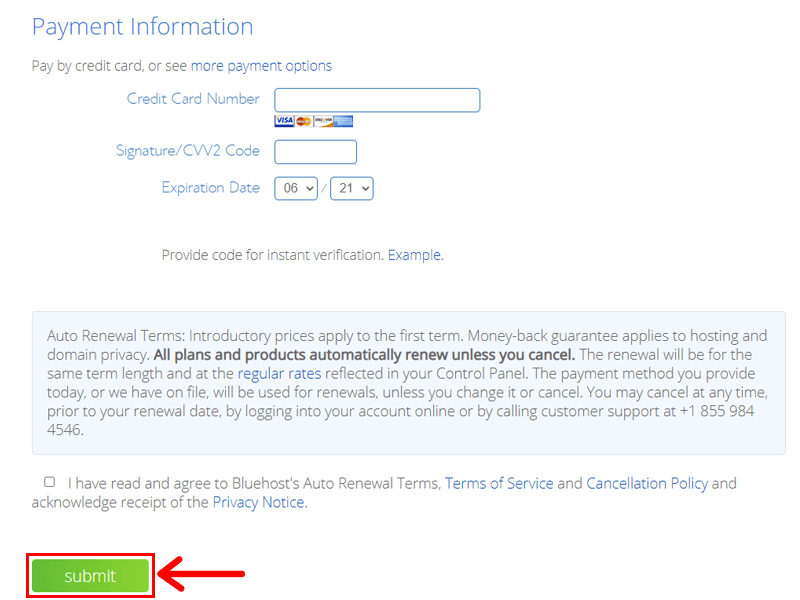
In the final step, you need to select your payment method. You can complete your checkout with a credit card or PayPal. Click on more payment options to enable the option for PayPal. Otherwise, it is hidden.
Select your payment method and complete the process. Now all you need to do is to agree to their terms and conditions and you’re all set. Just click on the Submit button at last.
You’re now subscribed to a hosting plan. That’s just stepping one. The next step is an easy one. Let’s head on to it.
Step 4: Set Up WordPress on Your Hosting Account
After the purchase is done, it’s time to set up a site with WordPress on your hosting account. So, follow these steps to do so.
i. Create a WordPress Website
Once you’ve completed the previous step and logged in to your Bluehost account, you’ll see something like the screenshot below. Just enter the site details and click on the Confirm button. Bluehost will now install WordPress for you.
After installation, all you have to do is log in to your website using wp-login.php at the very last of your URL. For example, http://example.com/wp-login.php is how you should enter it.
If your website is a blog, then enable Do you want a blog? toggle. It will make it easy setup up your blog. Also, it has an option for an online store, which you can enable if you are going to make an eCommerce website.
In this article, we are going to make a simple website in WordPress. So, after entering the information, your next screen will look like this:
You can now log in to your website with the information sent to your email address. Next is to set up how your website will look on the internet.
ii. Understanding WordPress Dashboard
After it gets successfully installed, you’ll see the WordPress dashboard. But, if you are not logged in automatically, then you need to log in again via the login page.
To login into your WordPress site, you need to type your website URL followed by /wp-login.php or /wp-admin/
For example,
www.yoursiteurl.com/wp-admin
www.example.com/wp-login.php
Next, you will see a login page. Where you have to enter your login information. Enter your username and password. After that, click on the Login button.
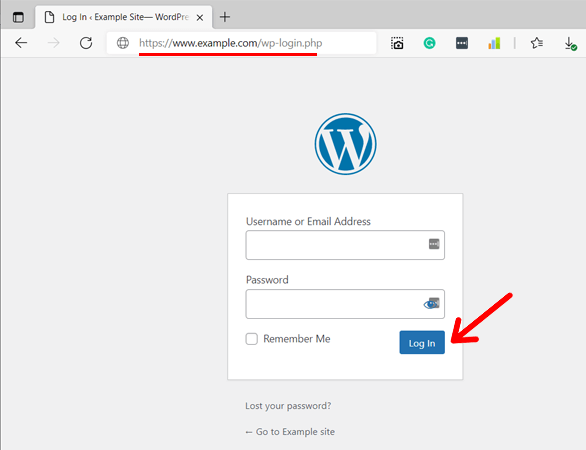
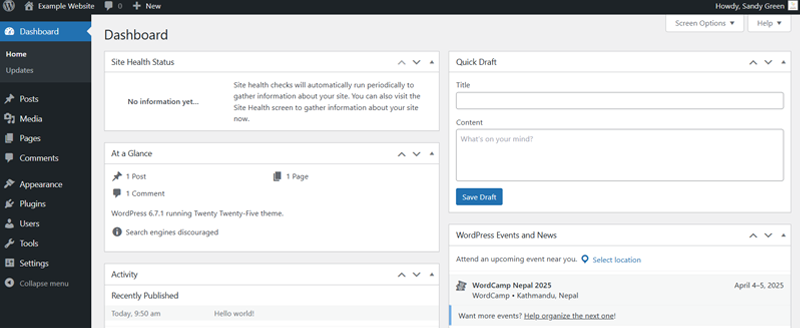
After login, you will see the WordPress dashboard. From this dashboard, you can manage your entire site. This is also called website backend. You can add or change themes, add plugins, create posts and pages, and many more.
iii. Add a Coming Soon Plugin
Once you host your first site, then everyone can open your site with the domain name or URL. But you won’t want your visitors to look at the site before it’s completely ready. Isn’t it?
So, what can you do is keep the site in coming soon mode. With that, a coming soon page will show up that notifies visitors that the site is still under development.
For that, you need to use a coming soon plugin! And there are many coming soon WordPress plugins.
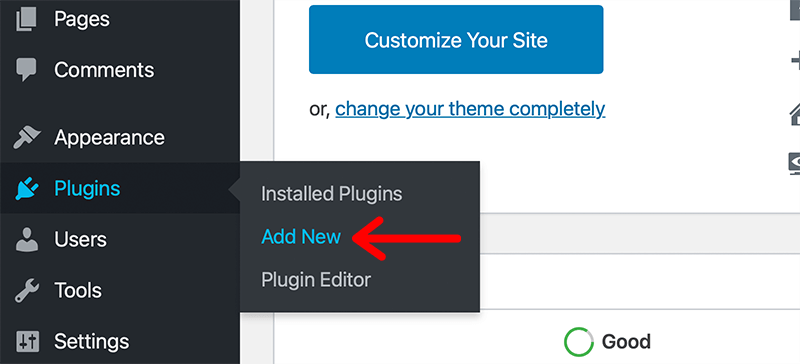
To use a coming soon plugin, you need to first navigate to Plugins > Add New option on your WordPress dashboard.
There, you can type ‘coming soon‘ and search for the plugins available. Next, you need to click on the Install Now button for the coming soon plugin you want to use. Here, we’ll be using the CMP plugin.
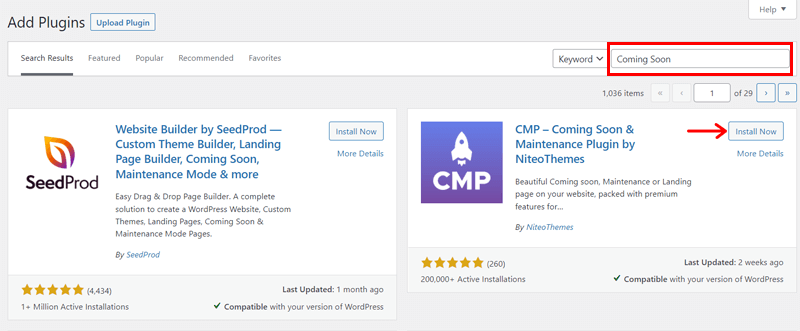
After the installation completes, click on the Activate button. Now, you can turn on the maintenance mode for the website using this plugin. That’s it!

Not to forget, after you complete all the steps and complete your site development, you need to turn off this maintenance mode. With that, your site content will be visible to your visitors.
Now, let’s select a theme, customize it and add some posts and pages from this dashboard. All of these are to create your website. So, keep on reading.
Step 5: Choose a Theme and Import Demo Site
With WordPress, it’s really easy to change how your website looks. To create your first page, let’s customize your website first. All you have to do is find the right WordPress theme and install it.
Currently, your WordPress site is using a default theme by WordPress. Apart from that, there are hundreds of really good-looking themes on the internet.
So, WordPress has thousands of WordPress free and premium themes for your use. For free themes, you can go to the WordPress official themes repository. And to purchase premium themes, you can go to ThemeForest, TemplateMonster, or Mojo Marketplace too.
i. Choosing the Best WordPress Theme for Your Site
Selecting a theme might be difficult. Just make sure to have a theme that’s pleasant to look at with a color that represents your site. And if you can code, then you can make a theme yourself and have your website look how you want it to.
At first, you need to be sure, what type of website you are going to make. You need to select a theme based on your need.
Read our detailed guide on how to choose a WordPress theme. This might help you in selecting a theme.
For instance, if you want to start a blog, then we recommend finding the best WordPress theme for your blog. Fairy, Polite, and Ashe themes are great for blogs. Check our blog themes collection for more options.
Here are some recommendations for you,
- Business Site: Astra, OceanWP, Zakra, and Neve are the most popular WordPress themes for business websites.
- eCommerce Site: Storefront, Avada, and Divi are recommended eCommerce themes. Check our best WooCommece themes collection for more themes.
- LMS Site: Check out the collection of LMS WordPress themes.
Some of these themes suit multiple kinds of sites, for example, Astra. Other multi-purpose themes include GeneratePress, Kadence, etc.
Our Recommendation – Astra
For now, we’ll go with free themes. And for this tutorial, we’ve chosen the most popular free WordPress theme Astra.
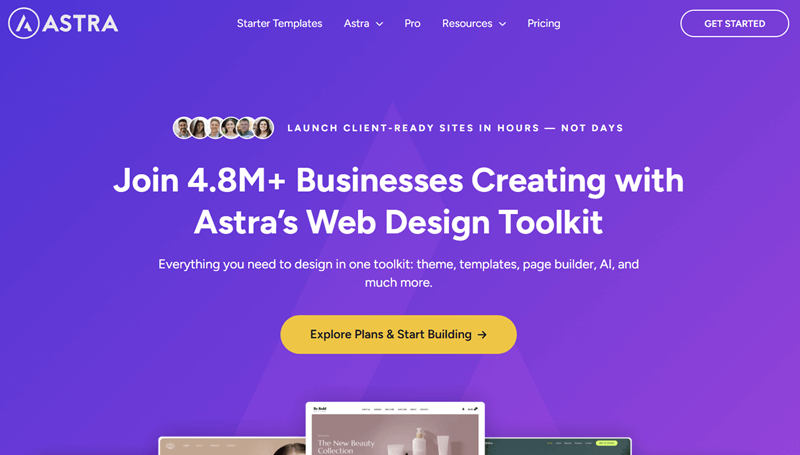
Why Astra? Here are some reasons behind it.
- Astra is the most popular free WordPress theme of all time.
- It is a multipurpose theme and can be used on any type of website.
- Built with popular WordPress page builders like Elementor, Beaver Builder, etc.
- Extremely fast and easy-to-use theme and many more.
Extra: WordPress Theme for Full Site Editing
Looking forward to using the new WordPress Full Site Editing (FSE) features to create a website? Then, first, read the following extra topic below before installing any theme. And if you don’t know this, still read the guide below to see how interesting it is!
For using the new Full Site Editing (FSE) features, you need to check which WordPress version you’re using on your hosting platform. For that, here’s our article to check the WordPress version.
Only the newer versions of WordPress from 5.9 come with the FSE features. So, if you want to use this new technology for your site, then you need to have the required WordPress version.
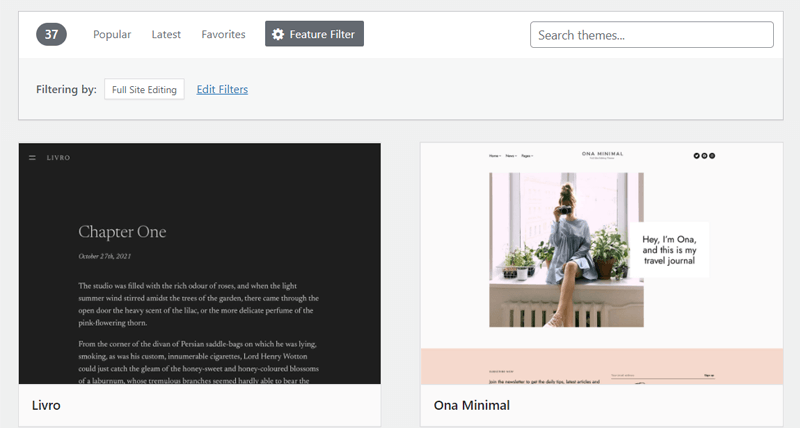
Moreover, you need to use a block theme to enjoy these FSE features. Any other themes won’t support using them. And there are just a few block themes available right now. Yet, many more to come!
But everyone may not know what FSE really is, so let’s get to know it and its features first! Then, you can decide whether to use it or not.
What is WordPress Full Site Editing (FSE)?
WordPress Full Site Editing (FSE) is a set of new features in WordPress that allows you to create and customize your entire site in one place. That also by using blocks in every part of your site.
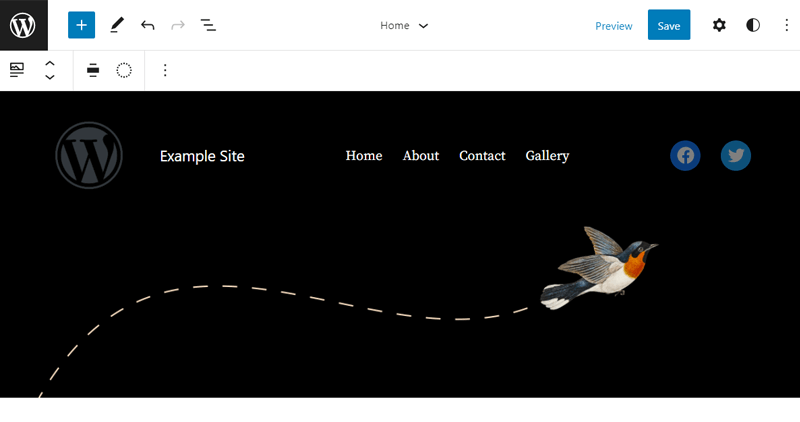
Previously, WordPress included a customizer that allowed you to create and edit your posts, pages, navigations, and footers separately. But with FSE, you can control your header, footer, posts, and pages using the Site Editor at once.

Do you want to know more about full site editing? Also, want to know how to make a website using Blocks? Check our comprehensive article on WordPress Full Site Editing.
For a quick glance, here are some of the amazing features of FSE:
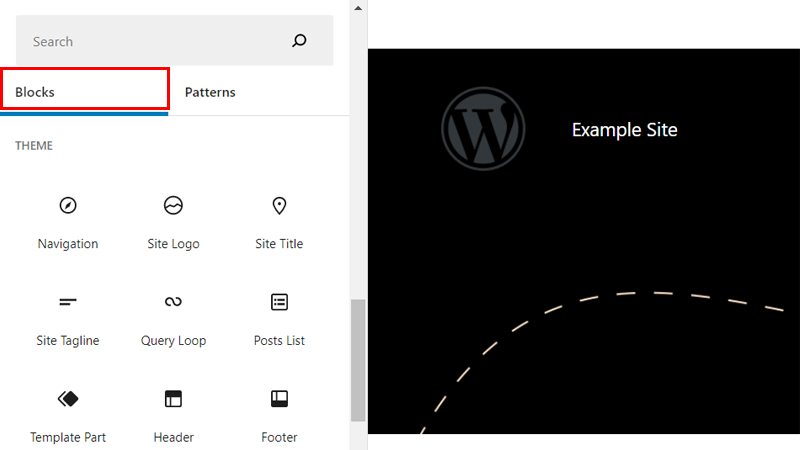
1. Blocks
FSE gives extra blocks to WordPress to enjoy the FSE features. You can use these blocks not only for posts and pages but also for other parts of the site.
Some of the blocks that you can use to add global pieces to a site are navigation, logo, footer, tagline, sidebar, etc. For example, a Navigation block will enable you to create, edit, and customize the menu of your site within the Editor.
2. Block Patterns
Block patterns are pre-designed blocks that you can use to show your content in beautiful layouts. Such as block patterns for adding a footer, header, button, etc.
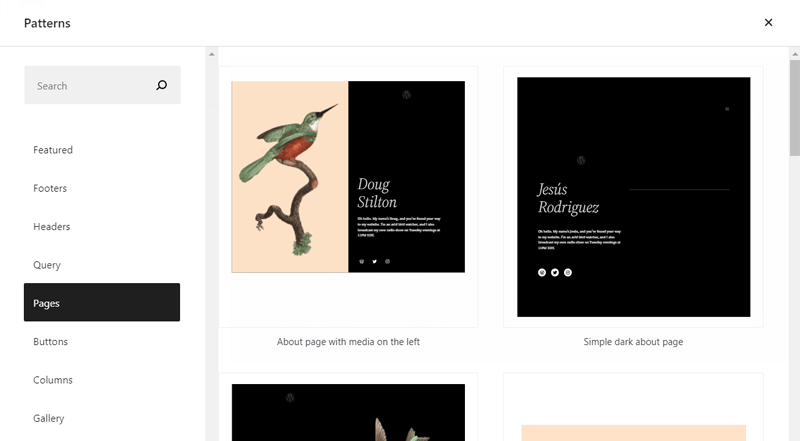
You can check all the blocks from the block pattern directory. Moreover, you can copy a block pattern from here and paste it onto your site.
3. Block Themes
Block themes are WordPress themes that give templates completely made up of blocks to use the FSE features. So, if you’re willing to use a block theme for creating a site with FSE, then we recommend you use Twenty Twenty-Five (default theme), Tove, or Clove.
4. Template and Template Parts
Templates give you a way to individually edit a post or page. Such as the home page, archive page, 404 page, etc.
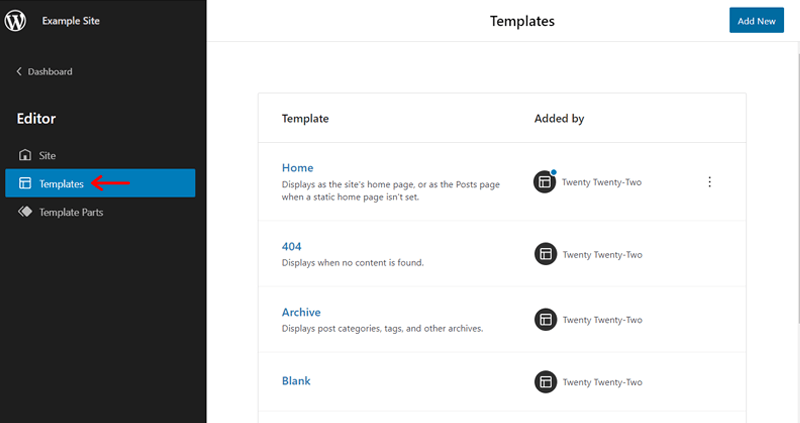
Whereas template parts enable you to edit the sections of a page/post like the header and footer. And that’s through the use of a container to specify the block.
5. Global Styles
With the global styles options, you can customize the typography, layout, and color of all the posts, pages, and blocks at once. Also, you get to edit them for an individual block type. For example, style all the heading blocks only.
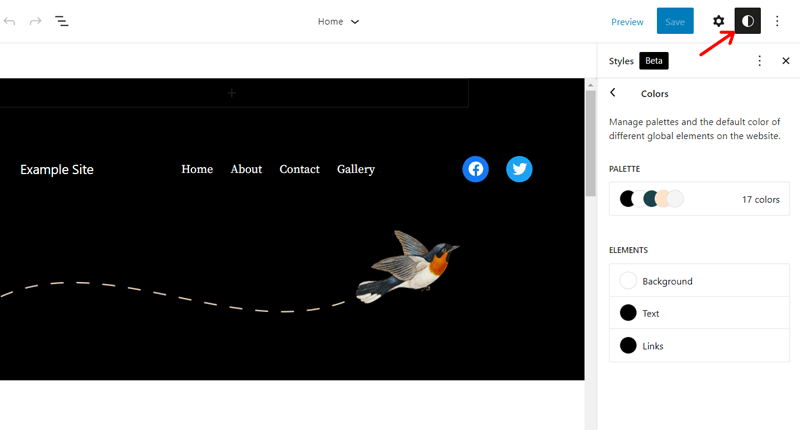
However, as a beginner, with most of the block themes being experimental right now, we don’t completely recommend using FSE. That’s why we’re showing the following steps using a classic theme i.e. Astra as mentioned before.
ii. Installing a WordPress Theme (Astra)
We believe that you are in your site dashboard.
If not, then access your site dashboard via, yoursiteurl.com/wp-login.php. For example, example.com/wp-login.php. You will see a login page. Enter your username and password and click Login. Check your email if you forget your login credentials.
Now, we will show you how to install the Astra theme and customize it to make a good-looking website. Stay with us.
Step 1:
Once you are in your site dashboard. Go to Appearance > Themes.
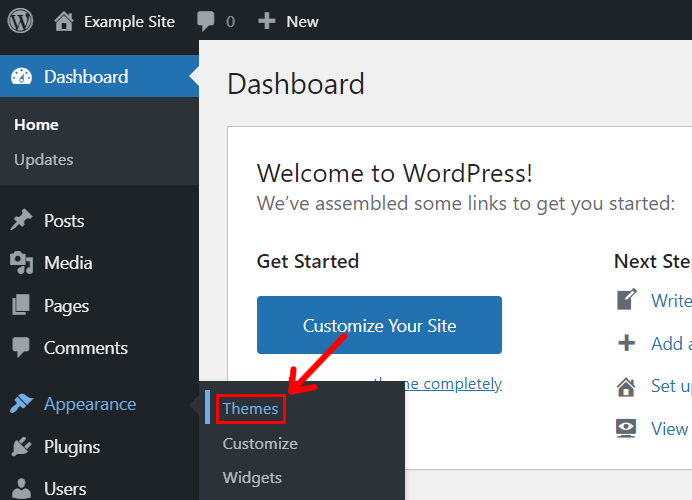
Step 2:
Now, click on the “Add New” option at the top, or the “Add New Theme” section at the bottom. This will take you to the theme selection page.
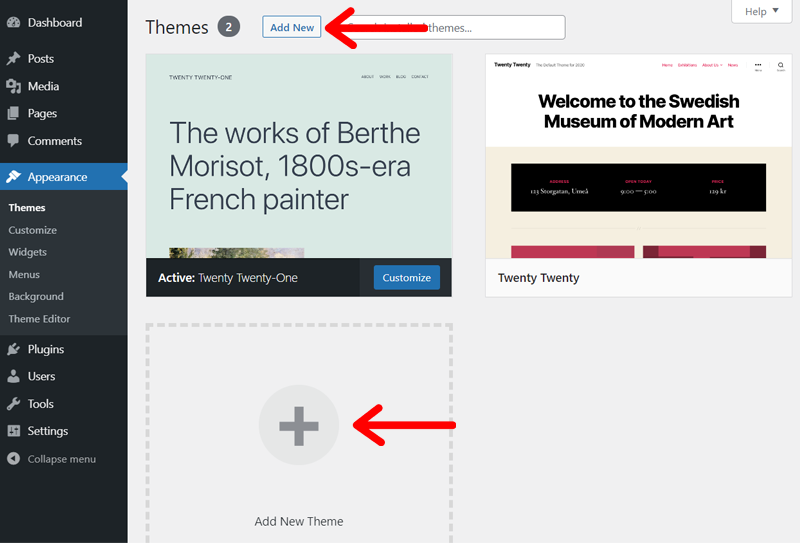
Step 3:
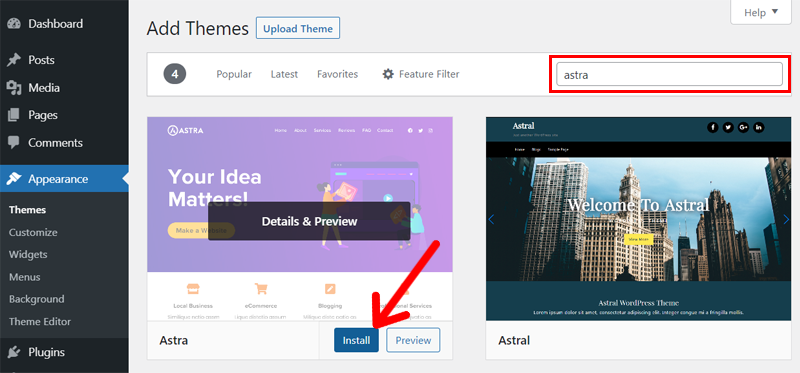
Here, find the theme that best fits your liking. Just enter the theme name on the textbox and search it. Once it’s displayed on the list, hover over it, and click the “Install” button. Here we are going to install the Astra theme.
Step 4:
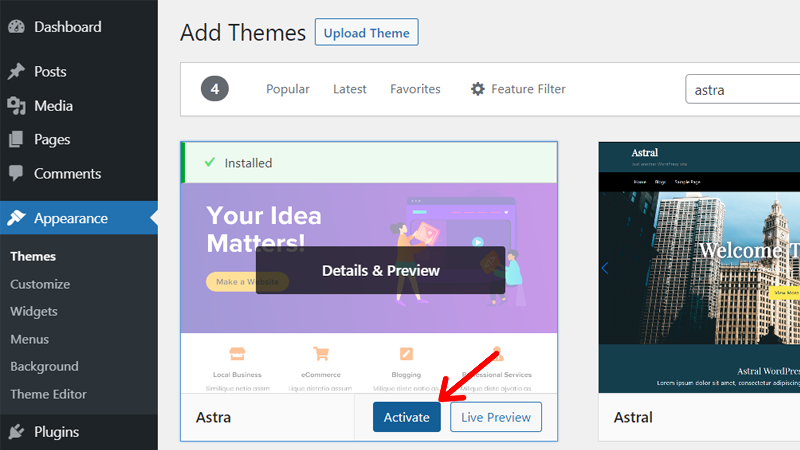
Once the theme gets installed, you need to press the Activate button.
Do you have a premium version of the theme and do you want to install it? Then, you should do it via the upload method. Follow these steps,
- Go to Appearance > Themes menu.
- Click the Add New button.
- Then, click on the Upload Theme option.
- Choose and upload the theme file that must be in .zip format). For example, astra.zip.
- At last, click on the Install Now button.
If you need additional help, then check our full guide on how to install a WordPress theme.
iii. Importing Demo Data
Once the theme is activated, you’ll see a notice at the top of the page. You can ignore this welcome notice if you’re planning to design your site from scratch. So, you can directly move to the next step to add the content manually.
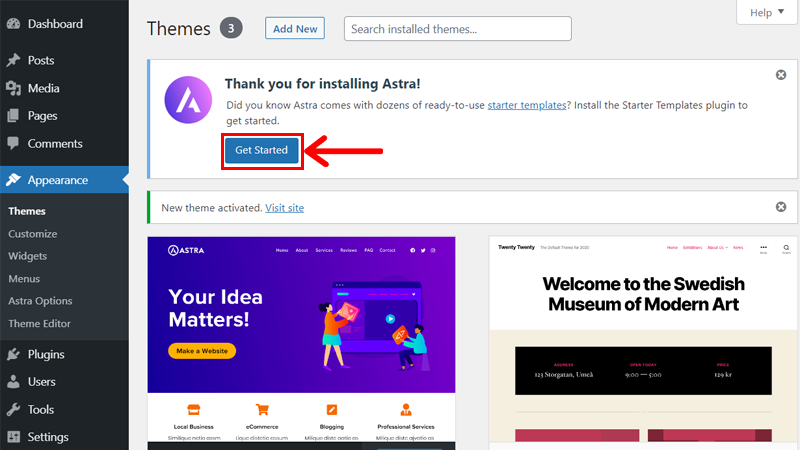
But, if you want a readymade website with some or all pages, then you need to use a plugin recommended by Astra first. And then click the Get Started button present on this notice.
Here, we’re making a site using the demo site. So, follow the steps below to do so:
Step 1:
A template is a demo site that allows you to easily get started with the front-end design of your site. To be able to import and use a template, you need to use the Starter Templates plugin.
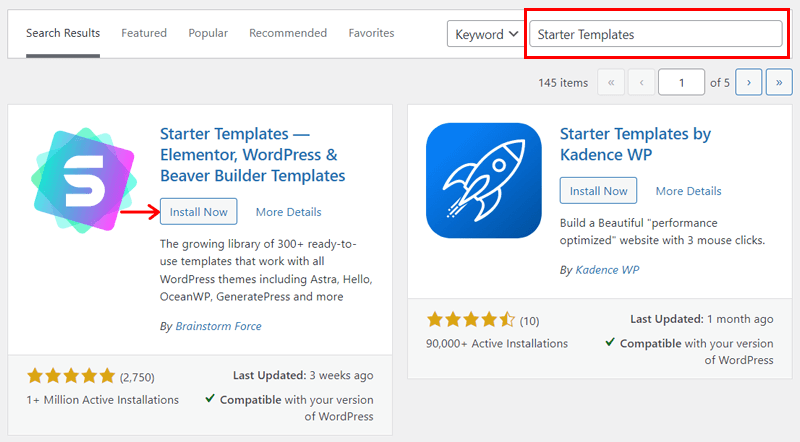
For that, go to Plugins > Add New menu on the dashboard as you’ve done before. And then search for the ‘Starter Templates‘ plugin. After that, click on the Install Now then Activate button as shown below.
Step 2:
Once you activate your plugin, you can now click on the Get Started button. Or, you can navigate to Appearance > Starter Templates.
Then, the starter templates will be activated. It takes a couple of minutes to get ready. You can see the below image for reference.

Step 3:
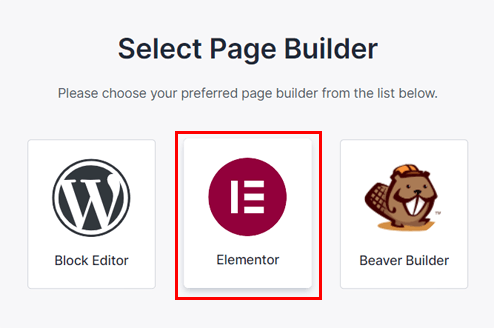
Then, you’ll redirect to another page where you’ve to select your preferred page builder. Page builders are plugins that ease you to create, edit, and customize your site with multiple features that WordPress alone can’t.
And Astra has 180+ starter demos using page builders for Gutenberg, Elementor, Beaver Builder, and Brizy. And if you’re planning to go with the WordPress FSE features, then you can simply choose the Block Editor option.
As Elementor is the most popular page builder plugin, we are going to use Elementor page builder here. So, click on the Elementor icon as shown below.
Step 4:
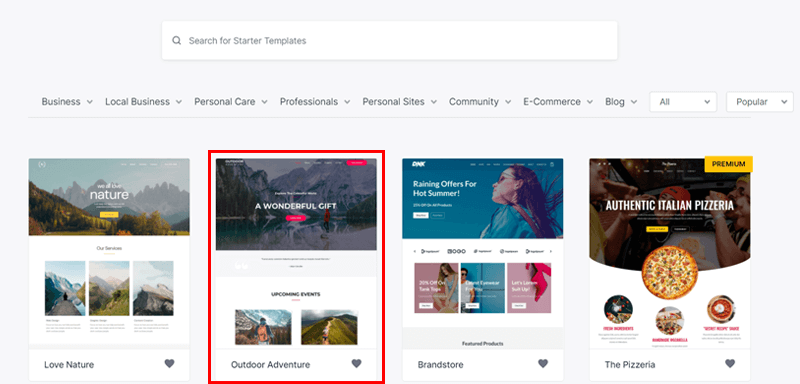
Now, you will redirect to the lists of Starter Templates. You can find the required demo from the list.
Here, we are going to choose the Outdoor Adventure demo. But, if have different ideas in mind, then you can find your desired starter templates from the list.
Click on Outdoor Adventure now.
Step 5:
Now, you’ll redirect to another page where you can change the logo of the demo site before importing it. You’re able to do that now, else just click on the Skip & Continue button for now.
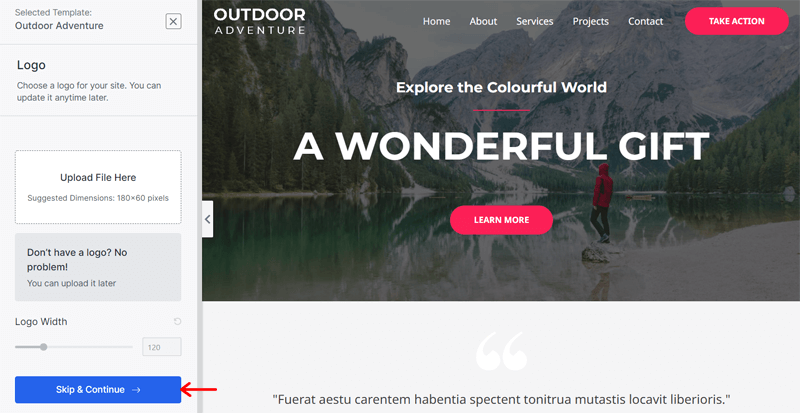
Similar goes to the next step that allows you to change the demo site color palette. But after that, you can see a form to fill. There, you need to enter your name and work email address. Also, your position and why you’re building this site.
Additionally, you’ve to agree with their terms and choose what you can import from the given options by Astra. Lastly, click on the Submit & Build My Website button.
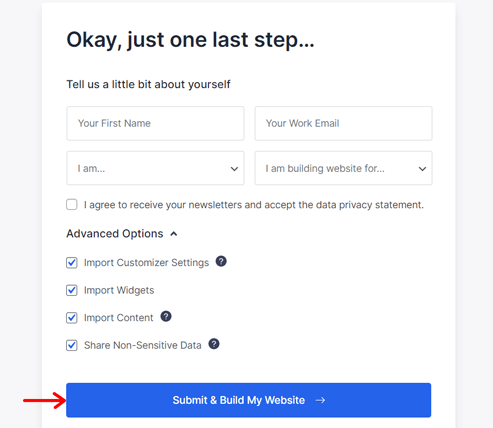
With that, the demo site will process for installation on your dashboard. Like this:
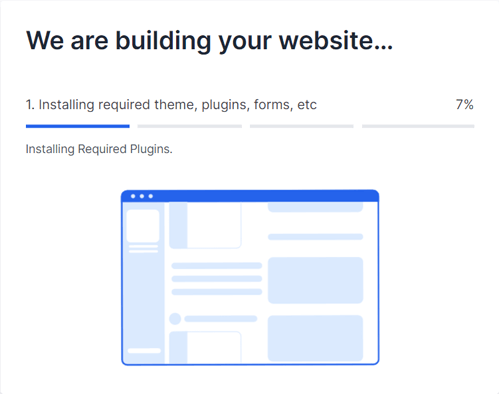
When you navigate to the Pages > All Pages menu, you can see the list of all the pages from the demo site. So, you can keep or delete them as you like. It’s best to use the home page of the demo site for your site at least.
That’s it! Make sure to install the page builder plugin you chose for your starter template. In this case, it’s Elementor. And here’s a complete guide on Elementor. With that, you can learn how to use a page builder to add and customize the content of the site.
But, if you’re adding the contents of the site on your own, then let’s move forward. In this next step, we’ll learn how to add content to your site. This also helps even if you’re using a starter template.
Step 6: Start Adding Content to Your WordPress Site
Now, in this step to create a website, we’ll be showing you how to add the contents. Whatever content you add to your posts and pages, your visitors will be able to see them. And for that, you also need to add a navigation menu from which users get access to your pages.
First, let’s be clear on what are posts and pages. Also, what kind of content you should keep on them.
- Pages: Pages usually includes static content. Here, you can provide your business or site’s general information. Some basic examples of pages are about us, contact, home, etc.
- Posts: On the other hand, you can keep dynamic content in the posts. Whenever you write new content, then it’ll be on the posts. It includes blog articles, news, reviews, etc.
Now, follow the steps below!
i. Create Posts and Pages
After you’ve selected the perfect theme for you, let’s start creating your first page.
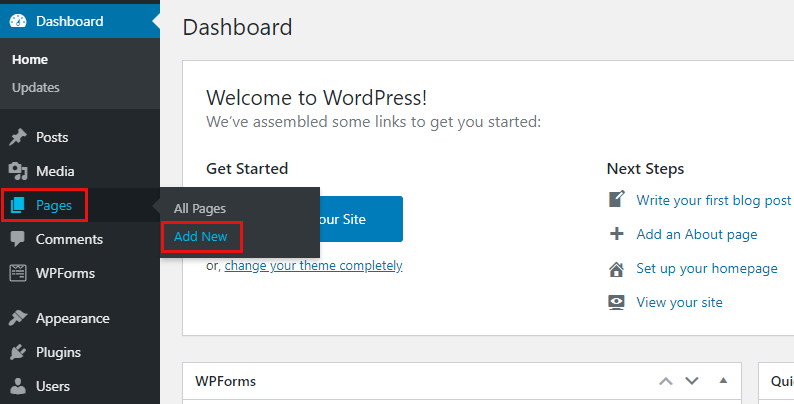
To create a page, go to your WordPress dashboard and select the “Pages” menu. Then, click on the “Add New” option.
You’ll be taken to the editor where you can create your first page. The editor page looks something like this.
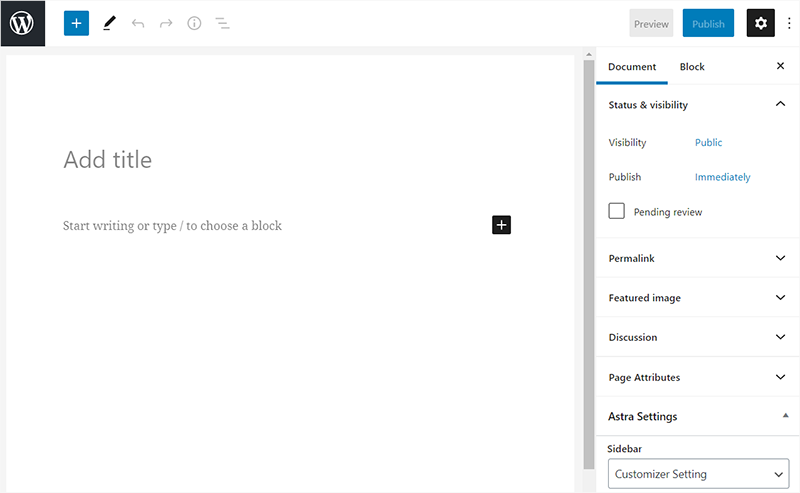
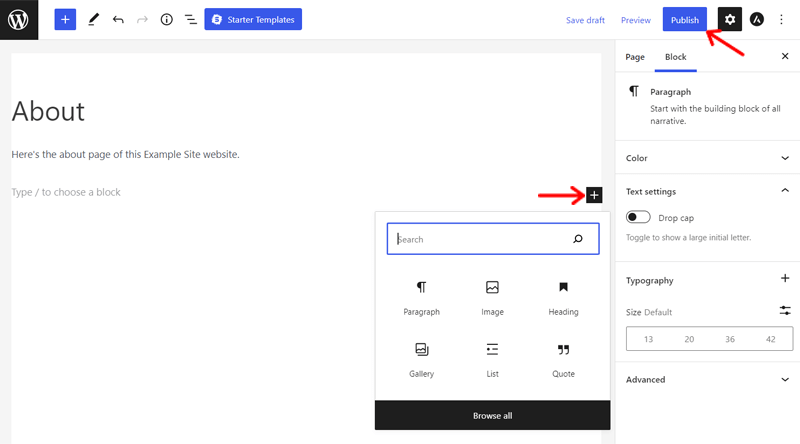
Simply, proceed to enter the title and add the content you want on your website. You can also upload images and audio directly through this page. All of this can be done using the blocks, that you can get from the ‘+’ symbol.
Then, click on the blue “Publish” button on the very right.
This was for your first page. Let’s create your first post as well.
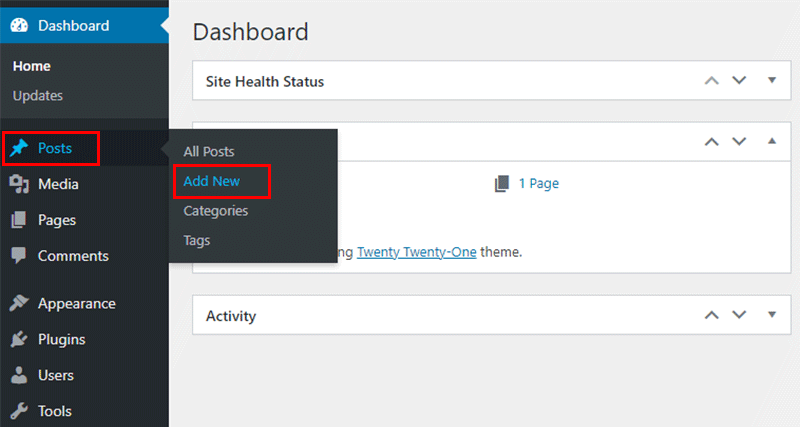
The steps are as simple as creating a page. Just a little bit different. Go to your WordPress dashboard and navigate to Posts > Add New option.
That’ll take you to the editor once again but this time the heading says, “Add New Post” instead of “Add New Page”. If you ever get confused, then that’s one way to know what you’re doing.
The editor looks something like this.
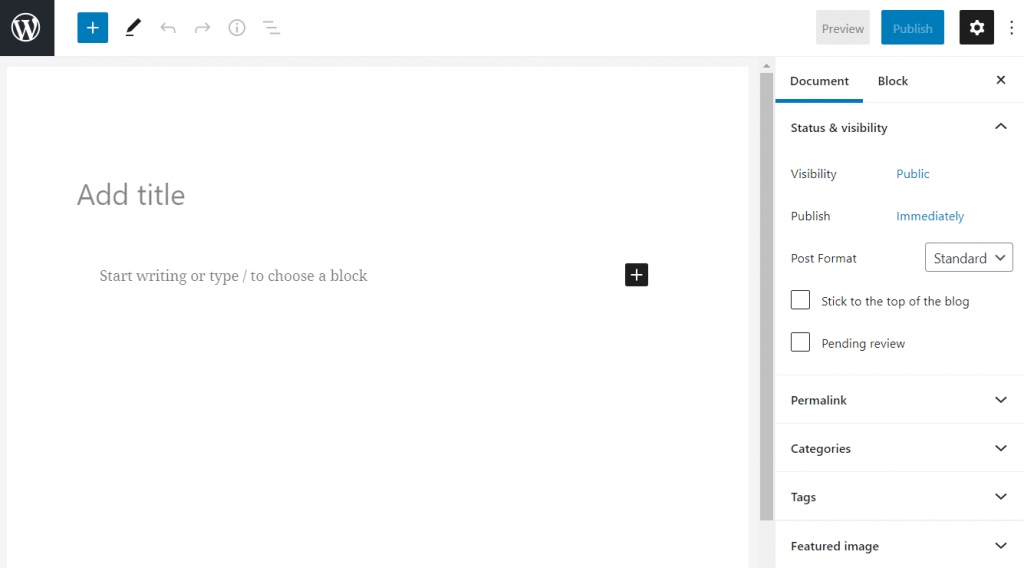
Just fill out everything you want for your first blog post and click on the blue “Publish” button. You can also add excerpts, custom fields, and discussions for your post. We recommend you experiment with everything to get a better understanding of how things work.
For guidance, you can check out the steps to add blog posts and pages section from our article on how to start a blog.
Now that we’re done creating your first page and post, let’s add a menu to your website so that your visitors have an easy time going through the website.
ii. Create Navigation Menu
Since the most important menu of all is the navigation menu, we’ll start with that one. A navigation menu allows you to quickly navigate through the website and its different pages. It sticks to the top of your website for easy navigation.
If you’re using a starter template, then your navigation is already made, so you just need to edit them. But for beginners or for the ones to create on their own, let’s see the process!
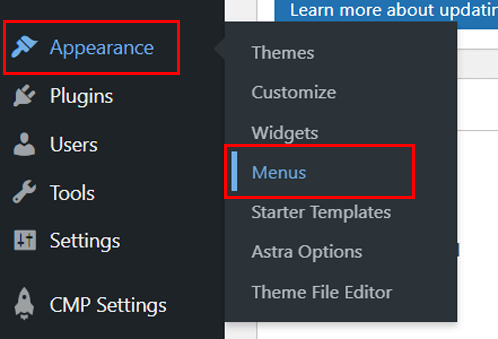
To add a navigation menu, go to your WordPress dashboard and click on “Appearance”. Then proceed to click on “Menu”.
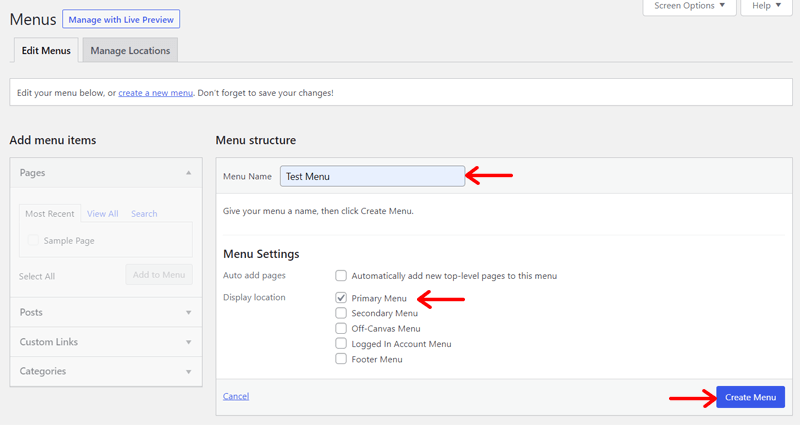
This will take you to the edit menu page which looks something like this. Give your menu a name, select the menu type as Primary Menu, and click on the “Create Menu” button.
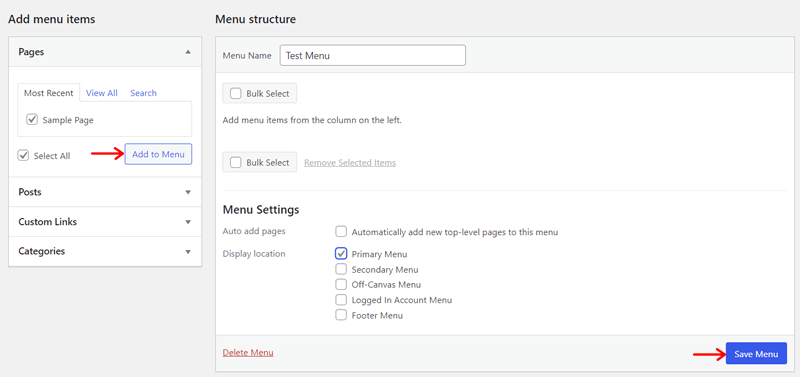
After you do that, you’ll be taken to a page where you can add pages to your navigation bar.
You can choose from your pages, posts, and what not to put on your menu. We recommend you keep adding pages as you create them to your menu.
Just select the page and click the Add to Menu button. Also, you can position your menu’s structure with drag and drop to keep items in the order that you like.
After that, just specify the display location, which is where you want the menu to be displayed on your website, and click on the blue “Save Menu” button to the bottom right of the page.
Check out our article on how to create a mega menu to create a more comprehensive menu.
Now that you’ve created your first page, post, and menu, it’s time to customize your website from the theme customizer.
Step 7: Customize Your Website
Customizing your website on WordPress is really easy thanks to the “Appearance” menu to the very left. You can customize every part of your website. From colors to fonts, everything is possible.
So, we’ll get to that in the course of this article. Let’s start!
i. Customize Widgets
For now, let’s start customizing your website by adding widgets. You can add widgets anywhere on your website. A widget basically allows you to add more content and help keep your website organized. To add a widget, just go to the “Appearance” button to the very left and click on the “Widgets” sub-menu.
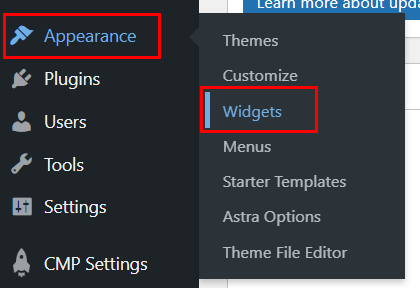
After that, you’ll be able to see available widgets. Simply drag and drop any widget that you want on available spaces on your website.
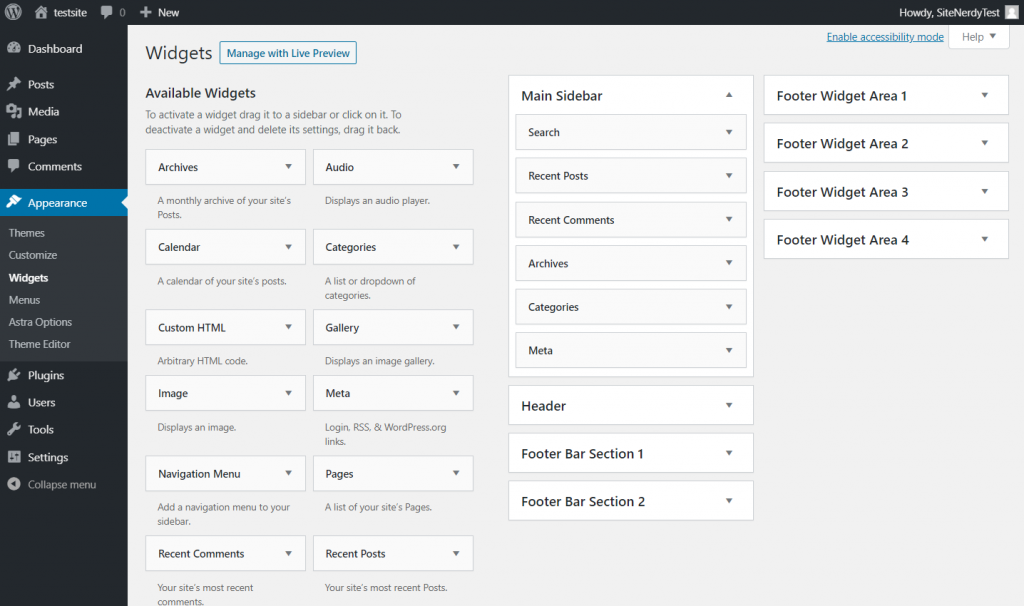
To know more about what are widgets and how to use them, here’s our complete guide on that.
ii. Change Site Title and Logo
Now that we have some widgets on our website, let’s add a logo to your website. You can create a logo by yourself or use an online logo maker like logomaker.com to create one.
After you have your logo, click on the “Appearance” menu and then click on the “Customize” option.
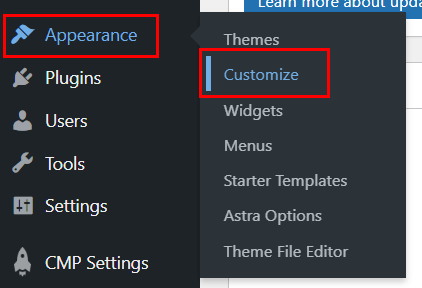
This leads you to the WordPress Customizer. You can change everything on your website from here. And it looks like this:
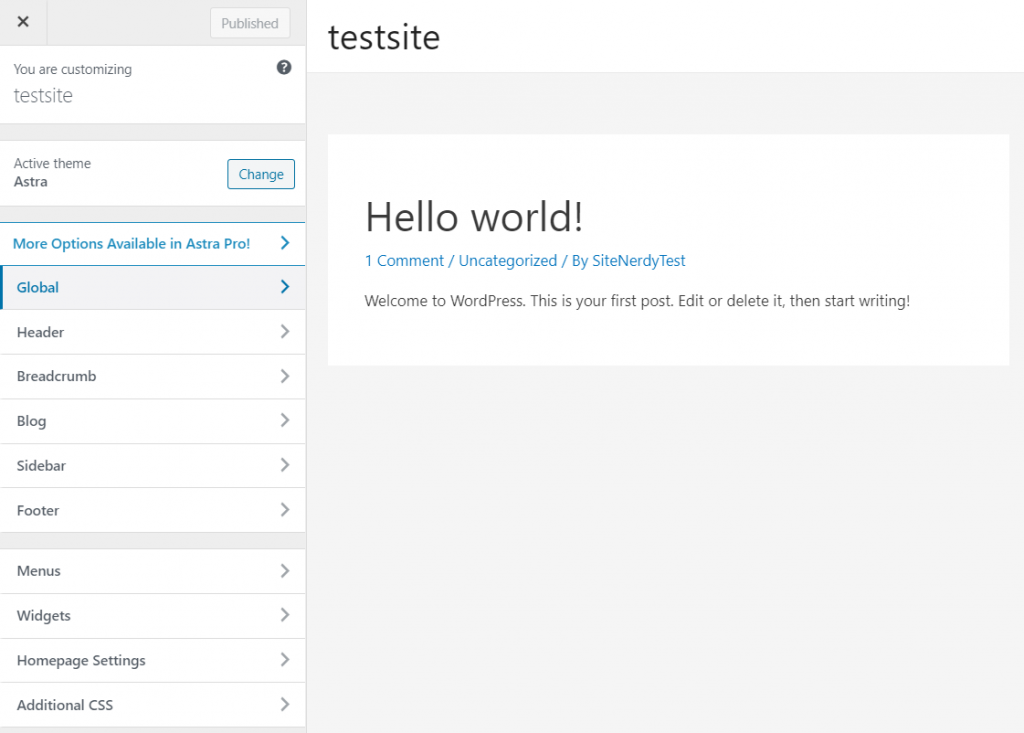
But for now, let’s see how to add a logo first. So, go to Header or Header Builder first.
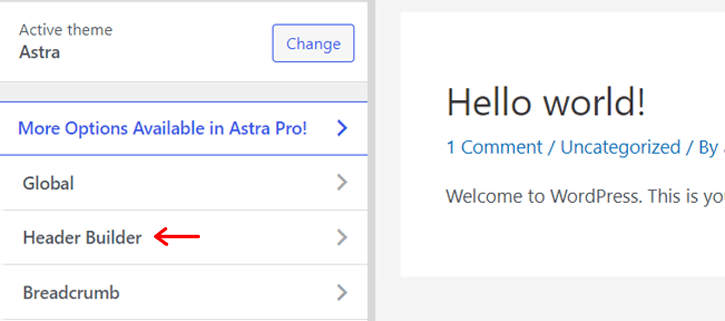
Next, click on the Site Title & Logo option as shown below:

After that, you can see the options to change the logo and title of your site.

iii. Customize Colors
Now, you can also customize your website’s color scheme and font. Having a unique mix of color schemes and fonts will make your website stand out from the rest.
To add a color scheme, click on the Global option in the customizer.

Then, click on “Colors“.
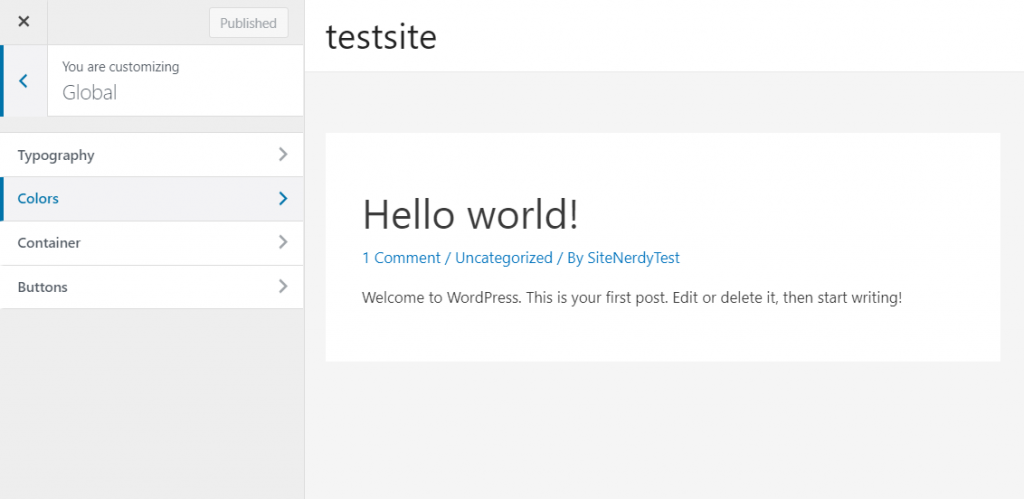
From here, you can choose the palette the theme provides. Moreover, you can change and keep the global color of links, text, heading, background, etc.

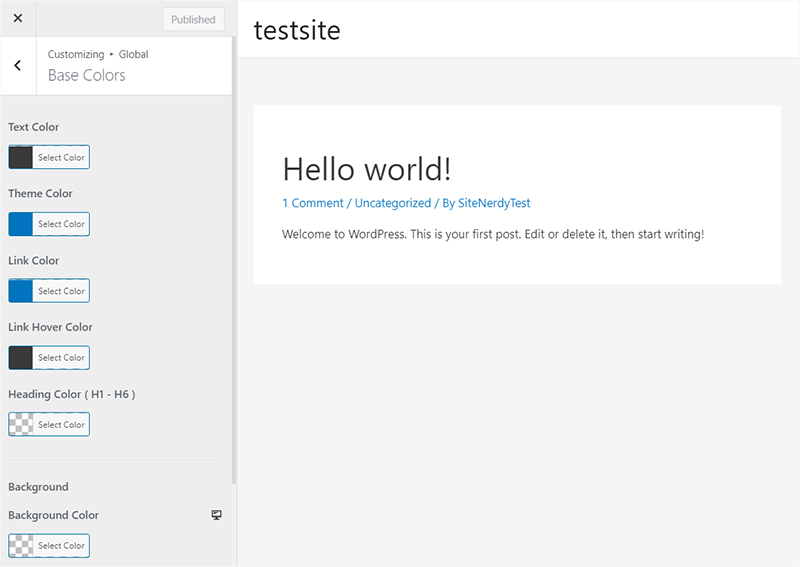
Click on the color option and pick a unique color that you like and you’re all set. After you’re done, click on the blue “Publish” button. Not only that, but you can change the colors of individual parts of your site. Just select the section and make changes.
Note that, every theme may provide different kinds of ways to change the colors in the customizer. Normally, you may see the Base Colors option when not using a theme. But the process is the same as this:
iv. Change Typography
Now that you’ve customized your website’s color, let’s customize your website’s font as well. It’s the same as customizing colors.
This time, click on the “Typography” option instead of ”Colors”.
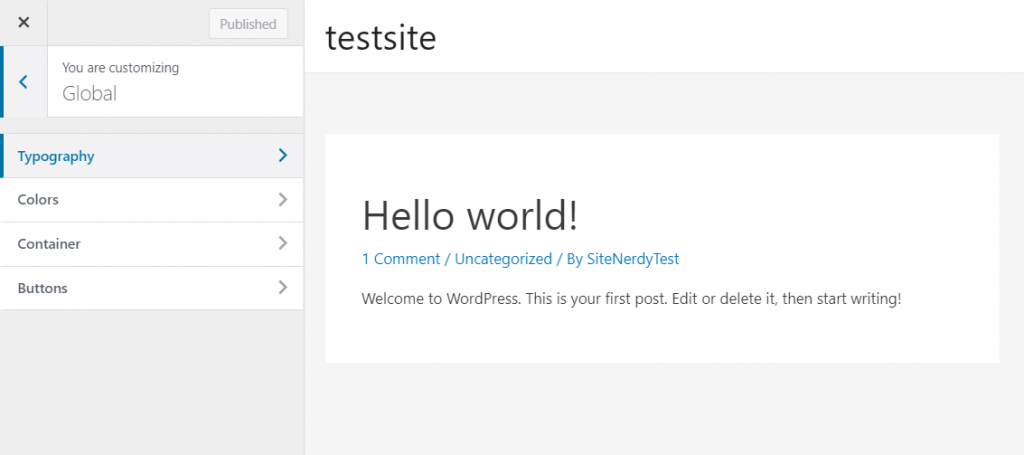
Then, you should be able to see something like this. And here, you can change the font family, font size, font weight, etc. of your texts.

Also, you can set fonts for individual headings or others. Just select a font of your liking and then click on the blue “Publish” button to make changes.
Similarly, for any other theme or when not using a theme, you may have to go to the Base Typography option to make changes to the typography.
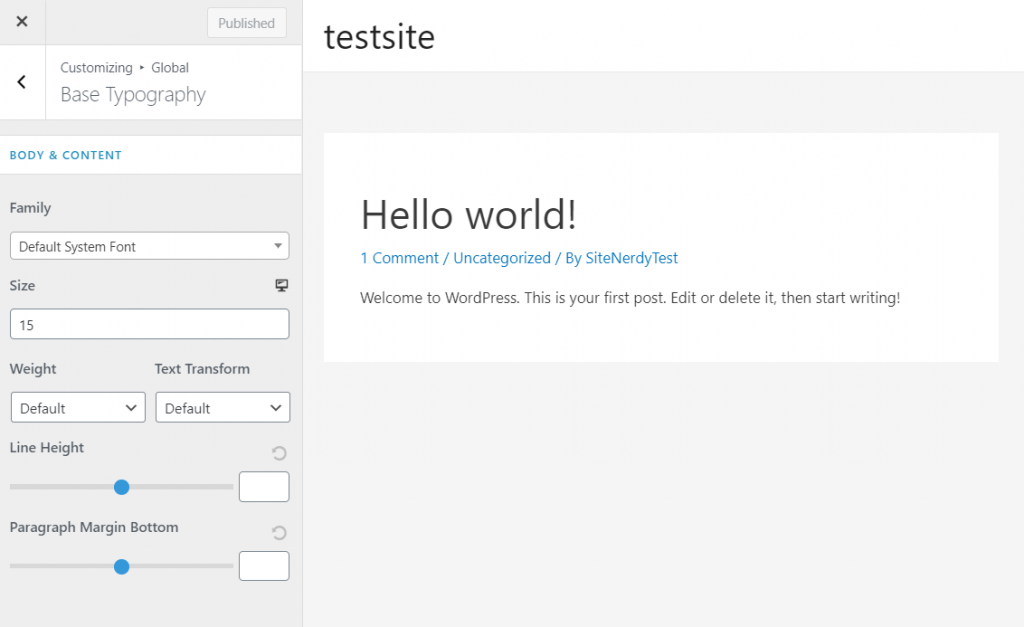
Those were basic and must-have customizations for your website. If you’d like to add more customizations, then we recommend you experiment with the settings and make changes accordingly.
Not to mention, the customization options totally depend on the theme you’re using. Whatever the options or names may seem like but the overall process is the same.
Now, let’s move on to configure your website’s settings.
Step 8: Configure Your Website Settings
Configuring your website is very important especially if you have a business website. It’s also important that you know how your website functions.
But fear not, we have just the settings for you to get more reach. Let’s get into what you should be changing to have more presence and reach on the internet.
And all these options are present on the Settings menu of your WordPress dashboard.
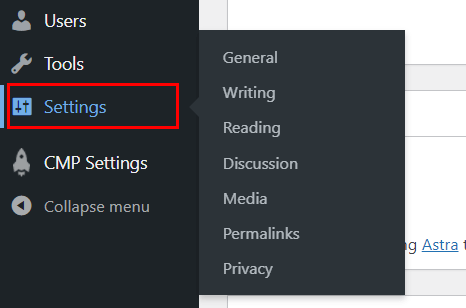
i. Site Title and URL
Firstly, in the General Settings, you can see multiple basic options for your site. Here, you can:
- Edit your site title and tagline. It’s important to keep this as per your business needs.
- Enter the WordPress and site address of your site (Not recommended).
- Allow or deny user registration.
- Select the date and time format plus timezone.
- Add your work email, and more.
After keeping these options as per your needs, click on the Save Changes button.

ii. Search Engine Visibility
For more reach, you want people to find your website easily. For that, we need to make your website visible to Google. How that works is, that Google’s algorithm and information gathered by search engines will assign a rank to a website.
The ranked websites are then displayed on search engine results in an order reflecting Google’s opinion on how accurate the search is as compared to the website’s content.
But currently, your site is on maintenance mode, which means site development is not completed. And that time, you need to stop the visibility of your site on search engines.
To do that, go to your WordPress dashboard and click on the “Settings” option. Under settings, click on the “Reading” option. Make sure the box is unchecked in “Search Engine Visibility”. It should look like this.
After that, click on the blue “Save Changes” button.
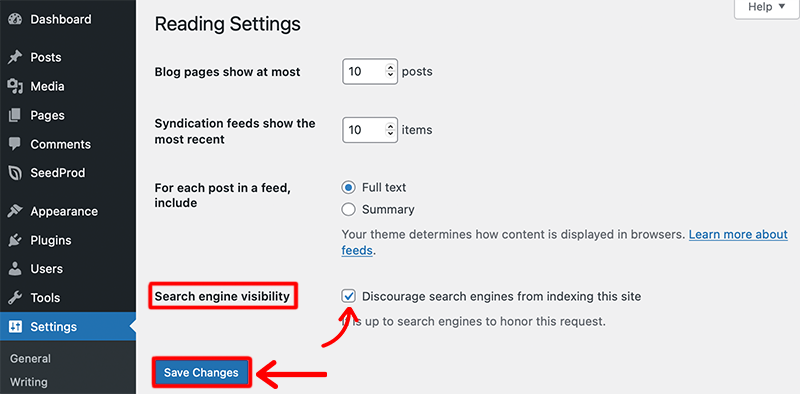
Note that, once your site is fully developed, then you’ve to remove this checkmark and save the changes. With that, search engines can easily find your complete site.
iii. Permalink Structure
The next setting you need to configure is the permalink structure. Permalinks are web addresses that trace back to your content. WordPress does set the permalink structure for you but it’s just not well optimized. Let us help you to optimize it best.
To optimize the permalink to its best, go to the “Settings” menu and click on the “Permalinks” option. Select the “Post Name” option under “Common Settings”. And lastly, click the Save Changes button.
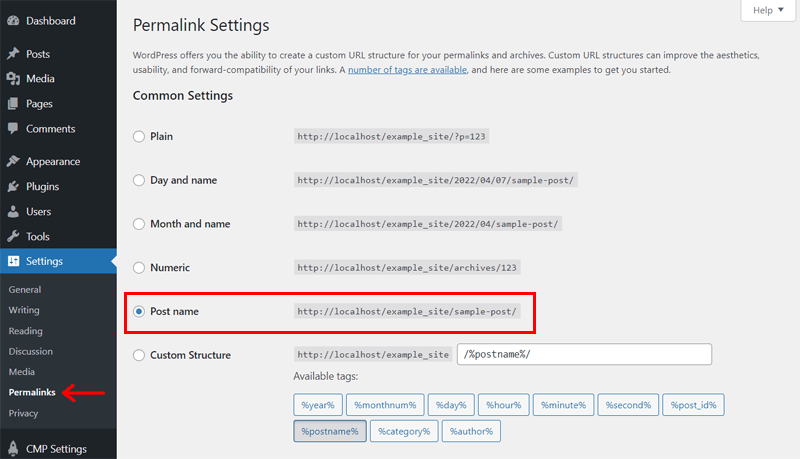
Post name type permalink is considered the best SEO-friendly permalink structure in WordPress. So, we recommend you go with that.
And that’s all you need to do to optimize your permalink for reach.
iv. Comments and Notification
Next up is managing your comments and notifications. Comments are an essential part of your website as visitors will give you feedback on what you’re doing good and what you need to change.
This is a big thing, especially for blogs as it might help widen your reach and your audience. A website without a comment section is just incomplete. Let’s see how you can add comments and enable notifications for your website.
First, go to the “Settings” menu and click on “Discussion”. Make sure to checkmark everything under the “Default article settings”.
You can also decide whether the comment author must fill out their name and email under “Other comment settings”. Moreover, it’s best to tick all the options under the Before a comment appears section for your approval to comment.
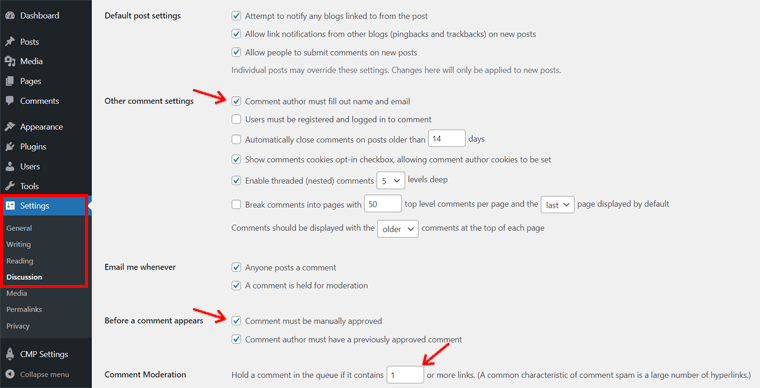
As for notifications, you should always receive an email whenever someone comments on your posts. So, checkmark everything under the “Email me whenever” section. Also, keep the ‘1’ value in the Comment Moderation section so that comments with a link are considered possible spam.
That was all for your website settings. Now, we’ll see how to add additional features to your website below.
Step 9: Add More Features to Your Website Using Plugins and Tools
You ideally want to have the best possible website on the internet. To do that, you’ll need to add some additional features to your website. WordPress allows the easy addition of extra features to your website with the help of WordPress plugins.
All you have to do is look for the correct plugin or tool and install it. And there are over 59,000 free WordPress plugins out there. Each of them works to improve one or more areas of your website.
First, let us help you by adding an analytics tool and a contact form to your website. Just follow the steps.
i. Install and Configure Analytics Plugin
First, let’s add an analytics tool to your website. Analytics are an important part of your website as they provide useful information about interactions on your website. You can then work on where you’re having the least interaction and gradually improve your website.
To help you get the best analytics, we’re going to help you set up Google Analytics. Google Analytics is one of the best analytics tools out on the internet.
To add a Google Analytics tool to your website, first, click on the “Plugins” menu on the very left. There, select the Add New option to add a new plugin.

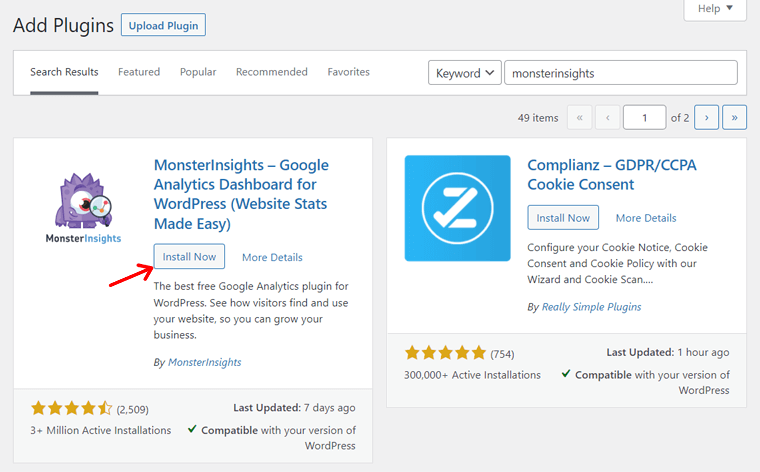
And then, search for “MonsterInsights”. This plugin is the one with the purple monster holding a magnifying glass. You should see something like this.
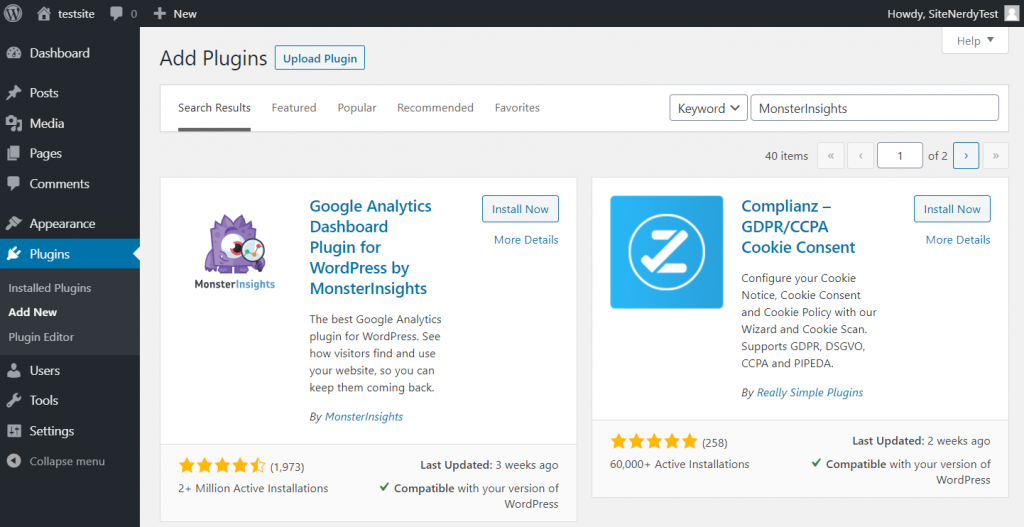
Click on the “Install Now” button first and then click on the “Activate” button.
Now go to “Insights” on the very left and click on “Settings”. Then, under “Google Authentication”, click on “Authenticate with your Google account”. Your screen should look like this.

After you perform the previous step, you should be redirected to connect a Google account to MonsterInsights. Select a Google account and allow MonsterInsights to manage your account.
Now, select the correct website profile for your website and then click on the “Complete Authentication” button.
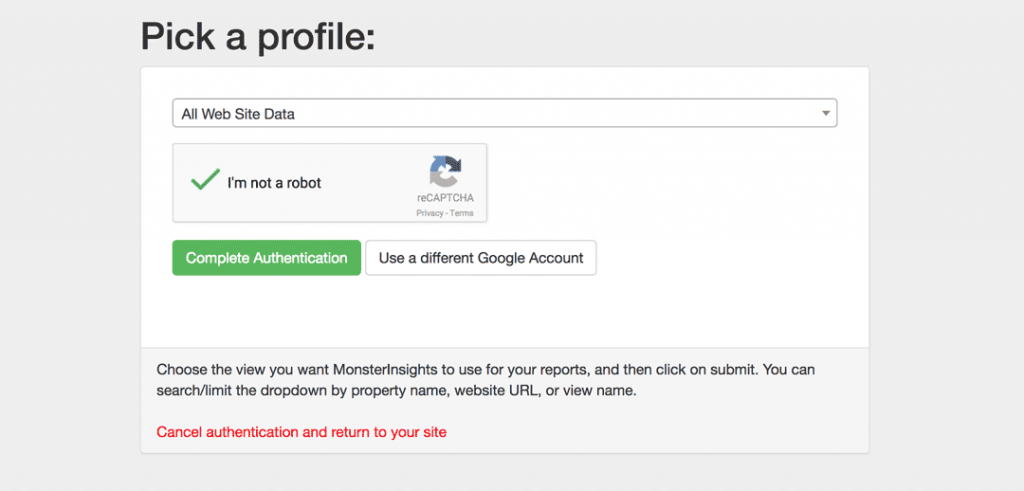
After you complete this step, you’re all set to use MonsterInsights. That done, to view how your website is doing, click on “Insights” and then click on “Reports”. You should see something like this.

Congratulations! You now have Google Analytics available for you. Experiment a little and see how your website does in a month. You should be able to improve based on that data.
ii. Install and Configure a Contact Form Plugin
Now, let’s add a contact form to your website. It’s even simpler than adding analytics.
Firstly, go to the “Plugins” tab to your very left and search for “WPForms”. After that, it’s the same step as before. But, it’s the brown bear icon this time. Click on the “Install” button and then click on the “Activate” button.
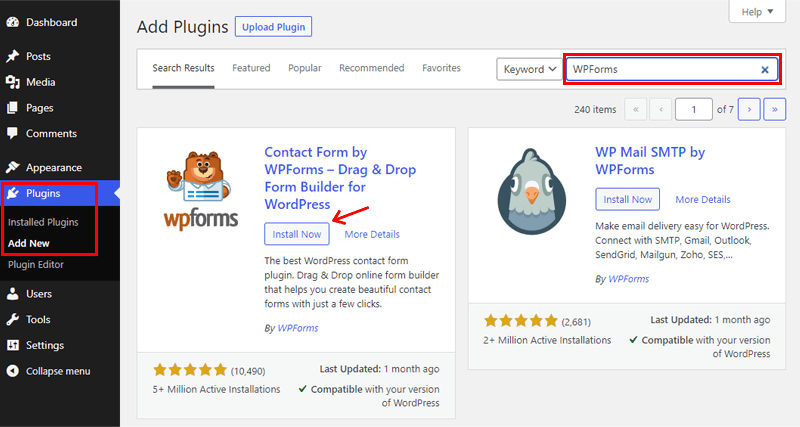
You should now be able to see a “WPForms” tab to your very left. Click on it and then click on “Add New”. This will create your first form.

You’ll then be able to select a template. If you want to start simple, you can choose to start with a blank form as well. You can also give a custom name to your contact form.

Let’s go with the “Simple Contact Form” for now. After that, you’ll be taken to a page that looks like this.

This is a simple drag-and-drop process. Drag items you want on your contact form from the left and drop them on the right. When you’re done, click on the orange “Save” button on the top right.
These are some initial steps to use this contact form plugin. For a detailed and complete guide, here’s our article on how to create a contact form.
The major step to installing a free plugin is similar. However, if you’re using a premium version, then the process can be a little difficult for you. So, check out our full guide on how to install a WordPress plugin.
iii. Optimize Your Site with SEO Plugin
Another important aspect of creating a website is making sure it’s optimized for search engines. This will help your site rank higher in search results and attract more organic traffic.
To optimize your site for SEO, we recommend the Rank Math plugin. Using it, you can configure your site’s SEO settings, optimize your posts and pages to your target keywords, monitor your site’s performance, etc.
Now, head to your WordPress dashboard, navigate to “Plugins > Add New”, and search for “Rank Math”.
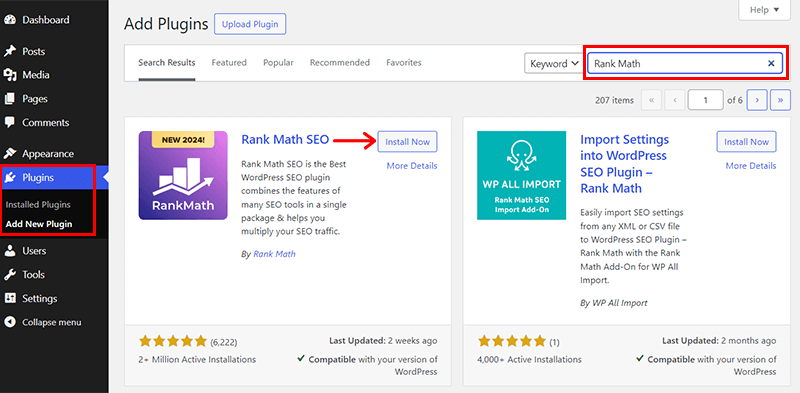
Once you find the plugin, click on the “Install Now” option followed by the “Activate” button.
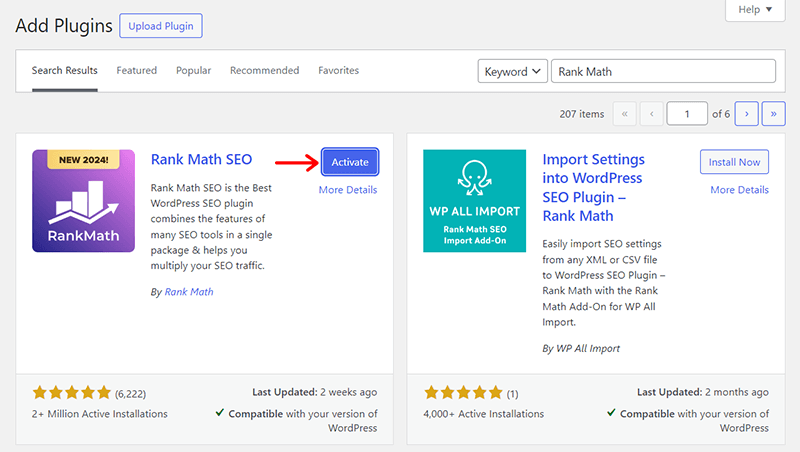
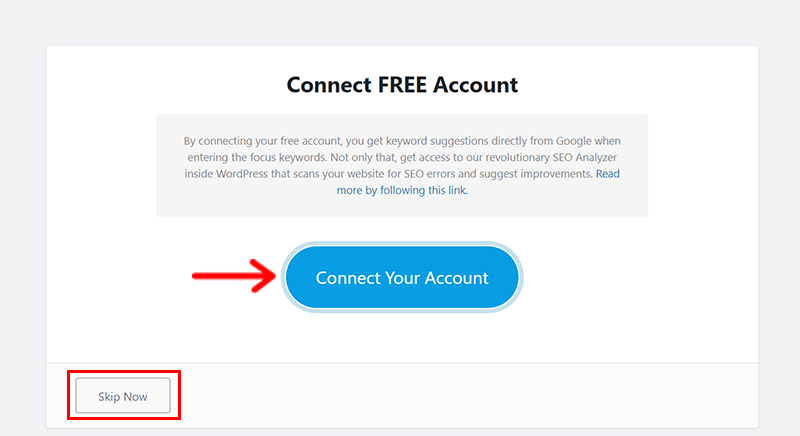
Upon activation, you’ll see the page as shown below. Here, you can “Connect Your Account” with your Gmail. Or, you can even “Skip” this step for now.
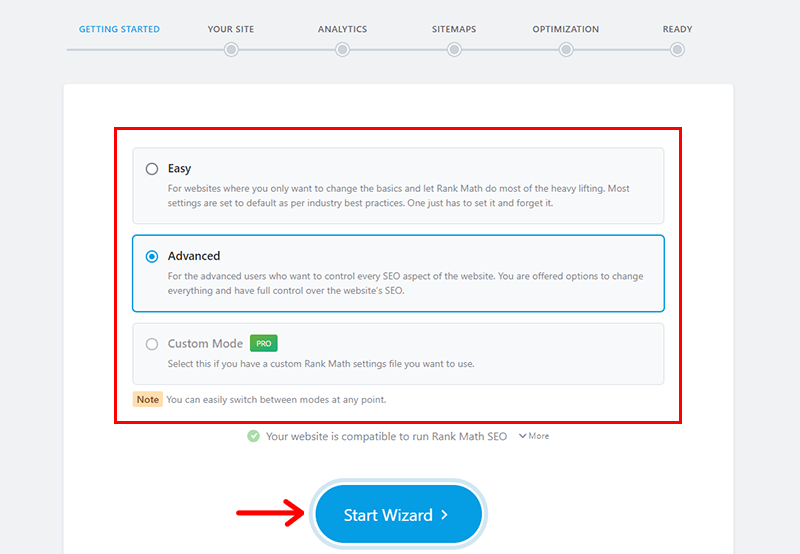
Then, Rank Math will guide you through a setup wizard.
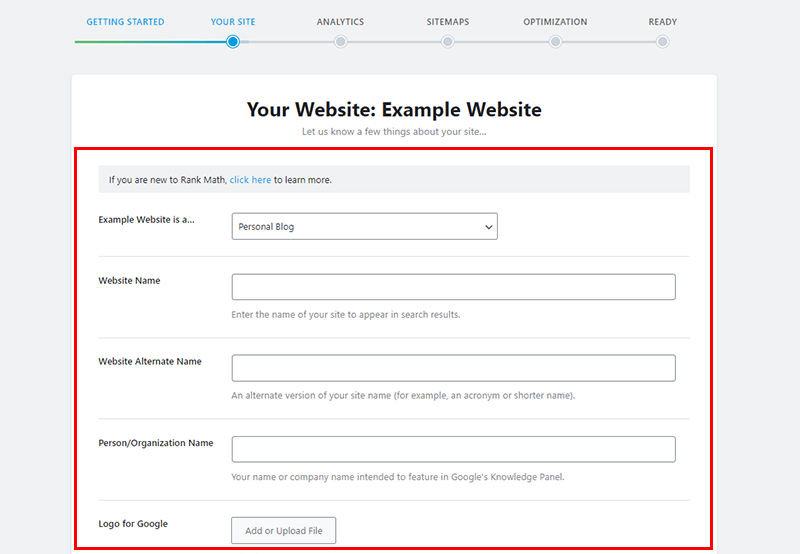
Here, you need to provide essential information about your website, such as type, business information, logo, etc.
Following the same pattern, you can configure ‘Analytics’, ‘SiteMaps’, and ‘Optimization’ and you’re all ready to go!
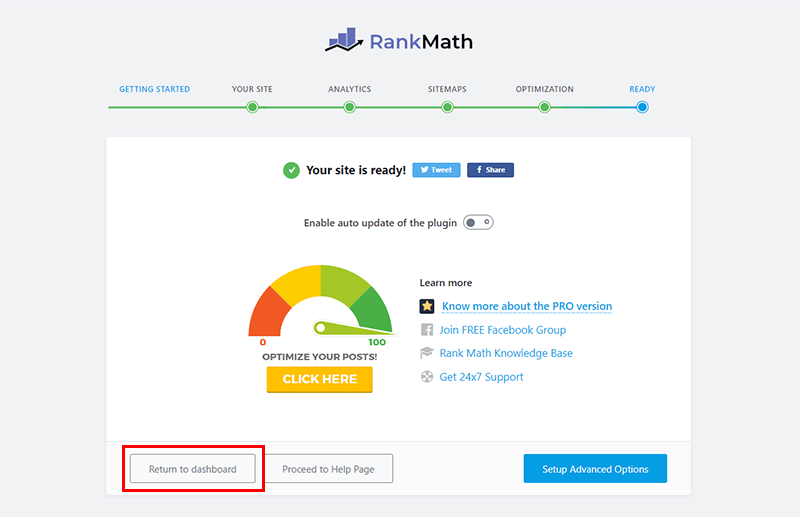
Once done, you can click on the ‘Return to Dashboard’ option.
Next, you’ll see the page as shown below.
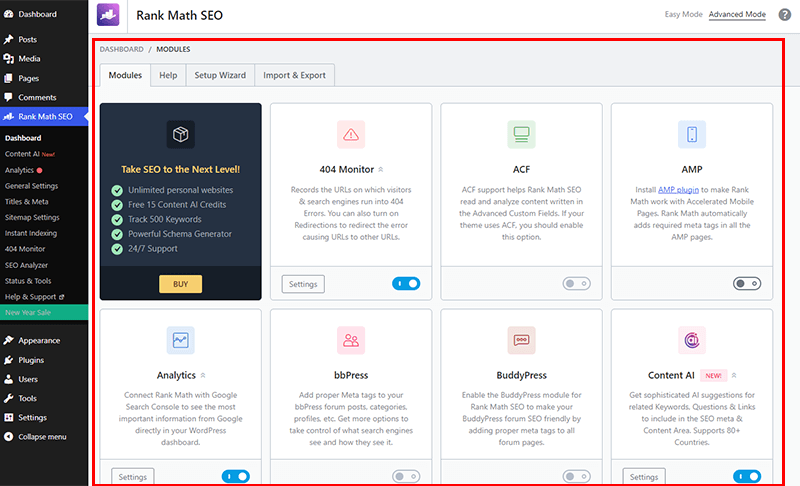
You can create an SEO-friendly website and improve user experience with all the resources available here. There are modules for 404 Monitor, AMP, Analytics, Image SEO, Local SEO, and more. You can enable the required modules as you wish.
Following that, you can simply add your content to your page or post. Then, on the right-hand side, go to the Rank Math post editor box for page optimization.
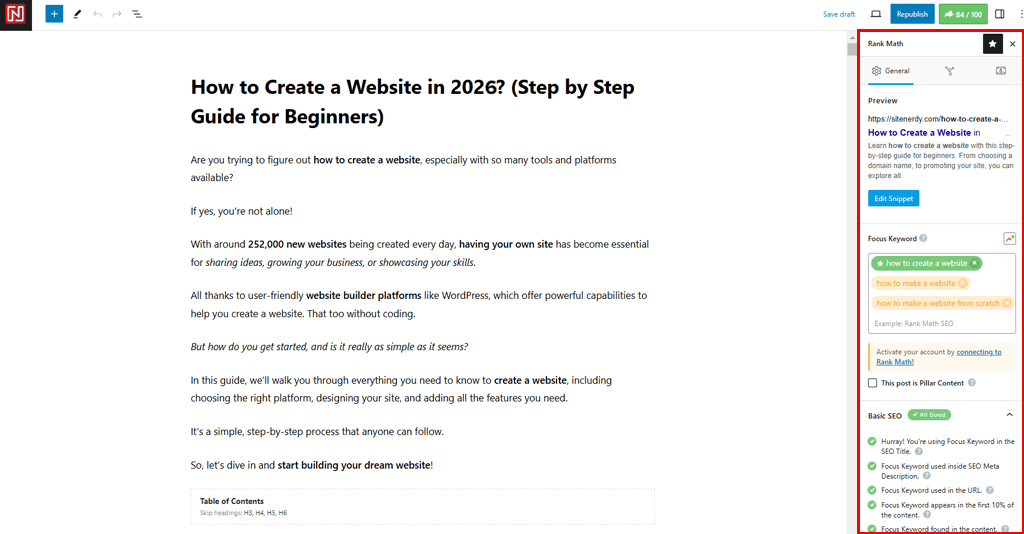
There is a “Focus Keyword” field there. Enter the target keyword or keywords for that particular piece of content here.
Now, on the basis of the keyword, it provides various suggestions and room for improvement. In the form of “Basic SEO”, “Additional”, “Title Readablity”, and “Content Readability”.
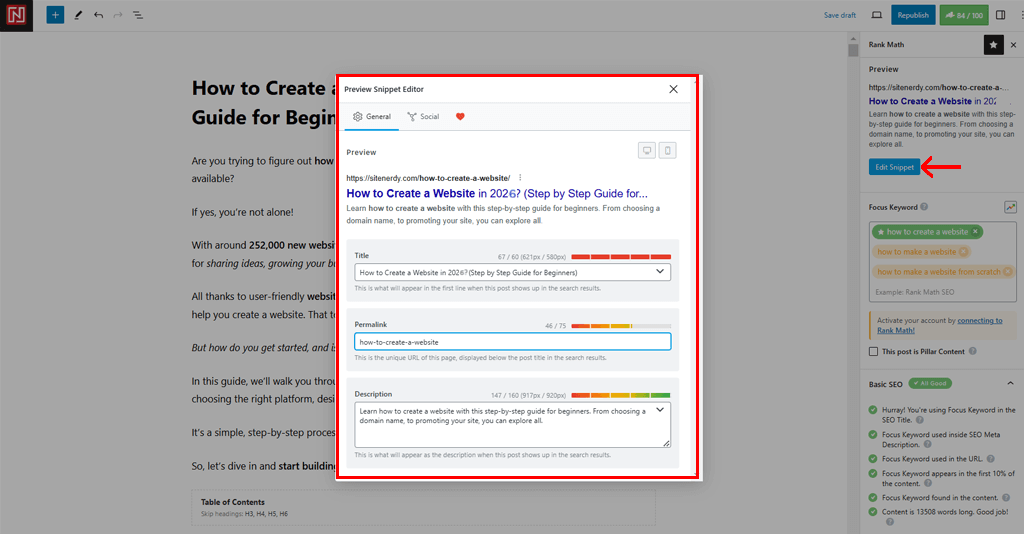
What’s more, you can also find the “Edit Snippet” in the Rank Math editor box.
On clicking it, you can tailor how you want your content to appear in search results. You can specifically adjust your meta description, URL, and title to make them interesting and appropriate.
Want to learn more about this plugin? Then, check our full review article on Rank Math review.
iv. Some of the Best WordPress Plugins
Here, we’ll be discussing some of the important WordPress plugins that you need to create your site. So, start to install them.
First, we’ve already mentioned installing the MonsterInsights, WPForms, and Rank Math plugins. To sum up:
- MonsterInsights: This allows you to add, customize, and manage the Google Analytics site tracking service on your website. As a freemium plugin, it’s available in both free and paid versions. Alternative: Site Kit by Google.
- WPForms: It’s a drag-and-drop form builder that you can use to create any kind of form with multiple attractive elements. Both free and premium versions are available. Alternatives: Contact Form 7, Gravity Forms, etc. Read best form builder plugins.
- Rank Math: SEO plugin that helps you configure your site’s SEO settings, optimize your posts and pages for your target keywords, and monitor your site’s performance. Alternatives: Yoast SEO.
Now, let’s check the others out!
1. WooCommerce
Another beneficial plugin, if you want to create an eCommerce website, is WooCommerce. It’s the most popular eCommerce WordPress plugin that contains every feature you may need to run an online store of any kind. Also, it includes many extensions for more advanced features.

Pricing: A free plugin that has several free and premium extensions for more features.
Alternatives: Easy Digital Downloads
2. Wordfence Security
Wordfence Security is an important WordPress plugin for website security. It performs all those firewall and malware protection methods to secure your site from harmful attacks.

Pricing: Consists of both free version and premium pricing plans that starts at the cost of $149 per year.
Alternatives: Succuri Security, iThemes Security, etc.
3. UpdraftPlus
Next is UpdraftPlus, which is one of the most favored WordPress backup plugins. It can automatically take backups of your site to store them safely and prevent any data loss. Also, you can schedule and restore the backups easily.
Pricing: Also contains the free and premium versions of this plugin which start at $70 per year.
4. WP Super Cache
When you create a website, you need to add this WP Super Cache plugin for better site speed and performance. It comes with many compression features to deal with the heavy resources of your site.
Pricing: Totally free plugin to use when you create a website.
For more recommendations, check out our ultimate list of the best and must-have WordPress plugins to use when you create a website. Also, here’s a guide on how to choose a WordPress plugin.
Step 10: Checklist for Launch
Wow! You made it! You’re finally ready with a basic website with basic plugins and tools. You can always experiment and add more that fit your liking to create your first website just like you want. Guess what? You’re now ready to launch your website on the internet.
Or are you? Just take a moment and complete our launch checklist that helps you check that you’ve covered everything you need to take your website out on the internet.

The internet is a tough competitor. If you truly want to outplay your competition, you have to be careful and that also applies to your website. You need to check if everything is okay on your website before your customers start flooding in.
We’ve made a list just for you to check whether your website is ready or not. If your website doesn’t meet even one of the following points, we recommend you check them out above in this article.
Website Launch Checklist:
- Required Pages: Make sure you have at least a home page, an about page, and a contact page.
- Recheck Content: Check your site for errors you may have made. Errors can be incorrect spellings to improper object placement. Here’s our list of the best grammar checkers. And we recommend Grammarly!
- Image Display: Make sure that the images you added show up on the site. We recommend using the .jpeg extension of images as any browser opens a .jpeg image.
- Optimize Images: Note that you need to optimize your images before you upload them for better speed. Here’s our list of the best image optimizer plugins.
- Accurate Links: You must test your links to see if they work. You don’t want your customers stuck on a page without being able to go any further. For that, you can use the Broken Link Checker tool.
- WordPress Settings: Make sure you’ve configured your WordPress settings exactly as we’ve guided. After you complete the overall site, check that you enabled search engine visibility.
- Site Speed: Once check the speed of your site which is essential for a better user experience. So, use WordPress speed optimization tools for that.
- Compatibility: Lastly, make sure your site is compatible with any device and optimized for any browser. For a mobile test, use the Mobile-Friendly Test by Google.
If your website fulfills all of the above, then it’s time for you to finally release your website on the internet. We wish you all the best.
Now that your website is out on the internet, there are some minor things you need to look after. Let’s see what steps you need to take after you’ve launched your website.
Step 11: Promote Your Website and Maintain it
Having your website out on the internet isn’t sufficient. There are millions of websites on the internet. Like it or not, your website is a drop of water in the massive ocean called the internet. You need to promote your website to get noticed on the internet.
But fear not, we’ll tell you how you can promote your website with ease.
Firstly, you’ll need social media accounts for your site on major social media platforms like Facebook, Instagram, and Twitter. There, you’ll be posting updates or new posts that you make on your site. This is very crucial to have a high visitor count. Thus, social media marketing is an effective method to promote your website.
Other than that, check out the top 7 methods below:
7 Methods to Promote Your Website
- If your website is a business website, then you’d ideally want to create videos of your products and post them on your website as well as your website’s social media.
- For a content website, then you want to create some pillar content that’ll rank well on Google. This way, you can get more visitors to your website.
- To encourage recurring visits to your website, incorporate a guest posting feature. This allows visitors to contribute posts displayed in a separate blog. You have the flexibility to curate and discard content as needed.
- We recommend you email your subscribers every time your site gets a new update, or you make a new post. Email marketing is one of the popular marketing strategies. There are the best email marketing services from where you can send emails in bulk.
- You can also use Google AdWords on your website to get more visitors. It puts up an ad for your site every time someone searches for a similar topic on Google. It can help in driving traffic to your website massively.
- Add live chat and forums on your site so that your visitors can stay connected with you. For that, use the best WordPress live chat plugins.
- Use a WordPress multilingual and translation plugin so that visitors across the world can understand your content.
5 Ways to Maintain Your Website
Talking about maintaining and improving your site, it also contains some measures that you need to follow. So, you need to look after these things time and again on your site:
- Make sure to keep adding new and interesting content to your site. We recommend you update the content at least once in three days to keep your website fresh and going. For that, you can add videos, audio, and other multimedia content to your site.
- Also, you should update your website design with the latest trends to give a more appealing look.
- Every time any plugin you use on your website gets an update; you should immediately update it.
- You can use a WordPress website maintenance service that will look after your site’s overall security.
- Keep on checking and improving your site’s overall SEO. For that, check the best SEO tools, WordPress SEO plugins, and keyword research tools.
That’s it for your website promotion and maintenance. You can check out our FAQs in this article below.
Frequently Asked Questions (FAQs)
1. Can I create a WordPress website without coding?
Absolutely. With the help of this article, you shouldn’t have to worry about coding even once. You can create a website without even opening a text editor.
2. Can I create a website without WordPress?
Yes, you can. If you want things to be your way, then you can always code your own website. Coding can also be better sometimes as you’ll have everything of your liking on your website.
3. How do I make my website secure?
Most hosting providers like Bluehost provide security to your website but if you want to extend it, you can always install security plugins. Sucuri is one of the best and most popular security plugins used to protect your website.
4. How do I make my website faster?
You can make your website faster by keeping the images on your website as low as possible. You can also install cache plugins like W3 Total Cache that help to load your website faster.
Conclusion
In this article, we guided you on how to create a website for yourself.
With WordPress, it’s more than easy to create a website. We also helped you all the way from the creation of your website to launching it on the internet. Well, we hope it wasn’t very difficult for you and you enjoyed the process.
You can also start a WordPress blog and make money online. Also, check our article on affiliates marketing and Search Engine Optimization.
It would motivate us to hear your thoughts on this article so feel free to comment on any queries or suggestions below.
And if you liked this article, then do share it with your friends and colleagues. If you’d like to, then follow us on Facebook and X (Formerly Twitter) for more articles like these.
